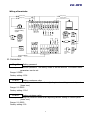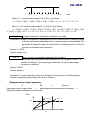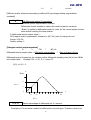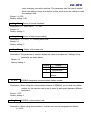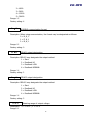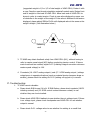
1
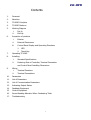
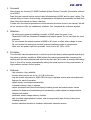
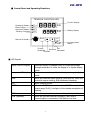
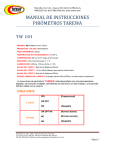
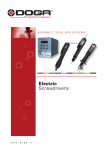
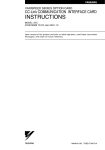
Tension Controller – Feedback
System
TC-608P Control Panel
(In the Form of a Load Cell)
(Built-In communications Function)
User Manual
TENSION CONTROLLER
KG
RUN
OUT
ERR
KG
CATCH
-
+ MODE
SET
LINK
TC-608P
Contents
1.
Foreword
2.
Attention
3.
TC-608P Principles
4.
TC-608P Features
5.
Working Diagram
6.
i.
Put-In
ii.
Roll-Up
Inspection of products
i.
Exterior
ii.
External Dimensions
iii.
Control Panel Display and Operating Directions
1.
LED
2.
Touch Key
7.
Operating TC-608P
8.
Installing
i.
Standard Specifications
ii.
Fastening Side of Controller, Terminal Connection
and Control Panel Installing Dimensions
9.
Wiring
i.
Terminal Functions
ii.
Terminal Connections
10.
Parameters
11.
List of Parameters
12.
List of Communication Parameters
13.
Indicating Output Status
14.
Feedback Equipment
15.
Control Equipment
16.
Issues Needing Attention When Conducting Trials
17.
Troubleshooting
1
1. Foreword
Many thanks for choosing TC-608P Feedback-System Tension Controller (hereinafter referred
to as 608P.)
Read this user manual before using to take full advantage of 608P and for users’ safety. The
manual tells you how to do the wiring, set parameters and detect abnormalities and deal with
them. Keep the manual for future reference.
Contact us in the event of questions to which answers cannot be found in the manual. We will
do our utmost to offer you satisfactory solutions. Your comments are welcome anytime.
2. Attention:
.No wiring and removing/installing connector of 608P when the power is on.
.Terminals of 608P are contacts of feedback and output signals. Do not use them for other
purposes.
.Do not connect the output terminal of 608P to AC power or allow alien voltage to enter.
.Do not remove the casing and conduct pressure-endurance tests on components.
.Make sure the power input into terminals 1 and 2 to be AC 220V ±10%.
3. Principles
The controller sets the material put-in and roll-up and the tension value required according to
the actual production conditions. 608H adjusts the output command after comparing the
settings with the value detected and returned by the Load Cell in order to change the braking
force or the roll-up torque, automatically setting the actual tension to the preset tension, a
high-precision tension control system.
4.
Features:
.high precision, high reliability
.tension value may be set at: kg / N / LB by the user
.may be directly connected to LOAD CELL for input; digitized zeroing and rate adjustment
features for ease of operation.
.digital design, unchanged characteristic
.humanistic design, easy to operate
.output command multi-functional display including preset and actual tension values
.possess the features of accelerating and decelerating master speed and augmentative
delayed time output
.parameter power outage memory function
.able to initiate augmentative function, able to compensate static friction arising from
initiating machine
.tension reduction function at shutdown eliminates excessive tension
2
5. Working Diagram
.Put-in
Motor
Air
Pressure
Brake
INV.
E/P
Magnetic
Powder
Brake
Load cell
VA-816
Electro
Pneumatic
INV.
TC-608P
.Roll-up
Load cell
INV.
INV.
TC-608P
3
Dc-Driver
VA-816
Oil Pressure Motor
Driver
6. Inspection of Products
.Exterior Dimensions
TENSION CONTROLLER
KG
RUN
OUT
ERR
KG
CATCH
-
+
MODE
SET
LINK
TC-608P
.Back Panel Pins
Pins 12-24
Back Cover
Pins 4-11
Pins 1-3
Casing Dimensions: 96mm X 96 mm
Opening Dimensions: 92 mm X 92 mm
4
■ Control Panel and Operating Directions
TENSION CONTROLLER
Tension Display
Operating Status
Relay Output
Abnormal Status
OUT
ERR
Tracking Complete
Manual VR Knob
KG
RUN
KG
CATCH
-
+
MODE
Setting Display
SET
LINK
TC-608P
Communication
Status
Set
Change
Decrease Parameter
Parameter
Increase
■ LED Signals:
Upper-row LED display
Specifies display of feedback value or output percentage
through parameter 18 while the display is in regular display
mode.
Lower-row LED display
Displays tension setting while the display is in regular display
mode.
RUN
When the controller stops working, RUN goes off. When the
controller begins working, RUN continues outputting.
OUT
When relaying output.
CATCH
When the INDEX feature is turned on, if INDEX error is within
preset range (Pr.02), this light is lit to indicate completion of
tracking.
ERR
When the system detects abnormalities, this light is lit.
LINK (Optional)
When RS-485 has external connection, each time a
communication is completed, LINK flashes one time.
5
■ Setting Parameters (Using press keys):
MODE
▲
▼
SET
(1) <MODE>:
The key is used to enter parameter display mode or return to regular display mode. Press
once to enter parameter display mode. Press again to return to regular display mode. When
inputting parameters, the Pr XX displayed at the bottom is parameter number, while the
content of the parameter is displayed at the top.
(2) <SET>:
This key serves three purposes. When pressing <MODE> and <SET>, the Pr XX displayed at
the bottom begins flashing, indicating entry into parameter change mode.
After parameter change is completed, press <SET> to store changed value in the controller.
If <SET> is not pressed before pressing <MODE> to exit, the parameter will remain
unchanged. When in regular display mode, <SET> may be used to remove error status.
(3) <▲>:
After entry into parameter display mode, <▲> may be used to add one to parameter number.
After entry into parameter change mode, <▲> may be used on <Lower-row Display Flash>
to add one to parameter value.
(4) <▼>:
When in parameter display mode, <▼> may be used to deduct one from parameter number.
When in parameter change mode, <▼> may be used on < Lower-row Display Flash > to
deduct one from parameter value.
7. Operating TC-608H:
Enter corresponding values used by the system’s Load Cell into internal parameters of 608H
(see “Parameters” for details.)
Press △ or ▽ on the control panel and enter the tension value needed. Or, set to “Manual”
and use the control panel knob to enter the tension needed.
(See “Terminals” and “Parameters” for applicable contacts’ functions and parameters.)
6
8. Electric Dimensions and Use Environment for Installation:
Electric Dimensions and Standard Dimensions
Voltage
Electric
Dimensions
Standard
Dimensions
AC 220 V + 10%50/60HZ
1 set of LOAD CELL input
0-4 mV input, floating zeroing and magnifying
2 sets of AI (optional)
DC 0-10V input, 12 bit resolution, input
impedance 200K
1 set of AO (1 set optional)
DC 0-10V output, max 10mA, 12 bit resolution
4 sets of DI
Dry contact or crystal method mode (Low
Active)
2 sets of RELAY DO
Relay A contact 5A 250VAC/30VDC
RS-485 MODBUS
communication
(optional)
Communication adopts RS-485 interface
MODBUS RTU protocol, output and read may
be activated, revised, and specified through
communication.
Panel dimensions
96mmx96mm
Opening dimensions
92mmx92mm
Installation depth
150mm
Weight
1kg and under
Use Environment for Installation
Environment
9.
Site of use
Indoors; no corrosive gases, fluids, and dust
Operating temperature
0℃ to 60℃
Storing temperature
0℃ to 60℃
Humidity of surrounding
environment
90% RH and under
Wiring
■ Terminal code numbers and pins
Serial #
Name
Function
Description
1
AC1
AC 220V
Power input (+10% error)
2
AC2
AC 220V
Power input (+10% error)
3
FG
FG
Power grounding
4
V+
LOAD CELL +10V
Connect LOAD CELL reference power supply + input
5
V-
LOAD CELL 0V
Connect LOAD CELL reference power supply - input
6
S+
LOAD CELL signal+ Connect LAOD CELL signal output +
7
S-
LOAD CELL signal- Connect LAOD CELL signal output -
8
RY1C
Relay1 COM contact
7
Serial #
Name
9
RY1A
Relay1 A contact
10
RY2C
Relay2 COM contact
11
RY2A
Relay2 A contact
Parameter designation 5A AC250/DC35V
12
AI1
Analog input 0-10V
Analog external feedback input
13
AI2
Analog input 0-10V
Master speed input
14
ACOM
ACOM
Analog COMMON contact
15
+12V
DC 12V
Use of +12V power output analog
setting
16
AOUT1
Analog output 1
Analog command output 0-10V
17
AOUT2
Reserved
18
INP1
External input contact 1 Operating started
19
INP2
External input contact 2 Tension reversion (manual/automatic)
20
INP3
External input contact 3 G1 plus % compensation
21
INP4
External input contact 4 G2 minus % compensation
22
ICOM
Input contact COM
Digital input contact COMMON
23
485+
RS - 485 +
RS – 485 communication
24
485 -
RS - 485 -
RS – 485 communication
Attention:
Function
Description
Parameter designation 5A AC250/DC35V
Input contact is a dry contact or NPN contact
Configuration of terminals:
8
Wiring of terminals:
input
master speed
analog output
analog input
communication
connection
variable resistor or
external analog
signals
roll-up, put-in
motors
master
motor
Cylinder
electro-pneumatic
transducer
magnetic
magnetic
particle brake, particle
driver
clutch
tension feedback
signals
10. Parameters
Pr‧01
Setting password
Description: Parameter password. The setting needs to be the same as 1234 before other
parameters can be set.
Range: 0-9999
Factory setting: 1234
Pr‧02
Setting maximum value
Description: Setting the maximum value when adjusting tension setting on control panel
(lower row).
Range: 0.1-999.9
Factory setting: 100.0
Pr‧03
Setting minimum value
Description: Setting the minimum value when adjusting tension setting on control panel
(lower row).
Range: 0.1-999.9
Factory setting: 100
9
Pr‧04
Feedback upper limit
Description: When the feedback is greater than the setting, a feedback upper limit will be set,
which can be used in conjunction with RELAY output.
Range: 0-999.9
Factory setting: 90.0
Pr‧05
Feedback lower limit
Description: When the feedback is greater than the setting, a feedback lower limit will be set,
which can be used in conjunction with RELAY output.
Range: -100.0-999.9
Factory setting: 0.1
Pr‧06
Insensitive area
Description: When the error between the feedback and the setting falls below the parameter’s
setting, corrective computation will terminate in order to avoid the instability
caused by a minor error.
Range: 0-25.5
Factory setting: 0.3
Pr.07 output voltage
Basic torque
Description: When input contact INP2 is ON, tension output will revert to basic torque output.
If Pr.36 (source of basic torque) is set at 0 (designated by Pr.07), the parameter
is able to set basic torque output value.
Range: 0-10.00 (V)
Factory setting: 1.00 (V)
Pr‧08
Startup augmentation (%)
Description: When INP1 operation is started, tension output will compensate startup
augmentation first with compensation time set by Pr.09.
Range: 0-255 (%)
Factory setting: 20 (%)
Pr‧09
Startup time
Description: When INP1 operation is started, tension starts augmentation compensation time
value. Computation begins from the instant INP1 is ON.
Range: 0-25.5 (seconds)
Factory setting: 0.5 (seconds)
10
Pr‧10
Axis acceleration augmentation (%)
Description: When AI2 axis speed input detects acceleration, tension output will compensate
for acceleration augmentation.
Range: 0-255 (%)
Factory setting: 20 (%)
Pr‧11
Axis acceleration augmentation delay time
Description: Once axis acceleration is over, delay time of acceleration augmentation may be
set by this parameter.
Range: 0-25.5 (seconds)
Factory setting: 0.5 (seconds)
Pr‧12
Axis deceleration augmentation (%)
Description: When AI2 axis speed input detects deceleration, tension output will compensate
for deceleration augmentation.
Range: 0-255 (%)
Factory setting: 20 (%)
Pr‧13
Axis deceleration augmentation delay time
Description: When axis deceleration is over, delay time of deceleration augmentation may be
set by this parameter.
Range: 0-25.5 (seconds)
Factory setting: 0.5 (seconds)
Pr‧14
Terminating augmentation (%)
Description: When INP1 operation is OFF, tension output will compensate for the termination.
Range: 0-255 (%)
Factory setting: 20 (%)
Pr‧15
Terminating movement time
Description: When INP1 is OFF, tension terminates augmentation compensation time. The
time begins from the moment INP1 is OFF.
Range: 0-25.5 (seconds)
Factory setting: 0.5 (seconds)
Pr‧16
G1 contact augmentation value (+%)
Description: When INP3 G1 compensation setting is ON, tension output will compensate G1
augmentation. The value is fixed at adding % augmentation.
Range: 0-255 (%)
Factory setting: 20 (%)
11
Pr‧17
G1 augmentation delay time
Description: When INP3 G1 is OFF, this parameter is able to set delay termination
compensation time.
Range: 0-25.5 (seconds)
Factory setting: 0.5 (seconds)
Pr‧18
G2 contact augmentation value (-%)
Description: When INP4 G2 compensation setting is ON, tension output will compensate for
G2 augmentation. This value is fixed at deducting % augmentation.
Range: 0-255 (%)
Factory setting: 20 (%)
Pr‧19
G2 augmentation delay time
Description: When INP4 G2 is OFF, this parameter is able to set delay termination
compensation time.
Range: 0-25.5 (seconds)
Factory setting: 0.5 (seconds)
Pr‧20
Output minimum torque voltage
Description: Regardless of the results of output computation, output shall not fall below this
preset voltage.
Range: 0-10.00 (V)
Factory setting: 1.00 (V)
Pr‧21
Output maximum torque voltage
Description: Regardless of the results of output computation, output shall not exceed this
preset voltage.
Range: 0-10.00 (V)
Factory setting: 10.00 (V)
Pr‧22
Selecting work mode
Description: Compensation direction varies as different work modes are selected.
0 = Put-in ; 1 = Roll-up
Range: 0-1
Factory setting: 0
12
Pr‧233
Feedback zero drift (correcting ZERO)
Description: When tension feedback reading zero is different the actual, this parameter may
be used to move zero position forward and backward.
Range: -9999-9999
Factory setting: 0
Pr‧243
Adjusting feedback rate (correcting rate SPAN)
Description: When tension feedback reading is different the actual weight, this parameter
may be used to adjust the rate. When using, zero shall be adjusted before
adjusting rate.
Range: 0.001- 9.999
Factory setting: 1.000
Pr‧253
Position of tension decimal point
Description: This is used to set the position of tension display’s decimal point.
Range: 0-3
Factory setting: 1
Pr‧263
Displaying average frequency
Description: When tension displays, this parameter can be used to set average frequency in
order to obtain more stable readings.
Range: 1-255
Factory setting: 1
Pr‧27
Starting the minimum master speed voltage value of integral
Description: When master speed (AI2) voltage is smaller than the setting, integral terminates.
If integral is set at 0, it continues after startup. Otherwise, master speed is set
at 0.
Range: 0-10.00(V)
Factory setting: 0.05 (V)
Pr‧28
Segment 1 integral compensation rate
(I1t segment 1 integral compensation time)
Description: When error continues to be generated, this value can be used to set integral rate.
The greater the value of setting is, the slower the speed of compensation and
vice versa. Excessively small setting will lead to output vibration.
13
Range: 0.01-99.99 (seconds)
Factory setting: 5.00 (seconds)
Pr‧29
Segment 2 integral compensation rate
(I2t segment 1 integral compensation time)
Description: Integral can be computed in two steps. The parameter is segment 2 value. When
using, segment 1 will be set at a greater rate (slower compensation), while
segment 2 set at a small rate (faster compensation). Pr.30 is then used to
determine the division point, which can achieve the effect of faster and steadier
revision.
Range: 0.01-99.99 (seconds)
Factory setting: 1.00 (seconds)
Pr‧30
The margin of error when using segment 1 integral (I revision)
Description: This value is the margin of error when using segment 1. Use segment 1 when
smaller than the margin of error, while using segment 2 when greater than the
margin of error.
Range: 0.1-999.9
Factory setting: 1.00
[Integral control output equation]
I
=
∑ (E ∆ It1)
Integral control output
=
Total of past errors
Example: When integral control time constant (∆ It1) is set at a greater value, within a fixed
period of time T, the accumulated I value is smaller, and the output effect caused by I value is
smaller, too. By the same token, When integral control time constant (∆ It1) is set at a smaller
value, within a fixed period of time T, the accumulated I value is greater, and the output effect
caused by I value is greater, too.
Example: For an error response curve as shown below, when the error goes from 0 to 3 and
back to 0, the integral value obtained varies due to different It settings.
E
Error value
3
Error value curve
2
1
14
0
T1
T2
T3
T4
T5
T6
Sec
Time
When It = 1 second, total integral I=∑ (E ∆1) is as follows:
I = T1(E) + T2(E) + T3(E) + T4(E) + T5(E) + T6(E) = 1 + 2 + 3 + 2 + 1 + 0 = 9
When It = 0.5 second, total integral I=∑ (E ∆0.5) is as follows:
I = T0.5(E) + T1(E) + T1.5(E) + T2(E) + T2.5(E) + T3(E) + T3.5(E) + T4(E) + T4.5(E) + T5(E)
+ T5.5(E) + T6(E) = 0.5 + 1 + 1.5 + 2 + 2.5 + 3 + 2.5 + 2 + 1.5 + 1 + 0.5 + 0 = 18
Pr‧31
Integral computation substitutes maximum error value
Description: Integral is computed by substituting the error. When the error is greater, integral
may be continuously substituted until an excessive value is accumulated. This
parameter is adopted to place an upper limit on substitution error in order to
prevent this situation from happening.
Range: 0.1-999.9
Factory setting: 10.0
Pr‧32
Error correction percentage adjustment (P correction)
Description: Basic percentage adjustment varies depending on the variation of error. The
greater the setting is, the percentage relationship of greater percentage
correction is obtained.
Range: 0-99.99
Factory setting: 0
Example: P is used to directly correct error deviation. It also serves to inhibit excessive
integral. Excessively great setting will result in vibration.
[Integral control output equation]
P
=
PK
x
E (error)
Percentage control output value
=
percentage setting augmentation constant
difference between setting and current value
Error
P=0.5
500
0
15
P=1.0
x
2.5V
5V
Correction
[Different output values corresponding to different PK percentage setting augmentation
constants]
Pr‧33
DK differential setting (D correction)
Description: Differential control augmentation constant.
Differential control is added to reduce the control system’s overshoot.
“Brake” is applied to differential control in order for the control system to slow
down before reaching the ideal position.
D (differential control output value) =
DK (integral control augmentation constant) x (∆E / ∆t) (rate of change of error)
Range: 0-99. 99
Factory setting: 0
[Integral control output equation]
D
=
DK
*
∆E / ∆t
Differential control output value = Differential augmentation * Rate of change of error
Differential control is based on the variation within differential sampling time (∆t) to turn ∆E/∆t
into output value.
Example: DK = 1.00, D = 2 when T2.
(2/1) x 1.00 = 2
E
Error
4
∆E=2
2
0
T
T1
T2
Sec
∆T=1
Pr‧34
Decline percentage of differential per 0.1 second
Description: The correction method of differential is of pulse type. Therefore, when error
16
stops changing, correction declines. This parameter sets the rate of decline.
When the setting is large, the decline is slow; while when the setting is small,
the decline is fast.
Range: 0.1-0.99
Factory setting: 0.50
Pr‧35
Source of tension feedback
Description: 0 = LOAD CELL; 1 = AI1
Range: 0-1
Factory setting: 0
Pr‧36
Source of basic torque setting
Description: 0 = Pr.07; 1 = Control panel knob
Range: 0-1
Factory setting: 0
Pr‧373
Display of the lower row
Description: This parameter is used to display the value to be observed. Settings of the
parameter are listed below:
Range: 0-2
Factory setting: 0
Setting
Display
0
Tension setting
1
Output value
2
Pr‧38
Master
voltage
speed
MODBUS designated communication station number
Description: When using the communication feature of MODBUS, an one and only station
number for the machine can be set in order to distinguish between different
controllers.
Range: 1-255
Factory setting: 1
Pr‧39
MODBUS communication rate
Description: When using communication, a certain rate can be designated as follows:
1 = 2400
17
2 = 4800
3 = 9600
4 = 19200
5 = 38400
Range: 1-5
Factory setting: 4
Pr‧40
MODBUS communication format
Description: When using communication, the format may be designated as follows:
0 = N, 8, 2
1 = E, 8, 1
2 = N, 8, 1
Range: 0-2
Factory setting: 0
Pr‧41
RELAY1 output designation
Description: RELAY1 may designate the output method:
1 = Start
2 = Feedback HI
3 = Feedback LOW
4 = Feedback NORMAL
Range: 1-4
Factory setting: 2
Pr‧42
RELAY2 output designation
Description: RELAY1 may designate the output method:
1 = Start
2 = Feedback HI
3 = Feedback LOW
4 = Feedback NORMAL
Range: 1-4
Factory setting: 3
Pr‧43
Description:
Range: 0-1
Selecting range of output voltage
0 = 0-10 V ; 1 = 0-5 V
18
Factory setting: 0
11. List of Parameters
Serial Parameter
Scope
User Settings
#
1
Set password
0000 - 9999
1234
2
Set maximum value
000.1- 999.9
100.0
3
Set minimum value
000.1- 999.9
100
4
Feedback upper limit
0000 - 999.9
90.0
5
Feedback lower limit
-100.0-999.9
00.1
6
Insensitive area
000.0 -025.5
00.3
7
Basic output voltage
00.00- 10.00(V)
1.00
8
Initiate augmentation
0000 - 0255(%)
020
9
Initiate delay time
000.0 - 025.5(seconds) 00.5
10
Correct percentage when
0000 - 0255(%)
020
master speed increases
11
Correct delay time when
000.0 - 025.5(seconds) 00.5
master speed increases
12
Correct percentage when
0000 - 0255(%)
020
master speed decreases
13
Correct delay time when
000.0 - 025.5(seconds) 00.5
master speed decreases
14
Master speed stop correction 0000 - 0255(%)
020
percentage
15
Master speed stop correction 000.0 - 025.5(seconds) 00.5
delay time
16
G1 contact augmentation
0000 - 0255(%)
value
19
020
Note
17
G1 augmentation delay time
000.0 - 025.5(seconds) 00.5
18
G2 contact augmentation
0000 - 0255(%)
020
value
19
G2 augmentation delay time
000.0 - 025.5(seconds) 00.5
20
Minimum output voltage
00.00- 10.00(V)
21
Maximum output voltage limit 00.00- 10.00(V)
10.00
22
Set roll-up, put-in
0000 - 0001
000
23
Feedback zero deviation
-9999 - 9999
000
Scope
User Settings
0.001 - 9.999
1.000
Serial Parameter
24
Feedback value rate
1.00
adjustment
25
Tension decimal point
0000 - 0003
001
26
Tension average time
0001 - 0255
001
27
Initiate integral’s minimum
0000 - 10.00(V)
00.5
master speed voltage value
28
Segment 1 integral
00.01 - 99.99(seconds) 5.00
compensation rate
29
Segment 2 integral
00.01 - 99.99(seconds) 1.00
compensation rate
30
Error scope of use of segment 000.1 - 999.9
1.00
1 integral
31
Integral computation
000.1 - 999.9
10.0
000.0 - 99.99
000
substitution maximum error
value
32
Error correction percentage
adjustment value
33
DK differential setting
000.0 - 99.99
000
34
Decline percentage of
000.1 – 00.99
0.50
differential per 0.1 second
35
Source of tension feedback
0000 - 0001
000
36
Initiate source of voltage
0000 - 0001
000
37
Display method of lower row 0000 – 0002
000
38
MODBUS communication
001
setting
0001 - 0255
20
Note
address
39
Communication rate
0001 - 0005
004
40
MODBUS communication
0000 - 0002
000
0001 - 0004
002
0001 - 0004
003
Select scope of output voltage 0000 - 0001
000
format
41
RELAY 1 designated output
method
42
RELAY 2 designated output
method
43
12. List of Communication Parameters
MODBUS communication description
(0000): tension display value
(0001): output voltage value
(0002): error code
(0003): tension setting
(0004): Set maximum value
(0005): Set minimum value
(0006): feedback upper limit
(0007): feedback lower limit
(0008): insensitive area
(0009): basic torque voltage (reversion)
(0010): initiate augmentation
(0011): initiation time
(0012): axis acceleration augmentation
(0013): master speed acceleration termination delay (X 0.1 second)
(0014): axis deceleration augmentation
(0015): master speed deceleration termination delay ( X 0.1 second)
(0016): terminate augmentation
(0017): termination time
(0018): G1 contact augmentation value (+)
(0019): G1 contact movement termination delay time
(0020): G2 contact augmentation value (+)
(0021): G2 contact movement termination delay time
(0022): minimum output torque voltage
(0023): maximum output torque voltage
21
13. Indicating Output Status:
Machine
operating
ON
OFF
Acceleration
Speed
Deceleration
Acceleration
Termination
Initiation
Time
Axis speed
Initiation time
Termination time
Acceleration
augmentation
Deceleration
augmentation
Put-in output
output
Acceleration
Acceleration
Deceleration
Endurance
output
Roll-up output
Initiation
Termination
Endurance
Time
Initiation
Acceleration
Acceleration
Endurance
Deceleration
Termination
Endurance
Time
Initiation: Use Pr.8 to set initiation augmentation percentage and Pr.9 to set initiation
augmentation time. Compensation direction will change depending on put-in or roll-up.
Termination: Use Pr.14 to set correction compensation percentage and Pr.15 to set correction
compensation time. Compensation direction will change depending on put-in or roll-up.
Acceleration: Use Pr.10 to set acceleration augmentation percentage and Pr.11 to set acceleration
augmentation time. Compensation direction will change depending on put-in or roll-up.
Deceleration: Use Pr.12 to set deceleration augmentation percentage and Pr.13 to set deceleration
augmentation time. Compensation direction will change depending on put-in or roll-up.
22
14. Feedback Equipment:
1.
LOAD CELL: LOAD CELL detects material surface tension and relay signal to
controller for calculation.
2.
Dancer: Dancer detects position of roller or arm and relay signal to controller for
calculation in order to control material tension.
3.
Frequency converter: TC-608H may connect master motor frequency converter
0-10VDC output into master speed signal (AI2) in order to determine master
acceleration/deceleration or stop, and assist in controlling material tension.
15. Control Equipment:
4.
Magnetic powder brake: TC-608P analog output contact can be used to control
put-in axis’s torque in order to achieve material surface tension control, to be
used in passive put-in.
5.
Electro-pneumatic converter: , Use cylinder to control put-in axis’s torque
through TC-608P analog output contact in order to achieve material surface
tension control, to be used in passive put-in.
6.
Magnetic powder clutch: Through TC-608P analog output contact, speed may
be fixed using roll-up axis’s motor. Material surface tension control can be
achieved with magnetic powder brake controlling axis’s torque, to be used in
roll-up.
7.
Motor driver: A. Use TC-608P analog output contact and roll-up speed
differential of roll-up axis’s motor to achieve material surface tension control, to
be used in roll-up.
B. Use TC-608P analog output contact and roll-up speed differential
of put-in axis’s to achieve material surface tension control, to be
used in power put-in.
16. Issues Needing Attention When Conducting Trials:
1. Please check wiring and parameter settings to make sure they are correct.
2. Calibrating and zeroing tension:
A. Zeroing tension: After power is turned on, under the circumstance of zero
load, check to see whether reading of controller’s upper row displays zero. If
tension displays, please adjust Pr.23 to ZERO until reading displays zero.
B. Calibrating tension: After tension is zeroed, please set Pr.24 (number of kilos
corresponding to 10V) to total weight of LOAD CELL. Take a weight
23
(suggested weight is 1/2 or 1/5 of total weight of LOAD CELL). Fasten it with
a rope. Pass the rope through simulation material’s actual route. Fasten front
end of weight to front end of LOAD CELL. Allow back end of LOAD CELL to
droop in order to create tension. Check to see value displayed on upper row
of controller is the weight of the weight. If the value is different from tension
displayed, please adjust SPAN of Pr.24 until displayed value is the same as the
weight’s weight. (See illustration below.)
fastening
end
weight
3. TC-608P may obtain feedback solely from LOAD CELL (AI1), without having to
refer to master speed signal (AI2) before conducting tension control. If above
control methods are needed, adjust Pr.27 (initiating integral correction minimum
master speed voltage) to 10V.
4. If contacts (16- VOUT analog output+) and (17- VCOM analog output-) voltage
output move in opposite directions (such as material tension becomes larger or
smaller), please check the setting for Pr.22 (setting roll-up/put-in) is correct.
17. Troubleshooting:
1.
TC-608P cannot calculate:
a. Please check RUN to see if it is lit. If RUN flashes, please check contacts (18-IP1
initiating contact) and (22-ICOM control contact common contact) to see
whether they are short-circuited.
b. Please check LOAD CELL feedback to see whether there is voltage input. If there
is no voltage input, please check loudspeaker and LOAD CELL to see whether
output is normal.
c. Please check Pr.21. voltage value to see whether the setting is so small that
24
output voltage is limited to the extent that it cannot reach the output voltage
needed.
25