1
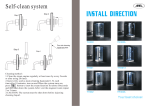
Install manual
Steam bathroom
MODEL : WS-608P
www.eaglebath.com
No advanced advice will be submit before we change our design and size.
The pictures may be a little different from the real products.
Our company keep the final explanation right.
Dear Guest,
Thank you very much for purchasing our sanitary ware.
To enable you to use this pro duct safely and effectively,
please read this insta llation and operation manual carefully
before use.
CAUTIONS
1. Please ensure that the product installed reliable electric leakage
protection device, the power plug contains earth line, and make
sure it is reliable earth line. Check the protect system of leakage
protection each time before use.
2.Do not turn on water pump, heat pump or air bubble pump
without water.
3.Before turn on water pump, check if the water level over jets 10
to 20 mm or not, make sure regular usage of water pump
otherwise it will be destroy because of water leakage.
4.People with Hypertension symptom, after drink or heart disease
are not allowed to use the bathtub. Children have a bath must
under adult's guidance.
5.During use please noticed that don't blocked the jets and
avoiding the air adjustment valve overflowing. Also keep the
bathtub clean and don't let it blocked by hair or mess.
6.During use, please firstly adjust the water temperature or it will
be burned.
7.The bathtub is designed with ergonomic, rise and fall changes
are quite big so during usage pay more attention of be slipped.
8.Please shut down the system when not to use.
TECHNIQUE PARAMETER
Voltage
Ac 110 V( ±10%)
Frequency
60HZ
Water
Volatge
0.1~0.2Mpa
Power of
steam
generator
2.65KW
Power of
water pump
1.2HP
Power of
heat pump
1KW
Power of
air pump
Storage
capacity
Storage
capacity
0.2KW
48gallon
0.22m
3
Self-clean system
Step 2
Step 1
Step 3
Pour into cleaning
liquid from here
Step 4
Cleaning method :
1.C lean the steam engine regularly at least once by every 2weeks
or after using 20 times.
2.Inject citric acid as main cleaning liquid,add 1.5L each
time.after 10 minutes, turn on and When the system turns on,
press “
” button to start the steam function for about 30seconds
and then shut down the system.After vent the stagnant
water,repeat 2 or 3 times.
3.CAUTION: The system must be shut down before injecting
CAUTIONS: Heat pump and air bubble pump is optional purchase.
01
WS-608P
WS-608P
16
CONSTRUCTION SKETCH
Packing list
Packing 1
three pieces of ABS board, two pieces of sliding glass
door,two pieces of fixed glass door.
Packing 2
one tray,one roof, two pieces of up and down bended
aluminum column, two pieces of deluxe shower holding
bar, one set of foot massage, one piece of steam pipe with
plastic pad.
Spare parts list
two pieces of “T” shaped pillow,one piece of remote
control,two pieces of round shaped handle,one piece of
drainage cover, four pieces of plastic seal for the post,two
s e t s of h a nd l e 2 2 , t w o s e t s of s ho w e r, M 6 * 2 5
screw(1),M6*35 screw(2),ST4*16 screw(3),ST4*25
s c re w ( 4) , S T4 * 12 s c r ew ( 5 ), M 5 * 25 s c r ew ( 6 )
,one instruction.
SCREW (1)
M6x25
18pcs
SCREW (2)
M6x30
10pcs
SCREW (3)
SCREW (4)
St4x35
ST4x25
SCREW (5)
SCREW (6)
St4x20
M4X20
1
2
3
4
5
16
6
7
8
17
18
19
20
9
4p cs
21
48pcs
8pcs
4pcs
1 、 body roof
2 、 movable shower
3、exhaust fan
4、decorated lamp
5、function switch
6、cold/hot water
switch
7、towel handrail
8、nozzle
15 WS-608P
10
11
12
13
14
15
9、steam room body
10、top lamp
11、top shower
12、movable shower 16
handrails with glass
13、control panel
14、temperature sensor
15、decorated lamp
16、handrail
17、soap box
18、foot massage
19、nozzle
20、Steam outlet box
21、bottom bathtub
WS-608P
02
ATTENTION
1.In order to be tripped and fell down, pay more attention when get into the
steam room. Please don't shut the finger in the door in order to be hurt.
2.In order to avoid damaging the surface of products please do not use hardness
and sharpness tool to curve the products.
3.In order to course fire, no smoking inside the bathroom.
4.the jets of steam and drainage pipe both are high temperature when products
working, in order to be hurt please be careful.
5.In order to be tripped and fell down please keep clear of the bathtub after
taking shower each time.
6.It will be leaking if the glass glue plastic sheet be off then please add some
more for recover.
7.If there are marks of water please clear with soft cloth and toothpaste.
8.In order to be blocked of drainage device please keep clean of the surface of
bathtub.
9.Please do not hang up heavy things on the steam room or the handle of steam
room.
10.Please deal with the products according to the local laws when it is no
longer be use.
11.Any request please contact with local dealer.
1、waterfall
2、drainage switch
3、water pump swich
4、air adjuster
5、recycle net
6、water jet(6PC)
7、drainage
INSTALLATION SKETCH
The socket
of power
ATTENTION FOR USAGE
1、check if power and cold/hot water switch be turn on or be turn off each time before
Cold water pipe
Hot water pipe
use this product.
1000(39″)
1250(49.2″)
2、check if power of electronic leakage device be get through or not.
Checking way:
Press testing button, light of power be off, press button of restart then light of power
be on.It is not being what mentioned above after operated step by step,then that
shows the electronic protection device out off control or there is something wrong
with the electronic leakage device,so should ask professional to check and maintain
the product.
3、Turn off the main power of control panel after stop usage. The plug of power should
be pull out because only turn off all the functions of control panel that is not stop the
power.
Size:1600X1600X2250mm
63”X63”X88.6”
4、People with hypertension or drunk are not allowed to have sauna steam bath.
5、Children should have sauna steam bath under adult's instruction.
6、Please don't shut the finger in the door in order to be hurt when get into the steam
room.
7、In order to be tripped and fell down, pay more attention when get into the steam
room.
8、keep clean of the tray in order to be tripped and fell down.
03 WS-608P
9、Pay attention to the steam sprayer and water tank drainage, they are in high
temperature while working.
WS-608P
14
Attention:
The machine must be fixed in the circuit which protected
by creepage protectionand should be well-connected with the
ground. Nontechnical people can not be fixed or removed at
random.
INSTALLATION PROCESS
Strip B
Strip A
Drain
Strip C
STEP1
1.Assembly of tray
If the ground is not smooth ,
please adjust the nail under the
tray to keep the balance of the
tray and ground . The steam pipe is
in the package box.
ST4X25
2 P ls . L ock th e alu minu m
col umns on acr ylic pane l left
sid e & rig ht si de per read y
scr ew ho les by fact ory .
13
WS-608P
STEP2
WS-608P 04
3.P ls . loc k t he big blu e
coa ted gla ss next to th e
alu minu m c olum ns per rea dy
scr ews hol es by fact ory 。
Aft er the blu e c oate d g lass
ins tall atio n , pls . pu t
dec orat ed bead s o n
cor resp ondi ng plac e o f
alu minu m c olum ns .
STEP3
ST4X20
4.I nsta ll spar e p arts on
bac ksid e s team ro om body . T hey
are mo vabl e s howe r h olde r ,
tow el hand rail , g lass sh elf &
soa p b ox . Thi s s tep req uire s 2
peo ple , on e h old the pa rt in
fro nt and ano ther on e t ight en
the sc rews at ba ck side . S oap
box ma kes up by one bo ttom sh elf
& 2 pcs bo xes , pl s . lock th e
bot tom she lf on read y s crew
hol es firs t , and put th e b oxes
on the bo ttom sh elf lat er .
STEP4
5.P ls . car ry the bac ksid e b ody
to the to p o f b atht ub and loc k
scr ews on rea dy scre ws hole s o n
the ir cont act sur face be hind
the st eam roo m b ody . In th is way ,
it is fix ed .
M6X30
05
WS-608P
STEP5
(1) The electrical pitch
Press
pitch can open the machine, the temperature
is the room temperature.The time will show 30m. At the same
time, it will open the ceiling lamp.Press again will close all the
functions. (After the closure of the machine, the water case
will drainfor 2 minutes)
(2) The application of the back lamp
Press
,the sidelight is on. Press
again, the ceiling
lamp is out, press
a third press, the sidelight is out too.
3) The steam function
Press
,startup the steam function, the water case
will pump water automati-cally. After 60minutes or so, it
will generate steam. (When the water case is lack ofwater,
the controller will replenish automatically)
(4) The air draft function
Under the condition of turnning on, press
can start
up air draft function, pressagain will colse it.
(5) The setting of time or temperature
1. Press
pitch can adjust the time from 1-99.
2. Press
pitch can adjust the temperature from
30-60 .
WS-608P
12
1
4
2
5
3
6
6.P ut the blu e c lear
gla ss with on e s ide
alu minu m p ole on the
bat htub ne xt to the
bac k s ide blu e c oate d
gla ss , a nd lock th em
tog ethe r b y l ock
scr ews on the se 2
alu minu m p oles .2
sid es blue cl ear
gla ss with on e s ide
alu minu m p ole
ins tall atio n w ay is
the sa me .
ST4X20
STEP6
7
8
1
Time adjustment pitch+
5
Temperature adjustment pitch-
2
Temperature adjustment pitch+
6
Fan Pitch
3
CeilingLamp/Back Lamp pitch
4
Time adjustment pitch-
7
8
ST4X20
Steam Pitch
Main Cock Pitch
STEP7
7.A fter th e f ixed do or
ins tall atio n , pls . lo ck 2 pcs
alu minu m p oles ba se on bath tub
per re ady scr ew hole s . Late r , pls .
ins ert the al umin um pole s w ith
hin ges int o t he base . A t t he same
tim e , pls . in sert 2 sid es fixe d
doo r g lass in to the gro ove of
the se alum inum po les fir st & p ut
gla ss glue in to the gro ove lat er .
put gl ass glu e h ere
11 WS-608P
WS-608P 06
DRAWING OF ELECTRICITY CONNECTION
clean system
steam outlet
M4x20
8.P ls . pu t ceil ing on t he
ste am room bod y an d ma ke
sur e the c eili ng is n ot
ove r t he s team roo m bo dy
. Th en lock the scr ews as
pic ture , a nd f ix t he ro om
bod y & c eili ng . O ne
per son s houl d hold t he
cei ling i nsid e the ro om .
water inlet
Po wer
STEP8
9.I nsta ll stri ps & m agne tic str ip on
lef t , ri ght & bott om side of 2 p cs
mov able gl ass doo r . Ca rry the gl ass doo r
to the to p o f b atht ub . Loo se the
pro trud ing hin ge part , and lo ck the
gla ss insi de the hin ge per rea dy glas s
hol e . Afte r t he mova ble doo r
ins tall atio n , pl s . inst all doo r h andl e
on doo rs ..
Strip C
Control
panel
Strip B
Fan
Li ght
(AC12 V) (DC12V)
07
WS-608P
STEP9
Strip A
WS-608P 10
DRAWING OF WATER CONNECTION
As the“ ”
“ ”from the picture,please make the
connection according to the serial number v1,v2,etc.
Top shower
Switch
valve
Switch
valve
Cold/hot
water switch
Cold/hot
water switch
10. Afte r t he stea m r oom ins tall atio n , pls . in stal l t he
res t s pare pa rts . Su ch as mova ble sho wer , fo ot mass age
Movable
shower head
Movable
shower head
11. Pls . pu t g lass gl ue on fixe d d oor bot tom out side &
ins ide and in side to p p art .
12. Fini sh cabl e & wa ter pip e c onne ctio n . ( pls . k indl y
che ck the att ache d p ictu re )
Nozzle
Nozzle
Water fall
Foot
massage
Nozzle
Steam generator
clean system
steam outlet
09
WS-608P
WS-608P 08