1
Symantec Enterprise Security Manager™
Security Update 15 User’s Guide
Release for Symantec ESM 5.1 and 5.5
NetWare/NDS Modules
Security Update 15 for NetWare/NDS
The software described in this book is furnished under a license agreement and may be
used only in accordance with the terms of the agreement.
Documentation version SU 15
Copyright Notice
Copyright © 2003 Symantec Corporation.
All Rights Reserved.
Any technical documentation that is made available by Symantec Corporation is the
copyrighted work of Symantec Corporation and is owned by Symantec Corporation.
NO WARRANTY. The technical documentation is being delivered to you
AS-IS, and Symantec Corporation makes no warranty as to its accuracy or use. Any use of
the technical documentation or the information that is contained therein is at the risk of
the user. Documentation may include technical or other inaccuracies or typographical
errors. Symantec reserves the right to make changes without prior notice.
No part of this publication may be copied without the express written permission of
Symantec Corporation, 20330 Stevens Creek Blvd., Cupertino, CA 95014.
Trademarks
Symantec, the Symantec logo, LiveUpdate, and Norton AntiVirus are U.S. registered
trademarks of Symantec Corporation. Symantec Enterprise Security Manager, Symantec
Intruder Alert, LiveUpdate Administration Utility, Symantec AntiVirus, and Symantec
Security Response are trademarks of Symantec Corporation.
Other brands and product names that are mentioned in this manual may be trademarks or
registered trademarks of their respective companies and are hereby acknowledged.
Printed in the United States of America.
10
9 8
7
6
5
4
3
2 1
3
Technical support
Technical support
As part of Symantec Security Response, the Symantec Global Technical Support
group maintains support centers throughout the world. The Technical Support
group’s primary role is to respond to specific questions on product feature/
function, installation, and configuration, as well as to author content for our
Web-accessible Knowledge Base. The Technical Support group works
collaboratively with the other functional areas within Symantec to answer your
questions in a timely fashion. For example, the Technical Support group works
with Product Engineering as well as Symantec Security Response to provide
Alerting Services and Virus Definition Updates for virus outbreaks and security
alerts.
Symantec technical support offerings include:
■
A range of support options that gives you the flexibility to select the right
amount of service for any size organization
■
Telephone and Web support components that provide rapid response and
up-to-the-minute information
■
Upgrade insurance that delivers automatic software upgrade protection
■
Content Updates for virus definitions and security signatures that ensure the
highest level of protection
■
Global support from Symantec Security Response experts, which is available
24 hours a day, 7 days a week worldwide in a variety of languages
■
Advanced features, such as the Symantec Alerting Service and Technical
Account Manager role, that offer enhanced response and proactive security
support
Please visit our Web site for current information on Support Programs. The
specific features that are available may vary based on the level of support
purchased and the specific product that you are using.
Licensing and registration
If the product that you are implementing requires registration and/or a license
key, the fastest and easiest way to register your service is to access the Symantec
licensing and registration site at www.symantec.com/certificate. Alternatively,
you may go to www.symantec.com/techsupp/ent/enterprise.htm, select the
product that you wish to register, and from the Product Home Page, select the
Licensing and Registration link.
4
Technical support
Contacting Technical Support
Customers with a current support agreement may contact the Technical Support
group by phone or online at www.symantec.com/techsupp.
Customers with Platinum support agreements may contact Platinum Technical
Support by the Platinum Web site at www-secure.symantec.com/platinum/.
When contacting the Technical Support group, please have the following:
■
Product release level
■
Hardware information
■
Available memory, disk space, NIC information
■
Operating system
■
Version and patch level
■
Network topology
■
Router, gateway, and IP address information
■
Problem description
■
Error messages/log files
■
Troubleshooting performed prior to contacting Symantec
■
Recent software configuration changes and/or network changes
Customer Service
To contact Enterprise Customer Service online, go to www.symantec.com, select
the appropriate Global Site for your country, then choose Service and Support.
Customer Service is available to assist with the following types of issues:
■
Questions regarding product licensing or serialization
■
Product registration updates such as address or name changes
■
General product information (features, language availability, local dealers)
■
Latest information on product updates and upgrades
■
Information on upgrade insurance and maintenance contracts
■
Information on Symantec Value License Program
■
Advice on Symantec’s technical support options
■
Nontechnical presales questions
■
Missing or defective CD-ROMs or manuals
SYMANTEC CORPORATION SOFTWARE LICENSE AGREEMENT
SYMANTEC CORPORATION AND/OR ITS SUBSIDIARIES
("LICENSOR") IS WILLING TO LICENSE THE SOFTWARE TO
YOU AS AN INDIVIDUAL OR THE COMPANY OR LEGAL ENTITY
THAT WILL BE UTILIZING PRODUCT AND THAT YOU
REPRESENT AS AN EMPLOYEE OR AUTHORIZED agent ("YOU
OR YOUR") ONLY ON THE CONDITION THAT YOU ACCEPT
ALL OF THE TERMS OF THIS LICENSE AGREEMENT. READ THE
TERMS AND CONDITIONS OF THIS LICENSE CAREFULLY
BEFORE USING THE SOFTWARE. THIS IS A LEGAL AND
ENFORCEABLE CONTRACT BETWEEN YOU AND LICENSOR. BY
OPENING THIS PACKAGE, BREAKING THE SEAL, CLICKING
THE "I DO AGREE" OR "YES" BUTTON OR LOADING THE
PRODUCT, YOU AGREE TO THE TERMS AND CONDITIONS OF
THIS AGREEMENT. IF YOU DO NOT AGREE TO THESE TERMS
AND CONDITIONS, CLICK THE "I DO NOT AGREE" OR "NO"
BUTTON AND DO NOT USE THE SOFTWARE.
1. LICENSE TO USE
Licensor grants You a non-exclusive, non-transferable license (the
"License") for the use of the number of licenses of Licensor’s software
in machine readable form, and accompanying documentation (the
"Product"), on Your machines for which You have been granted a
license key and for which You pay the License fee and applicable tax.
The License governs any releases, revisions or enhancements to the
Product that Licensor may furnish to You.
2. RESTRICTIONS
Product is copyrighted and contains proprietary information and trade
secrets belonging to Licensor and/or its licensors. Title to Product and
all copies thereof is retained by Licensor nd/or its licensors. You will
not use Product for any purpose other than for Your own internal
business purposes or make copies of the software, other than a single
copy of the software in machine-readable format for back-up or
archival purposes. You may make copies of the associated
documentation for Your internal use only. You shall ensure that all
proprietary rights notices on Product are reproduced and applied to
any copies. You may not modify, decompile, disassemble, decrypt,
extract, or otherwise reverse engineer Product, or create derivative
works based upon all or part of Product. You may not transfer, lease,
assign, make available for timesharing or sublicense Product, in whole
or in part. No right, title or interest to any trademarks, service marks or
trade names of Licensor or its licensors is granted by this License.
3. LIMITED WARRANTY
Licensor will replace, at no charge, defective media and product
materials that are returned within 30 days of shipment. Licensor
warrants, for a period of 30 days from the shipment date, that Product
will perform in substantial compliance with the written materials
accompanying the Product on that hardware and operating system
software for which it was designed, as stated in the documentation. Use
of Product with hardware and/or operating system software other than
that for which it was designed and voids this applicable warranty. If,
within 30 days of shipment, You report to Licensor that Product is not
performing as described above, and Licensor is unable to correct it
within 30 days of the date You report it, You may return Product, and
Licensor will refund the License fee. If You promptly notify Licensor of
an infringement claim based on an existing U.S. patent, copyright,
trademark or trade secret, Licensor will indemnify You and hold You
harmless against such claim, and shall control any defense or
settlement. This warranty is null and void if You have modified
Product, combined the Product with any software or portion thereof
owned by any third party that is not specifically authorized or failed
promptly to install any version of Product provided to You that is noninfringing. If commercially reasonable, Licensor will either obtain the
right for You to use the Product or will modify Product to make it noninfringing. The remedies above are Your exclusive remedies for
Licensor’s breach of any warranty contained herein.
4. LIMITATION OF REMEDIES
THE WARRANTIES IN THIS AGREEMENT ARE IN LIEU OF ALL
OTHER WARRANTIES, EXPRESS OR IMPLIED, INCLUDING BUT
NOT LIMITED TO THE IMPLIED WARRANTIES OF
MERCHANTABILITY AND FITNESS FOR A PARTICULAR
PURPOSE OF ANY PRODUCT OR ITS DOCUMENTATION. THE
LIABILITY OF LICENSOR HEREUNDER FROM ANY CAUSE OF
ACTION WHATSOEVER WILL NOT EXCEED THE AGGREGATE
LICENSE FEE PAID BY LICENSEE FOR THE PRODUCT. IN NO
EVENT WILL LICENSOR OR ITS AUTHORIZED
REPRESENTATIVES BE LIABLE FOR LOST PROFITS OR SPECIAL,
PUNITIVE, INCIDENTAL OR CONSEQUENTIAL DAMAGES
ARISING OUT OF ANY USE OF, OR INABILITY TO USE, THE
PRODUCT OR LOSS OF OR DAMAGE TO DATA, EVEN IF
LICENSOR OR ITS AUTHORIZED REPRESENTATIVES HAVE
BEEN ADVISED OF THE POSSIBILITY OF SUCH DAMAGES.
LICENSOR AND ITS AUTHORIZED REPRESENTATIVES WILL
NOT BE LIABLE FOR ANY SUCH CLAIMS BY ANY OTHER PARTY.
SOME STATES DO NOT ALLOW THE LIMITATION OR
EXCLUSION OF LIABILITY FOR INCIDENTAL OR
CONSEQUENTIAL DAMAGES SO THE ABOVE LIMITATION OR
EXCLUSION MAY NOT APPLY TO YOU. No action or claim arising
out of or relating to this Agreement may be brought by You more than
one (1) year after the cause of action is first discovered.
5. CONFIDENTIALITY
You agree that Product and all information relating to the Product is
confidential property of the Licensor ("Proprietary Information"). You
will not use or disclose any Proprietary Information except to the
extent You can document that any such Proprietary Information is in
the public domain and generally available for use and disclosure by the
general public without any charge or license. Use by persons to which
You have contracted any of Your data processing services is permitted
only if each contractor (and its associated employees) is subject to a
valid written agreement prohibiting the reproduction or disclosure to
third parties of software products and associated documentation to
which they have access and such prohibitions apply to the Product.
You recognize and agree that there is no adequate remedy at law for a
breach of this Section, that such a breach would irreparably harm the
Licensor and that the Licensor is entitled to equitable relief (including,
without limitation, injunctive relief) with respect to any such breach or
potential breach, in addition to any other remedies available at law.
6. EXPORT REGULATION
You agree to comply strictly with all US export control laws, including
the US Export Administration Act and its associated regulations and
acknowledge Your responsibility to obtain licenses to export, re-export
or import Product. Export or re-export of Product to Cuba, North
Korea, Iran, Iraq, Libya, Syria or Sudan is prohibited.
7. US GOVERNMENT RESTRICTED RIGHTS
If You are licensing Product or its accompanying documentation on
behalf of the US Government, it is classified as "Commercial Computer
Product" and "Commercial Computer Documentation" developed at
private expense, contains confidential information and trade secrets of
Licensor and its licensors, and is subject to "Restricted Rights" as that
term is defined in the Federal Acquisition Regulations ("FARs").
Contractor/Manufacturer is: Symantec Corporation, and its
subsidiaries, Cupertino, California, USA.
8. MISCELLANEOUS
This License is made under the laws of the State of California, USA,
excluding the choice of law and conflict of law provisions. Product is
shipped FOB origin. This License is the entire License between You and
Licensor relating to Product and: (i) supersedes all prior or
contemporaneous oral or written communications, proposals, and
representations with respect to its subject matter; and (ii) prevails over
any conflicting or additional terms of any quote, order,
acknowledgment, or similar communication between the parties
during the term of this License. Notwithstanding the foregoing, some
Products or products of Licensor may require Licensee to agree to
additional terms through Licensor’s on-line "click-wrap" license, and
such terms shall supplement this Agreement. If any provision of this
License is held invalid, all other provisions shall remain valid unless
such validity would frustrate the purpose of this License, and this
License shall be enforced to the full extent allowable under applicable
law. Except for additional terms that may be required through
Licensor’s on-line "click-wrap" license, no modification to this License
is binding, unless in writing and signed by a duly authorized
representative of each party. The License granted hereunder shall
terminate upon Your breach of any term herein and You shall cease use
of and destroy all copies of Product. Duties of confidentiality,
indemnification and the limitation of liability shall survive termination
or expiration of this Agreement. Any Product purchased by You after
the purchase of Product which is the subject of this License shall be
subject to all of the terms of this License. All of Symantec
Corporation’s and its subsidiaries’ licensors are direct and intended
third-party beneficiaries of this License and may enforce it against You.
Certain Software utilize content that is updated from time to time
(including but not limited to the following Software: antivirus
products utilize updated virus definitions; content filtering products
utilize updated URL lists; firewall products utilize updated firewall
rules; and vulnerability assessment products utilize updated
vulnerability data; these updates are collectively referred to as "Content
Updates"). Licensee may obtain Content Updates for any period for
which Licensee has purchased Upgrade Insurance for the Software,
entered into a maintenance agreement with Symantec that includes
Content Updates, or otherwise separately acquired the right to obtain
Content Updates.
ESM 5.5 Legal Agreement, 12 October 2001
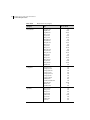
Contents
Technical support ............................................................................................. 3
Licensing and registration ......................................................................... 3
Contacting Technical Support .................................................................. 4
Customer Service ....................................................................................... 4
Chapter 1
Introducing Security Update 15 for NetWare
Symantec ESM modules ................................................................................. 14
User accounts and authorizations .................................................................. 15
Account Information (Queries) module ............................................... 15
Account Integrity module ....................................................................... 15
Login Parameters module ....................................................................... 15
Password Strength module ..................................................................... 15
User Files module .................................................................................... 15
Networked computer settings ........................................................................ 16
Network Integrity module ...................................................................... 16
Object Integrity module .......................................................................... 16
Startup Files module ............................................................................... 16
System Auditing module ......................................................................... 16
File Systems and directories ........................................................................... 17
File Attributes module ............................................................................ 17
File Access (Queries) module ................................................................. 17
File Find (Queries) module .................................................................... 17
File Information (Queries) module ........................................................ 17
Chapter 2
Installing Symantec ESM security modules
System requirements ...................................................................................... 20
Getting the update .......................................................................................... 20
Getting ready to install ................................................................................... 21
Installing the update ....................................................................................... 22
Mounting the CD-ROM drive ................................................................ 22
Copying the NetWare/NDS files ............................................................ 23
Installing the security update .................................................................. 23
Registering the modules ................................................................................. 25
Resolving connection errors ........................................................................... 25
8 Contents
Chapter 3
Reviewing policies, modules, and messages
Reviewing policies ...........................................................................................28
Implementing best practice policies .......................................................28
Responding to incidents ..........................................................................28
Creating and editing your own policies ..................................................29
Sample policies .........................................................................................30
Phase policies ....................................................................................30
Queries policy ...................................................................................31
Copying and moving policies ..................................................................32
Running policies ......................................................................................32
Demonstrating security checks ...............................................................32
Reviewing modules ..........................................................................................33
Enabling and disabling security checks ..................................................33
Specifying options ....................................................................................34
Editing name lists .....................................................................................35
Objects in name lists .........................................................................36
Users and Groups name list precedence .........................................37
Using an alias in a name list .............................................................39
Creating and editing templates ...............................................................40
Creating a template ..........................................................................40
Editing template rows ......................................................................41
If you edit any of the templates that are shipped with Symantec ESM,
your changes will be overwritten by the next Security Update. To
avoid this problem, create and edit your own templates. .......41
Editing template fields ......................................................................42
Reviewing messages .........................................................................................44
Reviewing message types .........................................................................44
Reviewing common messages .................................................................45
Correcting agents in messages .................................................................46
Updating template and snapshot files in messages ................................47
Editing messages ......................................................................................48
Chapter 4
Checking user accounts and authorizations
Account Information (Queries) module .......................................................52
User information .....................................................................................52
User information (cont’d) .......................................................................52
Group membership .................................................................................53
Security equivalences ...............................................................................53
Account login status ................................................................................54
Directory trustees .....................................................................................55
Directory trustees (cont’d) ......................................................................55
NDS module: Objects in agent context list will be considered .............55
Contents
Account Integrity module .............................................................................. 56
Updateable Account Integrity messages ................................................ 56
Accounts without expiration dates ......................................................... 57
Expiration time ........................................................................................ 58
Accounts without login time restrictions ............................................... 58
Accounts with common names .............................................................. 59
Accounts with common names (cont’d) ............................................... 59
Accounts without home directory .......................................................... 59
Accounts with access to other home directory ...................................... 60
New, changed, and deleted users ............................................................ 60
New, changed, and deleted groups ......................................................... 62
NDS module: Objects in agent context list will be considered ............. 63
Login Parameters module .............................................................................. 64
Inactive accounts ..................................................................................... 64
Unused accounts ..................................................................................... 64
Disabled accounts .................................................................................... 65
Locked accounts ...................................................................................... 66
Limit workstation addresses ................................................................... 66
Limit concurrent logins .......................................................................... 67
Intruder detection enabled ..................................................................... 68
Incorrect login attempts .......................................................................... 68
Intruder attempt reset interval ............................................................... 69
Intruder lockout reset interval ................................................................ 69
NDS module: Objects in agent context list will be considered ............. 69
Password Strength module ............................................................................. 70
User can change password ...................................................................... 70
Password length restrictions ................................................................... 71
Accounts without passwords .................................................................. 71
Force periodic password change ............................................................. 72
Require unique passwords ...................................................................... 73
Limit grace logins .................................................................................... 73
Password = username ............................................................................. 74
Password = any username ....................................................................... 75
Password = wordlist word ...................................................................... 76
Password = wordlist word (cont’d) ........................................................ 77
Reverse order ........................................................................................... 78
Double occurrences ................................................................................. 79
Plural forms ............................................................................................. 80
Add prefix ................................................................................................ 81
Add suffix ................................................................................................. 82
NDS module: Objects in agent context list will be considered ............. 82
Using and editing word files ................................................................... 83
9
10 Contents
User Files (Queries) module ...........................................................................86
Access to NDS login scripts .....................................................................86
Access to DOS bindery login scripts .......................................................86
All bindery users must have DOS login script ........................................87
NDS module: Objects in agent context list will be considered .............88
Chapter 5
Checking network and server settings
Network Integrity module ..............................................................................90
Disk space limits ......................................................................................90
All volumes have NDS objects in tree .....................................................91
Server module: All objects in the tree will be considered ......................91
Object Integrity module ..................................................................................92
Updateable Object Integrity messages ....................................................92
New, changed, and deleted print servers ................................................93
New, changed, and deleted print queues ................................................94
New, changed, and deleted file servers ...................................................95
Excessive ACL access ...............................................................................95
NetWare server equivalences ..................................................................98
Server console operators ..........................................................................98
Stealth objects ...........................................................................................99
ACLs of stealth objects .............................................................................99
Subordinates of stealth objects ................................................................99
ESM agent object’s access to agent’s contexts ......................................100
Missing object properties ......................................................................101
Missing object properties (cont’d) ........................................................101
NDS module: Objects in agent context list will be considered ...........102
Startup Files module .....................................................................................103
Updateable Startup Files messages ........................................................103
SECURE CONSOLE ..............................................................................104
REMOVE DOS .......................................................................................105
ALLOW UNENCRYPTED PASSWORDS = ON .................................106
LOAD REMOTE with unencrypted password .....................................106
Access to files loaded by AUTOEXEC.NCF .........................................107
NLMs currently loaded on server .........................................................108
NLMs required to be loaded .................................................................108
NLMs not allowed to be loaded ............................................................108
NLMs added since snapshot ..................................................................109
NLMs removed since snapshot .............................................................109
NLMs changed since snapshot ..............................................................110
NetWare console parameters ................................................................110
Server module: All objects in the tree will be considered ....................115
Contents
System Auditing module .............................................................................. 116
Volume auditing enabled ...................................................................... 116
Extended attribute events enabled ........................................................ 117
File events enabled (global) .................................................................. 117
File events enabled (user or file/directory) .......................................... 117
File events enabled (user and file/directory) ........................................ 118
Message events enabled ......................................................................... 118
QMS events enabled .............................................................................. 118
Server events enabled ............................................................................ 118
User events enabled ............................................................................... 118
Files/directories for auditing ................................................................. 119
Container auditing enabled .................................................................. 119
NDS Container events enabled ............................................................. 120
Users for auditing .................................................................................. 120
Dual module: Some NDS and some server checks .............................. 120
Chapter 6
Checking system files and directories
File Attributes module .................................................................................. 122
Updateable File Attributes messages .................................................... 122
Template file list .................................................................................... 123
File ownership ....................................................................................... 124
File attributes ......................................................................................... 124
Changed files (creation time) ............................................................... 125
Changed files (modification time) ....................................................... 126
Changed files (size) ............................................................................... 127
Changed files (signature) ...................................................................... 128
Inherited rights mask ............................................................................ 128
Allow any privileged owner .................................................................. 129
Match abbreviated names in templates ................................................ 129
Server module: NDS tree is not considered ......................................... 129
Editing the File template ....................................................................... 130
Editing File Attributes .................................................................... 134
File Access (Queries) module ....................................................................... 135
Excessive file access ............................................................................... 135
Access to ESM files ................................................................................ 136
System directories with non-recommended rights masks .................. 136
Server module: All objects in the tree will be considered .................... 137
File Find (Queries) module .......................................................................... 138
Duplicate system files ............................................................................ 138
Hidden and system files ........................................................................ 138
Duplicate non-system files .................................................................... 139
Server module: NDS tree is not considered ......................................... 139
11
12 Contents
File Information (Queries) module ..............................................................140
Items to report .......................................................................................140
Effective rights mask .............................................................................140
Users/groups to check ............................................................................141
Files/directories to check .......................................................................141
Directories only ......................................................................................142
Walk subdirectories ...............................................................................142
Server module: All objects in the tree will be considered ....................142
Index
Chapter
1
Introducing Security
Update 15 for NetWare
This chapter includes the following topics:
■
Symantec ESM modules
■
User accounts and authorizations
■
Networked computer settings
■
File Systems and directories
Note: Each chapter in this guide begins with a list such as the one above. In the
PDF version, you can click a topic in the list above to go directly to that topic.
Similarly, you can click an item in the Contents or Index, or a cross-reference that
contains a page number.
14 Introducing Security Update 15 for NetWare
Symantec ESM modules
Symantec ESM modules
Symantec Enterprise Security Manager (ESM) modules consist of security checks
that assess the vulnerability of networked systems to unauthorized access,
tampering, and denial of service in three key areas:
■
User accounts and authorizations
■
Network system and server settings
■
File systems and directories
A module is an executable file that examines a server or NetWare/NDS system
where a Symantec ESM agent is installed. Each module contains security checks
and options that relate to different areas of security.
For example, the Login Parameters module includes checks for excessive login
failures, expired passwords, and so forth. Each check examines a specific area of
concern such as inactive accounts or password length.
All reports are based on checks and options that you enable.
Introducing Security Update 15 for NetWare
User accounts and authorizations
User accounts and authorizations
The following modules examine user accounts and authorizations for
vulnerabilities that could lead to unauthorized access, modification, and
tampering. Some of these modules also retrieve information about users and
security groups on your systems.
Account Information (Queries) module
The Account Information module reports selected information about user
accounts and security groups on your systems. See “Account Information
(Queries) module” on page 52.
Account Integrity module
The Account Integrity module reports account policy settings that vary from
your security policy. The module examines user accounts and security groups for
permissions, home directories, and current statuses. It also creates and maintains
user and group snapshot files to detect account changes between policy runs. See
“Account Integrity module” on page 56.
Login Parameters module
The Login Parameters module reports old or unused accounts and accounts with
expired passwords. The module verifies that accounts are locked out after a
specified number of failed login attempts. The module also checks whether the
system hides the user ID from the Login dialog box, allows shutdown from a
Login dialog box, or permits automatic logins. See “Login Parameters module”
on page 64.
Password Strength module
The Password Strength module reports passwords that do not conform to your
established security policy. The module applies dictionary tests to detect easily
guessed passwords. It also checks the format, length, and expiration of passwords.
See “Password Strength module” on page 70.
User Files module
The User Files module reports problems when file ownerships and permissions in
NetWare and other systems do not match the original baselines. See “User Files
(Queries) module” on page 86.
15
16 Introducing Security Update 15 for NetWare
Networked computer settings
Networked computer settings
These modules examine network and server settings for vulnerabilities that could
lead to unauthorized access, modification, and tampering. They also retrieve
information about the systems on the network.
Network Integrity module
The Network Integrity module checks the security of NetWare/NDS, including
groups and directory and printer shares. See “Network Integrity module” on
page 90.
Object Integrity module
Security checks in the Object Integrity module examine ACL support for changes
in ownership, permissions, the logical-name table, rights identifiers, and other
software objects or device-specific files in the system device directory. The
module also creates and maintains a snapshot file to detect new devices, deleted
devices, and device changes between policy runs. See “Object Integrity module”
on page 92.
Startup Files module
The Startup Files module examines system startup files, looking for proper
configuration of NLMs and server parameters. See “Startup Files module” on
page 103.
System Auditing module
System auditing helps you identify unauthorized users and provides valuable
tracking information during or after a break-in. See “System Auditing module”
on page 116.
Introducing Security Update 15 for NetWare
File Systems and directories
File Systems and directories
These modules examine file systems and directories for vulnerabilities that could
lead to unauthorized access, modification, and tampering.
File Attributes module
Security checks in the File Attributes module report changes in files such as
ownership, size, creation time, and modification. Other reports include changes
in access control lists (ACLs), results of checksum checks, and directories that
grant full control to the Everyone group. See “File Attributes module” on
page 122.
File Access (Queries) module
Security checks in the File Access module report file permissions and users who
can access specified files.
To learn how to use the security checks in this module, see “File Access (Queries)
module” on page 135.
File Find (Queries) module
Security checks in the File Find module report certain file attributes, settings,
uneven permissions, specified text strings, and unowned files.
To learn how to use the security checks in this module, see “File Find (Queries)
module” on page 138.
File Information (Queries) module
Security checks in the File Information module report users and their effective or
trustee rights to specified directories and files. The module also reports inherited
rights masks for selected directories and files.
To learn how to use the security checks in this module, see “File Information
(Queries) module” on page 140.
17
18 Introducing Security Update 15 for NetWare
File Systems and directories
Chapter
2
Installing Symantec ESM
security modules
This chapter describes the steps that are required to successfully install Symantec
ESM Security Update modules on supported NetWare/NDS servers and resolve
connection errors.
This chapter includes the following topics:
■
System requirements
■
Installing the update
■
Registering the modules
■
Resolving connection errors
Note: You cannot install Security Update modules on Symantec ESM versions
prior to Symantec ESM 4.4.
20 Installing Symantec ESM security modules
System requirements
System requirements
Operating system platforms and Symantec ESM manager and agent core
products that can be upgraded with each Security Update release are included in
the Release Notes that are posted to the Symantec Web site.
Memory and disk space requirements are determined by the requirements for the
manager and agent core product that is upgraded by a Security Update. These
requirements are summarized by core product versions (Symantec ESM 5.5, 5.1,
5.0.1, and so on) in the Symantec ESM Operating Requirements document that is
also posted to the Symantec Web site with each new Security Update release.
Both Release Notes and Symantec ESM Operating Requirements can be
downloaded with the Security Updates from the Symantec Web site at
http://securityresponse.symantec.com.
Getting the update
Symantec ESM Security Updates are available:
■
On the Internet at http://securityresponse.symantec.com.
■
On the Security Update CD.
Two or three times a year, Symantec publishes a set of recent updates on a
CD. If you are unable to obtain Security Updates through LiveUpdate and
cannot download them from the Symantec Security Response Web site, use
the form at the end of this document to order the most recent CD.
Installing Symantec ESM security modules
Getting ready to install
Getting ready to install
Before you start installing the modules:
■
Make sure that each computer has an installed Symantec ESM agent.
■
Prepare a list of all NetWare/NDS computers that have an installed and
running agent that needs to be updated.
Include the names of all manager computers where each agent is registered.
Include the user name, password, and communication protocol that each
agent uses to contact the manager.
The user name and password must have privileges to register agents on the
manager.
■
Make sure you can access an account with root privileges on the computers
where you plan to install the security modules.
21
22 Installing Symantec ESM security modules
Installing the update
Installing the update
Before you can use modules in a Security Update release, you must install them
on the NetWare/NDS servers in your network that have an installed and running
Symantec ESM agent.
The ESMMODS.NLM installs the Security Update modules on NetWare 4.x and
NetWare 5.x. Use ESMSETUP.NLM to install the Security Updated on NetWare
6.x. To access the installation software, at least one NetWare server must have
access to a local CD-ROM drive or a workstation on the network with a local CDROM drive.
Note: If this is the first time you are installing Symantec ESM for NetWare/NDS
or if you are installing to NetWare 6.x, follow the instructions that are located in
the Symantec Enterprise Security Manager User Manual for running
ESMSETUP.NLM. After you install Symantec ESM for NetWare/NDS, continue
reading this section.
You can find the NetWare/NDS ESMMODS.NLM in the following directory on
the CD_ROM:
NOVELL\NWNDS\INTEL\ESMSU15
Note: Security Updates can also be downloaded from the Symantec Web site at
http://securityresponse.symantec.com.
Mounting the CD-ROM drive
You can mount the CD-ROM drive on the server or a workstation. See the Novell
or Microsoft manuals for enabling and accessing the CD-ROM drive.
If the CD-ROM drive is mounted on a file server and you have secured your
console, you must comment the “secure console” line from your autoexec.ncf file
and reboot your server before you can use the CD-ROM drive to copy files to the
server.
If the NetWare server has a CD-ROM drive, you can mount the CD-ROM on the
NetWare server and load the Symantec ESM files to a volume directory.
Installing Symantec ESM security modules
Installing the update
Copying the NetWare/NDS files
If the NetWare server lacks a CD-ROM drive, you can mount the CD-ROM on a
Windows workstation and copy the files to the NetWare/NDS server.
To copy the NetWare/NDS files
1
Map an available network drive.
2
Use this command to create a directory for the Symantec ESM files:
MAP X=SYS:SYMANTEC\ESM\INSTALL
3
Change to the new directory.
4
Use this command to copy the NetWare/NDS files from the ESM directory
on the CD-ROM to the intended directory on the mapped network drive:
COPY <CDROM_drive>:\NOVELL\NWNDS\INTEL\ ESMSU*\*.*
<MAPPED NETWORK DRIVE>
Note: If you are downloading this Security Update from Symantec’s web site, you
can also unzip the .ZIP file from the web directly onto the NetWare/NDS server.
Installing the security update
Use the ESMMODS.NLM program to install the Symantec ESM Security Update.
In large networked systems, you can install the Security Update by copying the
file to a local NetWare server running a Symantec ESM 5.1 or 5.5 manager/agent.
To install the security modules
1
From the NetWare console (or using RConsole), enter this command at the
NetWare prompt:
LOAD[VOLNAME]:\NOVELL\NWNDS\INTEL\ESMSU<#>
\ESMMODS.NLM
where volname represents the name of the NetWare volume that contains the
transport medium.
2
Type 1 and press Enter to begin the installation (or press Enter to choose the
default).
3
Type 1 and press Enter to perform the Basic installation.
4
Type the complete path name of the directory where the Symantec ESM files
should be installed and press Enter.
5
Type the name of the Symantec ESM manager and press Enter.
23
24 Installing Symantec ESM security modules
Installing the update
6
Type 1 to select the SPX network protocol or 2 for TCP and press Enter.
7
Type the port number to be used to contact the manager and press Enter.
8
Type your Symantec ESM manager user name and press Enter.
9
Type a password and press Enter.
Note: Type UNLOAD ESMMODS from the console if you need to stop the
installation before it is completed.
Installing Symantec ESM security modules
Registering the modules
Registering the modules
Each time you run a Security Update, you will be asked if you want to reregister
the module and .m files. You need to register the files only once for each
manager. If an agent is registered to multiple managers, rerun the Security
Update on the agent to register the modules with each manager.
To reregister each module to any other previously-registered manager, use
ESMSETUP.NLM.
Do not register different versions of Symantec ESM agents to the same manager.
This can cause manager database errors.
Although agents that were registered to a manager before it was upgraded
continue to function with the manager after the upgrade, you should upgrade
agents to the same version as the manager
Resolving connection errors
If you get a connection error while running security checks, check the
\esm\config\manager.dat file on the agent.
To resolve connection errors, add the manager’s fully-qualified name to the file.
If the file is missing, run ESMSETUP.NLM to reregister the agent to the manager.
25
26 Installing Symantec ESM security modules
Resolving connection errors
Chapter
3
Reviewing policies,
modules, and messages
This chapter includes the following topics:
■
Reviewing policies
■
Reviewing modules
■
Reviewing messages
For additional information, see your Symantec Enterprise Security Manager User
Manual.
28 Reviewing policies, modules, and messages
Reviewing policies
Reviewing policies
A policy is a set of modules with enabled security checks that look for security
vulnerabilities.
Symantec ESM is installed with seven default policies. Best practice policies can
be downloaded through LiveUpdate or from the Internet. Policies for application
products are sold separately.
Implementing best practice policies
Symantec ESM best practice policies are configured to protect specific
applications and/or operating system platforms from security vulnerabilities.
Operating system (OS) hardening policies incorporate Symantec security
research based on ISO 17799 and other industry standards and best practices. OS
policies can be used in place of the Symantec ESM Phase 1, 2, and 3 default
policies.
OS policies are configured by Symantec with values, name lists, templates, and
word files that apply to targeted platforms. They use Security Update modules
and templates to check OS patches, password settings, and other vulnerabilities
on the operating system. They may also introduce new templates and word lists
to examine conditions that are required by supported standards or regulations.
Maintenance-paying Symantec ESM customers can download OS Policies
without charge through LiveUpdate or at the Symantec Security Response Web
site: http://securityresponse.symantec.com.
Responding to incidents
Maintenance-paying Symantec ESM customers can download Response policies
for specific security incidents such as Code Red 2 and Nimda without charge at
the Symantec Security Response Web site: http://securityresponse.symantec.com.
Reviewing policies, modules, and messages
Reviewing policies
Creating and editing your own policies
Creating and editing Symantec ESM policies requires Create New Policies and
Modify Policy access rights. See “Assigning access rights to manager accounts” in
your Symantec Enterprise Security Manager User Manual.
You can create a new policy from scratch (add) or copy (duplicate) an existing
policy. After creating a policy, edit it to add or delete modules that the policy runs
when it executes.
Warning: The manager does not keep multiple copies of policies with the same
names. If users on different consoles add different policies with the same names,
the latest version of the new policy overwrites all prior versions.
To add a new policy
1
In the console tree, do one of the following:
■
Right-click a manager, then click New > Policy.
■
Right-click Policies, then click New Policy.
2
Type a new policy name of not more than 31 characters.
3
Press Enter.
To duplicate a policy
1
In the console tree, right-click a policy, then click Duplicate.
2
Type a new policy name of not more than 31 characters.
3
Press Enter.
To edit a policy
1
In the console tree, double-click the policy that you want to edit.
2
Edit the name lists:
3
■
In the Available Modules list, click the module that you want to add to
the policy, then click the left arrow.
■
In the Current Modules list, click the module that you want to remove
from the policy, then click the right arrow.
Click OK.
29
30 Reviewing policies, modules, and messages
Reviewing policies
To rename a policy
1
In the console tree, right-click a policy, then click Rename.
2
Type a new policy name of not more than 31 characters.
3
Press Enter or click OK.
To delete a policy
◆
In the console tree, right-click the policy, then click Delete.
The manager must have the Modify Policy access right.
You cannot delete a policy when more than one Symantec ESM Enterprise
Console is connected to the manager.
To delete report files that are associated with the policy, delete the
\reports\<policy> subdirectory in the manager’s ESM folder.
Sample policies
Seven sample policies are shipped with Symantec ESM. After installing Symantec
ESM, make copies of the sample policies, then rename and edit the copies to
implement your company’s security policy.
Phase policies
Five phase polices let you begin with the most basic security issues and resolve
any weaknesses before proceeding to the next level of complexity.
Phase policy modules are described in chapters 4–6. The policies are:
■
Phase 1 includes:
“File Access (Queries) module” on page 135
“File Find (Queries) module” on page 251.
“Login Parameters module” on page 64
“Password Strength module” on page 70.
“Startup Files module” on page 103.
“User Files (Queries) module” on page 86.
Reviewing policies, modules, and messages
Reviewing policies
■
Phase 2 includes all modules in Phase 1, with more security checks enabled,
plus:
“Account Integrity module” on page 56
“File Attributes module” on page 122.
“Network Integrity module” on page 90
“Object Integrity module” on page 92.
Phase 3 policies let you apply different standards to various networks or
computers, such as Relaxed for development or testing, Cautious for production,
and Strict for sensitive areas such as finance or strategic planning.
■
Phase 3:a Relaxed includes all modules in Phase 2, with more security checks
enabled.
■
Phase 3:b Cautious includes all modules in Phase 3:a, with more security
checks enabled.
■
Phase 3:c Strict includes all modules in Phase 3:b, with more security checks
enabled.
Queries policy
The Queries policy reports account information and file permissions. Two
modules—File Watch and User Files—are used in both Phase and Queries
policies. Queries policy modules are described in the following sections:
■
“Account Information (Queries) module” on page 52.
■
“Discovery (Queries) module” on page 128 [where?]
■
“File Access (Queries) module” on page 135
■
“File Find (Queries) module” on page 138
■
“File Information (Queries) module” on page 140
■
“User Files (Queries) module” on page 86
31
32 Reviewing policies, modules, and messages
Reviewing policies
Copying and moving policies
Copying policies ensures that policies are identical on multiple managers.
Moving policies removes a policy from one manager and adds it to another,
overwriting any policy-related information on the destination manager.
Copying and moving policies requires the Create New Policies access right. See
“Assigning access rights to manager accounts” in your Symantec Enterprise
Security Manager User Manual.
To copy a policy to another manager
◆
In the console tree, drag and drop a policy on a destination manager.
You can also right-click a policy, drag and drop it on a destination manager,
then click Copy.
To move a policy
1
In the console tree, drag the source manager policy and drop it on the
destination manager.
2
Click Move.
Running policies
To run a policy
◆
In the console tree, do one of the following:
■
Drag and drop your policy on the agent or domain.
■
Drag and drop your agent or domain on the policy.
Demonstrating security checks
Before you apply a new security check to your systems, create a demo policy and
add the check to it. Then verify the check on a representative computer. By using
a demo policy, you can obtain results without disturbing the settings of policies
that are created and named by the Symantec Security Response team.
Delete the demo policy after you complete your demonstrations.
Reviewing policies, modules, and messages
Reviewing modules
Reviewing modules
A module is a set of security checks and options that looks for security
vulnerabilities and reports messages in the console grid.
Enabling and disabling security checks
Only enabled checks provide information when you run a policy.
Note: Symantec best practice and response policies and modules cannot be
directly edited. First make a copy of the policy or module, then rename the copy.
You can then edit the renamed copy.
To enable and disable checks
1
Expand the Policies and module branches in the tree view:
2
Do one of the following:
3
■
Double-click the NetWare/NDS icon.
■
Right-click the NetWare/NDS icon, then click Properties.
Check or uncheck the appropriate check box.
33
34 Reviewing policies, modules, and messages
Reviewing modules
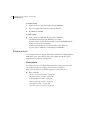
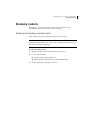
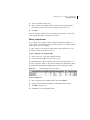
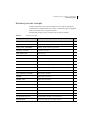
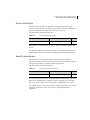
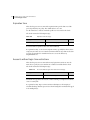
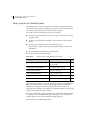
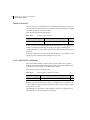
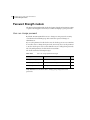
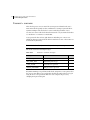
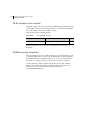
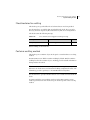
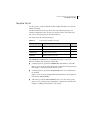
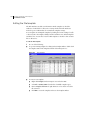
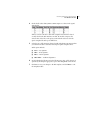
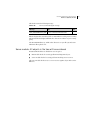
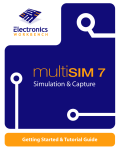
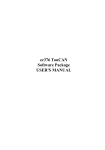
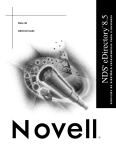
Specifying options
You control the behavior of security checks by specifying options. For example,
in the Password = wordlist word (cont’d) option of the Password Strength
module, you specify which users you want the checks to examine or skip in the
dictionary password check. This option is permanently enabled, as indicated by
the dot in the box.
Other options, such as Match abbreviated names in template, are selectable. You
select or uncheck these options to turn them on or off.
To display option items, click Password = wordlist word (cont’d) on the left side
of the window. In the name list panel, specify the users to include or exclude
when you run the module. When applicable, check one of the boxes to define
whether entries will be included or excluded.
Figure 3-1
NetWare/NDS Password Strength editing window
Name lists are the most common items that are available for editing in options.
Other items include check boxes to turn an option on or off, and text string
values, where you can specify parameters such as the minimum number of nonalphabetic characters that are required in a password.
A description of the option is displayed in the upper right area of the module
editing window.
Reviewing policies, modules, and messages
Reviewing modules
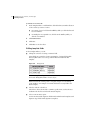
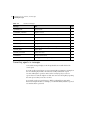
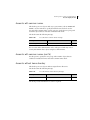
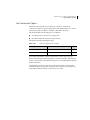
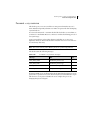
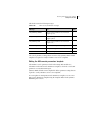
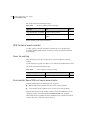
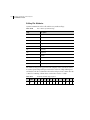
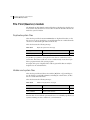
Editing name lists
Use the name lists in the module editing window to specify items that you want to
include or exclude when you run a module or security check.
Table 3-1
Name list types
Type
Contents
Users
User accounts, such as user1 and user2
Groups
User account groups such as system operators and
administrators
Files/directories
Files or directories such as c:\program
files\symantec\esm\bin
Enabled/disabled word files
Word files containing groups of words
Enabled/disabled templates
Template files
Key (words)
Sets of keys or keywords
Generic strings
Sets of generic character strings
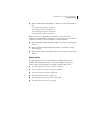
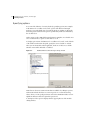
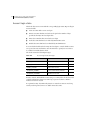
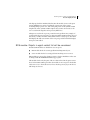
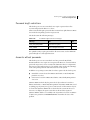
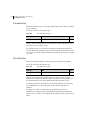
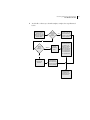
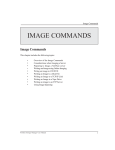
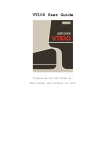
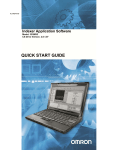
Most name list panes contain:
■
New, Delete, Move Up, and Move Down buttons
■
List area
■
Include and Exclude buttons
Figure 3-2
Name list pane
Move Down
Move Up
Delete
New
35
36 Reviewing policies, modules, and messages
Reviewing modules
Objects in name lists
A single name list can have a mix of users, groups, organizational roles, and
Containers. Always refer to objects by their fully distinguished names, such as
user1.department.region.company.
Object names must not have leading dots or type tags.
Note: You can use question marks (?) and asterisks (*) as wildcard characters in
the name lists.
You can specify a search level on a Container object, for example
department1.region.company+2. ESM uses this value to determine the search
level for the object.
Table 3-2
Object search depth values
Value
Result
blank
searches the object and all levels of children
+0
searches the object only, no children
+1
searches the object and one level of children
+n
searches the object and “n” levels of children
■
A leaf object can be a user or its equivalent.
■
A group object consists of the object and its members.
■
An organizational role includes the object and its occupants.
■
A Container consists of the Container and its subordinates.
To add an item to a name list
1
Click New.
2
Type the item name.
You can use the asterisk (*) character as a wildcard character to represent a
set of items in a name list. For example, \usr\myapp\* specifies all files in the
\usr\myapp directory.
To add another item, press Enter, then repeat steps 1–2.
3
Click Include or Exclude to indicate whether to examine or skip the listed
items.
4
Click OK.
Reviewing policies, modules, and messages
Reviewing modules
To remove an item from a name list
1
Click the item.
2
Click Delete.
3
Click OK.
To move an item up or down in a name list
1
Click the item.
2
Click Move Up or Move Down.
3
Click OK.
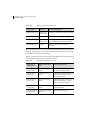
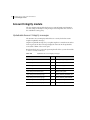
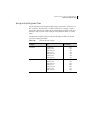
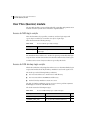
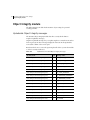
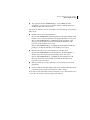
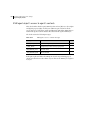
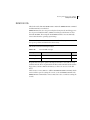
Users and Groups name list precedence
When a security check contains Users/Groups name lists, the check processes the
names in the Groups list first. Then, within each selected group, it processes the
names in the Users list. This table summarizes the results that you can expect
from name lists that include or exclude Users or Groups entries:
Table 3-3
Single Users and Groups list results
If the check
And the
users list
And the
groups list
Then the check reports
Includes a users or
groups name list
Contains
user entries
Is blank
Data for all reported users
Includes a users or
groups name list
Is blank
Contains
group
entries
Data for all reported groups and
users that are in them
Excludes a users or
groups name list
Contains
user entries
Is blank
Data for all groups and users
except the reported users
Excludes a users or
groups name list
Is blank
Contains
group
entries
Data for all groups except the
reported groups and users that are
in them
Includes or excludes
blank name lists
Is blank
Is blank
Data for all groups and users
37
38 Reviewing policies, modules, and messages
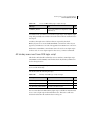
Reviewing modules
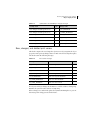
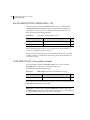
Table 3-4
If the check
Objects include and exclude lists
Object list
Then the check reports
Includes NDS objects Contains a list Data about each listed object and its equivalents
of NDS objects
Includes NDS objects Is blank
Data about any NDS object or its equivalents
Excludes NDS objects Contains a list Data about all objects and their equivalents,
of NDS objects except the listed objects and their equivalents
Excludes NDS objects Is blank
Data about all of the objects and their
equivalents
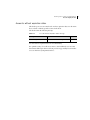
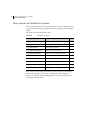
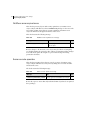
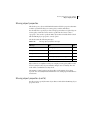
Some modules have Users to check options with name lists that are used by more
than one security check. Some of the security checks that use the Users to check
name lists also have their own name lists.
When a security check uses two Users and Groups name lists, the check processes
the combined contents of these name lists as follows:
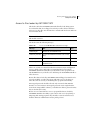
Table 3-5
Multiple Users/Groups list results
If the Users to
check option
And the check name
lists
Then the check reports
Includes user or
group entries
Include user or group
entries
Data about all groups and their users,
and all users, in both user lists
Includes user or
group entries
Exclude user or group
entries
Nothing about groups and users in the
check name lists (exclude entries
override include entries)
Excludes user or
group entries
Include user or group
entries
Nothing about groups and users in
Users to check name lists (exclude
entries override include entries).
Excludes user or
group entries
Exclude user or group
entries
Nothing about groups and users that
are in the name lists
Includes or excludes Include or exclude blank
blank name lists
name lists
Data for all groups and users
Reviewing policies, modules, and messages
Reviewing modules
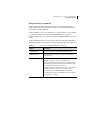
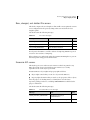
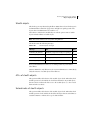
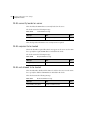
Using an alias in a name list
Symantec ESM uses aliases to make the contents of the name lists language
independent. An alias is equivalent to and can be used interchangeably with an
object name in another language.
Symantec ESM uses the %<account names>% format for aliases. As an example,
on a system running in French that has %PRIVILEGED% in a name list,
Symantec ESM can process the French equivalent of PRIVILEGED in the security
check.
Symantec ESM can only process these aliases. Use the actual fully distinguished
name of the NetWare Server object in the appropriate language for all other cases.
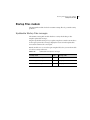
Table 3-6
Alias names for NetWare/NDS users and groups
Objects
Description
%DISABLED%
Any user object that is disabled by an Administrator
%PRIVILEGED%
Any object with super rights to the part of the tree that is
being checked
%TYPE:<NDS object>% Any NDS class in a name list that contains NDS objects. For
example, you can use %Type:users% for all users,
%Type:organizations% for all organizations, %Type:queues%
for all queues, %Type:directory maps% for all directory maps,
etc. In addition to NDS classes, you can use
%TYPE:Container% for all Container objects or %TYPE:leaf
for all non-Container objects. Case is not important;
%tYpe:GrouP% and %TYPE:GROUP% are equivalent.
Note that non-NDS objects such as files, keywords, templates,
or word files do not apply.
39
40 Reviewing policies, modules, and messages
Reviewing modules
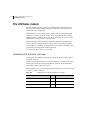
Creating and editing templates
A template is a file that contains module control directives and definitions of
objects with their expected states.
The following NetWare modules use templates:
■
Account Integrity
■
File Attributes
■
File Find (Queries)
■
File Watch
■
Network Integrity
■
OS Patches
■
Startup Files
■
System Auditing
Creating a template
To create a template
1
In the Symantec ESM console tree, right-click Templates, then click New.
Reviewing policies, modules, and messages
Reviewing modules
2
Select an available template type.
3
Type a name for the template without a file extension. Symantec ESM
provides the extension based on the template type that you select.
4
Click OK.
Your new template will be listed in the Templates branch of the console with
other template files that use the same file extension.
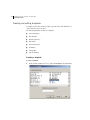
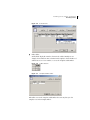
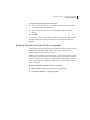
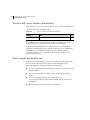
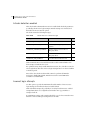
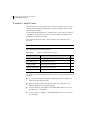
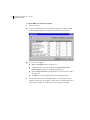
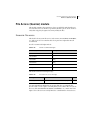
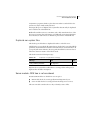
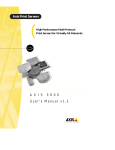
Editing template rows
If you edit any of the templates that are shipped with Symantec ESM, your
changes will be overwritten by the next Security Update. To avoid this problem,
create and edit your own templates.
To edit a template, open it in the Template Editor, add and delete rows, and
specify the contents of columns in each row.
To open a template in the Template Editor
1
In the console tree, expand the Templates branch.
2
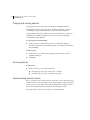
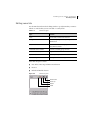
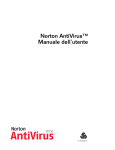
Double-click the template that you want to open.
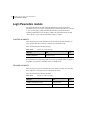
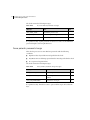
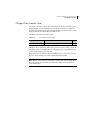
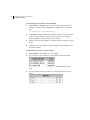
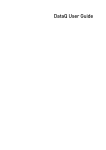
The Template Editor organizes templates into rows and columns. Each row
describes a single file, patch, or other item. Columns, also called fields, contain
the information that Symantec ESM attempts to match with agent settings.
Figure 3-3
Template Editor rows and columns
To add a template row
1
Open a template in the Template Editor, then click Add Row.
2
Specify row information, including any sublist information needed.
3
Click OK to save the row.
4
Click Close to exit the Template Editor.
41
42 Reviewing policies, modules, and messages
Reviewing modules
To remove one or more rows
1
In the Template Editor or Sublist Editor, click the leftmost, numbered button
of the row that you want to remove.
■
For a range of rows, hold down the Shift key while you click the first and
last row numbers.
■
For multiple non-sequential rows, hold down the Ctrl key while you
click the row numbers.
2
Click Remove Rows.
3
Click Save.
4
Click Close to exit the editor.
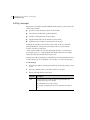
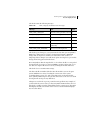
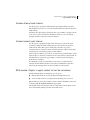
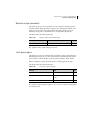
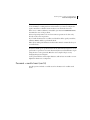
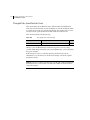
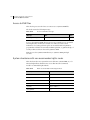
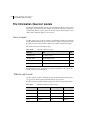
Editing template fields
In the Template Editor, you can:
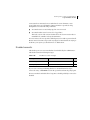
■
Change the contents of a string or numeric field.
String fields can contain free-form text. Examples of string fields include
Directory/File Name, User, Group, and Permissions fields in the File
template.
Figure 3-4
String fields
Note: For templates only, you can enter %SERVER%, %PRIVILEGED%, or
the actual, distinguished name of a user object.
Numeric fields can contain positive or negative integers or real (floating
point) numbers. An example of a numeric field is the Severity field in the
Patch template.
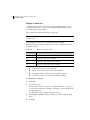
■
Check or uncheck a check box.
Check boxes direct the module to examine specific items, such as the New
and Removed check boxes in the File Watch template.
■
Select a context menu option.
Context menus include Signature fields in File and File Watch templates and
Signature Type fields in File Signatures templates.
Reviewing policies, modules, and messages
Reviewing modules
Figure 3-5
■
Context menu
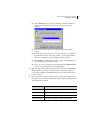
Edit a sublist.
Sublist fields display the number of items in the sublist (initially, 0). For
example, the Permissions ACL columns in File templates. Click a numbered
sublist button (not a row number) to access the Template Sublist Editor.
Figure 3-6
Sublist buttons
Figure 3-7
Template Sublist Editor
Edit sublist rows in the Template Sublist Editor the same way that you edit
template rows in the Template Editor.
43
44 Reviewing policies, modules, and messages
Reviewing messages
Reviewing messages
Messages consist of:
■
A message name, in all caps. Message names link Symantec ESM code to the
text of the message title and must not be changed. Message names appear
only in .m files.
■
A message title, in upper and lower case, that is displayed in the console grid.
You can edit message titles in .m files. See “Editing messages” on page 48.
■
Message text, in upper and lower case text, that is displayed in a separate
window of the summary report when you move the mouse over the Message
field in the console grid. You can edit message text in .m files. See “Editing
messages” on page 48.
■
Class (0–4). Class 0 displays a green message (no action needed), classes 1–3
display yellow messages (need attention), and class 4 displays a red message
(needs immediate attention).
■
Some messages display a code in the Updateable/Correctable field of the
console grid that identifies the message as template-updateable (TU) or
snapshot-updateable (SU). You can click the code to update the template or
snapshot file to match the current agent settings. See “Updating template
and snapshot files in messages” on page 47.
■
Some messages also display a code in the Updateable/Correctable field that
identifies the message as correctable (C). You can click the code to reverse
agent settings or disable a vulnerable account. See “Correcting agents in
messages” on page 46.
Most messages are reported in the console grid, though some common messages
are reported in a separate window.
Reviewing message types
Symantec ESM reports four types of messages:
■
Common messages, available to all modules, report Symantec ESM
operational information such as Correction succeeded, Disk write error, etc.
■
Correctable messages can be used to reverse current agent settings.
■
Updateable messages can be used to change template or snapshot settings to
the current agent settings.
■
Informative messages report administrative information such as lists of user
accounts, or security vulnerabilities that require manual adjustments.
Reviewing policies, modules, and messages
Reviewing messages
Reviewing common messages
Several messages that report system conditions are stored in the esm\register
\<architecture>\common.m file. Some of these common messages are displayed
in the console grid, others in separate windows.
The following messages can be generated by more than one module.
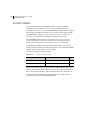
Table 3-7
Common messages
Message
Title
Class
CANCELED
Module execution canceled by user
4
CORRECT_FAIL
Correction failed
0
CHECK_NOT_ PERFORMED
Warning - check could not be performed
1
CORRECT_SUCCEED
Correction succeeded
0
DISK_WRITE_FAIL
Disk write error
0
EOF
End of file
0
FEATURE_NOTSUP
Module feature not supported
0
HEADER
No problems found
0
INTERNAL
ESM internal error, please report to Symantec technical support
4
LOCUNKNOWN
Location of user’s home directory is unknown
0
NDS_CONTEXTS_CONSIDERED
NDS context(s) considered against server resources
0
NDS_CONTEXTS_CHECKED
NDS context(s) checked
0
NOMEM
Failed to allocate memory
4
NOMEM_NLM
Failed to allocate memory
4
NO_NDS_CONTEXTS_CHECKED
No NDS context checked
0
NOTE
Please note the following
0
NOUSER
No such user on system
0
NOWORDS
No word files specified
4
NOCHKUSER
User not checked
0
NW_BINDERY_ON_NDS
Running ESM for NetWare 3.x on NetWare 4.x
1
REMOTEHOME
User’s home directory is on a remote mount
0
45
46 Reviewing policies, modules, and messages
Reviewing messages
Table 3-7
Common messages
Message
Title
Class
QUERYRESULT
Query Results
0
SNAPSHOT_CREATED
Snapshot created
4
SU_FAILED
Substitute User function failed (UNIX only)
0
SYSERR
Unexpected system error
4
TEMPLATE_ITEM
Template item
0
TEMPLATE_SUBLIST
Template sublist item
0
TOOMANYERR
Too many report records, please correct problems and rerun
4
UPDATE_FAIL
Update failed
0
UPDATE_SUCCEED
Update succeeded
0
UNEXPFMT
Unexpected file format
1
UNSUPPORTED
Not supported on this operating system
0
Correcting agents in messages
Correctable messages display a C in the Updateable/Correctable field of the
console grid.
You can use the Correct feature to correct agent rights or settings. For example, in
the Account Integrity module, the Generate security audits check reports
accounts with rights to generate entries in the security log. If you correct a
reported user account, the right is revoked. You can restore the right by repeating
the same process that you used to revoke it.
You can also use the Correct feature to disable a vulnerable account. In the
Password Strength module, for example, you can immediately disable a reported
account that has no password.
Reviewing policies, modules, and messages
Reviewing messages
To correct the agent reported in the console grid
1
In the console grid, right-click an item that contains C in the Updateable/
Correctable field, then click Correct.
2
Type the name and password of a user that has the right to change the
setting.
3
Click OK.
To reverse a correction, use the same procedure. Except in step 1, right-click an
item that contains Corrected in the Updateable/Correctable field, then click
Correct.
Updating template and snapshot files in messages
Some modules use template files that specify authorized settings. When you run a
module with enabled checks that examine these settings, discrepancies are
reported with a TU code in the console grid.
Similarly, some modules use snapshot files that contain settings that were found
the last time the module was run. (The snapshot file is created when you run the
module for the first time. Changes are detected in subsequent policy or module
runs.) Settings that do not match the snapshot file are reported with an SU code
in the console grid.
To update a template or snapshot file in the console grid
1
Right-click TU (or SU) in the Updateable/Correctable field.
2
Click Update Template (or Update Snapshot).
47
48 Reviewing policies, modules, and messages
Reviewing messages
Editing messages
Messages are contained in module initialization files, called .m (dot-m) files. The
.m file of each module:
■
Specifies security checks and options for the module.
■
Associates the module with specified name lists.
■
Contains a descriptive name for the module.
■
Supplies default values for the module’s security checks.
■
Supplies message text that is reported in the console grid.
During agent registration, the current version of each .m file is stored in the
manager database at esm\system\<system name>\db. You can specify the
location of .m files on each agent.
.m files contain ASCII text. Some lines begin with directives—words that are
preceded by a period (.)—that classify file information. Directives are usually
followed by data and sometimes by descriptive text.
Messages start with .begin directives, which always occur after information about
security checks, options, and templates. Do not delete or reorder any messages.
To edit messages
1
Select an agent with an operating system that reports messages that you want
to edit.
2
Open the common.m file or <module>.m file in a text editor.
3
Edit the following directives as needed:
Directive
Description
.title
Brief description of a security problem, in quotation marks, not
exceeding 79 characters. For example:
.title “Maximum password age too high”
The description is displayed in the console grid when the module is
run.
Reviewing policies, modules, and messages
Reviewing messages
Directive
Description
.class
Severity of the problem, 0–4. For example:
.class 2
0 = Green message (no action required)
1 = Yellow message (deserves attention)
2 = Yellow message (deserves attention)
3 = Yellow message (deserves attention)
4 = Red message (deserves immediate attention)
.text
Explanation of the problem. Lines of text cannot exceed 128 characters,
and the total explanation cannot exceed 1023 characters. Begin text on
the line after the .text directive.
Include:
■
■
■
Nature of the problem.
Why it is a security risk.
How to remedy the problem.
The .endtext directive should occur on a line by itself after the text
(required even if you omit an explanation). For example:
.text
The maximum password age is set too high. Infrequent password
changes allow anyone with a stolen password long term access to your
system. Set the maximum password age to 60 days.
.endtext
Note: Do not begin a line of text with a period. This character is used
as a control delimiter and improper usage causes the module to fail.
4
Change the .customized directive value of each modified message to 1.
This prevents the edited message from being overwritten when the module is
updated to a later version.
5
Increment the module version number in the .module directive by 1. In the
following example, 1700 was the last version number:
.module “Account Information” accountinfo 1701 NetWare/NDS
6
Save the edited .m file.
7
Reregister the module with appropriate managers.
49
50 Reviewing policies, modules, and messages
Reviewing messages
8
Verify that the modified messages appear in the message.dat file in the default
location on the manager computers.
System
Directory
NetWare
Symantec ESM creates a symbolic link:
\esm\system\<system name>\db\message.dat [VERIFY!!]
Chapter
4
Checking user accounts
and authorizations
This chapter includes the following topics:
■
Account Information (Queries) module
■
Account Integrity module
■
Login Parameters module
■
Password Strength module
■
User Files (Queries) module
These modules check user accounts and authorizations for unauthorized access,
modification, and tampering. They also retrieve information about the accounts
on a system.
This chapter also lists the messages that are returned by individual security
checks. For common messages that are returned by multiple security checks, see
“Reviewing common messages” on page 45.
To learn how to use name lists, see “Editing name lists” on page 35.
52 Checking user accounts and authorizations
Account Information (Queries) module
Account Information (Queries) module
The Account Information module reports information about user and group
accounts on the system. User information includes group memberships, security
equivalents, trustee assignments, and effective rights. Group information
includes members.
User information
This check reports information such as Full Name, Security Equals, Group
Memberships, E-mail Address, Last Login Time, and Organizational Unit for
users in the agent context list. Reported Group names are Distinguished Names.
You can use the check’s name list to exclude or include specific users for the
check. You can also select the attributes that are reported for each user from
keyword lists in the User information (cont’d) option.
The check returns the following messages:
Table 4-1
User information messages
Message
Title
Class
USER_INFORMATION
User information
0
NO_SEL_ATTRS
No attributes selected for User information 4
This check provides information and does not require any security action. If the
check returns the No attributes selected message, select at least one attribute
using the User information (cont’d) option, and rerun the policy.
User information (cont’d)
This option lets you enable or disable the keywords for user attributes that are
reported by the User information check. View the keywords by selecting this
option in the Symantec ESM console.
Checking user accounts and authorizations
Account Information (Queries) module
Group membership
This check lists all users that are members of specified groups in the agent’s
context. Use the name list to specify the groups that are excluded or included in
the check. Individual user names in the name list are ignored.
The check returns the following message.
Table 4-2
Group membership message
Message
Title
Class
GROUP_MEMB
Group membership
0
Each member of a group inherits the group’s rights to the file system and NDS
objects.
For optimal security, review each group member to determine whether the user
actually requires all of the access that is provided by membership in the group.
Security equivalences
This check reports user accounts with security equivalences and lists the
equivalent accounts for each account that is reported. Use the name list to specify
the user accounts that are excluded or included in the check.
The check returns the following message:
Table 4-3
Security equivalences message
Message
Title
Class
SECURITY_EQU
User security equivalence
0
A security equivalent may access and modify all files, including login scripts and
NDS objects. If Administrator equivalence has been granted, the account will
have access to all system resources and be able to modify all files in a context.
For optimal security, review each account to verify that it should be the security
equivalent of the listed account. Use caution in granting Administrator
equivalence.
53
54 Checking user accounts and authorizations
Account Information (Queries) module
Account login status
This check lists user accounts with the corresponding login status. Reported login
statuses include:
■
Active accounts with a recent user login
■
Inactive accounts that have not had a user login for the number of days
specified as the Days since last login value
■
Unused accounts that have never had a user login
■
Locked accounts that have been locked by Intruder Detection
■
Disabled accounts that have been disabled by an administrator
You can edit the default value for Days since last login to control which accounts
are reported as active and inactive. Use the name list to specify user accounts to
be excluded or included in the check.
The check returns the following messages:
Table 4-4
Account login status messages
Message
Title
Class
LOGIN_ACTIVE
Active user account
0
LOGIN_INACTIVE
Inactive user account
0
LOGIN_UNUSED
Unused user account
0
ACCOUNT_LOCKED
User account locked by intruder
0
ACCOUNT_DISABLED
Disabled user account
0
Inactive, unused, and disabled accounts can pose security risks. A locked account
could be nothing more than a user who forgot a password, but it could also
indicate a brute force attack.
For optimal security, determine why inactive or unused accounts are not being
actively used. In general, remove or disable unused accounts.
Checking user accounts and authorizations
Account Information (Queries) module
Directory trustees
This check lists trustee assignments for directories. Use the name list to specify
the users and user groups to be excluded or included in the check.
You can also use the Directory trustees (cont’d) option to specify the volumes
that the check examines. The report length varies according to the number of
volume names that are examined by the check.
The check returns the following messages:
Table 4-5
Directory trustees messages
Message
Title
Class
VOL_NOT_AVAIL
Volume not available
4
DIR_TRUSTEES
Trustee assignments
0
A volume that has been dismounted for repairs, or one that is removable such as
a CD-ROM, will not be available for Symantec ESM checks.
In general, this check provides information and does not require any security
action on your part. However, for optimal security, review each account to verify
that the directory trustee access is correct.
Directory trustees (cont’d)
Use this option to specify the distinguished names for volumes that you want the
Directory trustees check to examine.
NDS module: Objects in agent context list will be considered
NetWare/NDS modules are divided into two categories:
■
NDS module checks for security problems involving NDS object
■
Server module checks for security problems involving server resources
NDS modules are given a list of NDS contexts to check at installation. These can
be changed with the ESMSETUP.NLM setup program.
This module checks only the parts of the tree that are listed in the agent context
list of each NetWare/NDS agent where the module is run.
55
56 Checking user accounts and authorizations
Account Integrity module
Account Integrity module
The Account Integrity module checks user account information and NetWare
account settings to identify account privileges and settings that exist outside of
the established security policy.
Updateable Account Integrity messages
The NetWare Account Integrity module has two security checks that return
snapshot-updateable messages.
Snapshot-updateable messages let you update snapshots to match current values
for the agent system. These messages display the letters SU in the Updateable/
Correctable column of the console grid.
Run the module once to create the agent snapshot file before you run the module
to look for security weaknesses.
Table 4-6
Updateable Account Integrity messages
Security check
Code
Message name
New, changed and deleted users
SU
SNAP_USER_SECEQUAL
New, changed and deleted users
SU
SNAP_USER_GROUP
New, changed and deleted users
SU
SNAP_USER_EQUIVALENCE
New, changed and deleted users
SU
SNAP_USER_GONE
New, changed and deleted users
SU
SNAP_USER_NEW
New, changed and deleted groups
SU
SNAP_GROUP_MEMBER_NF
New, changed and deleted groups
SU
SNAP_GROUP_GROUPMEM
New, changed and deleted groups
SU
SNAP_GROUP_MISSING
New, changed and deleted groups
SU
SNAP_GROUP_ADDED
Checking user accounts and authorizations
Account Integrity module
Accounts without expiration dates
This check reports user accounts that do not have expiration dates. Use the name
list to exclude or include specific accounts in the check.
The check returns the following message:
Table 4-7
Accounts without expiration dates message
Message
Title
Class
ACCOUNT_EXPIRES
User account without an expiration date
2
Accounts without expiration dates can exist indefinitely.
For optimal security, do not allow accounts to exist indefinitely. User accounts
that remain valid longer than needed can provide an opportunity for an intruder
to access the Directory/Organizational tree.
57
58 Checking user accounts and authorizations
Account Integrity module
Expiration time
This check reports user accounts with expiration time periods that exceed the
period specified in your policy. The default value is set to 30.
Use the name list to exclude or include specific user accounts for the check.
The check returns the following message:
Table 4-8
Expiration time message
Message
Title
Class
ACCOUNT_LONG_LIVED
User account with long expiration time
1
Accounts without expiration dates can exist indefinitely.
For optimal security, set an account expiration time, especially for short term or
temporary accounts. User accounts that remain valid for longer than needed can
provide opportunities for unauthorized users to access the Directory/
Organizational tree.
Accounts without login time restrictions
This check reports user accounts without any login time restrictions. Use the
name list to specify user accounts that are excluded or included in the check.
The check returns the following message:
Table 4-9
Accounts without login time restrictions message
Message
Title
Class
NOTIMERESTRICT
User account without login time restrictions
1
Workstations logged into the network, and left running overnight and weekends,
create a security risk.
For optimal security, impose time restrictions that improve the integrity of
scheduled backups and that prevent users from leaving their workstations logged
in for multiple days.
Checking user accounts and authorizations
Account Integrity module
Accounts with common names
This check reports user objects with easy to guess names (such as ADMIN and
GUEST). Use the name list to specify the names that are checked. Use the
Accounts with common names (cont’d) option to specify the user, group, and
Container objects that are excluded or included in the check.
The check returns the following message:
Table 4-10
Accounts with common names message
Message
Title
Class
COMMON_NAME
User account has a common name
1
User accounts with common names can be easily guessed and may create a
security risk. Rename these objects using less common names.
Accounts with common names (cont’d)
Use this option to specify the user, group, and Container objects that are
excluded or included from Accounts with common names check.
Accounts without home directory
This check reports user objects without assigned home directories.
The check returns the following message:
Table 4-11
Accounts without home directory message
Message
Title
Class
NO_HOMEDIR
User account has no home directory
0
The check provides information. No action is required.
59
60 Checking user accounts and authorizations
Account Integrity module
Accounts with access to other home directory
This check reports user objects with unexpected access to other home directories.
The check returns the following message:
Figure 4-1
Access to other home directory message
Message
Title
Class
HOMEDIR_ACCESS
User account has access to another user’s home directory 1
For optimal security, review the information that is provided by this check to
verify that all access to other users’ home directories is authorized.
Other than Symantec ESM, there is no efficient way for you to immediately
identify accounts that have access to other home directories. You could launch
NWAdmin or ConsoleOne and manually review the effective rights for a
directory or volume, or you could simply search through each directory to
identify effective trustees.
New, changed, and deleted users
This check reports any changes to user accounts and security equivalences that
have occurred on the network since the last recorded snapshot update.
The check identifies the following conditions on the network:
■
Account security equivalences that have been added or removed since the last
snapshot update
■
User accounts that have been added or removed since the last snapshot
update
■
User account snapshots that are not found by the agent
A new snapshot will be created by Symantec ESM using the current server
information
■
Errors reading from the user snapshot file (sifuser.dat)
Checking user accounts and authorizations
Account Integrity module
The check returns the following messages:
Table 4-12
New, changed, and deleted users messages
Message
Title
SNAP_USER_ SECEQUAL
Account security equivalence removed 0
SNAP_USER_ EQUIVALENCE
Account security equivalence added
1
SNAP_USER_GONE
User account removed
0
SNAP_USER_NEW
User account added
1
USER_READING_DATABASE_SSTS
Error reading records from database
[sifuser.dat]
4
SNAP_NEW_USER_SNAPSHOT
New user account snapshot file
0
Class
This check reports changes to your system since the last time you ran Symantec
ESM. These changes may be evidence of tampering. If Symantec ESM finds
changes that are suspicious, examine your network for other evidence of
tampering. If these changes were authorized, update the snapshot to prevent this
message from being generated in the future.
Errors may indicate that the snapshot file (i.e., the sifuser.dat file) is corrupted. If
the snapshot file is corrupt, you can run CIFFIX to attempt a data repair or you
can delete the snapshot file and recreate it by running the module without it.
This check does not examine NDS settings.
The sifuser.dat file is initialized the first time this module is run on the agent
system. Initialization consists of reading the current state of the system,
essentially taking a picture of it, and storing that picture in the snapshot file.
Later, Symantec ESM compares the system’s current state to the one recorded in
the snapshot file and reports any differences.
Changes are noted in the report as potential security problems. For example, if
you have added a new user since you last ran Symantec ESM, and have selected
this check, you will be notified of that addition in the security report. The Name
field displays the full context name of the new user, and the Title field displays
User Account Added.
61
62 Checking user accounts and authorizations
Account Integrity module
New, changed, and deleted groups
This check compares current group parameters with group parameters that are
stored in the group snapshot file (sifgroup.dat) for the agent system and reports
any changes to group accounts since the last snapshot update.
The check reports the following group account conditions:
■
Group accounts with added or removed user objects since the last recorded
snapshot update
■
Group accounts that have been added or removed since the last snapshot
update
■
Group account snapshots that are not found by the agent
A new snapshot will be created by Symantec ESM using the current server
information.
■
Errors reading from the sifgroup.dat snapshot file
The check returns the following messages:
Table 4-13
New, changed, and deleted groups messages
Message
Title
Class
GROUP_READING_DATABASE_SSTS
Error reading records from
sifgroup.dat file
4
SNAP_GROUP_ GROUPMEM
User accounts added to group
1
SNAP_GROUP_ADDED
Group account added
1
SNAP_GROUP_MISSING
Group account removed
0
SNAP_NEW_GROUP_SNAPSHOT
New group account snapshot file
0
SNAP_GROUP_MEMBER_NF
User account removed from group
0
This check reports changes to your system since the last time you ran Symantec
ESM. These changes may be evidence of tampering. If Symantec ESM finds
changes that are suspicious, examine your network for other evidence of
tampering. If these changes were authorized, update the snapshot to prevent this
message from being generated in the future.
Errors may indicate that the sifgroup.dat file is corrupted. If the sifgroup.dat file
is corrupt, you can run CIFFIX to attempt a data repair or you can delete the
snapshot file and recreate it by running the module without it.
This check does not examine NDS settings.
Checking user accounts and authorizations
Account Integrity module
The sifgroup.dat file is initialized the first time this module is run on the agent
system. Initialization consists of reading the current state of the system,
essentially taking a picture of it, and storing that picture in the Symantec ESM
snapshot file. Later, Symantec ESM compares the system’s current state to the
one recorded in the snapshot and reports any differences.
Changes are noted in the report as potential security problems. For example, if
you have added a new group since you last ran Symantec ESM, and have selected
this check, you will be notified of that addition in the security report. The Name
field displays the full context name of the new group, and the Title field displays
Group Account Added.
NDS module: Objects in agent context list will be considered
NetWare/NDS modules are divided into two categories:
■
NDS module checks for security problems involving NDS objects.
■
Server module checks for security problems involving server resources.
NDS modules are given a list of NDS contexts to check at installation. These can
be changed with the ESMSETUP.NLM setup program.
This module checks only the parts of the tree that are listed in the agent context
list of each NetWare/NDS agent where the module is run, except for checks that
verify user access to home directories. Those checks report any object in the tree
with unexpected access.
63
64 Checking user accounts and authorizations
Login Parameters module
Login Parameters module
The Login Parameters module checks the Intruder Detection and Lockout
parameters for user accounts to verify that these settings and parameters conform
to your security policy. Only enabled module checks provide information.
Symantec ESM enables some checks by default. The Login Parameters module
can be edited to report only the information that you require.
Inactive accounts
This check reports accounts that have not been used for a specified number of
days. Use the name list to include or exclude users from this check.
This check returns the following message:
Table 4-14
Inactive accounts message
Message
Title
Class
LOGIN_INACTIVE
Inactive account
1
Because inactive accounts can provide easy targets for intruders that are trying to
break into your system, you should remove or disable them.
Unused accounts
This check reports new accounts that have never had a user login. Use the name
list to include or exclude specific accounts from the check.
This check returns the following messages:
Table 4-15
Unused accounts messages
Message
Title
Class
LOGIN_UNUSED_BY_DAYS
Unused account
1
LOGIN_UNUSED
Unused account
1
Checking user accounts and authorizations
Login Parameters module
Some unused accounts may be new. Others have become dormant or were
created, then never used. A Number of Days parameter is provided to help
distinguish between the following conditions:
■
Accounts that were created X days ago but were never used
■
Accounts that have never been used (i.e. logged into)
This is the case in older versions of NDS where the account creation date is
unavailable for a Number of Days determination.
New accounts are often set up with a default password or with no password at all.
Because unused accounts can provide easy targets for intruders that are trying to
break into your system, you should remove or disable them.
Disabled accounts
This check reports user accounts that have been disabled by the Administrator.
This check returns the following messages:
Table 4-16
Disabled accounts messages
Message
Title
Class
ACCOUNT_DISABLED
Disabled user account
0
DONT_USE_DISABLED
Invalid Name List Object: %DISABLED%
4
If you receive a message indicating that there is an invalid name list object,
remove the entry, %DISABLED%, from the option list and run the policy again.
If an account has been disabled for a long time, it should probably be removed or
disabled.
65
66 Checking user accounts and authorizations
Login Parameters module
Locked accounts
This check reports accounts that have been locked by Intruder Detection due to
excessive login attempts with an incorrect password. Use the name list to include
or exclude specific accounts for the check.
This check returns the following message:
Table 4-17
Locked accounts message
Message
Title
Class
ACCOUNT_LOCKED
User account locked by intruder
4
A user account becomes locked by Intruder Detection if a user exceeds the login
attempt count using an invalid password. These attempts could indicate an
attempted break-in, or they could be the result of a valid user who has forgotten a
password.
Determine whether the account was locked by an intruder or by a valid user, and
take appropriate action if break-in attempts are suspected.
Limit workstation addresses
This check verifies that all accounts in the user list are restricted to logging in
from listed workstation addresses. By default, privileged accounts (meaning those
with Supervisor access rights) are included in the user list.
This check returns the following message:
Table 4-18
Message
Limit workstation addresses messages
Title
NO_ADDR_RESTRICT Privileged account with no station restrictions
Class
3
Privileged accounts with unrestricted access to workstations on a Container can
create a window of opportunity through which computer viruses may propagate
and spread to the server.
All Administrator equivalent accounts should be restricted to logging in from a
limited number of closely supervised workstations.
Checking user accounts and authorizations
Login Parameters module
Limit concurrent logins
This check verifies that all users are limited to a number of concurrent
connections less than or equal to that specified. The default value is two. Use the
name list to specify users that are excluded or included in the check.
The check identifies the following types of conditions:
■
Accounts that are in violation of security policy
■
Accounts that have been granted exception status
This check returns the following messages:
Table 4-19
Message
Limit concurrent logins messages
Title
Class
TOO_MANY_CONNECTIONS User’s number of connections over limit
2
UNLIMITED_CONNECTIONS User’s number of connections not limited
2
Users with a high number of allowed connections are more apt to leave an
unattended workstation that is logged into a corporate Container. This situation
creates a security risk because intruders may access secured information through
an idle workstation.
A small number of allowed connections reduces the incidence of unattended
workstations that are logged into a Container. Review the account exceptions to
verify that the number of allowed connections are needed.
67
68 Checking user accounts and authorizations
Login Parameters module
Intruder detection enabled
This check verifies that Intruder Detection is enabled and checks the parameters
specified by the Incorrect login attempts, Intruder attempt reset interval, and
Intruder lockout reset interval options.
The check returns the following messages:
Table 4-20
Intruder detection enabled messages
Message
Title
Class
INTRUDER_DETECT_OFF
Intruder detection disabled
4
INTRUDER_ATTEMPT_NUM
Incorrect login attempts is greater than
specified
3
INTRUDER_ATTEMPT_INTERVAL
Intruder attempt reset interval lower
than policy allows
2
INTRUDER_LOCKOUT_INTERVAL
Intruder lockout reset interval lower
than policy allows
2
INTRUDER_NO_LOCKOUT
No lockout after intruder detection
3
Without Intruder Detection enabled, intruders would remain unhindered in
their attempts to hack into the server.
For optimal security, always enable Intruder Detection. Also, lock all accounts for
at least eight hours after three incorrect login attempts have been detected within
a 120-hour period.
Most of the other checks in this module cannot be performed if Intruder
Detection is disabled. By default, Intruder Detection is turned OFF at the
Container level within NDS.
Incorrect login attempts
Use this option to specify the maximum, allowable number of incorrect user
login attempts for the Intruder detection enabled check.
With each failed attempt, the possibility of a security breach increases. A failed
attempt limit that is set too high allows an intruder more opportunities to
attempt a break in.
For maximum security, each Container should be set to lock accounts after more
than three unsuccessful login attempts have been made.
Checking user accounts and authorizations
Login Parameters module
Intruder attempt reset interval
Use this option to specify the minimum time span during which consecutive
failed logins must occur to be counted toward the limit for the Intruder detection
enabled check.
Allowing a short interval gives an intruder more opportunities to attempt a break
in. Do not use a short interval. For maximum security, a count of bad login
attempts should be retained for at least 45 minutes.
Intruder lockout reset interval
Use this option to specify the length of time that user accounts in the agent
Container remain locked after intruder detection for the Intruder detection
enabled check. When this option is enabled, the check also reports any
Containers that do not have Lock Account After Detection enabled or that have
settings that are lower than the policy recommendation.
When an agent Container does not lock accounts after a specified number of bad
login attempts, or when the Container locks accounts only for a short interval, an
unauthorized user is given the opportunity to continue repeated attempts to
break into the Container.
For maximum security, accounts that are locked due to possible intrusion
attempts should remain locked for at least 4 hours (240 minutes) after three
incorrect login attempts have been detected within a 12-hour period.
NDS module: Objects in agent context list will be considered
NetWare/NDS modules are divided into two categories:
■
NDS module checks for security problems involving NDS objects.
■
Server module checks for security problems involving server resources.
NDS modules are given a list of NDS contexts to check at installation. These can
be changed with the ESMSETUP.NLM setup program.
This module checks only the parts of the tree that are listed in the agent context
list of each NetWare/NDS agent where the module is run.
69
70 Checking user accounts and authorizations
Password Strength module
Password Strength module
The Password Strength module checks the format, length, and expiration settings
of passwords and applies a dictionary test while attempting to guess passwords.
User can change password
By default, NetWare/NDS allows users to change account passwords. Security
considerations should limit group and certain other password changes to
administrators.
If you set the parameter for this check to Yes, the check reports user accounts that
do not allow users to change their passwords. Conversely, if you set the parameter
to No, the check reports user accounts that allow users to change their passwords.
The only valid parameters for this check are Yes and No.
The check returns the following messages:
Table 4-21
User can change password messages
Message
Title
Class
CAN_CHANGE_PASS
Password can be changed
1
CANNOT_CHANGE_PASS
Password cannot be changed
1
NOT_YES_NO
Invalid parameter for User Can Change Password 4
Only administrators should be able to change group and guest account
passwords.
Checking user accounts and authorizations
Password Strength module
Password length restrictions
This check reports user accounts that do not require a password as well as
accounts with passwords that are too short.
All accounts should require passwords that contain at least eight characters. Brute
force methods can quickly guess shorter passwords.
The check returns the following messages:
Table 4-22
Password length restrictions messages
Message
Title
Class
PASS_NOT_REQUIRED
Password not required
3
PASS_SHORT
Password length enforcement
2
For optimal security, require passwords for all user accounts. Set the minimum
password length to at least eight characters.
Accounts without passwords
This check reports user accounts that do not have passwords. By default,
NetWare/NDS does not require account passwords. However, accounts without
passwords can present a serious security risk. If intruders discover a login name,
they can access the authorized user’s personal files. They can also take advantage
of the other privileges that the authorized user has on the system.
In addition to reporting accounts that do not have passwords, the check reports:
■
Unreadable contexts located in a Master, Read-Write, or Read-Only NDS
partition on a server
■
Contexts not located in a Master, Read-Write, or Read-Only NDS partition
on a server
Symantec ESM can check only the passwords of objects that are located in a
Master, Read-Write, or Read-Only NDS partition. If Symantec ESM cannot read
everything properly, it may not report accounts in some of the Container objects.
To ensure that Symantec ESM is able to check all of the contexts in the tree at
least once, reconfigure the agent context lists on this and other agents. If
Symantec ESM is unable to successfully scan objects that are located on a Master
or NDS server partition, run DSREPAIR.NLM to determine the cause of the
problem.
71
72 Checking user accounts and authorizations
Password Strength module
The check returns the following messages:
Table 4-23
Accounts without passwords messages
Message
Title
Class
BAD_PART_STATE
Invalid NDS partition state
3
BAD_PART_TYPE
Invalid NDS partition type
4
NO_PASS
Password does not exist
4
For optimal security, require passwords for all user accounts. Set the minimum
password length to at least eight characters.
Force periodic password change
This check reports user accounts that have passwords with the following
conditions:
■
Expiration dates beyond the interval specified in the check
■
Days Between Forced Changes greater than the interval specified in the check
■
No set password expiration date
The check returns the following messages:
Table 4-24
Force periodic password change messages
Message
Title
Class
PASS_DISTANT_ EXPIRATION
Password expiration date exceeds standard
2
PASS_EXPIRATION_INTERVAL
Password expiration interval exceeds
standard
2
PASS_NO_EXPIRATION
Password does not expire
3
For optimal security, limit all accounts to passwords that expire in less than 90
days.
Checking user accounts and authorizations
Password Strength module
Require unique passwords
This check reports user accounts that do not have NetWare’s unique password
checking enabled. When NetWare’s unique password checking is enabled, users
cannot reuse any of their last eight passwords. Requiring unique passwords
minimizes the exposure to unauthorized use of compromised passwords.
The check returns the following message:
Table 4-25
Require unique passwords message
Message
Title
Class
NON_UNIQUE_PASS
Unique password not required
2
For optimal security, require unique passwords.
Limit grace logins
This check reports user accounts that have the number of Grace logins allowed or
Remaining grace logins set to a value greater than the maximum specified in the
policy, if the account has the Force periodic password changes check enabled.
Failure to limit grace logins defeats the purpose of having passwords expire.
The check returns the following messages:
Table 4-26
Limit grace logins messages
Message
Title
Class
PASS_TOOMANY_GRACE
Grace logins exceed policy
2
PASS_TOOMANY_REMAINING_GRACE Remaining grace logins exceed
policy
2
PASS_UNLIMITED_GRACE
3
Password grace logins unlimited
For optimal security, limit grace logins to six so users are required to change their
account passwords.
73
74 Checking user accounts and authorizations
Password Strength module
Password = username
This check reports a user account if the account password matches the user’s
name. Intruders frequently use this combination to attempt a system break-in.
Symantec ESM provides the check for servers with a large number of user
accounts. You can use this check when the Password = any username check takes
too much time or consumes too much CPU.
Secure passwords have at least eight characters including one or more nonalphabetic characters. Passwords should not match an account or host name nor
be found in any dictionary.
Note: This check will only run in Bindery mode on systems using NDS 8.x.
The check returns the following messages:
Table 4-27
Password = username messages
Message
Title
Class
BAD_PART_STATE
Invalid NDS partition state
3
BAD_PART_TYPE
Invalid NDS partition type
4
CANT_CRACK
Can’t crack user’s password
0
FOUND_PASSWORD
ESM guessed user’s password
3
If Symantec ESM reports problems in this check, assign more secure passwords to
the user accounts that are reported by this check, then notify each user to log in
using the more secure password. Have the users complete the process by
changing their passwords again.
Checking user accounts and authorizations
Password Strength module
Password = any username
This check reports a user account if the account password matches any user’s
name. Intruders frequently substitute user names for passwords when attempting
a system break-in.
You can use the Password = username check if this check takes too much time or
consumes too much CPU. However, continue to run this check during periods of
low system usage.
Secure passwords have at least eight characters including one or more nonalphabetic characters. Passwords should not match an account or host name nor
be found in any dictionary.
Note: This check will only run in Bindery mode on systems using NDS 8.x.
The check returns the following messages:
Table 4-28
Password = any username messages
Message
Title
Class
BAD_PART_STATE
Invalid NDS partition state
3
BAD_PART_TYPE
Invalid NDS partition type
4
CANT_CRACK
Can’t crack user’s password
0
FOUND_PASSWORD
ESM guessed user’s password
3
If Symantec ESM reports problems in this check, immediately assign more secure
passwords to reported user accounts. Then notify the users and ask them to log in
with the more secure passwords. Have the users complete the process by
changing their passwords again.
75
76 Checking user accounts and authorizations
Password Strength module
Password = wordlist word
This check reports a user account if the account password exists in one or more
dictionary files. If Symantec ESM can guess a password using common words,
then an intruder may also.
Use the name list in the Password = wordlist word (cont’d) option to include or
exclude users for this check. You can also enter the name of a Container to be
included or excluded for the check.
This check searches all accounts, even those that are not required to have a
password.
Note: This check will only run in Bindery mode on systems using NDS 8.x.
This check returns the following messages:
Table 4-29
Password = wordlist word messages
Message
Title
Class
BAD_PART_STATE
Invalid NDS partition state
3
BAD_PART_TYPE
Invalid NDS partition type
4
CANT_CRACK
Can’t crack user’s password
0
FOUND_PASSWORD
ESM guessed user’s password
3
NO_WORD_FILES
No word files selected for Password = Wordlist Word
4
The check reports the following information about account passwords and NDS
contexts:
■
User accounts with passwords that are matched by words or variations of
words in specified dictionary files
■
NDS object names with special characters that cause problems for the
Symantec ESM password cracking technique
■
Contexts that are not in a Master or Read-Only NDS partition on a server
and, therefore, are unverifiable
■
Contexts that are in a Master or Read-Only NDS partition on a server that
are unreadable
Checking user accounts and authorizations
Password Strength module
Note: Because Symantec ESM cannot check the passwords of objects that are not
located in Master or NDS partitions and Containers, you must reconfigure the
agent context lists so that all contexts in the tree are checked at least once.
If the server or NDS Container is unreadable, you must run DSREPAIR.NLM to
determine the cause of the problem.
Password guessing cannot be done from a remote agent. It can be done only
directly on the server in question.
If you enable the Password = wordlist word check but fail to specify a word list,
Symantec ESM is unable to perform the check.
NDS objects with special characters in their names must be renamed before you
to run the check.
If Symantec ESM reports problems in this check, immediately assign more secure
passwords to reported user accounts. Then notify the users and ask them to log in
using the more secure passwords. Have the users complete the process by
changing their passwords again.
Secure passwords have at least eight characters, with at least one number or nonalphabetic character as a component.
Password = wordlist word (cont’d)
Use this option to include or exclude users for the Password = wordlist word
check.
77
78 Checking user accounts and authorizations
Password Strength module
Reverse order
This check reports user accounts with passwords that match words spelled
backward; e.g., golf -> flog.
You must enable the Password = wordlist word check for this check to work. The
enabled word files in that check provide the words for this check.
You can include the Login names in the Containers of the agent’s context list as
additional words for the check by enabling the Password = username or Password
= any username checks.
Secure passwords have at least eight characters including one or more nonalphabetic characters. Passwords should not match an account or host name nor
be found in any dictionary.
This check returns the following message:
Table 4-30
Reverse order message
Message
Title
Class
FOUND_PASSWORD
ESM guessed user’s password
3
If Symantec ESM reports problems in this check, immediately assign more secure
passwords to reported user accounts. Then notify the users and ask them to log in
using the more secure passwords. Have the users complete the process by
changing their passwords again.
Checking user accounts and authorizations
Password Strength module
Double occurrences
This check reports user accounts with passwords that match double occurrences
of a word; e.g., golf -> golfgolf.
You must enable the Password = wordlist word check for this check to work. The
enabled word files in that check provide the words for this check.
You can include the login names in the Containers of the agent’s context list as
additional words for the check by enabling the Password = username or Password
= any username checks.
Secure passwords have at least eight characters including one or more nonalphabetic characters. Passwords should not match an account or host name nor
be found in any dictionary.
This check returns the following message:
Table 4-31
Double occurrences message
Message
Title
Class
FOUND_PASSWORD
ESM guessed user’s password
3
If Symantec ESM reports problems in this check, immediately assign more secure
passwords to reported user accounts. Then notify the users and ask them to log in
using the more secure passwords. Have the users complete the process by
changing their passwords again.
79
80 Checking user accounts and authorizations
Password Strength module
Plural forms
This check reports user accounts with passwords that match plural form of
words; e.g., golf -> golfs.
You must enable the Password = wordlist word check for this check to work. The
enabled word files in that check provide the words for this check.
You can include the Login names in the Containers of the agent’s context list as
additional words for the check by enabling the Password = username or Password
= any username checks.
Secure passwords have at least eight characters including one or more nonalphabetic characters. Passwords should not match an account or host name nor
be found in any dictionary.
This check returns the following message:
Table 4-32
Plural forms message
Message
Title
Class
FOUND_PASSWORD
ESM guessed user’s password
3
If Symantec ESM reports problems in this check, immediately assign more secure
passwords to reported user accounts. Then notify the users and ask them to log in
using the more secure passwords. Have the users complete the process by
changing their passwords again.
Checking user accounts and authorizations
Password Strength module
Add prefix
This check reports user accounts with passwords that match words with a prefix
that has been added to the Prefixes to use name list; e.g., golf -> progolf.
You must enable the Password = wordlist word check for this check to work. The
enabled word files in that check provide the words for this check.
You can include the Login names in the Containers of the agent’s context list as
additional words for the check by enabling the Password = username or Password
= any username checks.
Secure passwords have at least eight characters including one or more nonalphabetic characters. Passwords should not match an account or host name, nor
be found in any dictionary.
The check returns the following message:
Table 4-33
Add prefix message
Message
Title
Class
FOUND_PASSWORD
ESM guessed user’s password
3
If Symantec ESM reports problems in this check, immediately assign more secure
passwords to reported user accounts. Then notify the users and ask them to log in
using the more secure passwords. Have the users complete the process by
changing their passwords again.
81
82 Checking user accounts and authorizations
Password Strength module
Add suffix
This check reports user accounts with passwords that match words with a suffix
that has been added to the Suffixes to use name list; e.g., golf -> golfball.
You must enable the Password = wordlist word check for this check to work. The
enabled word files in that check provide the words for this check.
You can include the Login names in the Containers of the agent’s context list as
additional words for the check by enabling the Password = username or Password
= any username checks.
Secure passwords have at least eight characters including one or more nonalphabetic characters. Passwords should not match an account or host name, nor
be found in any dictionary.
The check returns the following message:
Table 4-34
Add suffix message
Message
Title
Class
FOUND_PASSWORD
ESM guessed user’s password
3
If Symantec ESM reports problems in this check, immediately assign more secure
passwords to reported user accounts. Then notify the users and ask them to log in
using the more secure passwords. Have users complete the process by changing
their passwords again.
NDS module: Objects in agent context list will be considered
NetWare/NDS modules are divided into two categories:
■
NDS module checks for security problems involving NDS objects.
■
Server module checks for security problems involving server resources.
NDS modules are given a list of NDS contexts to check at installation. These can
be changed with the ESMSETUP.NLM setup program.
This module checks only the parts of the tree that are listed in the agent context
list of each NetWare/NDS agent where the module is run.
Checking user accounts and authorizations
Password Strength module
Using and editing word files
Checks in the Password Strength module compare passwords to words in word
files (.wrd files). The Password = wordlist word check, for example, compares
passwords to dictionary word files. Passwords that match word file words (and
variations of those words) can be easily guessed by intruders and are a security
threat.
The Password Strength module provides the following word files. An asterisk
represents a language identifier.
Table 4-35
Word list files by category
Category
File
First name
firstnam.wrd
Fname_D.wrd
Fname_FR.wrd
Fname_I.wrd
Fname_NL.wrd
Fname_P.wrd
Fname_SP.wrd
6511
602
784
952
724
449
349
Last name
lastnam.wrd
Fname_D.wrd
Fname_FR.wrd
Fname_I.wrd
Fname_NL.wrd
Fname_P.wrd
Fname_SP.wrd
2958
3101
3196
2848
3005
723
3027
No. of words
83
84 Checking user accounts and authorizations
Password Strength module
Table 4-35
Word list files by category
Category
File
Dictionaries*
synopsis.wrd
english.wrd
lenglish.wrd
Slist_D.wrd
List_D.wrd
Llist_D.wrd
Slist_FR.wrd
List_FR.wrd
Llist_FR.wrd
Slist_I.wrd
List_I.wrd
Llist_I.wrd
Slist_NL.wrd
List_NL.wrd
Llist_NL.wrd
Slist_P.wrd
List_P.wrd
Llist_P.wrd
Slist_SP.wrd
List_SP.wrd
Llist_SP.wrd
yiddish.wrd
253
3489
34886
169
2597
19319
166
2517
17893
227
2490
14814
399
3038
14232
217
2169
16950
162
2424
19580
639
Computers
computer.wrd
Compu_D.wrd
Compu_FR.wrd
Compu_I.wrd
Compu_NL.wrd
Compu_P.wrd
Compu_SP.wrd
defaults.wrd
nerdnet-defaults.wrd
ntccrack.wrd
Oracle.wrd
wormlist.wrd
143
545
346
255
184
226
216
465
142
16870
37
432
Specialty
cartoon.wrd
college.wrd
disney.wrd
hpotter.wrd
python.wrd
sports.wrd
tolkien.wrd
trek.wrd
No. of words
133
819
433
715
3443
247
471
876
Checking user accounts and authorizations
Password Strength module
To enable a word file
1
In the Disabled Word Files list, select a word file.
2
Click the left arrow.
To disable a word file
1
In the Enabled Word files list, select a word file.
2
Click the right arrow.
To edit a word file
1
Do one of the following:
■
Open an existing word file in a text editor. (NetWare word files are
located in c:\program files\symantec\esm\words for Symantec ESM 5.5
and in c:\program files\axent\esm\words for Symantec Esm 5.1.)
■
Create a new ASCII plain-text word file in a text editor. Name the new
file with a .wrd extension (for example, medical.wrd).
2
Type only one word per line.
3
Save the file in the words directory.
85
86 Checking user accounts and authorizations
User Files (Queries) module
User Files (Queries) module
The User Files module reports problems when file ownerships and permissions in
NetWare and other systems do not match the original baselines.
Access to NDS login scripts
This check examines object profiles, Containers, and user login scripts and
reports any user with access to another user object’s login script.
This check returns the following message:
Table 4-36
Access to NDS login scripts message
Message
Title
Class
USERFILE_ACL
Excessive ACL assignment to Container, Profile, or User
Login Script
4
An unauthorized user with access to another’s login script can modify that login
script and cause undesired network actions when the authorized user next logs in.
Conduct a strict review of any users that are reported by this check.
Access to DOS bindery login scripts
This check verifies that only assigned users have access to their DOS bindery login
scripts. Perform this check only if bindery emulation is used on the agent server.
The check reports the following bindery conditions:
■
User accounts with access to another user's mail directory
■
User accounts with no SYS:MAIL\userid directory
■
Lack of a bindery emulation context on a server
The lack of a bindery emulation context on a server is not a problem. Symantec
ESM simply not check the SYS:MAIL directories.
The check returns the following messages:
Table 4-37
Access to DOS bindery login scripts messages
Message
Title
Class
NO_BINDERY_ EMULATION
No bindery emulation found
0
USERFILE_MAIL_DIR
User account without MAIL subdirectory
1
Checking user accounts and authorizations
User Files (Queries) module
Table 4-37
Access to DOS bindery login scripts messages
Message
Title
Class
USERFILE_TRUST
User account with trustee assignment to other 4
mail directory
An unauthorized user with access to another’s login script can modify that login
script and potentially cause undesired network actions when the authorized user
next logs in.
Conduct a thorough review of all users that are reported by this check.
Bindery objects are not created with NWAdmin or ConsoleOne. These objects
appear in your NDS tree as a result of an upgrade from a NetWare 2x or 3x server.
Furthermore, NWAdmin or ConsoleOne cannot be used to create login scripts
for these users. To create login scripts for these users, you must use SYSCON.
All bindery users must have DOS login script
This check verifies that all local bindery user accounts have a DOS login script
(SYS:MAIL\<userid>\LOGIN). Perform this check only if bindery emulation is
used on the agent server.
Note: The userid is an eight-digit hexadecimal number that corresponds to the
user record in the bindery.
The check returns the following messages:
Table 4-38
Bindery users DOS login script messages
Message
Title
Class
USERFILE_LOGIN
User account without DOS bindery login script 2
USERFILE_MAIL_DIR
User account without MAIL subdirectory
1
NO_BINDERY_EMULATION
No bindery emulation found
0
User accounts that lack a DOS bindery login script could allow an unauthorized
user to create a login script in their mail directories. That action could cause
undesired results when the authorized user next logs in.
87
88 Checking user accounts and authorizations
User Files (Queries) module
NDS module: Objects in agent context list will be considered
NetWare/NDS modules are divided into two categories:
■
NDS module checks for security problems involving NDS objects.
■
Server module checks for security problems involving server resources.
NDS modules are given a list of NDS contexts to check at installation. These can
be changed with the ESMSETUP.NLM setup program.
This module checks only the parts of the tree that are listed in the agent context
list of each NetWare/NDS agent where the module is run.
Chapter
5
Checking network and
server settings
This chapter includes the following topics:
■
Network Integrity module
■
Object Integrity module
■
Startup Files module
■
System Auditing module
These modules check the network and server settings on a system for
unauthorized access, modification, and tampering. They also retrieve
information about the systems on the network.
This chapter also lists the messages that are returned by individual security
checks. For common messages that are returned by multiple security checks, see
“Reviewing common messages” on page 45.
To learn how to use name lists, see “Editing name lists” on page 35.
90 Checking network and server settings
Network Integrity module
Network Integrity module
The Network Integrity module checks limitations that are placed on users such as
restrictions on concurrent connections, disk-space limits, and hardware login
addresses.
Disk space limits
This check verifies that all users are limited in the amount of disk space that they
may use on any NetWare volume. The check reports users who have disk space
limitations and users whose limitations exceed the value specified for the check.
Because NetWare does not limit disk space per user by default, the check may
report many users who have unlimited disk space. The check’s name list lets you
specify users that are excluded or included in the check.
The check returns the following messages:
Table 5-1
Disk space limits messages
Message
Title
Class
NET_DISK_UNLIMITED
User’s disk space restriction not limited
3
NET_DISK_SPACE
User’s disk space restriction over limit
3
Excessive directory size can indicate potential security problems. In addition, a
user who overfills disk space can block other users from using the server.
Place limits on user directories that reside on shared servers.
Checking network and server settings
Network Integrity module
All volumes have NDS objects in tree
This check verifies that the NDS tree contains an object for the agent’s server and
for each of its volumes.
The check returns the following messages:
Table 5-2
NDS objects in tree messages
Message
Title
Class
SERVER_NOT_IN_TREE
Server is not represented in the tree
1
VOLUME_NOT_IN_TREE
Volume is not represented in the tree
1
The server and volume objects store important information about the files and
directories on your network. If a server or volume is missing in the NDS tree,
Symantec ESM is unable to verify the requested security information.
Server module: All objects in the tree will be considered
NetWare/NDS modules are divided into two categories:
■
NDS module checks for security problems involving NDS objects.
■
Server module checks for security problems involving server resources.
This server module checks access to server resources against objects in the entire
NDS tree.
91
92 Checking network and server settings
Object Integrity module
Object Integrity module
The Object Integrity module checks NetWare object settings for potential
security problems.
Updateable Object Integrity messages
The NetWare Object Integrity module has three security checks that are
snapshot-updateable messages.
Snapshot-updateable messages let you update snapshots to match current values
for the agent system. These messages display the letters SU in the Updateable/
Correctable column of the console grid.
Run the module once to create the agent snapshot file before you run the module
to look for security weaknesses.
Table 5-3
Updateable/correctable Object Integrity messages
Security check
Code
Message name
New, changed, and deleted print queues
SU
SNAP_PRINTQ_NEW
New, changed, and deleted print queues
SU
SNAP_PRINTQ_GONE
New, changed, and deleted print queues
SU
DEVICE_PQ_DIR_DIF
New, changed, and deleted print queues
SU
PQ_TRUSTEE_ADDED
New, changed, and deleted print queues
SU
PQ_USER_ADDED
New, changed, and deleted print queues
SU
PQ_USER_REMOVED
New, changed, and deleted print queues
SU
PQ_OPERATOR_REMOVED
New, changed, and deleted print queues
SU
PQ_OPERATOR_ADDED
New, changed, and deleted print queues
SU
PQ_SERVER_REMOVED
New, changed, and deleted print queues
SU
PQ_SERVER_ADDED
New, changed, and deleted print servers
SU
PS_USERS_REMOVED
New, changed, and deleted print servers
SU
PS_USERS_ADDED
New, changed, and deleted print servers
SU
PS_OPERAT_REMOVED
New, changed, and deleted print servers
SU
PS_OPERAT_ADDED
New, changed, and deleted print servers
SU
PS_ADDED
Checking network and server settings
Object Integrity module
Table 5-3
Updateable/correctable Object Integrity messages
Security check
Code
Message name
New, changed, and deleted print servers
SU
PS_ID_MISMATCH
New, changed, and deleted print servers
SU
PS_NAME_MISMATCH
New, changed, and deleted file servers
SU
SERVER_ADDED
New, changed, and deleted file servers
SU
NW_NAME_MISMATCH
New, changed, and deleted file servers
SU
NW_ADDR_MISMATCH
New, changed, and deleted file servers
SU
F_SERVER_REMOVED
New, changed, and deleted print servers
This check compares the stored snapshot of print server objects against the object
properties and reports any changes that were made since the last snapshot update.
The check returns the following messages:
Table 5-4
Print server messages
Message
Title
Class
PS_OPERAT_REMOVED
Print server operator removed
1
PS_USERS_ADDED
Print server user added
2
PS_ADDED
Print server added
2
PS_OPERAT_ADDED
Print server operator added
2
PS_ID_MISMATCH
Print server object ID mismatch
2
PS_NAME_MISMATCH
Print server name mismatch
2
PS_USERS_REMOVED
Print server user removed
1
New objects and object changes in the NDS tree could be evidence of tampering.
Examine the system for other evidence of tampering.
If these changes were authorized, update the Symantec ESM snapshot to prevent
this message from being generated in the future.
93
94 Checking network and server settings
Object Integrity module
New, changed, and deleted print queues
This check compares the stored snapshot of print server queues against the print
queue properties and reports any changes that were made since the last snapshot
update.
The check returns the following messages:
Table 5-5
Print queue messages
Message
Title
Class
PQ_OPERATOR_ADDED
Print queue operator added
2
PQ_TRUSTEE_ADDED
Print queue directory trustee added
2
PQ_USER_ADDED
Print queue user added
2
PQ_OPERATOR_REMOVED
Print queue operator removed
1
PQ_SERVER_REMOVED
Print server removed from print queue
1
PQ_SERVER_ADDED
Print queue server added
2
DEVICE_PQ_DIR_DIF
Print queue directory has changed
2
SNAP_PRINTQ_GONE
Print queue deleted
2
SNAP_PRINTQ_NEW
Print queue added
2
PQ_USER_REMOVED
Print queue user removed
1
New objects or object changes in the NDS tree may be evidence of tampering.
Examine the system for other evidence of tampering. If these changes were
authorized, update the Symantec ESM snapshot to prevent this message from
being generated in the future.
Checking network and server settings
Object Integrity module
New, changed, and deleted file servers
This check compares the stored snapshot of known file servers against the current
server configuration and reports any changes that were made since the last
snapshot update.
The check returns the following messages:
Table 5-6
File server messages
Message
Title
Class
SERVER_ADDED
Server added to network
3
F_SERVER_REMOVED
File server removed from system
1
NW_ADDR_MISMATCH
Network address mismatch
2
New objects in the NDS tree could be evidence of tampering. Examine reported
servers for other evidence of tampering.
If these changes were authorized, update the Symantec ESM snapshot to prevent
this message from being generated in the future.
Excessive ACL access
This check reports errors when excessive ACL access has been granted to any
NDS object. If an object is found with excessive ACL access, a security
equivalence check of the object is performed.
NetWare/NDS uses object rights and property rights as follows:
■
Object rights control what you can do to objects in the NDS tree.
■
Property rights determine what you can do to the properties of those objects.
Since the purpose of checking ACLs is to identify those users who have
Supervisor privileges in the tree, excluding %PRIVILEGED% would defeat the
purpose of this check.
The check returns the following messages:
Table 5-7
Excessive ACL access messages
Message
Title
Class
DONT_EXCLUDE_PRIVILEGED
Invalid Name List Object:
%PRIVILEGED%
2
EXCESSIVE_CONTAINER_ACL
Excessive Container ACL assignment
2
95
96 Checking network and server settings
Object Integrity module
Table 5-7
Excessive ACL access messages
Message
Title
Class
EXCESSIVE_SERVER_ACL
Excessive NetWare Server object ACL
assignment
2
EXCESSIVE_OBJECT_ACL
Excessive object ACL assignment
2
SECURITY_EQUIV_PRIV_OBJECT
Security equivalence with privileged
object
2
The ACL (access control list) defines trustee assignments and user rights. This
check reports vital information regarding the object, user, and ACL access rights
using the following format:
■
The Name field lists the object name.
For example, a volume object (Server_Volume)
■
The information field shows the object that has the excessive ACL
assignment to the volume object.
For example, the report might indicate the following:
All Property Rights / the user name (user1) / CRWAS.
This line would indicate that user1 has S (Supervisor), C (Create), R (Read),
W (Write), and A (Add self) property rights to the volume object.
■
The second line down would show the same volume object in the Name field,
and the same user object (user1), with excessive Object Rights to the volume
object, in the Information field. However, user1 would now appear with the
object rights BADRS.
This second line would indicate that user1 has been granted B (Browse), D
(Delete), R (Rename), and S (Supervisor) rights to the volume object.
Additional items to remember when considering the reports for NDS objects with
excessive Container ACL assignments:
■
Any object that has the SUPERVISOR [S] ACL assignment to the [Object
Rights] of the Container will have SUPERVISOR privileges on all objects.
Unless filtered, this assignment is inherited by all subordinate objects.
■
Any object that has the SUPERVISOR [S], or the WRITE [W] ACL
assignment to [All Properties] of the Container will have sufficient privileges
to modify the NDS data on all properties of all objects. Unless filtered, this
assignment is inherited by subordinate objects.
Checking network and server settings
Object Integrity module
■
Any object that has the SUPERVISOR [S], or the WRITE [W] ACL
assignment to a property of the Container will have sufficient privileges to
modify the NDS data of the property.
The check also indicates excessive ACL rights to the following types of NetWare/
NDS objects:
■
NetWare Server object ACL assignments:
Objects with SUPERVISOR [S] ACL assignment to the [Object Rights] of the
NetWare Server object that is inherited to all physical volumes on the server
Objects with SUPERVISOR [S] or WRITE [W] ACL assignment to All
Properties of the NetWare server that can modify the NDS data of all
properties of the NetWare Server object
Objects with SUPERVISOR [S], or WRITE [W] ACL assignment with the
privileges to modify the NDS data of the NetWare Server object
■
NDS objects with excessive ACL assignment to another object:
Objects with SUPERVISOR [S] ACL assignment to the Object Rights of
another object that can exercise such privileges on the other object
Objects with SUPERVISOR [S], or WRITE [W] ACL assignment to All
Properties of another object and that can modify the NDS data of all
properties of the other object
■
NDS objects that are security equivalent to objects having excessive ACL
assignments
■
Container Objects with ACL rights that block the Symantec ESM agent from
performing a proper check on itself and subordinate objects
Users with excessive ACL rights can have undesired access to files and directories
on your file system and/or excessive rights in the NDS tree.
97
98 Checking network and server settings
Object Integrity module
NetWare server equivalences
This check reports any objects with security equivalences to NetWare Server
objects. Objects with this access have SUPERVISOR privileges on the server. The
access rights of NDS objects that are security equivalent of NetWare Server
objects are inherited to all physical volumes on the server.
This check returns the following message:
Table 5-8
Message
NetWare server equivalencies message
Title
SECURITY_EQUIVALENCE_SERVER Security equivalence with NetWare
Server object
Class
2
Because changes to the NetWare server objects may be evidence of tampering,
you should examine the system for other evidence of tampering. If these changes
were authorized, update the snapshot to prevent this message from being
generated in the future.
Server console operators
This check reports NDS objects that are console operators of NetWare server
objects. Objects with this access may remotely change the server date and time
and down the server.
The check returns the following message:
Table 5-9
Message
Server console operators message
Title
Class
CONSOLE_OPERATOR_SERVER Console operator on NetWare Server object 2
Review the report to ensure that only authorized NDS objects have been granted
these privileges.
Checking network and server settings
Object Integrity module
Stealth objects
This check reports any inherited rights filters (IRFs) that are found in the agent’s
local NDS database that block [S]upervisor and [B]rowse privileges and create
objects that even administrators are unable to see.
The behavior of this check is modified by two related options: ACLs of stealth
objects and Subordinates of stealth objects.
Note: This check will not work on systems using NDS 8.x.
The check returns the following messages:
Table 5-10
Stealth objects messages
Message
Title
Class
STEALTH_IRF_FOUND
IRF blocks [S]upervisor and [B]rowse privileges
4
STEALTH_SUB_FOUND
Subordinate to stealth object found
4
STEALTH_TWO_STAGE
Two-stage stealth object found
4
STEALTH_ACL_FOUND
ACL on stealth object found
4
Even system administrators cannot see or manage stealth objects and their
subordinates.
Symantec ESM is the only efficient way for a system administrator to immediately
verify the existence of stealth objects in the NDS tree.
ACLs of stealth objects
This option modifies the behavior of the Stealth objects check. When that check
and this option are both enabled, the check lists all ACLs for any stealth objects
that are found to indicate who has access to the stealth objects (i.e., who created
them and who uses them).
Subordinates of stealth objects
This option modifies the behavior of the Stealth objects check. When that check
and this option are both enabled, the check lists all objects that are subordinate to
a stealth Container to indicate the scope of what is hidden.
99
100 Checking network and server settings
Object Integrity module
ESM agent object’s access to agent’s contexts
This check verifies that the agent’s ESM object has at least [B]rowse object rights
and [R]ead property rights on all objects within its agent context list. It also
reports any access control lists (ACLs) and inherited rights filters (IRFs) that are
found in the agent’s local DS database files that block the agent’s ESM object.
The check returns the following messages:
Table 5-11
ESM agent access to contexts messages
Message
Title
Class
CURR_ESM_OBJ
Current ESM agent object
0
CANT_READ
ESM agent object can’t read object properties
4
IRF_BLOCKS_ESM
IRF blocks ESM
4
ACL_BLOCKS_ESM
ACL blocks ESM
4
Inadequate rights can hinder the ESM agent object from performing proper
checks on itself and on its subordinate objects. Increase the ESM object’s rights to
its object.
Checking network and server settings
Object Integrity module
Missing object properties
This check reports objects with blank information fields for properties that NDS
considers optional but that your security policy considers mandatory.
Use the name list to specify object classes and properties that are required by your
security policy. Name list entries must be specified in the form of <class>/
<property>. You can also specify the NDS objects that are included in the check
with the Missing object properties (cont’d) option.
The check returns the following messages:
Table 5-12
Missing object properties messages
Message
Title
Class
MISSING_PROPERTY
Missing property
1
BAD_PROPERTY
Property list entry is invalid
4
BAD_CLASS
Class entry is invalid
4
NO_PROPERTY_LIST
List of required properties is empty
4
MANDATORY_PROPERTY
Property is already mandatory in NDS
4
Objects that are in compliance with your company security policy will boost the
level of security for these objects and make changes easier to identify. The end
result will be a standardized security check.
The NetWare setting locations vary depending on the missing object that is
reported. You can usually find the information on a details page in NWAdmin or
ConsoleOne.
Missing object properties (cont’d)
Use this option to specify the NDS objects that are included in the Missing object
properties check.
101
102 Checking network and server settings
Object Integrity module
NDS module: Objects in agent context list will be considered
NetWare/NDS modules are divided into two categories:
■
NDS module checks for security problems involving NDS objects.
■
Server module checks for security problems involving server resources.
NDS modules are given a list of NDS contexts to check at installation. These can
be changed with the ESMSETUP.NLM setup program.
This module checks only the parts of the tree that are listed in the agent context
list of each NetWare/NDS agent where the module is run.
Checking network and server settings
Startup Files module
Startup Files module
The Startup Files module checks the NetWare Startup files for potential security
problems.
Updateable Startup Files messages
The NetWare Startup Files module has three security checks that produce
snapshot-updateable messages.
Snapshot-updateable messages let you update snapshots to match current values
for the agent system. These messages display the letters SU in the Updateable/
Correctable column of the console grid.
Run the module once to create the agent snapshot file before you run the module
to look for security weaknesses.
Table 5-13
Updateable Startup Files messages
Security check
Code
Message name
NLMs removed since snapshot
SU
NLM_SS_DEL
NLMs changed since snapshot
SU
NLM_SS_CHG
NLMs added since snapshot
SU
NLM_SS_NEW
103
104 Checking network and server settings
Startup Files module
SECURE CONSOLE
This check verifies that the AUTOEXEC.NCF file contains the SECURE
CONSOLE command, that the console is secured, and that DOS has been
unloaded. If the console is secured, the REMOVE DOS command is not required.
Theoretically, any NLM can crash the server or damage its files. Because NLMs
automatically have supervisory access to all server resources, you must use
caution to prevent unauthorized NLMs from running on your server.
The AUTOEXEC.NCF startup file on the agent server does not secure the
console. If the agent’s console is not currently secure, then DOS is loaded.
Remove DOS from memory so there can be no access to local disk drives.
The SECURE CONSOLE command unloads DOS from the system, prevents
loadable modules from being loaded from any directory other than SYS:SYSTEM,
and prevents keyboard entry into the OS debugger.
This check returns the following messages:
Table 5-14
Secure console messages
Message
Title
Class
SERVER_SECURE
The NetWare console has not been secured 4
STARTUP_SECURE
AUTOEXEC.NCF does not secure console 4
An NLM can crash the server or damage its files. Additionally, programs that can
capture passwords, and perform other covert tasks, are easily loaded from local
drives, in particular from drives with removable media (such as floppy drives).
Include the SECURE CONSOLE command (which removes DOS as part of
securing the console) in the AUTOEXEC.NCF file.
Checking network and server settings
Startup Files module
REMOVE DOS
This check verifies that AUTOEXEC.NCF contains the REMOVE DOS command
and that DOS has been unloaded.
REMOVE DOS alone does not prevent keyboard entry into the OS debugger, nor
does it prevent loadable modules (NLMs) from being loaded from areas other
than SYS:SYSTEM. The startup file AUTOEXEC.NCF does not automatically
remove DOS from the operating system image.
Note: DOS does not exist in NetWare 5.x or 6.x. Therefore, Symantec ESM will
not report a problem, and this check is unnecessary.
This check returns the following messages:
Table 5-15
Remove DOS messages
Message
Title
Class
STARTUP_DOS
AUTOEXEC.NCF does not remove DOS
4
SERVER_DOS
Server currently has DOS loaded
4
Programs that can capture passwords and perform other covert tasks are easily
loaded from local drives, in particular from drives with removable media (such as
floppy drives). Remove DOS from memory so there is no access to local disk
drives.
The best way to remove DOS is to add the SECURE CONSOLE command (which
removes DOS as part of securing the console) to the AUTOEXEC.NCF file. The
REMOVE DOS command also removes DOS, but it does so without securing the
console.
105
106 Checking network and server settings
Startup Files module
ALLOW UNENCRYPTED PASSWORDS = ON
This check verifies that the AUTOEXEC.NCF file does not set the ALLOW
UNENCRYPTED PASSWORDS parameter to ON and that the parameter is
currently set to OFF (since it can be changed at any time from the console).
This check returns the following messages:
Table 5-16
Unencrypted passwords ON messages
Message
Title
Class
SERVER_UNENCRYPT
Server currently allows unencrypted passwords
4
STARTUP_UNENCRYPT
AUTOEXEC.NCF allows unencrypted passwords
4
Allow unencrypted passwords to be set on agent servers only if NetWare 2x
servers are operating on the same network.
Because unencrypted passwords can be captured from the network wire using
available software, you should turn off unencrypted passwords unless they are
absolutely necessary.
LOAD REMOTE with unencrypted password
This check verifies that the AUTOEXEC.NCF file does not have a LOAD
REMOTE directive that allows an unencrypted password.
This check returns the following message:
Table 5-17
Message
LOAD REMOTE with unencrypted password message
Title
Class
LOAD_REMOTE_FOUND REMOTE.NLM loaded with unencrypted password 4
Because this option creates a major security risk, you should configure the LOAD
REMOTE option with password security.
Note: Make sure that the line reads LOAD REMOTE -E <hash> rather than
LOAD REMOTE <password>. The first instance is secure; the second instance is
not and could allow an intruder to spoof the configuration.
Checking network and server settings
Startup Files module
Access to files loaded by AUTOEXEC.NCF
This check verifies that AUTOEXEC.NCF and all its files load during system
boot. It lists files that are not flagged as read only, as well as all users that have
write access to these files. Use the name list to exclude authorized users with write
access from this check.
Note: Module load commands to be checked must include the full NetWare path
with module extension.
The check returns the following messages:
Table 5-18
Access to AUTOEXEC.NCF loaded files messages
Message
Title
Class
STARTUP_RW
Writable files in AUTOEXEC.NCF
1
STARTUP_DOSDRV
Programs in AUTOEXEC.NCF that reside on DOS 1
drives
FILE_NOT_FOUND
File referenced in startup files not found
1
STARTUP_ACCESS
Users with access to programs loaded from
AUTOEXEC.NCF
1
There is no security on removable media drives. Because anyone with physical
access to the file server could replace programs that have been loaded by
AUTOEXEC.NCF from a DOS drive, you should move these programs to the
SYS:SYSTEM directory of the file server and change the AUTOEXEC.NCF file to
reflect the move.
Because files that are loaded by AUTOEXEC.NCF and flagged as writable can be
accessed, modified, or replaced by anyone with write access to the directory
where these files are stored, you should flag these programs as Read Only.
Unencrypted passwords should be allowed only on networks that maintain
NetWare 2.x servers. Because unencrypted passwords can be caught from the
network wire using available software, you should turn off these passwords unless
they are absolutely necessary.
Because user accounts with write access to program files that are loaded by
AUTOEXEC.NCF have the ability to gain control of the server by replacing or
tampering with existing programs, they should be reviewed, and write access
should be limited to administrators and/or privileged users.
107
108 Checking network and server settings
Startup Files module
NLMs currently loaded on server
This check lists the NLMs that are currently loaded on the server.
The check returns the following message:
Table 5-19
Loaded NLMs message
Message
Title
Class
NLM_LIST
NLM is currently loaded
0
This check provides information. No security action is required.
NLMs required to be loaded
This check identifies required files that do not appear on the server. Use the name
list to specify the required NLMs that are included in the check.
The check returns the following message:
Table 5-20
Required NLMs message
Message
Title
Class
REQ_NLM_NOTRUN
Required NLM is not loaded
4
NLMs not allowed to be loaded
This check identifies disallowed files that are loaded on the server. Use the name
list to specify the disallowed NLMs that are included in the check.
This check returns the following message:
Table 5-21
Disallowed NLMs message
Message
Title
Class
DISSALLOW_NLM_RUN
Disallowed NLM is loaded
4
Checking network and server settings
Startup Files module
NLMs added since snapshot
This check compares the list of currently loaded NLMs against information in the
stored snapshot and reports any NLMs that have been added since the snapshot
was last updated.
This check returns the following message:
Table 5-22
Added NLMs message
Message
Title
Class
NLM_SS_NEW
NLM is new
0
This check provides information. No security action is required.
NLMs removed since snapshot
This check compares the list of currently loaded NLMs against information in the
stored snapshot and reports any NLMs that have been removed since the
snapshot was last updated.
This check returns the following message:
Table 5-23
Removed NLMs message
Message
Title
Class
NLM_SS_DEL
NLM had been unloaded
0
This check provides information. No security action is required.
109
110 Checking network and server settings
Startup Files module
NLMs changed since snapshot
This check compares the list of currently loaded NLMs against information in the
stored snapshot and reports any changes that have occurred in the actual NLM
files or file attributes since the last snapshot update.
This check returns the following message:
Table 5-24
Changed NLMs message
Message
Title
Class
NLM_SS_CHG
NLM had been changed
1
Always investigate reported changes to verify that they are not evidence of
tampering.
NetWare console parameters
This check compares the console SET parameters for each agent against records
in enabled template files. You can use the Template Editor to edit the Symantec
ESM default NW Console Params template or to create your own template for
this check. See “Editing the NW console parameters template” on page 111.
Use the name list to enable or disable template files for the check. Symantec
ESM’s c2.nws template file, which is enabled by default, checks the console
parameters that are recommended by Novell and included in
SYS:SYSTEM\SECURE.NCF.
Checking network and server settings
Startup Files module
This check returns the following messages:
Table 5-25
NW console parameters messages
Message
Title
Class
SET_PARAM_ GREEN
Value of console parameter does not match
template (green)
0
SET_PARAM_ YELLOW
Value of console parameter does not match
template (yellow)
1
SET_PARAM_ RED
Value of console parameter does not match
template (red)
4
SETPARAM_TMPL_ERROR Problem in console parameters template
4
NOTEMPLATES
No template files specified
4
MISSINGPARAM
Missing console parameters
4
The console parameter settings that are monitored by Symantec ESM’s default
template are required to certify a NetWare server as C2-compliant.
Editing the NW console parameters template
The NetWare console parameters check in the Startup Files module uses
information in the NW Console Parameters template to check the console SET
parameters on a NetWare/NDS agent.
Symantec ESM’s default c2.nws template file defines parameter settings that are
required to certify a NetWare server as C2-compliant.
You can update an existing NW Console Parameters template or create a new
NW Console Parameters template using the Template Editor in the Symantec
ESM Enterprise Console.
111
112 Checking network and server settings
Startup Files module
To edit the NW Console Parameters template
1
Choose an option:
■
To open an existing NW Console Parameters template for editing, doubleclick the template name in the Templates branch of the Enterprise tree.
■
To create a new template:
2
■
Right-click Templates in the enterprise tree.
■
Select New in the context menu, then select NW Console Params NetWare/NDS from the list of available template types.
■
Enter a Template file name of eight characters or less, but do not add a
file extension.
■
Click OK to create the template and access the Template Editor.
Use the control buttons in the Template Editor to load an agent’s current
parameter settings into the template, to add a new row and manually enter a
new parameter setting, or to remove selected rows from the template.
Checking network and server settings
Startup Files module
■
Click Add Parameters to open the Add Items to Template dialog box
and specify the parameter settings that you want to load into the
template.
■
Select the agent name of the server where the parameter setting is
located.
■
Enter the name of the parameter you want to load into the template in
the Item name text box. You can use asterisk (*) and question mark (?)
characters as wildcards to specify multiple parameter settings.
■
Click Add Row to add a blank row to the template and manually enter a
new parameter and its required settings.
■
Select one or more existing rows in the template and click Remove Rows
to delete the selected parameters from the template.
3
Enter the name of the parameter that you want to monitor in the Parameter
Name field. The name must be spelled exactly as it appears through the
console SET command. Capitalization may vary since these parameters are
not case sensitive.
4
Select the option from the Comparison context menu that determines how
the agent’s current parameter setting must compare with the template’s Value
entry. Valid options include:
Comparison value
Explanation
Equal
Setting must match template value
Not Equal
Setting must not match template value
Less Than
Setting must be less than template value
Less Than or Equal
Setting must be less than or equal to template value
113
114 Checking network and server settings
Startup Files module
Comparison value
Explanation
Greater Than
Setting must be greater than template value
Greater Than or Equal Setting must be greater than or equal to template value
Empty String
String setting must be empty
Non-empty String
String setting must not be empty
Contain String
String setting must contain template value
Not in String
String setting must not contain template value
5
Enter the value that the agent’s parameter setting will be compared with in
the template’s Value field.
6
Select the option from the Severity context menu that describes the security
level of the message that ESM will generate if the agent’s parameter setting
does not meet template requirements. Valid options include:
Severity value
Explanation
Red
Very severe
Yellow
Causes concern
Green
Informational
7
Select the Complain if missing check box only if the specified parameter
setting is required to exist on the agent server. Clearing this check box does
not disable the comparisons with template values, but it does suppress the
red-level Missing console parameters message that is generated by Symantec
ESM’s security check.
8
Click Save to save your template editing changes, and click Close to exit the
Template Editor.
For more information about the security check that uses the NW Console Params
template, see “NetWare console parameters” on page 110.
Checking network and server settings
Startup Files module
Server module: All objects in the tree will be considered
NetWare/NDS modules are divided into two categories:
■
NDS module checks for security problems involving NDS objects.
■
Server module checks for security problems involving server resources.
This server module checks access to server resources against objects in the entire
NDS tree.
115
116 Checking network and server settings
System Auditing module
System Auditing module
The System Auditing module reports whether auditing is enabled and configured
properly on NDS Volume and Container class objects.
Note: The System Auditing module is not supported on NetWare 6.x. The checks
in this module correspond to functionality that is no longer available in NetWare
6.x.
Volume auditing enabled
This check reports selected events in local volumes that are not being audited.
NetWare/NDS servers disable volume auditing by default. Enable auditing of
critical events for each local volume. Auditing provides valuable information in
the event of a break-in.
Use the name list to specify the volumes that are to be excluded or included in the
check.
Before this check can report whether selected events are being audited, you must
enable the corresponding event keys in the related option lists. The option lists
that are used by this check are:
■
Accounting events enabled
■
Extended attribute events enabled
■
File events enabled (global)
■
File events enabled (user and file/directory)
■
File events enabled (user or file/directory)
■
Message events enabled
■
QMS events enabled
■
Server events enabled
■
User events enabled
Checking network and server settings
System Auditing module
The check returns the following messages:
Table 5-26
Volume auditing enabled messages
Message
Title
Class
ALREADY_IN_USE
Unable to get auditing status of object, audit or
connection already in use
2
EVENT_DUPLICATE
File event was selected in multiple checks
4
NCP_NOT_SUPPORTED
Unable to get auditing status of object, NCP is not 2
supported on ’Host Server’
NO_VOLUME_AUDITING Volume Auditing disabled
2
VOL_EVENT_OFF
2
Required volume auditing event is not enabled
For optimal security, enable critical auditing events on all server volumes.
Accounting events enabled
Use this option to select the accounting events that are checked by the Volume
auditing enabled check. View the accounting event keys by selecting this option
in the Symantec ESM console.
Extended attribute events enabled
Use this option to select the extended attribute events that are checked by the
Volume auditing enabled check. View the extended attribute event keys by
selecting this option in the Symantec ESM console.
File events enabled (global)
Use this option to select the global file events that are checked by the Volume
auditing enabled check. View the global file event keys by selecting this option in
the Symantec ESM console.
File events enabled (user or file/directory)
Use this option to select the user or file/directory events that are checked by the
Volume auditing enabled check. View the user or file/directory event keys by
selecting this option in the Symantec ESM console.
117
118 Checking network and server settings
System Auditing module
File events enabled (user and file/directory)
Use this option to select the user and file/directory events that are checked by the
Volume auditing enabled check. View the user and file/directory event keys by
selecting this option in the Symantec ESM console.
Message events enabled
Use this option to select the message events that are checked by the Volume
auditing enabled check. View the message event keys by selecting this option in
the Symantec ESM console.
QMS events enabled
Use this option to select the QMS events that are checked by the Volume auditing
enabled check. View the QMS event keys by selecting this option in the Symantec
ESM console.
Server events enabled
Use this option to select the server events that are checked by the Volume
auditing enabled check. View the server event keys by selecting this option in the
Symantec ESM console.
The following server events are available only for NetWare 5.0 and higher:
■
Graded authentication failed access control service
■
Graded authentication get volume access label
■
Graded authentication get connection range
■
Graded authentication set volume access label
User events enabled
Use this option to select the user events that are checked by the Volume auditing
enabled check. View the user event keys by selecting this option in the Symantec
ESM console.
Checking network and server settings
System Auditing module
Files/directories for auditing
This check reports specified files in local volumes that are not being audited.
Use the name list to specify files that are included in the check. If you specify a
directory, the check reports any files in the directory that are not being audited.
The check returns the following message:
Table 5-27
Files and directories flagged for auditing message
Message
Title
Class
FILE_NOT_AUDITED
File is not flagged for auditing
2
Enable auditing on all critical files.
Container auditing enabled
This check reports Container objects in the agent’s context list that are not being
audited.
NetWare/NDS servers disable Container auditing by default. Enable Container
auditing for all of the Container objects. Auditing provides valuable information
during and after a break-in.
Note: You must exit AUDITCON completely before running this security check.
Otherwise, the check cannot read Container auditing configuration headers. The
Alt-F10 keys provide a quick way to exit AUDITCON from anywhere.
Use the name list to specify Containers that are to be excluded or included in the
check.
You must enable the corresponding event keys in the NDS Container events
enabled option list before the check can report whether specific events are being
audited.
119
120 Checking network and server settings
System Auditing module
The check returns the following messages:
Table 5-28
Container auditing enabled messages
Message
Title
NO_CONTAINER_ AUDITING Container auditing disabled
DS_EVENT_OFF
Class
2
Required Container auditing event is not 2
enabled
Enable auditing on all critical Containers.
NDS Container events enabled
Use this option to select the Container events that are to be checked by the
Container auditing enabled check. Container events are listed in the Disabled
keys name list.
Users for auditing
This check reports user objects in the agent’s context list that are not being
audited.
Use the name list to specify users that are to be excluded or included in the check.
The check returns the following message:
Table 5-29
Users flagged for auditing message
Message
Title
Class
USER_NOT_AUDITED
User is not flagged for auditing
2
Dual module: Some NDS and some server checks
NetWare/NDS modules are divided into two categories:
■
NDS module checks examine NDS objects for security problems
■
Server module checks examine server resources for security problems
NDS modules are given a list of NDS contexts to check at installation. You can
change the agent’s context list with the ESMSETUP.NLM setup program.
This module checks Containers and users within the agent context list as well as
volumes, directories, and files on the local server.
Chapter
6
Checking system files and
directories
This chapter includes the following topics:
■
File Attributes module
■
File Find (Queries) module
■
File Access (Queries) module
■
File Information (Queries) module
These modules check system files and directories for unauthorized access,
modification, and tampering.
This chapter also lists the messages that are returned by individual security
checks. For common messages that are returned by multiple security checks, see
“Reviewing common messages” on page 45.
To learn how to use name lists, see “Editing name lists” on page 35.
122 Checking system files and directories
File Attributes module
File Attributes module
The File Attributes module compares system file attributes with the attributes
that are specified in File templates and reports differences that could represent
unauthorized use or tampering.
The module also creates and maintains a snapshot file on each Symantec ESM
agent server to detect system file changes. Most system files should not change
during normal use. Changes that are not due to software updates by the system
administrator could represent a security problem.
Symantec ESM provides default File templates for NetWare operating system
versions that were available when this security update was developed. Update
these templates to match the operating system versions that are installed on your
systems before running the File Attributes module.
See “Editing the File template” on page 130.
Updateable File Attributes messages
The NetWare File Attributes module has 3 security checks that return snapshotupdateable messages.
Snapshot-updateable messages let you update snapshots to match current values
for the agent system. These messages display the letters SU in the Updateable/
Correctable column of the console grid.
Run the module once to create the agent snapshot file before you run the module
to look for security weaknesses.
Table 6-1
Updateable/correctable File Attributes messages
Security check
Code
Message name
File creation time
SU
DIFFSNAP
File ownership
C
DIFFOWN
File attributes
C
DIFFATTRIB
Checking system files and directories
File Attributes module
Template file list
Use this option to enable and disable the File template files that are used for file
attributes checking.
The File Attributes module can generate any of the following messages as it
examines template files. These messages are generated before the module runs
any of the security checks that are documented below.
The check returns the following messages:
Table 6-2
Common File attributes messages
Message
Title
Class
NOTEMPLATES
No template files specified
4
FORBIDWC
Forbidden wild card file exists
4
NOEXISTWC
Mandatory wild card entry
0
NOEXIST
Mandatory file does not exist
4
The FORBIDWC, NOEXISTWC, and NOEXIST messages correspond to
different conditions that exist in the template files:
■
A wild card pattern, specified as FORBIDDEN, that matches a current file.
Improve your security by either changing the requirement for this pattern in
the template or removing the file from your system.
■
A wild card pattern, specified as MANDATORY, that is not a valid measure
for checking.
Improve your security by placing full file and path names in the template for
items that are MANDATORY.
■
A file name, specified as MANDATORY, that does not exist on the system.
Improve your security by either changing the requirement for this file in the
template or adding the missing file to your system.
123
124 Checking system files and directories
File Attributes module
File ownership
This check verifies the proper ownership of files using the values that are specified
in your templates.
The check returns the following message:
Table 6-3
File ownership message
Message
Title
Class
DIFFOWN
Different file ownership
2
Changes in file ownership that were not made by the system administrator may
represent a serious security concern.
For optimal security, correct the file ownership and verify that the file has not
been modified by any unauthorized persons. If an unauthorized modification has
occurred, restore the file from the distribution media or from a backup as quickly
as possible.
File attributes
This check verifies file attributes using the values specified in your templates.
The check returns the following message.
Table 6-4
File attributes message
Message
Title
Class
DIFFATTRIB
Different file attributes
2
Changes in file attributes may indicate tampering. If one or more of the file
attributes do not match the attributes that are specified in the File template, you
should determine the cause of the mismatch and take appropriate action.
If a change was made to the attributes of a file and that change was made by the
system administrator, you should update the File template with the new
attributes.
If a change is not due to an update that was performed by the system
administrator, it might represent an unauthorized file attributes modification.
This is a serious security concern. Change the file attributes back to their previous
values.
Checking system files and directories
File Attributes module
Changed files (creation time)
This check verifies the creation times of files that have the Creation Time option
checked in their associated template records. The creation time is compared to
the value stored in the snapshot file. The snapshot file is created and stored on the
agent the first time the File Attributes module is run.
This check returns the following message.
Table 6-5
File creation time message
Message
Title
Class
DIFFSNAP
File attributes have changed
2
Changes to the creation time of files may represent a serious security concern. If
this change is due to an update that was performed by the system administrator,
you should update the agent’s snapshot.
If this change was not made by the system administrator, you should restore the
file either from a backup or from the original distribution media.
Note: Because it is possible for an intruder to modify a file without changing the
file creation time, you should also run CRC and/or MD5 checksum checks to
ensure file integrity.
125
126 Checking system files and directories
File Attributes module
Changed files (modification time)
This check verifies the modification times of files that have the Modification
Time option checked in their associated template records. The modification time
is compared to the value stored in the snapshot file. The snapshot file is created
and stored on the agent the first time the File Attributes module is run.
This check returns the following message:
Table 6-6
File modification time message
Message
Title
Class
DIFFSNAP
File attributes have changed
2
Changes to the modification times of files may represent a serious security
concern. If this change was made by the system administrator, you should update
the agent’s snapshot.
If this change is not due to an update that was performed by the system
administrator, you should restore the file from a backup or from the original
distribution media.
Note: Because it is possible for an intruder to modify a file without changing the
modification time, you should also run CRC and/or MD5 checksum checks to
ensure file integrity.
Checking system files and directories
File Attributes module
Changed files (size)
This check verifies the sizes of files that have the Size option checked in their
associated template records. The file size is compared to the value that is stored in
the snapshot file. The snapshot file is created and stored on the agent the first
time the File Attributes module is run.
This check returns the following message:
Table 6-7
File size message
Message
Title
Class
DIFFSNAP
File attributes have changed
2
Changes to the sizes of files may represent a serious security concern. If changes
are due to an update that was performed by the system administrator, you should
update the agent’s snapshot.
If a change is not due to an update that was performed by the system
administrator, you should restore the file either from a backup or from the
original distribution media.
Note: Because it is possible for an intruder to modify a file without changing the
file size, you should also run CRC and/or MD5 checksum checks to ensure file
integrity.
127
128 Checking system files and directories
File Attributes module
Changed files (signature)
This check runs checksum checks on files that have the CRC, MD5, or
CRC+MD5 option checked in their associated template records.
This check returns the following message.
Table 6-8
Checksum check (CRC/MD5) message
Message
Title
Class
DIFFSNAP
File attributes have changed
2
Checksum checks are the most difficult security checks for a hacker to
circumvent.
Inherited rights mask
This check looks at the inherited rights filter on directories that have the
Inherited Rights option selected in their associated template records. The
inherited rights filter is compared to the value that is stored in the snapshot file.
The snapshot file is created and stored on the agent the first time the File
Attributes module is run.
This check returns the following message:
Table 6-9
Inherited rights mask message
Message
Title
Class
DIFFSNAP
File attributes have changed
2
If changes in the inherited rights filter were made by the system administrator,
you should update the snapshot file.
Checking system files and directories
File Attributes module
Allow any privileged owner
This option modifies the behavior of the File ownership check. When this option
is enabled, Symantec ESM accepts not only the local server as owner, but any
privileged users as well, for files designated in templates with %SERVER%
owners. In most situations, ownership of system files by any privileged user is
acceptable. Use this option to accommodate variations in ownership between
different versions or installations of the same operating system and still use the
same templates.
Because most system files in NetWare are originally installed with the local server
as owner, the File Attributes templates specify %SERVER% in the owner field by
default. It is possible, however, for a privileged user (for example, SUPERVISOR
or a SUPERVISOR equivalent) to update these files and become the owner of the
updated files.
Match abbreviated names in templates
Enabling this option allows abbreviated forms of owner names to be used in
template files. For example, a template owner name of “shirley” will match a file
owner name of “shirley.sales.myco.”
Note: Ownership problems that are found with abbreviated template owner
names may not be correctable. See “Correcting agents in messages” on page 46.
Server module: NDS tree is not considered
NetWare/NDS modules are divided into two categories:
■
NDS module checks for security problems involving NDS objects
■
Server module checks for security problems involving server resources
This server module considers the tree only to identify owners of files.
129
130 Checking system files and directories
File Attributes module
Editing the File template
The File Attributes module uses information in File templates to check the
attributes of critical files or directories. Security checks in the File Attributes
module report conditions that do not match the template settings.
You can update an existing File template by loading the current settings for a file
or directory into the template, adding new files and directories, and deleting files
and directories. You can also create new File templates to monitor other sensitive
files or directories.
To edit the File template
1
Do one of the following:
■
To open an existing template for editing in the Template Editor, double-click
the template name in the Templates branch of the Enterprise tree.
Figure 6-1
■
File template
To create a new template:
■
Right-click Templates in the Enterprise tree and select New.
■
Select File - NetWare/NDS from the list of available template types.
■
Enter a Template file name of eight characters or less but do not add a
file extension.
■
Click OK to create the template and access the Template Editor.
Checking system files and directories
File Attributes module
2
To add a file or directory to the File template, complete the steps illustrated
below:
Obtain information
about the new file or
directory from a
reliable source. Then
access the ESM File
Template Editor.
Add the
data manually
to the
template?
Yes
Click the Add New
Row button. Enter the
new file or directory
information in the new
row of the template.
No
Adding
file or
directory?
Directory
Click the
Add Directory
button.
Enter the Item to add
and select the Items
to include in the
dialog box. Click the
OK button. The
module loads the files
and current settings
for the directory and
for its subdirectories
to the specified level.
File
Click the Add
File button.
Enter the Item name
in the dialog box.
Click the OK button.
The module loads the
current file settings.
Manually edit the
attributes to be
checked, then click
Save and Done.
131
132 Checking system files and directories
File Attributes module
To automatically add a new file to the File template
1
Click Add File or Add Directory and enter the required information. For
example, to add the Symantec ESM Manager database file to the template,
type:
SYS:SYMANTEC\ESM\ CONFIG\MANAGER.DAT.
2
Click OK and Symantec ESM loads current file settings for the specified file
or directory, and subdirectories to the specified level, into the template.
Symantec ESM also enables all check boxes by default.
3
Edit the new items in the template to conform with your company’s security
policy.
4
Click Save to save your changes to the File template, and click Done to exit
the Template Editor.
To manually add a new file to the File template
1
Click Add Row to add a blank row to the template.
2
Type string values for the Directory or File Name and the Owner fields.
Owner can be %Server%, %Privileged%, or a fully distinguished object
name.
3
Type the Attributes flags for the directory or file. Flags must be spaced as
shown.
Checking system files and directories
File Attributes module
4
Check the file values that Symantec ESM compares to values in the agent’s
snapshot file.
When you check a check box in the File template and enable the related
security check in the File Attributes module, the module compares the
current value of the file on the agent system with the value stored in the
agent’s snapshot file and reports differences.
5
Select the type of file signature, if any, from the CheckSum context menu that
you want the module to calculate and compare against snapshot values.
Valid options include:
■
None -- No signature
■
CRC -- 16 bit signature
■
MD5 -- 128 bit signature
■
CRC+MD5 -- Combined signatures
6
Specify whether the file must exist, the file must not exist, or file existence is
optional by checking the appropriate option in the Required context menu.
7
Click Save to save your changes to the File template, and click Done to exit
the Template Editor.
133
134 Checking system files and directories
File Attributes module
Editing File Attributes
Symantec ESM monitors these file and directory Attributes flags:
Table 6-10
File or directory attribute flags
Flag
Description
A
Archive
Di
Delete inhibit
H
Hidden
P
Purge
Ri
Rename inhibit
Ro
Read-only
Rw
Read/write
S
Sharable
Sy
System
T
Transactional
X
Execute only
The Attributes flags must appear in the File template in the order shown below.
You must separate flags with spaces and enclose each row of flags within spaces
and brackets. The first column after the bracket and space must contain either Ro
or Rw. The remaining columns must contain either a value or a dash.
Table 6-11
Template attribute flag sequence
[
Ro/Rw
S
A
X
H
Sy
T
P
--
--
Ci
Di
Ri
]
[
Ro
S
-
-
-
--
-
-
--
--
-
Di
Ri
]
Checking system files and directories
File Access (Queries) module
File Access (Queries) module
This module examines the permissions of user-specified files and identifies user
accounts that can access the files as specified by module options. It also checks to
verify that only policy-designated users may modify the files.
Excessive file access
This check looks at system directories (such as SYS:\, SYS:SYSTEM, SYS:PUBLIC,
etc.) and reports user accounts that have been given more rights than Novell
recommends.
Novell’s recommended rights include:
Table 6-12
Novell recommended rights
Directory
Rights
SYS:\
[]
SYS:SYSTEM
[]
SYS:LOGIN
[RF]
SYS:PUBLIC
[RF]
SYS:ETC
[]
SYS:QUEUES
[]
This check returns the following message:
Table 6-13
Excessive file access message
Message
Title
Class
EXCESS_RIGHTS
Accounts with excessive system directory rights
2
Accounts with Effective Rights that are greater than those recommended by
Novell could be used to replace or modify widely-used common files in a system
directory (like SYS:SYSTEM, SYS:LOGIN, SYS:PUBLIC, etc.). Ensure that extra
rights to these directories are strictly limited to a small number of trusted users.
135
136 Checking system files and directories
File Access (Queries) module
Access to ESM files
This check reports users who have account access to Symantec ESM files.
The check returns the following message:
Table 6-14
Access to ESM files message
Message
Title
Class
EXCESS_RIGHTS_ESM
Accounts with access to ESM directory
2
Access to the Symantec ESM directory gives users potential access to executable
and snapshot files. An intruder could use one of these accounts to hide
indications of a security problem, replace an executable with a Trojan Horse
program that could later be run with an admin equivalent, or gain knowledge of
security weaknesses that are detected by Symantec ESM.
Limit access to the Symantec ESM directory to Symantec ESM privileged
accounts.
System directories with non-recommended rights masks
This check searches server system directories (like SYS:, SYS:SYSTEM, etc.) for
inherited rights filters that allow more access than Novell recommends.
Novell’s recommended rights include:
Table 6-15
Novell recommended inherited rights filters
Directory
IRM
SYS:\
[]
SYS:SYSTEM
[]
SYS:LOGIN
[ SR ]
SYS:PUBLIC
[SR W C E M F A ]
SYS:ETC
[SR W C E M F A ]
SYS:QUEUES
[S]
Checking system files and directories
File Access (Queries) module
This check returns the following message:
Table 6-16
Message
Non-recommended rights message
Title
NON_RECOMMENDED_IRM Non-recommended inheritance filter
Class
2
Inherited rights that override Novell’s recommendations could present a security
risk. Review inherited rights and limit those that are in violation of your security
policy.
The SYS:SYSTEM directory, unlike other directories on your file system, has an
inheritance filter placed on it.
Server module: All objects in the tree will be considered
NetWare/NDS modules are divided into two categories:
■
NDS module checks for security problems involving NDS objects.
■
Server module checks for security problems involving server resources.
This server module checks access to server resources against objects in the entire
NDS tree.
137
138 Checking system files and directories
File Find (Queries) module
File Find (Queries) module
The File Find module identifies sensitive files that are duplicated on the file server
in areas where they should not be located. The module also identifies files that are
marked as system or hidden.
Duplicate system files
This check reports files from SYS:SYSTEM that are duplicated elsewhere on the
file server. You can use the file list to specify file names that are excluded from the
check. Do not include full path names in the file list.
This check returns the following message:
Table 6-17
Duplicate system files message
Message
Title
Class
SYSTEM_IN_OTHER
System file duplicated elsewhere
3
Trojan Horse programs are often placed in areas that are searched before the
system area. This action could cause a user to inadvertently execute the Trojan
Horse program instead of the system program.
Investigate all reports of duplicate files. Add any system files that can safely be
duplicated to the excluded file list.
Hidden and system files
This check reports files and directories with the [H]idden or [S]ystem flags set.
Use the file list to specify full pathnames (including the volume name) for files
that are excluded from the check.
This check returns the following messages:
Table 6-18
Hidden and system file messages
Message
Title
Class
FILE_HIDDEN
File is hidden
2
FILE_SYSTEM
File has system attribute
0
Files that have been set with the system attribute are not ordinarily a problem, but
Symantec ESM reports this condition for your information.
Checking system files and directories
File Find (Queries) module
Trojan Horse programs, which are placed in an area that is searched before the
system area, may be inadvertently activated.
Investigate all reports of duplicate files. System files that can safely be duplicated
can be added to the excluded file list.
Hidden files and directories are sometimes used to hide unauthorized use of the
directory tree. Ensure that each instance of a hidden file is investigated and that
those files that are authorized to be hidden are placed in the excluded file list.
Duplicate non-system files
This check reports files that are duplicated elsewhere on the file server.
The file list lets you specify the file names that are checked. If you specify a full file
path name, the check lists files with the same name that are located elsewhere. If
you specify a file name without a directory path, then all file locations are listed
when more than one instance of the file is located.
This check returns the following message:
Table 6-19
Duplicate non-system files message
Message
Title
Class
USER_DEFINE_BASELINE
File duplicated
1
Duplicated non-system files could indicate a security problem. All reports of
duplicate files should be investigated.
Server module: NDS tree is not considered
NetWare/NDS modules are divided into two categories:
■
NDS module checks for security problems involving NDS objects.
■
Server module checks for security problems involving server resources.
This server module considers the tree only to identify owners of files.
139
140 Checking system files and directories
File Information (Queries) module
File Information (Queries) module
The File Information module generates a report that includes selected users and
their rights to specified directories and files. Depending on the keywords that are
enabled in the Items to report option, the module reports effective rights, trustee
rights, and/or inherited rights for selected users.
Items to report
Use this option to choose the user rights to specified files and directories that are
included in File Information reports. Select the user rights from the keyword list.
Possible selections include effective rights, trustee rights, and inherited rights.
The check returns the following messages:
Table 6-20
Information report messages
Message
Title
Class
SYSTEM_NCS
No checks selected
0
SYSTEM_IRM
Inherited Rights Mask
0
SYSTEM_EF
Effective Rights
0
SYSTEM_TR
Trustee Rights
0
File Information queries are designed to produce information-only reports. No
security actions are recommended.
Effective rights mask
Use this option to enable or disable the keywords that define the privileges that
are reported as effective rights in File Information query results.
Possible selections and their default settings in the check’s keyword list include:
Table 6-21
ESM default effective rights settings
Effective Right
Default Setting
Effective Right
Default Setting
Access Control
Enabled
Supervisor
Enabled
Create
Disabled
Erase
Disabled
File Scan
Disabled
Modify
Disabled
Read
Disabled
Write
Disabled
Checking system files and directories
File Information (Queries) module
The module returns the following message when Effective Rights is enabled in the
Items to report option but all keywords are disabled in the Effective rights mask
option:
Table 6-22
Empty rights mask message
Message
Title
Class
EMPTY_MASK
Empty Rights Mask--Check Skipped
0
Users/groups to check
Use this option to specify the users and groups to include or exclude in reported
File Information query results.
The check returns the following message:
Table 6-23
Users/groups to check message
Message
Title
Class
SYSTEM_NUSL
No users selected
0
Files/directories to check
Use this option to specify the files and/or directories to include in reported File
Information query results. The following NetWare directories are included in the
option’s default file list:
■
SYS:ETC
■
SYS:LOGIN
■
SYS:MAIL
■
SYS:PUBLIC
■
SYS:SYSTEM
The check returns the following messages:
Table 6-24
Files/directories to check messages
Message
Title
Class
SYSTEM_NDOF
No directories or files selected
0
SYSTEM_BFN
Invalid file name
0
141
142 Checking system files and directories
File Information (Queries) module
Directories only
When this option is enabled, the module reports selected user rights information
for directories only and excludes files from reported query results.
Walk subdirectories
When this option is enabled, the module reports selected user rights information
for all subdirectories of directories that are specified by the Files/directories to
check option. When this option is disabled, only the specified directories are
included in reported query results.
Server module: All objects in the tree will be considered
NetWare/NDS modules are divided into two categories:
■
NDS module checks for security problems involving NDS objects.
■
Server module checks for security problems involving server resources.
This server module checks access to server resources against objects in the entire
NDS tree.
Index
Symbols
.class directive 49
.customized directive 48, 49
.m files
.customized directive 48, 49
.module directive 49
directives 48
editing messages 48
locations 48
.module directive 49
.text directive 49
.title directives 48
A
Access to ESM files
File Access 136
Access to NDS login scripts
User Files 86
Account Information checks
Account login status 54
Directory trustees 55
Directory trustees (cont’d) 55
Group membership 53
Objects in agent context list 55
Security equivalences 53
User information 52
User information (cont’d) 52
Account Information module (Queries) 52
Account Integrity checks 56
Accounts with access to other home directory 60
Accounts with common names 59
Accounts with common names (cont’d) 59
Accounts without a home directory 59
Accounts without expiration dates 57
Accounts without login time restrictions 58
Expiration time 58
New, changed, and deleted groups 62
New, changed, and deleted users 60
Objects in agent context list 63
updateable messages 56
Account login status
Account Information 54
Accounting events enabled
System Auditing 117
accounts
Queries policy 31
Accounts with access to other home directory
Account Integrity 60
Accounts with common names
Account Integrity 59
Accounts with common names (cont’d)
Account Integrity 59
Accounts without a home directory
Account Integrity 59
Accounts without expiration dates
Account Integrity 57
Accounts without login time restrictions
Account Integrity 58
ACL access
Object Integrity 95
ACLs of stealth objects
Object Integrity 99
Add prefix
Password Strength 81
Add suffix
Password Strength 82
agents
correct 46
All objects in the tree will be considered
File Access 137
File Information 142
Startup Files 115
All volumes have NDS objects
Network Integrity 91
Allow any privileged owner
File Attributes 129
ALLOW UNENCRYPTED PASSWORDS
Startup Files 106
AUTOEXEC.NCF
144 Index
files loaded by 107
Startup Files 107
B
bindery users with DOS script
User Files 87
C
Changed files (creation time)
File attributes 125
Changed files (modification time)
File Attributes 126
Changed files (signature)
File Attributes 128
Changed files (size)
File Attributes 127
check boxes in templates 42
Consider objects above server
Startup Files 142
console parameters
Startup Files 110
console parameters templates
in ESM 5.x console 111
Container auditing enabled
System Auditing 119
context menus in templates 42
copying the NetWare/NDS files 23
correctable messages 46
creating security policies 29
D
default policies
phase 30
Queries 31
demo policy 32
directives 48
title 48
Directories only
File Information 142
Directory trustees
Account Information 55
Directory trustees (cont’d)
Account Information 55
Disabled accounts
Login Parameters 65
Disk space limits
Network Integrity 90
DOS bindery login scripts
User Files 86
Double occurrences
Password Strength 79
Dual module NDS/server
System Auditing 120
Duplicate non-system files
File Find 139
Duplicate system files
File Find 138
E
editing
module security checks 33
Effective rights mask
File Information 140
ESM agent object’s access to agent’s contexts
Object Integrity 100
ESMMODS.NLM 22
ESMSETUP.NLM 22, 25
Excessive file access
File Access 135
Expiration time
Account Integrity 58
Extended attribute events
System Auditing 117
F
File Access checks
Access to ESM files 136
All objects in the tree will be considered 137
Excessive file access 135
non-recommended rights masks 136
File Access module 135
file attributes
editing 134
File Attributes checks
Allow any privileged owner 129
Changed files (creation time) 125
Changed files (modification time) 126
Changed files (signature) 128
Changed files (size) 127
File attributes 124
File ownership 124
Inherited rights mask 128
Index
Match abbreviated names in templates 129
NDS tree is not considered 129
template file list 123
updateable messages 122
File Attributes module 122
File events enabled
global 117
user and file/directory 118
user or file/directory 117
File Find checks
Duplicate non-system files 139
Duplicate system files 138
Hidden and system files 138
NDS tree is not considered 139
File Information checks
All objects in the tree will be considered 142
Directories only 142
Effective rights mask 140
Files/directories to check 141
Items to report 140
Users/groups to check 141
Walk subdirectories 142
File Information module 140
File ownership
File Attributes 124
file permissions
Queries policy 31
file systems
system directories 17
File template
editing 130
file templates
in ESM 5.x console 111
Files and directories flagged for auditing
System Auditing 119
files/directories name list 35
Files/directories to check
File Information 141
Force periodic password change
Password Strength 72
G
generic strings name list 35
Group membership
Account Information 53
groups name list 35
H
hardening operating systems 28
Hidden and system files
File Find 138
I
Inactive accounts
Login Parameters 64
Incorrect login attempts
Login Parameters 68
Inherited rights mask
File Attributes 128
installation
security update 22, 23
installation settings, restore 32
installation, Symantec ESM modules 20
Intruder attempt reset interval
Login Parameters 69
Intruder detection enabled
Login Parameters 68
Intruder lockout reset interval
Login Parameters 69
Items to report
File Information 140
K
key name list 35
L
Limit concurrent logins
Login Parameters 67
Limit grace logins
Password Strength 73
Limit workstation addresses
Login Parameters 66
LOAD REMOTE with unencrypted password
Startup Files checks 106
Locked accounts
Login Parameters 66
Login Parameters checks 64
Disabled accounts 65
Inactive accounts 64
Incorrect login attempts 68
Intruder attempt reset interval 69
Intruder detection enabled 68
145
146 Index
Intruder lockout reset interval 69
Limit concurrent logins 67
Limit workstation addresses 66
Locked accounts 66
Objects in agent context list 69
Unused accounts 64
M
Match abbreviated names
File Attributes 129
templates 129
Message events enabled
System Auditing 118
messages
.class directive 49
correctable 46
directives 48
editing 48
updateable 47
Missing object properties
Object Integrity 101
Missing object properties (cont’d)
Object Integrity checks 101
modules
Account Information 52
Account Integrity 56
editing security checks 33
File Access 135
File Attributes 122
File Information 140
installation 23
installing Security Updates 20
Login Parameters 64
Network Integrity 90
Object Integrity 92
Password Strength 70
Queries 52
restore installation settings 32
System Auditing 116
User Files 86
version number 49
mounting the CD-ROM drive 22
N
name lists 35
disabling items 85
multiple users/groups 38
NDS Container events enabled
System Auditing 120
NDS tree is not considered
File Attributes 129
File Find 139
Network Integrity checks
All volumes have NDS objects 91
Disk space limits 90
Objects in the tree will be considered 91
Network Integrity module 90
network settings 16
New, changed, and deleted file servers
Object Integrity 95
New, changed, and deleted groups
Account Integrity 62
New, changed, and deleted print queues
Object Integrity 94
New, changed, and deleted print servers
Object Integrity 93
New, changed, and deleted users
Account Integrity 60
NLMs
added since snapshot 109
changed since snapshot 110
currently loaded on server 108
disallowed 108
removed since snapshot 109
required 108
Startup Files 108, 109, 110
numeric fields in templates 42
O
Object Integrity checks
ACLs of stealth objects 99
ESM agent object’s access to agent’s contexts 100
Excessive ACL access 95
Missing object properties 101
Missing object properties (cont’d) 101
NetWare server equivalences 98
New, changed, and deleted file servers 95
New, changed, and deleted print queues 94
New, changed, and deleted print servers 93
Objects in agent context list 102
Server console operators 98
Stealth objects 99
Subordinates of stealth objects 99
Index
updateable messages 92
Object Integrity module 92
Objects in agent context list
Account Integrity 63
Login Parameters 69
Object Integrity 102
Password Strength 82
User Files 88
objects in agent context list
Account Information 55
Objects in the tree will be considered
Network Integrity 91
OS hardening policies 28
P
Password = any username
Password Strength 75
Password = username
Password Strength 74
Password = wordlist word
Password Strength 76
Password = wordlist word (cont’d)
Password Strength 77
Password Strength 71
Password Strength checks 70
Accounts without passwords 71
Add prefix 81
Add suffix 82
Double occurrences 79
Force periodic password change 72
Limit grace logins 73
Objects in agent context list 82
Password = any username 75
Password = username 74
Password = wordlist word 76
Password = wordlist word (cont’d) 77
Password length restrictions 71
Plural Forms 80
Plural forms 80
Require unique passwords 73
Reverse order 78
User can change password 70
word files 83
phase policies 30
Plural Forms
Password Strength 80
Plural forms
Password Strength 80
policies
add 29
copy between managers 32
creating with ESM console 29
default 30
delete 30
duplicate 29
edit 29
move between managers 32
OS hardening 28
phase 30
Queries 31
rename 30
Response 28
Q
QMS events enabled
system Auditing 118
Queries module
See Account Information module 52
Queries policy 31
R
REMOVE DOS
Startup Files 105
Require unique passwords
Password Strength 73
Response policies 28
Reverse order
Password Strength 78
S
SECURE CONSOLE
Startup Files 104
security checks
demonstrate 32
editing 35
Security equivalences
Account Information 53
security modules
editing checks 33
security policies
creating with ESM console 29
security policies. See policies
Server console operators
147
148 Index
Object Integrity 98
server equivalences
Object Integrity 98
Server events enabled
System Auditing 118
server settings 16
severity 49
Startup Files checks
Access to files loaded by AUTOEXEC.NCF 107
All objects in the tree will be considered 115
ALLOW UNENCRYPTED PASSWORDS 106
Consider objects above server 142
console parameters 110
LOAD REMOTE with unencrypted password 106
NLMs added since snapshot 109
NLMs changed since snapshot 110
NLMs currently loaded on server 108
NLMs not allowed to be loaded 108
NLMs removed since snapshot 109
REMOVE DOS 105
required NLMs 108
SECURE CONSOLE 104
Stealth objects
Object Integrity 99
stealth objects
ACLs 99
subordinates 99
string fields in templates 42
SU 47
sublists in templates 43
Subordinates of stealth objects
Object Integrity 99
System Auditing
Dual module NDS/server 120
System Auditing checks
Accounting events enabled 117
Container auditing enabled 119
Extended attribute events 117
File events enabled
global 117
user and file/directory 118
user or file/directory 117
Files and directories flagged for auditing 119
Message events enabled 118
NDS Container events enabled 120
QMS events enabled 118
Server events enabled 118
User events enabled 118
Users flagged for auditing 120
Volume auditing enabled 116
System Auditing module 116
system directories
File Access 136
with non-recommended rights masks 136
T
Template Editor 41
template file list
File Attributes 123
template name list 35
templates
check box fields 42
context menus 42
create 40
creating 40
editing 40
editing fields 42
editing rows 41
numeric fields 42
open editor 41
string fields 42
sublists 43
Template Editor 41
used by modules 40
templates in ESM 5.x console
console parameters 111
file 111
TU 47
U
Unused accounts
Login Parameters 64
updateable messages 47
Account Integrity 56
File Attributes 122
Object Integrity 92
user accounts and authorizations 15
User can change password
Password Strength 70
User events enabled
System Auditing 118
User Files checks
Access to DOS bindery login scripts 86
Index
Access to NDS login scripts 86
All bindery users must have DOS script 87
Objects in agent context list 88
User Files module 86
User information
Account Information 52
User information (cont’d)
Account Information 52
Users flagged for auditing
System Auditing 120
users name list 35
users/groups name lists
multiple 38
Users/groups to check
File Information 141
V
Volume auditing enabled
System Auditing 116
W
Walk subdirectories
File Information 142
word file directory 85
word file lists
editing 85
word files
creating ASCII *.wrd files 85
editing 83
editing *.wrd files 85
Password Strength 83
word files name list 35
149
150 Index
Symantec ESM Security Update
CD Request Form
Symantec ESM 5.x and the Symantec ESM Application Modules require recent Security Updates (SUs), which most registered
Symantec ESM 5.5 or later customers download with LiveUpdate.
Customers can also download the SUs at the Symantec Security Response Web site:
http://securityresponse.symantec.com > Security Updates: Enterprise Security Manager > ESM Security Updates
CD ORDERING
If you are a registered Symantec ESM customer and need a CD of the latest SUs, complete this form and send it with your payment
to the address below.
CUSTOMER INFORMATION
Name ______________________________________ Company ___________________________________________________
Street address (no P.O. boxes please) __________________________________________________________________________
City _______________________________________ State _______________ ZIP or other postal code _____________________
Country* _______________________ Daytime phone _________________________ Software purchase date _______________
*This offer limited to U.S. and Canada. Customers outside the U.S. and Canada, please contact your local Symantec office or
distributor.
CD price
Sales tax
Shipping & handling
TOTAL DUE
No charge
None
$ 9.95 USD
$ 9.95 USD
FORM OF PAYMENT (CHECK ONE)
Amount enclosed $_____________
____ Visa
____ MasterCard ____ AMEX
Credit card number ___________________________________________________________ Expires _____________________
Name on card (please print) __________________________________ Signature ______________________________________
MAIL YOUR CD REPLACEMENT ORDER TO
Symantec Corporation
Attention: Enterprise Customer Service
555 International Way
Springfield, OR 97477
Email: [email protected]
(800) 721-3934
Please allow 2-3 weeks for delivery within the U.S.
Symantec and Enterprise Security Manager are trademarks of Symantec Corporation.
Other brands and products are trademarks of their respective holders.
© 2002 Symantec Corporation. All rights reserved. Printed in the U.S.A.
PN: 10025180
08/02