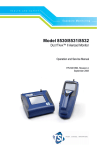
1
Exposure Monitoring Model AM510 SIDEPAKTM Personal Aerosol Monitor User Guide 1980456, Revision B May 2003 Model AM510 SIDEPAK™ Personal Aerosol Monitor User Guide May 2003 P/N 1980456, Rev. B SHIP TO/MAIL TO: TSI Incorporated 500 Cardigan Road Shoreview, MN 55126-3996 USA U.S. Customer Service: (800) 861-7919/(651) 490-3838 Fax: (651) 490-3824 E-mail address: [email protected] Website: http://www.tsi.com INTERNATIONAL Customer Service: (001 651) 490-3838 Fax: (001 651) 490-3824 Copyright © TSI Incorporated / 2002–2003 / All rights reserved. Address TSI Incorporated / 500 Cardigan Road / Shoreview, MN 55126 / USA Fax No. (651) 490-3824 Limitation of Warranty and Liability (effective July 2000) Seller warrants the goods sold hereunder, under normal use and service as described in the operator's manual, shall be free from defects in workmanship and material for twenty-four (24) months, or the length of time specified in the operator's manual, from the date of shipment to the customer. This warranty period is inclusive of any statutory warranty. This limited warranty is subject to the following exclusions: a. Hot-wire or hot-film sensors used with research anemometers, and certain other components when indicated in specifications, are warranted for 90 days from the date of shipment. b. Parts repaired or replaced as a result of repair services are warranted to be free from defects in workmanship and material, under normal use, for 90 days from the date of shipment. c. Seller does not provide any warranty on finished goods manufactured by others or on any fuses, batteries or other consumable materials. Only the original manufacturer's warranty applies. d. Unless specifically authorized in a separate writing by Seller, Seller makes no warranty with respect to, and shall have no liability in connection with, goods which are incorporated into other products or equipment, or which are modified by any person other than Seller. The foregoing is IN LIEU OF all other warranties and is subject to the LIMITATIONS stated herein. NO OTHER EXPRESS OR IMPLIED WARRANTY OF FITNESS FOR PARTICULAR PURPOSE OR MERCHANTABILITY IS MADE. TO THE EXTENT PERMITTED BY LAW, THE EXCLUSIVE REMEDY OF THE USER OR BUYER, AND THE LIMIT OF SELLER'S LIABILITY FOR ANY AND ALL LOSSES, INJURIES, OR DAMAGES CONCERNING THE GOODS (INCLUDING CLAIMS BASED ON CONTRACT, NEGLIGENCE, TORT, STRICT LIABILITY OR OTHERWISE) SHALL BE THE RETURN OF GOODS TO SELLER AND THE REFUND OF THE PURCHASE PRICE, OR, AT THE OPTION OF SELLER, THE REPAIR OR REPLACEMENT OF THE GOODS. IN NO EVENT SHALL SELLER BE LIABLE FOR ANY SPECIAL, CONSEQUENTIAL OR INCIDENTAL DAMAGES. SELLER SHALL NOT BE RESPONSIBLE FOR INSTALLATION, DISMANTLING OR REINSTALLATION COSTS OR CHARGES. No Action, regardless of form, may be brought against Seller more than 12 months after a cause of action has accrued. The goods returned under warranty to Seller's factory shall be at Buyer's risk of loss, and will be returned, if at all, at Seller's risk of loss. Buyer and all users are deemed to have accepted this LIMITATION OF WARRANTY AND LIABILITY, which contains the complete and exclusive limited warranty of Seller. This LIMITATION OF WARRANTY AND LIABILITY may not be amended, modified or its terms waived, except by writing signed by an Officer of Seller. Service Policy Knowing that inoperative or defective instruments are as detrimental to TSI as they are to our customers, our service policy is designed to give prompt attention to any problems. If any malfunction is discovered, please contact your nearest sales office or representative, or call TSI's Customer Service department at (800) 861-7919 (USA) or (001 651) 490-3838 (International). For Technical Support call (800) 861-7397 (USA) or (001 651) 765-3777 (International). CONTENTS SAFETY INFORMATION ................................................................... III CHAPTERS 1 UNPACKING AND PARTS IDENTIFICATION ............................ 1 SIDEPAK™ AM510 Personal Aerosol Monitor Accessory List ...... 2 2 SETTING-UP................................................................................. 7 Supplying Power to the SIDEPAKTM Aerosol Monitor ..................... 7 Battery Information ........................................................................ 7 Installing the NiMH Rechargeable Battery Pack..................... 7 Installing the AA Battery Pack ................................................ 8 Replacing the Cells in the AA Battery Pack.......................... 10 Using the Power Supply ....................................................... 10 Keypad Functions........................................................................ 12 Setting the Real-Time Clock Using the Keypad .......................... 12 Setting the Date Format:....................................................... 12 Setting the Current Time:...................................................... 13 Setting the Current Date: ...................................................... 13 Installing TRAKPROTM Data Analysis Software............................. 14 Connecting the SIDEPAK AM510 Personal Aerosol Monitor to Your Computer for the first time............................................... 15 Connecting the SIDEPAK AM510 Personal Aerosol Monitor to Your Computer once the drivers are installed ......................... 15 3 OPERATION ............................................................................... 17 Overview...................................................................................... 17 Keypad Functions........................................................................ 17 Identifying SIDEPAK AM510 Features.......................................... 18 Power Up..................................................................................... 18 Power Down ................................................................................ 19 Survey Mode ............................................................................... 19 Main Menu................................................................................... 19 Data Log ............................................................................... 20 Programming Prog 1 and Prog 2 with TRAKPRO ............ 21 Example Setup for Prog 1 and Prog 2 Modes Using TRAKPROTM ................................................................ 24 Things You Should Know About Using Prog 1 and Prog 2 Modes ............................................................ 26 Setup Menu........................................................................... 27 Time/Date ....................................................................... 27 Setting the Real-Time Clock Using TRAKPRO ................ 27 Clear Memory ................................................................. 27 Log Interval ..................................................................... 28 Editing the List of Log Intervals with TRAKPRO ............... 29 i Time Constant ................................................................29 Editing the List of Time Constants Using TRAKPRO........30 Cal Factor .......................................................................30 Editing the List of Calibration Factors using TRAKPROTM .................................................................31 Adjust Flow .....................................................................33 Statistics ................................................................................ 34 Zero Cal ................................................................................ 35 4 MAINTENANCE .......................................................................... 37 Maintaining Rechargeable Battery Packs ................................... 37 Charging a NiMH Battery Pack ............................................. 37 Zeroing the AM510 ...................................................................... 38 Using and Maintaining Built-in Impactors .................................... 39 Using and Maintaining the Respirable Cyclone .......................... 42 Cleaning the Cyclone ............................................................ 43 AM510 Field Service Kit .............................................................. 44 5 TROUBLESHOOTING ................................................................ 45 APPENDIXES A SPECIFICATIONS....................................................................... 49 Battery Information ...................................................................... 51 Typical Battery Life ...................................................................... 51 B CUSTOM CALIBRATIONS......................................................... 53 Determining the Calibration Factor for a Specific Aerosol .......... 53 C CONVERTING STORED DATA TO CALIBRATED DATA........ 55 D QUICK REFERENCE.................................................................. 57 Visit TSI’s website at: http://www.tsi.com ii Safety Information When operated according to the manufacturer’s instruction, this device is a Class I laser product as defined by U.S. Department of Health and Human Services standards under the Radiation Control for Health and Safety Act of 1968. A certification and identification label like the one shown below is affixed to each instrument. Sidepak AM 510 Aerosol Monitor S/N 02050026 MFD: May 2002 COMPLIES WITH 21 CFR 1040.10 AND 1040.11 TSI INC Shoreview, MN Made in USA There are no user-serviceable parts inside this instrument. Performing services other than those described in this manual may result in exposure to harmful (visible) laser radiation. A warning label like the one shown below is affixed to the internal laser device. DANGER: VISIBLE LASER RADIATION WHEN OPEN. AVOID DIRECT EXPOSURE TO BEAM WARNING: NO USER SERVICEABLE PARTS INSIDE. REFER SERVICING TO QUALIFIED PERSONNEL. iii iv Chapter 1 Unpacking and Parts Identification Carefully unpack the Model AM510 SIDEPAK™ Personal Aerosol Monitor from the shipping container. Use the table below to determine which components are included with the kit or single unit you purchased. A photo and description of each item follows the table. If any parts are missing, contact TSI immediately. 1 2 SIDEPAK™ AM510 Personal Aerosol Monitor Accessory List Chapter 1 AM510 Single-unit Kit with all accessories shown AM510 Personal Aerosol Monitor (AM510-1000) Battery Pack, 2700 mAH (801722) Battery Pack, 1650 mAH (801724) AA Battery Pack (801708) Unpacking and Parts Identification 3 Single Carry Case 11.25” x 9” x 4.25” (1319289) TRAKPRO CD (800700) Zero Filter (800663) Power Supply (2613210) 3-Unit Carry Case 17” x 12.5” x 4.2” (1319316) Impactor Kit (801702) USB Cable (1303754) Cyclone Kit (801701) Sample Tube (801703) 4 Chapter 1 Screwdriver (3012094) Quick Reference Card (1980461) Calibration Certificate User Guide (1980456) Unpacking and Parts Identification 5 Chapter 2 Setting-Up Supplying Power to the SIDEPAKTM Aerosol Monitor You must attach a battery pack to the SIDEPAKTM Personal Aerosol Monitor Model AM510 prior to use. There are three different TSI battery packs designed for the AM510: 1650 and 2700 mAH rechargeable nickel metal hydride (NiMH) battery packs and a AA battery pack that allows you to use standard AA-size batteries. You may also power the AM510 with the power supply, with or without a battery pack attached. The SIDEPAK monitor has a miniature internal backup battery cell that keeps stored data intact while the unit is turned off. Changing the main battery pack or disconnecting the power supply/charger will not cause data to be lost. The backup battery will last for many years. TSI will install a new battery, if necessary, when the unit is returned to the factory for service. The backup battery is not user-accessible. Both of the NiMH battery packs are approved and rated intrinsically safe. The AA battery pack is not intrinsically safe. The following battery information table provides the intrinsic safety rating information. Battery Information Charge Time* Intrinsically Safe 1650 mAH NiMH Pack (P/N 801724) 3.5 hours Yes** 2700 mAH NiMH Pack (P/N 801722) 5.5 hours Yes** 6-Cell AA-size Pack (P/N 801708) N/A No Battery Option CSA Rating Exia T2A/ Class I Groups A, B, C, D Exia T2C/ Class 1 Groups A, B, C, D N/A *Of a full depleted battery **All dust plugs and gaskets must be installed Installing the NiMH Rechargeable Battery Pack Battery packs slide on and off the AM510 in the direction shown below. There are serrations (teeth) that help hold the battery pack firmly onto 7 the AM510 body in addition to the two screws. Sliding the battery on/off requires firm pressure in the proper direction. Battery Pack, 1650 mAH Battery Pack, 2700 mAH Place the battery pack on top of the AM510 body and push firmly to slide it on. Make sure that the front edge of the battery fits under the lip near the keypad. Once the battery pack is fully seated and the screw holes are lined up, fasten it in place using the two battery screws provided. Note: When installing any of the NiMH battery packs for the first time, you should charge the battery before using the AM510 to ensure proper operation. See “Using the Power Supply” later in this chapter or the Maintenance chapter for charging information. Installing the AA Battery Pack Note: Alkaline battery cells are included with the AA battery pack. TSI recommends size AA alkaline batteries for best performance. The power supply may be used to power the AM510 while the AA battery pack is attached to the AM510 body. The AM510 will sense the presence of the AA battery pack and automatically disable the charging function. AA-size rechargeable batteries may be used in the AA battery pack; however they cannot be recharged by the SIDEPAK aerosol monitor charging system. An external charger will be needed. Instrument run-time with AA-size rechargeable cells may be unacceptably short (see "Typical Battery Life” specifications). The AA battery pack opens into two pieces. During normal operation, the bottom half is designed to be mounted to the instrument, while the top half is removed for replacement of the cells. Attach the bottom half (containing the battery holders) to the AM510 body first. Slide it onto 8 Chapter 2 the AM510 body until it is firmly seated and the screw hole lines up. Fasten it to the body with one screw as shown below. Install six AA-size battery cells. Make sure the cells are installed in the proper direction by matching the polarity markings on the cell holder with the markings on the battery cells. Attach the battery cover by carefully placing it in the forward position shown. Slide the cover forward, and under the lip on the instrument. Fasten it in place with two screws. Setting-Up 9 Replacing the Cells in the AA Battery Pack To replace the cells in the AA battery pack, remove the battery pack cover. Loosen the two screws about half way. Slide the cover back until it is free of the screws, then lift up and remove. Remove the AA cells. It may be helpful when removing the cells to gently pry up the positive (+) end of the cells, using the flat bladed screwdriver. Using the Power Supply The power supply allows you to power the SIDEPAK monitor from an AC wall outlet, or to charge any of the TSI NiMH battery packs. Connect the power supply to an AC wall outlet and plug the other end into the power port on the side of the AM510. ! 10 Caution Many power supplies look alike. Make certain you are using the proper power supply for the AM510. Using the wrong power supply may permanently damage the instrument and void the warranty. Chapter 2 The power supply cannot run the SIDEPAK monitor and charge the battery at the same time. Make sure the instrument is turned off to initiate the charging cycle. If the display does not show CHARGING BATTERY, it is not charging. When the power supply is first plugged into the AM510, the display will first show the message DETECTING BATTERY TYPE. If any of the TSI NiMH battery packs are detected, the display will show CHARGING BATTERY. Once the battery is fully charged, the display will show CHARGING COMPLETE. The instrument may be turned on at any time during or after the charging process by pressing the PAGE key. Turning the instrument on during the charging process will abort charging. If the AA battery pack is detected (regardless of installed cell type) or there is no battery pack at all, the display will show CHARGING OFF after 30 seconds. Press the PAGE key to turn the instrument on or off at any time. Setting-Up 11 Keypad Functions To turn the instrument ON, press the PAGE key. The model number, serial number, firmware revision and remaining battery charge are displayed for a few seconds before entering Survey Mode. To turn the instrument OFF, press and hold the PAGE key for three (3) seconds. Release when the countdown reaches "0 SECONDS." Use the PAGE key to go back to the previous menu. Use the ↵ key to execute selected menu options and confirm changes. Use the ▲▼ arrow keys to scroll through vertical menus and to change numeric values. To toggle between an unlocked and locked keypad (tamper prevention), press and hold the ▲ key and press ↵. When the keypad is locked, the display shows KEYPAD LOCK. Setting the Real-Time Clock Using the Keypad Setting the Date Format: The date format is user-selectable. The formats available are: • • • yyyy/mm/dd (default) mm/dd/yyyy dd/mm/yyyy where yyyy is the 4-digit year, mm is the 2-digit month, and dd is the 2-digit day of month. 1. 12 If necessary, turn the SIDEPAK AM510 on by pressing the PAGE key. Chapter 2 2. Press the PAGE key to access the Main Menu. 3. Under MAIN MENU, select Setup with the ▲ ▼ keys and press ↵. 4. Under SETUP MENU, select Time/Date with the ▲ ▼ keys and press ↵. 5. Under TIME/DATE, select Format with the ▲ ▼ keys and press ↵. 6. Use the ▲ ▼ keys to select the desired format, then press ↵. 7. Press the PAGE key to return to Survey Mode. Setting the Current Time: 1. If necessary, turn the SIDEPAK AM510 on by pressing the PAGE key. 2. Press the PAGE key to access the Main Menu. 3. Under MAIN MENU, select Setup with the ▲ ▼ keys and press ↵. 4. Under SETUP MENU, select Time/Date with the ▲ ▼ keys and press ↵. 5. Under the TIME/DATE menu, use the ▲ ▼ keys to select Time. Set the correct hour in 24-hour format (e.g. 3 p.m. = 15 hours) then press ↵. Use the ▲ ▼ keys to set the correct minutes and press ↵. 6. Press the PAGE key to return to Survey Mode. Setting the Current Date: 1. If necessary, turn the SIDEPAK AM510 on by pressing the PAGE key. 2. Press the PAGE key to access the Main Menu. 3. Under MAIN MENU, select Setup with the ▲ ▼ keys and press ↵. 4. Under SETUP MENU, select Time/Date with the ▲ ▼ keys and press ↵. 5. Under the TIME/DATE menu, use the ▲ ▼ keys to select Date. Use the ▲ ▼ keys to set the correct year and press ↵. Use the ▲ ▼ keys to set the correct month and press ↵. Use the ▲ ▼ keys to select the correct day and press ↵ (order will vary depending on selected date format). Setting-Up 13 6. Press the PAGE key to return to Survey Mode. Installing TRAKPROTM Data Analysis Software TRAKPROTM Data Analysis Software is included with SIDEPAK AM510 kits on a CD-ROM. TRAKPRO software allows you to preprogram the AM510, download data, create graphs, and make combined graphs with data from other TSI instruments. The following sections describe how to install the software and set up the computer. Note: You must use TRAKPRO Data Analysis Software version 3.30 or higher to communicate with the TSI SIDEPAK AM510. Older versions do not support the instrument. You can download the latest version of TRAKPRO software from the TSI website: www.tsi.com. To use TRAKPRO software with your SIDEPAK AM510 Personal Aerosol Monitor, your PC must be running Microsoft Windows® and it must have an available Universal Serial Bus (USB) port. Windows 3.x, Windows 95 and Windows NT do not support USB ports. 1. Insert the TRAKPRO Data Analysis Software CD into your CD-ROM drive. Wait a few moments while the install screen starts automatically. Note: If the software does not start automatically after a few minutes, manually run the program listed on the label of the CD using the Run command on the Windows Start Menu. 2. Follow the directions to install TRAKPRO software. Make certain that you install the USB driver when prompted. Installing the USB driver requires you to plug the SIDEPAK monitor into an open USB port during the install process. Note: If you neglected to install the USB driver during the initial installation of TRAKPRO, you can do it later simply by plugging the SIDEPAK monitor into an open USB port and following the onscreen instructions. When asked, have the program search the TRAKPRO CD to locate the driver. TRAKPRO software contains a comprehensive Online Help Function. This utility provides all the necessary information to guide you in all aspects of software operation after the software is installed. There is no separately printed TRAKPRO Data Analysis software manual. Notice that there is a great deal of additional information on the CD including an electronic (searchable) copy of this manual. ® Microsoft, Windows and Windows NT are trademarks of Microsoft Corporation. 14 Chapter 2 Connecting the SIDEPAK AM510 Personal Aerosol Monitor to Your Computer for the first time Most SIDEPAK AM510 kits include a USB (Universal Serial Bus) cable that connects between the instrument and an available USB port on your PC. 1. Locate an available USB port on your computer. 2. Connect the larger end of the USB cable to the USB port. 3. Turn the SIDEPAK AM510 on. 4. Connect the small end of the USB cable to the USB port on the SIDEPAK AM510. 5. The first time you plug in the SIDEPAK AM510, the Windows utility for installing new hardware will launch automatically. Follow the onscreen instructions for installing the drivers. When asked for the location of the driver files, select the CD-ROM. 6. After the New Hardware utility has finished, complete the installation of TRAKPRO software. Connecting the SIDEPAK AM510 Personal Aerosol Monitor to Your Computer once the drivers are installed After you have installed the drivers for the SIDEPAK AM510, each subsequent time you plug-in the instrument, the instrument will be automatically detected. Your computer will load the proper driver files to communicate with the SIDEPAK monitor. If you have difficulty communicating with the instrument, please review the following troubleshooting steps: Symptom Cause Solution Receive the following error message: The SIDEPAK AM510 drivers take approximately 20 seconds to “load,” each time the instrument is plugged in. If you attempt to communicate with the instrument during this period, you will receive an error. Wait approximately 30 seconds, after plugging in the USB cable, before you attempt to communicate with the instrument. Receive the following error message(s): 1. The Software Configuration is not set properly to SIDEPAK Aerosol 1. Select Option: Software Configure: SIDEPAK Setting-Up 15 Symptom Cause Monitor. 2. Or the AutoConfiguration is turned off. 3. Or the instrument is turned off (powered down). 4. Or the instrument is not attached to the USB cable, either at the instrument side or computer side. Solution Aerosol Monitor. 2. Or select the SIDEPAK Aerosol Monitor from the dropdown list on the menu bar. 3. Or Check (turnon) the Autoconfiguration, under Options. 4. Or turn on the instrument. 5. Or attach USB cable. Receive the following error message: 1. The instrument is not in the Survey Mode (it is logging data, the display is set to one of the Setup screens, etc.). It will not communicate properly in this case. 1. Return to the Survey Mode, before attempting to communicate with the instrument. Note: It may appear that TRAKPRO has found the SIDEPAK instrument on a COM port rather than a USB port. This is normal and will work fine. 16 Chapter 2 Chapter 3 Operation Overview The SIDEPAKTM Personal Aerosol Monitor is a miniature battery-operated laser photometer that measures airborne particle mass-concentration in units of milligrams per cubic meter (mg/m3). The built in sampling pump flow rate is user-adjustable, allowing you to attach a wide variety of inlet conditioners to sample from the worker’s breathing zone or other locations. The rugged belt-mountable unit is small, quiet, and lightweight, minimizing interference and discomfort for the wearer. The 12-character x 2 line LCD displays aerosol concentration and 8-hour TWA (time-weighted average) in realtime. Information can be stored and later downloaded via a Windows® based PC using the enclosed TRAKPRO software and USB (Universal Serial Bus) communications cable. Keypad Functions To turn the instrument ON, press the PAGE key. The model number, serial number, firmware revision and % battery charge are displayed for a few seconds before entering Survey Mode. To turn the instrument OFF, press and hold the PAGE key for three (3) seconds. Release when the countdown reaches "0 SECONDS." Use the PAGE key to go back to the previous menu. Use the ↵ key to execute selected menu options and confirm changes. 17 Use the ▲▼ arrow keys to scroll through vertical menus and to change numeric values. To toggle between an unlocked and locked keypad (tamper prevention), press and hold the ▲ key and press ↵. When the keypad is locked, the display shows KEYPAD LOCK. Identifying SIDEPAK AM510 Features USB Port Use the Universal Serial Bus (USB) port and USB cable to connect the SIDEPAK AM510 to an available USB port on your computer. The connector on the AM510 is a type USB-Mini-B socket. Power Port Connect the 9 VDC power supply to this port to charge TSI NiMH battery packs or to power the instrument at any time. Many power supplies look alike; make certain you use the right power supply to prevent damage. Exhaust Port Air drawn though the instrument exits here. Inlet Interchangeable inlet. You can install the standard inlet or one of three impactors provided with SIDEPAK AM510 Kits. Battery Screw Remove these two screws to remove the battery pack. Power Up Turn the SIDEPAK AM510 on by pressing the PAGE key. The AM510 will display the model number, serial number, percent memory remaining and firmware version. It will now immediately go into Warmup Mode during which time the pump is reaching the flow rate setpoint. During this time in 18 Chapter 3 Warmup Mode while the pump is in the process of reaching the flow rate setpoint, if the AM510 is under battery power, Battery Life Remaining will change (decrease) to account for the increasing current consumption of the pump, finally reaching a steady-state when the desired flow rate setpoint is achieved. After the pump has achieved the flow rate setpoint, it will go into Survey Mode. Power Down To turn the SIDEPAK AM510 off, press the PAGE key until the instrument displays SURVEY MODE. Then, press and hold the PAGE key. Release the key after the 3-second countdown reaches zero. Survey Mode When the SIDEPAK monitor is first turned on, it will always go into Survey Mode. In Survey Mode the instrument displays real-time aerosol concentration readings in units of milligrams per cubic meter (mg/m3). Data logging is not enabled during Survey Mode. While in Survey Mode, use the ▲ ▼ keys to view the: • • • • • Percentage of memory available Battery life remaining displayed in minutes Time of day Today's Date Current calibration factor Note: While in the Survey Mode, if you view another display screen and leave the display in this location, the AM510 display returns to the next higher level menu after 30 seconds. Eventually, it returns to the Survey Mode, showing real-time aerosol concentrations. Main Menu When in the Survey Mode, you can access the Main Menu by pressing the PAGE key. Use the ▲ ▼ keys to select one of the following sub menus: • • • • Data Log Setup Statistics Zero Cal Refer to the corresponding section below for details on each sub menu. Operation 19 Data Log The Data Log sub menu contains three options: • • • Run Manual Run Prog 1 Run Prog 2 Use the ▲ ▼ keys to make a selection, and press ↵ to accept. Run Manual immediately starts a data logging session (called a "Test"). Press ↵ or PAGE to stop a test in progress. The AM510 will ask you to confirm that you want to stop the test or not, while data logging continues. If you choose to continue (Return) by pressing the PAGE key, there will be no break in the data. While running a manual test, the display shows LOGGING DATA as well as the last data value recorded. Manual tests use the logging interval defined in Log Interval under the Setup Menu. Each test you run is assigned a sequential number (e.g., TEST#1, TEST#2, … TEST#100) until memory is used up or cleared. When a test is stopped, the display immediately switches to the Statistics Menu where you can view the following statistics for any stored test: • • • • • Maximum reading Minimum reading Average reading 8-hour TWA Time (duration of test) First, select the test to view with the ▲ ▼ keys and press ↵. Now, you can page through the available statistics using the keys. Initially, the test you just completed is offered. You can view test statistics any time you are not actively data logging by selecting Statistics under the Main Menu. Run Prog 1 and Run Prog 2 allow you to execute a data logging test that was preprogrammed using TRAKPRO Software. Preprogramming allows a great deal of flexibility that is not available with manual logging such as predefined start and stop times, logging intervals, calibration factors, and more. See “Programming Prog 1 and Prog 2 with TRAKPRO Software” later in this chapter. 20 Chapter 3 During data logging, use the ▲ ▼ keys to view: • • • • • Battery life remaining displayed in minutes 8-hour TWA Elapsed time Current time and date Log interval If 30 seconds elapse without a key being pressed, the display reverts back to LOGGING DATA and shows the last data value recorded. To stop a test, press the ↵ or PAGE key. The AM510 will ask you to confirm that you want to stop the test or not, while data logging continues. If you choose to continue (Return), there will be no break in the data. If you stop a test in progress, the AM510 will display Data Logging Stop Data Saved and switch to the Statistics Menu so you can view the results of that test. If you stop a test before any data points have been recorded, the display will show Data Logging Aborted and wait for you to acknowledge by pressing ↵. It will then return to Survey Mode. An example of when this may happen is if the logging interval is set to 1 minute and the test is stopped before the first data point is recorded. Programming Prog 1 and Prog 2 with TRAKPRO Use Prog 1 or Prog 2 modes for unattended recording and setting user protocols. With Prog 1 and Prog 2 modes you can set the start date, start time, test length, logging interval, number of tests and the time delay between tests. All or selected parameters can be set. To program a protocol for Prog 1 or Prog 2 mode: 1. Make sure the SIDEPAK monitor is connected to the computer and turned on. 2. Select Logging Setup from the Instrument Setup menu. TRAKPRO software retrieves the current settings for Prog 1 and Prog 2 modes from the SIDEPAK monitor and displays them in the following dialog: Operation 21 The following table summarizes the information displayed in the SIDEPAK Logging Protocols dialog box: Serial Number Number of tests logged Available Memory (%) Displays the serial number of the SIDEPAK monitor currently connected to computer. Displays the number of tests currently stored in the SIDEPAK monitor. Displays the percent of available memory in the SIDEPAK monitor. Prog 1 and Prog 2 Mode Protocols Displays the start date for Prog 1 and Prog 2 Start Date modes. Displays the start time for Prog 1 and Prog 2 Start Time modes. Displays the log interval for Prog 1 and Prog 2 Log interval modes. Displays the test length for Prog 1 and Prog 2 Test length modes. Displays the number of times to repeat the Number of tests defined test, for Prog 1 and Prog 2 modes. Displays the time between repeated tests for Time between Prog 1 and Prog 2 modes. tests 22 Chapter 3 Prog 1 and Prog 2 Mode Protocols Displays the percent of SIDEPAK memory Percent required to perform a Prog 1 or a Prog 2 mode memory sample. To store the results of a Prog 1 or required. Prog 2 mode sample, the Available Memory must be equal to or greater than the Percent memory required. 3. Enter the following for Prog 1 and Prog 2 modes: Start Date Start Time Log interval Test length Number of tests Time between tests Operation Enter the date and time to begin the sample: • If you enter a blank for a start date, the sample begins whenever the specified start time occurs. • If you enter a blank for the start time, both start date and start time are ignored, and the sample begins when the operator manually starts the sample. Enter the log interval to use for the test. Enter the length for the sample: • If you enter a value, the instrument automatically turns off when the last test is complete. • If you enter a blank, you must manually stop the sample. Enter the number of tests to perform. These tests will happen sequentially, with the Time between tests spaced in between each repetition. If you have specified more than one Number of tests, enter the time between tests. If you enter 0 or blank, the next test is started immediately after the last test is complete. 23 While you are entering values for Prog 1 and Prog 2 modes, the Percent Memory Required is dynamically updated to show the amount of SIDEPAK memory required to take the programmed sample. If the protocol you have defined requires more than 100% of memory (or more than the available memory), you can decrease the amount of memory required by manipulating the following protocol parameters: • Increase the logging interval. • Decrease the time (length) for the test. • Decrease the number of tests. Note: For proper operation, the settings for each Prog mode must not require more than 100% of the logger memory. If the Percent memory required is greater than the Available memory, the logging instrument automatically stops the test when memory is full. 4. When you have finished defining the parameters for Prog 1 and Prog 2 modes, select Send. The software confirms that the instrument was programmed properly. 5. You can now disconnect the SIDEPAK monitor and cable from the computer. Example Setup for Prog 1 and Prog 2 Modes Using TRAKPROTM The following example describes how to program Prog 1 or Prog 2 mode tests. The protocol for Prog 1 is set to take unattended aerosol readings for one day, 6/1/2002. The logging sample begins at 8:00 a.m. and continues for eight hours. The protocol for Prog 2 is set up to take unattended aerosol readings for two days, beginning on 6/1/2002. Logging begins at 8:00 a.m. and continues for eight hours. The instrument is off for 16 hours, and then repeats the eight-hour test on the following day. The following graphic shows the dialog box displayed in the TRAKPRO software, with these particular logging parameters. 24 Chapter 3 To program the above example, do the following: 1. Make sure the SIDEPAK monitor is connected to the computer and turned on. 2. Select Logging Setup from the Instrument Setup menu. TRAKPRO software retrieves the current settings for Prog 1 and Prog 2 modes from the SIDEPAK monitor and displays them in the dialog shown above. 3. Enter the following for Prog 1 and Prog 2: Setting Start Date Start Time Log interval Test length Number of tests Time between tests Operation Prog 1 06/01/2002 08:00 01:00 00:08:00 1 00:00:00 Prog 2 06/01/2002 08:00 05:00 00:08:00 2 00:16:00 4. Select Send. The SIDEPAK monitor is programmed for the Prog 1 and Prog 2 protocols. 5. Note that the Prog 1 test requires 1% of the available memory and Prog 2 requires less than 1% of the memory. A total of 100% of the memory is available for use. 25 6. You can now disconnect your SIDEPAK monitor from the computer. After programming the SIDEPAK monitor with TRAKPRO Data Analysis Software, attach the SIDEPAK monitor to the worker (or location) and turn it on. Put it into Prog 1 or Prog 2 mode (whichever you want) using the keypad. 1. From SURVEY MODE, press PAGE to access MAIN MENU. 2. Scroll to Data Log and press ↵. 3. 4. Scroll to Run Prog 1 (or Run Prog 2) and press ↵. If desired, lock the keypad to prevent tampering. Press and hold the ▲ key, then press ↵. Repeat to unlock. Things You Should Know About Using Prog 1 and Prog 2 Modes • If you press the PAGE or ↵ key during programmed operation, the instrument responds with a message, asking you to confirm your choice to end the program (unless the keypad is locked). 26 • If the programmed start date has already passed, the program will not execute. The instrument responds with a message indicating INVALID PRGM; START DATE. • It is always best to enter both a start time and start date! However, setting the start time but no start date causes the SIDEPAK monitor to start at the specified time regardless of the date. The instrument may not shut down prior to beginning logging. • If no start time is set, the SIDEPAK monitor begins sampling immediately after the program is selected and the ↵ key is pressed. • If no test length is set, the SIDEPAK monitor takes samples continuously until the program is deliberately terminated, using the ↵ key, or until memory is full. • When a preprogrammed test ends, the SIDEPAK monitor automatically shuts off. Chapter 3 Setup Menu When in Survey Mode, you can access the Setup Menu by pressing the PAGE key to reach the Main Menu, then use the ▲ ▼ keys to select Setup Menu and press ↵. The Setup Menu provides access to the following items. Use the ▲ ▼ keys to select the item you wish to access and press ↵. Each selection is described in detail below. • • • • • • Time/Date Clear Memory Log Interval Time Constnt Cal Factor Adjust Flow Time/Date See “Setting the Real-Time Clock Using the Keypad” in the Setup chapter for instructions on setting the real-time clock using the SIDEPAK keypad. Setting the Real-Time Clock Using TRAKPRO 1. Make sure the SIDEPAK monitor is connected to the computer and turned on. 2. In TRAKPRO Software, select Parameters, then Clock from the Instrument Setup menu. TRAKPRO software retrieves the current date and time settings from the SIDEPAK monitor. 3. The system date and time (from the computer) can be transferred to the SIDEPAK monitor by clicking the correct buttons on the screen. A drop-down calendar allows you to select the date. Alternately, the date and time can be manually typed into the dialog box. 4. Select Send to reprogram the real-time clock inside the SIDEPAK monitor. Clear Memory This function will permanently erase all logged data and associated statistics stored in memory. It will not affect the Prog-1 and Prog-2 stored programs, stored Cal Factors, or any other settings. 1. Operation After selecting Clear Memory under the Setup Menu, the display will show Press Enter = Clr Memory. Press ↵. 27 2. You will be prompted to confirm your intention with the display Confirm Clr Press Enter. Press ↵. 3. The display will show Memory Cleared for a few seconds and will go back to the Setup Menu. Log Interval The log interval is the time interval used between recorded data points during Run Manual logging operations (log intervals for Prog-1 and Prog-2 are set using TRAKPRO Software). For example, if the log interval is set to 30 seconds, a data point is stored to memory once every 30 seconds. One reason you might want to use a longer log interval is to conserve memory. The SIDEPAK AM510 always makes a measurement once every second regardless of the log interval selected. Using a log interval greater than one second results in stored data points that are averages of the 1-second readings. For example, a 10-second log interval will result in one stored data point every 10 seconds. Each of those data points will represent the computed average of ten, 1second readings. Do not confuse log intervals with time constants. Log intervals only affect recorded readings. Time constants only affect the AM510 LCD display. There are five preprogrammed choices for log intervals. If necessary, the list of available log intervals may be permanently altered using TRAKPRO Software. After selecting Log Interval from the Setup Menu, the display will show LOG INTVLx where "x" is a number from 1 to 5. This is the currently selected log interval. The value of that log interval is shown on the second line. Use the ▲ ▼ keys to scroll through the available log intervals. Press ↵ when the interval you wish to use is displayed. The factorypreset choices are: • • • • • 28 LOG INTVL1: LOG INTVL2: LOG INTVL3: LOG INTVL4: LOG INTVL5: 1 sec 10 sec 30 sec 1 min 5 min Chapter 3 Editing the List of Log Intervals with TRAKPRO To program the list of log intervals available for Run Manual Mode: 1. Start TRAKPRO Software and make sure the SIDEPAK monitor is connected to the computer and turned on. 2. In TRAKPRO, select Parameters, then Logging Intervals from the Instrument Setup menu. TRAKPRO software retrieves the current list of log intervals from the SIDEPAK monitor and displays them. 3. Enter a value for each of the five log intervals (the range is from 1 second to 59 minutes and 59 seconds). 4. Select Send. The SIDEPAK monitor is now reprogrammed to offer the log intervals you have specified. 5. Use the SIDEPAK monitor keypad to make sure the log interval is set to the value you want to use. Time Constant The time constant is used to dampen fluctuations in the displayed readings, to make them easier to read. The time constant setting affects values shown on the AM510 LCD display only. The SIDEPAK AM510 always makes a measurement once every second and updates the display every second regardless of the time constant selected. Using a time constant greater than one second results in displayed readings that are averages of the 1-second readings. For example, a 10-second time constant will cause the display to show an average of the most recent ten 1-second readings. In other words it is a 10-second "moving average," updated every second. Do not confuse time constant with logging intervals. Time constants only affect the AM510 display. Log intervals only affect recorded readings. There are five preprogrammed choices for time constants. If necessary, the list of available time constants may be permanently altered using TRAKPRO Software. After selecting Time Constant from the Setup Menu, the display will show TIME CONSTx where "x" is a number from 1 to 5. This is the currently active time constant. The value of that time constant is shown on the second line. Operation 29 Use the ▲ ▼ keys to scroll through the available time constants. Press ↵ when the time constant you wish to use is displayed. The factory-preset choices are: • • • • • TIME CONST 1: TIME CONST 2: TIME CONST 3: TIME CONST 4: TIME CONST 5: 1 sec 5 sec 10 sec 15 sec 30 sec Editing the List of Time Constants Using TRAKPRO To program the list of time constants using TRAKPRO Data Analysis Software: 1. Make sure the SIDEPAK monitor is connected to the computer and turned on. 2. Select Parameters, then Time Constants from the Instrument Setup menu. TRAKPRO software retrieves the current time constant settings from the SIDEPAK monitor and displays them. 3. Enter a value for each of the five available time constants. (The range is limited to 1-60 seconds.) 4. Select Send. 5. Use the SIDEPAK keypad to make sure the time constant is set to the value you want to use. Cal Factor The cal (calibration) factor is a multiplier that is applied to the raw data prior to being displayed or recorded. The purpose of the cal factor is to compensate the readings for aerosols that have different photometric properties than the aerosol used during factory calibration. There are four choices for cal factors (three of them adjustable): • Cal Fact 1: • Cal Fact 2: • Cal Fact 3: • Cal Fact 4: The factory cal factor, permanently set to 1.00. User adjustable. Set using AM510 keypad. Defined using TRAKPRO software. Defined using TRAKPRO software. After selecting Cal Factor from the Setup Menu, the display will show CAL FACT x where "x" is a number from 1 to 4. This is the currently active cal factor. The value of that cal factor is shown on the second line. 30 Chapter 3 Use the ▲ ▼ keys to scroll through the available time constants. Press ↵ when the time constant you wish to use is displayed. To modify the USER cal factor (CAL FACT 2) use the ▲ ▼ keys to scroll through the list. Press ↵ when the USER cal factor is displayed. Adjust the value of the cal factor using the ▲ ▼ keys. After making the desired changes, press the ↵ key to accept the changes and return to the Setup Menu. Editing the List of Calibration Factors using TRAKPROTM TRAKPRO software allows you to store several custom calibration factors along with a short label for the aerosol or environment the calibration was taken. This procedure allows you to edit the list of cal factors available to the SIDEPAK monitor but does not allow you to select the cal factor to use. That can only be done from the SIDEPAK keypad. Connect your SIDEPAK monitor to the computer and start the TRAKPRO software. 1. Operation Select Calibration in the Instrument Setup menu. The following dialog box is displayed. 31 2. Click the Set User Calibration Factor button. The following dialog box is displayed. 3. Enter a new Calibration Factor Name and Factor, in the lefthand side of the dialog. In the example, above, the Cal Factor label “coal” has been typed in, along with the value “0.25.” Select Add New Cal Factor. Note: In this example, the program asks you to confirm the choice of Calibration Factor, as “0.25”. This value is within the allowable range, but is considered an unusually low value. For this reason, the software asks for a confirmation before proceeding. Note: This action only adds a new Cal Factor to a list of available factors. This does not program this new Cal Factor into the instrument. To reprogram the instrument, continue with the procedure. 32 Chapter 3 4. After entering the new Cal Factor into the list of available factors, the instrument is programmed with this new factor. Highlight the selected cal factor (in this example, “coal”), and click one of the two “arrow” buttons. In this example, the “coal” Cal Factor was programmed into Cal Factor #4, replacing the previous selection of “oil mist.” 5. Press Send. This downloads the currently defined Cal Factors into the instrument. 6. To activate a particular Cal Factor, return to the instrument Setup Menu, scroll down to and select the Cal Factor menu. Scroll down to the desired Cal Factor and press ↵. 7. The SIDEPAK monitor response for all subsequent measurements will be multiplied by the new factor. To reset the SIDEPAK monitor to factory calibration, simply select the factory setting of 1.0. Adjust Flow Aerosol concentration measurements with the SIDEPAK AM510 are accurate regardless of the flow rate through the instrument. However, size-selective aerosol sampling inlets such as impactors and cyclones require specific flow rates to function within their design specifications. If you are using a size-selective inlet, you must adjust the flow rate precisely. It's always a good practice to Operation 33 adjust the flow rate immediately prior to the start of a sampling session. To adjust the flow rate, you will need a flow calibrator. This can be a simple rotameter or a precision flow calibrator often used for setting the flow on personal sampling pumps. A flow calibrator is an optional item and is not included with standard AM510 kits. 1. Connect a flow calibrator to the AM510 inlet. 2. Start the AM510 by pressing the PAGE key. After the monitor goes into SURVEY MODE, press the ↵ key to reach the MAIN MENU. 3. Under MAIN MENU, use the ▲ ▼ keys to scroll to Setup and press ↵. 4. Under SETUP MENU, use the ▲ ▼ keys to display Adjust Flow and press ↵. 5. Under FLOWRATE, use the ▲ ▼ keys to adjust the flow up or down until the calibrator reads the flow rate you desire; press ↵ to confirm the setting. The SIDEPAK display shows a % Range value for reference purposes and is only an approximation. Each single click of an arrow key changes the flow by 1 percent of the available range. You can change the flow more quickly by holding the arrow key down. Statistics The statistics menu allows you to view computed statistics for each test (up to 100 tests) that have been made using Run Manual, Run Prog 1 or Run Prog 2 data logging methods. The statistics computed by the SIDEPAK AM510 include: • • • • • 34 Max: Min: Avg: TWA: Time: Maximum concentration value recorded (mg/m3) Minimum concentration value recorded (mg/m3) Average of recorded concentration values (mg/m3) 8-hour time-weighted average (mg/m3) Elapsed time of test 1. When in Survey Mode, press the PAGE key to reach the Main Menu, then use the ▲ ▼ keys to select Statistics and press ↵. 2. Use the ▲ ▼ keys to select the test number you wish to access and press ↵. 3. Use the ▲ ▼ keys to scroll through the statistical data. If the display shows N/A for the TWA, it means that there is not enough data in that test to compute the TWA. The instrument must be Chapter 3 operated for a minimum of 15 minutes before a valid TWA may be calculated. To erase all test statistics, refer to “Clearing Memory.” Zero Cal For best results, it's important to zero the AM510 prior to each test. This ensures more accurate data, especially for low aerosol concentrations. This process only takes a few minutes. 1. Locate the zero filter provided with most AM510 kits and attach it to the inlet of the SIDEPAK monitor. 2. If necessary, start the AM510 by pressing the PAGE key. After the monitor goes into SURVEY MODE, press the PAGE key to reach the MAIN MENU. 3. Under MAIN MENU, use the ▲ ▼ keys to scroll to Zero Cal and press ↵. 4. The AM510 will prompt you to attach the zero filter to the inlet of the AM510. When the zero filter is connected, press ↵. 5. The AM510 will count-down from 60 to 0 and display Zero Cal Complete for a few seconds before switching back to the MAIN MENU. Do not press any keys during the count-down or else the zero cal process will abort. 6. Now the instrument is ready to make accurate measurements. Operation 35 Chapter 4 Maintenance The SIDEPAK Personal Aerosol Monitor Model AM510 requires periodic maintenance. The most common procedures are listed below: • • • • Charging batteries Zeroing Impactor maintenance Cyclone maintenance In addition to the procedures in this chapter, TSI recommends that you return your SIDEPAK Model AM510 Personal Aerosol Monitor to the factory for annual calibration. Regular factory-authorized cleaning and recalibration helps ensure that your instrument is working properly, has the latest updates, and will provide accurate and reliable measurements. Maintaining Rechargeable Battery Packs The SIDEPAK monitors incorporate the Smart Battery Management System that allows for fast charging and long battery life. This system utilizes a built-in computer chip in the battery packs. The microprocessor monitors battery capacity and calculates run time information by dividing capacity of the battery (mAH) by the instantaneous current consumed by the instrument (mA). This calculation is correct for current operating conditions and can change due to current (mA) consumption or changes in battery capacity. Conventional battery controllers can only make crude estimates of battery condition based on a simple voltage measurement. TSI rechargeable battery packs use nickel-metal hydride (NiMH) cells because they provide much greater capacity than conventional nickelcadmium (NiCad) cells and do not have the "memory" problems often associated with NiCad cells. Charging a NiMH Battery Pack The power supply allows you to power the SIDEPAK monitor from an AC wall outlet, or to charge any of the TSI NiMH battery packs. Connect the power supply/charger to an AC wall outlet and plug the other end into the power port on the side of the AM510. 37 ! Caution Many power supplies look alike. Make certain you are using the proper power supply for the AM510. Using the wrong power supply will permanently damage the instrument and void the warranty. The power supply cannot run the SIDEPAK monitor and charge the battery at the same time. Make sure the instrument is off to facilitate charging. If the display does not show CHARGING BATTERY, it is not charging. When the power supply is first plugged into the AM510, the display will first show DETECTING BATTERY TYPE. If a TSI NiMH battery pack is detected, the display will show CHARGING BATTERY until charging is completed. Once the battery is fully charged, the display will show CHARGING COMPLETE. The instrument may be turned on at any time during or after the charging process by pressing the PAGE key. Turning the instrument on during the charging process will abort charging. If the 6-cell AA-size battery pack is detected (regardless of installed cell type) or there is no battery pack at all, the display will show CHARGING OFF after 30 seconds. It is not possible to recharge AA rechargeable batteries by placing them in the 6-cell AA-size battery pack, and attaching them to the SIDEPAK monitor. Zeroing the AM510 For best results, it's important to zero the AM510 prior to each test. This ensures more accurate data, especially for low aerosol concentrations. It only takes a few minutes. 38 Chapter 4 1. Locate the zero filter provided with AM510 kits and attach it to the inlet of the SIDEPAK monitor. 2. Start the AM510 by pressing the PAGE key. After the monitor goes into SURVEY MODE, press the ↵ key to reach the MAIN MENU. 3. Under MAIN MENU, use the ▲ ▼ keys to scroll to Zero Cal and press ↵. 4. The AM510 will now prompt you to attach the zero filter to the inlet of the AM510. When the zero filter is connected, press ↵. 5. The AM510 will count-down from 30 to 0 and display Zero Cal Complete for a few seconds before switching back to the MAIN MENU. Do not press any keys during the count-down or else the zero cal process will abort. 6. Now the instrument is ready to make accurate measurements. Using and Maintaining Built-in Impactors The standard inlet on the SIDEPAK AM510 was designed not to cause any specific particle size separations. It is intended for use with external size-selective aerosol samplers such as a cyclone or external impactor at any flow rate within the allowable range. The standard inlet can be differentiated from the built-in impactors by the absence of a particle size marking on the side. Some AM510 Kits include a set of three impactors that can be used in place of the standard inlet to conveniently separate specific particle size fractions. The 50% cut-off size is marked in micrometers (µ) on each impactor. The three impactors provide cuts at 1.0µ, 2.5µ, and 10µ, corresponding to PM1.0, PM2.5 and PM10 specifications respectively. All inlets are made of conductive plastic to eliminate particle losses due to static charges. Note: SIDEPAK built-in impactors must be operated with the flow rate set to 1.7 lpm for proper performance. Using other flow rates will result in unknown particle size fractions. The standard inlet can be used at any flow rate. Always use the standard (unmarked) inlet when sampling through an external size-selective sampler such as a cyclone or external impactor. Maintenance 39 SIDEPAK size-selective inlets use an internal impactor insert with two Orings. This component functions as a collection plate where particles larger than the cut-size are trapped. The same insert is used for all impactors, but it is not used at all for the standard inlet. To make sure unwanted (large) particles remain trapped on the insert, it is necessary to apply a small amount of impactor grease (vacuum grease) for the particle to stick to. Grease is also applied to the O-rings to aid assembly and improve sealing. Note: Size-selective impactors will not function unless an impactor insert is installed. To ensure proper performance, the impactor insert should be removed, cleaned and regreased prior to each use. 1. Remove the impactor by loosening the two captive screws that hold the impactor in place. 2. Use a small screwdriver to push against the flange on the insert stem and slide the insert out of the impactor body. 40 Chapter 4 3. As necessary, clean the top of the insert and the inside of the impactor body, to remove accumulated particles. 4. Smear a very small amount of grease to the top of the insert (collection plate) and to the O-rings. Make sure there are two O-rings on base. Impactor Insert 5. Carefully slide the insert into the impactor body until it is fully seated. Push on the bottom of the insert, to make sure it is seated squarely and fully into the impactor body. Inspect the O-rings to make sure they are not pulled out of the grooves. Maintenance 41 6. Screw the impactor assembly back onto the AM510 body and tighten the two captive screws. Do not over tighten. Using and Maintaining the Respirable Cyclone The 10-mm Nylon Dorr-Oliver Cyclone included with some AM510 kits can be used to discriminate between the respirable fraction and other portions of the ambient aerosol. It is ideal for making breathing zone measurements because it can be attached to a worker's clothing near his or her head. TSI supplies a U-tube and clip with the cyclone specifically for this purpose. Four micrometers (4 µm) is internationally accepted as the 50 percent cut-off size for respirable aerosols. Particles larger than 4 µm impact onto the surfaces of the upper respiratory tract and cannot reach the lungs. The cyclone accessory provided with SIDEPAK AM510 kits is designed to provide a cut-off at 4 µm. This is specified as a 50 percent cut-off at 4 µm. The cyclone works by forcing the particle-laden air sample to swirl inside the cyclone body. Larger (higher mass) particles cannot follow the air stream and become trapped, while smaller particles stay in the air stream and pass through. When using the cyclone, you can assume that all particles smaller than the cut-off size pass through and all larger particles become trapped in the grit pot. The cut-off size for any cyclone is dependent on flow rate. ! 1. 42 Caution It is very important that the sample flow rate through the SIDEPAK monitor be set at 1.7 liters per minute (lpm). If some other flow rate is set, the cut-off size will be unknown. Be sure that you have the standard inlet (unmarked) installed on the SIDEPAK AM510 body and that there is no impactor insert inside. Chapter 4 2. Attach the cyclone and the same sample tube you intend to use onto the AM510 inlet. 3. Adjust the flow rate of the AM510 to 1.7 lpm. See the Operation chapter for instructions on how to set the flow rate. The SIDEPAK monitor and cyclone are now ready to use. Attach the cyclone to the individual test subject's clothing using the U-tube and clip provided with the cyclone. Cleaning the Cyclone The 10-mm Nylon Dorr-Oliver Cyclone should be cleaned prior to each use. In most cases, simply cleaning the grit pot will be all that is needed. Inspect the inside of the cyclone body regularly and clean it if necessary. 1. Unscrew the grit pot from the bottom of the cyclone. Remove the stainless steel cyclone clip and pull the cap off. 2. Hold the open end of the grit pot down and tap it on a hard surface to dislodge particles. Repeat with the cyclone body. Note: If dirt is visible inside either the grit pot or the cyclone body, it may be necessary to blow compressed air into the cyclone parts and/or to clean them with soap and water. A mild solvent like isopropanol may also be used. Make certain that the cyclone is perfectly dry before using it. 3. Re-assemble the cyclone. Note that the stainless steel cyclone clip that holds the cap onto the body will only fit one way. The cyclone cleaning procedure is now completed. Maintenance 43 Exploded View of 10 mm Nylon Dorr-Oliver Cyclone AM510 Field Service Kit The SIDEPAK AM510 Field Service Kit (P/N 801700) includes Dust Plugs (2 sets) and Battery Screws (2 sets). Parts from this field service kit are for replacement of damaged or lost Dust Plugs or Battery Screws. 44 Chapter 4 Chapter 5 Troubleshooting TSI recommends that you return your SIDEPAK Model AM510 Personal Aerosol Monitor to the factory for annual calibration. Regular factoryauthorized cleaning and recalibration helps ensure that your instrument is working properly, has the latest updates, and will provide accurate and reliable measurements. If you are having a problem with your SIDEPAK AM510, use the information below to try and resolve it in the field. If necessary, contact TSI Incorporated or a local TSI distributor to arrange for service. Contact information: TSI Incorporated 500 Cardigan Road Shoreview, MN 55126 USA Website: www.tsi.com E-mail: [email protected] The following table lists the symptoms, possible causes, and recommended solutions for common problems encountered with the SIDEPAK monitor. 45 Symptom Erratic zero reading. Possible Cause Leak. Corrective Action Check all connections for leaks. Carefully tighten sample inlet screws (do not overtighten!). If using an impactor, remove and regrease the impactor insert. Make sure the two O-rings are in place and not damaged. Make sure the impactor insert is seated squarely into the inlet, before replacing (see “Using and Maintaining Built-in Impactors”, in Chapter 4, for more information) Nothing visible on display. 46 Dirty inlet and/or sample tube. Clean inlet. Clean or replace tubing. Extreme temperature swings during operation. Internal optics chamber is contaminated. Zero instrument, at ambient temperature, before beginning test. Protect from extreme temperature swings. Unit not switched on. Return to factory for cleaning and servicing. Switch unit on. Low or dead batteries. Replace the batteries or plug in the AC adapter. Batteries installed backwards. Observe polarity indication on battery holder diagram. Dirty battery contacts. Clean the battery contacts. Chapter 5 Symptom Mass concentration number blinks; stays on the same value. No keypad response. Display shows KEYPAD LOCK. Possible Cause Instrument has reached the calibrated limit of it’s range (multiplied by Cal Factor). Keypad is locked out. LOW BATTERY message is displayed. Low battery charge. ZERO DRIFT message is displayed. Zero baseline on instrument has drifted. Need to Zero Cal. LASER FAILURE message is displayed. FLOW BLOCKED message is displayed. Laser has failed (low power output). CHARGING OFF message is displayed. Troubleshooting Corrective Action N/A To toggle between an unlocked and locked keypad (tamper prevention), press and hold the ▲ key and press ↵. When the keypad is locked, the display shows KEYPAD LOCK. Recharge batteries (NiMH); replace batteries (AA alkaline); or use AC adapter. Perform a zero calibration. See “Zeroing the AM510”, in Chapter 4, for more information. Return to factory for servicing. Inlet flow is blocked. Remove obstructions. Check for pinched sample tube. Check for correct installation of impactor inlet (if used). Outlet flow is blocked. Remove obstructions from outlet flow fitting (next to connectors). Internal filter is plugged. Return to factory for servicing. Or replace internal filter. See “AM510 Field Service Kit” section, in Chapter 4, for more information. Install NiMH battery pack, for proper charging. Instrument has detected either an alkaline battery pack or no battery pack. 47 Symptom LOGGING STOP MEMORY FULL message is displayed. Possible Cause Instrument has discontinued logging, due to memory full condition. DATA LOGGING ABORTED message is displayed. INVALID PROG START DATE (START TIME) message is displayed. User has discontinued data logging before a single data point was recorded. User is attempting to run a Prog 1 or Prog 2 data logging program that is not adequately defined. NO LOGGED DATA PRESENT message is displayed. 48 Program start date may be in the past (expired). User is attempting to review Test Statistics. However, no tests have been properly stored in memory. Corrective Action All data, up to this point, has been saved. Download or view Test Statistics. Clear Memory, as needed. N/A Setup correct logging protocol for Prog 1 or Prog 2, using TRAKPRO software. Record tests, using Run Manual, Prog 1 or Prog 2. Chapter 5 Appendix A Specifications Specifications are subject to change without notice. Sensitivity: Sensor type:..................... 90° light scattering, 670 nm laser diode Aerosol concentration range .............................. 0.001 to 20 mg/m3 (calibrated to respirable fraction of ISO 12103-1, A1 test dust) Particle size range ........... 0.1–10 micrometer (µm) Minimum resolution.......... 0.001 mg/m3 Zero stability..................... ±0.001 mg/m3 over 24 hours using 10second time-constant Temperature coefficient ... approximately +0.0005 mg/m3 per °C (for variations from temperature at which instrument was last zeroed) Flow Rate: Range............................... User-adjustable, 0.7–1.8 liters/min (lpm) Temperature Range: Operating range ............... 0 °C to 50 °C (32 °F to 120 °F) Storage range .................. -20 °C to 60 °C (-4 °F to 140 °F) Time Constant (LCD display): Range............................... User-adjustable, 1 to 60 seconds Built-in Inlets Standard inlet................... Not size-specific *PM1.0 impactor .............. 50% cut-off at 1.0 micron *PM2.5 impactor .............. 50% cut-off at 2.5 micron *PM10 impactor ............... 50% cut-off at 10.0 micron (*not included except in AM510 kits) 49 Data Logging: Data points ....................... Approx. 31,000 (21 days logging once per minute) Logging interval................ User-adjustable, 1 second to 1 hour User-Select Calibration Factors: Factory setting.................. 1.0 (non-adjustable) User-defined settings ....... 3, with user-defined labels Range............................... 0.1 to 10.0, user-adjustable Physical: External dimensions......... 106 mm x 92 mm x 70 mm (4.2 in x 3.7 in x 2.8 in) with 801724 battery 130 mm x 92 mm x 70 mm (5.1 in. x 3.7 in. x 2.8 in.) with 801722 or 801708 battery Weight .............................. 0.46 kg (16 oz) with 801724 battery 0.54 kg (19 oz) with 801722 battery 0.54 kg (19 ox) with 801708 battery Display.............................. 2 line x 12 character LCD Tripod socket.................... ¼-20 female thread Power Supply (p/n 2613210): Input voltage range .......... 100–240 VAC, 50–60 Hz Output voltage .................. 9 VDC @ 1.0 A Maintenance: Factory clean/calibrate ..... Recommended annually User zero calibration ........ Before each use User flow calibration......... As needed 50 Appendix A Approvals: Intrinsic Safety Rating Information............ TSI Battery Pack P/Ns 801722 or 801724 INTRINSICALLY SAFE CSA Exia T2A with 801724 T2C with 801722 Class I Groups A, B, C, D File: 200507 TSI Battery Pack P/N 801708 Not Intrinsically Safe Immunity EN61326-1: 1997 + A11998 Clause 6 Emissions EN61326:1997 + Amendment A1:1998 ! Caution All Dust Plugs and gaskets must be installed on the SIDEPAK SP330 or SP350, in addition to using the above battery packs to achieve Intrinsic Safety Rating. Battery Information Charge Time* Intrinsically Safe 1650 mAH NiMH Pack (P/N 801724) 3.5 hours Yes** 2700 mAH NiMH Pack (P/N 801722) 5.5 hours Yes** 6-Cell AA-size Pack (P/N 801708) N/A No Battery Option CSA Rating Exia T2A/ Class I Groups A, B, C, D Exia T2C/ Class 1 Groups A, B, C, D N/A *Of a full depleted battery **All dust plugs and gaskets must be installed Specifications 51 Typical Battery Life Cell Type Hours @ 0.7 lpm Hours @ 1.7 lpm NiMH (4.8 V, 1650 mAH) NiMH (4.8 V, 2700 mAH) AA Alkaline Cells AA NiMH Cells (1600 mAH per cell. Cells cannot be charged while inside AA Pack) 11.5 9.2 19.8 15.6 29.6 8.8 22.5 6.7 Battery Pack 1650 mAH NiMH Pack (P/N 801724) 2700 mAH NiMH Pack (P/N 801722) 6-Cell AA-size Pack (P/N 801708, with six user-supplied AA cells) Communications Interface: Type ................................. USB 1.1 Connector, instrument...... USB Mini-B (socket) Minimum Computer Requirements for TRAKPRO™ Software: Communications port ....... Universal Serial Bus (USB) v1.1 or higher Operating system ............. Microsoft Windows® 98, Me, 2000, XP (USB not supported in Windows 95 or NT) 52 Appendix A Appendix B Custom Calibrations In most situations, the SIDEPAK Personal Aerosol Monitor Model AM510 provides very good information on how the concentration of an aerosol changes for over time. Factory calibration to the respirable fraction of standard ISO 12103-1, A1 Test Dust (formerly Arizona Test Dust) allows comparisons between measurements where the source or type of dust is predominately the same. Because optical mass measurements are dependent upon particle size and material properties, there may be times when a custom calibration will improve your accuracy for a specific aerosol. The SIDEPAK AM510 monitor has several features to aid in obtaining good accuracy for a specific aerosol. • The SIDEPAK monitor’s custom calibration factor can be changed through the instrument keypad. All future readings from the SIDEPAK monitor will correspond to a specific aerosol until the calibration factor is changed back to the factory setting. • Custom calibration factors can be stored in a table and downloaded to the SIDEPAK monitor using the TRAKPRO Data Analysis Software. All future measurements will correspond to a specific aerosol until the calibration factor is changed back to the factory setting. • A single set of logged data can be converted to data calibrated to a specific aerosol with the use of the TRAKPRO software. This conversion can be done by knowing either the true mass concentration for the logged data or the calibration factor for the aerosol. Future measurements will continue to be read and logged with the original calibration factor (normally 1.0) and will not be converted automatically. All of these options require that you determine a true mass concentration (e.g., gravimetric analysis) for the aerosol you want to measure. The true mass concentration is used to calculate the custom calibration factor for that aerosol. Once you have a custom calibration factor, you can reuse it each time you make measurements in the same or similar aerosol environment. Determining the Calibration Factor for a Specific Aerosol The SIDEPAK Personal Aerosol Monitor Model AM510 is factory calibrated to the respirable fraction of standard ISO 12103-1, A1 Test Dust. The SIDEPAK monitor can be easily calibrated to any arbitrary aerosol by adjusting the custom calibration factor. The SIDEPAK monitor’s custom 53 calibration factor is assigned the value of 1.00 (factory setting) for the standard ISO test dust. This procedure describes how to determine the calibration factor for a specific aerosol. Using a calibration factor value of 1.00 will always revert back to the factory calibration. To determine a new calibration factor you need some way of accurately measuring the concentration of aerosol, hereafter referred to as the reference instrument. A gravimetric analysis is often the best choice, although it is limited to nonvolatile aerosols. To make an accurate calibration you must simultaneously measure the aerosol concentration with the SIDEPAK monitor and your reference instrument. 1. Zero the SIDEPAK monitor as described in the Maintenance chapter. 2. Select a short logging interval (e.g. 5 seconds), in the Setup: Logging Interval menu. 3. Put the instrument in Run Manual Mode. 4. Locate the SIDEPAK monitor and the reference sampler together so that they are measuring from the same area. If you use a size-selective inlet, make sure each instrument has an identical inlet. 5. Start sampling aerosol with both instruments at the same time. Note: Greater accuracy will be obtained with longer samples. The time you permit for sampling often depends on the reference instrument and characteristics of the measured aerosol. It may take some time to collect sufficient aerosol onto a filter cassette for accurate gravimetric analysis. Refer to instructions of your reference instrument for sampling times. 6. Stop sampling with both instruments at the same time. 7. At the conclusion of the test, the SIDEPAK monitor will display Test Statistics for the last test. Note the average concentration. You may also download the test data using TRAKPRO software, and view the Test Statistics. 8. Determine the mass concentration in mg/m3 from your reference instrument. For gravimetric sampling this means having the gravimetric sample weighed. 9. Compute the new calibration constant, NewCal, using the following formula: Reference Concentration NewCal = ⋅ OldCal AM510 Concentration The calibration factor, OldCal, can be obtained from the SIDEPAK monitor. The current Cal Factor is displayed in the Setup Menu: Cal Factor. 54 Appendix B Appendix C Converting Stored Data to Calibrated Data A single set of logged data can be converted to data calibrated to a specific aerosol with the use of the TRAKPRO software. This conversion can be done by knowing either the true mass concentration for the logged data or the calibration factor for the aerosol. To perform this conversion, follow these steps: Note: This process applies a new calibration factor to existing data files. It does not change the current calibration factor used by the SIDEPAK monitor. Future measurements will continue to be read and logged with the calibration factor made active using the SIDEPAK monitor keypad. 1. Connect your SIDEPAK monitor to the computer and start the TRAKPRO software. 2. If not already set to SIDEPAK Aerosol Monitor, set it from the Options menu under Software Configure. Or, select SIDEPAK Aerosol Monitor from list of available instruments on the drop-down menu on the menu bar. 3. Open the file that contains the data to be converted. Highlight a single test within that data file. 4. Select Apply New Cal Factor from the Options menu. The following dialog box is displayed. 55 Enter the New mass concentration value (in mg/m3). The New calibration factor is calculated and automatically updated. Press OK. 6. When you click OK, a new data set of the same name will be generated, calibrated to the mass concentration that you entered. This data set will be added to the same data file. The original data remains. 7. If you want to adjust the data to a previously determined custom calibration factor without performing a gravimetric calibration, enter the new calibration factor. The New mass concentration automatically updates. 5. 56 Appendix C Appendix D Quick Reference Startup Screen Power ON/OFF After pump achieves flowrate MODEL AM510 S/N 1 2 3 4 5 6 7 8 M E M O RY 100% VERSION 1.0 WARMUP MODE: 0.259 mg/m3 Survey Mode S U RV EY M O D E 0.259 mg/m3 M E M O RY 1 0 0 % B ATT 379 min 13:25:02 05/17/2002 C A L F A CT O R F A CT O RY 1 . 0 0 Main Menu MA I N D a t a MENU L o g S e t u p S t a t i s t i c s Z e r o C al Data Logging Menu DA T A LOG R u n Ma n u a l R u n R u n P r o g P r o g 1 2 Not shown Select Test Setup Menu S T A T e s T e s T e s T I S T I CS t # 1 SE T UP MENU T i me / D a t e t t C L T C A # # 2 3 l o i a d e a r g I me l F j u s Me nt e Co n ac t t F m r s o l o v t r o For Prog 1 and Prog 2, preprogram start & stop time using TRAKPRO software if Delay Set No Delay Not shown r y a l n t w PROGRAM D e l a y e d 1 S t r t ST ART T I ME 1 2 : 2 0 ST ART DAT E 0 5 / 1 7 / 0 2 F L OWR A T E 5 0 R a n g e Display Stats After Start time... TE S T 1 Ma x 0 . 7 3 4 M i n A v g TWA Time 0 . 0 5 0 . 3 6 0 . 2 5 7h 7 2 4 53m CA F a U s Wo O i L F A c t o r e r o d D l M i T I ME 1 C TO y 1 1 u s 1 s t 2 R . . . . 0 6 1 0 CONS T 1 s e c 5 1 0 1 5 3 0 s s s s e e e e c c c c 0 0 5 0 LOGGNG 0 . 3 2 5 DA T A mg / m3 MA N U A L BA T T MOD E 379 min 8 - HOUR 0 . 0 1 0 TWA mg / m3 E L AP S E D T I ME 5 5m 3 5 s 1 3 : 2 5 : 0 2 0 5 / 1 7 / 2 0 0 2 LOG 1 LOG I N T ERVAL s e c I N TV L 1 1 se c 1 0 3 0 1 5 se se mi mi c c n n 57 TSI Incorporated 500 Cardigan Road, Shoreview, MN 55126 U.S.A. Web: www.tsi.com