1
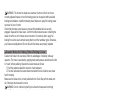
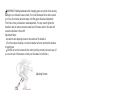
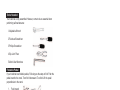
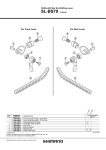
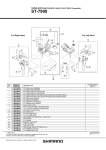
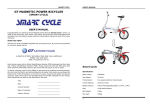
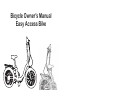
Bicycle Owner's Manual
Easy Access Bike
AGE: FROM 9 YEARS OLD AND UP
IMPORTANT
Check bike after assembly or any adjustments. Consult bicycle retailer with
questions.
Always wear a helmet.
Children should never ride after dusk or at night
Before use, check that the front wheel is firmly attached and brakes are in
proper working condition.
Adults should never ride after dusk or at night, unless absolutely
necessary. If it is absolutely necessary, you must take steps to make
yourself visible. (See Owner's Manual for requirements).
On wet roads, apply brakes early and gradually.
Bicycle User Manual — Cruiser, Trike, 1-speed and 6-speed models
Some of the contents and illustrations in this manual are for models other than
yours. Save this manual, it contains important information on use and
maintenance.
Folding Instruction for Bike
STEP 1: Loosen the seat post quick release and push the saddle with seat post
down to the lowest position. Then slightly tighten the quick release again.
STEP 2: Unlock the quick release of the handlebar stem and fold the handle bar
stem downward to the right band side of the bike.
STEP 3: Set the kickstand to the ready for riding position (kick it up horizontally).
STEP 4: Unlock the quick release of the frame and fold the front part of the
frame to left.
STEP 5: Fold the right hand pedal by pushing in and folding down (see page 7)
The steps are completed.
To fold the Tricycle frame follow steps 1 and 4 of above, then turn the Quick
Release Lever counter - clockwise to release the handlebar stem.
NOTE: When unfolding for use, reverse those steps and ensure that all quick
release hinges are secured tightly and that seat height and handlebar position is
adequate for rider.
Safety Checks
Make sure your bicycle/tricycle is in working condition and that all quick
releases on the folding hinges are properly tightened.
Always wear safety helmet and reflective clothing in the darkness.
Check and keep your brakes in proper working order.
Have a suitable bell fitted to your bicycle; do not have any other type of
warning device.
Make sure your tires are in good condition and are properly inflated.
Check that the chain is tight and in place.
Check that the moving parts are lubricated sufficiently.
Inspection and Maintenance
For your safety and enjoyment, and to ensure a long life for your folding
bike/trike, inspect and maintain your bike/trike regularly. The proper condition
and function of the key systems is critically important to your safety.
-1-
Brake mechanism - inspect before every ride and adjust as needed
Tire pressure - inspect before every ride and adjust as indicated
Tire wear or damage - inspect before every ride and replace as needed.
Brake pad & cable tension - inspect before every ride and adjust or replace
as needed.
Hub bearings - inspect periodically, clean and lubricate, adjust as needed.
Chain lubrication - inspect periodically, clean and lubricate.
Reflectors - inspect before every ride, clean and tighten as needed.
All moving parts should occasionally be cleaned and lubricated as needed.
Brake and Cable Adjustment
a.V-Brake for Folding Bike
V-Brakes on your bike are fully adjusted when you purchase the bike. They
allow you to adequately slow down and stop the bike when the brake lever is
squeezed. Periodically checking and adjusting the brakes is strongly
recommended. Braking cables can be tightened/loosed by rotating the barrel
adjuster nut on the brake levers (clockwise/counter clockwise). The V-brakes
have quick release mechanism and allow the brake shoes to clear the tire
when a wheel is removed or reinstalled. When the brake quick release is in the
open position, the brake will not operate. Make sure you understand the way
the brake quick release works on your bike. Consult local bike shop or bicycle
technician for detail whenever is needed.
Barrel Adjuster
V-Brake
b.Drum Brake for Folding Trike
Drum Brake on your trike is pre-adjusted.
However, if the front wheel is not turning
freely as a result of a tight drum brake,
readjust the cable adjusting screw.
Drum Brake
-2-
WARNING: The shorter the brake lever reaches, the more critical it is to have
correctly adjusted brakes, so that full braking power can be applied within available
braking travel distance. Insufficient braking travel distance to apply full braking power
can result in loss of control.
Check that the brake quick release is close and the straddle cable is securely
engaged. Squeeze the brake levers. Confirm that the brake shoes are contacting the
wheel rim within an inch of brake lever movement. You must be able to apply full
braking force at the levers without having them touch the handlebar grips. Otherwise,
your brakes need adjustment. Do not ride until the brakes are properly adjusted.
Coaster Brake for Folding Trike & Folding Cruiser
Coaster hub brake in the rear wheel offers the advantages of reliability and easy
operation. The brake is operated by applying back pedal pressure and allows the rider
to "coast" without pedaling. Operate the coaster brake as follows:
1.Push the pedals backward to move the chain backward.
2.The chain activates the coaster brake mechanism that is inside the rear wheel
hub for braking.
Make sure the brake arm is correctly attached to the Chain Stay with the brake arm
clip. Otherwise the brake will not work.
WARNING: Do not ride the bicycle/tricycle unless the brakes are functioning
properly. To test, apply the brakes, while trying to push the bike forward to make sure
it will stop the bicycle.
Brake maintenance (Coaster Brake)
There are many models of coaster hubs available, and the internal mechanisms are
very complex. They require infrequent maintenance as far as lubrication, adjustment
or replacement of the internal parts; if needed, ask a qualified specialist for help. Keep
the coaster hub sprocket clean and oil it along with the chain.
Derailleur Gear System Adjustment
If your bike is equipped with 6 speed gear system, the gear system consists of: a
freewheel, a rear derailleur (which moves the chain up and down the freewheel to
change the gear ratio), a gear shifter (on right hand side of handlebar), a control cable
and a chain. The purpose of derailleur is to move from one sprocket to another to
allow for a variety of gear ratios. These ratios allow the rider to maintain a constant
pedal revolution in a variety of road and speed conditions. The derailleur gears on
your bike are indexed. Each time you turn the gear shifter one click, the rear derailleur
travels a certain distance to engage to next gear. This enables you easier and more
accurate gear changing.
-3-
WARNING: Pedaling backwards while changing gears can jam the chain causing
damage to your bike and cause a crash. Your local bike dealer will be able to assist
you if you are uncertain about the steps in shifting gears. Derailleur Adjustment:
From time to time your derailleur needs adjustment. You may need to tighten the
derailleur cable to remove excessive cable slack. Excessive slack in the cable will
cause the derailleur to miss shift.
Adjustment Steps:
Locate the two adjusting screws on the surface of the derailleur.
Turn the screws clockwise or counter-clockwise half a turn and test the derailleur
changing gear.
Continue to turn the screws until the chain is pitching correctly onto each gear. (If
you are not sure of these steps, consult your bike dealer or technician.)
Adjusting Screws
Inter 3 Speed Gear System Adjustment (Trike)
1. Move the indicator cover for easy gear adjustment.
2. Make sure that no more than 2.5mm (1/8”) of axle protrudes from the axle hex nut.
3. Select 2nd gear and turn the pedal crank forward to ensure the gear is engaged.
Turn the cable adjuster or cable connector until the end of the indicator rod is level
with the end of the axle.
4. Tighten the cable-adjusting locknut and indicator locknut to lock in adjustment.
5. Select 3rd gear position, rotate the pedal crank, change back to 2nd gear and
check adjustment. Retry the stages description above when the gear changing
is not correct.
6. If there is an indicator cover, fit it firmly onto the guide nut or the guide pulley set.
Adjusting Screws
-4-
WARNING: Riding the gear hub out of the adjustment may cause damage to the
internal parts and possible malfunction.
Tires and Wheels Adjustment
Check tire inflation printed on tires. A visual check can be done by putting one hand
on the saddle, and one on the intersection of the stem and handlebars, then bouncing
your weight one the bike/trike while looking at tire deflection. Compare what you see
with how it looks when you know the tires are correctly inflated. Adjust if necessary.
Spin each wheel slowly and look for cuts in the tread and sidewall. Replace damaged
tires before riding. Spin each wheel and check for the brake clearance and
side-to-side wobble. If a wheel wobbles or hits the brake pads, take it to a qualified
bike shop to have the wheel corrected.
Handlebar and Stem Adjustment
a. Foldable Type.
Use Allen wrench to change the angle of the handlebar by loosening its binder bolt,
rotating the bar or extension to the desired angle, re-centering it and retightening the
binder bolt enough so that the bars or extension can't move in relation to each other
and the stem.
If the stem is not properly aligned with the front wheel, it will need to be adjusted.
Loosen the binder bolt on the stem (unlock the folding hinge and fold the stem before
you can loosen the binder bolt). Place the front wheel between your legs and twist the
handlebar/stem assembly to align the handlebars in relation to the stem. Then
retighten the binder bolt.
b. Quick Release Type
Turn the Quick Release Lever clockwise to tighten the handlebar stem. Turn the
Quick Release Lever counter-clockwise to release the handlebar stem.
Warning: Failing to properly tighten the stem binder bolt or the handlebar binder
bolt, may compromise steering action, which could cause you to lose control and fall.
WARNING: The stem must NOT project from the head tube beyond its
-5-
minimum insertion or maximum extension marks.
WARNING: Do not over tighten the stem bolt or other clamping devices; there is a
danger of damaging the stem and the fork and risk of injury to the rider.
Saddle Adjustment
Correct saddle adjustment is an important factor in getting the best performance and
comfort from your bicycle/tricycle.
a.Saddle height adjustment
Your leg length determines the correct saddle height. To check for correct saddle height:
- Sit on the saddle
- Place one heel on a pedal
- Rotate the crank until the pedal with your heel is on the lowest position and the
crank is parallel to the seat tube. Your leg should be almost straight. If not, your
saddle height needs adjustment.
To adjust the saddle height, loosen the seat post quick release and move the seat post up
or down as required. Retighten the seat post by locking the seat post with quick release.
Make sure that it is tightened enough and you cannot twist the saddle easily out of
alignment.
WARNING: The seat post must NOT project from the frame beyond its minimum
insertion or maximum extension marks.
b.Saddle front/back adjustment
To find the most comfortable position, loosen the saddle clamp and adjust the saddle
forward or back to suit you (this applies to some saddle models only).
WARNING: After any saddle adjustment, be sure to tighten the saddle adjusting
mechanism properly before riding.
Height Requirement is Determined by the Rider's Leg Length
Stand over height is the basic element of bike/trike fit. Rider must be able to straddle
bicycle/tricycle with at least 25mm (or 1") clearance above the horizontal bar when
standing.
A bicycle/tricycle that is too big or too small for the rider is hard to control and can be
uncomfortable. If your bicycle does not fit
Not Less
properly you may lose control and fall.
Than 1”
-6-
Tools Needed
Your bike/trike is fully assembled. However, some tools are essential when
performing self-maintenance:
I. Adjustable Wrench
2.Flat-head Screwdriver
3.Phillips Screwdriver
4.Slip-Joint Pliers
5.Metric Allen Wrenches
Foldable Pedal
If your bike/trike has foldable pedals, Following are the steps to fold: Push the
pedal inward to the crank. Then fold it downward. To unfold: Lift the pedal
perpendicular to the crank.
1. Push inward
2. Fold downward
Carrier (Folding Bike and Folding Cruiser Bike)
Your bike is equipped with a removable carrier.
WARNING: Maximum load rapacity of this carrier is 11 lbs. Da not overload
or carry any passenger on the carrier.
Basket (Trike only)
Your trike is equipped with a removable rear basket.
WARNING: Maximum load capacity of this basket is 22 lbs. Do not overload
or carry any passenger on this basket.
Reflectors
Reflectors are important safety devices that are designed as an integral part of
your bicycle/tricycle. Do not remove them on any circumstance. Keep clean and
replace them immediately if damage is found.
-7-
Basic Safety Rules
Always perform the mechanical check explained in this manual before every ride.
Always wear a helmet and safety gear that complies with local laws.
Keep body and clothing away from the chain ring and other moving parts on the
bike/trike.
Wear shoes that fit, will stay on your feet and properly grip the pedals. Never ride
with unprotected or poorly protected feet. Do not ride wearing sandals or other open
footwear.
Wear bright, visible clothing (reflective in darkness) that does not restrict
movement but is not so loose that can be caught by the moving parts of the bike or
objects as you ride past them.
Do not jump or attempt stunts on the Bicycle/Tricycle.
Travel at or below the speed where you can comfortably react to any problem that
could occur during your ride. Allow for ample time to brake slowly and safely to avoid
obstacles.
Riding on the Road
Before you move off from the side of the road, think which way you intend to go
and look both ahead and behind for moving traffic. If there is traffic approaching, wait
until it has passed.
Except in an emergency, stopping must be done carefully and gradually. Think of
where you wish to stop and look particularly to the rear over your right shoulder for
following traffic. Signal that you are going to slow down and stop.
When braking keep both hands on the handlebar.
On a wet road, it will take a much longer distance to stop; so allow at least twice
the distance than normal.
You must keep at least one hand on the handlebar at all time.
Always keep both feet on the pedals.
Always use a bicycle way or cycle lane.
Never tow or hold on to a vehicle or tow another cyclist or other vehicle.
You must not carry a passenger.
You must not carry anything which might affect your complete control of your
bicycle or your balance, or can be caught into the wheels or chain.
You must not carry anything that blocks, or may block, your view of the road.
Do not wear earphones of any audio devices.
Do not lead an animal.
-8-
Night Riding Safety
Make sure your bicycle/tricycle is equipped with correctly positioned reflectors, and
an adequate headlight and taillight.
Wear bright, reflective clothing.
Make sure your clothing or objects are not obstructing your bike/trike reflectors or
installed lights.
Ride slowly and on routes that are already familiar to you.
WARNING: Reflectors are not a substitute for required lights. Riding at dawn, at
dark, at night or at other times of poor visibility without an adequate bicycle lighting
system is dangerous and may result in serious injury.
Wet Weather Riding
Under wet conditions, the stopping power of your brake (as well as the brakes of other
vehicles sharing the road) is dramatically reduced and your tires do not grip nearly as
well. This makes it harder to control speed and easier to lose control. To make sure that
you can slow down and stop safely in wet conditions, ride more slowly and apply your
brakes earlier and more gradually than you would under normal, dry conditions.
WARNING: Wet weather impairs traction, visibility and braking for the rider and for
other vehicles sharing the road. The risk of accident is dramatically increased in wet
conditions.
Additional Warnings:
Use only neutral non alkali/acid based detergent to clean chain and re-lubricate all
derailleur parts regularly.
For any questions regarding adjustments, maintenance or operation, contact a
professional bicycle dealer.
LIMITED WARRANTY POLICY
Camping World, Inc. offers a lifetime warranty against manufacturer's defects on all
frames and forks (except suspension fork). We also warranty any components which
prove defective for a period of 90 days from date of consumer purchase. This warranty
does not cover any damage caused by abuse, accident or improper assembly. If you
find any missing or defective parts contact
www.CampingWorld.com
-9-
1