1
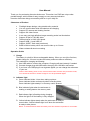
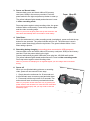
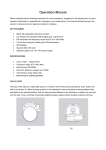
Hercules Actioncam Aluminum Edition User Manual Thank you for purchasing Hercules Actioncam. This action /car DVR has unique ultraportable design, which makes it easy to apply to every area and situation. Hercules Actioncam brings more safety and fun to your daily life. Characters of Product Flashlight shape design, using durable alloy material. You can record video while the batteries are charging, Support PC camera and chatting function. Support AVI video format. It can carry out high definition image recording under low illumination. Support 30 fps for 720*480 video Takes pictures in 1280*1024 pixels. Support USB 1.1 and USB 2.0. Support 16GB T-flash card.(maximum) Build-in lithium battery which can record video up to 2 hours Water resistant & aluminum casing Operation Guide 1. Charge The battery is a built-in lithium rechargeable battery. When you use it the first time, please charge for 10 hours to make the battery achieve maximum efficiency. The methods for charging as following: 1) Use USB cable to connect the computer. Charging will start instantly if needed. 2) Connect charger plug with USB cable, then plug into 100-240v wall socket. 3) If you have a 5v USB-plug for car cigarette lighter you can charge the actioncam in your car. Notice: when battery power is low, Hercules Actioncam will enter into protection mode, so it cannot be turned on. Please charge for it to be operational again! 2. Indicator light A. Green indicator blinks 1 time when taking a picture. Green indicator blinks continuously when recording video. Green indicator lights steady if no memory card is present. B. Blue indicator lights when the actioncam is reading or writing data to the memory card. C. Red indicator light is flashing during charging. When the light is off the battery is fully charged. D. Yellow indicator lights steady when the actioncam is ready to record video. Yellow indicator light is off when the actioncam is ready to take picture. Notice: to switch between these two states press and hold the top button for 2 seconds. 3. Power on/ Record video Unscrew back cover and insert a Micro SD memory card (max 16GB) in the memory card slot. Push the power switch to the right and press top button to start up. The yellow indicator lights steady and actioncam is now in video recording mode. Press top button again to start recording video, the green indicator blinks continuously. Press the top button again and the video recording stops. Notice: if you not do anything after start up the actioncam will shut down automatically after 15 seconds to save battery. 4. Take Photo When the actioncam is in video recording mode (read above), press and hold the top button for two seconds. The yellow indicator will turn off. The actioncam is now in picture mode. Now simply press the top button. The green indicator blinks 1 time when taking a picture. 5. Recording during charging (not working when connected to USB-computer) Unscrew back cover and insert a Micro SD memory card (max 16GB) in the memory card slot. Push the power switch to the right. Connect wall socket plug with USB cable, then plug into 100-240v wall socket. The yellow indicator lights steady and actioncam is now in video recording mode. Press top button again to start recording video. Notice: if you have a USB-plug for car cigarette lighter you can charge and record while driving. 6. Power off When you are finished taking pictures or recording video, power off can execute in two ways. 1. Simply leave the actioncam for 30 seconds and it will automatic save to memory card and shut down. 2. Press and hold the top button for 5 seconds. The actioncam will save to memory card and shut down. Notice: if you power off the actioncam only by pushing the power switch to the left there is a risk that some media files will not be saved properly and you may need to reset the timestamp again. 7. Timestamp If the timestamp is not correct on your recorded media files this is how you correct it. On the product CD-record there is a txt-file named TAG. Please copy this txt-file to the root of your Micro SD memory card. Open the txt-file that you copied to the memory card and write the correct date and time in this format: 2009/08/24 19:20:00 Notice the space after the date (24) Save your changes in the txt-file and disconnect the actioncam from the computer. Start your actioncam and record a movie or take a picture. Power of and connect to your computer. When you look at the media files you can see the correct timestamp printed on the photos or movies. 8. Connecting computer Install the driver from the product CD-disk. The driver name is SPCA1528_V2220_VHQL. After installation is finished there will be a program icon named AMCAP on your computer desktop. You can now connect the actioncam to your computer with the USB-cable during power off mode or standby mode. The Micro SD memory card will show up as a USB-disk on your computer. You can now look, copy, cut, paste, and delete the files on your memory card. Notice: a. You can also take out the Micro SD memory card from the actioncam and put it in a suitable memory card reader to see the contents of the memory card. b. If you experience choppy or slow playback of video files on the Micro SD memory card, please copy the video files to your computer hard drive and watch them from there. 9. PC camera Install the driver from the product CD-disk. The driver name is SPCA1528_V2220_VHQL. After installation is finished there will be a program icon named AMCAP on your computer desktop. Connect the actioncam to your computer with the USB-cable during power off mode or standby mode. Press the top button and the actioncam will switch into PC camera mode. You can now use the actioncam as a webcam with your favorite chat program or with the AMCAP program you installed from the product CD-disk.