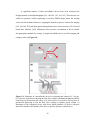
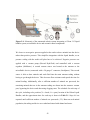
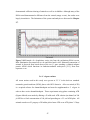
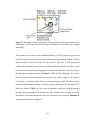
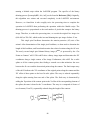
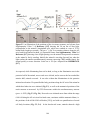
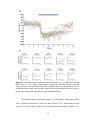
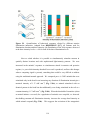
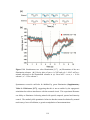
1
AUTOMATED MICROFLUIDIC SCREENING AND PATTERNED ILLUMINATION FOR INVESTIGATIONS IN CAENORHABDITIS ELEGANS NEUROSCIENCE A Dissertation Presented to The Academic Faculty by Jeffrey N. Stirman In Partial Fulfillment of the Requirements for the Degree Doctor of Philosophy in the Bioengineering program in the School of Chemical & Biomolecular Engineering Georgia Institute of Technology May 2012 AUTOMATED MICROFLUIDIC SCREENING AND PATTERNED ILLUMINATION FOR INVESTIGATIONS IN CAENORHABDITIS ELEGANS NEUROSCIENCE Approved by: Dr. Hang Lu, Advisor School of Chemical & Biomolecular Engineering Georgia Institute of Technology Dr. Athanassios Sambanis School of Chemical & Biomolecular Engineering Georgia Institute of Technology Dr. Philip Santagelo School of Biomedical Engineering Georgia Institute of Technology Dr. Alexander Gottschalk Institute of Biochemistry and Frankfurt Institute for Molecular Life Sciences (FMLS) Johann Wolfgang Goethe-University Frankfurt (Frankfurt, Germany) Dr. Jennifer Curtis School of Physics Georgia Institute of Technology Date Approved: 5 December 2011 ACKNOWLEDGEMENTS I would like to foremost thank my advisor, Dr. Hang Lu, who graciously accepted me into her lab. She had provided me with invaluable guidance, support, and when needed, freedom to explore. I have truly enjoyed my experience as her graduate student, and am grateful to her. I express my gratitude to my thesis committee for valuable guidance and advice on shaping the structure and content of this thesis. I thank Dr. Philip Santangelo, whom I have known since entering the graduate program. He has given me valuable advice on a number of both research and non-research related issues. Finally, I express my great gratitude to my long distance committee member and close collaborator, Dr. Alexander Gottschalk. Through his expertise in C. elegans neuroscience, optogenetics, and experimentation, and our constant communication, we have had a highly successful collaboration. I thank all current and past members of the Lu lab. I make special note of the two founding members of the lab, Kwanghun Chung and Edward Park, both who provided a great deal of teaching and troubleshooting, and without both I feel the lab and all successive members would not have been as successful. Of all the great members of the lab, I would especially like to express my thanks to Matthew Crane. During my time here, he has provided valuable assistance and guidance, both experimentally and educationally. More importantly, he has been a great sounding board and friend. I express my great gratitude and love to all my family members and most especially my parents, who have given me much needed support through all my many years of school. Finally, I would like express my thanks and love to my fiancée Gina Cremona, who has given me love, support, and advice over the past several years, allowing me to pursue and complete the task of obtaining my PhD. iv TABLE OF CONTENTS Page ACKNOWLEDGEMENTS iv LIST OF TABLES ix LIST OF FIGURES x SUMMARY xiv CHAPTER 1 Introduction 1 1.1 C. elegans as a model organism 1 1.1.1 C. elegans Development 2 1.1.2 RNAi 3 1.1.3 Tissue, cell, and protein visualization in C. elegans 4 1.1.4 Transgenic animals, C. elegans nomenclature and genetic maintenance 7 1.1.5 The neuroanatomy and neurophysiology of C. elegans 1.2 Optogenetics 9 17 1.2.1 Channelrhodopsin-2 17 1.2.2 Optogenetics and neuroscience 19 1.2.3 Optogenetics in C. elegans’ research 21 1.2.4 Techniques for optogenetics illumination 22 1.3 Microfluidcs 23 1.3.1 Microfluidic device design and fabrication 25 1.3.2 Microfluidics in C. elegans research 26 1.4 Thesis Outline 30 v 2 Microfluidics, machine vision, and lab automation for high-throughput optogenetic screening 2.1 Motivation and overview 32 2.2 Microfluidic Device Design, Fabrication, and Operation 33 2.3 Image acquisition and analysis 36 2.4 Results 38 2.5 Automated Robotic Liquid Handling and Integration 41 2.5.1 Higher throughput device 41 2.5.2 Integration of microfluidic device and liquid handler 42 2.5.3 Measuring worm concentration 44 2.5.4 Preliminary RNAi screen 46 2.6 C. elegans culture 47 2.7 Master microfluidic control box 48 2.7.1 Components 49 2.8 Conclusions 50 2.8.1 Limitations and considerations 3 32 Design, construction, and characterization of a multi-modal optical illumination system 3.1 Motivation and overview 51 56 56 3.1.1 Potential applications of the method 57 3.1.2 Comparison with other methods 58 3.1.3 Overview of the procedure 60 3.2 Experimental design 63 3.2.1 Choice of 3-LCD projector 63 3.2.2 Modification of the projector and insertion of custom optics 63 3.2.3 Modification of microscope optics for infinity corrected systems 66 vi 3.2.4 Modification of microscope optics for 160 mm fixed tube length systems 67 3.2.5 System assembly 67 3.3 Characterization of the illumination system 68 3.3.1 Spectral and intensity characterization 68 3.3.2 Illumination distribution across the field-of-view 69 3.3.3 Spatial resolution and accuracy 71 3.3.4 Temporal illumination resolution and accuracy 75 3.4 Conclusions 4 78 Software for selected area illumination of freely moving C. elegans and behavioral analysis 80 4.1 General computer setup 80 4.2 Projector alignment 81 4.2.1 Initial axial (Z) and in-plane (XY) alignment 81 4.2.2 Coordinate transformation 82 4.3 Color illumination and tracking 83 4.3.1 Image acquisition 84 4.3.2 Motorized stage control 86 4.3.3 Image processing, segmentation and illumination 87 4.3.4 Video recording 94 4.4 Scheduled illumination 95 4.5 Head encode 96 4.6 Complete video analysis 97 4.6.1 Using the program 97 4.6.2 Extracted parameters 98 4.7 Conclusions 101 vii 5 Demonstration of illumination system for neural circuit dissection 5.1 Motivation 103 5.2 Qualitative behavior elicited by structured illumination 103 5.3 Spatial activation of sensory and command neurons 105 5.4 Spatiotemporal control of the illumination intensity 112 5.5 Simultaneous multi-color illumination 116 5.6 Optogenetic dissection of a nociceptive neural circuit 120 5.7 Methods 123 5.7.1 C. elegans culture 123 5.7.2 Optical illumination, behavioral recording, and analysis 124 5.8 Conclusions and discussion 5.8.1 Limitations and considerations 6 103 124 125 Thesis contributions and future work 127 6.1 Thesis contributions 127 6.2 Future directions 130 6.2.1 Optimize the methods for optogenetic illumination 130 6.2.2 Combine optogenetics and behavioral recording 133 6.2.3 Utilize microfluidics, optogenetics and calcium imaging techniques for exploration of integration sensory information between distinct neural circuits 134 APPENDIX A: Publications and other scientific activities APPENDIX B: Detailed procedure for projector modification, optical system construction, and software 138 APPENDIX C: Additional contributions 155 REFERENCES 158 viii 141 LIST OF TABLES Page Table 2.1: Schedule for valve control 44 Table 3.1: Dimensions and specifications of the custom filters for insertion in to the modified Hitachi CP-X605 65 Table B.1: Troubleshooting table. 153 ix LIST OF FIGURES Page Figure 1.1: Organization of a neural circuit. 10 Figure 1.2: Mechanosensory circuit of C. elegans. 16 Figure 1.3: Structure of ChR2. 18 Figure 1.4: Action spectrum of two common optogenetic reagents. 19 Figure 1.5: Dye filled image of a microfluidic device. 24 Figure 1.6: Process for microfluidic device fabrication. 26 Figure 1.7: Microfluidics for precise control of the external environment. 28 Figure 1.8: Schematic of a microfluidic device for screening and sorting of C. elegans. 29 Figure 2.1: Microfluidic chip used in this investigation. 34 Figure 2.2: Index matched solution greatly decreases contrast between flow and control layers 35 Figure 2.3: Schematics of computer data processing 37 Figure 2.4: Histogram of the worm loading efficiency. 38 Figure 2.5: Contraction and relaxation of C. elegans muscles under photoactivation of motor neurons. 40 Figure 2.6: Nicotine (30 mM) induced contraction and ChR2 induced relaxation. 41 Figure 2.7: Device for increased throughput. 42 Figure 2.8: Schematic of the automated robotic system. 43 Figure 2.9: Measurement of concentration based on light scattering. 45 Figure 2.10: Example of a length-time series plot from the preliminary RNAi screen. 47 Figure 2.11: Master microfluidic control box. 49 Figure 2.12: Power analysis. 53 x Figure 3.1: Final optical configuration for the system. 61 Figure 3.2: Optical configuration of the system and components. 62 Figure 3.3: Schematic of final configuration of the modified projector. 64 Figure 3.4: Disassembly and insertion of custom optics into the 3-LCD projector. 66 Figure 3.5: Spectral and intensity characterization of the illumination. 69 Figure 3.6: Measuring the uniformity of illumination across the entire projector image 71 Figure 3.7: Measuring the effect of lens contrast transfer function on illumination spatial spread. 73 Figure 3.8: Measuring the limits of spatial resolution. 74 Figure 3.9: Measurement of temporal accuracy and resolution. 77 Figure 4.1: Cross pattern used for projector alignment. 82 Figure 4.2: A grid of 20 points is sequentially projected and imaged. 83 Figure 4.3: Software modules for performing imaging, stage movements, and image processing 83 Figure 4.4: Front panel of the LabVIEW custom program. 84 Figure 4.5: Live image acquisition and binary image creation. 85 Figure 4.6: The stage only tracks the object within the field-of-view. 86 Figure 4.7: Custom software for processing the acquired images, ultimately creating illumination pattern for the real-time illumination of freely behaving C. elegans. 87 Figure 4.8: Control panel used to initiate the thinning and segmenting operations. 89 Figure 4.9: User panel for illumination control. 90 Figure 4.10: Example of the segmentation of a thinned image into quarters. 91 Figure 4.11: This pane displays the illumination. 93 Figure 4.12: Control panel for setting complex custom illumination patterns. 95 xi Figure 4.13: Front panel for encoding the position of the head in the video file. 96 Figure 4.14: Front panel of the “Complete Video Analysis” program. 97 Figure 4.15: Extracted parameters from the video analysis. 100 Figure 5.1: Sequential frames from acquired videos showing qualitative behavioral responses. 104 Figure 5.2: Illumination line scan. 106 Figure 5.3: Histograms showing the distributions of positions along the AP axis at which point the blue light elicited a reversal response. 107 Figure 5.4: Representative fluorescent images of pmec-4::GFP animals. 108 Figure 5.5: Optical stimulation of anterior/posterior mechanosensory neurons. 109 Figure 5.6: Individual animal responses to anterior stimulus. 110 Figure 5.7: Optical stimulation of forward/ backward command interneurons. 111 Figure 5.8: Velocity plots from pooled data from animals receiving different illumination intensities. 113 Figure 5.9: Quantification of behavioral responses elicited by different anterior illumination intensities. 114 Figure 5.10: Illumination patterns used to explore the integration of anterior/posterior signals and behavior generated from the stimulation. 115 Figure 5.11: Distributions among the four response states for anterior illumination alone or simultaneous anterior/posterior illumination at the same intensity (1.17mW mm–2). 116 Figure 5.12: The neural gentle touch circuit. 117 Figure 5.13: Multi-spectral dynamic capacity of the illumination system. 118 Figure 5.14: Simultaneous two color illumination. 119 Figure 5.15: Illumination of PVD expressing ChR2. 121 Figure 5.16: Optogenetic dissection of the nociceptive response. 123 xii Figure 6.1: Schematic representation of a system for the simultaneous imaging of fluorescently labeled neurons and optogenetic illumination. 132 Figure 6.2: Investigation of sensory integration. 136 Figure C.1: Quantitative measurements of bending amplitude upon reversal 156 xiii SUMMARY The field of neuroscience has recently seen optogenetics emerge as a highly utilized and powerful method of non-invasive neural activation and inhibition. As optogenetics becomes a common method to probe neural circuits and function, a great amount of research has been dedicated to advancing and enhancing the optogenetic toolbox. Thus far, much effort has been devoted to the optogenetic reagents themselves: increasing sensitivity, altering ion channel/pump properties and selectivity, and altering the activity spectrum. While important, improvements of the hardware and software used in optogenetic experiments must also be improved; the methods of illumination must be made more specific to target specific areas, supporting methods must be developed to increase the processing power of optogenetic screens, and software for control of developed hardware must be made flexible and approachable for all users. Due to its relative neural simplicity, and the wealth of resources available, C. elegans is a popular model organism for neuroscience research. The use of optogenetics in C. elegans research has seen a vast increase over the past several years and has been utilized to study synaptic function, neural basis of behavior, transfer characteristics of synaptic connections, mating behavior, among several of areas of neurobiology. Thus, optogenetics is a powerful and rapidly emerging technique for investigations of the nervous system in C. elegans. These studies will only increase in sensitivity, complexity, and throughput as corresponding advances in the hardware and software are developed. This thesis seeks to enhance the optogenetic toolbox through the design, construction, and evaluation of a number of hardware and software modules for research in C. elegans neuroscience. In the first aim, we combine optogenetics, microfluidics, and automated image processing, to create a system capable of high-throughput analysis of synaptic function. Furthermore, the system was further enhanced by combining it with a commonly used liquid handling system for increased processing power. In the second xiv aim, we develop a multi-modal illumination system for the manipulation of optogenetic reagents. The system is capable of multi-spectral illumination in definable patterns, with the ability to dynamically alter the intensity, color, and shape of the illumination. The illumination system is controlled by a set of software programs introduced in aim three, and is demonstrated through a set of experiments in aim four where we selectively activate and inhibit specific neural nodes expressing optogenetic reagents in freely moving C. elegans. With the ability to target specific nodes in a freely moving animal, we can correlate specific neural states to behavior, allowing for the ability to dissect neural circuits. Taken together, the developed technologies for optogenetic researchers will allow for experimentation with previously unattainable speed, precision and flexibility. xv CHAPTER 1 INTRODUCTION This dissertation utilizes optogenetic and microfluidic methods applied to C. elegans in order to increase the available tools for researchers in neurobiology. To understand the motivation and application of the developed tools, this chapter introduces the three main components of the thesis and challenges with the current technologies: C. elegans, optogenetics, and microfluidics. 1.1 C. elegans as a model organism In the late 1960’s, Sidney Brenner began using the small nematode Caenorhabditis elegans for his research in developmental biology and the genetic basis of behavior [1, 2]. Dr. Brenner had a specific interest in relating genes to behavior, but believed there was no simple way to directly map the two. He believed the problem could be dissected into two components: the genetic determination and specification of the nervous system, and how the functional nervous system leads to behavior [1]. A nervous system is an interconnected network of cells, and in the examination of the nervous system, it would be ideal to visualize the connections between the cell, and cellular anatomy and development. At the time of initiating research into C. elegans, the main method for visualization of cell-cell interaction is the electron microscope. Therefore, Dr. Brenner’s desired qualities in an organism for his research were small size, existence of a nervous system, yet few cells involved, and amenable to genetic manipulations. In is search for such an organism, he came across C. elegans [1]. C. elegans meets Dr. Brenner’s aforementioned requirements, and has many other favorable advantages. C. elegans is a soil dwelling nematode, roughly one millimeter long [1]. It is generally found in temperate climates and can be found all over the world. 1 There are many “wild-type” animals; the most widely used wild-type animals are N2 (originally isolated in Bristol, England) and CB4856 (originally isolated in Hawaii). Over 99.8% of the animals found are self-fertilizing hermaphrodites; with the other 0.2% are males. The developmental time of the animal is short: about 3.5 days from fertilization to adulthood [1], and the average life-span is 2-3 weeks [3]. The rapid developmental time and the large brood size of a hermaphrodite, about 300 per cycle, means a large number of animals can be generated in a short period of time: ideal for genetic, biochemical, and developmental analysis. C. elegans are easily kept and maintained in a laboratory setting, typically grown on agar plates seeded with a bacterial food supply. Furthermore, C. elegans has a number of features which though might have not been known initially, have emerged as powerful aspects in C. elegans research. The most informative way to illuminate the biological power and to introduce some important features of C. elegans is to discuss the Nobel Prizes that have been awarded to researchers utilizing this small, yet powerful nematode. 1.1.1 C. elegans Development In 2002, the Nobel Prize in Physiology or Medicine was awarded to Sydney Brenner, Robert Horvitz, and John Sulston "for their discoveries concerning 'genetic regulation of organ development and programmed cell death'" (nobelprize.org). Dr. Sulston and Dr. Horvitz were postdoctoral researchers in Dr. Brenner’s lab in the 1970’s. Their work focused on the lineage tracking of cells in larval development. The life cycle of C. elegans consists of embryonic development and post-embryonic development consisting of four larval stages and adulthood and the timing of development in temperature dependent [3, 4]. Drs. Sulston and Horvitz took on the task of tracking the complete cell lineage among the developing post-embryonic animal [5]. During this time, the animal develops from 671 cells (L1) to a total of 959 somatic cells in the adult hermaphrodite: 302 of these are neurons and 95 are body wall muscle cells [6]. They found that this 2 development is stereotypical among animals, and they could map all final cells to precursor cells. Later, Dr. John Sulston mapped the cell lineage from the single cell fertilized egg stage to the L1 larval stage [7]. This completed the complete lineage mapping, and is still the only complete mapping of cell division and lineage analysis of an animal. In itself, the cell lineage mapping is an enormous task and finding. But additionally, this led the researchers, and specifically Robert Horvitz, to study and understand the mechanisms of cellular apoptosis which had previously been reported [810]. During the study of cellular division and differentiation, they found that there were 131 cells that existed in the L1 hatched larva, that did not give rise to daughter cells, or survive to adulthood: they underwent programmed cell death (apoptosis) [5, 7, 11]. In both of these studies, these researchers, their collaborators, students and postdocs found and characterized a number of mutant animals. In discovering mutants, characterizing the nature of the mutation and eventually finding the gene responsible, C. elegans has been powerful in elucidating the mechanisms, control, and determination of cell division, lineage tracking, and apoptosis. Primarily for these two studies, the significance and enormity of the finding, the three researchers (Brenner, Horvitz, and Sulston) were awarded the Nobel Prize. 1.1.2 RNAi In 2006, the Nobel Prize committee awarded the Nobel Prize in Physiology or Medicine to Andrew Z. Fire and Craig C. Mello "for their discovery of RNA interference - gene silencing by double-stranded RNA" (nobelprize.org). RNA interference (RNAi) is a cellular process in which the level of protein expression is regulated through the interference of RNA translation by either small interfering RNA (siRNA) or microRNA (mRNA) [12, 13]. The process of gene silencing had previously been recognized in plants [14-19] and animals [20-23]. Fire et al. found efficient gene knock-down could be 3 achieved by injection of double-stranded DNA (dsDNA) [12]. It soon then became apparent that all these studies were controlled by similar mechanisms. Although RNAi is an inherent mechanism of gene regulation, researchers have harnessed this mechanism for experimental control of gene expression [13]. Large scale screens utilizing RNAi have been performed in the multicellular organisms C. elegans [24] and D. melanogaster [25] and cells [26]. Administration of RNAi in C. elegans is relatively simple [27]: the animal can be fed [28, 29], injected [12], or soaked in RNAi [30]. A number of genome-wide RNAi screens have been performed and used to discover genes involved in synaptic transmission, longevity and aging, regulation of small molecules, fat storage, genome protection, development and many sensory functions [24, 31-40]. These screens are extremely time consuming and relatively low-throughput. Those that have demonstrated high-throughput and generally low-content end-point assays (drug resistance) or can be done imaging many animals at low magnification [41]. As screens become increasingly dependent on identification of subtle behavioral differences or necessitate high magnification imaging, new methods for performing these RNAi screens must be developed. 1.1.3 Tissue, cell, and protein visualization in C. elegans Upon first examining C. elegans under the microscope, one can immediately see a striking feature of this animal: it is optically transparent. This allows for easy visualizations of the internal structures, organs, and cells. This fact certainly aided in tracking the cell lineages, observing cell divisions, and annotating cellular patterning of tissue and organs. Osamu Shimomura, Martin Chalfie, and Roger Y. Tsien received the 2008 Nobel Prize in Chemistry for “for the discovery and development of the green fluorescent protein, GFP” (nobelprize.org). Though the research on GFP did not necessitate the use 4 of worms, its power was certainly emphasized through the use in C. elegans. Perhaps one of the most transformative technological discoveries in molecular biology, cellular biology, and physiology, the green fluorescent protein (GFP), and other fluorescent proteins, have found widespread applications as transcriptional/translation reporters, cell identification markers, sub-cellular protein localization reporter, and visualization of cellular anatomy. GFP can be genetically encoded, negating the requirement for injection or other methods of introducing the fluorescent marker, and can be expressed and visualized at all cell cycles and organism stages. Green fluorescent protein is a 238 amino acid, helical barrel structure protein. It was purified from the jellyfish, Aequorea victoria by Osamu Shimomura in the early 1960s [42, 43]. The wild-type GFP has major and minor excitation peaks at 395 nm and 475 nm respectively. It exhibits fluorescent emission peak at 509 nm. Roger Tsein made a major advance in GFP through a single point mutation (S65T) improving the photostability, fluorescent intensity and shifting the major excitation peak to 488 nm [44], making the spectral characteristics compatible with commonly used FITC fluorescent filters. Dr. Tsien also dedicated a significant amount of work to further improving GFP and modifying it to fluoresce at other wavelengths [44, 45]. He also developed mRFP [46], and modified it to include other colors of the visible spectrum [47]. The fluorescent protein palette now covers all wavelengths of the visible spectrum, even extending into the infrared, making multiplexing and co-localization studies possible [48-51]. The transparent nature of C. elegans makes the use of GFP especially easy and powerful. In 1994, Martin Chalfie et al. published a paper in Science describing the use of GFP for analysis of gene expression [52]. Gene expression analysis had previously been performed with the LacZ/X-Gal reporter system [53, 54]. In this system, the LacZ gene which encodes β-galactosidase, is placed downstream from a genetic regulator known as the promoter. The promoter element is a sequence of DNA located upstream from the gene-of-interest and recruits transcription factors that associate with the RNA 5 polymerase, thus enabling transcription. Along with other regulatory elements, the promoter is a critical regulator of genetic translation whereby the protein is only expressed in certain cells and tissues. The LacZ/X-Gal reporter system allows for visualization of cells and tissues where the promoter is active (and hence gene of interest is actively expressed). β-galactosidase can hydrolyze X-Gal (5-bromo-4-chloro-indolylgalactopyranoside) into galactose and 5-bromo-4-chloro-3-hydroxyindole. After the latter dimerizes and is oxidized, it forms a blue product which can easily be visualized. In this way, the LacZ/X-Gal system can be used to visualize specific cells and tissues expressing the gene-of-interest (under the control of the promoter). The main drawback to this method is that the tissue must be fixed and permeabilized for efficient staining. This is where the advantages of GFP become readily apparent. By placing the DNA sequence encoding GFP downstream of the regulatory promoter, GFP can be expressed and visualized in specific cells [52]. This was demonstrated in C. elegans when GFP was expressed in touch sensitive neurons under the control of the promoter for the mec-7 gene [52]. Needing no additional co-factors and efficiently folding at room temperatures, after expression, GFP can be visualized using fluorescent microscopy [43, 49, 50, 52]. This means the animals do not need to be fixed, and visualization can be performed in living animals. GFP can also be fused to proteins and thus can be used to monitor protein trafficking and localization [53, 55] (with the knowledge that the fusion product might have different diffusion characteristics or trafficking than the endogenous protein). The green fluorescent protein has found widespread use in biology and has transformed experimental biology. The three Nobel Prizes demonstrate the utility of C. elegans for studies in basic biology. The relative simplicity of the animal, yet the conservation of biological principles across species have allowed the animal to become a widely utilized organism. There are other 6 useful features of C. elegans, both genetically and physiologically, that need be mentioned to motivate the use of this animal in this dissertation. 1.1.4 Transgenic animals, C. elegans nomenclature and genetic maintenance Creating transgenic C. elegans is a relatively simple process and is routinely performed [56, 57]. Using transgenic methods, genetic function and cell specificity is studied using mutant rescues, protein function is analyzed using over-expression, investigate DNA/RNA regulatory elements, and investigate protein cellular localization [57]. Transgenic animals are created by injecting exogenous DNA into an animal (wild-type or mutant). The microinjection of the DNA (usually using a plasmid with the desired promoter and gene of interest) leads to an extrachromosomal array containing many copies of the introduced DNA. The extrachromosomal array is transmissible to offspring, with variable transmissibility. Integrated lines are created using irradiation, creating DNA breaks and integration of the extrachromosomal arrays during DNA repair [57]. The extrachromosomal arrays are designated with a two letter prefix designating the lab in which they were created (e.g. zx is the Gottschalk lab) then the letters Ex followed by a number. If the extrachromosomal array is later integrated through irradiation techniques, then the Ex designation becomes Is. The complete description of the animal can be found in its genotype designation, which specifies all known differences between its genotype and wild-type N2. Each difference is listed and would have a unique designation. The strain name of an animal represents the unique two letter prefix of the lab that originally created or isolated the strain, flowed by a number. This two letter code is usually different from the two letter code designated for extra or integrated constructs. For instance, the strain KG1180 genotype is lite-1(ce314) and indicated the unique mutation in the lite-1 gene originally found by the Miller lab (designated by KG). Another example is AQ2334 which has the genotype lite-1(ce314); ljIs123[pmec-4::ChR2; punc-122::RFP]; this strain describes an animal containing the 7 lite-1 genotype that has been injected and integrated with a chromosomal array ljIs123 (both AQ and lj designate the Schafer lab). This chromosomal array has the channelrhodopsin-2 (ChR2) gene downstream from the mec-4 promoter (promoter designated by the prefix p) as well as the gene encoding RFP downstream from the unc122 promoter. Creation of the chromosomal array is accomplished through microinjection of two plasmids, one containing the ChR2 construct and another containing the RFP construct, into the KG1180 strain, thus giving the lite-1 background. After microinjection, animals are selected either through behavioral phenotyping, or usually through co-injection markers which can either be fluorescent (such as the punc-122::RFP construct) or a phenotype rescue marker (such as lin-15+). These animals can either be maintained as extra-chromosomal arrays by selecting animals with the appropriate phenotype, or they can be integrated (as with the AQ2334 strain) through irradiated and subsequent selection. A more in depth discussion and nomenclature guidelines can be found in References [58, 59]. C. elegans was also the first multicellular organism to have its genome completely sequenced which was completed in 1998 [60]. This has made gene identification, genetic screens, and genetic analysis much simpler. The website www.wormbase.org is a comprehensive listing of identified genes, functions, and phenotypic information for C. elegans. Additionally, the web resource www.wormatlas.org and www.worm is a database of the known structural and behavioral anatomy of C. elegans. A large number of the known genetic knock-out animals and transgenic animals are maintained at a central respository at The Caenorhabditis Genetics Center (CGC) and is located at the University of Minnesota, Twin Cities. 8 1.1.5 The neuroanatomy and neurophysiology of C. elegans As mentioned previously, the adult hermaphrodite has exactly 302 neurons. Of these neurons, 282 belong to one distinct large somatic nervous system and the remaining 20 belong to a small pharyngeal nervous system [5, 7, 61, 62]. Early work by Drs. Sulston and Horvitz mapped the lineage off all cells including neurons [5, 7]. The knowledge of this lineage is important in relating structure, function relationships among neurons as well as intelligent choice of precursor neurons that one can optically ablate [63]. Furthermore, the complete connectome or wiring pattern of all neurons has been reconstructed through serial electron microscopy images [62]. This connectome has also seen recent improvements through both additional electron micrographs and computational analysis [64]. The wiring diagram of C. elegans is a powerful tool for assessment of neural function and association of neural state with behavior. If a neuron is identified or implicated in a particular response or behavior, other neurons involved in that process can be inferred from the connectivity diagram. The connections between neurons are either through gap junctions (approximately 900) or through chemical synapses (approximately 6400); additionally, there approximately 1500 connections between the nervous system and the musculature: the neuromuscular junction (NMJ) [62]. As it with the cell lineage and cellular localization, the location of synapses is also highly stereotypical among isogenic animals showing over 75% reproducibility among animal [65]. In addition to the basic behaviors such as locomotion, feeding, foraging, and defecation, C. elegans demonstrates a wide repertoire of more complex behaviors including, mating, omega turns, pirouettes, and sex specific behaviors. C. elegans also demonstrates a number of sensory related behaviors including nociception, olfaction, propioception, mechanosensation, and chemosensation, [66-72]. The circuits responsible for the sensory functions and behaviors are often overlapping and communicate through interneurons thus producing a hierarchy of execution. 9 The sensory responses are conferred by neural circuits that are generally composed of 3 level of organization [72]. The first level is composed of sensory neurons which transduce an external stimulus into a polarization state of the neurons. This is transferred to the second levels primarily composed of interneurons and can have a few layers. Interneurons are neurons which relay signals from upper levels (afferent neurons) to lower levels (efferent neurons). The interneurons usually contain multiple inputs, signals from multiple sensory neurons, and can thus compare and integrate multiple inputs. The final level is composed of motor neurons which control the musculature. These levels (neural classes) (Fig. 1.1) are not completely restrictive: some neurons are polymodal and can belong to more than one layer. Similarly, sensory neurons can belong to one or more sensory modalities. Figure 1.1 Organization of a neural circuit. Three levels of neurons transmit signals from sensory neurons to motor neurons which ultimately lead to a behavior. Connections between neurons within and between levels are both chemical and electrical (gap junctions). Figure adapted from Reference [72]. 10 1.1.5.1 Synaptic Transmission Transmission of information from neurons to neurons and neurons to muscles is a necessary function in the nervous system. Signal transmission occurs primarily though gap junctions and synaptic transmission. Synaptic transmission occurs across the synaptic cleft from the pre-synaptic neurons to the post-synaptic target (whether it is neuron or muscle). The process of this transmission occurs through many steps: neurotransmitter synthesis, vesicle loading, vesicle trafficking to axon terminal, vesicle fusion to membrane, release of neurotransmitter, recycling of vesicle, diffusion of neurotransmitter across synaptic cleft, binding of neurotransmitter to post-synaptic receptor, enzymatic alteration of neurotransmitter, reuptake of neurotransmitter, and recycling of neurotransmitter [73]. Defects in any of these steps can lead to diminished or elevated synaptic transmission and synaptic dysfunction is associated with neurological and psychiatric disorders. Binding of synaptic vesicles to the cellular membrane and release of neurotransmitter is initiated by the influx of calcium through voltage gated Ca++ channels. In C. elegans, neurons are not spiking (no action potential) and are graded [74, 75]. As such, synaptic release is also graded and is roughly proportional to the membrane potential [74]: as the membrane is depolarized below the resting potential, more neurotransmitter is released; as the membrane is hyperpolarized (potential more positive than resting potential), neurotransmitter release is decreased or halted. Although many genes and proteins involved in synaptic transmission have been identified in C. elegans, new genes are being discovered and new functions of known genes are being attributed continuously (albeit slowly) by traditional genetic methods such as the RNAi screens discussed earlier. There are a variety of neurotransmitters in the C. elegans’ nervous system. These neurotransmitters can either be excitatory or inhibitory depending on the nature of the post-synaptic receptor complex. Examples of some common neurotransmitters are 11 Acetylcholine (ACh), Serotonin (5HT), Dopamine (DA), Tyramine (TA), Octopamine (OA), Glutamate (Glu), and Gamma-aminobutyric acid (GABA) [76]. 1.1.5.2 Gap Junctions A second primary method of signal transmission in C. elegans occurs through gap junctions [77, 78]. Gap junctions represent about 1/3 of the connection in the nervous system [6, 62], and are additionally important in connecting cell populations in the early development of the animal. Gap junctions are intercellular connections formed by multiple channels connecting the cytoplasm of cells. The channel formed allows the direct passage of ions and small molecules and therefore provide a mechanism for rapid signal transmission. As a neuron’s membrane potential is altered through the influx or efflux of ions, these ions can diffuse to neurons connected through gap junctions thus altering the connected neurons membrane potential. The extent to which the connected neuron’s membrane potential is altered is due to the properties of the gap junction (selectivity, conductance). In vertebrates, gap junctions are formed between two hemichannels (one in each cell) and are composed of connexin proteins. In the region of the gap junctions, the intercellular space is about 4 nm. In invertebrate animals, gap junctions are composed of proteins called innexins (invertebrate analog of connexins). The innexins protein family is functionally similar, but with no sequence homology to vertebrate connexins. In both vertebrates and invertebrates, a hemichannel is composed of six connexins or innexins. The hemichannel can be homomeric if the connexins (innexins) are the same, while those with differing connexins (innexins) are heteromeric. Additionally, the gap channel can be composed of the same hemichannel (homotypic) or different hemichannels (heterotypic). Depending on the composition of the channel, it can exhibit single channel conductances from about 30 pS to 500 pS. Furthermore, the selectivity to small molecules is greatly altered by the components that make up the gap junction channel. 12 1.1.5.3 Assessment of neural function in C. elegans Traditionally, the role of neurons was assessed through behavioral genetic techniques. Animals are mutagenzied [41]and assessed for deficiencies in one or more behavioral assays [68]. These behavioral assays test for defects in sensory processes such as mechanosensation, chemosensation, and olfaction. The deficiencies are typically behavioral responses that differ from those observed in wild-type animals. After determination of the specific behavioral abnormality, the mutation can be mapped to a specific gene [79]. The neurons expressing this defective protein can be determined through cell-specific rescue or expression of GFP [53]. In this way neurons implicated in a specific sensory function can be determined. Another powerful technique for determining the function of neurons is optical laser ablation [7, 63, 66, 71, 80-85]. This method targets specific neurons in early larval stage animals (L1) with a tightly focused nanosecond UV to blue laser beam and destroys the cell. Again, behavioral assays are performed on populations of animals and assessed for deficiency, thereby correlating behavior to neurons [66, 71, 81, 83]. Similarly, genetic ablations can be performed [86], though usually with less specificity. Although powerful, these techniques only provide static information about the neuron and its relation to the behavior in its absence. There are newer techniques that can directly assess the functions of neurons under application of a stimulus. Electrophysiological recording from neurons is a direct method of measuring activity of neurons. Although very challenging due to the small size of neurons in C. elegans and the tough cuticle of the animal, electrophysiology in C. elegans is well established [87-91]. Animals are immobilized (usually by gluing them), and putative neurons involved in a particular sensation are patched. The animal can then be subjected to a stimulus (mechanical, chemical, etc.) and electrical recordings are made thus directly observing the response of the neuron. Another technique is similar in function, though less invasive 13 and less sensitive, is calcium imaging. There are a number of genetically encoded calcium indicators (GECI) that have been used in C. elegans neuroscience [92-101]. Cameleon indicators have two fluorescent proteins (usually CFP and YFP) connected by calmodulin (CaM) and the calmodulin-binding domain of myosin light chain kinase (M13) [102, 103]. Upon the introduction of the calcium ion, CaM binds free Ca++ and then M13 can bind to the CaM. This causes a conformational change in the protein bringing the two fluorescent proteins together allowing fluorescent resonant energy transfer (FRET) to occur. The fluorescence arising from the FRET can be imaged thus indicating relative changes in the concentration of the intracellular calcium. The other main calcium indicator is based on a GFP or YFP variant [101, 104-107]: CaM and M13 are introduced into the middle of the fluorescent protein. When unbound to calcium, the barrel structure of the GFP is open and no fluorescence can occur. Upon binding to Ca++, the conformational change closes the barrel of GFP and fluorescence can occur. As mentioned previously, calcium influx though voltage gated Ca++ channels is in direct consequence to membrane depolarization and precedes neurotransmitter release, and hence monitoring the intracellular Ca++ concentration is a means of monitoring neural function. As with the electrophysiological methods, animals can be subjected to a stimulus while monitoring Ca++ transients, or measure these transients as specific behaviors of the animal occur. Both these methods (electrophysiology and Ca++ imaging) provide a more direct means of correlating neural function to a behavior or sensory function, as well as providing information about the temporal and sequential response of neurons within a circuit. Combining these methods with others such as optogenetics and microfluidics (discussed below) provides greater flexibility and detail when measuring the neural basis of behavior and the perception of sensory information. 14 1.1.5.4 C. elegans mechanosensation In C. elegans, there are six neurons that have been identified to be part of the gentle touch response. These touch receptor neurons (TRN) were identified both through behavioral genetic techniques as well as optical ablations [66, 108, 109]. The six neurons (ALML/R, AVM, PVM, and PLML/R) are named based on their anatomical location as well as the observation of 15-protofilament microtubules [110]. The anterior neurons (ALML/R and AVM) comprise the anterior sensory field and upon stimulation by touching the anterior portion of the animal, the animal responds with a rapid reversal [109]. The posterior sensory field is made from the PLML/R neurons and upon mechanical stimulation of the posterior the animal responds with rapid forward acceleration [109]. The PVM neuron is not implicated in the mechanosensory response [66, 111]. The complete mechanosensory wiring diagram (Fig. 1.2) has been reconstructed through genetic and optical methods, as well as the reconstructed wiring diagram of White [62]. Both gap junctions and chemical synapses connect the sensory level to the internuerons as well as from the interneurons to the motor neurons. The interneurons responsible for forward movement receive connection from both anterior and posterior sensory fields, as do the interneurons responsible for reversals. This would indicate that the interneurons receive antagonistic signals, compare and integrate the signals ultimately leading to the appropriate behavioral response. Mechanosensory behavioral assays are traditionally performed by touching the animal with an eyelash attached to a pipette tip or toothpick [109]. The location of the sensory stimulus is determined by the researcher as they manually track the animal. The duration and intensity of the stimulus is also determined by the ability of the researcher to control this and is highly variable and difficult to control. Another commonly used technique for mechanical stimulation is through a “plate tap” [109, 112-114]. By tapping or vibrating the agar plate containing the animal, a non-specific mechanical stimulus is delivered to the animal. This stimulus presumably activates both anterior and posterior 15 TRNs, and thus the resulting behavior is an integrated response between the two sensory fields [114]. The stimulus intensity and duration can be controlled, though the variation in intensity could be quite high depending on the location of the animal on the plate and the mechanical characteristics of the agar. Both of these methods have allowed for investigation of the role of the TRNs and other characteristics such as the habituation response [115, 116]. However neither method provides sufficient control for a detailed investigation of the temporal and spatial integration and processing of antagonistic responses. Furthermore, these methods are difficult to integrate with other methods of neural examination. Optogenetics (discussed below) provides a non-invasive method of stimulating neurons with great control and flexibility. Figure 1.2 Mechanosensory circuit of C. elegans [117]. Sensory signals are transmitted from the sensory level, to internuerons, finally to motor neurons that drive locomotion. 16 1.2 Optogenetics Understanding the cellular and genetic basis of neural function and behavior of an organism is a central problem in neuroscience. Recently developed optogenetic methods have contributed enormously to our experimental toolbox [118-125]. Optogenetics is a method to control the excitability of cells using light on the millisecond timescale. Initially, opsins from Drosophila photoreceptor cells in combination with G proteins were shown to photosensitize cells when expressed [126]. Light gated opsins derived from bacteria and fungi were subsequently shown to be superior as functional light-gated ion channels or pumps [124, 125, 127, 128]. When expressed in cells (sometimes requiring the co-factor retinal), illumination with the appropriate wavelength of light, the opsin undergoes a conformational change thus allowing the passage of cations or anions into the cell, hence depolarizing or hyperpolarizing the cell. Currently a number of opsins are being used for optogenetic studies such as the non-specific cation channel Channelrhodopsin-2 (ChR2) (from Chlamydomonas reinhardtii) which depolarizes excitable cells; Halorhodopsin (NpHR) an inward directed Cl- pump from Natronomonas pharaonis, the outward directed proton pumps MAC (bacteriorhodopsin from Leptoshaeria maculans) and Arch (archaerhodopsin-3 from the archaeon Halorubrum sodomense), all of which hyperpolarize cells [124, 125, 128]. 1.2.1 Channelrhodopsin-2 Channelrhodopsin-1 was first discovered and characterized to be involved in the phototaxis and photophobic responses in the green algae Chlamydomonas reinhardtii [127]. The isolated protein was shown to be an ion channel, primarily passing protons, and when expressed in Xenopus laevis oocytes could evoke channel currents that depend on illumination of light. Later Channelrhodopsin-2 (ChR2), also isolated from Chlamydomonas reinhardtii, was demonstrated to also be an ion channel, non-specific to cations, and when expressed could depolarize cells in a light dependent manner [129, 17 130]. Because it is allows the passage of ions directly, it is ionotropic. ChR2 is composed of seven transmembrane domains, which form the pore of the ion channel. The chromophore is made of all-trans-retinal (ATR) and is coupled to the protein through covalent linkage (Fig. 1.3). The C-terminus of the protein extends into the intracellular space of the cell, and to this terminus a fluorescent protein can be fused. During this allows for direct visualization and confirmation of expression of ChR2 [121, 122, 130]. Figure 1.3 Structure of ChR2. Illumination of blue light allows for passage of cations into the intracellular space. Fluorescent proteins are often fused to the C-terminus thus allowing direct visualization of the expression of ChR2. Figure courtesy of Dr. Alexander Gottschalk. The action spectrum of ChR2 is shown in Figure 1.4: it is maximally excited at 470 nm [130]. Upon illumination with the appropriate wavelength of light, the all-trans-retinal cofactor undergoes a conformational change converting to all-cis-retinal, thus opening the pore of ChR2 to approximately 6 Å. After excitation and in the absence of light, ChR2 relaxes to its closed, all-trans state in a few milliseconds. 18 Figure 1.4 Action spectrum of two common optogenetic reagents. ChR2 is a depolarizing reagent and MAC is a hyperpolarization reagent. Figure courtesy of Dr. Steven Husson (Gottschalk laboratory). 1.2.2 Optogenetics and neuroscience In 2005, several research groups brought optogenetics to the field of neuroscience. As it was previously shown that ChR2 can alter the polarization state of cells, Karl Deisseroth’s research group at Stanford imaginged optogenetic reagents could confer precise control over excitable cells such as neurons. They demonstrated that when expresed in cultered mammilian hypocampal neurons, ChR2 evoked deplarization could enduce spiking patterns precisely controlled through the blue light illumination [121]. This was achieved with millisecond precision, and single spikes could be evoked with a high degree of repeatability. This spiking appeared electrophysiologically indistinguishable from natural spiking, as did the ability of the spiking neurons to induce synaptic transmission. Furthermore, they found subthreshold depolarization of neurons was controllable with ChR2. Similarly, later in the same year Landmesser’s and Herlitze’s group demonstrated ChR2 was sufficient to drive neural spiking and synaptic transmission [131]. They also demonstrated for the first time in whole animal preparations, chic embryos, that ChR2 could drive 19 neural sctivity and induce a behavoral response. A short time later, the Gottschalk group published a paper that in addition to showing ChR2 could alter the depolarization state of excitable cells, demonstrated two additional important features [122]. First, they introduced a ChR2 varient that had a single amino acid substitution (H134R). This variant was demonstrated to have a larger stationary current and is a gain-of-function variant ChR2(gf). Secondly, they demonstrated cell-specific expression of ChR2 in the nematode C. elegans using cell-or tissue-specific promoters. There are several advantages. First, this allowed to test the function of ChR2 directly in muscle cells of C. elegans, showing that when expressed in muscles and illuminated with blue light, muscle cells depolarize and cause contraction of musculature in the animal. Secondly, they expressed ChR2 specifically in neurons of C. elegans responsible for gentle touch mechanosensation, and showed that ilumination of blue light could indeed cause specific excitation of these neurons rapidly leading to a behavoral response that mimics the respnose naturally observed. Since these initial studies demonstrating the utility of ChR2 in nueroscience research, ChR2 has gone on to be the reagent of choice for specific non-invasive control over the state of excitability in neurons and muscles. Optogenetics (a term coined by Deisseraoth in 2006 [132]) has been utilized for a number of studies including mapping of synaptic connectivity in mice [133], studying learned behaviour in mice [134], dissecting neuronal circuitry in brains with Parkinsons disease [135], examining the escape response in zebrafish [136], and examinging an avoidance circuit in C. elegans [137]. Multiple animal systems have been used for optically targeting optogenetic reagents for non-invasive excitation and inhibition including cultured cells [124, 125, 130, 138, 139] and neurons and muscles in small model organisms such as the nematode Caenorhabditis elegans [74, 117, 122, 137, 140144], the fruitfly Drosophila melanogaster [145-148] the zebrafish Danio rerio [136, 149-153], and mice [133, 134, 154-157]. 20 1.2.3 Optogenetics in C. elegans’ research The nematode C. elegans is an ideal organism for optogenetic studies as it is transparent, has 302 neurons with known wiring, and a host of genetic tools as discussed earlier. Unlike cell ablations and genetic manipulations of neurotransmitters to probe neuronal circuitry, which have specific limitations such as an inability to probe networks with temporal control and the risk of circuit compensation during development, optogenetics is non-invasive, reversible, and can be employed at any developmental stage. It has been successfully used in C. elegans to investigate neural circuits, synaptic transmission, and the cellular basis of behavior [122, 140, 158-166]. 1.2.3.1 Optogenetic investigation of neurotransmission (OptIoN) Optogenetics has been applied to studying synaptic transmission in C. elegans [140, 142]. Liewald et al. demonstrated the ability to distinguish mutants defective in synaptic transmission from wild-type using optogenetics [140]. They expressed ChR2 in the cholinergic (depolarizing neurotransmitter at the C. elegans NMJ) or gabaergic (hyperpolarizing neurotransmitter at the C. elegans NMJ) motor neurons (zxIs6 and zxIs3). Upon stimulation with blue light, ChR2 depolarized these neurons releasing Ach or GABA causing muscle contraction or relaxation respectively. In animals containing the zxIs6 or zxIs3 transgene in the wild-type (N2) background, when illuminated the animal will decrease or increase in length. When a number (10-40) of animals are subjected to illumination and the length versus time plots are averaged, a length-time series plot is generated that is characteristic. Length-time plots from mutant animals can be compared to wild-type and can indicate animals defective in synaptic transmission [140]. The absolute amount of contraction or elongation as functions of time is informative: it is a read-out of the ability to synthesize, release, or bind neurotransmitter; additionally, the shape of the length-time series plot can be indicative of neurotransmitter 21 recycling. Defects in synaptic transmission alter this behavioral output and can therefore be observed and quantified. Current methods of performing OptIoN investigations are quite labor-intensive: individual animals picked and are placed on a blank agar plate; the plate is then placed on a microscope stage and manually tracked while the animal is illuminated with blue light. Videos of this process are acquired and either manually or automatically processed measuring the relative body length as a function of time. Although already a powerful new technique, OptIoN’s current drawbacks of low throughput, manual manipulation of animals, variation in animal analysis and long data processing time need to be overcome to make it a widely applicable tool in neurogenetics. 1.2.4 Techniques for optogenetics illumination Most optogenetic experiments are currently done using either whole-field illumination [167] , by positioning an optical fiber directly in the vicinity of the neurons [168, 169], or by focusing light onto neurons in immobilized animals [137]. Thus, the illumination is either spatially non-specific, or it can only be applied to larger or non-moving animals. The expression of transgenes in a subpopulation of cells is routine in C. elegans but precise single-cell expression is often difficult; therefore whole-body illumination generally does not permit the cell specificity required to interrogate circuits at the singleneuron level. To truly understand a specific circuit, one would ideally probe multiple distinct nodes (cells) with temporally separate signals. There have been a few techniques that demonstrate restricted illumination capable of targeting individual neurons or subareas of cells. Two techniques involve the use of two-photon microscopy coupled with temporal focusing [138] or generalized phase contrast combined with temporal focusing [139]. It has been also been shown that in constrained worms, ChR2 can be used to stimulate specific spatially separate neurons while Ca2+ transients are recorded from neurons connected to them using a commercial digital micromirror device (DMD) [170]. 22 These techniques allow the interrogation of neural circuits in a cell-specific manner and greatly advance the state of the art for optogenetic illumination. However, these techniques for precise and localized illumination are quite expensive and relatively difficult to implement for laboratories without significant experience in optical design. Furthermore, many behavioral neuroscience problems would additionally benefit from the ability to control and monitor a particular behavior in a freely moving animal. 1.3 Microfluidics Microfluidics is a very general term that refers to the manipulation, control, and behavior of fluids that are generally confined to channels or chambers on the micron scale and occupy small volumes (nL, pL, fL) [171, 172]. On this scale, some properties of the fluid start to dominate the behavior such as fluid resistance (viscous forces), surface tension, and energy dissipation. As the viscous forces start to dominate, the Reynold’s number (Re, ratio of inertial to viscous forces) decreases. It is in this regime where microfluidics operates: low Re number flow or laminar flow. In laminar flow when two liquid streams come together (e.g. two channels combine into one), there is no mixing through convective forces, and the dominate mechanism of fluid mixing is through diffusion across the interface (Fig. 1.5). The two streams will flow in parallel with no transverse (perpendicular) flow. 23 Figure 1.5 Dye filled image of a microfluidic device. There are three inputs each of a different color (blue, red, yellow) flowing at equivalent flow rates. The laminar nature of the flow at low Reynolds number can be seen as the different color combine in the channels without mixing. Figure courtesy of Alison Paul. In addition to unique properties of the fluid, there are also very practical advantages of using microfluidics. Because of the small volumes and ability to prevent mixing through laminar flow, the concentration of reagent in microfluidic devices can be very well defined [172]. Furthermore, the small volumes lead to little reagent usage and precious or expensive reagent consumption can be minimized [172]. The advantages of microfluidics have been exemplified when culturing cells on chip [171, 173-177], performing biochemical assays [178-183], and manipulating and imaging multicellular organisms such as C. elegans [99, 142, 184-195]. Another major advantage to using microfluidics is the ability to automate the system. There has also been an increasing push to parallelize and multiplex experiments on a single chip through large scale valve integration [196]. With both automation and parallelization, microfluidics has the potential to perform massive biological experimentation and screening, with decreased time, manpower, and cost [177, 197]. 24 1.3.1 Microfluidic device design and fabrication As microfluidics was born from the microelectronics industry, many of the first microfluidic devices were constructed from relatively hard materials such as silicon, ceramic materials, or glass. Currently, the more popular choice for device fabrication, both for its ease of use, rapid prototyping, and use of on chip valves, is polydimethylsiloxane (PDMS) [198, 199]. PDMS is an elastomeric material that is highly deformable. It is typically made from a mixture of two components in a 10:1 ratio: a base component and a cross-linking component. After mixing the two liquid components, curing occurs at room temperature, with elevated temperatures greatly decreasing the curing times. The use of PDMS for construction of microfluidic devices is accomplished in a process called micro-molding [198, 199]. In this process, the mixed two component precursors are poured over a mold and cured. The mold (called a master) is a negative of the final intended channel structure, and can be composed of multiple layers. After curing, the PDMS is peeled from the master, and the master can be reused multiple times (replica molding). The structures in the master can be created using traditional MEMS processing techniques such as wet-etching. Additionally, the molds can be formed using micro-milling techniques. However, these processes are either time consuming and expensive, or have low fidelity and resolution. The most commonly used method for creating masters for replica molding is photolithography. In this method, a photoresist is spun onto a substrate (usually a Silicon wafer) to the desired height. The photoresist can be positive or negative and the pattern is defined by a mask (positive or negative). The mask is a high resolution transparency whose features can be created on drawing programs such as AutoCAD. Multiple layers of PDMS can also be made using multiple masters. The individual layers can be aligned and bonded thus creating complex geometries (multi-layer soft lithograph) [198]. Using this process, on-chip valves can also be made (ref). On-chip valving technology greatly increases the flexibility and control of a microfluidic device, allowing for large scale integration, multiplexing, 25 chamber and channel isolation. On-chip valves also allow for greater ability to control fluid flow and distribution of reagents and specimens. The general flow diagram of creating a microfluidic device and soft lithography is shown below (Fig. 1.6). Figure 1.6 Process for microfluidic device fabrication. Masters are created using photolithography. PDMS is then molded on the masters and cured. Individual PDMS layers are aligned and bonded, and the final device is bonded to a microscope slide. 26 1.3.2 Microfluidics in C. elegans research Because of its small size, C. elegans is ideally suited for microfluidic manipulation. Microfluidics has largely been applied to studying C. elegans in two ways: 1) altering the chemical and physical environment around the animal, and 2) positioning the animals for imaging and sorting. The initial research harnessing the power of microfluidics for C. elegans research was performed in the laboratory of Dr. Cornelia Bargmann by Dr. Hang Lu. In this initial work, the external environment was manipulated and the behavior of animals introduced into the environment was observed. In one study, olfactory learning in C. elegans was investigated by observing the preferential migration of animals toward a particular food source (bacterial strain) [185]. The animals are introduced into a central arena made of PDMS which is surrounded by several channels terminating with a chamber containing various forms of bacteria (Fig. 1.7a). Animals will travel to those areas to which it is attracted and avoid those to which they have an aversion. The microfluidics provides a highly controlled manner of defining the olfactory cues that guide C. elegans. In another study, a gradient of oxygen was established in a PDMS device (Fig. 1.7b) [184]. The animals will migrate to the area of the device with their preferred O2 concentration. Animals deficient in O2 sensation can similarly be examined in the device. Again, microfluidics provides a means of establishing a precisely defined external environment not possible by traditional means. Another powerful use of microfluidics applied to C. elegans neuroscience was developed by Nikos Chronis again in Dr. Bargmann’s laboratory. In this study they combined microfluidics and Calcium imaging [99]. By using laminar flow in a microfluidic channel, they could precisely define the concentration and duration of a chemical stimulus flowing over the nose of an animal (Fig. 1.7c). Simultaneously they imaged calcium transients in downstream neurons. The microfluidics not only provided a means of defining the stimulus, it also provided a means to immobilize the animal (restrictive immobilization) well enough to acquire high magnification fluorescent images. 27 Figure 1.7 Microfluidics for precise control of the external environment [189]. (a) Attractive and aversive bacteria are assessed within a microfluidic decision arena. (b) A precise O2 gradient is established in a microfluidic device allowing for evaluation of preferred O2 concentration. (c) Laminar flow in a microfluidic channel can precisely stimulate sensory neurons in C. elegans. Microfluidics when combined with automated image processing has been shown to greatly increase the speed and efficiency of handling, imaging, analysis, and sorting of cells and small organisms like C. elegans [142, 186-188, 200-204]. Controlling the size of microfluidic features and the fluid flow properties allows the control, distribution, and manipulation of C. elegans within the microfluidic device. Hulme et al. have previously demonstrated a microfluidic device for isolation and imaging of multiple individual worms [186]. This device utilizes microfluidic flow properties to distribute the worms: when a worm occupies a channel, the resistance in that channel increases and flow is diverted to other channels. Animals are highly restricted in this device, providing sufficient immobilization for high magnification imaging and laser ablation. 28 A significant number of other microfluidic devices have been developed for imaging animals with high-throughput [142, 186-189, 192, 194, 195]. These devices are similar in operation, usually employing a two-layer PDMS design where the on-chip valves provide mechanical barriers, stopping the animals in precise location for imaging [142, 186-189, 203] and other optical manipulations such as laser axotomy [192-194] and neural laser ablations [204]. Additional valves provide a mechanism to divert animals into appropriate channels for sorting. A simple microfluidic device used for imaging and sorting is shown in Figure 1.8. Figure 1.8 Schematic of a microfluidic device for screening and sorting of C. elegans. (a) Overview of the device showing the flow layer (white) containing the animals and the control layer (red) that form the valves. (b) Cross section of a valve area. The top layer is pressurized depressing in into the flow layer creating a partially closed section. (c) Illustration of the completed device with access holed punched. (d) Device with pins inserted to introduce the animals (flow layer) or positive pressure (control layer). 29 These devices employ a number of techniques for immobilization such as cooling [187, 204], mechanical [186, 192, 193], CO2 [205], and a sol-gel Pluronic [206]. Typically, these devices contain one or two channels because of the limited field-of-view. These devices have demonstrated a vast increase in the speed and efficiency of screening, sorting, and manipulating C. elegans. The ease of fabrication, biocompatibility, and feature size lends microfluidics to high-throughput genetic, behavioral, and physiological studies using C. elegans. 1.4 Thesis Outline This thesis seeks to advance the currently available technologies for research in C. elegans neuroscience. Over the past several years, both microfluidics and optogenetics have made great contributions to research by conferring to researchers the ability to precisely manipulate the chemical and physical environment, rapidly position and sort animals, and allow for non-invasive manipulation of neural nodes. Additionally, automated image processing and lab automation combined with microfluidics and optogentic technologies allows for greater speed of data collection, precise and repeatable manipulations, and unbiased data quantitation. In the first aim (Chapter 2) we combine microfluidics and optogenetics to demonstrate a vast increase in processing and data acquisition for the analysis of synaptic transmission. Although demonstrated for this particular study, the combination of microfluidics and optogenetics would be valuable for any study where a large number of animals need to be optogenetically probed. In the second aim (Chapter 3) we develop and optical illumination system capable of defining an illumination pattern in both space and time for the purpose of specifically illuminating neurons and muscles expressing optogenetic reagents. Furthermore, we have the ability to dynamically alter the color and intensity of the illumination in near real-time, thus exploiting the ever expanding optogenetic reagent palette. To control the illumination system, providing the needed control to illuminate specific areas of freely moving C. 30 elegans, we develop a set of software in aim 3 (Chapter 4). The software is responsible for acquiring images of the animal, analyzes the images to determine anatomical locations of the animal, and directs the illumination system to optically illuminate the intended targets. There is an additional software module for analysis of the resulting behavior and quantitative phenotyping. In the final aim (Chapter 5), we demonstrate the power and utility of the illumination system and software by targeting specific nodes of the mechanosensory circuit. We demonstrate capabilities that are not possible using traditional assays. We finally summarize the thesis contribution and suggest future work following up on the research presented in this thesis (Chapter 6). 31 CHAPTER 2 MICROFLUIDICS, MACHINE VISION, AND LAB AUTOMATION FOR HIGH-THROUGHPUT OPTOGENETIC SCREENING Much of the work presented in this chapter was originally published [142]: Stirman et al., “Microfluidic system for high-throughput studies of synaptic functions using ChR2”, Journal of Neuroscience Methods, 2010, 191(1), 90-93. Additionally, reference to the original publication of the associated figure can be found in the figure caption. 2.1 Motivation and Overview Over the past several years, optogenetic techniques have become widely used to help elucidate a variety of neuroscience problems. The unique optical control of neurons within a variety of organisms provided by optogenetics allows researchers to probe neural circuits and investigate neuronal function in a highly specific and controlable fashion. Recently, optogenetic techniques have been introduced to investigate synaptic transmission in the nematode Caenorhabditis elegans [140]. For synaptic tranmission studies, although quantitative, this technique is manual and lowthroughput [140]. As it is, this technique is difficult being applied to large-scale genetic screens. In this chapter, we enhance this new tool by combining it with microfluidics technology, machine vision and lab automation. This allows us to increase the assay throughput by a couple of orders of magnitude as compared to standard approach currently. We also demonstrate the ability to infuse drugs to worms during optogenetic experiments using microfluidics. Finally, by combining microfluidics, liquid handling robotics, and lab automation, we demonstrate the capability of merging traditional high-throughput screening technologies (HTST) with 32 current HTST (microfluidics). Together, these technologies will enable highthroughput genetic studies such as the investigation of genes regulating synaptic function. 2.2 Microfluidic Device Design, Fabrication, and Operation The first goal is to develop a microfluidic system in which animals can be loaded into an imaging area, illuminated with blue light and imaged, and then unloaded. This process must be reliably repeated many times to acquire sufficient number of ananimals for analysis. To achieve high-throughput in a controllable integrated system, we designed and fabricated a two-layer polydimethylsiloxane (PDMS, DowCorning) device using multi-layer soft lithography [198]. Details of multi-layer PDMS device fabrication can be found in Chapter 1.3.1. The device is composed of eight parallel imaging channels connecting a large loading and un-loading chamber. The loading chamber contains multiple pillars that serve two functions: support for the large chamber and an additional mechanism to distribute worms throughout the array of channels. These channels can be isolated (trapping the worm) by actuating a set of two valves (Valve 1 and Valve 2) (Fig. 2.1a). The on chip valves serve to isolate animals within the imaging area, not allowing other animals to enter durin g optogenetic excitation and behavioral recording. They also provide a means by which the animals that are trapped, can subsequently be released, thus providing the needed reversibility. 33 Figure 2.1 Microfluidic chip used in this investigation [142]. (a) Microfluidic device for parallel investigation of C. elegans responses to light stimulation. Green channels are the flow layer (where C. elegans are located) and the red channels are the valve control layer. Arrow indicates direction of worm loading. Scale bar is 500 µm. (b) Schematic representation of the partially closed valves used in this device. The main imaging channels are 60 µm wide: slightly larger than the width of a young adult worm. It is important that the channels not provide any resistance to the animals when the animals contract (when activated by ChR2). The cross-sections of the valves are rectangular and are therefore only partially closed, allowing some fluid flow while preventing larger animals to pass through the channels (Fig. 2.1b). The partially closed valve (also known as sieve valves) also allows young animals and eggs to pass through the channel, providing a simple method to filter unwanted animals and debris. We chose to use a single large valve, which covers all channels, instead of eight individual valves. This greatly simplifies the device construction, set -up, and operation. To aid in downstream image processing, we filled the valve channels with a 58% (W/W) glycerol solution. This solution has a refractive index closely matching that of PDMS (n = 1.41) as estimated from Reference [207]; at the location where a valve channel crosses a flow channel, only a faintly contrasting line is seen, a dramatic improvement from when the valve channel is filled with air or water (Fig 2.2). To operate the device, initially Valves 1 is closed and Valve 2 is open. Worms 34 are pushed into the device by pressure-driven flow, and are stopped at Valve 1. The injection pressure used was between 2 psi and 4 psi. As an animal enters an imaging channel, the resistance of that channel increases, and thus the flow through that channel decreases. Subsequent animals are then diverted to unloaded channels. When worms have filled the channels, Valve 2 is actuated and closed and the driving fluid pressure is turned off. After the completion of the illumination and imaging, fluid pressure is turned back on and Valve 1 is opened flushing the animals from the imaging area. Valve 1 is then closed and Valve 2 opened beginning another cycle. For the infusion of soluble drugs, a 20 gauge stainless steel hypodermic tubing Y connector (SmallParts) was used in the inlet. After introducing the worms into the device through one inlet of the Y, the inlet was closed with an off-chip pinch valve (Cole Parmer) and a 30 mM solution of nicotine (Sigma-Aldrich) was introduced through the other inlet of the Y. Figure 2.2 Index matched solution greatly decreases contrast between flow and control layers. Top row is when the valve is open (no pressure) and the bottom is with the valve closed (positive pressure). (a) Valve filled with air. (b) Valve filled with water. (c) Valve filled with a 58% glycerol solution. 35 2.3 Image Acquisition and Analysis All experiments were performed on a Leica DM-IRB inverted microscope with a 4x objective and a Hamamatsu Orca camera. Custom software was written in LabV IEW 9.0 with Vision to control worm injection, valve actuation, and video acquisition. Blue light illumination (0.3 mW.mm-2) was delivered via the epi-fluorescent port from a Leica EL6000 metal-halide fluorescent light source, filtered through a GFP excitation filter (450-490 nm) and electronically shuttered. The microscope was properly aligned for Kohler illumination insuring uniform blue illumination across the entire field of view. On-chip valves and electronic shutter were controlled by the computer controlled custom control box (Chapter 2.6). After loading and isolating the worms, a movie was started (8 frames/sec at 1280×1024) with no blue light illumination to obtain a baseline reading of the worms’ lengths. After 2 seconds, the shutter was opened to illuminate the worms for another 5 seconds, after which time the shutter was closed. Then the worms were unloaded and another cycle begun. Decisions on when to isolate the animals and initiate the recording and illumination cycle were determined by the user. The timing of video acquisition and illumination were controlled via the LabVIEW program. The acquired videos were post-processed using custom software written in LabVIEW. Movies were analyzed frame-by-frame first identifying each of the eight channels (Fig. 2.3a, b). Channel identification was done by matching regions in the first video frame that matched a template image. The template image identified the region of the isolation valve (green box, Fig. 2.3a). From this matched image region, and the known dimension of the microfluidic device, the entire channel could be matched and extracted (red box, Fig. 2.3a-d). These isolated images were then processed to identify the worm (filtering out the edges of the channel) and threshold, and finally the worm was thinned to a single pixel backbone (Fig. 2.3e, f). The length of the backbone was then calculated for all frames of the video. Specifics of 36 calculating the backbone and the length of the backbone are discussed in Chapter 4.6. The relative length of the backbone was calculated (initial length was taken as the average length during the 1 second before blue light illumination) and plotted versus time. Comparisons of mean relative body length can be made between wild-type animals and those with mutations in genes involved in synaptic transmission. Only those animals of age L4 to adults (based on length) were included in the analysis and animals not meeting these criteria were rejected. Figure 2.3 Schematics of computer data processing [142]. Worm strain is zxIs6 expressing ChR2 in the cholinergic neurons. (a) Bright field image of loaded worms prior to blue light illumination. (b) Bright field image of loaded worms 2 seconds after blue light illumination. The analysis program identifies each channel (red box) and separates it for further processing. (c), (d) Zoom in view of the areas selected by the red boxes. (e),( f) For each channel section, the worm is first identified and separated from the rest of the image, and then thresholded (white). Then a curve (black) is fit to the midline of the animal and its length is measured. This process is done for every frame of the movie (8 fps). From this length data the curves in Fig. 2a are generated. Scale bars are 250 µm. 37 2.4 Results We successfully designed and fabricated the microfluidic devices, and integrated with the off-chip hardware and the control/image analysis software. The microfluidic chip design and operation features lead to a low occurrence in which there is more than one worm in a single channel (<5%) (Fig. 2.4). Figure 2.4 Histogram of the worm loading efficiency [142]. Channels with zero or multiple worms (+++) were not analyzed. We found an average of ~6.6 worms could be analyzed per loading cycle. Loading, isolation, and release time averaged 13 seconds, and after worm isolation, our experiments lasted 7 seconds (2 seconds with no illumination and 5 seconds with blue illumination). This averages to 3 loading cycles per minute and an average of ~6.6 single worms per loading cycle, yielding an over-all rate of about ~20 animals per minute. The experimental loading efficiency depends on a number of factors, including worm density and driving fluidic pressure which typically varied in the range of 1.5-5 psi and 300-1200 animals/mL. There is a trade-off between the number of channels with single worms versus multiple worms and the loading time and loading efficiency. We found high speed and efficiency of loading (Fig. 2.4) was best achieved with an injection pressure of ~2.5 psi and worm density of ~900 38 animals/mL. The worm density was initially estimated visually and was later confirmed and tested with a custom worm “densitometer” (Chapter 2.5.3). Using our current scheme, the rate of processing animals is already two orders of magnitude faster than manual approaches. We tested wild-type and mutants expressing ChR2 in the motor neurons innervating the body-wall muscles. zxIs3 is a worm strain carrying ChR2 in the GABAergic neurons which act to release an inhibitory transmitter [208] at the neuromuscular junction (NMJ) of body-wall muscle cells. Upon blue light excitation, GABA released from these neurons into the NMJ synaptic cleft binds to GABA A receptors on the muscle cell, leading to a hyperpolarization and thus relaxation of the muscle. This can be seen as a lengthening of the animal (Fig. 2.5a, b). zxIs6 is a worm strain carrying ChR2 in the cholinergic neurons which act in an excitatory [208] fashion at the NMJ. When zxIs6 worms are exposed to blue light, a shortening of the animal is observed (Fig. 2) due to the release of acetylcholine, which induces muscle depolarization and thus contraction. Animals mutant in the unc-49 gene (encoding the GABA A receptor) carrying the zxIs6 transgene showed an additional decrease in body length (Fig. 2) under blue light illumination. This is because the cholinergic motor neurons connect to GABAergic neurons, such that GABA release is co-activated by ACh release, which reduces the activating effect of ACh (unless the UNC-49 GABAAR is absent). The data in Figure 2.5a,b agree extremely well with those previously obtained by standard manual methods [140]. This demonstrates that the microfluidic devices coupled with the automation and image processing tools give comparable experimental results, but are faster and more easily standardized. 39 Figure 2.5 Contraction and relaxation of C. elegans muscles under photoactivation of motor neurons [142]. (a) Changes in body length over a 7 second interval. Body length is relative to an average of the body length 2 seconds prior to blue light illumination. Blue light was turned on at t = 0. (b) Mean relative body length measured 2 seconds after continuous blue light illumination (t = 2 seconds). The numbers of individual animals tested are indicated at the bottom of the bars. Blue bar indicates time when blue light illumination is present. ATR was added to the growth media to yield functional ChR2, unless otherwise indicated. Error bars are s.e.m. An additional advantage of using the microfluidic setup is the ability to infuse drugs during experiments. To demonstrate the utility of this microfluidic chip, we combined the stimulation of the neurons with ChR2 along with exposure of the animal to a soluble drug. Nicotine is a known acetylcholine receptor agonist (present on the muscle cells at the NMJ) that causes a depolarization (and thus contraction) of the muscle cells [209]. The microfluidic device was used to deliver M9 buffer containing nicotine to zxIs3 worms; this strain relaxes under blue light illumination. Within seconds of the nicotine stimulation, the worms began to contract (Fig. 2.6) (n = 49), rapidly at first and then gradually slowing. At t = 180 seconds, the blue light was turned on to excite the GABAergic neurons, releasing the neurotransmitter GABA into the neuromuscular junction. This led to a hyper-polarization of the muscle cells, as seen in the increase in the worms length (relaxation of the muscles), which then decreased rapidly because of the continued presence of nicotine. This additional 40 ability to perfuse drugs adds to the toolbox for these types of studies. Figure 2.6 Nicotine (30 mM) induced contraction and ChR2 induced relaxation (n = 49) [142]. Blue bar indicates time when blue light illumination is present. 2.5 Automated Robotic Liquid Handling and Integration The previously described system demonstrated relatively high throughput and the ability to easily handle and assess multiple animals from a single population. In order to handle several populations in a row, as would be needed in a large scale screen such as an RNAi (as discussed in Chapter 1), drug library, or bacterial feeding screen, the device, external control, and computer automation needs to be further improved. 2.5.1 Higher throughput device A relatively simple means to increase the number of animals simultaneously is to increase the number and density of imaging channels. The number of parallel imaging channels we can image in one field-of-view is limited by the resolution of the imaging system at the requisite magnification. The enhanced device has 16 parallel imaging channels (Fig. 2.7) connected to a single inlet and a single outlet. The field-of-view of the imaging system is 3.2 mm by 2.4 mm when imaged with a 4x objective (red box, Fig. 2.7a, Fig. 2.7b). The inlet of the device consists of a diverging channel (1-2-4-8-16): this 41 design serves to distribute the animals among the imaging channels. The large chamber outlets allow for rapid animal unloading and minimize clogging. The operation of the device is similar to previously discussed. Figure 2.7 Device for increased throughput. (a) Dye filled device showing flow layer (green) and control layer (red). Loading in this device is left-to-right, in the direction of the arrow. (b) Zoomed image of red region from (a) showing loaded C. elegans. Scale bars are 500 µm. 2.5.2 Integration of microfluidic device and liquid handler In order to increase the throughput as well as decrease burden on the end-user, we have integrated an automated liquid handler and the microfluidic system. The general idea is that a number of washed and diluted populations (6-24) of animals can be loaded into a multi-well plate. The animal populations can be individually addressed in the multi-well plate by the Gilson 215 liquid handler. The animals are drawn into the microfluidic device through negative pressure at the outlet and can be sequentially processed with very little “dead-time” between and performed in an automated fashion. To achieve efficient operation a number of external pinch valves (Cole Palmer) were incorporated for automated flushing and washing of the microfluidic device between processing of populations of animals. A schematic of the integrated system is shown in Figure 2.8. 42 Figure 2.8 Schematic of the automated robotic system integrating a Gilson 215 liquid handler system, microfluidic device and external control components. We chose to use negative pressure applied at the outlet to draw animals into the device rather than positive pressure. This simplifies integration with the liquid handler, as no pressure sealing with the multi-well plate has to be achieved. Negative pressure was applied with a vacuum pump (Bio-rad HydoTech) and controlled with a vacuum regulator (McMaster). A second vacuum source was located at the entrance to the microfluidic device (connected with a 20 gauge Y connector, Smallparts). This second source is able to draw animals and wash fluid into the main entrance tubing without having to go through the device. This decreases flow resistance and speeds the time for animal loading. Additionally, after a sufficient number of animals are processed, the remaining animals that are in the entrance tubing are drawn into the entrance vacuum port, bypassing the device and decreasing clogging rates. The schedule for each step of the cycle, including valve position (X = closed; O = open), location of the Gilson Liquid Handler, and the approximate time for each step is shown in Table 2.1. Steps 6-8 are repeated until sufficient number of animals are processed (~35). Between each animal population, the tubing and device are washed and rinsed with ethanol and water. 43 Table 2.1 Schedule for valve control. The pinch valves are external valves located between the device and the vacuum port and control the fluid flow. The capture valve and loading valve are on-chip valves as seen in Figure 2.6a. The aspiration pin on the liquid handler is translated (XYZ) into a well of the multi-well plate containing the animals or to a wash stations (EtOH, H2O). Process Entrance Pinch Valve O X O X O Exit Pinch Valve X O X O O 6 Load X 7 Capture/ Image 8 Unload 1 2 3 4 5 Wash 1 Wash 2 Rinse 1 Rinse 2 Pre-load Capture Loading Valve Valve O O O O O O O O O O O O X X X X X X O X O Liquid Handler Location EtOH EtOH H2O H2O MW Plate MW Plate MW Plate Approximate Time (s) MW Plate 5 30 30 30 30 60 15 80 2.5.3 Measuring worm concentration In order to efficiency of load animals into the microfluidic device, the concentration of animals to be loaded is critical. A low concentration of animals takes a great deal of time to load animals into the device; if the concentration is too high, the clogging rate and the frequency of multiple animals in a single channel are greatly increased. For all experimentation described quantification of the concentration of animals and dilution to optimal levels for introduction into the microfluidic device is required. Animals are grown on agar plates containing the bacterial food source. Animals are rinsed from the agar plate with M9 buffer. Animal concentration is measured using a designed a worm “densitometer”. This simple instrument measures the scattering of incident light (red light) by the worms and quantifies it either by a photodiode. We have tested this instrument at relevant worm concentration. Shown below is a plot of scattered light 44 intensity versus time for various worm concentrations (Fig. 2.9a). As the worms settle into the scattering area (area of illumination), the intensity of scattered light increases. We chose to measure worm concentration at t = 60s (time after washing animals from the plate into a microcentrifuge tube). At this time we found most of the L4 and adult animals had settled, while the unwanted L1-L3 animals and eggs remain in the supernatant. Additionally, shown is a plot of scattered light intensity concentration at t = 60s showing a linear relationship between concentration and scattered light intensity (Fig. 2.9b). We found experimentally that the optimum worm concentration for our device is ~900 worms/mL. Therefore, after washing the worms off the plate and measuring the relative number, the optimum density of worms was achieved by removing the supernatant and adding the appropriate volume of M9 buffer. For each animal population, this was done and the final animal solution was transferred to the multi-well plate. This was done for 6-24 populations of animals at a time. Figure 2.9 Measurement of concentration based on light scattering. (a) Measure of scattering as a function of time indicating rate of worm settling to the bottom of the centrifuge tube. (b) Quantification of worm density by measuring the amount of light scattered into the detector at t = 60s. Control of the Gilson 215 liquid handler was achieved by custom software in LabVIEW. Serial commands were sent to the Gilson 215 by ActiveX commands controlled in LabVIEW. The off-chip pinch valves and on-chip valves were controlled by 45 the master control box (see Section 2.7) operated via the LabVIEW program. The LabVIEW program for automated analysis was similar to that discussed in section 2.3. 2.5.4 Preliminary RNAi screen In order to test the system and C. elegans genetic constructs, we performed a preliminary RNAi screen for synaptic transmission (with Sabastian Wabnig, Dr. Gottschalk lab, Goethe University). This screen utilized both cholineregic and gabaergic animals (zxIs6 and zxIs3) in a neuronal RNAi sensitive background (nre-1) [210]. We screened 90 genes for both strains using the microfluidic device and liquid handler discussed above. The 90 genes were chosen based on positive hits from an aldicarb resistance screen done previously [40] and were fed to C. elegans following standard methods [27]. From this screen about 70% of the genes screened (from the zxIs6 cholineregic line) were found to have some synaptic transmission defects. Additionally, several positive controls (known synaptic transmission mutants) were included as well as negative controls (both empty vector and no ATR). An example of a length-time series plot is shown below (Fig. 2.10). In this example, animals were fed RNAi for unc-11: an AP180 clathrin adaptor homolog involved in endocytosis [211]. It was previously demonstrated that a unc-11(e47) mutant demonstrated enhanced contract when assessed by OptIoN [140]. Using the RNAi knockdown and the microfluidics, we also observe this phenotype (Fig. 2.10), however because it is involved in synaptic vesicle recycling, it is expected that the contraction would gradually relax during the experimental time (A. Gottschalk, personal communication). This was not observed leaving some questions about the ability of the RNAi to phenocopy the genetic mutant. Although many of the RNAi tested demonstrated a difference from the control (empty vector), the results were largely inconclusive: the reasons and limitations of the system and analysis are discussed in Chapter 2.7. We found an average processing time of 15 minutes per population, easily allowing 24 populations to be processed in a day. The washing routine utilized 46 demonstrated sufficient clearing of animals as well as air bubbles. Although many of the RNAi tested demonstrated a difference from the control (empty vector), the results were largely inconclusive. The limitations of the system and analysis are discussed in Chapter 2.7. Figure 2.10 Example of a length-time series plot from the preliminary RNAi screen. Blue illumination was turned on at t=0s and lasted until t=60s. Enhanced contraction of animals is observed from knock-down of the unc-11 gene encoding a clatherin adaptor protein AP180 which functions in clatherin-mediated endocytocis [211]. Error bars represent s.e.m. 2.6 C. elegans culture All worm strains used in this study were grown at 22 °C in the dark on standard nematode growth medium (NGM) plates with OP50 bacteria. All-trans retinal (ATR) is a required cofactor for channelrhodopsin and must be supplimented to C. elegans in order to have active channelrhodopsin. Those experiments using plates containing ATR (Sigma-Aldrich) were made by diluting a 50 mM stock ATR solution (in ethanol) in 300 µl OP50 to a final concentration of 100 µM and spreading on a 5.5 cm NGM plate. All animals tested were F1 progeny of P0 adults picked onto ATR or no-ATR plates 3.5 days 47 prior to experiments. For the RNAi experiments animals were grown on either an empty control vector, or the vector containing the RNAi construct for the gene of interest. The strains used in this chapter include zxIs3[punc-47::chop-2(H134R)::yfp; lin15+], zxIs6[punc-17::chop-2(H134R)::yfp;lin-15+] and unc-49(e407); zxIs6. These strains were created by Martin Brauner in Dr. Alexander Gottschalk’s lab (Frankfurt, Germany). RNAi worm strains include RNAi sensitive strains with ChR2 in the cholinergic neurons: nre-1(hd 20), lin-15b; zxIs10[punc-17::chop-2(H134R)::YFP; unc119] and RNAi sensitive strains with ChR2 in the gabaergic neurons ones to nre-1(hd 20), lin-15b; zxIs8[punc-47::chop-2(H134R)::YFP; unc-119]. These strains were constructed by Sebastian Wabnig in Dr. Alexander Gottschalk lab. The RNAi bacterial feeding strains came from the Ahringer Lab RNAi library (Geneservice, Ltd.). 2.7 Master microfluidic control box A major limitation in the implementation of microfluidics is the lack of an integrated control method for the devices. Microfluidics is a relatively young field, and is primarily limited to research labs, and therefore little commercially available support for microfluidics exists. The commercially available microfluidic devices and instrumentation are largely proprietary and designed specifically for the final product, and thus are not flexible in their usage for custom devices. Over the past several years, working closely with Matthew Crane (Lu lab, Georgia Institute of Technology) we have transformed the external control system from a loose collection of regulators, gauges, valves and tubing, into a self-contained control box (Fig. 2.11). The control box is computer controlled through a USB connection and can be addressed in LabVIEW, Matlab, or other programs. The simplified and integrated control box has significantly eased the testing and usage of microfluidic devices in our lab, and more importantly, has allowed the ease of transfer of technology to non-engineering labs utilizing the lab’s 48 microfluidic devices. The discussed control box has been distributed to collaborators’ labs in Germany, Australia, England, and several others throughout the United States. Figure 2.11 Master microfluidic control box. (a) Front panel of the control box. Two sets of 0-60 PSI and two sets of 0-15 PSI regulators and gauges control the outlet air pressure. On the front are the air outlets. (b) On the back are additional ports for electronic control of external components such as pinch valves. Also, on the back are the USB input, main air inlet, power supply connector and power switch. (c) Within the control box there are both pneumatic and electronic connectors, the micro solenoid valves, and the USB control board. 2.7.1 Components Pressurized air enters the back of the control box. This is split into four lines: 1) A set of four solenoid valves, regulated at 0-60 psi; 2) a second set of four solenoid valves, regulated at 0-60 PSI; 3) a set of two solenoid valves, monitored and regulated at 0-15 49 PSI; and 4) an unvalved outlet regulated 0-15 PSI. The miniature solenoid valves are Asco Series 188 valves (Part #18800056) and were selected based on their ability to actuate at high pressure (up to 115 PSI), and their reliable performance. We have previously tested Lee Company and Hargraves valves and found their performance to be unreliable and they ultimately fail after routine usage of 3-6 months. The pressure regulators utilized are Polysulfone Panel-Mount Pressure Regulator (McMaster, part numbers 43275K13 and 43275K14), and the gauges are Panel-Mount Multipurpose Gauge (McMaster, part numbers 3846K41 and 3846K43). The valves, gauges, and regulators are connected through push-to-connect fittings and 5/32” tubing. The power and control for the solenoid valves and the external ports are supplied by a USB output driver board (PacDrive, Ultimarc). The board is controlled by DLL calls written in LabVIEW, Matlab, or other custom programs. The completed control box is capable of controlling eight on-chip valves (2×4, each controlled at 0-60 PSI), has two worms injection ports (0-15 PSI), a single outlet (0-15 PSI) that is used for flushing fluid (not utilized or described in this work), and four back ports for control of external components such as pinch valves and LEDs. 2.8 Conclusions The work presented in this chapter demonstrated for the first time the combination of two recently advancing techniques in C. elegans biological research: optogentics and microfluidics. By combining the rapid positioning and imaging of C. elegans utilizing microfluidics with the non-invasive, specific activation of neurons with optogenetics, we demonstrated reliable, repeatable, and fast assessment of synaptic function using OptIoN. The machine visions programs allowed for automated control of illumination, image acquisition, and data analysis. The combined system demonstrated at least an order of magnitude increase in the speed of data collection. Furthermore, the developed supporting hardware, such as the “worm densitometer” and the master microfluidic 50 control box, increase the ease of use and efficiency of the microfluidic system. Finally, utilizing automated liquid handling systems further increases the processing ability of the microfluidic system and decreases researcher burden. Although a significant step forward in the application of OptIoN, there are still a number of barriers that must be overcome. The current RNAi susceptible strains were quite sickly and did not fully demonstrate phenocopying the mutant phenotype. As improvements in the ability to deliver RNAi to neurons are made, this should increase the applicability of the method. Although greatly diminished when using the microfluidic channels, coiling of the animals still represent a significant problem for image processing. This can possibly be addressed by altering the geometry of the channels, or putting the animals in a mutant background that suppressed this effect. Finally, combining robotic liquid handling systems and microfluidics is a significant step in bridging the gap between traditional and more recent high throughput screening technologies, though additional work remains to be done standardizing connections and the supporting control systems. 2.8.1 Limitations and considerations Our average processing time for a single population was about 15 minutes. Furthermore a long time between sets of populations (usually 6-24 populations each run) was incurred because of the manual processing and washing of animals. These manual steps represent a way in which the process can be further improved: though automated washing of animals from plates is a substantial hurdle. There is a possibility to culture the animals in liquid culture rather than on the solid agar, though animals cultured in liquid are generally longer and thinner, and the culture method has an unknown effect on the efficacy of the RNAi. Furthermore, the main purpose of washing the animals is to remove bacteria from the suspension. Bacteria cause significant clogging in microfluidic devices and can cause problems for the image processing steps. Animals cultured in liquid culture 51 would still need to be washed and diluted appropriately and would therefore save little time. The most significant amount of time involved in the process of data collection is acquiring a sufficient number of animals for statistical significance. To explore the possibility that fewer animals are needed, we performed a power analysis test. Based on the data collected experimentally (Fig. 2.5), we found a standard deviation of 2.08% before the illumination and 2.94% after the illumination was initiated. The standard deviation during the illumination period is the most important factor in the power analysis and therefore we use 2.94% as the sigma value for both populations. In addition to this, we would need to know the absolute difference in the means of the animal populations. In the investigations using the mutant animals (Fig. 2.5), a difference of ~6% was observed between zxIs6 and unc-49; zxIs6. This however is an extreme case, and much smaller differences are expected. If we choose an expected or desired difference of 2.5% (true difference of means), and perform a power analysis test (twotailed t test, α = 0.05) we see that for a predictive power of 0.8 (80%), an n-value of 23 (n=46 total, split equally among the two populations: control and mutant) is found [212] (Fig. 2.12a). If we fix the power at 0.8 and vary the discriminative ability (difference of means) we find as the difference decreases, the n-value drastically increases [212] (Fig. 2.12b). Therefore, if we wish to keep the discriminative ability high, difference of means = 1.5% to 2.5%, then the number of animals analyzed must remain between ~25 and 50. 52 Figure 2.12 Power analysis showing the number of animals that must be analyzed for high discriminative ability. (a) Power as a as a function of n value. For a given α = 0.05, σ = 2.94%, and desired difference of means = 2.5%, we find n=23 for a power of 0.8. (b) Keeping power = 0.8, α = 0.05, and σ = 2.94%, we see that significantly more animals are required for smaller difference of means. There are two ways to increase the power of statistical analysis: increasing the sample size and decreasing sigma (standard deviation). If we keep the power = 0.8, then the number of animals required for analysis can be decreased by decreasing the standard deviation. The spread in data (standard deviation) comes from two sources: experimental noise and biological noise. It is difficult to distinguish the two and separate their contributions. Prior to illumination, the animal is not subjected to any stimulus and thus we expect the animal to have little to no biological variation. In the analysis of the length of animals before illumination (Fig. 2.5), we find a standard deviation = 2.08%, and we believe this is primarily due to experimental noise: fluctuations in illumination, contrast, and variations in length due to motion artifacts. The increase of ~1% in the standard deviation after the onset of the illumination is due to biological variation and noise; this variation cannot be decreased. If it were possible to decrease the experimental noise to zero, then σ = ~1% and we would only need ~4 animals per population for true difference of means = 2.5%, α = 0.05, and power of = 0.8, showing a drastic decrease in the required 53 number of animals. However, it is highly unlikely to be able to decrease the experimental noise significantly. First, the animals must remain somewhat unrestrained to be able to freely contract or relax, and therefore there will always be some motion artifacts. Secondly, we rely on the contrast difference between the animals and the media (aqueous solution) for imaging; because this difference in refractive index between the animals and the aqueous solution is low, the contrast will remain somewhat low and always introduce some noise in imaging. Techniques for increasing the contrast such as phase contrast imaging or dark field imaging are possible, and might decrease the experimental noise; however these remain challenging in microfluidics due to the additional changes in refractive index caused by the PDMS. Decreasing the experimental noise would be the most straightforward technique to decrease the required number of animals, and should be explored in future work. An additional problem encountered was possible low efficacy of the RNAi as well as very sick animals due to the mutation (nre-1) leading to the RNAi sensitivity. These problems result in false negatives, as well as small sized animals with low fertility and hence a low number of animals. Furthermore, many of the RNAi control populations failed to phenocopy the mutant response which could be due a few reasons. One possibility is that the neural RNAi sensitive animal is still not efficiently taking up the RNAi and the transcripts are not sufficiently being knocked down. This could be evaluated by expressing a GFP construct in the neurons of interest and observing the percent knock-down with the RNAi for GFP. A second reason possibility is that the RNAi fundamentally should not phenocopy the mutant response. Many of the mutants tested in this study and in previous studies [140] were point mutation mutants (loss-offunction or decrease-of-function) rather than complete knockout mutants. If effective, the RNAi would knockout the protein (to some extent) rather than alter its function as the point mutation might (decrease of function), and therefore it is possible that the two might not exhibit similar responses. Finally, another problem exists with using the RNAi. 54 It is possible that the RNAi in fact does efficiently knockdown (or knockout) the gene and the gene is essential, and therefore those animals did not develop or died: only those animals not effectively taking up the RNAi survived and were tested leading to false negatives. These factors should be taken into consideration and perhaps it is not completely appropriate to compare RNAi animals to their mutant counterpart. Currently, Sebastian Wabnig is assessing a new RNAi sensitive strain [213] which should have increased sensitivity while maintaining the viability and health of the animals. The over expression of the sid-1 gene in neurons has been shown to have an increased ability of neurons to effectively take up RNAi and demonstrate a more potent knock-down effect [213]. Furthermore, these animals were observed to be healthy and appear much closer in size and offspring number to N2 when compared to other RNAi sensitive animals such as the nre-1 strain [213]. We believe this strain might be more suitable to use for the OptIoN RNAi screen. 55 CHAPTER 3 DESIGN, CONSTRUCTION, AND CHARACTERIZATION OF A MULTI-MODAL OPTICAL ILLUMINATION SYSTEM Much of the work presented in this chapter was originally published [214]: Stirman et al., “Assembly of a multispectral optical illumination system with precise spatiotemporal control for the manipulation of optogenetic reagents”, Nature Protocols, accepted. Additionally, reference to the original publication(s) of the associated figure can be found in the figure caption. 3.1 Motivation and Overview Recently, there has been significant interest in optically targeting optogenetic reagents for non-invasive excitation and inhibition of cultured cells[124, 125, 130, 138, 139] and neurons and muscles in small model organisms such as the nematode Caenorhabditis elegans [74, 117, 122, 137, 140-144], the fruitfly Drosophila melanogaster [145-148] the zebrafish Danio rerio [136, 149-153], and mice [133, 134, 154-157]. As discussed in detail in Chapter 1, optogenetic reagents are light-gated ion channels and pumps, and when expressed in excitable cells (neurons and muscles), illumination with the appropriate wavelength of light cause depolarization (e.g. Channelrhodopsin-2 or ChR2 [130]) or hyperpolarization (e.g. Halorhodopsin or NpHR [124], MAC, and Arch [125]) of the cell. In cultured cells and small model organisms, the ability to excite or inhibit a subset of the cells would allow for probing circuits and functions in real time. However, there are few single-cell specific promoters in C. elegans, and thus optogenetic reagents are generally expressed in a larger population of cells. Although there are techniques for single cell expression, including Cre-lox[215] and FLP recombinase [216], these can be unreliable or do not allow for sufficient expression of optogenetic reagents. Furthermore, 56 to investigate integration of distinct neural signals, expression in multiple cells is required. To fully utilize the potential of the optogenetic reagents, the toolbox must be expanded to include techniques for specific and localized optical targeting of excitable cells. Additionally, because currently available optogenetic reagents cover a broad range of the optical spectrum, the ability to have multi-spectral optical illumination is valuable. In this chapter, we present a procedure to modify a commercially available three panel liquid crystal display (3-LCD) projector and integrate it with most inverted epifluorescent microscopes for the purpose of patterned illumination on a sample. The presented protocol allows for fully reversible modification of the microscope system. Once completed, the illumination system is capable of multi-color illumination, and can be applied to both static and moving samples. The illumination pattern is defined by a computer and sent to the projector as a second video output; the image is then relayed from the projector to the microscope and de-magnified (determined by the objective and the accessory optics). Images for projection can be easily defined statically through programs such as Microsoft PowerPoint, or can be dynamic and more complex in design through the use of image processing techniques in Matlab or LabVIEW [117]. Compared to other custom assembled systems and commercially available products, the protocol discussed in this chapter allow a researcher to assemble the illumination system for a fraction of the cost and can be completed within a few days. 3.1.1 Potential applications of the method One set of applications of this illumination system, as well as similar systems, is for the dissections of various neural circuits and synaptic functions in C. elegans [117, 137, 143], as will be demonstrated in Chapter 5. In addition, this technology can replace or supplement other technologies used for illumination in other model systems including D. melanogaster [146-148], D. rerio [136, 149, 150], and cells [217, 218] where regionspecific illumination of optogenetic reagents is beneficial. We also envision that this 57 method might be applied to cultured cell lines, for instance, for monitoring homeostasis in a network of neurons in a culture dish. Furthermore, because the protocol describes a method to create a system for patterned illumination, the system can be used in place of existing techniques that use spatially defined illumination, including enhancing resolution by reconstruction of samples using structured illumination technique [219] and patterned photo-crosslinking [220]. Additionally, the illumination intensity is sufficient to perform standard fluorescent imaging and the multi-spectral capability of the illumination system can allow for simultaneous multi-color fluorescent imaging. When extremely fast shuttering (< 15 ms) is not needed, the projector can replace the excitation epifluorescent shutter as the projector can switch from full-on (pixel value 255) to full-off (pixel value 0) at a maximum rate of 60 Hz (refresh rate of the projector), and therefore we envision that this could also replace a shuttering system. Lastly, because the light intensity is defined by the value of the pixel (from 0 to 255, 8-bit), the projector can also modulate the intensity of illumination and thus potentially replace neutral density filters. 3.1.2 Comparison with other methods Details of other optogenetic illumination are addressed in Chapter 1. Here they are briefly reviewed and compared to the illumination system presented in this chapter. Many of the existing techniques for optogenetic illumination are performed by positioning optical fibers in the vicinity of the target [149, 169, 221, 222], statically focused laser illumination[223], or static shadowing of illumination regions [136]. These methods are frequently imprecise or are performed in static samples, limiting their applicability. Current state-of-the-art illumination systems involve the use of two photon microscopy [138, 139], LED arrays [218], DLP (digital light processing) mirrors [137, 143, 217] or commercially available LCD projectors [117, 148] to spatially restrict light, and have the ability to dynamically alter illumination pattern. These techniques allow for a high degree of light localization to target individual or groups of neurons or muscles and can form 58 any pattern for complex illumination schemes. In addition, the illumination patterns can change dynamically, and the system can be automated to allow for continuous illumination even in moving targets. However, the commercially available single-chip DLP system, two-photon, and LED based methods may be cost-prohibitive to many labs and require substantial knowledge of optical components and design. A further limitation of the two-photon, LED array, and single DLP based systems is that they are generally limited to single color illumination. If more than a single color is used, then it must be achieved by rapid switching between colors and thus it is not truly simultaneous; this adds significant complexity due to multi-component synching, and adds substantial cost. In contrast, the 3-LCD projector-based system presented here has three independent light paths for red, green, and blue, which allow for true simultaneous illumination. The offthe-shelf availability of 3-LCD projectors makes the system presented in this protocol affordable and feasible for implementation in most laboratories. By using the native metal halide light source of the projector, no additional cost is incurred, and the final system is one to two orders of magnitude cheaper than comparable commercial systems. Such a light source is standard in fluorescent imaging and provides high-brightness illumination across a broad spectrum. Furthermore, the protocol described here does not require an expert in optics, engineering, or physics to be able to assemble the equipment. Recently, Leifer et al. have described the use of a similar system for optical manipulation of C. elegans [143]. Although similar in many ways to the system described here, there are some important distinctions. Leifer et al. use a single DMD from Texas Instruments and thus only single color illumination is used at a time, compared to the system described in this chapter which can perform simultaneous (spatially independent) 3-color illumination. Secondly, Leifer et al. use light[143] from either a blue laser (473 nm, 5 mW mm-2) or green laser (532 nm, 10 mW mm-2) providing spectrally narrower and slightly higher intensity; in comparison, the system described in this chapter uses the native metal halide light source with the addition of custom bandpass filters: blue (430 59 nm – 475 nm, 4.62 mW mm-2), green (543 nm – 593 nm, 6.03 mW mm-2), and red (585 nm – 670 nm, 5.00 mW mm-2). By using the native metal halide light source of the projector, no additional cost is incurred, as well as simplifying the optical configuration of the system. Finally, the two systems differ in the software used for real-time control and feedback and the closed loop operation speed. By using the C programming language, optimizing the code, and using Intel’s Integrated Performance Primitives, Leifer et al. were able to achieve a closed loop temporal accuracy of ~ 20 ms while using the full resolution of the camera (1024 x 768)[143]. We chose to use LabVIEW with Vision software (discussed in Chapter 4) for its ease of use for non-programming experts and our system operates with a closed loop temporal accuracy of ~111 ms at a camera resolution of 320 x 240. Both systems provide similar software user interfaces and options as well as subsequent data analysis capabilities. 3.1.3 Overview of the Procedure The overall objective of the steps presented in this protocol is relatively simple: to take an image created by a projector, and instead of enlarging it and projecting it onto a screen, to relay the image through the epifluorescent port on a microscope and transfer a demagnified image to the sample plane (Fig. 3.1). 60 Figure 3.1. Final optical configuration for the system. Adapted from [117]. The epifluorescent optics are replaced by an accessory tube lens (infinity corrected) or relay lens pair (160 mm) and a modified 3-LCD projector. A projector operates by shining light through a spatial light modulator (SLM) (in this case an LCD), and thereby creating an image composed of hundreds of thousands of individual pixels defined by the individually addressable SLM pixel elements. The image formed at the SLM (object plane) is then transferred through a relay zoom lens and a concave (diverging) magnifying projection focusing lens to form the primary image and projected (magnified) image (Fig. 3.2a). By removing the diverging projection lens, a primary image is formed by the zoom lens a few centimeters in front of the lens. This image is then relayed through a reconfigured epifluorescent optical train of an inverted microscope, passing through the objective, forming a demagnified image at the focal plane of the objective (specimen plane) (Fig. 3.2b, c). It is in this specimen plane that the object of interest (e.g. freely moving C. elegans) is located and illuminated. 61 Figure 3.2. Optical configuration of the system and components [214]. (a) Optical configuration of the projector in the original unmodified state. (b) Optical configuration of the constructed illumination system for an infinity corrected microscope. (c) Optical configuration of the constructed illumination system for a 160 mm microscope. The image projected onto the sample plane can be constructed through programs such as Microsoft PowerPoint, or other graphic illustrators, for simple static patterns [137] or for patterns that change in time in a predefined manner [148]. These projected images would be suitable for immobilized animals or cells, or objects that vary slowly in time as there is no real-time feedback. For freely behaving animals or for dynamic events, one must use software that can provide and process real-time feedback. Custom programs can be written in LabVIEW, MatLAB, or C that can dynamically alter the illumination patterns based on user inputs or closed-loop automated analysis of images (e.g. targeting neurons and muscles in C. elegans [117, 143]). The specifics of the program we utilized 62 to control the projector for illumination of freely moving C. elegans are presented in Chapter 4. 3.2 Experimental Design 3.2.1 Choice of 3-LCD Projector A few considerations must be taken into account when selecting a 3-LCD projector. The main specifications of importance are the brightness, the size of the LCD panels, and the contrast ratio. The combination of the brightness (reported in lumens) and the size of the LCD panels define the maximum possible intensity of the demagnified image at the sample plane. Because the etendue of an optical system cannot decrease, a projector with the same reported brightness yet smaller LCD panels will yield greater intensity at the sample plane. Therefore a projector that maximizes the brightness (minimum suggested is 2,000 ANSI lumens) with the smallest panels should be chosen (maximum panel size suggested is 1 inch). The Hitachi CP-X605 is a 4,000 ANSI lumen projector with 0.79 inch LCD panels, and is used in this dissertation. Also important is the contrast ratio. Both DLP and LCD based systems have no true zero intensity: even when the DLP or LCDs are in the off state there is a finite amount of background illumination. To minimize the background illumination (thus preventing unwanted excitation of the optogenetic reagents), a high contrast ratio projector (at least 500:1) should be selected. The Hitachi CP-X605 has a stated contrast ratio of 1,000:1. 3.2.2 Modification of the projector and insertion of custom optics The protocol to reconfigure the 3-LCD projector (Hitachi CP-X605) begins by removing the diverging projection lens and inserting custom filters internally (Fig. 3.3). The filters are selected to best match the requirements of the illumination: for fluorescent protein excitation or optogenetic reagent activation. 63 Figure 3.3 Schematic of final configuration of the modified projector. Internal filters are added to the 3-LCD projector thus narrowing the bandpass for each RGB color. Adapted from [117]. The spectrum of each color of the unmodified Hitachi CP-X605 projector is quite broad and would thus cause significant cross-activation between optogenetic reagents. Similar spectra would be observed for other 3-LCD projectors. Therefore, to limit the spectral width of the excitation, custom filters are added inside the projector; the filters in this protocol are chosen to maximize optogenetic activation and minimize cross-activation for the optogenetic reagents used later (Chapter 5): ChR2 and MAC (Fig. 1.4). To fit in the projector, the new filters must either be custom sized by a filter company (e.g. Semrock or Chroma), or cut from a larger filter by a professional glass cutter. The specifications, dimensions and method of cutting of the filters used in this protocol (for the Hitachi CPX605) are found in Table 3.1. Filter sizes for alternative projectors can be determined through careful measuring of the locations for filter insertion. The procedure to modify the projector optics and add internal filters are discussed in more detail in Appendix B, and are pictorially shown in Fig. 3.4. 64 Table 3.1 Dimensions and specifications of the custom filters for insertion in to the modified Hitachi CP-X605 [214]. 65 Figure 3.4. Disassembly and insertion of custom optics into the 3-LCD projector [214]. (a) Removal of the projection/zoom lens system. (b) Removal of the screws connecting the top of the projector case to the main body. (c) Disconnecting the top control panel to remove projector case cover. (d) Removal of the LAN board. (e) Disconnecting wires and screws connecting main board. (f) Disconnecting LCD panel cables. (g) Removal of the dynamic iris. (h) Removal of the cover of the main optical RGB path. (i) Cover showing the polarizing filters. (j) RGB optical paths. (k) Optical path after insertion of optical filters; colored boxes show location for red, green, and blue filter insertion. (l) Removal of the diverging projection lens from the zoom lens system. 3.2.3 Modification of microscope optics for infinity corrected systems The epifluorescent optical train of a microscope cannot properly relay the projector image to the sample plane as its lenses are not of the proper style or focal length, and thus must be removed to make room for the custom optics. In this protocol we describe the modifications for both the infinity corrected microscope, and for the 160 mm fixed tube length microscopes. In an infinity corrected microscope, the objective lens and tube lens combine to form a two lens system and when imaging the amount of magnification is determined by the ratio of the focal lengths of two lenses (M = TLfl/OLfl > 1). In order to 66 transfer the projector’s primary image (PPI, Fig. 3.2b) to the sample plane (SP, Fig. 3.2b), an accessory tube lens (ATL, Fig. 3.2b) must be inserted in the optical path between the projector and the objective. The magnification in this direction is again determined by the ratio of the focal lengths of two lenses (M = FLOL/FLTL), which will yield M < 1 or demagnification. Tube lenses from different microscope manufacturers have different focal lengths (Leica, 200 mm; Nikon, 200 mm; Olympus, 180 mm; and Zeiss 165 mm). The accessory tube lens to be inserted should be chosen to best match the focal length of the tube lens of the microscope manufacturer; in this way the power of the objective closely matches the amount of demagnification. The distance between the accessory tube lens (ATL) and the projector primary image (PPI) should be equal to the focal length of the ATL (FLATL, Fig. 3.2b). The distance between the accessory tube lens/projector combination and the objective lens is not as critical; however it is generally recommended that this distance be kept as short as possible. 3.2.4 Modification of microscope optics for 160 mm fixed tube length systems. Although the 160 mm fixed tube length microscopes are an older style microscope, they are more than adequate for the purpose of constructing this multispectral illumination system and can often be found more cheaply. In a 160 mm tube length microscope, the specimen is placed “slightly in-front” of the front focal plane of the objective and the intermediate image is formed 160 mm behind the nosepiece opening. To reverse this process and demagnify the projector image, the primary projector image (PPI, Fig. 3.2c) should be placed 160 mm from the nosepiece opening. However, due to mechanical restrictions, this is usually not possible. Therefore, the primary projector image must be transmitted to the plane 160 mm from the nosepiece opening. This is accomplished by using a relay lens (RL, Fig. 3.2c) consisting of a 1:1 matched relay lens pair. The relay lens pair should be located such that the front focal plane (FFLRLP) of the lens pair and 67 160 mm plane coincide and the back focal plane (BFLRLP) of the lens pair and primary projector image coincide (Fig. 3.2c). 3.2.5 System Assembly. The projector is mounted on a stable lab jack to provide z-translational ability; the accessory tube lens or relay lens and the projector must be centered along the optical axis of the epifluorescent port. Fine adjustments to the location of the lenses and projector are made to ensure the demagnified projector image and the object of interest (e.g. C. elegans) is coincident. When connected to a computer and set-up as a dual-monitor display, the completed system will relay the image for the second monitor (projector) through the microscope, which reduces it in size, projecting it onto the sample. A step-by-step procedure for modification of the projector, alteration of the microscope, assembly and alignment of the system is presented in Appendix B. 3.3 Characterization of the illumination system 3.3.1 Spectral and Intensity Characterization. After insertion of the internal filters in the 3-LCD projector, the spectrum of the three color planes (Red, Green, Blue) are spectrally restricted (Fig. 3.5a) based on the specifications of the filters (Table 3.1) as measured using a spectrometer (CCS100, Thorlabs). The narrow band width of the spectrum allows for sufficient separation of wavelength to excite distinct optogenetic reagents. These results are expected based on the band-pass values of the filters. If other filters are chosen, the modified spectra should reflect those filter specifications. Note that the modification of the individual color spectra can only further narrow the individual color spectra; it cannot extend the limits of the color spectrum as those are determined by the dichroic mirrors within the projector’s optical train, which are not modified in this protocol. Each pixel element is defined by an 68 8-bit integer (0-255) for each color and thus defines the relative intensity at that location (Fig. 3.5b). Figure 3.5 Spectral and intensity characterization of the illumination [117]. (a) Measured spectra before and after addition of filters internally in the projector limiting the spectral range of each RGB color. (b) Relative intensity as a function of pixel value (see text for maximal intensities). The contrast ratio for each color was determined by the ratio between full on (pixels set to 255 for that color; Fig. 3.5b) to full off (zero pixel value; Fig. 3.5b) and, for the modified Hitachi CP-X605 projector, are: Red = 896:1; Green = 463:1; and Blue = 605:1 as measured using a power meter (PM100D, Thorlabs). These values are less than the manufacturer’s stated contrast ratio of 1000:1 due to the modifications performed on the projector. The contrast ratio is an important feature of the system as it determines the “background” light intensity and should be as low as possible to avoid causing any undesired stimulation. Therefore, we suggest choosing a projector with a high initial (i.e. manufacturer’s stated value) contrast ratio (> 500:1) and carefully measuring these values before and after modifications are performed. The main source of significant decrease (greater than a 2-fold decrease) in contrast ratios after modifications are performed might be due to slight incidental rotational misalignment in the polarizing filters occurring in 69 Step 8 (Appendix B). Should this be the case, these filters can be slightly adjusted, the projector reassembled, and contrast ratios re-measured; however, this is a timely process and care should be taken to avoid initial misalignment. 3.3.2 Illumination Distribution across the Field-of-view Spectral power measurements (light intensity at 460nm, 568nm, and 620nm) were made at the object plane using a PM100D (with S121C sensor) power meter (Thorlabs). In order to accurately define the intensity, we first measured the variation of intensity across the demagnified projector image (at the object/specimen plane). To do this, we projected a spot 20 pixels in diameter, and scanned this spot across the XY plane while measuring the power. After subtraction of the background light intensity (blank projector image) we normalized the values to 1. A heat map of this scan is seen in Figure 3.6a along with line scans taken across the center of the image (Fig. 3.6b, c). From these plots we observe the central region of the projected light is uniform within 6% of the maximum. Because we actively track the animal and keep it within the center of the field of view, we never illuminate outside this region. We then measured the power illuminating the full area of the projector. Dividing this value by the full area of illumination (3.05 mm × 2.29 mm) yielded the average intensity across the entire projected image. To correct for the illumination intensity within the central region, we multiplied this average intensity value by the ratio of the average value of normalized intensity across the entire projector image (0.882) to the average value of normalized intensity across the central region of the projector image (0.977). This yielded a correction factor of 1.11. The values reported in the text are the centrally corrected intensity and any references to intensity have an uncertainty of about ±3%. Spectral measurements were made using a USB-1 spectrometer (Thorlabs). 70 Figure 3.6 Measuring the uniformity of illumination across the entire projector image [117]. (a) Heat map showing the variation of intensity across the 1024x768 pixel projector image. Black dotted line represents the field of view of the camera. The red dotted circle represents the central region (~1mm diameter) where the worms are located during active tracking of the animals. This demonstrates that the uniformity of the projected illumination intensity is within 6% of the maximum. Knowing the calibration factors, one can also correct/compensate during illumination if desired. (b) Variation of intensity across the X axis at Y=384. Dotted red lines represent central region. (c) Variation of intensity across the Y axis at X=512. Dotted red lines represent central region. 3.3.3 Spatial Resolution and Accuracy There are a number of factors involved in determination of system resolution and accuracy. We will address each individually below. 71 3.3.3.1 Imaging Resolution. The limits of resolution follow the well known equation Resolution (r) = 0.61λ/NA, where λ is the wavelength of the light used for imaging and NA is the numerical aperature of the objective utilized. We use a 4x objective with NA = 0.1 and image using 650 nm light. This yields a limit of resolution of about 4 µm. Our camera is measured to have 6.6 µm pixel–1 (at 320×240) and using the Rayleigh criteria needing 2 pixels to define a spot, this yields a camera resolution of 13.2 µm. Thus we are camera-limited when imaging. 3.3.3.2 Illumination Spatial Resolution. A 4x objective was used for all experiments. At this magnification, the theoretical size limit of illumination is ~3µm corresponding to one pixel on the projector. However, due to contrast transfer functions of optical lenses and imaging systems, any well-defined spatial pattern spreads out over a larger area. To determine the effects of the lens’s contrast transfer function on spatial spread of illumination patterns, we projected spots of known diameter onto a mirror and imaged them using the full 640×480 resolution of the camera. Fig. 3.7a shows a spot of diameter = 59.6 µm (20 projector pixels in diameter) projected onto a mirror and imaged using a 4x objective. A line scan of intensity was taken and compared against the ideal case (Fig. 3.7b). As expected the intensity spreads out over a larger diameter than the ideal case (measured to be 68.5 µm at 10% relative intensity). 72 Figure 3.7 Measuring the effect of lens contrast transfer function on illumination spatial spread [117]. (a) A spot of diameter 59.6 µm (20 pixels) was projected onto a mirror using a 4x objective. Dotted line shows location of an intensity line scan across image used for part (b). (b) Intensity line scan showing measured and perfect (ideal) profile. A spatial spread in intensity is due to the contrast transfer function of the illumination/imaging system. The width of the spot at 10% intensity was measured to be 68.5 µm. Different spot diameters were projected, measured and used to generate Figure 3.8. This was done for a number of different spot sizes and is plotted in Figure 3.8a. From this we see that as the smallest spots are approached, the measured width of the spot (10% intensity) levels off. This places a lower limit of illumination resolution at about 14 µm using a 4x objective. This, however, is thought to be the worst case scenario because this measurement involves two contrast transfer functions: one from the projector to the object plane and one from the object plane to the camera; actual illumination onto the object plane only involves the first contrast transfer function. Lower limits of illumination resolution can be achieved by increasing the objective power thereby increasing the amount of demagnification, but similar shape curves would be expected just shifting to lower limits. As a demonstration, we have also characterized the resolution of a 25x objective as shown in Figure 3.8b. With this objective the spatial resolution can be as high as 5 µm. 73 Figure 3.8 Measuring the limits of spatial resolution [117]. (a) Measured spot-size using a 4x objective. This shows a resolution limit to be about 14 µm at 4x. (b) Measured spotsize using a 25x objective. Similar measurements to above were made using the 25x objective. This shows a resolution limit to be about 5µm at 25x. The measured spatial resolution of the system is typical for the selected objective and projector. Should another projector be used, the main feature of the projector that could alter this value is the size of the LCD panels (0.79” for the Hitachi CP-X605). If the resolution of the system is much lower than expected, the most likely source of error is the axial focus of the projector. The projector must be focused at the sample plane (Steps 21-23; Appendix B) to ensure a high spatial resolution. This is increasingly critical as the magnification and numerical aperture of the objective increases. 3.3.3.3 Static Spatial Illumination Accuracy. The static spatial accuracy is the ability of the illumination system to target a pre-defined specified point when the sample is stationary. To determine this accuracy we randomly selected 1000 points in the camera coordinate system. These were then converted to projector coordinates (after careful alignment and calibration) and projected onto a mirror and imaged. The location of these spots is then recorded and compared to the original intended locations and a deviation was calculated. The average deviation of the 1000 points was found to be less than 1 pixel (at full 640×480 resolution) or less than 3 µm. 74 3.3.4 Temporal Illumination Resolution and Accuracy 3.3.4.1 Temporal Illumination Resolution. Analogous to the measurements made for spatial resolution (Fig. 3.7, 3.8), the temporal resolution was measured (Fig. 3.9). Due to the pixel response time (time it takes for the LCD pixel elements to change polarization states as the applied value is changed from 0 to 255 and back again) and the refresh rate of the projector, it is expected that a measured pulse of light from the projector will be less than the ideal or intended pulse duration. To test the temporal resolution, we placed a Switchable Gain, Amplified Silicon Detector (PDA100A, Thorlabs) at the focal plane of the objective. The detector was set to a gain of 40 dB, and analog voltage measurements were acquired with an analog data acquisition unit (USB-6221, National Instruments). Measurements were recorded in a LabVIEW program written to acquire measurements from the DAQ card in a loop operating at 2 KHz. In a separate loop, images were sent to the projector in predefined pulse durations. The “on” of the pulses were simple blue squares of value 255, and the “off” was a black image (50% duty cycle). The duration of the pulse was measured and characterized by the full width half maximum (∆tFWHM) of the pulse (Fig. 3.9a-d), performed over a range of 40 ms to 1000 ms. As expected, the measured pulse width is less than the intended pulse duration and would be ultimately limited by the refresh rate of the projector (17 ms) or for custom software as we employ, would be rate of the image processing/display loop (40 ms). 3.3.4.2 Temporal Illumination Accuracy. The temporal accuracy can be defined as the time it takes for the image to actually appear relative to the time the image was sent to the projector. This is affected by the pixel response time, rise time, (∆trise) (Fig. 3.9e), as well as a known phenomena, although not reported by manufacturers, of both DLP and LCD projectors, monitors, and TVs known 75 as input lag or display lag. The lag time (∆tlag) (Fig. 3.9e) is mostly due to the image preprocessing which occurs within the electronics of the display. The lag time was measured as the time it takes from the time the image was sent to the projector until the time the intensity is 5% of the maximum, and the rise time was measured as the time it takes to transition from 5% to 95% of the maximum intensity. Therefore the overall temporal accuracy is the sum of the lag time plus rise time, or the time from image output to reach 95% of the maximum intensity. Measuring this over the range [40, 50, 75, 100, 125, 150, 250, 500, 750, 1000] and N=100 for each yielded an average of 70 ms (N=1000) with a standard deviation of 7 ms. This would be the temporal accuracy of the projector alone. Taking into account the automated software for animal tracking, image processing, and automated illumination would further increase this by ~16 ms for image acquisition and ~25 ms for image processing yielding an overall temporal accuracy of ~111 ms. 76 Figure 3.9 Measurement of temporal accuracy and resolution [214]. (a) Measurements of pulse width (full width – half maximum) over a range of applied widths [40 ms, 50 ms, 75 ms, 100 ms, 125 ms, 150 ms, 250 ms, 500 ms, 750 ms, 1000 ms], with a 50% duty cycle. N=100 for each. (b) Expanded region of (a). (c) Example measured pulse train for an applied pulse width of 250 ms. Blue regions indicate when the pulse was applied, and the red trace indicated the measured relative intensity. (d) Expanded view of one cycle (“on” to “off”) from (c) indicating the measured pulse width (∆tFWHM). Blue represents when the signal applied. (e) Expanded view of the onset of the pulse from (d) indicating the time lag (∆tlag), as well as the rise time (∆trise). These two factors determine the overall temporal accuracy. 77 3.3.4.3 Moving Spatial Illumination Accuracy. The static spatial resolution of the system was found to be 14 µm using a 4x objective and 5 µm at 25x. This can be thought of as the limits of an optical system to display an object. Another critical feature is the spatial accuracy, or how close an intended target can be illuminated. If the object is not moving, then this can simply be measured by selecting a target and illuminating it and measuring the distance from intended target to actual illumination. This was performed and yielded a spatial accuracy of less than 3 µm. If the target is moving, then another critical aspect is the temporal accuracy as defined and measured above. We can therefore define another spatial accuracy as ∆dsa = v×∆tta, where ∆dsa represents spatial accuracy and tta represents temporal accuracy. Assuming a representative C. elegans moving forward at 250 µm sec-1, then the spatial accuracy would be ~28 µm; thus our illumination would be off-target by as much as this amount. In all experiments performed, the boundaries of our illumination extended well beyond this amount relative to the intended target (neuron or muscle cells). It is suggested, knowing this temporal and spatial accuracy, the intended illumination region is chosen such that it is greater than the target area by at least the amount defined by the spatial accuracy, ∆dsa. For very slow moving or non-moving objects such as cultured cells, the spatial accuracy would be determined by the previously reported value of less than 3 µm. 3.4 Conclusions The goal of this research was to design and create a multi-modal optical illumination system. The design goals were to create a system capable of illuminating targets that are spatially distinct, and with control over the intensity and spectrum of the illumination. Furthermore, the illumination pattern should be dynamically alterable such that moving targets could be actively tracked and illuminated. To make the designed technology accessible to many labs, the system should be relatively inexpensive and simple to construct and thus not requiring experts in optical design and construction to assemble. 78 This chapter outlines a protocol to modify a commercially available 3-LCD projector. By modifying an existing technology, the price of the system is kept low. The 3-LCD projector is modified such that custom inserted internal filters narrow the spectral bandwidth for each of the three colors, best matching some of the available optogentic reagents. By optically modifying the projector and coupling it to an inverted microscope, we demonstrate the ability to create an image, demagnify it, and relay it to the sample plane where the object of interest is located. The completed system can be dynamically controlled at 25 Hz and has full capability to alter the location, intensity, and color of the illumination pattern. The described system is relatively simple to assemble and the protocol presented in this chapter and Appendix B does not require an optical expert and can be completed in a few days. Equally important the system is 10×-100× cheaper than other assembled or commercial systems bringing the technology to any lab. The biggest improvement to the system would be to increase the spatial accuracy. This would best be accomplished by increasing the temporal accuracy by decreasing the time delay. There are a few methods to reduce this time delay and therefore increase the temporal accuracy: (1) using a high-speed camera, (2) optimizing the software image processing thereby reducing the processing time, and (3) some newer models of projectors offer a “gaming mode” which greatly reduces image pre-processing and can reduce the input lag by up to 66%. Other system improvements or adding system functionality are discussed in Chapter 6. 79 CHAPTER 4 SOFTWARE FOR SELECTED AREA ILLUMINATION OF FREELY MOVING C. ELEGANS AND BEHAVIORAL ANALYSIS This chapter describes the custom software written for control of the optical illumination system described in Chapter 3 for the purpose of multi-spectral optical illumination of neural and muscular targets in freely moving C. elegans. Software modules were written for control of motorized microscope stage, camera acquisition, and the projector control. Additional modules were used for analysis of worm posture and identification of anatomical locations along the anterior-posterior axis of the animal used for defined illumination of targets. All modules were integrated into a single program for tracking and illumination. Additional programs were written for alignment of the projector system, and analysis of acquired videos. All programs were written in LabVIEW 2009 utilizing the Vision Development Module, and Matlab scripts were implemented in some of the modules (requiring Matlab). The programs discussed in this chapter can be found at http://www.nature.com/nmeth/journal/v8/n2/full/nmeth.1555.html#/supplementary- information. The rest of the chapter describes the details of the programs and how to use the programs. 4.1 General Computer Setup The main purpose of this software is to relay an image to the projector to accurately illuminate samples placed at the imaging plane (e.g. moving C. elegans). Intended illumination patterns are sent to the projector through a second video port. The computer is configured to have two displays: one for the main monitor and the second is for the projector with display resolution set to the naïve resolution of the projector (1024×768 for the Hitachi CP-X605). It is important to configure the computer to have dual display by extending the desktop rather that mirrored. Within the LabVIEW programs, images 80 are transferred to the projector by displaying the desired image in a window offset to coordinates such that is located entirely on the second monitor (i.e. the projector). For example, in our LabVIEW software, all images are offset by X=1913 and Y=-30. The main monitor has an X resolution of 1920 and there is an 8 pixel border around the window. This gives an X position of 1921-8=1913. The Y=-30 value is set such that the top border of the window is hidden and will not display. The size of all images appearing within this display window is equal to the resolution of the projector. 4.2 Projector Alignment After construction and rough alignment of the projector system described in Chapter 3, the system must undergo a refined alignment. Furthermore, a coordinate transformation must be made to convert the acquired images represented in camera coordinates (XCYC (defining the object of interest within the field-of-view of the camera) and the projector coordinates, XPYP (defining the intended illumination pattern). The parameters for coordinate transformation are saved for subsequent use in other programs. 4.2.1 Initial Axial (Z) and In-plane (XY) Alignment Upon starting the program a cross pattern is projected through the illumination system. In order to visualize this pattern and properly align the system, we must use a reflective fluorescent target. The target is placed at the sample plane and should first be brought into sharp focus by focusing on dust or an imperfection (scratch) on the target surface. Fluorescent slides or a blank NGM plate work well for this purpose. This should be done first, ignoring the projected light pattern. After focusing on the target, the projector’s XYZ position should be altered such that the cross projected pattern is both centered and sharply focused (Fig. 4.1). The camera should be rotated such that the cross pattern is perfectly horizontal and vertical using the guidelines. This can also be slightly offset to maximize the region where the projector image intensity is the flattest. Camera values 81 can be adjusted to see the image clearly. Successfully completing these steps will ensure that the object (specimen) plane and projection image plane are coincident. Figure 4.1 Cross pattern used for projector alignment. The camera is rotated such that it is aligned both horizontally and vertically, and the projector is (XYZ) adjusted so the pattern is centrally located and in sharp focus. 4.2.2 Coordinate Transformation After alignment, click “Continue” on the program. A grid of 20 solid circles is projected (known center positions XP, YP) sequentially through the constructed optical system (left side, Fig. 4.2). These images are seen on the target surface and imaged with the camera. The locations of the projected circles are determined (XC, YC) by measuring the center position of the threshold image (right side, Fig. 4.2). After completion of this program a file is saved containing the translational offset and scaling factor used in the main program. Upon successful completion a dialog box will pop up stating proper completion or error occurred. If an error occurred, check alignment and perform again. This program is generally run throughout the day to ensure proper alignment is maintained throughout the experiments. 82 Figure 4.2 A grid of 20 points is sequentially projected and imaged, determining parameters for coordinate transformation. 4.3 Color Illumination and Tracking The custom software described in this section is capable of automatically tracking C. elegans, acquiring images, identifying anatomical locations, and directing the projector to illuminate the animal at the desired location, with a specified color and intensity. The program consists of several individual modules running in individual execution loops (Fig. 4.3). Each loop runs at 25 Hz. Figure 4.3 Software modules for performing imaging, stage movements, and image processing. Each loop operates independently thus increasing overall processing rate. 83 The front panel of the program is shown in Figure 4.4 and each component of the program will be discussed in detail below. Figure 4.4 Front panel of the LabVIEW custom program for tracking, illumination, and video acquisition. The program controls all functions described in this section (4.3). 4.3.1 Image Acquisition For our system, a Guppy AVT firewire camera was chosen to be used. This camera utilizes a 1/3” format CMOS chip, and can acquire images at 640×480 at a maximum rate of 60 Hz. We found that using a firewire camera, rather than a USB camera, frees up resources on the main motherboard and due to the increased data transfer rates it can more accurately maintain the set rate (25 Hz). The live images (IL) are acquired at a resolution of 640x480, and are resized to 320×240: this done to increase processing time in future program modules. At the objective magnification (4x) and C-mount camera coupler (~0.4x), the measured calibration was 6.6 µm/pixel. For each acquired image, a binary image was created (IB) by performing a simple threshold process to the live image. In most cases, we kept the parameters of the binary image creation to be 1 for pixel 84 values between 0-100, and equal to 0 for pixel values of 101-255 (Fig. 4.5). The brightfield illumination intensity is adjusted such that the binary image is an accurate representation of the animal. Figure 4.5 Live image acquisition and binary image creation. The binary image is used to determine animal position offset within the field-of-view as well as used in subsequent image processing steps. After creation of the binary image, the image is filtered such that only the largest object in the field-of-view is kept: all others particles are removed. A few binary image processing steps are performed on the image to enable the most accurate determination of the center-of-mass and for subsequent processing steps: 1) the image is first eroded (×1), 2) holes are filled in, and 3) the image is dilated (×1). These steps are part of the binary image processing pallet within LabVIEW and eliminate small “spurs” or bumps on the outside edge of the binary image, fill small holes, and return the binary image to its original size. From the binary image (IB) of the animal, the center of mass of the animal 85 is calculated using the built in binary image analysis routines. These values, Xcom and Ycom, are passed to the motorized stage subroutine. 4.3.2 Motorized Stage Control For our system, we used a Prior motorized stage. Control of the motorized stage was achieved through the serial port and RS232 commands were sent through the VISA read/write subVIs in LabVIEW. The command language used can be found on the Prior website (www.prior.com). Upon each new execution of the motorized stage loop, the stage is first queried for its current position (Xstage , Ystage). Next, the X and Y offsets of the center-of-mass values of the animal (Xcom , Ycom) from the center of the field-of-view are calculated (ΔXoffset and ΔYoffset). These values are converted from pixel measurements to microns using the previously determined calibration factor (6.6 µm/pixel). The stage is then instructed to move the appropriate number of steps to re-center the animal. In our case one step equals one micron, thus the stage is instructed to move ΔXoffset and ΔYoffset microns in the appropriate direction. The stage control loop operates at 25 Hz and thus the animal is maintained within the center of the field-of-view. This allows for both continuous animal tracking for extended time periods and also maintains the animal within the area of the least variance in relative illumination intensity (Fig. 3.6). The front panel control for stage control is shown below (Fig. 4.6). Figure 4.6 The stage only tracks the object within the field-of-view when the “TRACK” button is selected. The tracking rate and conversion factors are user defined, and the measured tracking loop period and current X and Y positions of the stage are indicated. 86 4.3.3 Image Processing, Segmentation and Illumination After the live images (IL) are acquired (Fig. 4.7a) and the filtered, processed binary image (IB) is created (Fig 4.7b), the image is sent to a the segmentation and illumination loop to undergo further processing: ultimately calculating the relative anatomical positions of the worm and creating the desired illumination (Fig 4.7c-f). Figure 4.7 Custom software for processing the acquired images, ultimately creating illumination pattern for the real-time illumination of freely behaving C. elegans [214]. (a) Acquired bright-field live image (IL) of C. elegans. (b) Binary image after applied thresholding (IB). (c) The binary image is thinned to single pixel backbone (ITHIN), representing the AP axis of the animal, and segmented according to user selectable parameters (ISL). The locations for segmenting are based along the relative path length of the backbone where the head is 0 and the tail is 1. (d) Resulting segmentation of the binary image (ISA). (e) Selected illumination color pattern (ISI) generated based on user selectable options including segment number, color (RGB), intensity (0-255) for each color, as well as illumination duration. (f) Resulting multi-color illumination pattern projected onto the moving C. elegans. Image is falsely colored based on the intended illumination pattern. Scale bar is 250 µm. 4.3.3.1 Thinning The binary image (IB) is first processed to a single pixel backbone (red line, Fig. 4.7c). This is achieved by the thinning algorithm in Matlab. This algorithm is accessed by 87 running a Matlab script within the LabVIEW program. The specifics of the binary thinning process [bwmorph(BW, thin, inf)] can be found in Reference [224]. Originally, this algorithm was written and executed completely in the LabVIEW environment. However, we found that it takes roughly twice the processing time to complete the operation in LabVIEW than performing the operation within the Matlab script. The thinning process is proportional to the total number of pixels that compose the binary image. Therefore, to reduce the processing time, we rescale the original live image size (640×480) to 320×240, which results in a total thinning time per image of about 15 ms. This single pixel backbone determines the anterior-posterior (AP) axis of the animal. After determination of the single pixel backbone, we then need to determine the length of this backbone, and from that determine the relative locations along the AP axis. The newly created single pixel thinned binary image (ITHIN) is processed by the “Get Points on Contour” subVI. This subVI takes a binary image input and determines the XY coordinates along a single contour of the image. Furthermore, this subVI fits a cubic spline to all the contour points, thus finding a smooth curve that minimizes the error between the fit curve and the descretized points along the contour. The final output array of the subVI indicates the XY coordinates of the original points along the contour and the XY offset of those points to the best fit cubic spline. The array is ordered sequentially along the spline starting from one end of the spline. The final array is determined by adding the X position of the contour point to the X offset of the corresponding element of the spline; the same is done for the Y coordinates. The array is a composed of cluster of two elements (X and Y), sequentially ordered along the length of the contour: ( ) ( ) 88 ( ) The 0th array element (i=0) is one terminal end of the contour, and the other terminal end is defined by i=N-1, where N is the number of pixels in the original binary thinned image (ITHIN). Anatomical locations of neural cell bodies are given in relative coordinates along the AP axis (http://wormatlas.org/neuronalwiring.html), with 0 = head and 1 = tail. To determine the appropriate locations along the AP axis, the array of clusters must be ordered such that the 0th element corresponds to the head of the animal. Many automated methods have been evaluated to determine which end of the animal is the head, however these usually fail, especially when the animal reverses and the tail “looks” very similar to the head. To most accurately determine the location of the head, we employ manual annotation. The program assigns one end of the thinned image as the head and the other as the tail, and places a small dot in the location of the 0th element. If this incorrectly labels the tail, then the user can select the “Flip HT” button (Fig. 4.8), which will then reverse the array such that the i=0 element becomes the N-1 element and all others are reordered such that ifinal = (N-1) – iinitial. Figure 4.8 Control panel used to initiate the thinning and segmenting operations, as well as user control of the assignment of the location of the head. The location of the head is then maintained by subsequently comparing the two terminal ends of the most recent spline array to the previously annotated and ordered spline array, assigning the head location to the end point that has the smallest distance to the previous head location. In this way, once the assignment is made, it is maintained 89 throughout. This procedure can fail at times when the animal curls upon itself (as in an omega turn), however, then the user can simply correct using the “Flip HT” button. Now that the location of the head is determined, the remaining relative locations can be assigned. First, the overall length (as measured in pixels) must be determined. The absolute length at each element is found by: ∑√ and is defined for i > 0. The total length is found with i = N, and the relative length, and hence location along the AP axis (0 to 1), is found by dividing the Li value by LN. Each [xi, yi] coordinate of the spline is then associated with a relative position along the AP axis. The overall length of a young adult animal is usually around 150 pixels, and hence each point along the AP axis represents about 0.67% of the total. 4.3.3.2 Segmentation The location of segmentation is controlled via user input (Fig. 4.9), and segmentation is initiated by selecting the “Thin and Segment” button (Fig. 4.8). Figure 4.9 User panel for illumination control, including animal segmentation properties, color, intensity, and duration of illumination. 90 Within the control panel (Fig. 4.9), the user can select the number of segments (S) and the locations of the segmentation lines as defined by the AP axis position (red box, Fig. 4.9). The first (leftmost) numeric control is always set to zero and the next ones define the location of separation along the thinned image. In the example in Figure 4.9, the segments are chosen to equally separate the animal into quarters (Fig 4.10). Figure 4.10 Example of the segmentation of a thinned image into quarters. The white dot indicates the head, the red line defines the AP axis, and the yellow lines segment the animal. In Figure 4.7, the animal is divided into sixths, and hence 6 segments (S=6) would be entered along with the following values for segmentation [0; 0.167, 0.333; 0.500; 0.667; 0.833]. The segmentation lines, according to the segmentation parameters, (yellow lines, Fig. 4.7, 4.10) are found by first matching the element in the length array, Li, that most closely matches the desired AP axis position. Once this element is found, obtaining i, the correspond point [x, y]i is retrieved, as well as the i-3 and i+3 points. From these three points, a least square line is determined. A line is then drawn extending through the point 91 [x, y]i and at a right angle to the previously determined line. In this manner, a line extending through the desired segmentation point and normal to the AP axis is found. The length of this line is determined by user input (Width, Fig. 4.8) and should be set to a value slightly larger than the width of the animal (around 15-20 pixels). This is repeated for all values in the input panel: equal to the number of segments minus one (S – 1). To decrease processing time, the total number of segments should be kept as low as needed for the particular experiment. In other words, if you wish to illuminate a segment between 0.5 and 0.55, it would be best to choose three segments with divisions of [0, 0.5, 0.55] and only utilize the middle segment, rather than choose 20 equally divided segments and utilize the 11th segment. From the defined line segments, a binary image is created consisting only of these segmentation lines (ISL). A binary image of the segmented animal (ISA) is then found by the following image logic operation (Fig. 4.7d): ̅ The final image (ISA) now contains S individual segments and are labeled from 1 to S, where the 1st segment contains the head and the Sth segment contains the tail, thus keeping the order of the segments along the AP axis. 4.3.3.3 Illumination Control Within the illumination control panel (Fig. 4.9) the controls for colors (RGB) for each defined segment (RBGS) are found. The user can input a value (0 to 255) for each color and for each segment, and thereby determine the relative intensity (Fig. 3.6) for that segment. Also within the illumination control panel are buttons to turn illumination of the particular segment on or off (BS; “on” = 1, “off” = 0). A preview of the desired illumination pattern is seen in the main panel (Fig. 4.4, Fig. 4.11) under the “Selected Illumination” pane. The switch between “Simple” and “Scheduled” (Fig. 4.9) determines the illumination scheme. “Simple” uses the parameters set in the previously discussed 92 Illumination Control. For “Simple” there are also options for “Timed” illumination and “Untimed”, where the duration of illumination can be set. “Scheduled” illumination option utilizes a previously saved illumination schedules for more complicated illumination (see section 4.3). The “Level #” indicator shows the current parameter line of the illumination schedule. Finally, to transmit the current illumination pattern for either “Simple” or “Schedules”, the “Illuminate!” button is pressed. Illumination will only occur if the Thinning and Segmentation is currently “ON”. Fig 4.11 This pane displays the illumination determined by the control in Figure 4.9. In the example shown here, the control has the 2nd and 4th segment turned on and the blue value has been set to 200, and all other color set to 0. To create the illumination pattern according to the previously discussed user input, the binary image of the segmented animal (ISA), is first divided into S (number of segments) individual binary images, each containing only one segment (IsSA). Each of these images is then multiplied by the corresponding color value for that segment (RGBS) and by the binary value of the segment (BS; “on” = 1, “off” = 0), as defined in the “Illumination Control” panel or in “Scheduled Illumination”. The final selected illumination image (ISI), is then the sum of all the individual segment images: 93 ∑( ) Examples of final illumination image (ISI) can be seen in Figure 4.7e and Figure 4.11. This image is calculated every iteration of the Segmentation and Illumination loop at a set rate of 25 Hz. Finally, when the user selects the “Illuminate!” button, this image is transmitted to the projector, and thus to the specimen. This will continue until the pre-set illumination time has elapsed, or until the user deselects this button. To accurately transmit the image (ISI) to the projector, the previously found (section 4.1.2) X and Y scaling and offset factors are utilized: The ISI is scaled and offset by the needed amount and finally copied into a black image of size equal to the resolution of the projector (1024×768). 4.3.4 Video Recording Within the main control panel, there is an option to record a video. Selecting the “Record?” button (Fig. 4.4) will begin recording, and “Stop” will terminate recording. Upon stopping the video acquisition, the video is compressed and saved to the previously determined location. The user will then be prompted for the name and location of the next video to be acquired. The video records both the live image (IL) and the selected illumination image (ISI) as side-by-side images. Additionally, the following parameters are encoded within the .avi file for each and every frame: current stage position (Xstage , Ystage), and all the previously discussed parameters of illumination control. 94 4.4 Scheduled Illumination By utilizing this program, more complicated illumination patterns and timing schedules can be set, and saved. The saved illumination schedule can be called from the “Color Illumination and Tracking” main program discussed in section 4.3. Upon starting the program, the user is prompted for the number of levels of illumination as well as the number of segments: this sets the discrete number of different illumination patterns. Then, the user can set the specifics of the duration at each level, the locations for segmentation, the color, and intensity for each segment. When calling the saved file within the main program, the program sequentially creates the selected illumination image (ISI) from the saved parameters, and sends these images to the projector for the set amount of time. Figure 4.12 Control panel for setting complex custom illumination patterns. In this example there are 4 segments and fours levels (or time periods). The first time period lasts 2 sec. during which nothing is illuminated. The second period lasts 3 sec. and the second spatial segment is illuminated in blue. The third time period lasts 3 sec. and the first spatial segment is illuminated in green. Finally, the last time period is 2-sec. long and again nothing is illuminated. 95 4.5 Head Encode The purpose of this program is to encode the location of the head of the animal into the video. This location information is used in the subsequent video analysis. Several automated methods can be used to perform head/tail discrimination, but all have non-zero failure rates. The videos processed in this study (Chapter 5), are relatively short (< 45 seconds), and thus manually annotating the position of the head is an acceptable method. Upon starting the program, a dialog box will then prompt the user for a video file. Select the intended video. The first frame of the video will be displayed. Place the mouse cursor over the position of the head and hit the enter key. Follow the location of the head with the cursor until the program is complete. A video will be saved in the same location with the name of the original video plus "-HE" and the location of the cursor for each frame is encoded in the video file. Figure 4.13 Front panel for encoding the position of the head in the video file. After starting the program, the user follows the position of the head with the cursor. 96 4.6 Complete Video Analysis This program is used to analyze the videos for multiple parameters. These parameters are saved in a text file which can be opened and analyzed in Microsoft Excel or other data analysis programs. 4.6.1 Using the Program Upon starting the program (Fig. 4.14), a dialog box will appear prompting the user to select the videos for analysis (choose the “-HE” video from the last program): one can select as many video as one wishes to have bulk analysis performed. Upon selection of all videos for analysis click “OK” to begin analysis. Upon completion of the analysis, all extracted parameters are saved to a file named “name of video”+”-data.txt”. Figure 4.14 Front panel of the “Complete Video Analysis” program. There are only a few options in the program: conversion factor, image binning, threshold parameters, and number of divisions of the animal. 97 Parameters that the user can adjust are the conversion factor (μm per pixel) for the camera and binning of the video. For our system, 3.3 μm/pixel is the full camera resolution conversion factor and the video is binned 2×2 (yielding a final conversion of 6.6 μm/pixel). These values will differ depending on specific microscope system and camera. Also, because the program uses both the location of the animal within the field of view and the position of the stage, the conversion factor is important. For our system, one stage step equals one micron, so no additional conversion was used for the stage coordinates. Finally, each stage might have different directionality, e.g. positive values of position might be negative in direction. The way velocity is calculated might have to be changed depending on the particular system. The threshold parameters can be adjusted, though using the same parameters used in the “Tracking and Color Illumination” is advised. Finally, the user can choose the number of equal segments to divide the worm into. An equal distance between points is found and these points and segments define the angles (discussed below). 4.6.2 Extracted Parameters A number of parameters are analyzed for each frame in the video. The specifics for each parameter are discussed below. 1) Velocity: The instantaneous speed is calculated as distance traveled by the animal between successive frames multiplied by the frame rate yielding speed measured in μm/sec. The total displacement is determined by adding the displacement of the stage from frame to frame plus the displacement of the center-of-mass of the animal (Fig. 4.15a, b) within the field-of-view from frame to frame (after conversion from pixel to μm). The program also analyzes the direction of travel: if the movement is toward the head (as assigned in the “Head Encode” program), then the speed is assigned a positive value, and if toward the tail, then speed is negative. 98 2) Length: This measures the length (Fig. 4.15c) of the animal in the same manner discussed in Section 4.3.3.1 (converted from pixels to μm based on the conversion factor). 3) Angles: To measure the angles, or curvature of the animal, the animal is first descretized into a user defined number of segments (S). Each segment is of equal length (measured along the contour of the animal’s AP axis). Segmentation of the animal is done as described in Sections 4.3.3.1 and 4.3.3.2. Points along the AP axis of the animal at each segmentation point are determined, plus the points at the head and the tail yielding S+1 points describing the animal (Fig. 4.15d). a. Two-point angles: This measures the angle between two successive points along the animal relative to 90 degrees. The angle is then normalized [117] such that the expectation value of all angles along the animal equal to zero (Fig. 4.15e). The normalization of these angles (subtracting the average of all measured angles from the angle) serves to adjust the coordinate system such that it is in the frame of reference of the animal, and thus the absolute orientation of the animal is ignored. There are a total of S (number of segments) two-point angles. These angles can be used in subsequent eigenshape analysis as was performed in Reference [225]. b. Three-point angles: This measures the angle between three successive points along the animal relative (Fig. 4.15f). There are a total of S-1 threepoint angles. 4) Average angles: This is an average of the absolute values of the previous angles. From the average angles, one can see if the overall bending angles of the animal change over time. For example when an animal reverses one can see the average bending angle increase as the animal deepens its posture. 99 5) Head/Tail distance: This is a measure of the straight-line distance between the tip of the head and tail (green line, Fig. 4.15g). For example, this distance decreases when an animal reverses or as it begins an omega turn. 6) Amplitude: The amplitude measured is the maximum right-angle distance from a line connecting the head and the tail to the spline of the animal (red line, Fig. 4.15h) Figure 4.15 Extracted parameters from the video analysis. (a) Bright-field image of the animal. (b) Binary image based on (a). (c) Thinned image of (b). From this backbone the length of the animal is determined. (d) Segmented animal is labeled by S+1 total points starting with S0 at the head. (e) Illustration of the measurement of a two-point angle. (f) Illustration of the measurement of a three-point angle. (g) Head-to-Tail length is the straight line distance from one end of the spline to the other. (h) Amplitude of the animal is determined by the maximum distance from the spline of the animal to the line connecting the head and the tail. 100 These parameters are the main outputs of the program. A large amount of information can also be found from the IMAQ Particle Analysis subVIs, which we have chosen to not output to the saved text file. The following can also be easily found using this VI: bounding rectangle, area, perimeter, angle, moments of inertia, hydraulic radius (see IMAQ Vision for LabVIEW User Manual and IMAQ Vision Concepts Manual for more information). Additionally, within the video, the illumination parameters are encoded. These are read from the .avi file and saved to the final “–data.txt” file for each frame. The final “–data.txt” files saves all the data for each frame and the order of the columns is time, illumination, level, length of animal, velocity, average 2-pt angles, number of 2-pt angles, 2-pt angles, average 3-pt angles, number of 3-pt angles, 3-pt angles, head-to-tail distance, and amplitude. On the front panel (Fig. 4.14) these calculated parameters are displayed in tabbed windows. Also, at the bottom of the screen is a color map of both the 2-point and 3-point bending angles. In this image time is along the X axis, and the Y axis is the location along the animal (segments). The color indicates the bending angle: black is 0 degrees and intensities of the red and blue indicate angle (the more intense the color, the deeper the angle). The video analysis program is not limited to the system discussed in Chapter 3: one can acquire video on any system (such as a dissecting microscope). Assuming the contrast is sufficient (on blank agar plates, for example), this program can analyze the video and extract the discussed parameters. 4.7 Conclusions The goal of this research was to create a comprehensive set of software for control of the illumination system described in Chapter 3. The software needed to posses sufficient speed and accuracy to illuminate intended targets within a freely moving animal. Furthermore, the software should possess the ability to automatically locate anatomical 101 structures within the animal and illuminate those areas. As demonstrated in this chapter, the designed software meets the above stated goals. The software acquires images of animals freely moving on an agar plate and through image processing routines determines the AP axis of the animal and hence can locate a priori known anatomical structures. The software can then instruct the projector the illuminate user determinable locations of the animal with full control over the intensity, color, and duration of the illumination. Subsequent programs are used for extraction of a number of parameters associated with C. elegans’ locomotion and are used for quantitative phenotyping. The final programs are designed for flexibility and a friendly user interface such that non-programming experts find them easy to use. 102 CHAPTER 5 DEMONSTRATION OF ILLUMINATION SYSTEM FOR NEURAL CIRCUIT DISSECTION Much of the work presented in this chapter was originally published [117]: Stirman et al., “Real-time multimodal optical control of neurons and muscles in freely behaving Caenorhabditis elegans”, Nature Methods, 8, 153-158 (2011). Additionally, references to the original publication(s) of the associated figure can be found in the figure caption. 5.1 Motivation The ability to optically excite or silence individual cells using optogenetics has provided a powerful tool to interrogate the nervous system. Optogenetic experiments in small organisms have mostly been performed using whole-field illumination but genetic methods do not always provide adequate specificity. Targeted illumination can be a valuable alternative but to date it has only been shown in non-moving animals without the ability to observe behavior output. The real-time multimodal illumination technology presented in Chapter 3 and 4 allows both tracking and recording the behavior of freely moving Caenorhabditis elegans while stimulating specific cells that express lightsensitive proteins. We use this system to optically manipulate nodes within the C. elegans touch circuit and study the roles of sensory and command neurons and the ultimate behavioral output. Together with optogenetic reagents, this technology significantly enhances our ability to control, alter, observe, and investigate how neurons, muscles, and circuits ultimately produce behavior in animals. 5.2 Qualitative Behavior Elicited By Structured Illumination We performed two simple experiments to show spatiotemporal control over gross C. elegans behaviors using structured illumination and ChR2-expression. First, we tracked 103 animals expressing ChR2 in the cholinergic motor neurons (ZX460). While the animals were moving forward, we illuminated the head with blue light (430-475 nm) at regular intervals. This produced a dorsal coiling effect[226] when the head was illuminated and resulted in an animal moving in a triangle (Fig. 5.1a). In the second experiment, we controlled the muscles of neuronally-paralyzed animals that express ChR2 (ZX299)[124] using structured illumination: Ivermectin (0.01 mg ml–1 solution), a nematocidal agonist of glutamate-gated Cl- channels, which causes neuronal hyperpolarization, was delivered to the animals; this eliminates the activities of motor neurons ―which are known to express ivermectin-sensitive channels― while muscles remained excitable[227] and were controlled with the light pulses. Partitioning the paralyzed animal into four quadrants (Dorsal-Anterior, Dorsal-Posterior, Ventral-Anterior, and Ventral-Posterior) and exciting the muscles in alternating patterns, we were able to produce S-shaped body postures, suggestive of locomotion patterns during crawling (Fig 5.1b). Although non- quantitative, these experiments demonstrate that illumination of optically controllable cells can be well defined, easily controlled, and dynamically alterable using the projector system. Figure 5.1 Sequential frames from acquired videos showing qualitative behavioral responses [214]. (a) Using the dorsal coiling effect to cause a worm to crawl in a triangle. (b) Showing direct muscular control of a paralyzed worm. Images are falsely colored to show illumination pattern. Scale bar is 100 µm. 104 5.3 Spatial Activation of Sensory and Command Neurons To demonstrate the spatial resolution of our system when performed in freely moving animals, we performed experiments analyzing the mechanosensory behavior in C. elegans. There are six major mechanosensory neurons in C. elegans: AVM and ALML/R (anterior), and PVM and PLML/R (posterior) [66, 228] as discussed in Chapter 1.X. Animals carrying pmec-4::ChR2 (AQ2334) express ChR2 in these six touch neurons (Fig. 5.2a). By traditional touch assay and laser ablation, it has been established that stimulating the anterior neurons causes the animal to move backwards, whereas stimulating the posterior neurons causes forward movement or acceleration[66]. In our experiment, we used a 20µm-wide bar of blue light and scanned it along a pmec4::ChR2 animal’s anterior-posterior (AP) axis at a relative velocity of 12.5% body length per second (~100 µm s–1) while monitoring the locomotor behavior of the animal (Fig. 5.2b, c). The line was scanned in both the head-to-tail and tail-to-head directions (Fig. 5.2b, c). 105 Figure 5.2 (a) Illustration of the positions of the six sensory neurons, and a frame from Supplementary Video 3 of Reference [117] showing the 20 µm bar of blue light, perpendicular to the animal’s longitudinal axis, which was scanned at a rate of 12.5% animal body length per second (~100 µm s–1). (b) Two scanning schemes along the AP axis: head-to-tail and tail-to-head. (c) Sequential frames from Supplementary Video 3 of Reference [117] showing a bar of light passing over the animal from posterior to anterior as the animal is freely crawling. Initially the animal is traveling forward, but when the light reaches the anterior mechanosensory neurons expressing ChR2 (middle frame), the animal quickly reverses direction. Scale bar is 250 µm. Adapted from REFERENCE [117]. As expected, while illuminating from tail to head, as long as the illumination was in the posterior half of the animal, no reversals were elicited, and as soon as the bar reached the anterior half, animals reversed. It was also evident that illuminations in the posterior initiated acceleration. We quantified the body positions along the AP axis of the animal at which these behaviors were initiated (Fig. 5.3), as well as the anatomical positions of the touch neurons as measured by GFP fluorescence within the mechanosensory neurons (pmec-4::GFP) (Fig. 5.3, Fig. 5.4). Reversals were initiated most often within the range 0.40-0.48 along the AP axis in tail-to-head scans, consistent with the anatomical data (i.e. the positions of the ALM/AVM cell bodies [229]), and with our quantification of neural cell body locations (Fig. 5.3, 5.4). In the head-to-tail scans, animals showed a high 106 probability of reversal well before reaching the AVM or ALM cell bodies (Fig. 1f), indicating that activation of the ChR2 in the distal processes is sufficient to elicit a response. This is likely because enough ChR2 is present in neuronal processes to allow sufficient photo-depolarization of the cell. No behavioral response was observed for illumination in the region of the PVM neuron (data not shown), which is consistent with the observation that PVM plays no role in hermaphrodite mechanosensation [66, 111]. Figure 5.3 Histograms showing the distributions of positions along the AP axis at which point the blue light elicited a reversal response [117]. Shown are the distribution of positions where accelerations elicited by the tail-to-head scan were observed (28 out of 52 animals showed an increase in speed two standard deviations greater than the average speed prior to illumination), and the distributions of the anatomical positions of the touch neurons in pmec-4::GFP animals (Figure 5.4). 107 This experiment suggests that the resolution of the system can be used for precise interrogation of the neuronal network at the single-cell level, if used in combination with appropriate promoters that drive ChR2 expression in single-cells (e.g. cre-lox system [230]) and provided that the cells expressing ChR2 have cell-bodies or processes farther apart than the spatial resolution of the system. Figure 5.4 Representative fluorescent images of pmec-4::GFP animals [117]. Images were processed in the same manner as in all experiments and backbone of the animal determined. The gentle touch sensory neurons were identified and quantified as a location along the AP axis (defined by the backbone). This data was used in Figure 5.3. In the C. elegans’ touch circuit, command interneurons integrate signals from sensory neurons and ultimately produce locomotor behaviors [66, 114, 228, 231] (Fig. 108 1.2). To quantify these behaviors, we excited the head- or tail-touch neurons and the head- or tail-interneurons using ChR2 and the structured illumination system, and measured the animals’ velocity. First, pmec-4::ChR2 animals (Fig. 5.5a) were stimulated either in the second 25% or the last 25% of the body. We illuminated a quarter of the body length because this resolution is sufficient to distinguish the anterior and the posterior sensors, and it ensures illumination of the relevant cell bodies in all animals. When the last quarter was illuminated with blue light, thus exciting PLML/R neurons, we observed the expected velocity increase (Fig. 5.5b). Conversely, when the second quarter of the body was illuminated, exciting AVM and ALML/R neurons, we observed a large velocity decrease followed by a reversal (Fig. 5.5b). These behaviors were robust and reproducible between animals as can be seen in individual animal traces (Fig. 5.6). This demonstrates that the optical illumination system and software is well suited to investigate the neural basis of behavior and is capable of eliciting cell-specific behaviors. Figure 5.5 Optical stimulation of anterior/posterior mechanosensory neurons. Adapted from REFERENCE [117]. (a) Illustration of the positions of neurons expressing ChR2 in pmec-4::ChR2 transgenic worms. (b) Average velocity plots of pmec-4::ChR2 animals under illumination conditions (shown as a blue bar above). n = 13 (posterior illumination); n = 15 (anterior illumination). Error bars = s.e.m. 109 Figure 5.6 Individual animal responses to anterior stimulus [117]. (a) Individual velocity plots of pmec-4::ChR2 animals upon anterior stimulation. Blue bar indicates when the anterior portion of the animal was illuminated with blue light. (b) Scatter plots of velocity at individual time points from the above figure. Below the indication of the time point is the average velocity and in parenthesis is the standard deviation. We performed similar experiments on pglr-1::ChR2 animals, which express ChR2 in the command interneurons as well as in other neurons [232]. Illuminating the first quarter of the body with blue light excites the interneurons in the head, including AVA, 110 AVD, and AVB (Fig. 5.7a). Although this stimulation includes interneurons for both backward and forward movements, the predominant effect is the backward command. The velocity profile (Fig. 5.7b) shows a robust reversal upon stimulation using this light pattern. Similarly, when the last quarter of the pglr-1::ChR2 animals was illuminated and PVC excited, there was a small but appreciable acceleration. Although we cannot exclude the effects of photostimulation of the other glr-1 expressing cells, the experiment shows specific illumination in freely moving animals in ways that is not possible to perform with previous methods. The behavior is consistent with the known roles of the locomotive interneurons. Previous interrogations of the interneurons relied on traditional genetic techniques or optical ablations, where the absence of the behavior was correlated with the role of the neuron [66, 114]. This demonstrated direct elicitation of the behavior through ChR2 activation of the interneurons using the presented illumination, thus allowing a direct causation of the behavior rather than a correlation. Figure 5.7 Optical stimulation of forward/ backward command interneurons. Adapted from REFERENCE [117]. (a) Illustration of the positions of neurons expressing ChR2 in pmec-4::ChR2 and pglr-1::ChR2 transgenic worms. (b) Average velocity plots of pglr1::ChR2 animals under illumination conditions (shown as a blue bar above). n = 24 (posterior illumination); n = 12 (anterior illumination). Error bars = s.e.m. 111 5.4 Spatiotemporal Control of the Illumination Intensity Traditionally, the study of C. elegan’s touch circuit has been largely performed using a manual assay either by touching the head or tail of a freely moving animal with an eyelash or by tapping the agar plate containing animals [66, 114]. One difficulty associated with this assay is controlling and standardizing the force with which animals are stimulated. Micro force transducers have been fabricated to allow control of forces [233]. While precise, the micro force systems are technically demanding, particularly when used on behaving animals and when needed to apply in anatomically different positions simultaneously. Using light to drive ChR2, the stimulus intensity (which translates into signal strength in neurons [234, 235]) can be easily controlled over a wide range with spatial specificity and in a variety of illumination and intensity profiles. Changing the light intensity in optogenetic experiments normally requires changing the lamp voltage or introducing neutral density filters, which change the light-intensity over the entire field of view. With the illumination method described here, one can easily control the local intensity by varying the pixel values (Fig. 3.5b). First we show that illumination using graded intensities elicits differential behaviors when stimulating the second anterior quarter of pmec-4::ChR2 animals with blue light. We recorded the animals’ responses to 0.29, 1.17, and 4.67 mW mm–2 illumination intensities and reordered whether different stimulation strengths produce behaviors with different probability distributions. We grouped the behavior of all the animals (illuminated at different intensities) into four categories: a robust large reversal (R, defined as reversals with three or more headswings [236]), a small reversal (r, defined as reversals with less than three headswings [236]), a slowing or pausing response but no reversals (Sl/P), and no measurable responses (NR). Regardless of the illumination intensities, we observed that these four categories always exist and are distinguishable (Fig. 5.8): the number of animals showing NR, Sl/P, r, and R are 28, 14, 35, and 43 respectively. Grouping the behavioral responses by the illumination intensities (Fig. 5.9), 112 we show that the low intensity stimulation produces a higher probability of no-response and slow-response in the animals, while the animals are much more likely to reverse upon stimulation at higher intensities (Fig. 5.9b). This suggests that the illumination intensities, and hence depolarization state of the neuron, affect the sensory neuron responses and ultimately modulate the distribution of the behavioral responses. Figure 5.8 Velocity plots from pooled data from animals receiving different illumination intensities [117]. ‘NR’ = No Response; ‘Sl/P’ indicates a slowing or pausing of the animal with no negative velocity; ‘r’ is a small reversal; and ‘R’ is a large reversal. The number of animals showing NR, Sl/P, r, and R are 28, 14, 35, and 43 respectively. Error bars = s.e.m. 113 Figure 5.9 Quantification of behavioral responses elicited by different anterior illumination intensities. Adapted from REFERENCE [117]. (a) Patterns used for illumination location and their intensity. (b) Distribution of the four responses observed at the three intensity levels. n = 40 for each of the three illumination levels. Next we asked whether it is possible to simultaneously stimulate neurons in spatially distinct locations and with sophisticated light-intensity patterns. We were interested in the animals’ responses to simultaneous stimuli in anterior and posterior regions (i.e. past which intensity threshold a reversal is produced, and how this changes when a competing signal is present), something that would be very difficult to address using the traditional manual approach. We compared pmec-4::ChR2 animals that were stimulated only in the head in an increasing step function of illumination intensity(to a maximal intensity of 1.17 mW mm–2) (Fig. 5.10a), to animals stimulated with an identical pattern in the head but that additionally were being stimulated in the tail at a constant intensity (1.17 mW mm–2) (Fig. 5.10b). When the threshold of intensities (when an animal initiates a reversal) for a population of animals were compiled, we observed that holding constant tail illumination intensity increases the average head intensity at which animals respond (Fig. 5.10c). This suggests the activation of the antagonistic 114 sensory field modulates the response of the other sensory field, and that the two are integrated leading to the ultimate behavioral outcome of the animal. Figure 5.10 Illumination patterns used to explore the integration of anterior/posterior signals and behavior generated from the stimulation. Adapted from REFERENCE [117]. (a) Illumination locations and plot of the temporal variation of the intensity for the two patterns tested. Normalized intensity of 1 corresponds to blue light of intensity 1.17mW mm–2. (b) Histogram distributions of intensity at which animals initiated a reversal under two illumination patterns: anterior alone, and anterior and posterior simultaneously. (n = 40 for each illumination scheme). To further investigate the integration of competing signals, we stimulated one set of animals with a single light pulse in the anterior, and another set with a simultaneous anterior and posterior pulse with the same intensity. The behavioral response based on illumination modes (Fig. 5.11d) show how the combined probability of reversals decreases while the probability for no-response increases when the posterior sensory 115 neurons PLML/R are excited. This suggests that the signals from the anterior and posterior sensors are integrated at all times to produce the proper behavior. Additionally, certain combinations of anterior and posterior illumination intensities appeared to be conflicting sensory signals and resulted in conflicting commands as the animals quickly alternated between forward and reverse locomotion (Supplementary Video 7 of Reference [117]). Figure 5.11 Distributions among the four response states for anterior illumination alone or simultaneous anterior/posterior illumination at the same intensity (1.17mW mm–2). (n = 40 for each). Adapted from REFERENCE [117]. 5.5 Simultaneous Multi-Color Illumination Because many of the currently available light-sensitive proteins used in optogenetics [124, 125, 237] are spectrally distinct, an illumination system that can be used to illuminate at different wavelengths would be valuable. For instance, ChR2 is activated in 116 the blue region while NpHR[124] and MAC[125], which both hyperpolarize and silence cells, are both activated in the green-yellow region. Simultaneously exciting and inhibiting different cells in a circuit, particularly in behaving animals, can greatly enhance our ability to understand circuits and their functions. By using an LCD projector, we have three independently controllable LCD panels that can be used for three independent illuminations. We used two of these channels to interrogate the mechanosensory circuit using pmec-4::ChR2; pglr-1::MAC animals. In these animals, MAC inactivates the glr-1 interneurons when illuminated by green light (550 nm). Because MAC can also be activated (although less efficiently) by blue light[125], we illuminated the second quarter of the body along the A-P axis (i.e. avoiding illumination of glr-1 neuron cell bodies) using blue light and the first quarter of the body using green light. This allowed exciting the ALM/AVM sensory neurons while inhibiting the glr:1 neurons only in the anterior part of the animals (inhibiting all backward command neurons but only one of two pairs of forward command neurons). Figure 5.12 The neural gentle touch circuit showing the neurons that are either stimulated or silenced and the resulting behaviors at different points in the two sets of experiments. Adapted from REFERENCE [117]. 117 As processes of the glr-1::MAC-expressing cells pass the region of mec-4::ChR2 expressing neurons, behaviors evoked in mec-4 neurons may be slightly dampened (Supplementary Note 2). The behavior of the animals was tracked over time while they were manipulated following the two photostimulation schemes depicted in Fig. 5a. Velocity averages from multiple animals are shown in Fig. 5b. When the anterior sensory neurons (ALM/AVM) were stimulated by blue light for 4 seconds at 1.17 mW mm–2 intensity (Scheme 1; Fig. 5a-c), the animals produced a robust reversal behavior. When ALM/AVM neurons were illuminated the same way while the head interneurons were inhibited by green light 2 seconds after the blue light was on (Scheme 2; Fig. 5a-c), the animals first produced the expected reversals but upon silencing of the interneurons, the reversals were inhibited and the velocity became positive (Fig. 5b). Figure 5.13 Sequential frames from Supplementary Video 8 of Reference [117] demonstrating the multi-spectral dynamic capacity of the illumination system. The animal is illuminated with blue light in the region of the anterior mechanosensory neuron which express ChR2 thus eliciting a reversal. The animal is subsequently illuminated with green light in the region of the command interneurons which express the hyperpolarizing MAC thus halting the reversal. Scale bar is 250 µm. 118 Figure 5.14 Simultaneous two color illumination [117]. (a) Illustrations of the two illumination schemes (b) Velocity plots of pmec-4::ChR2 and pglr-1::MAC::mCherry animals subjected to the illumination schemes in (a). Error bars = s.e.m; n = 19 for scheme 1; n = 12 for scheme 2. Spontaneous reversals could also be inhibited by green illumination (Supplementary Video 8 of Reference [117]), suggesting that this is not an artifact by the optogenetic stimulation but a direct interference with the neuronal circuit. This experiment illustrates our ability to illuminate a behaving animal with spatial, temporal, spectral and intensity control. The method yields quantitative behavior data that cannot be obtained by manual touch assays, laser cell ablation, or genetic manipulation of neurotransmitters. 119 5.6 Optogenetic Dissection of a Nociception Neural Circuit In this section I will briefly review and discuss additional studies which largely utilize the illumination system and software (Chapters 3 and 4). The experiments were performed by Dr. Steven Husson in Dr. Alexander Gottschalk’s lab (Goethe University, Frankfurt, Germany) [238]. As will be discussed in Chapter 6.1, both the illumination system and software were transferred to Dr. Alexander Gottschalk’s lab during an extended visit in October 2010. Working closely with Dr. Gottschalk’s lab, I have continued to assist the lab with troubleshooting and maintenance of the system and software. A variety of noxious stimuli (mechanical, chemical, and thermal) have the potential to damage tissue. Nociceptive neurons in C. elegans help to protect the animal by evoking a fast withdrawal upon neural activation. Two neurons whose dendridic arbors cover a large receptive field in C. elegans are FLP and PVD: these neurons respond to harsh mechanical touch. Traditionally, the harsh touch response in C. elegans is assessed by prodding the animal with a platinum wire (harsh touch). The response is complicated by the co-activation of the other mechanically sensitive neurons such as those previously discussed (ALM, AVM, PLM). Furthermore, distinguishing the roles of FLP and PVD in this response is very challenging by traditional techniques. Optogenetics presents a powerful method to investigate the nociceptive response, by photoactivating FLP and PVD, as well as the downstream integrating interneurons, without concurrent activation of other mechanically sensitive neurons. However, traditional whole animal illumination would activate both PVD and the other neurons expressing ChR2 under the promoter used. Furthermore, when expressing ChR2 in PVD and FLP, whole body illumination would activate both neurons, and thus would give little information regarding the relative role for the individual neurons. To test the functional role of PVD, ChR2 was expressed in this neuron under the control of the F49H12.4 promoter (ZX819). This promoter also expresses ChR2 in two 120 additional neurons: AQR in the head, and an unidentified neuron in the tail. To specifically illuminate PVD and exclude the effects of photoactivation of the two other neurons, the illumination, tracking system, and software (Chapter 3 and 4) was utilized. First, the third quarter of the animal was illuminated with blue light. This segment contains the PVD cell body (AP axis position = 0.65), and under photoactivation leads to rapid acceleration (Fig. 5.15a). No perceptible change was observed for illumination of the head (first quarter), photoactivating AQR (Fig. 5.15b), or illumination of the tail (fourth quarter), photoactivating the unknown tail neuron (Fig. 5.15c). In order to test the sensitivity of the dendridic arbor to photostimulation, we next illuminated the regions along the AP axis of 0.4-0.6 (Fig. 5.15d), 0.3-0.5 (Fig. 5.15e), and 0.2-0.4 (Fig. 5.15f). Comparing the maximal velocity during illumination, a decrease was observed as the illumination was shifted further from the cell body (Fig. 5.15g), though no statistical significance was seen between 0.4-0.6 and 0.3-0.5. Figure 5.15 Illumination of PVD expressing ChR2 [238]. (a) Photoactivation of PVD. (b) Photoactivation of the head neuron AQR. (c) Photoactivation of the unknown tail neuron. (a)-(c) Red line indicated mean and gray shading indicates the s.e.m. Number of animals tested is indicated in the figure. (d-f) Photostilulation of the dendridic branches of PVD. Fractions of responding animals are indicated by the bar graphs. (d) Illumination of region 0.4-0.6; n=28 (e) Illumination of region 0.3-0.5; n=22 (f) Illumination of region 0.2-0.4; n=30 (g) Maximal speed observed for the animals tested in (d)-(f). Statistical significance was determined using a t-test; *p<0.05. 121 These results indicate that PVD is primarily responsible for initiating escape behavior through rapid acceleration forward. When prodded by a platinum wire, the primary response is rapid reversal [239]: this suggests that another neuron responsible for the reversal behavior gets coactivated by this mechanosensory insult. Recently, the neuron FLP has been implicated in the mechanical nociceptive response [240]. To further investigate the nociceptive response and circuit responsible for this behavior, FLP neurons as well as the integrating interneurons were then photostimulated. The mechanical nociceptive circuit (Fig. 5.16a) shows both PVD and FLP have synaptic connectivity to both the forward and reverse command interneurons. As demonstrated previously (Fig. 5.15), the primary response upon photostimulation of PVD is acceleration forward. To test the role of the interneurons, ChR2 expressing animals in PVD were stimulated with both synaptic partner interneurons present (N2, zxIs12), and in animals in which the PVC interneuron was degenerated (deg-1(d), zxIs12). As before, when both interneurons were present, photostimulation of PVD resulted in rapid forward acceleration (Fig. 5.16b). When the command interneuron responsible for forward movement (PVC) was absent, photostimulation of PVD resulted in rapid reversal (Fig. 5.16b). This indicates both interneurons are active and respond to PVD stimulation, however the forward command interneuron (PVC) dominates, perhaps due to increased synaptic connections and strength to PVD. To test the role of FLP in this response, animals expressing ChR2 in FLP, HSN, and PVD (ZX1014) were photostimulated. Illuminating only the anterior region containing FLP, resulted in rapid reversal of the animal (Fig. 5.16c). 122 Figure 5.16 Optogenetic dissection of the nociceptive response [238]. (a) Simplified wiring diagram of the nociceptive neural network. (b) Photostimulation of PVD in animals with both forward and reverse interneurons and with the forward interneuron degenerated. (c) Response of photostimulation of the FLP neuron. Together these results suggest that both FLP and PVC contribute to the nociceptive response. While photostimulation of PVD results in forward acceleration and photostimulation of FLP results in reversal: together this suggests that both FLP and PVC are have an active role in the harsh touch sensation and FLP is the primary anterior sensor and PVD is the primary posterior sensor. 5.7 Methods 5.7.1 C. elegans culture Worm strains were cultured at 22 °C in the dark on standard nematode growth medium (NGM) plates with OP50 bacteria. The required cofactor for channelrhodopsin, all-trans retinal (ATR; Sigma-Aldrich) was supplemented. ATR was supplemented to the NGM plates by diluting a 50 mM stock ATR solution (in ethanol) in 300 µl OP50 to a final concentration of 100 µM and spreading on a 5.5 cm NGM plate. The strains used in this paper include ZX299: lin-15(n765ts); zxEx22[pmyo-3::ChR2(H134R)::YFP; lin-15+]; ZX460: N2; zxIs6[punc-17::ChR2(H134R)::YFP;lin-15+]; AQ2334: lite-1(ce314); 123 ljIs123[pmec-4::ChR2; punc-122::RFP]; ZX899: lite-1(ce314); ljIs123[pmec-4::ChR2; punc-122::RFP]; zxEx621[pglr-1::MAC::mCherry; pelt-2::GFP]; ZX900: lite-1(ce314); zxEx622[pglr-1::ChR2(H134R)::mCherry; pelt-2::GFP]; SK4005: zdIs5[pmec-4::GFP; lin-15+]; ZX819: lite-1(ce314); zxIs12[pF49H12.4::ChR2::mCherry;pF49H12.4::GFP]; ZX1014: lite-1(ce314); zxEx633[pegl-46::ChR2::YFP; Pelt-2::mcherry]. 5.7.2 Optical illumination, behavioral recording, and analysis All animals tested were F1 progeny of P0 adults picked onto ATR plates 3.5 days prior to experiments. Young adult animals were picked onto blank NGM plates 25 minutes prior to the experiments. Strains with non-integrated transgenes were picked based on a fluorescent co-injection marker. Each animal was only used for a single experiment and then discarded. Single animal plates were inverted and placed on a custom made petri dish holder on a motorized X-Y stage (Prior). Video recording and illumination was achieved using the previously discussed illumination system (Chapter 3) and custom software (Chapter 4). Analysis extracting the velocities and anatomical locations (AP axis) from the video analysis software discussed in Chapter 4. 5.8 Conclusions and Discussion Optogenetics has received significant attention due to the potential for fast, repeatable stimulation of genetically defined neurons. We have shown here that it is possible to track a freely moving animal, and spatiotemporally excite and/or inhibit specific nodes of neural networks. This illumination system is capable of delivering light stimuli to genetically modified, optically excitable cells with high repeatability and light intensity control. It also enables the use of combinations of optogenetic tools with non-overlapping activation spectra. By using a three-color LCD, we were able to achieve true simultaneous multi-color illumination, allowing this spatial and spectral separation to probe neuronal networks more precisely. 124 In addition to the experiments shown here, multimodal real-time optogenetic control will allow further studies of other sensory circuits. Furthermore, studies related to the integration of different sensory modalities and behaviors will be considerably advanced by the ability to track and stimulate freely moving animals. Real-time illumination and behavior tracking as presented here can also be combined with calcium imaging or with other methods capable of perturbing the circuit, such as using microfluidic devices to deliver well-defined sensory stimuli, analyzing animal mutants for particular neurotransmitters or performing laser ablation of cells, axons, or synapses to remove single nodes or connections within the circuit. Lastly, one could imagine using the illumination system with other photostimulation methods such as uncaging of small molecules. 5.8.1 Limitations and Considerations We demonstrated that few, or even single neurons can be illuminated in freely moving animals. We note that, however, neurons could be activated not only by illuminating cell bodies, but also processes. This has to be considered, if a region harboring the cell of interest also contains dendrites from other neurons expressing ChR2. Thus, one should choose promoters as restricted in their expression pattern as possible, and consider using combinatorial techniques for expression, such as the cre-lox system. However, scenarios can be envisioned where it may be beneficial if neuronal processes can be illuminated rather than cell bodies, e.g. when the cell body of interest is spatially too close to other ChR2-postive cells that should not be activated, while the processes of the particular neuron run in a region that is free of other cells or processes. Currently, we aimed at particular cells using the knowledge of their relative position in the animals’ body, which required to illuminate regions larger than just one cell body, such as to ensure illumination of the neuron at all times. Nevertheless, our system has the potential of higher precision, if the cell of interested could be labeled with a fluorescent protein, and 125 the fluorescence could be followed. The software could be trained to shine light at the desired neuron, and not at others also expressing the fluorescent protein. 126 CHAPTER 6 THESIS CONTRIBUTIONS AND FUTURE WORK 6.1 Thesis Contributions This thesis sought to increase and enhance the available tools for C. elegans’ neuroscience research. As both microfluidics and optogenetics increases in popularity and widespread application by neurobiologists, the complexity and sophistication of the questions that can be asked increases. In order to keep pace with the questions biologists posed, efficiently aid in answering these questions, and push the frontier, we must develop corresponding technologies. The current limitations of some optogenetic experiments (OptIoN) are that they are low throughput and place a heavy burden on the researcher. The manual methods employed do not lend themselves well to scaling-up as would be needed in a large scale RNAi or drug screen. In other optogenetic experiments, the experiment is limited in interpretation and flexibility by the current illumination systems. Those illumination systems rely on traditional epi-fluorescent systems designed for broad-field illumination or more sophisticated, precise systems are prohibitively expensive and complex in their construction. This thesis addresses the major limitations of current technologies and methods. In Chapter 2, we demonstrated for the first time the combination of microfluidics and optogenetics. Microfluidics has previously been demonstrated to increase the processing speed and efficiency when imaging small model organisms like C. elegans. The previous work using microfluidic devices for aiding high throughput screens was either limited to a single imaging channel, or compressively immobilized the animals, and were therefore not suited for our particular purpose. We designed a relatively simple microfluidic device capable of loading up to 16 animals into individual imaging channels. The channels are sized to be slightly wider than young adults therefore allowing the animals’ relatively 127 free behavior (contraction or elongation). The device is designed for rapid loading/unloading and generally loading single animals per channel. Supporting software was written and successfully demonstrated capability of fully controlling and automating the microfluidic device. Furthermore, additional software could extract loaded animals and automatically measure the length of the animals as a function of time (illumination). To further enhance the application of microfluidics for large scale screens we also demonstrated for the first time the integration of microfluidics and traditional highthroughput screening technologies such as a robotic liquid handler. Although the combined system was not completely automated (we still manually washed animals from culture plates), this was a significant step in increasing the processing capabilities of microfluidics. The additionally developed supporting hardware, such as the device to measure the worm concentration and the microfluidic control box, also greatly increase the ability to perform screens and the ease of transferring microfluidic technologies to other laboratories. In Chapter 3, we set out to develop an inexpensive, flexible, yet powerful tool for optogenetic illumination. The main limitation of current techniques is that they are spatially non-specific. To overcome this limitation, we modified a commercially available 3-LCD projector and integrated it with an inverted epi-fluorescent microscope. The system was designed to demagnify an image that is created by a computer, transferred to the projector, and illuminates a sample at the imaging plane. The construction of the completed illumination system is fairly simple to perform using the details of the protocol outlined in this thesis and is at least 10× cheaper than other described systems. It demonstrated a high spatial resolution capable of producing a spot size of ~5 µm at 25× magnification. The systems’ main limitation is in the temporal accuracy, which is limited to ~111 ms, and thus ultimately limits the spatial accuracy when dealing with a moving target. The system also represents a significant advance in optogenetic illumination technologies because it can simultaneously illuminate any 128 targets within the field-of-view with independent full control over the illumination color, intensity, and duration. No other systems have previously demonstrated such control and flexibility, while remaining economical. In order to control the designed illumination system dynamically and have the ability to target neurons and muscles in freely moving C. elegans, we developed a set of software described in Chapter 4. The software was written to acquire images of freely moving animals and provide a frame of reference on the animal such that one can define the intended anatomical structures. The software provides full control over the previously mention factors (color, intensity, time, location). Flexibility within the software enables the user to define complex illumination pattern that can create sophisticated patterns of neural activation when used with optogenetic reagents, thus allowing the interrogation of the neural basis of behavior. The interface of the software was designed for ease of use and approachability to non-engineering laboratories. The other software presented allows for extraction of a multitude of parameters that can be used for quantitative phenotyping, thus allowing quantitative comparisons between different neural patterns and activity. In Chapter 5, we demonstrated that the completed illumination system and software is capable of targeting neurons and muscles in C. elegans. We showed for the first time the optogenetic elicitation of a behavior by specifically illuminating the anterior or posterior touch receptor neurons (TRNs). Furthermore, we could elicit similar behavior through the activation of the interneurons (AVA, AVB, AVD, PVC) responsible for forward or reverse locomotion. Although the function of these neurons has been well established, this was the first time these behaviors could be directly interrogated and done so with some spatial specificity. Additional capabilities of the system were demonstrated with the experiments investigating the probabilistic behavior of the animals upon differential stimulus intensity, and the simultaneous illumination of the anterior and posterior TRNs. These experiments were not previously possible using other methods and thus our method opens up the door to a new manner of investigation properties of a 129 neural circuit, propagation of a signal, and the integration of signals within a neural network. Finally, the multi-color capabilities of the system allow for simultaneous activation of many optogenetic reagents. This means that true multiplexing of optogenetic reagents is now possible and complex assessment of the function of neurons can be accomplished. In summary, this thesis combines several technologies that are rapidly advancing C. elegans neuronscience: microfluidics, optogenetics, lab automation, and automated machine vision. The developed technologies discussed in this chapter should allow increasingly high-content, complex interrogation into the nervous system of C. elegans both in regard to the genetic and neural basis of behavior. 6.2 Future Directions Throughout the thesis I have noted areas in which the developed technologies or application of those technologies could be improved. In this section I outline some specific improvements and experiments that would directly follow up on the work I have discussed in this thesis. 6.2.1 Optimize the methods for optogenetic illumination The objective of this section is to enhance the methods for optogenetic illumination: increase the spatial and temporal resolution, and develop technologies to perform highresolution illumination of multiple animals simultaneously. The methods for illumination discussed in this thesis, targeting neurons in freely moving animals, are based largely on anatomical features and thus relying on pre-defined stereotypical locations of the neurons. This leads to some uncertainty about the extent and precision of illumination and hence uncertainty about the excitation of optogenetic reagents. Additionally, these methods, though performed at low magnifications (4x), are still limited to single animals. The engineering methods suggested in this section seek to fill the gaps of the optogenetic 130 illumination methods presented in this thesis: allowing for targeted illumination of neurons based on locating the neurons directly and developing technologies to perform population based assays. The technologies outlined in this section are highly transferrable and well suited for studies in D. melanogaster larvae and cultured cells as well. A current limitation of the illumination system (Chapter 3) is the accuracy when illuminating intended targets. Although we can target specific sections of the animal (e.g. 1st quarter, 4th quarter), this might not have the requisite resolution if the neurons expressing ChR2 are located in close proximity to one another or if the position of the neurons change as the animal moves. One solution is to fluorescently label the neurons of interest with a soluble fluorescent protein and thereby through fluorescent imaging we can precisely define the locations of the neurons. This could be accomplished by coexpress soluble mCherry and ChR2 in the same neurons and continuously fluorescently image the mCherry signal. The fluorescent signal will specifically define the intended targets. The projector based illumination system can then illuminate one or more of the neural targets. This can both increase processing speed and increase the resolution of the system. Because the illumination system is already capable of multi-spectral illumination at high intensities, excitation of the mCherry would present no challenge. The main system alteration is to include simultaneous imaging of a red channel (mCherry) and bright field for whole animal behavioral recording (Fig. 6.1). 131 Figure 6.1 Schematic representation of a system for the simultaneous imaging of fluorescently labeled neurons and optogenetic illumination. Blue light for ChR2 is provided by the projector (Chapter 3) and can be spatially pattered. Green light for mCherry excitation is also provided by the projector. Transmitted light uses a far red source. The red mCherry emission and transmitted light are split by a downstream dichroic and are imaged separately onto CCD cameras. As a separate technology, I suggest the construction of an illumination system capable of multi-spectral illumination across a wide field of view (> 2 cm). The main difficulty of such a system is maintaining sufficient intensity required for optical activation of optogenetic reagents as well as spatial resolution for targeting distinct sections of C. elegans or D. melanogaster. This system can be constructed either by modifying existing microscopes to relay a projector image to the sample plane at a slight magnification, or by constructing a customized microscope system. This system would have decreased resolution compared to the system described in Chapter 3, but would be 132 able to target multiple independent animals simultaneously while still maintain the ability to at least segment the animal into anterior and posterior halves. This system would allow population assays to be performed rapidly, accruing significant amount of data with few experiments. 6.2.2 Combine optogenetics and behavioral recording The goal of this section is to outline a few experiments and techniques to investigate sensory integration within the mechanosensory circuit of C. elegans. The C. elegans touch circuit was discussed in Chapter 1.4.5.4; interneurons integrate signals from sensory neurons and ultimately produce behaviors [66, 228, 241, 242]. The anterior touch cells, when activated, lead to a reversal, and the posterior cells, when activated, lead to a forward acceleration. Presumably, in the soil, both anterior and posterior sets of mechanosensory neurons are excited, often simultaneously, and the animal must decide the appropriate response. How these sensory signals are integrated remains largely unknown. Investigation of the integration of sensory signals from the mechanosensory neurons through optical excitation of ChR2 within these neurons using the structured illuminated system outlined in this thesis and in 6.3.1.2, would provide a significant step forward in understanding how neural circuits operate. We have demonstrated both anterior and posterior escape behavior elicited by optical activation and how complex illumination pattern can be used to interrogate anterior/posterior signal integration (Chapter 5). To deepen the understanding of processing by a neural circuit, experiments of sequential posterior illumination pulses followed by anterior illumination pulses and vice versa at different inter-stimulus intervals would be performed. Similar experiments have been performed by Rankin et al. by mechanical touching and tapping [243]. With our system we can achieve a greater level of stimulus control by using optical excitation. These experiments will help elucidate how opposing sensory signals are integrated temporally to produce a behavioral 133 response. We would hypothesize that a posterior stimulus can inhibit a subsequent anterior stimulus and the level of inhibition depends on both the stimulus intensity as well as the inter-stimulus interval. Furthermore we would expect to find that an anterior stimulus can inhibit a posterior stimulus to a stronger degree: the intensity of anterior stimulus that can inhibit a posterior stimulus will be less than the required posterior stimulus to inhibit an anterior stimulus due to the AP asymmetry of the mechanosensory circuit. The connectivity within the mechanosensory circuit is well known. However, the contributions of gap junction and synaptic connections (and if they are excitatory or inhibitory) has yet to be fully elucidated. To examine the role of gap junctions and synaptic transmission in signal transduction and integration in the mechanosensory circuit, one would perform optogenetic experiments using mutants defective in synaptic transmission (eat-4), elimination of synaptic transmission by using cell specific expression of Tetanus Toxin (TeTx) [244] expressed in the mechanosensory neurons (ALM, AVM, PLM) and the RIM interneuron, and RNAi knockdowns of genes for both synaptic transmission and gap junction formation (in AVM, ALM, PVM and RIM) using cell specific RNAi sensitive strains (sid-1) [213]. 6.2.3 Utilize microfluidics, optogenetics and calcium imaging techniques for exploration of integration sensory information between distinct neural circuits In C. elegans there are a variety of sensory modalities. Though we can attempt to isolate and understand individual neural networks responsible for each sensory modality, it would be of great interest to examine the relationship and inter-sensory processing between these senses. Organisms are subjected to a wide range of stimuli and must “choose” an appropriate response. In this section the goal is to investigate the integration of distinct sensory modalities by combining optogenetics and microfluidics, and observe 134 both behavioral response as well as use calcium imaging as an indicator of neural activity. C. elegans are known to migrate to temperatures on which they were cultivated [245]. The neural circuit for thermosensation [246] is distinct from the mechanosensory circuit, though there are some overlapping interneurons and motor neurons. In this section, the behavioral response would be investigated when animals are placed on a temperature gradient and allowed to freely move while at the same time optogenetically exciting the escape response via the touch neurons (Fig. 6.2). As the animals enter certain regions of temperature, one would stimulate anterior touch cells and observe the behavioral response. We expect the normal behavioral response due to mechanosensation to be altered depending on the temperature in which animals currently reside and the cultivation temperature: further enhancing the escape response when on a temperature not to their liking. It will also be interesting to determine if an animal can be “trained” to reside at temperatures other than those they were cultivated on based on negative feedback applied though optogenetic excitation of the mechanosensory escape response. This would require the illumination system described in 6.3.1.3. 135 Fig. 6.2 Investigation of sensory integration between the optogenetically elicited mechanosensation and thermosensation. In this thesis (Chapter 2), we demonstrated combining microfluidic technologies and optogenetics for the high-throughput analysis of synaptic function at the C. elegans neuromuscular junction [142]. Combining microfluidics and calcium imaging has been demonstrated to study the neural and genetic basis of odor detection [99] and oxygen sensation in C. elegans [247]. Recent work demonstrated the use of microfluidics for precise spatial and temporal definition of chemical attractant while monitoring C. elegans’ behavior [248]. One can use a microfluidic device [99] to apply a chemical attractant such as sodium which is primarily sensed by ASE, and using Ca++ imaging can monitor the downstream interneurons AIB, AIY, RIA, RIM, as well as those interneurons involved in the mechanosensory circuit AVA, AVB, AVD, and PVC. These measurements will give a baseline in response to chemical stimuli. One can then combine the chemical stimulation with optogenetic stimulation of the anterior mechanosensory neurons responsible for escape response and monitor the calcium transients in the same 136 interneurons. I expect a modulation of the calcium response based on the addition of an opposing sensation (attractive vs. repulsive) as the interneurons in the two sensory modalities have some overlap. Because one would use the blue light activated ChR2, the new red calcium indicator RCaMP (Looger, Janelia Farm) could be simultaneously used. To monitor Ca++ fluorescence and optogenetically stimulate neurons, one would use a similar illumination scheme described earlier. I have outlined a few techniques for use in dissection of neural circuits in C. elegans. Other model organisms such as D. melanogaster as well as cultured cells are ideally suited for similar studies of neural circuits as outlined in this section. The future directions outlined will yield new technologies for optogenetic illumination, and by combining those with calcium imaging and microfluidics very sophisticated experiments can be performed dissecting neural circuits and sensory integration in C. elegans. Using the technologies described in this thesis and the follow-up technology and experiments described in this chapter would give new insight into the neural basis of behavior, the processing of neural circuits, and the integration of sensory signals. 137 APENDIX A PUBLICATIONS AND OTHER SCIENTIFIC ACTIVITIES JOURNAL PUBLICATIONS Matthew M. Crane, Peri Kurchan, Jeffrey N. Stirman, Kang Shen, and Hang Lu, “Automated and self-directed forward genetic screening of C. elegans using computer vision and microfluidics”. In preparation. Steven J. Husson, Jana F. Liewald, Jeffrey N. Stirman, Hang Lu, and Alexander Gottschalk, “Microbial light-activatable proton pumps as circuit breakers to dissect neuronal networks in C. elegans”. In review. Steven J. Husson, Wagner Steuer Costa, Jeffrey N. Stirman, Joseph D. Watson, W. Clay Spencer, Millet Treinin, David M. Miller, Hang Lu, and Alexander Gottschalk, “Optogenetic analysis of a nociceptor neuron and network reveals modulatory ion channels acting downstream of nociceptive sensors”. In review. John F. Nahabedian, Hiroshi Qadota, Jeffrey N. Stirman, Hang Lu, and Guy Benian, “A New Quantitative Assay of C. elegans Locomotion: Identification of Phenotypes for Mutants in Genes Encoding Muscle Focal Adhesion Components”. Methods. Accepted. Jeffrey N .Stirman, Matthew M. Crane, Steven J. Husson, Alexander Gottschalk, and Hang Lu, “A Multispectral Optical Illumination System with Precise Spatiotemporal Control for the Manipulation of Optogenetic Reagents”. Nature Protocols. In press. Hiroshi Qadota, Takayuki Miyauchi, John F. Nahabedian, Jeffrey N. Stirman, Hang Lu, Mutsuki Amano, Guy M. Benian and Kozo Kaibuchi, "PKN-1, a homologue of mammalian PKN, is involved in the regulation of muscle contraction and force transmission in C. elegans". Journal of Molecular Biology, 2011, 407: 222-231. J.N. Stirman, Matthew M. Crane, Steven J. Husson, Sabastian Wabnig, Christian Schultheis, Alexander Gottschalk, and Hang Lu, “Real-time multimodal optical control of individual neurons and muscles in freely behaving Caenorhabditis elegans”. Nature Methods, 2011, 8: 153-U78. Gary L. Moulder, Gina H. Cremona, Janet Duerr, Jeffrey N. Stirman, Stephen D. Fields, Wendy Martin, Hiroshi Qadota, Guy M. Benian, Hang Lu and Robert J. Barstead, "[alpha]-Actinin Is Required for the Proper Assembly of Z-Disk/FocalAdhesion-Like Structures and for Efficient Locomotion in Caenorhabditis elegans". Journal of Molecular Biology, 2010, 403: 516-528. J. N. Stirman, M. Brauner, A. Gottschalk and H. Lu, "High-throughput study of synaptic transmission at the neuromuscular junction enabled by optogenetics and microfluidics". Journal of Neuroscience Methods, 2010, 191: 90-93. 138 M. M. Crane, K. Chung, J. Stirman and H. Lu, "Microfluidics-enabled phenotyping, imaging, and screening of multicellular organisms". Lab on a Chip, 2010, 10: 1509-1517. PRESENTATIONS (presenter is underlined) ORAL Jeffrey N. Stirman and Hang Lu. “Monitoring and manipulating C. elegans Behavior – Workshop”. 18th International C. elegans Meeting, 2011. (Invited presentation). Steven J. Husson, Wagner Steuer Costa, Jeffrey N. Stirman, Joseph D. Watson, W. Clay Spencer, Millet Treinin, David M. Miller III, Hang Lu, Alexander Gottschalk. “Optogenetics dissection of the nociceptive PVD network: RNAi of PVD-specific genes reveals TRP channels as signal amplifiers”. 18th International C. elegans Meeting, 2011. Matthew M. Crane, Jeffrey N. Stirman, and Hang Lu. “Autonomous synaptogenesis screening via SVM-generated quantitative phenotypical space”. Cold Spring Harbor Lab – Automated Imaging and High Throughout Phenotyping, 2010. Husson S.J., Steuer Costa W., Stirman, J.N., Watson J.D., Spencer, W.C., Miller D.M., Treinin M., Lu H. Gottschalk A. “Optogenetics-assisted functional analysis of a PVD-mediated nociceptive neuronal network in Caenorhabditis elegans”. European Worm Neurobiology Meeting, 2010. Husson S.J., Steuer Costa W., Stirman, J.N., Watson J.D., Spencer, W.C., Miller D.M., Treinin M., Lu H., Gottschalk A. “Optogenetics-assisted functional analysis of a harsh touch nociceptive neuronal network in Caenorhabditis elegans”. Structure and Function of Neuronal Circuits, EMBO/EMBL symposium, 2010. Jeffrey N. Stirman, Matthew M. Crane, Alexander Gottschalk, and Hang Lu. “Spatial and temporal optical activation of neurons in freely behaving worms”. Neuroscience Topic Worm Meeting, 2010. Jeffrey N. Stirman, Alexander Gottschalk, and Hang Lu. “High-Throughput Study of Synaptic Transmission Enabled by Optogenetics and Microfluidics”. Neuroscience Topic Worm Meeting, 2010. Jeffrey N. Stirman and Hang Lu. “Microfluidic Platforms for Neuroscience and Systems Biology”. TRAM-Method Seminar Series, Biocenter / Campus Riedberg, Max-von-Laue-Str. 9, Frankfurt a.M. 2010. (Invited presentation). Kwanghun Chung, Jeffrey Stirman, Matthew Crane and Hang Lu. “Large-Scale In Vivo Genetic Screens and Laser Microsurgery Enabled by Automated Microsystems”. Association for Laboratory Automation, 2009. 139 POSTER Steven J. Husson, Jana F. Liewald, Jeffrey N. Stirman, Hang Lu, Alexander Gottschalk. “Microbial proton pumps as hyperpolarizers complement the optogenetics toolbox in Caenorhabditis elegans”. 18th International C. elegans Meeting, 2011. Matthew M. Crane, Peri T. Kurshan, George J. Wang, Jeffrey N. Stirman, Kang Shen, Hang Lu. “Computer automated forward-genetic screening using sub-cellular fluorescent reporters”. 18th International C. elegans Meeting, 2011. Sebastian Wabnig, Jasper Akerboom, Jeffrey N. Stirman, Hang Lu, Loren Looger, Alexander Gottschalk. “Addition of the genetically encoded, red-shifted Ca2+ sensor RCaMP to the C. elegans optogenetic toolbox”. 18th International C. elegans Meeting, 2011. Karen Erbguth, Matthias Prigge, Franziska Schneider, Jeffrey N. Stirman, Hang Lu, Peter Hegemann, Alexander Gottschalk. “Red-shifted optical excitation with a Chlamydomonas / Volvox hybrid Channelrhodopsin”. 18th International C. elegans Meeting, 2011. J.N. Stirman, Matthew M. Crane, Steven J. Husson, Christian Schultheis, Alexander Gottschalk, and Hang Lu, “Real-time multimodal optical control of individual neurons and muscles in freely behaving Caenorhabditis elegans”. Georgia Tech Research and Innovation Conference, 2011. J.N. Stirman, Matthew M. Crane, Steven J. Husson, Christian Schultheis, Alexander Gottschalk, and Hang Lu, “Real-time multimodal optical control of individual neurons and muscles in freely behaving Caenorhabditis elegans”. Clayton State WI2STEM conference on C. elegans and other model organisms, 2010. (Best Poster – Graduate Division) Gina Cremona, Jeffrey Stirman, and Hang Lu. “Quantitative Phenotyping of C. elegans in an Automated Microsystem”. Twelfth International Conference on Miniaturized Systems for Chemistry and Life Sciences, 2008. PATENT APPLICATIONS Jeffrey Stirman, Matthew Crane, and Hang Lu, “Real-time multi-spectral optical illumination of model organisms or cells”. US Patent Office, Provisional Patent, GTRC #5514, filed January 14, 2011. 140 APPENDIX B DETAILED PROCEDURE FOR PROJECTOR MODIFICATION, OPTICAL SYSTEM CONSTRUCTION, AND SOFTWARE Modification of the LCD projector ● TIMING ~2.5 h ! CAUTION All steps in this section should be performed with the projector unplugged and after at least 30 minutes if the projector was previously on as the bulb is very hot. It is also suggested that one works on an anti-static mat. 1| Begin by removing the frame around the projector lens to be able to remove lens. For the Hitachi CP-X605, there are two screws on the bottom of the frame, and two additional screws that can be found by opening the lens shift cover on the top of the case that must be unscrewed. After removing the frame, remove the entire zoom lens by pressing up on the lens release latch (Fig. 3.4a) and twisting the lens counter clockwise. Carefully set the lens aside. ∆ CRITICAL STEP Use care when handling the projector lens to ensure it is not damaged or scratched as it will be used later. ∆ CRITICAL STEP for some projectors, the lens assembly is not able to be removed. For those projectors, this step can be omitted. 2| Remove the screws on the back of the projector case so that the internal circuit boards can later be removed. There are ten such screws on the back of the Hitachi CP-X605 projector to be removed. 3| Locate and remove the screws on the bottom of the projector which connect the main body and the top of the projector case. The Hitachi CP-X605 has nine screws on the bottom of the projector (Fig. 3.4b) holding the case together. Remove the screws and save for later reassembly. 4| Return projector to the upright position. Carefully begin to lift off the top portion of the case. Angle the cover back and look inside to locate connector cables connecting 141 the top control panel to the main circuit board (two cables for the Hitachi CP-X605). Disconnect these cables from the main unit (Fig. 3.4c). The case cover can now be completely removed and set aside. ? TROUBLESHOOTING 5| The topmost metal casing is the LAN board. Disconnect the large set of blue wires connecting the LAN board to the main circuit board. Locate the four screws holding the LAN board down and unscrew. There is also a black grounding wire connected to the left side of the LAN board that should be disconnected. The LAN board can now be carefully removed and set aside (Fig. 3.4d). ∆ CRITICAL STEP We suggest that a photograph of the projector and the location of the wires is obtained before disconnecting to assist with accurate reassembly later. 6| You will now be able to see all the wires connecting to the main board as well as the three LCD panel connections (Fig. 3.4e). Disconnect all wires taking note where the wires were connected. Unlatch the LCD panel cable connector and slide out the LCD panel cable from the main board (Fig. 3.4f). There are three screws on the right side of the main board which need to be removed as well as an additional one on the back left of the metal bracket connected to the main board. ∆ CRITICAL STEP We suggest that a photograph of the projector and the location of the wires is obtained before disconnecting in order to assist with accurate reassembly later. 7| Remove the screws on the cover to the dynamic iris (Fig. 3.4g). Remove the cover and then slide out the dynamic iris unit. Disconnect the green grounding wire. 8| The cover to the main optical train of the projector must now be removed. The Hitachi CP-X605 has four screws holding down the cover (Fig. 3.4h) to be removed, as well as two plastic brackets (Fig. 3.4h) that can be unlatched with a flathead screwdriver or spatula. Remove the cover. 142 ∆ CRITICAL STEP Connected to the optical train cover (removed in this step) are three polarizing filters (Fig. 3.4i), which are positioned directly in front of the LCD panel when the cover is in place. Care should be taken not to damage these filters. These filters have also been aligned at the factory (rotationally) to maximize the contrast of the projector. These filters should not be rotated or altered. 9| The internal optical path can now be seen; the left path is for red, the middle for green, and the right for blue (Fig. 3.4j). Locations of the insertion of the custom filters are indicated with boxes in Figure 3.4k. Insert the pre-cut optical filters (dimensions for filters for the Hitachi CP-X605 can be found in Table 4.1) into the appropriate locations. The filters should be secured to the case with high-temperature epoxy. Alternatively, the filters can be temporarily secured from the top side with electrical tape. ? TROUBLESHOOTING ∆ CRITICAL STEP All optical components should be handled with care. 10| Once the filters have been successfully placed and secured (Fig. 3.4k), the projector can be reassembled by reversing steps 4 to 9. ∆ CRITICAL STEP For the projector to function correctly, all cables must be reattached in the original position; otherwise an error will occur when powering on the projector. Refer to the photographs acquired in the previous steps for accurate reassembly. 11| To remove the projection lens from the lens assembly, remove the screws attached to the zoom ring (four screws for the Hitachi CP-X605). ∆ CRITICAL STEP For those projectors where the lens assembly cannot be removed, the projection lens can simply be removed by completely unscrewing counterclockwise. 12| Slide the zoom ring back as far as possible and rotate to see the small inner screws (Fig. 3.4l). These are stops for the projection focus lens preventing it from being fully 143 unscrewed. Loosen these screws until the diverging projection lens can be fully rotated counterclockwise and off the zoom lens assembly. 13| Reattach the zoom ring. The zoom lens should now be reinserted into the projector by lining up the notches and rotating clockwise until a click is heard. ∆ CRITICAL STEP The projection lens portion of the zoom lens assembly must be removed for optimal performance. However, the diverging projection lens can be reinserted to use the projector in its original function (magnify and project an image). Adjustment of the projector settings ● TIMING ~0.25 h 14| Reinsert the projection lens. Turn on the projector and focus on a wall or a screen. ? TROUBLESHOOTING 15| The settings of the projector must be set to ensure optimal performance. Follow the manufacturers’ user’s manual instructions and set the following: All keystone setting should be zero offset Brightness, contrast, color, and tint should be set to the middle position (usually default) (+0 on the Hitachi CP-X605). The active iris should be turned off. 16| Adjust the vertical and horizontal lens shift setting to a neutral (zero offset) position by following manufacturers’ user’s manual instructions. 17| Remove the projection lens by unscrewing counterclockwise. Assembly of projector and microscope system ● TIMING ~3 h 18| These steps describe the process for modification of an inverted microscope and integration of the projector into the system. Either an infinity corrected microscope (A) or 160mm fixed tube length microscope (B) can be used for these steps. (A) Assembly of projector and microscope system (Infinity corrected) 144 (i) Remove the epifluorescent optical train from the inverted fluorescent microscope. Follow the manufacturers’ user’s manual for schematics and description. ∆ CRITICAL STEP All optical components should be handled with care. Save all optical components, noting locations from which they came for later reassembly if necessary. (ii) Place the accessory tube lens in the epifluorescent optical path near the filter cube centering it along the optical axis. (iii) Remove the transmitted light optical filter. With the filter cube in place (with the dichroic and emission filter, but no excitation filter as it has been inserted internally in the projector), place the stage micrometer calibration slide on the microscope stage and bring the slide into focus. (iv) Turn up the transmitted light intensity. Using a piece of paper, find the position along the epifluorescent optical path where the image of the micrometer comes into sharp focus. This should be at the back focal plane of the accessory tube lens. (v) Place the projector such that the primary projector image coincides with the location of the focal plane of the accessory tube lens determined in step 18A(iv) (Fig. 3.2b). ? TROUBLESHOOTING (B) Assembly of projector and microscope system (160 mm) (i) Remove the epifluorescent optical train from the inverted fluorescent microscope. Follow the manufacturers’ user’s manual for schematics and description. ∆ CRITICAL STEP All optical components should be handled with care. Save all optical components, noting locations from which they came for later reassembly if necessary. (ii) Remove the transmitted light optical filter. With the filter cube in place (with the dichroic and emission filter, but no excitation filter), place the stage micrometer calibration slide on the microscope stage and bring the slide into focus. 145 (iii) Turn up the transmitted light intensity. Using a piece of paper, find the position along the epifluorescent optical path where the image of the micrometer comes into sharp focus. This will be at the back focal plane of the objective, located 160 mm from the nosepiece opening. This will be the location IP160mm in Figure 3.2c. (iv) Place the relay lens pair such that the edge of the lens housing is 92 mm (the working distance of the lens pair) from the position found in the previous step. This will position the back focal plane of the lens pair at the back focal plane of the objective (Fig. 3.2c). (v) Place the projector such that the primary projector image is 92 mm from the front edge of the lens tube pair. This will place the primary projector image at the front focal plane of the lens pair (Fig. 3.2c). ? TROUBLESHOOTING Computer setup and alignment of system ● TIMING ~1 h 19| With the projector connected to the computer, adjust the display settings to have dual display capabilities: extending the desktop onto the second monitor (projector), not cloning the primary monitor. The projector should be configured as the secondary monitor and should be set to utilize the full resolution of the projector (Hitachi CPX605 – 1024 x 768). The desktop should also be set to use a solid black background therefore not projecting any unwanted image to the sample. 20| Place a piece of fluorescent paper or slide glass on the microscope stage and bring it into focus through the eyepieces or camera. 21| With the projector turned on, bring up an image on the “second monitor” (projector) from the computer. A checkerboard pattern will work well for this step. Without adjusting the focus of the microscope, bring the pattern into focus on the paper by adjusting the position of the projector and lens. Gross adjustments can be made by observing the pattern on the paper by eye. 146 ? TROUBLESHOOTING 22| To make fine adjustments in the projector position and focus, begin by placing a highly reflective material on the microscope stage; this can be a front coated silver mirror. Also, a blank NGM plate works well for this purpose. Bring the front surface of the reflective material into focus by focusing the microscope on an imperfection or dust on the surface. 23| With the projector on and projecting an image, make further adjustments of the X,Y, and Z position of the projector and lens system to bring the projected image into sharp focus. These positions should be noted and the lens and projector system can be fixed. ∆ CRITICAL STEP This is a critical step to ensure the projected image is focused on the sample of interest. When the sample of interest is focused through the microscope, the projector image will be demagnified and focused on the sample. If the system is not moved, these focusing steps need not be repeated, although it is suggested doing once in a while (weekly) to ensure proper alignment. Small offsets in the axial location of the lens and projector from the ideal locations (Fig. 3.2b, c) will make only slight alterations in the amount of demagnification. Example applications: Methods of illumination control 24| These steps provide three different approaches for performing targeted illumination with the constructed system: option A is suitable for rapid evaluation, single “point” white illumination and human feedback; option B is suitable for multi-color static pattern generation or pre-defined pattern generation and projection with no feedback; and option B utilizes custom software[117] for real-time automated illumination of samples that may vary in space and time. (A) Simple illumination using a mouse pointer ● TIMING ~0.10 h 147 (i) Place the sample on the microscope and bring it into focus. (ii) Move the mouse cursor from the primary monitor to the secondary monitor (projector). A small point of light moving in the area of the sample will be observed as the mouse is translocated. The mouse can be placed over the intended target area by observing through the eyepieces or camera. In this way one can rapidly evaluate the constructed illumination system as well as qualitatively assess the reaction of the sample. (B) Static or pre-defined dynamic illumination using Microsoft PowerPoint ● TIMING ~0.25 h (i) Create a new presentation in Microsoft PowerPoint. Set the background of the slides to solid fill with black as the color. (ii) Draw the desired geometrical shape. Set the RGB color of the object by rightclicking the object, select “Format shape…”, and then select “Solid Fill” under the “Fill” tab. Under “Color”, select “More colors…” and the “Custom” tab. In this window the specific values for the Red, Green, and Blue intensities can be set. For example, Zhang et al. used a ring of blue light (B=255; G=0; R=0) to confine D. Melanogaster larvae expressing ChR2 in nociceptive neurons[148]. (iii) To create a time-series sequence of patterns, create patterns for each time point and use the “Custom Animations” option for determination of the transition times. (iv) Place the sample on the microscope and bring it into focus. (v) To project the created objects or animations, set the presentation to display on the secondary monitor and begin the slide show. (C) Selected area illumination of C. elegans using custom software[117] ● TIMING ~0.25 h (i) Open the “Beamer alignment” program and start with the play button. 148 CRITICAL STEP These steps describe using the custom software written for our specific camera and motorized stage. In order to adapt it to other cameras and stages, a few alterations must be made to the software. These are discussed in more detail in the supporting documentation of the software[117]. ∆ CRITICAL STEP Steps 24C(i)-(iv) are critical calibration steps that must be performed before using the Main Program. Inaccurate alignment and calibration could cause mislocalized illumination. These steps must be performed on a regular basis (e.g. daily) to ensure accurate calibration of the system. ? TROUBLESHOOTING (ii) Place a highly reflective material on the microscope stage; this can be a front coated silver mirror or a blank NGM plate. Bring the front surface of the reflective material into focus by focusing the microscope on an imperfection or dust on the surface. (iii) A window will open on the secondary monitor (projector) displaying a cross pattern. Adjust the location of the projector such that the cross pattern is located roughly in the center of the field-of-view of the microscope. (iv) Adjust the rotation of the camera such that the cross pattern lines are perfectly horizontal and vertical. There are alignment marks on the image display to aid in this step. (v) Repeat steps 24C(ii) and (iii) until the cross pattern is centered and horizontal/vertical. (vi) Hit continue to initiate calibration. At this step, a sequence of 20 solid circles will be projected and the corresponding location will be recorded. The calibration parameters for translation from camera coordinates to projector coordinates will be saved. (vii) Pick an animal onto a blank 6 cm NGM plate. 149 (viii) Allow the animal to freely crawl for approximately 25 minutes on the plate to allow the animal to recover from the mechanical disturbance of picking and adjust to the lack of food[249]. (ix) Open the main program, “Color illumination and tracking”, and start with the play button. ? TROUBLESHOOTING (x) Select the location and name of the video to be saved when prompted. (xi) With the transmitted light filter in place and the transmitted light turned on, invert the plate and place it on the custom microscope stage. Locate the animal and center it within the field of view and bring it into focus. (xii) Adjust the bright-field illumination intensity such that the binary image is an accurate representation of the animal (Fig. 2c). (xiii) With the animal in the center of the field-of-view, select the “TRACK” button to begin automated tracking of the animal. (xiv) In the upper right of the program interface, there is a block labeled “Illumination Control”. In this block, the number of segments and location of the segment divisions should be set (Fig. 2d, e). Additionally, within this block set the values (0-255) of the individual red, green, and blue light, and select (turn on) the segments to illuminate. Finally, set the timing to “Timed” and adjust the illumination duration, or alternatively set to “Untimed”. These setting can be adjusted with the slide bar set to “Simple”. More complicated illumination patterns can be set with the “Scheduled” option (see “Read Me – Program Overview” in Supplementary Software from Reference [117]). (xv) In order to begin the segmentation (Fig. 2d, e), select the “Thin and Segment” option. The small white dot in the “Backbone” display should be located at the animal’s head. If this is incorrect, press the “Flip HT” button. 150 (xvi) With the options set as desired, begin the video recording with the “Record?” button. (xvii) Begin the illumination by clicking “Illuminate!”. (xviii) When completed, stop the video acquisition to save the movie and enter the name for the next video when prompted. (xix) Stop the program with “Complete Stop”. (xx) To implement ‘Head Encode’ on the saved video, open the “Head encode” program and start with the play button. (xxi) Place the mouse cursor over the head of the animal and hit “Enter” button on keyboard. Follow the position of the head with the cursor as video is played. The encoded video will automatically be saved with the name of the original file plus “-HE”. (xxii) To analyze the completed video, open the “Complete video analysis” program. (xxiii) Enter the calibration value for micrometers per pixel (at full resolution) and select the binning of the camera used. For the data obtained [117], we measured 3.3 µm per pixel and used a 2x2 binning, thus providing a calibration of 6.6 µm per pixel for our recorded videos. (xxiv) Start program with the play button. (xxv) When prompted, select video(s) (“*-HE.avi”) to be analyzed. The data based on the video will be saved to a text file with the extension “*-data.txt”. The data order of the columns is time, illumination, level, length of animal, velocity, average 2-pt angles, number of 2-pt angles, 2-pt angles, average 3-pt angles, number of 3-pt angles, 3-pt angles, and head-to-tail distance. ? TROUBLESHOOTING See Table 1 for troubleshooting advice. 151 ● TIMING Steps 1-13, Modification of the LCD projector: 2.5 hrs Steps 14-17, Adjustment of the projector settings: 0.25 hrs Step 18A, Assembly of projector and microscope for infinity corrected microscope: 3 hrs Steps 18B, Assembly of projector and microscope for 160 mm microscope: 3 hrs Steps 19-23, Alignments of the system: 1 hr Step 24A: Simple illumination using a mouse pointer: 0.10 hr Step 24B: Static or pre-defined dynamic illumination using PowerPoint: 0.25 hr Step 24C: Selected area illumination of C. elegans using custom software: 0.25 hr 152 TABLE B.1 | Troubleshooting table. Step Problem Possible reason 4 Case cover will not Not all screws have slide off been removed 9 Filters will not fit Mis-sized filter 14 Projector will not turn on Internal disconnected cables Dim image Color is missing/absent Other errors associated with projector Bulb is near the end of life Disconnected LCD panel cable Shifted or broken filter Color or image is striped Unsecured/loose LCD panel cable 18.A.v Insufficient space to position the projector Accessory tube lens focal plane located within body of microscope 18.B.v Insufficient space to position the projector 21 Image never focuses Program gives error upon start Relay lens focal plane located within body of microscope Mis-positioned lenses Altered camera from what program 24.C.i 153 Solution Check both the back and the bottom of the projector to ensure all necessary screws have been removed Measure the opening at the location for the filters and check dimension of the custom filters. Alter the filters as necessary to fit. If all cables were not correctly connected when reassembling projector, then unit will not power up. Take projector apart and ensure all cables are connected. Check error blinking codes and consult user’s manual for solution Check projector for bulb hours and consult user’s manual on replacing Disassemble projector to ensure that LCD panel cables have been securely reattached Disassemble projector and check all inserted filters to check if they have shifted or possibly broken. Replace if necessary. Disassemble projector to ensure that LCD panel cables have been securely reattached Extend the accessory tube lens to the rear of the microscope allowing the focal plane to be located outside the body of the microscope Select a matched lens pair of greater focal length Check that all lenses are located as described in Figure 1. Alter the LabVIEW code to communicate with the specific was written for 24.C.ix Program gives error upon start Altered camera from what program was written for Altered motorized stage from what program was written for 154 camera used. See also supporting documentation of Ref. 12. Alter the LabVIEW code to communicate with the specific camera used. See also supporting documentation of Ref. 12. Alter the LabVIEW code to communicate with the specific stage used. See also supporting documentation of Ref. 12. APPENDIX C ADDITIONAL CONTRIBUTIONS In addition to the research presented in the preceding chapters, there was some additional work of interest. Dr. Guy Benian’s (Emory University, Department of Pathology) research focuses on muscle physiology and utilizes the nematode C. elegans for his investigations. Over the years he has discovered a number of mutants defective in some aspect of their musculature. Though these mutants have altered phenotypes when looking muscle structure (electron microscopy and immunohistochemistry), no easily observable behavioral phenotype was observed. Along with Gina Cremona (Lu lab, Georgia Institute of Technology) and Dr. Hang Lu, we developed a quantitative assay that could distinguish many mutants from wild-type. In this assay, animals are prodded on their head with a platinum wire: this excites the harsh touch escape response and causes the animal to rapidly reverse. By quantitatively measuring the maximal bending amplitude upon reversal, animals mutated in some musculature associated proteins could be distinguished from wild-type [250]. Because many behavioral assays are end-point assays or primarily observe forward locomotion, we believe the subtleties of the mutants were previously overlooked. In a reversal, we believe not only are different sets of muscles engaged in a different pattern, but also due to the rapid escape response the musculature is more heavily engaged. For these reasons we believe the defects are illuminated with this assay. The software discussed in Chapter 4.6 was used to measure the length of the animal as well as the amplitude, and from this the amplitude/length (A/L) ratio was calculated (Fig.6.1). Though simple, this assay has proven to be very powerful in finding mutants both deficient in their ability to bend as well as hyper-flexible [250-252]. 155 Figure C.1 Quantitative measurements of bending amplitude upon reversal [252]. (a) Bright-field image of C. elegans undergoing a reversal. (b) Binary image calculated from (a). (c) Backbone spline was found from the binary image and from this the length (L) was calculated. (d) The amplitude (A) was found by measuring the maximum straightline distance from a line connecting the head and tail to the backbone. (e) Ratio of amplitude to length (A/L) was measured for the time of reversal (gray box) and the maximum (A/L) was found. These values (A/LMAX) were compared between wild-type and mutants. Another aspect of the research presented in this thesis was the transfer of technology. In many of the projects we undertake in Dr. Lu’s laboratory, we work closely with collaborators around the United States and internationally. As we develop 156 technologies to advance the state of the art in neuroscience and aid our collaborators in their research, they often wish to have the technology fully accessible and available in their own lab. As such, much of our time is spent insuring the hardware and software we develop is easily used by others, often non-engineers and non-experts in microfluidics, imaging, or programming. I have been very grateful to work with Dr. Gottschalk and his research group, and have the opportunity to visit his lab (Frankfurt, Germany) twice, each for a month. During these visits I was responsible for transferring the technologies discussed in Chapters 2-5 and establishing the systems along with training students in the lab on proper usage and troubleshooting. Over the past few years of developing and transferring the technology, I have had significant interaction with the collaborators discussing alterations to the hardware and software to make it more user-friendly and accessible. The final software represents multiple iterations adding additional functionality and making the GUI easy to operate. Furthermore, several “user guides” were made to explain the usage of both the microfluidics and the illumination system. The microfluidic master control box (Chapter 2.7) that I designed and constructed was a direct consequence of the need to have a user-friendly end product that could be given to our collaborators all over the world. This represents a significant improvement on the initial loose collection of unreliable valves, wires, tubing and often failing regulators: technologies so unreliable that transfer of early systems would be nearly impossible. Although the development of the discussed technologies is very satisfying, I have found the transfer of the technologies to others who find them valuable to be equally satisfying and perhaps a more telling descriptor of the impact and contribution of this thesis research. 157 REFERENCES 1. 2. 3. Brenner, S., Genetics of Caenorhabditis elegans. Genetics, 1974. 77(1): p. 71-94. Brenner, S., Autobiography. nobelprize.org, (accessed 9-25-2011). Cassada, R.C. and R.L. Russell, The dauerlarva, a post-embryonic developmental variant of the nematode Caenorhabditis elegans. Developmental Biology, 1975. 46(2): p. 326-342. 4. Byerly, L., R.C. Cassada, and R.L. Russell, The life cycle of the nematode Caenorhabditis elegans: I. Wild-type growth and reproduction. Developmental Biology, 1976. 51(1): p. 23-33. 5. Sulston, J.E. and H.R. Horvitz, Post-embryonic cell lineages of the nematode, Caenorhabditis elegans. Developmental Biology, 1977. 56(1): p. 110-156. 6. White, J.G., Chapter 4: The Anatomy, in "The Nematode Caenorhabditis Elegans", ed. W.B. Wood. 1988: Cold Spring Harbor Laboratory. 7. Sulston, J.E., et al., The embryonic cell lineage of the nematode Caenorhabditis elegans. Developmental Biology, 1983. 100(1): p. 64-119. 8. Glucksmann, A., Cell deaths in normal vertebrate ontogeny. Biological Reviews, 1951. 26(1): p. 59-86. 9. Lockshin, R.A. and C.M. Williams, Programmed cell death: Endocrine potentiation of the breakdown of the intersegmental muscles of silkmoths. Journal of Insect Physiology, 1964. 10(4): p. 643-649. 10. Saunders, J.W., Death in Embryonic Systems. Science, 1966. 154(3749): p. 604612. 11. Avery, L. and H.R. Horvitz, A cell that dies during wild-type C. elegans development can function as a neuron in a ced-3 mutant. Cell, 1987. 51(6): p. 1071-1078. 12. Fire, A., et al., Potent and specific genetic interference by double-stranded RNA in Caenorhabditis elegans. Nature, 1998. 391(6669): p. 806-811. 13. Hannon, G.J., RNA interference. Nature, 2002. 418(6894): p. 244-251. 14. Vanderkrol, A.R., et al., Inhibition of flower pigmentation by antisense chs genes - promoter and minimal sequence requirements for the antisense effect Plant Molecular Biology, 1990. 14(4): p. 457-466. 15. Napoli, C., C. Lemieux, and R. Jorgensen, Introduction of a chimeric chalcone synthase gene into petunia results in reversible co-suppression of homologous genes in trans. Plant Cell, 1990. 2(4): p. 279-289. 16. Ruiz, M.T., O. Voinnet, and D.C. Baulcombe, Initiation and maintenance of virus-induced gene silencing. Plant Cell, 1998. 10(6): p. 937-946. 17. Angell, S.M. and D.C. Baulcombe, Consistent gene silencing in transgenic plants expressing a replicating potato virus X RNA. Embo Journal, 1997. 16(12): p. 3675-3684. 18. Dougherty, W.G., et al., RNA-mediated virus-resistance in transgenic plants exploitation of a cellular pathway possibly involved in RNA degradation Molecular Plant-Microbe Interactions, 1994. 7(5): p. 544-552. 19. Kumagai, M.H., et al., Cytoplasmic inhibition of carotenoid biosynthesis with virus-derived RNA. Proceedings of the National Academy of Sciences of the United States of America, 1995. 92(5): p. 1679-1683. 158 20. 21. 22. 23. 24. 25. 26. 27. 28. 29. 30. 31. 32. 33. 34. 35. 36. 37. 38. 39. Romano, N. and G. Macino, Quelling - transient inactivation of gene-expression in Neurospora crassa by transformation with homologous sequences. Molecular Microbiology, 1992. 6(22): p. 3343-3353. Fire, A., et al., Production of antisense RNA leads to effective and specificinhibition of gene-expression in C. elegans muscle. Development, 1991. 113(2): p. 503-514. Dernburg, A.F., et al., Transgene-mediated cosuppression in the C. elegans germ line. Genes & Development, 2000. 14(13): p. 1578-1583. PalBhadra, M., U. Bhadra, and J.A. Birchler, Cosuppression in Drosophila: Gene silencing of Alcohol dehydrogenase by white-Adh transgenes is Polycomb dependent. Cell, 1997. 90(3): p. 479-490. Kamath, R.S. and J. Ahringer, Genorne-wide RNAi screening in Caenorhabditis elegans. Methods, 2003. 30(4): p. 313-321. Boutros, M., et al., Genome-wide RNAi analysis of growth and viability in Drosophila cells. Science, 2004. 303(5659): p. 832-835. Silva, J.M., et al., RNA interference microarrays: High-throughput loss-offunction genetics in mammalian cells. Proceedings of the National Academy of Sciences of the United States of America, 2004. 101(17): p. 6548-6552. Ahringer (ed.), J., Reverse genetics, in WormBook, T.C.e.R. Community, Editor, WormBook. Timmons, L. and A. Fire, Specific interference by ingested dsRNA. Nature, 1998. 395(6705): p. 854-854. Timmons, L., D.L. Court, and A. Fire, Ingestion of bacterially expressed dsRNAs can produce specific and potent genetic interference in Caenorhabditis elegans. Gene, 2001. 263(1-2): p. 103-112. Tabara, H., A. Grishok, and C.C. Mello, RNAi in C. elegans: Soaking in the genome sequence. Science, 1998. 282(5388): p. 430-431. Ashrafi, K., et al., Genome-wide RNAi analysis of Caenorhabditis elegans fat regulatory genes. Nature, 2003. 421(6920): p. 268-272. Hamilton, B., et al., A systematic RNAi screen for longevity genes in C. elegans. Genes & Development, 2005. 19(13): p. 1544-1555. Kim, J.K., et al., Functional genomic analysis of RNA interference in C. elegans. Science, 2005. 308(5725): p. 1164-1167. Maeda, I., et al., Large-scale analysis of gene function in Caenorhabditis elegans by high-throughput RNAi. Current Biology, 2001. 11(3): p. 171-176. Pothof, J., et al., Identification of genes that protect the C. elegans genome against mutations by genome-wide RNAi. Genes & Development, 2003. 17(4): p. 443-448. Simmer, F., et al., Genome-wide RNAi of C. elegans using the hypersensitive rrf-3 strain reveals novel gene functions. Plos Biology, 2003. 1(1): p. 77-84. Sugimoto, A., High-throughput RNAi in Caenorhabditis elegans: genome-wide screens and functional genomics. Differentiation, 2004. 72(2-3): p. 81-91. Vastenhouw, N.L., et al., A genome-wide screen identifies 27 genes involved in transposon silencing in C. elegans. Current Biology, 2003. 13(15): p. 1311-1316. Zhang, S.L., et al., Genome-wide RNAi screen of Ca2+ influx identifies genes that regulate Ca2+ release-activated Ca2+ channel activity. Proceedings of the 159 40. 41. 42. 43. 44. 45. 46. 47. 48. 49. 50. 51. 52. 53. 54. 55. 56. 57. 58. National Academy of Sciences of the United States of America, 2006. 103(24): p. 9357-9362. Sieburth, D., et al., Systematic analysis of genes required for synapse structure and function. Nature, 2005. 436(7050): p. 510-517. Jorgensen, E.M. and S.E. Mango, The art and design of genetic screens: Caenorhabditis elegans. Nat Rev Genet, 2002. 3(5): p. 356-369. Prendergast, F.G. and K.G. Mann, Chemical and physical properties of aequorin and the green fluorescent protein isolated from Aequorea forskalea. Biochemistry, 1978. 17(17): p. 3448-3453. Tsien, R.Y., The green fluorescent protein. Annual Review of Biochemistry, 1998. 67(1): p. 509-544. Heim, R., A.B. Cubitt, and R.Y. Tsien, Improved green fluorescence. Nature, 1995. 373(6516): p. 663-664. Ormo, M., et al., Crystal Structure of the Aequorea victoria Green Fluorescent Protein. Science, 1996. 273(5280): p. 1392-1395. Campbell, R.E., et al., A monomeric red fluorescent protein. Proceedings of the National Academy of Sciences of the United States of America, 2002. 99(12): p. 7877-7882. Shaner, N.C., et al., Improved monomeric red, orange and yellow fluorescent proteins derived from Discosoma sp. red fluorescent protein. Nat Biotech, 2004. 22(12): p. 1567-1572. Shaner, N.C., P.A. Steinbach, and R.Y. Tsien, A guide to choosing fluorescent proteins. Nat Meth, 2005. 2(12): p. 905-909. Yuste, R., Fluorescence microscopy today. Nat Meth, 2005. 2(12): p. 902-904. Chudakov, D.M., S. Lukyanov, and K.A. Lukyanov, Fluorescent proteins as a toolkit for in vivo imaging. Trends in Biotechnology, 2005. 23(12): p. 605-613. Livet, J., et al., Transgenic strategies for combinatorial expression of fluorescent proteins in the nervous system. Nature, 2007. 450(7166): p. 56-62. Chalfie, M., et al., Green fluorescent protein as a marker for gene expression. Science, 1994. 263(5148): p. 802-805. Boulin, T., J.F. Etchberger, and O. Hobert, Reporter gene fusions, in WormBook, T.C.e.R. Community, Editor, WormBook. Fire, A., S.W. Harrison, and D. Dixon, A modular set of lacZ fusion vectors for studying gene expression in Caenorhabditis elegans. Gene, 1990. 93(2): p. 189198. Gregory J, P., Green fluorescent protein-- a bright idea for the study of bacterial protein localization. FEMS Microbiology Letters, 2001. 204(1): p. 9-18. Mello, C.C., et al., Efficient gene-transfer in C. elegans - extrachromosomal maintenance and integration of transforming sequences. Embo Journal, 1991. 10(12): p. 3959-3970. Evans (ed.), T.C., Transformation and microinjection, in WormBook, T.C.e.R. Community, Editor, WormBook. Horvitz, H.R., et al., A uniform genetic nomenclature for the nematode Caenorhabditis elegans. Molecular and General Genetics MGG, 1979. 175(2): p. 129-133. 160 59. 60. 61. 62. 63. 64. 65. 66. 67. 68. 69. 70. 71. 72. 73. 74. 75. 76. 77. 78. Hodgkin, J., Nomenclature. http://wiki.wormbase.org/index.php/UserGuide:Nomenclature, (accessed 10-122011). Consortium, C.e.S., Genome sequence of the nematode C. elegans: A platform for investigating biology. Science, 1998. 282(5396): p. 2012-2018. Ward, S., et al., Electron microscopical reconstruction of the anterior sensory anatomy of the nematode Caenorhabditis elegans. The Journal of Comparative Neurology, 1975. 160(3): p. 313-337. White, J., et al., The structure of the nervous-system of the nematode Caenorhabditis elegans. Philos Trans R Soc Lond B Biol Sci., 1986. 314(1165): p. 1-340. Bargmann, C.I. and L. Avery, Laser killing of cells in Caenorhabditis elegans. Methods in Cell Biology, Vol 48, 1995. 48: p. 225-250. Varshney, L.R., et al., Structural Properties of the Caenorhabditis elegans Neuronal Network. Plos Computational Biology, 2011. 7(2): p. 21. Durbin, R.M., Studies on the development and organisation of the nervous system of C. elegans. Ph.D. thesis. University of Cambridge, United Kingdom., 1987. Chalfie, M., et al., The neural circuit for touch sensitivity in Caenorhabditis elegans. Journal of Neuroscience, 1985. 5(4): p. 956-964. Hart, A.C., S. Sims, and J.M. Kaplan, Synaptic code for sensory modalities revealed by C. elegans GLR-1 glutamate receptor. Nature, 1995. 378(6552): p. 82-85. Hart (ed.), A.C., Behavior, in WormBook, T.C.e.R. Community, Editor, WormBook. Joshua M, K., Sensory signaling in Caenorhabditis elegans. Current Opinion in Neurobiology, 1996. 6(4): p. 494-499. Tobin, D.M. and C.I. Bargmann, Invertebrate nociception: Behaviors, neurons and molecules. Journal of Neurobiology, 2004. 61(1): p. 161-174. Bargmann, C.I., E. Hartwieg, and H.R. Horvitz, Odorant-selective genes and neurons mediate olfaction in C. elegans. Cell, 1993. 74(3): p. 515-527. Hart, A.C. and M.Y. Chao, Chapter 1:From Odors to Behaviors in Caenorhabditis elegans. The Neurobiology of Olfaction., 2010. Purves, D., Neuroscience. 4th ed. 2008, Sunderland, Mass.: Sinauer. xvii, 857, G16, IC-7, I-29 p. Liu, Q., G. Hollopeter, and E. Jorgensen, Graded synaptic transmission at the Caenorhabditis elegans neuromuscular junction. Proceedings of the National Academy of Sciences of the United States of America, 2009: p. 10823-10828. Lockery, S.R. and M.B. Goodman, The quest for action potentials in C. elegans neurons hits a plateau. Nat. Neurosci., 2009. 12(4): p. 377-378. Richmond, J., Synaptic function, in WormBook, T.C.e.R. Community, Editor, WormBook. Majewska, A. and R. Yuste, Topology of Gap Junction Networks in C. elegans. Journal of Theoretical Biology, 2001. 212(2): p. 155-167. Altun, Z.F., et al., High Resolution Map of Caenorhabditis elegans Gap Junction Proteins. Developmental Dynamics, 2009. 238(8): p. 1936-1950. 161 79. 80. 81. 82. 83. 84. 85. 86. 87. 88. 89. 90. 91. 92. 93. 94. 95. 96. 97. Fay, D., Genetic mapping and manipulation: Chapter 1-Introduction and basics, in WormBook, T.C.e.R. Community, Editor, WormBook. Priess, J.R. and J.N. Thomson, Cellular interactions in early C. elegans embryos. Cell, 1987. 48(2): p. 241-250. Avery, L. and R. Horvitz, Pharyngeal pumping continues after laser killing of the pharyngeal nervous-system of C. elegans. Neuron, 1989. 3(4): p. 473-485. Sulston, J.E. and J.G. White, Regulation and cell autonomy during postembryonic development of Caenorhabditis elegans. Developmental Biology, 1980. 78(2): p. 577-597. Bargmann, C.I. and H.R. Horvitz, Chemosensory neurons with overlapping functions direct chemotaxis to multiple chemicals in C. elegans. Neuron, 1991. 7(5): p. 729-742. Bargmann, C.I. and H.R. Horvitz, Control of larval development by chemosensory neurons in Caenorhabditis elegans. Science, 1991. 251(4998): p. 1243-1246. Schnabel, R., Autonomy and nonautonomy in cell fate specification of muscle in the Caenorhabditis elegans embryo - a reciprocal induction. Science, 1994. 263(5152): p. 1449-1452. Harbinder, S., et al., Genetically targeted cell disruption in Caenorhabditis elegans. Proceedings of the National Academy of Sciences of the United States of America, 1997. 94(24): p. 13128-13133. Goodman, M.B., et al., Active Currents Regulate Sensitivity and Dynamic Range in C. elegans Neurons. Neuron, 1998. 20(4): p. 763-772. Raizen, D.M. and L. Avery, Electrical activity and behavior in the pharynx of Caenorhabditis elegans. Neuron, 1994. 12(3): p. 483-495. Rogers, C.M., et al., Regulation of the pharynx of Caenorhabditis elegans by 5HT, octopamine, and FMRFamide-like neuropeptides. Journal of Neurobiology, 2001. 49(3): p. 235-244. Cook, A., C.J. Franks, and L. Holden-Dye, Electrophysiological recordings from the pharynx, in WormBook, T.C.e.R. Community, Editor, WormBook. Richmond, J.E., Electrophysiological recordings from the neuromuscular junction of C. elegans, in WormBook, T.C.e.R. Community, Editor, WormBook. Kerr, R., et al., Optical imaging of calcium transients in neurons and pharyngeal muscle of C. elegans. Neuron, 2000. 26(3): p. 583-594. Shyn, S.I., R. Kerr, and W.R. Schafer, Serotonin and G(o) modulate functional states of neurons and muscles controlling C. elegans egg-laying behavior. Current Biology, 2003. 13(21): p. 1910-1915. Suzuki, H., et al., In vivo imaging of C. elegans mechanosensory neurons demonstrates a specific role for the MEC-4 channel in the process of gentle touch sensation. Neuron, 2003. 39(6): p. 1005-1017. Kahn-Kirby, A.H., et al., Specific polyunsaturated fatty acids drive TRPVdependent sensory signaling in vivo. Cell, 2004. 119(6): p. 889-900. Kimura, K.D., et al., The C. elegans thermosensory neuron AFD responds to warming. Current Biology, 2004. 14(14): p. 1291-1295. Shimozono, S., et al., Slow Ca2+ dynamics in pharyngeal muscles in Caenorhabditis elegans during fast pumping. Embo Reports, 2004. 5(5): p. 521526. 162 98. 99. 100. 101. 102. 103. 104. 105. 106. 107. 108. 109. 110. 111. 112. 113. Hilliard, M.A., et al., In vivo imaging of C. elegans ASH neurons: cellular response and adaptation to chemical repellents. Embo Journal, 2005. 24(1): p. 63-72. Chronis, N., M. Zimmer, and C.I. Bargmann, Microfluidics for in vivo imaging of neuronal and behavioral activity in Caenorhabditis elegans. Nature Methods, 2007. 4(9): p. 727-731. Kerr, R.A., Imaging the activity of neurons and muscles, in WormBook, T.C.e.R. Community, Editor, WormBook. Tian, L., et al., Imaging neural activity in worms, flies and mice with improved GCaMP calcium indicators. Nature Methods, 2009. 6(12): p. 875-U113. Miyawaki, A., et al., Dynamic and quantitative Ca2+ measurements using improved cameleons. Proceedings of the National Academy of Sciences of the United States of America, 1999. 96(5): p. 2135-2140. Miyawaki, A., et al., Fluorescent indicators for Ca2+ based on green fluorescent proteins and calmodulin. Nature, 1997. 388(6645): p. 882-887. Baird, G.S., D.A. Zacharias, and R.Y. Tsien, Circular permutation and receptor insertion within green fluorescent proteins. Proceedings of the National Academy of Sciences of the United States of America, 1999. 96(20): p. 11241-11246. Nagai, T., et al., Circularly permuted green fluorescent proteins engineered to sense Ca2+. Proceedings of the National Academy of Sciences of the United States of America, 2001. 98(6): p. 3197-3202. Nakai, J., M. Ohkura, and K. Imoto, A high signal-to-noise Ca2+ probe composed of a single green fluorescent protein. Nature Biotechnology, 2001. 19(2): p. 137-141. Nagai, T., et al., Expanded dynamic range of fluorescent indicators for Ca2+ by circularly permuted yellow fluorescent proteins. Proceedings of the National Academy of Sciences of the United States of America, 2004. 101(29): p. 1055410559. Sulston, J., M. Dew, and S. Brenner, Dopaminergic neurons in the nematode Caenorhabditis elegans. The Journal of Comparative Neurology, 1975. 163(2): p. 215-226. Chalfie, M. and J. Sulston, Developmental genetics of the mechanosensory neurons of Caenorhabditis elegans. Developmental Biology, 1981. 82(2): p. 358370. Chalfie, M. and J.N. Thomson, Structural and functional diversity in the neuronal microtubules of Caenorhabditis elegans. The Journal of Cell Biology, 1982. 93(1): p. 15-23. Wicks, S.R., C.J. Roehrig, and C.H. Rankin, A dynamic network simulation of the nematode tap withdrawal circuit: Predictions concerning synaptic function using behavioral criteria. Journal of Neuroscience, 1996. 16(12): p. 4017-4031. Chalfie, M. and M. Au, Genetic control of differentiation of the Caenorhabditis elegans touch receptor neurons. Science, 1989. 243(4894): p. 1027-1033. Rankin, C.H., Interactions between 2-antagonistic reflexes in the nematode Caenorhabditis elegans. Journal of Comparative Physiology a-Sensory Neural and Behavioral Physiology, 1991. 169(1): p. 59-67. 163 114. 115. 116. 117. 118. 119. 120. 121. 122. 123. 124. 125. 126. 127. 128. 129. 130. Wicks, S.R. and C.H. Rankin, Integration of mechanosensory stimuli in Caenorhabditis elegans. J. Neurosci., 1995. 15(3): p. 2434-2444. Rankin, C.H., C.D.O. Beck, and C.M. Chiba, Caenorhabditis elegans - a new model system for the study of learning and memory. Behavioural Brain Research, 1990. 37(1): p. 89-92. Rankin, C.H. and B.S. Broster, Factors affecting habituation and recovery from habituation in the nematode Caenorhabditis elegans. Behavioral Neuroscience, 1992. 106(2): p. 239-249. Stirman, J.N., et al., Real-time multimodal optical control of neurons and muscles in freely behaving Caenorhabditis elegans. Nature Methods, 2011. 8(2): p. 153U78. Zemelman, B., et al., Photochemical gating of heterologous ion channels: Remote control over genetically designated populations of neurons. Proceedings of the National Academy of Sciences of the United States of America, 2003. 100(3): p. 1352-1357. Nagel, G., et al., Channelrhodopsin-2, a directly light-gated cation-selective membrane channel. Proceedings of the National Academy of Sciences, 2003. 100(24): p. 13940-13945. Banghart, M., et al., Light-activated ion channels for remote control of neuronal firing. Nature Neuroscience, 2004. 7: p. 1381-1386. Boyden, E., et al., Millisecond-timescale, genetically targeted optical control of neural activity. Nature Neuroscience, 2005. 8: p. 1263-1268. Nagel, G., et al., Light activation of channelrhodopsin-2 in excitable cells of Caenorhabditis elegans triggers rapid Behavioral responses. Current Biology, 2005. 15(24): p. 2279-2284. Szobota, S., et al., Remote control of neuronal activity with a light-gated glutamate receptor. Neuron, 2007. 54(4): p. 535-545. Zhang, F., et al., Multimodal fast optical interrogation of neural circuitry. Nature, 2007. 446(7136): p. 633-U4. Chow, B.Y., et al., High-performance genetically targetable optical neural silencing by light-driven proton pumps. Nature, 2010. 463(7277): p. 98-102. Zemelman, B.V., et al., Selective photostimulation of genetically ChARGed neurons. Neuron, 2002. 33(1): p. 15-22. Nagel, G., et al., Channelrhodopsin-1: A light-gated proton channel in green algae. Science, 2002: p. 2395-2398. Nagel, G., et al., Channelrhodopsin-2, a directly light-gated cation-selective membrane channel. Proceedings of the National Academy of Sciences of the United States of America, 2003: p. 13940-13945. Sineshchekov, O.A., K.H. Jung, and J.L. Spudich, Two rhodopsins mediate phototaxis to low- and high-intensity light in Chlamydomonas reinhardtii. Proceedings of the National Academy of Sciences of the United States of America, 2002. 99(13): p. 8689-8694. Nagel, G., et al., Channelrhodopsin-2, a directly light-gated cation-selective membrane channel. Proceedings of the National Academy of Sciences of the United States of America, 2003. 100(24): p. 13940-13945. 164 131. 132. 133. 134. 135. 136. 137. 138. 139. 140. 141. 142. 143. 144. 145. 146. 147. Li, X., et al., Fast noninvasive activation and inhibition of neural and network activity by vertebrate rhodopin and green algae channelrhodopsin. Proceedings of the National Academy of Sciences of the United States of America, 2005. 102(49): p. 17816-17821. Deisseroth, K., et al., Next-generation optical technologies for illuminating genetically targeted brain circuits. Journal of Neuroscience, 2006. 26(41): p. 10380-10386. Wang, H., et al., High-speed mapping of synaptic connectivity using photostimulation in Channel rhodopsin-2 transgenic mice. Proceedings of the National Academy of Sciences of the United States of America, 2007. 104(19): p. 8143-8148. Huber, D., et al., Sparse optical microstimulation in barrel cortex drives learned behaviour in freely moving mice. Nature, 2008. 451(7174): p. 61-U7. Gradinaru, V., et al., Optical Deconstruction of Parkinsonian Neural Circuitry. Science, 2009. 324(5925): p. 354-359. Douglass, A.D., et al., Escape behavior elicited by single, Channelrhodopsin-2evoked spikes in zebrafish somatosensory neurons. Current Biology, 2008. 18(15): p. 1133-1137. Guo, Z.V., A.C. Hart, and S. Ramanathan, Optical interrogation of neural circuits in Caenorhabditis elegans. Nature Methods, 2009. 6(12): p. 891-U47. Andrasfalvy, B.K., et al., Two-photon single-cell optogenetic control of neuronal activity by sculpted light. Proceedings of the National Academy of Sciences of the United States of America, 2010. 107(26): p. 11981-11986. Papagiakoumou, E., et al., Scanless two-photon excitation of channelrhodopsin-2. Nature Methods, 2010. 7(10): p. 848-U117. Liewald, J.F., et al., Optogenetic analysis of synaptic function. Nature Methods, 2008. 5(10): p. 895-902. Mahoney, T., et al., Intestinal signaling to GABAergic neurons regulates a rhythmic behavior in Caenorhabditis elegans. Proceedings of the National Academy of Sciences of the United States of America, 2008: p. 16350-16355. Stirman, J.N., et al., High-throughput study of synaptic transmission at the neuromuscular junction enabled by optogenetics and microfluidics. Journal of Neuroscience Methods, 2010. 191(1): p. 90-93. Leifer, A.M., et al., Optogenetic manipulation of neural activity in freely moving Caenorhabditis elegans. Nature Methods, 2011. 8(2): p. 147-U71. Schultheis, C., et al., Optogenetic Long-Term Manipulation of Behavior and Animal Development. Plos One, 2011. 6(4). Fiala, A., et al., Light-induced activation of neurons in Drosophila using channelrhodopsin-2. Journal of Neurogenetics, 2006. 20(3-4): p. 115-116. Schroll, C., et al., Light-induced activation of distinct modulatory neurons triggers appetitive or aversive learning in Drosophila larvae. Current Biology, 2006: p. 1741-1747. Suh, G.S.B., et al., Light activation of an innate olfactory avoidance response in Drosophila. Current Biology, 2007. 17(10): p. 905-908. 165 148. 149. 150. 151. 152. 153. 154. 155. 156. 157. 158. 159. 160. 161. 162. 163. Zhang, W., W.P. Ge, and Z.R. Wang, A toolbox for light control of Drosophila behaviors through Channelrhodopsin 2-mediated photoactivation of targeted neurons. European Journal of Neuroscience, 2007. 26(9): p. 2405-2416. Arrenberg, A.B., F. Del Bene, and H. Baier, Optical control of zebrafish behavior with halorhodopsin. Proceedings of the National Academy of Sciences of the United States of America, 2009. 106(42): p. 17968-17973. Arrenberg, A.B., et al., Optogenetic Control of Cardiac Function. Science, 2010. 330(6006): p. 971-974. Schoonheim, P.J., et al., Optogenetic Localization and Genetic Perturbation of Saccade-Generating Neurons in Zebrafish. Journal of Neuroscience, 2010. 30(20): p. 7111-7120. Umeda, K., et al., Transgenic zebrafish expressing an optimized channelrhodopsin variant under regulation of Gal4/UAS systems: optogenetic stimulation of Rohon-Beard neurons. Journal of Physiological Sciences, 2010. 60: p. S118-S118. Zhu, P.X., et al., Optogenetic dissection of neuronal circuits in zebrafish using viral gene transfer and the Tet system. Frontiers in Neural Circuits, 2009. 3. Arenkiel, B.R., et al., In vivo light-induced activation of neural circuitry in transgenic mice expressing channelrhodopsin-2. Neuron, 2007. 54(2): p. 205-218. Aravanis, A.M., et al., An optical neural interface: in vivo control of rodent motor cortex with integrated fiberoptic and optogenetic technology. Journal of Neural Engineering, 2007. 4(3): p. S143-S156. Ayling, O.G.S., et al., Automated light-based mapping of motor cortex by photoactivation of channelrhodopsin-2 transgenic mice. Nature Methods, 2009. 6(3): p. 219-224. Cardin, J.A., et al., Targeted optogenetic stimulation and recording of neurons in vivo using cell-type-specific expression of Channelrhodopsin-2. Nature Protocols, 2010. 5(2): p. 247-254. Mahoney, T., et al., Intestinal signaling to GABAergic neurons regulates a rhythmic behavior in Caenorhabditis elegans. Proceedings of the National Academy of Sciences of the United States of America, 2008. 105(42): p. 1635016355. Liu, Q., G. Hollopeter, and E. Jorgensen, Graded synaptic transmission at the Caenorhabditis elegans neuromuscular junction. Proceedings of the National Academy of Sciences of the United States of America, 2009. 106(26): p. 1082310828. Leifer, A.M., et al., Optogenetic manipulation of neural activity in freely moving Caenorhabditis elegans. Nature Methods. 8(2): p. 147-U71. Lindsay, T.H., T.R. Thiele, and S.R. Lockery, Optogenetic analysis of synaptic transmission in the central nervous system of the nematode Caenorhabditis elegans. Nature Communications. 2. Narayan, A., G. Laurent, and P.W. Sternberg, Transfer characteristics of a thermosensory synapse in Caenorhabditis elegans. Proceedings of the National Academy of Sciences of the United States of America. 108(23): p. 9667-9672. Petzold, B.C., et al., Caenorhabditis elegans Body Mechanics Are Regulated by Body Wall Muscle Tone. Biophysical Journal. 100(8): p. 1977-1985. 166 164. 165. 166. 167. 168. 169. 170. 171. 172. 173. 174. 175. 176. 177. 178. 179. 180. 181. 182. Schultheis, C., et al., Optogenetic analysis of GABA(B) receptor signaling in Caenorhabditis elegans motor neurons. Journal of Neurophysiology. 106(2): p. 817-827. Schultheis, C., et al., Optogenetic Long-Term Manipulation of Behavior and Animal Development. Plos One. 6(4). Stirman, J.N., et al., Real-time multimodal optical control of neurons and muscles in freely behaving Caenorhabditis elegans. Nature Methods. 8(2): p. 153-U78. Nagel, G., et al., Light activation of channelrhodopsin-2 in excitable cells of Caenorhabditis elegans triggers rapid behavioral responses. Curr. Bio., 2005. 15(24): p. 2279-2284. Aravanis, A., et al., An optical neural interface: in vivo control of rodent motor cortex with integrated fiberoptic and optogenetic technology. Journal of Neural Engineering, 2007. 4(3): p. S143-S156. Gradinaru, V., et al., Targeting and readout strategies for fast optical neural control in vitro and in vivo. Journal of Neuroscience, 2007. 27(52): p. 1423114238. Guo, Z.V., A.C. Hart, and S. Ramanathan, Optical interrogation of neural circuits in Caenorhabditis elegans. Nat. Methods, 2009. 6(12): p. 891-U47. El-Ali, J., P.K. Sorger, and K.F. Jensen, Cells on chips. Nature, 2006. 442(7101): p. 403-411. Whitesides, G.M., The origins and the future of microfluidics. Nature, 2006. 442(7101): p. 368-373. Angres, B., Cell microarrays. Expert Review of Molecular Diagnostics, 2005. 5(5): p. 769-779. Fernandes, T.G., et al., High-throughput cellular microarray platforms: applications in drug discovery, toxicology and stem cell research. Trends in Biotechnology, 2009. 27(6): p. 342-349. Flaim, C.J., et al., Combinatorial signaling microenvironments for studying stem cell fate. Stem Cells and Development, 2008. 17(1): p. 29-39. Jang, J.H. and D.V. Schaffer, Microarraying the cellular microenvironment. Molecular Systems Biology, 2006. 2: p. 2. Park, E.S., et al., Continuously perfused, non-cross-contaminating microfluidic chamber array for studying cellular responses to orthogonal combinations of matrix and soluble signals. Lab on a Chip, 2010. 10(5): p. 571-580. Bernard, A., B. Michel, and E. Delamarche, Micromosaic immunoassays. Analytical Chemistry, 2001. 73(1): p. 8-12. Sato, K., et al., Microchip-based immunoassay system with branching multichannels for simultaneous determination of interferon-gamma. Electrophoresis, 2002. 23(5): p. 734-739. McClain, M.A., et al., Microfluidic devices for the high-throughput chemical analysis of cells. Analytical Chemistry, 2003. 75(21): p. 5646-5655. Wei, C.W., et al., Using a microfluidic device for 1 mu l DNA microarray hybridization in 500 s. Nucleic Acids Research, 2005. 33(8). Sims, C.E. and N.L. Allbritton, Analysis of single mammalian cells on-chip. Lab on a Chip, 2007. 7(4): p. 423-440. 167 183. 184. 185. 186. 187. 188. 189. 190. 191. 192. 193. 194. 195. 196. 197. 198. 199. 200. 201. Hirsch, A.M., et al., Parallel multi-time point cell stimulation and lysis on-chip for studying early signaling events in T cell activation. Lab on a Chip, 2009. 9(4): p. 536-544. Gray, J.M., et al., Oxygen sensation and social feeding mediated by a C. elegans guanylate cyclase homologue. Nature, 2004. 430(6997): p. 317-322. Zhang, Y., H. Lu, and C.I. Bargmann, Pathogenic bacteria induce aversive olfactory learning in Caenorhabditis elegans. Nature, 2005. 438(7065): p. 179184. Hulme, S.E., et al., A microfabricated array of clamps for immobilizing and imaging C. elegans. Lab on a Chip, 2007. 7(11): p. 1515-1523. Chung, K.H., M.M. Crane, and H. Lu, Automated on-chip rapid microscopy, phenotyping and sorting of C. elegans. Nature Methods, 2008. 5(7): p. 637-643. Crane, M.M., K. Chung, and H. Lu, Computer-enhanced high-throughput genetic screens of C. elegans in a microfluidic system. Lab on a Chip, 2009. 9(1): p. 3840. Crane, M.M., et al., Microfluidics-enabled phenotyping, imaging, and screening of multicellular organisms. Lab on a Chip, 2010. 10(12): p. 1509-1517. Gilleland, C.L., et al., Microfluidic immobilization of physiologically active Caenorhabditis elegans. Nature Protocols. 5(12): p. 1888-1902. Samara, C., et al., Large-scale in vivo femtosecond laser neurosurgery screen reveals small-molecule enhancer of regeneration. Proceedings of the National Academy of Sciences of the United States of America. 107(43): p. 18342-18347. Zeng, F., C.B. Rohde, and M.F. Yanik, Sub-cellular precision on-chip smallanimal immobilization, multi-photon imaging and femtosecond-laser manipulation. Lab on a Chip, 2008. 8(5): p. 653-656. Guo, S.X., et al., Femtosecond laser nanoaxotomy lab-on-achip for in vivo nerve regeneration studies. Nature Methods, 2008. 5(6): p. 531-533. Ben-Yakar, A. and F. Bourgeois, Ultrafast laser nanosurgery in microfluidics for genome-wide screenings. Current Opinion in Biotechnology, 2009. 20(1): p. 100105. Ben-Yakar, A., N. Chronis, and H. Lu, Microfluidics for the analysis of behavior, nerve regeneration, and neural cell biology in C. elegans. Current Opinion in Neurobiology, 2009. 19(5): p. 561-567. Thorsen, T., S.J. Maerkl, and S.R. Quake, Microfluidic large-scale integration. Science, 2002. 298(5593): p. 580-584. Ottesen, E.A., et al., Microfluidic digital PCR enables multigene analysis of individual environmental bacteria. Science, 2006. 314(5804): p. 1464-1467. Unger, M.A., et al., Monolithic microfabricated valves and pumps by multilayer soft lithography. Science, 2000. 288(5463): p. 113-116. Xia, Y.N. and G.M. Whitesides, Soft lithography. Annual Review of Materials Science, 1998. 28: p. 153-184. Hulme, S.E., et al., Lifespan-on-a-chip: microfluidic chambers for performing lifelong observation of C. elegans. Lab on a Chip, 2010. 10(5): p. 589-597. Hung, P.J., et al., Continuous perfusion microfluidic cell culture array for highthroughput cell-based assays. Biotechnology and Bioengineering, 2005. 89(1): p. 1-8. 168 202. 203. 204. 205. 206. 207. 208. 209. 210. 211. 212. 213. 214. 215. 216. 217. 218. Rowat, A.C., et al., Tracking lineages of single cells in lines using a microfluidic device. Proceedings of the National Academy of Sciences of the United States of America, 2009. 106(43): p. 18149-18154. Chung, K., et al., Microfluidic chamber arrays for whole-organism behaviorbased chemical screening. Lab on a Chip, 2011. 11(21): p. 3689-3697. Chung, K. and H. Lu, Automated high-throughput cell microsurgery on-chip. Lab on a Chip, 2009. 9(19): p. 2764-2766. Chokshi, T.V., A. Ben-Yakar, and N. Chronis, CO(2) and compressive immobilization of C. elegans on-chip. Lab on a Chip, 2009. 9(1): p. 151-157. Krajniak, J. and H. Lu, Long-term high-resolution imaging and culture of C. elegans in chip-gel hybrid microfluidic device for developmental studies. Lab on a Chip. 10(14): p. 1862-1868. DowCorning, Refractive Index of Glycerine-Water Solutions at 20C (69F). "http://msdssearch.dow.com/PublishedLiteratureDOWCOM/dh_0032/0901b8038 00322b7.pdf?filepath=glycerine/pdfs/noreg/115-00667.pdf&fromPage=GetDoc", (accessed 19 November 2011). White, J.G., et al., The Structure of the Nervous-System of the Nematode Caenorhabditis-Elegans. Philosophical Transactions of the Royal Society of London Series B-Biological Sciences, 1986. 314(1165): p. 1-340. Richmond, J.E. and E.M. Jorgensen, One GABA and two acetylcholine receptors function at the C. elegans neuromuscular junction. Nature Neuroscience, 1999. 2(9): p. 791-797. Schmitz, C., P. Kinge, and H. Hutter, Axon guidance genes identified in a largescale RNAi screen using the RNAi -hypersensitive Caenorhabditis elegans strain nre-1(hd20) lin-15b(hd126). Proceedings of the National Academy of Sciences of the United States of America, 2007. 104(3): p. 834-839. Nonet, M.L., et al., UNC-11, a Caenorhabditis elegans AP180 homologue, regulates the size and protein composition of synaptic vesicles. Molecular Biology of the Cell, 1999. 10(7): p. 2343-2360. Lenth, R.V., Java Applets for Power and Sample Size [Computer software]. from http://www.stat.uiowa.edu/~rlenth/Power, retrieved 10 November 2011. Calixto, A., et al., Enhanced neuronal RNAi in C. elegans using SID-1. Nat Meth, 2010. 7(7): p. 554-559. Stirman, J.N., et al., Assembly of a multispectral optical illumination system with precise spatiotemporal control for the manipulation of optogenetic reagents. Nature Protocols, In Press. Macosko, E.Z., et al., A hub-and-spoke circuit drives pheromone attraction and social behaviour in C. elegans. Nature, 2009. 458(7242): p. 1171-U110. Davis, M.W., et al., Gene activation using FLP recombinase in C. elegans. Plos Genetics, 2008. 4(3). Wang, S., et al., All optical interface for parallel, remote, and spatiotemporal control of neuronal activity. Nano Letters, 2007. 7(12): p. 3859-3863. Grossman, N., et al., Multi-site optical excitation using ChR2 and micro-LED array. Journal of Neural Engineering, 2010. 7(1). 169 219. 220. 221. 222. 223. 224. 225. 226. 227. 228. 229. 230. 231. 232. 233. 234. 235. 236. 237. Delica, S. and C.M. Blanca, Wide-field depth-sectioning fluorescence microscopy using projector-generated patterned illumination. Applied Optics, 2007. 46(29): p. 7237-7243. Itoga, K., et al., Cell micropatterning using photopolymerization with a liquid crystal device commercial projector. Biomaterials, 2004. 25(11): p. 2047-2053. Aravanis, A., et al., An optical neural interface: in vivo control of rodent motor cortex with integrated fiberoptic and optogenetic technology. Journal of Neural Engineering, 2007: p. S143-S156. Campagnola, L., H. Wang, and M.J. Zyka, Fiber-coupled light-emitting diode for localized photo stimulation of neurons expressing channelrhodopsin-2. Journal of Neuroscience Methods, 2008. 169(1): p. 27-33. Schoenenberger, P., et al., Optimizing the spatial resolution of Channelrhodopsin2 activation. Brain Cell Biology, 2008. 36(1-4): p. 119-127. MathWorks, R2011b Documentation-Image Processing Toolbox. "http://www.mathworks.com/help/toolbox/images/", (accessed 19 November 2011). Stephens, G.J., et al., Dimensionality and dynamics in the Behavior of C. elegans. Plos Comp. Bio., 2008. 4(4): p. e1000028. Liewald, J.F., et al., Optogenetic analysis of synaptic function. Nat. Methods, 2008. Holden-Dye, L. and R.J. Walker, Anthelmintic drugs, in WormBook, T.C.e.R. Community, Editor, WormBook. Goodman, M.B., Mechanosensation, in WormBook, T.C.e.R. Community, Editor, WormBook. White, J., et al., The structure of the nervous-system of the nematode Caenorhabditis elegans. Philos Trans R Soc Lond B Biol Sci. , 1986. 314(1165): p. 1-340. Macosko, E., et al., A hub-and-spoke circuit drives pheromone attraction and social behaviour in C. elegans. Nature, 2009. 458(7242): p. 1171-1175. Kaplan, J. and H. Horvitz, A dual mechanosensory and chemosensory neuron in Caenorhabditis elegans. Proc. Natl. Acad. Sci. USA, 1993. 90(6): p. 2227-2231. Brockie, P.J. and A.V. Maricq, Ionotropic glutamate receptors: genetics, behavior and electrophysiology, in WormBook, T.C.e.R. Community, Editor, WormBook. Park, S.J., M.B. Goodman, and B.L. Pruitt, Analysis of nematode mechanics by piezoresistive displacement clamp. Proc. Natl. Acad. Sci. USA, 2007. 104(44): p. 17376. Liu, Q., G. Hollopeter, and E. Jorgensen, Graded synaptic transmission at the Caenorhabditis elegans neuromuscular junction. Proc. Natl. Acad. Sci. USA, 2009. 106(26): p. 10823-10828. Mellem, J.E., et al., Action potentials contribute to neuronal signaling in Celegans. Nat. Neurosci., 2008. 11(8): p. 865-867. Gray, J.M., J.J. Hill, and C.I. Bargmann, A circuit for navigation in Caenorhabditis elegans. Proc. Natl. Acad. Sci. USA, 2005. 102: p. 3184-3191. Nagel, G., et al., Channelrhodopsin-2, a directly light-gated cation-selective membrane channel. Proc. Natl. Acad. Sci. USA, 2003. 100(24): p. 13940-13945. 170 238. Husson, S.J., et al., Optogenetic analysis of a nociceptor neuron and network reveals modulatory ion channels acting downstream of nociceptive sensors. (in review). 239. Way, J.C. and M. Chalfie, The mec-3 gene of Caenorhabditis elegans requires its own product for maintained expression and is expressed in 3 neuronal celltypes.Genes & Development, 1989. 3(12A): p. 1823-1833. Chatzigeorgiou, M. and W.R. Schafer, Lateral Facilitation between Primary Mechanosensory Neurons Controls Nose Touch Perception in C. elegans. Neuron, 2011. 70(2): p. 299-309. Kaplan, J. and H. Horvitz, A dual mechanosensory and chemosensory neuron in Caenorhabditis elegans. Proceedings of the National Academy of Sciences of the United States of America, 1993: p. 2227-2231. Wicks, S.R. and C.H. Rankin, Integration of Mechanosensory Stimuli in Caenorhabditis elegans. Journal of Neuroscience, 1995. 15(3): p. 2434-2444. Rankin, C.H., Interactions between 2-antagonistic reflexes in the nematode Caenorhabditis elegans. Journal of Comparative Physiology a-Sensory Neural and Behavioral Physiology, 1991. 169(1): p. 59-67. Sweeney, S.T., et al., Targeted expression of tetanus toxin light-chain in Drosophila specifically eliminates synaptic transmission and causes behavioral defects. Neuron, 1995. 14(2): p. 341-351. Hedgecock, E.M. and R.L. Russell, Normal and mutant thermotaxis in nematode Caenorhabditis elegans. Proceedings of the National Academy of Sciences of the United States of America, 1975. 72(10): p. 4061-4065. Mori, I. and Y. Ohshima, Neural regulation of thermotaxis in Caenorhabditis elegans. Nature, 1995. 376(6538): p. 344-348. Zimmer, M., et al., Neurons Detect Increases and Decreases in Oxygen Levels Using Distinct Guanylate Cyclases. Neuron, 2009. 61(6): p. 865-879. Albrecht, D.R. and C.I. Bargmann, High-content behavioral analysis of Caenorhabditis elegans in precise spatiotemporal chemical environments. Nat Meth, 2011. 8(7): p. 599-605. Gray, J.M., J.J. Hill, and C.I. Bargmann, A circuit for navigation in Caenorhabditis elegans. Proceedings of the National Academy of Sciences of the United States of America, 2005. 102(9): p. 3184-3191. Moulder, G.L., et al., alpha-Actinin Is Required for the Proper Assembly of ZDisk/Focal-Adhesion-Like Structures and for Efficient Locomotion in Caenorhabditis elegans. Journal of Molecular Biology, 2010. 403(4): p. 516-528. Qadota, H., et al., PKN-1, a Homologue of Mammalian PKN, Is Involved in the Regulation of Muscle Contraction and Force Transmission in C. elegans. Journal of Molecular Biology, 2011. 407(2): p. 222-231. Nahabedian, J.F., et al., Bending Amplitude--A New Quantitative Assay of C. elegans Locomotion: Identification of Phenotypes for Mutants in Genes Encoding Muscle Focal Adhesion Components. Methods, Accepted. 240. 241. 242. 243. 244. 245. 246. 247. 248. 249. 250. 251. 252. 171