Transcript
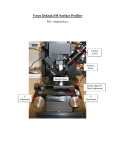
Dektak3 Instructions
DESCRIPTION. This machine is used to measure the vertical surface profile of a sample. A
diamond-tipped stylus is lowered onto the sample, and the stage is slowly translated, causing the
stylus to move up and down vertically as it moves along the surface. The vertical motion of the
stylus is measured electrically and converted to a digital format. Any sample with a reasonably
hard surface (hard-baked photoresist is fine) with a vertical range of 100 Å to 655 kÅ can be
measured. Vertical resolution can be as low as 10 Å. Maximum sample thickness is 20 mm.
The profile can be viewed on the screen and saved to disk to be printed. For information in
addition to that provided here, consult the user’s manual (Veeco Meteorology Group, Dektak3),
located in the characterization lab.
OPERATION PROCEDURE.
Initial Setup. Press any key on the keyboard to wake up from screen saver. Turn on the
illumination intensity control (knob directly above stylus on Dektak). In Display menu, select
Video and Graphics. Load sample on stage, and move using thumbwheels until area of interest
is in field of view on monitor. Focus the camera lens (to right of stylus). In the Scan Programs
menu, select Scan Routine and click on any of the Scan Procedures to bring up a white window.
Enter the desired scan length. The bottom profile (hills & valleys) is usually best unless you are
sure that the surface will have only one or the other, as well as low or medium scan speed. When
done, click OK. In the Display menu select Data Plot, and again in the Display menu, select
Video and Graphics. Note that the scales of the video image and the grid do not correspond.
Leveling the Stage. VERY IMPORTANT! Place Height Standard on the stage. Press F3 to
lower stylus, and note final position of stylus relative to the grid. Press F3 to raise stylus, and
using the thumbwheels, move stage so a known level portion of the sample is a little to the right
of the initial stylus position (the stylus scans from left to right). NEVER ADJUST THE
STAGE WHEN THE STYLUS IS DOWN. Press F4 to run a single scan, and observe the
white data line on the screen as the scan proceeds. It should be level and follow the zero line. If
the scan slopes down (up) to the right, move the large wheel under the stage clockwise
(counterclockwise) and repeat until level.
Scanning the Sample. Move the area to be scanned just to the back of the initial stylus position,
taking into account that the stylus moves a short distance before data is collected. Press F4 to
run a single scan. If the scan is not in the desired location, press Esc/Abort to abort the scan, and
adjust the stage accordingly. NEVER ADJUST THE STAGE WHEN THE STYLUS IS
DOWN. Once the scan is complete, move the Measurement (M) and Reference (R) cursors to
two known level points on either side of the area of interest. In the Plot menu, select Level. To
obtain a printable version of the screen, insert your floppy disk, and from the Print menu, select
either Plot or Plot and Summary. This file can be printed from a Unix machine.
SHUTDOWN PROCEDURE. When finished, remove your sample and TURN OFF THE
ILLUMINATION. Leave the computer and the Dektak camera on.
WBJ
JEP