1
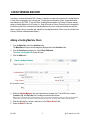
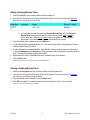
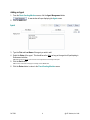
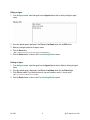
Pennsylvania
TOBACCO PREVENTION REPORTING SYSTEM
(TPRS)
PRIMARY CONTRACTOR USER MANUAL
CHECK VENDING MACHINE MODULE
Prepared for the
Pennsylvania Department
Of Health by:
KIT Solutions, Inc @2006
5700 Corporate Dr. Suite 530
Pittsburgh, PA 15237
June 2006
TABLE OF CONTENTS
Check Vending Machine................................................................................................................................ 3
Adding a Vending Machine Check ............................................................................................................ 3
Editing a Vending Machine Check ........................................................................................................ 5
Deleting a Vending Machine Check ...................................................................................................... 5
Managing Agencies and Agents................................................................................................................ 6
Adding an Agency................................................................................................................................. 6
Adding an Agent ................................................................................................................................... 8
Appendix...................................................................................................................................................... 10
“Unable to Check” Result* Definitions ..................................................................................................... 10
Spell Check Feature................................................................................................................................ 12
PA TPRS
2
@ KIT Solutions, Inc. 2006
CHECK VENDING MACHINE
According to contract deliverable PA20, Primary Contractors are required to inspect each Vending Machine
in their county a minimum of one time per year. To make this process easier to track, a separate module
was added to the PA TPRS. To use the Check Vending Machine module, the Primary Contractor needs to
assign a Vending Machine to the Provider (i.e., Service Provider or Primary Contractor) who is responsible
for performing the check, maintaining the Vending Machine list in their county and tracking their activities.
(How to assign a store to a provider and maintain the Vending Machine list in their county is included in the
Primary Contractor’s Administrative Manual.)
Adding a Vending Machine Check
1. From the Menu Box, select the Activities folder.
The Menu Box will reopen will subcategories displayed under the Activities folder.
2. From the Activities subcategory list, select Check V Machine.
The Check Vending Machine screen will open.
3. Click the Add button.
4. Select the Vending Machine* that was visited from the dropdown list. This will fill in the Location
(Location, City, and Zip Code) of the vending machine that was chosen.
*Note: If you have more than 200+ stores in the Check Store module, you must first enter the first letter of the store name. Wait a few seconds while the
screen reopens. Then choose the store that was visited using the black drop-down arrow. All the stores listed will begin with the letter specified.
5. Enter the date that the visit was conducted on in the Date of Action* field.
6. Select the Result* of the visit.
PA TPRS
3
@ KIT Solutions, Inc. 2006
*Note: Both Cited means both the Clerk and Store were cited. Unable to Check means that you could not check this store on this visit. If you choose
Unable to Check, a new drop-down box will appear for which you must give a reason why you were unable to check the store. Detailed definitions of each
of the Unable to Check options are located at the end of this document in the “Unable to Check” Result* Definitions section.
*Note: If the store could not to be checked on just this particular visit, mark the reason with accessible. This will keep the store on the accessible list and
can be visited on another day. If the reason the store was not visited because it will never be accessible, then marking the result inaccessible will put the
store on the inaccessible list and it will no longer be considered an active store to be checked.
7. Type in any additional information regarding this check in the Notes field.
*Note: Use this Notes field if an Unable to Check option has been selected that is detailed as needing an explanation. Details of each option can be
found in the “Unable to Check” Result* Definitions section.
8. Select the appropriate Agency from the dropdown list.
*Note: The purpose for Agency is for those organizations that are entering data for other agencies (e.g., police).
9.
10.
11.
12.
Select the appropriate Law Enforcement Agent from the dropdown list.
Select the appropriate County.
If known, enter the Clerk Citation #.
Click the Save button.
*Note: To exit the screen without saving any of the changes, click the Cancel button.
PA TPRS
4
@ KIT Solutions, Inc. 2006
Editing a Vending Machine Check
1. Select the Vending* that you wish to edit from the dropdown list.
2. From the list of checks done at this store (located at the bottom of the screen), click on the Selection
link next to the check that you wish to edit.
3.
4.
5.
6.
7.
a. You may filter your search by using the Checked Record Since field. The Checked
Record Since field is used to display the checks that took place since or before the
current fiscal year. Select since or before from the dropdown list. Then select the
appropriate Fiscal Year from the dropdown located directly to the right.
Once the desired check is displayed, click the Edit button.
To edit a field that has a predetermined list (i.e., it has a black down-arrow on the right end of the box),
select the desired value from the list.
To edit a field without a predetermined list, select the field to edit by using the mouse to click inside of
it. Use the Backspace and/or Arrow key on your keyboard to delete the unwanted characters from the
field. Then type the information you want in the field.
Repeat steps 4-5 until all of the fields have been modified the way you want them.
Click the Save button.
*Note: To exit the screen without saving any of the changes, click the Cancel button.
Deleting a Vending Machine Check
1. Select the Vending Machine* that you wish to delete from the dropdown list.
2. From the list of checks done at this store (located at the bottom of the screen), click on the Selection
link next to the check that you wish to delete.
3. Once the desired check is displayed, click the Delete button.
4. Click OK when asked “If you delete this record, you won’t be able to undo it. Are you sure?”.
*Note: If you do not want to delete this record, click Cancel.
PA TPRS
5
@ KIT Solutions, Inc. 2006
Managing Agencies and Agents
Adding an Agency
1. From the Check Vending Machine screen, click the Agency Management button
. A new window will open displaying the Agency screen.
2. Click the Add button.
3. Type the name of the agency you wish to add in the Agency Name field.
4. The Status is automatically defaulted to Active. This should be set to Active as long as the agency is
still participating in Enforcement activities.
*Note: Setting the agency to Inactive will remove it from the lists of agencies that are used throughout the system.
5. Click the Save button.
*Note: To exit the screen without saving any of the changes, click the Cancel button.
6. Click the Return button to return to the Check Vending Machine screen.
Editing an Agency
1. From the Agency screen, select the agency from the Agency List you wish to edit by clicking the
agency name.
PA TPRS
6
@ KIT Solutions, Inc. 2006
2. Once the desired agency is displayed in the Agency Name field, click the Edit button.
3. Make any changes needed to the Agency Name.
4. Click the Save button.
*Note: To exit the screen without saving any of the changes, click the Cancel button.
5. Click the Return button to return to the Check Vending Machine screen.
Deleting an Agency
1. From the Agency screen, select the agency from the Agency List you wish to delete by clicking the
agency name.
2. Once the desired agency is displayed in the Agency Name field, click the Delete button.
3. Click OK when asked “If you delete this record, you won’t be able to undo it. Are you sure?”.
*Note: If you do not want to delete this record, click Cancel.
4. Click the Return button to return to the Check Vending Machine screen.
PA TPRS
7
@ KIT Solutions, Inc. 2006
Adding an Agent
1. From the Check Vending Machine screen, click the Agent Management button
. A new window will open displaying the Agent screen.
2. Click the Add button.
3. Type the First and Last Name of the agent you wish to add.
4. Select the Status of the agent. This should be set to Active as long as the agent is still participating in
Enforcement activities.
*Note: Setting the agent to Inactive will remove it from the lists of agents that are used throughout the system.
5. Click the Save button.
*Note: To exit the screen without saving any of the changes, click the Cancel button.
6. Click the Return button to return to the Check Vending Machine screen.
PA TPRS
8
@ KIT Solutions, Inc. 2006
Editing an Agent
1. From the Agent screen, select the agent from the Agent List you wish to edit by clicking the agent
name.
2. Once the desired agent is displayed in the First and Last Name fields, click the Edit button.
3. Make any changes needed to the agent’s name.
4. Click the Save button.
*Note: To exit the screen without saving any of the changes, click the Cancel button.
5. Click the Return button to return to the Check Vending Machine screen.
Deleting an Agent
1. From the Agent screen, select the agent from the Agent List you wish to delete by clicking the agent
name.
2. Once the desired agent is displayed in the First and Last Name fields, click the Delete button.
3. Click OK when asked “If you delete this record, you won’t be able to undo it. Are you sure?”.
*Note: If you do not want to delete this record, click Cancel.
4. Click the Return button to return to the Check Vending Machine screen.
PA TPRS
9
@ KIT Solutions, Inc. 2006
APPENDIX
“Unable to Check” Result* Definitions
Bad Address - Use this category if the location turns out to be a private residence, the address does not
exist or the information supplied was insufficient to locate the outlet. In many cases, the enforcing agent
has enough knowledge of the area to find an outlet with an incomplete address. In addition, there are many
resources available to find a phone number of a business, such as, the phone book or websites like
www.worldpages.com, www.superpages.com, or www.infospace.com. Once a number is found, call the
outlet to get directions without revealing the purpose of your visit. If all resources have been exhausted and
the outlet still can’t be found, use the Bad Address category.
Bar-Not Accessible - Use this category if the bar has a sign limiting entry to adults or a bouncer at the
door not allowing any minors into the establishment. Use this category when the bar is completely
inaccessible to minors. This category is different than "Bar-Other" in the sense that minors are not
permitted to enter the building.
Bar-Other - Use this category for bars where an attempt was not made, but there was no sign or doorman
restricting access by young people.
Buyer Known - The youth participant is to leave the outlet without attempting the purchase if someone
who knows the youth participant is in the outlet. This outlet must be revisited.
Itinerant Vendors – Itinerant Vendors are little trucks, which go to baseball games and other locations
where crowds gather to sell food, beverages, and tobacco products. Do not try to find these vendors.
No Longer Selling– The outlet does not sell cigarettes anymore.
Other, Accessible – Use this category for any reason, which does not fit into another category, of why a
purchase attempt was not made at a location that might be accessible to youth. This outlet must be
revisited.
Other, Not Accessible - A variety of locations are not accessible to youth, such as lunchrooms in a
factory, adult bookstores, and state prisons. In addition, if an outlet only sells cigarettes through a vending
machine, then that outlet should be marked as a non-completion and categorized as an Other, Not
Accessible.
Out Of Business - Use this code or description if the outlet is closed permanently.
Outlet Closed, Accessible - The outlet was closed when it was visited, but is opened at a different time of
day or on a different day of the week. If the outlet is an adult establishment or private club that has signs
outside explicitly prohibiting minors or non-members, it should not be categorized as "Outlet Closed", but
rather as "Bar Not Accessible" or "Private Club". Always look for signs when an outlet is closed. This outlet
must be revisited.
PA TPRS
10
@ KIT Solutions, Inc. 2006
Outlet Closed, Not Accessible – Use this code if the outlet is closed at the time of the enforcement check
or if the outlet isn’t open during daylight hours. Enforcement checks should be conducted between 6 AM to
8:30 PM. If an outlet opens at 9:00 PM and closes at 2 AM, then it is an Unable to Check reason and
should be classified as Outlet Closed, Not Accessible.
Outlet Dangerous - Do not go in! This protocol instructs the enforcing agent and youth participants not to
enter locations, which they consider dangerous. The safety of the youth participant is the most important
consideration during an enforcement check. A situation that may be encountered is when a bar does not
have signs or doormen prohibiting access to the entrance, but is too dangerous for any youth to enter. It is
not that the enforcement team is reluctant to enter a bar, which would be "Bar-Other", but an enforcement
team member thinks there may be risk involved in conducting an inspection. This is "Outlet Too
Dangerous".
Private Club - Many locations may be membership only locations. These include, for example, volunteer
fire companies, veterans’ organizations, fraternal organizations, and motorcycle clubs.
PA TPRS
11
@ KIT Solutions, Inc. 2006
Spell Check Feature
A spell check feature has been added to various sections of the PA TPRS to help eliminate spelling errors.
The following section details the various options in the Check Spelling page. When the Spell Check button
has been selected a new window will appear displaying the Check Spelling page. The spell check feature
will look at any words written within a text box or field.
The following table is a summary of options in the spell check feature.
Option
Change to
Description
When the Change button is clicked, the value in the Change to box will replace the
highlighted misspelled word and the spell checker will continue to the next word. You may
type in this field if an appropriate suggestion is not present in the Suggestions drop down.
Suggestions A drop down box of spelling suggestions for the misspelled word. If the word is misspelled
but not available as an option in the Suggestions drop down – you may type the correct
spelling in the Change to box.
Ignore
Disregards the misspelling in the highlighted word only and continues to the next word.
The next occurrence of the misspelled word will be highlighted for correction.
Ignore All
Disregards the misspelling in the highlighted word and all future occurrences of the word.
You will no longer be prompted to fix the spelling. An example when to use this is if your
name was highlighted as misspelled – this would be a case to ignore all.
Change
Changes the spelling of the highlighted word to the selected Change to word.
Change All
Changes the spelling of the highlighted word to the selected word and all future
occurrences of the word.
Close
Closes the Check Spelling window.
PA TPRS
12
@ KIT Solutions, Inc. 2006