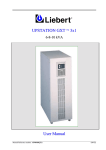
1
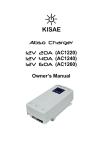
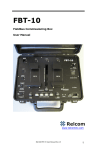
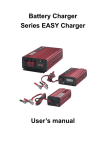
Short form Manual Document rev: 1.10 Firmware rev: 02.00.30 Date: 31-Mar-14 Lithium Ion Battery With integrated Battery Management System Lithium Battery User Manual Safety Instructions Lithium batteries are classified as Class 9 hazardous material UN3481, a power source with high energy density and dangerous materials in a closed metal case! Installation must strictly follow the national safety regulations in compliance with the enclosure, installation, creep age, clearance, casualty, markings, and segregation requirements of the end-use application. Installation must be performed by professional installers only. Switch off the system and check for hazardous voltages before altering any connection! Lithium batteries must be handled only by qualified and trained personnel. The lowest protection degree of specific parts of a lithium battery is IP20. Ensure that the installation of the lithium battery is in accordance with IP20 requirements. Especially keep these rules: • Do not open the Lithium Ion Battery. • Do not discharge a new Lithium Ion Battery before it has been fully charged first. • Charge only within the specified limits. • Do not mount the Lithium Ion Battery upside down or on the sides for air-flow. • Check if the Li-Ion battery has been damaged during transport. • Do not put lithium systems in serial. Dangers involved in case of fire: • Danger of dust particle explosions • Decomposition through fire or heat under development of toxic and cauterizing gases • Combustion gasses which strongly irritate eyes and respiratory organs General actions to be taken by the driver if these dangers occur: • Turn of the engine • Put a warning signal on the road to warn others • Inform others about the danger and direct them to stand away from the wind direction • Call police and fire fighters immediately and notify them that lithium batteries (UN3481) is onboard Instruction for fire extinguishing: • Extinguish with water, if possible cover battery completely in water • Extinguishing with water will produce fluoride, phosphate, fluoride-oxide and carbon-oxide. • Alternatively extinguish with a CO² extinguisher. Note: when put to storage the battery must be fully charged and must be charged again every 6 months. ON-SPILLABLE LI-ION BATTERY Page 2 Lithium Battery User Manual Table of Contents Safety Instructions ............................................................................................................................................. 2 Handling and Maintenance ................................................................................................................................ 4 Quick start: ..................................................................................................................................................... 4 Start-up of an empty battery: ......................................................................................................................... 4 Periods between recharge in storage (off) and idle mode:............................................................................ 4 Overheating of the battery: ............................................................................................................................ 4 EMC and standards: ...................................................................................................................................... 4 Before Installation .......................................................................................................................................... 4 In the box: ...................................................................................................................................................... 4 Mounting ............................................................................................................................................................ 5 Installation Guide ............................................................................................................................................... 6 General Installation Instructions .................................................................................................................... 6 Standalone Setup .......................................................................................................................................... 7 Alternator Setup with Battery Separator ........................................................................................................ 8 Alternator Setup with 12V/24V DC-DC Converter ......................................................................................... 9 Auxiliary Alternator ....................................................................................................................................... 10 Using an Alternate AC/DC or DC/DC charger ................................................................................................. 11 Parallel Connection of Clayton Power Li-Ion Batteries .................................................................................... 12 Cables .......................................................................................................................................................... 12 Serial Connection of Clayton Power Li-Ion Batteries .................................................................................. 12 DIP Switch functionality ................................................................................................................................... 13 Switch 1 ....................................................................................................................................................... 13 Switch 2 ....................................................................................................................................................... 13 Physical dimensions ........................................................................................................................................ 15 Function Description ........................................................................................................................................ 16 Power On/Off ............................................................................................................................................... 16 Protections ................................................................................................................................................... 16 Empty Li-Ion Battery .................................................................................................................................... 16 Outputs ........................................................................................................................................................ 16 Lithium battery general parameters ................................................................................................................. 17 Parallel connector parameters ..................................................................................................................... 17 Signal connector parameters ....................................................................................................................... 18 LED Codes ...................................................................................................................................................... 18 Features of the Li-Ion Battery .......................................................................................................................... 20 Warranty .......................................................................................................................................................... 22 CE Marking ...................................................................................................................................................... 23 Page 3 Lithium Battery User Manual Handling and Maintenance ATTENTION: Never connect Lithium Batteries in serial. Quick start: Connect INPUT3 to GND or the black minus terminal. The battery starts up and LED´s for fuel gauge and status become active. Start-up of an empty battery: Restart the battery and begin charging in less than 30 seconds. If the battery is deeply discharged; restart and begin charging in less than 3 seconds. Periods between recharge in storage (off) and idle mode: The time for a fully charged battery is: 12V Lithium Ion Battery Storage: 6 months Idle: 9 days 24V Lithium Ion Battery Storage: 6 months Idle: 15 days Overheating of the battery: The red LED flash two times; wait until the battery has cooled down. Other failures: See page 17 EMC and standards: 2006/95/EC (Safety directive); The following harmonized standards have been applied: EN 60950-1:2001+ A11:2004 (LVD) 2004/108/EC (EMC directive); The following harmonized standards have been applied: EN 61000-6-3: 2007 Emission hold equipment EN 61000-6-2: 2007 Immunity industrial Before Installation ATTENTION: Read the safety instructions before starting to install the battery and install the needed functions as shown in the diagrams. ATTENTION: When installing the battery, do not mount the Lithium Ion Battery upside down or on the sides for air-flow. Do not cover or block the fan or the air inlet to insure the battery dos not overheat. Mounting holes are for prefixation, suitable fixation has to be added. ATTENTION: Do not connect the batteries in series, only in parallel. ATTENTION: Make sure the Lithium Ion Battery is powered down before starting the installation and do not connect any active wakeups before end of the installation. ATTENTION: If DC consumers are part of the installation, please make sure to apply the DC consumers with a switch or fuse so they can be disconnected. The DC consumers may in some cases cause problems when starting up the system. In the box: 1x Lithium Ion Battery 1x Phönix connector 3 pol Page 4 Lithium Battery User Manual 1x Phönix connector 5 pol 1x CAN communication cable 1x Shorform manual Mounting ATTENTION: Mount the battery topside up or on the side, never upside down. ATTENTION: Fans inside, be sure of that air must be able to flow through the ventilation. Mounting holes for fixation: M5 See more dimensions on page 15 Page 5 Lithium Battery User Manual Installation Guide ATTENTION: Before installing, make sure that all appliances are turned off. General Installation Instructions A general system utilizing a CP Li-Ion battery, a CP G3 Inverter/Charger and a CP G3 Display all have the following in common. It is highly recommended to add fuses to the 230 Vac output to protect the equipment. 2 The communications cable and power cables to the display unit must be 0.5 mm . The supplied 200 A fuse must be mounted on either the positive or negative terminal as illustrated here. Front Top Mounting Screw Torque M8 X 30 mm M8 x 30 mm 1 M5 8N 12 N 5N Note 1: The length of the M5 mounting screws depends on what the Li-Ion battery is mounted on. Page 6 Lithium Battery User Manual Standalone Setup The diagram on Figure 1 shows how to wire a standalone system. This can be used as an Uninterruptable Power Supply (UPS) system. ATTENTION: Make sure the AC mains is disconnected during assembly or service Connecting the G3 Inverter/Charger to the Li-Ion Battery 1. Connect the GND connections to all the components. 2. Connect all the data and small signal connections. 3. Connect the 230Vac mains connections. NB: the 230Vac mains relay (not supplied) is essential for the system if it needs to charge from the mains supply. 4. Connect the positive DC supply. Figure 1 Page 7 Lithium Battery User Manual Alternator Setup with Battery Separator Starting with the standalone system, the display power (red wire) should be moved from the Li-Ion battery to the lead-acid battery as in Figure 2. Using connection point, connect the positive terminal of the Li-Ion battery, the G3 Inverter/Charger and the G3 Display to the DC OUTPUT on the CDR Battery separator. Connect the OUTPUT 2 to the GND terminal of the CDR battery separator. Connect the Lead-Acid battery GND to the negative terminal of the Li-Ion battery, the G3 Inverter/Charger and the G3 Display using a connection point. Connect the INPUT 1 to the D+ signal from the car. Connect the positive power from the lead acid battery in the car to the DC INPUT terminal on the CDR battery separator. Figure 2 Page 8 Lithium Battery User Manual Alternator Setup with 12V/24V DC-DC Converter Using a 12V/24V DC-DC Converter insures that the voltage for charging the Li-Ion battery is sufficient. Figure 3 shows the diagram of how to connect this setup. Using a connection point, connect the positive terminal of the Li-Ion battery and the G3 Inverter/Charger to the 24V OUT on the Booster. Connect the G3 Display power to the Lead-Acid battery positive terminal. Connect the control coil of a 24Vdc relay from OUTPUT 2 on the Li-Ion battery to the positive terminal on the Li-Ion battery. Connect the contact of the 24Vdc relay between the positive terminal of the Li-Ion battery and the IGN terminal of the booster. Connect the INPUT 1 to the D+ signal from the car. Using a connection point, connect the negative terminal of the Li-Ion battery, the G3 Inverter/Charger, the G3 Display and Lead-Acid battery to the GND on the Booster Figure 3 Page 9 Lithium Battery User Manual Auxiliary Alternator It is possible to charge from an extra alternator if it has a control function/input. This setup is shown I the diagram in Figure 4. Using a connection point, connect the negative terminal of the Li-Ion battery, the G3 Inverter/Charger and the G3 Display to the GND terminal on the alternator. Connect OUTPUT 2 of the battery to whatever control function/input the alternator has. Using a connection point, connect the positive terminal of the Li-Ion battery, the G3 Inverter/Charger and the G3 Display to the positive terminal on the alternator. If possible, connect the G3 Display power to an alternate power source, including a GND connection to the rest of the system. Figure 4 Page 10 Lithium Battery User Manual Using an Alternate AC/DC or DC/DC charger ATTENTION: Before installing, make sure all appliances are turned off. ATTENTION: The CP Li-Ion battery must be able to stop the charging via a charge control relay. Connect the DC Charging device to the battery through a DC charge control relay as shown in the diagram in Figure 5. The charge control relay must get its control signal from OUTPUT 2 on the battery. A charge wakeup relay is connected between the power input pins of the charger to sense when the CP LiIon battery can start charging. This relay contact is connected between the INPUT 1 on the Li-Ion battery and GND. The relay must be of a Normally Open type, in order to pull the input to GND when active. Finally the DIP switch in the battery must have switch 2 in the on position. Figure 5 Page 11 Lithium Battery User Manual Parallel Connection of Clayton Power Li-Ion Batteries ATTENTION: Before installing, make sure that all appliances are turned off. ATTENTION: Connect a maximum of 20 Clayton Power Li-Ion batteries in parallel. ATTENTION: Do not mix Clayton Power Li-Ion batteries with batteries of different brands of batteries unless proper separation is used. ATTENTION: Do not connect Clayton Power Li-Ion batteries is serial. Make sure the DIP switch 1 is set as described on page 13. Cables To ensure optimal performance all batteries in parallel must be connected to one pair of connection points. All cables from the batteries to these connection points must have the same length (±20%). All the cables must meet the following criteria 2 35 mm < 2 m 2 50 mm < 3 m 2 75 mm < 5 m Serial Connection of Clayton Power Li-Ion Batteries Do not connect the CP Li-Ion batteries in serial. Page 12 Lithium Battery User Manual DIP Switch functionality Two DIP switches are placed in a cutout in the front of the battery. These are illustrated in Figure 5 and Figure 7. Switch 1 To connect batteries in parallel, each battery must be connected via the CAN bus with the supplied 4p4 cables. The two batteries with only one cable must have switch 1 in the on position. The rest of the batteries must have switch 1 in the off position. A maximum of 20 CP Li-Ion batteries can be connected in parallel. The SW communication must only be connected to one of the batteries. This should preferably be one of the end batteries as in Figure 7. Switch 2 Switch 2 is able to change the wakeup levels of input 1 and input 2. Position ON OFF Input 1 Active Low and analog change Active high (TTL Levels) Input 2 Active Low (TTL Levels) Active High (TTL Levels) The Analog Change Wakeup function is able to sense when the generator in a car is running. Figure 6 Shows the basic connection needed to use the analog wakeup feature. When the voltage on Input 1 is greater than 10V and raises with more than 0,5V within 5 seconds the battery will wake up. If the battery sees a current into the battery, it will stay on as long as there is charge current. Figure 6 Page 13 Lithium Battery User Manual Figure 7 Page 14 Lithium Battery User Manual Physical dimensions Front and back of both 24V and 12V Li-Ion battery Left: Side of 12V Li-Ion battery Bellow: Side of 24V battery Page 15 Lithium Battery User Manual Function Description Power On/Off The Li-Ion battery will start when it detects wakeup active signal on one of the wakeup inputs. The Li-Ion battery will remain active until all active wakeup signals are deactivated. Wakeup sources: Input 1 (Active high) Input 2 (Active high) Input 3 (Active low or detecting SW data) CAN wakeup (Active high) Car ignition signal Display remote out 230Vac Grid input The default uses for the different inputs are as follows; Input 1: Enables the system to charge the Li-Ion battery when the engine is running. Input 2: If the G3 Display is powered on by the user, this will activate the Li-Ion battery. Input 3: If the user plugs in a 230Vac source the Li-Ion battery will begin charging. Protections To prevent hazardous use, the Li-Ion battery can disconnect the main switch by way of 4 measures Overcharge Deep discharge Temperature extremes Short circuit / over current. The system ensures a high level of safety by 2 measures Communication to the control component Internal switch to cut of charge / discharge current Empty Li-Ion Battery The Li-Ion battery will protect itself from deep discharge, by disconnecting the main switch and enter sleep mode when empty. The battery is able to startup and stay connected for 30 seconds, to allow charge current to rise above 1A, when empty. If the Li-Ion battery is deeply discharged, the charge detection time is shortened to 3 seconds. Outputs The battery has 2 outputs for controlling external equipment such as; Battery separator, Charger, Solar charger etc. The outputs are of open collector type and can be configured from a PC. The default output settings are Trigger condition Reset condition Purpose Output 1 SOC < 10% SOC > 11% Output 2 Cell voltage > 4,1V Cell voltage < 3,9V Driving an external Empty Li-Ion battery alarm Protect against overcharge from external charger Page 16 Lithium Battery User Manual Lithium battery general parameters Battery type Available capacity Nominal battery voltage Operation voltage discharge Operation voltage charge Cell voltage min cut-off Cell voltage max cut-off Continuous discharge current 10 min Max discharge Impulse 5 Sec current 10 µSec Continuous charge current Standard charge/discharge current Lifecycle 80%DOD Lifecycle 70%DOD Operating temperature Cooling Inputs (wakeup function) Outputs (Open Collector) Communication Parallel connection Self-discharge rate per month (Sleep mode) Operating mode consumption Sleep mode consumption Connection terminals Weight Dimensions in mm (H x W x L) 100Ah-12V 80Ah 12 VDC 9.2 VDC 15 VDC 100Ah-24V 80Ah 24 VDC 18.4 VDC 30 VDC 2.3 VDC 4.2 VDC 100 A 200 A (temperature controlled) > 500 A > 1000 A 100 A 50 A > 3000 > 5000 -40°C~50°C Forced fan 3 2 CAN (SAE J1939) - CP Single Wire 1 to 20 < 3% 350mA 180mA < 2mA < 2mA M8 screw M8 screw 19 kg 36 kg 274 x 192 x 301 274 x 192 x 558 Parallel connector parameters Pin # Signal name 1 CAN Wakeup 2 CAN GND 3 CAN High 4 CAN low Parameter Output voltage (open drain) Output Impedance Max Input Voltage Input Trigger Voltage (High/Low) Input Impedance (as pull down) Max Current Fuse Rating Communication Speed Communication Protocol Output Impedance Communication Speed Communication Protocol Output Impedance Page 17 Value Battery voltage * 2 10 KΩ 60 VDC 3.5 VDC 4,7 MΩ 250 mA 300 mA Thermal fuse 125 Kbps SAE J1939-11 > MΩ 125 Kbps SAE J1939-11 > MΩ Lithium Battery User Manual Signal connector parameters Pin name Output 1 Output 2 Input 1 Input 2 Input 3 SW Data (Single wire bus) SW GND (Single wire bus) GND Parameter Max Drain Voltage Max Sink Current Fuse Rating Topology Max input Voltage Input voltage level (high/low) Input Impedance (as pull up) Max Input Voltage Input Trigger Voltage (High/Low) Input Impedance (as pull up to +5 V) Communication Speed Output Impedance (+12V) Fuse Rating Max Current Fuse Rating Max Current Fuse Rating LED Codes Power LED (Blue) Solid light Flashing (3Hz) Connected Connected and charging Fuel gauge LED’s LED 100% (Green) 80% (Green) 60% (Green) 40% (Green) 20% (Red) SOC level >90% 80% - 90% >70% 60% - 70% >50% 40% - 50% >30% 20% - 30% >10% 0% - 10% Status Solid light Flashing (1Hz) Solid light Flashing (1Hz) Solid light Flashing (1Hz) Solid light Flashing (1Hz) Solid light Flashing (1Hz) Page 18 Value 45 VDC 300 mA 300 mA Thermal fuse Open collector 45 VDC TTL Levels 4.7 MΩ 45 VDC 3.8 VDC 2 MΩ 9600 Baud 1 KΩ 300 mA Thermal fuse 300 mA 300 mA Thermal fuse 300 mA 300 mA Thermal fuse Lithium Battery User Manual LED Codes: Failure LED (Red) Code 1 Flash Failure Battery is empty 2 Flash Battery temperature too high 3 Flash 4 Flash Battery overloaded or short circuit Pre-charge failure 5 Flash Battery overcharged 6 Flash Internal failure: Cell voltage monitor Internal failure: Cell temperature monitor Internal failure: internal communication failure Internal failure: Other failures 7 Flash 8 Flash 9 Flash Failure description Battery is empty, restart the battery and ensure charge current (> 1 A) within 30 sec or the battery will enter sleep mode Battery temperature is too high, wait until the battery has cooled down. Battery overloaded, remove the load and restart the battery. The battery will enter sleep mode after 30 sec. Battery unable to pre-charge the load. Remove load and restart the battery. The battery will enter sleep mode after 30 sec. Charger is overcharging the battery, check charger. Battery is protecting and doing maintenance balancing. Battery cell voltage monitor is failing. The battery will enter sleep mode after 30 sec. Contact your supplier Battery cell temperature monitor is failing. The battery will enter sleep mode after 30 sec. Contact your supplier Battery internal communication is failing. The battery will enter sleep mode after 30 sec. Contact your supplier Battery has other failures. The battery will enter sleep mode after 30 sec. Contact your supplier Page 19 Lithium Battery User Manual Features of the Li-Ion Battery System Control The Li-Ion battery works as a controller in a complete power system. The Li-Ion battery manages power distribution and the priority of operation of different power consumers. Charger Control It is necessary to control the charging of lithium batteries in order to avoid un-controlled disconnects and to protect the lithium cells from unstable conditions. The charging can be controlled via the interface using communication or output pins. G3 Inverter/Charger control The lithium batteries can communicate with a CP G3 Inverter/Charger and control power distribution and charging. Parallel connection Several lithium batteries can be parallel connected in order to increase battery capacity and current capability. The interconnected batteries have separate MOSFET safety breakers ensuring parallel connection without any safety risk while maintaining full control over the batteries. Battery Management System Each lithium battery has a built-in Battery Management System ensuring full control and safety. The BMS monitors lithium cell activity and uses the information for safety, maintenance, SOC, and interface control. Cell voltage measurement The BMS measures cell voltage with high accuracy. The accuracy is necessary to calculate the SOC as a few mV make a big difference. Cell temperature measurement The BMS measures the temperature of all individual cells in a battery pack to ensure that none of the cells overheat or cause thermal runaway. The temperature information is also used for SOC calculations. Shunt and current measurement Page 20 Lithium Battery User Manual The current goes through the BMS and the internal shunt. The BMS measures the current and uses it for protection and SOC calculation. Integrated MOSFET safety breaker The most important part of the BMS circuit protection is the integrated MOSFET safety breaker. It allows the BMS to cut off all charge and discharge currents in hazardous situations. Overload protection The advantage of the internal MOSFET safety breaker is its capability to disconnect high currents without damaging the main switch. The BMS can use the MOSFET safety breaker for overload protection without damaging the cells. Short-circuit protection The MOSFET safety breaker, in the BMS, protects the battery against output short-circuits. The MOSFET has a very short reaction time and can disconnect the output in short-circuit situations without damaging any components. Pre-charge function The BMS has a pre-charge function build into the MOSFET breaker. The pre-charge function reduces inrush currents when high-capacity consumers are connected. Advanced SOC calculation The highly advanced algorithm for SOC calculation involves a combination of voltage, temperature and impedance mapped in tables combined with detection of actual data. The data tables include information about SOC vs. OCV, immediate cell impedance, time-effected cell impedance, and temperature vs. cell impedance. Cell balancing The advanced SOC calculation ensures that all cells are kept in a balanced condition at all times. The BMS has a high cell-balance current that reduces the need for active cell balancing and restores the cells to a balanced condition faster. The BMS is cell balancing of each single cell in charge, discharge and idle mode. Interface Each lithium battery has an extended interface that allows it to control power distribution for different consumers. The interface can control alternative chargers, solar panels, gen-sets, and other charging devices. The control of external devices is ensured via several communications, wake-ups, and input and output pins. 2 CAN Communication connectors 1 CP Single Wire Communication 3 high/low inputs 2 open collection outputs Wake-up When the lithium battery is not in use enters the BMS a low power state. In this state the BMS keeps power consumption ultra-low to avoid further discharge of the lithium cells. The BMS can be reactivated through several wakeup high/low input pins and charge currents plugged into the battery. Configurable outputs The output pins can be configured via PC software to be triggered in occasion of different events caused by cell voltage, cell temperature, current and/or SOC levels. Statistics log The BMS statistics log is a diagnostics tool by which the BMS logs all events, ampere hours going in and out of the battery, and tracking failures. The information is stored in a non-voltage EEPROM. Firmware update via CAN The firmware can be updated via a simple USB connection to a CAN-adapter to ensure the newest firmware and functions. Page 21 Lithium Battery User Manual Warranty CAUTION & WARNING: DO NOT USE OR ATTEMPT TO USE THIS PRODUCT UNTIL YOU HAVE READ THIS USER'S MANUAL IN ITS ENTIRETY. IMPROPER INSTALLATION OR USAGE OF THIS DEVICE MAY BE HAZARDOUS AND MAY CAUSE DAMAGE TO OTHER ELECTRICAL EQUIPMENT AND WILL VOID WARRANTY. Clayton Power warrants, to the original purchaser only, for a period of 24 months from the date of purchase, that the Clayton Power device will be in good working order when properly installed and operated as described in this manual. If the display fails within this time period under normal use, Clayton Power will, without charge, at the place of Clayton Power's choosing, repair or replace the display - with new or reconditioned parts or a new or reconditioned display as Clayton Power deems necessary. This warranty is void and will not be applied if: The inverter has been used against the recommendations of this manual. The inverter has been used in an application outside of general automotive, solar, industrial or marine applications without the agreement of Clayton Power. The inverter has been modified or repaired without written authorization of Clayton Power. Reverse polarity, excessive overloading, general abuse, neglect, wear & tear, ingress of liquids (water, oil, acid, or otherwise), foreign objects, lightning strikes, over or under voltage, RFI/EMI, etc. Obtaining Warranty Service To obtain warranty service, please contact the outlet at which you purchased your product. Do not contact Clayton Power directly. For warranty service you will require the following: 1. Proof of purchase 2. Model number 3. Serial number 4. Brief description of application and problem Telephone your Clayton Power dealer for an authorization number prior to dispatch - do not send without authorization. Once this number has been obtained, please carefully package your display and send (freight paid) to the Clayton Power dealer. Copyright The information contained within this document remains the sole property of Clayton Power No part of this document may be copied or reproduced in any form or by any means, and the information contained within is not to be communicated to a third party, without the prior written consent of Clayton Power. Page 22