1
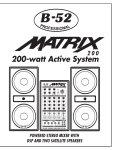
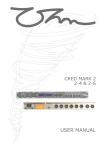
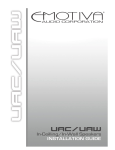
709-950-1-1_2030_usermanual.indd 1
12/03/2012 12:03:58 PM
important safety instructions
1.
2.
3.
4.
5.
6.
7.
8.
9.
10.
11.
12.
13.
14.
15.
16.
17.
18.
19.
20.
21.
22.
23.
Read these instructions.
Keep these instructions.
Heed all warnings.
Follow all instructions.
Do not use this apparatus near water.
Clean only with dry cloth.
Do not block any ventilation openings. Install in accordance with the manufacturer’s instructions.
Do not install near any heat sources such as radiators, heat registers, stoves, or other apparatus
(including amplifiers) that produce heat.
This is a Class I product and shall be connected to a MAINS socket outlet with a protective earthing
connection.
Do not defeat the safety purpose of the polarized or grounding-type plug. A polarized plug has two
blades with one wider than the other. A grounding type plug has two blades and a third grounding
prong. The wide blade or the third prong are provided for your safety.
If the provided plug does not fit into your outlet, consult an electrician for replacement of the obsolete
outlet.
Protect the power cord from being walked on or pinched particularly at plugs, convenience receptacles,
and the point where they exit from the apparatus.
Only use attachments/accessories specified by the manufacturer.
Use only with the cart, stand, tripod, bracket, or table specified by the manufacturer,
or sold with the apparatus.
When a cart is used, use caution when moving the cart/apparatus combination to avoid
injury from tip-over.
Unplug this apparatus during lightning storms or when unused for long periods of time.
Refer all servicing to qualified service personnel. Servicing is required when the apparatus has been
damaged in any way, such as power-supply cord or plug is damaged, liquid has been spilled or objects
have fallen into the apparatus, the apparatus has been exposed to rain or moisture, does not operate
normally, or has been dropped.
Keep packaging out of reach of children.
Take care when lifting the speaker.
The Event 2030 is a precision monitoring tool capable of producing high sound pressure levels that
could cause permanent hearing loss.
Please exercise caution when listening, ideally using an SPL meter to monitor output levels.
Never touch the heatsink while in operation. Never cover the 2030 while turned on. Ensure there is
suitable ventilation around the rear of the cabinet for heat dissipation.
The appliance coupler shall remain operable once the product is installed.
Warning - To reduce the risk of fire or electric shock, do not expose this apparatus to rain or moisture.
Apparatus shall not be exposed to dripping or splashing and no objects filled with liquids, such as vases,
shall be placed on the apparatus.
The 2030 is a free-standing speaker and is designed for operation on open surfaces such as speaker
stands or a work surface. Do not operate the 2030 within cabinets or any enclosed space with limited
ventilation.
709-950-1-1_2030_usermanual.indd 2
12/03/2012 12:05:21 PM
important safety instructions
5
12
15
15
16
17
18
19
709-950-1-1_2030_usermanual.indd 3
12/03/2012 12:05:22 PM
709-950-1-1_2030_usermanual.indd 4
12/03/2012 12:05:25 PM
introduction
Thank you for purchasing the Event 2030. Before you set up your speakers for the first time, please read
through this user guide.
The Event 20/20 pedigree needs no introduction. As the speaker family that made studio monitoring
accessible to countless artists and engineers, it has become a household name and is a staple in studios the
world over. Now the time has come to build upon this legendary speaker platform, with the 2030 three-way
studio monitor system.
The 2030 is a category defining three-way studio monitoring system that combines three discrete drivers to
allow for incredibly accurate reproduction of the entire audio spectrum.
The 2030 borrows heavily from the technology developed for the Event Opal, incorporating fully discrete
Class AB amplifiers for the mid-high assembly and woofer that provide up to 240 watts of burst power with
less than .02% total harmonic distortion, providing higher dynamic range which is maintained as the output
level is increased. This behaviour is due to the incomparable “soft clipping” nature of the 2030s Class AB
topology; audio playback is unfettered and remains unmasked by the distortion and inter-modulation
artifacts produced by less sophisticated amplifier designs.
Please take the time to visit www.eventelectronics.com and register your 2030 monitors.
709-950-1-1_2030_usermanual.indd 5
12/03/2012 12:05:30 PM
2030 BAS - front
tuned waveguide
mid range driver
709-950-1-1_2030_usermanual.indd 6
tweeter
low resonance speaker baffle
woofer
illuminated LED power indicator
12/03/2012 12:05:32 PM
2030 BAS - rear
rear firing port
rear panel controls
(see next page)
signal input (balanced xlr)
heatsink
mains switch
mains input
mains voltage selector
709-950-1-1_2030_usermanual.indd 7
12/03/2012 12:05:38 PM
rear panel controls
SIGNAL INPUT
The 2030 requires the input of an
industry standard XLR style cannon jack.
GAIN
Allows for modification of the input
sensitivity, from -12dB to +12dB in
regards to the reference sensitivity of
0.775v RMS. The default setting is 0.
HF SHELF
Allows for the implementation of a
shelving filter at 2kHz. The boost and cut
is variable between +/– 3dB. The default
setting is 0 - filter not engaged.
LF SHELF
Allows for the implementation of a
shelving filter at 200Hz. The boost and
cut is variable between +/– 3dB. The
default setting is 0 - filter not engaged.
709-950-1-1_2030_usermanual.indd 8
12/03/2012 12:05:43 PM
mains power
MAINS SWITCH
Use the Mains Switch to turn the 2030
on or off.
MAINS INPUT
Connect the mains supply here. Ensure
that you use only the cable supplied or
a genuine Event replacement. Note that
the amplifier is not entirely disconnected
from mains power unless this cable is
completely disconnected.
MAINS VOLTAGE SELECTOR
Please note, that as the 2030 is not fixed
to operate in the voltage range of the
region that it is sold in, extra care must
be taken before connecting the mains
power.
Please ensure that the voltage selector
is set to the correct voltage for your
region, and that the correct fuse
is installed. Damage caused by an
incorrect voltage setting will not be
covered under warranty.
709-950-1-1_2030_usermanual.indd 9
12/03/2012 12:05:44 PM
unpacking your speakers
We understand that you may be eager to unpack your new Event 2030s,
but please be careful when unpacking the speakers. Your new studio
monitors have been carefully inspected, tested and packed by our quality
control engineers prior to shipping. Please take care at each stage of
unpacking.
The Event 2030 features an aluminium alloy dome tweeter, which may
be easily damaged by hands when removing the speaker from the
packaging.
Once you have successfully unpacked your new speakers, please store all
packaging material in a safe place for future transport of your speakers.
To prevent damage, do not touch the aluminium alloy tweeter dome
709-950-1-1_2030_usermanual.indd 10
12/03/2012 12:05:44 PM
connecting your speakers
Before you connect and turn on your Event 2030 speakers, ensure the Gain
level on the rear of the speaker is set to the lowest setting and the HF shelf
and LF shelf dials are both set to zero. If too much input signal is present,
the amplifiers may overload. Ensure the power switch is also turned off.
Next, connect your monitors via the XLR input located at the back of the
speaker. Use only good quality input connectors having industry standard
dimensions. If you require an input type other than XLR such as RCA or
TRS, you will require an adaptor to connect your speakers. However Event
strongly recommends using the XLR balanced input wherever possible for
a higher quality signal.
Check that your voltage selector has been configured to the correct
setting for your location. If your speaker is set at an incompatible
voltage, it will be necessary to switch the voltage selector and change the
fuse type.
If at all unsure of how to complete this process, Event strongly recommends
you contact qualified service personnel to switch the fuse. Once voltage
is correctly configured, connect your 3-Pin IEC AC connector from the
monitor to an AC power socket.
Your 2030 monitors are now ready to turn on. Adjust the Gain setting
as necessary to achieve a suitable level, leaving enough headroom for
control through your signal source.
709-950-1-1_2030_usermanual.indd 11
12/03/2012 12:05:49 PM
2030 acoustic axis
The 2030 is an active 3-way speaker. This means that monitor placement slightly differs from a 2-way system.
The acoustic axis of the 2030 is located at the point directly between the tweeter and midrange driver.
Please see the diagram below for the acoustic axis point.
ACOUSTIC AXIS POINT
X
709-950-1-1_2030_usermanual.indd 12
X
ACOUSTIC AXIS POINT
12/03/2012 12:05:54 PM
mounting your speakers
The Event 2030 have been designed to be mounted horizontally. This means that each speaker will be a mirror
image of its partner. To ensure the most accurate frequency response, the speakers should be placed in the
correct left and right positions, with the tweeter / midrange driver assembly facing inward as shown below.
Mount the speakers at ear level, facing slightly inward, so that the acoustic axis (see previous page) directly
faces the listening position. When oriented this way, the listener is in the “sweet spot” which yields the most
accurate stereo reproduction. If you need a wider sweet spot to allow for greater listener movement or for
group monitoring, face the speakers in a slightly more open position, but never more than absolutely necessary.
While not ideal, if you must mount the speakers substantially above or below ear level, you will also need to
tilt the cabinets downward or upward to keep the acoustic axis directly facing you.
It is important to note that the listening space has a large effect on the performance of speakers, particularly
the low frequency response. It is best to try your monitors in a variety of positions to achieve optimum results.
The speakers will ideally be placed in a symmetrical room, with each speaker at an equal distance to its closest
respective wall. As the 2030 uses convection for cooling, it is essential that you leave adequate space around
each speaker for ventilation. Please keep this in mind when mounting the speakers in a cabinet or similar
closed space.
When placement near room boundaries causes inconsistencies in the bass response, it is always best to first
move the speakers to a more ideal position, however where this is not possible, the variable Low frequency
shelf control (LF SHELF) can be used to compensate. There is also a variable high frequency shelf control,
which is useful for correcting overly bright or dull sounding spaces. For the best speaker performance, It is
always advisable to first acoustically treat any listening space when problems arise.
709-950-1-1_2030_usermanual.indd 13
12/03/2012 12:06:04 PM
specifications
system
709-950-1-1_2030_usermanual.indd 14
Type
Three way, bass reflex
Frequency Response
38Hz - 22kHz
Crossover Frequencies
400Hz & 3kHz
Crossover Type
Linkwitz-Riley Acoustic Fourth order for Low/Mid range
Event Proprietary Acoustic Second order for Mid/High range
Low Frequency Filter
Butterworth Subsonic Second
Order (-3dB at 38Hz)
Acoustic Output - SPL @ 1m,
Long term (80Hz - 20kHz)
111dB
Acoustic Output - SPL @ 1m,
Peak (80Hz - 20kHz)
114dB
Signal Input
XLR - balanced
AC Input Connector
3-Pin IEC
Average Long Term Power
Consumption
95 watts
Quiescent Power
Consumption
<10 watts
Overdrive Protection
Event proprietary IC based fast
limiting with sliding gain
Thermal Protection
Thermal cutoff switch, auto reset
12/03/2012 12:06:04 PM
specifications
low frequency transducer
Piston Diameter
180mm (7.1”)
Voice Coil Diameter
38mm (1.5”)
Former Material
Kapton
Voice Coil Wire
Copper
Magnet Type
Ferrite (fully shielded)
Cone Type
Mineral Filled Polypropylene
mid range transducer
Piston Diameter
85mm (3.3”)
Voice Coil Diameter
25mm (1”)
Former Material
Glass fiber
Voice Coil Wire
Copper
Magnet Type
Ferrite
Cone Type
Pressed pulp/Mineral filled
polypropylene
high frequency transducer
Piston Diameter
19mm (0.75”)
Voice Coil Diameter
19mm (0.75”)
Magnet Type
Neodymium (fully shielded)
Cone Type
Aluminium alloy with Ferrofluid
cooled magnetic gap
709-950-1-1_2030_usermanual.indd 15
12/03/2012 12:06:09 PM
specifications
low frequency amplifier
Frequency Response
20Hz - 40kHz (± 0.25dB)
bandwidth limited
Operating Band Pass
20Hz - 400Hz
Total Harmonic Distortion
0.02% @ 120 watts into 4ohm load
Long Term Power @ 4 Ohms*
80 watts
Power @ 4 Ohms**
120 watts
Output Topology
Class AB with proprietary soft
clipping topology
Cooling
Convection - Aluminium heat sink
high frequency amplifier
Frequency Response
20Hz - 40kHz (± 0.25dB)
(bandwidth limited)
Operating Band Pass
400Hz - 30kHz
Total Harmonic Distortion
0.02% @ 120 watts into 4ohm load
Long Term Power @ 6 Ohms*
80 watts
Power @ 6 Ohms**
120 watts
Output Topology
Class AB with proprietary soft
clipping technology
Cooling
Convection - Aluminium heat sink
*
Both high frequency and low frequency were measured independently for this specification.
Long term power was measured using 1kHz sine wave signal.
**
Burst power was measured using a 1kHz burst tone waveform where the burst portion contains 4 cycles
(on) and the low level signal contains 200 cycles (off). This test signal succinctly represents the strain and
demands placed on the amplifier by music content containing high transients.
709-950-1-1_2030_usermanual.indd 16
12/03/2012 12:06:14 PM
specifications
physical
Cabinet Construction
Engineered Composite Wood
Low Frequency Vent
High “Q” /
High output rear firing port
Cabinet Volume
16 Litres
Cabinet Dimensions
275mm W x 300mm H x 260mm D
10.8” W x 11.8” H x 10.2” D
Cabinet Weight
14.6kg/32lb
Shipping Dimensions
435mm W x 500mm W x 415mm D
17.1” W x 19.7” H x 16.3” D
Shipping Weight
16.5kg/36lb
Operating Temperature
Range
5-35 deg C / 40-95 deg F
power supply
Type
Torodial
Rating
270VA
AC mains fuse and
AC voltage selector
100V-120V 5 Amp
220V-250V 2.5 Amp
709-950-1-1_2030_usermanual.indd 17
12/03/2012 12:06:18 PM
warranty and support
The Event 2030 is supplied with a 12 month manufacturer’s warranty from
date of purchase, covering defect in product or workmanship.
The warranty excludes defects caused by modification, shipping damage,
or failure to use the speaker as per the instruction guide.
Please retain your sales receipt as proof of purchase.
If you experience any problems with your 2030, please contact the Event
Customer Service department via the details provided to the right.
Before emailing, however, we ask that you please consult the Technical
Support section of our web site, www.eventelectronics.com
Please note that there are no user serviceable parts within the Event 2030.
For any servicing please refer to an authorised service technician.
If you believe your monitor is in need of repair, please contact the Event
Customer Service department to request a Return Authorization Number
(RA#). We can accept for servicing only those units that are accompanied
by an RA#. Units shipped without an RA# number will be refused.
709-950-1-1_2030_usermanual.indd 18
12/03/2012 12:06:23 PM
event electronics customer support
Website: www.eventelectronics.com/support
Email : [email protected]
709-950-1-1_2030_usermanual.indd 19
12/03/2012 12:06:28 PM
International
107 Carnarvon Street
Silverwater NSW 2128 Australia
www.eventelectronics.com
USA
Suite A 6385 Rose Lane,
Carpinteria CA 93013
[email protected]
709-950-1-1_2030_usermanual.indd 20
12/03/2012 12:06:33 PM