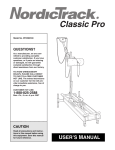
1
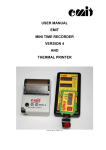
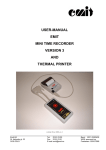
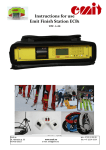
User manual
Emit Time Recorder
ETR3
(c) Emit 5. Oktober 2004, rev 1
Emit AS
St. Halvards gt. 33
N-0192 OSLO
Tel: +47 22 91 03 00
Fax: +47 22 91 03 01
E-mail: [email protected]
Bank: 6011.05.80439
WEB: www.emit.no
Reg.no: 930127868
Emit Time Recorder 3, ETR3, is a compact easy-to-use timer with the six most used
programs from RTR2 built-in: program 10 (times only), program 20 (start numbers
and times), program 60 (cross-country with external units), program 90 (mass
-arrangements) , program 130 (EPT, e-cards) and program 131 (EPT, e-cards and
barcodes)
ETR3 can connect to a barcode reader and handles times from a startgate and/or
photocell, when connected to an external connection box. ETR3 is delivered in a
handy transport case, which also contains the thermal printer EPR3 with cable,
timetaking-button and a USB cable for connection to a PC. A USB-driver and user
manual are also included.
ETR3 has four inputs on top of the unit, where different equipment may be
connected. The inputs are marked with the letters A, B, C and D.
The following inputs are in use on ETR3:
• 'A'
RS232 (serial) connection to a PC
• 'B'
Thermal printer EPR3
• 'C'
Timetaking-button
• 'D'
USB connection to a PC
The following keys are in use on ETR3:
• Clear/ON
turns the unit on/off deletes last key pressed
• Enter (↵ )
accepts entered value
• A
adjust internal clock in prog.mode
• ⇓
adjust internal date in prog.mode
• Numerical keys
Battery
ETR3 uses a built-in 3,6V Lithium battery. The battery has a capacity of 10 years of
normal usage.
The battery used in ETR3 is soldered on and should only be replaced by authorized
personnel. With normal usage it will last for many years.
Environment
ETR3 is not waterproof. Beware not to expose the connectors on the upside of ETR3 to
water. It will work fine in temperatures down to minus 20 degrees Celsius (the thermal
printer however is not designed to tolerate water or temperatures below 0 degrees).
USB connection
Connect ETR3 to a PC using the supplied USB cable. Connect the cable to input 'D' on
ETR3 and the other end of the cable to a vacant USB port on the PC. Turn on ETR3.
Install the USB-driver by inserting the CD containing the USB-driver into the PC's CDROM player, and pointing to this drive (for example D:) when the PC asks for driver files.
Please note that this installation consists of two steps: first a "USB Serial converter" must
be installed; second a "USB Serial Port" can be installed. The USB serial port normally
gets the next free com-port (com3, com4, etc.), depending on how many com-ports that is
present in the PC.
Memory
ETR3 stores the last 2.040 e-cards in its internal memory, using program 130 and 131.
When using the other programs, ETR3 stores up to 50.000 pairs of startno./times. The
first data stored is overwritten when the internal memory is full.
ETR3 makes a pointer to a new event when started by pressing 'Clear/ON'
Turning on ETR3:
• Turn on ETR3 by pressing the Clear/ON-key and holding it down for 3 seconds.
The battery level is shown in the upper display for a few seconds. If the battery
level goes below 3.10 V, ETR3 will beep repeatedly to indicate that the battery
should be replaced. The lower display shows the unit's serial no.
• If ETR3 contains data from an earlier event, the upper display shows "rESEnd",
while the lower display shows "0 or 1". Press 1 to resend the data from the
previous event. The upper display will then show "PC tr" (PC transmit), while the
lower display shows the program no. used in the previous event ("P 90"). When
the transmission is finished, ETR3 must be restarted by pressing Clear/ON. If
you don't want to resend the data from the previous event, just press 0. The upper
display shows "ConF 9" (confirm 9). ETR3 asks for a confirmation before
deleting the data from the previous event. Press 9 to confirm that you want to
delete the data from the previous event.
• The upper display shows "ProG", and ETR3 is ready for a new event.
Setting the date and time
The correct date and time must be set before choosing what program to use. After
choosing a program no., ETR3 must be restarted to set the date and time.
Set correct date by pressing the ⇓-key. The upper display shows ETR3's internal date
(YYMMDD), and the lower display shows "000000". If you need to change the date;
enter the correct date and confirm by pressing ↵. If the date already is correct; just
confirm by pressing ↵. It is important to set the date before the time, since ETR3 will
change time according to the Daylight Saving Act (summertime/wintertime).
Set the correct time by pressing A. The upper display shows ETR3's internal clock
(HHMMSS), and the lower display shows "000000". If you need to change the time;
enter the correct time and confirm by pressing ↵. If the time already is correct; just
confirm by pressing ↵.
General introduction to the various programs
ETR3 has the following six program choices:
•
Program 10 - Registration of finish-time with a printout.
This program is suitable for small arrangements where only the finish-time, and
not the starting number, is being registered. The timetaking-button is being used.
The EPR3 printer prints all the finish-times. These finish-times are being
numbered continuously, so you can see how many times that has been taken.
•
Program 20 - Registration of start number and finish-time with a printout.
This program registers both the finish-time and the start number. A timetakingbutton is used at the finish-line, while the start numbers are registered at the
keyboard. The start numbers can also be registered with a barcode-reader, that
is if the start numbers are written with barcodes. The ETR3 doesn't calculate
the used times, but the printer prints the start number and the finish-time. This
is probably the mostly used program, especially at common-start arrangements,
and when a PC with a result-program is connected with the ETR3. Typical
sports are cross-country, orienteering, exercise runs and cycle-competitions.
•
Program 60 - Cross-country with external units.
Program 60 is used at important cross-country events where there is a demand
for a startgate at the start, and photocells at the finish. The photocells, the
timetaking-button and the startgate are connected to an external connection
box, which is connected to ETR3.
•
Program 90 - Timetaking in mass-arrangements. Timetaking by registration
of start numbers.
While using this program you'll need a barcode-reader as external equipment.
The barcode-reader is connected via the external connection box. Further, it is
assumed that all the competitors have a start number with a barcode-label. The
times are taken when the start number is read. If a runner is missing his/hers
barcode-label, the start number can be entered at ETR3´s keyboard. This
program is most suitable for use in different types of mass-arrangements.
• Program 130 - Emit EPT electronic timetaking.
This program uses Emits electronic punching- and timetaking-system for
orienteering. The finish-time is automatically taken when punching at the last
control. All split-times and punching-receipts are read directly on ETR3 by
placing the e-card on the designated field, marked by a thin red line, on top of
ETR3's keyboard.
• Program 131 - Emit EPT electronic timetaking with barcodes.
This program uses Emits electronic punching- and timetaking-system for
orienteering, in addition to barcodes. The finish-time is automatically taken
when punching at the last control. All split-times and punching-receipts are
read directly on ETR3 by placing the e-card on the designated field, marked by
a thin red line, on top of ETR3's keyboard. In addition, the runners' start
numbers are registered using a barcode-reader, connected to the external
connection box. The start number can also be entered at ETR3´s keyboard.
PROGRAMMING AND USING THE VARIOUS PROGRAMS
Program 10. Times only
General
This program is used for various sports when the finish-time only (and not
the start number) is to be registered.
Mounting
The timetaking-button is connected to input 'C' on ETR3, and the printer-cable is
connected to input 'B'. If using a PC, connect the USB-cable to input 'D' on ETR3, and
the other end to a vacant USB-port on the PC.
Programming
Choose program 10 by pressing 10 and confirm with ↵. The upper display shows "Addr"
and the lower display shows a number (for example 1). ETR3 asks what address it should
be associated with. The address is only of interest when using more than one ETR3; to
identify the different ETR3s. Choose address 1 by pressing 1 and confirm with ↵. If
ETR3 already has another address, use the Clear/ON key to delete the number, before
pressing 1.
The lower display now shows "00000". ETR3 asks for the correct event time. The time
is entered in minutes and seconds. The numbers of minutes range from 0 to 999. Most
usually the time starts from 0 when the event starts. In cross-country, the first start is
often 11.00.30. The organizers then want the time to be 0 at 11.00.00. If ETR3 should
display time 000.00 at 11.00.00, and is started at 10.30, type 97000. Press ↵ exactly at
10.30.00. If you want to start ETR3 from 000.00, just press ↵ directly when the event
time is 000.00.
When ETR3 is started the upper display shows the running time, for example "972.42"
The EPR3-printer prints:
EMIT timing system
2004.11.09
14:08:19
KUN UTSKRIFT TIDER (TIMES ONLY)
ETR3 is now ready for use.
User mode
The timetaking-button is pressed once each time a runner passes the finish line. The
finish-time is printed in minutes, seconds and 1/100 second. Every time is also
numbered, starting from 1. This makes it possible to tell how many runners that have
passed the finish line. The information on the printout, from left to right, is: The letter
M (means finish time, not start-or intermediate time), thereafter the "number at the
finish line" and to the far right the time in min., sec., 1/100sec.
M
M
M
1
2
3
25:12.17
25:15.31
25:20.09
Feed the printer-paper by pressing the FEED-button on EPR3 before tearing it off. Use
the FEED-button again after tearing off the paper to avoid partly overlapping of the first
two lines.
It is also possible to number each "tear-off". Type 0000 followed by ↵ before tear-off.
A status line is then printed:
K=00
BUNT=
1
SUM=
3
The BUNT-number informs about how many times ETR3 has been synchronized. The
SUM-number is the total number of times taken.
Program 20. Times and start numbers
General
In this program both times and start numbers are recorded. ETR3 makes pairs of times
and start numbers, and prints out each pair. It is most commonly used in crosscountry, orienteering, exercise runs and bicycling. The program is relevant for interval
start as well as mass start (common start).
In this program ETR3 does not calculate times, but prints the finish-time and start
number. Most often program 20 is used when a computer is connected to ETR3. The
computer program will then do all the necessary calculations, and prints the result lists.
For timetaking in exercise runs, orienteering and cross-country it is practical to use one
or more chutes at the finish. The finish line and the timetaking are at the entrance of
the chute. The registration of the start numbers is at the exit of the chute. There
should always be a back-up system both for timetaking and for number registration.
ETR3 is used as the main timetaking unit. The timetaking-button is placed at the
finish line, and connected to ETR3. The start numbers are registered directly on
ETR3's keyboard, or by using a barcode-reader that is connected to ETR3 via the
external connection box. ETR3 prints pairs of times/start numbers and sends the same
information to the PC.
Mounting
The timetaking-button is connected to input 'C' on ETR3, and the printer-cable is
connected to input 'B'. If using a PC, connect the USB-cable to input 'D' on ETR3, and
the other end to a vacant USB-port on the PC.
Programming
Choose program 20 by pressing 20 and confirm with ↵. The upper display shows "Addr"
and the lower display shows a number (for example 1). ETR3 asks what address it should
be associated with. The address is only of interest when using more than one ETR3; to
identify the different ETR3s. Choose address 1 by pressing 1 and confirm with ↵. If
ETR3 already has another address, use the Clear/ON key to delete the number, before
pressing 1.
The lower display now shows "00000". ETR3 asks for the correct event time. The time
is entered in minutes and seconds. The numbers of minutes range from 0 to 999. Most
usually the time starts from 0 when the event starts. In cross-country, the first start is
often 11.00.30. The organizers then want the time to be 0 at 11.00.00. If ETR3 should
display time 000.00 at 11.00.00, and is started at 10.30, type 97000. Press ↵ exactly at
10.30.00. If you want to start ETR3 from 000.00, just press ↵ directly when the event
time is 000.00.
The EPR3-printer prints:
EMIT timing system
2004.11.09
14:08:19
KUN UTSKRIFT TIDER (TIMES ONLY)
ETR3 is now ready for use.
When ETR3 is started the upper display shows "t0 S0". 't' means unpaired times that has
been registered, and 'S' means unpaired start numbers. The lower display shows "Sno"
(start number).
The EPR3-printer prints:
EMIT timing system
2004.11.09
14:08:19
STARTNUMRE UTEN KLASSER (START NUMBERS WITHOUT CLASSES)
ETR3 is now ready for use.
User mode
The timetaking-button is pressed once each time a person passes the finish line.
The start number is entered on the keyboard, or by a barcode-reader connected to the
external connection box. The number is presented in the lower display. Press ↵ to
confirm. The start number is then stored in ETR3 and at the same time erased from the
display
The order in which times and start numbers are entered is indifferent. The printer writes
pairs of start numbers and times. This means that at least one time and one start number
must have been registered before the printer presents any output.
Normally times are taken before starting numbers are entered. When a time is taken, the
number of unpaired times is increased with one in the upper display. Each time a start
number is entered, the number of unpaired times is reduced with one. If seven times
have been taken, and two starti numbers have been entered (no. 23 and 24), the upper
display will show: "t5 S0".
And the printer has written:
M
M
23
24
13:42.19
13:58.43
When all times and all start numbers have been registered, both the number of unpaired
times and unpaired start numbers should be 0.
Synchronizing (BUNT)
Synchronizing is a way to split the event into smaller parts. This opens for the
possibility to start on scratch in pairing times and starting numbers, in case the timetaker
or the ETR3-operator have made a mistake. This method is used when the finish-area is
empty (a gap between the runners), and all times and start numbers have been registered.
The upper display will then normally indicate 0 for the number of unpaired times and
start numbers. If the timetaker or the ETR3-operator have made a mistake, the upper
display will indicate that one or more times or start numbers are unpaired.
Synchronizing is done by typing 0000 and confirming with ↵.
If the pairing of start numbers/times is correct, the printer just writes a status line. In the
example below, three times have been taken and three start numbers have been entered
before synchronizing was done. Then the complete printout is:
M
M
M
K=00
23
24
27
BUNT=1
13:42.19
13:58.43
14:04.81
SUM=3
BUNT=1 indicates that this is the first synchronizing. SUM=3 indicates that a total of
three start numbers have been registered.
If there are any unpaired times or start numbers, the printer will print those first, and
then the status line. If two times are unpaired, the printer prints:
M
M
K=00
- - - - - - BUNT=2
18:55.04
19:05.37
SUM= 3
BUNT= 2 indicates that this is the second synchronizing, SUM= 3 indicates that no new
start numbers have been registered since the preceding synchronizing.
Program 60. Cross-country with external units.
General
Program 60 is used in important cross-country or biathlon events, where there is a
demand for a startgate at the start and a photocell at the finish. The photocell, the
timetaking-button and the startgate are connected to ETR3 via the external connection
box.
In this program ETR3 does not calculate times, but prints the start time in addition to the
finish-time and start number.
Mounting
The timetaking-button, the startgate and the photocell are connected to ETR3 via the
external connection box. The printer-cable is connected to input 'B'. If using a PC,
connect the USB-cable to input 'D' on ETR3, and the other end to a vacant USB-port on
the PC.
If you choose to use a photocell you must know about the limitations a photocell
involves. If two competitors come closer than 0.35 seconds to each other they will be
registered as one competitor. Therefore it is important to use the photocell and the
timetaking-button in parallel. In cases where there is doubt if the photocell will register
all the competitors, the timetaking-button must be used in addition.
Programming
Choose program 60 by pressing 60 and confirm with ↵. The upper display shows "Addr"
and the lower display shows a number (for example 1). ETR3 asks what address it should
be associated with. The address is only of interest when using more than one ETR3; to
identify the different ETR3's. Choose address 1 by pressing 1 and confirm with ↵. If
ETR3 already has another address, use the Clear/ON key to delete the number, before
pressing 1.
The lower display now shows "00000". ETR3 asks for the correct event time. The time
is entered in minutes and seconds. The numbers of minutes range from 0 to 999. Most
usually the time starts from 0 when the event starts. In cross-country, the first start is
often 11.00.30. The organizers then want the time to be 0 at 11.00.00. If ETR3 should
display time 000.00 at 11.00.00, and is started at 10.30, type 97000. Press ↵ exactly at
10.30.00. If you want to start ETR3 from 000.00, just press ↵ directly when the event
time is 000.00.
When ETR3 is started the upper display shows "t0 S0". 't' means unpaired times that has
been registered, and 'S' means unpaired start numbers. The lower display shows "Sno"
(start number).
The EPR3-printer prints:
EMIT timing system
2004.11.09
14:08:19
Cross-country
ETR3 is now ready for use.
User mode
When a startgate is used ETR3 prints the start time every time a new runner starts:
S
- - - - 8:59.47
The letter 'S' means that this is a start time. The time is written in minutes, seconds and
1/100 second. The start time is transferred to the PC via ETR3, and the result-program
used on the PC updates the start time for the runner. None of the displays on ETR3
shows start time information.
The finish-line procedure is the same as the one described in program 20, except that we
in program 60 use both a timetaking-button and a photocell.
As a method of synchronizing we recommend the same procedure as described for
program 20.
Program 90. Timetaking in mass-arrangements
General
This program is specially made for mass-arrangements (exercise runs, mass crosscountry arrangements) where a certain number of competitors pass the finish line every
minute. The time is not taken with a timetaking-button, but is read when the start
number is registered. The drawback is that the time is registered after the competitor
has passed the finish line. It is possible to correct this in the computer-program, or by,
on purpose, delaying ETR3 a few seconds (4-5 sec.) in proportion to the start clock.
This program supposes use of a barcode-reader and the competitors must have a start
number with a barcode-label. If some of the competitors don't have a barcode-label,
the start number may be entered at ETR3's keyboard. The time is taken when ↵ is
pressed.
Mounting
The barcode-reader (with headset) is connected to ETR3 via the external connection box.
The printer-cable is connected to input 'B'. If using a PC, connect the USB-cable to input
'D' on ETR3, and the other end to a vacant USB-port on the PC. If several ETR3s are
used, the ETR3s connect to the PC via an external connection box. In this case input 'A'
(RS232-input) is used instead of input 'D' (USB-input).
Programming
Choose program 90 by pressing 90 and confirm with ↵. The upper display shows "Addr"
and the lower display shows a number (for example 1). ETR3 asks what address it should
be associated with. The address is only of interest when using more than one ETR3; to
identify the different ETR3's. Choose address 1 by pressing 1 and confirm with ↵. If
ETR3 already has another address, use the Clear/ON key to delete the number, before
pressing 1.
The lower display now shows "00000". ETR3 asks for the correct event time. The time
is entered in minutes and seconds. The numbers of minutes range from 0 to 999. Most
usually the time starts from 0 when the event starts. If you want to start ETR3 from
000.00, just press ↵ directly when the event time is 000.00.
We choose to start ETR3 five seconds after the start clock. Press ↵ five seconds after the
competitors have started. This leads to that most of the competitors get about one second
better time than their actual time.
When started, ETR3's upper display shows the running time, for example "972.42"
The lower display shows "Sno" (start number).
The EPR3-printer prints:
EMIT timing system
2004.11.09
14:08:19
TID TAS VED REG STARTNR (Time is taken by start no.)
ETR3 is now ready for use.
User mode
When the competitors pass the finish line the barcodes on the start numbers are read
with the barcode-reader. The receipt for a correct reading is:
•
The barcode-reader “beeps”. The beep is clearly heard if you're using
headphones.
•
A red flash occurs once in the round window of the barcode-reader.
•
The start number is shown in ETR3's lower display.
When start number 1289 is registered the number 1289 will be shown at ETR3's lower
display for a few seconds. The upper display shows the running event-time.
The EPR3-printer prints:
M
1289
32:16.51
When a barcode-reader is being used you don't have to type anything at ETR3's
keyboard, except if a competitor has lost his/hers start number or if the barcode has been
damaged. If so, type the start number the usual way and confirm with ↵. The time is
registered when ↵ is pressed. While typing the start number it will be shown in the
lower display. The number is removed when ↵ is pressed.
If you want to divide the arrangement into smaller units, it is possible to make a
synchronizing by entering 0000+↵ . The printout shows:
K=00
BUNT=1
SUM=8
This means that eight persons were registered when the first synchronizing was made.
Program 130. Emit EPT electronic timetaking
General
This program is specially made for use with Emit EPT (Electronic Punching- and
Timetaking system). The timetaking-button is not used. The finish-time is
automatically taken when punching at the last control. All split-times and punchingreceipts are read directly on ETR3 by placing the e-card on the designated field, marked
by a thin red line, on top of ETR3's keyboard. It is assumed that a result-program
(eTiming) is used on the PC, with a database for the runners' e-cards.
This program reads all times and punching-receipts from the e-cards, and prints the time
of reading. All information contained in the e-cards is transferred to the result-program
running on the PC. If a runner has lost his/hers e-card, or the e-card is impossible to
read, it is possible to enter the e-card number on ETR3's keyboard followed by ↵.
Mounting
The printer-cable is connected to input 'B'. The USB-cable is connected to input 'D' on
ETR3, and the other end to a vacant USB-port on the PC.
Programming
Choose program 130 by pressing 130 and confirm with ↵. The upper display shows
"Addr" and the lower display shows a number (for example 1). ETR3 asks what address
it should be associated with. The address is only of interest when using more than one
ETR3; to identify the different ETR3s. Choose address 1 by pressing 1 and confirm with
↵. If ETR3 already has another address, use the Clear/ON key to delete the number,
before pressing 1.
The lower display now shows "00000". ETR3 asks for the correct event time. The time
is entered in minutes and seconds. The numbers of minutes range from 0 to 999. Most
usually the time starts from 0 when the event starts. If you want to start ETR3 from
000.00, just press ↵ directly when the event time is 000.00.
When started, ETR3's upper display shows the running event time, while the lower
display shows "tag" (e-card no.)
The EPR3-printer prints:
EMIT timing system
2004.11.09
14:08:19
ORIENTERING BRIKKE (Orienteering e-card)
ETR3 is now ready for use.
User mode
After the runner has punched at the last control and passed the finish line, the e-card is
read on ETR3 by placing the e-card on the designated field, marked by a thin red line,
on top of ETR3's keyboard. A correct reading is confirmed by:
•
•
•
ETR3 beeps
The e-card number is shown in the lower display for a few seconds
The e-card number and the time of reading are printed on the EPR3-printer.
When e-card number 125589 has been registered, the e-card number will be shown in
the lower display for a few seconds. The upper display continues to show the running
event time.
The printout shows:
M
125589
32:16.51
It is not necessary to use ETR3's keyboard while using program 130, except in cases
where the runner has lost his/hers e-card, or the e-card is impossible to read. In these
cases it is possible to enter the e-card number on ETR3's keyboard followed by ↵.
Program 131. Emit EPT electronic timetaking with barcodes.
General
This program is specially made for use with Emit EPT (Electronic Punching- and
Timetaking system) and anonymous e-cards. The timetaking-button is not used. The
finish-time is automatically taken when punching at the last control. All split-times and
punching-receipts are read directly on ETR3 by placing the e-card on the designated
field, marked by a thin red line, on top of ETR3's keyboard. It is assumed that a resultprogram (eTiming) is used on the PC, and that all runners have start numbers with
barcodes.
Since the runners have anonymous e-cards, it is important that the e-card number is
paired with the correct start number. This is done by reading the barcode on the start
number with a barcode reader first, and then reading the e-card by placing it on top of
the ETR3. If the barcode and/or e-card is impossible to read, it is possible to enter the
information on ETR3's keyboard followed by ↵.
This program reads all times and punching-receipts from the e-cards, and prints the time
of reading. All information contained in the e-cards is transferred to the result-program
running on the PC.
Mounting
The barcode-reader (with headset) is connected to ETR3 via the external connection box.
The printer-cable is connected to input 'B'. The USB-cable is connected to input 'D' on
ETR3, and the other end to a vacant USB-port on the PC.
Programming
Choose program 131 by pressing 131 and confirm with ↵. The upper display shows
"Addr" and the lower display shows a number (for example 1). ETR3 asks what address
it should be associated with. The address is only of interest when using more than one
ETR3; to identify the different ETR3s. Choose address 1 by pressing 1 and confirm with
↵. If ETR3 already has another address, use the Clear/ON key to delete the number,
before pressing 1.
The lower display now shows "00000". ETR3 asks for the correct event time. The time
is entered in minutes and seconds. The numbers of minutes range from 0 to 999. Most
usually the time starts from 0 when the event starts. If you want to start ETR3 from
000.00, just press ↵ directly when the event time is 000.00.
When started, ETR3's upper display shows the running event time, while the lower
display shows "Sno" (start number)
The EPR3-printer prints:
EMIT timing system
2004.11.09
14:08:19
ORIENTERING BRIKKE (Orienteering e-card)
ETR3 is now ready for use.
User mode
After the runner has punched at the last control and passed the finish line, the start
number is read with the barcode-reader. The receipt for a correct reading is:
•
The barcode-reader “beeps”. The beep is clearly heard if you're using
headphones.
•
A red flash occurs once in the round window of the barcode-reader.
•
The start number is shown in ETR3's lower display.
If a competitor has lost his/hers start number or if the barcode has been damaged, type
the start number the at ETR3's keyboard and confirm with ↵.
After the start number is registered, the lower display shows "tag". ETR3 is now ready
for reading the e-card. Place the e-card on the designated field, marked by a thin red
line, on top of ETR3's keyboard. A correct reading is confirmed by:
•
•
•
ETR3 beeps
The e-card number is shown in the lower display for a few seconds
The start number, e-card number and the time of reading are printed on the EPR3printer.
If a runner has lost his/hers e-card, or the e-card is impossible to read, it is possible to
enter the e-card number on ETR3's keyboard followed by ↵.
When e-card number 125589 has been registered, the e-card number will be shown in
the lower display for a few seconds. The upper display continues to show the running
event time.
The printout shows:
B
M
123
125589
- - - 32:16.51
The letter 'B' means barcode and is normally the same as the start number. In this case
start number 123 has used e-card number 125589, and was read at 32:16.51.
PRINTING
Printing with EPR-3.
Connect the cable from ETR3 to the EPR3-printer. The cable is connected to input B on
ETR3 (4-pin phone plug) and the other end connects to the EPR3 printer (mini-DIN,
male). Turn on the printer. The cable can be extended using a standard PC-keyboard
extension cable. Recommended maximum length is 3 meters.
Simultaneous printers and PC
It is possible to connect to a printer and a PC at the same time.
TheEPR-3 thermal printer
The Emit EPR-3 is a compact and lightweight portable thermal printer with an RS232
serial interface via a 6-pin PS/2 (Mini-DIN) style connector. It is powered from an
environment friendly, replacable7,2V Ni-MH battery pack. Average printing speed is 12
lines per second and paper width is 57 or 58mm. Operating range is 0 to +50 degrees C.
Paper-out detection
The printer will automatically detect when the paper has run out and the red ERRORLED will blink rapidly. After replacing the paper, the printer will continue to print all data
in its 10K buffer. This is sufficient to hold print-data for about 20 E-cards (with 20
controls each). One should NOT power off the printer during replacement of the paper as
the print-data then will be lost (but the MTR4 keeps the data, so spooling to PC will still
work).
Inserting new paper.
Note that maximum roll-diameter for EPR-3 is 40 mm.
The printer has a "clam-shell design" making it very easy to change paper. The paper roll
is inserted into the compartment, and the end of the paper is extended outside the printer
while closing the cover.
Charging the battery
The power-adapter will charge an empty battery full in approximately 4 to 5 hours. The
adapter shows a steady red light when charging the printer. When fully charged it will
change to a green light. However, several tests indicate that the charger switches to a
green light before the battery is fully charged. To ensure that the battery actually is fully
charged, we recommend that the battery is charged for 10-12 hours. This will not harm
the battery in any way.
Battery-capacity
A new and full battery pack has sufficient power to print continuously for approximately
1 hour. When battery level becomes low the green power-LED will blink red while
printing, indicating that battery should be changed or charged. One hour of printing is
approximately printing of 1200 E-cards with 15 punches.
Power On Self-Test
The self-test procedure is initiated by turning on the printer with the FEED button
pressed.
Release the feed button and the self-test procedure will start. This will check most of the
printer functions and also print the firmware version and protocol in use. The protocol
should show:
MODE = RS-232C.
SERIAL = 9600 BAUD
8 DATA BIT
NO PARITY
1 STOP BIT
Resetting the protocol.
The protocol of the printer was correctly set when the printer left EMIT. If the protocol
has been changed, it can be reset to the correct reading by following this procedure. If in
doubt, you can at any moment turn the printer off in an on to start over without storing
modifications. The modification will only be stored when pressing MODE and FEED at
the same time (see step 17 below).
1. Turn the printer ON.
2. Press and hold the MODE button down until the red ERROR-LED has flashed 5
times, then release MODE. The MODE-LED should now blink once
(com.settings) and the ERROR-LED should also blink once (RS232C Mode)
3. If the ERROR-LED didn't blink once, press MODE once (shortly), and count the
number of times the ERROR-LED blinks.
4. Repeat step 3 until the ERROR-LED blinks only once (it will cycle through 1, 2
and 3 blinks, 1 blink means RS 232-C protocol).
5. Press FEED button once, shortly (the MODE-LED will blink twice indicating that
we are entering baudrate-selection mode). Count the number of blinks on the
ERROR-LED; it should be 4 (meaning 9600 baud).
6. If there were NOT 4 blinks, press MODE shortly and count number of ERRORLED blinks
7. Repeat step 6 until ERROR-LED blinks 4 times.
8. Press FEED button once. (the MODE-LED should blink 3 times). Count the
number of blinks on the ERROR-LED; it should be 2.
9. If there were NOT 2 blinks, press MODE shortly and count number of ERRORLED blinks.
10. Repeat step 9 until ERROR-LED blinks 2 times.
11. Press FEED button once (the MODE-LED should blink 4 times). Count the
number of blinks on the ERROR-LED; it should be 1.
12. If there was not 1 blink, press MODE shortly and count number of ERROR-LED
blinks.
13. Repeat step 12 until ERROR-LED blinks 1 time.
14. Press FEED button once (the MODE-LED should blink 5 times). Count the
number of blinks on the ERROR-LED; it should be 3.
15. If there were not 3 blinks, press MODE shortly and count number of ERRORLED blinks.
16. Repeat step 15 until ERROR-LED blinks 3 times.
17. Press MODE and FEED simultaneously to store new settings.
Copyright 2005 Emit.as 26.01.2005