1
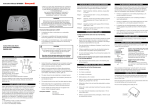
The Sampler
Motorized Sampling Pump
50105442-056
English
© BW Technologies 2013. All rights reserved.
User Manual
The Sampler
User Manual
Table of Contents
Contacting BW Technologies by Honeywell ......................................0
Copyright, Notices, Trademarks..........................................................1
Signal Words .........................................................................................1
International Symbols...........................................................................1
Introduction ...........................................................................................1
Safety Information - Read First............................................................2
Getting Started ......................................................................................4
What’s in the Box ......................................................................................................... 4
Activating the Sampler .........................................................................4
Normal Operation..................................................................................4
Operating Guidelines............................................................................4
Standard Hose Configuration ...................................................................................... 5
Sample Tube Connections .......................................................................................... 5
Block the Airflow .......................................................................................................... 5
Deactivating the Sampler ..................................................................... 6
Alarms.................................................................................................... 6
Low Flow Alarm............................................................................................................ 6
Low Battery Alarm ........................................................................................................ 6
System Fault Alarm ...................................................................................................... 6
Calibration ............................................................................................. 6
Calibration Pass ........................................................................................................... 6
Calibration Fail ............................................................................................................. 6
Maintenance .......................................................................................... 7
Replacing the Batteries ................................................................................................ 7
Replacing a Filter ......................................................................................................... 8
Draining the Water Trap ............................................................................................... 8
Troubleshooting.................................................................................... 9
Replacement Parts and Accessories ................................................ 10
Specifications...................................................................................... 10
i
Limited Warranty and Limitation Liability
BW Technologies LP (BW) warrants the product to be free from defects in material and workmanship under normal use and service for a period of two years, beginning on the date of shipment to the buyer. This
warranty extends only to the sale of new and unused products to the original buyer. BW’s warranty obligation is limited, at BW’s option, to refund of the purchase price, repair or replacement of a defective
product that is returned to a BW authorized service center within the warranty period. In no event shall BW’s liability hereunder exceed the purchase price actually paid by the buyer for the Product.
This warranty does not include:
a) fuses, disposable batteries or the routine replacement of parts due to the normal wear and tear of the product arising from use;
b) any product which in BW’s opinion, has been misused, altered, neglected or damaged, by accident or abnormal conditions of operation, handling or use;
c) any damage or defects attributable to repair of the product by any person other than an authorized dealer, or the installation of unapproved parts on the product; or
The obligations set forth in this warranty are conditional on:
a) proper storage, installation, calibration, use, maintenance and compliance with the product manual instructions and any other applicable recommendations of BW;
b) the buyer promptly notifying BW of any defect and, if required, promptly making the product available for correction. No goods shall be returned to BW until receipt by the buyer of shipping instructions
from BW; and
c) the right of BW to require that the buyer provide proof of purchase such as the original invoice, bill of sale or packing slip to establish that the product is within the warranty period.
THE BUYER AGREES THAT THIS WARRANTY IS THE BUYER ’S SOLE AND EXCLUSIVE REMEDY AND IS IN LIEU OF ALL OTHER WARRANTIES, EXPRESS OR IMPLIED, INCLUDING BUT NOT LIMITED TO ANY IMPLIED WARRANTY OF
MERCHANTABILITY OR FITNESS FOR A PARTICULAR PURPOSE. BW SHALL NOT BE LIABLE FOR ANY SPECIAL, INDIRECT, INCIDENTAL OR CONSEQUENTIAL DAMAGES OR LOSSES, INCLUDING LOSS OF DATA, WHETHER ARISING
FROM BREACH OF WARRANTY OR BASED ON CONTRACT, TORT OR RELIANCE OR ANY OTHER THEORY.
Since some countries or states do not allow limitation of the term of an implied warranty, or exclusion or limitation of incidental or consequential damages, the limitations and exclusions of this warranty may not
apply to every buyer. If any provision of this warranty is held invalid or unenforceable by a court of competent jurisdiction, such holding will not affect the validity or enforceability of any other provision.
Contacting BW Technologies by Honeywell
Corporate Headquarters
BW Technologies by Honeywell
2840 2nd Ave. SE
Calgary, AB
Canada T2A 7X9
Tel:
+1.403.248.9226
Toll-free: 1.800.663.4164
Fax:
+1.403.573.3708
United States
BW Technologies by Honeywell
405 Barclay Blvd.
Lincolnshire, IL
USA 60069
Tel:
+1.847.955.8200
Toll-free: 1.800.538.0363
Fax:
+1.847.955.8210
Europe
BW Technologies by Honeywell
4 Stinsford Road
Nuffield Industrial Estate
Poole, Dorset
United Kingdom BH17 0RZ
Tel: +44 (0) 1295.700.300
Fax: +44 (0) 1295.700.301
Asia Pacific
Honeywell Analytics Asia Pacific
#701 Kolon Science Valley (1)
43 Digital‐Ro, 34‐Gil Guro‐Gu, Seoul, 152‐729
Korea
Tel: +82 (0)2 6909 0300
Fax: +82 (0)2 2025 0388
Email: [email protected]
Email
[email protected]
Web
www.gasmonitors.com
Copyright, Notices, Trademarks
This work contains valuable, confidential and proprietary information. Disclosure, use or reproduction outside of BW Technologies by Honeywell (BW Technologies) and/or Honeywell
International Inc. (Honeywell) is prohibited except as authorized in writing. This unpublished work is protected by the laws of the United States and other countries.
While this information is presented in good faith and believed to be accurate, BW Technologies and/or Honeywell disclaims the implied warranties of merchantability and fitness for a particular
purpose and makes no express warranties except as may be stated in its written agreement with and for its customers.
In no event is BW Technologies by Honeywell and/or Honeywell liable to anyone for any indirect, special or consequential damages. The information and specifications in this document are
subject to change without notice. The Sampler is a trademark(s) of Honeywell International, Inc. Other brand or product names are trademarks of their respective owners.
Signal Words
This document uses the following signal words, as defined by ANSI Z535.4-1998:
Hazardous situation which, if not avoided, will result in death or serious injury. This symbol identifies the most extreme hazardous situations.
Hazardous situation which, if not avoided, could result in death or serious injury.
Hazardous situation which, if not avoided, may result in moderate or minor injury.
Situations which, if not avoided, may result in property damage.
International Symbols
n
Approved to both U.S. and Canadian Standards by CSA International
g
European Explosives Protection
The Sampler
Introduction
To ensure your personal safety, read the Safety Information before you use the
Sampler.
The Motorized Sampling Pump (the Sampler) is a spot sampling device that can be used with
most BW Technologies by Honeywell (BW Technologies) single and multiple gas detectors. An
internal motorized pump transports potentially hazardous gases from a sample area to a
detector.
The Sampler is an accessory for a personal safety device. It is your responsibility to respond
properly to alarm conditions.
Order Number
Description
GA-SP01
Motorized sampling pump with rigid probe and sample tubing
GA-SP02
Motorized sampling pump with rigid probe and sample tubing (Europe)
1
The Sampler
User Manual
Safety Information - Read First
Use the Sampler only as specified in this manual, otherwise the protection provided by the
Sampler may be impaired.
To avoid personal injury:
• Replace the batteries as soon as the Sampler indicates a Low Battery Alarm.
• Use only batteries recommended by BW Technologies by Honeywell to prevent
damage or personal injury and maintain intrinsic safety.
• Use only approved AA alkaline or charged AA NiMH batteries properly installed in
the Sampler case. Refer to Specifications for approved batteries.
• To avoid personal injury or damage to the detector, use only the specified
replacement parts.
• Do not expose the Sampler to electrical shock and/or severe continuous
mechanical shock.
• The Sampler warranty will be void if the unit is disassembled, adjusted or serviced
by non-BW Technologies by Honeywell personnel.
• Do not immerse the Sampler in liquids.
• Confirm that the water trap is empty.
•
•
•
•
FOR SAFETY REASONS, THIS EQUIPMENT MUST BE OPERATED AND
SERVICED BY QUALIFIED PERSONNEL ONLY. READ AND UNDERSTAND THE
USER MANUAL COMPLETELY BEFORE OPERATING OR SERVICING.
• Warning: Substitution of components may impair Intrinsic Safety.
• This product is not a gas detector.
• Do not use the Sampler if it is damaged. Before you use the Sampler, inspect the
case. Look for cracks or missing parts.
• Do not use the detector if it is damaged. Inspect the detector before using. Look for
cracks and/or missing parts.
• If the Sampler is damaged or something is missing, contact BW Technologies by
Honeywell immediately.
• Use only recommended AA alkaline or NiMH batteries properly charged and
installed in the Sampler case. Refer to Replacement Parts and Accessories.
• Charge NiMH batteries using the recommended charger only. Do not use any other
charger. Failure to observe this precaution could lead to fire or explosion.
• Do not change or charge batteries in a hazardous location. Doing so will impair the
intrinsic safety of the unit and may lead to fire or explosion.
• Read and observe all instructions and precautions in the literature provided with
the charger. Failure to do so may result in fire, electric shock or other forms of
personal injury or property damage.
2
•
•
•
ecThis instrument contains batteries. Do not mix with the solid waste stream.
Spent batteries should be disposed of by a qualified recycler or hazardous
materials handler.
Airflow can also be blocked by temporarily kinking the hose or covering the end of
the rigid tube.
We recommend that you perform a block test once the Sampler is activated.
If you reactivate the Sampler within a 30-minute period, it will resume normal
operation (i.e., the Sampler will not enter calibration).
Once the Low Battery Alarm has been activated you have approximately 20
minutes before the Sampler turns off.
To initiate a calibration, confirm the Sampler is on then press C and hold for
6 seconds. The Sampler beeps, then deactivates. The Sampler enters calibration
mode the next time it is activated.
Do not tighten the rear assembly screws greater than 3.0 in-lb
The Sampler
Safety Information - Read First
Pushbutton
Short sample tube (inlet)
C
Activation button C
Action
Press C to activate.
Deactivate
Press C and hold for 2 seconds to deactivate. The
Sampler beeps, then deactivates. The Sampler
enters calibration mode the next time it is activated.
Calibration
• Confirm that the Sampler is on.
• Press and hold C for 6 seconds to start
calibration.
• The Sampler beeps, then deactivates. The
Sampler enters calibration mode the next time it is
activated.
Green ON LED
Yellow BLOCK LED
Description
Activate
Red FAIL LED
Audible alarm
To block airflow through the Sampler, firmly press the
block trigger.
Note: Airflow can also be
blocked by temporarily kinking the
hose or covering the
end of the rigid tube.
Airflow
Cowl
LED
Status
Description
Green
ON
Indicates the Sampler is operating properly.
Yellow
BLOCK
Prompts you to block the airflow.
Red
FAIL
Indicates that the Sampler is in an error condition.
Block trigger
Water trap
Drain plug
Filter plug
Tube fitting (outlet)
3
The Sampler
User Manual
Getting Started
The Sampler monitors and controls airflow continuously. Occasionally the motor speed adjusts
automatically to compensate for changes in environmental and sampling conditions. The
Sampler also automatically enters calibration mode when required.
Activating the Sampler
1. To activate the Sampler, press C.
2. All 3 LEDs flash and the audible alarm beeps 4 times. When the Sampler is activated for
the first time, it enters calibration mode. See Calibration to ensure activation.
At any time, you can verify that the Sampler is operating correctly by blocking the flow and
generating a low flow alarm.
What’s in the Box
The list below provides the standard items included with the Sampler. If the Sampler is
damaged or parts are missing, contact BW Technologies by Honeywell or an authorized
distributor immediately.
• Batteries (2 replaceable AA alkaline cells)
• Short sample tube (4.65 in/11.81 cm)
• Medium sample tube (10.25 in/26.00 cm)
• Sampling hose (10 ft/3 m) with blue stone coarse particulate filter attached
• Attachment hose (3 ft/1 m)
• Particulate filters, Quantity 2
• Quick reference card
• User Manual
Normal Operation
During normal operation, the green ON LED is lit and the motor is running.
To order replacement parts, refer to Replacement Parts and Accessories.
The Sampler is shipped with the short sample tube installed. The Operation section describes
how to replace the sample tube. To install the batteries, refer to Replacing the Batteries.
Operating Guidelines
When operating the Sampler, adhere to the following guidelines:
1. Confirm that all hoses are properly attached to the Sampler
2. Confirm that there are no leaks in the system before obtaining a sample.
Depending upon the length of tubing and the type of gas being sampled, allow at least
3 seconds per foot of hose to ensure the readings stabilize.
Example: 50 feet = 2.5 minutes
Refer to the applicable detector user manual for expected response time(s).
4
The Sampler
Operating Guidelines
Standard Hose Configuration
Sample Tube Connections
The Sampler is shipped with the short sample tube installed.
To remove the installed sample tube, grasp the end of the tube and pull straight out. Insert the
new sample tube through the enclosure and into the gasket opening. To ensure a proper seal,
the end of the tubing should be inserted until firm resistance is felt.
Sampling hose
Attachment hose
Block the Airflow
Block the airflow to the Sampler to confirm that it is working correctly and there are no leaks in
the system.
There are two ways for you to test the airflow of the Sampler:
1. Press and hold the block trigger
2. Kink the sampling or attachment hose.
If the red FAIL LED blinks and the alarm beeps while the airflow is blocked, then the Sampler is
operating correctly. If it does not, reconnect the hose/tube to check for leaks.
Note: We recommend that you perform a block test once the
Sampler is activated.
5
The Sampler
User Manual
Deactivating the Sampler
Calibration
To deactivate the Sampler, press C and hold for 2 seconds.
Upon startup, the audible alarm emits three beeps, the pump activates at a high speed and the
green ON LED flashes.
The audible alarm beeps 3 times, all LEDs light up and then the Sampler turns off.
Note: If you reactivate the Sampler within a 30-minute period, it
resumes normal operation (i.e., the Sampler will not enter
calibration).
Alarms
Low Flow Alarm
If the Sampler detects a low flow situation, the red FAIL LED flashes and the audible alarm
beeps twice.
The Sampler will continue in this mode for approximately 10 seconds. This gives you time to
remove any blockage in the line. If the condition does not change, the Sampler indicates a
block.
If the Sampler detects the expected airflow it returns to normal operation. If the Sampler does
not detect the expected airflow it returns to the low flow alarm state until the airflow recovers.
Low Battery Alarm
Note: Once the Low Battery Alarm has been activated you have
approximately 20 minutes before the Sampler
turns off.
The Sampler tests the batteries on activation and continuously thereafter. If the battery voltage
is low, the Sampler activates the Low Battery Alarm. The audible alarm will beep once every
20 seconds and the green ON LED will flash.
The Low Battery Alarm continues until you replace the batteries or the battery power nears
depletion. If the battery voltage drops too low, the audible alarm beeps once the red FAIL LED
lights and the Sampler turns off.
Refer to Replacing the Batteries.
System Fault Alarm
If the Sampler detects a system fault, the red FAIL LED lights and the audible alarm beeps.
Press C to clear the alarm. The Sampler automatically enters the calibration mode. If the
Sampler passes calibration it will enter normal operation mode. If calibration fails, refer to
Troubleshooting.
6
After one second, the pump speed adjusts to its normal rate.
The audible alarm then emits a beep and a tone and the yellow BLOCK LED lights. At this time,
block the airflow. Refer to Block the Airflow.
Note: To initiate a calibration, confirm the Sampler is on then
press C and hold for 6 seconds. The Sampler beeps, then
deactivates. The Sampler enters calibration mode the next
time it is activated.
Calibration Pass
When the Sampler passes calibration the audible alarm emits 3 beeps and the Sampler enters
normal operation mode.
Calibration Fail
If the Sampler fails calibration, the audible alarm emits 6 beeps, the red FAIL LED lights and the
Sampler turns off. Refer to Troubleshooting.
Note: To initiate a calibration, confirm the Sampler is on then
press C and hold for 6 seconds. The Sampler beeps, then
deactivates. The Sampler enters calibration mode the next
time it is activated.
The Sampler
Maintenance
Maintenance
To keep the Sampler in good operating condition, perform the following basic maintenance as
required:
• Log all maintenance and fault events.
• Clean the exterior with a soft damp cloth. Do not use solvents, soaps or polishes.
• Do not immerse the Sampler in liquids.
• Confirm that the filter is free of dirt and replace it if necessary.
• Confirm that the water trap is empty.
Cowl
Replacing the Batteries
To avoid personal injury:
• Replace the batteries as soon as the Sampler indicates a Low Battery Alarm.
• Use only batteries recommended by BW Technologies by Honeywell to prevent
damage or personal injury and maintain intrinsic safety.
• Use only approved AA alkaline or charged AA NiMH batteries, properly installed in
the Sampler. Refer to Specifications for approved batteries.
• Charge batteries using only a recommended charger. Do not use any other
charger. Failure to observe this precaution could lead to fire or explosion.
• Do not change or charge batteries in a hazardous location. Doing so will impair the
intrinsic safety of the unit, and may lead to fire or explosion.
Deactivate the Sampler before replacing the batteries.
1. Loosen but do not remove the #4-40 x 3/8 in button head screw on the side of the
Sampler. The screw may not be included in certain regions.
2. Spread the cowl to disengage it from the body of the Sampler.
3. Rotate the cowl upwards.
4. Remove the two batteries.
5. Install new batteries, observing polarity.
6. Attach the cowl.
7. Rotate the cowl downward until it snaps into position. Tighten the #4-40 x 3/8 in
button head screw, if included.
#4-40 x 3/8 in button
head screw (may not
be included in certain
regions)
+
Batteries
+
7
The Sampler
User Manual
Replacing a Filter
Draining the Water Trap
The filter must be changed when it becomes clogged with dirt.
1. Remove the filter plug assembly from the Sampler.
2. Remove the clogged filter and insert a new filter, ensuring that the filter is firmly
seated into the plug and the open end of the filter is facing out.
3. Insert the filter plug assembly into the Sampler, ensuring the filter enters the gasket
filter opening.
Empty the water trap periodically.
Pull open the drain plug and shake any water out of the water trap. Replace the plug when
complete.
Filter
Filter plug
Open end of filter
Gasket filter opening
Filter plug assembly
Water trap
Drain plug
8
The Sampler
Troubleshooting
Troubleshooting
If a problem occurs, calibrate the Sampler.
If the problem persists, refer to the Troubleshooting table, below.
If the problem cannot be resolved, contact BW Technologies by Honeywell.
Problem
Sampler does not turn on.
Continuous low flow alarm.
System fault alarm.
Possible Cause
Solution
No batteries.
Install batteries.
Depleted batteries.
Replace batteries.
Damaged or defective Sampler.
Contact BW Technologies by Honeywell or an authorized distributor.
Extreme environmental change has formed condensation in the Wait approximately 15 minutes for the condensation in the Sampler to clear.
pump mechanism.
Sampler automatically turns off.
Automatic Shutdown feature activated due to weak batteries.
Replace batteries.
Sampler turns off with red FAIL LED flashing.
A blocked state was not triggered during calibration.
Activate the Sampler. During calibration, block the airflow of the Sampler when the
yellow LED flashes.
There is water in the water trap.
Empty the water trap.
Filter is in backwards.
Remove the filter plug assembly and orient the filter so the open end is facing away
from the filter plug. Re-insert the filter plug assembly.
The filter is dirty.
Replace the filter.
The filter assembly or drain plug is not installed.
Install the filter assembly and drain plug.
Rear assembly screws are loose.
Tighten rear assembly screws.
Screws
Note: Do not tighten greater than 3.0 in-lb
Pump has failed.
Contact BW Technologies by Honeywell or an authorized distributor.
9
The Sampler
User Manual
Replacement Parts and Accessories
Specifications
To avoid personal injury or damage to the detector, use only the specified
replacement parts.
To order parts or accessories listed in the following table, contact BW Technologies by
Honeywell or an authorized distributor.
Model No.
Description
Qty.
GAMIC-V-CHRG1
12V vehicle charger and 4 AA NiMH batteries
1
GAMIC-C01-K
110 VAC 4-port charger and 4 AA NiMH batteries
1
GAMIC-C01-K-(xx)
220 VAC 4-port charger* and 4 AA NiMH batteries
1
SP-T2-S
Standard rigid sample tube with barbed fitting
(4.65 in/11.81 cm)
1
SP-T2-M
Standard rigid sample tube with barbed fitting
(10.25 in/26.00 cm)
1
SP-T1-2
Rigid sample probe
D4-PF-1
Blue stone coarse particulate filter
M1806
Flexible sampling hose
SP-PF-1
Sampler particulate filters
5
M2437K
#4-40 x 3/8 in button head screw
10
*Note: To ensure that you receive the correct power adaptor in
your region, add one of these suffixes to the end of order
number.
(-UK) for United Kingdom
(-EU) for Europe
(-AU) for Australia/China
10
/ft/0.3 m
1
/ft/0.3 m
Operating Humidity: 5% to 95% relative humidity (non-condensing)
Sample Flow Rate: Typical 300 ml/min
Sample Distance: 50 ft/15.2 m maximum recommended.
Sample Delay Time: 3 seconds per 1 ft/0.3 m.
Connections:
Outlet 1/8 in (3.175 mm) barbed fitting for soft hose.
Inlet 1/8 in (3.175 mm) barbed fitting for soft hose or 1/4 in (6.35 mm) O.D. for rigid tube.
Weight: 6.2 oz (175 g)
Dimensions: 7.4 x 1.3 x 2.1 in/18.8 x 3.3 x 5.3 cm
Visual Alarm: Three high-intensity LEDs
Warning Conditions: Low flow, low battery, system fault
Typical Battery Life: Alkaline, NiMH 30 hours at 25°C (77°F)
Altitude: Up to 9843 ft/3000 m
Pollution Degree: 2
Installation Category: I
Approved Batteries:
North America/IECEx
Alkaline
Duracell MN1500
Energizer E91
NiMH rechargeable
Quest Platinum HGAAC1800G
Quest HG1600AACS
Energizer NH15
Maha Powerex 1700 mAh MH-AA170
Maha Powerex 1800 mAh MH-AA180
Yuasa Delta 1300 mAh DHA1400AA
Yuasa Delta 1500 mAh DHA1600AAC
Worst Case Temperature Code
Alkaline
NiMH
Ambient
Temperature Code (Class)
T150°C
T163°C
T211.4°C
T199°C
T205°C
T192°C
T201.1°C
T209°C
T204.4°C
T163°C
T212°C
-20°C ≤ Ta ≤ +50°C
The Sampler
Specifications
Battery Charger (optional): Quest™ Q2 4-port rapid NiMH battery charger with
country-specific mains adapter
Charge Time: 1-3 hours
Approvals: Approved by CSA to both U.S. and Canadian Standards.
Class I, Division 1, Group A, B, C, and D;
Class I, Zone 0, Group IIC
IECEx Approval: Ex ia IIC Ga
IECEx CSA04.0003X
ABS Type Approved VA-348-169-X
11
The Sampler
Motorized Sampling Pump
50105442-056, Rev 3
English
© BW Technologies 2013. All rights reserved.
User Manual