1
Version 13
Control
This document applies to Adabas D Version 13 and to all subsequent releases.
Specifications contained herein are subject to change and these changes will be reported in subsequent
release notes or new editions.
© Copyright Software AG 2004
All rights reserved.
The name Software AG and/or all Software AG product names are either trademarks or registered
trademarks of Software AG. Other company and product names mentioned herein may be trademarks of
their respective owners.
Adabas D: Control
Control
Table of Contents
Control
.
.
.
.
.
.
.
.
.
.
.
.
.
.
Control .
.
.
.
.
.
.
.
.
.
.
.
.
.
Introduction
.
.
.
.
.
.
.
.
.
.
.
.
.
Introduction .
.
.
.
.
.
.
.
.
.
.
.
.
Overview .
.
.
.
.
.
.
.
.
.
.
.
.
.
Overview .
.
.
.
.
.
.
.
.
.
.
.
.
.
Serverdb Structure .
.
.
.
.
.
.
.
.
.
.
Logging
.
.
.
.
.
.
.
.
.
.
.
.
.
Backup
.
.
.
.
.
.
.
.
.
.
.
.
.
Restart .
.
.
.
.
.
.
.
.
.
.
.
.
.
Restore
.
.
.
.
.
.
.
.
.
.
.
.
.
Consistency Check and Optimizer Support .
.
.
.
.
.
Process Structure
.
.
.
.
.
.
.
.
.
.
.
Caches .
.
.
.
.
.
.
.
.
.
.
.
.
.
Multiprocessor Configurations
.
.
.
.
.
.
.
.
Client Server
.
.
.
.
.
.
.
.
.
.
.
.
Availability .
.
.
.
.
.
.
.
.
.
.
.
.
Operating and Installation .
.
.
.
.
.
.
.
.
.
Operating and Installation .
.
.
.
.
.
.
.
.
.
Control Menu Structure and Help Texts
.
.
.
.
.
.
Calling Control .
.
.
.
.
.
.
.
.
.
.
.
Installing a New Serverdb
.
.
.
.
.
.
.
.
.
Stepwise Serverdb Installation
.
.
.
.
.
.
.
.
Installing the Serverdb from an Existing Data Backup .
.
.
The Additional Installation of Control .
.
.
.
.
.
.
The Main Screen
.
.
.
.
.
.
.
.
.
.
.
Backup Concepts and Strategies .
.
.
.
.
.
.
.
.
Backup Concepts and Strategies
.
.
.
.
.
.
.
.
Concepts .
.
.
.
.
.
.
.
.
.
.
.
.
Backup Media
.
.
.
.
.
.
.
.
.
.
.
Backup Generations .
.
.
.
.
.
.
.
.
.
Medium Label
.
.
.
.
.
.
.
.
.
.
.
Examples of a Backup Scheme .
.
.
.
.
.
.
.
Backup / Restore - a Practical Guide .
.
.
.
.
.
.
Saving to One Medium
.
.
.
.
.
.
.
.
.
Restoring from One Medium .
.
.
.
.
.
.
.
Saving to a Medium with Continuation Medium .
.
.
.
Restoring from a Medium with Continuation Media .
.
.
Saving to Several Parallel Media without Continuation Medium
Restoring from Several Parallel Media without Continuation Media
Saving to Several Parallel Media with Continuation Media .
.
Restoring from Several Parallel Media with Continuation Media
Restoring from Version Files (Autosave) .
.
.
.
.
.
Restoring Several Log Segments from Tape (AUTOSAVE)
.
Autoloader under Windows
.
.
.
.
.
.
.
.
Other Autoloaders .
.
.
.
.
.
.
.
.
.
.
Example of Backup / Restore .
.
.
.
.
.
.
.
Batch Mode: xbackup / xrestore .
.
.
.
.
.
.
.
.
.
.
.
.
.
.
.
.
.
.
.
.
.
.
.
.
.
.
.
.
.
.
.
.
.
.
.
.
.
.
.
.
.
.
.
.
.
.
.
.
.
.
.
.
.
.
.
.
.
.
.
.
.
.
.
.
.
.
.
.
.
.
.
.
.
.
.
.
.
.
.
.
.
.
.
.
.
.
.
.
.
.
.
.
.
.
.
.
.
.
.
.
.
.
.
.
.
.
.
.
.
.
.
.
.
.
.
.
.
.
.
.
.
.
.
.
.
.
.
.
.
.
.
.
.
.
.
.
.
.
.
.
.
.
.
.
.
.
.
.
.
.
.
.
.
.
.
.
.
.
.
.
.
.
.
.
.
.
.
.
.
.
.
.
.
.
.
.
.
.
.
.
.
.
.
.
.
.
.
.
.
.
.
.
.
.
.
.
.
.
.
.
.
.
.
.
.
.
.
.
.
.
.
.
.
.
.
.
.
.
.
.
.
.
.
.
.
.
.
.
.
.
.
.
.
.
.
.
.
.
.
.
.
.
.
.
.
.
.
.
.
.
.
.
.
.
.
.
.
.
.
.
.
.
.
.
.
.
.
.
.
.
.
.
.
.
.
.
.
.
.
.
.
.
.
.
.
.
.
.
.
.
.
.
.
.
1
1
2
2
3
3
4
5
5
5
5
6
7
10
11
11
12
13
13
13
17
18
26
28
30
30
34
34
34
35
35
36
39
42
42
45
47
48
51
53
56
61
63
64
66
67
68
73
i
Control
Functionality and Parameters .
.
.
.
Actions
.
.
.
.
.
.
.
.
Errors .
.
.
.
.
.
.
.
.
Standard Input and Output .
.
.
.
xbackup / xrestore Exit Codes
.
.
.
Files .
.
.
.
.
.
.
.
.
External Backup Tools
.
.
.
.
.
Notes on Timing
.
.
.
.
.
.
Notes on "EXTERN" Medium .
.
.
Notes on ADSM
.
.
.
.
.
.
Notes on NetWorker
.
.
.
.
.
Automatic Log Saves Using An Archiver Tool
Operating Menu Function
.
.
.
.
.
Operating Menu Function
.
.
.
.
.
Operating / Colors
.
.
.
.
.
.
Refresh .
.
.
.
.
.
.
.
.
Operating / Restart
.
.
.
.
.
.
Operating / Restart / Warm .
.
.
.
Operating / Restart / Cold
.
.
.
.
Operating / Restart / Restart Local
.
.
Operating / Restart / Restart Copy
.
.
Operating / Restart / Reconnect .
.
.
Operating / Restart / Reconnect Copy .
.
Operating / Shutdown .
.
.
.
.
.
Operating / Update Statistics .
.
.
.
Operating Exit
.
.
.
.
.
.
.
Info Menu Function .
.
.
.
.
.
.
Info Menu Function .
.
.
.
.
.
.
Info / Activity
.
.
.
.
.
.
.
Info / Configuration .
.
.
.
.
.
Info / Distribution .
.
.
.
.
.
.
Info / Users .
.
.
.
.
.
.
.
Info / Caches .
.
.
.
.
.
.
.
Info / I/O Accesses
.
.
.
.
.
.
Info / Locks .
.
.
.
.
.
.
.
Info / Logs .
.
.
.
.
.
.
.
Info / Processes .
.
.
.
.
.
.
Info / Regions
.
.
.
.
.
.
.
Info / Memory
.
.
.
.
.
.
.
Info / Version
.
.
.
.
.
.
.
Options Menu Function .
.
.
.
.
.
Options Menu Function .
.
.
.
.
.
Options / Reset Counter .
.
.
.
.
Options / Remote SQL Server .
.
.
.
Options / Accounting .
.
.
.
.
.
Options / Access Mode
.
.
.
.
.
Options / Kernel Trace
.
.
.
.
.
Options / Autosave Log
.
.
.
.
.
Options / Schedule
.
.
.
.
.
.
ii
Adabas D: Control
.
.
.
.
.
.
.
.
.
.
.
.
.
.
.
.
.
.
.
.
.
.
.
.
.
.
.
.
.
.
.
.
.
.
.
.
.
.
.
.
.
.
.
.
.
.
.
.
.
.
.
.
.
.
.
.
.
.
.
.
.
.
.
.
.
.
.
.
.
.
.
.
.
.
.
.
.
.
.
.
.
.
.
.
.
.
.
.
.
.
.
.
.
.
.
.
.
.
.
.
.
.
.
.
.
.
.
.
.
.
.
.
.
.
.
.
.
.
.
.
.
.
.
.
.
.
.
.
.
.
.
.
.
.
.
.
.
.
.
.
.
.
.
.
.
.
.
.
.
.
.
.
.
.
.
.
.
.
.
.
.
.
.
.
.
.
.
.
.
.
.
.
.
.
.
.
.
.
.
.
.
.
.
.
.
.
.
.
.
.
.
.
.
.
.
.
.
.
.
.
.
.
.
.
.
.
.
.
.
.
.
.
.
.
.
.
.
.
.
.
.
.
.
.
.
.
.
.
.
.
.
.
.
.
.
.
.
.
.
.
.
.
.
.
.
.
.
.
.
.
.
.
.
.
.
.
.
.
.
.
.
.
.
.
.
.
.
.
.
.
.
.
.
.
.
.
.
.
.
.
.
.
.
.
.
.
.
.
.
.
.
.
.
.
.
.
.
.
.
.
.
.
.
.
.
.
.
.
.
.
.
.
.
.
.
.
.
.
.
.
.
.
.
.
.
.
.
.
.
.
.
.
.
.
.
.
.
.
.
.
.
.
.
.
.
.
.
.
.
.
.
.
.
.
.
.
.
.
.
.
.
.
.
.
.
.
.
.
.
.
.
.
.
.
.
.
.
.
.
.
.
.
.
.
.
.
.
.
.
.
.
.
.
.
.
.
.
.
.
.
.
.
.
.
.
.
.
.
.
.
.
.
.
.
.
.
.
.
.
.
.
.
.
.
.
.
.
.
.
.
.
.
.
.
.
.
.
.
.
.
.
.
.
.
.
.
.
.
.
.
.
.
.
.
.
.
.
.
.
.
.
.
.
.
.
.
.
.
.
.
.
.
.
.
.
.
.
.
.
.
.
.
.
.
.
.
.
.
.
.
.
.
.
.
.
.
.
.
.
.
.
.
.
.
.
.
.
.
.
.
.
.
.
.
.
.
.
.
.
.
.
.
.
.
.
.
.
.
.
.
.
.
.
.
.
.
.
.
.
74
.
76
.
77
.
78
.
79
.
79
.
79
.
81
.
81
.
82
.
82
.
83
.
84
.
84
.
84
.
85
.
85
.
85
.
86
.
86
.
86
.
86
.
87
.
87
.
88
.
88
.
89
.
89
.
90
.
94
.
97
.
98
.
99
.
100
.
101
.
102
.
104
.
106
.
108
.
108
.
109
.
109
.
109
.
109
.
110
.
111
.
112
.
112
.
113
.
Adabas D: Control
Backup Menu Function .
.
.
.
.
.
.
Backup Menu Function .
.
.
.
.
.
.
Backup / Save
.
.
.
.
.
.
.
.
Backup / Save / Verify Devspaces
.
.
.
Backup / Save / Data
.
.
.
.
.
.
Backup / Save / Updated Pages .
.
.
.
Backup / Save / Log
.
.
.
.
.
.
Backup / Save / Log Segment
.
.
.
.
Backup / Restore .
.
.
.
.
.
.
.
Backup / Restore / Data .
.
.
.
.
.
Backup / Restore / Updated Pages
.
.
.
Backup / Restore / Log (UNTIL) .
.
.
.
Backup / Restore / Devspace
.
.
.
.
Backup / Restore / Clear Log .
.
.
.
.
Backup / Show History
.
.
.
.
.
.
Backup / Show Protocol .
.
.
.
.
.
Backup / Media Manager .
.
.
.
.
.
Backup / Generations .
.
.
.
.
.
.
Backup / Schedule Manager
.
.
.
.
.
Examples of Weekly Schedules and Timetables
How to Create Weekly Schedules and Timetables
Backup / Schedule Manager / Week .
.
.
Backup / Schedule Manager / Action .
.
.
Backup / Schedule Manager / Tools .
.
.
Backup / Schedule Manager / Help .
.
.
Backup / Schedule Manager / Timetable .
.
Diagnose Menu Function .
.
.
.
.
.
.
Diagnose Menu Function
.
.
.
.
.
.
Diagnose / Op Messages .
.
.
.
.
.
Diagnose / Command History .
.
.
.
.
Diagnose / Inst Protocol .
.
.
.
.
.
Configuration Menu Function .
.
.
.
.
.
Configuration Menu Function
.
.
.
.
.
Configuration / Alter Parameters
.
.
.
.
Configuration / Alter Parameters / Set Defaults .
Configuration / Alter Parameters / Termchar Set
Configuration / Alter Parameters / Mapchar Set
Configuration / Alter Parameters / Session
.
Configuration / Alter Parameters / Kernel .
.
Configuration / Alter Parameters / Sysuser
.
Configuration / Alter Config .
.
.
.
.
Configuration / Alter Config /Add Devspace .
Configuration / Alter Config / Log Segment .
Configuration / Alter Config / Data Restore
.
Configuration / Alter Config / Change Devspace
Configuration / Alter Config / Alter Log .
.
Configuration / Load Systables .
.
.
.
.
Configuration / Install Serverdb
.
.
.
.
Configuration / Clear Serverdb .
.
.
.
.
Control
.
.
.
.
.
.
.
.
.
.
.
.
.
.
.
.
.
.
.
.
.
.
.
.
.
.
.
.
.
.
.
.
.
.
.
.
.
.
.
.
.
.
.
.
.
.
.
.
.
.
.
.
.
.
.
.
.
.
.
.
.
.
.
.
.
.
.
.
.
.
.
.
.
.
.
.
.
.
.
.
.
.
.
.
.
.
.
.
.
.
.
.
.
.
.
.
.
.
.
.
.
.
.
.
.
.
.
.
.
.
.
.
.
.
.
.
.
.
.
.
.
.
.
.
.
.
.
.
.
.
.
.
.
.
.
.
.
.
.
.
.
.
.
.
.
.
.
.
.
.
.
.
.
.
.
.
.
.
.
.
.
.
.
.
.
.
.
.
.
.
.
.
.
.
.
.
.
.
.
.
.
.
.
.
.
.
.
.
.
.
.
.
.
.
.
.
.
.
.
.
.
.
.
.
.
.
.
.
.
.
.
.
.
.
.
.
.
.
.
.
.
.
.
.
.
.
.
.
.
.
.
.
.
.
.
.
.
.
.
.
.
.
.
.
.
.
.
.
.
.
.
.
.
.
.
.
.
.
.
.
.
.
.
.
.
.
.
.
.
.
.
.
.
.
.
.
.
.
.
.
.
.
.
.
.
.
.
.
.
.
.
.
.
.
.
.
.
.
.
.
.
.
.
.
.
.
.
.
.
.
.
.
.
.
.
.
.
.
.
.
.
.
.
.
.
.
.
.
.
.
.
.
.
.
.
.
.
.
.
.
.
.
.
.
.
.
.
.
.
.
.
.
.
.
.
.
.
.
.
.
.
.
.
.
.
.
.
.
.
.
.
.
.
.
.
.
.
.
.
.
.
.
.
.
.
.
.
.
.
.
.
.
.
.
.
.
.
.
.
.
.
.
.
.
.
.
.
.
.
.
.
.
.
.
.
.
.
.
.
.
.
.
.
.
.
.
.
.
.
.
.
.
.
.
.
.
.
.
.
.
.
.
.
.
.
.
.
.
.
.
.
.
.
.
.
.
.
.
.
.
.
.
.
.
.
.
.
.
.
.
.
.
.
.
.
.
.
.
.
.
.
.
.
.
.
.
.
.
.
.
114
.
114
.
114
.
115
.
115
.
118
.
118
.
118
.
119
.
119
.
120
.
120
.
120
.
123
.
123
.
123
.
123
.
123
.
124
.
125
.
131
.
136
.
140
.
144
.
144
.
145
.
148
.
148
.
148
.
148
.
149
.
150
.
150
.
150
.
150
.
156
.
157
.
159
.
160
.
162
.
162
.
163
.
164
.
165
.
166
.
166
.
167
.
168
.
169
.
iii
Control
Remote Control .
.
.
.
.
.
.
.
.
.
.
.
Remote Control .
.
.
.
.
.
.
.
.
.
.
.
Call Syntax .
.
.
.
.
.
.
.
.
.
.
.
Options .
.
.
.
.
.
.
.
.
.
.
.
.
Starting the Application .
.
.
.
.
.
.
.
.
The Navigator Tree .
.
.
.
.
.
.
.
.
.
Servernodes
.
.
.
.
.
.
.
.
.
.
.
Serverdbs .
.
.
.
.
.
.
.
.
.
.
.
Info Sheet .
.
.
.
.
.
.
.
.
.
.
.
Kernel Parameter .
.
.
.
.
.
.
.
.
.
Configuration .
.
.
.
.
.
.
.
.
.
.
SysUsers .
.
.
.
.
.
.
.
.
.
.
.
Devices .
.
.
.
.
.
.
.
.
.
.
.
LoadSystem Tables .
.
.
.
.
.
.
.
.
.
Diagnose .
.
.
.
.
.
.
.
.
.
.
.
Media Manager
.
.
.
.
.
.
.
.
.
.
Save Operations
.
.
.
.
.
.
.
.
.
.
Restore Operations .
.
.
.
.
.
.
.
.
.
Install New Serverdb
.
.
.
.
.
.
.
.
.
Remote Control Server
.
.
.
.
.
.
.
.
.
Configuration File of the Remote Control Server .
.
.
Environment Variables
.
.
.
.
.
.
.
.
.
Configuration of Control .
.
.
.
.
.
.
.
.
Tcl Commands .
.
.
.
.
.
.
.
.
.
.
Troubleshooting When Problems Occur .
.
.
.
.
.
Troubleshooting When Problems Occur
.
.
.
.
.
.
What to do When the System Crashes .
.
.
.
.
.
Saving the Protocol Files
.
.
.
.
.
.
.
.
The x_look Analysis Tool Under Unix
.
.
.
.
.
Finding the cause of a System Crash .
.
.
.
.
.
The Log is Full .
.
.
.
.
.
.
.
.
.
.
The Database Administrator’s Action .
.
.
.
.
.
The Database
.
.
.is Full
.
.
.
.
.
.
.
.
.
.
.
A Log Disk is Defective .
.
.
.
.
.
.
.
.
The Database Administrator’s Action .
.
.
.
.
.
A System Error Has Occurred .
.
.
.
.
.
.
.
The Database Administrator’s Action .
.
.
.
.
.
Database Performance: Basics, Performance Analysis and Tuning
Database Performance: Basics, Performance Analysis and Tuning
Optimizer and Statistics .
.
.
.
.
.
.
.
.
"updmaster" and "updslave" Programs .
.
.
.
.
.
Searching Bottlenecks In The Kerneltrace (x_wizbit) .
.
.
Call .
.
.
.
.
.
.
.
.
.
.
.
.
Description
.
.
.
.
.
.
.
.
.
.
.
Prerequisites .
.
.
.
.
.
.
.
.
.
.
Options
.
.
.
.
.
.
.
.
.
.
.
.
Remarks .
.
.
.
.
.
.
.
.
.
.
.
Analyzing Adabas Bottlenecks (x_wizard) .
.
.
.
.
Call .
.
.
.
.
.
.
.
.
.
.
.
.
Description
.
.
.
.
.
.
.
.
.
.
.
Prerequisites .
.
.
.
.
.
.
.
.
.
.
iv
Adabas D: Control
.
.
.
.
.
.
.
.
.
.
.
.
.
.
.
.
.
.
.
.
.
.
.
.
.
.
.
.
.
.
.
.
.
.
.
.
.
.
.
.
.
.
.
.
.
.
.
.
.
.
.
.
.
.
.
.
.
.
.
.
.
.
.
.
.
.
.
.
.
.
.
.
.
.
.
.
.
.
.
.
.
.
.
.
.
.
.
.
.
.
.
.
.
.
.
.
.
.
.
.
.
.
.
.
.
.
.
.
.
.
.
.
.
.
.
.
.
.
.
.
.
.
.
.
.
.
.
.
.
.
.
.
.
.
.
.
.
.
.
.
.
.
.
.
.
.
.
.
.
.
.
.
.
.
.
.
.
.
.
.
.
.
.
.
.
.
.
.
.
.
.
.
.
.
.
.
.
.
.
.
.
.
.
.
.
.
.
.
.
.
.
.
.
.
.
.
.
.
.
.
.
.
.
.
.
.
.
.
.
.
.
.
.
.
.
.
.
.
.
.
.
.
.
.
.
.
.
.
.
.
.
.
.
.
.
.
.
.
.
.
.
.
.
.
.
.
.
.
.
.
.
.
.
.
.
.
.
.
.
.
.
.
.
.
.
.
.
.
.
.
.
.
.
.
.
.
.
.
.
.
.
.
.
.
.
.
.
.
.
.
.
.
.
.
.
.
.
.
.
.
.
.
.
.
.
.
.
.
.
.
.
.
.
.
.
.
.
.
.
.
.
.
.
.
.
.
.
.
.
.
.
.
.
.
.
.
.
.
.
.
.
.
.
.
.
.
.
.
.
.
.
.
.
.
.
.
.
170
.
170
.
170
.
170
.
170
.
171
.
172
.
172
.
173
.
173
.
174
.
174
.
174
.
175
.
175
.
175
.
176
.
176
.
177
.
177
.
178
.
179
.
179
.
180
.
181
.
181
.
181
.
181
.
182
.
183
.
201
.
202
.
203
204
.
204
.
205
.
205
.
205
.
208
.
208
.
208
.
209
.
210
.
210
.
211
.
211
.
211
.
211
.
212
.
212
.
212
.
213
.
Adabas D: Control
Options
.
.
.
.
.
.
.
.
.
.
.
.
.
.
Remarks .
.
.
.
.
.
.
.
.
.
.
.
.
.
x_wizard Messages .
.
.
.
.
.
.
.
.
.
.
.
The Course of Measured Values (x_wiztrc) .
.
.
.
.
.
.
Call .
.
.
.
.
.
.
.
.
.
.
.
.
.
.
Description
.
.
.
.
.
.
.
.
.
.
.
.
.
Prerequisites .
.
.
.
.
.
.
.
.
.
.
.
.
Options
.
.
.
.
.
.
.
.
.
.
.
.
.
.
Remarks .
.
.
.
.
.
.
.
.
.
.
.
.
.
x_wiztrc
.
. Output
.
.Tables
.
.
.
.
.
.
.
.
.
.
.
.
Direct Search For Costly SQL Statements
.
.
.
.
.
.
.
Direct
.
. Search
.
.For Costly
.
. SQL
. Statements
.
.
. Using
. DIAGNOSE
.
.
. MONITOR
.
.
.
Table Statistics and Structural Checks (xpu) .
.
.
.
.
.
Call .
.
.
.
.
.
.
.
.
.
.
.
.
.
.
Description
.
.
.
.
.
.
.
.
.
.
.
.
.
Options
.
.
.
.
.
.
.
.
.
.
.
.
.
.
Output Files
.
.
.
.
.
.
.
.
.
.
.
.
.
Return Code .
.
.
.
.
.
.
.
.
.
.
.
.
Remarks .
.
.
.
.
.
.
.
.
.
.
.
.
.
Settings for NetTerm .
.
.
.
.
.
.
.
.
.
.
.
.
Settings for NetTerm
.
.
.
.
.
.
.
.
.
.
.
.
Control
.
.
.
.
.
.
.
.
.
.
.
.
.
.
.
.
.
.
.
.
.
.
.
.
.
.
.
.
.
.
.
.
.
.
.
.
.
.
.
.
.
.
.
.
.
.
.
.
.
.
.
.
.
.
.
.
.
.
.
.
.
.
.
.
.
.
.
.
.
.
.
.
.
.
.
.
.
.
.
.
.
.
.
.
.
.
.
.
.
.
.
.
.
.
.
.
.
.
.
.
.
.
.
.
.
213
.
213
.
214
.
225
.
225
.
225
.
225
.
225
.
225
.
226
.
231
.
232
233
.
233
.
233
.
233
.
233
.
233
.
233
.
234
.
235
.
235
.
v
Adabas D: Control
Control
Control
Introduction
Overview
Operating and Installation
Backup Concepts and Strategies
Operating Menu Function
Info Menu Function
Options Menu Function
Backup Menu Function
Diagnose Menu Function
Configuration Menu Function
Remote Control
Troubleshooting When Problems Occur
Database Performance: Basics, Performance Analysis and Tuning
Settings for NetTerm
1
Introduction
Adabas D: Control
Introduction
Control is used to control and monitor the Adabas server, and to execute the backup and recovery
procedures.
Control supports the following operations:
Installing the database server,
Loading the system tables,
Starting and shutting down the database server,
Starting and shutting down the remote SQL server,
Monitoring the database server,
Backing up the database and log,
Restoring the database and log,
Expanding the disk capacities of the database server,
Running the Diagnose tool.
Remote access to non-local database servers by Control is not yet supported. Note, however, that there are
numerous terminal emulations that can be used to access Unix servers from Windows PCs. For example,
the NetTerm terminal emulation of the InterSoft International Inc. company is an appropriate tool for this
purpose. (The settings recommended for NetTerm are described in detail in Appendix 2)
2
Adabas D: Control
Overview
Overview
One or more instances of Adabas can be installed and operated on a computer. Each Adabas instance
consists of processes, main memory structures (caches), and a disk-based serverdb.
______________
|
|
| Caches
|
|____________|
Adabas D Instance
|
|
| Processes
|
|____________|
|
|
| Serverdb
|
|____________|
This chapter covers the following topics:
Serverdb Structure
Logging
Backup
Restart
Restore
Consistency Check and Optimizer Support
Process Structure
Caches
Multiprocessor Configurations
Client Server
Availability
3
Overview
Adabas D: Control
Serverdb Structure
A serverdb has the following structure:
System
Transaction
Archive
Data
Devspace
Log Devspace
Log Devspace(s)
Devspace(s)
... ( 0..7 )
... ( 1..64 )
The term "devspace" denotes a physical disk or part of a physical disk, for example, a Unix raw device or
a file.
Adabas assumes that each devspace is located on a different disk. If this is not true, decreased
performance is to be expected. The used disks should present uniform performance data (especially access
speed) because only then an equal usage of the devspaces can be obtained.
The Adabas devspaces have the following meanings:
System Devspace
The configuration data and the mappings of the logical page numbers to physical page addresses
are administered on the system devspace. The size of the system devspace therefore depends
directly on the database size and is determined by the database kernel.
Transaction Log Devspace
Modifications to the data are recorded in the transaction log and written to disk at the end of the
transaction. The transaction log can be used to ROLLBACK transactions, it is written cyclically.
Its size must be sufficient to receive the modifications of all open transactions.
Archive Log Devspaces
All modifications made to the database contents are recorded in the archive log devspace to
ensure the recovery of the database contents after a media failure. The log backup functions
(Save / Log, Save / Log Segment) can be used to save the archive log devspace contents to tape
(DLT, DAT, Video8) and to release the used space afterwards. The size of the archive log
devspace must therefore be sufficient to receive all modifications occurring during two backups.
The archive log can comprise several devspaces.
Data Devspaces
The user data (tables, indexes) and the SQL catalog (schema information) are stored in the data
devspaces. As a rule, an Adabas-internal striping algorithm evenly distributes the data belonging
to a table across all data devspaces. The storage space defined by all data devspaces is the total
size of the database.
The data devspaces are not directly related to the storage of database objects. An assignment of tables to
data devspaces is not possible and not necessary. A table or an index can use one page (4 KB) as a
minimum; or a table can use all data devspaces (i.e., the whole database) as a maximum. A table increases
or decreases in size automatically without administrative intervention.
4
Adabas D: Control
Overview
The system devspace and all data devspaces of a serverdb can be mirrored to obtain a higher degree of
availability. Write operations are performed on each of the two mirrored devspaces, while read operations
alternate between one mirrored data devspace and the other to distribute the I/O load.
If the data devspaces become full, database operation stops and Adabas performs an "Emergency
Shutdown". The devspace usage level of a serverdb is therefore a critical parameter of database operation
and must be monitored. A serverdb can be expanded by additional data devspaces, if necessary, while the
database is operational.
Logging
Adabas provides a gradual logging concept to satisfy different data protection and computer configuration
requirements. A configuration parameter, LOG MODE, can be used to select one of several variants.
Backup
Adabas supports complete and incremental backups providing the required restore and restart functions in
order to make databases operational again after power and media failures. Periodic backups are
indispensable for production database environments.
To ensure round-the-clock operation, data backups (complete and incremental) can be performed in warm
mode and log segments can be automatically saved as soon as they have been completed.
Data backups are done with checkpoint; i.e., they are consistent. Data backups can be performed in warm
database mode. This can impair database operation.
As the low speed of the tape devices involved is a limiting factor for save and restore operations, Adabas
provides the option to save to or restore from several tape devices in parallel. Up to 32 tape devices can be
used to reduce save and restore times considerably. This is not possible for save log segment.
Restart
If a database failure other than a devspace failure (e.g., a power failure) occurs, the restart of Adabas
ensures that the last consistent database state is reestablished using the transaction log; this means, the
effects of committed transactions are reapplied on the data devspaces, and the effects of open transactions
are rolled back.
Even if a devspace failure (of physical disks) occurs, a restart of the serverdb can suffice as recovery
measure to restore the last consistent database state providing the archive log contains all the data
required.
Restore
If a media failure occurs on the system devspace or a data devspace, database operation ends (unless the
data devspaces and the system devspace are mirrored). After repairing the media failure, the database
must be restored using the last complete backup version (Restore / Data).
5
Overview
Adabas D: Control
If the archive log had not been saved in the meantime, the restart has the effect that the database
modifications recorded in the archive log are reapplied, thus reestablishing the last consistent state of the
database (see section Restart).
If the archive log had been saved in the meantime, Restore / Data must be performed and the backup of
the archive log must be restored with Restore / Log) (see also section Troubleshooting When Problems
Occur).
If the database needs to be reset to a previous state for organizational reasons, the most recent complete
backup (Restore / Data) that was made previous to the desired date and time must be restored, the current
archive log must be saved, and the log backups subsequent to the complete backup (Restore / Log) must
be restored. The desired database state can be determined by specifying a date and a time (Restore / Log
UNTIL).
For a recovery using modified database pages instead of log backups, a similar procedure is used. A
sequence of Save / Updated Pages tapes written after the last complete backup will also be availabe in this
case. The tapes must be restored one after the other with Restore / Updated Pages. The current contents of
the archive log do not need to be saved; they are used to reestablish the last consistent database state
during the following restart.
If a media failure occurs on the transaction log devspace or one of the archive log devspaces, database
operation ends unless the log mode DUAL defines a mirrored archive log. After repairing the media
failure and performing RESTORE LOG FROM DEVSPACE and a subsequent restart, the database is in a
consistent state again.
Consistency Check and Optimizer Support
To ensure a safe database operation and good performance, two other activities must be done from time to
time: Verify and Update Statistics.
Verify can be executed while the database is operational. It checks the consistency of internal chains
within the B* trees used. If inconsistencies are discovered, the database must be restored. A Verify is
recommended before each complete backup of the database.
Verify in COLD mode (i.e., before a Restart of the serverdb) has an additional property: pages wrongly
recorded as used since an irregular end of database operation are released to the free space management.
Update Statistics determines the number of rows in tables and the selectivity of individual columns. The
Adabas optimizer needs these specifications to determine the best strategy for the processing of complex
SQL statements. If the sizes or the value assignments in the database have changed considerably, a new
Update Statistics must be performed. Update Statistics should be executed once a week.
If Adabas determines differences between the optimizer assumptions from the last Update Statistics and
the current state of a table, it attempts to perform an implicit Update Statistics. If there are conflicting
locks, this attempt might be aborted, so that the implicit Update Statistics is not a complete equivalent of
the explicit Update Statistics.
6
Adabas D: Control
Overview
Process Structure
An Adabas instance consists of a set of Unix processes or Windows threads. Under Unix, a process acts as
UKP (user kernel process) or as special process with special tasks. Under Windows, the term "thread" is
used instead of process; consequently, there are UKTs (user kernel threads). Strictly speaking, the Adabas
instance is realized in Windows by a process subdivided into threads. The required number of
UKPs/UKTs and of special processes/threads depends on the number of used devspaces, the hardware
configuration, and the database parameters.
In the following example, each box represents one UKP/UKT. Some UKPs/UKTs bundle up several tasks,
others realize just one special task. The example is valid for a process structure in a Unix system with one
CPU.
A UKP/UKT bundles up a subset of all tasks (internal tasking). There are the following tasks:
Usertasks
Each user or each application program is assigned a usertask when connecting to the database.
The usertask ensures the processing of SQL statements for the session. The number of available
usertasks is defined by the database parameter MAXUSERTASKS.
Servertasks
The main purpose of servertasks is to perform data backups. If the installed database is a
distributed system, servertasks also realize access to remote data. When configuring the
database, the number of servertasks is automatically computed from the number of data
devspaces and the number of provided backup devices.
7
Overview
Adabas D: Control
Servertasks ensure the writing to secondary storage. They become active when a savepoint is
being performed. A savepoint means that the modifications done to the data cache are also performed to
the data on the disk.
Logwriter 1
The logwriter 1 ensures the writing of modification information (before and after images) to the
transaction log.
Logwriter 2
The logwriter 2 ensures the writing of before and after images to the archive log(s).
Bufreader
For a large data cache, savepoint writing takes a long time. The bufreaders become also active
between two savepoints to write data asynchronously from the data cache to disk. The number
of bufreaders to be activated, if needed, must be defined in xparam. It depends primarily on the
data cache size and the number of data devspaces.
Utility Task
The utility task is reserved for the database operating. It is only used to handle administrative
tasks. As there is only one utility task for each serverdb instance, no parallel operating actions
can be done.
Bufwriter Task
Adabas allows a special trace, the so-called vtrace, to be activated for diagnose purposes. The
bufwriter task is provided for this purpose.
Sender and Receiver
In a distributed database installation, these tasks perform the communicative operations between
the serverdbs involved.
Timertask
The timertask handles all kinds of timeout situations.
Special processes/threads are activated in addition to UKPs/UKTs. There are the following
special processes/threads:
Requestor
The requestor receives the local communication requests (connect) as well as requests from the
network and assigns them to a UKP/UKT. For example, the requestor informs the corresponding
UKP/UKT when a user disconnects abnormally.
Timer
The timer monitors the time for timeout control.
8
Adabas D: Control
Overview
Dev Processes/Threads
Dev processes/threads ensure that write and read operations to be done for the corresponding
tasks are actually performed. Their number primarily depends on the number of devspaces in the
installed database. Usually, two dev processes/threads are activated for each data devspace and
the system devspace, one dev process/thread is activated for the log devspaces and for vtrace
writing, if this has been enabled.
The process/thread dev0 plays a special part. Dev0 coordinates and monitors the dev
processes/threads. For example, if a mirrored devspace fails in warm mode (bad devspace), dev0
ensures that the corresponding dev processes/threads are terminated. Database operation is not
impaired in this case.
If the database is enlarged in warm mode by adding another data devspace, dev0 ensures that
new dev processes/threads are generated.
All the other dev<i-> processes/threads write data to or read it from the devspaces.
Temporary Dev Process
Processes/threads are temporarily activated to read and write data for data backups. These
processes are called asdev<i>. Their number depends on the number of data devspaces and of
the number of backup devices.
In Unix systems, dev0 coordinates these processes.
On a Windows system, the special thread async0 coordinates these processes.
Coordinator
The coordinator process/thread has a special meaning. It monitors all kernel processes/threads of
the instance. When starting the database instance, the coordinator is the first process/thread that
becomes active coordinating the start of the other processes/threads. For example, if a
process/thread fails in warm mode, the coordinator stops all the other processes/threads in the
worst case.
There are some more special processes/threads in addition, according to the operating system:
Clock Thread
The clock thread is only used On a Windows system. It computes internal times; for example, to
determine the time needed to execute an SQL statement.
Console Process
In Unix systems, the console process gathers information produced by other processes that could
be useful to the administrator and writes it to the knldiag operating message file.
On a Windows system, there is also a knldiag operating message file into which the information
is entered by each thread.
Console Thread
9
Overview
Adabas D: Control
On a Windows system, this special thread satisfies requests made by the x_cons console. x_cons
communicates with the console thread for this purpose.
In Unix systems, x_cons receives the required information from the processes’ shared memory.
Death Process (Unix only)
The death process monitors the coordinator process. If the coordinator process fails in an
operative database, the death process stops all the other processes.
Network Process (Unix only)
If REMOTE-ACCESS is set to YES in xparam, this process - instead of the vserver - is used for
communication between a remote application (remote SQL) and the kernel. A network process
can serve several connections.
Caches
Read and write operations to the devspaces are buffered in order to save disk accesses. The pertinent main
memory structures are called caches. They can be dimensioned appropriately. Adabas defines the
following caches:
Data Cache
This cache contains the last read- or write-accessed pages of the data devspaces. The data cache
is shared by all simultaneously active users. The hit rate, i.e. the relation between successful and
unsuccessful accesses to the data cache, is decisive for the performance. Successful access
means that the required data was already available in the data cache.
Converter Cache
The converter cache and its hit rate are also decisive for performance. The converter cache
contains the last read- or write-accessed pages of the system devspace. The converter cache is
shared by all simultaneously active users. For the converter cache, you should strive for hit rates
as close to 100% as possible.
Proc Code Cache
This structure contains the code of the last executed DB procedures, triggers, or DB functions.
The proc code cache is shared by all simultaneously active users.
Proc Data Cache
This cache exists for each active user (or for each database session). It contains the parameters
or variables belonging to the last executed DB procedures, triggers, and DB functions.
Catalog Cache
This cache exists for each active user (or for each database session). It contains the last catalog
objects used by a database session and the internal representation (application plans) of the last
exec commands. Displacements from the catalog cache first move the data into the data cache.
10
Adabas D: Control
Overview
Temp Cache
This cache exists for each active user (or for each database session). It contains the last database
objects (SELECT results, temporary tables) generated or temporarily used by a database session.
Applications that generate large join results or frequently work with temporary tables can
improve their performance by configuring a temp cache with an appropriate size. Displacements
from the temp cache first move the temporary data into the data cache.
Multiprocessor Configurations
For an optimal usage of multiprocessor configurations, Adabas supports an external/internal tasking that
can be configured. The aim hereby is to support as many database sessions as possible with a minimum
number of operating system processes. One operating system process is required for each CPU that resides
in the computer and is to be used by an Adabas serverdb.
The degree of the external/internal tasking is controlled by the two configuration parameters
MAXUSERTASKS and MAXCPU.
The parameter MAXUSERTASKS indicates the maximum number of simultaneously active users
(database sessions). Overconfiguration exceeding the actual requirements results in increased address
space (especially shared memory) requirements.
The parameter MAXCPU indicates the number of CPUs to be made available to the serverdb.
For example, if you want to use up to 800 simultaneously active database sessions on a 4-processor
computer, MAXUSERTASKS must be set to 800 and MAXCPU to 4. The serverdb can then utilize the
four processors by establishing four operating system processes each of which performs an internal
tasking for up to 200 users.
If the number of configured database sessions is exhausted, no other user can connect to the serverdb. The
number of active sessions is therefore a critical parameter of database operation and must be monitored.
Client Server
To open a serverdb for remote SQL client operation, only the remote SQL server must be started. It acts as
an agent for the remote clients.
To be able to use this connectivity built into Adabas via TCP/IP sockets, the corresponding TCP/IP entries
must have been previously configured. Information required for this purpose is contained in the "User
Manual Unix" or "User Manual Windows".
To connect to a serverdb, the name of the serverdb and the network name of the corresponding computer
or network node (servernode) must be specified in addition to a valid user name/password combination.
When connecting to a local serverdb, the servernode specification can be omitted.
Note:
Control can only be used on the local serverdb.
11
Overview
Adabas D: Control
Availability
The availability of a serverdb can be increased by using the corresponding hardware, operating system, or
database features.
For mission-critical applications, we recommend RAID-5 configurations as disk peripherals for data
devspaces. Then a failure and the exchange of a disk does not impair database operation. For performance
reasons, the log devspaces must not be created on RAID-5 systems but on special disks.
The same applies to operating system mirror disks. These, however, require double disk capacity.
Regardless of the hardware and operating system properties, Adabas provides a mirroring of the system
devspace and all data devspaces. (Independent of these mirrored devspaces, log mode DUAL can be used
to define mirrored archive log devspaces.) Mirroring the system devspace and the data devspaces is
controlled by the configuration parameter MIRRORED and requires the definition of a corresponding
number of mirrored devspaces. In a mirrored configuration, read operations alternate between the original
and the mirrored devspace; write operations concern both devspaces.
12
Adabas D: Control
Operating and Installation
Operating and Installation
This chapter covers the following topics:
Control Menu Structure and Help Texts
Calling Control
Installing a New Serverdb
Stepwise Serverdb Installation
Installing the Serverdb from an Existing Data Backup
The Additional Installation of Control
The Main Screen
Control Menu Structure and Help Texts
13
Operating and Installation
14
Adabas D: Control
Adabas D: Control
Operating and Installation
|
|
__________________________________________________________________________________________________
|
| Regions
|
| Operating
|_______________|
| Info ..
| Options ..
|
|
|
|
|
|
| Backup
| Diagnose
| Configuration
|
|
|
|____________|_______________|________________|_______________|_______________|__________________|
| Memory
|
|
| Colors
|
|
|
|_______________|
F2 | Activity
| Reset Counters | Save
|
|
| Op Messages
| Alter Parameters |
|
|
|
|____________|_______________|________________|_______________|_______________|__________________|
|
| Version
|
|
|
|
|
|
|
| Refresh..
|_______________|
| Configuration | Remote
| Restore
| Command
| Alter Config ..
|
|
|
|
|
| History
|
|
|
| SQL Server ..
| Help
|
|____________|_______________|________________|_______________|_______________|__________________|
|
|_______________|
|
|
|
|
|
|
| Restart
| Users
| Show History
| Inst Protocol | Load Systables
|
| Accounting..
|____________|_______________|________________|_______________|_______________|__________________|
|
|
|
|
| Access Mode..
| Show Protocol |
| Install Serverdb |
|____________|_______________|________________|_______________|
|__________________|
|
|
|
|
|
| Update
| I/O Accesses
| Kernel Trace.. | Media Manager |
| Clear Serverdb
|
|
|
|
| Shutdown.. | Caches
| Statistics |
|
|
|
|
|
|____________|_______________|________________|_______________|
|
| Exit
|
F3 | Locks
|
|
| Autosave Log.. | Generations
|
|
|__________________|
|
|
|____________|_______________|________________|_______________|
|
|
|
|
| Log
| Schedule..
| Schedule
|
|
|
| Manager
|
|_______________|________________|_______________|
|
|
| Processes
|
|_______________|
15
Operating and Installation
Adabas D: Control
The menu bar can be activated in different ways.
A menu bar item can be selected directly by pressing the highlighted letter (indicated by an
underscore in the illustrations) and the Control key at the same time. In most cases, selecting a menu
item will display a pulldown menu.
If the cursor is placed on an input field within the input screen, F12 can be used to enable the menu
bar. To reach the adjacent pulldown menu, use the left / right cursor keys.
A function of a displayed pulldown menu is activated either by positioning the cursor and pressing the
Enter key or by selecting the highlighted letter (in this case, it is not necessary to press the Control key at
the same time).
If a help function is available, it can be called using the F1 key. A help screen or a selection of values is
displayed. One of the displayed values can be selected. To obtain help on further subjects from within the
help screens, position the cursor on the corresponding catchword and press F1. F3 , End returns to the
previous screen.
If the release characters are not highlighted, the presentation of Control is not adapted to the definition of
the terminal. In this case, F2 can be used to change from within the Main Screen and all Installation
Screens to another presentation (color).
In the Main Screen, the function keys are set to the following functions:
F1
Help
F2
Colors
F3 , End
Cancel
F5 , Enter
Ok
F9
Refresh
In the Installation Screens, the function keys are set to the following functions:
F2
Colors
F3 , End
Cancel
F4
Print
F5 , Enter
Ok
F7 , Pgup
Prev
F8 , Pgdn
Next
In the Info Screens, the function keys are set to the following functions:
16
Adabas D: Control
Operating and Installation
F2
In Pages / In KB
F3 , End
Return
F4
Print
F5 , Enter
Ok
F6
Edit
F7 , Pgup
Prev
F8 , Pgdn
Next
F9
Refresh
In the Schedule Manager, the function keys are set to the following functions:
F1
- Help
F2
- Reset
F3 , End
- End, Quit, Cancel
If values have been modified, a warning is displayed.
F4
- Insert
F5 , Enter
- Ok, Update, Confirm
F6
- Delete
F7 , Pgup
- Prev, Scroll Up
F8 , Pgdn
- Next, Scroll Down
F9
- Search
Calling Control
Control can be called from the operating system level (Unix, Windows) using the following command:
xcontrol -d <serverdb name> -u <controluser name>,< password >
If Control has not yet been installed for the specified server database, the Installation Screen appears. If no
parameters have been specified, the Connect Screen appears.
In the Connect Screen, the Control user identification, the Control user password, and the name of the
serverdb must be entered.
Instructions for the usage of the user interface by means of pulldown menus, function keys, and buttons
are given in section Control Menu Structure and Help Texts.
17
Operating and Installation
Adabas D: Control
Installing a New Serverdb
If a non-existent serverdb is specified for the call of Control (i.e., no parameter file with the database
name exists), the following screen is displayed:
____________________________________________________________________________
|
|
|
Install Serverdb <serverdb> on <servernode>
|
|
___________________________________________________________________
|
|
|
|
CONTROL USER NAME..:
PASSWORD...:
SYSDBA NAME........:
PASSWORD...:
|
|
|
|
|
|
|
|
DOMAIN USER NAME...: DOMAIN
PASSWORD...:
|
|
|
|
_____________________________________________________________________
|
|
|
|
|
|
| If you want to create a new serverdb fill this form and press "Ok" |
|
|
|____________________________________________________________________|
|
Serverdb does not exist
|
|
|
________
|
|
|
| Next | | Prev |
| Color |
|
|______| |______|
|_______|
| |
_______
|
________
|
|
________
|
|
_________
|
|
|
|
| Print |
| Cancel |
|
|_______|
|________|
|
|____________________________________________________________________________|
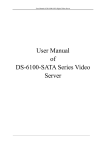
Fig.: Installation Screen 1
Serverdb name is taken from the call option -d. SERVERNODE is the computer name within the network.
If the computer has no net card, the SERVERNODE name is "local".
Control knows four special users:
1. The Control USER has the right to perform all functions of Control. The Control USER can connect
several times to his serverdb, for example, to retrieve information about operating parameters while
performing long-time backups.
2. The SYSDBA USER is the system administrator. This user owns the system tables and has the
privilege to create other administrators. This user is especially needed for the installation.
3. The user DOMAIN is the owner of the catalog tables. This user is also needed for the installation.
4. The user OPERATOR is a database operator with restricted rights. This user may only perform save
functions.
In the Installation Screen, name and password are defined for the users Control and SYSDBA, whereas
the password is only defined for the user DOMAIN. First, the user OPERATOR has the password
OPERATOR. It can be modified using the Configuration / Alter Parameters / Sysuser menu item.
18
Adabas D: Control
Operating and Installation
The names and passwords have a maximum length of 18 characters. Passwords must be entered twice to
recognize input errors. When the specifications are complete, the screen must be acknowleged using either
the Enter key or Ok button, and a screen for the definition of the database parameters is displayed.
___________________________________________________________________________
|
|
|
Install Serverdb <serverdb> on <servernode>
|
|__________________________________________________________________________|
|
|
|
|
| MAXBACKUPDEVS
2
|
| MAXSERVERTASKS
4
|
| MAXUSERTASKS
50
|
| MAXCPU
1
|
| DATA_CACHE_PAGES
200
|
| PROC_DATA_PAGES
130
|
| PROC_CODE_PAGES
76
|
| TEMP_CACHE_PAGES
30
|
| CATALOG_CACHE_PAGS
816
|
| LOG_QUEUE_PAGES
50
|
| LOG_CACHE_PAGES
100
|
| CONV_CACHE_PAGES
100
|
|
|
|
_____________________________________________________________
|
|
|
|
|
|
| Maximum Number of backup devices (e.g. tape devices) used |
|
|
| in parallel for SAVE/RESTORE
|
|
|
|___________________________________________________________|
|
|
|
|
________
|
|
|
| Next | | Prev |
| Explain |
| Print |
| Cancel |
|
|
|______| |______|
|_________|
|_______|
|________|
|
| |
_______
|
__________
|
|
________
|
|
|
|
_________
|
|
|
|
|__________________________________________________________________________|
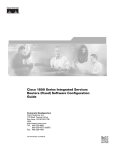
Fig. Installation Screen 2
All parameters are set to default values. In a window above the functional buttons, a description is output
for the parameter on which the cursor is placed. The parameters can be changed by overwriting them.
EXPLAIN can be used to display the computation formula of the numeric parameters and their
dependencies of the other parameters. To obtain the second parameter screen, use the Next button or the
Enter key.
Configuration Parameters
MAXBACKUPDEVS
Saving and restoring the database log can be accelerated with several tape devices used in
parallel. This parameter defines the maximum number of parallel tape devices.
MAXSERVERTASKS
Servertasks in a distributed configuration help to process SQL statements of other serverdbs.
Servertasks in a stand-alone configuration accelerate the save and restore operations.
MAXUSERTASKS
19
Operating and Installation
Adabas D: Control
This parameter restricts the number of simultaneously active user sessions on this serverdb.
MAXCPU
This parameter is only of interest for multi-CPU machines. The number of UKPs (UKTs)
reserved for user tasks is set by the system to one for each CPU made available here. These user
tasks use up far and away the most processing power taken up by the database.
UKPs/UKTs are the so-called "user kernel processes" (Unix) or "user kernel threads"
(Windows). There are also UKPs that do not contain user tasks (despite the name), and as these
demand far less CPU resources, they are not influenced by this parameter.
As these UKPs/UKTs are often quite aggressive in their usage of CPU resources, it can be very
useful to have some control over them, to reserve resources for other tasks running within and
outside of Adabas. For a four-CPU dedicated database server, a good choice would be to set
MAXCPU to three. If "foreign" important CPU-intensive tasks are to be run on the system as
well, it might be necessary to set MAXCPU to an even lower ratio, 50% or even 25%, e.g. 1 on
a dual-processor system.
For a single-processor computer MAXCPU must be set to 1.
DATA_CACHE_PAGES
This parameter defines the size of the data cache. The specification is made in 4 KB pages.
PROC_DATA_PAGES
This parameter defines the total size of the proc data cache. The specification is made in 4 KB
pages.
PROC_CODE_PAGES
This parameter defines the size of the dbproc code cache. The specification is made in 4 KB
pages.
TEMP_CACHE_PAGES
This parameter defines the size of the temp cache. The specification is made in 4 KB pages.
CATALOG_CACHE_PAGES
This parameter defines the size of the catalog cache. The specification is made in 4 KB pages.
LOG_QUEUE_PAGES
This parameter defines the size of the buffer for the write processes of the log. The specification
is made in 4 KB pages.
LOG_CACHE_PAGES
This parameter defines the window size for the last log written. The specification is made in 4
KB pages.
20
Adabas D: Control
Operating and Installation
CONV_CACHE_PAGES
This parameter defines the size of the converter cache. The specification is made in 4 KB pages.
Here you can continue"Install Serverdb from an Existing Data Backup" using the Restore button. How
this is done, is described in the next section.
___________________________________________________________________________
|
|
|
Install Serverdb <serverdb> on <servernode>
|
|__________________________________________________________________________|
|
|
| MAXLOCKS
2500
|
| PNOPOOLSIZE
10000
|
| RUNDIRECTORY
/u/rel10/usr/wrk/DBDEMO
|
| OPMSG1
/dev/syscon
|
| OPMSG2
/dev/null
|
| DIAGSIZE
100
|
| KERNELTRACESIZE
200
|
| DEFAULT CODE
ASCII
|
| DATE TIME FORMAT
INTERNAL
|
|
|
__________________________________________________________________
|
|
|
|
|
|
|
| Name of the destination to which priority 1 message will be sent |
|
|
|__________________________________________________________________|
|
|
|
|
________
|
|
|
| Next | | Prev |
| ReadConf |
| Print |
| Cancel |
|
|
|______| |______|
|__________|
|_______|
|________|
|
| |
_______
|
___________
|
|
________
|
|
|
_________
|
|
|
|
|
|
|
|__________________________________________________________________________|
Fig.: Installation Screen 3
MAXLOCKS
This parameter defines the maximum size of the lock list in which row and table locks held and
requested are recorded for all users.
PNOPOOLSIZE
This parameter defines the number of entries for the list of free data pages. This list is
administered in main memory.
RUNDIRECTORY
The log files of some Adabas tools are stored in the specified directory.
OPMSG1
To inform about exceptional situations, Adabas displays messages. Priority 1 messages are
displayed either on the specified terminal or output to the specified file.
OPMSG2
21
Operating and Installation
Adabas D: Control
To inform about exceptional situations, Adabas displays messages. Priority 2 messages are
displayed either on the specified terminal or output to the specified file.
DIAGSIZE
This parameter defines the size from which the kernel diagnose file will be overwritten. The
default directory of the kernel diagnose file which is called knldiag is the rundirectory. The
specification is made in 4 KB pages.
TRACESIZE
This parameter defines the size from which the kernel trace file will be overwritten. The default
directory of the kernel trace which is called knltrace is the rundirectory. The specification is
made in 4 KB pages.
DEFAULT CODE
The internal code defined here is used to store CHAR values. For open systems, this is usually
the ASCII code.
DATE TIME FORMAT
This parameter is used to define the default representation of DATE and TIME values.
In the next screen, the time values, the LOG, and the DEVSPACEs must be specified. And it must be
defined whether the serverdb is to be installed as a remote serverdb; i.e., whether it will operate with other
serverdbs in a distributed database configuration.
___________________________________________________________________________
|
|
|
Install Serverdb <serverdb> on <servernode>
|
|__________________________________________________________________________|
|
|
| TIMEOUTS
-----------------------------------------------|
|
SESSION
900
|
|
LOCK
360
|
|
REQUEST
180
|
|
DEVSPACES
-----------------------------------------------|
|
LOG MODE
NORMAL
|
|
LOG SEGMENT SIZE
1500
|
|
NO OF ARCHIVE LOGS
1
|
|
NO OF DATADEVSPACES
2
|
|
MIRRORED
(Y/N)
N
|
|
|
|
__________________________________________________________________
|
|
|
| |
|
| ROLLBACK RELEASE when the time between two SQL commands is
| |
|
| more than the SESSION TIMEOUT
| |
|
| ( 30 sec - 32400 sec or 0 = OFF )
| |
|
|__________________________________________________________________| |
|
|
|
________ _______
___________
________
_________
|
|
|
| |
| |
| |
| |
|
|
|
| Next | | Prev | | ReadConf | | Print | | Cancel |
|
|
|______| |______| |__________| |_______| |________|
|
|
|
|__________________________________________________________________________|
Fig.: Installation Screen 4
SESSION TIMEOUT
This parameter defines the maximum time of inactivity allowed for all database sessions. The
specification is made in seconds. If no SQL statement is issued within the specified time, the
database session concerned is implicitly terminated with ROLLBACK WORK RELEASE.
LOCK TIMEOUT
This parameter defines the maximum time of inactivity allowed for all database sessions holding
locks. The specification is made in seconds. If no SQL statement is issued within the specified
time and if there are other users waiting for the lock to be released, the transaction concerned is
22
Adabas D: Control
Operating and Installation
implicitly rolled back with ROLLBACK WORK.
REQUEST TIMEOUT
This parameter restricts the waiting time for a lock release for all database sessions. The
specification is made in seconds. If a lock request cannot be satisfied within the time thus
defined, a message is returned to the waiting database session.
DEVSPACES
The type (raw device or file), the size (in 4 KB pages), and a path name are specified here for
each devspace required for a configuration. 0 specified as size for raw devices has the effect that
the devspace size is implicitly determined.
LOG MODE
Here, you enter the log mode selected for this serverdb.
NORMAL:
This log mode is the recommended default mode. It requires one archive log
devspace in addition to the transaction log. The archive log must be located on
disks different from all the other devspaces (system devspace, transaction log
devspace, data devspaces). A minimum configuration for this log mode therefore
requires at least two (physical) disks. Recovery operations after a device failure
depend on which of the two devspaces was affected by the failure.
DUAL:
For a still higher degree of data protection, the archive log can be mirrored. The
minimum configuration comprises at least three disks: one for the transaction log,
one for the archive log, and one for the mirrored archive log. This configuration has
the following advantages: a failure of the transaction log devspace or of one of the
archive log devspaces does not interrupt database operation, and once the defective
devspace has been repaired, it can be updated while the database is operational.
SINGLE:
In this configuration, the archive log and the transaction log build a common log
devspace. This is useful for Adabas configurations with one disk. The log should be
saved in defined periods of time. If a device failure occurs, the contents of database
and of the log devspace are destroyed. The database can then be restored by using a
complete backup and further log backups (Restore / Data Restore / Log). In such a
case, only the contents of the log not yet saved and open transactions cannot be
recovered.
DEMO:
In this configuration, there is no archive log, and only the transaction log is written.
In contrast to log mode SINGLE, the transaction log is cyclically overwritten to
prevent it from being filled completely. Therefore, the log cannot be saved.
LOG SEGMENT SIZE
23
Operating and Installation
Adabas D: Control
Here, you define the size of a log segment. The specification is made in 4 KB pages.
NO OF ARCHIVE LOG DEVSPACES
Here, you define the number of archive log devspaces.
NO OF DATA DEVSPACES
Here, you define the number of data devspaces.
MIRRORED
Here, you determine whether or not the system devspace and the data devspaces are to be
mirrored.
Depending on the specification of the number of DEVSPACEs ("NO OF ARCHIVE LOGS"
and "NO OF DATADEVSPACES"), the following screen is initialized with the corresponding
number of lines. If MIRRORED was marked with Y, double the number of lines appears for the
system and data devspaces. In total, 64 DATADEVSPACEs and 7 ARCHIVE LOGs are
supported.
An R in the column TYPE indicates a raw device, an F indicates a file, and an L indicates a
symbolic link. For the device type F, Control itself creates the specified directories if they do not
exist.
The SIZE is specified in 4KB pages. For raw devices with the size specification 0, the total size
of the device is automatically determined. The size of the system devspace cannot be specified,
because it is dynamically adapted by the system to the number of data pages used.
___________________________________________________________________________
|
|
|
Install Serverdb <serverdb> on <servernode>
|
|
|
|
NAME
TYPE
SIZE
DEVSPACE PATH
|
|
_______________________________________________________________________|
|
SYSTEMDEV
F
/u/dev/SYS1
|
|
TRANS LOG
R
3000
/dev/log0DB1
|
|
ARCHLOG 1
R
3000
/dev/log1DB1
|
|
DATDEV 01
L
50000
/u/dat01DB1
|
|
DATDEV 02
R
50000
/dev/dat02DB1
|
|
|
|
__________________________________________________________________
|
|
|
| |
|
|Please enter a DEVSPACE name with absolute path
| |
|
|__________________________________________________________________| |
|
|
|
________ _______
_____
________
_________
|
|
|
| |
| |
| |
| |
|
|
|
| Next | | Prev | | Ok | | Print | | Cancel |
|
|
|______| |______| |____| |_______| |________|
|
|
|
|__________________________________________________________________________|
Fig.: Installation Screen 5
When this screen has been filled completely and confirmed with "Ok", the actual installation begins.
Control allows for a step-by-step installation or an uninterrupted installation without explicit confirmation.
For the first installation, it is recommended to choose the automatic variant without confirmation. The
step-by-step installation is useful if only a partial installation is to be performed first. This is described in
section Stepwise Serverdb Installation.
___________________________________________________________________________
|
|
|
***** START INSTALLATION *****
|
|
|
|
|
|
Press "Install" to run the whole installation without interrupts
|.
|
Press "Stepwise" for installation with interactive interrupts.
|
|
Press "Restore" to install the SERVERDB from an existing data save. |
|
Press "Cancel" to go back to parameter manipulation.
|
|
|
|
___________ ____________ ___________ ___________
|
|
|
| |
| |
| |
|
|
|
| Install | | Stepwise | | Restore | | Cancel |
|
|
|_________| |__________| |_________| |_________|
|
|
|
|__________________________________________________________________________|
24
Adabas D: Control
Operating and Installation
Fig.: Installation Start Screen
After selecting the Install button, the automatic installation begins without user dialog. The progress of the
installation can be seen from the position of the arrow and the status message ACTIVE. If an installation
step was terminated successfully, the status "Ok" is displayed and the next action becomes ACTIVE.
___________________________________________________________________________
|
|
|
Install Serverdb <serverdb> on <servernode>
|
|__________________________________________________________________________|
|
|
|
|
|
---> INSTALL PARAMETERS.............. ACTIVE
|
|
START SERVERDB COLD............. -|
|
INIT CONFIGURATION.............. -|
|
ACTIVATE SERVERDB............... -|
|
LOAD SYSTEM TABLES.............. -|
|
|
|
|
|__________________________________________________________________________|
Fig.: Status Screen 1
If the status changes to ERROR, an error occurred. Select the Protocol button to display the installation
log file. CANCEL can be used to return to Installation Screen 5. Use Next and Prev to alternate between
the Installation Screens to adjust the parameters so as to avoid the error situation when you restart the
installation.
If the installation was aborted completely, it can be repeated at a later point in time. For the next call of
Control, the message "INST NOT COMPLETE" is displayed in the Main Screen. Configuration / Install
Serverdb can be used to start a new installation for which the values previously entered are displayed.
When the installation has reached the point "LOAD SYSTEM TABLES" in the Status Screen 1, the
following screen displayed to output more detailed information about the installation procedure:
___________________________________________________________________________
|
|
|
Load System Tables for Complete Installation
|
|__________________________________________________________________________|
|
|
|
|
|
---> Create general systemtables...............
OK
|
|
Load messages and help infos..............
ACTIVE
|
|
Load SET defaults.........................
--
|
|
Load system tables for precompilers.......
--
|
|
Load system tables for QUERY..............
--
|
|
Load system tables for SQL-PL.............
--
|
|
Load SQL-PL WORKBENCH.....................
--
|
|
Load system tables for QueryPlus..........
--
|
|
Create system views.......................
--
|
|
Create ODBC tables........................
--
|
|
Load data dictionary META DATA............
--
|
|
Load system DB-PROCEDURES.....
|
|
|
|__________________________________________________________________________|
Fig.: Status Screen 2
If an error occurs, the installation is aborted and the status ERROR appears behind the action just
performed. Select the Protocol button to display the LOAD log file.
If all actions were performed free of errors, all lines end with "OK" and the display changes to the Control
Main Screen.
25
Operating and Installation
Adabas D: Control
Stepwise Serverdb Installation
If Stepwise is activated in the Installation Start Screen, a message is displayed for each executed item
contained in the Status Screen. This display allows you to interrupt the installation procedure.
Step 1: INSTALL PARAMETERS
After installing the serverdb kernel parameters (Install Parameters), the minimum values for the
configuration parameters of the operating system kernel are displayed for a check.
Example under Unix:
___________________________________________________________________________
|
|
|
INSTALL PARAMETERS Protocol
|
|
|
|__________________________________________________________________________|
|
|
|
NPROC
39
|
NREGION
|
117
|
|
NCALL
39
|
|
MAXUP
39
|
|
MSGMNI
1
|
|
SEMMNI
27
|
|
SEMMAP
27
|
|
SEMMNS
27
|
|
SHMMNI
7
|
|
SHMSEG
7
|
|
SHMMAX
4083974
|
|
SHMALL
4157702
|
|
Minimum size of real memory needed for the database kernel
|
|
to prevent swapping or paging. Memory needs of the OS
|
|
kernel or running applications are not considered.
|
|
RAMSIZE_MB
|
|
16
____________
_________
|
|
|
|
|
|
|
|
|Continue
|
| Cancel
|
|
|
|___________|
|_________|
|
|
|
|__________________________________________________________________________|
Fig.: Step Screen 1
The operating system kernel must be adapted to these requirements, if necessary. To do so, interrupt the
installation procedure at this point, change the operating system kernel, and repeat the installation (see
Section Configuration / Install Serverdb).
Step 2: START SERVERDB COLD & INIT
___________________________________________________________________________
|
|
|
|
|
|
|
Please press "Continue" for INIT CONFIGURATION
|
|
|
|
If you press "Cancel", the installation is not complete -
|
|
to complete the installation start Install Serverdb again.
|
|
|
|
____________
_________
|
|
|
|
|
|
|
|
| Continue
|
| Cancel
|
|
|
|___________|
|_________|
|
|
|
|__________________________________________________________________________|
26
Adabas D: Control
Operating and Installation
Fig.: Step Screen 2
The second step initializes the serverdb with the selected configuration after starting the serverdb into cold
mode.
Step 3: ACTIVATE SERVERDB
If the installation is continued using Continue, the following screen displayed after initializing the
configuration:
___________________________________________________________________________
|
|
|
|
|
|
|
Please press "Continue" for ACTIVATE SERVERDB
|
|
|
|
Press "Restore" to install the SERVERDB from an existing data save
|
|
If you press "Cancel", the installation is not complete -to complete
|
|
the installation start Configuration/Activate Serverdb or
|
|
Backup/Restore to install from an existing data save.
|
|
____________
___________
|
|
|
|
|
| Continue
|
|
|___________|
|
_________
|
|
|
|
| Restore |
| Cancel
|
|
|_________|
|_________|
|
|
|
|__________________________________________________________________________|
Fig.: Step Screen 3
At this point, the installation can be loaded from an existing data backup version using the Restore button
or the serverdb can be activated without loading data using the Continue button. Make sure that the data
backup to be loaded with restore is consistent. Afterwards, the serverdb is in COLD operating mode and
must be started into WARM operating mode.
Step 4: LOAD SYSTEM TABLES
If the installation is continued with Continue, Activate Serverdb is performed and after that, the question
is displayed whether the system tables are to be loaded. For a restore, it is not necessary to load the system
table.
___________________________________________________________________________
|
|
|
|
|
|
|
Please press "Continue" for LOAD SYSTEM TABLES
|
|
|
|
If you press "Cancel", the installation is not complete -
|
|
to complete the installation start Configuration/Load Systables.
|
|
____________
_________
|
|
|
|
|
|
|
|
| Continue
|
| Cancel
|
|
|
|___________|
|_________|
|
|
|
|__________________________________________________________________________|
Fig.: Step Screen 4
This is the last installation step.
27
Operating and Installation
Adabas D: Control
Installing the Serverdb from an Existing Data Backup
When installing the serverdb from an existing data backup, it must be ensured that the space requirements
of the data have been determined beforehand (e.g. by using the "SELECT maxdatapno FROM
SERVERDBSTATISTICS" issued in xquery or another tool). The space required must be ensured by the
configuration of the sizes of the data devspaces.
There are two ways to install a database from an existing data backup:
1. Using the Configuration and the Data of the Backup
By clicking on the ReadConf button in one of the Installation Screens and the Restore button in the
Start Screen. In this case, the configuration parameters can be modified, if required.
2. Using the Data only (not the Configuration) of the Backup.
By clicking on the Restore button in the Start Screen.
In both cases, the Media Manager is displayed to define the medium which contains the data backup.
Using the Configuration and the Data of the Backup
First, the procedure is identical to that of installing a new serverdb. Control is called with the new
serverdb name, user specifications are entered in the Installation Screen 1. After entering the kernel
parameters in the Screens 2 and 3, the Restore button which is only displayed in Screen 3 must be pressed.
___________________________________________________________________________
|
|
|
Install Serverdb <serverdb> on <servernode>
|
|
|
|__________________________________________________________________________|
|
|
|
OPMSG1
/dev/syscon
|
|
OPMSG2
/dev/null
|
|
DEFAULT CODE
ASCII
|
|
DATE TIME FORMAT
INTERNAL
|
|
|
|
____________________________________________________________________
|
|
|
|
|
|
Name of the destination to which priority 1 message will be sent |
|
|
|___________________________________________________________________|
|
|
|
|
|
|
|
________
|
|
|
| Next | | Prev |
| Restore |
|
|______| |______|
|_________|
| |
_______
|
__________
|
|
________
_________
|
|
|
| Print |
| Cancel |
|
|_______|
|________|
|
|
|
|
|
|
|
|
|__________________________________________________________________________|
28
Adabas D: Control
Operating and Installation
Fig.: Installation Screen 3
A Status Screen appears displaying the saving of the kernel parameters and the start of the serverdb.
___________________________________________________________________________
|
|
|
Init Config Restore <serverdb> on <servernode>
|
|__________________________________________________________________________|
|
|
|
|
|
---> INSTALL PARAMETERS..............
|
START SERVERDB COLD.............
ACTIVE
|
--
|
|
|
|__________________________________________________________________________|
Fig.: Status Screen for Init Config Restore
If the serverdb was started successfully and is in COLD mode, the Media Manager is displayed to define
the medium containing the data backup.
After selecting the defined medium, the configuration is read from the backup and displayed. Then the
configuration can be modified. After confirming the configuration, it is accepted, and the data is restored
from the backup. If the backup is read from a pipe, ensure that after restarting the serverdb, the pipe is
restarted.
The following procedure corresponds to that of Alter Config Restore. For Alter Config Restore, the
configuration of the current database (not that of the saved database) is displayed for change.
Using the Data only (not the Configuration) of the Backup
All Installation Screens must be filled completely. To do so, the required sizes of the saved serverdb
configuration must be known. The installation must be executed step by step so that the restore procedure
(see Section Stepwise Database Installation) can be performed after the "Initialize Configuration" step.
___________________________________________________________________________
|
|
|
***** START INIT CONFIG RESTORE *****
|
|
|
|__________________________________________________________________________|
|
|
|
Press "Normal" for quick restore from a 6.1 save.
|
|
Press "Migrate" for sequential restore from a 3.1.2 save.
|
|
Press "Cancel" to go back to parameter changes.
|
|
|
|
|
|
_________
_________
|
|
|
|
|
| Normal
|
|
|_________|
__________
|
|
|
|
|
| Migrate |
| Cancel
|
|
|_________|
|__________|
|
|
|
|
|
|__________________________________________________________________________|
Fig.: Start Screen for Init Config Restore
If you click on the Restore button in the Installation Start Screen, you can use a backup of Adabas version
3.1.2 for installation. When doing so, the media are loaded sequentially which will take more time than
the normal parallel restore operation.
29
Operating and Installation
Adabas D: Control
The Additional Installation of Control
If Control is called for the first time on a serverdb that was installed without Control, the Systemdba is
requested first because he holds the system tables. For the additional installation of Control, the existing
local serverdb must be in WARM mode.
___________________________________________________________________________
|
|
|
|
|
Type SYSDBA
|
|
|
|
___________________________________________________________________
|
|
|
|
Username:
Password:
|
|
|
|
|
|
_____
_________
|
|
|
|
|
|
|
|
| Ok
|
| Cancel
|
|
|
|_____|
|_________|
|
|
|
|__________________________________________________________________________|
Fig.: Input Screen for Systemdba Definition
After acknowledging the screen, the Control system files and system tables are created, and the Main
Screen of CONTROl is displayed.
Warning:
If you leave the screen with Cancel, the systemdba is unknown to
Control and the system tables cannot be created.
The Main Screen
After a successful connect, the Main Screen is displayed showing the most important round-the-clock
system activities of the Adabas server:
30
Adabas D: Control
Operating and Installation
Fig.: Main Screen of Control
The data fields in the Main Screen have the following meanings:
<Serverdb>
Name of the server database.
<Servernode>
Name of the computer within the network where the database server is installed.
<Date> <Time>
Date and time at which the displayed data was found out.
Usage Levels (in Bar Form)
Data
describes the current utilization level of the database. This measured value informs the operator
whether the physical disk space must be expanded soon. The Adabas server performs an
"emergency shutdown"; i.e., it shuts down automatically when the usage level of the database is
100%.
Log
describes the current utilization level of the log. The database server shuts down ("emergency
shutdown") when the usage level of the log is 100%.
The operator should therefore observe the log usage in order to start a manual backup of the log
or of a log segment, if this should become necessary.
After a save of a log segment, the utilization level of the log will be decreased accordingly.
Sessions
describes the percentage use of the configured database server connections. When the maximum
value is reached, no more connections can be established to the database server. Application
programs attempting to connect to the database server receive a corresponding error message.
This maximum value can be decreased or increased using the Configuration / Alter Parameters /
Kernel menu function, by modifying the system parameter MAXUSERTASKS (see Section
Installing a New Serverdb for "Configuration Parameters").
Other Information
Serverdb State
describes the current operating mode of the database server. The following table shows all
operating modes of the Adabas server and their meanings:
31
Operating and Installation
OFFLINE:
The Adabas server is not running. The database server kernel has
not been started yet. Usually, the operator starts the database system
directly in warm mode using theOperating / Restart menu function.
COLD:
The Adabas server has been started successfully. All system
parameters which were changed using the Configuration / Alter
Parameters menu function are effective. Database activities are not
possible. Only in this mode, some maintenance activities such as
restoring the database or log, or modifying certain system
parameters can be performed.
Adabas D: Control
WARM: This is the normal operating mode in which users can work with the
Adabas server.
Background
shows whether a backup, a verify devspaces, or an update statistics is active in background.
Log Segments
shows whether a log segment is full and thus ready for saving.
Autosave Log
shows whether the automatic log backup has been enabled.
Remote SQL
shows whether the remote SQL server has been started, thus allowing users to access the server
database from other computers.
Serverdb Monitoring
The following sizes refer to the start point of the serverdb or the last counter reset (see also
Section Options / Reset Counter).
SQL-Commands
shows the number of SQL statements issued since the last counter reset or serverdb start.
Logical Reads
shows the number of read accesses to the data cache performed since the last counter reset or
serverdb start.
Logical Writes
shows the number of write accesses to the data cache performed since the last counter reset or
serverdb start.
Data Cache Hit Rate
32
Adabas D: Control
Operating and Installation
shows the percentage hit rate of accesses to the data cache since the last counter reset or
serverdb start. The hit rate should be as close to 100% as possible. For an unfavourable hit rate (under
99%), you should search for the reasons.
Converter Cache Hit
shows the percentage hit rate of accesses to the converter cache. The converter cache hit rate
should be as close to 100% as possible. If necessary, the system parameter
CONV_CACHE_PAGES (see Section Installing a New Serverdb for "Configuration
Parameters") can be increased using the Configuration / Alter Parameters / Kernel menu
function.
33
Backup Concepts and Strategies
Adabas D: Control
Backup Concepts and Strategies
This chapter covers the following topics:
Concepts
Backup / Restore - a Practical Guide
Batch Mode: xbackup / xrestore
External Backup Tools
Concepts
Control supports the backup and restore procedures in a convenient way. These procedures can be
activated immediately; or they can be performed at fixed times based on a weekly timetable. If desired, a
segment of the archive log is automatically saved to a particular medium whenever the log segment has
been completed.
Ad-hoc Backups
In WARM and COLD database mode, Control provides the following kinds of interactive
backups under the Backup/Save menu item (see Section Backup / Save):
Data (physically complete),
Updated Pages (physically incremental),
Log (logically incremental),
Log Segment (logically incremental).
Automatic Backup of Log Segments
The oldest log segment can be automatically backed up in Control as soon as the log segment
has been completed. For this purpose, the automatic backup of the log can be enabled or
disabled in Control either under the Options / Autosave Log menu item or in the schedule using
the actions AUTOON and AUTOOFF. For the automatic backup of log segments, a separate
backup device must be used which must be accessible to the backup process at any time.
Backups in the Schedule Manager
The schedule under the Backup / Schedule Manager menu item can be used to plan the same
actions as for an ad-hoc backup:
SAVEDATA (physically complete),
SAVEPAGES (physically incremental),
34
Adabas D: Control
Backup Concepts and Strategies
SAVELOG (logically incremental),
SAVELOGSEG (logically incremental),
AUTOON and AUTOOFF.
Verification and Optimizer Support in the Schedule Manager
Verify and UPDSTAT (Update Statistics) must be performed from time to time to guarantee
secure database operation and good performance. See Sections Concepts, Consistency Check
and Optimizer Support, Backup / Save / Verify Devspaces, or Operating / Update Statistics.
Automatic backup of log segments as well as backup, verification, and optimizer support in the schedule
are performed in batch operation; i.e., the parameters must be defined before starting the action or when
defining them using the Schedule Manager.
Backup Media
One backup medium is assigned to each backup action. A backup medium can be a file, a tape, or a pipe.
A backup medium is defined in the Media Manager and receives a name that can be selected freely.
Media can be comprised to form a group of parallel mediaand be named. Parallel media are
simultaneously written or read by the database server. This increases data throughput - and thus the speed
of backup or restore. The name of a group of parallel media appears as an additional backup medium and
can be assigned to a backup action like an individual backup medium.
If the capacity of the tapes is sufficient for the backup, no intervention of an operator is required during
the backup. Control requests more tapes if the backup has not been terminated although the tape is full.
For this purpose, the Media Size must have been specified for the media definition or the tape device must
be able to recognize the end of tape. A backup can be done to one backup medium as a minimum.
Backups Performed Using Third-Party Backup Tools
Several external backup tools are supported, for example, ADSM (ADSTAR Distributed Storage
Manager). Special names must be used for a backup medium. A detailed description of the tools supported
is contained in Section External Backup Tools.
Control does not require any operator intervention during the backup. The sequence of the tapes for a
restore is defined by the backup tool of the manufacturer.
If the group of parallel media is denoted by a predefined name appropriate for the external backup tool
and if the individual media definitions contain the path of the pipe, then a "parallel" backup is also
possible to external backup tools.
Backup Generations
In practice, it can happen that structural or media failures are already contained in the backup of a
serverdb or tape. In such a case, as sometimes for organizational reasons, it is necessary to restart with a
previous state of the database.
This is possible if several backup generations are used. A backup generation consists of a complete
backup and any number of subsequent incremental physical and logical backups. The next complete
backup starts a new backup generation.
35
Backup Concepts and Strategies
Adabas D: Control
The administration of several backup generations provides several reentry positions for the recovery of a
serverdb thus increasing data protection.
The backup generations are denoted by letters; they are part of the label identifying a backup. The number
of backup generations can be defined under the Backup / Generations menu item.
Medium Label
Each backup version contains a label for its identification. The label is automatically provided by Control.
It specifies the type of backup (complete or incremental backup of data or log), the backup generation, the
sequence number of the last completed log segment, a version number, and a sequence number of each
tape.
The version number puts the backups in an order relevant for a restore. For Save / Log Segment, the
version number indicates the time when the log segment was completed; for all the other types of backup,
the version number is equivalent to the generation time of the backup.
The medium label uniquely identifies the backups done since the installation of the database. It must be
written down on the sticker of the tape or cassette after the backup terminates.
Example 1: Labels for the first backups after a first installation of the database
Example 2: Labels between the first two complete backups. The tape for the automatic
backup of log segments became full, and the backup was only restarted after the second
complete backup.
36
Adabas D: Control
Backup Concepts and Strategies
Exaqmple 3: Labels between two complete backups. To save the log between the complete
backups, the Save / Log menu function is used instead of the automatic backup of the log
segments.
37
Backup Concepts and Strategies
DATA_A0_A
First complete backup of the database (SAVEDATA), first generation
(A), first tape (A).
DATA_D0_A
Complete backup of the database (SAVEDATA) of the fourth
generation (D).
DATA_A1_A
Incremental backup of the data (SAVEPAGES), the first tape (A) of it.
When this backup is used for a recovery, a consistent database is
restored without having to load another backup of the log.
Adabas D: Control
LOG_A2_1 Backup of the log after a log segment was completed.
DATA_B0_B
Complete backup of the database of the second generation (B), the
second tape of it written simultaneously with or after the first tape.
LOG_B1_1 Backup of the log of the second generation (B); for a restore, it must be
loaded after the DATA_B0_A backup (and following: DATA_B0_B
...), unless there is a SAVEPAGES backup.
DATA_B2_A
SAVEPAGES backup of the second generation; for a restore, it can be
loaded after the DATA_B0_A backup (and following: DATA_B0_B
...) instead of the log.
For a backup started immediately, the label is displayed in the protocol file at the end of backup. When
restoring, the label is displayed for confirmation before the restore procedure starts; it is also included in
the protocol files where each save and restore action is recorded. Later, after concluding the backup, the
label can be read at any time by means of the Media Manager.
Before you start an immediate backup to tape, you should always read the label of the backup that could
already be on the tape. In this way, you can make sure that the backup is written to a tape belonging to the
same generation, which is recommended.
You should always use the same tape for each type of save and generation. After some time, the sticker of
a SAVEDATA backup written to the tape could look as follows:
Example:
Sticker of the first tape of a SAVEDATA backup of the first generation (A), after using the tape six times.
Of course, you must take care that the tapes and cassettes are not used more often than is recommended by
the manufacturers.
38
Adabas D: Control
Backup Concepts and Strategies
Rules for Medium Labels
1. Data backups (Save / Data or Save / Pages) are identified by "DATA"; log backups (Save / Log or
Save / Log Segment) by "LOG". The identification of the backup is part of the backup label.
2. Each backup belongs to a backup generation. The generation of the backup can be recognized by the
generation letter. All backups with the same letter belong to the same generation. The generation
letter is part of the backup label. A complete backup of the database starts the next backup
generation. The next letter is used.
3. Up to 26 backup generations can be defined (A, ... Z). For n generations defined, the (n+1)st "Save /
Data" is started again with the medium label DATA_A.
4. The log segments of a database are counted sequentially starting at the time of database installation.
A database without an explicitly defined log segment size is considered as a database with one log
segment. Each backup is assigned the number of the last completed log segment. The first log
segment has the number 1.
5. Data backups can be written to several tapes either in parallel or consecutively. Up to 32 backup
media can be operated in parallel. The tape devices accessed by the backup media can be supplied
with tapes several times. The sequence number of the tape is part of the backup label. Backups of the
log can only be written consecutively.
Formal Description of the Medium Labels
<medium label> ::= <save kind>_<generation>_<log>_<version>_<count>
<save kind> ::=DATA | LOG
<generation> ::=A .. Z
<version>::=0 .. 32676
<count>::=A..Z | 1..32
where A..Z for DATA and 1..32 for LOG
Examples of a Backup Scheme
Example 1
1. Four backup generations
2. One Save / Data per week
3. Regular or automatic backups of the log segments (Autosave Log, AUTOON) between the complete
backups (Save / Data). Note that Autosave Log requires a tape device of its own.
4. Save / Pages in special application situations only
39
Backup Concepts and Strategies
Sat
1st
Sun
_________
_______
week |DATA_A_| |
|...
Adabas D: Control
Mon
Tue
Wed
Thu
Fri
_______
______
_______
_______
_______
| |LOG_A_| |LOG_A_| |LOGA_A_| |LOG_A_| |LOG_A_|
| |
| |...
| |...
| |...
| |...
| |...
|
|_______| |_______| |______| |______| |_______| |______| |______|
________
2nd
_______
|DATA_B_| |
_______
week |...
_______
_______
_______
________
| |LOG_B_| |LOG_B_| |LOG_B_ | |LOG_B_| |LOG_B |
| |
| |...
| |...
| |...
| |...
| |...
|
|_______| |_______| |______| |______| |_______| |______| |______|
________
3rd
_______
|DATA_C_| |
_______
week |...
_______
_______
_______
________
| |LOG_C_| |LOG_C_| |LOG_C_ | |LOG_C_| |LOG_C |
| |
| |...
| |...
| |...
| |...
| |...
|
|_______| |_______| |______| |______| |_______| |______| |______|
________
4th
_______
|DATA_D_| |
_______
week |...
_______
_______
_______
________
| |LOG_D_| |LOG_D_| |LOG_D_ | |LOG_D_| |LOG_D |
| |
| |...
| |...
| |...
| |...
| |...
|
|_______| |_______| |______| |______| |_______| |______| |______|
________
5th
_______
|DATA_A_| |
week |...
| |
_______
_______
_______
_______
________
| |LOG_A_| |LOG_A_| |LOG_A_ | |LOG_A_| |LOG_A |
| |...
| |...
| |...
| |...
| |...
|
|_______| |_______| |______| |______| |_______| |______| |______|
The recommended backup scheme consists of one complete backup per week (on Saturdays) and one or
more log segment backups per work day. Each week, the complete backup starts a new generation of
backup tapes (next letter in the alphabet). The number of generations can be defined and determines the
number of weeks in this scheme to be fallen back upon in case of restore.
In Section Backup / Schedule Manager, the recommended backup scheme is represented in form of a
timetable.
Example 2
1. Four backup generations
40
Adabas D: Control
Backup Concepts and Strategies
2. One Save / Data per week
3. Automatic backups of the log segments (Autosave Log, AUTOON) between the complete backups
(Save / Data). Note that Autosave Log requires a tape device of its own.
4. Save / Pages daily - preferably at the end of a work day
Sat
1st
Sun
_________
_______
week |DATA_A_| |AUTO|...
Mon
Tue
Wed
Thu
Fri
_______
______
_______
_______
_______
| |ON
| |LOG_A_| |LOG_A_| |LOGA_A_| |LOG_A_| |LOG_A_|
| |20:00 | |20:00 | |20:00
| |20:00 | |20:00 |
|_______| |_______| |______| |______| |_______| |______| |______|
________
2nd
_______
|DATA_B_| |
_______
week |...
_______
_______
_______
________
| |LOG_B_| |LOG_B_| |LOG_B_ | |LOG_B_| |LOG_B |
| |
| |20:00 | |20:00 | |20:00
| |20:00 | |20:00 |
|_______| |_______| |______| |______| |_______| |______| |______|
________
3rd
_______
|DATA_C_| |
_______
week |...
_______
_______
_______
________
| |LOG_C_| |LOG_C_| |LOG_C_ | |LOG_C_| |LOG_C |
| |
| |20:00 | |20:00 | |20:00
| |20:00 | |20:00 |
|_______| |_______| |______| |______| |_______| |______| |______|
________
4th
_______
|DATA_D_| |
_______
week |...
_______
_______
_______
________
| |LOG_D_| |LOG_D_| |LOG_D_ | |LOG_D_| |LOG_D |
| |
| |20:00 | |20:00 | |20:00
| |20:00 | |20:00 |
|_______| |_______| |______| |______| |_______| |______| |______|
________
5th
_______
|DATA_A_| |
week |...
| |
_______
_______
_______
_______
________
| |LOG_A_| |LOG_A_| |LOG_A_ | |LOG_A_| |LOG_A |
| |20:00 | |20:00 | |20:00
| |20:00 | |20:00 |
|_______| |_______| |______| |______| |_______| |______| |______|
The recommended backup scheme consists of one complete backup per week (on Saturdays) and one save
pages per work day. Each week, the complete backup starts a new generation of backup tapes (next letter
in the alphabet). The automatic backup of log segments is entered once in this example in order to be
complete. As the automatic backup only takes place once, it can be enabled interactively or entered once
in the schedule (see Section Backup / Schedule Manager).
Save pages is recommended in addition to save log segment, because, in most cases, it ensures
considerably faster recovery times than save log segment.
41
Backup Concepts and Strategies
Adabas D: Control
Backup / Restore - a Practical Guide
Saving to One Medium
The simplest kind of saving is when only one medium is required, providing the medium’s capacity is
sufficient.
Interactive Procedure:
1. Select the save action.
2. Select the medium.
3. Check the entries.
4. Start the save operation.
1. Select the Save Action (Example: Backup / Save / Data)
Select one of the save actions "Data", "Updated Pages" up to "Log Segment" under the Backup / Save
menu item.
A list of the defined media appears. If no media have been defined so far, they must be defined now. This
can be done with the Media Manager.
Example of several defined media:
______________________
_____________________
|
Save Data : Medium Selection
|
|
|
|
|
|
|
|
DAT90
T
Y 500000
/dev/rmt0
(
)
|
|
EXAMPLE
T
Y
0
/dev/rmt0
(
)
|
|
FILE
F
N
0
/backup/dblog.save
(
)
|
|
NREWTAPE
N
Y 500000
/dev/nrmt/c0s1
(
)
|
|
REWTAPE
T
Y 500000
/dev/rmt/c0s0
(
)
|
|
|
|
|
|
_____________________________________________________________
|
|
|
|
|
|
|
Please select a backup medium from the list
|
|
|
|
Use Buttons or Keys to handle media - otherwise Return.
|
|
|
|___________________________________________________________|
|
|
|
|
________
| |
______
|
|
________
|
|
|
______
|
|
______
|
_______
|
|
|
|
_________
|
|
|
| | Select |
| Drop |
| Edit |
| New |
| Next |
| Prev |
| Cancel |
|
| |________|
|______|
|______|
|_____|
|______|
|______|
|________|
|
|__________________________________________________________________________|
2. Select the Medium
To select the medium from the list of defined media, place the cursor on the desired medium and click on
the Select button or press the Enter key.
We recommend a tape (Device Type "T" or "R") as medium. However, any other medium listed in the
example can also be used. Pipes should only be used along with backup tools (see Section External
Backup Tools) or for ad hoc backups. Version files (Overwrite="V") can only be used along with the
automatic backup of log segments.
42
Adabas D: Control
Backup Concepts and Strategies
___________________________________________________________________________
|
|
|
Save Data
|
|
|
| _______________________________________________________________________
|
|
|
|
|
|
Medium
.....: DAT90
|
Device Type.....: T
|
Path: /dev/rmt0
|
Path2:
Next Medium
:
|
Parallel
:
|
|
|
|
|
|
Overwrite(Y/N/V): Y
Media Size in Pages.: 500000
|
|
|
|
|
|
_____
|
|
|
|
| Ok |
|
|____|
________
|
|
________
|
|
|
|
| Label |
| Cancel |
|
|_______|
|________|
|
|__________________________________________________________________________|
3. Check the Entries
The screen with the selected medium definition is displayed for security reasons. Before continuing, you
can check which backup is on the mounted tape by displaying the label of the backup (using the Label
button).
Confirm the medium definition with Ok or the Enter key. (The Cancel button can be used to cancel the
save operation.)
Data can still be modified, if required, (after pressing the F12 key). The Media Manager, however, does
not store these changes as permanent medium definition. For modifications of media definitions, the
interrelations within the Media Manager must be considered.
A screen displayed containing the data for the media and the backup label.
___________________________________________________________________________
|
|
|
|
|
|
|
Device:
/u/rmt0
|
|
Type:
T
|
|
Size:
500000
|
|
Label:
DATA_A0_A
|
|
|
|
|
|
_____
|
|
|
|
|
________
|
|
|
|
| Ok |
| Cancel |
|
|____|
|________|
|
|__________________________________________________________________________|
4. Start the Save Operation
For tapes selected as media, you must now mount the tape to the tape device if this has not been done yet,
because otherwise the backup will fail. Then you can confirm the screen. To start the backup, click on the
Ok button (or press the Enter key).
When the backup terminates, the result protocol is displayed. As long as the backup is being performed,
no other backup can be started. Only after confirming the result protocol, you can start another backup.
43
Backup Concepts and Strategies
______________________________
|
Adabas D: Control
_____________________________
mydb on mynode
|
|
|
|
|
| Report of backup operations
2002-02-18 16:14:26
|
|
|
| ----- Control 12
2002-02-18 16:14:08
SAVE ------
|
| USE SERVERDB ’mydb’ on ’mynode’
|
| 16:14:09
|
| INSERT LABEL ’/dev/rmt0’,’A’
|
| 16:14:17
|
| SAVE DATA QUICK TO ’/dev/rmt0’ TAPE COUNT
500000 BLOCKSIZE 8
|
| 16:14:24
|
| Label: DATA_A0_A
|
| COMMIT WORK RELEASE
|
| SESSION END
|
|
|
|
________
| |
______
|
|
________
|
|
|
______
|
|
______
|
_______
|
|
|
|
_________
|
|
|
| | Select |
| Drop |
| Edit |
| New |
| Next |
| Prev |
| Cancel |
|
| |________|
|______|
|______|
|_____|
|______|
|______|
|________|
|
|__________________________________________________________________________|
44
Adabas D: Control
Backup Concepts and Strategies
Batch Call:
Syntax:
xbackup -a<action> -d<serverdb> -m<medium name>
Example:
xbackup -a SAVEDATA -d mydb -m DAT90
The complete description of the batch calls is included in Section Batch Mode: xbackup / xrestore.
To display the protocol file of the batch call, you can use the Backup / Show Protocol menu function.
Restoring from One Medium
The simplest kind of restoring is that from one medium only. The restore procedure corresponds to the
save procedure.
Interactive Procedure:
1. Select the restore action.
2. Select the medium.
3. Check the entries.
4. Start the restore operation.
1. Select the Restore Action (Example: Backup / Restore / Data)
Select one of the restore actions "Data", "Updated Pages" up to "Log Segment" from the Backup / Restore
menu item.
A list of the defined media appears.
Example of several defined media:
_______________________
|
_______________________
Save Data : Medium Selection
|
|
|
|
|
|
DAT90
T
Y 500000
/dev/rmt0
(
)
|
|
FILE
F
N
/backup/dblog.save
(
)
|
|
NREWTAPE
R
Y 500000
/dev/nrmt/c0s1
(
)
|
|
REWTAPE
T
Y 500000
/dev/rmt/c0s0
(
)
|
0
|
|
|
|
|
Please select a backup medium from the list
|
|
Use Buttons or Keys to handle media - otherwise Return.
|
|
|
| |
|
________
______
|
|
________
|
|
|
______
|
|
______
|
_______
|
|
|
|
_________
|
|
|
| | Select |
| Drop |
| Edit |
| New |
| Next |
| Prev |
| Cancel |
|
| |________|
|______|
|______|
|_____|
|______|
|______|
|________|
|
|__________________________________________________________________________|
45
Backup Concepts and Strategies
Adabas D: Control
2. Select the Medium
To select the medium from the list of defined media, place the cursor on the desired medium containing
the backup and click on the Select button or press the Enter key.
We recommend to select the same medium for the recovery that was used for the backup. In exceptional
situations, however, it can be necessary to restore from another medium. For example, the backup had
been done to a file that was meanwhile written to tape. In this case, you can restore directly from tape by
defining the corresponding tape device as the medium. (Or version files that had been generated for the
automatic backup of log segments were written to tape from which they can be restored directly.)
___________________________________________________________________________
|
|
|
Save Data
|
|
|
| _______________________________________________________________________
|
|
|
|
|
|
Medium Name.....: DAT90
Next Medium
:
|
|
Device Type.....: T
Parallel
:
|
|
Path: /dev/rmt0 Path2:
|
|
|
|
|
|
Overwrite(Y/N/V): Y
Media Size in Pages.: 500000
|
|
|
|
_____
|
|
|
|
| Ok |
|
|____|
________
|
|
________
|
|
|
|
| Label |
| Cancel |
|
|_______|
|________|
|
|__________________________________________________________________________|
3. Check the Entries
The screen with the selected medium definition is displayed for security reasons. For tapes selected as
media, you must now mount the tape to the tape device if this has not been done yet, because otherwise
the backup will fail. Then you can confirm the media screen.
Confirm the medium definition with Ok or Enter. The Cancel button can be used to terminate the restore
operation.
Data can still be modified, if required, (after pressing the F12 key). The Media Manager, however, does
not store these changes as permanent medium definition.
Now a screen displayed showing the content of the label included on the medium to be restored to identify
the backup. The label (here "DATA_A0_A") is displayed for information and must be confirmed.
___________________________________________________________________________
|
|
|
|
|
|
|
created:
: 2002-02-22 12:10:12
|
|
version
: KERNEL 12
|
|
serverdb
: mydb
|
|
servernode: mynode.any.de
|
|
label:
|
: DATA_A0_A
|
|
|
|
|
_____
|
|
|
|
|
________
|
|
|
|
| Ok |
| Cancel |
|
|____|
|________|
|
|__________________________________________________________________________|
46
Adabas D: Control
Backup Concepts and Strategies
4. Start the Restore Operation
Start the restore procedure by clicking on the Ok button (or by pressing the Enter key.
Control displays a bar to indicate the progress of the recovery. If the recovery terminates, the result
protocol is displayed.
______________________________
|
_____________________________
mydb on mynode
|
|
|
|
|
| Report of backup operations
2002-02-18 16:14:26
|
|
|
| ----- Control 12
2002-02-18
12:10:12
SAVE ------
|
| USE SERVERDB ’mydb’ on ’mynode’
|
| 12:10:12
|
| READ LABEL ’/dev/rmt0’
|
| created
: 2002-02-22 12:10:12
| version
: KERNEL 12
| serverdb
: mydb
|
DATE 2002-02-15
|
|
| servernode : mynode.any.de
|
| label
|
: DATA_A0_A
| 12:17:32
|
| RESTORE DATA QUICK FROM ’/dev/rmt0’ TAPE
|
|
|
200134 pages transferred
| 12:17:40
|
| COMMIT WORK RELEASE
|
| SESSION END
|
|
|
| |
|
________
______
|
|
________
|
|
|
______
|
|
______
|
_______
|
|
|
|
_________
|
|
|
| | Select |
| Drop |
| Edit |
| New |
| Next |
| Prev |
| Cancel |
|
| |________|
|______|
|______|
|_____|
|______|
|______|
|________|
|
|__________________________________________________________________________|
Batch Call:
Syntax:
xrestore -a<action> -d<serverdb> -m<medium name>
Example:
xrestore -a SAVEDATA -d mydb -m DAT90
The complete description of the batch calls is included in Section Batch Mode: xbackup / xrestore.
To display the protocol file of the batch call, you can use the Backup / Show Protocol menu function.
Saving to a Medium with Continuation Medium
Backups to media with continuation media are only useful if there is only one output device. Whenever
possible, the backup should always be done to several parallel media rather than to a medium with
continuation media.
Interactive Procedure:
1. Select the save action.
2. Select the medium.
3. Check the entries.
47
Backup Concepts and Strategies
Adabas D: Control
4. Start the save operation.
5. Mount the next volume and continue the save operation.
Steps 1 to 4 are the same as for saving to an individual medium.
If the medium is not large enough, the progress indicator stops before the medium is full, and a screen
appears requesting you to mount the next medium.
___________________________________________________________________________
|
|
|
CHANGE TAPE
|
|
|
| _______________________________________________________________________
|
|
|
|
|
|
End of volume reached. Please enter name of next volume.
|
|
Device:
/dev/rmt0
|
|
Type:
T
|
|
Size:
500000
|
|
Label:
DATA_A0_A
|
|
|
|
|
|
_____
|
|
|
|
| Ok |
|
|____|
_________
|
|
________
|
|
|
|
| Ignore |
| Cancel |
|
|________|
|________|
|
|__________________________________________________________________________|
5. Mount the Next Medium and Continue the Save Operation
If the medium is a tape, simply mount the next tape and click on the Ok button or press the Enter key. If
the medium is a file, you can specify the path name of the next file (after pressing the F12 key). You can
change the capacity of the medium, and you can select another type for the continuation medium.
The save operation is continued with the Ok button. Before clicking on the Ok button, you should make
sure that the tape just written was placed in safety and the right tape has been mounted.
Step 5 must be repeated as often as is needed to terminate the backup or until it is canceled.
In the "Device", "Type", and "Size" fields, the screen shows the specifications valid for the previous
medium. After pressing the F12 key, these fields are updatable. The label that Control will write to the
next medium appears in the "Label" field which is write-protected.
We recommend to specify the exact capacity when defining the medium (in units of 4 KB pages).
However, more and more tape device drivers can be relied on when they inform about the end of tape.
When this is true, Control acts in the described manner even for a "Media Size = 0". If the end of tape is
not recognized correctly, the "Writing Error" message is displayed. In this case, too, you can continue as
described.
The Ignore button is meaningless in this case.
As long as the backup is being performed, no other backup can be started. Only after confirming the result
protocol, you can start another backup.
Restoring from a Medium with Continuation Media
48
Adabas D: Control
Backup Concepts and Strategies
Interactive Procedure:
1. Select the restore action.
2. Select the medium.
3. Check the entries.
4. Start the restore operation.
5. Mount the next medium and continue the restore operation.
Steps 1 to 4 are the same as for restoring from an individual medium.
If the medium does not contain the complete backup, the progress indicator stops before reaching 100%,
and a screen appears requesting you to mount the next medium.
___________________________________________________________________________
|
|
|
CHANGE TAPE
|
|
|
| _______________________________________________________________________
|
|
|
|
|
|
End of volume reached. Please enter name of next volume.
|
|
|
|
Device:
/dev/rmt0
|
|
Type:
T
|
|
Size:
|
Label:
|
DATA_A0_A
|
|
|
|
|
|
_____
|
|
|
|
| Ok |
|
|____|
_________
|
|
________
|
|
|
|
| Ignore |
| Cancel |
|
|________|
|________|
|
|__________________________________________________________________________|
5. Mount the Next Medium and Continue the Restore Operation
If the medium is a tape, simply mount the next tape. If the medium is a file, you can specify the path name
of the next file. You can also select another type of medium for the next medium. The restore operation is
continued with the Ok button.
In the "Device", "Type, and "Label" fields, the screen shows the specifications valid for the previous
medium. After pressing the F12 key, the "Device" field is updatable.
The Ignore button is meaningless in this case.
After confirming the next medium with the Ok button, Control displays the label information read from
the specified medium. Only after clicking again on the Ok button, the restore operation is continued.
49
Backup Concepts and Strategies
Adabas D: Control
___________________________________________________________________________
|
|
|
|
|
|
|
created:
: 2002-02-22 12:12:13
|
|
version
: KERNEL 12
|
|
serverdb
: mydb
|
|
servernode: mynode
|
|
label:
|
: DATA_A0_A
|
|
|
|
|
_____
|
|
|
|
|
________
|
|
|
|
| Ok |
| Cancel |
|
|____|
|________|
|
|__________________________________________________________________________|
Batch Call:
No batch call is provided for restoring from several media in succession. We recommend to use external
backup tools or autoloaders in this case.
50
Adabas D: Control
Backup Concepts and Strategies
Saving to Several Parallel Media without Continuation Medium
Interactive Procedure:
1. Select the save action.
2. Select the parallel medium.
3. Check the entries.
4. Start the save operation.
1. Select the Save Action (Example: Backup / Save / Data)
Select one of the save actions "Data", or "Updated Pages" from the Backup / Save menu item.
The list of the defined media appears.
_______________________
|
_____________________
Save Data : Medium Selection
|
|
|
|
|
| DAT90
T
Y 500000
/dev/rmt0
(
)
|
| FILE
F
N
/backup/dblog.save
(
)
|
| TAPE0
T
Y 400000
/dev/rmt0
( X )
|
| TAPE1
T
Y 400000
/dev/rmt1
( X )
|
| TAPE2
T
Y 400000
/dev/rmt2
( X )
|
| TAPE3
T
Y 400000
/dev/rmt3
( X )
|
| TAPES_4
T
Y
PARALLEL
(
|
0
0
)
|
|
|
Parallel-Id : TAPES_4
|
|
|
|
_________________________________________________________
|
|
|
|
|
|
| Please select a backup medium from the list
|
|
|
| Use Buttons or Keys to handle media - otherwise Return. |
|
|
|_________________________________________________________|
|
|
|
|
|
| |
|
________
______
|
|
________
|
|
|
______
|
|
______
|
_______
|
|
|
|
_________
|
|
|
| | Select |
| Drop |
| Edit |
| New |
| Next |
| Prev |
| Cancel |
|
| |________|
|______|
|______|
|_____|
|______|
|______|
|________|
|
|__________________________________________________________________________|
2. Select the Medium
The medium defined with the parallel-id ("TAPES_4" in the example) must be selected from the list of
defined media.
If no parallel group of media has been defined so far, you can do this now with the Media Manager.
We recommend to use tapes as parallel media (Device Type "T"; for Windows "T" or "R"). However,
parallel media can also be files or pipes. Pipes should only be used along with backup tools (see Section
External Backup Tools) or for immediate backups
The maximum number of media that can be defined parallel to each other is restricted by the kernel
parameter MAXBACKUPDEVS. Should it become necessary to change this parameter, the serverdb must
be stopped and restarted to bring the parameter into effect.
The list of parallel media is displayed again in a separate screen.
51
Backup Concepts and Strategies
Adabas D: Control
___________________________________________________________________________
|
|
|
|
|
Media
Path
|
|__________________________________________________________________________|
|
|
|
TAPE0
/dev/rmt0
|
|
TAPE1
/dev/rmt1
|
|
TAPE2
/dev/rmt2
|
|
TAPE3
/dev/rmt3
|
|
|
|
|
|
______________________________________________
|
|
|
|
|
|
| Number of volumes used for the last save:4 |
|
|
|____________________________________________|
|
|
|
|
|
|
_____
|
|
|
|
|
________
|
|
|
|
| Ok |
| Cancel |
|
|____|
|________|
|
|__________________________________________________________________________|
3. Check the Entries
In addition to the list of media, the screen shows how many media were used for the preceding backup of
this kind. If the number of media is known to be sufficient, it is not necessary to change the parameter.
Confirm the medium definition with Ok or Enter. (The Cancel button can be used to end the save
operation.)
The parameter is only important when the number of parallel media is not sufficient for the backup.
Therefore, it is described in detail in Section Saving To Several Parallel Media With Continuation Media.
As for the backup to one medium, a screen displayed; this time for each medium, containing a short
description of the medium label that will be written to the medium to identify the backup.
Example of the fourth label screen:
___________________________________________________________________________
|
|
|
|
|
|
|
Device:
/u/rmt0
|
|
Type:
T
|
|
Size:
400000
|
|
Label:
DATA_A0_D
|
|
|
|
|
|
_____
|
|
|
|
|
________
|
|
|
|
| Ok |
| Cancel |
|
|____|
|________|
|
|__________________________________________________________________________|
4. Start the Save Operation
For tapes selected as media, you must now mount the tape to the tape device if this has not been done yet,
because otherwise the backup will fail. Then you can confirm the label screens. To start the backup, click
on the Ok button (or press the Enter key). Each screen must be confirmed with the Ok button (or the Enter
key); otherwise Control cancels the save operation.
After confirming the last label screen, Control starts the backup displaying a bar to indicate the progress of
the backup. When the backup terminates, the result protocol is displayed.
As long as the backup is being performed, no other backup can be started. Only after confirming the result
protocol, you can start another backup.
52
Adabas D: Control
Backup Concepts and Strategies
______________________________
|
_____________________________
mydb on mynode
|
|
|
|
|
| Report of backup operations
2002-02-18 16:14:26
|
|
|
| ----- Control 12
2002-02-18
16:14:08
SAVE ------
|
| USE SERVERDB ’mydb’ on ’mynode’
|
| 16:14:09
|
| INSERT LABEL ’/dev/rmt0’,’DATA_A0_A’
|
| 16:14:10
|
| INSERT LABEL ’/dev/rmt1’,’DATA_A0_B’
|
| 16:14:11
|
| INSERT LABEL ’/dev/rmt2’,’DATA_A0_C’
|
| 16:14:12
|
| INSERT LABEL ’/dev/rmt3’,’DATA_A0_D’
|
| 16:14:17
|
| SAVE DATA QUICK TO ’/dev/rmt0’ TAPE COUNT 400000 ’/dev/rmt1’
| 400000 ’/dev/rmt2’ TAPE COUNT 400000 ’/dev/rmt3’
TAPE COUNT|
TAPE COUNT 400000
|
| BLOCKSIZE 8
|
|
|
360134 pages transferred
| 16:14:24
|
| COMMIT WORK RELEASE
|
| SESSION END
|
|
|
| |
|
________
______
|
|
________
|
|
|
______
|
|
______
|
_______
|
|
|
_________
|
|
|
|
| | Select |
| Drop |
| Edit |
| New |
| Next |
| Prev |
| Cancel |
|
| |________|
|______|
|______|
|_____|
|______|
|______|
|________|
|
|__________________________________________________________________________|
Batch Call:
Syntax:
xbackup -a<action> -d<serverdb> -m<medium name>
Example:
xbackup -a SAVEDATA -d mydb -m TAPES_4
The complete description of the batch calls is included in Section Batch Mode: xbackup / xrestore.
To display the protocol file of the batch call, you can use the Backup / Show Protocol menu function.
Restoring from Several Parallel Media without Continuation Media
Interactive Procedure:
1. Select the restore action.
2. Select the parallel medium.
3. Check the entries.
4. Start the restore operation.
1. Select the Restore Action (Example: Backup / Restore / Data)
Select one of the restore actions "Data", "Updated Pages" up to "Log" from the Backup / Restore menu
item.
The list of defined media appears.
53
Backup Concepts and Strategies
_______________________
|
Adabas D: Control
_____________________
Save Data : Medium Selection
|
|
|
|
|
| DAT90
T
Y 500000
/dev/rmt0
(
)
|
| FILE
F
N
/backup/dblog.save
(
)
|
| TAPE0
T
Y 400000
/dev/rmt0
( X )
|
| TAPE1
T
Y 400000
/dev/rmt1
( X )
|
| TAPE2
T
Y 400000
/dev/rmt2
( X )
|
| TAPE3
T
Y 400000
/dev/rmt3
( X )
|
| TAPES_4
T
Y
PARALLEL
(
|
0
0
)
|
|
|
Parallel-Id : TAPES_4
|
|
|
|
_________________________________________________________
|
|
|
|
|
|
| Please select a backup medium from the list
|
|
|
| Use Buttons or Keys to handle media - otherwise Return. |
|
|
|_________________________________________________________|
|
|
|
|
|
|
________
| |
______
|
|
________
|
|
|
______
|
|
______
|
_______
|
|
|
|
_________
|
|
|
| | Select |
| Drop |
| Edit |
| New |
| Next |
| Prev |
| Cancel |
|
| |________|
|______|
|______|
|_____|
|______|
|______|
|________|
|
|__________________________________________________________________________|
2. Select the Medium
The medium defined with the parallel-id ("TAPES_4" in the example) must be selected from the list of
defined media.
Usually, you will use the same media as for the save action. But it is also possible to restore a save in
parallel that was written to a medium with continuation media.
The maximum number of media that can be defined parallel to each other is restricted by the kernel
parameter MAXBACKUPDEVS. Should it become necessary to change this parameter, the serverdb must
be stopped and restarted to bring the parameter into effect.
For tapes selected as media, you must now mount the tape to the tape device if this has not been done yet,
because otherwise the recovery will fail. Then you can confirm the media screens.
The list of parallel media is displayed again in a separate screen.
___________________________________________________________________________
|
|
|
|
|
Media
Path
|
|__________________________________________________________________________|
|
|
|
TAPE0
/dev/rmt0
|
|
TAPE1
/dev/rmt1
|
|
TAPE2
/dev/rmt2
|
|
TAPE3
/dev/rmt3
|
|
|
|
|
|
______________________________________________
|
|
|
|
|
|
| Number of volumes used for the last save:4 |
|
|
|____________________________________________|
|
|
|
|
|
|
_____
|
|
|
|
|
________
|
|
|
|
| Ok |
| Cancel |
|
|____|
|________|
|
|__________________________________________________________________________|
54
Adabas D: Control
Backup Concepts and Strategies
3. Check the Entries
In addition to the list of media, the screen shows how many tapes were used for the preceding backup of
this kind. Here, you should specify the number of tapes that make up the save to be restored.
The parameter is only important when the number of tapes is larger than the number of parallel media
available. Therefore, this parameter is described in detail in Section Restoring From Several Parallel
Media With Continuation Media.
Confirm the medium definition with Ok or Enter. To cancel the restore operation, use the Cancel button.
As for the backup for each medium, a screen appears containing the content of the label stored on the
medium. In the example, these labels are "DATA_A0_A", "DATA_A0_B", "DATA_A0_C", and
"DATA_A0_D".
___________________________________________________________________________
|
|
|
|
|
|
|
created:
: 2002-02-22 12:12:13
|
|
version
: KERNEL 12
|
|
serverdb
: mydb
|
|
servernode: mynode
|
|
label:
|
: DATA_A0_A
|
|
|
|
|
_____
|
|
|
|
________
|
|
|
|
|
| Ok |
| Cancel |
|
|____|
|________|
|
|__________________________________________________________________________|
4. Start the Restore Operation
Each screen must be confirmed with the Ok button (or the Enter key); otherwise Control cancels the
restore operation. To start the recovery, click on the Ok button (or press the Enter key) in the last label
screen. The result protocol is displayed after the recovery.
Example of the last page of the result protocol. Here, you can see the label of the fourth medium and the
restore operation with the specification of the four media.
______________________________
|
_____________________________
mydb on mynode
|
|
|
|
|
| Report of backup operations
2002-02-18 16:14:26
|
|
|
| ----- Control 12
2002-02-18
16:14:08
SAVE ------
|
| 14:09:40
|
| READ LABEL ’/dev/rmt3’
|
| created
: 2000-02-22 12:10:12
| version
: KERNEL 12
| serverdb
: mydb
|
DATE 2002-02-15
|
|
| servernode : mynode.any.de
|
| label
|
: DATA_A0_D
| 12:17:32
|
| RESTORE DATA QUICK FROM ’/dev/rmt0’ TAPE, ’/dev/rmt1’ TAPE,
|
| ’/dev/rmt2’
TAPE, ’/dev/rmt3’ TAPE
|
|
200134 pages transferred
|
| 12:17:40
|
| COMMIT WORK RELEASE
|
| SESSION END
|
|
|
| |
|
________
______
|
|
________
|
|
|
______
|
|
______
|
_______
|
|
|
|
_________
|
|
|
| | Select |
| Drop |
| Edit |
| New |
| Next |
| Prev |
| Cancel |
|
| |________|
|______|
|______|
|_____|
|______|
|______|
|________|
|
|__________________________________________________________________________|
55
Backup Concepts and Strategies
Adabas D: Control
Batch Call:
Syntax:
xrestore -a<action> -d<serverdb> -m<medium name>
Example:
xrestore -a SAVEDATA -d mydb -m TAPES_4
The complete description of the batch calls is included in Section Batch Mode: xbackup / xrestore.
To display the protocol file of the batch call, you can use the Backup / Show Protocol menu function.
Saving to Several Parallel Media with Continuation Media
Interactive Procedure:
1. Select the Save action.
2. Select the parallel medium.
3. Check the entries.
4. Start the save operation.
5. Mount the continuation media and continue the save operation.
Steps 1 to 4 are the same as for saving to several parallel media without continuation medium.
When the capacity of parallel media is not sufficient for the backup, saving is somewhat more
complicated than described in Section Saving To Several Media In Parallel Without Continuation
Medium. In contrast to the backup to one medium, all media defined as parallel media can have a
continuation medium. For this case, the "Number of volumes used for the last save" will be explained in
greater detail. Three examples follow in which one parameter is set to a different value for Step 3. It is
assumed for the three examples that six media are sufficient for the backup.
After selecting the medium named "TAPES_4" as the medium to be used for Save / Data, Control
displays the following screen:
___________________________________________________________________________
|
|
|
|
|
Media
Path
|
|__________________________________________________________________________|
|
|
|
TAPE0
/dev/rmt0
|
|
TAPE1
/dev/rmt1
|
|
TAPE2
/dev/rmt2
|
|
TAPE3
/dev/rmt3
|
|
|
|
|
|
______________________________________________
|
|
|
|
|
|
| Number of volumes used for the last save:4 |
|
|
|____________________________________________|
|
|
|
|
|
|
_____
|
|
|
|
|
________
|
|
|
|
| Ok |
| Cancel |
|
|____|
|________|
|
|__________________________________________________________________________|
56
Adabas D: Control
Backup Concepts and Strategies
Example 1 As few media are to be used as possible. The default number of tapes; i.e., the number of
parallel media, is used as the number of tapes.
3. Check the Entries
The number of media is set to 4; in the example, this is also the maximum number of parallel media
(=MAXBACKUPDEVS). The parameter is important now because the first parallel media do not suffice.
If the data backup is called for the first time, the value of the MAXBACKUPDEVS parameter (4 in the
example) appears as the number of media used for the last save.
After clicking on the Ok button, Control displays, for each medium used, a short description and the
generation that will be written to the medium as part of the label. The letter of generation is the same for
the four tapes ("A").
___________________________________________________________________________
|
|
|
|
|
|
|
Device:
/dev/rmt0
|
|
Type:
T
|
|
Count:
400000
|
|
Label:
DATA_A0_A
|
|
|
|
|
|
_____
|
|
|
|
________
|
|
|
|
|
| Ok |
| Cancel |
|
|____|
|________|
|
|__________________________________________________________________________|
4. Start the Save Operation
For tapes selected as media, you must now mount the tape to the tape device if this has not been done yet,
because otherwise the backup will fail. Then start the backup by clicking on the Ok button (or the Enter
key). Each screen must be confirmed with the Ok button (or the Enter key); otherwise Control cancels the
save operation.
After confirming all the labels, Control starts the backup displaying an increasing bar to indicate the
progress of the backup.
As the four media do not suffice and the value of the parameter is 4, Control expects a continuation
medium for just one medium assuming that this is the last.
___________________________________________________________________________
|
|
|
CHANGE TAPE
|
|
|
| _______________________________________________________________________
|
|
|
|
|
|
End of volume reached. Please enter name of next volume.
|
|
|
|
Device:
/dev/rmt0
|
|
Type:
T
|
|
Size:
400000
|
|
Label:
DATA_A0_B
|
|
|
|
|
|
_____
|
|
|
|
| Ok |
|
|____|
_________
|
|
________
|
|
|
|
| Ignore |
| Cancel |
|
|________|
|________|
|
|__________________________________________________________________________|
57
Backup Concepts and Strategies
Adabas D: Control
5. Mount the Continuation Media and Continue the Save Operation
If the medium is a tape, simply mount the next tape and click on the Ok button or press the Enter key. If
the medium is a file, you can specify the path name of the next file. You can also change the capacity of
the medium, or you can select another type for the next medium.
The save operation is continued with the Ok button.
Step 5 must be repeated as often as is needed to terminate the backup or until it is canceled.
In the "Device", "Type", and "Size" fields, the screen shows the specifications valid for the previous
medium. After pressing the F12 key, these fields are updatable. In the "Label" field, the label appears that
Control will write to the next medium. The "Label" field is write-protected.
The Ignore button is meaningless in this case.
As long as the backup is being performed, no other backup can be started. Only after confirming the result
protocol, you can start another backup.
Summary of Example 1
If less tapes have been specified than are required (e.g., 4), just one tape device that has become free
requests all the needed tapes in succession. This kind of backup takes the most time, but all the tapes
except the last one are written up to the end.
Example 2 The backup is to be done as fast as possible. The specified number of tapes
probably is too large.
The backup is to be done as fast as possible.
3. Check the Entries
The number of media is set to eight or more.
After clicking on the Ok button, Control displays, for each medium used, a short description and the
generation that will be written to the medium as part of the label.
58
Adabas D: Control
Backup Concepts and Strategies
4. Start the Save
As in example 1, confirm the screens to start the save operation.
As the four media do not suffice and the value of the parameter is 8, Control expects a continuation
medium for each of the four media.
___________________________________________________________________________
|
|
|
CHANGE TAPE
|
|
|
| _______________________________________________________________________
|
|
|
|
|
|
End of volume reached. Please enter name of next volume.
|
|
|
|
Device:
/dev/rmt0
|
|
Type:
T
|
|
Size:
400000
|
|
Label:
DATA_A0_E
|
|
|
|
|
|
_____
|
|
|
|
| Ok |
|
|____|
_________
|
|
________
|
|
|
|
| Ignore |
| Cancel |
|
|________|
|________|
|
|__________________________________________________________________________|
5. Mount the Continuation Media and Continue the Save Operation
In this case, you must answer the request for a continuation medium four times. If the medium is a tape,
simply mount the next tape and click on the Ok button or press the Enter key. If the medium is a file, you
can specify the path name of the next file. You can change the capacity of the medium, or you can select
another type for the next medium.
The save operation is continued with the Ok button after each continuation medium. As six tapes are
sufficient for the backup in the example, Control does not request another continuation medium.
Here, the Ignore button has the effect that the tape device will be ignored and all the tapes to be mounted
are immediately expected from the remaining tape devices. This can be useful, for example, if you only
want to write the tapes on particular tape devices and no longer on all parallel devices defined.
Summary of Example 2
For eight specified tapes, the four tape devices request another tape as soon as they have become free. The
rest of the backup is speeded up because it is done simultaneously to four tapes instead of two.
59
Backup Concepts and Strategies
Adabas D: Control
Example 3 The backup is to be done as fast as possible to as many media as necessary. The
number of tapes probably needed is used as the number of tapes.
3. Check the Entries
The number of media is set to six.
4. Start the Save Operation
As in example 1.
As the four media do not suffice and the value of the parameter is 6, Control expects a continuation
medium for just two media.
5. Mount the Continuation Media and Continue the Save Operation
In this case, you must answer the request for a continuation medium twice. If the medium is a tape, simply
mount the next tape and click on the Ok button or press the Enter key. If the medium is a file, you can
specify the path name of the next file. You can also change the capacity of the medium, or you can select
another type of medium for the next medium.
The save operation is continued with the Ok button after each continuation medium. As six tapes are
sufficient for the backup in the example, Control does not request another continuation medium.
Here, the Ignore button has the effect that the tape device will be ignored and all the tapes to be mounted
are immediately expected from the remaining tape devices. This can be useful, for example, if you only
want to write the tapes on particular tape devices and no longer on all parallel devices defined.
Summary of Example 3
Control uses the number of media used last for this kind of save as the number of tapes (in the example,
6). After about an hour, the four tape devices are ready and request, one after the other, a new tape. In this
case, a tape is only requested for two of the four free tape devices; the other two tape devices are ignored
by Control.
60
Adabas D: Control
Backup Concepts and Strategies
Batch Call:
No batch call is provided for saving to parallel media with continuation media. We recommend to use
external backup tools or autoloaders in this case.
Restoring from Several Parallel Media with Continuation Media
Interactive Procedure:
1. Select the restore action.
2. Select the parallel medium.
3. Check the entries.
4. Start the restore operation.
5. Mount the continuation media and continue the restore operation.
Steps 1 to 4 are the same as for restoring from several parallel media without continuation media.
When the number of media to be loaded is larger than the number of parallel tape devices available,
restoring is somewhat more complicated than described in Section Restoring From Several Parallel Media
Without Continuation Media. In contrast to the backup, the number of media to be loaded is known for the
recovery. Therefore, you are not compelled to specify the correct number of media. But the handling of
the mounting of tapes will be easier if the correct number of media is specified.
After selecting the medium named "TAPES_4" as the medium to be used for Restore / Data, Control
displays the following screen:
___________________________________________________________________________
|
|
|
|
|
Media
Path
|
|__________________________________________________________________________|
|
|
|
TAPE0
/dev/rmt0
|
|
TAPE1
/dev/rmt1
|
|
TAPE2
/dev/rmt2
|
|
TAPE3
/dev/rmt3
|
|
|
|
|
|
______________________________________________
|
|
|
|
|
|
| Number of volumes used for the last save:6 |
|
|
|____________________________________________|
|
|
|
|
|
|
_____
|
________
|
|
|
|
|
|
|
| Ok |
| Cancel |
|
|
|____|
|________|
|
|__________________________________________________________________________|
3. Check the Entries
Enter the number of media to be loaded as the number of media. The parameter is important now, because
the number of parallel tape devices is not sufficient to simultaneously load all the media. For tapes
selected as media, you must now mount the tapes to the tape devices if this has not been done yet, because
otherwise the recovery will fail. Then confirm the list of media.
61
Backup Concepts and Strategies
Adabas D: Control
After clicking on the Ok button, Control displays the label information just loaded for each medium, for
security reasons. These labels (in the example, for the first four tapes: DATA_A0_A to DATA_A0_D)
should be identical to the text contained on the stickers of the tapes.
Example of the label information of the first tape:
___________________________________________________________________________
|
|
|
|
|
|
|
Device:
/dev/rmt0
|
|
Type:
T
|
|
Count:
400000
|
|
Label:
DATA_A0_A
|
|
|
|
|
|
_____
|
|
|
|
________
|
|
|
|
|
| Ok |
| Cancel |
|
|____|
|________|
|
|__________________________________________________________________________|
4. Start the Restore Operation
Confirm each screen with the Ok button (or the Enter key); otherwise Control cancels the restore action.
The restore operation is started by clicking on the Ok button (or by pressing the Enter key) in the last label
screen.
During the restore operation, Control displays an increasing bar to indicate the progress of the recovery.
As the number of parallel tape devices is not sufficient for the number of tapes to be loaded, Control
expects continuation media in this case.
___________________________________________________________________________
|
|
|
CHANGE TAPE
|
|
|
| _______________________________________________________________________
|
|
|
|
|
|
End of volume reached. Please enter name of next volume.
|
|
|
|
Device:
/dev/rmt0
|
|
Type:
T
|
|
Size:
|
Label:
|
DATA_A0_A
|
|
|
|
|
|
_____
|
|
|
|
| Ok |
|
|____|
_________
|
|
________
|
|
|
|
| Ignore |
| Cancel |
|
|________|
|________|
|
|__________________________________________________________________________|
5. Mount the Continuation Media and Continue the Restore Operation
If the medium is a tape, simply mount the next tape. If the medium is a file, you can specify the path name
of the next file, after pressing the F12 key. You can also select another type for the next medium.
The restore operation is continued with the Ok button.
Step 5 must be repeated as often as is needed to terminate the recovery or until it is canceled.
In the "Device", "Type", and "Label" fields, the screen shows the specifications valid for the previous
medium. After pressing the F12 key, the "Device" and "Type" fields are updatable.
62
Adabas D: Control
Backup Concepts and Strategies
Here, the Ignore button has the effect that the tape device will be ignored and all the tapes to be mounted
are immediately expected from the remaining tape devices. This can be useful, for example, if you only
want to load the tapes from particular tape devices and no longer from all parallel devices defined.
Batch Call:
No batch call is provided for restoring from parallel media with continuation media. We recommend to
use external backup tools or autoloaders in this case.
Restoring from Version Files (Autosave)
As described for the automatic backup of log segments (see Section Options / Autosave Log), log
segments can be saved to single version files. The version files are automatically numbered in ascending
order. When restoring from version files, the same medium is used as for saving. A range of numbers
must be specified in addition.
Interactive Procedure:
1. Select the restore action Restore / Log.
2. Select the medium.
3. Check the entries.
4. Start the restore operation and specify a range of numbers.
5. Confirm the version file and continue the restore operation.
Steps 1 to 3 are the same as for restoring from one medium without continuation media.
___________________________________________________________________________
|
|
|
|
|
|
|
Device:
/autosave/logseg
|
From number: 121
|
|
|
to number:
128
|
|
Label:
DATA_A0_A
|
|
|
|
_____
|
|
|
|
|
________
|
|
|
|
| Ok |
| Cancel |
|
|____|
|________|
|
|__________________________________________________________________________|
4. Start the Restore Operation and Specify a Range of Numbers
Click on the Ok button to start the restore operation and to display the first version file for confirmation.
____________________________
|
_________________________
/autosave/logseg.121
|
|
|
|
|
|
created.........: 24.01.2002
17:37:24
|
|
version/volume..: 24.01.2002
17:37:24/0
|
|
server
|
label/blocksize : LOG_B1_1 / 8
: db_first
|
|
|
|
|
UNTIL
20020130
00145205
|
|
|
|
_____
|
|
|
|
|
________
|
|
|
|
| Ok |
| Cancel |
|
|____|
|________|
|
|__________________________________________________________________________|
63
Backup Concepts and Strategies
Adabas D: Control
5. Confirm the Version File and Continue the Restore Operation.
For security reasons, Control displays the label information of the next file to be restored. Here, you can
also specify an UNTIL point in time up to which the version files available are to be restored.
Batch Call:
No batch call is provided for restoring the log from version files. We recommend to use external backup
tools or autoloaders in this case.
Restoring Several Log Segments from Tape (AUTOSAVE)
As described for the automatic backup of log segments (see Section Options / Autosave Log), log
segments can be saved to one or more tapes in succession. Control supports the interactive recovery from
tapes.
Interactive Procedure:
1. Select the restore action Restore / Log.
2. Select the medium.
3. Check the entries.
4. Start the restore operation.
5. Confirm the restore operation and continue.
Steps 1 to 3 are the same as for restoring from one medium without continuation media.
4. Start the Restore Action
Click on the Ok button to start the restore operation and to display the label of the first log segment for
confirmation.
5. Confirm the Restore Operation and Continue
Control displays the result of this recovery step. The following three cases can occur:
a) When restoring several successive log segments from tape, it can happen that the first log segments do
not match the data version available in the serverdb. Simply ignore this action and continue the restore
operation by clicking on the Return button.
64
Adabas D: Control
Backup Concepts and Strategies
___________________________________________________________________________
|
|
|
CONTINUE
|
|
|
| _______________________________________________________________________
|
|
|
|
|
|
-8003 Log and Data must be compatible.
|
|
|
|
Device:
/dev/nrmt0
|
|
Type:
N
|
|
Size:
|
|
Label:
|
|
|
|
|
|
_____
|
|
|
|
| Ok |
|
|____|
_________
|
|
________
|
|
|
|
| Ignore |
| Cancel |
|
|________|
|________|
|
|__________________________________________________________________________|
b) If the log segment could be restored successfully, Control automatically continues the restore operation
by loading and restoring the next log segment.
65
Backup Concepts and Strategies
Adabas D: Control
c) After restoring the last log segment of the tape, Control attempts once more to restore a log segment.
The database system does not recognize another log segment and ends the restore operation.
Batch Call:
No batch call is provided for restoring several log segments from tape.
Autoloader under Windows
In Windows, saving to tapes with continuation tapes can also be done without operator intervention using
an autoloader. To activate the autoloader, specify the medium "A" as "Device Type".
When reaching the end of tape, the autoloader is addressed which will use the next tape available. The
backup will only be successful if the number of tapes is sufficient for it.
The interactive procedure is the same as for saving to a medium without continuation media.
Example of the medium definition:
___________________________________________________________________________
|
|
|
Save Data
|
|
|
| _______________________________________________________________________
|
|
|
|
|
|
Medium
.....: AUTOL_NT
Next Medium
:
|
Device Type.....: A
|
Parallel
:
|
Path: \\:\tape 0
|
|
|
Path2:
|
|
|
|
Overwrite(Y/N/V): Y
Media Size in Pages.: 0
|
|
|
|
|
|
_____
|
|
|
|
| Ok |
|
|____|
________
|
|
________
|
|
|
|
| Label |
| Cancel |
|
|_______|
|________|
|
|__________________________________________________________________________|
At the end of the backup, the tape device shows the number of tapes written. The labels displayed and
confirmed at the start of the backup (Step 3) should be put down on the stickers of the tapes.
Before backing up, it is strictly recommended to check the write protection of all tapes, because otherwise
the backup procedure will be aborted.
After inserting the tape cartridge in the autoloader, the first tape must be selected manually.
Batch Call:
Syntax:
xbackup -a<action> -d<serverdb> -m<medium name>
Example:
xbackup -a SAVEDATA -d mydb -m AUTOL_NT
The complete description of the batch calls is included in Section Batch Mode: xbackup / xrestore.
66
Adabas D: Control
Backup Concepts and Strategies
To display the protocol file of the batch call, you can use the Backup / Show Protocol menu function.
Restoring under Windows by means of the autoloader is done in the same way as saving. Simply use the
same medium definition as for saving and perform the restore operation as if restoring from one medium.
To ensure a successful restore, all tapes belonging to the save must have been mounted to the autoloader.
Use the xrestore command as batch call.
Other Autoloaders
Saving to tapes with continuation tapes can also be done in other operating systems without operator
intervention using an autoloader.
Control provides an option to formulate an explicit operating system command initiating the change of
tape. Specify an "L" as "Device Type" when defining the medium to be used. Then use the OsCmd button
to define the command that will initiate the change of tape.
The interactive procedure is the same as for saving to a medium without continuation media.
Example of the medium definition:
___________________________________________________________________________
|
|
|
Save Data
|
|
|
| _______________________________________________________________________
|
|
|
|
|
|
Medium
.....: AUTOL
Next Medium
:
|
Device Type.....: L
|
Parallel
:
|
Path: u/dev/rmt0
|
|
|
OS Cmd: mt -f /dev/rmt0 rewoffl
|
|
|
|
Overwrite(Y/N/V): Y
Media Size in Pages.: 0
|
|
|
|
|
|
_____
|
|
|
|
| Ok |
|
|____|
________
|
|
________
|
|
|
|
| Label |
| Cancel |
|
|_______|
|________|
|
|__________________________________________________________________________|
At the end of the backup, the tape device shows the number of tapes written. The labels displayed and
confirmed at the start of the backup (Step 3) should be put down on the stickers of the tapes.
Batch Call:
Syntax:
xbackup -a<action> -d<serverdb> -m<medium name>
Example:
xbackup -a SAVEDATA -d mydb -m AUTOL
The complete description of the batch calls is included in Section Batch Mode: xbackup / xrestore.
To display the protocol file of the batch call, you can use the Backup / Show Protocol menu function.
67
Backup Concepts and Strategies
Adabas D: Control
Restoring by means of an autoloader is done in the same way as saving. Simply use the same medium
definition as for saving and perform the restore operation as if restoring from one medium. To ensure a
successful restore, all tapes belonging to the save must have been mounted to the autoloader.
Use the xrestore command as batch call.
Example of Backup / Restore
The following illustration shows a data backup cycle, where three points in time of disk failure
occurrences are marked for the following recovery examples. Examples of tape labels that Control uses to
identify the individual save actions are given in parentheses on the right.
__________________________________________________________________
|
|
|
|
SAVE DATA
(1)
(DATA_A0_A) |
Disk Failure A
|
|
SAVE LOG SEGMENT (1)
(LOG_A1_1)
|
|
SAVE LOG SEGMENT (2)
(LOG_A2_1)
|
|
SAVE LOG SEGMENT (2)
(LOG_A3_1)
|
|
SAVE PAGES
(1.1)
(DATA_A4_A) |
|
SAVE LOG SEGMENT (4)
(LOG_A5_1)
|
|
SAVE LOG SEGMENT (5)
(LOG_A6_1
|
|
SAVE LOG SEGMENT (6)
(LOG_A7_1)
|
|
SAVE PAGES
(1.2)
(DATA_A8_A) |
|
SAVE LOG SEGMENT (7)
(LOG_A9_1)
|
SAVE LOG SEGMENT (8)
(LOG_A10_1) |
|
Disk Failure B
|
|
|
|
SAVE LOG SEGMENT (9)
SAVE DATA
|
(2)
(LOG_A11_1) |
(DATA_B0_A) |
Disk Failure C
|
|
SAVE LOG SEGMENT (10) (LOG_B1_1)
|
|
SAVE LOG SEGMENT (11) (LOG_B2_1)
|
|
Disk Failure D
|
|_________________________________________________________________|
68
Adabas D: Control
Backup Concepts and Strategies
If the log is also damaged, the recovery procedures outlined in the following three examples require the
existence of at least one intact log devspace which can be used in log mode DUAL or NORMAL to
recover the defective log devspace (see Section Backup / Restore / Devspace).
Recovery After Disk Failure A
To recover the database after the disk failure A, only the first backup version of the data devspace must be
restored using Restore / Data. The subsequent restart completes the data devspace redoing the transactions
recorded in the log.
__________________________________________________________________
|
|
|
restore data (1) (DATA_A0_A)
|
|
restart
|
|________________________________________________________________|
Recovery After Disk Failure B
When disk failure B occurs, there are several ways of recovering the serverdb. The quickest method of
recovery consists of reloading the database using Restore / Data and subsequently reloading the modified
pages using Restore / Updated Pages. Finally, Restore / Log must be performed to restore the backups of
the log segments 7 and 8.
The correct choice of the log segments 7 and 8 after restoring the pages (1.2) corresponds to the ascending
serverdb version which can be found in the protocol of the corresponding data backup. A correct selection
prevents failures.
Since Restore / Log overwrites the log, the current log version, which is not contained in the log segments
saved so far, must be backed up to an external backup device or a host file using Save / Log (Cold). Then
the backups of the log segments can be restored using Restore / Log. In log mode DUAL or NORMAL,
the backup of a log segment is implicitly copied onto both log devspaces. Once the log segments 7 and 8
are restored, the copy of the current log that was backed up using Save / Log (Cold) must be restored
using Restore / Log. Restart completes the recovery.
First restore variant:
69
Backup Concepts and Strategies
Adabas D: Control
__________________________________________________________________
|
|
|
restore data
(1)
(DATA_A0_A)
|
|
restore pages
(1.1)
(DATA_A4_A)
|
|
restore pages
(1.2)
(DATA_A8_A)
|
|
save log cold
(current log)
|
restore log
(log segment 7)
(LOG_A9_1)
|
|
restore log
(log segment 8)
(LOG_A10_1)
|
|
restore log
(current log)
|
restart
|
|
|
|________________________________________________________________|
There is a choice of previous backups of the log segments which can be used for the recovery of the
serverdb.
Second restore variant:
__________________________________________________________________
|
|
|
restore data
(1)
(DATA_A0_A)
|
|
restore pages
(1.1)
(DATA_A4_A)
|
|
save log cold
(current log)
|
restore log
(log segment 4)
|
...
|
restore log
(log segment 8)
|
restore log
(current log)
|
restart
|
(LOG_A5_1)
|
|
(LOG_A10_1)
|
|
|
|________________________________________________________________|
Third restore variant:
70
Adabas D: Control
Backup Concepts and Strategies
__________________________________________________________________
|
|
|
restore data
(1)
(DATA_A0_A)
|
save log cold
(current log)
|
restore log
(log segment 1)
|
...
|
restore log
(log segment 8)
|
restore log
(current log)
|
restart
|
|
(LOG_A1_1)
|
|
(LOG_A10_1)
|
|
|
|________________________________________________________________|
Recovery After Disk Failure C
When disk failure C occurs, the serverdb can be recovered in the following way:
Only the last backup version of the data devspace needs to be restored. If this version is not readable for
some reason, older data backup versions can be restored which require that the corresponding log
segments are redone.
First restore variant:
__________________________________________________________________
|
|
|
restore data
|
restart
(2)
(DATA_B0_A)
|
|
|________________________________________________________________|
Second restore variant:
71
Backup Concepts and Strategies
Adabas D: Control
__________________________________________________________________
|
|
|
restore data
(1)
(DATA_A0_A)
|
|
restore pages
(1.1)
(DATA_A4_A)
|
|
restore pages
(1.2)
(DATA_A8_A)
|
|
save log cold
(current log)
|
restore log
(log segment 4)
|
...
|
restore log
(log segment 7)
(LOG_A9_1)
|
|
restore log
(log segment 8)
(LOG_A10_1)
|
|
restore log
(log segment 9)
(LOG_A11_1)
|
|
restore log
(current log)
|
restart
|
(LOG_A5_1)
|
|
|
|
|________________________________________________________________|
The same procedure must be used if organizational reasons require an older database state to be restored.
Restore / Log UNTIL can then be used to select the point in time of the desired database state.
Recovery After Disk Failure D
Exmple 1: Of a restored log segment that does not match the restored data save.
The most recent complete backup is to be used for the recovery before loading the backups of the log
segments. Usually, you proceed according to the backup protocol loading the log segments in the order of
creation.
__________________________________________________________________
|
|
|
restore data
(2)
|
save log cold
(current log)
|
restore log
(log segment 10)
|
|
(DATA_B0_A)
|
|
(LOG_B1_1)
|
--> "-8003 Log and Data must be compatible"|
restore log
(log segment 11)
(LOG_B2_1)
|
|________________________________________________________________|
72
Adabas D: Control
Backup Concepts and Strategies
For this restore variant, the version number 201 in the LOG_B1_1 label shows that log segment 11 was
completed before the complete DATA_B0_A save. Therefore, the error -8003 is returned when this log
segment is restored after the complete DATA_B0_A save. This error can be ignored and the next save of a
log segment (see the backup protocol file) LOG_B2_1 can be loaded.
Example 2: Of a restored log segment that does not match the restored data save.
First restore variant for disk failure B in this section:
__________________________________________________________________
|
|
|
restore data
(1)
(DATA_A0_A)
|
|
restore pages
(1.1)
(DATA_A4_A)
|
|
restore pages
(1.2)
(DATA_A8_A)
|
|
save log cold
(current log)
|
restore log
(log segment 1)
|
|
(LOG_A1_1)
|
--> "-8003 Log and Data must be compatible"|
|
restore log
(log segment 7)
(LOG_A9_1)
|
|
restore log
(log segment 8)
(LOG_A10_1)
|
|
restore log
(current log)
|
restart
|
|
|________________________________________________________________|
In this example, log segment 1, LOG_A1_1, is loaded erroneously instead of log segment 7. The version
numbers 178 and 131 within the labels show that DATA_A8_A cannot be followed by LOG_A1_1. The
error message "-8003 Log and Data must be compatible" is output. In this case, you only need to continue
with the correct log segment 7. The next log segment to be restored can be looked up in the backup
protocol file.
Batch Mode: xbackup / xrestore
In addition to the backup options described above (ad hoc, schedule, timetable), interfaces to batch
operations of Control are provided.
The xbackup and xrestore functions are mainly provided to combine the Control backup functions with
third-party backup tools. Two variants are possible:
1. xbackup and xrestore are called under control of the backup tool.
2. xbackup or xrestore call the external backup tool.
73
Backup Concepts and Strategies
Adabas D: Control
The xbackup and xrestore functions can also be used as genuine batch interfaces providing further options
in addition to the backup and recovery functions.
Functionality and Parameters
Call Syntax:
{xbackup | xrestore}
[-r <dbroot>] [-d <dbname>] [-a <savetype>] [-m<media name>]
[-f <device>] [-h] [-q] [-v] [-V]
xbackup and xrestore take the following parameters:
-a <Action>
The action to perform (see Section Actions)
Default: SAVEDATA.
-d <Database>
The name of the database to work on.
Default: Environment variable $SERVERDB
(former $DBNAME).
74
Adabas D: Control
-f
Backup Concepts and Strategies
Optional: The file (pipe, tape drive) name of the medium. If this
<FileName> parameter is given, the name is checked against the medium
definition. A mismatch is considered a fatal error. If the medium name
(parameter -m) starts with the string EXTERN, this parameter is
mandatory.
-h
"Help": Give usage information about the particular interface and
output the names of the special media, then terminate.
-m
<Medium
Name>
The medium name used (see Section External Backup Tools).
Default: none.
If only one medium is defined in Control, this is the default. If the
definition of another medium is added, there is no default.
-q
"Quiet": Reduce the output of routine messages.
-r
The directory in which the Adabas software is installed.
<Directory>
Default: Environment variable $DBROOT.
-R
Same as "-r".
<Directory>
-v
"Verbose": Give more progress messages.
-V
Give a version message of xbackup or xrestore. Give the names of the
special media in addition, then terminate.
If the environment variables $DBROOT and $SERVERDB are set properly, the database administrator
can do the standard "save the complete database contents to tape" by calling "xbackup -m TAPE"
(provided "TAPE" has been defined in the Media Manager with the "Medium Name" of the tape device,
e.g. /dev/rmt0).
In case of a disk failure, the administrator can switch the database to cold state, mount the tape written by
xbackup, and then perform "xrestore -m TAPE". This will restore the database contents valid when the
backup operation was started.
When restoring a save, xrestore identifies the target database from the parameter -d or the environenment
variable $DBNAME (or $SERVERDB). If the medium identifies an archiver tool, that tool will be asked
for a list of saves of the target database, and the list will be presented to choose the save wanted.
The tool xrestore has two new optional parameters which change this behavior if the medium designates
an external archiver tool holding saves from several databases:
-D dbname
identifies the database whose saves are to be asked for
(default: target database).
-N dbnode
identifies the machine on which that database was running
(default: current node).
75
Backup Concepts and Strategies
Adabas D: Control
So it is possible to take saves of database A on node B and to restore them into database X on node Y,
provided the size of the target database is sufficient. This holds for physical and logical saves.
This will load the target database with the contents of the save being restored (the previous content is
lost), but the target database will not be installed and set up - it must exist already.
A way to achieve that is by creating a new database using Control (Configuration / Install Serverdb),
setting the configuration and then choosing "Stepwise". The individual steps must then be executed up to
and including "Activate Serverdb", then terminated by Cancel. Then the database must be brought to cold
state. Now "xrestore TargetDatabase -D SourceDatabase -N SourceNode ...." can be called to transfer that
save of the source database into the target database.
Detailed information on the use of save and restore functions can be found in the Sections Backup / Save
and Backup / Restore.
The media names are arbitrary strings of up to eight characters. It is the user’s responsibility to choose
names that are appropriate for the files (devices) identified, e.g. "TAPE" for "/dev/ios0/rstape005h". If the
specified medium (-m parameter) is the name of a parallel group, all group members are used for the
operation (e.g.; group "ALLTAPES" with the members "TAPE0" and "TAPE1", device names /dev/rmt0
and /dev/rmt1). If the file name given in the medium definition does not exist when a backup is started,
Control and/or the database kernel will create that as an ordinary file. In Windows, however, a named pipe
is recognizable by its name; so, in this case, a pipe is created, not a file.
xbackup and xrestore write progress and error messages to their standard output. If all checks succeed,
they call Control (and possibly an archiving tool, see Section External Backup Tools) to perform the
backup or restore operation. When this is finished, they write a message giving the exit code(s) (see
Section xbackup / xrestore Exit Codes). xbackup and xrestore terminate with the Control exit code (or the
sum of Control and archiver exit codes) which will be zero in the success case and non-zero otherwise.
If a check performed by xbackup or xrestore fails (e.g., the database is not running, or the tool to be called
is not installed on the machine), they give a message and terminate with a non-zero exit code.
Actions
xbackup supports the following actions:
76
Adabas D: Control
Action
Needs
medium
("-m")
Backup Concepts and Strategies
Special medium Function is equivalent to menu
allowed (pipe) sequence
SAVEDATA y
y
Backup / Save / Data
SAVEPAGES y
y
Backup / Save / Updated Pages
SAVELOG
y
y
Backup / Save / Log
SAVELOGSEG
yj
y
Backup / Save / Log Segment
AUTOSAVLOG
y
n
Options / Autosave Log / Start
AUTOOFF n
./.
Options / Autosave Log / Stop
UPDSTAT
n
./.
Operating / Update Statistics / All
Tables
VERIFY
n
./.
Backup / Save / Verify Devspaces
CRONON
n
./.
Options / Schedule / On Backup /
Schedule Manager / Tools / Schedule /
On
CRONUPD n
./.
(Each modification of the schedule.)
CRONOFF n
./.
Options / Schedule / Off Backup /
Schedule Manager / Tools / Schedule /
Off
xrestore supports the following actions:
Action
Needs medium
("-m")
Special medium
allowed (pipe)
unction is equivalent to
menu sequence
SAVEDATA y
y
Backup / Restore / Data
SAVEPAGES y
y
Backup / Restore / Updated
Pages
SAVELOG
yj
y
Backup / Restore / Log
SAVELOGSEG
y
y
Backup / Restore / Log
CLEARLOG n
./.
Backup / Restore / Clear
Log
RESTOREDEV
./.
Backup / Restore / Devspace
n
If no -a parameter is given, the default value is "SAVEDATA".
Errors
xbackup and xrestore check for the following errors:
The tool was called with invalid syntax.
77
Backup Concepts and Strategies
Adabas D: Control
DBROOT is neither given as an -r or -R parameter nor set in the environment, or it does not point to
a valid Adabas installation directory.
SERVERDB (or DBNAME) are neither given as a -d parameter nor set in the environment, or they
do not identify a valid Adabas instance.
Adabas instance "SERVERDB" is not running.
Adabas instance "SERVERDB" is not running in cold mode for xrestore.
The utility task of the Adabas instance "SERVERDB" is busy and cannot accept a new session.
The tool is called by a user who does not have both read and write permission on the files needed by
Control.
The action parameter is not valid.
The action requires a medium, and none is given (and no default possible).
The medium given is not defined to Control.
The file name given as -f parameter does not agree with the Control medium definition.
The medium is a special medium (e.g., of kind EXTERN, ADSM or NSR), and the action is not
allowed for it.
The medium is of kind EXTERN, and there is no -f parameter.
The medium is of kind EXTERN, and the file name does not identify a named pipe.
The medium addresses a specific archiver tool (e.g., ADSM or NSR) (see Section External Backup
Tools), but the tool (or its client for Adabas) is not installed on the machine.
The medium addresses a specific archiver tool (see Section External Backup Tools), and (one of) the
pipe(s) is already in use or could not be created.
The medium addresses a specific archiver tool (see Section External Backup Tools) for a restore
operation, but the medium definition has a number of members different from that at backup time, or (one
of) the pipe name(s) is different from that at backup time.
The medium addresses a specific archiver tool (see Section External Backup Tools) for a restore
operation, but the tool has no save available, or not all parts of a save are available.
If an error is detected, an explanatory message is written to standard output. These errors are considered
fatal, the execution is aborted, and the exit code is non-zero.
Standard Input and Output
xbackup and xrestore both write progress messages to their standard output. The amount of information
can be influenced by the optional parameters -q and ‑v, but cannot be fully suppressed.
Any archiver tool is called with the same standard input, standard output, and standard error as xbackup or
xrestore, so any messages are included in the protocol.
78
Adabas D: Control
Backup Concepts and Strategies
If xrestore is called for a specific archiver tool (e.g. ADSM or NSR), it writes a numbered list of available
saves to standard output and then prompts the user to enter a selection which is a number read from
standard input.
xbackup / xrestore Exit Codes
xbackup and xrestore terminate with the sum of the exit codes of Control and any archiver tool processes
called.
The exit code of Control (between 20 and 30) makes reference to the following ranges of error codes in
the document "Messages and Codes":
20:
-20999..
-20000
System errors detected by Control.
21:
-9999..
+9999
System errors detected by the kernel.
22:
-16999..
-16000
System errors detected by the interpreter.
30:
Any other unclassified errors.
For the exit code of any archiver tool called, please see the documentation of that tool.
Files
xbackup and xrestore are in $DBROOT/bin (Windows : %DBROOT%\bin). This directory should
normally be included in the user’s command search path.
On Windows, %DBROOT%\misc\NetVault.txt contains a template for pre- and post-scripts.
External Backup Tools
External backup tools can be used to save to tapes and continuation tapes without operator intervention.
Control provides a connection to several external backup tools.
Currently, the following external backup tools are supported:
ADSM (IBM)
Networker (Legato)
NetVault (AT&T, NCR)
When proceeding according to the NetVault pattern (see the EXTERN medium name), any arbitrary
backup tools can be linked, because no adaptations are required for Control.
An interactive procedure is not provided. Backup/recovery with external backup tools is only possible in
batch mode (see Section Batch Mode: xbackup / xrestore).
External backup tools are addressed by special media names.
Example of the medium definition:
79
Backup Concepts and Strategies
Adabas D: Control
___________________________________________________________________________
|
|
|
Save Data
|
|
|
| _______________________________________________________________________
|
|
|
|
|
|
Medium
.....: ADSM
|
Device Type.....: P
|
Path: /tmp/adsm-pipe
|
Path2:
Next Medium
:
|
Parallel
:
|
|
|
|
|
|
Overwrite(Y/N/V): N
Media Size in Pages.: 0
|
|
|
|
|
|
_____
|
|
|
|
| Ok |
|
|____|
________
|
|
________
|
|
|
|
| Label |
| Cancel |
|
|_______|
|________|
|
|__________________________________________________________________________|
Media for the Usage of External Backup
The following strings as the start of a medium name will cause special treatment. In all these cases, data
transfer will be via named pipes, so the "Device Type" must be "P" and the "Media Size" 0:
EXTERN
The external backup tool has the control. xbackup or xrestore is called by an external archiver
tool . Data transfer is via a named pipe which must already be available. (The administrator of)
The archiver tool is responsible for the proper identification of the save and labelling of the tape
reel. This medium name must not be the name of a parallel group. The pipe name must be
passed as -f parameter, it is checked against the medium definition.
For Windows, the archiver tool NetVault (NCR) is used to store database saves. This tool calls
xbackup or xrestore using the "EXTERN" medium name (see also Section Notes on EXTERN
Medium).
ADSM, NSR
xbackup or xrestore has the control. xbackup or xrestore calls a specific archiver tool to take or
deliver the data. Data transfer is via named pipes which must not exist when xbackup or xrestore
is called.
The tool called is ADSM (IBM) or Networker (Legato), respectively. However, details may still
change for a specific tool. More tools can be added (see the current README file). See the
Sections Notes on EXTERN Medium, Notes on ADSM and Notes on NetWorker.
On backup, an identification is automatically generated (containing database name, date, time, type of
save, and machine name). This identification is used to identify the save in the archiver tool. On restore,
the user is shown (on standard output) a numbered list of all saves known to the tool whose strings match
machine and database name, and is prompted to choose the save wanted.
If the name is that of a parallel group, several instances of the archiver tool will be started in parallel. The
number of group members at restore must match that at backup.
To see the list of archiver tools valid for the current state of xbackup or xrestore, specify the parameters -h
(Help) or -V (Version) with the call of xbackup or xrestore.
80
Adabas D: Control
Backup Concepts and Strategies
Batch Call:
Syntax:
xbackup -a<action> -d<serverdb> -m<medium name>
Example:
xbackup -a SAVEDATA -d mydb -m ADSM
The complete description of the batch calls is included in Section Batch Mode: xbackup / xrestore.
Restoring with the aid of external backup tools is done like saving. One simply uses the same medium
definition as for the backup and performs the restore operation as from one medium.
Use the xrestore command as batch call.
If several databases (on one or more computers) are backed up using the same backup tool, then it is
possible to select the backup of another database for a restore ("database replication").
Notes on Timing
When Control starts a backup operation, the database kernel first generates a checkpoint and then delivers
all pages of the database in the state valid at that checkpoint. Any ongoing modifying activity does not
write to these pages, so a consistent save is produced without shutting down modifying activities.
However, this checkpoint can only be generated when all modifying transactions that are already running
have come to an end. The time needed cannot be determined beforehand as it depends on the transactions
running. When the archiver tool calls xbackup (EXTERN medium), this unknown delay may cause the
archiver tool involved to detect a timeout if such a feature is provided and the transactions running take
too long. When xbackup calls the archiver tool (e.g. "ADSM" medium type), the call is delayed for the
actions SAVEDATA and SAVEPAGES until the checkpoint has been completed. If this delay or the
timeout causes problems, the Adabas mechanisms to display lock manager information must be used to
identify the transaction(s) holding "exclusive" locks and thus causing the delay.
When Control starts a restore operation, the database kernel first accesses the devspaces involved and then
initializes a mapping of the database pages to disk blocks (the system devspace). This causes a delay
between reading the first pages (containing the configuration information) and the bulk of the data. The
time needed depends on the size of the database and on the speed of the machine. This delay may cause an
archiver tool involved to detect a timeout if such a feature is provided and it is configured too small.
Based on current customer information, a period of ten minutes should be sufficient.
Notes on "EXTERN" Medium
The EXTERN medium name serves to perform database backups under the administration of a backup
tool. xbackup writes the data to a named pipe. xrestore reads the data from a named pipe. An external
archiver tool must call xbackup or xrestore as a synchronous function to have the data transferred.
Some archiver tools, e.g. NetVault, do not provide for calling synchronous functions, they only support a
pre-function to initiate the data transfer and a post-function to terminate it. To connect xbackup or xrestore
to such a tool, there must be an interface that is started as a pre-function of the tool and then calls xbackup
or xrestore without waiting for termination. Then Control and the archiver run in parallel, and when
transfer is finished, the archiver calls a post-function.
81
Backup Concepts and Strategies
Adabas D: Control
The Adabas version for Windows contains a NetVault.txt file in the %DBROOT%\misc directory. This
file is a template for pre- and post-functions to interface between NetVault (or another similar archiver
tool) and xbackup or xrestore. It contains a description of the steps the user must perform to transfer this
template into the actual .bat files. For more information on this subject, see the "NetVault Reference
Information", Section "Using Named Pipes".
Notes on ADSM
The ADSM version 2.1 (or newer) including the "adint2" program is required. The ADSM installation
directory must be specified as $ADINT (%ADINT%) environment variable; on Unix platforms, /usr/adint
is the default directory.
The name of the ADSM configuration file must be specified as $ADA_OPT (%ADA_OPT%)
environment variable; otherwise init${SERVERDB}.opt (init%SERVERDB%.opt) in the ADSM
installation directory will be the default configuration file.
xbackup or xrestore determines the transfer size independently.
Notes on NetWorker
NetWorker media must be single media (neither a parallel group nor a member of one).
In the directory "/nsr/adabas" there must exist a file "env" (this path name can be overridden by an
environment variable "NSR_ENV") which contains lines with options (name, one or more blanks, value):
NSR_HOME
name of the directory with the NetWorker programs
save, nminfo and recover
NSR_HOST
node running the NetWorker backend
NSR_POOL
NetWorker tape pool to receive the save
NSR_EXPIRE
expiry period (do not protect blanks by quotation marks
or back slashes - they are not passed through a shell!).
The first two items are mandatory, the latter are optional and can be overridden by environment variables
with the respective name.
Due to NetWorker restrictions, restoring a save (of the same or another database) is only possible if the
absolute path name of the pipe is the same for both save and restore - NetWorker cannot change pipe
names or directories. If a takeover is to be possible, the same naming convention should be used on all
nodes - e.g. "/tmp/nsr_pipe".
Inside NetWorker, the various database saves are identified by their "SaveSet-ID". When the user has
selected the desired save to be restored, xrestore passes that value to the NetWorker program "recover".
Due to NetWorker restrictions, this is not allowed to arbitrary users, so the following administrative steps
are needed:
82
Adabas D: Control
1)
Backup Concepts and Strategies
The "recover" program (e.g. "/opt/networker/bin/recover") must de owned by the
user "root" and must have the "Set-User-ID"-Bit set, so
chown root /opt/networker/bin/recover
chmod u+s /opt/networker/bin/recover
2)
There must be a Unix group "operator", and the database user (performing
xrestore) must be a member of this group.
xrestore requires these items to be observed (with NetWorker version 5.5 - any possible changes in
NetWorker need to be considered).
Automatic Log Saves Using An Archiver Tool
xbackup can be called with the action SAVELOGSEG. This is only meaningful if a completed log
segment exists, because otherwise nothing can be saved.
xbackup therefore delays the start of an archiver program taking a logical save for about 30 seconds.
Control uses this time to check for the existence of a completed log segment. If none exists, Control
terminates with an error message, and the archiver tool is not started (or no tape is written).
"xbackup ... -a SAVELOGSEG" called periodically in a loop can be used to reach the effect of an
AUTOSAVE LOGSEGMENT to an archiver tool. (For reasons of process structure, the operation
AUTOSAVE LOGSEGMENT directly into an archiver tool is not provided for - as before). To do this,
the distance between two calls must be shorter than the time till completion of the next segment (because
each call saves only the oldest segment), but larger than the time to save a single segment (because two
parallel calls of Control are not provided for). On Unix systems, implementation could use "cron", a shell
script with a while loop and "sleep", or a shell script with a call to "at". However, such a log segment save
must not collide with another save, e.g. SAVEDATA.
The delay is a fixed time; should the machine be loaded so heavily that the check is not finished in time,
an "empty" save will still be produced.
83
Operating Menu Function
Adabas D: Control
Operating Menu Function
_______________
|
|
| Operating.. |
|
|
________|_____________
|
|
|____| Colors
|
| Refresh..
|
| Restart..
|
| Shutdown..
|
| Update Statistics..
|
| Exit
|
|______________________|
The Operating menu offers the following functions: refreshing the contents of the screen, starting and
shutting down the database server, and performing update statistics. Control can be left using the Exit
menu item.
This chapter covers the following topics:
Operating / Colors
Refresh
Operating / Restart
Operating / Shutdown
Operating / Update Statistics
Operating Exit
Operating / Colors
This menu function can be used to modify screen attributes and color settings. It displays several
presettings for selection: (Example: "DEFAULT", "AIX", "BLACK", "CYAN", "HP9_SUN", and
"WHITE"). On some terminals, the releasing letters of the individual menu items cannot be recognized
with the setting "DEFAULT". In this case, the setting "AIX" with inverse representation of the releasing
letters should be selected.
In the main screen and the installation screens, this function can also be called by using the function key
F2.
More color settings can be defined in warm serverdb mode using the Configuration / Alter Parameters /
Set Defaults function.
84
Adabas D: Control
Operating Menu Function
Refresh
_______________
|
|
| Operating.. |
|
|
________|____
|
|
|____| Refresh..
|
|
________|_____
|
|
|
|___| Now
|
| 10 sec
|
| 30 sec
|
|
2 min
|
| 10 min
|
|_____________|
This menu function updates the values of the main screen.
An automatic refresh can be started at intervals of 10 sec, 30 sec, 2 min, or 10 min. The function can be
cancelled with Ctrl-C.
Operating / Restart
_______________
|
|
| Operating.. |
|
|
________|____
|
|
|____| Restart..
|
|
|
________|_____
|
|
|___| Warm
|
| Cold
|
|_____________|
The Restart menu function starts the database server from OFFLINE or COLD operating mode into
WARM mode. If the WARM operating mode is not reached after activating the Restart menu function,
the possible error cause can be determined by using the Diagnose / Op Messages menu function.
If the serverdb belongs to a distributed database, the Warm Local function is provided in addition to
connect the serverdb to a distributed database.
Operating / Restart / Warm
Restart / Warm starts the serverdb; i.e., switches the serverdb into WARM mode.
In the event of a system crash, Restart / Warm ensures that all committed transactions are redone and that
all uncommitted transactions are rolled back.
The function can be executed in COLD or OFFLINE operating mode. In OFFLINE operating mode,
Control first switches the serverdb into COLD mode.
85
Operating Menu Function
Adabas D: Control
If the serverdb belongs to a distributed database, Restart / Warm is performed in two phases. In the first
phase, all committed transactions are redone and all uncommitted transactions are rolled back, and
EXCLUSIVE locks are set for all "pending" transactions. "LOCAL RESTART: Ready" displayed in
OPMSG2/3 (DIAGFILE) indicates successful termination of the first phase.
In the second RESTART phase, a connection is established to the network specified by the serverdb
entries contained in the system catalog. Depending on whether the starting serverdb or the network
represents the majority of replicated objects, the corresponding log entries are copied from or to the other
serverdbs and are redone. Moreover, pending transactions are resolved.
Although no connection to other serverdbs can be established, for example, because these have been
disconnected from the network by DISCONNECT or SHUTDOWN, the distributed RESTART terminates
successfully and the started serverdb is ready to receive.
"DISTRIBUTED RESTART: Ready" displayed in OPMSG2/3 (DIAGFILE) indicates successful
termination of the second phase.
Operating / Restart / Cold
Restart / Cold switches the serverdb from OFFLINE mode into COLD operating mode. In COLD mode,
Control only provides the operations allowed for this mode (example: restore of the serverdb). These
operations are valid for both a stand-alone serverdb and a serverdb belonging to a distributed database.
Operating / Restart / Restart Local
A normal Restart / Restart Local can influence distributed database operation if extensive modifying
operations on replicated objects must be redone in the serverdb after establishing a connection to the
network, because the objects are locked for other applications while being processed by the system.
Restart / Restart Local starts a serverdb without establishing a connection to the network. This
corresponds to the first phase of the Restart / Warm function. It is possible to include the started serverdb
in the network at a later time using the Restart / Reconnect function).
Operating / Restart / Restart Copy
The Restart / Restart Copy function is provided in COLD operating mode. Restart / Restart Copy gives
the same result as the Restart function. In contrast to the Restart function, the Restart / Restart Copy
function updates the distributed data of the database by copying instead of applying the log of the majority
serverdb. This function is useful, for example, if the log of the majority serverdb does no longer contain
the needed data. Before the global, distributed data is copied from the majority serverdb, it is deleted on
the local serverdb.
Operating / Restart / Reconnect
The Restart / Reconnect function can only be executed in a distributed database. It performs the second
phase of the Restart / Restart Local function. Before Restart / Reconnect can be executed, Restart /
Restart Local must have been performed. It can be useful for time and performance reasons to deliberately
execute the two phases of Restart / Restart Local in two steps.
86
Adabas D: Control
Operating Menu Function
Operating / Restart / Reconnect Copy
The Restart / Reconnect Copy function is used in a WARM database. This function is useful when the
Restart / Reconnect function function has failed, because the distributed data could not found out from the
log of the majority serverdb for the reconnect. For Restart / Reconnect Copy, the distributed data is
updated by copying as it is done for the Restart / Restart Copy function. Before the global, distributed data
is copied from the majority serverdb, it is deleted on the local serverdb. This function should only be used
in exceptional cases, because the copy procedure can take a very long time.
Restriction: The local serverdb must not be the majority serverdb.
Operating / Shutdown
_______________
|
|
| Operating.. |
|
|
________|_______
|
|
|____| Shutdown..
|
|
|
___________|_____
|
|___| Cold
| Offline
|
|
|
|________________|
The Shutdown menu functions switch the database server from WARM into COLD mode. This is
displayed as OFFLINE mode.
If Exit is used in COLD mode to leave Control, a window is displayed providing the STOP button. This
button can be used to completely shut down the database server, before terminating Control.
The Shutdown / Coldmenu function is only provided in WARM mode to switch the Adabas server into
COLD mode. A screen displayed which allows the user to cancel the function, perform a normal
Shutdown (all transactions can regularly be terminated), or perform a Shutdown Quickthat aborts any
existing connections and transactions.
The Shutdown / Offline menu function shuts down the Adabas server. In WARM mode, a screen is
displayed which allows the user to cancel the function, perform a normal Shutdown, or perform a
Shutdown Quick . Afterwards, the Adabas server is in OFFLINE mode.
For a serverdb belonging to a distributed database, Shutdown shuts down the local serverdb passing the
MAJORITY status to the serverdbs remaining in the network. Shutdown Quick disconnects a serverdb
from the network; in consequence, pending transactions can occur and the serverdb that shuts down does
not pass the MAJORITY status.
A normal Shutdown fails when the serverdb that shuts down was connected to the network and the
shutdown is done simultaneously with a connect or disconnect of other serverdbs.
87
Operating Menu Function
Adabas D: Control
Operating / Update Statistics
_______________________
|
|
| Update Statistics.. |
|
|
________________|_____
|
|
|____| All Tables
|
| Table
|
| Column
|
|______________________|
This function updates the statistical information of the database. This includes the number of table entries,
the size of tables and indexes, and the value distribution (distinct values) of indexes or columns; it stores
this information in the catalog.
The Adabas optimizer needs these specifications to find out the best processing strategy for complex SQL
statements. If the sizes or value assignments have considerably changed in the database, a new Update
Statistics is required. We recommend to perform an Update Statistics once a week.
If Adabas determines differences between the optimizer assumptions from the last Update Statistics and
the current state of a table, it attempts to perform an implicit Update Statistics. If there are conflicting
locks, this attempt might be aborted, so that the explicit Update Statistics is not replaced completely.
The operation can be applied to particular tables, particular columns or to all base tables of the database
server. In the Schedule Manager (see Section Backup / Schedule Manager), an Update Statistics is always
performed on the whole serverdb.
Operating Exit
This function is used to leave Control. If the database server is in COLD operating mode, the database can
be switched OFFLINE by selecting the STOP button. All active database processes are closed.
88
Adabas D: Control
Info Menu Function
Info Menu Function
_______________
|
|
| Info..
|
|
|
________|_____________
|
|
|____| Activity
|
| Configuration
|
| Distribution
|
| Users
|
| Caches
|
| I/O Accesses
|
| Locks
|
| Logs
|
| Processes
|
| Regions
|
| Memory
|
| Version
|
|______________________|
The functions of the Info menu can be used to retrieve information about caches, logical and physical I/O,
locking states of database objects, database connections, the state of the log and of the logging processes,
the states of database processes, conflicting shared memory segments, main memory usage, the command
or system profile as well as the version identification of Adabas.
In the display screen, it is possible to page down using the Next menu function and to page up using the
Previous menu function. The End menu function closes the display screen, returning to the main screen of
Control.
In some info screens, it is possible to display the sizes in the corresponding format by using the In Pages
or In KB menu function. This setting is then also valid for the main screen until it is reset by activating the
other menu function.
To interpret this information, an understanding of parts of the Adabas implementation is required. Such an
understanding may be obtained from the training program for Adabas Database Administration. A detailed
interpretation of these outputs is usually only needed for support purposes.
This chapter covers the following topics:
Info / Activity
Info / Configuration
Info / Distribution
Info / Users
Info / Caches
Info / I/O Accesses
89
Info Menu Function
Adabas D: Control
Info / Locks
Info / Logs
Info / Processes
Info / Regions
Info / Memory
Info / Version
Info / Activity
This menu function displays the most important events and activities of the Adabas server, showing
summarized information about the states of the data buffers, the number and type of the commands
processed by the Adabas server, the applied search strategies, the state of lock synchronization, and the
activities of the logging process.
Example:
___________________________________________________________________________
|
|
|
Cache activity
Size KB
Accesses
Hits
|
Hit rate %|
|
|--------------------------------------------------------------------------|
|
|
|
Data..................
800
349
349
100 |
|
|
Converter.............
987
421
418
99 |
Catalog...............
3264
130
104
|
80 |
Temporary.............
120
0
0
0 |
|
|
|
Command activity
|
|--------------------------------------------------------------------------|
|
SQL commands ........
32
Creates..........
4 |
|
Rollbacks............
4
Alters...........
0 |
|
Commits..............
3
Drops............
0 |
|
Prepares.............
11
|
Executes.............
22
Catalog scans....
7 |
|
|__________________________________________________________________________|
On the first page, the display contains the following information about the Adabas caches:
Total number of accesses, successful and unsuccessful accesses to the Adabas data cache as well as
the percentage of successful accesses(Data)
Accesses to the buffers (caches) are shown in the same way for
the Catalog
the converter
90
Adabas D: Control
Info Menu Function
the temporary data cache (Temporary)
The hit rate for the cache areas indicates whether the configured size of these areas is sufficient. The
data cache and the converter cache hit rate is especially important. It should be as close to 100% as
possible. Values under 70% are insufficient and a sign of bad performance.
In the following, information about the processed SQL statements is shown:
Number of SQL statements
(SQL Commands)
Number of ROLLBACKs
(Rollbacks)
Number of COMMITs
(Commits)
From the number of COMMITs and ROLLBACKs results the number of transactions.
Number of dynamic SQL statements
(Prepares)
Number of executions of dynamic SQL statements
(Executes)
Number of SQL statements for the creation of database objects
(Creates)
Number of SQL statements for the alteration of database objects
(Alters)
Number of SQL statements for the dropping of database objects
(Drops)
Number of sequential read commands through the catalog
(Catalog scans)
The next section shows the I/O activities:
91
Info Menu Function
Adabas D: Control
___________________________________________________________________________
|
|
|
I/O activity
|
|
|
|--------------------------------------------------------------------------|
|
|
|
Physical reads......
0
Logical reads......... 344 |
|
Physical writes.....
0
Logical writes........ 173 |
|
|
|
Locking activity
|
|--------------------------------------------------------------------------|
|
Entries available... 5100
Row locks............... 4 |
|
Max. used...
4
|
Avg. used...
0
|
|
Lock holder.........
0
Collisions.............. 0 |
|
Lock requester......
0
Escalations............. 0 |
|
|
Table locks............. 7 |
|
Logging activity
|
|--------------------------------------------------------------------------|
|
Logpages written....
0
Group commits........ .. 0 |
|
Waits for logwriter.
0
Log queue overflows..... 0 |
|
|
|
Scan and sort activity
|
|--------------------------------------------------------------------------|
|
Table scans.........
9
Cache sorts............. 9 |
|
Index scans.........
0
Row sorts............... 9 |
|__________________________________________________________________________|
92
Adabas D: Control
Info Menu Function
Number of physical reads
Physical
Number of physical writes
Physical
Number of logical reads
Logical
Number of logical writes
Logical
The following information about the locking activities is output:
Maximum number of lock entries available
Entries available
The maximum number of available lock entries can be specified using the MAXLOCKS system
parameter (see Section Installing a New Serverdb, "Configuration Parameters") of the Configuration
/ Alter Parameters / Kernel menu function.
Maximum number of entries used in the lock list
Entries, Max Used
Average number of entries used in the lock list
(Entries, Avg. Used)
Number of active lock holders
Lock holder
Number of current lock requests
Lock requester
Total number of row locks set
Row locks
Number of table locks set
Table locks
Number of lock collisions
(Collisions)
93
Info Menu Function
Adabas D: Control
Number of lock escalations
(Escalations)
The number of lock collisions and lock escalations in relation to the total number of locks shows whether
the chosen number of configured lock entries is sufficient for the database tasks.
In the next section, some essential information about the logging activities is output:
Number of log pages written(Logpages written)
The number of log pages written is an expression of the modifying activities on the database. In
normal database work, the log devspace is the most I/O intensive area.
Number of wait states for log write operationsWaits for logw
Number of group commitsGroup co
If a transaction is completed, then, before writing the actual commit, a check is made as to whether
other transactions have reached a commit as well. If so, the writing of the commits for the
transactions is done in a single I/O operation.
Number of log queue overflowsLog queue overflows
In the last section, statistics about successful scan and sort activities are output:
Number of sequential scans through the whole base table(Table Scans)
Sequential scans are the slowest search operations. Too frequent scanning can be a sign of poor
database design. The creation of additional indexes on the respective tables could be the remedy.
Number of scans for which an index was read sequentially without accessing base table rows(Index
Scans)
Number of sorts within the cache(Cache sorts)
Number of sorts within rows after an insert(Row sorts)
Info / Configuration
This menu function produces both the current values of the database management system configuration
and the current usage of storage space.
Example:
94
Adabas D: Control
Info Menu Function
95
Info Menu Function
Adabas D: Control
|
Used temporary space..............in %
1 |
___________________________________________________________________________
|
|
Free space.......................in KB
|
|
Free space........................in %
Serverdb Status
|
|
Last data page no
243124 |
|
12 |
|
49576 |
|
|__________________________________________________________________________|
|--------------------------------------------------------------------------|
|
|
|
Serverdb mode READ/WRITE is...........
ON |
|
Accounting is.........................
OFF |
|
Schedule is...........................
OFF |
|
Monitoring is.........................
ON |
|
Max. database users...................
15 |
|
Max. transaction......................
31 |
|
Max. server databases for distribution
1 |
|
Max. distribution tasks for serverdb..
10 |
|
Size of data cache...............in KB
6000 |
|
Size of procedure data cache.....in KB
80 |
|
Size of procedure code cache.....in KB
70 |
|
Size of temp cache...............in KB
120 |
|
Size of catalog cache. ..........in KB
1024 |
|
Size of converter cache..........in KB
400 |
|
Max lock entries......................
1500 |
|
Checkpoint wanted.....................
NO |
|
Vtrace
|
Termchar set..........................
|
|
NO |
IBM437_GER ASCII |
|
Serverdb Usage
|
|--------------------------------------------------------------------------|
|
Total data space.................in KB
1953736 |
|
Used space.......................in KB
1698612 |
|
Used space........................in %
87 |
|
Used temporary space.............in KB
12000 |
96
Adabas D: Control
Info Menu Function
___________________________________________________________________________
|
|
|
Serverdb Configuration
|
|
|
|--------------------------------------------------------------------------|
|
|
|
Default code..........................
ASCII |
|
Date/Time format......................
INTERNAL |
|
Session timeout.......................
900 |
|
Lock timeout..........................
360 |
|
Request timeout.......................
180 |
|
Log mode..............................
NORMAL |
|
Log segment size......................
20000 |
|
No of Archive Logs....................
1 |
|
No of Data Devspaces..................
1 |
|
Mirrored Devspaces....................
NO |
|
|
|
SYS DEVSPACE:
|
|--------------------------------------------------------------------------|
|
Devspace name ........................
/u/sys |
|
Devspace size ................... in KB
14 724 |
|
|
|
TRANSACTION LOG:
|
|--------------------------------------------------------------------------|
|
Devspace name ........................:
/u/tra |
|
Devspace size .................... in KB
120000 |
|
|
|
ARCHIVE LOG 1:
|
|--------------------------------------------------------------------------|
|
Devspace name ........................
|
Devspace size .....................in KB
|
|
/u/arc1 |
120000 |
|
DATA DEVSPACE 1:
|
|--------------------------------------------------------------------------|
|
Devspace name ........................
/u/dat1 |
|
Devspace size .....................in KB
1953736 |
|__________________________________________________________________________|
The displayed values are composed of the parameters for the data devspaces, the log devspaces, and the
cache areas. Should modifications to these values become necessary, these can be done using the
Configuration / Alter Parameters menu function.
Info / Distribution
SHOW SERVERDB displays the serverdbs connected to the local serverdb showing the "MAJORITY"
status in addition. If the local serverdb belongs to a network partition without the "MAJORITY" status,
then it is not possible to issue a statement of the "MAJORITY"status of the remaining serverdbs and
"UNDEF" is therefore displayed as the "MAJORITY" status.
Example:
97
Info Menu Function
Adabas D: Control
___________________________________________________________________________
|
|
|
Info Distribution
|
|
|
|--------------------------------------------------------------------------|
|
|
|
No
State
Majority
Serverdb
Servernode
|
|--------------------------------------------------------------------------|
|
0
UP
YES
DBDEMO
mynode
|
|
1
UP
YES
OTHERDB
wdnode
|
|
2
DOWN
NO
DBDEMO2
mynode
|
|__________________________________________________________________________|
Info / Users
This menu function shows all database users who are currently connected to a database.
Example:
___________________________________________________________________________
|
|
|
User ID
Term ID
|
MAYER
hst1tys3
|
|
SCHULZ1
hst1tys5
|
|
DEMO
hst3tys1
|
|
MAYER
hst1tys2
|
|
TEST02
hst2tys5
|
|
|
|
|__________________________________________________________________________|
98
Adabas D: Control
Info Menu Function
The following information is output:
USERID
The name of the connected user.
TERMID
A terminal identification which depends on the particular operating system.
Info / Caches
This menu function shows information about the effectiveness of the Adabas server’s data buffering
(caches). The Adabas server keeps statistics on the current number of both physical and buffered read and
write accesses.
Example:
___________________________________________________________________________
|
|
|
Cache
Accesses
Successful
Failed
Hit rate %|
|
|
|--------------------------------------------------------------------------|
|
|
|
Data..................
16299
15946
298
98 |
|
File Directory.........
1755
1522
233
84 |
|
FBM Cache..............
6
6
0
100 |
|
Converter..............
22
22
0
100 |
|
USM....................
0
0
0
0 |
|
Log....................
8
8
0
100 |
|
Catalog................
5941
4584
1357
77 |
|
Temporary..............
0
0
0
0 |
|__________________________________________________________________________|
The display contains the following information about the Adabas caches:
Total number of accesses (Accesses) as well as number of successful (Satisfied) and unsuccessful
(Failed) accesses to the Adabas data cache
Percentage of successful accesses to the database data cache(Hit rate %)
Analogous to the accesses to the Adabas data cache, the values for the following caches are displayed:
the file directory cache (File directory)
The database system uses this area for internal organization. For example, the page addresses of the
roots of the individual data trees are administered there.
the FBM cache (FBM Cache)
This area is used for the management of free disk blocks.
99
Info Menu Function
Adabas D: Control
the converter cache (Converter Cache)
the USM cache (USM Cache)
This area is used for the User Storage Management.
the log cache (Log)
During rollback, the log cache helps to accelerate the process.
the dictionary cache (Catalog)
Information from the data dictionary of the database provided in the dictionary cache is available fast
because no accesses to the disk are required. The hit rate for this area should therefore be more than 80%.
number of accesses to the temporary data cache (Temporary)
Temporary result sets are managed in the temporary cache. Such result sets are created, e.g., during
the execution of a SELECT statement with ORDER BY clause.
Info / I/O Accesses
This menu function shows statistics on the number of physical and logical accesses to the different data
devspaces of an Adabas database.
Example:
___________________________________________________________________________
|
|
|
Logical I/O
Physical I/O
Reads Writes
Reads Writes
|
|
|
|
Datapages
|
|
|
|--------------------------------------------------------------------------|
|
|
|
Catalog..............
256
0
1
0
|
|--------------------------------------------------------------------------|
|
Permanent............
1302
58
5
33
|
|
Temporary............
3907
1950
0
0
|
|--------------------------------------------------------------------------|
|
Leaf.................
4079
1941
6
32
|
|
Level 1..............
1344
67
0
1
|
|
Level 2..............
38
0
0
0
|
|
Level 3..............
4
0
0
0
|
|
* Summary *..........
5465
2008
6
33
|
|__________________________________________________________________________|
For each data devspace, the number of logical and physical read and write accesses is displayed:
Catalog
denotes the data devspace used by the data dictionary of the database system. Frequent writing
to this area is a sign of modifications made to the database design.
100
Adabas D: Control
Info Menu Function
Permanent
is the actual data devspace for permanent data.
Temporary
is a data devspace on disk used temporarily. It is required, e.g., for the generation of selected
datasets.
Leaf, Level 1, Level 2, Level 3
display information about the structure of the data trees. Adabas organizes the storage of data in
form of B* trees.
Info / Locks
This menu function informs about the current locks and lock requests of the Adabas server.
Example:
___________________________________________________________________________
|
|
|
Lock List Statistics --------------------------------------------------|
|
|
|
Avg. Entries.........
7 Max. Entries...........
196 |
|
Collisions...........
0 Escalations............
0 |
|
Row Locks............ 826 Table Locks............
261 |
|
|
|
Lock State ------------------------------------------------------------|
|
|
|
|
DBADM.SUPPLIERS 9 00FFFE000000000001
LOCK ROW excl (360s) 00.00000058.000008 DBADM
|
qlcptys4
012 |
|__________________________________________________________________________|
The upper part of the screen shows information about the average number of locks held and requested, the
maximum number of locks held and requested, the number of collisions and escalations that have
occurred, as well as the number of current row or table locks.
In the lower part of the screen, all current locks and lock requests are described in detail.
In addition to the table and row concerned, the kind of lock, the lock holder, and the lock holder’s terminal
are shown.
Share locks protect used data against modifications while being accessed. Other users can only
read-access data thus locked.
The displayed exclusive locks prevent other users from accessing the same data. Not even read-access is
possible. If exclusive locks are held for a longer time, they are disadvantageous for the user. In this
context, the parameters LOCK REQUEST TIMEOUT and LOCK INACTIVITY TIMEOUT are
interesting. These time values that can be configured (see Section Info / Configuration) serve to solve
blocking and deadlock situations.
101
Info Menu Function
Adabas D: Control
LOCK REQUEST TIMEOUT indicates the time a process may wait for the setting of a requested lock
before it will be aborted.
LOCK INACTIVITY TIMEOUT indicates the time a process may hold locks without activities, before it
will be rolled back automatically (ROLLBACK).
Info / Logs
This menu function displays the state and activity of the logging process.
The following information is output:
Maximum storage space available on the log devspace(Max. size)
Size of a segment(Segment size)
Segmentation of the log devspace is especially advantageous for the log mode Autosave. Completed
log segments are automatically saved while the database is operational. Afterwards, the saved
segment is available again for the logging mechanism.
Size of space reserved on the log devspace(Reserved size)
Mode in which the log is operated(Mode)
Size of used space(Used size)
Percentage of the devspace used(Used in %)
The utilization level of the log devspace should be monitored carefully. If the utilization level reaches
100%, the database is shut down automatically. Work can only be continued after the log devspace
has been saved and cleared. If the utilization level exceeds 60%, messages are output to the
diagnostic file of the database.
Space available(Free size)
Percentage of the devspace unused(Free size in %)
Example:
102
Adabas D: Control
Info Menu Function
___________________________________________________________________________
|
|
|
Log
|
|--------------------------------------------------------------------------|
|
Max. size in KB........ 159988 Reserved size in KB....
|
Segment size in KB.....
40000 Log mode...............
NORMAL |
|
Used size in KB........
17316 Used size in %.........
11 |
|
Free size in KB........ 142672 Free size in %.........
89 |
|
|
4 |
|
Since database restart
|
|--------------------------------------------------------------------------|
|
Physical writes........
41 Segments completed.....
|
|
0 |
|
Since last save of log
|
|--------------------------------------------------------------------------|
|
Savepoints written.....
|
KB per savepoint.......
31 Checkpoints written... .
558 KB per checkpoint......
|
|
1 |
17312 |
|
Queue
|
|--------------------------------------------------------------------------|
|
Queue size in KB.......
20 Group commits..........
0 |
|
Queue allocated in KB..
8 Waits for logwriter....
38 |
|
Queue entries..........
41 Max. waits.............
1 |
|
Queue overflows........
0 Avg. waits.............
1 |
|__________________________________________________________________________|
The next section displays the write and read activities (physical writes, physical reads), as well as the
number of completed segments (Segment completed) in the log devspace since the last restart of the
database system.
103
Info Menu Function
The next section displays statistical information about save and checkpoint activities:
Number of SAVEPOINTS written(Savepoints)
Number of CHECKPOINTS written(Checkpoints)
Average SAVEPOINT distance, measured in KB(KB per savepoint)
Average CHECKPOINT distance, measured in KB(KB per checkpoint)
The next section displays information about the log queue before the logging process:
Current size of the log queue(Queue size)
Number of group commits(Group commits)
Devspace currently allocated(Queue allocated)
Number of wait states for log write operations(Waits for logwriter)
Maximum size of log queue(Queue entries)
Maximum number of wait states per log page(Max. waits)
Number of log queue overflows (Overflows)
Average number of wait states per log page(Avg. waits)
Info / Processes
This menu function shows the states of all database processes that are currently active.
Example (of Unix):
104
Adabas D: Control
Adabas D: Control
Info Menu Function
___________________________________________________________________________
|
| ID
| pid
|
UNIX
TYPE
APPL
State
Timeout
pid
Region
Wait
cnt
idx
UKPsleep
|
sec
|
| T1
7888 Timer
-1
Vsleep
0
0
0
0
2670294 (s) |
| T2
7888 Logwr1
-1
Vsuspend
0
0
0
0
2670294 (s) |
| T3
7888 Logwr2
-1
Vsuspend
0
0
0
0
2670294 (s) |
| T4
7887 Bufwr.
-1
Vsuspend
0
0
0
0
590 (s) |
| T5
7888 Bufrd.
-1
Vsleep
0
0
0
0
2670294 (s) |
| T6
7888 Sender
-1
Vsuspend
0
0
0
0
2670294 (s) |
| T7
7888 Receiv.
-1
Vsuspend
0
0
0
0
2670294 (s) |
| T9
7888 Server
-1
Vsuspend
0
0
0
0
2670294 (s) |
| T10
7888 Server
-1
Vsuspend
0
0
0
0
2670294 (s) |
| T11
7888 Server
-1
Vsuspend
0
0
0
0
2670294 (s) |
| T12
7888 Server
-1
Vsuspend
0
0
0
0
2670294 (s) |
| T13
7888 Server
-1
Vsuspend
0
0
0
0
2670294 (s) |
| T14
7888 Server
-1
Vsuspend
0
0
0
0
2670294 (s) |
| T15
7888 User
26798
Command wait -1
0
0
0
2670294 (s) |
| T16
7888 User
26794
Command wait -1
0
0
0
2670294 (s) |
| T17
7888 User
26799
Command wait -1
0
0
0
2670294 (s) |
| T18
7888 User
26800
Command wait -1
0
0
0
2670294 (s) |
| T19
7888 User
26797
Command wait -1
0
0
0
2670294 (s) |
| T20
7888 User
26795
Command wait -1
0
0
0
2670294 (s) |
| T21
7888 User
26796
Command wait -1
0
0
0
2670294 (s) |
|
3 Tasks are in State ’Connect wait’
|
|__________________________________________________________________________|
The most important process states are the following:
105
Info Menu Function
Adabas D: Control
Command Wait
kernel waits for command
Vsuspend
wait state, e.g., for system resources
IOwait
process is waiting for I/O
Vsleep
process is not active for a short time
Vbegexcl
process is waiting for Critical Region (latch)
Running
process is running
Runnable
process is operable, but waits for CPU allocation
Vresume
prompting command
Info / Regions
This menu function shows the states of all shared memory segments to which access is synchronized via
semaphores. Especially interesting are the collision rates on certain shared memory segments. Collision
rates over 10% are critical.
Evaluation of this data requires an understanding of the internal structures of Adabas.
Example (of Unix):
106
Adabas D: Control
Info Menu Function
___________________________________________________________________________
|
|
| Index
Region
|
1
|
2
|
3
BUFWRTR
|
4
BUF2WRTR
|
5
CONFIG
|
6
|
7
|
8
|
9
|
Owner
Get-Cnt
Tas-Cnt
Coll.
Waits
BACKUP
0
0
0
0
BREAK
0
0
0
0
515823
76
3618
3
0
239
DATACACH
DIAGCACH
Excl.
Coll %
|
0
0.00 %
|
0
0.00 %
|
0
0
0.70 %
|
0
0
0
0.00 %
|
0
0
0
0
0.00 %
|
1032765
0
1
0
0
0.00 %
|
692
0
0
0
0
0.00 %
|
DRDA
0
0
0
0
0
0.00 %
|
ERRTXT
0
0
0
0
0
0.00 %
|
10
FLUSH
0
0
0
0
0
0.00 %
|
|
11
KEYMEM
|
12
LOCK
|
13
|
1
0
0
0
0
0.00 %
|
33442
0
32
0
0
0.10 %
|
LOG
3677
0
4
0
0
0.11 %
|
14
LOGWRITE
3805
0
0
0
0
0.00 %
|
|
15
NET
40
0
0
0
0
0.00 %
|
|
16
NETDOWN
3
0
0
0
0
0.00 %
|
|
17
NETSEND
0
0
0
0
0
0.00 %
|
|
18
PERMFDIR
21942
0
0
0
0
0.00 %
|
|
19
PSM
8938
0
2
0
0
0.02 %
|
|
20
SURROGAT
321
0
0
0
0
0.00 %
|
|
21
TEMPFDIR
206
0
3
0
0
1.46 %
|
|
22
TRACE
498504
0
25
0
0
0.01 %
|
|
23
TREE
188800
0
0
0
0
0.00 %
|
| Alone :
| Count : 45939
| Sleep Count : 38
|
|
Collisions : 2
|
|
|__________________________________________________________________________|
107
Info Menu Function
Adabas D: Control
Info / Memory
This menu function shows information about the database server’s address space requirements.
Example (of Unix):
___________________________________________________________________________
|
|
|
Size of code
KB 3216
|
|
Size of task stacks
KB 3874
|
|
Size of shared data
KB 19772
|
|
Unused shared dyn pool KB 27
|
|
Unused shared dyn data KB 12
|
|
Number of existing tasks 30
|
|__________________________________________________________________________|
Info / Version
This menu function displays the current version of the database kernel and of Control.
108
Adabas D: Control
Options Menu Function
Options Menu Function
_______________________
|
|
|
Options ..
|
|
|
________________|______
|
|____|
|
Reset Counter
|
|
Remote SQL Server .. |
|
Accounting ..
|
|
Access Mode ..
|
|
Kernel Trace ..
|
|
Autosave Log ..
|
|
Schedule ..
|
|_______________________|
This chapter covers the following topics:
Options / Reset Counter
Options / Remote SQL Server
Options / Accounting
Options / Access Mode
Options / Kernel Trace
Options / Autosave Log
Options / Schedule
Options / Reset Counter
This menu function resets the database activity counters to zero.
Options / Remote SQL Server
_______________________
|
|
|
Options ..
|
|
|
________________|______
|
|
|____|
Remote SQL Server .. |
|
___________________|______
|____|
|
| Start
|
| Stop
|
|________________________|
109
Options Menu Function
Adabas D: Control
This menu function starts and shuts down the Remote SQL Server that is required for a client/server
connection. If the Remote SQL Server is started, application processes running on another computer
(client) can directly connect to the Adabas server database and open database sessions there.
The Remote SQL Server / Startmenu function starts the remote SQL server. The Remote SQL Server /
Stopmenu function aborts all connections that users have established from other computers to this database
server.
Options / Accounting
_______________________
|
|
|
Options ..
|
|
|
________________|______
|
|____|
|
|
Accounting ..
|
___________________|______
|____|
|
| On
|
| Off
|
| Trigger
|
|________________________|
The Accounting / Onmenu function initializes the recording of statistical information about resources
used. This information is kept for a particular session. It is entered into the table SYSACCOUNT which
has the following structure:
110
Adabas D: Control
Options Menu Function
CREATE TABLE SYSACCOUNT
(
SERVERDBNO
FIXED
( 4) KEY,
SESSION
FIXED
(18)
KEY,
USERNAME
VARCHAR (18),
GROUPNAME
VARCHAR (18),
SENDERID
CHAR
DBANAME
VARCHAR (18),
CONNECTDATE
DATE,
CONNECTTIME
TIME,
RELEASEDATE
DATE,
RELEASETIME
TIME,
( 8),
COMMANDCOUNT FIXED
(10),
CPUTIME
FIXED
(10),
IOCOUNT
FIXED
(10),
SESSIONEND
CHAR
( 8),
DBPROGTYPE
VARCHAR ( 8),
DBPROGOWNER
VARCHAR (18),
DBPROGNAME
VARCHAR (18))
The data collected in the table SYSACCOUNT can be evaluated for a user-specific accounting. The data
is not implicitly deleted or overwritten.
For sessions that do not leave traces in the table SYSACCOUNT although they run for a very long time,
there is the Accounting / Trigger menu function. This function can be used to signal each user session to
enter a row of information into the table SYSACCOUNT. This signal is always checked before a new
SQL statement is executed. After processing the signal, it has become meaningless. This means that a new
entry can only be made using Accounting / Trigger again or at the end of the session.
Options / Access Mode
_______________________
|
|
|
Options ..
|
|
|
________________|______
|
|____|
|
|
Access Mode ..
|
___________________|______
|____|
|
|
Read/Write
|
|
Read Only
|
|
Nolog Off
|
|________________________|
111
Options Menu Function
Adabas D: Control
The Access Mode menu function enables or disables write access to the database. Usually, it is always
possible to write- and read-access the database. The Access Mode / Read Only menu function prevents the
database from being modified. Write transactions that are active while changing from READ/WRITE
mode to READ-ONLY mode can terminate their write operations in a regular way.
In exceptional cases, the Nolog Off menu function can be used to cancel write protection for tables loaded
with NOLOG. When backing up the serverdb, write protection is automatically cancelled.
Options / Kernel Trace
_______________________
|
|
|
Options ..
|
|
|
________________|______
|
|____|
|
|
Kernel Trace ..
|
___________________|______
|____|
|
|
On
|
|
Off
|
|
Flush
|
|________________________|
The Kernel Trace / Onmenu function enables an Adabas kernel trace for a particular command
(VTRACE).
The Kernel Trace / Offmenu function disables the tracing. The Kernel Trace / Flushmenu function is only
meaningful if the Adabas kernel trace has been previously enabled. Kernel Trace / Flush must be
performed to write the remaining buffered entries to the trace file. This file cannot be read directly. It can
only be interpreted by Adabas customer support.
The trace can be evaluated using Diagnose tools provided in Superuser mode of Control.
Options / Autosave Log
_______________________
|
|
|
|
Autosave Log ..
|
___________________|______
|____|
|
|
Start
|
|
Stop
|
|________________________|
The start option can be used to enable an automatic backup of log segments. The state of the automatic
backup of log segments is displayed in the main screen (Autosave: Enabled, Disabled or Active).
To be able to assign a medium to the backup, the media list as described in Section Backup / Save is
displayed for selection. Whenever a log segment has been completed, the backup is automatically
performed in background. If there is no log segment sufficiently filled to be saved, the system waits two
minutes before checking for another completed log segment.
We therefore recommend to use a separate backup device for the automatic backup of log segments.
112
Adabas D: Control
Options Menu Function
The automatic log segment backup must be terminated before a data backup is performed ad hoc or within
the Schedule Manager (see Section Backup / Schedule Manager). While the automatic log segment
backup is enabled, no other backup activity can be performed. If the automatic log segment backup is
interrupted and restarted, the tape used for the automatic log segment backup should be changed to avoid
that the already saved log segments are overwritten.
We recommend to use a log devspace that consists of at least two segments. Whenever a segment has
been completed, the backup and subsequent clearing of this segment is automatically initiated. This has
the advantage that a log overflow is almost impossible. The use of this mechanism is especially
recommended for intensive write operations and long-running modifying transactions. Thus, the
utilization level of the log devspace does not need to be monitored constantly.
It must be ensured that there is sufficient free space on the backup medium for the resulting data stream. If
the end of the tape has been reached and no media size has been specified for the medium, the backup
terminates with the error message NEXT VOLUME REQUIRED. In this case, only the tape must be
changed and Autosave Log must be restarted. With the next start of Autosave Log, the corresponding log
segment will be written completely to the new tape.
Options / Schedule
_______________________
|
|
|
Options ..
|
|
|
________________|______
|
|____|
|
|
Schedule ..
|
___________________|______
|____|
|
|
On
|
|
Off
|
|________________________|
This option can be used to control the execution of scheduled actions of the Schedule Manager. If the
Schedule option is enabled (On), all actions confirmed are executed. If the Schedule option is disabled
(Off), actions can be scheduled and confirmed in the Schedule Manager. These actions, however, will not
be started for execution.
113
Backup Menu Function
Adabas D: Control
Backup Menu Function
_______________________
|
|
|
|
Backup ..
|
___________________|______
|____|
|
|
Save ..
|
|
Restore ..
|
|
Show History
|
|
Show Protocol
|
|
Media Manager ..
|
|
Generations
|
|
Schedule Manager ..
|
|________________________|
This menu function allows you to save and restore either the complete database contents and log contents,
or only the modifications made since the last database log backup medium used for the backup can be a
tape, a file, or a pipe. The save or restore operations only apply to the addressed server database
(serverdb). Ad-hoc backups are performed interactively; i.e., Control expects that the required parameters
are entered in screens. Input can also be expected for started backups, e.g., if the capacity of the backup
medium is not sufficient for the backup. Incorrect entries or a timeout occurring due to delayed input can
have the effect that the backup is aborted.
This chapter covers the following topics:
Backup / Save
Backup / Restore
Backup / Show History
Backup / Show Protocol
Backup / Media Manager
Backup / Generations
Backup / Schedule Manager
Backup / Save
_______________________
|
|
|
|
Backup ..
|
___________________|______
|____|
|
|
|
Save ..
|
__________________|
|_____|
|
| Verify Devspace
|
| Data
|
| Updated Pages
|
| Log
|
| Log Segment
|
|__________________|
114
Adabas D: Control
Backup Menu Function
The following objects can be saved:
Data
saves the complete contents of database (Save / Data)
Updated Pages
saves all modifications made since the last backup (Save / Updated Pages)
Log
saves the complete log (Save / Log)
Log Segment
saves an individual log segment (Save / Log Segment)
Each backup is done to a backup medium that can be selected from the Media Manager. After selecting
the corresponding type of backup in the menu, the Media Manager appears to select or define the backup
medium. We recommend, however, to define the backup media in the Media Manager in advance.
After selecting, the backup expects a storage device in the specified backup medium. During the backup,
the storage device is provided with a label that indicates, e.g., the type of backup. The used label is
displayed and must be confirmed.
Backup / Save / Verify Devspaces
This menu function checks the consistency of the internal data structures in WARM or COLD operating
mode. If there are serious inconsistencies, the database must be restored in the same way as after a disk
failure.
In COLD operating mode, free storage pages wrongly recorded as used since an irregular end of database
operation are released to the free space management.
We recommend a Verify before performing a complete backup of the database.
Backup / Save / Data
The Save / Data menu function creates a backup version of the contents of the serverdb.
For backups in WARM mode, it must be taken into account that the database is saved with the state when
the backup operation was started. Modifications to the contents of the database made during the backup
operation are not saved.
Save / Data can also be executed in COLD mode. To be able to create a consistent database with the
generated backup version without having to restore more log devspaces during a subsequent Restore, the
database must be in a consistent state when saving. A database is in a consistent state, when it was
switched into COLD mode using the Operating / Shutdown / Cold Ok (not Quick) menu function.
It is necessary to perform a complete backup in adequate time intervals (e.g., at least weekly).
115
Backup Menu Function
Adabas D: Control
To ensure maximum data throughput, Save / Data can be used to simultaneously back up the serverdb to
several media. The maximum number of media to which simultaneous writing is possible can be set as
configuration parameter (see MAXBACKUPDEVS in Section Installing a New Serverdb under
"Configuration Parameters" and section Configuration / Alter Parameters / Kernel ). If a parallel backup
to several media is to be performed, a group of media must be defined as parallel media in the Media
Manager.
Control displays the following screen that must be confirmed:
___________________________________________________________________________
|
|
|
Media
Path
|
|
|
|__________________________________________________________________________|
|
|
|
Tape 1
/dev/rmt0
|
|
Tape 2
/dev/rmt1
|
|
Tape 3
/dev/rmt2
|
|
Tape 4
/dev/rmt3
|
|
|
|
_____________________________________________________________
|
|
|
|
|
|
|
|
|
|
|___________________________________________________________|
|
Number of volumes used for the last save:6
|
|
|
|
|
_____
|
|
|
|
|
_________
|
|
|
|
| Ok |
| Cancel |
|
|____|
|________|
|
|__________________________________________________________________________|
The number of tapes required determines the behavior of Control during the save or restore operation.
Control saves or restores simultaneously until the number of required media has been reached. All the
media required beyond the specified number are sequentially written. Thus it can be controlled that either
as few media are used as possible or rather a maximum save or restore speed is obtained (then a large
number must be specified). The number of required media can be changed after pressing the F12 key.
The following schemes shall illustrate the reaction of Control. In the three example cases, six tapes are
needed for the data save and four tape devices are used in parallel. Writing a tape up to its end takes an
hour.
a) Control takes the last number of media used for this save as the number of tapes (six in the example).
After about an hour, the four tape devices are ready and request the next tape, one after the other. In
this case, only two of the four free tape devices request a tape; the other two tape devices are ignored
by Control.
116
Adabas D: Control
Backup Menu Function
b) With eight tapes provided, the four tape devices that have become free give notice one after the other
expecting another tape. The rest of the save can be done faster, because four tapes, instead of two, are
simultaneously written.
c) If less tapes are specified than needed (e.g. four), the last tape device that has become free gives
notice requesting all the tapes required one after the other. This variant of save takes the most time,
but all tapes, except the last one, are written up to their ends.
117
Backup Menu Function
Adabas D: Control
Backup / Save / Updated Pages
The Save / Updated Pages menu function creates an incremental backup version of the local serverdb’s
data devspace. This backup version contains all pages updated since the last Save / Data or Save / Updated
Pages.
For backups in WARM mode, it must be taken into account that the database is saved with the state when
the backup operation was started. Modifications to the contents of database made during the backup
operation are not saved.
Save / Updated Pages can also be executed in COLD mode. To be able to create a consistent database
with the generated backup version without having to restore more log devspaces during a subsequent
Restore, the database must be in a consistent state when saving. A database is in a consistent state, when it
was switched into COLD mode using the Operating / Shutdown / Cold Ok (not Quick) menu function.
Incremental backups are only advantageous when the database modifications concentrate on partial
database devspaces. As a rule, backup times are quite short with Save / Log, but recovery may take more
time.
As for the selected parallel media, Save / Updated Pages behaves like Save / Data.
Backup / Save / Log
The Save / Log menu function creates a backup of the whole log. After successful termination of the
backup operation, the log is cleared if the server database is in WARM operating mode. In COLD mode,
the log is not cleared after the backup.
Save / Log cannot be executed in log mode DEMO.
The log should always be saved in WARM mode. The log must be backed up in adequate time intervals
(e.g., daily), unless the backup is performed on log segments.
Note: Save / Log is also provided in COLD mode, but has another meaning there. A log saved in COLD
mode cannot be used for a restore within a sequence of log backups. A log saved in COLD mode can only
be used to save the last state before starting a restore operation. A log saved in COLD mode is always the
last log to be restored after all the other log or log segment backup versions have been restored.
Backup / Save / Log Segment
The Save / Log Segment menu function creates a backup version of the oldest completed log segment.
After successful termination of the backup operation, the log segment is cleared.
Log segments can be saved in WARM and in COLD mode. The backup of log segments must be
performed in adequate time intervals (e.g., daily). It is recommended to use Options / Autosave Log to
save a log segment automatically as soon as it has been completed.
For configurations without log segments, the Save / Log Segment menu function is only provided in
COLD mode. In this case, the whole log is saved as one segment and the log is cleared after successful
termination of the backup.
118
Adabas D: Control
Backup Menu Function
If a log should become full in an operative serverdb, the serverdb shuts down automatically. In this case,
Control can only reach the WARM mode after performing Save / Log Segment in COLD mode. Control
recognizes such a situation and automatically suggests this action.
Backup / Restore
_______________________
|
|
|
|
Backup ..
|
___________________|______
|____|
|
|
|
Restore
|
__________________|
|_____|
|
| Data
|
| Updated Pages
|
| Log
|
| Devspace
|
| Clear Log
|
|__________________|
The restore functions can only be used when the database system is in COLD operating mode (exception:
Restore / Devspace).
The following backups can be restored with Restore:
Data
restores a complete backup of the database (Restore / Data)
Updated Pages
restores an incremental backup (Restore / Updated Pages)
Log
restores the log devspace (Restore / Log (UNTIL) )
Devspace
restores a devspace from the mirrored devspace (Restore / Devspace)
After selecting the corresponding menu item, the Media Manager is displayed to select the restore
medium.
For restore, a storage device is expected in the specified backup medium label available on the tape is
displayed and must be confirmed.
Backup / Restore / Data
The Restore / Data menu function restores a backup version of the serverdb.
The configuration of the serverdb is not read from the backup version, but from the system devspace.
Therefore, the name of the configuration parameter SYSTEM DEVSPACE must be identical with that of
an intact system devspace.
119
Backup Menu Function
Adabas D: Control
The procedure for Restore / Data is similar to that for Save / Data.
Backup / Restore / Updated Pages
The Restore / Updated Pages menu function restores an incremental backup version of the data devspace.
Depending on the number of incremental backup versions, Restore / Updated Pages can be repeated in
succession as often as is necessary. In doing so, be careful to restore the incremental backup versions
exactly in the Save order.
Backup / Restore / Log (UNTIL)
The Restore / Log menu function restores a backup version of the log devspace, redoing the transactions
recorded there.
This function overwrites the existing log devspace. Therefore, the current contents of the log must be
saved with Save / Log (Cold) in cold mode to an external backup device or into an external file, before the
Restore / Log menu function can be executed for the first time.
Restore / Log allows for a "Point in Time Restore". After selecting the medium, the information
identifying the medium is displayed for confirmation. In this screen, the point in time can be defined up to
which the log entries are to be restored.
____________________________________________________________________________
|
|
|
created.........: 24.01.2002
17:37:24
|
|
version/volume..: 24.01.2002
17:37:24/0
|
|
server
|
label/blocksize : LOG_B1_1/1
: db_first
|
|
|
|
|
|
|
UNTIL
20000130
00145205
|
|
|
|
_____
|
|
|
|
|
_________
|
|
|
|
| Ok |
| Cancel |
|
|____|
|________|
|
|__________________________________________________________________________|
Remark: The Restore / Log function can produce the error message "‑8003 Log and Data must be
compatible" for the first log segments restored after a Restore / Data. This error message occurs if the
content of the restored log was generated before the restored save and therefore is irrelevant.
Backup / Restore / Devspace
Depending on the state and configuration of the database, Control performs the following functions:
COLD Mode (RESTORE LOG FROM DEVSPACE)
This function is used to recover a damaged log. In the event of a media failure in log mode DUAL or
NORMAL causing an "Emergency Shutdown", the defective log can be restored using Backup / Restore /
Devspace (once the media failure has been corrected).
120
Adabas D: Control
Backup Menu Function
In the following four cases, the devices are restored in COLD mode.
a)
Log Mode Normal
b)
Log Mode Dual
After restoring the transaction log in case b, the defective archive log can be restored in WARM mode
using Backup / Restore / Devspace.
c)
Log Mode Normal
d)
Log Mode Dual
If only the transaction log was intact (cases c and d), the archive log cannot completely be restored,
because only the transactions relevant for the Restart are copied from the transaction log to the archive
log. This means, the archive log cannot be used to restore the database using a former backup version of
the data devspace. Therefore a new backup of the data devspace is required which can only be performed
after putting the data devspace into a consistent state by Restart.
In log mode DUAL (case d), the transaction log is copied to the archive log and the mirrored archive log.
Control displays all log devices for the restore operation. If the defective log device is selected, the
function is executed as described. If an intact log device is selected, there is no effect.
121
Backup Menu Function
Adabas D: Control
WARM Mode (RESTORE FROM MIRRORED DEVSPACE
This function is used to recover a damaged mirrored devspace. In the event of a media failure in mirrored
devspace operation, the database continues working without this devspace, only accessing the intact
devspace of the pair of mirrored devspaces concerned. Once this devspace has been repaired, it can be
restored from the intact one using Backup / Restore / Devspace. Afterwards, both devspaces work in
normal mirrored devspace operation.
e)
Mirrored Devspaces
This function is only active if the database is in WARM mode and mirrored devspaces are configured.
In this sense, the log mode DUAL represents mirrored devspace operation. This means, in the event of a
media failure in the log (transaction log, archive log or mirrored archive log), the database disables the
defective devspace. Once the disabled devspace has been repaired, it can be re-integrated using Backup /
Restore / Devspace.
f)
122
Log Mode Dual
g)
Log Mode Dual
Adabas D: Control
Backup Menu Function
In the event of a second media failure in another log (e.g. transaction log failure when an archive log is
already defective) results in an "Emergency Shutdown". In this case, the log damaged last must be
restored first using Backup / Restore / Devspace in COLD operating mode (cases b and d).
Backup / Restore / Clear Log
This function is used to clear the complete log in order to resume work on an old database state that was
restored using a data backup reloaded with Restore / Data.
Backup / Show History
When selecting this menu item, the results of the backup operations performed so far are shown with the
backup identification, backup type, date and time of backup start and end, the backup device, and current
mode. This information is stored in the database in tabular format.
Backup / Show Protocol
The Show Protocol menu function shows the end of the backup protocol file, where information about the
last save or restore operation is recorded. It is possible to page up to the top of the file.
Backup / Media Manager
The MEDIA MANAGER can be used to create, update, or delete descriptions of the backup media.
Backup / Generations
The number of generations to be used for the backup can be defined under the Backup / Generations menu
item.
_______________________
|
|
|
|
Backup ..
|
___________________|______
|____|
|
|
Generations
|
|________________________|
For this purpose, the currently valid number of generations and the interval of letters resulting from this
setting are displayed. The new number of generations can be specified. When leaving the input field, the
corresponding interval of letters is automatically updated.
123
Backup Menu Function
Adabas D: Control
_____________________
|
_______________________
Number of Save Generations
|
|
|
|
|
current value
:
4
( A .. D )
|
|
|
|
|
|
|
new
value
:
12
( A .. L )
|
|
|
|
|
|
_____
|
|
|
|
|
_________
|
|
|
|
| Ok |
| Cancel |
|
|____|
|________|
|
|__________________________________________________________________________|
The default setting is four generations. The new value is valid at once and will be used as the new number
of backup generations for the next backup.
Backup / Schedule Manager
Under Unix, the Schedule Manager is based on the cron mechanism. Under Windows, the Schedule
Manager is not active.
The Schedule Manager
The Backup / Save menu function provides an option to perform immediate (ad hoc) backups. In addition,
Control offers a Schedule Manager for scheduling one-time and periodic (backup) operations. There is the
option to use the backup mechanism provided by the Schedule Manager in addition to ad hoc backups. All
activities - whether ad hoc or scheduled - use the same backup procedure and write log entries to a history
file, thus providing an overview of previous and future actions at any time.
124
Adabas D: Control
Backup Menu Function
The schedule can be prepared starting from the current week and continuing for up to one year. Up to 255
past log entries can be displayed.
Timetables or Named Schedules
In order to facilitate the scheduling of regularly recurring actions, the Control Schedule Manager allows
you to define timeables to be used as templates for scheduling. A number of timetables can be defined and
applied to specific weeks in the weekly schedule.
Using the Schedule Manager
The Schedule Manager can only be used when the database is in WARM mode. In another mode, the
Backup / Schedule Manager menu item cannot be called. Backups can then only be performed ad hoc.
Activating the Schedule Manager
The actions scheduled in the Schedule Manager are performed only if the Options / Schedule option is set
to On. You can activate and deactivate the schedule using the Options / Schedule / On and Options /
Schedule / Off menu items contained in the Control Main Screen (in WARM mode only). This option can
be changed using the Tools / Schedule / On or Tools / Schedule / Off menu item in the Schedule Manager
(see Section Backup / Schedule Manager / Tools).
Both the Schedule Manager screen or the value of the option in the Main Sreen indicate whether the
schedule is active or passive. You can deliberately deactivate the schedule in order to allow for times
when the database is shut down or for scheduling purposes. In the Schedule Manager, you can select and
display any week in the past and all weeks in the future for up to one year (see Section Backup / Schedule
Manager / Week).
Calling the Schedule Manager
Select the Backup / Schedule Manager menu item to branch to the Schedule Manager. The schedule for
the current week is displayed.
Examples of Weekly Schedules and Timetables
Example of a Weekly Schedule
Example of a weekly schedule where the selected day is Thursday, 11/28/2002 in week 48:
125
Backup Menu Function
126
Adabas D: Control
Adabas D: Control
Backup Menu Function
|__________________________________________________________________________|
___________________________________________________________________________
|
|
|
|
|
|
__________
|
| |
___________
__________
|
|
|
|
|
|
__________
|
|
|
|
|
|__________________________________________________________________________|
| | Week.. | | Action.. | | Tools.. | | Help.. |
|
| |_________|
|__________|
|_________|
|________|
|
|
|
|__________________________________________________________________________|
| Schedule : ON
Phase
: Present
Date : 30.10.2002
|
| Planned
Last at
: 11.01.2003
Time : 10.00.00
|
: 25
|
Week 48 2002
|_______________________________
|
|
|
|
|
|
_________________________________|
|
|
|
|
|
Monday | Tuesday | Wednesday | Thursday | Friday | Saturday | Sunday
25.11 |
26.11 |
27.11 |
28.11 |
29.11 |
30.11 |
1.12
|
|
|_________|_________|___________|__________|________|__________|___________|
| SAVEDATA
SAVEPAGES
UPDSTAT
SAVE LOG
|
| 18.00.00
12.00.00
5.30.00
12.00.00
|
|
WAIT
INSERT
WAIT
|
SAVED
|__________________________________________________________________________|
|
SAVELOGSEG
SAVEPAGES
|
|
14.00.00.
10.00.00
|
|
WAIT
INSERT
|
|__________________________________________________________________________|
|
|
|
VERIFY
23.59.59
WAIT
|
|
|
|__________________________________________________________________________|
|
|
|
|
|
|
127
Backup Menu Function
Adabas D: Control
Fig.: Weekly Schedule
Example of a Timetable
___________________________________________________________________________
|
|
|
_______________
__________
|
___________
__________
|
|
|
| |
|
|
|
|
| | Timetable..
|
| Action.. |
| Tools.. |
|
| Help.. |
|
| |______________|
|__________|
|_________|
|________|
|
|
|
|__________________________________________________________________________|
| Timetable name : Timetab-1
Date : 30.10.2002 |
| Timetable with 6 action(s) and 2 change(s)
Time : 10.00.00
|
___________________________________________________________________________|
|
|
|
|
|
|
|
|
Monday | Tuesday | Wednesday | Thursday | Friday | Saturday | Sunday
|
|
|_________|_________|___________|__________|________|__________|___________|
| SAVEDATA
SAVEPAGES
UPDSTAT
SAVE LOG
|
| 18.00.00
12.00.00
5.30.00
12.00.0018:00-
|
|__________________________________________________________________________|
|
SAVELOGSEG
|
14.00.00
SAVEPAGES
|
10.00.00
|
|__________________________________________________________________________|
|
|
|
|
|__________________________________________________________________________|
|
|
|
|
|__________________________________________________________________________|
Fig.: Named Schedule (Timetable)
The following two illustrations show two possibilities how the backup scheme recommended in Section
Examples of a Backup Scheme could be realized by a timetable.
First Example of a Backup Scheme
see the first example in Section Examples of a Backup Scheme
128
Adabas D: Control
Backup Menu Function
___________________________________________________________________________
|
|
|
_______________
__________
| |
|
|
|
| | Timetable..
|
| Action.. |
| |______________|
|__________|
___________
__________
|
|
|
|
|
| Tools.. |
| Help.. |
|
|_________|
|________|
|
|
|
|
|__________________________________________________________________________|
| Timetable name : Timetab-1
Date : ...
|
| Timetable with 6 action(s)
Time : 10.00.00
|
___________________________________________________________________________|
|
|
Monday
|
|
| Tuesday
| Wednesday | Thursday | Friday | Saturday | Sunday |
|
|
|
|
|
|___________|__________|___________|__________|________|__________|________|
|SAVELOGSEG SAVELOGSEG SAVELOGSEG
SAVELOGSEG SAVELOGSEG
SAVEDATA
|
| 18.00.00
18.00.00
01.00.00
|
18.00.00
18.00.00
18.00.00
|__________________________________________________________________________|
|
|
|
|
|__________________________________________________________________________|
For illustration purposes, the backup of log segments was scheduled explicitly in this example and was not
implicitly initiated by AUTOON when a log segment was completed. The timetable can be started on a
specific day, e.g., on a Saturday (see "Timetable/Apply" in Section Backup / Schedule Manager /
Timetable). Thus the timetable corresponds exactly to the scheme recommended in Section Examples of a
Backup Scheme. The first backup then is a complete backup. The automatic backup of log segments
(Autosave Log) must not be enabled in this timetable.
As an alternative, the timetable can be defined with an automatic backup of the log segments, as
recommended. In this case, the time of log segment backups is not known in advance, because the
segments are saved as soon as they have been completed.
129
Backup Menu Function
Adabas D: Control
Second Example of a Backup
see the second example in Section Examples of a Backup Scheme
___________________________________________________________________________
|
|
|
_______________
__________
|
___________
__________
|
|
|
| |
|
|
|
|
| | Timetable..
|
| Action.. |
| Tools.. |
|
| Help.. |
|
| |______________|
|__________|
|_________|
|________|
|
|
|
|__________________________________________________________________________|
| Timetable name : Timetab-1
Date : ...
|
| Timetable with 1 action(s)
Time : 10.00.00
|
|__________________________________________________________________________|
|
|
Monday
|
|
| Tuesday
| Wednesday | Thursday | Friday
|
|
|
|
|
| Saturday | Sunday|
|___________|__________|___________|__________|_________|__________|_______|
|SAVEPAGES
SAVEPAGES
SAVEPAGES
SAVEPAGES
SAVEPAGES
SAVEDATA
|
| 20.00.00
20.00.00
20.00.00
20.00.00
20.00.00
01.00.00
|
|__________________________________________________________________________|
|
|
|
|
|__________________________________________________________________________|
For this timetable, the automatic backup of log segments (Autosave Log, AUTOON) must be enabled
once. This can be scheduled using the weekly schedule. The automatic backup of log segments remains
active during the complete backup and the backup of pages. The database kernel performs the two
backups simultaneously, if required.
Example of an AUTOON action scheduled once for the 10th week in 2002:
130
Adabas D: Control
Backup Menu Function
___________________________________________________________________________
|
|
|
__________
__________
| |
|
|
|
| | Week..
|
| Action.. |
| |_________|
|__________|
___________
__________
|
|
|
|
|
| Tools.. |
| Help.. |
|
|_________|
|________|
|
|
|
|
|__________________________________________________________________________|
| Schedule : ON
Phase
: Future
Date : 05.03.2002 |
| Planned
Last at
: 01.03.2002
Time : 10.00.00
: 1
|
Week 10
|_______________________________
|
|
|
|
|
|
_________________________________|
|
|
|
|
|
Monday | Tuesday | Wednesday | Thursday | Friday | Saturday | Sunday
04.03 |
05.03 |
|
06.03 |
07.03 |
08.03 |
09.03 |
10.03
|
|
|_________|_________|___________|__________|________|__________|
|
|
AUTO-ON
|
|
12.00.00
|
|
WAIT
|
|__________________________________________________________________________|
|
|
|
|
|
|
|__________________________________________________________________________|
How to Create Weekly Schedules and Timetables
131
Backup Menu Function
Adabas D: Control
Scheduling Actions
Actions can either be scheduled individually for a specific sta "Action/Confirm" in Backup / Schedule
Manager / Action. An action can only be confirmed if its start time is at least five minutes after the
confirmation time and within a year.
Saving the Schedule Status
When you exit the Schedule Manager, you are informed of any ations that have been sheduled but not
confirmed. You can exit the Schedule Manager without losing the schedule status and resume scheduling
ant any time in the future.
The Timetable Screen
Select the Week / Timetable menu item from the Schedule Manager (see "Week/ Timetable" in Section
Backup / Schedule Manager / Week) to branch to timetable editing. If no timetable or one timetable is
defined, the timetable screen is empty or displayed with a timetable. If only one timetable is defined, the
screen contains this timetable. If more than one timetable is defined, a list of the names of the timetables is
displayed from which you can make a selection.
The timetable screen has the same layout as the Schedule Manager screen. Their appearance, menu bars,
elements, and functions are shown and described in the following.
Schedule Manager Information lines are displayed below the action bar for the Schedule Manager and for
timetable editing.
Schedule Manager Information Lines:
___________________________________________________________________________
| Schedule : ON
| Planned
: 25
Phase
: Present
Last at
: 01.03.2002
|
Time : 10.00.00
Week 48 2002
|_______________________________
|
|
Date : 30.10.2002 |
|
|
|
_________________________________|
|
|
|
|
|
Monday | Tuesday | Wednesday | Thursday | Friday | Saturday | Sunday
|
25.11 |
26.11 |
|
27.11 |
28.11 |
29.11 |
30.11 |
|_________|_________|___________|__________|________|__________|
|
01.12
|
13->
|
Timetable Information Lines:
____________________________________________________________________________
| Timetable name : Timetab-1
Date : 30.10.2002 |
| Timetable with 6 action(s) and 2 change(s)
Time : 10.00.00
|
|__________________________________________________________________________|
|
|
Monday
|
|
|
|
| Tuesday
| Wednesday | Thursday | Friday
|
|
|
| Saturday | Sunday|
|___________|__________|___________|__________|_________|__________|_______|
132
Adabas D: Control
Backup Menu Function
These information lines indicate whether the Schedule option is activated or deactivated (On/Off). Actions
that are scheduled and confirmed will be performed only if the Schedule option is activated. You can
change the status of this option using the Tools / Schedule menu item in the Schedule Manager (see
Section Backup / Schedule Manager / Tools) or the Options / Schedule menu item in the Control Main
Screen.
Displaying the Current Date and Time
The current date and the current time are displayed on the right-hand side in the information lines.
Displaying the Schedule Phase (Schedule Manager only)
In the middle, "Phase" specifies whether the selkected schedule is in the future (Future), past (History) or
present (Present).
Displaying the Scheduled Actions (Schedule only)
Below the schedule status, the number of scheduled (confirmed or unconfirmed) actions is displayed. Next
to it, the most future begin date is displayed ("Last at").
Displaying the Schedule Week (Schedule only)
The schedule week selected is specified above the day and date with the format "WW.YY" (WW =
number of the calendar week; YY = last two digits of the year). The current day is marked in the action
schedule’s date display by the symbols > and <. You can change the selected week or day using the Week
/ Any F2 menu function (see "Week/Any" in Section Backup / Schedule Manager / Week) .
Displaying Unconfirmed Actions (Schedule Manager only)
Unconfirmed actions are identified in the action scheduleb y the INSERT, UPDATE, or DELETE
status.The number of unconfirmed actions scheduled before and after the selected week is displayed on
the line below the date display, to the left and right, next to the symbols << and >>.Confirmed actions are
identified in the Schedule Manager by the WAIT status.
Displaying the Name (Timetables only)
For timetables, the name of the schedule is displayed.
Displaying the Actions and Changes (Timetables only)
For timetables, the number of actions and changes since the last save of the timetable are displayed.
Help Texts and Error Messages
Help texts and error messages are displayed on the last line of the screens.
The Action Schedule
Actions that have been or will be performed on a particular day are listed below the relevant day in the
order of their start times. The action schedule displays e name, start time, and status of each action.
133
Backup Menu Function
Adabas D: Control
SAVEPAGES
Action name
12.00.00
Start Time
WAIT
Status
Action Name
The following actions are possible:
Action
Description
SAVEDATA
saves the database completely
SAVEPAGES
saves the database pages incrementally
SAVELOG
saves the log incrementally
SAVELOGSEG
saves the oldest log segment incrementally
AUTOON
activates autosave
AUTOOFF
deactivates autosave
UPDSTAT
updates statistical data
VERIFY
checks the consistency of the database
Fig.: Action List
Start Time
For future actions, this field displays the scheduled start time; for past actions, it displays the
actual start time.
Status
Modified actions can have the INSERT, UPDATE, or DELETE status. Scheduled and
confirmed actions have the WAIT status (they are performed at the scheduled time if the
schedule option is set). The status of actions that have already been performed is determind by
the result of the backup operation.
In timetables, the status of an action is not displayed.
Actions in Timetables
If a timetable is applied to a period of time, each action is performed within the period of seven
days on the defined week day at the defined point in time. The actions in the individual calendar
week schedules are marked as WAIT and their creator name is the name of the schedule (see
"Displaying Actions" below in this section).
Actions in the Schedule Manager
Actions whose scheduled start times have expired are displayed with their actual start times and
results in form of protocol entries. You can display and edit the actions belonging to another
calendar week by selecting this week (see Section Backup / Schedule Manager / Week).
134
Adabas D: Control
Backup Menu Function
Moving the Cursor in the Action Schedule
You can move the cursor in the action schedule using the TABULATOR (="Tab"), Pgup, Pgdn
and cursor keys.
Scrolling in the Action Schedule
Using Pgup and Pgdn, you can display up to ten actions per day. Each time you press one of
these keys, you page through one action line (= four screen lines). The cursor continues to be
positioned on the action for as long as it remains visible.
If more than ten actions have been scheduled or performed on a given day, a message to this
effect is displayed at the tenth position in the action table.
Since the action screen also allows you to scroll through the actions of a selected week (see the
next paragraph "Displaying Actions"), you can use it to edit the actions that are not displayed.
Displaying Actions
Select the Action / Zoom menu item (see "Action/Zoom" in Section Backup / Schedule Manager
/ Action") or press Enter to display or modify an action. The action on which the cursor is
located is then displayed in the action screen. If the cursor is not located on an action but is,
instead, located on a future day or the current day, an empty action screen is displayed. For
actions that are represented by their log entries (i.e., past actions), a message is output indicating
that they must not be modified or deleted. However, it is possible to change their date and
reschedule them.
________________________________
__________________________________
|
Action
|
|
|
|
Action Name
: SAVEPAGES
Medium
: Tape1
|
|
Begin Date
: 30.11.2002
Begtime
: 12.00.00
|
|__________________________________________________________________________|
|
Status
: WAIT
Creator
|
Create Date
: 29.11.2002
Create Time : 14.03.26
: CONTROLDBA
|
|
|
End Date
:
End Time
:
|
|
Returncode
:
Generation
:
|
|
|
|
_________
_________
_________
________
_______
|
|
|
|
|
|
|
|Insert |
|Update |
|Delete |
|Reset |
|Prev |
|
|_______|
|_______|
|_______|
|______|
|_____|
|
|
|
|
|
______
________
|
|
|
|Mext |
|Cancel |
|
|_____|
|_______|
|
|
|
|
|__________________________________________________________________________|
Press F1 to call up the help function for the "Action Name", "Medium", "Begin Date" and
"Begin Time" input fields; you can then select the correct values. When you select Insert/F4,
Update/F5, and Delete/F6 to transfer the data, all input values are checked for correctness.
Control sets the "Creator", "Create Date"/"Create Time", "End Date"/" End Time" "Generation"
and "Returncfode" output fields when the action is scheduled, confirmed or performed.
135
Backup Menu Function
Adabas D: Control
The confirmation time must be at least "Action/Confirm" in Section Backup / Schedule Manager
/ Action") in order to allow sufficient time for the action to be stored.
If an action screen is empty, the day on which the cursor is located is displayed as the default
setting and can be overwritten. The default time is the current time plus half an hour. Input must be in the
selected SET format. Press F1 to display and accept the selected SET format, the default date or
the default time. The current date is used as the default setting for past actions that are to be modified.
Note:
Be sure to schedule a sufficient period of time between successive actions in order to avoid
situations where actions must wait. Save actions do not wait, i.e., they are aborted with an error if an
action is already running.
You must enter or select a medium for all actions requiring a medium. In such cases, you can
press F1 to display a list of media. No input is necessary for actions that do not use a medium.
In the case of scheduled actions, "Create Date"/"Create Time" indicate when the status was last
modified. For ad hoc actions these fields indicate the activation tieme. Depending on the hardware load
there may be a difference between the activation time and start time.
End Date"/"End Time", "Returncode" and "Generation" are used only when actions have
already been performed. They are not displayed in timetables.
Insert /F4, Update/F5, and Delete/F6 allow you to insert, update or delete the displayed action.
Select Reset/F2 to display the action that was originally selected by using Zoom/Enter. Prev
(=Previous)/F7 and Next/F8 serve to display the previous or next action in the selected week or
in the timetable. Select Cancel/F3 to exit the screen; if you have modified any values, a warning
screen is output.
History, Present, Future (Schedule only)
If the calendar week selected is entirely in the past, the action table contains only the log entries
for the actions that were performed; if the week is entirely in the future, it contains only those
actions that are scheduled. If the week seleted contains the current date and time, the log entries
up until the curent time are displayed along with the scheduled actions as of the current time.
Backup / Schedule Manager / Week
The scheduling unit in Control is one week. For this reason, the actions are displayed by the week (see
"The Action Schedule" in Section "How to Create Weekly Schedules and Timetables). The Week menu
function allows you to change to a different calendar week.
When you select the Week menu function, the following pull-down menu is displayed:
136
Adabas D: Control
Backup Menu Function
___________________________________________________________________________
|
|
|
__________
__________
__________
|
|
|
| |
|
|
|
|
| | Week..
|
| Action.. |
| Tools.. |
| Help.. |
|
| |_________|
|__________|
|_________|
|________|
|
|
|
___________
|
|
|__________________________________________________________________________|
_____________
|
|
| Prev
F7 |
|___________|
|
|
| Next
F8 |
|___________|
|
|
| Any
F2 |
|___________|
|
|
| Timetable |
|___________|
|
|
| Quit
F3 |
|___________|
Week/Prev F7
This menu item displays the schedule for the previous calendar week.
137
Backup Menu Function
Adabas D: Control
Week/Next F8
This menu item displays the schedule for the next calendar week.
Week/Any F2
When you select the Week / Any menu item, the date screen displayed in which you can enter
any calendar week or date and thus change to a different schedule week. You can enter either
the date or the calendar week in the relevant input field (Date or Week). The other input field
and the output fields will be adapted accordingly. Select Ok/Enter to transfer them to the
Schedule Manager.
________________________________
|
____________________________________
Date
|
|
|
|
Date
: 28.11.2000
Week
|
Day
: Wednesday
Monday: 25.11.2002
: 48.00
(WW.YY)
|
|
Phase : Present
Sunday: 02.12.2002
|
|
|
|
|
______
|
|
|
| Ok |
| Cancel |
| Date |
| Prev |
|
|____|
|________|
|______|
|______|
|______|
|
|
________
|
|
________
________
________
|
|
|
|
|
|
| Next |
|
|
|
|__________________________________________________________________________|
Select Date/F2 to set the current date. Select Prev/F7 or Next/F8 to obtain the week that
precedes or follows the date displayed; the day of the week itself remains the same. All date
information is expected in the selected SET format and the calendar week is expected in the
format "WW.YY".
Week/Timetable
The Week / Timetable menu item allows you to branch from the Schedule Manager to timetable
editing. If no timetables are defined, the timetable screen is empty. If only one timetable is
defined, the screen contains this timetable. If more than one timetable is stored, a list of the
names of the timetables is displayed from which you can make a selection.
Example of a list of names:
138
Adabas D: Control
Backup Menu Function
________________________________
_______________________________
|
Timetables
|
|
|
|
|
|
TIMETAB-1
|
|
WEEKLYSAVE
|
|
ALLDAYSAVE
|
|
SPECIAL-1
|
|
SPECIAL-2
|
|
|
|
|
|
1 -
5 of
12
|
|
|
|
______
_____
|
|
|
|
|
| New |
| Ok |
| Cancel|
|
|
|_____|
|____|
|_______|
|
|
|
|
________
|
|
|__________________________________________________________________________|
Use Ok/F5 to select the name on which the cursor is located; use New/F2 to open an empty
timetable screen.
In screens in the Schedule Manager where names must be specified in input fields, you can
press F1 to display such a kind of lists as help.
Week/Quit F3
Select this menu item to exit the Schedule Manager. If you have not confirmed all actions (see
"Action/Confirm" in SectionBackup / Schedule Manager / Action), a warning is output:
139
Backup Menu Function
Adabas D: Control
________________________________
|
_______________________________
Timetables
|
|
|
|
There are unconfirmed changes !
|
|
Do You Want to Quit ?
|
|
|
|
_____
|
|
|
|
________
|
|
|
|
|
| Ok |
| Cancel|
|
|____|
|_______|
|
|__________________________________________________________________________|
Unconfirmed actions in the Schedule Manager are kept as schedule status.
Backup / Schedule Manager / Action
When you select the Action menu function, the following pull-down menu is displayed in the Schedule
Manager (in the case of timetables, the Confirm, Search, and Apply items are omitted):
140
Adabas D: Control
Backup Menu Function
___________________________________________________________________________
|
|
|
__________
__________
|
___________
__________
|
|
|
| |
|
|
|
|
| | Week..
|
| Action.. |
| Tools.. |
| Help.. |
|
| |_________|
|__________|
|_________|
|
|________|
|
|
|
|
|__________________________________________________________________________|
_____________________
|
| Zoom
|
Enter
|
|___________________|
|
| Delete
|
F6
|
|___________________|
|
| Confirm
|
F5
|
|___________________|
|
| Search
|
F9
|
|___________________|
|
|
| Apply Timetable
|
|___________________|
|
|
| Save As Timetable |
|___________________|
141
Backup Menu Function
Adabas D: Control
The Zoom and Delete menu functions apply to the action in the action schedule on which the cursor is
currently located (see "The Action Schedule " in Section How to Create Weekly Schedules and
Timetables). Confirm applies to all actions that have not yet been confirmed and Search applies to a set of
actions to be retrieved (see "Action/Confirm" and "Action/ Search" below in this section).
Action/Zoom Enter
When you select the Zoom menu item, the action screen displayed allowing you to view, enter,
and modify the action. In the case of timetables, Zoom displays only the portion of the action
screen that is relevant here. If you select Zoom when the cursor is not located on a scheduled
action in the future, an empty action screen is opened.
Zoom can be used to modify the status that is displayed for an action (see under "Status" in
Section How to Create Weekly Schedules and Timetables).
Action/Delete F6
The Delete menu function allows you to delete an action from the schedule. The displayed status
is changed to DELETE. Deleted actions are not removed from the schedule until you select
Confirm, thus allowing you to continue to use an action marked with DELETE as a template for
other actions or to modify this action and change its status to UPDATE.
Action/Confirm F5
Confirm allows you to confirm the scheduled actions. All actions with the INSERT, UPDATE,
and DELETE status are displayed in an action list.
Example of an action list:
____________________________
|
____________________________
Actions to Confirm
|
|
|
|
|
|
Action
Begin Date & Time
Status
|
|__________________________________________________________________________|
|
UPDSTAT
01.12.2002 05.30.00 INSERT
|
|
SAVEPAGES
01.12.2002 10.00.00 INSERT
|
|
|
|
|
|
1 -
10 of
15
|
|
|
|
___________
|
|
|
| Confirm |
| Cancel |
|
|_________|
|________|
|
________
|
______
|
|
|
_________
|
|
|
|
| Top |
| Bottom |
|
|_____|
|________|
|
|__________________________________________________________________________|
Select Confirm or F5 to confirm the actions in the schedule (INSERT or UPDATE) or to delete
them from the schedule (DELETE). The status of confirmed actions changes to WAIT. A
warning is displayed if the Schedule option is not enabled and the confirmed actions become not
effective.
Select Top/F7 or Bottom/F8 to position the cursor at the beginning or end of the list. Use Pgup
and Pgdn to scroll through the contents of a screen.
Action/Search F9
When you select the Search menu function, the following selection screen is displayed:
_________________________________
|
_______________________________
Search
|
|
|
|
|
|
Begin Date
: 30.11.2002
Begtime
: 12.00.00
|
|__________________________________________________________________________|
|
Status
: WAIT
Creator
: CONTROLDBA
|
|
Create Date
: 29.11.200q
Create Time : 14.03.26
|
|
End Date
: *
End Time
: *
|
|
Returncode
: *
Generation
: *
|
|
|
|
________
|
|
|
| Show |
| Confirm |
| Delete |
|
|______|
|_________|
|________|
|
|
__________
|
|
_________
|
|
________
|
|
_________
|
|
|
|
| Reset |
| Cancel |
|
|_______|
|________|
|
|
|__________________________________________________________________________|
142
||
|
Action Name
: SAVEPAGES
Medium
: Tape1
|
Adabas D: Control
Backup Menu Function
The selection screen contains the same fields as the action screen; in this case, all the fields are
input fields. An asterisk ( * ) can be used to represent any number of characters. Pressing
Reset/F2 places an * in the field on which the cursor is located; pressing this key again places *
in all fields of the screen. The help key F1 allows you to display and, if desired, select correct
values.
When you select Show/Enter, Confirm/F5 or Delete/F6, the entered values are combined by
AND to form a query on all scheduled actions. All actions that match this query are displayed in an action
list and can be edited. If no action is found, a warning screen is output.
You can specify a start time in the "Begin Date" and "Begin Time" fields. The result then
includes all actions that are to be started after this start time. (The search does not find actions that have
already been performed.)
You can specify an end time in the "End Date" and "End Time" fields. The result then includes
all actions that should have been (!) started before this end time.
If you specify a "Creator", and particularly if you specify the name of a timetable, you can then
select all actions generated by the specified creator. Press F1 to display a list of the names of all
creators and timetables. You can specify a creation time in the "Create Date" and "Create Time" fields.
The result then includes all actions that were scheduled after this creation time.
An action list is generated from the values entered in the selection screen and then displayed.
This action list allows you to apply the selected function to the selected actions using the associated button
or Enter. The selected actions are all confirmed at the same time.
Action/Apply Timetable
You can use the Action / Apply Timetable menu item to apply timetables directly from the
Schedule Manager. If at least one timetable exists, the application screen described under
Timetable / Apply (see "Timetable/Apply" in Section Backup / Schedule Manager / Timetable) is
displayed; you can then apply a timetable to the specified calendar weeks. The actions thus
entered must still be confirmed in the Schedule Manager (with Confirm) before they can be
activated.
If no timetable has been defined, a warning is output.
Action/Save As Timetable
You can use the Action / Save As Timetable menu item to generate a timetable from the actions
of the displayed week. The procedure and the corresponding screen are equivalent to the
function described under "Timetable/Save As" in Section Backup / Schedule Manager /
Timetable).
Changes of Status
Actions that have been deleted (Status: DELETE), inserted (Status: INSERT) or updated
(Status: UPDATE) retain their status even after the end of a sessions (see "Week/Quit" in
Section Backup / Schedule Manager / Week) if they have not been confirmed (see
"Ation/Confirm" above in this section). Thus, the schedule status is retained for subsequent
sessions.)
143
Backup Menu Function
Adabas D: Control
Backup / Schedule Manager / Tools
When you select the Tools menu function, the following pull-down menu is displayed:
___________________________________________________________________________
|
|
|
__________
__________
| |
|
|
|
| | Week..
|
| Action.. |
| |_________|
|__________|
___________
__________
|
|
|
|
|
| Tools.. |
| Help.. |
|
|_________|
|________|
|
|
|
|
|__________________________________________________________________________|
_________________
|
|
| SET Parameter |
|_______________|
|
|
| Media Manager |
|_______________|
|
|
| Schedule
|
|_______________|
This menu item allows you call other tools from Control.
Tools/SET Parameter
Presently, this function cannot be activated.
Tools/Media Manager
Presently, this function cannot be activated.
Tools/Schedule
The option for the usage of the schedule can be changed. A menu allows you to activate the
corresponding state (On, Off). When enabling the schedule, all confirmed actions are accepted
for the schedule (Unix cron mechanism). When disabling the schedule, all actions entered by the
Schedule Manager are removed from the schedule.
Backup / Schedule Manager / Help
This menu item displays a help screen for the Schedule Manager. For the usage of help, see section
Control Menu Structure and Help Texts.
144
Adabas D: Control
Backup Menu Function
Backup / Schedule Manager / Timetable
When you select the Timetable menu function, the following pull-down menu is displayed in the timetable
screen:
___________________________________________________________________________
|
|
|
_____________
| |
__________
|
|
__________
|
|
|
|
|
| | Timetable.. |
| Action.. |
| Tools.. |
| Help.. |
|
| |_____________|
|__________|
|_________|
|________|
|
|
|
___________
|
|
|__________________________________________________________________________|
_______________
|
|
| Show
F9 |
|______________|
|
|
| New
F2 |
|______________|
|
|
| Delete
|
|______________|
|
|
| Save
|
|______________|
|
|
| Save As
|
|______________|
|
|
| Apply
F5 |
|______________|
|
|
| Quit
|
|______________|
For the Show, New, Apply, Delete, and Quit actions, a warning is output if you modify the schedule
displayed but do not save it ( Save , Save As) since otherwise your modifications would be lost.
Timetable/Show F9
This menu item displays a list of the names of timetables for your selection.
Timetable/New F2
145
Backup Menu Function
Adabas D: Control
This menu item displays an empty scree for a new timetable.
Timetable/Apply F5
This menu item applies the displayed timetable to the Schedule Manager.
The following application screen is displayed:
_________________________________
|
_______________________________
Apply
|
|
|
|
|
|
from
|
Week : 48.00
to Week : 51.00
|
|
Date : 29.11.2002
to Date : 21.12.2000
|
|
Day
Day
: Friday
: Saturday
|
Name : TIMETAB-1
|
|
|
|
|
|
||
|
|
__________
_____
|
|
|
|
|
| Reset
|
|
|_________|
_________
|
|
|
|
|
| Ok |
| Cancel |
|
|____|
|________|
|
|
|
|__________________________________________________________________________|
The name of the displayed timetable is used in the screen as a default setting. You can also enter
the name of any other timetable or select one using F1.
You can specify the calndar weeks to which the timetable is to be applied. The first and last
days of the week specified are then displayed in the fields beneath them. You also have the
option of specifying a date. The calendar week or the specified date must be within a year. The
timetable is applied witin the specified time interval exactly on the specified day.
Select Ok/Enter to check all input fields for correct syntax and semantics and to enter the actions
of the timetable in the specified weeks. The actions thus entered must still be confirmed in the
Schedule Manager (with Confirm) before they can be activated (see "Action/Confirm" in
Section Backup / Schedule Manager / Action).
Timetable/Save
If the displayed timetable is named, it is saved under this name. If it is not named, you are asked
to enter a name (see the next paragraph "Timetable/Save As").
Timetable/Save As
This menu item allows you to store the displayed timetable under a (different) name. You must
enter the name in the name screen:
_________________________________
|
_______________________________
Save As
|
|
|
|
|
|
|
|
|
|
_____
|
_________
|
|
Name : TIMETAB-2
|
|
|
|
|
|
| Ok |
| Cancel |
|
|
|____|
|________|
|
|
||
|
|__________________________________________________________________________|
Select Ok /Enter to store the displayed timetable under the specified name. A check is run to
determine whether the specified name already exists; if it does exist, a warning is output. You
then have the option of overwriting the existing timetable or specifying a different name. Press
F1 to display a list of the names that have already been assigned; this list must not contain the
new name.
Timetable/Delete
146
|
Adabas D: Control
Backup Menu Function
This menu item allows you to delete the displayed timetable. As a precaution, a warning screen
is output. Afterwards, this timetable can no longer be selected. Actions that have already been entered in
the Schedule Manager by a previous application (Apply) (see "Timetable/Apply" above in this
section) are not modified. Especially, the entry of the creator remains in the scheduled actions even if the
creating timetable has been deleted.
Timetable/Quit F3
This menu item exits timetable editing. If you have not saved the timetable displayed
(Timetable/Save, Timetable/Save As , see above in this section), a warning is output. If you exit
a timetable that you have not saved, your modifications are lost.
147
Diagnose Menu Function
Adabas D: Control
Diagnose Menu Function
_______________________
|
|
|
Diagnose ..
|
___________________|______
|
|____|
|
|
Op Messages
|
|
Command History
|
|
Inst Protocol
|
|________________________|
This chapter covers the following topics:
Diagnose / Op Messages
Diagnose / Command History
Diagnose / Inst Protocol
Diagnose / Op Messages
This menu function shows the console log file of the Adabas server. In the display screen, it is possible to
page down using the Next menu function and to page up using the Previous menu function. The End menu
function terminates the display screen and returns to the Main Screen of Control.
The console log file helps you to interpret the events that occurred during Adabas server operation. The
entries are made in chronological order. When it reaches a certain size, the console log file is overwritten
cyclically. A line with dashes denotes the current end of the console log file.
The console log file records events such as the following:
Starting and shutting down the Adabas server,
Information about the physical storage areas (DEVSPACEs)of the Adabas server,
Information about user processes which have established database sessions with the Adabas server,
Error messages of the Adabas server system embedding which may be the result of selected invalid
system parameter sizes,
System error messages, e.g., after device failures,
Error messages and warnings of the Adabas kernel as output, e.g., after an "Emergency Shutdown"
(see Section The Main Screen on the subject Usage Levels ) or for internal inconsistencies, etc.
Diagnose / Command History
This menu function shows all actions executed so far in Control. In addition, the results and errors which
might have occurred are displayed for the activities performed. The cursor is always positioned at the end
of the command history, because the most recent information is recorded there.
148
Adabas D: Control
Diagnose Menu Function
Diagnose / Inst Protocol
This menu function displays the console log resulting from the last installation or from loading the system
tables. The cursor is always positioned at the end of the installation log, because the result of the
installation and an overview of the errors occurred are recorded there.
149
Configuration Menu Function
Adabas D: Control
Configuration Menu Function
_______________________
|
|
|
Configuration ..
|
___________________|______
|
|____|
|
|
Alter Parameters ..
|
|
Alter Config ..
|
|
Load Systables
|
|
Install Serverdb
|
|
Clear Serverdb
|
|________________________|
This chapter covers the following topics:
Configuration / Alter Parameters
Configuration / Alter Config
Configuration / Load Systables
Configuration / Install Serverdb
Configuration / Clear Serverdb
Configuration / Alter Parameters
_______________________
|
|
|
Configuration ..
|
___________________|______
|
|____|
|
|
|
Alter Parameters ..
|
___________________|_______
|____|
|
|
Set Defaults
|
|
Termchar Set
|
|
Mapchar Set
|
|
Session
|
|
Kernel
|
|
Sysuser ..
|
|__________________________|
Configuration / Alter Parameters / Set Defaults
This menu function can be used to display and modify the default SET parameters of the SYSDBA. The
default SET parameters of the SYSDBA are inherited by any newly created user. A user-specific copy of
the SET parameters is only created when the default SET parameters are modified.
Note: The settings for Print Format, System Editor, and SQL-PL Presentation are used by Control and are
also valid in COLD and OFFLINE mode. The Set Defaults can only be changed in WARM serverdb
mode.
150
Adabas D: Control
Configuration Menu Function
After clicking on the Set Defaults menu function, the following screen containing the default settings of
the SET parameters is displayed:
___________________________________________________________________________
|
|
|
Control
..
SET
|
|
|
|
__________________________
_________________________
|
|
|
|
Language
ENG
|
|
Null String
?
|
|
Boolean
TRUE/FALSE
|
|
Decimal
//./
|
|
Date
INTERNAL
|
|
Time
INTERNAL
|
|
Timestamp
INTERNAL
|
|
Separator
STANDARD
|
|
Print Format
DEFAULT
|
|
Number of Copies
1
|
|
System Editor
vi
|
|
Load Presentation
DEFAULT
|
|
Load Protocol File
DEFAULT
|
|
Query Presentation
DEFAULT
|
|
Query Protocol File
DEFAULT
|
|
Autoprot
OFF
|
|
SQL-PL Presentation
DEFAULT
|
|
|
|
|
|
________________ <serverdb> : <user> _______________________________
|
|
|
|
|
|
3=Quit 4=Default 5=Save 10=Printer 11=Presen
Overwrite for new values and press function key
|
|
|
|__________________________________________________________________________|
The displayed values of the SET parameters can be modified by overwriting them. Outside the input
fields, the display form is write-protected.
The parameters from Language to System Editor are valid for all tools while the other parameter specific
to one tool.
The individual SET parameters have the following meanings:
1. Language defines the language for the output of the database messages: ENG stands for English,
DEU for German. A language can only be set if messages are actually available for it.
2. Null String defines the character string for the representation of NULL values from the database. This
string may have a maximum length of 20 characters.
3. Boolean defines the character strings for the representation of BOOLEAN values from the database.
The character strings may have a maximum length of 10 characters. In case of <true>/<false>, <true>
defines the character string for values that are true, and <false> defines the character string for values
that are false.
151
Configuration Menu Function
Adabas D: Control
4. Decimal defines the characters to be used for decimal numbers: in case of /<t>/<d>/, <t> defines the
character for the thousands separator and <d> the character for the decimal sign; <t> may be omitted.
5. Date defines the format in which DATE column values are represented in REPORTs or in the DATE
function and are accepted in SQL statements.
Note:
The name of a standard format or a user-defined format can be specified. If a standard representation
is chosen, this is automatically applied to date and time parameters. In SQL statements, user-defined
formats are treated as INTERNAL.
Standard formats are:
ISO
which corresponds to
YYYY-MM-DD,
USA
which corresponds to
MM/DD/YYYY,
EUR
which corresponds to
DD.MM.YYYY,
JIS
which corresponds to
YYYY-MM-DD,
INTERNAL
which corresponds to
YYYYMMDD.
Here D stands for D(ay), M for M(onth), and Y for Y(ear).
If three positions are specified for the month, then the name of the month will be output in its
common abbreviation (Oct for October). User-defined formats need not contain each of the three symbols
for the date portions.
6. Time defines the format in which TIME column values are represented in REPORTs or in the TIME
function and are accepted in SQL statements.
ISO
which corresponds to
HH.MM.SS,
USA
which corresponds to
HH:MM AM (PM),
EUR
which corresponds to
HH.MM.SS,
JIS
which corresponds to
HH:MM:SS,
INTERNAL
which corresponds to
HHHHMMSS.
Thereby H stands for H(our), M for M(inute), and S for S(econd).
7. Timestamp defines the format in which TIMESTAMP column values are to be input and output.
Standard formats are:
ISO
which corresponds to YYYY-MM-DD-HH.MM.SS.NNNNNN,
USA
which corresponds to ISO,
EUR
which corresponds to ISO,
JIS
which corresponds to ISO,
INTERNAL which corresponds to YYYYMMDDHHMMSSNNNNNN.
152
Adabas D: Control
Configuration Menu Function
Here N stands for milliseconds and microseconds; the other letters have the same meanings as
explained for date and time.
8. Separator defines the character string used to separate result table columns from each other. If this
string is to contain blanks at its end, it must be enclosed in single quotation marks. The string may have a
maximum length of 20 characters. The default value "STANDARD" corresponds to the string " | " with
the special feature that the column separations appear as a continuous line on the screen if the monitor is
capable of representing semigraphics.
9. Print Format defines the format of the printout. Here the user can specify either a print format
provided with the installation or a user-defined print format. Up to eight print formats can be defined - see
the description of the Printer key below in this section.
10. Number of Copies defines how many copies are to be made on printing.
11. For System Editor,the user can define an editor of his selection. The editor can be called with the
command SYSED.
12. LOAD Presentation allows setting the presentation of the SYSDBA that is to be valid in Load. The
presentation name designates a certain setting of screen colors and attributes. This setting can be modified
enabling you to adapt the aspect of LOAD according to your liking.
13. The structure of the LOAD Protocol File name depends on the operating system. If the name is
changed, Load closes the old file and opens a protocol file with the new name for execution of the next
statement. The character combinations &U, &D, &P, &T, and &N are position indicators for user name,
serverdb name, process-id, terminal-id, and terminal number. Within the names, they can be specified at
any place. They are meant to separate the protocol files of Load applications that are performed
simultaneously.
With the installation, several presentations are provided which are immediately available to every
user. These presentations can be paged through or redefined. Up to eight presentations can be defined see the description of the Presen key below in this section.
14. QUERY Presentation allows you to set the presentation of the SYSDBA that is to be valid in
QUERY (also see item 12, LOAD Presentation).
15. The structure of the QUERY Protocol File name depends on the operating system. If the name is
changed, Query closes the old file and opens a protocol file with the new name for the execution of the
next statement.
16. The parameter AUTOPROT only refers to the Query tool. If AUTOPROT ON is specified, then all
SQL statements you send from Query to the database will be recorded in the file defined with Query
protocol file.
17. SQL-PL Presentation allows you to set the presentation of the SYSDBA that is to be valid in
SQL‑PL. This setting is also used to display the Control presentation. The presentation name
designates a certain setting of screen colors and attributes. This setting can be modified enabling you to
adapt the aspect of SQL‑PL or Control according to your liking.
The Save key accepts the newly entered values and leaves the SET mode.
153
Configuration Menu Function
Adabas D: Control
The Quit key leaves the SET mode without having the modifications come into effect.
The Default key sets all displayed parameters to predefined default values.
The Printer and Presen keys branch to further forms. They are described in the following.
The PRINTER Key
The Printer key switches from SET mode to a menu where the print formats can be defined.
___________________________________________________________________________
|
|
|
Control
..
SET
|
|
|
|
__________________________
_________________________
|
|
|
|
Print Format Name
DEFAULT
|
|
|
|
Printer
|
Page Width
80
|
|
|
Page Length
68
|
|
Left Margin
10
|
|
Right Margin
5
|
|
Top Margin
5
|
|
Bottom Margin
5
|
|
New Page
OFF
|
|
|
|
________________ <serverdb> : <user> _______________________________
|
|
|
3=Quit
|
More entries via up/down
|
|
4=Default
5=Save
6=Delete
9=Copy
|
|
|
|__________________________________________________________________________|
At first the currently set print format is displayed. If more formats are defined, a message
informs you about it. You can switch from one format to the other using the scroll keys.
The settings can be modified by overwriting the entries. The following settings can be defined in
such a format:
1. For Printformat Name, that name is displayed which was given to the defined format.
2. Printer specifies the printer name that will be passed with the operating system specific
print command when printing (under Unix: lp). The default is an empty field.
3. Page Width defines the width of a print page. The value may be 254 at the most.
4. Page Length defines the complete length of a print page in number of lines.
5. Left and Right Margin define the number of blanks to be output to the left and to the right
of the text.
6. Top and Bottom Margin define the number of blank lines to be output above and below the
text.
154
Adabas D: Control
Configuration Menu Function
7. New Page defines whether (ON) or not (OFF) a form feed is to be performed for each
separate print job.
The Quit, Default, and Save keys have the same meanings as in the superior SET form. If you
return to the first form using Save , the last displayed format becomes the current format, i.e. its
name is displayed for Print Format.
Defined formats can be deleted using the Delete key.
The Copy key generates a new entry in which the format name is not yet assigned. The other
parameters are taken over from the setting previously displayed and can be modified at will.
The PRESEN Key
The Presen(tation) key switches from SET mode to a menu where the presentations can be
defined.
___________________________________________________________________________
|
|
|
Control
..
SET
|
|
|
|
__________________________
_________________________
|
|
|
|
Presentation Name
DEFAULT
|
|
Text normal
ATTR1
(
)
|
|
Text enhanced
ATTR2
(
)
|
|
Title
ATTR3
(
)
|
|
State
ATTR4
(
)
|
|
Info Message
ATTR5
(
)
|
|
Error Message
ATTR6
(
)
|
|
Graphic
ATTR7
(
)
|
|
|
|
|
|
|
|
________________ <serverdb> : <user> _______________________________
|
|
|
|
|
|
2=Mark
3=Quit
...
More entries via up/down
10=Backgr
11=Foregr
12=Attribute
|
|
|
|__________________________________________________________________________|
At first the currently set presentation is displayed. If more presentations are defined, a message
informs you about it. You can switch from one presentation to the other using the scroll keys.
In such a presentation, the different physical properties are assigned to the sixteen logical
attribute names. Control only uses the first seven logical attribute names. Each logical attribute
name (ATTR1 to ATTR16) is depicted in the menu together with the attributes and colors
assigned to it.
It depends on the used installation and system, what kinds of representation and colorings are
available. If colors cannot be set, the keys Backgr and Foregr are not displayed.
To change such an assignment, mark one or more attributes with an x and press the Attribute,
Foregr or Backgr key. Popup menus appear where the desired settings for the coloring and kind
of representation can be chosen by placing an x in the corresponding field.
155
Configuration Menu Function
Adabas D: Control
The toggle switch Mark has the effect that all attributes are marked with an x. If all attributes are
already marked with an x, this key removes them instead.
The Quit, Default, Save , Delete, and Copy keys have the same functions as in the other SET
forms.
Configuration / Alter Parameters / Termchar Set
A Termchar Set is a character set that maps terminal-specific codes to the ISO ASCII code. Termchar sets
are needed for the German language, for example, to map the terminal character codes for umlauts to the
internal ISO ASCII code.
This menu function can be used to create, display, alter, and delete termchar sets. Adabas is always
distributed with the termchar set IBM437_GER (that contains the most frequent representation of the
umlauts). To define a new termchar set, alter the CHAR SET NAME of an existing termchar set.
Afterwards, the Create button is provided instead of the Alter button. Up to 128 characters can be defined
for each termchar set.
The activated termchar set with the modified character definitions only becomes effective with the next
restart.
Example:
___________________________________________________________________________
|
|
|
Alter Parameters Termcharset
<Serverdb> on <Servernode>
|
____________________________________________________________________
|
|
|
|
CHAR SET NAME
IBM437_GER
|
ENABLE CHAR SET
Y
|
|
CHAR SET CODE
ASCII
|
|
____________________________________________________________________
|
|
CODE
1
C4 8E
A-umlaut
CODE
2
E4 84
a-umlaut
|
|
CODE
3
D6 99
O-umlaut
CODE
4
F6 94
o-umlaut
|
|
CODE
5
C4 8E
U-umlaut
CODE
6
FC 81
u-umlaut
|
|
CODE
7
C4 8E
sharp s
CODE
8
A7 15
paragraph
|
|
CODE
9
CODE
10
|
|
CODE
11
CODE
12
|
|
CODE
13
CODE
14
|
|
CODE
15
CODE
16
|
|
|
|
________________ <serverdb> : <user> _______________________________
|
|
|
|
________
|
|
|
| Next |
| Prev |
| Alter |
| Drop |
|
|______|
|______|
|_______|
|______|
|
_______
|
|
________
________
________
__________
|
|
|
|
|
|
|
| Print |
| Cancel |
|
|_______|
|________|
|
|
|
|
|__________________________________________________________________________|
Fig.: Termchar Set Screen
CHAR SET NAME
156
Adabas D: Control
Configuration Menu Function
the name of the termchar set. It can have a length of up to 18 bytes.
CHAR SET CODE
denotes the ISO ASCII or EBCDIC code underlying the character set. Valid codes are "ASCII"
and "EBCDIC".
ENABLE CHAR SET
specifies that the termchar set is to be activated on the local serverdb with the next restart. Valid
input values are "Y" and "N".
CODE nn
specifies a terminal-specific character to be converted.
Each one-byte character to be converted must be specified in its original form and then in its
terminal-specific form.
The input field is divided into three columns.
The original form in hexadecimal format (ISO-ASCII or EBCDIC) is to be entered in column 1.
The terminal-specific variant in hexadecimal form is to be entered in column 2. In column 3, the
code variant can be provided with a comment of up to eight bytes.
If column 2 is deleted from the input field, the character definition is removed from the termchar
set.
Configuration / Alter Parameters / Mapchar Set
A Mapchar Set is a character set that maps language-specific characters to alternative notations. The SQL
MAPCHAR function uses mapchar sets, for example, to sort fields that contain umlauts.
This menu function can be used to create, display, alter, and delete mapchar sets. Adabas is always
distributed with the mapchar set called "Defaultmap". To define a new mapchar set, alter the CHAR SET
NAME of an existing mapchar set. Afterwards, the Create button is provided instead of the Alter button.
Example:
157
Configuration Menu Function
Adabas D: Control
___________________________________________________________________________
|
|
|
Alter Parameters Mapcharset
<Serverdb> on <Servernode>
|
____________________________________________________________________
|
|
|
|
CHAR SET NAME
Defaultmap
CHAR SET CODE
ASCII
|
|
|
|
|
____________________________________________________________________
|
|
CODE
1
A1
!
CODE
2
BF
?
|
|
CODE
3
C0
A
CODE
4
C1
A
|
|
CODE
5
C2
A
CODE
6
C3
A
|
|
CODE
7
C4
Ae
CODE
8
C5
Aa
|
|
CODE
9
C6
Ae
CODE
10
C7
C
|
|
CODE
11
C8
E
CODE
12
C9
E
|
|
CODE
13
CA
E
CODE
14
CB
E
|
|
CODE
15
CC
I
CODE
16
CD
I
|
|
____________________________________________________________________
|
|
|
|
________
|
|
|
| Next |
| Prev |
| Alter |
| Drop |
|
|______|
|______|
|_______|
|______|
|
_______
|
|
________
________
________
__________
|
|
|
|
|
|
|
| Print |
| Cancel |
|
|_______|
|________|
|
|
|
|
|__________________________________________________________________________|
Fig.: Mapchar Set Screen
CHAR SET NAME
158
Adabas D: Control
Configuration Menu Function
is the name of the mapchar set. It can have a length of up to 18 bytes.
CHAR SET CODE
denotes the ISO ASCII or EBCDIC code underlying the character set. Valid codes are "ASCII"
and "EBCDIC".
CODE nn
specifies a language-specific character to be converted.
Each one-byte character to be converted must be specified in its original form and in the target
form with a maximum length of two bytes.
The input field is divided into three columns.
The original form in hexadecimal format (ISO ASCII or EBCDIC) is to be entered in column 1.
In the columns 2 or 3, the target form is to be defined. In column 2, it can be specified with
printable characters; in column 3, in hexadecimal format.
If the columns 2 and 3 are deleted from the input field, the character definition is removed from
the mapchar set.
Configuration / Alter Parameters / Session
This menu function can be used to alter the default code, the date and time format, and the time values.
The modifications become effective only with the next Restart. In the input screen, the parameters are set
to the last defined values.
Example:
___________________________________________________________________________
|
|
|
|
Alter Session Parameter
<Serverdb> on <Servernode>
____________________________________________________________________
|
|
|
|
|
DEFAULT CODE
ASCII
|
|
DATE TIME FORMAT
INTERNAL
|
|
SESSION TIMEOUT
900
|
|
LOCK
TIMEOUT
360
|
|
REQUEST TIMEOUT
180
|
|
____________________________________________________________________
|
|
|
|
_____
|
________
__________
|
|
|
|
|
|
|
|
|
| Ok |
| Print |
| Cancel |
|
|
|____|
|_______|
|________|
|
|__________________________________________________________________________|
Fig.: Session Parameter Screen
159
Configuration Menu Function
Adabas D: Control
Configuration / Alter Parameters / Kernel
This menu function can be used to display and modify the configuration parameters of the Adabas server.
In the lower part of the screen, the parameters are described briefly.
Example:
___________________________________________________________________________
|
|
|
|
Alter Kernel Parameter
<Serverdb> on <Servernode>
|
____________________________________________________________________
|
|
|
|
SYSDEVSPACE
/u/dev/SYS1
|
MIRR_SYSDEVSPACE
|
|
TRANSACTION_LOG
/dev/log0DB1
|
|
ARCHIVE_LOG
/dev/log1DB1
|
|
MIRR_ARCHIVE_LOG
|
MAXDEVSPACES
8
|
|
MAXDATADEVSPACES
3
|
|
MAXSERVERDB
1
|
|
MAXBACKUPDEVS
2
|
|
MAXSERVERTASK
6
|
|
MAXUSERTASK
50
|
|
MAXDATAPAGES
150000
|
|
MAXCPU
1
|
|
|
|
____________________________________________________________________
|
|
|
|
|
|
|
|
|
|
|__________________________________________________________________|
|
Logical name of the first SYSTEMDEVSPACE
|
|
|
________
________
______
___________
________
__________
|
|
|
|
|
|
|
|
|
|
|
| Next |
| Prev |
| Ok |
| Explain |
| Print |
| Cancel |
|
|
|______|
|______|
|____|
|_________|
|_______|
|________|
|
|
|
|
|
|
|__________________________________________________________________________|
Fig.: Kernel Parameter Screen 1
160
Adabas D: Control
Configuration Menu Function
___________________________________________________________________________
|
|
|
|
Alter Kernel Parameter
<Serverdb> on <Servernode>
|
____________________________________________________________________
|
|
|
|
DATA_CACHE_PAGES
3000
|
|
PROC_DATA_PAGES
100
|
|
PROC_CODE_PAGES
50
|
|
TEMP_CACHE_PAGES
50
|
|
CATALOG_CACHE_PAGS
96
|
|
CONV_CACHE_PAGES
100
|
|
MAXLOCKS
800
|
|
RUNDIRECTORY
/sqldb/E20/db/wrk/E20
|
|
OPMSG1
/dev/syscon
|
|
OPMSG2
/dev/null
|
|
|
|
____________________________________________________________________
|
|
|
|
|
|
|
Number of 4KB blocks to be allocated for the data cache
|
|
|
|
in main memory
|
|
|
|__________________________________________________________________|
|
|
|
|
________
________
______
___________
________
__________
|
|
|
|
|
|
|
|
|
|
|
| Next |
| Prev |
| Ok |
| Explain |
| Print |
| Cancel |
|
|
|______|
|______|
|____|
|_________|
|_______|
|________|
|
|
|
|
|
|
|__________________________________________________________________________|
161
Configuration Menu Function
Adabas D: Control
Fig.: Kernel Parameter Screen 2
The user has the possibility to modify the system parameters. When the parameters are confirmed with
Enter, all parameters are checked. If the modifications of the parameters lead to deviating computations
for related values, the user can choose between the entered and the computed value. Other errors are
shown in the displayed console log.
Finally, the minimum values required for the configuration parameters of the operating system kernel are
displayed, so you can check the settings. If this should be necessary, adapt the operating system kernel to
these requirements.
If parameters have been modified, they become effective only after a shutdown and subsequent restart of
the serverdb.
Configuration / Alter Parameters / Sysuser
Example:
___________________________________________________________________________
|
|
|
|
Alter CONTROLUSER
<Serverdb> on <Servernode>
____________________________________________________________________
|
|
|
|
|
|
Username:
Password:
|
____________________________________________________________________
|
|
|
|
_____
|
__________
|
|
|
|
|
|
|
| Ok |
| Cancel |
|
|
|____|
|________|
|
|__________________________________________________________________________|
Fig.: Alter Sysuser Screen
The password of the SYSDBA, DOMAIN, and OPERATOR, as well as the name and password of the
ControlUSER can be modified. The passwords of the SYSDBA and of the DOMAIN user can only be
modified in WARM mode. The password of the ControlUSER can only be modified if the mode is not
WARM. The OPERATOR password can be changed in any mode.
After entering the user name and password of the previous user definition, the system uses the user name
to determine the sysusertype to be modified. When entering the new definition, the password must be
specified twice for security reasons.
If the SYSDBA has been modified outside Control, the system recognizes during the logon to Control that
the definition is not identical to the profile data and requests the input of correct data for the SYSDBA.
Configuration / Alter Config
162
Adabas D: Control
Configuration Menu Function
_______________________
|
|
|
Configuration ..
|
___________________|______
|
|____|
|
|
|
Alter Config ..
|
___________________|_______
|____|
|
|
Add Devspace
|
|
Log Segment
|
|
Data Restore
|
|
Change Devspace
|
|
Alter Log
|
|__________________________|
All functions, except Add Devspace, can be executed only if the serverdb is in COLD mode.
Configuration / Alter Config /Add Devspace
The Add Devspace menu function expands the Adabas server by the specified new physical storage area.
Activating the Add Devspace menu function displays a popup window on the main screen into which the
size of the new physical storage area must be entered in 4 KB storage pages, along with the operating
system name of the physical storage area, e.g., Raw Device under Unix. Before the database server can be
expanded, the access rights of the Adabas server must be checked for the particular Raw Device.
163
Configuration Menu Function
Adabas D: Control
Control suggests the number of 4 KB pages remaining for data devices (the difference between the
defined configuration parameter MAXDATAPAGES and the sum of all data device sizes) as size of the
additional device. The computed remaining size must not be exceeded. Therefore it could be necessary to
change first the parameter MAXDATAPAGES using the Configuration / Alter Parameters / Kernel menu
function. After the installation, MAXDATAPAGES is defined in such a way that another devspace having
the size of the largest configured devspace can be added.
For the parameter MAXDEVSPACES, the default setting is that either up to one of the two devspaces of a
Mirrored Devspace or two normal devspaces can be added with the Add Devspace function without
having to increase the parameter.
These restrictions do not apply, if Add Devspace is performed in COLD mode.
Example:
___________________________________________________________________________
|
|
|
|
Add Devspace
<Serverdb> on <Servernode>
____________________________________________________________________
|
|
|
|
|
Size in pages:
Size in KB..:
|
|
|
|
|
|
Name.........:
|
|
Mirror Name..:
|
|
|
|
____________________________________________________________________
|
|
|
|
_____
|
________
__________
|
|
|
|
|
|
|
|
|
| Ok |
| Print |
| Cancel |
|
|
|____|
|_______|
|________|
|
|__________________________________________________________________________|
Fig.: Add Devspace Screen
The Mirror Name is only required if the configuration is set to mirrored devspace operation (MIRRORED
= Y).
Configuration / Alter Config / Log Segment
This menu function can be used to alter the maximum segment size for log backups. If the log segment
size is to be recuded, Save Log should be performed before Alter Log Segment, because otherwise the
restart could fail for a high usage level of the log.
Example:
164
Adabas D: Control
Configuration Menu Function
___________________________________________________________________________
|
|
|
|
Alter Log Segment
<Serverdb> on <Servernode>
____________________________________________________________________
|
|
|
|
Log Segment Size in 4 KB pages :
|
|
|
|
|
____________________________________________________________________
|
|
|
|
_____
|
__________
|
|
|
|
|
|
|
| Ok |
| Cancel |
|
|
|____|
|________|
|
|__________________________________________________________________________|
Fig.:Alter Log Segment Screen
The segment size, specified in KB, must not exceed the size of the archive log. The specification "0"
means that the size of the log segment is identical to that of the archive log. The segment size is preset to
the value valid so far and can only be modified in COLD mode.
Configuration / Alter Config / Data Restore
This menu function can be used to alter configuration of the data DEVSPACEs before restoring a backup
version of the data devspace.
The procedure of Alter Config / Data Restore is analogous to that of Alter Config / Config Restore.
165
Configuration Menu Function
Adabas D: Control
First, the name of the path where the backup is located must be specified. The backup version is displayed
and must be confirmed. Then the names, sizes, and number of data DEVSPACEs can be modified.
The log is kept.
Configuration / Alter Config / Change Devspace
This menu function can be used to rename the paths of the DEVSPACEs.
___________________________________________________________________________
|
|
|
Change Devspace
<Serverdb> on <Servernode>
|
|
|
|
|
NAME
TYPE
SIZE
DEVSPACE PATH
|
____________________________________________________________________
|
|
|
|
SYSTEMDEV
F
-
/u/dev/SYS1
|
|
TRANS LOG
R
3000
/dev/log0DB1
|
|
ARCHLOG 1
R
3000
/dev/log1DB1
|
|
DATDEV 01
R
50000
/dev/dat01DB1
|
|
DATDEV 02
R
50000
/dev/dat02DB1
|
|
|
|
_____
|
________
|
|
__________
|
|
|
|
|
|
|
| Ok |
| Print |
| Cancel |
|
|
|____|
|_______|
|________|
|
|__________________________________________________________________________|
Fig.: Input Screen for Rename Devspace
Prerequisite is that a copy of the original devspace has been written to the new path.
Configuration / Alter Config / Alter Log
This menu function can be used to alter the log mode, as well as the names and sizes of the log
DEVSPACEs.
___________________________________________________________________________
|
|
|
|
Alter Log
<Serverdb> on <Servernode>
|
____________________________________________________________________
|
|
|
|
LOG MODE
NORMAL
|
|
LOG SEGMENT SIZE
1500
|
|
NO OF ARCHIVE LOGS
1
|
|
NO OF DATADEVSPACES
2
|
|
MIRRORED
N
|
|
|
|
____________________________________________________________________
|
|
|
|
|
|
|
|
|
|
|__________________________________________________________________|
|
LOG MODE can be SINGLE, NORMAL, DUAL or DEMO
|
|
|
________
________
________
__________
|
|
|
|
|
|
|
|
|
| Next |
| Prev |
| Print |
| Cancel |
|
|
|______|
|______|
|_______|
|________|
|
|
|
|
|__________________________________________________________________________|
166
Adabas D: Control
Configuration Menu Function
Fig.: Input Screen 1 for Alter Log
___________________________________________________________________________
|
|
|
Alter Log
<Serverdb> on <Servernode>
|
|
|
|
|
|
|
NAME
TYPE
SIZE
DEVSPACE PATH
|
______________________________________________________________________
|
|
|
|
SYSTEMDEV
F
-
/u/dev/SYS1
|
|
TRANS LOG
R
3000
/dev/log0DB1
|
|
ARCHLOG 1
R
3000
/dev/log1DB1
|
|
DATDEV 01
R
50000
/dev/dat01DB1
|
|
DATDEV 02
R
50000
/dev/dat02DB1
|
|
|
|
|
|
________
________
______
_________
_________
|
|
|
|
|
|
|
|
|
|
| Next |
| Prev |
| Ok |
| Print |
| Cancel |
|
|
|______|
|______|
|____|
|_______|
|________|
|
|
|
|
|
|__________________________________________________________________________|
Fig.: Input Screen 2 for Alter Log
Configuration / Load Systables
For a new version, this function can be used to update the system tables.
167
Configuration Menu Function
Adabas D: Control
___________________________________________________________________________
|
|
|
Load System Tables for Update Installation
|
|__________________________________________________________________________|
|
|
|
---> Create general systemtables...............
ACTIVE
|
|
Load messages and help infos..............
--
|
|
Load SET defaults.........................
--
|
|
Load system tables for precompilers.......
--
|
|
Load system tables for QUERY..............
--
|
|
Load system tables for SQL-PL.............
--
|
|
Load SQL-PL WORKBENCH.....................
--
|
|
Load system tables for QueryPlus..........
--
|
|
Create system views.......................
--
|
|
Create ODBC tables........................
--
|
|
Create SQL catalog views..................
--
|
|
Load system DB PROCEDURES.................
--
|
|__________________________________________________________________________|
Fig.: Status Screen for Load System Tables
Configuration / Install Serverdb
This menu function can be used to recreate the existing serverdb. When doing so, the current data will be
lost. The procedure corresponds to that of a first installation (see Section Installing a New Serverdb),
whereby the values valid so far are provided. In any case, the system tables must be loaded after Install
Serverdb either by loading a DBEXTRACT using the component LOAD or by restoring a data backup
using the Control Backup / Restore / Data menu function or by loading the tables using the Configuration
/ Load Systables menu function.
WARNING: The old database contents will be lost thereafter.
This function can also be used to install a serverdb from a data backup either with or without the
configuration of the backup version. This is described in detail in Section Installing the Serverdb from an
Existing Data Backup.
168
Adabas D: Control
Configuration Menu Function
Configuration / Clear Serverdb
This menu function removes the current serverdb. When confirming this selection, the complete data of
this database will be lost. Any information about the server database and its contents will be deleted.
Afterwards, the server database name is available again.
169
Remote Control
Adabas D: Control
Remote Control
This chapter covers the following topics:
Call Syntax
Options
Starting the Application
The Navigator Tree
Remote Control Server
Environment Variables
Configuration of Control
Tcl Commands
Call Syntax
adcontrol
[-n <dbnode>] [-d <dbname>]
[-u < control user>,<passwd>] [-r batchfile]
[command ...]
Options
-n
database node (default=local);
-d
database name (default=$SERVERDB);
-u
name and password of the control user;
-r
name of a batch file containing tcl commands;
command
tcl command.
Starting the Application
When starting up the application, a window called "Adabas D Control" is displayed. It consists of four
parts, a menu at the top, a navigation tree to the left, an information window to the right, and a status line
at the bottom. The information displayed in the information window depends on the position of the cursor
in the tree to the left.
In the initial state, the cursor of the navigation tree is positioned on the name of the local computer and the
right window is showing a picture of a traffic light, each of its bulbs corresponding to a state of the
database server.
170
Adabas D: Control
Remote Control
RED
database server is offline.
YELLOW
database server is started (COLD).
GREEN
database server is in normal mode (WARM).
The current mode of the Adabas server is tested and the traffic light shows the corresponding color. Since
the user is not connected to any serverdb yet, no traffic light shines. After moving the cursor of the
navigator tree onto the name of a serverdb and entering the correct connect data into the fields of the
connect window, one bulb of the traffic light will be switched on.
The Navigator Tree
On the left side of the window, there is the navigator tree where the user can navigate through the
serverdbs of the local computer and all remote hosts which are configured to allow for remote database
administration.
The navigator tree consists of nodes representing a hierarchy of servernodes, serverdbs, backup media or
save operations, to name just a few. If a node has subitems, there is a little square to the left of the node
displaying a minus or plus sign. A minus sign signals an open node, i.e., the children of this node are
visible, a plus sign signals a closed node, i.e., the children of the node are invisible.
The user can modify the navigator tree by means of the cursor and/or the mouse pointer. A double-click
with the left mouse button over a closed node opens it (makes the children of this node visible), a
double-click over an already opened node closes it.
One node always has the cursor, i.e., the name of the node is highlighted. You can use the up and down
keys to move the cursor to the node above or below. The left or right key moves the cursor one node up or
down the hierarchy or opens or closes a node with children. If you click on a node, the cursor jumps to
171
Remote Control
Adabas D: Control
this node.
By clicking on a leaf of the navigator tree you can switch the contents of the right window. For example,
if you click on a medium name, the Media Manager shows the attributes of the selected medium on the
right side. If you move onto a leaf with the cursor keys, the right side automatically shows the
corresponding information after half a second.
There is a context sensitive popup menu available by clicking on a node with the right button. This menu
has at least a help entry, but there is a good chance that you can call additional functions by means of this
menu.
The following sections describe all the different kinds of nodes of the navigator tree.
Servernodes
The top level nodes of the navigator tree represent servernodes which export serverdbs you can connect
to.
You can add other servernodes with the Options/Servernodes menu function. A small window pops up
and asks you for the name of the servernode. If you press Add, the given servernode will be added to the
navigator tree.
You can delete servernodes from the navigator tree by means of the File/Forget servernode menu
function. A small window pops up where you can select a servernode with an option menu. If you press
Forget, the selected servernode will be removed from the navigator tree.
Which servernodes are displayed at the start of Control, will be remembered by the Remote Control
Server, if it is running. So you will see the same list of servernodes, when you start the program next time.
Serverdbs
All exported serverdbs of the host are displayed below a servernode. To the left of the serverdb name,
there is a tiny picture of a database device near a traffic light. One bulb of the light shines according to the
state of the serverdb (see Section Starting the Application).
Sometimes no bulb of the traffic light shines. This may be the case for a local serverdb, if the state cannot
be evaluated most probably due to version differences, or for remote serverdbs, if they are already
exported, but do not yet exist. See Section Install Serverdb.
If the cursor rests on a node representing a serverdb, the right window displays a picture with a full size
traffic light.
To interact with Control, the user can click on any of the bulbs or on the area (in the bottom right-hand
corner) where the word Help or Quit is displayed.
When clicking on a light, the database server changes its current state into the state which corresponds to
the clicked light. When clicking on Help, a window pops up, in which you can read this document. This
function is also made available by pressing F1. When clicking on Quit, Control terminates after asking the
user, if the database server should be stopped, too.
If the database server reports an error while changing its state from offline into cold mode, the error
messages are displayed in the top left corner of the window. If there is additional information in the kernel
diagnose file, a blinking word Diag appears above the Help word. A mouse click on the word brings up a
172
Adabas D: Control
Remote Control
window containing the kernel diagnose file. You can read this file at any time (even if no error occurred)
by means of the navigator tree (see Section Diagnose).
As you can see in picture "The Navigator Tree", the same list of nodes appears below all opened
serverdbs: InfoSheet, KernelParameter, Configuration, Diagnose, MediaManager and SaveOperations.
These nodes are described in the following sections.
Info Sheet
A click on the InfoSheet node creates a window on the right side displaying statistics about the serverdb.
There are three horizontal bars which show the usage levels of data pages, log pages, and user sessions.
Below these bars appear Serverdb parameters during database operation which are described in Section
The Main Screen.
If the state of the serverdb is COLD or WARM, you can open the InfoSheet node; below it there are nodes
to get information about processes, regions and memory. If the serverdb is warm, additional nodes with
information about activity, configuration, distribution, users, cache I/O accesses, locks and logs are
available. These functions are described in Section Info / Activity to Info / Memory.
The displayed values are updated once in a while (every 10 or 30 seconds, 2 or 10 minutes). The user can
adjust the time span by means of the cascade menu Refresh Info Sheet of the Options menu.
Kernel Parameter
A click on the KernelParameter node creates a window on the right side displaying a table of kernel
parameters. These are the parameters, which are used during startup of the database kernel to determine
the size of its internal tables and data structures.
The table columns: the left one shows the name of the parameter (or parameter group), the right displays a
folder icon for groups and the current value for parameters. It will contain a row for every parameter
group and for every parameter belonging to no group (like RUNDIRECTORY).
If you click into the row of a parameter group, the table will display the parameters for the group currently
displayed in this row.
If you click into a row containing a parameter, the right side will become a form displaying all
information available for this parameter.
In this form you can edit the value of this parameter, if it is mutable. You can type in the new value in the
"Value:" field or use the spin buttons or the default Set button, if they are enabled.
After editing some values, you have to confirm your changes by clicking on the Save kernel parameters
button. This way all parameters are checked. If the modifications of the parameters lead to deviating
computations for related values, you can choose between the entered and the computed value. Other errors
are shown in the displayed log.
Finally, the minimum values required for the configuration parameters of the operating system kernel are
displayed, so you can check the settings.
If parameters have been modified, they become effective only after a shutdown and subsequent restart of
the serverdb.
173
Remote Control
Adabas D: Control
Some more information about the parameters can be found in Section Installing a New Serverdb.
Configuration
A click on the Configuration node creates a window on the right side displaying a table of the four
configuration groups: Session, SysUsers, Log and Devices. These groups contain the parameters, which
have influence on a running instance of a database kernel.
If you click into the row for the configuration group Session or Log, the table will display the parameters
of the group. If you click there into a row containing a parameter, the right side will become a form
displaying all information available for this parameter.
In this form you can edit the value of this parameter, if the serverdb is in COLD state.
You can type in the new value in the "Value:" field or use the spin buttons, the choice button or the default
Set button, if they are available.
After editing some values, you have to confirm your changes by clicking on the Save configuration
button. The session configuration will simply be stored into the database kernel, and will become effective
with the next restart.
The change of a log configuration will take more steps (the serverdb will be shutdown and started again).
A status screen informing about every step is displayed during execution.
SysUsers
The password of the SYSDBA, DOMAIN as well as the name and password of the CONTROLUSER can
be modified. The passwords of the SYSDBA and of the DOMAIN user can only be modified in WARM
mode. The name and password of the CONTROLUSER can only be modified if the mode is NOT
WARM.
After entering the password of the previous user definition, you have to enter Return, when the cursor is in
the password field of the sysusertype to be modified. When entering the new definition, the password
must be specified twice for security reasons.
Devices
A click on the Devices node creates a window on the right side displaying a table of information about the
devices of the serverdb. For every device the name, type, size (in 4 KB pages) and the path are displayed.
At the bottom there are some buttons by which you can alter the device configuration. If the serverdb is in
WARM state, a button with the title Add Devspace is enabled, in COLD state the buttons Change
Devspace , Alter Log and Init Config are also enabled.
Add Devspace
After calling this function, the device table gets an additional row where you can specify the
configuration of the new device. To change the value of the Type field, simply enter an r
indicating a raw device, f indicating a file or 1 indicating a symbolic link (Unix only).
Change Devspace
174
Adabas D: Control
Remote Control
After calling this function, you can edit the Devspace Path field of the device table. After filling
in the values, click on the OK button to start the change of the configuration.
Prerequisite for raw devices is that a copy of the original devspace has been written to the new
path.
Alter Log
After calling this function, you can edit the Type, Size and Devspace Path fields of all log
devices. After filling in the values, click on the OK button to start the Alter Log function.
Init Config
After calling this function, you can edit the Type, Size and Devspace Path of all devices. After
filling in the values click on the OK button to start the recreation of the existing serverdb. When
doing so, the current data will be lost. The procedure corresponds to that of a first installation,
whereby the values existing so far are provided.
Warning:
The old database contents will be lost thereafter.
LoadSystem Tables
The last subnode of Configuration is called LoadSystemTables. By double clicking this node you can start
loading the system tables.
Diagnose
Below the Diagnose node there are nodes where you can browse through the diagnose files of the
serverdb. A click on one of these nodes creates a window on the right side displaying the operator
messages of the current instance of the serverdb, the operator messages of the last instance or the protocol
of the last installation. You can browse through the text with the attached scrollbars or by means of the
cursor keys.
Media Manager
A click on the MediaManager node creates a window on the right side where media for backup and
restore can be defined. If there is already defined at least one medium, a table with all defined media is
displayed, else an empty form where you can define a medium.
A double-click on the MediaManager (or a click on the plus sign at the left) opens the media node, i.e., all
media defined at the connected serverdb are listed as new nodes below the MediaManager. Clicking on
any medium displays its attributes in the form on the right side. If there is a group of parallel media
defined, it is displayed as first medium, and you can open it to see all media belonging to this group.
In the form you can change the attributes of a medium:
Next medium
If the end of the medium is reached, the save (or restore) will automatically continue to read
from this medium.
175
Remote Control
Adabas D: Control
Device type
With this option menu you can specify the device type of the medium: tape, file, norewind (also
a tape), pipe and autoloader.
Parallel
Here you can check, if this medium belongs to the parallel group or not.
Path
This is the path name of the device. You can use the browse button to look for the path name on
the file system.
Path2 | OS Cmd
Here you can specify an additional path or (for autoloader devices on Unix systems) an
operating system command, which will be invoked, if a medium reaches its end.
Overwrite
Here you can check, whether the file of this medium already exists, whether the file of this
medium can be overwritten, or whether it should be considered an error to overwrite it.
Media Size
If there is a maximum size of data, which should be written to this medium, you can specify it in
this entry. 0 stands for no upper limit.
Note:
Note that you have to click on the Save button (or press the Return key) to store your changes
permanently. The Clear button will wipe out all the data in the media form, and the Delete
button will delete the current medium.
If the current medium already contains a database save, you can look at the label of this medium
by clicking on the Read Label button. A small window pops up displaying information such as
the creation date of the save and its label name.
Save Operations
You start a backup on the current serverdb by clicking on one of the save operations. A window pops up
where you must specify a medium. You can also drag the wanted save operations onto a medium.
The progress of the save process can be watched in the window at the right side. If an error occurs, the
error message will be displayed in red. If everything works properly, the progress bar should display
100%.
Restore Operations
You start a restore on the current serverdb by clicking on one of the restore operations. A window pops up
where you must specify a medium. You can also drag the wanted save operations onto a medium.
176
Adabas D: Control
Remote Control
The progress of the restore process can be watched in the window at the right side. If an error occurs, the
error message will be displayed in red. If everything works properly, the progress bar should display
100%.
Install New Serverdb
If you want to install a new serverdb, use the function Install new... in the ServerDB menu. You can also
click on an icon of a serverdb which does not yet exist (what is only possible for serverdbs on remote
hosts).
You have to specify the name and password of the control user of the new serverdb in the form entries of
the connect window popping up. If it is a local serverdb or it matches the name and password of the
remote serverdb, you enter a dialog sequence consisting of four windows.
Installation (1): SysUsers
Here you have to specify the names and passwords of the SYSDBA, DOMAIN and the
CONTROLUSER. The password must be specified twice for security reasons.
Installation (2): KernelParameter
Here you have to specify the limits of the database kernel. See Section KernelParameter.
Installation (3): Configuration
Here you have to specify the configuration of the new serverdb. See Section Configuration. You
can also set the number of devices and if the data devspaces are mirrored.
Installation (4): Devices
Here you have to specify the device configuration of the new serverdb. See Section Devices.
At the bottom of the window there are the buttons Next and Prev. You can use these buttons to switch
between the four installation steps mentioned above. To navigate between the parameters of one
installation step (e.g. from kernel parameter MAXUSERTASKS to kernel parameter MAXLOCKS) you
can use the navigator tree at the left.
Remote Control Server
To enable remote administration of a serverdb, there must run a server which serves requests from clients
on remote hosts to do some administration tasks of a serverdb on this host. You can start or stop the
Remote Control Server on the local host by means of the Remote Control Server menu item in the File
menu. The corresponding button in the File menu indicates the status.
Which local serverdbs are exported (i.e. administration from remote hosts is enabled, as long as the
remote client gives the correct control user name and password), can be determined by means of the
Export ... function in the File menu.
If you click on the node RemoteControl in the tree of the local host, the right window will display the
configuration of the Remote Control Server. This window contains the following information:
177
Remote Control
Adabas D: Control
Exported serverdbs at hostname
A list for every exported serverdb containing its name (Serverdb), the information if it already
exists or if it is new, and its root directory (DBROOT).
Allow remote installation of any serverdb
If you want to install a new serverdb from a remote host, you first have to export this (right now
not yet existent) serverdb. These are the serverdbs displayed as new in the list above. Since you
have to give the name and password of the control user, when exporting a new serverdb, none
without knowledge about this data can create serverdbs on your host. If you trust all the people
in your network, you can enable this switch; then everybody can install new serverdbs, even
remote, without the need for you to export them first.
Put protocol into file
If you disable this switch, the remote control server will write its protocol to standard out.
Otherwise you can specify the name of the protocol here.
Remote Control Server, Start or Stop
Here you can start or stop the server.
Exported Serverdbs, Add...
After clicking on this button a window will pop up, where you can enter name and DBROOT of
the serverdb you want to control from remote hosts. If this serverdb does not yet exist, you have
to specify name and password of the control user, too.
Exported Serverdbs, Forget
By clicking on this button the highlighted serverdb will be deleted from the above list of
exported serverdbs.
Exported Serverdbs, Apply or Save
The configuration changes will be saved and a running server will be notified of the new
configuration.
The normal way to start or stop the server is to use the function Remote Control Server in the File menu.
On a Unix system you can use rcontrol & as a shell command to start the server and rcontrol stop to stop
it.
On a Windows system you can use the Control Panel/Services function of the Explorer. The server has the
name "Adabas D Remote Control Server".
Configuration File of the Remote Control Server
On Unix systems the name of the configuration file is located at
178
Adabas D: Control
Remote Control
/usr/spool/sql/adabasd.conf
On Windows the configuration is entered into the registry below the key
HKEY_LOCAL_MACHINE\Software\Software AG\Adabas D\Remote Control
Environment Variables
SERVERDB
The default Adabas D server name. If it is not set, the variable DBNAME is also inspected.
Configuration of Control
While starting on a Unix system, the X resource database is read, so that the behavior of Control can be
customized by the user. The resources can be set via the xrdb command (highest priority) or mentioned in
the files $HOME/.adabasrdb or $HOME/.Xdefaults.
On a Windows system, the registry is read during the startup phase. The options for the behavior of a
Control client are entered below the key
HKEY_CURRENT_USER\Software\Software AG\Adabas D\Control
If no assignment can be found, the default values can be seen in the following excerpt from a resource file.
*control.autostart:
True
*control.autostop:
True
*control.edition:
Database Server
*control.fontFamily:
courier
*control.fontOverstrike:
False
*control.fontSize:
12
*control.fontSlant:
roman
*control.fontUnderline:
False
*control.fontWeight:
normal
*control.netscapeHelp:
False
*control.fontWeight:
normal
*control.netscapeHelp:
False
*control.refresh:
10
*control.servernodes:
*control.splashScreen:
True
179
Remote Control
Adabas D: Control
Tcl Commands
You can use Control as extended Tcl interpreter. You specify the name of a file containing Tcl commands
by means of the -r option or you specify the Tcl command as additional parameters. Here a very simple
example, which will output the current state of the serverdb:
# adcontrol -d MYDB -u control,adabas state
warm
You can specify more complex Tcl commands, but remember to protect them against interpretation of the
shell by putting them in single quotation marks. Here another example, which starts a save, serverdb is in
warm state:
# adcontrol -d pc2:DB2 -u c,c ’if {[state] == "warm"}
{backup data MEDIUM1}’
If the commands get more complex than this, or if your prompt cannot escape the special characters of the
Tcl command (e.g. the DOS prompt), you should put the commands into a script file and call Control with
the -r option.
180
Adabas D: Control
Troubleshooting When Problems Occur
Troubleshooting When Problems Occur
This section is intended to help database administrators find the rigth strategy for correcting errors when
they occur. In order to do this,the errors must be precisely anaylzed on the basis of the Adabas error
Protocol files. When the cause of error isknown , the appropriate measures can be quickly taken for
returning the system to operation.
This chapter covers the following topics:
What to do When the System Crashes
The Log is Full
The Database is Full
A Log Disk is Defective
A System Error Has Occurred
What to do When the System Crashes
Saving the Protocol Files
When your system crashes, you must first of all save the protocol files located in the rundirectory before
any attempt is made to start the database so that Adabas Support can later analyze these files.
In the default configuration, the rundirectory is located in the
$DBROOT/wrk/$DBNAME (UNIX)
or
%DBROOT%\WRK\%DBNAME% (Windows) directory.
If the administrator does not know where to find the rundirectory, he or she can derive the path from the
value of the RUNDIRECTORY parameter, which is found with the aid of Control by means of the
Configuration / Alter Parameters / Kernel menu function.
The following protocol files are of particular importance in the event of a system crash.
knldiag
All database messages, regardless of their priority, are recorded here. knldiag is a readable
ASCII file that is wrapped around. When the database is started, this file is saved under the
name knldiag.old and a new file is created for the active database. Only one backup copy of this
file exists at any one time.
knltrace
181
Troubleshooting When Problems Occur
Adabas D: Control
The database trace is written to this file, which is also wrapped around. This file can be analyzed
using special database tools only. When the database is started, this area is reinitialized.
knldump
If the database crashes, a memory dump from the database is written to this file. knldump can be
analyzed using special database tools only. It is not initialized when the system is started up.
In addition, the operating system can generate another file.
Under Unix, the rundirectory then contains a core that can be analyzed usinng the appropriate debuggers
or the Adabas tool x_look.
Under Windows, a "Dr. Watson" message is generated in the drwtsn32.log file in the Windows directory.
All the files mentioned above should be saved to a separate directory before performing any additional
action.
The x_look Analysis Tool Under Unix
The x_look analysis tool is currently available for UNIX platforms only and is located in the
$DBROOT/bin directory. If no attempt has been made to restart the system since it crashed, all the
protocol files are retained so that you can enter the following command to call x_look as the database
administrator (UNIX) in the rundirectory without additional parameters:
x_look
This applies to those cases where the environment variables DBROOT and DBNAME are set correctly. If
these values are wrong (or missing), they must be passed via the parameters "-r" and "-d" (see below).
In the rundirectory, a protocol file diag.analyze is generated. It contains information about the operating
system and the database (version, parameters, current files, ...) as well as the first and the last entries from
the knldiag file.
Should the rundirectory contain a file core, x_look evaluates it automatically and writes the stack
backtrace to diag.analyze as well. For this action, x_look supports the debuggers "adb", "dbx", "gdb", and
"sdb" and selects the one typically installed on the respective platform, this choice can be overridden by
the parameter "-c".
If an attempt was already made to start the database before x_look was called, you must cal x_look wsith
specific parameters. Enter the folowing to display all the available parameters
x_look -h
The x_look options have the following meaning:
182
Adabas D: Control
-V
Displays the x_look program version.
-v
Verbose); displays the files that will be
-vv
isplays the individual steps run through by
-r / -R
xpects the path of DBROOT to be
-d
xpects the database name to be
-p
xpects the DB kernel program to be specified
-f
xpects the backup file name (e.g.
-c
Expects the namen of a debugger program.
-a
Expects call arguments for the debugger.
Troubleshooting When Problems Occur
Commands for currently unsupported debuggers
-q
uppresses some progress messages of
If applicable, the diag.analyze file should be made available to Adabas Support forfurther analysis.
Finding the cause of a System Crash
Using the knldiag file, database administrators can discover the cause of a system crash by themselves.
Duning database operation, the knldiag file is constantly filled with database messages and wrapped
aroun.
You can view the knldiag file directly from Control by means of the Diagnose / Op Messages menu
function provided that the database has not been restarted since the system crash. Control automatically
displays the current position and thus, in the event of a crash, the most recent entries.
If the system has meanwhile been restarted, you can view the copy of the file (knldiag.old) on the
operating system level with the aid of the usual editors. The current cursor position is indicated by a single
dashed line.
The following excerpt from the kn lediag file shows a successful startup of the runtime environment with
the database in cold mode:
02.25 15:42:54 9517 -11081 RTE 10.0.2.00 SV/386/R4 DATE 2002-02-24
02.25 15:42:54 9517 -11081 key for ipc resources 0x4400187e
02.25 15:42:54 9517 -11070 bw;2000*sv,br;l1;l2;sn,rc,ut;ti,30000*us;compress
02.25 15:42:54 9517 -11070 number of users: 5
02.25 15:42:54 9517 -11070 number of servers: 14
02.25 15:42:54 9517 -11070 number of tasks: 27
02.25 15:42:54 9517 -11070 number of ukps: 6
183
Troubleshooting When Problems Occur
02.25 15:42:54 9517 -11070 using dynamic KGS
02.25 15:42:54 9517 -11070 creating shared section size 24281088
02.25 15:42:54 9517 -11070 alignment gaps total size 2820
02.25 15:42:54 9517 -11070 attached shared section at 0xbe820000
02.25 15:42:54 9517 -11070 shared section ends at 0xbff48000
02.25 15:42:58 9517 -11081 INFO: KERNEL STARTING ++++++++++++++++
02.25 15:42:58 9517 -11081 INFO: KERNEL DBNAME ’db10’
02.25 15:42:58 9517 -11081 INFO: KERNEL DBNODE ’ns2’
02.25 15:42:58 9518 -11087 CONSOLE started
02.25-15:42:58 9523 -11088 UKP1 started
02.25-15:42:58 9524 -11088 UKP2 started
02.25-15:42:58 9525 -11088 UKP3 started
02.25-15:42:58 9526 -11088 UKP4 started
02.25-15:42:58 9527 -11088 UKP5 started
02.25-15:42:58 9528 -11088 UKP6 started
02.25-15:42:58 9521 -11084 REQUESTOR started
02.25-15:42:58 9519 -11082 DEATH started
02.25-15:42:58 9520 -11083 TIMER started
02.25-15:42:58 9528 -11088 area for task-stack-allocation is DATA
02.25-15:42:58 9528 -11088 allocated 1085440 bytes for static-stacks
02.25-15:42:58 9528 -11987 UKP6 attached big comseg at 0xbe814000
02.25-15:42:58 9528 -11987 UKP6 big comseg ends at 0xbe81e2a8
02.25-15:42:58 9523 -11088 area for task-stack-allocation is DATA
02.25-15:42:58 9523 -11088 allocated 12288 bytes for static-stacks
02.25-15:42:58 9524 -11088 area for task-stack-allocation is DATA
02.25-15:42:58 9525 -11088 area for task-stack-allocation is DATA
02.25-15:42:58 9525 -11088 allocated 12288 bytes for static-stacks
184
Adabas D: Control
Adabas D: Control
Troubleshooting When Problems Occur
02.25-15:42:58 9526 -11088 area for task-stack-allocation is DATA
02.25-15:42:58 9526 -11088 allocated 12288 bytes for static-stacks
02.25-15:42:58 9527 -11088 area for task-stack-allocation is DATA
02.25-15:42:58 9527 -11088 allocated 256000 bytes for static-stacks
02.25-15:42:58 9527 -11987 UKP5 attached big comseg at 0xbe81c000
02.25-15:42:58 9527 -11987 UKP5 big comseg ends at 0xbe81e088
02.25-15:42:59 9524 -11088 allocated 2928640 bytes for static-stacks
02.25-15:42:59 9522 -11054 DEV0 started
02.25-15:43:01 9528 -519 DYNPOOL==>AK51SIZES HEAD_LIST total: 24
02.25-15:43:01 9528 -519 DYNPOOL==>USER + 1: 6
02.25-15:43:01 9528 -519 DYNPOOL==>AK51SIZES HEAD_LIST element: 4
02.25-15:43:01 9528 -519 DYNPOOL==>AK51SIZES LIST total: 144
02.25-15:43:01 9528 -519 DYNPOOL==>USER + 1: 6
02.25-15:43:01 9528 -519 DYNPOOL==>AK51SIZES LIST element: 24
02.25-15:43:01 9528 -519 DATAPAGES to manage by each FBM-Page: 16320
02.25-15:43:01 9528 -519 DYNPOOL==>FBM_GLOBAL_STRUCT total: 68
02.25-15:43:01 9528 -519 DYNPOOL==>FBM_DEV_INFO total: 192
02.25-15:43:01 9528 -519 DYNPOOL==>MAXDATASPACES + FIRST_DEVNO 3
02.25-15:43:01 9528 -519 DYNPOOL==>FBM_DEV_INFO element: 64
02.25-15:43:01 9528 -519 DYNDATA==>FBM_CACHE_PAGES (4K): 3
02.25-15:43:01 9528 -519 DYNPOOL==>FBM_DIRTY_LIST total: 3
02.25-15:43:01 9528 -519 DYNPOOL==>MAX_FBM_PNO : 3
02.25-15:43:01 9528 -519 DYNPOOL==>FBM_DIRTY element (tsp_int1) 1
02.25-15:43:01 9528 -11051 KERNEL 6.1.16.00 DATE 1997-11-04
02.25-15:43:01 9524 -519 DYNPOOL==>DISTRIB_DESC_CACHE total: 880
02.25-15:43:01 9524 -519 DYNPOOL==>DISTRIB_DESC_CACHE (XPARAM) 22
02.25-15:43:01 9524 -519 DYNPOOL==>DISTRIB_DESC_CACHE element: 40
185
Troubleshooting When Problems Occur
Adabas D: Control
02.25-15:43:01 9524 -519 DYNPOOL==>DISTRIB_CMD_DESC total: 544
02.25-15:43:01 9524 -519 DYNPOOL==>DISTRIB_CMD_CACHE (XPARAM) 17
02.25-15:43:01 9524 -519 DYNPOOL==>DISTRIB_CMD_DESC element: 32
02.25-15:43:01 9524 -519 DYNPOOL==>DISTRIB_CMD_CACHE total: 140760
02.25-15:43:01 9524 -519 DYNPOOL==>DISTRIB_CMD_CACHE (XPARAM) 17
02.25-15:43:01 9524 -519 DYNPOOL==>DISTRIB_CMD_CACHE element: 8280
02.25-15:43:01 9524 -519 DYNPOOL==>DISTRIB_TASK_DESC total: 960
02.25-15:43:01 9524 -519 DYNPOOL==>(USER + SERVER + 2) / 0.7 30
02.25-15:43:01 9524 -519 DYNPOOL==>DISTRIB_TASK_DESC element: 32
02.25-15:43:01 9524 -519 DYNPOOL==>DISTRIB_SERVER_DESC total: 336
02.25-15:43:01 9524 -519 DYNPOOL==>MAXDISTRIBSERVER (XPARAM) 14
02.25-15:43:01 9524 -519 DYNPOOL==>DISTRIB_SERVER_DESC element: 24
02.25-15:43:02 9524 -519 DYNPOOL==>DISTRIB_SITE_DESC total: 120
02.25-15:43:02 9524 -519 DYNPOOL==>MAXSERVERDB (XPARAM) 1
02.25-15:43:02 9524 -519 DYNPOOL==>DISTRIB_SITE_DESC element: 120
02.25-15:43:02 9523 -11987 vdevsize: ’knltrace’, 200 requested
02.25-15:43:02 9523 -11987 vdevsize: ’knltrace’, 200 succeded
02.25-15:43:02 9523 -11054 attach ’knltrace’
02.25-15:43:02 9523 -519 DYNDATA==>TRACE BUFFER (4K): 2
02.25-15:43:02 9529 -11054 DEV started
===========================================================================
02.25-15:43:03 9520 -1 INFO: startup complete
02.25-15:43:04 9521 -11987 Connecting T8 apid 9451
02.25-15:43:04 9527 -11987 Connected T8 apid 9451 Bbe81c004
-----------------------------------------------------------------The information before the double line (system parameter setting) is retained until system shutdown; i.e.
this section is not wrapped around.
186
Adabas D: Control
Troubleshooting When Problems Occur
The "startup complete" message indicates that the database system’s rutime environment has been
successfully started.
In the following excerpt from the knldiag file, the "RESTART LOCAL: Ready" message indicates that the
database was successfully restarted. The system is now in warm mode:
02.25-17:32:03 9749 -1 INFO: startup complete
02.25-17:32:04 9750 -11987 Connecting T8 apid 9657
02.25-17:32:04 9756 -11987 Connected T8 apid 9657 Bbe81c004
02.25-17:32:05 9756 -519 DYNDATA==>B15CONFIG (4K): 3
02.25-17:32:05 9756 -11054 New devspace ’db10.sys’
02.25-17:32:05 9756 -11054 attach ’db10.sys’
02.25-17:32:05 9767 -11054 DEV started
02.25-17:32:05 9768 -11054 DEV started
02.25-17:32:05 9756 -11054 single I/O attach ’db10.sys’
02.25-17:32:05 9756 -11054 detach devno 1 ’db10.sys’
02.25-17:32:05 9767 -11054 DEV stopped
02.25-17:32:05 9768 -11054 DEV stopped
02.25-17:32:05 9756 -11054 attach ’db10.sys’
02.25-17:32:05 9769 -11054 DEV started
02.25-17:32:05 9756 -11054 single I/O attach ’db10.sys’
02.25-17:32:05 9756 -11987 vcurrdevsize: devno 1 is 166
02.25-17:32:05 9770 -11054 DEV started
02.25-17:32:05 9756 -11054 New devspace ’/db10’
02.25-17:32:05 9756 -11054 attach ’/db10’
02.25-17:32:05 9771 -11054 DEV started
02.25-17:32:05 9756 -11054 New devspace ’db10.log’
02.25-17:32:05 9756 -11054 attach ’db10.log’
02.25-17:32:05 9772 -11054 DEV started
02.25-17:32:05 9773 -11054 DEV started
187
Troubleshooting When Problems Occur
Adabas D: Control
02.25-17:32:05 9774 -11054 DEV started
02.25-17:32:05 9756 -519 DYNDATA==>RESTART RECORD (4K): 1
02.25-17:32:05 9756 -519 DYNDATA==>FROZEN RST REC (4K): 1
02.25-17:32:05 9756 -519 DYNPOOL==>FREE_PNO_POOL total: 43996
02.25-17:32:05 9756 -519 DYNPOOL==>PNOPOOLSIZE: 10999
02.25-17:32:05 9756 -519 DYNPOOL==>FREE_PNO_POOL element: 4
02.25-17:32:05 9756 -519 DYNPOOL==>USM_CACHE_CTRL total: 32
02.25-17:32:05 9756 -519 DYNPOOL==>USM_CACHE_PAGES (XPARAM): 4
02.25-17:32:05 9756 -519 DYNPOOL==>USM_CACHE_CTRL element: 8
02.25-17:32:05 9756 -519 DYNDATA==>UMS_CACHE_PAGES (4K): 4
02.25-17:32:05 9756 -519 DYNPOOL==>CONV_CACHE HEAD_LIST total: 32008
02.25-17:32:05 9756 -519 DYNPOOL==>CONV_HEAD_LIST_SIZE (XPARAM): 4001
02.25-17:32:05 9756 -519 DYNPOOL==>CONV_CACHE HEAD_LIST element: 8
02.25-17:32:05 9756 -519 DYNPOOL==>CONV_CACHE PID_QUEUE total: 432
02.25-17:32:05 9756 -519 DYNPOOL==>USER + SERVER + 8: 27
02.25-17:32:05 9756 -519 DYNPOOL==>CONV_CACHE PID_QUEUE element: 16
02.25-17:32:05 9756 -519 DYNDATA==>CONV_CACHE_PAGES (XPARAM, 4K): 163
02.25-17:32:05 9756 -519 DYNPOOL==>CONV_CACHE CB total: 6520
02.25-17:32:05 9756 -519 DYNPOOL==>CONV_CACHE_PAGES (XPARAM): 163
02.25-17:32:05 9756 -519 DYNPOOL==>CONV_CACHE CB element: 40
02.25-17:32:05 9756 -11054 single I/O attach ’/db10’
02.25-17:32:06 9756 -519 DYNPOOL==>TEMP_CACHE IO_CTRL total: 48
02.25-17:32:06 9756 -519 DYNPOOL==>USER + 1: 6
02.25-17:32:06 9756 -519 DYNPOOL==>TEMP_CACHE IO_CTRL element: 8
02.25-17:32:06 9756 -519 DYNDATA==>TEMP_CACHE_IO (4K): 6
02.25-17:32:06 9756 -519 DYNPOOL==>FREE PNO LIST total: 264000
02.25-17:32:06 9756 -519 DYNPOOL==>FREE PNO LIST element: 12
188
Adabas D: Control
Troubleshooting When Problems Occur
02.25-17:32:06 9756 -519 DYNPOOL==>FREE ROOT LIST total: 26400
02.25-17:32:06 9756 -519 DYNPOOL==>FREE ROOT LIST element: 12
02.25-17:32:06 9756 -519 DYNPOOL==>DATA_CACHE IO_QUEUE total: 2000
02.25-17:32:06 9756 -519 DYNPOOL==>DATA_CACHE_PAGES DIV 10: 500
02.25-17:32:06 9756 -519 DYNPOOL==>DATA_CACHE IO_QUEUE element: 4
02.25-17:32:06 9756 -519 DYNPOOL==>DATA_CACHE HEAD_LIST total: 79784
02.25-17:32:06 9756 -519 DYNPOOL==>HEAD_LIST_SIZE (XPARAM): 9973
02.25-17:32:06 9756 -519 DYNPOOL==>DATA_CACHE HEAD_LIST element: 8
02.25-17:32:06 9756 -519 DYNPOOL==>DATA_CACHE PID_QUEUE total: 432
02.25-17:32:06 9756 -519 DYNPOOL==>USER + SERVER + 8: 27
02.25-17:32:06 9756 -519 DYNPOOL==>DATA_CACHE PID_QUEUE element: 16
02.25-17:32:06 9756 -519 DYNDATA==>DATA_CACHE_PAGES (XPARAM, 4K): 620
02.25-17:32:06 9756 -519 DYNPOOL==>DATA_CACHE CB total: 39680
02.25-17:32:06 9756 -519 DYNPOOL==>DATA_CACHE_PAGES (XPARAM): 620
02.25-17:32:06 9756 -519 DYNPOOL==>DATA_CACHE CB element: 64
02.25-17:32:06 9756 -519 DYNPOOL==>DATA_CACHE HEAD_LIST total: 79784
02.25-17:32:06 9756 -519 DYNPOOL==>HEAD_LIST_SIZE (XPARAM): 9973
189
Troubleshooting When Problems Occur
Adabas D: Control
02.25-17:32:06 9756 -519 DYNPOOL==>DATA_CACHE HEAD_LIST element: 8
02.25-17:32:06 9756 -519 DYNPOOL==>DATA_CACHE PID_QUEUE total: 432
02.25-17:32:06 9756 -519 DYNPOOL==>USER + SERVER + 8: 27
02.25-17:32:06 9756 -519 DYNPOOL==>DATA_CACHE PID_QUEUE element: 16
02.25-17:32:06 9756 -519 DYNDATA==>DATA_CACHE_PAGES (XPARAM, 4K): 620
02.25-17:32:06 9756 -519 DYNPOOL==>DATA_CACHE CB total: 39680
02.25-17:32:06 9756 -519 DYNPOOL==>DATA_CACHE_PAGES (XPARAM): 620
02.25-17:32:06 9756 -519 DYNPOOL==>DATA_CACHE CB element: 64
02.25-17:32:06 9756 -519 DYNPOOL==>DATA_CACHE HEAD_LIST total: 79784
02.25-17:32:06 9756 -519 DYNPOOL==>HEAD_LIST_SIZE (XPARAM): 9973
02.25-17:32:06 9756 -519 DYNPOOL==>DATA_CACHE HEAD_LIST element: 8
02.25-17:32:06 9756 -519 DYNPOOL==>DATA_CACHE PID_QUEUE total: 432
02.25-17:32:06 9756 -519 DYNPOOL==>USER + SERVER + 8: 27
02.25-17:32:06 9756 -519 DYNPOOL==>DATA_CACHE PID_QUEUE element: 16
02.25-17:32:06 9756 -519 DYNDATA==>DATA_CACHE_PAGES (XPARAM, 4K): 620
02.25-17:32:06 9756 -519 DYNPOOL==>DATA_CACHE CB total: 39680
02.25-17:32:06 9756 -519 DYNPOOL==>DATA_CACHE_PAGES (XPARAM): 620
190
Adabas D: Control
Troubleshooting When Problems Occur
02.25-17:32:06 9756 -519 DYNPOOL==>DATA_CACHE CB element: 64
02.25-17:32:06 9756 -519 DYNPOOL==>DATA_CACHE HEAD_LIST total: 79784
02.25-17:32:06 9756 -519 DYNPOOL==>HEAD_LIST_SIZE (XPARAM): 9973
02.25-17:32:06 9756 -519 DYNPOOL==>DATA_CACHE HEAD_LIST element: 8
02.25-17:32:06 9756 -519 DYNPOOL==>DATA_CACHE PID_QUEUE total: 432
02.25-17:32:06 9756 -519 DYNPOOL==>USER + SERVER + 8: 27
02.25-17:32:06 9756 -519 DYNPOOL==>DATA_CACHE PID_QUEUE element: 16
02.25-17:32:06 9756 -519 DYNDATA==>DATA_CACHE_PAGES (XPARAM, 4K): 620
02.25-17:32:06 9756 -519 DYNPOOL==>DATA_CACHE CB total: 39680
02.25-17:32:06 9756 -519 DYNPOOL==>DATA_CACHE_PAGES (XPARAM): 620
02.25-17:32:06 9756 -519 DYNPOOL==>DATA_CACHE CB element: 64
02.25-17:32:06 9756 -519 DYNPOOL==>DATA_CACHE HEAD_LIST total: 79784
02.25-17:32:06 9756 -519 DYNPOOL==>HEAD_LIST_SIZE (XPARAM): 9973
02.25-17:32:06 9756 -519 DYNPOOL==>DATA_CACHE HEAD_LIST element: 8
02.25-17:32:06 9756 -519 DYNPOOL==>DATA_CACHE PID_QUEUE total: 432
02.25-17:32:06 9756 -519 DYNPOOL==>USER + SERVER + 8: 27
02.25-17:32:06 9756 -519 DYNPOOL==>DATA_CACHE PID_QUEUE element: 16
191
Troubleshooting When Problems Occur
Adabas D: Control
02.25-17:32:06 9756 -519 DYNDATA==>DATA_CACHE_PAGES (XPARAM, 4K): 620
02.25-17:32:06 9756 -519 DYNPOOL==>DATA_CACHE CB total: 39680
02.25-17:32:06 9756 -519 DYNPOOL==>DATA_CACHE_PAGES (XPARAM): 620
02.25-17:32:06 9756 -519 DYNPOOL==>DATA_CACHE CB element: 64
02.25-17:32:06 9756 -519 DYNPOOL FOR BD LOCKLISTPARTITION NO: 0
02.25-17:32:06 9756 -519 DYNPOOL==>TREE_LOCK_HEAD_LIST total: 25028
02.25-17:32:06 9756 -519 DYNPOOL==>DATA_CACHE_PAGES * 10 / partit 6257
02.25-17:32:06 9756 -519 DYNPOOL==>TREE_LOCK_HEAD_LIST element: 4
02.25-17:32:06 9756 -519 DYNPOOL==>TREE_LOCK_LIST total: 1848
02.25-17:32:06 9756 -519 DYNPOOL==>(USER + SERVER + 2) * 2: 42
02.25-17:32:06 9756 -519 DYNPOOL==>TREE_LOCK_LIST element: 44
02.25-17:32:06 9756 -519 DYNPOOL FOR BD LOCKLISTPARTITION NO: 1
02.25-17:32:06 9756 -519 DYNPOOL==>TREE_LOCK_HEAD_LIST total: 25028
02.25-17:32:06 9756 -519 DYNPOOL==>DATA_CACHE_PAGES * 10 / partit 6257
02.25-17:32:06 9756 -519 DYNPOOL==>TREE_LOCK_HEAD_LIST element: 4
02.25-17:32:06 9756 -519 DYNPOOL==>TREE_LOCK_LIST total: 1848
02.25-17:32:06 9756 -519 DYNPOOL==>(USER + SERVER + 2) * 2: 42
02.25-17:32:06 9756 -519 DYNPOOL==>TREE_LOCK_LIST element: 44
02.25-17:32:06 9756 -519 DYNPOOL FOR BD LOCKLISTPARTITION NO: 2
02.25-17:32:06 9756 -519 DYNPOOL==>TREE_LOCK_HEAD_LIST total: 25028
02.25-17:32:06 9756 -519 DYNPOOL==>DATA_CACHE_PAGES * 10 / partit 6257
02.25-17:32:06 9756 -519 DYNPOOL==>TREE_LOCK_HEAD_LIST element: 4
02.25-17:32:06 9756 -519 DYNPOOL==>TREE_LOCK_LIST total: 1848
02.25-17:32:06 9756 -519 DYNPOOL==>(USER + SERVER + 2) * 2: 42
02.25-17:32:06 9756 -519 DYNPOOL==>TREE_LOCK_LIST element: 44
02.25-17:32:06 9756 -519 DYNPOOL FOR BD LOCKLISTPARTITION NO: 3
02.25-17:32:06 9756 -519 DYNPOOL==>TREE_LOCK_HEAD_LIST total: 25028
192
Adabas D: Control
Troubleshooting When Problems Occur
02.25-17:32:06 9756 -519 DYNPOOL==>DATA_CACHE_PAGES * 10 / partit 6257
02.25-17:32:06 9756 -519 DYNPOOL==>TREE_LOCK_HEAD_LIST element: 4
02.25-17:32:06 9756 -519 DYNPOOL==>TREE_LOCK_LIST total: 1848
02.25-17:32:06 9756 -519 DYNPOOL==>(USER + SERVER + 2) * 2: 42
02.25-17:32:06 9756 -519 DYNPOOL==>TREE_LOCK_LIST element: 44
02.25-17:32:06 9756 -519 DYNPOOL FOR BD LOCKLISTPARTITION NO: 4
02.25-17:32:06 9756 -519 DYNPOOL==>TREE_LOCK_HEAD_LIST total: 25028
02.25-17:32:06 9756 -519 DYNPOOL==>DATA_CACHE_PAGES * 10 / partit 6257
02.25-17:32:06 9756 -519 DYNPOOL==>TREE_LOCK_HEAD_LIST element: 4
02.25-17:32:06 9756 -519 DYNPOOL==>TREE_LOCK_LIST total: 1848
02.25-17:32:06 9756 -519 DYNPOOL==>(USER + SERVER + 2) * 2: 42
02.25-17:32:06 9756 -519 DYNPOOL==>TREE_LOCK_LIST element: 44
02.25-17:32:06 9756 -519 DYNPOOL FOR BD LOCKLISTPARTITION NO: 5
02.25-17:32:06 9756 -519 DYNPOOL==>TREE_LOCK_HEAD_LIST total: 25028
02.25-17:32:06 9756 -519 DYNPOOL==>DATA_CACHE_PAGES * 10 / partit 6257
02.25-17:32:06 9756 -519 DYNPOOL==>TREE_LOCK_HEAD_LIST element: 4
02.25-17:32:06 9756 -519 DYNPOOL==>TREE_LOCK_LIST total: 1848
02.25-17:32:06 9756 -519 DYNPOOL==>(USER + SERVER + 2) * 2: 42
02.25-17:32:06 9756 -519 DYNPOOL==>TREE_LOCK_LIST element: 44
02.25-17:32:06 9756 -519 DYNPOOL FOR BD LOCKLISTPARTITION NO: 6
02.25-17:32:06 9756 -519 DYNPOOL==>TREE_LOCK_HEAD_LIST total: 25028
02.25-17:32:06 9756 -519 DYNPOOL==>DATA_CACHE_PAGES * 10 / partit 6257
02.25-17:32:06 9756 -519 DYNPOOL==>TREE_LOCK_HEAD_LIST element: 4
02.25-17:32:06 9756 -519 DYNPOOL==>TREE_LOCK_LIST total: 1848
02.25-17:32:06 9756 -519 DYNPOOL==>(USER + SERVER + 2) * 2: 42
02.25-17:32:06 9756 -519 DYNPOOL==>TREE_LOCK_LIST element: 44
02.25-17:32:06 9756 -519 DYNPOOL FOR BD LOCKLISTPARTITION NO: 7
193
Troubleshooting When Problems Occur
02.25-17:32:06 9756 -519 DYNPOOL==>TREE_LOCK_HEAD_LIST total: 25028
02.25-17:32:06 9756 -519 DYNPOOL==>DATA_CACHE_PAGES * 10 / partit 6257
02.25-17:32:06 9756 -519 DYNPOOL==>TREE_LOCK_HEAD_LIST element: 4
02.25-17:32:06 9756 -519 DYNPOOL==>TREE_LOCK_LIST total: 1848
02.25-17:32:06 9756 -519 DYNPOOL==>(USER + SERVER + 2) * 2: 42
02.25-17:32:06 9756 -519 DYNPOOL==>TREE_LOCK_LIST element: 44
02.25-17:32:07 9756 -514 CHECK FILE: 2 (ROOT)
02.25-17:32:07 9756 -11054 single I/O attach ’db10.log’
02.25-17:32:07 9756 -11054 detach devno 1 ’db10.sys’
02.25-17:32:07 9769 -11054 DEV stopped
02.25-17:32:07 9770 -11054 DEV stopped
02.25-17:32:07 9756 -11054 detach devno 2 ’/db10’
02.25-17:32:07 9771 -11054 DEV stopped
02.25-17:32:07 9772 -11054 DEV stopped
02.25-17:32:07 9756 -11054 detach devno 3 ’db10.log’
02.25-17:32:07 9773 -11054 DEV stopped
02.25-17:32:07 9774 -11054 DEV stopped
02.25-17:32:07 9756 -11987 Releasing T8
02.25-17:32:07 9750 -11987 Connecting T8 apid 9657
02.25-17:32:07 9756 -11987 Connected T8 apid 9657 Bbe81c004
02.25-17:32:07 9756 -11054 New devspace ’db10.sys’
02.25-17:32:07 9756 -11054 attach ’db10.sys’
02.25-17:32:07 9777 -11054 DEV started
02.25-17:32:07 9756 -11054 single I/O attach ’db10.sys’
02.25-17:32:07 9756 -11987 vcurrdevsize: devno 1 is 166
02.25-17:32:07 9756 -11054 New devspace ’/db10’
02.25-17:32:07 9756 -11054 attach ’/db10’
194
Adabas D: Control
Adabas D: Control
Troubleshooting When Problems Occur
02.25-17:32:07 9778 -11054 DEV started
02.25-17:32:07 9779 -11054 DEV started
02.25-17:32:07 9756 -11054 New devspace ’db10.log’
02.25-17:32:07 9756 -11054 attach ’db10.log’
02.25-17:32:07 9780 -11054 DEV started
02.25-17:32:07 9781 -11054 DEV started
02.25-17:32:07 9756 -11054 single I/O attach ’/db10’
02.25-17:32:07 9782 -11054 DEV started
02.25-17:32:08 9756 -514 CHECK FILE: 2 (ROOT)
02.25-17:32:08 9756 -519 DYNPOOL==>LOCK_LIST total: 280000
02.25-17:32:08 9756 -519 DYNPOOL==>MAXLOCKS (XPARAM): 5000
02.25-17:32:08 9756 -519 DYNPOOL==>LOCK_LIST element: 56
02.25-17:32:08 9756 -519 DYNPOOL==>LOCK_LIST TRANS_ENTR total: 2520
02.25-17:32:08 9756 -519 DYNPOOL==>MAXTRANS (XPARAM): 21
02.25-17:32:08 9756 -519 DYNPOOL==>LOCK_LIST TRANS_ENTR element: 120
02.25-17:32:08 9756 -519 DYNPOOL==>LOG_QUEUE PID_LIST total: 168
02.25-17:32:08 9756 -519 DYNPOOL==>USER + SERVER + 2: 21
02.25-17:32:08 9756 -519 DYNPOOL==>LOG QUEUE PID_LIST element: 8
02.25-17:32:08 9756 -519 DYNDATA==>LOG_QUEUE_PAGES (XPARAM, 4K): 50
02.25-17:32:08 9756 -519 DYNDATA==>LOG_CACHE_PAGES (4K): 20
02.25-17:32:08 9756 -11054 single I/O attach ’db10.log’
02.25-17:32:08 9756 -520 LOCAL RESTART: Ready
02.25-17:32:08 9756 -11987 Releasing T8
--------------------------------------------------------------------------The next excerpt from the knldiag file indicates that a database has been correctly shut down into cold
mode:
02.25-17:51:09 9750 -11987 Connecting T8 apid 9819
195
Troubleshooting When Problems Occur
02.25-17:51:09 9756 -11987 Connected T8 apid 9819 Bbe81c004
02.25-17:51:09 9753 -519 B20PREPARE_SVP
02.25-17:51:09 9753 -519 B12SAVEPOINT start(2) pid: 9
02.25-17:51:09 9753 -519 B12SAVEPOINT (2) pid: 9
02.25-17:51:09 9753 -519 B12SAVEPOINT (2) IO: 0
02.25-17:51:09 9753 -519 B12SVP_PART start cache_offset: 1
02.25-17:51:09 9753 -519 B12SVP_PART start (2) pid: 10
02.25-17:51:09 9753 -519 B12SVP_PARTICIPANT(2) pid: 10
02.25-17:51:09 9753 -519 B12SVP_PARTICIPANT(2) IO: 0
02.25-17:51:09 9753 -519 B12SVP_PART start cache_offset: 2
02.25-17:51:09 9753 -519 B12SVP_PART start (2) pid: 10
02.25-17:51:09 9753 -519 B12SVP_PARTICIPANT(2) pid: 10
02.25-17:51:09 9753 -519 B12SVP_PARTICIPANT(2) IO: 0
02.25-17:51:09 9753 -519 B12SVP_PART start cache_offset: 3
02.25-17:51:09 9753 -519 B12SVP_PART start (2) pid: 10
02.25-17:51:09 9753 -519 B12SVP_PARTICIPANT(2) pid: 10
02.25-17:51:09 9753 -519 B12SVP_PARTICIPANT(2) IO: 0
02.25-17:51:09 9753 -519 B12SVP_PART start cache_offset: 4
02.25-17:51:09 9753 -519 B12SVP_PART start (2) pid: 10
02.25-17:51:09 9753 -519 B12SVP_PART start cache_offset: 5
02.25-17:51:09 9753 -519 B12SVP_PART start (2) pid: 11
02.25-17:51:09 9753 -519 B12SVP_PART start cache_offset: 6
02.25-17:51:09 9753 -519 B12SVP_PART start (2) pid: 12
02.25-17:51:09 9753 -519 B12SVP_PARTICIPANT(2) pid: 12
02.25-17:51:09 9753 -519 B12SVP_PARTICIPANT(2) IO: 0
02.25-17:51:09 9753 -519 B12SVP_PART start cache_offset: 7
02.25-17:51:09 9753 -519 B12SVP_PART start (2) pid: 12
196
Adabas D: Control
Adabas D: Control
Troubleshooting When Problems Occur
02.25-17:51:09 9753 -519 B12SVP_PARTICIPANT(2) pid: 12
02.25-17:51:09 9753 -519 B12SVP_PARTICIPANT(2) IO: 0
02.25-17:51:09 9753 -519 B12SVP_PARTICIPANT(2) pid: 11
02.25-17:51:09 9753 -519 B12SVP_PARTICIPANT(2) IO: 1
02.25-17:51:09 9753 -11054 single I/O attach ’/db10’
02.25-17:51:09 9753 -519 B12SVP_PARTICIPANT(2) pid: 10
02.25-17:51:09 9753 -519 B12SVP_PARTICIPANT(2) IO: 2
02.25-17:51:09 9753 -519 B12SAVEPOINT converter start(2) pid: 9
02.25-17:51:09 9753 -519 B12SVP_PART start cache_offset: 8
02.25-17:51:09 9753 -519 B12SVP_PARTICIPANT converter start pid: 10
02.25-17:51:09 9753 -519 B12SVP_PARTICIPANT converter pid: 10
02.25-17:51:09 9753 -519 B12SVP_PARTICIPANT converter IO: 0
02.25-17:51:09 9753 -519 B12SAVEPOINT converter(2) pid: 9
02.25-17:51:09 9753 -519 B12SAVEPOINT converter(2) IO: 1
02.25-17:51:09 9753 -11054 single I/O attach ’db10.sys’
02.25-17:51:09 9753 -11054 single I/O attach ’db10.log’
02.25-17:51:09 9753 -519 B20SVP_COMPLETED
02.25-17:51:09 9753 -11054 detach devno 1 ’db10.sys’
02.25-17:51:09 9777 -11054 DEV stopped
02.25-17:51:09 9778 -11054 DEV stopped
02.25-17:51:09 9753 -11054 detach devno 2 ’/db10’
02.25-17:51:09 9779 -11054 DEV stopped
02.25-17:51:09 9780 -11054 DEV stopped
02.25-17:51:09 9753 -11054 detach devno 3 ’db10.log’
02.25-17:51:09 9781 -11054 DEV stopped
02.25-17:51:09 9782 -11054 DEV stopped
02.25-17:51:09 9753 -521 SHUTDOWN
197
Troubleshooting When Problems Occur
Adabas D: Control
02.25-17:51:09 9756 -11051 Shutdown normal requested
02.25-17:51:10 9756 -11987 Releasing T8
--------------------------------------------------------------------------Before a database can be shut down correctly, a checkpoint must be written in order to guarantee database
consistency. When this checkpoint is written, it is recorded in the knldiag file with the "CHKPONT"
message. Once the checkpoint has been successfully written (B20SVP_COMPLETED), the database is
shut down. The "SHUTDOWN" and "Shutdown normal requested" messages indicate that the shutdown
was successful.
If a Shutdown Quick is performed, all open transactions are canceled. A checkpoint is then written and the
Shutdown Quick is recorded in the knldiag file as follows:
02.26-14:28:07 10698 -11987 Connecting T8 apid 10610
02.26-14:28:07 10704 -11987 Connected T8 apid 10610 Bbe81c004
02.26-14:28:08 10701 -519 B20PREPARE_SVP
02.26-14:28:08 10701 -519 B12SAVEPOINT start(2) pid: 9
02.26-14:28:08 10701 -519 B12SAVEPOINT (2) pid: 9
02.26-14:28:08 10701 -519 B12SAVEPOINT (2) IO: 0
02.26-14:28:08 10701 -519 B12SVP_PART start cache_offset: 1
02.26-14:28:08 10701 -519 B12SVP_PART start (2) pid: 10
02.26-14:28:08 10701 -519 B12SVP_PARTICIPANT(2) pid: 10
02.26-14:28:08 10701 -519 B12SVP_PARTICIPANT(2) IO: 0
02.26-14:28:08 10701 -519 B12SVP_PART start cache_offset: 2
02.26-14:28:08 10701 -519 B12SVP_PART start (2) pid: 10
02.26-14:28:08 10701 -519 B12SVP_PARTICIPANT(2) pid: 10
02.26-14:28:08 10701 -519 B12SVP_PARTICIPANT(2) IO: 0
02.26-14:28:08 10701 -519 B12SVP_PART start cache_offset: 3
02.26-14:28:08 10701 -519 B12SVP_PART start (2) pid: 10
02.26-14:28:08 10701 -519 B12SVP_PARTICIPANT(2) pid: 10
02.26-14:28:08 10701 -519 B12SVP_PARTICIPANT(2) IO: 0
02.26-14:28:08 10701 -519 B12SVP_PART start cache_offset: 4
198
Adabas D: Control
Troubleshooting When Problems Occur
02.26-14:28:08 10701 -519 B12SVP_PART start (2) pid: 10
02.26-14:28:08 10701 -519 B12SVP_PART start cache_offset: 5
02.26-14:28:08 10701 -519 B12SVP_PART start (2) pid: 11
02.26-14:28:08 10701 -519 B12SVP_PART start cache_offset: 6
02.26-14:28:08 10701 -519 B12SVP_PART start (2) pid: 12
02.26-14:28:08 10701 -519 B12SVP_PARTICIPANT(2) pid: 12
02.26-14:28:08 10701 -519 B12SVP_PARTICIPANT(2) IO: 0
02.26-14:28:08 10701 -519 B12SVP_PART start cache_offset: 7
02.26-14:28:08 10701 -519 B12SVP_PART start (2) pid: 12
02.26-14:28:08 10701 -519 B12SVP_PARTICIPANT(2) pid: 12
02.26-14:28:08 10701 -519 B12SVP_PARTICIPANT(2) IO: 0
02.26-14:28:08 10701 -519 B12SVP_PARTICIPANT(2) pid: 11
02.26-14:28:08 10701 -519 B12SVP_PARTICIPANT(2) IO: 1
02.26-14:28:08 10701 -11054 single I/O attach ’/db10’
02.26-14:28:08 10701 -519 B12SVP_PARTICIPANT(2) pid: 10
02.26-14:28:08 10701 -519 B12SVP_PARTICIPANT(2) IO: 2
02.26-14:28:08 10701 -519 B12SAVEPOINT converter start(2) pid: 9
02.26-14:28:08 10701 -519 B12SVP_PART start cache_offset: 8
02.26-14:28:08 10701 -519 B12SVP_PARTICIPANT converter start pid: 10
02.26-14:28:08 10701 -519 B12SVP_PARTICIPANT converter pid: 10
02.26-14:28:08 10701 -519 B12SVP_PARTICIPANT converter IO: 0
02.26-14:28:08 10701 -519 B12SAVEPOINT converter(2) pid: 9
02.26-14:28:08 10701 -519 B12SAVEPOINT converter(2) IO: 1
02.26-14:28:08 10701 -11054 single I/O attach ’db10.sys’
02.26-14:28:08 10701 -11054 single I/O attach ’db10.log’
02.26-14:28:08 10701 -519 B20SVP_COMPLETED
02.26-14:28:08 10701 -11054 detach devno 1 ’db10.sys’
199
Troubleshooting When Problems Occur
Adabas D: Control
02.26-14:28:08 10725 -11054 DEV stopped
02.26-14:28:08 10726 -11054 DEV stopped
02.26-14:28:08 10701 -11054 detach devno 2 ’/db10’
02.26-14:28:08 10727 -11054 DEV stopped
02.26-14:28:08 10728 -11054 DEV stopped
02.26-14:28:08 10701 -11054 detach devno 3 ’db10.log’
02.26-14:28:08 10729 -11054 DEV stopped
02.26-14:28:08 10730 -11054 DEV stopped
02.26-14:28:08 10701 -521 SHUTDOWN quick
02.26-14:28:08 10704 -11051 Shutdown normal requested
--------------------------------------------------------------------------If no transactions were canceled by Shutdown Quick, only "Shutdown" is entered in the knldiag file.
If a database is taken OFFLINE, following the shutdown messages the runtime envrionment and database
kernel program are terminated, which is indicated by the "KERNEL STOPPED" messge:
02.26-16:33:27 15135 -521 SHUTDOWN
02.26-16:33:27 15138 -11051 Shutdown normal requested
02.26-16:33:28 15138 -11987 Releasing T8
02.26-16:33:28 15134 -11054 single I/O attach ’knltrace’
02.26-16:33:28 15135 -11987 UKP stopped
02.26-16:33:28 15136 -11987 UKP stopped
02.26-16:33:28 15137 -11987 UKP stopped
02.26-16:33:28 15134 -11051 Releasing Bufwriter
02.26-16:33:28 15134 -11051 UKP stopped
02.26-16:33:28 15128 -11045 Killing all database processes
02.26-16:33:28 15132 -11084 REQUESTOR stopped
02.26-16:33:28 15138 -11987 UKP stopped
02.26-16:33:28 15139 -11987 UKP stopped
200
Adabas D: Control
Troubleshooting When Problems Occur
02.26-16:33:29 15128 -11081 KERNEL STOPPED ---------------02.26 16:33:29 15129 -11087 CONSOLE stopped
--------------------------------------------------------------------------The knldiag file is analyzed from back to front, starting from the point of the crash. Sections Options to
Remote Control Server contain excerpts from the knldiag file for the particular error situation.
The Log is Full
All modifying transactions are recorded consecutively in the database’s log devspace.When the log is
saved regularly with the database in warm mode, the log devspace is released.
The log continues to fill up; from the moment it becomes 2/3 full, warnings are recorded in the knldiag
file. If the log is not saved in time, the database’s log devspace may become full, with the automatic result
that database operation is terminated. The database goes OFFLINE with an "Emergency Shutdown"
message. The following messages are contained in the knldiag file:
02.26-16:44:42 15306 -501 log used 95% (150 pages left)
02.26-16:44:53 15306 -501 log used 98% (48 pages left)
02.26-16:45:03 15302 -501 log used 99% (8 pages left)
02.26-16:45:03 15302 -501 log used 99% (7 pages left)
02.26-16:45:03 15302 -501 log used 99% (6 pages left)
02.26-16:45:03 15302 -501 log used 99% (5 pages left)
02.26-16:45:03 15302 -501 log used 99% (4 pages left)
02.26-16:45:03 15302 -501 log used 99% (3 pages left)
02.26-16:45:03 15302 -501 log used 99% (2 pages left)
02.26-16:45:03 15302 -501 log used 99% (1 pages left)
02.26-16:45:03 15302 -501 log used 100% (0 pages left)
02.26-16:45:03 15302 -11054 detach devno 1 ’db10.sys’
02.26-16:45:03 15455 -11054 DEV stopped
02.26-16:45:03 15456 -11054 DEV stopped
02.26-16:45:03 15302 -11054 detach devno 2 ’/db10’
02.26-16:45:03 15457 -11054 DEV stopped
02.26-16:45:04 15458 -11054 DEV stopped
201
Troubleshooting When Problems Occur
Adabas D: Control
02.26-16:45:04 15302 -11054 detach devno 3 ’db10.log’
02.26-16:45:04 15459 -11054 DEV stopped
02.26-16:45:04 15460 -11054 DEV stopped
02.26-16:45:04 15302 -901 EMERGENCY SHUTDOWN: log full
02.26-16:45:04 15302 -11051 Shutdown kill requested
02.26-16:45:04 15302 -11081 Resumed BUFWRITER
02.26-16:45:04 15302 -11987 UKP stopped
02.26-16:45:04 15301 -11054 single I/O attach ’knltrace’
02.26-16:45:04 15304 -11987 UKP stopped
02.26-16:45:04 15303 -11987 UKP stopped
02.26-16:45:04 15306 -11987 UKP stopped
02.26-16:45:04 15301 -11066 vfopen ’knldump’
02.26-16:45:04 15305 -11987 UKP stopped
02.26-16:45:14 15301 -11051 Releasing Bufwriter
02.26-16:45:14 15301 -11051 UKP stopped
02.26-16:45:14 15295 -11045 Killing all database processes
02.26-16:45:14 15299 -11084 REQUESTOR stopped
02.26-16:45:15 15295 -11987 ABEND: KERNEL DIED ================
02.26 16:45:15 15296 -11087 CONSOLE stopped
--------------------------------------------------------------------------A "LOG Full" message is also displayed in the Main Screen when calling Control.
The Database Administrator’s Action
The database is started by means of the Operating / Restart / Warm menu function, just as it would be if
no error had occurred. After the runtime environment is started up, the database is in cold mode. The
message "Log is Full, Please save log" is displayed and must be acknowledged by means of Ok. The
system automatically branches to the Save / Log Segment menu function, since this action must be
performed before the log devspace can be released after being saved with the database in cold mode. The
Media Manager displays all the available media. If no medium has been defined beforehand, one can now
be defined. The administrator selects a medium and the save operation begins.
202
Adabas D: Control
Troubleshooting When Problems Occur
If long-running transactions have caused the log to overflow without a log segment being completed,
Control issues the error message "Log Segment incomplete". The log devspace can then be released only
by means of Save / Log in warm mode. Control detects the cause of error and switches the database to
warm mode. The system then automatically branches to the Save menu (see Section 8.1). The log
devspace is saved using the same procedure as in cold mode.
The database is once again available to users.
The Database is Full
When there is no longer enough space available on the data devspaces for permanent data or temporary
result sets, the database goes OFFLINE by means of an "Emergency Shutdown". The "no more space"
message indicates that the database is full:
02.26-19:51:03 16512 -511 PAGES USED 95% (75 PAGES LEFT)
02.26-19:51:03 16512 -511 PAGES USED 96% (60 PAGES LEFT)
02.26-19:51:03 16512 -511 PAGES USED 97% (45 PAGES LEFT)
02.26-19:51:03 16512 -511 PAGES USED 98% (30 PAGES LEFT)
02.26-19:51:03 16512 -11054 detach devno 1 ’dbtest.sys’
02.26-19:51:03 16572 -11054 DEV stopped
02.26-19:51:03 16509 -11987 ABEND: vabort called
02.26-19:51:03 16573 -11054 DEV stopped
02.26-19:51:03 16512 -11054 detach devno 2 ’dbtest.dat’
ABEND: sqlabort called
02.26-19:51:03 16574 -11054 DEV stopped
02.26-19:51:03 16575 -11054 DEV stopped
02.26-19:51:03 16512 -11054 detach devno 3 ’dbtest.log’
02.26-19:51:03 16576 -11054 DEV stopped
02.26-19:51:03 16577 -11054 DEV stopped
02.26-19:51:03 16512 -900 EMERGENCY SHUTDOWN: no more space
02.26-19:51:03 16512 -11051 Shutdown kill requested
02.26-19:51:03 16508 -11987 UKP stopped
02.26-19:51:03 16510 -11987 UKP stopped
203
Troubleshooting When Problems Occur
Adabas D: Control
02.26-19:51:03 16511 -11987 UKP stopped
02.26-19:51:03 16507 -11054 single I/O attach ’knltrace’
02.26-19:51:03 16512 -11081 Resumed BUFWRITER
02.26-19:51:03 16512 -11987 Cancel task T23
02.26-19:51:03 16512 -11987 UKP stopped
02.26-19:51:03 16507 -11066 vfopen ’knldump’
02.26-19:51:06 16507 -11051 Releasing Bufwriter
02.26-19:51:06 16507 -11051 UKP stopped
02.26-19:51:06 16501 -11045 Killing all database processes
02.26-19:51:06 16505 -11084 REQUESTOR stopped
02.26-19:51:07 16501 -11987 ABEND: KERNEL DIED ================
02.26 19:51:07 16502 -11087 CONSOLE stopped
When the database’s data devspace is full, an indication is also displayed in the Main Screen of Control.
The database must be provided with new disk space in the form of data devspaces. When a restart is
attempted, Control automatically branches to the Add Devspace Screen. If a new devspace of the type "F"
(for file) is specified under Windows, Control automatically creates this file.
Under Unix, only raw devices should be used as data devspaces. These raw devices must have the 640
rights (or 660 if the group is also to have write access) and have the Unix database user assigned as their
owner.
The newly specified data devspace is configured and made known to the database. The database is then
restarted and the system is once again available to users.
A Log Disk is Defective
Adabas differentiates between two different log modes. The DUAL log mode comprises one transaction
log and two archive logs. The NORMAL log mode comprises one transaction log and one archive log.
A database always requires two intact log devspaces in order to be operable.
If one log devspace fails in DUAL log mode, the database continues to be operable. Database logging is
then done to the two intact log devspaces only.
If one log devspace fails in NORMAL log mode, the database switches to cold mode.
In either case, a BAD DEVSPACE causes the defective log devspace to be entered in the knldiag file. In
addition, Control displays the error message "BAD DEVSPACE" in the Main Screen.
204
Adabas D: Control
Troubleshooting When Problems Occur
The Database Administrator’s Action
NORMAL Log Mode
When one log devspace fails in NORMAL log mode, the database goes OFFLINE. When an attempt is
made to restart into warm mode, the defective devspace is recorded in the knldiag.
The defective disk must be replaced and the new disk provided with the correct rights under Unix. If the
devspaces are addressed via symbolic links (Unix), the link must be reset if the new disk is addressed
under a different raw device name.
The database can then be switched to cold mode. With the aid of the intact log devspace, the defective log
devspace must be restored in cold mode by means of the Backup / Restore / Devspace menu function.
Following a successful Restore / Devspace operation, the database can be returned to warm mode. If the
archive log was restored with the aid of the transaction log, the backup history no longer contains all the
log data for a complete backup of the log. For this reason, it is absolutely essential that a complete backup
of the database be initiated before the system is enabled for users.
DUAL Log Mode
If only one log devspace has failed in DUAL log mode, the database remains operable. Once the defective
disk has been replaced, the Backup / Restore / Devspace menu function must be used to restore the
defective log devspace with the aid of the intact archive log devspace and with the database in warm
mode.
If two log devspaces are defective, as in NORMAL log mode one log devspace must be restored with the
database in COLD mode and the other with the database in WARM mode. If one of the two defective log
devspaces is the transaction log, this log devspace must be restored in cold mode. The defective archive
log is then restored in warm mode. If both archive logs are defective, one of the archive logs is restored
with the aid of the transaction log in cold mode and the other is restored in warm mode. In this case, as in
NORMAL log mode, log information for the backup history is lost. For this reason, a Save / Data
operation must be performed after the log devspaces are restored.
A System Error Has Occurred
Adabas system error numbers are from -9000 to -9999. These error numbers refer to internal errors that
the administrator cannot correct without appropriate support. For this reason, they are not described in the
"Messages and Codes" manual but are recorded in the knldiag file.
The Database Administrator’s Action
If this type of error occurs, Adabas Support must be informed. Before the system can be restarted after a
system crash, the rundirectory must be saved and, if appropriate, the x_look tool (Unix) started.
In the standard configuration, Adabas provides various traces that support the activities of the database
administrator in the event of errors.
If the error can be reproduced, Adabas Support requires the so-called vtrace.
205
Troubleshooting When Problems Occur
Adabas D: Control
The vtrace documents all kernel actions performed that were started by means of a database statement.
This means that the vtrace can be used not only for tracing errors that occur while processing statements
but also for providing a more exact classification of inconsistencies caused, for example, by hardware
errors.
The trace is activated by means of the Options / Kernel Trace / On menu function. From this moment on,
every kernel activity is recorded in the knltrace file in the rundirectory. For this reason, as little load as
possible should be applied during the analysis; i.e. if possible, only those actions necessary for
reproducing the error should be performed.
If the effect to be analyzed has occurred, any information still contained in the database buffers must be
written to the hard disk by means of the Options / Kernel Trace / Flush menu function. The vtrace must
then be deactivated as soon as possible by means of Kernel Trace/ Off in order to avoid influencing
performance unnecessarily.
The data written from the kernel is contained in the knltrace file in a highly compressed form. The
knltrace file is wrapped around.
The knltrace file is unreadable. Control automatically edits the knltrace file in readable files (vtrace0x.dat)
by means of the Options / Kernel Trace / Flush menu function. If the vtrace flush was initiated by
QUERY rather than by Control, the knltrace file must be converted to readable "vtrace0x.dat" files as
follows:
Enter the following call on the operating system level:
x_vtrace <dbname>
This generates files with the nams "vtrace01.dat" to "vtrace0<n>.dat" in the current directory. The size
and number of files depends on the amount of data written and the size configured for the knltrace file.
Regardless of how the vtrace<n>.dat files were generated (with Control or x_vtrace), they must then be
edited using the Diagnose tool (Unix: x_diagnose, Windows: x_diag).
The Diagnose tool must be called from the directory containing the "vtrace01.dat, ..." files. After the
Diagnose tool is called, a file name must first be selected for the readable protocol to be generated. The
default name for the protocol file is diag.prt.
Important: If a diag.prt file already exists, it is not overwritten; instead, the new analysis is appended to
the existing protocol file. Therefore, you should either delete this file beforehand or select a different
protocol file name.
Now select the type of protocol to be generated. Normally, "1 KERNPROT" is sufficient for an initial
analysis. Next, select the file to be edited (INPUT FILENAME), e.g. vtrace01.dat. The Diagnose tool now
offers a number of analysis options from various points of view. Select the "1 ALL" menu option and
accept the default entry (akbn). Press F3 to return to the menu, in which you can specify another input file.
Repeat this procedure until all vtrace.dat files have been analyzed by means of the Diagnose tool and
transferred to the protocol file
Analyzing this protocol file requires specialized knowledge of databases and is a task reserved for Adabas
Support. Due to the size of the file, the information cannot be sent by fax. Therefore, a line (e.g. via
modem) must be made available to Adabas Support.
206
Adabas D: Control
Troubleshooting When Problems Occur
The files generated (diag.prt and vtrace<n>.dat) must not be deleted until they have been successfully
analyzed by Support.
207
Database Performance: Basics, Performance Analysis and Tuning
Adabas D: Control
Database Performance: Basics, Performance
Analysis and Tuning
This chapter covers the following topics:
Optimizer and Statistics
"updmaster" and "updslave" Programs
Searching Bottlenecks In The Kerneltrace (x_wizbit)
Analyzing Adabas Bottlenecks (x_wizard)
The Course of Measured Values (x_wiztrc)
Direct Search For Costly SQL Statements
Direct Search For Costly SQL Statements Using DIAGNOSE MONITOR
Optimizer and Statistics
SQL statements functionally describe WHAT is to be done. How these statements are physically executed
best depends on the amount of stored data, the value distribution of the data, and the available access
structures.
A special component within the Adabas kernel, the optimizer, examines all possible ways of processing
and selects the most advantageous variant.
To be able to make a correct selection, the optimizer needs information about
- the number of rows in the base tables,
- the size of B* trees of the base tables and indexes,
- the number of different values in the columns (join optimization).
If the database kernel maintained this information synchronously for each modification of the data, the
performance of applications would decrease considerably. Adabas therefore provides some SQL
statements (UPDATE STATISTICS ... etc.) which a user/database administrator can use to update the
statistical information at an appropriate point in time (at low load times and/or after major modifications).
Without such an update, the optimizer could select unfavorable ways of processing thus causing a drastic
loss of system performance. (Correct results, however, are always ensured.)
Updating the statistics always means a great effort (TABLE SCANs and building temporary B* trees) for
the I/O system or the CPU. Consequently there is a conflict between the effort for processing the
applications and that for updating the statistics.
208
Adabas D: Control
Database Performance: Basics, Performance Analysis and Tuning
For an update of statistics the following utility programs are distributed with Adabas:
UPDMASTER/UPDSLAVE, XPU/UPDCOL,
XCONTROL(Operating/Update Statistics)
These programs use the above mentioned Adabas SQL statements to maintain statistical information.
These programs differ from each other mainly with regard to
the completeness of the statistics maintained,
the occurring system load or the ways of load control,
the ways of selecting the objects to be processed,
the used Adabas SQL statements.
"updmaster" and "updslave" Programs
The "updmaster" program organizes the extent and procedure of updating the statistics of base tables and
snapshots within a database. It must be started by the special database user "SYSSTAT". The actual data
maintenance is done by calling "updslave".
Updmaster
[-L <KEY>] [-F <KEY>] [-C <KEY>]
[-T <No of seconds| timestamp>]
The most important options:
-L
The statistics are only to be updated for objects which are specified in the
<KEY> "SYS$VSTAT_EXPLICIT" table with OBJECTLIST_KEY = <KEY>.
Default: "ALL" (all objects of all database users)
The "ALL" selection is generated by the "updmaster" program and cannot
be modified by the user.
209
Database Performance: Basics, Performance Analysis and Tuning
-F <KEY>
Adabas D: Control
The statistics are only to be updated for objects which satisfy the
selection critera specified in the "SYS$STAT_FILTER" table with
FILTER_KEY = <KEY>.
The "DEFAULT" filter criterion can be modified by the user.
-C <KEY>
When updating the statistics, the runtime options for load
restriction specified with the CONF_KEY = <KEY> in the
"SYS$STAT_CONF" table are to be taken into account.
The "DEFAULT" load restrictions can be modified by ther user.
-T <No of
seconds|
timestamp>
The "updmaster" program and the "updslave" programs started by
the "updmaster" program should not run longer than <No of
seconds> or stop working before <timestamp>.
timestamp format: MM-DD-hh.mm or hh.mm
Default: unlimited
When it can be presumed that the time limits specified with -T will be sufficient, "updmaster" starts an
"updslave" task for all objects which satisfy all criteria of the -L and -F options considering the load
restrictions specified with -C.
The "updslave" program performs either the complete update of the statistics for a single object or only a
step of it. Usually it does not use the Adabas SQL statements "UPDATE STATISTICS ...", because these
can cause locking conflicts with simultaneously running productive applications or backup operations.
"updslave" is called by the "updmaster" program. It can also be started by the owner of an object to be
processed or by the database user "SYSSTAT".
updslave [-O <OWNER> ] -T <TABLE>
The most important options:
-O <OWNER>
Owner of the object to be processed
Default: the user connecting to the database
-T <TABLE>
Name of the base table or snapshot
As these programs are new programs, they are still subject to large modifications. The administration
tables and the database user "SYSSTAT" are not yet created with a database installation. Detailed
information about the installation and usage of these programs can be found in the Updmaster manual.
Searching Bottlenecks In The Kerneltrace (x_wizbit)
Call
x_wizbit
[-d] [-t time] [-r rel] [-p pages] [-s] [-l lines]
[-L line] Vtracefile
210
Adabas D: Control
Database Performance: Basics, Performance Analysis and Tuning
Description
x_wizbit searches for SQL statements in the Adabas kernel trace (the so-called vtrace) that could cause a
database bottleneck for the current application because of their runtime, an unfavorable search strategy, or
a great number of database pages read.
For each SQL statement, the following information is output: runtime, optimizer strategy, number of read
and qualified rows, virtual and physical page accesses.
Prerequisites
Adabas D from Version 12
The database monitoring must be active
The TIME vtrace must be active (xutil: DIAGNOSE VTRACE DEFAULT TIME ON)
Storage of the parsed statements must be active (xutil: DIAGNOSE PARSEID ON)
The CONNECT to the database is done using the DEFAULT key in xuser. If there is no xuser file,
the CONNECT parameters must be passed using the shell variable SQLOPT.
Options
-d
Searching critical statements in the internal Adabas table SYSPARSEID.
Only this option displays the SQL statement that belongs to the measured
values.
-t
Showing all SQL statements with a runtime greater than <time> seconds.
<time> Default: 1.
-r
<rel>
Showing all SQL statements for which the relation between read and
qualified (i.e., found) rows is greater than <rel>. Default: 10.
-p
Showing all SQL statements for the processing of which more than
<pages> <pages> pages had to be read virtually or physically. Default: 1000.
-s
Showing all table scans.
-l
No display of statements that wrote less than <lines> lines to the vtrace.
<lines>
-L
Showing vtrace output from line <line> up to the end of the statement. The
<line> option -L cannot be used together with the other options (it overrides
them, if necessary).
Remarks
The vtrace analysis using x_wizbit requires some preparatory steps. For example, the storage of SQL
statements in the database must be activated (xutil: DIAGNOSE PARSEID ON) before starting the
application program. At the end of the measuring, the storage should be disabled (DIAGNOSE PARSEID
OFF) because each stored statement needs up to 4 KB storage space in the database. In addition, the TIME
vtrace must be active. In productive systems, the vtrace should only be activated for the required
measuring period or for a selected session because vtrace writing can be very costly under high load. The
211
Database Performance: Basics, Performance Analysis and Tuning
Adabas D: Control
size of the vtrace area (xparam parameter KERNELTRACESIZE) should comprise at least 1000 pages.
Under Unix, use kernprot -dn $DBNAME akbt to create the vtrace.
Under Windows, you must proceed in the following way:
- x_vtrace <database
name>
- x_diag
- Activate (or change) the trace file name
- Select menu item 1: Kernprot
- Confirm Input Filename
- Select menu item 1: All
- Enter akbt for Select Char and confirm it with
Enter
- Leave x_diag
-t, -r, -s, and -p are additive options; i.e., output occurs if at least one of the output criteria is met. If only
the statements are to be output that satisfy exactly one criterion, maximum value specified for the other
options (example: show all statements with a relation of rows read / rows qual > 10: x_wizbit -d -r 10 -t
10000 -p 10000 E20.prt).
Long runtimes frequently only occur because statements were dispatched because of internal waits for
I/O, SQL locks, etc. To find out these non-critical statements, use the option -l. As a matter of experience,
no bottlenecks are caused by statements that create less than 50 lines of vtrace output.
Analyzing Adabas Bottlenecks (x_wizard)
Call
x_wizard
[-t interval] [-x] [-p|-a] [-d n][-b] [-s] [-D] [-L]
[-k|-K][-l Sprache]
Description
x_wizard attempts to analyze the bottlenecks of the current database run. The basis for this analysis are
database monitoring and the database console x_cons. Detected bottlenecks are output in text form to
rapidly provide database administrators with an overview of the possible causes of performance problems.
The analysis can be done either once or in regular intervals using the option -t.
x_wizard should be issued on the database server, because the database console x_cons cannot be used in
remote operation. Should only a remote call be possible, only the monitoring data can be analyzed. In this
case, the option -x must not be used.
212
Adabas D: Control
Database Performance: Basics, Performance Analysis and Tuning
Prerequisites
Adabas D from Version 12.
The database monitoring must be active (MONITOR ON; with option -t, it will be automatically
enabled; otherwise, it must be manually activated using "xquery -S Adabas").
The database CONNECT is done using the DEFAULT key in xuser. If there is no xuser file, the
CONNECT parameters must be passed using the shell variable SQLOPT.
Options
-t
Regular evaluation after <interval> seconds. The first x_wizard output
<interval> shows the analysis for the time past since starting the database
monitoring. Any other output refers to the preceding interval. The cache
hit rates are recomputed for each interval.
-x
Additional evaluation of the x_cons data. This option is only allowed
when calling x_wizard on the database server.
-p
Logging the results in the x_wizard.prt file.
-a
Logging the results in the x_wizard.prt file in append mode.
-b
Logging the measured data (binary format) in the x_wizard.bin file for
later evaluation by x_wiztrc.
-D
Creating the log file yyyymmdd.wiz (logging the warnings with option
-p) or yyyymmdd.wbi (data file to be used by x_wiztrc with option -b).
New files are created for each day. New entries are appended to existing
files.
-L
Creating a lock file x_wizard.lck in the Adabas rundirectory. Just one
x_wizard can be locked for one serverdb.
-k
Stopping x_wizard started by a lock file (without restart).
-K
Stopping x_wizard started by a lock file, restarting it with the other
options.
-s
No output to stdout.
-l
Displaying the warnings in the <language> language. Possible values for
<language> are: e (English), d (German, default).
<language>
Remarks
For a routine monitoring of database operation in productive systems, an interval of 15 minutes is
sufficient (-t 900). Logging (-p) should be enabled to provide Adabas support with an overview of the
database activities. To search directly for bottlenecks by using the tool x_wizbit, a measuring interval of
30 seconds is recommended.
The detected bottlenecks are classified according to their importance (I: Information, W1: minor
bottleneck warning, W2: moderate bottleneck warning, W3: major bottleneck warning). The classification
of warnings refers to running applications. As a rule, warnings displayed at a system’s start can be
ignored.
213
Database Performance: Basics, Performance Analysis and Tuning
Adabas D: Control
Not all x_wizard outputs must be necessarily caused by actual bottlenecks. For example, table scans can
be useful in certain situations, long runtimes of statements can automatically occur for large data sets, etc.
Especially, if bad search strategies (rows read/rows qual) are suspected, an exact vtrace analysis is
unavoidable (x_wizbit).
x_wizard Messages
Low data cache hit rate : <percentage> % <number of> accesses, <number> successful, <number> not
successful
Explanation
The hit rate is too low when accessing the database cache. The data cache hit rate for a running database
application should not be less than 99% because otherwise, too much data had to be read physically. For a
short time, lower hit rates may occur; e.g., when reading tables for the first time, or when the table does
not fit into 10% of the data cache for repeated table scans (with DEFAULT_LRU=YES only). For an
interval of 15 minutes, data cache hit rates less than 99% must be avoided.
User Action
In addition to enlarging the data cache (note the paging risk in the operating system), search the cause for
the high read activity. Frequently, single SQL statements cause a high percentage of the total logical and
physical read activities. Enlarging the cache only transfers the load from disk to CPU although an
additional index could transform a read-intensive table scan into a cheap direct access (see Section
Searching Bottlenecks In The Kerneltrace (x_wizbit)).
Low catalog cache hit rate : <percentage> % <number of> accesses, <number> successful,<number>
not successful
Explanation
The hit rate is too low when accessing the catalog cache in which the parsed SQL statements are
administered. The catalog cache hit rate for a running database application should be about 90%. For a
short time, the hit rate can decrease to very small values when new programs or parts of programs are
started. However, it should not be less than 85% for each interval of 15 minutes.
User Action
For each database session, the size of the catalog cache should be about 100 pages. This value should be
checked using the xparam parameters MAXUSERTASKS and CATALOG_CACHE_PAGES. The active
database sessions dynamically enlarge the catalog cache and clear it when a session is being released. To
find out the current cache sizes, use SHOW USER CONNECTED. If sessions need many more than 100
pages and there is sufficient storage space available the catalog cache should be enlarged.
Low converter cache hit rate : <percentage> % <number of> accesses, <number> successful,<number>
not successful
Explanation
The hit rate is too low when accessing the converter cache in which the assignments of logical to physical
data pages are administered. The converter cache hit rate for a running database application should be at
least 98%. When data pages are accessed that are not located in the data cache, their physical position on
the data devices must be searched in the converter cache. In consequence, frequent, additional I/O could
214
Adabas D: Control
Database Performance: Basics, Performance Analysis and Tuning
be necessary if a converter cache had been defined too small.
User Action
Enlarge the converter cache size using the xparam parameter CONV_CACHE_PAGES.
Cache swaps: <number of> pages/sec
Explanation
Modified pages are swapped from the data cache to disk because the data used by the applications cannot
be completely kept in the data cache. If the size of the data cache were sufficient, the physical write would
be delayed until the next SAVEPOINT and then be done asynchronously. Cache swapping results in
synchronous I/O and should be avoided, if possible. For long load operations (data import), however,
swapping occurs almost automatically because the volume of imported data usually exceeds the cache size
considerably.
User Action
Enlarge the data cache (and the converter cache, if necessary). Activate the so-called bufwriters for
regular asynchronous bufferflushs to be performed between the SAVEPOINTS, especially in case of large
data imports (xparam parameter NUM_BUFREADER, BR_SLEEPTIME, BR_IF_IOCNT_LT).
High read rate (physical ): <number of> pages per command, <number of> physical reads, <number of>
commands
Explanation
The application contains statements that issue many physical reads to the database because the requested
data cannot be found in the data cache. If a table is accessed for the first time or if it was not used for a
long time and had therefore been swapped from the data cache this behavior is not problematic.
User Action
If the read activity cannot be explained with the first access to a table, both the size of the data cache and
the data cache hit rate should be checked. You should also make sure that the SQL statements issued by
the application do not read much more data than is required for the actual processing (table scans or
unfavorable search strategies; evaluate the vtrace, if necessary). In case of table scans, note that with
DEFAULT_LRU=YES (xparam), only 10% of the cache is used for table buffering so that not the
complete table may be contained in the cache and must be physically reread with the next scan.
High read activity (physical), <number of> pages/sec
Explanation
Many physical reads are performed on the data devices because the data requested by the applications
cannot be found in the data cache. If tables are accessed for the first time or if they were not used for a
long time and had therefore been swapped from the data cache this behavior is not problematic.
User Action
215
Database Performance: Basics, Performance Analysis and Tuning
Adabas D: Control
If the read activity cannot be explained with the first access to tables, the data cache hit rate should be
checked and the data cache be enlarged, if necessary. You should also make sure that SQL statements
issued by the application do not read much more data than is required for the actual processing (table
scans or unfavorable search strategies; evaluate the vtrace, if necessary). In case of table scans, note that
with DEFAULT_LRU=YES (xparam), only 10% of the cache is used for table buffering so that not the
complete table may be contained in the cache and must be physically reread with the next scan.
High write activity (physical), <number of> pages/sec
Explanation
Many physical writes are performed on the data devices because the data used by the applications cannot
be completely kept in the data cache. Therefore, pages are swapped from the cache to disk. For long load
operations (data import), however, swapping occurs almost automatically because the volume of imported
data usually exceeds the cache size considerably.
The data cache is flushed at regular intervals (default: 10 minutes) at the so-called SAVEPOINTS; i.e., all
modified pages are written from cache to disk to generate a consistent database state on the devices. At
this time, the I/O activity increases considerably (workload on disk almost 100%) without producing a real
bottleneck. In normal operation, no important write activities should be measured outside the
SAVEPOINTS.
User Action
If high write activities are observed in normal operation make sure that no SAVEPOINT was active
during the (possibly too short) measuring interval. Otherwise, enlarge the data cache to prevent the
necessity of cache swapping.
High read rate (virtual) <number of> pages per command, <number of> virtual reads , <number of>
commands
Explanation
The application contains statements that lead to many logical reads on the database cache. To decide on
whether this represents a problem, the application profile must be known. For example, a great number of
virtual read operations occurs with an application containing numerous bulk selects with relatively
unspecific WHERE conditions.
User Action
Check whether the SQL statements issued by the application read much more data than is required for the
actual processing (table scans or unfavorable search strategies; evaluate the vtrace, if necessary, using
x_wizbit).
High parse activity, <number of> prepares per command, <number of> commands (executes), <number
of> prepares
Explanation
The number of parse operations in relation to the total number of executed statements is very large. Before
executing an SQL statement for the first time, the SQL command string is analyzed (parsed); when doing
so, Adabas determines the possible access strategies and stores the statement in compact form in the
database. For further executions, only this internal information is accessed and the statement is directly
216
Adabas D: Control
Database Performance: Basics, Performance Analysis and Tuning
executed. If static SQL and the Adabas precompiler were used to build the application, the Adabas
precompiler ensures that the parse operation is performed only once for each statement. If dynamic SQL
or the CALL Interface is used the developer is responsible for the administration of the parse and execute
requests. High parse activity in current operation can indicate that the implementation of a cursor cache is
missing. High parse activity for the first start of programs or part of programs is normal.
User Action
No specific action is possible from the database side.
Low hit rate for table scans : <percentage>% <number of> scans, <number of> rows read, <number
of> rows qual
Explanation
For table scans, the relation between read and qualified rows is bad. In almost all cases, this indicates a
bad search strategy caused either by the application (missing or insufficient indexes, etc.) or by a problem
occurring during cost-based SELECT optimization of the database kernel. Scanning large tables can
considerably deteriorate the performance of the whole system because of numerous negative effects (I/O,
overwriting the data cache, CPU load, etc.).
User Action
First, the attempt should be made whether the Adabas optimizer could find a better search strategy by
recreating the internal database statistics, thus avoiding table scans. A statistics update can be done either
by issuing UPDATE STAT * or UPDATE STAT <tablename> in xquery or by using the updcol tool from
the operating system command line. As the data sets to be checked can be very large, these statements can
take a very long time and should not be executed while applications are active (also because of possible
conflicting locks).
If this does not produce the desired result, search the statement initiating the table scan. This can be done
in two ways: either by applying the x_wizbit tool to the database trace or by enabling the appropriate
traces (precompiler trace using SQLOPT=-X) and subsequently searching for long-running statements to
check the search strategy applied by the optimizer; use the EXPLAIN statement for this check.
Low hit rate for optimizer strategy: <percentage> %
<number of> accesses, <number of> rows read, <number of> rows qual
Explanation
The relation between read and qualified rows is bad for a certain access strategy applied by the Adabas
optimizer. The explanation given for "Low hit rate for table scans" is true.
User Action
First, the attempt should be made whether the Adabas optimizer could find a better search strategy by
recreating the internal database statistics, thus avoiding table scans. A statistics update can be done either
by issuing UPDATE STAT * or UPDATE STAT <tablename> in xquery or by using the updcol tool from
the operating system command line. As the data sets to be checked can be very large, these statements can
take a very long time and should not be executed while applications are active (also because of possible
conflicting locks).
217
Database Performance: Basics, Performance Analysis and Tuning
Adabas D: Control
If this does not produce the desired result, search the statement initiating the unfavorable search strategy.
This can be done in two ways: either by applying the x_wizbit tool to the database trace or by enabling the
appropriate traces (precompiler trace using SQLOPT=-X) and subsequently searching for long-running
statements to check the search strategy applied by the optimizer; use the EXPLAIN statement for this
check.
Low hit rate on <deletes/updates>: <percentage> % <number of> rows read, <number of> rows qual
Explanation
For DELETES or UPDATES, the relation between read and updated rows is bad. Before rows can be
updated or deleted for UPDATES or DELETES, their positions in the corresponding table must be
determined. The same access strategies used for SELECT are applied for this purpose.
User Action
First, the attempt should be made whether the Adabas optimizer could find a better search strategy by
recreating the internal database statistics. A statistics update can be done either by issuing UPDATE
STAT * or UPDATE STAT <tablename> in xquery or by using the updcol tool from the operating system
command line. As the data sets to be checked can be very large, these statements can take a very long time
and should not be executed while applications are active (also because of possible conflicting locks).
If this does not produce the desired result, search the statement initiating the bad hit rate. This can be done
in two ways: either by applying the x_wizbit tool to the database trace or by enabling the appropriate
traces (precompiler trace using SQLOPT=-X) and subsequently searching for long-running
UPDATE/DELETE statements.
’Physical Temp Page Writes’ high : <pages> per command Creating big result tables
Explanation
When creating temporary database pages to build (temporary) result sets, e.g., for joins or ORDER BY
statements, the cache is not sufficient to receive the temp pages. Therefore, pages are swapped to disk.
Since these pages must be reread to further process the SQL statement, the physical writing of temporary
pages should be avoided. Result sets are frequently generated because of problems in the applications
design (missing indexes, etc.) or Adabas optimizer. The creation of large result sets can considerably
deteriorate the performance of the whole system because of numerous negative effects (I/O, overwriting
the data cache, CPU load, etc.).
User Action
First, the attempt should be made whether the Adabas optimizer could find a better search strategy by
recreating the internal database statistics, thus avoiding the creation of large result sets. A statistics update
can be done either by issuing UPDATE STAT * or UPDATE STAT <tablename> in xquery or by using
the updcol tool from the operating system command line. As the data sets to be checked can be very large,
these statements can take a very long time and should not be executed while the application is active (also
because of possible conflicting locks).
If this does not produce the desired result, search the statement initiating the creation of the result sets.
The easiest way to do this is to enable the appropriate traces (precompiler trace using SQLOPT=-X) and
subsequently search for long-running statements to check the search strategy applied by the optimizer,
using the EXPLAIN statement (Result is copied).
218
Adabas D: Control
Database Performance: Basics, Performance Analysis and Tuning
High collision rate on SQL locks, <average number> per write transaction
<number of> write transactions, <number of> SQL collisions
Explanation
For a high percentage of write transactions, locks are set on SQL objects (rows, tables). This causes a wait
state in the application until the locking application task releases the lock by a COMMIT. As a rule, this is
rather a problem in the applications design than of the database; but for a very large number of locks, a
CPU bottleneck can occur on the Adabas lock list. If locks are requested by other sessions (these are in
vwait then), Adabas attempts to execute the locking tasks in the database kernel with higher priority to
prevent queues before SQL lock objects.
User Action
Check whether the application is appropriate for isolation level 0 (dirty read) to avoid read locks. Then
check whether the period between setting the lock and writing the COMMIT could be reduced (do not
hold locks during dialog sessions). If high collision rates occur frequently in multi-user mode, the
parameter PRIO_TASK can be set to the value 203 (207 for MAXCPU > 1) in xparam; this gives
precedence to the committing transactions.
Another bottleneck can be produced by log writing, because the SQL locks of the corresponding
transaction can only be released after successful physical log I/O of the COMMIT. Therefore, the log
should be placed on the fastest devices available. The maximum length of the log queue (monitoring) can
be used to find out whether bottlenecks occur sometimes during log writing.
Long waiting times with SQL collisions: <duration> sec per Vwait (<number of> Vwaits)
Explanation
If collisions occur on SQL objects, the waiting time for the SQL lock release is very long. The locking
application releases an SQL lock by a COMMIT. Long waiting times are often caused by long
transactions in which the application holds an SQL lock for a very long time. Long waiting times also
occur when many applications want to lock the same object, because a queue may then occur before the
corresponding SQL lock. The queue is frequently reduced very slowly (especially in multi-CPU systems)
due to sequencing. If locks are requested by other sessions (these are in vwait then), Adabas attempts to
execute the locking tasks in the database kernel with higher priority to prevent queues before SQL lock
objects. To receive information about the current lock situation, use SHOW STATISTICS LOCK while
the database is operative.
User Action
Check whether the application is appropriate for isolation level 0 (dirty read) to avoid read locks. Then
check whether the period between setting the lock and writing the COMMIT could be reduced (do not
hold locks during dialog sessions). If queues occur before SQL objects, check in the application whether
splitting a table would prevent simultaneous locks on the same table row. In xparam, the parameter
PRIO_TASK can be set to the value 207, thus giving precedence to the committing transactions.
Queue on SQL collisions: coll/vwait = <relation> <number of> lock list collisions, <number of> vwaits
Explanation
219
Database Performance: Basics, Performance Analysis and Tuning
Adabas D: Control
There are queues before SQL locks; i.e., more than one task waits for the release of these locks. The
locking application releases an SQL lock by a COMMIT. Queues are often caused by long transactions in
which the application holds an SQL lock for a very long time. Queues are frequently reduced very slowly
(especially in multi-CPU systems) due to sequencing. If locks are requested by other sessions (these are in
vwait then), Adabas attempts to execute the locking tasks in the database kernel with higher priority to
prevent queues before SQL lock objects. To receive information about the current lock situation, use
SHOW STATISTICS LOCK while the database is operative.
User Action
Check whether the application is appropriate for isolation level 0 (dirty read) to avoid read locks. Then
check whether the period between setting the lock and writing the COMMIT could be reduced (do not
hold locks during dialog sessions). The applications logic should be changed in such a way that
simultaneous locks on the same row are avoided. In xparam, the parameter PRIO_TASK can be set to the
value 203 (207 for MAXCPU > 1), thus giving precedence to the committing transactions.
Lock escalations (<number of> table locks)
Explanation
The number of SQL row locks a transaction set on a table exceeded a threshold value; therefore, the single
row locks were transformed into a table lock. As a rule, SQL locks are set to single rows in a table. For
two reasons, Adabas attempts to lock the table exclusively for the corresponding transaction from a
threshold value that can be configured: first, because the administration of single row locks becomes more
expensive with an increasing number of row locks and second, because the database lock list can only
administer a restricted number of locks. The disadvantage of this procedure is that no other transactions
can lock a single row in this table up to a COMMIT.
User Action
The maximum number of single row locks that can be administered by the database can be configured
using the xparam parameter MAXLOCKS. An escalation is attempted as soon as a task holds more than
0.1*MAXLOCKS single row locks in a table. If undesired escalations occur frequently, the parameter
value should be increased (max. 2.3 mio.). To a great extent, it depends on each application whether lock
escalations represent a problem. When lock escalations occur, the application should be checked as to
whether modifying transactions holding many row locks could be relieved by several COMMITS.
Log queue overflows (<number>), parameter ’LOG_QUEUE_PAGES’ (<number of pages>) too small
Explanation
An overflow occurred in the queue receiving the log entries. Log entries written by modifying transactions
are buffered in a queue before the so-called logwriter writes them to the log device. As a rule, this queue
consists of one page. Especially with bulk statements (mass DELETES, array INSERTS, etc.), so many
log entries can be generated that they cannot be physically written to disk at the same time. If an overflow
occurs in the log queue, no more log requests can be accepted. This causes numerous database-internal
wait states (vsuspend) in a very short time. As transactions writing log entries hold SQL locks, they hinder
other transactions.
User Action
220
Adabas D: Control
Database Performance: Basics, Performance Analysis and Tuning
Increase the xparam parameter LOG_QUEUE_PAGES (max. 200). Check also whether the log devices
could be placed on faster disks to accelerate the physical log I/O.
’Log Queue Pages’ too small : total <pages> , max. used <pages>
Explanation
Probably, the queue receiving the log entries is too small. Log entries written by modifying transactions
are first buffered in a queue before the so-called logwriter writes them to the log device. As a rule, this
queue consists of one page. Especially with bulk statements (mass DELETES, array INSERTS, etc.), so
many log entries can be generated that they cannot be physically written to disk at the same time. If an
overflow occurs in the log queue, no more log requests can be accepted. This causes numerous
database-internal wait states (vsuspend) in a very short time. As transactions writing log entries hold SQL
locks, they hinder other transactions.
User Action
Although the log queue has not yet overflowed, the xparam parameter LOG_QUEUE_PAGES should be
increased. Check also whether the log devices could be placed on faster disks to accelerate the physical
log I/O.
High log activity, <pages> pages/sec
Explanation
The number of log pages written per unit of time is very large. Depending on the capacity of the current
log disks, physical log writing may cause a bottleneck. For each COMMIT, a 4KB log page must be
written to disk, even if the page is not full. So with many short modifying transactions a log page can be
physically written several times. In multi-user systems, Adabas attempts to combine the COMMITS of
several application tasks into so-called group commits.
User Action
If the measured I/O rate has reached the limit of the log disks’ capacity, you should think about changing
the log to faster disks. For application programs with many very short parallel write transactions, the
attempt can be made to increase the number of group commits using the xparam parameter
DELAY_LOGWRITER=YES.
Long write transactions: <number of> log pages per transaction <number of>write transactions,
<number of> log pages
Explanation
The write transactions issued by the application are very long and produce many physical write operations
on the log. This behavior is not problematic for batch-type applications. However, a long write transaction
can cause a bottleneck if other sessions must access SQL objects (rows, tables) locked by the long write
transaction. Very long transactions can also cause a delay in the so-called CHECKPOINT,because the
COMMIT of all open write transactions must be awaited at CHECKPOINT time. As no new write
transactions are admitted up to the end of the CHECKPOINT, it is almost impossible to avoid a temporary
standstill of the database (all tasks in vwait). To find out whether a CHECKPOINT is being written, issue
SHOW LOCK CONFIG in xquery (output: CHECKPOINT WANTED TRUE).
221
Database Performance: Basics, Performance Analysis and Tuning
Adabas D: Control
User Action
This cannot be influenced from the database side. If delays occur frequently because of CHECKPOINTS,
enlarge the log segments, because a CHECKPOINT is written for each concluded log segment. If
long-running transactions occur with interactive applications, check whether the long transaction can be
relieved by additional COMMITS.
High collision rate on <name> region: <percentage> % <number of> accesses (of a total of <number>),
<number of> collisions
Explanation
The collision rate is very large while accessing protected areas in the Adabas kernel storage space.
Accesses to critical zones in the Adabas kernel storage space commonly used by several tasks are
protected by so-called regions. Database tasks exclusively reserving a region prevent, e.g., a global
storage position from being manipulated by several database processes/ threads. If only one processor is
used for Adabas (xparam parameter MAXCPU=1), collisions on regions can almost never occur because
of the so-called internal tasking (exception: parallel CONNECTS, SAVEPOINT). If in multi-CPU
operation high collision rates occur on regions, there is the risk that the whole database operation is
sequenced. The usage of additional CPUs can deteriorate the performance because of additional
synchronization overhead.
User Action
Actions are required for collision rates of more than 10%. The probability of collisions generally increases
with an increase of the number of UKPs (xparam parameter MAXCPU). Check in multi-processor
systems whether the database can satisfy the requirements of the application with CPUs that are used to a
smaller extent.
If large collision rates occur on regions in multi-processor central systems, a check should be made
whether the machine is CPU-bound and the UKPs are therefore blocked by the application. In such a case,
UKPs containing user tasks should receive real time priority from the operating system. For HP, this can
be obtained by the xparam parameter REAL_TIME_PRIORITY=<0 ... 127>. Ensure that the value of
MAXCPU is at least one less than the number of actual CPUs.
Additional actions:
DATAn, TREEn region:
Data cache segmentation can be increased using the xparam parameters DATA_CACHE_REGIONS
and TREE_REGIONS, thus reducing the probability of collisions. At the same time, the data cache
(DATA_CACHE_PAGES) should (but need not) be enlarged to avoid that the subcaches become to
small. A very large collision rate only occurring on a subregion of the DATA or TREE structure
represents a special problem. In this case, several applications operate simultaneously on the same
page or on the same table (root page). This situation can only be improved by changing the
applications logic.
LOCK region:
The probability of collisions on the LOCK region increases with an increasing number of SQL lock
entries in the lock list. A decrease in the lock number usually results in a drastic reduction of region
collisions. Possible actions in the application: isolation level 0, short transactions, table locks instead
of row locks. Possible actions in xparam: parameter PRIO_TASK=203 for one UKP or
222
Adabas D: Control
Database Performance: Basics, Performance Analysis and Tuning
PRIO_TASK=207 for several UKPs (i.e., MAXCPU > 1).
TRACE-, BUFWRTR region:
Enable the vtrace only temporarily to localize a database problem.
High TAS collision rate, <number> per region accesses <number of> TAS collisions, <number of>
region accesses
Explanation
The collision rate is very large when accessing Adabas-internal semaphores for region accesses (see
above). With correct parameters, this phenomenon can only be observed with multi-CPU machines and
large CPU or UKP numbers (xparam parameter MAXCPU > 4).
User Action
The probability of TAS collisions increases with an increasing number of UKPs (xparam parameter
MAXCPU). In multi-processor systems, a check should be made whether the database can satisfy the
requirements of the application with CPUs that are used to a smaller extent.
If the database runs on a genuine database server (client server) and there are at least four CPUs, number
of UKPs should be at least one less than the number of CPUs. If TAS collisions continue to occur, the
xparam parameter REG_DIRTY_READ should be set to YES.
If many TAS collisions occur with less than four UKPs in multi-processor central systems, check whether
the machine is CPU-bound and the UKPs are therefore blocked by the application. In such a case, UKPs
containing user tasks should receive real time priority from the operating system. For HP, this can be
obtained by the xparam parameter REAL_TIME_PRIORITY=<0 ... 127>. Ensure that the value of
MAXCPU is at least one less than the number of actual CPUs.
Large number of timeconsuming commands (> 1 sec): <percentage> % <number of> long commands,
<number of> commands
Explanation
A large percentage of SQL statements has a runtime of more than a second in the Adabas kernel. It
depends on the structure of the application whether this is a real bottleneck. For example, bulk statements
in batch processing frequently cause long runtimes; or locks on SQL objects produce waiting times that
prolong the processing. Thus, the occurrence of long-running statements can only be a warning signal.
User Action
If there are no other instructions from x_wizard, check whether the database server is CPU-bound.
Long command runtime in DB kernel (receive/reply): <duration> sec
Explanation
The average processing time of SQL statements by the Adabas kernel exceeds 100 ms. It depends on the
structure of the application whether this is a real bottleneck. For example, bulk statements in batch
processing frequently cause long runtimes; or locks on SQL objects, physical I/O, dispatching due to
prioritization of other tasks, etc. produce kernel-internal waiting times that prolong the processing.
223
Database Performance: Basics, Performance Analysis and Tuning
Adabas D: Control
User Action
If there are no other instructions from x_wizard, check whether the database server is CPU-bound.
Large number of self suspends (dispatches): <number> per command
Explanation
The number of Adabas-internal task self suspends is very large. The processing of long-running
statements is interrupted after a certain runtime (xparam parameter REG_LOCK_SLICE) in order that
such a time-consuming statement does not block the database for other transactions (similar to timeslices
in operating systems). The applications profile must be known to decide whether this behavior represents
a problem. For example, complex searches in the data cache almost necessarily result in a drastic increase
of self suspends. In any case, a large number of self suspends indicates a high percentage of long-running
statements.
A task can also perform a self suspend, if another task with higher priority changes from waiting into
operative state (for xparam DYN_DISP_QUE_SRCH=YES only).
User Action
For batch-type applications, the number of self suspends can be decreased by increasing the xparam
parameter REG_LOCK_SLICE. This can improve throughput because of sequencing the statement to be
processed, but it will be detrimental to short-running statements (because of longer dialog response times).
If an analysis of the database application does not produce any hint that there are complex statements,
check whether the SQL statements read considerably more data than is needed for the actual processing
(e.g., by table scans or an unfavorable search strategy; evaluate the vtrace, if necessary, using x_wizbit).
Long vsuspend time (user tasks: <duration> sec per vsuspend (<number of> vsuspends)
Explanation
Adabas-internal wait states are very long. This does not mean collisions on SQL lock objects (these result
in the so-called vwait), but wait states for different events, such as writing a log entry, releasing a B* tree
after a structural change, etc.
User Action
None. An exact analysis can only be performed by Adabas support.
Large number of vsleeps (user tasks): <number> per command <number of> vsleeps, <number of>
commands
Explanation
The Adabas-internal wait state vsleep occurs very frequently.
User Action
None. An exact analysis can only be performed by Adabas support.
224
Adabas D: Control
Database Performance: Basics, Performance Analysis and Tuning
The Course of Measured Values (x_wiztrc)
Call
x_wiztrc
[-i Filename] [-P lines]
-o|-c|-t|-O|-C|-g|-s|-S|-l|-r| -R|-T|-d|-p
Description
x_wiztrc evaluates the data collected by x_wizard outputting it chronologically in tabular format. . The
measured values shown refer always to the interval between two measuring times.
Prerequisites
Adabas D from Version 12.
Previous start of x_wizard with the options "-t sec -b ..."
Options
-i
Input data file containing the measured values of x_wizard (Default:
<filename> x_wizard.bin).
-P <lines>
New heading after each <lines> lines.
-o
Overview. The most important measured values.
-c
Commands. Executed statements
(SELECT, UPDATE, DELETE...).
Remarks
225
Database Performance: Basics, Performance Analysis and Tuning
-t
Adabas D: Control
Transactions. Executed transactions
(COMMITS, ROLLBACKS ...).
-O I/O. I/O activities.
-C Caches. Database cache accesses and hit rates.
-g
Log. Logging activities.
-s
Strategy. Access strategies of the cost-based Adabas optimizer (1).
-S
Strategy. Access strategies of the cost-based Adabas optimizer (2).
-l
Lock. SQL locks.
-r
Regions. Accesses to and collisions on regions (1).
-R Regions. Accesses to and collisions on regions (2).
-T Temp. Activities on temp pages.
-d
Dispatching. Overview of the dispatcher activities.
-p
Prioritization. Task prioritization in the dispatcher.
x_wiztrc Output Tables
x_wiztrc is designed for Adabas support and development staff, not for the end user. Therefore, no
detailed explanation of the output parameters is included.
Overview
DaH
data cache hit rate [%]
CaH
catalog cache hit rate [%]
Exe
number of executes
Wtr
number of write transactions
PhR
number of physical reads
PhW
number of physical writes
LgW
number of physical log writes
WaC
number of SQL collisions (Vwait)
WaTm
average duration of an SQL collision [s]
SuC
number of Vsuspends
SuTm
average duration of a Vsuspend [s]
RRTm
average command processing time in the DB kernel [s]
LoC
number of command processing times > 1 second
Rcol
average collision rate on regions [%]
CSwp
number of cache swaps (physical writes)
226
Adabas D: Control
Database Performance: Basics, Performance Analysis and Tuning
Commands
SeA
number of selects
SeQ
number of selected rows
SeH
hit rate (found/read) for select [%]
InsA
number of inserts
InsQ
number of inserted rows
UpdA
number of updates
UpdQ
number of updated rows
UpdH
hit rate (found/read) for update [%]
DelA
number of altered deletes
DelQ
number of deleted rows
DelH
hit rate (deleted/read) for delete [%]
Transactions
Sql
number of SQL statements
Pre
number of prepares (parses)
Exe
number of executes
WTr
number of write transactions
Com
number of commits
Rol
number of rollbacks
I/O
PhR
number of physical reads
PhW
number of physical writes
USio
number of I/Os using a UKP (user task)
USioT
average I/O time using a UKP (user task)
UDio
number of I/Os using a DEV process (user task)
UDioT
average I/O time using a DEV process (user task)
SSio
number of I/Os using a UKP (server task)
SSioP
number of pages written using a UKP (server task)
SSioT
average I/O time using a UKP (server task)
SDio
number of I/Os using a DEV process (server task)
SDioP
number of pages written using a DEV process (server task)
SDioT
average I/O time using a DEV process (server task)
227
Database Performance: Basics, Performance Analysis and Tuning
Caches
DaA
number of accesses to the data cache
DaH
data cache hit rate [%]
CaA
number of accesses to the catalog cache
CaH
catalog cache hit rate [%]
CoA
number of accesses to the converter cache
CoH
converter cache hit rate [%]
DnRC
collision frequency on data cache regions [%]
CoRC
collision frequency on the converter cache region [%]
CSwp
number of cache swaps (physical writes)
Log
LgI
number of log queue inserts
Lov
number of log queue overflows
LgW
number of physical log writes
LgR
number of physical log reads
Sio
number of logwrite requests using a UKP (self I/O)
SioP
number of log pages written using a UKP (self I/O)
SioT
average I/O time of a log request using a UKP (self I/O) [s]
Dio
number of logwrite requests using a DEV process
DioP
number of log pages written using a DEV process
DioT
average I/O time of a log request using a DEV process [s]
Strategy (1)
228
Adabas D: Control
Adabas D: Control
Database Performance: Basics, Performance Analysis and Tuning
TscA
number of accesses using the strategy "table scan"
TscR
number of rows read for the strategy "table scan"
TscQ
number of qualified rows for the strategy "table scan"
KeyA
number of accesses using the strategy "key"
KeyR
number of rows read for the strategy "key"
KeyQ
number of qualified rows for the strategy "key"
KRaA
number of accesses using the strategy "key range"
KRaR
number of rows read for the strategy "key range"
KRaQ
number of qualified rows for the strategy "key range"
IndA
number of accesses using the strategy "index"
IndR
number of rows read for the strategy "index"
IndQ
number of qualified rows for the strategy "index"
Strategy (2)
IRaA
number of accesses using the strategy "index range"
IRaR
number of rows read for the strategy "index range"
IRaQ
number of qualified rows for the strategy "index range"
IsIA
number of accesses using the strategy "isolated index"
IsIR
number of rows read for the strategy "isolated index"
IsIQ
number of qualified rows for the strategy "isolated index"
IIRA
number of accesses using the strategy "isolated index range"
IIRR
number of rows read for the strategy "isolated index range"
IIRQ
number of qualified rows for the strategy "isolated index range"
IISA
number of accesses using the strategy "isolated index scan"
IISR
number of rows read for the strategy "isolated index scan"
IISQ
number of qualified rows for the strategy "isolated index scan"
Lock
229
Database Performance: Basics, Performance Analysis and Tuning
LocR
number of lock list entries (row)
LocT
number of lock list entries (table)
LoCol
number of lock list collisions
WaC
number of SQL lock collisions (Vwaits)
WaTm
average duration of a collision [s]
LcRG
number of accesses to the lock region
LcRC
collision rate on the lock region [%]
Kb05
number of KB05 requests
Regions (1)
CoRG
number of accesses to the CONVERT region
CoRC
collision rate on the CONVERT region [%]
LcRG
number of accesses to the LOCK region
LcRC
collision rate on the LOCK region [%]
DnRG
number of accesses to DATAn regions
DnRC
collision rate on DATAn regions [%]
TnRG
number of accesses to TREEn regions
TnRC
collision rate on TREEn regions [%]
SnRG
number of accesses to SPLITn regions
SnRC
collision rate on SPLITn regions [%]
Regions (2)
LoRG
number of accesses to the LOG region
LoRC
collision rate on the LOG region [%]
LwRG
number of accesses to the LOGWRITER region
LwRC
collision rate on the LOGWRITER region [%]
PdRG
number of accesses to the PERMFDIR region
PdRC
collision rate on the PERMFDIR region [%]
TdRG
number of accesses to the TEMPFDIR region
TdRC
collision rate on the TEMPFDIR region [%]
TrRG
number of accesses to the TRACE region
TrRC
collision rate on the TRACE region [%]
230
Adabas D: Control
Adabas D: Control
Database Performance: Basics, Performance Analysis and Tuning
Temp
TPR
number of physical temp page reads
TPW
number of physical temp page writes
TPVR
number of virtual temp page reads
TPVW
number of virtual temp page writes
Dispatching
ToDC
number of dispatcher calls
ToVwa
number of vwaits
ToSus
number of vsuspends
ToSle
numberof vsleeps
TRegA
number of accesses to regions
TReCo
number of collisions on regions
TReWa
number of region waits (sem queue)
TBgTC
number of TAS collisions in vbegexcl
TEnTC
number of TAS collisions in vendexcl
Prioritization
ToDC
number of dispatcher calls
ToTCo
number of commands
TotPr
number of task prioritizations
TPrFO
number of task prioritizations by other UKPs
TPrCQ
number of task prioritizations in the com queue
TPrRQ
number of task prioritizations in the rav queue
TPrCo
number of task prioritizations with commits
Direct Search For Costly SQL Statements
Stop the application, if any
xutil: DIAGNOSE VTRACE DEFAULT TIME ON
xutil: DIAGNOSE PARSEID ON
xquery (Adabas mode): MONITOR ON
231
Database Performance: Basics, Performance Analysis and Tuning
Adabas D: Control
Open a second window, if possible, and change to the Adabas rundirectory
In the first window, enter x_wizard -x -t 30 (after adapting the xuser entry or setting SQLOPT, if
necessary)
Start the application
When the message "Low hit rate for optimizer strategy: <percentage> ... " appears, create the vtrace
in the second window using "kernprot -dn $DBNAME akbt" under Unix or following the procedure
for Windows described above.
Evaluate the vtrace using "x_wizbit -l 50 -d $DBNAME.prt > wizbit.prt"
Analyze the long-running statements in the file wizbit.prt. To do so, check in xquery whether the
WHERE qualification could be processed using either the KEY or an index. If necessary, check the search
strategy with EXPLAIN in xquery.
Direct Search For Costly SQL Statements Using
DIAGNOSE MONITOR
Diagnose Monitor allows you to log commands automatically in tables when limiting values relative to
selectivity, read activity or runtime are exceeded while processing these commands.
Utility must be started in warm serverdb mode:
Call: xutil -d <serverdb> -u <controluser, controlpassword>
The following commands can be issued in the Utility command line:
DIAGNOSE MONITOR SELECTIVITY <no>
<no> is the ratio of ROWS_QUAL to ROWS_READ in permill.
DIAGNOSE MONITOR READ <reads>
<reads> specifies the maximum number of virtual reads.
DIAGNOSE MONITOR TIME <time>
<time> is the maximum time for SELECT and subsequent FETCH. The specification is made in
milliseconds.
DIAGNOSE MONITOR ROWNO<cnt>
<cnt> specifies the number of monitoring results that are to be stored in the target table.
DIAGNOSE MONITOR OFF
disables the monitoring functions.
The results are written to the table SYSMONITOR. To find out the corresponding command, a SELECT
containing the value of the "parseid" column can be issued on the table SYSPARSEID.
232
Adabas D: Control
Database Performance: Basics, Performance Analysis and Tuning
Table Statistics and Structural Checks (xpu)
Call
xpu -v|-s [-u] count
Description
xpu allows the following to be done in parallel:
generating table statistics for the cost-based optimizer.
checking the B* tree structure of tables.
Options
-v
Verify.
Checks the B* tree structure of all tables of a database user.
-s
Statistics update.
Updates the table statistics of a database user, if required.
-u
Unconditional statistics update.
New creation of the table statistics of all tables of a database user. Only
possible in connection with the -s option.
count
Number of database tasks working in parallel.
Output Files
While checking the B* tree structure with "xpu -v", the following two files are generated in the current
directory:
-
chtab.prt
containing a list of all tables checked.
-
chtab.err
containing the tables where errors occurred during verification.
Use the recorded error codes to check whether these errors are so serious
that a recovery is required.
While updating table statistics with "xpu -s", the updcol.prt file is generated in the current directory. This
file contains the following information: the tables for which the validity of the statistics for the cost-based
optimizer was checked and the tables for which an update of statistics was necessary.
Return Code
If table processing by xpu was free of errors and xpu was terminated regularly, the return code 0 (zero) is
output to the operating system; otherwise, a value different from 0.
233
Database Performance: Basics, Performance Analysis and Tuning
Adabas D: Control
Remarks
For large databases, checking tree structures and creating exact statistical information requires the
physical read of large amounts of data. xpu allows for parallel read operations by distributing the actions
to several tasks. The count parameter indicates how many database tasks are to operate in parallel. Ensure
that "count" is less than the Adabas kernel parameter MAXUSERTASKS. Preferably, xpu should be
started in low-load times.
The count parameter should be about double the disks used physically for data devspaces (e.g. 5
devspaces on 5 disks: count = 10; 1 devspace on RAID 5 with 6 physical disks: count = 12).
After special error situations; e.g., after reading inconsistent database pages by a defective disk controller
(error code -9026), tables are internally marked as defective and locked for further, modifying usage,
although the data on hard disk can be still intact. "xpu -v" can be used at a later time; for example, after
exchanging the controller, to check the internal structure of all tables (but of no indexes). Tables found out
to be correct are marked as such and can then be updated again.
xpu is started for the database user who is entered in the XUSER file as the default user (see the "User
Manual Unix" or "User Manual Windows"). For other users, the SQLOPT environment variable must be
set. Only the tables of the corresponding user are processed.
For amounts of data that increase dynamically, the optimizer statistics should be updated weekly (xpu -s).
A consistency check of the table structures (xpu -v) should be performed before each new backup
generation, even if no errors occurred in the meantime.
234
Adabas D: Control
Settings for NetTerm
Settings for NetTerm
For an optimum use of NetTerm on a PC, the following settings are recommended:
File / Phone Directory menu item:
- Emulation = VT100
- Keys = CIS
The following settings are required for a correct functioning of the Enter key:
Options / Setup / Keyboard Keys menu item:
- Click on the Enter key of the displayed keyboard.
- Select "^M" instead of "^J" in the text field.
- Click on the Change key beside the text field.
- Click on the Save key.
- Click on Ok to leave the menu.
After logging onto the Unix server, the following variables must be set:
DBHIF=NETTERM
DBTERM=vt100
TERM=vt100
TERMINFO=$DBROOT/terminfo
Use the F2 key to select the "NETTERM" color setting. This setting is also available in Query and Load
as one of several presentations that can be selected by means of the SET command.
235