1
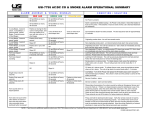
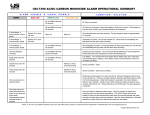
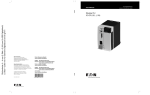
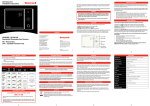
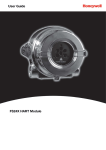
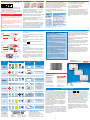
1. Welcome
3. About Carbon Monoxide (CO)
2. Description
Thank you for purchasing this Carbon Monoxide (CO) alarm.
The symbols above mean that the alarm is suitable for use in
domestic premises (including static caravan holiday homes),
caravans, motor caravans and boats.
XC70
This manual contains important safety information about the
installation and operation of the alarm. Read the manual carefully
and keep it in a safe place for future reference.
Warnings
XC100
XC100D
Honeywell offers three versions of its battery powered CO alarms,
with different user interfaces and lifetime:
The basic model XC70 uses indicator lights to visually signal the
state of the unit and comes with 7 years life and warranty
XC100 and XC100D both show big alarm messages in the case of
an alarm, and both come with 10 years life and warranty.
Installation of a CO alarm should not be used as a substitute
for proper installation, use and maintenance of fuel burning
appliances including appropriate ventilation and exhaust
systems.
XC100D has an LCD screen to provide more information about
rising CO levels and recorded CO peak levels.
In addition, all versions have an audible alarm and a TEST/HUSH
button.
This CO alarm is designed to protect individuals from the
acute effects of carbon monoxide exposure. It will not fully
safeguard individuals with specific medical conditions. If in
doubt consult a medical practitioner.
All Honeywell X-Series alarms can be wirelessly interconnected
using an optional plug-in module. This means that if one X-Series
CO or Fire Alarm triggers an alarm, all interconnected units will
give an audible alarm as well. This is especially useful, when
living in a large or multi-story dwelling. Some wireless module
information is included in this manual for completeness.
Long exposure to low levels (>10 ppm) of CO may cause
chronic effects. If in doubt consult a medical practitioner.
1
Carbon Monoxide (CO) is an invisible, odourless gas which is
highly toxic. It is produced by the incomplete burning of fuels such
as wood, charcoal, coal, heating oil, paraffin, petrol, natural gas,
propane, butane etc. and by cigarette smoke. A dangerous level of
CO can occur if an appliance is faulty or badly maintained, if a flue
is blocked or if a room is inadequately ventilated.
The CO alarm will activate if it has detected a certain
concentration for a given time, as described below:
The poisoning effect of breathing in CO depends on the
concentration (described in parts per million, ppm) and how long
you are exposed for.
The CO alarm is set in accordance with the relevant European
standard to provide alarms that are determined by the
concentration and how long it has been present. This ensures
that the alarm activates when dangerous levels of CO have built
up over time and immediate action is required, and avoids false
alarms from temporary low levels of CO (e.g. from cigarette
smoke).
Concentration
Signs and Symptoms
~ 100 ppm
Slight headache, flushing of skin
(indefinite exposure)
Headache (5 – 6 hour exposure)
200 – 300 ppm
Severe headache, weakness, dizziness,
400 – 600 ppm
nausea, vomiting (4 – 5 hour exposure)
1100 – 1500 ppm Increased pulse and breathing rate,
syncope (fainting), coma, intermittent
seizures (4 – 5 hour exposure)
5000 – 10000 ppm Weak pulse, depressed respiration /
respiratory failure, death (1 – 2 minutes
exposure)
50 ppm: Alarm between 60 and 90 minutes
100 ppm: Alarm between 10 and 40 minutes
300 ppm: Alarm within 3 minutes
Source: Health Protection Agency Compendium of Chemical Hazards,
Carbon Monoxide, Version 3, 2011
2
3
4
4. CO Alarm Operation
XC70
Separate, indicators for
each unit state
•Alarm
•Power
•Fault
•Ventilate (pre-alarm)
All alarms have four status indicator lights, an audible alarm and a
TEST/HUSH button.
Loud sounder
output
The green POWER light indicates that the unit is activated and
working normally.
The red ALARM light indicates that a dangerous CO condition has
been detected.
Gas inlet
TEST/HUSH button
•Fault hush
•Alarm hush
•Test with reduced
sound level
The blue VENTILATE light gives an early indication of a dangerous
CO condition.
The yellow FAULT light indicates that the unit is not working
properly.
XC100 / XC100D
Loud sounder
output
Separate, indicators for
each unit state
•Power
•Fault
•Ventilate (pre-alarm)
Prominent action
message:
•Appears only
in alarm
(“Hidden Text”)
Gas inlet
Normal operation
The green POWER light will flash once per minute, to indicate that
your alarm is working. The screen of the XC100D will be blank.
TEST/HUSH button
•Fault hush
•Alarm hush
•Test with reduced
sound level
Display (XC100D only)
Alarm or Fault silenced
Replace unit
Remote fire alarm
Remote alarm triggered
by another unit
Full CO alarm
CO pre-alarm levels
The TEST/HUSH button is used to test the unit, or to mute an alarm
or fault signal.
75%
50%
25%
PPM
Alarm
If a dangerous CO condition is detected the red ALARM light/
message will flash and the audible alarm will sound continuously.
XC100D will display the current CO level and a skull symbol.
If the unit is in ALARM and the gas clears, the unit will go into
Alarm Memory mode. Press the TEST/HUSH button to return to
normal operation.
CO concentration in PPM
Number of units in a wireless
network (during configuration
with XW100 wireless module)
5
• Open all doors and windows to increase the rate of
ventilation
If the unit is in ALARM, the audible alarm can be silenced for
5 minutes by pressing the TEST/HUSH button (the red light will
continue to flash, XC100D will show the muted symbol). If a
dangerous gas level is still present after 5 minutes, the audible
alarm will sound again.
• Stop using all fuel-burning appliances and turn them off
where possible
Note: The HUSH function only operates if the gas reading is less
than 350 ppm and can only be operated once
• If the alarm continues, then evacuate the premises. Leave
the doors and windows open, and only re-enter the building
when the alarm has stopped
Alarm memory
If your unit is in ALARM, keep calm, and carry out the
following actions in the order given:
• Get medical help for anyone suffering the effects of
Carbon Monoxide poisoning, such as headache or nausea,
and advise that Carbon Monoxide inhalation is suspected
• Telephone the gas or other fuel supplier on their emergency
number, so that the source of carbon monoxide emissions
can be identified and corrected
• Do not use the fuel-burning appliances again until they
have been checked and cleared for use by a competent
person according to national regulations
Alarm
(Red)
Power
(Green)
Fault
(Yellow)
Ventilate
(Blue)
Display
(XC100D)
Sound
Honeywell’s CO alarms record a history of events, which can
be downloaded by professionals. This provides a more in depth
analysis of CO events such as detailed information on the CO
concentration of the last 7 days, and weekly maximums for the
whole operating life. Dates of alarm events are recorded.
8
Operating and
Installation Instructions
Meaning
Normal operation
No gas present
NORMAL
OPERATION
1 flash once every minute
I56-4127-000
*
75%
50%
25%
ALARM
Dangerous CO condition detected
PPM
Contact us
Current CO concentration
www.homesafety.honeywell.com
www.honeywellanalytics.com
www.honeywell.com
Continuously 4 chirps and flashes
After 60 minutes, pattern is repeated once every 30 seconds
REMOTE CO or
FIRE ALARM***
Event logger
7
4. CO Alarm Operation continued
Lights and Sound
XC100D will also show the recorded peak concentration level for
10 seconds after pressing the button.
Note: There may be another source of carbon monoxide
emission apart from fuel-burning appliances, for example a
large amount of tobacco smoke, town gas or emission from a
smouldering fire.
6
Status
CO does not leave any detectable traces, so if an alarm happens
while you are out, the memory function will keep the red light
flashing till the button is pressed or 7 days have passed.
75%
50%
25%
PPM
75%
50%
25%
PPM
Dangerous CO condition detected by
another interconnected CO alarm
CO ALARM: Continuously 4 chirps
Fire ALARM: Continuously 3 chirps
ALARM MEMORY
Fire detected by an interconnected
fire alarm
Dangerous CO condition detected
whilst user was absent.
Currently, no dangerous
CO level present
PPM
1 chirp and flash once every minute
*
PRE-ALARM**
75%
50%
25%
PPM
Current CO concentration and
percentage of full alarm level
A dangerous CO condition is building up.
A full CO alarm will be triggered
later, if the CO level does
not decrease
1 (2, or 3) chirps and flashes once every 30 seconds, increasing the longer CO is present
*
FAULT
The unit has reached its end of life
and must be replaced
PPM
1 chirp and flash once every minute
*
FAULT***
75%
50%
25%
The wireless module is not working
correctly. Refer to the wireless
module manual for further details
PPM
PPM
3 chirps and flashes once every minute
*unless muted by pressing
the TEST/HUSH button
**only if activated during
first time switch on
***only applicable when a
wireless interconnection
plug-in module is installed
GAS EMERGENCY SERVICE
TELEPHONE NUMBER
0800 111 999
Contact numbers for other fuel appliances:
Oil users:
Contact OFTEC on 0845 658 5080
Solid fuel users: Contact HETAS on 0800 600 000
13
For liquified petroleum gas (LPG),
Bulk and metered supplies; see telephone
number on the bulk storage vessel or at the meter
UK customer service centre
Honeywell Analytics Ltd.
4 Stinsford Road
Nuffield Industrial Estate
Poole, Dorset BH17 0RZ
Tel: +44 (0)1202 645577
Fax: +44 (0)1202 665331
[email protected]
Please Note:
While every effort has been made to ensure
accuracy in this publication, no responsibility
can be accepted for errors or omissions.
Data may change, as well as legislation, and
you are strongly advised to obtain copies of
the most recently issued regulations, standards,
and guidelines. This publication is not intended
to form the basis of a contract.
I56-4127-000
MAN0936_Issue 2_04/14_EN
© 2014 Honeywell Analytics
Acts for and on behalf of Life Safety Distribution AG,
Javastrasse 2, 8604 Hegnau, Switzerland by
its Authorised Representative Honeywell Inc.
X-Series Battery CO Alarms
XC70
XC100
XC100D
4. CO Alarm Operation continued
Ventilate - Pre-Alarm
Fault – end of unit life
Dangerous CO levels may be caused by faulty appliances, which
start to produce more and more CO over time. Pre-alarms will give
an early warning of such situations even if the alarm levels are
not being reached. If these occur frequently it is recommended
to call a technician for further investigations. The pre-alarm will
start giving indications once 25% of the alarm level (time and
concentration) has been reached. For example, if 50 ppm CO is
present, the pre-alarm will start after 15-23 minutes instead of
60-90 minutes for a full alarm.
If the unit is in FAULT the YELLOW light will flash every minute
with a short chirp. The CO alarm must not be used any more,
and should be replaced. (The only exception is a wireless module
fault, which is signalled with a triple chirp. In this case, refer to
the wireless module manual for further details). The chirps can
be silenced for 24 hours by pressing the TEST/HUSH button.
The 24 hour period can be restarted by pressing the TEST/HUSH
button twice (XC100D will show the muted symbol).
By default, this function is deactivated as it is not required to
protect you from dangerous levels of CO. The installation section
gives details of how to activate it. The pre-alarm is intended to
help the knowledgeable end-user to get an early indication of
malfunctioning appliances.
If the Pre-Alarm function is activated, and CO is detected, the blue
ventilate light will flash with a short chirp 1, 2 or 3 times every 30
seconds when 25%, 50% or 75% of the alarm level respectively
has been reached. XC100D will also indicate the percentage of the
alarm level and current CO concentration. The audible alarm can
be silenced by pressing the TEST/HUSH button (XC100D will show
the muted symbol).
Note: The fault signal is caused by a low battery, an electronics
failure or the end of the CO sensor life. The end-of-life signal
comes from an inbuilt timer, and is given 10 years (XC100,
XC100D models) or 7 years (XC70 model) after activation.
A replace by date is also printed on the side of the unit to
facilitate an advance replacement before the end-of-life signal
is given. This date includes a 6 months shelf life, i.e. this is the
latest date the unit should be replaced. An end-of-life signal may
be given earlier.
Cylinder supplies; see gas supplier emergency contact
details in the local telephone directory
(The Calor Gas Emergency number is 08457 444999)
14
15
16
4. CO Alarm Operation continued
Low Level Monitoring Mode
Normally, the CO alarm only signals an Alarm condition after
a gas concentration higher than 43 ppm has been present for a
period of time. It can be temporarily set to a low level monitoring
mode, to enable it to be used as a measuring device. Once this
mode is activated, the alarm will signal the presence of a CO
level higher than 10 ppm immediately.
To activate the low level monitoring mode, press and hold the
test button for 18 seconds. (During this time, the low volume and
high volume tests will be active). After 18 seconds you will see a
green and a blue light flash and hear a short chirp and you can
release the button. The low level monitoring mode is now active
for 60 minutes, which is indicated by the flashing green light
every 4 seconds.
CO concentrations higher than 10 ppm will be indicated by
a flashing blue ventilate light. XC100D will also display the
CO concentration level.
6. Testing your alarm
Lights
/
/
Sound
Alarm (red)
Power (green)
Fault (yellow)
Ventilate (blue)
Display*
Meaning
Green power
light flashing
= Low level
monitoring
mode.
Current CO
concentration Blue Ventilate
light flashing
= CO detected
PPM
Green/blue light flashing every
4 seconds.
One short chirp when CO rises
above 10 ppm
*only available on XC100D
The CO alarm should be tested once per month, to check that all
visual and audible signals are working.
Unit mode
1s
2s
3s
4s
Green Flash
+ chirp
Yellow Flash
+ chirp
Blue Flash
+ chirp
5s
6s
Dimensions
Weight
Installation
Full
Alarm
8s
9s
Pause
Done even if button released
PreAlarm
Low Level
Monitoring
Mode
~ 75
~19
minutes minutes
Immediately
≥100
~25
~6
minutes minutes
≥ 300
~90
~ 23
seconds seconds
100 mm x 72 mm x 36 mm
133 g
Free standing, wall mount, ceiling
The apparatus should be installed by a competent person.
Contents:
• Directly above a sink or in the immediate vicinity of a cooking
appliance
•
•
•
•
CO alarm
Wall mounting plate
Fixing nail
Instructions (this document)
If the alarm is being fitted in the same room as a fuel-burning
appliance:
Caution: The alarm must be connected to the wall mounting
plate to switch it on.
•
Alarm (red)
Power (green)
Fault (yellow)
Ventilate (blue)
13. Switch off the Alarm
The alarm is switched off by removing it from the wall mounting
plate. Use a suitable tool such as a small screwdriver to press on
the tamper proof tab located at the top right edge of the alarm,
and then slide the alarm to the left to remove it from the wall
mounting plate.
Meaning
Pre-alarm
function was
activated
sucessfully
29
17s
Pause
18+s
Low level monitoring
mode start indication:
Green Flash +
Blue Flash + chirp
Button may be
released
At least 30 cm
At least 15 cm
CO Alarm
CO Alarm
1 m to 3m
14. Conformance
The CO Alarm is certified by BSI to the European standard
EN 50291-1 “Electrical apparatus for the detection of carbon
monoxide in domestic premises” and EN50291-2 “Electrical
apparatus for continuous operation in a fixed installation in
recreational vehicles and similar premises including recreational
craft”. It conforms to the Low Voltage Directive (LVD) and the
Restriction of Hazardous Substances Directive (RoHS).
30
CO Alarm
24
11. First time switch on
For quick wall mounting:
1. Place the wall mounting plate where you want to mount the
alarm
2. With a pencil, mark the location of the central key hole
3. Tap in the nail (provided) at the marked location
Note: The optional Pre-Alarm function can only be activated
during the first 30 seconds after switching on the alarm.
The alarm is switched on by clipping it into place in the wall
mounting plate.
Caution: Even if your alarm is free standing, you must attach
the wall mounting plate.
1. Place the wall mounting plate where you want to mount the
alarm
2. With a pencil, mark the location of the two screw holes
3. Drill holes of diameter 5 mm and insert appropriate wall plugs
4. Screw the mounting plate to the wall/ceiling
Discreet ON/OFF switch, activates
when mounted to wall bracket
Hanger key-hole
for non-permanent
wall mounting
27
15. Troubleshooting and getting assistance
1. Fit the alarm onto the wall mounting plate approximately
10 mm to the left of centre
2. Press firmly against the wall plate and slide the alarm to the
right
3. Tamper proof locking tab will click into place
4. All lights will flash in sequence and the sounder will chirp to
indicate that the alarm has been activated.
5. The green light will blink once per minute indicating that the
alarm is operating
6. Test the alarm following the procedure for the Monthly Test.
28
18. Warranty
After you have carefully read all instructions and your alarm still
fails to work, contact the nearest customer service centre listed
in the “Contact Us” section. Customer service advisors may be
able to resolve your problem quickly. Alternatively contact your
local supplier.
Honeywell warrants your new CO alarm for seven years
(XC70 model) or ten years (XC100 and XC100D models) from
the date of purchase by the end user or until the expiry date
on the side of the unit, whichever occurs first, according to the
specifications as set out in this instruction manual.
If the product needs to be returned for repair or replacement, put
it in a padded box with a letter describing the fault and postage
paid. For battery powered devices, ensure that the alarm has been
switched off.
We will, at our discretion, repair or replace, with same or similar
product, any part of the CO alarm which is found to be defective
in either materials or workmanship within the warranty period.
16. End of life
If activation is not successful, switch off the alarm and try again.
To de-activate the Pre-Alarm function at any time, switch off the
alarm, and then switch it on again without pressing the
TEST/HUSH button. To check if the Pre-Alarm function is
activated, briefly press the TEST/HUSH button. If the Pre-Alarm
is activated, the green POWER and the blue VENTILATE lights
will flash once together. If the Pre-Alarm function is not activated,
only the green POWER light will flash.
16s
• The alarm should be at a horizontal distance of between 1 m
and 3 m from the nearest edge of the potential source
A proof of purchase must be provided to claim repair under
warranty.
Blank
5 times within 4 seconds
15s
A ceiling mounted alarm should be at least 300 mm from any
wall, and a wall-mounted alarm should be at least 150 mm
from the ceiling. Note: Ensure that you can access the tamper
proof locking tab.
Wall mount screwholes
26
Display*
14s
• It should be located close to the ceiling and at a height greater
than the height of any door or window
For tamper proof wall or ceiling mounting:
The alarm can be free standing (e.g. placed on a shelf or table), or
fixed to a wall or ceiling. There are two options for wall mounting,
either hooked onto the nail provided, or permanently fixed using
appropriate wall plugs and screws (not provided).
Sound
13s
20
10. Installation - Mounting the alarm
• In an enclosed space or where it can be obstructed
Lights
12s
Will go back to Normal mode as soon as button released
23
Warning
To activate the Pre-Alarm function, which gives an early
indication of a dangerous CO condition, press the TEST/HUSH
button five times during the first 30 seconds after switching on
the alarm. The power light will flash each time the TEST/HUSH
button is pressed. If activation is successful, the blue VENTILATE
light will flash five times in conjunction with short chirps.
11s
For premises such as bedsits, caravans or boats where the
accommodation is a single living space incorporating the sleeping
area, the apparatus should be positioned as far from the cooking
appliances as possible but near to where the person sleeps.
The alarm should not be installed:
12. Activate the Pre-Alarm function
10s
If the alarm is being fitted in a room without a fuel-burning
appliance it should be located relatively close to the breathing
zone of the occupants.
9. Installation - Where not to put the alarm
25
All icons
shown
High volume alarm pattern
Ideally, an alarm should be fitted in every room containing a
fuel-burning appliance. It is strongly recommended to also fit
alarms in bedrooms, and in rooms where you spend a lot of time.
22
• In a damp or humid location
PPM
All light and
sound signals
are working
*only available on XC100D
19
≥ 10
≥ 43
21
• Where dirt and dust may block the sensor
75%
50%
25%
Meaning
8. Installation - Where to put the alarm
PPM
Alarm levels
7s
Reduced volume alarm
pattern
7. Specification
• Next to a door or window, extractor fan or air vent
Display*
Each light flashing
sequentially with a chirp
Press the test button for 1 second to activate a full test cycle
showing all lights/messages (green, yellow, blue, red) and sound
the audible output at a reduced level. If you wish, hold the test
button for 10 seconds to test with the full 85dB sound level.
18
• In any outside location or where the temperature may drop
below -10°C or exceed 45°C
Sound
Alarm (red)
Power (green)
Fault (yellow)
Ventilate (blue)
Monthly Test
Press the
button for
5. Precautions during use
17
Gas detected Carbon Monoxide
Electrochemical Cell
Sensor
XC70: Ecosure
technology
XC100, XC100D: EcosureX
EN50291-1:2010
Third party
EN50291-2:2010
approvals
BSI Kite marked KM 565387
RoHS, REACH
Other
compliances
Every 60 minutes
Self test
Lifetime and XC70: 7 years
XC100, XC100D: 10 years
warranty
Temperature -10°C to +45°C
25 - 95% RH (non-condensing)
Humidity
IP44
IP rating
Power supply Long life lithium battery, 3 V, sealed for the life
of the product (no replacement necessary)
Power: Green LED
Visual
Alarm: Red LED – big message
indicators
Fault: Yellow LED
Ventilate: Blue LED
> 90 dB @ 1 m
Audible
Lights
Your CO alarm has an automatic self-test function for the
electronics, which is performed every 60 minutes.
Test/Measuring mode overview:
The CO alarm does not require any maintenance other than to
clean the outside case occasionally with a clean tissue. Ensure that
the holes on the front of the unit are not blocked with dust or dirt.
Some common household substances can affect the sensitivity of
the CO alarm. Do not use household cleaners, polishes, perfumes
or aerosol sprays on or close to the alarm. Avoid the use of nail
polish remover, model paint or model glue close to the alarm.
The low level monitoring mode will end automatically after
60 minutes or by pressing the button at any time.
Automatic self-test
When the unit has come to the end of its life, dispose of
it in accordance with local regulations. It is classified as
electronic waste and contains a battery and therefore
should be disposed of separately from household waste.
17. Disclaimer
This Carbon Monoxide alarm is designed to alert you to a
potentially dangerous build-up of Carbon Monoxide gas. It is not
designed to remedy a Carbon Monoxide problem nor to locate a
specific source of Carbon Monoxide. Honeywell shall not be liable
to pay for any Carbon Monoxide investigation or service call
carried out or arranged in response to an alarm.
31
We shall be under no obligation to repair or replace units which
are found to be defective in any way due to unreasonable use or
neglect, improper storage, used or maintained not in accordance
with the user manual or if the product has been tampered with or
found to have been dismantled.
This warranty is instead of and excludes all warranties implied
by law, and to the extent permitted by law, our liability under the
warranty is capped at the price of the product.
In no event are we liable for (a) any direct, indirect, incidental,
consequential loss; (b) any loss arising from business
interruption; (c) loss of profits; (d) loss of revenue; (e) loss of use
of any property or capital; (f) loss of anticipated savings or loss
of data.
32