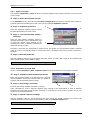
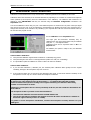
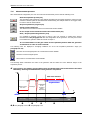
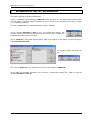
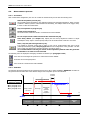
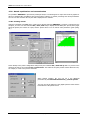
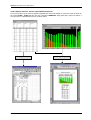
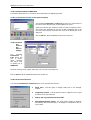
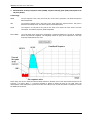
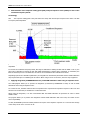
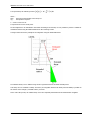
1
dBBATI32 Building acoustics USER MANUAL Copyright © dBBATI32 Building acoustics measurement and processing software User manual [email protected] Þ www.01dB.com 01dB Head Office 200, chemin des Ormeaux F-69578 Limonest Cedex FRANCE +33 4 72 52 48 00 +33 4 72 52 47 47 01dB Italia s.r.l. Via Antoniana, 278 35011 Campodarsego ITALY 01dB Inc. 31 Jordan Street P.O. Box 796 Skaneateles NY 13152 USA 01dB do Brasil Rua Domingos de Morais 2102 Sala 11 – 1 Andar – Vila Mariana 04036-000 Saõ Paulo BRAZIL 01dB Asia Pacific No. 9 Jalan USJ10/1D 47620 Petaling Jaya Selangor MALAYSIA +39 049 92 00 966 +39 049 92 01 239 +1 315 685 3141 +1 315 685 3194 +55 11 5579 6460 +55 11 5579 6610 +60 3 563 22 633 +60 3 563 18 633 The specifications are subject to change without notice. SYMPHONIE® is a registered trademark of 01dB MICROSOFT® is a registered trademark Microsoft Corporation Windows 95™, Windows 98™ are trademarks of Microsoft Corporation P83MAN30-04 NOT1109 gb_dBBATI32_4.1_manual_04.doc – Updated on: October 2003 DBBATI32 SOFTWARE SUITE: USER MANUAL TABLE OF CONTENTS 1. 1 DESCRIPTION OF A 01DB-STELL PC BASED MEASUREMENT CHAIN ________________________________ 9 1.1. 1.2. 1.3. INTRODUCTION _________________________________________________________________________________ 9 GENERAL DESCRIPTION __________________________________________________________________________ 10 BUILDING ACOUSTICS APPLICATIONS ________________________________________________________________ 11 2. NEW FEATURES ________________________________________________________________________________ 13 3. ACQUISITION, ANALYSIS AND COMPUTATION WITH DBBATI32 __________________________________ 15 3.1. OVERVIEW OF THE SOFTWARE PACKAGE : PRINCIPLE OF OPERATION ________________________________________ 15 3.2. MEASURING WITH DBBATI32 ____________________________________________________________________ 16 3.2.1. Common steps____________________________________________________________________________ 16 3.2.2. Types of measurements in dBBATI32__________________________________________________________ 16 3.2.3. Spectra measurements _____________________________________________________________________ 17 3.2.4. Equipment noise measurements ______________________________________________________________ 18 3.2.5. Reverberation time measurements ____________________________________________________________ 19 3.2.6. Room criteria measurements ________________________________________________________________ 20 3.2.7. Signal recording __________________________________________________________________________ 21 3.2.8. Acquisition en mode MLS ___________________________________________________________________ 21 3.3. DATA PROCESSING IN DBBATI32 __________________________________________________________________ 22 4. HARDWARE CONFIGURATION __________________________________________________________________ 25 5. MEASUREMENT CHAIN CALIBRATION __________________________________________________________ 27 6. USE OF THE MANAGERS ________________________________________________________________________ 29 6.1. 6.2. 6.3. 7. INTRODUCTION ________________________________________________________________________________ 29 CONFIGURATION OF A MANAGER ___________________________________________________________________ 29 SET-UP OF A MANAGER __________________________________________________________________________ 30 SPECTRA MEASUREMENTS _____________________________________________________________________ 31 7.1. MEASUREMENT WINDOW OVERVIEW ________________________________________________________________ 32 7.2. MEASUREMENT SET-UP __________________________________________________________________________ 33 7.2.1. Acquisition channel types for spectrum measurement _____________________________________________ 33 7.2.2. Analysis parameters _______________________________________________________________________ 33 7.2.3. Signal characteristics ______________________________________________________________________ 34 7.2.4. Measurement options ______________________________________________________________________ 35 7.2.4.1. Acquisition options ___________________________________________________________________ 35 7.2.4.2. Averaging options ____________________________________________________________________ 35 7.2.5. Gain and threshold command, autorange ______________________________________________________ 36 7.3. DISPLAY SET-UP AND STATUS BAR __________________________________________________________________ 38 7.3.1. Dynamic settings__________________________________________________________________________ 38 7.3.2. Status bar _______________________________________________________________________________ 38 7.4. MEASUREMENT PROCESS_________________________________________________________________________ 39 8. MECHANICAL EQUIPMENT NOISE MEASUREMENT ______________________________________________ 41 8.1. MEASUREMENT SET-UP __________________________________________________________________________ 42 8.2. MEASUREMENT WINDOW OVERVIEW ________________________________________________________________ 43 8.3. DISPLAY SET-UP AND STATUS BAR __________________________________________________________________ 44 8.3.1. Dynamic settings__________________________________________________________________________ 44 8.3.2. Display time history _______________________________________________________________________ 44 8.3.3. Manual determination of the equipment noise level_______________________________________________ 44 8.3.4. Graphical settings_________________________________________________________________________ 44 8.3.5. Status bar _______________________________________________________________________________ 45 8.4. MEASUREMENT PROCESS_________________________________________________________________________ 45 1 Important Notice: Because this software package is modular in structure, some of the functions described in this manual may not be available in your copy of the software. To upgrade your version with optional modules, contact your 01dB agent. TABLE OF CONTENTS PAGE 5 DBBATI32 SOFTWARE SUITE: 9. USER MANUAL REVERBERATION TIME (RT) MEASUREMENTS ___________________________________________________ 47 9.1. MEASUREMENT WINDOW OVERVIEW ________________________________________________________________ 48 9.2. MEASUREMENT SET-UP __________________________________________________________________________ 49 9.2.1. Acquisition channel types for RT measurement __________________________________________________ 49 9.2.2. Analysis parameters _______________________________________________________________________ 49 9.2.3. Signal characteristics ______________________________________________________________________ 50 9.2.4. RT computation parameters _________________________________________________________________ 51 9.2.5. Measurement options ______________________________________________________________________ 52 9.2.5.1. Acquisition options ___________________________________________________________________ 52 9.2.5.2. Averaging options ____________________________________________________________________ 52 9.2.6. Gain and threshold command, autorange ______________________________________________________ 53 9.3. DISPLAY SET-UP AND STATUS BAR __________________________________________________________________ 55 9.3.1. Dynamic settings __________________________________________________________________________ 55 9.3.2. Status bar _______________________________________________________________________________ 55 9.4. MEASUREMENT PROCESS _________________________________________________________________________ 56 9.4.1. Procedure _______________________________________________________________________________ 56 9.4.2. Sketches_________________________________________________________________________________ 56 10. DECAY EDITION WINDOW (RT)________________________________________________________________ 59 11. ROOM CRITERIA MEASUREMENTS____________________________________________________________ 61 11.1. 11.2. 11.2.1. 11.2.2. 11.2.3. 11.2.4. 11.2.5. 11.2.6. 11.3. 11.3.1. 11.3.2. 11.4. 11.4.1. 11.4.2. MEASUREMENT WINDOW OVERVIEW ______________________________________________________________ 62 MEASUREMENT SET-UP ________________________________________________________________________ 63 Acquisition channel types for room criteria measurement __________________________________________ 63 Analysis parameters _______________________________________________________________________ 63 Signal characteristics ______________________________________________________________________ 64 Criteria computation parameters _____________________________________________________________ 65 Measurement options ______________________________________________________________________ 65 Gain and threshold command, autorange ______________________________________________________ 66 DISPLAY SET-UP AND STATUS BAR________________________________________________________________ 68 Dynamic settings __________________________________________________________________________ 68 Status bar _______________________________________________________________________________ 68 MEASUREMENT PROCESS ______________________________________________________________________ 69 Procedure _______________________________________________________________________________ 69 Sketches_________________________________________________________________________________ 70 12. DECAY EDITION WINDOW (ROOM CRITERIA) _________________________________________________ 71 13. SIGNAL ACQUISITION ________________________________________________________________________ 73 13.1. 13.2. 13.3. 14. 14.1. 14.2. 15. RECORDING COMMAND ________________________________________________________________________ 73 GAIN AND THRESHOLD COMMAND________________________________________________________________ 75 RECORD CONFIGURATION COMMAND _____________________________________________________________ 76 MLS ACQUISITION MODE _____________________________________________________________________ 77 SET-UP AND MEASUREMENT ____________________________________________________________________ 77 GAIN SETTINGS ______________________________________________________________________________ 78 MANAGEMENT OF MEASUREMENT SESSION DATAFILES (CMG) ________________________________ 81 15.1. CMG DATAFILE MANAGEMENT__________________________________________________________________ 81 15.1.1. New CMG datafile ________________________________________________________________________ 81 15.1.2. Open a CMG datafile ______________________________________________________________________ 82 15.1.3. Close a CMG datafile ______________________________________________________________________ 82 15.1.4. Save a CMG datafile_______________________________________________________________________ 82 15.1.5. Delete one or several CMG datafile(s)_________________________________________________________ 82 15.2. MEASUREMENT SESSION WINDOW OVERVIEW _______________________________________________________ 83 15.2.1. Toolbars ________________________________________________________________________________ 83 15.2.2. Measurement session information window______________________________________________________ 84 15.2.3. Measurement session comments ______________________________________________________________ 84 15.2.4. Playback audio events______________________________________________________________________ 84 15.2.5. Delete data items__________________________________________________________________________ 84 15.2.6. Modify data items (edition)__________________________________________________________________ 85 15.2.6.1. Edition of items : date and time __________________________________________________________ 85 15.2.6.2. Edition of items : location and comments __________________________________________________ 85 15.2.6.3. Edition of items : Level conversion _______________________________________________________ 85 TABLE OF CONTENTS PAGE 6 DBBATI32 SOFTWARE SUITE: USER MANUAL 15.2.6.4. Edition of items : study zone ____________________________________________________________ 86 15.2.6.5. Edition of items : Type for building acoustics ______________________________________________ 86 15.2.6.6. Edition of items : Information ___________________________________________________________ 86 15.2.7. Create new data item ______________________________________________________________________ 87 15.2.8. Operations on data items ___________________________________________________________________ 87 15.3. PLOT DATA ITEMS (GRAPHICS) __________________________________________________________________ 88 15.3.1. Signal view ______________________________________________________________________________ 88 15.3.2. Broad band spectra view ___________________________________________________________________ 90 15.3.2.1. Display parameters of the graphical view __________________________________________________ 90 15.3.2.2. Data parameters for the graphical view ____________________________________________________ 91 15.4. LISTINGS OF DATA ITEMS (TABLES) _______________________________________________________________ 92 15.5. AUTOMATIC TEST REPORTS _____________________________________________________________________ 93 15.6. DESCRIPTION AND SELECTION OF COLUMNS IN A MEASUREMENT SESSION WINDOW ___________________________ 95 15.7. EDITION AND EXECUTION OF REQUESTS (DATA SORTING) ______________________________________________ 96 15.7.1. Overview of requests' edition ________________________________________________________________ 96 15.7.2. Add or modify a request (local or global _______________________________________________________ 97 15.7.2.1. Overview ___________________________________________________________________________ 97 15.7.2.2. Definition principle ___________________________________________________________________ 98 15.7.2.3. List of the values available to define a request ______________________________________________ 99 15.7.3. Execute a request ________________________________________________________________________ 101 15.8. RESULT EXPLOITATION AND CUSTOMISATION ______________________________________________________ 102 15.8.1. Printing results __________________________________________________________________________ 102 15.8.2. Export data to a word or spreadsheet processor ________________________________________________ 103 15.8.3. Principle and configuration of the Copy command ______________________________________________ 104 15.8.4. Exportation of data at ASCII format (TXT file) _________________________________________________ 105 15.8.5. Customisation of dBBATI32 ________________________________________________________________ 107 15.8.5.1. Select the colours of the data to display __________________________________________________ 107 15.8.5.2. Select the fonts of the data to display ____________________________________________________ 107 15.8.5.3. General functions____________________________________________________________________ 107 15.8.5.4. Start options ________________________________________________________________________ 109 15.8.5.5. Parameters for operations on data items __________________________________________________ 109 15.8.5.6. Measurement session general options ____________________________________________________ 109 16. SPECTRA ANALYSIS _________________________________________________________________________ 111 16.1. ANALYSIS WINDOW OVERVIEW _________________________________________________________________ 112 16.2. ANALYSIS SET-UP ___________________________________________________________________________ 113 16.2.1. Analysis parameters ______________________________________________________________________ 113 Averaging and processing options ____________________________________________________________________ 113 16.3. DISPLAY SET-UP AND STATUS BAR ______________________________________________________________ 114 16.3.1. Dynamic settings_________________________________________________________________________ 114 16.3.2. Status bar ______________________________________________________________________________ 114 16.4. SELECTION OF AUDIO RECORDS TO ANALYSE_______________________________________________________ 115 16.5. ANALYSIS PROCESS__________________________________________________________________________ 115 17. REVERBERATION TIME (RT) ANALYSIS ______________________________________________________ 117 17.1. 17.2. 17.2.1. 17.2.2. 17.2.3. 17.3. 17.3.1. 17.3.2. 17.4. 17.5. 18. ANALYSIS WINDOW OVERVIEW _________________________________________________________________ 118 ANALYSIS SET-UP ___________________________________________________________________________ 119 Analysis parameters ______________________________________________________________________ 119 RT computation parameters ________________________________________________________________ 119 Processing and averaging parameters ________________________________________________________ 119 DISPLAY SET-UP AND STATUS BAR ______________________________________________________________ 120 Dynamic settings_________________________________________________________________________ 120 Status bar ______________________________________________________________________________ 120 SELECTION OF RECORDS TO ANALYSE ____________________________________________________________ 121 ANALYSIS PROCESS__________________________________________________________________________ 122 ROOM CRITERIA ANALYSIS__________________________________________________________________ 123 18.1. ANALYSIS WINDOW OVERVIEW _________________________________________________________________ 124 18.2. ANALYSIS SET-UP ___________________________________________________________________________ 125 18.2.1. Analysis parameters ______________________________________________________________________ 125 18.2.2. Criteria computation parameters ____________________________________________________________ 125 18.2.3. Analysis options _________________________________________________________________________ 125 18.3. DISPLAY SET-UP AND STATUS BAR ______________________________________________________________ 126 18.3.1. Dynamic settings_________________________________________________________________________ 126 18.3.2. Status bar ______________________________________________________________________________ 126 TABLE OF CONTENTS PAGE 7 DBBATI32 SOFTWARE SUITE: 18.4. 18.5. 19. USER MANUAL SELECTION OF RECORDS TO ANALYSE ____________________________________________________________ 127 ANALYSIS PROCESS __________________________________________________________________________ 127 STANDARD CALCULATIONS__________________________________________________________________ 129 19.1. COMPUTATION PARAMETERS___________________________________________________________________ 129 19.2. COMPUTATION PROCESS ______________________________________________________________________ 131 19.2.1. Selection of the data items _________________________________________________________________ 131 19.2.2. Run the computation ______________________________________________________________________ 132 20. SIMPLIFIED USER LEVEL ____________________________________________________________________ 133 20.1. 20.2. 21. LIMITATIONS_______________________________________________________________________________ 133 MEASUREMENT MANAGER SET-UP (SIMPLIFIED VERSION) _____________________________________________ 134 APPENDICES ________________________________________________________________________________ 137 21.1 21.2. 21.3. 21.4. 21.4.1. 21.4.2. 21.4.3. 21.4.4. 21.5. 21.5.1. 21.5.2. 21.5.3. EDITION OF THE SOFTWARE LICENCE NUMBER______________________________________________________ 137 MLS TECHNIQUE ___________________________________________________________________________ 137 REVERBERATION TIME CALCULATION ALGORITHM __________________________________________________ 138 STANDARD CALCULATIONS ____________________________________________________________________ 143 Insulation ______________________________________________________________________________ 143 Impact noise ____________________________________________________________________________ 146 Mechanical equipment noise________________________________________________________________ 147 Absorption coefficient _____________________________________________________________________ 148 ROOM CRITERIA ____________________________________________________________________________ 151 Reverberation time _______________________________________________________________________ 151 Energy criteria __________________________________________________________________________ 152 Intelligibility criteria______________________________________________________________________ 154 TABLE OF CONTENTS PAGE 8 DBBATI32 SOFTWARE SUITE: 1. USER MANUAL DESCRIPTION OF A 01DB-STELL PC BASED MEASUREMENT CHAIN You have purchased a 01dB PC-based system to perform sound and vibration analysis. The 01dB concept is to combine sound and vibration instrumentation with the computational and management facilities of a PC. For first time users of a PC based measurement chain, the following chapter describes the concept with respect to environmental noise measurements. 1.1. For more general information on the concept of a PC – based measurement system, see the “getting started user manual” delivered with your measurement system. Introduction The use of personal computers for acoustical measurement and data processing has been a topic of much discussion, even controversy over recent years. The phenomenal growth in PC technology now offers the benefits of computational speed and flexibility that are being employed in many areas of research and engineering applications. Traditionally the function of acoustical measurement has belonged to the dedicated instrument while the computer has carried out the tasks of data storage, display and basic processing. The interface between the two has been either an RS-232 serial communication or manual entry via a keyboard. Human error, excessive time and long rolls of silver paper are just some of the disadvantages of this system. An attractive solution for the pure technologist is to build a PC based instrument, though the benefits over the dedicated instrument should be apparent. Alternatively, the design of an optimum PC based measurement system will depend on the management of data handling between the dedicated hardware and the PC environment. The possibility of flexible and creative solutions that offer a very high degree of accuracy over a wide range of applications have been sought and developed over the last ten years by the team at 01dB. CHAPTER 1 - DESCRIPTION OF A 01DB-STELL PC BASED MEASUREMENT CHAIN PAGE 9 DBBATI32 SOFTWARE SUITE: 1.2. USER MANUAL General description 01dB have developed a modular PC - based measurement chain, similar to that used by traditional stand-alone measurement systems. This generic approach applies to sound level meters, tape recorders or multi-channel analysers. The principle features are: A transducer that transforms a physical quantity into an electrical input signal. A signal conditioner amplifies and conditions the electrical signal for treatment in an acquisition unit. Conditioning units require power supply. An acquisition platform or digital signal-processing unit (DSP) with some dedicated DSP function performing the actual measurements. To control the instrument, a visual display panel is necessary. In addition, the results (spectra, time histories, etc.) require a graphical interface. Dedicated calculation functions, such as the calculation of building acoustics criteria, may be performed on the input signals. The results, which may take the form of a raw audio recording or a set of Ln measurements for example, must be stored to allow post-processing operations. The personal computer may be used as a host to a dedicated instrument. Duplication of function, however, quickly becomes apparent. A PC may handle many internal functions of the dedicated instrument more efficiently. Benefits of the PC include access to greater storage capacity, input / output devices, higher resolution with a Windows™ style graphical interface and general integration with the computer based design environment. The computer may also take responsibility for system control. (Note that some existing analysers actually feature an internal Intel x86 PC processor as the system controller) The application software determines the type of measurement that the user is able to perform The PC platform controls the user interface, graphics, storage and post processing functions. Here lies the real advantage of a virtual instrument: with 01dB application software the user has the possibility to choose the nature of the measurement system. It may be a sound level meter, a real time analyser, a digital tape recorder, etc. However, it should be remembered that for acoustics, computer technology is not an end in itself but a tool to provide the most efficient and accurate method of sound and vibration measurement. What is a PC based measuring system? It is a system comprising hardware resources, software modules and a host computer, which must meet the current Standards for corresponding dedicated instruments. The field of acoustical measurement is yet, dominated by the use of dedicated instruments, with standards and tests to reflect this. Any technology is redundant without the degree of accuracy required for useful results. In parallel with the development of sound level meters, standards have been created for each type of acoustical measurement instrument. For example, the Standards IEC 651, IEC 804 and IEC 1043 and their national equivalents give minimum requirements with respect to dynamic range, linearity and frequency response of the instrument Our systems, such as SYMPHONIE are type 1 approved in several countries. This accuracy rating applies to the use of generic computing hardware, that in practice enables any brand of computer to be used that meets current minimum standards. In general, a fast processor such as the Pentium® with an ample storage capacity is preferred. CHAPTER 1 - DESCRIPTION OF A 01DB-STELL PC BASED MEASUREMENT CHAIN PAGE 10 DBBATI32 SOFTWARE SUITE: 1.3. USER MANUAL Building acoustics applications For building applications using a 01dB PC based measurement system, the following set of components is required to carry out a measurement. For example, the isolation of air born noise, shock reception levels, equipment noise or reverberation time measurements. The list below is not exhaustive and may vary from application to application. Transducer unit (dual channel measurements in option) Type 1 or Type 2 condenser microphone (pre-polarised, externally polarised (200 V). Associated preamplifier. It should supply the polarisation voltage for the condenser microphone if required. Accessories Windshield to protect the microphone for outdoors measurements. Extension cable for connection to the acquisition unit. Tripods. Measurement case for outdoors measurements. Type 1 or Type 2 acoustical calibrator to perform calibrated measurements. Noise sources Pink and white noise sources in octave bands with or without a controller for air borne sound isolation measurements (type GDB95). Dodecaheader Omnidirectional noise source type DO12. Standardised tapping machine for impact noise insulation measurements (Type N211). Power amplifier M700 Amplified loudspeaker connected to the output of the SYMPHONIE or HARMONIE acquisition unit in order to use the internal signal generator (white noise and pink noise). Measurement systems Laptop, industrial or desktop computer, that meets the minimum requirements specified by 01dB, with a Windows operating system. Acquisition unit connected to the computer (type SYMPHONIE or HARMONIE). dBBATI32 measurement and processing software. The photograph opposite illustrates a 01dB buildings measurement system. All the components listed above are available from our offices. Contact your regional sales representative for more information. A complete description on how to assemble the various components of your system is given in the getting started manual delivered with the system CHAPTER 1 - DESCRIPTION OF A 01DB-STELL PC BASED MEASUREMENT CHAIN PAGE 11 DBBATI32 SOFTWARE SUITE: 2. USER MANUAL NEW FEATURES Managers The user interface of dBBATI32 has been modified for a greater ease of use. The managers allows the operator to configure and save the settings of the measurement system more easily and faster as well as performing successive measurements in batch mode. Three different managers are available : Measurement manager (*.GSM) Analysis manager (*.GSA) Standard calculation manager (*.GSC) All display, acquisition and calculation parameters are saved with a given manager These managers therefore offer a simple and efficient mean to save in a single file all the parameters of a measurement sequence. For example, a measurement file insulation.GSM may contain all the acquisition parameters for emitted noise, received noise, background noise and reverberation time measurements. Example of computation manager Refer Example of measurement manager to chapter 6 for further information on the use of these managers Quick access to off-line calculations using icons The operations that can be performed off-line to items of a measurement session can now be accessed directly using the icons of the measurement session toolbar, avoiding the use of the computation server for these simple calculations. The icons shown aside can be used when compatible items of a measurement session are selected. These icons allows the operator to perform the following operations : Addition of items Subtraction of items Averaging of items Frequency recombination in octave bands RT computation from a time decay item Refer to paragraph 15.2.8 for further information. Simplified and Standard user levels In standard mode, all the functions of the software package may be accessed. It is possible to access to the simplified version of the software by using a command of the Preferences menu. This version offers a simplified user interface to the operator, but some functions are not available. Refer to chapter 20 for further information. CHAPTER 2 - NEW FEATURES PAGE 13 DBBATI32 SOFTWARE SUITE: USER MANUAL Measurements Measurement of equipment noise (=Maximum value in Slow A) The measurement of equipment noise for building acoustics applications correspond to the maximum value of the Aweighted Leq time history, using a Slow time constant, over a user-defined duration. Refer to chapter 8 for further information. Measurement using the MLS technique The MLS method (Maximum Length Sequence) can be used for all types of measurements, excepted equipment noise. The use of this technique is througoutly explained in the chapters relative to acquisition. Refer as well to annex 21.2 Received noise measurements are treated differently for airborne and impact noises Refer to chapter 7 for further information. Room criteria measurements Refer to chapter 11 for further information. Pink noise generator remotely controlled : stabilisation delay of the noise in the room under test, automatic cut-off of the generator for reverberation time measurements. Delayed measurements : User-defined delay for the operator to leave the room under test. Standard calculations In this version of dBBATI32, many building acoustics standards are taken into account (calculation of ISO 717 criteria for example). Refer to chapter 16 for further information. Edition of test reports It is now possible to create, edit and print tests reports featuring standard calculations, directly from the software package. These reports comply with the specifications of ISO standards. Refer to paragraph 15.5 for further information. CHAPTER 2 - NEW FEATURES PAGE 14 DBBATI32 SOFTWARE SUITE: USER MANUAL 3. ACQUISITION, ANALYSIS AND COMPUTATION WITH DBBATI32 3.1. Overview of the software package : principle of operation Measurement chain configuration (dBCONFIG32) dBBATI32 hardware configuration System calibration MEASUREMENT selection Room criteria RT Emitted noise Received airborne noise Background Received noise impact noise Simultaneous emission / Spectra reception Equipment noise MLS acquisition possible Reverberation decay edition Spectra (+audios if required) IMPORTATION / AUDIO RECORDINGS MEASUREMENT SESSION (CMG) Reverberation time Room criteria Audios only Data storage (all types) Spectra ANALYSIS Edition & execution of requests STANDARD CALCULATIONS Insulation, impact noise, equipment noise, absorption. OFF-LINE OPERATIONS Recombination, arithmetic operations, etc. All data acquired, as well as any analysis result, are saved in a database called a measurement session datafile (of extension *.CMG). The procedures for each type of measurement, as well as each data processing operation, are presented in the following paragraphs. The stages common to each type of measurement are also described. Each procedure is then described in details in the different chapters of this manual. CHAPTER 3 - ACQUISITION, ANALYSIS AND COMPUTATION WITH DBBATI32 PAGE 15 DBBATI32 SOFTWARE SUITE: 3.2. USER MANUAL Measuring with dBBATI32 3.2.1. Common steps These steps have to be taken before each measurement. There are common to all the types of measurement. Stage 1 : Set up of the measurement chain Connection of the hardware elements, definition of their characteristics in the database utility dBCONFIG32, set up of the signal conditioning options of both the transducer and the hardware peripheral. Stage 2 : Selection of acquisition hardware: one or more transducer / calibrator pair Choose Acquisition / Hardware Configuration. Select the acquisition platform (and associated signal conditioning options), the correct transducer and calibrator pairs, etc. Refer to chapter4. Stage 3: Calibration Carry out the calibration of the measurement chain before each measurement (Command Acquisition / Calibration). Refer to chapter 5. 3.2.2. Types of measurements in dBBATI32 dBBATI32 features different types of measurements, analyses and computation. The acquisition can be done : Either by importation existing audio data files (16-bit files or other 01dB application data files) Either by real time acquisition. 4 main types of real time acquisition may be identified :spectra measurements, equipment noise measurements, Reverberation time measurements and room criteria measurements. Either by direct signal recording on the computer hard disk for later analysis. The spectra, time decays, room criteria and audio recordings obtained from each of these methods are stored in a measurement session datafile (*.CMG) to enable airborne or impact sound insulation measurements, for example. Furthermore, each type of measurements listed above can be saved in a measurement manager (*.GSM file). CHAPTER 3 - ACQUISITION, ANALYSIS AND COMPUTATION WITH DBBATI32 PAGE 16 DBBATI32 SOFTWARE SUITE: USER MANUAL 3.2.3. Spectra measurements This type of acquisition is used for general spectra measurements in octaves and third octaves (emitted noise, received noise, background noise spectra, received airborne noise and impact noise spectra, simultaneous emitted and received noise spectra, spectra with no particular type) enabling standardised insulation calculations. Access this type of measurement from a measurement manager by the command Acquisition / New or, if a measurement configuration already exists, by the command Acquisition / Open. Refer to chapter 6 for further explanation on how to use a manager. Step 1 Use the command Configure of the manager to select the types of measurements to activate. Step 2 Use the command Parametrize to select the acquisition parameters, the generator settings, the averaging parameters, channel selection settings, etc. 1 2 3 5 Step 3 Use the icons of the manager toolbar to start a given type of spectra measurement. The measurement window shown aside is displayed on screen. 4 6 Step 4 : Setting the dynamic range Use the command Commands / Gain and threshold or alternatively use the associated icon. 7 The gain settings are used to set the dynamic range for the measurement in order to eliminate over or under charge during acquisition. The Autorange facility is used when the sound level during the measurement is fairly constant. This is usually the case for airborne sound insulation or impact sound insulation measurements. To initiate the autorange use the Acquisition / Autorange command or the touch key function F8. Threshold levels are used to automatically trigger a measurement when a sound level (the threshold) is passed (a direction is specified). Stage 5 : Setting the display parameters Definition of the display parameters from the Display menu (for optimisation the scale, display of time histories etc.). The colours of the graphs may be edited using Preferences / Colours. Stage 6 : Starting the measurement Acquisition is started using the command Acquisition / Start (F3). Icons found within the measurement window allow the start or ending of the measurement. Passing the threshold could also start measurement. dBBATI32 also features a pink or white noise generator when used with SYMPHONIE or HARMONIE. Stage n° 7 : Validation of the results and data storage At the end of each measurement, the results can either be accepted or rejected. For results that are accepted, the spectra are stored in a measurement session datafile *.CMG. Refer to chapter 7 for detailed explanations on spectra measurements. CHAPTER 3 - ACQUISITION, ANALYSIS AND COMPUTATION WITH DBBATI32 PAGE 17 DBBATI32 SOFTWARE SUITE: USER MANUAL 3.2.4. Equipment noise measurements This type of acquisition is used for equipment noise measurements (maximum value of the A-weighted Leq time history, using a Slow time constant, over a user-defined duration). Equipment noise spectra can also be saved (instantaneous spectrum at the time of the maximum A-weighted Leq value). Access this type of measurement from a measurement manager by the command Acquisition / New or, if a measurement configuration already exists, by the command Acquisition / Open. Refer to chapter 6 for further explanation on how to use a manager. Step 1 Use the command Configure of the manager to select the type of measurement mechanical equipment noise. 1 Step 2 Use the command Parametrize to select the acquisition parameters, the generator settings, the averaging parameters, channel selection settings, etc. 2 3 5 Step 3 Use the icon mechanical equipment noise of the manager toolbar to start an acquisition. The measurement window shown aside is displayed on screen. 4 Step 4 : Setting the dynamic range Use the command Commands / Gain and threshold or alternatively use the associated icon. The gain settings are used to set the dynamic range for the measurement in order to eliminate over or under charge during acquisition. 6 7 8 Stage 5 : Setting the display parameters Definition of the display parameters from the Display menu (for optimisation the scale, display of time histories etc.). The colours of the graphs may be edited using Preferences / Colours. Stage 6 : Start the acquisition When opening the measurement window, the equipment noise level is acquired and memorised. It is possible to start the measurement again (reset) by using the Commands / Start (F3). Stage 7 : End of acquisition The maximum value of the A-weighted Slow Leq is displayed on screen for validation since the latest reset. Stage 8 : Validation of the results and data storage At the end of each measurement, the results can either be accepted or rejected. If an extraneous noise source affects the measurement result (for example, a door slamming), the user may manually adjust the equipment noise level by using the cursor on the time history plot. For results that are accepted, the spectra are stored in a measurement session datafile *.CMG. Refer to chapter 8 for detailed explanations on equipment noise measurements. CHAPTER 3 - ACQUISITION, ANALYSIS AND COMPUTATION WITH DBBATI32 PAGE 18 DBBATI32 SOFTWARE SUITE: USER MANUAL 3.2.5. Reverberation time measurements This provides complete reverberation duration calculation enabling normalised insulation spectra calculations absorption indices, etc. Access this type of measurement from a measurement manager by the command Acquisition / New or, if a measurement configuration already exists, by the command Acquisition / Open. Refer to chapter 6 for further explanation on how to use a manager. Step 1 Use the command Configure of the manager to select the type of measurement reverberation time. Step 2 Use the command Parametrize to select the acquisition parameters, the generator settings, the averaging 5 parameters, etc 1 2 3 Step 3 Use the icon reverberation time of the manager toolbar to start an acquisition. The measurement window shown aside is displayed on screen. Step 4 : Setting the dynamic range Use the command Commands / Gain and threshold or alternatively use the associated icon. The gain settings are used to set the dynamic range for the measurement in order to eliminate over or under charge during acquisition. 4 6 8 7 The Autorange facility is used when the sound level during the measurement is fairly constant. This is usually the case for reverberation time measurements using a stationary signal. To initiate the autorange use the Acquisition / Autorange command or the touch key function F8. Threshold levels are used to automatically trigger a measurement when a sound level (the threshold) is passed (a direction is specified). Stage 5 : Setting the display parameters Definition of the display parameters from the Display menu (for optimisation the scale, display of time histories etc.). The colours of the graphs may be edited using Preferences / Colours. Stage 6 : Starting the measurement Acquisition is started using the command Acquisition / Start (F3). Icons found within the measurement window allow the start or ending of the measurement. Passing the threshold could also start measurement. dBBATI32 also features a pink or white noise generator when used with SYMPHONIE or HARMONIE. Stage 7 : Decay editing Editing at the end of measurement is possible for time decays whose slope allows reverberation time spectra calculations. The decays edition window is automatically displayed on screen by default. Stage n° 8 : Validation of the results and data storage At the end of each measurement, the results can either be accepted or rejected. For results that are accepted, the spectra are stored in a measurement session datafile *.CMG. Refer to chapter 9 et 10 for detailed explanations on RT spectra measurements. CHAPTER 3 - ACQUISITION, ANALYSIS AND COMPUTATION WITH DBBATI32 PAGE 19 DBBATI32 SOFTWARE SUITE: USER MANUAL 3.2.6. Room criteria measurements This type of acquisition is used for complete measurement of room criteria (RT, EDT, Clarity, Definition, ST1, RASTI, STI). Access this type of measurement from a measurement manager by the command Acquisition / New or, if a measurement configuration already exists, by the command Acquisition / Open. Refer to chapter 6 for further explanation on how to use a manager. Step 1 Use the command Configure of the manager to select the type of measurement room criteria. Step 2 Use the command Parametrize to select the acquisition, signal and computation parameters, the averaging parameters, etc. 1 2 3 5 Step 3 Use the icon room criteria of the manager toolbar to start an acquisition. The measurement window shown aside is displayed on screen. Step 4 : Setting the dynamic range Use the command Commands / Gain and threshold or alternatively use the associated icon. The gain settings are used to set the dynamic range for the measurement in order to eliminate over or under charge during acquisition. 4 6 8 7 To initiate an autorange use the Acquisition / Autorange command or the touch key function F8. Threshold levels are used to automatically trigger a measurement when a sound level (the threshold) is passed (a direction is specified). Stage 5 : Setting the display parameters Definition of the display parameters from the Display menu (for optimisation the scale, display of time histories etc.). The colours of the graphs may be edited using Preferences / Colours. Stage 6 : Starting the measurement Acquisition is started using the command Acquisition / Start (F3). Icons found within the measurement window allow the start or ending of the measurement. Passing the threshold could also start measurement. Stage 7 : Decay editing At the end of each measurement, the user may edit the slope of the time decays in each frequency band and set up the arrival of the direct wave. These settings have a non-neglectable effect on the calculation of room criteria. The decays edition window is automatically displayed on screen by default. Stage n° 8 : Validation of the results and data storage At the end of each measurement, the results can either be accepted or rejected. For results that are accepted, the spectra are stored in a measurement session datafile *.CMG. Refer to chapter 11 and 12 for detailed explanations on room criteria measurements. CHAPTER 3 - ACQUISITION, ANALYSIS AND COMPUTATION WITH DBBATI32 PAGE 20 DBBATI32 SOFTWARE SUITE: USER MANUAL 3.2.7. Signal recording This command (Acquisition / record) useful to record audio signals for later frequency analysis. It can be used as a DAT recorder. Stage 1 : Define the acquisition process In the Acquisition menu, select the command Record configuration and select the rearming mode: Manual or Automatic (when a threshold trigger is used). Then, use the command Acquisition / Record. Stage 2 : Acquisition parameters 2 3 Define the acquisition frequency range as well as the maximum duration of an audio record. Stage 3 : Gain and Threshold settings / Autorange Select the gain settings command, manual or automatic (autorange). These commands are used to adjust the dynamic range required for the measurement in order to eliminate surcharge and under loads during recording. 4 Autorange is used when the sound levels to measure do not vary greatly over the acquisition duration. Threshold levels are used to automatically trigger a measurement when a threshold sound level is passed (a direction is specified). Stage 4 : Recording Audio files Start the acquisition when the set-up operations have been carried out. Audio data is saved to the computer hard disk in a measurement session datafile (*.CMG). Refer to chapter 13 for detailed explanations on signal recording. 3.2.8. Acquisition en mode MLS Use the command Acquisition / MLS* acquisition mode to start a measurement of room impulse responses. Stage 1 : Definition of MLS acquisition parameters 2 Define the parameters relative to the MLS sequence to generate and the acquisition such as the sequence order, the number of averages, and the acquisition frequency range. Stage 2 : Gain settings / Autorange 3 1 Select the gain setting command (automatic or manual). These commands are used to adjust the dynamic range required for the measurement in order to eliminate surcharge and under loads during recording. Autorange is used when the sound levels to measure do not vary greatly over the acquisition duration. Stage 3 : Impulse response recordings Start the acquisition when the set-up operations have been carried out. Impulse responses are saved to the computer hard disk in a measurement session datafile (*.CMG) as an impulse response item. Refer to chapter 14 for detailed explanations on MLS acquisition * MLS : Maximum Length Sequence CHAPTER 3 - ACQUISITION, ANALYSIS AND COMPUTATION WITH DBBATI32 PAGE 21 DBBATI32 SOFTWARE SUITE: 3.3. USER MANUAL Data processing in dBBATI32 Data processing in dBBATI32 can now be performed with analysis and computation managers. The first action for data analysis is to open an existing measurement session (command File / Open) that contains the measurement data items to analyse. Analysis of audio records dBBATI32 allows one to perform three types of analysis on audio records : spectra analysis, RT analysis and room criteria analysis. These analyses can be configured and performed with the help of the analysis manager (Analysis menu). Analyses can performed successively in an automatic manner for several audio signals, using the batch mode. Refer to chapter 16, 17 and 18 for detailed explanations on audio data analysis. Standardised calculations In this version of dBBATI32, several standard indices may be computed directly using the computation manager. 4 different types of computation are available (Standard calculations menu) : Insulation, Impact noise, Mechanical equipment noise and absorption. Standardised calculations may be performed successively in an automatic manner over several items using the batch mode. Refer to chapter 16 for detailed explanations on standardised calculations. The tables shown below features all the indices computed in dBBATI32 as well as the standard it refers to. Airborne noise (insulation) Raw level difference D Standardised level difference DnT A weighted standardised level difference DnAT Raw insulation D Normalised sound insulation Dn Standardised sound insulation Dn,T Weighted normalised sound insulation Dn,w Weighted standardised sound insulation Dn,T,w Sound reduction index R Apparent sound reduction index R' Weighted sound reduction index Rw Weighted apparent sound reduction index R'w CHAPTER 3 - ACQUISITION, ANALYSIS AND COMPUTATION WITH DBBATI32 French standard NF S 31-057 International standard ISO 140-4 International standard ISO 717-1 International standard ISO 140-3 (NF EN 140-3) International standard ISO 140-4 (NF EN 140-4) International standard ISO 717-1 (NF EN 717-1) PAGE 22 DBBATI32 SOFTWARE SUITE: USER MANUAL Impact noise Normalised impact sound pressure level LnT A-weighted normalised impact sound pressure level LnAT Normalised impact sound pressure level Ln Normalised impact sound pressure level L'n Standardised impact sound pressure level L'nT Weighted normalised impact sound pressure level Ln,w Weighted normalised impact sound pressure level L'n,w Weighted standardised impact sound pressure level L'nT,w French standard NF S 31-057 International standard ISO 140-6 and ISO 140-7 International standard ISO 717-2 Mechanical equipment noise Normalised equipment noise level LeT French standard NF S 31-057 Absorption Absorption coefficient αs Weighted sound absorption index αw International standard ISO 354 (NF EN 20354) International standard ISO 11654 (NF EN 11654) General management of measurement session datafiles Data processing in dBBATI32 can now be performed in a global manner thanks to the implementation of analysis scripts. Refer to chapter 14 for details on the procedures allowing the user : To generally manage measurement session datafiles (open, save, close, print, copy/paste, etc…) To edit data items in a measurement session (date, comments, type, levels, etc.) To perform general calculations on data items : addition, subtraction, averaging, recombination, RT computation from time decays. To plot or list data items. To edit / print / save a test report To sort measurement data items in a measurement session datafile To import 16-bit and DOS datafiles (for users of 01dB PC-based systems with 16-bit version software packages) To export audio/signal events at the Microsoft WAV format CHAPTER 3 - ACQUISITION, ANALYSIS AND COMPUTATION WITH DBBATI32 PAGE 23 DBBATI32 SOFTWARE SUITE: 4. USER MANUAL HARDWARE CONFIGURATION Hardware configuration cannot be performed when a measurement manager is opened Hardware specification and settings are required before any measurement. The Hardware configuration option is found under the Acquisition menu of dBBATI32 main window. This dialog box (see below) features various tabs: Hardware Peripheral is used to define which hardware elements are used to perform an acquisition (hardware peripheral, transducers, calibrators, active channels), Remote control is used to define and configure a remote control object. From the hardware peripheral tab, define: The type of hardware platform The active measurement channels For each channel, a couple transducer / calibrator of same type The signal conditioning options of the selected hardware peripheral (Configuration key) The hardware configuration defined here will be recalled automatically next time the program is used. The acquisition platforms, transducers and calibrators are selected from hardware elements' databases defined under the hardware configuration programme dBCONFIG32. Access to tachometric transducers is only available in dBFA32. Hardware The hardware board configuration sets up the computer so that it will be able to record data generated by the specified board. It sets the number of possible active channels. The Configuration key gives access to signal conditioning options, built-in the hardware unit. Active channels Among the possible channel(s) available on the acquisition unit, define which channels will be active for both acquisition and calibration. Transducer The transducer configuration loads the transfer function of the selected transducer and allows the conversion of measured data into an input voltage and the reverse process after data analysis to display the results. A transducer must be prescribed to each active channel. Calibrator The calibrator configuration allows the user to perform the calibration routine, which adjusts the transfer function of the transducer in order to perform calibrated and accurate measurements. A calibrator must be declared for each active channel. 0 To enable direct power supply of a transducer from a SYMPHONIE or HARMONIE unit or a JAZZ acquisition card, define the same option(s) for the transducer(s) and for the hardware platform (Configuration command). For more information concerning hardware configuration, refer to the getting started manual delivered with your measurement system. CHAPTER 4 - HARDWARE CONFIGURATION PAGE 25 DBBATI32 SOFTWARE SUITE: 5. USER MANUAL MEASUREMENT CHAIN CALIBRATION Calibration is recommended before every measurement. Calibration guarantees the reliability of the results. Calibration affects the sensitivity of the selected transducer by adjusting it as a function of measured and expected values (defined by the frequency and level characteristics of the calibrator). The calibrators and transducers are defined by using dBCONFIG32 and they are selected using the Hardware configuration command in the Acquisition menu. The current calibration is done using Leq over a 125-millisecond period. It measures the Leq value of the input signal and converts it into the unit set in the transducer’s characteristics. By adjusting the level to the expected level, it changes the sensitivity of the transducer. By validating it, the adjusted value will now become the default value for the next time the program is used. Access Calibration via the Acquisition menu. The input gain and transducer sensitivity may be calibrated from the control panel Values may be modified using the ‘+’, ‘-’ and ‘Adjust’ buttons. Calibration levels can be expressed either in dB or in physical units. On validation, the system is ready to carry out calibrated measurements. Caution! Before calibration: Verify that the calibration signal remains constant for a sufficiently long period. Verify that the gain view meter is correctly positioned (neither too weak, nor overloading). It is preferable to place the calibrator on foam to reduce the effect of vibrations. Caution! After calibration: If, for the same transducer / calibrator pair, the sensitivity after calibration differs greatly from the original sensitivity, damage to the microphone may have occurred. If the measured values are not correct but the calibration value is OK, it could mean that the sensitivity of the microphone is correct only at 1 000 Hz. Check the microphone membrane. A microphone is very fragile equipment. A fall of 10-cm may damage the microphone membrane. As general rule, if the measured value in dB varies by +/- 1.5 dB from the value that would be measured with the microphone according to the original sensitivity (see calibration data sheet), consider your microphone as faulty. Example: For a microphone that as a factory sensitivity of 50 mV / Pa and a calibrator that delivers 94 dB at 1000 Hz. The microphone is able to perform correct measurements if: The measured calibration level lies between 92.5 dB and 95.5 dB. The current microphone 'sensitivity lies between (around) 40 mV/Pa and 60 mV/Pa ( multiply or divide the original value by a factor of 1.1885) For greater or lower microphone 'sensitivities, consider the microphone as faulty. Return it to your 01dB agent CHAPTER 5 - MEASUREMENT CHAIN CALIBRATION PAGE 27 DBBATI32 SOFTWARE SUITE: USER MANUAL 6. USE OF THE MANAGERS 6.1. Introduction dBBATI32 allows the user to quickly configure a measurement, analysis or computation and to carry out measurements in batch mode immediately, thanks to a simple and powerful user interface. These managers are the key elements used at all time in order to perform a measurement, an analysis or standardised calculations. There are shown as toolbars, which size depend on the number of elements added by the operator. Three different managers are available : - Measurement manager (*.GSM) Analysis manager (*.GSA) Standard calculation manager (*.GSC) Example of measurement manager Only one manager of each type can be opened at the same time, but the contents of each one can be customised by the user. Use the commands of the menus Acquisition, Analysis and Standard calculations to create, open and save different types of managers (in standard version). Saving a manager All display, acquisition and calculation parameters are saved with a given manager. Use respectively the command Acquisition / Save As, Analysis / Save As and Standard calculations / Save As to save the 3 different types of managers These managers therefore offer a simple and efficient mean to save in a single file all the parameters of a measurement sequence. For example, a measurement file insulation.GSM may contain all the acquisition parameters for emitted noise, received noise, background noise and reverberation time measurements. 6.2. Configuration of a manager The number of elements contained in a given manager can be user-defined. Use the icon manager to open the dialog box shown below : Configure of a Use this arrow to add measurement elements to the manager Double-click on one element to modify the default name List of available elements Liste of selected elements Select one or several elements in the list on the left and use the arrow to add it to the list of selected elements on the right. The list of selected elements will be shown in the manager toolbar. Identical available elements can be added several times to the list of selected elements. It is also possible to select the positioning of the manager toolbar and the order of the elements in the toolbar. On validation, the manager toolbar is updated. CHAPTER 6 - USE OF THE MANAGERS PAGE 29 DBBATI32 SOFTWARE SUITE: 6.3. USER MANUAL Set-up of a manager Use the icon Parametrize of a given manager to access the dialog box containing all acquisition, analysis and computation parameters. The dialog box shown below allows one to set-up the parameters of a given element of a manager and to define common parameters to all elements of the manager as well. Use the tabs to access to all the parameters of the manager Select one or several elements of the manager Common settings for one, several or all elements of a manager can be performed by selecting multiple elements in the list (using the Ctrl key while selecting elements with the mouse). Example (measurement manager) If the acquisition frequency range must be the same for all measurement, proceed as follow to set-up the measurement manager. Select all elements in the list (upper left-hand corner) with the mouse, and the CTRL key pushed down. Only the settings common to all elements can then be accessed. Select the frequency range of acquisition for all the selected elements. Simultaneous set-up of the frequency range for all elements. Refer to the chapter dealing with measurement, analysis and standard calculations for more explanations on the parameters to select for a given measurement. CHAPTER 6 - USE OF THE MANAGERS PAGE 30 DBBATI32 SOFTWARE SUITE: 7. USER MANUAL SPECTRA MEASUREMENTS This chapter deals with spectra measurements, such as the ones listed below : Standard spectrum Emitted noise Received airborne noise Received impact noise Background noise Simultaneous emission and reception The characteristics of these types of measurements are very similar, even if some functions cannot be accessed for particular cases (for example, the pink noise generator or the MLS acquisition mode). This chapter presents in a general manner how to set-up and perform spectra measurements. Use the command Acquisition / New to open a new measurement manager. This manager is used to select which measurement will be performed and to configure the acquisition parameters of each one of them. Click on Configure to select which elements will be added to the manager. In this chapter, we select each type of spectrum measurements that can be done. The manager toolbar then looks like this: Refer to chapter 6 for more information on how to use the managers in dBBATI32. All the display and acquisition parameters can be saved in a measurement manager file (*.GSM) by using the command Acquisition / Save As. CHAPTER 7 - SPECTRA MEASUREMENTS PAGE 31 DBBATI32 SOFTWARE SUITE: 7.1. USER MANUAL Measurement window overview All measurement window can be accessed from the icons of the manager toolbar. An example of spectra measurement window is given below: Display parameters' toolbar : curves to display, autoscale, time history, etc. Command toolbar : acquisition parameters, averaging parameters, gains, threshold, start , stop measuring, etc… Display acquired data with cursors' values and references Status bar : state and information about the acquisition process The measurement configuration and control is accessible via the vertical command toolbar. In the following, we describe the functions of each icon: Definition of the measurement (location and comment) identifier Start the acquisition process Show/hide information table Stop the acquisition in progress Overloads and threshold exceedance display. Validate current results and store them in a measurement session datafile The upper part shows overload LEDs (instantaneous on the left, max hold on the right). The lower part shows a threshold exceedance LED (see paragraph 7.2.5). Reset LEDs indication by a simple click on it Cancel current results and start again The following icons are displayed if averaging conditions are set at the acquisition parameters' stage (See paragraph 7.2.4.2). Define gain and threshold parameters Store the current averaged measurement session datafile Perform an (autorange) Reset the current averaged spectra automatic gain adjustment Start / Stop the noise generator. if the generator option has been activated (See paragraph 7.2.3) spectra in a Save results in a measurement session datafile The display type and the display parameters of the active curves are controlled using the horizontal toolbar: Automatic re-scaling of the spectra and time history plots Enable or disable linked amplitude scales of plots for each active measurement channel Enable or disable display of the time history plot and select the frequency band to monitor Perform an automatic autoscale to adjust data display at the end of the measurement. CHAPTER 7 - SPECTRA MEASUREMENTS PAGE 32 DBBATI32 SOFTWARE SUITE: 7.2. USER MANUAL Measurement set-up Measurement set-up can be done by pressing the key Parametrize of the manager. The dialog box shown below appears on screen : The above settings are for measurement of an emitted noise spectrum. The set-up process will however be the same for other types of spectra measurements. Refer to chapter 6 for more information on how to use the managers. 0 Received impact noise : MLS and Pink noise generator options are not available. Background noise : Pink noise generator option not available. 7.2.1. Acquisition channel types for spectrum measurement Define the active measurement channels (the acquisition platform input lines) that will be used for spectrum acquisition. Note that only channels that have been enabled in the hardware configuration dialogue box may be selected (see chapter 4). The spectrum type of each channel is automatically defined as a function of the type of measurement. However, for the element «Emi. / Rec. simultaneously», it is possible to choose the channels types (Emission or Airborne noise reception level) 7.2.2. Analysis parameters Choose between octave and third octave spectrum analysis and define the frequency limits for the analysis. CHAPTER 7 - SPECTRA MEASUREMENTS PAGE 33 DBBATI32 SOFTWARE SUITE: USER MANUAL 7.2.3. Signal characteristics Standard signal The duration of the measurement is defined in seconds. Noise generator parameters A pink noise can be generated in order to carry out emitted and / or received noise spectra measurements. It is necessary to connect an amplified loudspeaker to the LEMO4 output socket of the SYMPHONIE or HARMONIE acquisition box. This generator may manually activated with an icon of the measurement window or the F11 function key. It may also be automatically started and stopped by dBBATI32. To do so, tick the option automatic and define a stabilisation duration before staring the acquisition, as a function of the percentage of the complete duration of the measurement. Refer to paragraph 7.4 for detailed explanations on the generator state during a measurement. MLS signal In MLS mode (Maximum-Length Sequence), follow the following recommendations. It is necessary to connect an amplified loudspeaker to the LEMO4 output socket of the SYMPHONIE acquisition box. The response duration should be carefully selected, as it should be adapted to the geometry of the room. Make sure that the response duration is long enough in order to obtain a background noise at the end of the measurement. It is possible to average this response in order to decrease the effect of background noise. The higher the average number, the better the response quality, because the influence of random phenomena (background noise) decreases. On the other hand, the acquisition duration increases (the signal to noise ratio increase by 3 dB when doubling the number of averages. Refer to annex 21.2. General remark (SYMPHONIE) The output level of the signal can be set by the SYMPHONIE icon driver from the Windows task bar with the right of the Click on the icon mouse. A contextual menu appears. Choose the Configuration field and set the SYMPHONIE output level. The output level is changed in real time if you are playing a noise. For more information on SYMPHONIE or HARMONIE (for example, connection plugs and driver configuration), consult the system installation manual.. CHAPTER 7 - SPECTRA MEASUREMENTS PAGE 34 DBBATI32 SOFTWARE SUITE: USER MANUAL 7.2.4. Measurement options The configuration of measurement options and (if required) averaging options can be performed in the Options tab of the measurement set-up dialog box. 7.2.4.1.Acquisition options Define if the audio signal is to be recorded to hard disc. When this option is activated, the audio recording is stored in the active measurement session datafile and dBBATI32 will use the "post-processing" mode. Perform an autorange automatically before each measurement Automatic validation of the results. Useful when averaging over several measurements. Define a delay before starting a measurement (so that the operator may leave the room during the measurement process. Refer to paragraph 7.4 for more information on the measurement process 7.2.4.2.Averaging options Averaging between channels of the same type One spectrum result is given for the active measurement, irrespective of the number of channels. For example, if two channels are recording emitted noise dBBATI32 calculates the average emitted noise spectra over the two channels. An option allows separate storage of each spectrum from each active channel. Average over several measurements. In this case, dBBATI32 will calculate the average spectra over a sequence of measurements. It is necessary to define the number of measurements that are being considered. The storage of intermediate spectra is also possible. It is possible to combine the two types of averaging methods CHAPTER 7 - SPECTRA MEASUREMENTS PAGE 35 DBBATI32 SOFTWARE SUITE: USER MANUAL 7.2.5. Gain and threshold command, autorange Once the measurement set-up has been completed from the measurement manager, perform the following from within the measurement window. Use the command Commands / Gains and threshold. This dialog box enables the definition of gain and threshold settings. These parameters can be used in several ways by the application software. All parameters and the available actions may be enabled or disabled according to the acquisition module, which calls this command. Identification of active measurement channels The gains (linked and/or identical) for each active measurement channel Automatic gain setting (autorange) launch command and associated parameters Gain view meters and gain adjustment scrolling bar Physical unit used to display gain levels Activation of a threshold Selection of the acquisition trigger conditions (no trigger, use of a threshold condition, logical operator) Threshold value Slope of the threshold trigger (trigger active on a rising or falling slope) Gains When the option Linked is active, the gains on all active measurement channels are modified: The gain setting of one active channel leads to identical modification on all active measurement channels. The gains on the active channels are identical, if the option Identical is activated. Each setting of one channel is passed to all other active channels. This option is only available if the option linked has been chosen. Autorange . Start automatic gain setting according to the input level on the hardware platform. The autorange proceeds as follows: during the duration, defined in the dialogue box, the programme stores the highest reached value and adjust the gain so that this value is located “x” dB (margin defined in the dialogue box) below that maximum measured value. Units: Selection of the display unit of the input level. The gain view meters may display the input levels according to three different units: dB Phys: Display the view meters in physical decibel. This is a relative level in dB calculated according to the transducer sensitivity and the reference 0 dB of the transducer type. dB ADC: Display the view meters in converter decibel. This is a relative level in dB. The level 0 dB is defined as the full scale of the converter. The values in dB ADC are always negative between 0 and -90 dB. Unit: Display of the view meters in physical units. In case the transducer is a pressure microphone, the view meter displays the values in Pascals (Pa). In case the transducer is an accelerometer, the view meter displays the values in m/s². CHAPTER 7 - SPECTRA MEASUREMENTS PAGE 36 DBBATI32 SOFTWARE SUITE: USER MANUAL Trigger: Define here the trigger parameters used for acquisition (not available in MLS mode). Trigger selection: Direct: to start the measurement immediately after clicking on the start acquisition command or Threshold: to start the acquisition with a threshold condition (negative or positive) defined on the right hand side. The programme waits for the threshold, when the measurement start command is activated. Trigger delay (in ms): For threshold triggering, it is possible to start the acquisition with a pre-delay or a post-delay in relation to threshold crossing. Input this delay or use the arrows up/down to increase/reduce the value Operation: Select a logical Boolean operator for the threshold trigger: OR to activate the recording if one of the conditions is fulfilled and AND to activate the recording when all conditions are fulfilled. Channels Define an identifier for each active measurement channel and, if possible, enable or disable the current measurement channel. The gain adjustment scrolling bars allows the user to perform manual gain selection : Click on the arrows to increase or decrease the gain value by steps of 1dB or unit. Click on the scrolling bars to increase or decrease the gain value by steps of 10dB or units. Threshold condition indicator: becomes and stay yellow when one or several threshold trigger conditions are fulfilled. Click once on the indicator to reset it. CHAPTER 7 - SPECTRA MEASUREMENTS Enable / Disable the threshold condition for a given measurement channel Threshold level Trigger way. The threshold condition will be fulfilled when the input level passes above (positive slope) or passes below (negative slope) the threshold value. PAGE 37 DBBATI32 SOFTWARE SUITE: 7.3. USER MANUAL Display set-up and status bar The horizontal toolbar can be used to set the graphical display parameters of the measurement window. 7.3.1. Dynamic settings Use the command Display / Autoscale to automatically re-scale the plots as a function of the measured noise levels. Use the command Display / Link channels to enable or disable linked amplitude scales of plots for each active measurement channel.. Use the command Display / Automatic autoscale at the end of acquisition to automatically re-scale the plots at the end of the acquisition process Display / Time history to display the time Use the command history plot and select the frequency band to monitor. The following dialog box appears on-screen. Tick the box Show time history and select the frequency band (or overall level) to display. Use the command Display / Set-up to define the display parameters of each type of data (spectra and time histories) in the measurement window. The following dialog box is displayed on screen. Display or not the Y-axis scale and select the graph dynamic range (constant range or set up manually the minimum and maximum limits) Display or not X-axis scale Show / Hide one or two cursors on the plot. Display or not a grid on the plot Show / Hide cursors’ values and select channels. 7.3.2. Status bar The status bar allows the operator to select the measurement locations and input a general comment, either by direct input or by selection in a list, corresponding to the last 4 locations completed by the operators and the default locations. Measurement location Overall comment on the measurement % of data acquired or processed It is possible to edit different locations for each measurement channels by using the syntax Location1 / Location2 in the edit zone. For example, the syntax Room / Office will affect the location Room to channel 1 and Office to channel 2. Commands / This operation may be done with the command Identifier. The dialog shown aside is displayed on screen. Input the locations for each active channels and a general comment. CHAPTER 7 - SPECTRA MEASUREMENTS PAGE 38 DBBATI32 SOFTWARE SUITE: 7.4. USER MANUAL Measurement process After measurement configuration, the user can control the measurement process with the following icons: Start the acquisition process (F3) The acquisition starts according to the defined acquisition and averaging parameters. When a trigger condition is defined (with the command Gain and threshold), the analyser waits for the trigger event, in order to start the measurement. Stop an acquisition in progress (F4) Accept current results (F7) The measurement results are saved in a measurement session datafile. Do not accept current results and restart the measurement (F6) Start / Stop the pink noise generator (F11) It is possible to generate a pink noise in order to carry out received or emitted noise spectra measurements. See paragraph 7.2.3 on the configuration of the generator. The first press on this icon activates the generator while the second one stops it. It is recommended to set the gain values of the acquisition platform while the generator is switched on in order to avoid overloads The following icons are displayed if averaging conditions are set at the acquisition parameters' stage (see paragraph 7.2.4.2). Store the current averaged spectra in a measurement session datafile Reset the current averaged spectra Save results in a measurement session datafile The following sketch summarises the state of the generator and the status bar at the different stages of the acquisition process. 0 This process is not valid for received impact noise and background noise measurements. The states Wait delay, Autorange and Stabilisation of the generator are optional. L Pink noise emission ACQUISITION Delay to leave the room Autorange Stabilisation of the generator before acquisition t START STOP «Wait delay» «Autorange» n o «Generator» p <Measurement» STATUS BAR q n/o See paragraph 7.2.4.1 p See paragraph 7.2.3 CHAPTER 7 - SPECTRA MEASUREMENTS PAGE 39 DBBATI32 SOFTWARE SUITE: 8. USER MANUAL MECHANICAL EQUIPMENT NOISE MEASUREMENT The measurement of equipment noise for building acoustics applications correspond to the maximum value of the Aweighted Leq time history, using a Slow time constant, over a user-defined duration. Audio signal recording and internal signal generator options are not available in this mode. Use the command Acquisition / New to pen a new measurement manager. This manager is used to select which measurement will be performed and to configure the acquisition parameters of each one of them. Click on Configure to select which elements will be added to the manager. Select only Mechanical equipment noise. The manager toolbar then looks like this: Refer to chapter 6 for more information on how to use the managers in dBBATI32. All the display and acquisition parameters can be saved in a measurement manager file (*.GSM) by using the command Acquisition / Save As. CHAPTER 8 - MECHANICAL EQUIPMENT NOISE MEASUREMENT PAGE 41 DBBATI32 SOFTWARE SUITE: 8.1. USER MANUAL Measurement set-up Measurement set-up can be done by pressing the key Parametrize of the manager. The dialog box shown below appears on screen : Acquisition tab Channels Define the active measurement channels (the acquisition platform input lines) that will be used for spectrum acquisition (see chapter 4). Frequencies If the equipment noise spectrum is saved (in the options tab), choose between octave and third octave spectrum analysis and define the frequency limits for the analysis. This setting does not affect the Leq measurement frequency range. Options tab Storage of the spectrum Tick the box Equipment noise spectrum storage to save the mean Slow spectrum along with the measurement results (autospectrum data item). Automatic validation Tick the box Automatic validation for the results to be saved automatically in the measurement session datafile at the end of the acquisition. CHAPTER 8 - MECHANICAL EQUIPMENT NOISE MEASUREMENT PAGE 42 DBBATI32 SOFTWARE SUITE: 8.2. USER MANUAL Measurement window overview Once the measurement set-up has been completed, start the acquisition by pressing the icon Mechanical equipment noise of the measurement manager toolbar. The following measurement window appears on screen Display parameters' toolbar : curves to display, autoscale, time history, etc. Command toolbar : acquisition parameters, gains, threshold, start , stop measuring, etc… Display Slow time history (Aweighted) with cursors' values and references Status bar : state and information about the acquisition process The measurement configuration and control is accessible via the vertical command toolbar. In the following, we describe the functions of each icon: Automatic re-scaling of the spectra and time history plots Enable or disable linked amplitude scales of plots for each active measurement channel Enable or disable display of the time history plot and select the frequency band to monitor Perform an automatic autoscale to adjust data display at the end of the measurement. The equipment noise level becomes equal to the cursor value. The measurement configuration and control is accessible via the vertical command toolbar. In the following, we describe the functions of each icon: Definition of the measurement (location and comment) identifier Show/hide information table Start the acquisition process – Reset all indicators and data values. Stop the acquisition in progress Overloads and underloads display The upper part shows overload LEDs (instantaneous on the left, max hold on the right). Validate current results and store them in a measurement session datafile The lower part shows underload LEDs Define gain parameters CHAPTER 8 - MECHANICAL EQUIPMENT NOISE MEASUREMENT Cancel current results and start again PAGE 43 DBBATI32 SOFTWARE SUITE: 8.3. USER MANUAL Display set-up and status bar The horizontal toolbar can be used to set the graphical display parameters of the measurement window. 8.3.1. Dynamic settings Use the command Display / Autoscale to automatically re-scale the plots as a function of the measured noise levels. Use the command Display / Link channels to enable or disable linked amplitude scales of plots for each active measurement channel.. Use the command Display / Automatic autoscale at the end of acquisition to automatically re-scale the plots at the end of the acquisition process 8.3.2. Display time history Display / Time history to display the time Use the command history plot and select the duration to monitor. The following dialog box appears on-screen. The measurement window is updated on validation. 8.3.3. Manual determination of the equipment noise level By default, it is the maximum Leq A-weighted Slow value over the complete duration of the acquisition that is considered as the equipment noise level. However, if an unwanted noise event occurred (door slamming), this value may be manually selected. Display / Modify equipment noise to Move the cursor on the time history plot and use the command manually select the equipment noise level with the cursor (for the active channel). The indicators are automatically updated. 0 Storage of the equipment noise spectrum is not possible if this function is used. 8.3.4. Graphical settings Use the command Display / Set-up to define the display parameters of each type of data (spectra and time histories) in the measurement window. The following dialog box is displayed on screen. Display or not the Y-axis scale and select the graph dynamic range (constant range or set up manually the minimum and maximum limits) Display or not X-axis scale Display or not a grid on the plot CHAPTER 8 - MECHANICAL EQUIPMENT NOISE MEASUREMENT Show / Hide one or two cursors on the plot. Show / Hide cursors’ values and select channels. PAGE 44 DBBATI32 SOFTWARE SUITE: USER MANUAL 8.3.5. Status bar Measurement location Overall comment on the measurement The status bar allows the operator to select the measurement locations and input a general comment, either by direct input or by selection in a list, corresponding to the last 4 locations completed by the operators and the default locations. It is possible to edit different locations for each measurement channels by using the syntax Location1 / Location2 in the edit zone. For example, the syntax Room / Office will affect the location Room to channel 1 and Office to channel 2. Commands / This operation may be done with the command Identifier. The dialog shown aside is displayed on screen. Input the locations for each active channels and a general comment. 8.4. Measurement process After measurement configuration, the user can control the measurement process with the following icons: Start the acquisition process (F3) The acquisition starts according to the defined acquisition parameters. From this moment, the maximum A-weighted Slow Leq value is stored. To reset the measurement, press again on this key. All indicators would be reset in this case. Stop an acquisition in progress (F4) The equipment noise measurement is stopped : the maximum A-weighted Slow Leq value since the last reset is displayed for validation. Calculation of the equipment noise spectrum (mean autospectrum for the selected frequency bands) is stopped. Accept current results (F7) The measurement results are saved in a measurement session datafile. Do not accept current results and restart the measurement (F6) CHAPTER 8 - MECHANICAL EQUIPMENT NOISE MEASUREMENT PAGE 45 DBBATI32 SOFTWARE SUITE: 9. USER MANUAL REVERBERATION TIME (RT) MEASUREMENTS This chapter deals with RT spectra measurements. During a reverberation time measurement, dBBATI32 creates time decay for each measurement frequency band and then applies a regression calculation algorithm in order to determine the reverberation time value in seconds (i.e. we obtain a RT spectrum). Refer to annex 21.3 for a detailed explanation of the RT calculation. Use the command Acquisition / New to pen a new measurement manager. This manager is used to select which measurement will be performed and to configure the acquisition parameters of each one of them. Click on Configure to select which elements will be added to the manager In this chapter, we select the type of element Reverberation time. The manager toolbar then looks like this: Refer to chapter 6 for more information on how to use the managers in dBBATI32. All the display and acquisition parameters can be saved in a measurement manager file (*.GSM) by using the command Acquisition / Save As. CHAPTER 9 - REVERBERATION TIME (RT) MEASUREMENTS PAGE 47 DBBATI32 SOFTWARE SUITE: 9.1. USER MANUAL Measurement window overview The measurement window can be accessed from the icon Reverberation time of the manager toolbar Display parameters' toolbar : curves to display, autoscale, etc. Command toolbar : acquisition parameters, averaging parameters, gains, threshold, start , stop measuring, etc… Display acquired data with cursors' values and references Status bar : state and information about the acquisition process The measurement configuration and control is accessible via the vertical command toolbar. In the following, we describe the functions of each icon: Definition of the measurement (location and comment) identifier Start the acquisition process Show/hide information table Stop the acquisition in progress Overloads and threshold exceedance display. Validate current results and store them in a measurement session datafile The upper part shows overload LEDs (instantaneous on the left, max hold on the right). The lower part shows a threshold exceedance LED (see paragraph 9.2.6). Cancel current results and start again The following icons are displayed if averaging conditions are set at the acquisition parameters' stage (See paragraph 9.2.5.2). Reset LEDs indication by a simple click on it Store the current averaged measurement session datafile Define gain and threshold parameters Reset the current averaged spectra Perform an (autorange) Save results in a measurement session datafile automatic gain adjustment Start / Stop the noise generator. if the generator option has been activated (See paragraph 9.2.3) spectra in a Display the time decay edition window to adjust RT spectrum values (See chapter 10). The display type and the display parameters of the active curves are controlled using the horizontal toolbar: Automatic re-scaling of the spectra and time history plots Enable or disable linked amplitude scales of plots for each active measurement channel Enable or disable display of the time history plot and select the frequency band to monitor Perform an automatic autoscale to adjust data display at the end of the measurement. CHAPTER 9 - REVERBERATION TIME (RT) MEASUREMENTS PAGE 48 DBBATI32 SOFTWARE SUITE: 9.2. USER MANUAL Measurement set-up Measurement set-up can be done by pressing the key Parametrize of the manager. The dialog box shown below appears on screen : Refer to chapter 6 for more information on the use of managers. 9.2.1. Acquisition channel types for RT measurement Define the active measurement channels (the acquisition platform input lines) that will be used for spectrum acquisition. Note that only channels that have been enabled in the hardware configuration dialogue box may be selected (see chapter 4). The type « Reverberation time » is automatically associated to each channel (all fields are greyed). 9.2.2. Analysis parameters Choose between octave and third octave spectrum analysis and define the frequency limits for the analysis. Also, define the time basis used in the computation of the reverberation time decay. Greater accuracy is achieved with a smaller time basis, though at the expense of calculation time. 0 The RT measurement is performed in real-time only if the selected time step is multiple of 20 ms. CHAPTER 9 - REVERBERATION TIME (RT) MEASUREMENTS PAGE 49 DBBATI32 SOFTWARE SUITE: USER MANUAL 9.2.3. Signal characteristics Select of signal that will be used for the reverberation time measurement. Interrupted stationary signal dBBATI32 offers reverberation time calculations from a stationary signal (cut-off of a pink noise source). The duration of the measurement is defined in seconds. Noise generator parameters It is necessary to connect an amplified loudspeaker to the LEMO4 output socket of the SYMPHONIE or HARMONIE acquisition box to generate a pink noise. This generator may manually activated with an icon of the measurement window or the F11 function key. It may also be automatically started and stopped by dBBATI32. To do so, tick the option automatic and define a stabilisation duration before staring the acquisition and the emission duration, as a function of the percentage of the complete duration of the measurement. Refer to paragraph 9.4 for detailed explanations on the generator state during a measurement. Impulse signal dBBATI32 offers reverberation time calculations from an impulse signal. The duration of the measurement is defined in seconds. It is recommended to start an acquisition with a threshold trigger (see paragraph 9.2.6). Refer to paragraph 9.4 for detailed explanations on the measurement process. CHAPTER 9 - REVERBERATION TIME (RT) MEASUREMENTS PAGE 50 DBBATI32 SOFTWARE SUITE: USER MANUAL MLS signal In MLS mode (Maximum-Length Sequence), follow the recommendations below. It is necessary to connect an amplified loudspeaker to the LEMO4 output socket of the SYMPHONIE or HARMONIE acquisition box. The response duration should be carefully selected, as it should be adapted to the geometry of the room. Make sure that the response duration is long enough in order to obtain a background noise at the end of the measurement. It is possible to average this response in order to decrease the effect of background noise. The higher the average number, the better the response quality, because the influence of random phenomena (background noise) decreases. On the other hand, the acquisition duration increases (the signal to noise ratio increase by 3 dB when doubling the number of averages. Refer to annex 21.2 for more details on the MLS acquisition. Refer to paragraph 9.4 for detailed explanations on the measurement process. General remark (SYMPHONIE) The output level of the signal can be set by the SYMPHONIE icon driver from the Windows task bar with the right of the Click on the icon mouse. A contextual menu appears. Choose the Configuration field and set the SYMPHONIE output level. The output level is changed in real time if you are playing a noise. For more information on SYMPHONIE or HARMONIE (for example, connection plugs and driver configuration), consult the system installation manual. 9.2.4. RT computation parameters Click on the Parametrize key of the measurement manager and select the RT computation tab. dBBATI32 offers reverberation time calculations from either stationary, impulsive or MLS signals. From an impulsive signal source (or MLS signal), it is possible to apply integration (Schröeder) and/or suppress the background noise. During the calculation phase, the start and end settings define the regression boundaries that are used to calculate the RT values by frequency bands. CHAPTER 9 - REVERBERATION TIME (RT) See chapter 21.2 for a detailed reverberation time calculation explanation. MEASUREMENTS PAGE 51 DBBATI32 SOFTWARE SUITE: USER MANUAL 9.2.5. Measurement options The configuration of measurement options and (if required) averaging options can be performed in the Options tab of the measurement set-up dialog box. 9.2.5.1.Acquisition options Define if time decays are to be recorded into the measurement session, for later analysis. Define if the audio signal is to be recorded to hard disc. When this option is activated, the audio recording is stored in the active measurement session datafile at the end of the acquisition. Perform an autorange automatically before each measurement Automatic validation of the results. Useful when averaging over several measurements. Define a delay before starting a measurement (so that the operator may leave the room during the measurement process). Refer to paragraph 9.4 for more information on the measurement process. 9.2.5.2.Averaging options Averaging between channels of the same type When a measurement is performed with, say, two active channels, dBBATI32 calculates the average RT spectra over the two channels. Each spectrum of an active channel may be stored separately. Averaging over several measurements. dBBATI32 will calculate a unique averaged spectrum over a sequence of spectra. Use the dialogue box to define the number of measurements to be included in the averaging calculation. Intermediate spectra, calculated for each measurement will be stored in order to effect the averaged spectrum. The option Automatic validation allows the user to perform a serie of measurements automatically. It is possible to combine the two types of averaging methods. CHAPTER 9 - REVERBERATION TIME (RT) MEASUREMENTS PAGE 52 DBBATI32 SOFTWARE SUITE: USER MANUAL 9.2.6. Gain and threshold command, autorange Once the measurement set-up has been completed from the measurement manager, perform the following from within the measurement window. Use the command Commands / Gains and threshold. This dialog box enables the definition of gain and threshold settings. These parameters can be used in several ways by the application software. All parameters and the available actions may be enabled or disabled according to the acquisition module, which calls this command. Identification of active measurement channels The gains (linked and/or identical) for each active measurement channel Automatic gain setting (autorange) launch command and associated parameters Gain view meters and gain adjustment scrolling bar Physical unit used to display gain levels Activation of a threshold Selection of the acquisition trigger conditions (no trigger, use of a threshold condition, logical operator) Threshold value Slope of the threshold trigger (trigger active on a rising or falling slope) Gains When the option Linked is active, the gains on all active measurement channels are modified: The gain setting of one active channel leads to identical modification on all active measurement channels. The gains on the active channels are identical, if the option Identical is activated. Each setting of one channel is passed to all other active channels. This option is only available if the option linked has been chosen. Autorange . Start automatic gain setting according to the input level on the hardware platform. The autorange proceeds as follows: during the duration, defined in the dialogue box, the programme stores the highest reached value and adjust the gain so that this value is located “x” dB (margin defined in the dialogue box) below that maximum measured value. Units: Selection of the display unit of the input level. The gain view meters may display the input levels according to three different units: dB Phys: Display the view meters in physical decibel. This is a relative level in dB calculated according to the transducer sensitivity and the reference 0 dB of the transducer type. dB ADC: Display the view meters in converter decibel. This is a relative level in dB. The level 0 dB is defined as the full scale of the converter. The values in dB ADC are always negative between 0 and -90 dB. Unit: Display of the view meters in physical units. In case the transducer is a pressure microphone, the view meter displays the values in Pascals (Pa). In case the transducer is an accelerometer, the view meter displays the values in m/s². CHAPTER 9 - REVERBERATION TIME (RT) MEASUREMENTS PAGE 53 DBBATI32 SOFTWARE SUITE: USER MANUAL Trigger: Define here the trigger parameters used for acquisition (not available in MLS mode). Trigger selection: Direct: to start the measurement immediately after clicking on the start acquisition command or Threshold: to start the acquisition with a threshold condition (negative or positive) defined on the right hand side. The programme waits for the threshold, when the measurement start command is activated. Trigger delay (in ms): For threshold triggering, it is possible to start the acquisition with a pre-delay or a post-delay in relation to threshold crossing. Input this delay or use the arrows up/down to increase/reduce the value Operation: Select a logical Boolean operator for the threshold trigger: OR to activate the recording if one of the conditions is fulfilled and AND to activate the recording when all conditions are fulfilled. Channels Define an identifier for each active measurement channel and, if possible, enable or disable the current measurement channel. The gain adjustment scrolling bars allows the user to perform manual gain selection : Click on the arrows to increase or decrease the gain value by steps of 1dB or unit. Click on the scrolling bars to increase or decrease the gain value by steps of 10dB or units. Enable / Disable the threshold condition for a given measurement channel Threshold condition indicator: becomes and stay yellow when one or several threshold trigger conditions are fulfilled. Click once on the indicator to reset it. CHAPTER 9 - REVERBERATION TIME (RT) Threshold level Trigger way. The threshold condition will be fulfilled when the input level passes above (positive slope) or passes below (negative slope) the threshold value. MEASUREMENTS PAGE 54 DBBATI32 SOFTWARE SUITE: 9.3. USER MANUAL Display set-up and status bar The horizontal toolbar can be used to set the graphical display parameters of the measurement window. 9.3.1. Dynamic settings Use the command Display / Autoscale to automatically re-scale the plots as a function of the measured noise levels. Use the command Display / Link channels to enable or disable linked amplitude scales of plots for each active measurement channel.. Use the command Display / Automatic autoscale at the end of acquisition to automatically re-scale the plots at the end of the acquisition process Display / Time history to display the time Use the command history plot and select the frequency band to monitor. The following dialog box appears on-screen. Tick the box Show time history and select the frequency band (or overall level) to display. Use the command Display / Set-up to define the display parameters of each type of data (spectra and time histories) in the measurement window. The following dialog box is displayed on screen. Display or not the Y-axis scale and select the graph dynamic range (constant range or set up manually the minimum and maximum limits) Display or not X-axis scale Show / Hide one or two cursors on the plot. Display or not a grid on the plot Show / Hide cursors’ values and select channels. 9.3.2. Status bar The status bar allows the operator to select the measurement locations and input a general comment, either by direct input or by selection in a list, corresponding to the last 4 locations completed by the operators and the default locations. Measurement location Overall comment on the measurement % of data acquired or processed It is possible to edit different locations for each measurement channels by using the syntax Location1 / Location2 in the edit zone. For example, the syntax Room / Office will affect the location Room to channel 1 and Office to channel 2. Commands / This operation may be done with the command Identifier. The dialog shown aside is displayed on screen. Input the locations for each active channels and a general comment. CHAPTER 9 - REVERBERATION TIME (RT) MEASUREMENTS PAGE 55 DBBATI32 SOFTWARE SUITE: 9.4. USER MANUAL Measurement process 9.4.1. Procedure After measurement configuration, the user can control the measurement process with the following icons: Start the acquisition process (F3) The acquisition starts according to the defined acquisition and averaging parameters. When a trigger condition is defined (with the command Gain and threshold), the analyser waits for the trigger event, in order to start the measurement. Stop an acquisition in progress (F4) Accept current results (F7) The measurement results are saved in a measurement session datafile. Do not accept current results and restart the measurement (F6) Time decay edition (See chapter 10). Display the time decay adjustment window to adjust manually the decay 'slope in each frequency band, if the RT measurement results are not correct . Start / Stop the pink noise generator (F11) It is possible to generate a pink noise in order to carry out RT measurements with source cut-off (interrupted stationary signal). See paragraph 9.2.3 on the configuration of the generator. The first press on this icon activates the generator while the second one stops it. It is recommended to set the gain values of the acquisition platform while the generator is switched on in order to avoid overloads The following icons are displayed if averaging conditions are defined (see paragraph 9.2.5.2). Store the current averaged RT spectra in a measurement session datafile Reset the current averaged spectra Save results in a measurement session datafile 9.4.2. Sketches The following sketch summarises the RT measurement process for the 3 modes available in dBBATI32. the states of the generator and the status bar at the different stages of the acquisition process are indicated. Emission duration L Pink noise emission Interrupted stationary signal nSee paragraph 9.2.5 oSee paragraph 9.2.5 pSee paragraph 9.2.3 ACQUISITION Delay to leave the room Autorange Stabilisation of the generator before acquisition t START STOP «Wait delay» n CHAPTER 9 - REVERBERATION TIME (RT) «Autorange» o MEASUREMENTS «Generator» p <Measurement» STATUS BAR q PAGE 56 DBBATI32 SOFTWARE SUITE: USER MANUAL Impulse signal Impulse signal (blank gun shot…) nSee paragraph 9.2.5 Delay to leave the room ACQUISITION t START STOP «Wait delay» STATUS BAR «Measurement» n o MLS Signal nSee paragraph 9.2.5 oSee paragraph 9.2.5 L Emission of MLS sequence ACQUISITION Delay to leave the room Autorange t START STOP «Wait delay» «Autorange» <Measurement» n o p STATUS BAR 0 The states Wait delay, Autorange and Stabilisation of the generator are optional. CHAPTER 9 - REVERBERATION TIME (RT) MEASUREMENTS PAGE 57 DBBATI32 SOFTWARE SUITE: 10. USER MANUAL DECAY EDITION WINDOW (RT) The time decay edition window is used to display the time decays that are used to compute a reverberation time spectrum. This window is displayed at the end of the RT measurement or analysis process (see chapters 9 and 17). It is also possible to modify time decays linked to an existing RT spectrum of the measurement session. When editing a time decay item, it is not possible to close the measurement session. This window is made up of A frame showing the current RT spectrum resulting from regression calculation of the time decay of each frequency band and the time decays of each frequency band. The slope of these decays (on which the RT value depends) can be adjusted manually. It is possible to zoom each time decay frame by double clicking within its frame (or by pressing the Double-click Enter key) Regression line computed. The slope represents the RT value in seconds Noise level of the source before cut-off Active decay used for regression computation Background noise level These elements are automatically selected according to the user defined RT calculation parameters and the calculation algorithm. The toolbar of this window allows the user to perform the following operations: Modify the measurement identifier and add comments Automatic re-scaling of the plots Define or modify the calculation parameters Link cursors on all the graphical view (not active for RT adjustment) Define a study zone for a given frequency band. dBBATI32 allows the user to exclude any part of the time history such as noise, parasites, double decay etc, that are not useful for the calculation process. Hide display of the RT spectrum Relaunch an automatic RT spectrum calculation according to the current RT calculation parameters. Hide display of the time histories Enable or disable the decay manual adjustment mode. When enabled, this option allows the user to select the start and end points of the regression calculations. Simply select these points with the cursors on the adequate decay plot. Save the results in the active measurement session Undo the latest slope adjustment Close the time decay edition window without saving CHAPTER 10 - DECAY EDITION WINDOW (RT) PAGE 59 DBBATI32 SOFTWARE SUITE: 11. USER MANUAL ROOM CRITERIA MEASUREMENTS dBBATI32 allows the user to compute the following room criteria : Quality criteria : RT, EDT, Clarity, Definition, ST1. Intelligibility criteria : STI, RASTI. These criteria are obtained from echogram curves per frequency bands. These curves result from an analysis by digital filtering from an impulse response of the room. This response may be obtained by MLS technique. Refer to chapter 21.5 for detailed explanations on the calculations, criteria definition and results’ interpretation. This chapter deals the measurement set-up and process of room criteria in dBBATI32. Use the command Acquisition / New to pen a new measurement manager. This manager is used to select which measurement will be performed and to configure the acquisition parameters of each one of them. Click on Configure to select which elements will be added to the manager. In this chapter, we select the type of elements room criteria. The manager toolbar then looks like this: Refer to chapter 6 for more information on how to use the managers in dBBATI32. All the display and acquisition parameters can be saved in a measurement manager file (*.GSM) by using the command Acquisition / Save As. CHAPTER 11 - ROOM CRITERIA MEASUREMENTS PAGE 61 DBBATI32 SOFTWARE SUITE: USER MANUAL 11.1. Measurement window overview The measurement window can be accessed by the icon room criteria of the manager toolbar. Display parameters' toolbar : curves to display Command toolbar : acquisition parameters, gains, threshold, start , stop measuring, decays, etc… Display acquired data with cursors' values and references Status bar : state and information about the acquisition process The measurement configuration and control is accessible via the vertical command toolbar. In the following, we describe the functions of each icon: Definition of the measurement (location and comment) identifier Show/hide information table Overloads and threshold exceedance display. The upper part shows overload LEDs (instantaneous on the left, max hold on the right). The lower part shows a threshold exceedance LED (see paragraph 11.2.6). Reset LEDs indication by a simple click on it Define gain and threshold parameters Perform an (autorange) automatic gain adjustment Start the acquisition process Stop the acquisition in progress Validate current results and store them in a measurement session datafile Cancel current results and start again Display the time decay edition window to adjust values (See chapter 12). The display type and the display parameters of the active curves are controlled using the horizontal toolbar: Automatic re-scaling of the spectra and time history plots Enable or disable linked amplitude scales of plots for each active measurement channel Select the room criterion to display in the spectrum view. Perform an automatic autoscale to adjust data display at the end of the measurement. Enable or disable display of the time history plot and select the frequency band to monitor CHAPTER 11 - ROOM CRITERIA MEASUREMENTS PAGE 62 DBBATI32 SOFTWARE SUITE: USER MANUAL 11.2. Measurement set-up Measurement set-up can be done by pressing the key Parametrize of the manager. The dialog box shown below appears on screen : Refer to chapter 6 for more information on the use of managers. 11.2.1.Acquisition channel types for room criteria measurement Define the active measurement channels (the acquisition platform input lines) that will be used for spectrum acquisition. Note that only channels that have been enabled in the hardware configuration dialogue box may be selected (see chapter 4). The type « Room criteria » is automatically associated to each channel (all fields are greyed). 11.2.2.Analysis parameters Choose between octave and third octave spectrum analysis and define the frequency limits for the analysis. CHAPTER 11 - ROOM CRITERIA MEASUREMENTS PAGE 63 DBBATI32 SOFTWARE SUITE: USER MANUAL 11.2.3.Signal characteristics Select of signal that will be used for the room criteria measurement. Impulse signal dBBATI32 offers room criteria computation from the measurement of an impulse response. The duration of the measurement is defined in seconds. Refer to paragraph 21.5 for the calculation principle of room criteria. Refer to paragraph 11.4 for detailed explanations on the measurement process. MLS Signal In MLS mode (Maximum-Length Sequence), follow the recommendations below. It is necessary to connect an amplified loudspeaker to the LEMO4 output socket of the SYMPHONIE or HARMONIE acquisition box. The response duration should be carefully selected, as it should be adapted to the geometry of the room. Make sure that the response duration is long enough in order to obtain a background noise at the end of the measurement. It is possible to average this response in order to decrease the effect of background noise. The higher the average number, the better the response quality, because the influence of random phenomena (background noise) decreases. On the other hand, the acquisition duration increases (the signal to noise ratio increase by 3 dB when doubling the number of averages. Refer to annex 21.2 for more details on the MLS acquisition. Refer to paragraph 21.5 for the calculation principle of room criteria. Refer to paragraph 11.4 for detailed explanations on the measurement process. General remark (SYMPHONIE) The output level of the signal can be set by the SYMPHONIE icon driver from the Windows task bar with the right of the Click on the icon mouse. A contextual menu appears. Choose the Configuration field and set the SYMPHONIE output level. The output level is changed in real time if you are playing a noise. For more information on SYMPHONIE or HARMONIE (for example, connection plugs and driver configuration), consult the system installation manual.. CHAPTER 11 - ROOM CRITERIA MEASUREMENTS PAGE 64 DBBATI32 SOFTWARE SUITE: USER MANUAL 11.2.4.Criteria computation parameters Click on the Parametrize key of the measurement manager and select the criteria computation tab. This dialog box is used to select the criteria that will be computed from the measured impulse response. Refer to paragraph 21.5 for the calculation principle and definition of room criteria The computation of intelligibility criteria account for the signal to noise ratios per frequency bands. It is however to manually inputs these values. By default, background noise is considered neglectable, thus having a signal to noise ratio infinite (100). 11.2.5.Measurement options The configuration of measurement options can be performed in the Options tab of the measurement set-up dialog box. Define if decays are to be recorded into the measurement session, for later analysis. Define if the audio signal is to be recorded to hard disc. When this option is activated, the audio recording is stored in the active measurement session datafile at the end of the acquisition. Perform an autorange automatically before each measurement Automatic validation of the results. Define a delay before starting a measurement (so that the operator may leave the room during the measurement process). Refer to paragraph 11.4 for more information on the measurement process. CHAPTER 11 - ROOM CRITERIA MEASUREMENTS PAGE 65 DBBATI32 SOFTWARE SUITE: USER MANUAL 11.2.6.Gain and threshold command, autorange Once the measurement set-up has been completed from the measurement manager, perform the following from within the measurement window. Use the command Commands / Gains and threshold. This dialog box enables the definition of gain and threshold settings. These parameters can be used in several ways by the application software. All parameters and the available actions may be enabled or disabled according to the acquisition module, which calls this command. Identification of active measurement channels The gains (linked and/or identical) for each active measurement channel Automatic gain setting (autorange) launch command and associated parameters Gain view meters and gain adjustment scrolling bar Physical unit used to display gain levels Activation of a threshold Selection of the acquisition trigger conditions (no trigger, use of a threshold condition, logical operator) Threshold value Slope of the threshold trigger (trigger active on a rising or falling slope) Gains When the option Linked is active, the gains on all active measurement channels are modified: The gain setting of one active channel leads to identical modification on all active measurement channels. The gains on the active channels are identical, if the option Identical is activated. Each setting of one channel is passed to all other active channels. This option is only available if the option linked has been chosen. Autorange . Start automatic gain setting according to the input level on the hardware platform. The autorange proceeds as follows: during the duration, defined in the dialogue box, the programme stores the highest reached value and adjust the gain so that this value is located “x” dB (margin defined in the dialogue box) below that maximum measured value. Units: Selection of the display unit of the input level. The gain view meters may display the input levels according to three different units: dB Phys: Display the view meters in physical decibel. This is a relative level in dB calculated according to the transducer sensitivity and the reference 0 dB of the transducer type. dB ADC: Display the view meters in converter decibel. This is a relative level in dB. The level 0 dB is defined as the full scale of the converter. The values in dB ADC are always negative between 0 and -90 dB. Unit: Display of the view meters in physical units. In case the transducer is a pressure microphone, the view meter displays the values in Pascals (Pa). In case the transducer is an accelerometer, the view meter displays the values in m/s². CHAPTER 11 - ROOM CRITERIA MEASUREMENTS PAGE 66 DBBATI32 SOFTWARE SUITE: USER MANUAL Trigger: Define here the trigger parameters used for acquisition (not available in MLS mode). Trigger selection: Direct: to start the measurement immediately after clicking on the start acquisition command or Threshold: to start the acquisition with a threshold condition (negative or positive) defined on the right hand side. The programme waits for the threshold, when the measurement start command is activated. Trigger delay (in ms): For threshold triggering, it is possible to start the acquisition with a pre-delay or a post-delay in relation to threshold crossing. Input this delay or use the arrows up/down to increase/reduce the value Operation: Select a logical Boolean operator for the threshold trigger: OR to activate the recording if one of the conditions is fulfilled and AND to activate the recording when all conditions are fulfilled. Channels Define an identifier for each active measurement channel and, if possible, enable or disable the current measurement channel. The gain adjustment scrolling bars allows the user to perform manual gain selection : Click on the arrows to increase or decrease the gain value by steps of 1dB or unit. Click on the scrolling bars to increase or decrease the gain value by steps of 10dB or units. Threshold condition indicator: becomes and stay yellow when one or several threshold trigger conditions are fulfilled. Click once on the indicator to reset it. CHAPTER 11 - ROOM CRITERIA MEASUREMENTS Enable / Disable the threshold condition for a given measurement channel Threshold level Trigger way. The threshold condition will be fulfilled when the input level passes above (positive slope) or passes below (negative slope) the threshold value. PAGE 67 DBBATI32 SOFTWARE SUITE: USER MANUAL 11.3. Display set-up and status bar The horizontal toolbar can be used to set the graphical display parameters of the measurement window. 11.3.1.Dynamic settings Use the command Display / Autoscale to automatically re-scale the plots as a function of the measured noise levels. Use the command Display / Criteria… to select the criterion that will be displayed on the spectrum view. Only the criteria selected during measurement set-up may be displayed.. Use the command Display / Link channels to enable or disable linked amplitude scales of plots for each active measurement channel.. Use the command Display / Automatic autoscale at the end of acquisition to automatically re-scale the plots at the end of the acquisition process Display / Time history to display the time Use the command history plot and select the frequency band to monitor. The following dialog box appears on-screen. Tick the box Show time history and select the frequency band (or overall level) to display. Use the command Display / Set-up to define the display parameters of each type of data (spectra and time histories) in the measurement window. The following dialog box is displayed on screen. Display or not the Y-axis scale and select the graph dynamic range (constant range or set up manually the minimum and maximum limits) Display or not X-axis scale Show / Hide one or two cursors on the plot. Display or not a grid on the plot Show / Hide cursors’ values and select channels. 11.3.2.Status bar The status bar allows the operator to select the measurement locations and input a general comment, either by direct input or by selection in a list, corresponding to the last 4 locations completed by the operators and the default locations. Measurement location Overall comment on the measurement % of data acquired or processed It is possible to edit different locations for each measurement channels by using the syntax Location1 / Location2 in the edit zone. For example, the syntax Room / Office will affect the location Room to channel 1 and Office to channel 2. Commands / This operation may be done with the command Identifier. The dialog shown aside is displayed on screen. Input the locations for each active channels and a general comment.. CHAPTER 11 - ROOM CRITERIA MEASUREMENTS PAGE 68 DBBATI32 SOFTWARE SUITE: USER MANUAL 11.4. Measurement process 11.4.1.Procedure After measurement configuration, the user can control the measurement process with the following icons: Start the acquisition process (F3) The acquisition starts according to the defined acquisition and averaging parameters. When a trigger condition is defined (with the command Gain and threshold), the analyser waits for the trigger event, in order to start the measurement. Stop an acquisition in progress (F4) Accept current results (F7) The measurement results are saved in a measurement session datafile. Do not accept current results and restart the measurement (F6) Decay edition (See chapter 12). Display the decay adjustment window to adjust manually the decay 'slope and direct wave arrival in each frequency band, if the measurement results are not correct CHAPTER 11 - ROOM CRITERIA MEASUREMENTS PAGE 69 DBBATI32 SOFTWARE SUITE: USER MANUAL 11.4.2.Sketches The following sketch summarises the room criteria measurement process for the 3 modes available in dBBATI32. the states of the generator and the status bar at the different stages of the acquisition process are indicated. Impulse signal ACQUISITION Impulse signal (blank gun shot…) L Delay to leave the room n See paragraph 11.2.5 COMPUTATION t START STOP «Wait delay» «Measurement» n o STATUS BAR <Computation» p MLS Signal n See paragraph 11.2.5 o See paragraph 11.2.5 p See paragraph L Emission of MLS sequence ACQUISITION Delay to leave the room COMPUTATIO N Autorange t START STOP «Wait delay» n 0 «Autorange» o < Measurement» p <Computation» BARRE DE STATUT q The states Wait delay and Autorange are optional. CHAPTER 11 - ROOM CRITERIA MEASUREMENTS PAGE 70 DBBATI32 SOFTWARE SUITE: 12. USER MANUAL DECAY EDITION WINDOW (ROOM CRITERIA) The time decay edition window is used to display the decays that are used to compute room criteria. This window is displayed at the end of the room criteria measurement or analysis process (see chapters 11 and 18). It is also possible to modify decays linked to an existing RT spectrum of the measurement session. When editing a decay item, it is not possible to close the measurement session This window present : The spectra or values of the room criteria The time decays for each active frequency band It is possible to zoom each time decay frame by double clicking within its frame (or by pressing the Enter key) Double-click Regression line computed. The slope represents the RT value in seconds Active decay used for regression computation Background noise level The search for the arrival of the direct wave and the decay zone is performed automatically by applying a calculation algorithm for room criteria. If the signal being studied is not clean, the algorithm for searching the decay zones cannot be applied. It is therefore required to manually adjust the arrival of the direct wave, and maybe the RT calculation limit (see example below). CHAPTER 12 -DECAY EDITION WINDOW (ROOM CRITERIA) PAGE 71 DBBATI32 SOFTWARE SUITE: USER MANUAL The toolbar of this window allows the user to perform the following operations: Modify the measurement identifier and add comments Select the room criteria to display Define or modify the calculation parameters Automatic re-scaling of the plots Define a study zone for a given frequency band. dBBATI32 allows the user to exclude any part of the time history such as noise, parasites, double decay etc, that are not useful for the calculation process. Link cursors on all the graphical view (not active for RT adjustment) Relaunch an automatic criteria calculation according to the current calculation parameters. Activate labelling of decay X-axis in distances rather then time Enable or disable the decay manual adjustment mode. When enabled, this option allows the user to select the start and end points of the regression calculations. Hide display of the results Activate manual adjustment of the beginning point of the direct wave Hide display of the time histories Undo the latest slope or direct wave adjustment Save the results in the active measurement session Close the time decay edition window without saving Example : Manual adjustment of the direct wave In this example, the impulse response features 2 successive peaks. dBBATI32 cannot therefore correctly apply the room criteria calculation algorithm. Let consider that the first peak is a parasite noise. Room criteria calculation must be applied to the second decay. Use the function for adjusting the direct wave and move the cursor to the start of the second peak. dBBATI32 then apply automatically the decay search algorithm and indicate by a different colour the new study zone. The regression line used to compute the RT spectrum is also re-calculated. Advice Use the linked cursors’ command to adjust the direct wave start for all frequency bands. CHAPTER 12 -DECAY EDITION WINDOW (ROOM CRITERIA) PAGE 72 DBBATI32 SOFTWARE SUITE: 13. USER MANUAL SIGNAL ACQUISITION This command is accessible from the menu Acquisition / Record. The user can record audio signals then perform any type of off-line processing operation. This command can be used as a digital tape recorder (DAT). The analysis manager may be used to analyse audio recordings as spectra (chapter 16), reverberation time spectra (chapter 17) or room criteria (chapter 18). 13.1. Recording command The Record dialogue box allows the user to define the recording parameters and to carry out an acquisition. 2 3 4 With the following buttons the user can configure and control recordings: Start an automatic gain setting (autorange) Stop the acquisition without saving signal file Show gain view meter and set the gains and threshold parameters Stop recording and save signal file before the end of measurement duration Start recording Exit the signal recording mode After configuration (see chapter 4) and calibration (see chapter 5) of the measurement chain, the user can follow this procedure to carry out signal recordings: Stage 1 : Definition of the acquisition mode (see paragraph 13.3) Select the menu Acquisition / Record configuration and the rearming mode: manual or automatic (using a threshold trigger). Then choose the command Acquisition / Record Stage 2: Setting up the measurement parameters Define the following parameters: The acquisition frequency range Choose the frequency range for the acquisition. This range defines the sampling frequency of the signal file. The relation between the sampling frequency and the pass band is defined by the Shannon theorem. The list of available frequency ranges depends on the hardware platform. Symphonie, Harmonie : Jazz : 20 000 Hz, 10 000 Hz, 5 000 Hz, 2 500 Hz, 1 250 Hz, 625 Hz, 300 Hz, 150 Hz, 80 Hz, 40 Hz. 20 000 Hz, 10 000 Hz, 5 000 Hz, 1 000 Hz, 500 Hz, 100 Hz, 50 Hz. The maximum record duration. Define the duration for audio recording. Use the arrows up/down to increase/reduce the duration of audio recording or input directly the recording duration via keyboard. The maximum recording duration depends on the available hard disk space and the chosen pass band. CHAPTER 13 -SIGNAL ACQUISITION PAGE 73 DBBATI32 SOFTWARE SUITE: USER MANUAL Stage 3 : Threshold and gain settings / Autorange (see paragraph 13.2) Select the icon of manual or automatic gain setting (autorange). These commands are useful to set up the measurement dynamic range, in order to avoid overloads and underloads during recording. The autorange is useful, if the sound level does not vary greatly over the recording duration. The thresholds allow to start a measurement automatically, if a sound level passes under (or over) the defined threshold. The user can check with the overload indicators, if a threshold is exceeded (the lamp on the left-hand side becomes yellow, if a threshold is exceeded) or if an overload has occurred (the lamp on the right hand side becomes red in case of overload). Stage 4 : Audio signal recording Start recording after configuring the parameters. The recordings are saved on the hard disk of the computer in a measurement session file (*.CMG). Use the following commands: Start recording according to the defined parameters (by using a trigger condition, the acquisition starts only if this one is fulfilled). Stop recording without saving the audio event. Stop recording and save signal file before the end of measurement duration. Exit the signal-recording mode An indicator of the dialogue box reflects the recording status: The programme waits for acquisition start command. The recording is activated, but the trigger condition has to be fulfilled for signal recording. A recording is in progress. CHAPTER 13 -SIGNAL ACQUISITION PAGE 74 DBBATI32 SOFTWARE SUITE: USER MANUAL 13.2. Gain and threshold command This dialog box enables the definition of gain and threshold settings. These parameters can be used in several ways by the application software. All parameters and the available actions may be enabled or disabled according to the acquisition module, which calls this command. Identification of active measurement channels The gains (linked and/or identical) for each active measurement channel Automatic gain setting (autorange) launch command and associated parameters Gain view meters and gain adjustment scrolling bar Physical unit used to display gain levels Activation of a threshold Selection of the acquisition trigger conditions (no trigger, use of a threshold condition, logical operator) Threshold value Slope of the threshold trigger (trigger active on a rising or falling slope) Gains When the option Linked is active, the gains on all active measurement channels are modified: The gain setting of one active channel leads to identical modification on all active measurement channels. The gains on the active channels are identical, if the option Identical is activated. Each setting of one channel is passed to all other active channels. This option is only available if the option linked has been chosen. Autorange . Start automatic gain setting according to the input level on the hardware platform. The autorange proceeds as follows: during the duration, defined in the dialogue box, the programme stores the highest reached value and adjust the gain so that this value is located “x” dB (margin defined in the dialogue box) below that maximum measured value. Units: Selection of the display unit of the input level. The gain view meters may display the input levels according to three different units: dB Phys: Display the view meters in physical decibel. This is a relative level in dB calculated according to the transducer sensitivity and the reference 0 dB of the transducer type. dB ADC: Display the view meters in converter decibel. This is a relative level in dB. The level 0 dB is defined as the full scale of the converter. The values in dB ADC are always negative between 0 and -90 dB. Unit: Display of the view meters in physical units. In case the transducer is a pressure microphone, the view meter displays the values in Pascals (Pa). In case the transducer is an accelerometer, the view meter displays the values in m/s². CHAPTER 13 -SIGNAL ACQUISITION PAGE 75 DBBATI32 SOFTWARE SUITE: USER MANUAL Trigger: Define here the trigger parameters used for acquisition. Trigger selection: Direct: to start the measurement immediately after clicking on the start acquisition command or Threshold: to start the acquisition with a threshold condition (negative or positive) defined on the right hand side. The programme waits for the threshold, when the measurement start command is activated. Trigger delay (in ms): For threshold triggering, it is possible to start the acquisition with a pre-delay or a post-delay in relation to threshold crossing. Input this delay or use the arrows up/down to increase/reduce the value Operation: Select a logical Boolean operator for the threshold trigger: OR to activate the recording if one of the conditions is fulfilled and AND to activate the recording when all conditions are fulfilled. Channels Define an identifier for each active measurement channel and, if possible, enable or disable the current measurement channel. The gain adjustment scrolling bars allows the user to perform manual gain selection : Click on the arrows to increase or decrease the gain value by steps of 1dB or unit. Click on the scrolling bars to increase or decrease the gain value by steps of 10dB or units. Enable / Disable the threshold condition for a given measurement channel Threshold condition indicator: becomes and stay yellow when one or several threshold trigger conditions are fulfilled. Click once on the indicator to reset it. Threshold level Trigger way. The threshold condition will be fulfilled when the input level passes above (positive slope) or passes below (negative slope) the threshold value. 13.3. Record configuration command This command allows defining the rearming type after running a signal record (audio). Manual The successive recordings are started manually by the user. Automatic The successive audio recordings are started automatically (no user intervention is needed). This option is only available in threshold triggering mode. Each time the threshold condition is fulfilled, a recording will be executed. At the end of each recording, dBBATI32 stores the new item in a measurement session datafile. CHAPTER 13 -SIGNAL ACQUISITION PAGE 76 DBBATI32 SOFTWARE SUITE: 14. USER MANUAL MLS ACQUISITION MODE 14.1. Set-up and measurement The acquisition in MLS mode (Maximum Length Sequence) is used for measurements of the impulse response of a given 'system'. It is based on the emission of a Binary Maximum Length Sequence (BMLS). Refer to annex 21.2 for more information. The command Acquisition / MLS acquisition mode to perform room impulse response measurements. Before proceeding with the MLS acquisition, two items have to be connected to the hardware platform: an amplified loudspeaker (noise source) connected to the output of the hardware platform, in order to generate the BMLS. connect one (or several) microphone(s) to input channel(s) to measure the system response 2 3 1 Start acquisition Gain settings Stop acquisition Autorange Set-up the acquisition parameters Exit MLS acquisition mode Stage 1 : Set-up acquisition parameters to define the acquisition parameters in MLS mode. The Use the icon dialogue box opposite appears on the screen. This dialogue box allows the operator to define the order (which interact with the response duration), the number of averages, the frequency range and the measurement mode. The response duration should be carefully selected, as it should be adapted to the geometry of the room. Make sure that the response duration is long enough in order to obtain a background noise at the end of the measurement. It is possible to average this response in order to decrease the effect of background noise. The higher the average number, the better the response quality, because the influence of random phenomena (background noise) decreases. On the other hand, the acquisition duration increases (the signal to noise ratio increase by 3 dB when doubling the number of averages. CHAPTER 14 -MLS ACQUISITION MODE PAGE 77 DBBATI32 SOFTWARE SUITE: USER MANUAL Stage 2 : Gain settings / Autorange (see paragraph14.2) Select the gain setting command (automatic or manual). These commands are used to adjust the dynamic range required for the measurement in order to eliminate surcharge and under loads during recording. Autorange is used when the sound levels to measure do not vary greatly over the acquisition duration. Threshold settings are not available in MLS acquisition mode. Stage 3 : Impulse response recordings Start the acquisition when the set-up operations have been carried out. Impulse responses are saved to the computer hard disk in a measurement session datafile (*.CMG) as an impulse response item. 14.2. Gain settings This dialog box enables the definition of gain and threshold settings. These parameters can be used in several ways by the application software. All parameters and the available actions may be enabled or disabled according to the acquisition module, which calls this command. Identification of active measurement channels The gains (linked and/or identical) for each active measurement channel Gain view meters and gain adjustment scrolling bar Automatic gain setting (autorange) launch command and associated parameters Physical unit used to display gain levels Gains When the option Linked is active, the gains on all active measurement channels are modified: The gain setting of one active channel leads to identical modification on all active measurement channels. The gains on the active channels are identical, if the option Identical is activated. Each setting of one channel is passed to all other active channels. This option is only available if the option linked has been chosen. Autorange . Start automatic gain setting according to the input level on the hardware platform. The autorange proceeds as follows: during the duration, defined in the dialogue box, the programme stores the highest reached value and adjust the gain so that this value is located “x” dB (margin defined in the dialogue box) below that maximum measured value. CHAPTER 14 -MLS ACQUISITION MODE PAGE 78 DBBATI32 SOFTWARE SUITE: USER MANUAL Units: Selection of the display unit of the input level. The gain view meters may display the input levels according to three different units: dB Phys: Display the view meters in physical decibel. This is a relative level in dB calculated according to the transducer sensitivity and the reference 0 dB of the transducer type. dB ADC: Display the view meters in converter decibel. This is a relative level in dB. The level 0 dB is defined as the full scale of the converter. The values in dB ADC are always negative between 0 and -90 dB. Unit: Display of the view meters in physical units. In case the transducer is a pressure microphone, the view meter displays the values in Pascals (Pa). In case the transducer is an accelerometer, the view meter displays the values in m/s². Channels Define an identifier for each active measurement channel and, if possible, enable or disable the current measurement channel. The gain adjustment scrolling bars allows the user to perform manual gain selection : Click on the arrows to increase or decrease the gain value by steps of 1dB or unit. Click on the scrolling bars to increase or decrease the gain value by steps of 10dB or units. NOT ACTIVATED NOT ACTIVATED NOT ACTIVATED NOT ACTIVATED CHAPTER 14 -MLS ACQUISITION MODE PAGE 79 DBBATI32 SOFTWARE SUITE: 15. USER MANUAL MANAGEMENT OF MEASUREMENT SESSION DATAFILES (CMG) Any data acquired in dBBATI32 is stored in a measurement session datafile (extension *.CMG). From this datafile, the user can perform a given analysis (for example, calculation of an averaged spectrum from a signal recording). From the measurement session window, it is possible to print tables of results and graphics, to copy and paste data items to a spreadsheet or word processor for further analysis and for editing a measurement report. This chapter deals with the following aspects of data management: Create / Open / Save measurement sessions Description of the measurement session window and its toolbars Information window Comments Audio playback Edit/ Remove / Create data items Operations on data items (addition, subtraction, averaging, recombination, etc.) List / Plot data items Create / Edit / Print test reports Edit / Execute requests Print / Export / Copy the results General set-up of dBBATI32 15.1. CMG datafile management A measurement session data file, with the CMG extension, may represent several megabytes of data and dBBATI32 may work simultaneously on several data files. 15.1.1.New CMG datafile To create a new measurement session datafile CMG that is empty, click on the icon New (CTRL+N). or use the command File / An empty measurement session is then displayed on screen. CHAPTER 15 -MANAGEMENT OF MEASUREMENT SESSION DATAFILES (CMG) PAGE 81 DBBATI32 SOFTWARE SUITE: USER MANUAL 15.1.2.Open a CMG datafile To open a CMG measurement session file stored on the computer hard disk, click on the icon command File / Open. The following dialog box appears on screen. Select a measurement session file in the list (files with extension CMG) or use the Choice of the hard disk sub-directory where the CMG files are stored. Name of the selected measurement session file General informations on the selected CMG file Detailed information on the selected CMG files (number of audio records, noise quantities, codes, etc.) The upper part of this dialog box allows the user to select a measurement session file CMG for processing in dBBATI32 by choosing the appropriate location on the hard disk. The lower part of this dialog box is activated when a CMG file has been selected in the list. Various information on the datafile are given such as: The date and time the file has been first recorded and when it was last saved, the version and the number of items contained in the CMG file. By ticking the details box, the size in bytes of the datafile, the start and end dates of the measurements, the number of events (audios, spectrums, etc.) as well as general parameters (dynamic range, number of codes, etc.) Once a file has been selected, click on the Open button to open the datafile and proceed with its analysis. 15.1.3.Close a CMG datafile To close a measurement session file of type CMG, use the command File / Close. Closing down the window of the datafile will also result in closing the CMG datafile. All others windows (results' listings, plots, etc.) will be closed as well. dBBATI32 will also prompt the user to save this CMG datafile if any modifications have been made to it before closing. 15.1.4.Save a CMG datafile Use the command File / Save (CTRL+S) or File / Save As to save the measurement session on the computer hard disk. 15.1.5.Delete one or several CMG datafile(s) Use the command File / Delete session(s) to delete one or several measurement session datafiles, including temporary files. A dialog box is displayed on screen in order to select the datafiles to delete.. CHAPTER 15 -MANAGEMENT OF MEASUREMENT SESSION DATAFILES (CMG) PAGE 82 DBBATI32 SOFTWARE SUITE: USER MANUAL 15.2. Measurement session window overview In the measurement session window, the data items are displayed as for a database. Each line corresponds to a given type of data and each column corresponds to a given type of information about this data. Click on the title of a column to sort the list of data items Toolbars of the measurement session window The horizontal toolbars allows the user to perform general and data processing operations for the data items contained in the measurement session. Select data items in the list and perform the desired operation. Display of data items contained in the datafile as for a database. 15.2.1.Toolbars The following operations are possible for the data items contained in a measurement session file. According to the type and number of items selected in the list, some operations may not be activated. Create an empty measurement session file (CTRL + N) List (table) the selected data items Open an existing measurement session file (CTRL+O) Playback the selected audio events Save the active measurement session file (CTRL+S) Modify a data item (date, level correction, etc.) Transfer data from a sound level meter Create a data item (Level or RT spectrum) Activate the next window of dBBATI32 (CTRL + TAB) Delete the selected items Open an existing measurement manager (*.GSM) Access batch processing analysis Open an existing analysis manager (*.GSA) Add the selected items Open an existing computation manager (*.GSC) Subtract the selected items Display an information window about the measurement session Average the selected items Edit the general comment of the measurement session Recombine in octaves a third-octave spectrum Automatically generate a test report Compute RT spectrum from time decays Plot (graphics) the selected data items Open the index on the on-line help system. (Contextual help accessed by the F1 key). Sort data items according to the selected request Edition of requests Automatically adjust the width of each column Automatically adjust the size of the measurement session window Select the window columns to display CHAPTER 15 -MANAGEMENT OF MEASUREMENT SESSION DATAFILES (CMG) PAGE 83 DBBATI32 SOFTWARE SUITE: USER MANUAL 15.2.2.Measurement session information window Use the command Datafile / Session Information to display the information window of the active measurement session. The following information is given in this window: Date of creation and last modification Number of data items contained in the datafile Datafile size Start and end date and time Number of data items of each family This list is updated automatically each time a modification is made into the measurement session datafile. 15.2.3.Measurement session comments Use the command Datafile / Session comments to input a general comment for the active measurement session datafile. 15.2.4.Playback audio events Select an audio event in the list and use the command Datafile / Replay to playback an audio event through the sound system of the computer (signal output of SYMPHONIE HARMONIE, JAZZ or integrated sound card). The dialog box shown aside is displayed on-screen during playback. When a plot is displayed, a vertical cursor follows the progress of the playback on this plot. 15.2.5.Delete data items Edit / delete or the Suppr function key. Select the data items to remove in the list and use the command After confirmation of the deletion, the data items are completely removed from the measurement session file. Use the command Preferences / Measurement sessions not to activate the confirmation of data items removal. CHAPTER 15 -MANAGEMENT OF MEASUREMENT SESSION DATAFILES (CMG) PAGE 84 DBBATI32 SOFTWARE SUITE: USER MANUAL 15.2.6.Modify data items (edition) Datafile / Modify to edit general parameters Select one or several data items in the list and use the command of these items. The user may modify the following parameters for each item: The start date and time The location and comment defined during acquisition The study zone of the item Furthermore, it is possible to apply a calibration correction (level in dB) for some given types of data items. Each item is identified in the measurement session by its identifier (ID). This identifier is a number. 15.2.6.1.Edition of items : date and time In the Date tab, edit the date and time values, corresponding to acquisition start, of the selected data items. The modification can be performed in an absolute manner (direct edition of the date and time) or by bringing forward or putting back the original date by a user-defined duration (format : Day / hour / minutes / seconds / milliseconds). The user has to confirm each date and time modification. 15.2.6.2.Edition of items : location and comments In the Location tab, edit the comment relative to the location of the measurement channel. In the Comment tab, edit the comment relative to, for example, the measurement conditions. 15.2.6.3.Edition of items : Level conversion In the calibration tab, define a calibration adjustment for the selected data items. A calibration level conversion in decibels is applied globally with a resolution of 0.01dB. Click on the key Restore original level value to cancel the level correction. CHAPTER 15 -MANAGEMENT OF MEASUREMENT SESSION DATAFILES (CMG) PAGE 85 DBBATI32 SOFTWARE SUITE: USER MANUAL 15.2.6.4.Edition of items : study zone In the study tab, select the study zone for any subsequent analysis. Click on the Complete study key to select the complete duration of the data item for an analysis. 15.2.6.5.Edition of items : Type for building acoustics In the Type tab, select the type of a given autospectrum or audio file for building acoustics calculations. The spectra resulting from a measurement in dBBATI32 already have the correct type. 15.2.6.6.Edition of items : Information DAC conversion value Conversion value allowing us to pass directly from the digital value measured on the acquisition card to the analogue value expressed in Pascals. This value depends on the sensitivity of the transducer and the gain used. Example : For the hardware platform Symphonie, sampling is performed over 16 bit, with values ranging from -32768 to +32768. For a digital value of 5000, the level in Pascals is 5000 * DAC. Thus : 5000 * 3.432e-4 = 1.716 Pa Full scale level Maximum value in decibels that can be measured with the current DAC value. For Symphonie, this value is equal to : 20 log ( (32768*DAC) / P0) in dB with a reference sound pressure level P0 = 20 mPa Transducer type used to acquired the audio data Gain for the input signal CHAPTER 15 -MANAGEMENT OF MEASUREMENT SESSION DATAFILES (CMG) PAGE 86 DBBATI32 SOFTWARE SUITE: USER MANUAL 15.2.7.Create new data item Use the command Datafile / Create to add a new data item (spectrum or RT spectrum) to the active measurement session. The data values will be edited manually. The dialog box shown below appears on screen. Select the type of spectrum (level in dB or RT in seconds) as well as the frequency resolution (octaves or third octaves). Click on the OK button The data item modification dialog box appears on screen (Values tab). Then, input manually the values of the spectrum for each frequency band (in seconds or in dB). The user is not obliged to input a value for each frequency band. It is possible to input a location, a comment and to give a particular type to this spectrum by using the other tabs of this data item. Refer to paragraph 15.2.6. 15.2.8.Operations on data items The following icons allows the operator to perform a serie of operations on data items selected in a measurement session datafile. Add all selected data items (spectrum, audio, RT) and create a new data item containing the result. Subtract all selected data items (spectrum, audio, RT) and create a new data item containing the result. Average all selected data items (spectrum, audio, RT) and create a new data item containing the result. The 3 above arithmetic operations may be carried out according to two calculation rules : algebraic or logarithmic. Use the command Preferences / Operations to select which rule will be used (see paragraph 15.8.5.5). Recombine a third octave spectrum into an octave spectrum (autospectrum or time decays only) and create a new data item containing the result. Compute a RT spectrum from a time decay data item selected in the measurement session. Use this function if the RT spectrum corresponding to a given time decay has been deleted from the measurement session. Use the command Preferences / Operations to select how the RT calculation will be carried out (see paragraph 15.8.5.5). CHAPTER 15 -MANAGEMENT OF MEASUREMENT SESSION DATAFILES (CMG) PAGE 87 DBBATI32 SOFTWARE SUITE: USER MANUAL 15.3. Plot data items (graphics) Use the command Datafile / Plot, after selection of one or several data items in the list, to display the data in a graphical manner, when possible. Double click on a data item in the list to also display a graphical view. Data items of the following types may be displayed graphically in dBBATI32: Signal edition view Signal recording (audio) Broad band spectrum and/or multispectrum view Octave, third octave, 1/Nth octave band spectra Reverberation time in octaves and third octaves Let now describe each view in the following paragraphs. 15.3.1.Signal view In this type of graphical view, any time history of a signal (in physical units), noise and vibration quantity (level in dB or in physical units) can be displayed. An example of signal view is given below: Select the channel units to display, zoom functions, etc. Define the study zone and the threshold search functions Display the item over its complete duration Zoom an given part of the signal The toolbar of this graphical view allows the user to perform the following operations: Select the active channel for the view End of the study zone Select the display unit Define the study zone in between the cursors Activate/ Deactivate automatic autoscale for the zoom Define the study zone over the complete duration of the item Show/Hide a channel and activate/deactivate a channel for any subsequent study Perform an autoscale in the signal zoom view Activate the zoom view Search for a threshold exceedance Deactivate the zoom view Stop threshold search Beginning of the study zone Next threshold The vertical toolbar allows the user to define the study zone for the signal and to perform threshold search operations. CHAPTER 15 -MANAGEMENT OF MEASUREMENT SESSION DATAFILES (CMG) PAGE 88 DBBATI32 SOFTWARE SUITE: USER MANUAL The threshold search command (command Study / Threshold / Search) allows the user to define the level of the threshold (value given in physical unit) and a slope (positive or negative) to the threshold condition. When the threshold condition has been fulfilled, the cursor is located at the threshold exceedance on the graphical view. allows the user to stop the threshold search and the command The command next threshold exceedance. allows the user to find the The horizontal toolbar allows the user to define display parameters of the graphical view. It is possible to use zoom functions to zoom a part of the signal and perform an autoscale for the zoom view. The display units depend of the type of graphical view. For signals, it is possible to select the following display units: ADC : Displays the dynamic in dB converter. It’s a relative decibel level. The 0dB level is the full-scale value of the converters (i.e. a sample which has a numerical value of 2 16 (32767) corresponds to the 0dB value). dBADC values are always negative between 0 and -90dB. V : Dynamic display in Volts. Physical unit : If the transducer is a microphone, he dynamic is displayed in Pascals (Pa), If the transducer is an accelerometer, the dynamic is displayed in Acceleration (m/s²). For sound and vibration quantities of type autospectrum, cross-spectrum and transfer functions, it is possible to select the following display units: dB : Level in decibels of the considered quantity (Leq, Slow, Fast, Impulse, etc…) RMS (Root Mean Square) : Average quadrate value for all the instantaneous squared values expressed in physical units. PWR (Power) : The power represents the average of a squared value. It is the unit used to determine the power at a given frequency for a determined (sinusoidal) signal. It is expressed in squared units It is possible to display up to two signals on the same graphical view if the data items have the same characteristics (periods, duration). CHAPTER 15 -MANAGEMENT OF MEASUREMENT SESSION DATAFILES (CMG) PAGE 89 DBBATI32 SOFTWARE SUITE: USER MANUAL 15.3.2.Broad band spectra view This type of view is used to graphically display spectra in broad bands (octaves, third octaves), An example of this type of view is given below:: Definition of data display parameters and general graphical view parameters Display of spectra on the same graphical view. Display of overall levels The toolbar of the graphical view allows the user to perform the following operations: Definition / Edition of data parameters for the graphical view Definition / Edition of display parameters for the graphical view It is possible to display up to 6 data items on the same view if they have the same characteristics (periods, resolution). 15.3.2.1.Display parameters of the graphical view Set-up the graphical display parameters by the command Plot / Plot set-up. The plot is updated immediately when a modification is made. Each plot has its own settings’ dialog box: a modification on one plot does not affect the settings of another plot. Display or not X-axis scale Display or not the Y-axis scale and select the graph dynamic range (constant range or set up manually the minimum and maximum limits) Show / Hide one or two cursors on the plot. Show / Hide cursors’ values and select channels. Display or not a millimetered grid on the plot. CHAPTER 15 -MANAGEMENT OF MEASUREMENT SESSION DATAFILES (CMG) Zoom in the plot for the time portion between cursors (IN) Zoom out the plot (OUT) PAGE 90 DBBATI32 SOFTWARE SUITE: USER MANUAL 15.3.2.2.Data parameters for the graphical view Define data parameters for the graphical view by the command Plot / Parameters. The following dialog box appears on-screen. The tabs allows the user to define the following parameters: X axis tab In this tab, select the minimum and maximum frequency bands for spectrum display in the graphical view. If the All box is ticked, the spectrum is displayed over the complete frequency range of acquisition. Data tab In this tab, select if the data should be displayed in physical units (Dynamic : Lin) or in decibels (dB). Then select the required spectral unit (RMS or PWR for broad band spectra and multispectra) as well as frequency weighting to apply to the spectral data values. If the Optimise box is not ticked, the user may then select the minimum and maximum values of the display dynamic range. Overall levels tab (broad band spectra) In this tab, and for broad band spectra only, select the overall levels to compute according to a given frequency weighting, displayed in a list. Overall levels are then displayed on the right hand side of the spectrum view. CHAPTER 15 -MANAGEMENT OF MEASUREMENT SESSION DATAFILES (CMG) PAGE 91 DBBATI32 SOFTWARE SUITE: USER MANUAL Graphics tab In this tab, select the type of graphics that will be displayed : line mode or bars mode. Examples of the different types of graphical representation are given below: Bars mode Line mode (stairs) Line mode (mountain) 15.4. Listings of data items (tables) Use the command Datafile / List, after selection of one or more data items in the list, in order to display data items as a table of results. The user can also double click on the items of interest to display the table of results. Broad band spectra may be displayed as tables in dBBATI32. Select the minimum and maximum frequency bands for spectrum data values in the table of results.. If the All box is ticked, the spectrum values are listed over the complete frequency range of acquisition. Select the overall levels to compute according to a given frequency weighting, displayed in a list (A and Lin levels). The levels are listed in decibels (dB) PWR. Overall levels are shown at the bottom of the table. The toolbar of the table of results allows the user to perform the following operations: Definition / Edition of data parameters for the table of results Automatically adjust the size of the window CHAPTER 15 -MANAGEMENT OF MEASUREMENT SESSION DATAFILES (CMG) PAGE 92 DBBATI32 SOFTWARE SUITE: USER MANUAL 15.5. Automatic test reports It is possible to create, edit and print test reports automatically after performing standard calculations in dBBATI32. These test reports comply with the specifications of the ISO standards currently in use. Refer to paragraph 21.4 for details on the standards and the computation methods used. n Select a data item in the measurement session datafile Select in the measurement session data file a data item that result from a standard calculation. All data items obtained from the computation manager (insulation, impact noise, mechanical equipment noise, absorption) may be used to create automatically a test report. is activated when a compatible data item The icon for the creation of a test report has been selected. Absorption : The item A1 (equivalent sound absorption of an empty room) cannot be used to create a test report, because this item is only used to check that other sound absorption indices are valid.. The two RT items that have been used for computation in the report must be saved in the measurement session datafile. o Generation of the test report Use the command Datafile / Test report to automatically generate a test report in HTML format. The fields that appear in light yellow may be modified by the user The test report window features some fields that filled automatically by dBBATI32 and other ones that the user has to complete, to identify the measurement. The Description field is automatically completed with the location and comments of the selected data item. The layout and the number of graphics and tables in the report depend upon the data item selected in the datafile As default, the fields Client and Test Company are empty. It is possible to complete manually these fields, and there will be used again for all subsequent reports by using the command Preferences / Fields of test reports (see below). The parameters that have been used for the computation of the data item (selected in the computation manager) cannot be modified. However, in some reports, other parameters may be completed manually. CHAPTER 15 -MANAGEMENT OF MEASUREMENT SESSION DATAFILES (CMG) PAGE 93 DBBATI32 SOFTWARE SUITE: USER MANUAL Definition of default fields for the test reports Use the command Preferences / Fields of test reports to define as standard the references of the client and the company that performed the test, featured on each test report. This operation allows the user to save time when editing a test report, but it is always possible to edit manually within a particular test report. Table of values The table of values featured in the test reports uses symbols and colours explained below : The listed spectrum does not contain this particular value The values marked in red are used to compute the singlenumber quantity The listed spectrum contains a value that is not valid for this frequency band Difference too small between received and background noise levels p Save the test report Use the command Report / Save or Rapport / Save As to save the complete test report in a HTML file (standard format for web browsers). Open a test report on another computer : The graphic display in the report uses a Java applet that is installed as standard with 01dB programs. This applet must be present on the computer to display correctly the graphics of a report. Proceed as follow to display a test report : On the PC where dBBATI32 is installed, copy the Com directory, located in the directory where 01dB software applications have been installed. Copy this directory on the PC, at the exact same location on the hard disc, where the test report is displayed. q Printing the report Use the command File / Print to print the test report. The user modifications (fields) in the test reports are taken into account before the print operation. CHAPTER 15 -MANAGEMENT OF MEASUREMENT SESSION DATAFILES (CMG) PAGE 94 DBBATI32 SOFTWARE SUITE: USER MANUAL 15.6. Description and selection of columns in a measurement session window Use the command Datafile / Columns to select the columns that will be displayed in the main window of a measurement session data file. The dialog box shown below appears on screen. Select with the mouse the different column fields that will be displayed in the main window of a measurement session data file. The key Select all allows the user to select all possible columns fields while the key Unpick all allows the user to clear all the column fields. The table below gives the meaning of column available in a measurement session window: Columns Meaning Selection (Sel.) When selecting several data items in the measurement session window, a number is shown in this column that displays the selection order of the data items. ID Identifier of the data item. A number. This number is incremented (from 0)each time a data item is added to the measurement session. Family Type Set of data items of the same family : audio, autospectra, transfer functions, etc. Type of a given spectrum (emitted noise, received noise, etc. for building acoustics) Data type Type of quantity allowing us to define more accurately the data item (for a Fast sound pressure level, the family would be Leq and the data type will be Fast) Weighting Frequency weighting applied to the data item during acquisition or off-line analysis : A, B, C, Lin weightings, vibration weightings, etc. Name Name of the analysis that created this data item. It is the name of the operator for a off-line analysis and the name of the acquired quantity for a real-time measurement. Date Date and time of the data item, corresponding to the date of creation or modification 1st channel location Duration Period Average type Y axis X axis resolution X axis Location defined during acquisition (Channel 1 by default). For cross spectra, it corresponds to the location of the first measurement channel. Duration of the data item (hour / minutes / seconds) Base duration or integration time of data items that vary with time. Type of averaging method used to compute the data item (average, min., max., statistical) Physical unit (or dB for the histograms) of the Y axis Resolution of the X axis (in seconds for time histories of data items, frequency resolution for spectrum data items) Unit of the X axis (Hz, seconds, %, etc.) Channel(s) Number of the measurement channel on which the data item has been acquired Comments Comments of the data item, from measurement set-up or item modification Track For off-line analysis, this field indicates how this data item was computed : ID of the original data item, name and type of operators used to compute the result) CHAPTER 15 -MANAGEMENT OF MEASUREMENT SESSION DATAFILES (CMG) PAGE 95 DBBATI32 SOFTWARE SUITE: USER MANUAL 15.7. Edition and execution of requests (data sorting) Measurement session datafiles have a structure similar to databases. As any measurement result is stored into these datafiles, a set of requests functions allow the user to sort the data according to various parameters. One can display, for example, data items of the same family only (audio events, narrow band spectra, octaves and third octave spectra, etc.) in the measurement session view. The simplest way to sort data is to click on a column field in the measurement session 15.7.1.Overview of requests' edition Use the command remove requests. Datafile Edition of requests to open the dialog box that allows the user to define, edit or dBBATI32 manages two types of requests: local requests, which apply only to the active measurement session, and global requests, which apply to any measurement session. Global requests are preceded by an asterisk (*). The procedure to define a request is the same in both cases. Click on the key Add local request to add a new local request to the active measurement session and click on the key Add global request to add a new global request for any measurement session that will be opened in the application software. Click on the key Edit to modify an existing request selected in the list and click on the key Remove to remove an existing request from the list. By default, 5 types of requests are available : * All items Sort data items of a measurement session according to their dates of creation. * Insulation Display only the data items of the measurement session that deals with Insulation : Emitted noise, received airborne noise, RT, background noise and the results of sound insulation calculations. * Impact noise Display only the data items of the measurement session that deals with Impact noise : Received impact noise, TR, RT, background noise and the results of impact noise calculations. * Mechanical equipment noise Display only the data items of the measurement session that deals with equipment noise : equipment noise level, RT and standardised equipment noise level. * Absorption Display only the data items of the measurement session that deals with absorption : RT and the results of sound absorption calculations. CHAPTER 15 -MANAGEMENT OF MEASUREMENT SESSION DATAFILES (CMG) PAGE 96 DBBATI32 SOFTWARE SUITE: USER MANUAL 15.7.2.Add or modify a request (local or global 15.7.2.1.Overview Access the dialog box shown below when creating a new request or editing an existing request. Navigate, displacement, removal of the conditions of a request. Give a name to the request List of conditions that compose the request Sort data items corresponding to the request according to an additional parameter After definition of the request name (that will appear in the list of requests), define one or several conditions that compose the request. The columns of the list of conditions of a request allows the user to define the following parameters: Logic column Define a Boolean operator (AND/OR) when several conditions have been defined. The data items will be displayed when all the conditions of the request are verified (operators AND) or at least one condition is verified (operators OR). NEG column (negative) If this case is activated, the data items that will be displayed are the items that do not correspond to the condition. Fields column Select the quantity according to which the data items will be sorted. A list proposes all the fields that characterise data items (family, name, ID, duration, etc.) Op column (operation) Equality, inequality of the quantity selected in the Fields column. Value column Value that takes the quantity selected in the Fields column. The operation of the Op column forms the condition of the request. Furthermore, a tool bar allows the user to perform the following operations: Insert a condition in the list at the current mouse location Remove the condition selected in the list Move up the condition selected in the list (appears in video inverse) Move down the condition selected in the list (appears in video inverse) CHAPTER 15 -MANAGEMENT OF MEASUREMENT SESSION DATAFILES (CMG) PAGE 97 DBBATI32 SOFTWARE SUITE: USER MANUAL The definition order of the conditions is important : indeed, the boolean operator (logic column) of the last condition defined is applied to all the conditions that precede it. For example, for a set of conditions to verify simultaneously (AND operator in between each condition), on), if the operator for the last condition is OR, then the request will display data items that match all the conditions associated by the AND operator as well as the data items that match the last condition. The example below illustrates the principle: Data items of the Audio family and of duration greater than 30 seconds will be displayed as well as data items (whatever the family) of duration less than 1 minute. Data items of the Audio family and of duration ranging from 30 seconds to 1 minute will be displayed. 15.7.2.2.Definition principle Follow the instructions below to add a new request: 2 3 4 7 1 6 5 8 1. Give a name to the current request. This name will appear in the list of request in the management dialog box. 2. On the first line of the conditions' list, click on the Fields column and select the desired quantity in the scrolling list. 3. On the same line, click on the Op column and select the equality value in the scrolling list. 4. On the same line, click on the Value column and select a value in a scrolling list or input it manually. 5. Repeat steps 2 to 4 for each condition to define 6. Select the boolean operators in the Logic column to define interactions in between the conditions. 7. Define the order of the request conditions, remove a condition if necessary 8. Validate the request. CHAPTER 15 -MANAGEMENT OF MEASUREMENT SESSION DATAFILES (CMG) PAGE 98 DBBATI32 SOFTWARE SUITE: USER MANUAL 15.7.2.3.List of the values available to define a request Here is a complete table of the different choices available when defining a request. Fields column Description (Fields column) Op column Value column 1/n octave Frequency resolution of a broad band spectrum or multispectrum < ; <= ; <> ; = ; > ; >= n = 1, 3, 6, 12, 24, 48 Application Name of the application software used to create the item @, = Manual input Date Date of creation of the item < ; <= ; <> ; = ; > ; >= Manual input (day/month/year hh:mm:ss). 01/02/1999 16:42:05 Duration Duration of an item < ; <= ; <> ; = ; > ; >= Manual input (ddd/hh/mm/ss/ms) 30 seconds : 000j00h00m30s000 = ; <> attack decay sustain release, audio, autospectrum, clarity, code, coherence, comment, counter, room criteria, EDT, transfer functions (1/H1, H1, 1/H2, H2), histogram (%, Nb), cumulated histogram (%, Nb), Intensity (active, reactive, free field), cross-spectrum, sound insulation, Leq, measurement, mean pressure, psycho, RASTI, impulse response, sensitivity, Bark spectrum, scalar spectrum, STI, TI, TR Family Set of data items of the same family : audio, autospectra, transfer functions, etc. Data type Type of quantity allowing us to define more accurately the data item (for a Fast sound pressure level, the family would be Leq and the data type will be Fast) = ; <> Peak, Fast, Fast Inst., Fast Max, Fast Min, Impulse, Impuls Inst, Impuls Max, Impuls Min, instantaneous, Isel, Leq, Min, RC, RC Inst., RC Max, RC Min, SEL, Slow, Slow Inst, Slow Min, Slow Max, Tmax 3, Tmax 5 X axis quantity Physical unit of the X axis = ; <> Bark, dB, Hz, Order, Scalar = ; <> Acceleration, counter, displacement, force, jerk, Noy, pressure, rate, rate (DC), second, scalar, sone (D, F, GD, GF), voltage, velocity, W/m² ID Identifier of the data item. A number. This number is incremented (from 0)each time a data item is added to the measurement session. < ; <= ; <> ; = ; > ; >= Manual input of a number 1st channel location Location defined during acquisition (Channel 1 by default). For cross spectra, it corresponds to the location of the first measurement channel. @;= Manual input of a location Average type Type of averaging method used to compute the data item = ; <> Max, Min, Average, Stat 1st meas. Channel no Number of the measurement channel used to create the item. 2nd meas. Channel no For cross-spectra, the number of each channel used to calculate the cross spectrum is described < ; <= ; <> ; = ; > ; >= 1, 2, 3, 4 Name Name of the analysis that created this data item. It is the name of the operator for a off-line analysis and the name of the acquired quantity for a real-time measurement. @;= Manual input Y1 axis quantity Y2 axis quantity Physical unit of the Y-axis. For cross-spectra, Y1 corresponds to the physical unit of the first item and Y2 corresponds to the physical unit of the second item used to calculate the cross spectrum CHAPTER 15 -MANAGEMENT OF MEASUREMENT SESSION DATAFILES (CMG) PAGE 99 DBBATI32 SOFTWARE SUITE: USER MANUAL Fields column Description (Fields column) Op column Value column Period Base duration or integration time of data items that vary with time. < ; <= ; <> ; = ; > ; >= Manual input (0,00000 seconds) 125 ms : 0.12500 Weighting Frequency weighting applied to the data item during acquisition or offline analysis : A, B, C, Lin weightings, vibration weightings, etc. = ; <> A, B, C, D, G, Lin, PL, Pla, PN, Pink A, Pink Lin, Road A, Road Lin, TPN, Wb, WBc, Wc, Wd, We, Wf, Wh, Wj, Wk Building acoustics spectrum Type of a given spectrum (emitted noise, received noise, etc. for building acoustics = ; <> Background noise, emitted noise, received noise Statistics Statistical index Ln < ; <= ; <> ; = ; > ; >= Manual input (0,00000) L99.8 : 99,8000 X axis unit X axis unit for a quantity acquired with other software (not 01dB) @;= Manual input @;= Manual input < ; <= ; <> ; = ; > ; >= Manual input (0,00000) Version 1.01 : 1,01000 Y1 axis unit Y2 axis unit Version Legend: < <= <> = > >= @ X axis unit for a quantity acquired with other software (not 01dB). For example, the temperature For cross-spectra, Y1 corresponds to the physical unit of the first item and Y2 corresponds to the physical unit of the second item used to calculate the cross spectrum Version of the file format Less than Less than or equal to Not equal to Equal to Greater than Greater than or equal to Contain the character string CHAPTER 15 -MANAGEMENT OF MEASUREMENT SESSION DATAFILES (CMG) PAGE 100 DBBATI32 SOFTWARE SUITE: USER MANUAL 15.7.3.Execute a request Once all the requests have been defined, use the scrolling list session window or the command Datafile / Current request. of the measurement The selected request is then executed automatically. An example of execution of a request to display only items of the audio family is given below: CHAPTER 15 -MANAGEMENT OF MEASUREMENT SESSION DATAFILES (CMG) PAGE 101 DBBATI32 SOFTWARE SUITE: USER MANUAL 15.8. Result exploitation and customisation It is possible in dBBATI32 to print directly a data plot and/or a result listing and to export the results as graphics or values in standard office spreadsheet and word processor software, for further processing and result presentation. The user can also customise the way the data is displayed in the software. 15.8.1.Printing results Using the commands of the File menu, results can be directly printed by dBBATI32, if a printer is connected to the computer, of course. Use the command File / Print (CTRL + P) to display the Print dialog box. Specify which pages should be printed, the number of copies, and the printer driver to use as well as other parameters (print quality, etc.). Access directly to the printer configuration dialog box by the command File / Print Set-up and to a preview of the document to print by the command File / Print Preview. The toolbar of the print preview window allows the user, for example, to zoom in the preview document. When printing graphics, the user can set a few additional parameters by the commands Preferences / printout options. The user can set the margins of the graphic printout frame and the line thickness of the printed curves. CHAPTER 15 -MANAGEMENT OF MEASUREMENT SESSION DATAFILES (CMG) PAGE 102 DBBATI32 SOFTWARE SUITE: USER MANUAL 15.8.2.Export data to a word or spreadsheet processor The user may either export results as graphics (graphical plots and results listings) or export the results as values by the command Edit / (CTRL+C). After the copy command of dBBATI32, simply paste (Edit / Paste) the data in a word processor or a spreadsheet processor as shown below: Copy Values CHAPTER 15 -MANAGEMENT OF MEASUREMENT SESSION DATAFILES (CMG) Copy Image PAGE 103 DBBATI32 SOFTWARE SUITE: USER MANUAL 15.8.3.Principle and configuration of the Copy command The copy command may be configured to work in different ways in dBBATI32. Use the command Preferences / Copy options to define how the copy command will work. The following dialog box appears on screen. By default, for all graphical views, the command Edit / Copy can be used to copy the image of the graphical view. The data values cannot be copied Copy of tables of results In some cases, for a table of results mainly, it is possible to copy either an image of the table or the data values of the table at the ASCII format. The default option Be prompted for the type of copy each time allows the user to display a dialog box for choosing to copy either the image or the values of the table of results The option Copy the values only can be used to copy directly the data values. The option Copy the image only can be used to directly copy the image of the table. Copy of an item when a study zone has been defined For items where a study zone can be defined (an audio signal for example), it is possible to copy the image of the view over the complete duration of the item (option Copy the whole) or to copy only the image of the view over the defined study zone (Copy only the study zone). The default option Be prompted for the type of copy each time allows the user to display a message to either copy the image of the view over the complete duration or the study zone. The following message appears on screen: See paragraph 15.2.6 for more details on defining a study zone. Copy data items at ASCII format When copying directly data items from the measurement session window at ASCII format, an additional parameter is the way it will be pasted in a word or spreadsheet processor. The data values can be displayed vertically (default value) : data of X-axis and Y-axis are displayed in columns. Alternatively, they can be displayed horizontally : data of X-axis and Y-axis are displayed in lines. CHAPTER 15 -MANAGEMENT OF MEASUREMENT SESSION DATAFILES (CMG) PAGE 104 DBBATI32 SOFTWARE SUITE: USER MANUAL 15.8.4.Exportation of data at ASCII format (TXT file) The command File / Export allows the user to copy the data values of one or several items of a measurement session datafile at the ASCII format into a TXT file. A wide range of application software packages may open these files: Windows notepad, word processors, spreadsheet processors, database software, etc. The user can perform any operation on the formatted data to edit a measurement report or to perform further calculations. Each field in the ASCII file is separated from the next one by a tabulation, in order to easily import these files into a spreadsheet processor. We give below an example of ASCII file containing data from a sound insulation spectrum: Id 9 Identifier number of the measurement. Ident Name ISOL_0 Comment Origin dBOper32 These fields correspond to the fields of a 01dB measurement session (*.CMG files) : The name of the operator that allowed the user to perform the calculations, the comment associated to the item, the origin of the computation. Family Sound insulation Set of data items of the same family : audio, autospectra, etc. Data Type Leq Type of quantity allowing us to define more accurately the data item (for a Fast sound pressure level, the family would be Leq and the data type will be Fast) Type Type of a given spectrum (emitted noise, received noise, etc. for building acoustics) Begin 25/11/94 15:49:56 End 25/11/94 15:49:56 StudyBegin 25/11/94 15:49:56 StudyEnd 25/11/94 15:49:56 Start and end date and time of an item, Start study zone date and time of the item. Period 0,000e+00 Base duration or integration time of data items that vary with time. Set to 0 when the items are time averaged. Average Type of average applied to the item (mean, maximum, minimum) Average Duration Averaging duration for a spectrum Where emitted noise Defined location for the measurement session.. Coord Unit dB Physical unit of the measured data. For noise levels, Pascal (Pa) is used. As the sound insulation calculation has been performed from spectra in decibels, the unit is the decibel. PowerUnit PWR The power represents the average of a squared value. It’s the unit used to determine the power at a given frequency for a determined (sinusoidal) signal. It is expressed in squared units Reference 1,000e+00 Reference value of the measured quantity for level conversion in decibels. For sound pressure levels, the reference value of the international system is 2x10⁻⁵ Pa. Here, the reference is equal to 1 because sound insulation calculation has been performed from spectra in decibels, the unit is the decibels. dB/Lin dB Unit of the stored quantity. Here, the levels are directly given in decibels (dB). For a time decay, for example, the values are given in physical units (Lin) CHAPTER 15 -MANAGEMENT OF MEASUREMENT SESSION DATAFILES (CMG) PAGE 105 DBBATI32 SOFTWARE SUITE: USER MANUAL Weight Lin Frequency weighting applied to the data Partial 3 X unit Hz X Min 100 Hz X Max 5 kHz Partial corresponds to the broad band resolution of the spectrum: 1 means Octave, 3 means Third octave. X unit corresponds to the physical unit of the X-axis: In this example, we are dealing with Frequency in Hertz (Hz). X Min and X Max correspond respectively to the minimum and maximum frequency bands of acquisition (in this example, we consider third octave bands ranging from 100Hz to 5kHz). Nb Elements 1 Number of data values contained in the item. 100 Hz 125 Hz 160 Hz 1.6 kHz 2 kHz 16,5 19,5 21,7 47,9 49,8 The data values are given for 200 Hz 250 Hz 315 Hz 2.5 kHz 3.15 kHz4 kHz 28,7 28,5 32,3 45,3 43,9 44,4 each frequency band. 400 Hz 500 Hz 630 Hz 800 Hz 1 kHz 5 kHz 35,2 40,8 42,1 43,6 42,3 44,9 1.25 kHz 45,5 We give below the example of a data item of an averaged spectrum (averaging time of 30 seconds) in octave bands Id … Family Data Type Type Begin End … Period Average Average Duration 0 1 2 Autospectrum Leq Autospectrum Leq Autospectrum Leq 10/05/99 14:38:41 10/05/99 14:38:41 10/05/99 14:38:41 10/05/99 14:38:41 10/05/99 14:38:41 10/05/99 14:38:41 0,000e+00 Average 3,000e+01 0,000e+00 Max 3,000e+01 0,000e+00 Min 3,000e+01 The field average type can be: Average for an averaged spectrum, Max for a maximum spectrum, Min for a minimum spectrum. Where … Unit PowerUnit Reference dB/Lin Weight Partial X unit X Min X Max #19 #19 #19 Pa PWR 2,000e-05 dB Lin 1 Hz 31.5 Hz 4 kHz Pa PWR 2,000e-05 dB Lin 1 Hz 31.5 Hz 4 kHz Pa PWR 2,000e-05 dB Lin 1 Hz 31.5 Hz 4 kHz The three fields above are added for averaged spectra. Partial corresponds to the broad band resolution of the spectrum: 1 means Octave, 3 means Third octave. X unit corresponds to the physical unit of the X-axis: In this example, we are dealing with Frequency in Hertz (Hz). X Min and X Max correspond respectively to the minimum and maximum frequency bands of acquisition (in this example, we consider octave bands ranging from 100Hz to 5kHz). Nb Elements 31.5 Hz 63 Hz 125 Hz 250 Hz 500 Hz 1 kHz 2 kHz 4 kHz 1 55,7 57,5 72,8 73,1 69,9 62,3 60,7 66,3 1 56,3 58,2 73,3 74,0 71,0 63,8 61,9 67,5 1 50,7 49,4 65,6 61,2 49,0 39,4 38,0 47,2 The data values are given for each frequency band CHAPTER 15 -MANAGEMENT OF MEASUREMENT SESSION DATAFILES (CMG) PAGE 106 DBBATI32 SOFTWARE SUITE: USER MANUAL 15.8.5.Customisation of dBBATI32 The software allows the user to customise various parameters for displaying the data. 15.8.5.1.Select the colours of the data to display The commands Preferences / Colours allows the user to respectively set the colours of the different types of data displayed on screen. Select in this list the type of data for which you want to modify the colour. The actual colour associated to this type of data is displayed next to the list. Then, select with the mouse the new colour in the bottom part of the dialog box. Click on OK when all the modifications have been carried out 15.8.5.2.Select the fonts of the data to display The command Preferences / Font allows the user to choose which computer font will be used to display text in dBBATI32. Select the font type, style (regular, Italic, Bold, etc.) and size in this dialog box. Click on OK when all the modifications have been carried out.. 15.8.5.3.General functions The command Preferences / Functions allows one to customise the software : Small icons : Tick this option to display small icons in the manager toolbars. Compulsory location : Tick this option in order to oblige the user to input a location for any next data item. Display and copy all measurement results Automatically display decays : The decay edition window is displayed automatically after a measurement or an analysis of reverberation time, or room criteria. CHAPTER 15 -MANAGEMENT OF MEASUREMENT SESSION DATAFILES (CMG) PAGE 107 DBBATI32 SOFTWARE SUITE: USER MANUAL Arrange all windows automatically : all windows within the software will be arranged automatically in the main window, either vertically or horizontally. CHAPTER 15 -MANAGEMENT OF MEASUREMENT SESSION DATAFILES (CMG) PAGE 108 DBBATI32 SOFTWARE SUITE: USER MANUAL 15.8.5.4.Start options The command Preferences / Start allows to open automatically some elements when opening the application software. 15.8.5.5.Parameters for operations on data items The command Preferences / Operations allows the operator to modify the default parameters of the calculations on data items. The choice of the rules (algebraic or logarithmic) for arithmetic operations is applied to the addition, subtraction and averaging operations. The RT computation parameters apply to RT calculation operation. Refer to paragraph 15.2.8 for further information. 15.8.5.6.Measurement session general options Use the command Preferences / Measurement session to define general parameters about the management of measurement session datafiles. The option Confirm delete items allows the user to display a dialog box to confirm or not any item removal operation in the active measurement session datafile. The option Confirm add items allows the user to display a dialog box to confirm or not any item addition in the active measurement session datafile. The option save items in separated files allows the user to save the different items of a measurement session files into binary files. The binary data of each item are stored in a BID (Binary Item Data) file and the references of this item are saved into the measurement session itself. The option Automatically save all sessions every X minutes allows the user to save all the opened measurement sessions at regular time intervals. Therefore, a name must be defined when creating a new measurement session. CHAPTER 15 -MANAGEMENT OF MEASUREMENT SESSION DATAFILES (CMG) PAGE 109 DBBATI32 SOFTWARE SUITE: 16. USER MANUAL SPECTRA ANALYSIS This chapter deals with spectra analysis (off-line analysis of audio records). This mode allows the user to perform a batch analysis of existing audio signals stored in a measurement session datafile (as acquired with dBBATI32) to obtain spectra in octaves or third octaves. The audio items to analyse are selected in a measurement session datafile. To analyse several audio items successively and in an automatic manner, use the batch command. This chapter presents in a general manner how to set-up and perform spectra analysis. Use the command Analysis / New to open a new analysis manager. This manager is used to select which analysis will be performed and to configure the analysis parameters of each one of them. Click on Configure to select which elements will be added to the manager. In this chapter, we select the type of element Spectrum. The manager toolbar then looks like this: Refer to chapter 6 for more information on how to use the managers in dBBATI32. All the display and analysis parameters can be saved in an analysis manager file (*.GSA) by using the command Analysis / Save As. CHAPTER 16 -SPECTRA ANALYSIS PAGE 111 DBBATI32 SOFTWARE SUITE: USER MANUAL 16.1. Analysis window overview Use the icon Spectrum of the analysis manager to start the analysis window. Display parameters' toolbar : curves to display, autoscale, time history, etc. Display analysis data with cursors' values and references Command toolbar : analysis parameters, start/ stop analysis, etc Status bar : state and information about the analysis process The analysis configuration and control is accessible via the vertical command toolbar. In the following, we describe the functions of each icon: Show/hide information table The following icons are displayed if averaging conditions are set at the analysis parameters' stage (See paragraph 16.2.2). Start analysis Store the current averaged measurement session datafile spectra in Stop the analysis in progress End analysis process in batch mode Validate current results and store them in a measurement session datafile Save results in a measurement session datafile a Cancel current results and start again The display type and the display parameters of the active curves are controlled using the horizontal toolbar: Automatic re-scaling of the display Perform an automatic autoscale to adjust data display at the end of the analysis. Enable or disable display of the time history plot and select the frequency band to monitor CHAPTER 16 -SPECTRA ANALYSIS PAGE 112 DBBATI32 SOFTWARE SUITE: USER MANUAL 16.2. Analysis set-up Analysis set-up can be done by pressing the key Parametrize of the manager. Refer to chapter 6 for more information on how to use the managers. 16.2.1.Analysis parameters Use the analysis tab of the analysis set-up dialog box. Choose between octave and third octave spectrum analysis and define the frequency limits for the analysis. 16.2.2.Averaging and processing options Use the options tab of the analysis set-up dialog box. Automatic validation of the results. When a spectrum is calculated, it will be automatically stored in the active data session. This option is useful for a batch analysis of several audio data items (see paragraph 16.4). Averaging over all the selected data items. In this case, dBBATI32 will calculate the mean spectrum for all the selected audio items. The intermediate spectra associated with each item may also be saved. Refer to paragraph 16.5 for more information on the analysis process CHAPTER 16 -SPECTRA ANALYSIS PAGE 113 DBBATI32 SOFTWARE SUITE: USER MANUAL 16.3. Display set-up and status bar 16.3.1.Dynamic settings The horizontal toolbar can be used to set the graphical display parameters of the analysis window. Use the command Display / Autoscale to automatically re-scale the plots as a function of the computed noise levels. Use the command Display / Automatic autoscale at the end of acquisition to automatically re-scale the plots at the end of the analysis process. Use the command Display / Time history to display the time history plot and select the frequency band to monitor. The following dialog box appears on-screen. Tick the box Show time history and select the frequency band (or overall level) to display. Use the command Display / Set-up to define the display parameters of each type of data (spectra and time histories) in the measurement window. The following dialog box is displayed on screen. Display or not the Y-axis scale and select the graph dynamic range (constant range or set up manually the minimum and maximum limits) Display or not X-axis scale Show / Hide one or two cursors on the plot. Display or not a grid on the plot Show / Hide cursors’ values and select channels. 16.3.2.Status bar The status bar allows the operator to select the measurement locations and input a general comment, either by direct input or by selection in a list, corresponding to the last 4 locations completed by the operators and the default locations. Measurement location Overall comment on the measurement % of data acquired or processed By default, the location and the comment correspond to the audio data item being analysed. CHAPTER 16 -SPECTRA ANALYSIS PAGE 114 DBBATI32 SOFTWARE SUITE: USER MANUAL 16.4. Selection of audio records to analyse Select the audio records to analyse in a measurement session data file. Analyse one audio record Æ Start the analysis process (see paragraph 16.5) Analyse several audio records Æ Use the batch command explained below. To analyse several audio records successively and automatically, use the batch mode. Use the command Datafile / Batch to display the batch window shown aside. of the batch window to import the audio Use the icon items selected in the measurement session datafile to the batch window. The following icons of the batch window may be used : Use these icons to select in which order the items will be analysed Remove the selected item from the batch analysis Use this icon to reset the batch analysis. All items are in the state "To do ". Remove all items from the batch analysis Processing for the selected item is "Not active"). "Group by" : For spectral analysis of existing audio items, this element must be set to 1 because the analysis is done sequentially, one item after another. The main information bar of the analysis window shows the indication «Batch», as well as the number of items analysed and the total number of items to be analysed. Start the analysis process (see paragraph 16.5). 16.5. Analysis process After configuration, the user can control the analysis process with the following icons: Start the analysis. (F3) The analysis starts according to the defined analysis and averaging parameters. If no audio record has been selected in the measurement session datafile, this key is greyed. Analysis is performed for : Either a single audio record selected in the session datafile (the main information bar of the analysis window indicate the name of the session datafile) Either for a set of audio records defined in the batch window (the main information bar of the analysis window indicates Batch) Stop the analysis in progress (F4) Accept current results (F7) The analysis results are saved in a measurement session datafile. Do not accept current results and restart the analysis (F6) CHAPTER 16 -SPECTRA ANALYSIS Stop the analysis process in batch mode The following icons are displayed if averaging conditions are set (see paragraph 16.2.2). Store the current averaged spectra in a measurement session datafile. Save results in a measurement session datafile. PAGE 115 DBBATI32 SOFTWARE SUITE: 17. USER MANUAL REVERBERATION TIME (RT) ANALYSIS This chapter deals with RT spectra analysis (off-line analysis of audio records). This mode allows the user to perform a batch analysis of existing audio signals stored in a measurement session datafile (as acquired with dBBATI32) to obtain reverberation time spectra and time decays in octaves or third octaves. The audio items to analyse are selected in a measurement session datafile. To analyse several audio items successively and in an automatic manner, use the batch command. This chapter presents how to set-up and perform RT spectra analysis. Use the command Analysis / New to open a new analysis manager. This manager is used to select which analysis will be performed and to configure the analysis parameters of each one of them. Click on Configure to select which elements will be added to the manager. In this chapter, we select the type of element Reverberation time. The manager toolbar then looks like this: Refer to chapter 6 for more information on how to use the managers in dBBATI32. All the display and analysis parameters can be saved in an analysis manager file (*.GSA) by using the command Analysis / Save As. CHAPTER 17 -REVERBERATION TIME (RT) ANALYSIS PAGE 117 DBBATI32 SOFTWARE SUITE: USER MANUAL 17.1. Analysis window overview Use the icon Reverberation time of the analysis manager to start the RT analysis window. Display parameters' toolbar : curves to display, time history, etc. Command toolbar : analysis parameters, start/ stop analysis, etc. Display analysis data with cursors' values Status bar : state and information about the analysis process The analysis configuration and control is accessible via the vertical command toolbar. In the following, we describe the functions of each icon: Show/hide information table Display the time decay edition window for RT spectrum calculation (See chapter 10). The following icons are displayed if averaging conditions are set at the analysis parameters' stage (See paragraph 17.2.3). Start analysis Stop the analysis in progress Store the current averaged measurement session datafile spectra in Validate current results and store them in a measurement session datafile End analysis process in batch mode Cancel current results and start again Save results in a measurement session datafile a The display type and the display parameters of the active curves are controlled using the horizontal toolbar: Automatic re-scaling of the display Perform an automatic autoscale to adjust data display at the end of the analysis. Enable or disable display of the time history plot and select the frequency band to monitor CHAPTER 17 -REVERBERATION TIME (RT) ANALYSIS PAGE 118 DBBATI32 SOFTWARE SUITE: USER MANUAL 17.2. Analysis set-up Analysis set-up can be done by pressing the key Parametrize of the manager. 17.2.1.Analysis parameters Use the analysis tab of the analysis set-up dialog box. Choose between octave and third octave spectrum analysis and define the frequency limits for the analysis. Also, define the time basis used in the computation of the reverberation time decay. Greater accuracy is achieved with a smaller time basis, though at the expense of calculation time. 17.2.2.RT computation parameters Click on the Parametrize key of the measurement manager and select the RT computation tab. dBBATI32 offers reverberation time calculations from either stationary, impulsive or MLS signals. The computation algorithm therefore depends upon the type of the audio records to analyse. Refer to paragraph 15.2.6.5. From an impulsive signal source (using MLS or not), it is possible to apply integration (Schröeder) and/or suppress the background noise. During the calculation phase, the start and end settings define the regression boundaries that are used to calculate the RT values by frequency bands. See chapter 21.2 for a detailed reverberation time calculation explanation. 17.2.3.Processing and averaging parameters Use the options tab of the analysis set-up dialog box. Store the time decays associated with each RT spectrum, for later analysis. Automatic validation of the results. When a spectrum is calculated, it will be automatically stored in the active data session. This option is useful for a batch analysis of several audio data items (see paragraph 17.4). Averaging over all the selected data items. In this case, dBBATI32 will calculate the mean RT spectrum for all the selected audio items. The intermediate spectra associated with each item may also be saved. Refer to paragraph 17.5 for more information on the analysis process CHAPTER 17 -REVERBERATION TIME (RT) ANALYSIS PAGE 119 DBBATI32 SOFTWARE SUITE: USER MANUAL 17.3. Display set-up and status bar 17.3.1.Dynamic settings The horizontal toolbar can be used to set the graphical display parameters of the RT analysis window. Use the command Display / Autoscale to automatically re-scale the plots as a function of the computed noise levels. Use the command Display / Automatic autoscale at the end of acquisition to automatically re-scale the plots at the end of the analysis process. Display / Time history to display the time Use the command history plot and select the frequency band to monitor. The following dialog box appears on-screen. Tick the box Show time history and select the frequency band (or overall level) to display. Use the command Display / Set-up to define the display parameters of each type of data (spectra and time histories) in the measurement window. The following dialog box is displayed on screen. Display or not the Y-axis scale and select the graph dynamic range (constant range or set up manually the minimum and maximum limits) Display or not X-axis scale Show / Hide one or two cursors on the plot. Display or not a grid on the plot Show / Hide cursors’ values and select channels. 17.3.2.Status bar The status bar allows the operator to select the measurement locations and input a general comment, either by direct input or by selection in a list, corresponding to the last 4 locations completed by the operators and the default locations. Measurement location Overall comment on the measurement % of data acquired or processed By default, the location and the comment correspond to the audio data item being analysed. CHAPTER 17 -REVERBERATION TIME (RT) ANALYSIS PAGE 120 DBBATI32 SOFTWARE SUITE: USER MANUAL 17.4. Selection of records to analyse Select the audio records to analyse in a measurement session data file. Example of measurement session that contains the three types of items compatible with RT analysis. The following items may be used for RT analysis : audio impulse response MLS impulse response From an impulsive signal source (or MLS signal), it is possible to apply integration (Schröeder) and/or suppress the background noise. Analyse one audio record Æ Start the analysis process (see paragraph 17.5) Analyse several audio records Æ Use the batch command explained below To analyse several items successively and automatically, use the batch mode. Use the command Datafile / Batch to display the batch window shown aside. of the batch window to import the items Use the icon selected in the measurement session datafile to the batch window. The following icons of the batch window may be used : Use these icons to select in which order the items will be analysed Remove the selected item from the batch analysis Use this icon to reset the batch analysis. All items are in the state "To do ". Remove all items from the batch analysis Processing for the selected item is "Not active"). Group by" : For spectral analysis of existing items, this element must be set to 1 because the analysis is done sequentially, one item after another. The main information bar of the analysis window shows the indication «Batch», as well as the number of items analysed and the total number of items to be analysed Start the analysis process (see paragraph 17.5) CHAPTER 17 -REVERBERATION TIME (RT) ANALYSIS PAGE 121 DBBATI32 SOFTWARE SUITE: USER MANUAL 17.5. Analysis process After configuration, the user can control the analysis process with the following icons: Start the analysis. (F3) The analysis starts according to the defined analysis and averaging parameters. If no record has been selected in the measurement session datafile, this key is greyed. Analysis is performed for : Either a single audio record selected in the session datafile (the main information bar of the analysis window indicate the name of the session datafile) Either for a set of audio records defined in the batch window (the main information bar of the analysis window indicates Batch) Stop the analysis in progress (F4) Accept current results (F7) The analysis results are saved in a measurement session datafile. Do not accept current results and restart the analysis (F6) Time decay edition (See chapter 10). Display the time decay adjustment window to adjust manually the decay 'slope in each frequency band, if the RT analysis results are not correct. Stop the analysis process in batch mode. The following icons are displayed if averaging conditions are set (see paragraph 17.2.3). Store the current averaged spectra in a measurement session datafile. Save results in a measurement session datafile. CHAPTER 17 -REVERBERATION TIME (RT) ANALYSIS PAGE 122 DBBATI32 SOFTWARE SUITE: 18. USER MANUAL ROOM CRITERIA ANALYSIS This chapter deals with the analysis of room criteria from existing data items (off-line). These criteria are obtained from echogram curves per frequency bands. These curves result from an analysis by digital filtering from an impulse response of the room. This response may be obtained by MLS technique. dBBATI32 allows the user to compute the following room criteria : Quality criteria : TR, EDT, Clarity, Definition, ST1. Intelligibility criteria : STI, RASTI. These criteria are obtained from echogram curves per frequency bands. These curves result from an analysis by digital filtering from an impulse response of the room. This response may be obtained by MLS technique. Refer to chapter 21.5 for detailed explanations on the calculations, criteria definition and results’ interpretation. The audio items to analyse are selected in a measurement session datafile. To analyse several audio items successively and in an automatic manner, use the batch command. This chapter presents in a general manner how to set-up and perform room criteria analysis. Use the command Analysis / New to open a new analysis manager. This manager is used to select which analysis will be performed and to configure the analysis parameters of each one of them. Click on Configure to select which elements will be added to the manager. In this chapter, we select the type of element Room criteria. The manager toolbar then looks like this: Refer to chapter 6 for more information on how to use the managers in dBBATI32. All the display and analysis parameters can be saved in an analysis manager file (*.GSA) by using the command Analysis / Save As. CHAPTER 18 - ROOM CRITERIA ANALYSIS PAGE 123 DBBATI32 SOFTWARE SUITE: USER MANUAL 18.1. Analysis window overview Use the icon Room criteria of the analysis manager to start the room criteria analysis window. Display parameters' toolbar : curves to display, time history, etc. Command toolbar : analysis parameters, start/ stop analysis, etc. Display analysis data with cursors' values Status bar : state and information about the analysis process The analysis configuration and control is accessible via the vertical command toolbar. In the following, we describe the functions of each icon: Show/hide information table Cancel current results and start again Start analysis End analysis process in batch mode Stop the analysis in progress Display the decay edition window (See chapter 12). Validate current results and store them in a measurement session datafile The display type and the display parameters of the active curves are controlled using the horizontal toolbar: Automatic re-scaling of the display Enable or disable display of the time history plot and select the frequency band to monitor Select the room criterion to display in the spectrum view. Perform an automatic autoscale to adjust data display at the end of the analysis. CHAPTER 18 - ROOM CRITERIA ANALYSIS PAGE 124 DBBATI32 SOFTWARE SUITE: USER MANUAL 18.2. Analysis set-up Analysis set-up can be done by pressing the key Parametrize of the manager. 18.2.1.Analysis parameters Use the analysis tab of the analysis set-up dialog box. Choose between octave and third octave spectrum analysis and define the frequency limits for the analysis. 18.2.2.Criteria computation parameters Click on the Parametrize key of the measurement manager and select the Criteria computation tab. The computation of intelligibility criteria account for the signal to noise ratios per frequency bands. It is however to manually inputs these values. By default, background noise is considered neglectable, thus having a signal to noise ratio infinite (100). Refer to paragraph 21.5 for the calculation principle and definition of room criteria 18.2.3.Analysis options The configuration of measurement options can be performed in the Options tab of the analysis set-up dialog box. Define if decays are to be recorded into the measurement session, for later analysis. Automatic validation of the results. This option is useful for a batch analysis of several data items (see paragraph 18.4). Refer to paragraph 18.5 for more information on the analysis process CHAPTER 18 - ROOM CRITERIA ANALYSIS PAGE 125 DBBATI32 SOFTWARE SUITE: USER MANUAL 18.3. Display set-up and status bar 18.3.1.Dynamic settings The horizontal toolbar can be used to set the graphical display parameters of the analysis window. Use the command Display / Autoscale to automatically re-scale the plots as a function of the computed noise levels. Use the command Display / Automatic autoscale at the end of acquisition to automatically re-scale the plots at the end of the analysis process Display / Time history to display the time Use the command history plot and select the frequency band to monitor. The following dialog box appears on-screen. Tick the box Show time history and select the frequency band (or overall level) to display. Use the command Display / Set-up to define the display parameters of each type of data (spectra and time histories) in the measurement window. The following dialog box is displayed on screen. Display or not the Y-axis scale and select the graph dynamic range (constant range or set up manually the minimum and maximum limits) Display or not X-axis scale Show / Hide one or two cursors on the plot. Display or not a grid on the plot Show / Hide cursors’ values and select channels. 18.3.2.Status bar The status bar allows the operator to select the measurement locations and input a general comment, either by direct input or by selection in a list, corresponding to the last 4 locations completed by the operators and the default locations. Measurement location Overall comment on the measurement % of data acquired or processed By default, the location and the comment correspond to the audio data item being analysed. CHAPTER 18 - ROOM CRITERIA ANALYSIS PAGE 126 DBBATI32 SOFTWARE SUITE: USER MANUAL 18.4. Selection of records to analyse Select the audio records to analyse in a measurement session data file. Analyse one record Æ Start the analysis process (see paragraph 18.5) Analyse several audio records Æ Use the batch command explained below. To analyse several items successively and automatically, use the batch mode. Use the command Datafile / Batch to display the batch window shown aside. of the batch window to import the items Use the icon selected in the measurement session datafile to the batch window. The following icons of the batch window may be used : Use these icons to select in which order the items will be analysed Remove the selected item from the batch analysis Use this icon to reset the batch analysis. All items are in the state "To do ". Remove all items from the batch analysis Processing for the selected item is "Not active"). Group by" : For spectral analysis of existing items, this element must be set to 1 because the analysis is done sequentially, one item after another. The main information bar of the analysis window shows the indication «Batch», as well as the number of items analysed and the total number of items to be analysed Start the analysis process (see paragraph18.5) 18.5. Analysis process After configuration, the user can control the analysis process with the following icons: Start the analysis. (F3) The analysis starts according to the defined analysis parameters. If no record has been selected in the measurement session datafile, this key is greyed. Analysis is performed for : Either a single record selected in the session datafile (the main information bar of the analysis window indicate the name of the session datafile) Either for a set of records defined in the batch window (the main information bar of the analysis window indicates Batch) Stop the analysis in progress (F4) Accept current results (F7) The analysis results are saved in a measurement session datafile. Do not accept current results and restart the analysis (F6) CHAPTER 18 - ROOM CRITERIA ANALYSIS Stop the analysis process in batch mode Decay edition (See chapter 12). Display the decay adjustment window to adjust manually the decay 'slope and direct wave arrival in each frequency band, if the analysis results are not correct PAGE 127 DBBATI32 SOFTWARE SUITE: 19. USER MANUAL STANDARD CALCULATIONS dBBATI32 can performed standard calculations from a variety of national and international standards. This chapter presents the use and configuration of the following types of standard calculations : Insulation, Impact noise, Mechanical equipment noise and sound absorption. Use the command Standard calculations / New to open a new computation manager. This manager is used to select which calculations will be performed and to configure the calculation parameters of each one of them. Click on Configure to select which elements will be added to the manager. In this chapter, we select each type of standard calculations that can be done. The manager toolbar then looks like this: Refer to chapter 6 for more information on how to use the managers in dBBATI32. All the display and acquisition parameters can be saved in a measurement manager file (*.GSC) by using the command Standard calculations / Save As. 19.1. Computation parameters Computation parameters can be accessed by pressing the key Parametrize of the manager. The dialog box shown below appears on screen : Select from each tab the standard indices to compute. For some calculations, it is possible to modify default computation parameters, such a reference RT value or room volumes. When only one index is displayed, the result is a spectrum. When two indices are displayed side by side, the result is a spectrum and the corresponding single value quantity. Example : : Raw sound insulation spectrum D : Normalised insulation spectrum DnT and corresponding single number value DnTw. CHAPTER 19 - STANDARD CALCULATIONS PAGE 129 DBBATI32 SOFTWARE SUITE: USER MANUAL Each criterion selected requires input data items in a measurement session datafile. The following tables give an overview of the criteria that can be computed, the corresponding standard, and the required data items for computation. Refer to chapter 21.4 for detailed explanations of the computation of each standard criteria. Insulation Spectra Standard Raw level difference D Standardised level difference DnT Raw level difference D Normalised sound insulation Dn Standardised sound insulation Dn,T Sound reduction index R NF S 31-057 ISO 140-4 Single values Apparent sound reduction index R' A weighted standardised level difference DnAT Weighted normalised sound insulation Dn,w Weighted standardised sound insulation Dn,T,w Weighted sound reduction index Rw Weighted apparent sound reduction index R'w Input data items Received RT noise spectrum spectrum X X X X X X X X X X Emitted noise spectrum X X X X X X ISO 140-3 (NFEN 140-3) ISO 140-4 (NF EN 140-4) NF S 31-057 X X Background noise spectrum - X - Spectrum DnT Spectrum Dn Spectrum Dn,T Spectrum R Spectrum R’ ISO 717-1 ISO 717-1 (NF EN 717-1) Impact noise Spectra Normalised impact sound pressure level LnT Normalised impact sound pressure level Ln Normalised impact sound pressure level L'n Standardised impact sound pressure level L'nT NF S 31-057 Single values Standard A-weighted normalised impact sound pressure level LnAT Weighted normalised impact sound pressure level Ln,w Weighted normalised impact sound pressure level L'n,w Weighted standardised impact sound pressure level L'nT,w NF S 31-057 Input data items Received RT Background impact noise spectrum noise spectrum spectrum X X X X ISO 140-6 and ISO 140-7 X X X X - Spectrum LnT Spectrum Ln Spectrum L’n Spectrum L’nT,w ISO 717-2 Mechanical equipment noise Normalised equipment noise level LeT Standard Input data items NF S 31-057 Equipment noise level (Leq) + RT spectrum Absorption Absorption coefficient αs Weighted sound absorption index αw Standard ISO 354 (NF EN 20354) ISO 11654 (NF EN 11654) Input data items RT empty room + RT room with test specimen Spectrum αs X : compulsory - : optional CHAPTER 19 - STANDARD CALCULATIONS NF : French standard ISO : international standard PAGE 130 DBBATI32 SOFTWARE SUITE: USER MANUAL 19.2. Computation process 19.2.1.Selection of the data items Simple calculations Select the required data items to start a standard calculations. The icons of the computation manager are greyed until the adequate items have been selected in the measurement session datafile. Example When emission, reception and RT spectra are selected, the icon Insulation becomes active in the manager toolbar Warning ! For insulation calculations from spectra obtained using the MLS technique, two conditions must be fulfilled: All the spectra must have been obtained using the MLS technique. It is recommended that all spectra have the same response duration Batch processing To analyse several items successively and automatically obtain standard results, use the batch mode Use the command Datafile / Batch to display the batch window shown aside. of the batch window to import Use the icon the items selected in the measurement session datafile to the batch window.. The following icons of the batch window may be used : Use these icons to select in which order the items will be analysed Remove the selected item from the batch analysis Use this icon to reset the batch analysis. All items are in the state "To do ". Remove all items from the batch analysis Processing for the selected item is "Not active"). "Group by" :Allows to create groups of items. For the above example, group items by 2 (emission and reception) for a batch processing of insulation criteria. Start the computation process (see paragraph 19.2.2). CHAPTER 19 - STANDARD CALCULATIONS PAGE 131 DBBATI32 SOFTWARE SUITE: USER MANUAL 19.2.2.Run the computation The computation process is started by clicking on the icons of the computation manager. During computation, it is possible that some warning and confirmation dialog boxes are displayed. A message is displayed for example if the level difference between the received noise spectrum and the background noise spectrum, per frequency band, is too small. Computation time may be long if many criteria have to be computed. The results are then saved in the active measurement session data file. The added items may be identified using the values in the Family and Type columns. The Comment features any eventual warning that may have occurred during computation. Once the results are stored in the measurement session datafile, it is possible to edit, print and display the results (see chapter 15). A test report may be automatically generated from these results. It may then be edited, printed and saved (see paragraph 15.5). CHAPTER 19 - STANDARD CALCULATIONS PAGE 132 DBBATI32 SOFTWARE SUITE: 20. USER MANUAL SIMPLIFIED USER LEVEL In standard mode, all the functions of the software are available. It is possible to access to the simplified version of the software by using a command User level of the Preferences menu. 20.1. Limitations This version offers a simplified user interface to the operator, but some functions are not available. One measurement channel only All types of measurements are available but they can only be performed with one active measurement channel. As a consequence, the type « Emi. / Rec. Simultaneously » is not available. No analysis manager The analysis manager is not available in the simplified version. It is therefore not possible to obtain results by analysis of audio records. No audio signal recording The signal recording mode (DAT recorder) is not available. Only measurement and standard calculations are available. No importation of datafiles It is not possible to import datafiles such as 16bit 01dB files, WAV files or MP3 files into a measurement session datafile. No room criteria Computation of room criteria is not available No averaging It is not possible to average measurement results over several measurements, whatever the type of measurement selected. Time step of the decays : fixed value The time step of the decays used for RT spectrum computation is fixed to 20 milliseconds. Only one measurement or computation manager, saved automatically There is only one measurement manager and one computation manager in the simplified version. There contents cannot be modified, as all possible measurement or computations are displayed in the toolbars. Start a manager by simple click on an icon of the main toolbar. CHAPTER 20 - SIMPLIFIED USER LEVEL PAGE 133 DBBATI32 SOFTWARE SUITE: USER MANUAL 20.2. Measurement manager set-up (simplified version) In simplified mode, the following measurements may be performed: Standard spectrum Emitted noise spectrum Received airborne noise spectrum Background noise spectrum Mechanical equipment noise spectrum Reverberation time spectrum Received impact noise spectrum Measurement set-up can be done by pressing the key Parametrize of the manager. The dialog box shown below appears on screen : Refer to the corresponding chapters in standard mode for more detailed explanations on how to configure and perform measurements in dBBATI32. Impulse and standard signal : The measurement duration is defined in seconds. MLS signal : The response duration should be carefully selected, as it should be adapted to the geometry of the room. Make sure that the response duration is long enough in order to obtain a background noise at the end of the measurement. It is possible to average this response in order to decrease the effect of background noise. The higher the average number, the better the response quality, because the influence of random phenomena (background noise) decreases. On the other hand, the acquisition duration increases (the signal to noise ratio increase by 3 dB when doubling the number of averages. Refer to annex 21.2 for more details on the MLS acquisition. General remark (SYMPHONIE) The output level of the signal can be set by the SYMPHONIE icon driver from the Windows task bar with the right of the Click on the icon mouse. A contextual menu appears. Choose the Configuration field and set the SYMPHONIE output level. The output level is changed in real time if you are playing a noise. For more information on SYMPHONIE or HARMONIE (for example, connection plugs and driver configuration), consult the system installation manual. CHAPTER 20 - SIMPLIFIED USER LEVEL PAGE 134 DBBATI32 SOFTWARE SUITE: USER MANUAL Noise generator parameters A pink noise generator may be used for measurement of emitted and received noise spectra as well as RT spectra. It is necessary to connect an amplified loudspeaker to the LEMO4 output socket of the SYMPHONIE or HARMONIE acquisition box to generate a pink noise. This generator may manually activated with an icon of the measurement window or the F11 function key. It may also be automatically started and stopped by dBBATI32. To do so, tick the option automatic and define a stabilisation duration before staring the acquisition and the emission duration, as a function of the percentage of the complete duration of the measurement. Frequencies Choose between octave and third octave spectrum analysis and define the frequency limits for the analysis. RT computation dBBATI32 offers reverberation time calculations from either stationary, impulsive or MLS signals. The computation measurements. algorithm therefore depends upon the type of From an impulsive signal source (using MLS or not), it is possible to apply integration (Schröeder) and/or suppress the background noise. During the calculation phase, the start and end settings define the regression boundaries that are used to calculate the RT values by frequency bands. See chapter 21.2 for a detailed reverberation time calculation explanation. Options Define if time decays are to be recorded into the measurement session, for later analysis. Tick the box Equipment noise spectrum storage to save the mean Slow spectrum along with the measurement results (autospectrum data item). Perform an autorange automatically before each measurement Automatic validation of the results. Define a delay before starting a measurement (so that the operator may leave the room during the measurement process). CHAPTER 20 - SIMPLIFIED USER LEVEL PAGE 135 DBBATI32 SOFTWARE SUITE: 21. USER MANUAL APPENDICES 21.1. Edition of the software licence number Use this command (menu ? / About dBBATI32) to obtain general information on the software version, copyright and licence number. If the licence number of the software module has to be modified, click on the key Licence number. The following dialog box appears on screen: Enter the new licence number, provided by 01dB technical support. Start again the application software in order to account for this modification. 21.2. MLS technique To measure an impulse response, most of use an impulse excitation such as a gun shot (with blank bullets). This method however is limited : non-linearity, insufficient dynamic, not repeatable, etc. It is the reason why an excitation with a stationary signal is preferred, as it offers a greater precision of the result, however, the measurement process and computation load could only be carried out on large computers with great computational power. The MLS technique(Maximum Length Sequence) allows us to perform impulse response measurements that, once there are been filtered by frequency band, will give access to reverberation times and spectra (such as emitted and received noise spectra). The Hadarmard transform (mathematical operation) is a great tool that can be used to obtain an impulse response from a stationary excitation in a simple and fast manner. The emission of a white noise (binary pseudo-random sequence of maximum length) and the simultaneous measurement in a given point of a room will allow us to perform accurate frequency measurements, with great dynamic, in presence of extraneous noise sources. The MLS is therefore an efficient measurement technique in noisy environments that works without a powerful noise source and that allows to obtain results more accurate than traditional methods. This technique is already implemented in various standard, such as for evaluation of noise barriers. CHAPTER 21 - APPENDICES PAGE 137 DBBATI32 SOFTWARE SUITE: USER MANUAL 21.3. Reverberation time calculation algorithm The reverberation time calculation is performed from the decay curves on each of the selected frequency bands. These decay curves are generated at the time of frequency analysis of the recorded signal. The reverberation time calculation is divided into the following steps: Determination of signal emergence and significant sequence Terminology Reference band The reference band is the medium frequency band of the considered frequency range i.e. when using the standardised 125 Hz to 4 kHz octave bands, the meaning channel is 500 Hz. Study zone The study zone is the time section of the decay taken into account for the RT computation. As default value, the study zone is the complete duration of the original signal file. It may be changed in order to improve the result using the observation window This step is dedicated to identifying the section of the decay curve to be taken into account for the RT calculation. From the decay curve of the reference band, the program calculates the average level between the limits of the study zone. It checks the sequences of the decay curve where the level exceeds the average value and retains the largest value. This is the sequence on which the following computation will be performed. In the figure above the first sequence will be considered. CHAPTER 21 - APPENDICES PAGE 138 DBBATI32 SOFTWARE SUITE: USER MANUAL Determination of the pre-sequence noise (PRSN), sequence starting point (SSP) and sequence cut off point (SCOP). Terminology: PRSN The pre-sequence noise is the noise level prior to the source generation. The PRSN is frequency band independent SSP The sequence starting point is the point on the decay where the sequence starts. This point is defined in multi band mode. The SSP is frequency band independent SCOP The sequence cut off point is the point on the decay curve where the noise source has been interrupted. The SCOP is frequency band independent. MULTI BAND The multi band mode means that computation is performed taking into account all considered bands with particular weighting. The weighting consists in giving more importance to the high frequency bands than the low ones. At this stage, the aim is to define the SSP and SCOP common to all decay curves. From the forecast first point of the sequence ( see figure above ), a recursive algorithm is applied to define the SSP. On the other hand, the determination of the SCOP point is performed. At the end of the process, the SSP and SCOP co-ordinates as well as the PRSN level are known. CHAPTER 21 - APPENDICES PAGE 139 DBBATI32 SOFTWARE SUITE: USER MANUAL Determination of the sequence ending point (SEP) and post-sequence noise (POSN) on each of the considered frequency bands. Terminology SEP The sequence ending point is the point where the decay ends and the post-sequence noise starts. The SEP is frequency band dependent POSN The post-sequence noise is the noise level once the decay itself has ended. The POSN is frequency band dependent. For each of the considered frequency bands, this stage is dedicated to defining the SEP and the POSN. To do so, the same type of algorithm as during the SSP and PRSN determination is applied. Once completed, on each band, the limits on the decay curves to be taken into account for the reverberation time calculation are known. Depending upon the RT calculation parameters, the integration as described by Schröeder and the POSN subtraction may be performed prior to calculating the RT values. When using a source cut-off noise, the next step is bypassed. Applying integration (SCHRÖEDER theorem ) and POSN subtraction when using an impulsive noise The 01dB program allows you to perform an integration (as defined by SCHRÖEDER in 1965) as well as POSN subtraction when using an impulsive noise. As a matter of fact, the data measured from an impulsive noise represents the impulsive response of the room and should not be used directly to calculate the reverberation time. When using the integration, it is also recommended that the POSN subtraction be performed in order to obtain reliable results. The program allows you to perform the integration without POSN subtraction and in this case, the results are the user's responsibility In 1965, SCHRÖEDER proved the identity between the square of the impulsive response of a room and the average of the decay curves due to a source cut off. CHAPTER 21 - APPENDICES PAGE 140 DBBATI32 SOFTWARE SUITE: USER MANUAL It is expressed by the following formula : where : S2(t) the mean sound intensity of the decay at t r(t) the impulsive response t = 0 is the source cut-off N represents the source sound power As the integral has to be calculated to the infinite according to the formula, it is not possible to perform a reliable RT calculation without using the POSN subtraction as the recording is finite. The figure below shows the principle of the integration using the POSN subtraction. An estimated decay curve is defined using a linear regression between the SCOP and SEP points. This decay curve is extended to infinity. Therefore, the integration between the SCOP point and infinity is possible as the surface of the triangle ( extended surface ) is known. At the end of the process, the reliable decay curves are completely defined and the RT determination is applied. CHAPTER 21 - APPENDICES PAGE 141 DBBATI32 SOFTWARE SUITE: USER MANUAL Reverberation time calculation according to the user defined parameters. User defined parameters X : Start (dB ) Defines the regression starting point (RSP) on the decay curve to be considered for the linear regression calculation. The RSP point is defined as being the point on the decay which is X decibels below the level of the SCOP. The RSP point is frequency dependent. Y : Dynamic (dB) Defines the regression ending point (REP). The REP point is defined as being the point on the decay curve which is Y decibels below the RSP point. The REP point is frequency dependent. Strict The strict option disables the calculation on the band where it is not possible to define the REP point i.e. if the decays dynamic range is lower than Y -X. In this case, the RT value for the corresponding band is not calculated. The figure below shows the principle of the RT value calculation The Reverberation time for the corresponding frequency band is calculated as being the slope of the linear regression between the RSP and REP. In the case where the REP cannot be calculated ( below the SEP ), when using the strict option, the RT is not calculated whereas when disabling it, the RT is calculated between the RSP and the SEP. Once the RT is calculated, the program displays the correlation between the linear regression and the points of the decay curve. The RT computation process is ended. CHAPTER 21 - APPENDICES PAGE 142 DBBATI32 SOFTWARE SUITE: USER MANUAL 21.4. Standard calculations 21.4.1.Insulation French standard Raw level difference D Standardised level difference DnT A weighted standardised level difference DnAT (with reference to Pink noise or Road traffic noise) Standard Inputs NF S 31-057 - 1 emitted noise spectrum - 1 received noise spectrum NF S 31-057 - 1 emitted noise spectrum - 1 received noise spectrum - 1 RT spectrum NF S 31-057 - 1 Standardised level difference spectrum DnT - Optionally, 1 background noise spectrum Parameters - Optionally, 1 background noise spectrum Reference RT value Frequencies - Octaves or third octaves - Octaves or third octaves - Octaves or third octaves - The DnT spectrum must comprise all frequency bands in the range 100 - 5000 Hz in third octaves, or 125 - 4000 Hz in octaves Computation Per frequency band : Per frequency band : D = L1 – L2 (dB) DnT = D + 10 lg (T / T0) (dB) Calculation for the frequency bands in the range 100 - 5000 Hz in third octaves, or 125 4000 Hz in octaves L1 : Emitted noise level L2 : Received noise level T : RT reception room T0 : Reference RT value If background noise spectrum as an input, there is an additional correction. (cf (1)) The lower limit of the T duration is 0.4 s. If the measured value is less than this limit, T=0.4s for the calculation. If background noise spectrum as an input, there is an additional correction. (cf (1)) j : indice of the frequency band m : 6 for octaves measurements 18 for third octaves measurements Sj : Level for the frequency band j of the reference emitted noise spectrum for which the calculation is made (pink noise or road traffic noise) (Cf Table 1) Cj : A weighting value for the frequency band j (Cf Table 2) DnTj : Value of the standardised level difference for the frequency band j A weighted overall level of the theoretical emitted noise spectrum : (Sj + Cj) /10 m XE =10lg(∑10 ) j =1 A weighted overall level of the theoretical received noise spectrum : m (Sj − DnTj +Cj) /10 XR=10lg(∑10 ) j =1 DnAT = XE – XR (in dBA) Limitations Result Cf background noise correction (1) Result per octave or third octave bands, over the whole frequency of the input spectra quantities Cf background noise correction (1) D DnT CHAPTER 21 - APPENDICES Result per octave or third octave bands, over the whole frequency of the input spectra quantities Single number value in dBA DnAT (pink noise or road traffic noise according to the reference used) PAGE 143 DBBATI32 SOFTWARE SUITE: USER MANUAL ISO standards Sound reduction index R Weighted sound reduction index Rw Apparent sound reduction index R' Standard Inputs ISO 140-3 (NF EN 140-3) - 1 emitted noise spectrum - 1 received noise spectrum - 1 RT spectrum ISO 717-1 (NF EN 717-1) - 1 sound reduction index spectrum R ISO 140-4 (NF EN 140-4) - 1 emitted noise spectrum - 1 received noise spectrum - 1 RT spectrum Weighted apparent sound reduction index R'w ISO 717-1 (NF EN 717-1) - 1 apparent sound reduction index spectrum R’ - Optionally, 1 background noise spectrum - Optionally, 1 background noise spectrum Parameters - V : Volume of reception room (m3) - S : Area of the test specimen equal to the test opening (m²) - V : Volume of reception room (m3) - S : Area of the test specimen equal to the test opening (m²) Frequencies - Third octaves - Third octaves - The sound reduction index spectrum R must contain the frequency bands ranging from100 to 3150 Hz - Octaves or third octaves - Octaves or third octaves - The apparent sound reduction index spectrum R’ must contain the frequency bands ranging from100 to 3150 Hz in third octaves and 125 - 2000 Hz in octaves Computation Equivalent absorption area A per frequency band: Computation is carried out taking into account the frequency bands ranging from 100 to 3150 Hz Equivalent absorption area A per frequency band: The reference curve (cf table 3) is shifted in steps of 1 dB towards the measured curve (R spectrum) until the sum of the unfavourable deviations is as large as possible but no more than 32.0 dB (2.0 dB per frequency band – 16 bands) V : Volume of reception room (m3) T : RT reception room Computation is carried out taking into account the frequency bands ranging from 100 to 3150 Hz in third octaves and 125 - 2000 Hz in octaves. An unfavourable deviation at a particular frequency occurs when the result of measurements is greater than the reference value. Only the unfavourable deviations are taken into account. The max. unfavourable deviation at any frequency should be recorded if it exceeds 8.0 dB. L1 : Emitted noise spectrum L2 : Received noise spectrum S : Test area A = (0.16 * V) / T (m²) V : Volume of reception room (m3) T : RT reception room Sound reduction index per frequency band : R = L1–L2+10 lg(S/A) (dB) L1 : Emitted noise spectrum L2 : Received noise spectrum S : Test area If background noise spectrum as an input, there is an additional correction. (Cf (2)) A = (0.16 * V) / T (m²) Apparent sound reduction index per frequency band : R’ = L1–L2+10 lg(S/A) (dB) If background noise spectrum as an input, there is an additional correction. (Cf (3)) After the progressive curve shifting, Rw (dB) is the value of the reference curve at 500 Hz. The reference curve (cf table 3) is shifted in steps of 1 dB towards the measured curve (R’ spectrum) until the sum of the unfavourable deviations is as large as possible but no more than 32.0 dB (2.0 dB per frequency band – 16 bands) in third octaves and 10.0 dB (2.0 dB per frequency band – 5 bands) in octaves. An unfavourable deviation at a particular frequency occurs when the result of measurements is greater than the reference value. Only the unfavourable deviations are taken into account. The max. unfavourable deviation at any frequency should be recorded if it exceeds 8.0 dB After the progressive curve shifting, R’w (dB) is the value of the reference curve at 500 Hz. Limitations Result Result per third octave bands, over the whole frequency of the input spectra quantities R CHAPTER 21 - APPENDICES Single number value in dB Rw Result per octave or third octave bands, over the whole frequency of the input spectra quantities Single number value in dB R’w R’ PAGE 144 DBBATI32 SOFTWARE SUITE: USER MANUAL ISO standards Raw level difference D Normalised sound insulation Dn Weighted normalised sound insulation Dn,w Standardised sound insulation Dn,T Weighted standardised sound insulation Dn,T,w Standard Inputs ISO 140-4 - 1 emitted noise spectrum - 1 received noise spectrum ISO 140-4 - 1 emitted noise spectrum - 1 received noise spectrum - 1 RT spectrum ISO 717-1 - 1 Normalised sound insulation spectrum Dn ISO 140-4 - 1 emitted noise spectrum - 1 received noise spectrum - 1 RT spectrum ISO 717-1 - 1 standardised sound insulation spectrum Dn,T - Optionally, 1 background noise spectrum Parameters - Optionally, 1 background noise spectrum - Optionally, 1 background noise spectrum Reference RT Frequencies - Octaves or third octaves - V : Volume of reception room (m3) - Octaves or third octaves Computation Per frequency band : Per frequency band : D = L1 – L2 (dB) Dn = D - 10 lg (0.16*V / T*A0) (dB) L1 : Emitted noise level L2 : Received noise level If background noise spectrum as an input, there is an additional correction. (cf (3)) Result Result per octave or third octave bands, over the whole frequency of the input spectra quantities D V : Volume of reception room (m3) T : RT reception room A0 : Reference equivalent absorption area (10 m²) If background noise spectrum as an input, there is an additional correction. (cf (3)) Result per octave or third octave bands, over the whole frequency of the input spectra quantities - Octaves or third octaves - The Dn spectrum must contain the frequency bands ranging from100 to 3150 Hz in third octaves and 125 - 2000 Hz in octaves Computation is carried out taking into account the frequency bands ranging from 100 to 3150 Hz in third octaves and 125 - 2000 Hz in octaves. The reference curve (cf table 3) is shifted in steps of 1 dB towards the measured curve (Dn spectrum) until the sum of the unfavourable deviations is as large as possible but no more than 32.0 dB (2.0 dB per frequency band – 16 bands) in third octaves and 10.0 dB (2.0 dB per frequency band – 5 bands) in octaves. - Octaves or third octaves - Octaves or third octaves - The DnT spectrum must contain the frequency bands ranging from100 to 3150 Hz in third octaves and 125 - 2000 Hz in octaves Per frequency band : Computation is carried out taking into account the frequency bands ranging from 100 to 3150 Hz in third octaves and 125 - 2000 Hz in octaves. Dn,T = D + 10 lg (T / T0) (dB) T : RT reception room T0 : Reference RT value If background noise spectrum as an input, there is an additional correction. (cf (3)) An unfavourable deviation at a particular frequency occurs when the result of measurements is greater than the reference value. Only the unfavourable deviations are taken into account. The max. unfavourable deviation at any frequency should be recorded if it exceeds 8.0 dB An unfavourable deviation at a particular frequency occurs when the result of measurements is greater than the reference value. Only the unfavourable deviations are taken into account. The max. unfavourable deviation at any frequency should be recorded if it exceeds 8.0 dB After the progressive curve shifting, Dn,w (dB) is the value of the reference curve at 500 Hz. Single number value in dB Dn,w The reference curve (cf table 3) is shifted in steps of 1 dB towards the measured curve (DnT spectrum) until the sum of the unfavourable deviations is as large as possible but no more than 32.0 dB (2.0 dB per frequency band – 16 bands) in third octaves and 10.0 dB (2.0 dB per frequency band – 5 bands) in octaves. After the progressive curve shifting, Dn,T,w (dB) is the value of the reference curve at 500 Hz. Result per octave or third octave bands, over the whole frequency of the input spectra quantities Single number value in dB Dn,T,w Dn,T Dn CHAPTER 21 - APPENDICES PAGE 145 DBBATI32 SOFTWARE SUITE: USER MANUAL 21.4.2.Impact noise French standard Normalised impact sound pressure level LnT Standard Inputs NF S 31-057 - 1 received impact noise spectrum (received noise level of test floor excited by a standardised tapping machine). - 1 RT spectrum Parameters Frequencies - Optionally, 1 background noise spectrum Reference RT value - Octaves or third octaves Computation Per frequency band : LnT = Li - 10 lg (T / T0) (dB) Li :Received impact noise (raw impact noise level) T : RT reception room T0 : Reference RT value The lower limit of the T duration is 0.4 s. If the measured value is less than this limit, T=0.4s for the calculation. If background noise spectrum as an input, there is an additional correction. (cf (1)) Limitations Cf background noise correction (1) Result Result per octave or third octave bands, over the whole frequency of the input spectra quantities A-weighted normalised impact sound pressure level LnAT NF S 31-057 - 1 normalised impact sound pressure level LnT - Octaves or third octaves - The LnT spectrum must contain the frequency bands ranging from100 to 5000 Hz in third octaves and 125 - 4000 Hz in octaves Computation is carried out taking into account the frequency bands ranging from 100 to 5000 Hz in third octaves and 125 4000 Hz in octaves. j : indice of the frequency band m : 6 for octaves measurements 18 for third octaves measurements Cj : A weighting value for the frequency band j (Cf Table 2) LnTj : Value of the normalised impact sound pressure level for the frequency band j m LnAT = 10 lg ( ∑ 10 ( LnTj + Cj ) / 10 ) (in dBA) j =1 Single number value in dBA LnAT LnT ISO standard Normalised impact sound pressure level Ln Weighted normalised impact sound pressure level Ln,w Normalised impact sound pressure level L'n Standard Inputs ISO 140-6 - 1 received impact noise spectrum (received noise level of test floor excited by a standardised tapping machine). - 1 RT spectrum ISO 717-2 1 Normalised impact sound pressure level Ln spectrum ISO 140-7 - 1 received impact noise spectrum (received noise level of test floor excited by a standardised tapping machine). - 1 RT spectrum Parameters - Optionally, 1 background noise spectrum - V : Volume of reception room (m3) Frequencies - Third octaves Computation Per frequency band : Ln = Li + 10 lg (0.16*V / T*A0) (dB) Li :Received impact noise (raw impact noise level) V : Volume of reception room (m3) T : RT reception room A0 : Reference equivalent absorption area (10 m²) If background noise spectrum as an input, there is an additional correction. (cf (2)) Result Result per third octave bands, over the whole frequency of the input spectra quantities Ln CHAPTER 21 - APPENDICES - Third octaves - The Ln spectrum must contain the frequency bands ranging from100 to 3150 Hz in third octaves Computation is carried out taking into account the frequency bands ranging from 100 to 3150 Hz in third octaves The reference curve (cf table 4) is shifted in steps of 1 dB towards the measured curve (Ln spectrum) until the sum of the unfavourable deviations is as large as possible but no more than 32.0 dB (2.0 dB per frequency band – 16 bands) An unfavourable deviation at a particular frequency occurs when the result of measurements is greater than the reference value. Only the unfavourable deviations are taken into account. After the progressive curve shifting, Ln,w (dB) is the value of the reference curve at 500 Hz. Single number value in dB Ln,w - Optionally, 1 background noise spectrum - V : Volume of reception room (m3) - Octaves or third octaves Per frequency band : Ln = Li + 10 lg (0.16*V / T*A0) (dB) Li :Received impact noise (raw impact noise level) V : Volume of reception room (m3) T : RT reception room A0 : Reference equivalent absorption area (10 m²) If background noise spectrum as an input, there is an additional correction. (cf (3)) Result per octave or third octave bands, over the whole frequency of the input spectra quantities L’n PAGE 146 DBBATI32 SOFTWARE SUITE: USER MANUAL ISO standard Weighted normalised impact sound pressure level L'n,w Standardised impact sound pressure level L'nT Weighted standardised impact sound pressure level L'nT,w Standard Inputs ISO 717-2 - 1 normalised impact sound pressure level L’n spectrum ISO 140-7 - 1 received impact noise spectrum (received noise level of test floor excited by a standardised tapping machine). - 1 RT spectrum ISO 717-2 - 1 standardised impact sound pressure level L'nT spectrum Parameters Frequencies Computation - Octaves or third octaves - The L’n spectrum must contain the frequency bands ranging from100 to 3150 Hz in third octaves or 125 - 2000 Hz in octaves Computation is carried out taking into account the frequency bands ranging from 100 to 3150 Hz in third octaves and 125 - 2000 Hz in octaves. The reference curve (cf table 4) is shifted in steps of 1 dB towards the measured curve (L’n spectrum) until the sum of the unfavourable deviations is as large as possible but no more than 32.0 dB (2.0 dB per frequency band – 16 bands) in third octaves and 10.0 dB (2.0 dB per frequency band – 5 bands) in octaves. - Optionally, 1 background noise spectrum Reference RT - Octaves or third octaves Per frequency band : L’nT = Li - 10 lg (T / T0) (dB) Li :Received impact noise (raw impact noise level) T : RT reception room T0 : Reference RT value If background noise spectrum as an input, there is an additional correction. (cf (3)) Result L’n,w Computation is carried out taking into account the frequency bands ranging from 100 to 3150 Hz in third octaves and 125 - 2000 Hz in octaves. The reference curve (cf table 4) is shifted in steps of 1 dB towards the measured curve (L’nT spectrum) until the sum of the unfavourable deviations is as large as possible but no more than 32.0 dB (2.0 dB per frequency band – 16 bands) in third octaves and 10.0 dB (2.0 dB per frequency band – 5 bands) in octaves. An unfavourable deviation at a particular frequency occurs when the result of measurements is greater than the reference value. Only the unfavourable deviations are taken into account. An unfavourable deviation at a particular frequency occurs when the result of measurements is less than the reference value. Only the unfavourable deviations are taken into account. After the progressive curve shifting, L’n,w (dB) is the value of the reference curve at 500 Hz. Single number value in dB - Octaves or third octaves - The L’nT spectrum must contain the frequency bands ranging from100 to 3150 Hz in third octaves or 125 - 2000 Hz in octaves After the progressive curve shifting, L’nT,w (dB) is the value of the reference curve at 500 Hz. Result per octave or third octave bands, over the whole frequency of the input spectra quantities Single number value in dB L’nT,w L’nT 21.4.3.Mechanical equipment noise French standard Normalised equipment noise level LeT Standard Inputs NF S 31-057 - 1 equipment noise level in dBA (received noise level when the equipment is working) - 1 RT spectrum Reference RT value - Octaves or third octaves - Le input RT spectrum must contain at least the frequency bands 250Hz and 500 Hz LeT = Le - 10 lg (T / T0) (dBA) Parameters Frequencies Computation Le : Raw equipment noise level T : RT reception room T0 : Reference RT value Result T is defined as the arithmetic average of the measured reverberation time in the frequency bands 250 and 500 Hz. Single number value in dBA LeT CHAPTER 21 - APPENDICES PAGE 147 DBBATI32 SOFTWARE SUITE: USER MANUAL 21.4.4.Absorption coefficient ISO standard Absorption coefficient αs Weighted sound absorption index αw Standard Inputs ISO 354 (NF EN 20354) 2 RT spectrum : - TR1 : RT empty room - TR2 : RT room with test specimen - V : Volume of empty reverberant room (m3) - S : Surface of test specimen (m²) - Third octaves ISO 11654 (NF EN 11654) - 1 Absorption coefficient spectrum αS Parameters Frequencies Computation Equivalent absorption area of test specimen per frequency band : - Third octaves - The αS spectrum must contain the frequency bands ranging from 100 to 5000 Hz 1- Calculation of practical absorption indice per frequency band: A = 0.16 * V * (1/T2 – 1/T1) αpi = (αi1 + αi2 + αi3) / 3 (m²) - TR1 : RT empty room - TR2 : RT room with test specimen αS = A / S no unit no unit i : octave band i αi1, αi2, αi3 : sound absorption indices (αs) for the three third octave bands of the octave band i. The averaged value is computed to the second decimal and rounded by steps of 0.05, with a limitation of αpi = 1.00 for the rounded averaged values greater than 1.00. Examples of rounded values : 0.92 is rounded to 0.90, 0.93 is rounded to 0.95 0.97 is rounded to 0.95 0.98 is rounded to 0.90+0.1. 2- Computation of the weighted sound absorption index αw : A translation of the reference curve is performed (Cf table 6) by steps of 0.05 towards the measured values until the sum of the unfavourable deviations is less than or equal to 0.10. An unfavourable deviation at a particular frequency occurs when the result of measurements is greater than the reference value. Only the unfavourable deviations are taken into account. αw is the value of the shifted reference curve at 500 Hz.. 3- Add shape indicators : Each time a sound absorption index αpi exceeds the value of the reference by 0.25 or more, one or several shape indicators are added, between brackets, to the αw value. If the absorption excess occurs at 250 Hz, use the notation L. If the absorption excess occurs at 500 or 1000 Hz, use the notation M. If the absorption excess occurs at 2000 or 4000 Hz, use the notation H. Limitations The equivalent absorption area A1 of the empty room measured per octave bands must be greater than values given in table 5, when multiplied by a factor (V/200)2/3 A1 = 0.16 * (V / T1) (m²) The curve of the equivalent sound absorption area of the empty room as a function of frequency must be regular and should not present any holes nor peaks of amplitude greater than 15% of the averaged value of the two adjacent third octave bands. Result Result per third octave bands, over the whole frequency of the input spectra quantities αS in option : A1 Single number value + shape indicators, if required αw : for example 0.70 (MH) in option : αp Result per octave bands ranging from 125 to 4000 Hz A CHAPTER 21 - APPENDICES PAGE 148 DBBATI32 SOFTWARE SUITE: USER MANUAL Background noise correction (1) : Background noise correction for NF S 31-057 French Standard When the level difference between the noise source level and the background noise level lies in the range 5 to 7 dB (limits included), 1 dB has to be subtracted to the measured values. If the level difference is less than 5 dB, the measurement is considered as not significant. However, if the quality requirements of the measurement have been fulfilled, the result may be obtained (2) : Background noise correction for ISO 140-3 and ISO 140-6 standards If the level difference is less than 15 dB but greater than 6 dB, the background noise correction factor is given by the formula : L = 10 lg (10Lsb / 10 - 10Lb / 10) L : Corrected noise level (dB) Lsb : Combined signal and background noise level Lb : Background noise level If the level difference is less than 6 dB, for any frequency band, the background noise correction is equal to 1,3 dB. This correction correspond to a level difference of 6 dB. (3) : Background noise correction for ISO 140-4 and ISO 140-7 standards If the level difference is less than 10 dB but greater than 6 dB, the background noise correction factor is given by the formula : L = 10 lg (10Lsb / 10 - 10Lb / 10) L : Corrected noise level (dB) Lsb : Combined signal and background noise level Lb : Background noise level If the level difference is less than 6 dB, for any frequency band, the background noise correction is equal to 1,3 dB. This correction correspond to a level difference of 6 dB. Tables of values used for the standard calculations Table 1 –Sj reference spectrum values for road traffic noise (standard NF 31 057) Frequency 100 125 160 200 250 315 400 500 630 800 1000 1250 1600 2000 2500 3150 4000 5000 Sj values per third octave band (dB) 66 66 66 65 65 63 62 61 61 61 60 59 59 58 56 54 52 50 Sj values per octave band (dB) 71 70 66 65 63 57 Note : For pink noise reference spectrum, this value is constant whatever the frequency band. CHAPTER 21 - APPENDICES PAGE 149 DBBATI32 SOFTWARE SUITE: USER MANUAL Table 2 –Cj values for A-weighting for computation of single number values in dB(A) (standard NF 31 057) Frequency 100 125 160 200 250 315 400 500 630 800 1000 1250 1600 2000 2500 3150 4000 5000 Cj values per third octave band (dB) -19,1 -16,1 -13,4 -10,9 -8,6 -6,6 -4,8 -3,2 -1,9 -0,8 0 0,6 1 1,2 1,3 1,2 1 0,5 Cj values per octave band (dB) -16 -8,5 -3 0 1 1 Table 3 – Reference values for airborne noise (ISO standard) Frequency 100 125 160 200 250 315 400 500 630 800 1000 1250 1600 2000 2500 3150 Reference value per third octaves (dB) 33 36 39 42 45 48 51 52 53 54 55 56 56 56 56 56 Reference value per octaves (dB) 36 45 52 55 56 Table 4 – Reference values for impact sound (ISO standard) Frequency 100 125 160 200 250 315 400 500 630 800 1000 1250 1600 2000 2500 3150 Reference value per third octaves (dB) 62 62 62 62 62 62 61 60 59 58 57 54 51 48 45 42 Reference value per octaves (dB) 67 67 65 62 49 Tableau 5 – Maximal values of sound absorption for a room of volume V = 200 m3 (ISO standard) Frequency Equivalent sound absorption area, m² 125 6.5 250 6.5 500 6.5 1000 7.0 2000 9.5 4000 13.0 Table 6 – Reference curve values for computing the weighted absorption index αw (ISO standard) Frequency Value CHAPTER 21 - APPENDICES 250 0.80 500 1.00 1000 1.00 2000 1.00 4000 0.90 PAGE 150 DBBATI32 SOFTWARE SUITE: USER MANUAL 21.5. Room criteria dBBATI32 allows the user to compute the following room criteria : Quality criteria : RT, EDT, Clarity, Definition, ST1. Intelligibility criteria : STI, RASTI. This chapter present the definition of each index and a brief introduction to their meanings. These criteria are obtained from echogram curves per frequency bands. These curves result from an analysis by digital filtering from an impulse response of the room. This response may be obtained by MLS technique. For each criterion, the computation principle is identical. It may describe as follow: For each frequency band (octaves or third octaves) : Detection of the arrival of the direct wave and computation of the background noise level before the source signal is emitted. Detection of the end of signal emission and computation of the background noise level after source emission. Calculation of the cumulated energy between the start and a given point of the echogram, with or without background noise removal. Calculation of the criterion with or without background noise removal, by cumulating difference. Refer to chapters 11 and 18 to know how to compute room criteria 21.5.1.Reverberation time RT 60 The reverberation time, for a given frequency and a given location in space, is defined as the time taken for a sound to decay by 60 dB after the sound source is abruptly switched off. The decay must be more or less constant. The reverberation time is usually estimated between –5 to –35 dB of sound decay. Subjective evaluation The RT60 is an indicator of the reverberant feel, or sonorousness, of a sound field. If the reverberation time is too short, the acoustic field of a room may be considered as too « dry ». If the reverberation time is too long, the acoustic field of a room may be considered as too « confuse ». For speech : The RT value must not be too long in order to avoid a masking effect (RT 60 < 1 to 1,3 s). For music : The RT value must not be long, otherwise the sounds may not be distinguished from one another. The obtained result is a confuse. The influence of RT 60 may not evaluated on its own as it always combine the level of the reverberant part of the echogram with respect to the direct sound. EDT (Early Decay Time) The Early Decay Time could be considered as a short reverberation time computed on the first 10 dB of the sound decay. The EDT is measured between 0 and -10 dB and extrapolated to a 60dB sound decay. The idea to limit the RT measurement dynamic to 10 dB comes from the fact that, during a concert, the human ear can only rarely listen to sound decay of greater dynamic. The EDT value is compared to the RT 60 value. It allows us to estimate the balance between the early sound energy and the overall sound energy. The more the energy is concentrated at the beginning of the response (sound not useful), the greater the sound decay slope, and the shorter the EDT. The EDT is useful because it takes into account the effect of the first sound reflections in a room, and therefore it is closer to the subjective judgement of the listeners. Subjective evaluation This criterion appears to be closely related to the reverberation feel of the room, although it interpretation remains difficult. The EDT is linked to several others sensations such as the sharpness of attacks and their intensity. For the same room (same volume), there is a significant difference between the RT60 and EDT values. The EDT varies more quickly as a function of distance than the RT. CHAPTER 21 - APPENDICES PAGE 151 DBBATI32 SOFTWARE SUITE: USER MANUAL 21.5.2.Energy criteria Calculation of cumulated energy and energy criteria Emission The cumulated energy is calculated for a point P by adding the energy of each point located between the beginning of the echogram and the point P. If one wishes to calculate the criteria with background noise removal, the cumulated energy is calculated while subtracting the background noise energy at each point of the echogram. Background noise Decay Background noise Arrival of direct wave Each integral used to compute the criteria correspond to the difference between two cumulated energies. For example, the Clarity 80 will give : 80ms ∫h²(t).dt=cumul(80ms)−cumul(ondedirecte) 0 There is a relationship between the sound energy contained in a given time interval and the sound energy in the following time interval. Several time intervals have been proposed : 33, 35, 50, 80 and 95 ms. For each interval, the main idea is the same : the energy contained in this interval is considered as useful and the energy of the next time interval is considered as secondary or even harmful in particular cases. This comes from the functioning of the ear. The ear cannot differentiate sound reflections that occur in less than 35, 50 or 80 ms. The individual contributions of the first reflections are therefore added. These energy relationships describe the subjective indicators such as Clarity. Clarity 80 This criterion, defined by Reichardt, is the ratio between the sound energy contained in the first 80 milliseconds of the impulse response after the arrival of the direct wave (where the time T is set to zero) and the energy contained in the rest of the impulse response. It draws a relationship between the subjective sensation of a sound field and the interpretation of reflected sounds by the ear : 80ms C80=10.log ∫h²(t).dt 0 ∞ ∫h²(t).dt =10.log( E80 ) Erev (in dB) 80ms with h(t) the impulse response of a room. This parameter is negative when the energy after 80ms is greater than the energy in the range 0-80ms. It is positive when the energy after 80ms is less than the energy in the range 0-80ms (E80 > Erev). Subjective evaluation This criterion is mainly employed for music. It translates subjective sensations dealing with : The definition The discrimination The sharpness of attacks The differentiation between different voices The transparency The source location, etc. CHAPTER 21 - APPENDICES PAGE 152 DBBATI32 SOFTWARE SUITE: USER MANUAL Values The measurement of the clarity coefficient C80 is performed with an Omni-directional microphone. Examples of values for known auditory (1) : Auditorium Gross Musikhereinsalle (Vienna) Salle Pleyel (Paris) Auditorium M. Ravel (Lyon) Smallest value Averaged value Greatest value -5,30 -2,90 -0,30 -3,37 -0,70 4,37 -3,07 -0,13 2,88 (1) JULLIEN J.P. Acoustique des Salles, CNET LANNION, 1982, p.19 In general, values around 0 dB mean that the acoustics of a room is well suited for listening to symphonic music. For music, the limits that are usually used range form -2 to +2 dB. For operas, C80 must lie in the range 1 to 4 dB. Clarity 50 This criterion, as for C80, is calculated as the ratio between the sound energy contained in the first 50 milliseconds of the impulse response after the arrival of the direct wave (where the time T is set to zero) and the energy contained in the rest of the impulse response. The 50ms threshold is mainly used for speech and very little for music. Definition We use the criterion "Definition" (D) of index 50 which is in fact the ratio E50 / Etot : 50ms ∫h²(t).dt = E50 D50= ∞0 Etot ²( ). h t dt ∫ Expressed in en %. 0 ST1 We use again an energy ratio. 100ms ST1=10.log ∫h²(t).dt 110 10ms (in dB) ∫h²(t).dt 0 CHAPTER 21 - APPENDICES PAGE 153 DBBATI32 SOFTWARE SUITE: USER MANUAL 21.5.3.Intelligibility criteria An intelligibility criteria is essential to characterise the acoustic field of a conference room, a theatre and in more general terms, any place where speech is important. When a speech signal is produced in a room, normally or with the aid of a speech amplification system, the syllables tends to mask each other because of the multiple reflections and the reverberant sound spoken word so that the listener may not clearly distinguish them. When the speech sound level is too weak with respect to the background noise, the intelligibility is too low because of this masking effect. Various objective criteria are available to qualify the speech intelligibility of a room. The C50 Clarity coefficient OR the D50 definition (see preceding paragraph) can be used to estimate speech intelligibility although they do not take into account the background noise level. STI (Speech Transmission Index) The STI index is an objective criterion that characterise speech intelligibility. The STI is an indicator that takes into account all the possible causes of speech intelligibility alterations, excepted the non-linear effect. STI formula Let first recall that any alteration of the signal modulation may be expressed at a signal to noise ratio. We start with the acquisition of a M.T.F.(Modulation Transfer Function) for the octave bands ranging from 125Hz to 8kHz, covering the whole frequency range of speech phones. Any modification of the room characteristics result into an effective reduction of the signal modulation with a delay. The M.T.F may be obtained from the impulse response of the room h(t) by calculation of the modulation index m(F) for low frequencies F, contained in the speech modulation. ∞ m(F)= − 2jπFt ∫h²(t).e 0 dt . ∞ ∫h²(t)dt Iparole Iparole+ Ibruit 0 The numerator is the squared Fourier transform of the impulse response. Ispeech and Inoise are the respective sound intensities of speech and noise. Let compute signal to noise ratio per frequency bands such as: m (F ) S / Nk (F)=10log 1−m(F) We then calculate the mean S / Nk after limitations of the S/Nk(F) to ±15 dB. S / Nk = 1.∑S / Nk(F) n F n being the modulation frequency number. Let now calculate Transmission indices for speech per frequency band : TI k = S / N k +15 30 The STI is the weighted sum of the TIk : ∑(W .TI ) ∑Wk k STI = k F k CHAPTER 21 - APPENDICES PAGE 154 DBBATI32 SOFTWARE SUITE: USER MANUAL Use of the STI index The STI allows us to measure the critical distance dc for which speech intelligibility becomes bad. Indeed, it decays relatively quickly at short distances of the orator, then from the distance "dc", it becomes more or less constant, reflected sounds being predominant. For conference rooms with absorption coefficients varying from 0,1 to 0,4, the distance dc is between 15 to 20 meters. RASTI (RApid Speech Transmission Index) The RASTI method allows us to perform objective measurements of the qualities of speech intelligibility. The computation technique is similar to the STI calculation, with the following differences : The octave bands 500 Hz and 2 kHz are not taken into account All signal to noise ratios (Xi) are limited to ±15 dB The arithmetical average (Xi) for all Xi are performed RASTI = ( Xi + 15) / 30 There are additional limitations to the validity of RASTI measurements : Distortion and non-linear cut-offs are not considered. The emerging pure tones of the background noise outside the frequency range 500 Hz – 2 kHz are not allowed. It is assumed that the background noise is stationary during the whole measurement. Values The STI and RASTI criteria vary between 0 and 1. There is a scale to interpret the intelligibility from the se values: Bad 0 Poor 0.3 Average 0.45 Good 0.6 Excellent 0.75 1 References This annex uses extracts from : - The study report from C.LUQUET and J.BEAUMONT established for Laboratoire Régional des Ponts et Chaussées of Strasbourg (France) on room acoustics. It itself refer to the work of J.P. VIAN and R. CROCOMBETTE (Master in acoustics) carried out at the CSTB (Centre Scientifique et Technique du Bâtiment de Grenoble) and the work of J.P. JULLIEN and A.C. SEVERNE from IRCAM in Paris. - The thesis realised by V. FAVRE pour l’Ecole Supérieure de Mécanique de Marseille (1998) CHAPTER 21 - APPENDICES PAGE 155