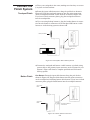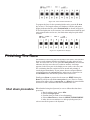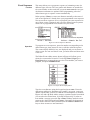
1
Swimming 6 For The System 6 Sports Timer Software User Guide F870 Rev. 1003 1551 East Eleventh Street Loveland, Colorado 80537-5056 Customer Service Department Phone: 970-667-1000 ext. 256 Toll Free U.S. and Canada 800-287-0653 Fax: 970-667-1032 Colorado Time Systems Corporate Office 1551 East 11th Street Loveland, CO 80537 USA Sales : 800-279-0111 or +1 970-667-1000 Service: 1-800-287-0653 x256 or +1 970-667-1000 x256 Service Fax: 970-667-1032 Web: www.coloradotime.com Email: [email protected] IBM is a registered trademark of IBM Corporation. Epson is a registered trademark of Epson America, Inc. Lime-A-Way is a registered trademark of Benckiser Consumer Products, Inc. Part Number F870, Rev. 1003 ©2003. Colorado Time Systems. All rights reserved. Table of Contents 1 Introduction Getting to Know Your System 6. . . . . . . . . . . . . . . . . . . . . . . . . . . 1-1 Scope of the Manual . . . . . . . . . . . . . . . . . . . . . . . . . .1-2 Contents . . . . . . . . . . . . . . . . . . . . . . . . . . . . . . . . . . . . .1-3 2 Swimming System Hardware Setup General Guidelines . . . . . . . . . . . . . . . . . . . . . . . . . . . . .2-1 Start Systems . . . . . . . . . . . . . . . . . . . . . . . . . . . . . . .2-1 Finish Systems . . . . . . . . . . . . . . . . . . . . . . . . . . . . . .2-2 System Layout Diagrams . . . . . . . . . . . . . . . . . . . . . .2-3 System 6 I/O Panel . . . . . . . . . . . . . . . . . . . . . . . . . . .2-4 Connection to meet management computer . . . . . . . .2-6 Scoreboard Configuration . . . . . . . . . . . . . . . . . . . . . . . .2-6 Introduction . . . . . . . . . . . . . . . . . . . . . . . . . . . . . . . .2-6 Single-Line Scoreboard . . . . . . . . . . . . . . . . . . . . . . . .2-7 Multi-Line Scoreboard . . . . . . . . . . . . . . . . . . . . . . . .2-7 System Test . . . . . . . . . . . . . . . . . . . . . . . . . . . . . . . . .2-9 3 Tutorial Some Assumptions . . . . . . . . . . . . . . . . . . . . . . . . . . . . . .3-1 Before the Race . . . . . . . . . . . . . . . . . . . . . . . . . . . . . . . .3-1 Starting the Race . . . . . . . . . . . . . . . . . . . . . . . . . . . . . . .3-2 Using the +Touch Key . . . . . . . . . . . . . . . . . . . . . . .3-2 Using Split Arm . . . . . . . . . . . . . . . . . . . . . . . . . . . .3-3 Using Finish Arm . . . . . . . . . . . . . . . . . . . . . . . . . . .3-3 Finishing the Race . . . . . . . . . . . . . . . . . . . . . . . . . . . . . .3-4 4 Reference Basic Operation . . . . . . . . . . . . . . . . . . . . . . . . . . . . . . .4-1 Self Test/Loading Swimming . . . . . . . . . . . . . . . . . . .4-1 User Interface . . . . . . . . . . . . . . . . . . . . . . . . . . . . . . .4-2 Warning Messages . . . . . . . . . . . . . . . . . . . . . . . . . . . .4-2 Timing Problems . . . . . . . . . . . . . . . . . . . . . . . . . . . .4-2 Timing Corrections . . . . . . . . . . . . . . . . . . . . . . . . . . .4-3 Relay Judging . . . . . . . . . . . . . . . . . . . . . . . . . . . . . . .4-3 Keyboard . . . . . . . . . . . . . . . . . . . . . . . . . . . . . . . . . . . . .4-4 Lane On-Off . . . . . . . . . . . . . . . . . . . . . . . . . . . . . . . .4-4 Finish Arm . . . . . . . . . . . . . . . . . . . . . . . . . . . . . . . . .4-4 Split Arm . . . . . . . . . . . . . . . . . . . . . . . . . . . . . . . . . .4-4 Start . . . . . . . . . . . . . . . . . . . . . . . . . . . . . . . . . . . . . .4-5 Store/ Print . . . . . . . . . . . . . . . . . . . . . . . . . . . . . . . . .4-5 Next Heat . . . . . . . . . . . . . . . . . . . . . . . . . . . . . . . . . .4-5 Next Event . . . . . . . . . . . . . . . . . . . . . . . . . . . . . . . . .4-5 Edit Event/Heat . . . . . . . . . . . . . . . . . . . . . . . . . . . . .4-6 Edit/DQ . . . . . . . . . . . . . . . . . . . . . . . . . . . . . . . . . . . .4-6 + Touch . . . . . . . . . . . . . . . . . . . . . . . . . . . . . . . . . . .4-6 - Touch . . . . . . . . . . . . . . . . . . . . . . . . . . . . . . . . . . . .4-6 Events . . . . . . . . . . . . . . . . . . . . . . . . . . . . . . . . . . . . .4-7 Reset . . . . . . . . . . . . . . . . . . . . . . . . . . . . . . . . . . . . . .4-7 Numeric Keypad . . . . . . . . . . . . . . . . . . . . . . . . . . . . . . .4-8 Enter . . . . . . . . . . . . . . . . . . . . . . . . . . . . . . . . . . . . . .4-8 C/E . . . . . . . . . . . . . . . . . . . . . . . . . . . . . . . . . . . . . . .4-8 Console Keys . . . . . . . . . . . . . . . . . . . . . . . . . . . . . . . . . .4-9 Enter . . . . . . . . . . . . . . . . . . . . . . . . . . . . . . . . . . . . .4-9 Quit . . . . . . . . . . . . . . . . . . . . . . . . . . . . . . . . . . . . . . .4-9 Battery Check . . . . . . . . . . . . . . . . . . . . . . . . . . . . . . .4-9 TOCi Help . . . . . . . . . . . . . . . . . . . . . . . . . . . . . . . . . . . . . .4-9 Softkeys . . . . . . . . . . . . . . . . . . . . . . . . . . . . . . . . . . . . . .4-10 Print . . . . . . . . . . . . . . . . . . . . . . . . . . . . . . . . . . . . . .4-10 Display . . . . . . . . . . . . . . . . . . . . . . . . . . . . . . . . . . . .4-12 Scoreboard . . . . . . . . . . . . . . . . . . . . . . . . . . . . . . . . .4-13 Setups . . . . . . . . . . . . . . . . . . . . . . . . . . . . . . . . . . . . .4-14 Setups Softkey Menu . . . . . . . . . . . . . . . . . . . . . . . . .4-14 Stored Data . . . . . . . . . . . . . . . . . . . . . . . . . . . . . . . .4-24 Misc . . . . . . . . . . . . . . . . . . . . . . . . . . . . . . . . . . . . . . .4-27 Appendix A Maintenance Customer Service . . . . . . . . . . . . . . . . . . . . . . . . . . . . . . .A-1 Factory Maintenance . . . . . . . . . . . . . . . . . . . . . . . . . . . .A-1 Routine Maintenance . . . . . . . . . . . . . . . . . . . . . . . . . . . .A-2 System 6 . . . . . . . . . . . . . . . . . . . . . . . . . . . . . . . . . . .A-2 Connectors . . . . . . . . . . . . . . . . . . . . . . . . . . . . . . . . .A-2 Cables . . . . . . . . . . . . . . . . . . . . . . . . . . . . . . . . . . . . .A-2 Start Systems . . . . . . . . . . . . . . . . . . . . . . . . . . . . . . .A-3 Scoreboard . . . . . . . . . . . . . . . . . . . . . . . . . . . . . . . . .A-3 Printer . . . . . . . . . . . . . . . . . . . . . . . . . . . . . . . . . . . .A-3 Troubleshooting . . . . . . . . . . . . . . . . . . . . . . . . . . . . . . .A-4 Troubleshooting Chart . . . . . . . . . . . . . . . . . . . . . . . .A-5 References . . . . . . . . . . . . . . . . . . . . . . . . . . . . . . . . . . . .A-8 Start System . . . . . . . . . . . . . . . . . . . . . . . . . . . . . . .A-8 Finish System . . . . . . . . . . . . . . . . . . . . . . . . . . . . . .A-9 Wiring System . . . . . . . . . . . . . . . . . . . . . . . . . . . . . .A-10 Printers . . . . . . . . . . . . . . . . . . . . . . . . . . . . . . . . . . .A-10 Appendix B Glossary . . . . . . . . . . . . . . . . . . . . . . . . . . . .B-1 Appendix C Specifications . . . . . . . . . . . . . . . . . . . . . . .C-1 Appendix D History . . . . . . . . . . . . . . . . . . . . . . . . . . . . .D-1 TOCii 1 Introduction You have chosen the latest sports timer from Colorado Time Systems, the company that pioneered precision and accuracy in swim timing. A legacy of excellence is behind your new timer. A brief history of swim timing is included in this manual in Appendix D. Getting To Know Your System 6 After removing the System 6 from its shipping container and carrying case, take a few minutes to familiarize yourself with it. In particular, examine the areas discussed below. Back Panel A variety of output connectors are mounted on the back panel. Notice in particular those described below. Inputs to the System 6 include: An external DC power supply Near-end cable harness (lanes 1-10) (second connector for 11-12) Far-end cable harness (lanes 1-10) (second connector for 11-12) Duplicate Near- and Far-end cable harnesses to attach a second timer for backup Judges I/O port Keyboard & Mouse Outputs from the System 6 include: Scoreboard Com port for computer running meet management software Printer port External monitor 3½ disc drive for software installation (right side of timer) CTS expansion ports Ethernet port Liquid Crystal Display (LCD) Screen Turn on your System 6 and load the Swimming program (refer to Chapter 4 for loading instructions). The full-sized display screen provides you with a wide range of display information to help run your swim meets. The screen always displays current race information including running time, the status of the race, event and heat numbers and more. The Swimming software keeps you in full control of the race situation at all times. Battery An internal lithium ion battery provides backup power in case of emergency or power outage. To charge the battery, plug the System 6 into a grounded power outlet with the unit turned off. The charge time of the battery is 3 hours. The battery will provide approximately 45 minutes of usage time. This can be increased to 1 hour after 4 to 5 cycles of fully charging and fully discharging. If you are discharging the battery go to the “SELECT SPORT MENU” and let the timer run until it dies. The softkeys located to the right of the display screen let you select 1-1 Softkeys from a variety of options. You can: Select the kind and format of printed race information. Print a sponsor’s message on race printouts Display detailed race information including backup button input and relay judging information. Access special scoreboard control features. Customize the Swimming software to meet your individual needs. All setup information can be stored in memory for future races. Program standard or special event sequences. Control voltage delivered to the touchpads to help control contact corrosion. Keyboard Insert The keyboard insert helps you run meets efficiently. You can: Turn lanes on and off quickly with a single keystroke. Quickly recover from missed or inadvertent touchpad hits. Store and print race information with a single keystroke. Edit times and enter DQ information. Change the length of an event quickly and easily. Figure 1-B Swimming Keyboard Insert Now that you are familiar with your System 6 Sports Timer and Swimming software we encourage you to continue reading this manual at your convenience. Scope Of This Manual This manual is intended to address all issues related to the normal operation of the System 6 with the Swimming software. It is written with the beginning timer operator in mind, but it also contains detailed information on advanced operations which are of interest to the experienced operator. Use the index to locate specific information quickly. A complete Maintenance section covers the most common problems that are user correctable. For any repairs or problems not found in the manual, call Colorado Time Systems' Customer Service Department at 800-287-0653 (U.S. and Canada) or 970-667-1000 (International). 1-2 Contents Chapter 1 Contains introductory information and an overview of the System 6 Sports Timer/Swimming software and the scope of the instruction manual. Chapter 2 Covers hardware setup of your total system in preparation for a swim meet. The instructions relating to equipment other than the System 6 are general in nature and are not intended to serve as a substitute for the manual(s) accompanying your accessory software and hardware. Chapter 3 A step-by-step race tutorial, the purpose of which is to acquaint you with commonly used features and options available in the Swimming software. Chapter 4 The most detailed chapter in this manual, Chapter 4 is the Reference section which describes in detail the operation of the Swimming software and the action of each key and option. This chapter includes complete information on Setups and the keyboard insert. Appendix A Maintenance. A logically organized, step-by-step maintenance and troubleshooting reference that describes the symptoms, causes and cures for the most frequently encountered user-serviceable problems. Appendix B Glossary. This appendix contains a glossary of terms relating to the Swimming software and the System 6. Appendix C Specifications and power requirement information for the System 6 in English and German. Appendix D History of Swim Timing. A historical perspective of swim timing. Index A complete index provides quick access to specific information. The index is cross-referenced and organized to make finding any information in this manual fast and easy. 1-3 1-4 2 Swimming System Hardware Setup The first part of this chapter describes in general terms the assembly of the various hardware components that make up the swimming system. The second part explains scoreboard module configuration in detail. General Guidelines The following instructions provide a general, step-by-step check list for setting up your swimming system. The large number of possible accessory combinations make it impossible to provide detailed installation instructions here. These instructions assume that your scoreboard, touchpad mounting brackets and other permanent equipment are installed as specified in the appropriate instruction manuals. Connect the Start System Start Button, Loudspeaker Start System Loudspeaker Start System Detail of Connector Touchpad and Button A Cable Harness Figure 2-A Start System Connections 1) To set up a loudspeaker start system, place the start console a safe distance from the pool and plug in the microphone. Route the loud speaker cable harness along the edge of the pool and connect the speaker(s) to the harness, as shown in Figure 2-G 2) Connect the cable from the start system to the start connection on the touchpad and button A cable harness as shown in Figure 2-A, or to the start connector on your in-deck wiring system. 3) If you are using a backup start button, plug it into the connector marked backup start on the touchpad and button A cable harness. Refer to Figure A. 2-1 Connect the Finish System Touchpad Finish 1) Place your touchpads in the water, making sure that they are securely in place on their brackets. 2) Route the input cable harness(es) along the pool deck as shown in Figure 2-E. Plug the touchpad connectors into the prime connectors on the touchpad and button A cable harness as shown in Figure 2-B. If you have in-deck connector plates, plug the touchpad connectors into the touchpad slot. 3) If you are using backup button(s), plug the backup button A connectors into the button A connectors on the touchpad and button A cable harness or in-deck wiring system as shown 2-B. Backup Start Button Touchpad Detail of Connector Touchpad and Button A Cable Harness Figure 2-B Touchpad/1-Button Backup Finish 4) Connect the touchpad and button A cable harness or in-deck wiring system cable to the primary input connector on the I/O panel of your System 5. Figure 2-E shows a complete pad finish and one-button back-up system. Button Finish One Button: Route the input cable harness along the pool deck as shown in Figure 2-F. Plug the finish button into the prime connectors on the touchpad and A backup button cable harness. If you have in-deck connector plates, plug the finish button into the touchpad connector. Second Finish Button Detail of Connector Single Finish Button Touchpad and Button A Cable Harness Figure 2-C Button Finish Connections 2-2 Two Buttons: If you are using 2 finish buttons, plug the second buttons into the A connectors on the touchpad and button A cable harness as shown in Figure 2-C. If a 2 button finish is used, the finish time is the average of the two button times recorded. Three Buttons: If you are using 3 finish buttons, first route the B and C backup button cable harness along the pool deck. Then plug the third button into the B connectors on this cable harness. B & C Backup Buttons with Touch pads 1) Route the B and C backup button cable harness along the pool deck. Connect the B and C backup button to the correspondingly labeled connections on the cable harness or in-deck plates, as shown in figures 2-D and 2-G. 2) Connect the B and C backup cable harness or in-deck cable into either Near End input connector on the I/O panel of your System 6. Backup Button C Detail of Connector Backup Button B B and C Backup Button Cable Harness Figure 2-D Backup Buttons B & C System Layout Diagrams Touchpad Finish/ 1 Button Backup The following three figures show sample layouts of standard swim timing systems. Use them as general references when putting together your swimming system. This diagram shows an electronic start system and pad finish with 1 button backup. On this type of system, the start software setup should be set to near end, primary finish = pads. Refer to Chapter 4 for more information on software setups. System 6 Sports Timer 1 Backup Button per Lane Start System Touchpad and Button A Cable Harness Touchpads Figure 2-E Touchpad Finish/1-Button Backup 2-3 System 6 Sports Timer 1 Finish Button per Lane Touchpad and Button A Cable Harness Figure 2-F Single Button Finish Single Button Finish This diagram shows an electronic start system and a single button finish without backup buttons. “FINISH/BUTTONS” SETUPS should be set to Near End Primary Finish = Button(s). Refer to Chapter 4 for more information on software setups. Scoreboard Computer Loudspeaker Start System B and C Backup Button Cable Harness Loudspeaker Cable Harness and Speakers Touchpad and Button A Cable Harness RJP-1’s Button A RJP-1 Figure 2-G Full System Full System System 6 Back Panel Note: This diagram shows a loudspeaker start system, RJP relay judging platforms, touchpad finish with 3 backup buttons per lane, a printer, a computer running meet management software, a power supply for the System 6 and a scoreboard. On this type of system, the “FINISH/BUTTONS” SETUPS be set to Near End Primary Finish = Pad. Refer to Chapter 4 for more information on software setups. The System 6 back panel houses all Input and Output (I/O) connectors. This section describes the I/O panel connectors from left to right as viewed from the back. Refer to Figure 2-H for the locations of the items described below. Shut Down the System6 and then turn the power off before connecting or disconnecting any cables from the I/O panel. 2-4 Figure 2-H System 6 I/O Panel Power ON/OFF Switch Important Note: External Power Important Note: Judges I/O Scbd Com Port 1 & 2 Printer Port This is the red switch to the side of the I/O Panal. Do not turn off power to your System 6 while in any of the Sport Programs. Always follow the proper shut down procedure: Select Misc on the softkeys, then choose Change Sport, then choose Shut Down. After this, your System 6 is ready for the power to be turned off. Connect the DIN connector from the approved 15 volt power supply here. Use only the recommended power supply! Use of any other power supply (including a System 5 power supply) may cause serious damage to your system. Make sure the power supply is plugged into a working AC outlet to avoid unintentionally discharging the System 6's internal batteries. This DIN connector accepts input from the Judging expansion hardware. It is also available for other expansion input/output devices for other sports made available by Colorado Time Systems. The scoreboard connection is to the side of the I/O Panal just below the red ON/OFF switch. Connect the cable from your scoreboard here. Push the quarter-inch jack into the socket until it snaps firmly into place. Both are 9-pin standard serial communication ports which allows the System 6 to communicate with outside devices. COM1 is for a computer running swim meet management software. COM2 is used for special operations only. This is a standard IBM PC parallel port. Attach the cable from your printer to this connector. Make sure the cable connector is firmly seated and tighten the screws to make a secure connection. Monitor This is a standard VGA port. If you wish to use an external monitor at the scoring table, connect the cable from your monitor to this connector. The timer’s screen is displayed on this output. Mouse This is a standard IBM PC PS-2 mouse connection. If you wish to use a mouse, connect it here. Keyboard CTS Expansion Ports This is a standard IBM PC PS-2 keyboard connection. If you wish to use external keyboard, connect it here. The USB port and the Ethernet port are NOT available, they have been included for future expansion. Connecting devices to these ports is NOT RECOMMENDED. 2-5 Near End Input and Far End Input Connect the cable from the near-end touchpads, start system and backup buttons to a Near End connector. Connect the cable from the far end touchpads and backup buttons to a Far End connector. Snap the wire bails into place on the cable connectors to ensure secure connections. The other near- and far-end ports allow the connection of a second timer as a backup unit. For this configuration, connect the near and far end inputs on the primary System 6 as described above, and then connect the other near and far end ports on the primary timer to the near and far end ports on the secondary timer. The connectors to the left of the near end ports and to the right of the far end ports are used for near-and far-end inputs for pools with more than 10 lanes. Connection to Meet Management Computer You will need use a “male to female 9 pin DIN straight through RS232 cable” to connect your System6 to your Meet Management Computer. The timer is now ready to talk to your meet managment program. You will need to refer to your meet management user guide if you have any problems after this. Scoreboard Configuration Introduction Colorado Time Systems' scoreboards offer great flexibility. We offer fixed digit (LED or light-reflective) displays and full-matrix LED displays. Both options offer a good alternative to the hassle of light bulbs. The scoreboards themselves are manufactured to withstand the rigors of the swimming pool environment and give years of trouble-free service. No routine maintenance is necessary. The modular design of both the fixed digit and matrix displays allow your scoreboard to grow with your program and to be easily arranged to accommodate new sports. Adding new lines to the display presents no difficulty. Once the new lines are mounted, simply use the included cables to connect the scoreboards together. The examples in this chapter show many common and very useful digit arrangements for the fixed digit displays and the templates for the matrix displays. Once you have the physical layout of your scoreboard in place, you can set the electronic configuration to display the desired information. Each scoreboard line makes up a complete display module to which the Swimming software sends specific information. You determine what information is displayed by setting the switches in each scoreboard line to the channel on which those data are transmitted. For example, the Swimming software sends race information for lane 1 on channel 01. To display that information on the first scoreboard line, as shown in the example on page 2-8, set the switches in your first scoreboard line to channel 01. All other channels work the same way. Your scoreboard manual contains detailed information on setting the channel switches. Refer to the figures later in this chapter for example displays from each channel. 2-6 You can also redirect data from one channel to another using the Swimming software scoreboard setup feature. Information that is ordinarily carried on one channel can be carried on another. For example, an event record time is received on channel 0B at the scoreboard. That information can be redirected to any channel, such as channel 09 which is the scoreboard module used to display race information for lane 9. Your options are not limited. Any scoreboard information can be sent to any scoreboard module. This feature allows you to customize your scoreboard display for special events or requirements. Refer to Setups in Chapter 4 for complete instructions. Single-Line Scoreboard Team Scores Reset Start Lane, Place and Finish Time: Displayed by Place Running Time During Race Finish Lead Split Figure 2-I Single-line Scoreboard Display Sequence All race information can be displayed on a single-line scoreboard. The Swimming software sequences race information as shown in Figure 2-I. You can set the exact sequence used before the meet begins. Refer to Chapter 4 for more information on single-line scoreboard sequencing. Figure 2-J Single-line Scoreboard Digits/Signage To use a single-line scoreboard display properly, the channel switch inside the scoreboard module must be set to channel 0F. Recommended arrangement of the scoreboard digits and placement of signage is shown in Figure 2-J. The data that is displayed on this module can be defined in SCOREBOARD SETUPS One-Line Scoreboard Sequence List. The number of times this data is displayed and the duration of the display can also be set here. Multi-Line Scoreboard To display race results and other information on a multi-line scoreboard, your scoreboard must be properly configured. Scoreboard configuration is a two-part process. First, the scoreboard must be installed and the digits and signage arranged to meet your needs. Refer to the figures in this section for examples of proper scoreboard arrangement and refer to your scoreboard manual for instructions on moving digits and installing signage. Once the scoreboard is installed, the channel switches in each scoreboard module must be set to agree with the channel setting in the 2-7 Swimming software. For example, channel 01 in the Swimming software sends information to the scoreboard module set to channel 01, channel 02 in software sends information to the scoreboard module set to channel 02, and so on. The Swimming software uses each channel to transmit specific race information. For example, channel 01 sends the place and time information for Lane 1, channel 0C sends the event and heat information for the current race. To function properly, the switches in each scoreboard module must be set to receive the proper information. The Swimming software provides the option to redefine a scoreboard module by sending information from one channel to another. For example, you could redefine scoreboard module 0B, which ordinarily receives record time information, to receive data from channel 06 which carries place and time information for lane 6. Refer to Chapter 4 under Setups for more details. Channel Selection This section shows sample scoreboard module displays and the corresponding channel selections to produce them. Set the switches inside each scoreboard module to agree with the channel number listed beside it as shown in Figure 2-K. No Swimming software configuration changes are necessary. Note that channel 03 also displays the time of day when you press the Scoreboard Blank softkey on the Scoreboard softkey menu. Figure 2-K Scoreboard Displays/Channel Numbers *Channel 11 is a multi-purpose channel that displays time and place information for lane 1 (channel 01) during the race. Following reset, team scores (channel 0D) are automatically displayed on the same scoreboard module. **Channel 12 is a special purpose channel which is very useful for televised broadcasts. It displays the running time, lead split time and winning finish time. Unlike channel 0F, this channel does not cycle through all finish times, but displays only winning time until it is reset. 2-8 Display Modules When you are done setting the channel switches in your scoreboard, check the configuration. Press 2-Show definitions on scoreboard in the Scoreboard Setup menu to display the module definitions on the scoreboard as shown in Figure 2-L. Refer to page 4-18 for more information. Figure 2-L Scoreboard Displaying Module Definitions System Test Before the first race of the meet begins, test all accessories for proper operation. Use the Diagnostics screen to test your touchpads, push buttons and start system before the meet begins. Refer to Section 4:StartUp/Main Screen for instructions on running these tests. Test the start system to ensure that the Swimming race timer starts as expected. Check all touchpads and backup buttons for proper operation. 2-9 2-10 3 Tutorial This chapter provides step-by-step instructions for timing a race using the Swimming software with your System 6 Sports Timer. The purpose of this chapter is to provide a basic understanding of the operation of the Swimming software under race conditions. Various aspects of the user interface are addressed as are some commonly required operator inputs. Although the race described here is hypothetical, the circumstances covered are not uncommon in an actual race. Is is important to note also that many possible occurrences are beyond the scope of this tutorial. Use this chapter only as an introduction to swim timing with the Swimming software. Some Assumptions This tutorial assumes that all hardware, including touchpads, start system, scoreboard and printer are already installed and properly connected to your System 6 Sports Timer. All of these operations are described in the preceding chapter. Our hypothetical race is a 200 yard freestyle relay event number 3, heat 2. The hypothetical pool is a 10-lane, 25 yard pool. This race, however, uses only 6 lanes. The hardware configuration consists of an electronic horn start system, near-end touchpads, 1 backup button per lane, a scoreboard and a printer. Before The Race Before starting the race, turn on your System 6 and printer. Make sure your printer is loaded with paper and is ready to print on a new page. The operator controls some functions of the System 6 with keyboard keys, and other functions with softkeys. The keyboard keys are located on the membrane keyboard that is built in to the System 6. The removable insert identifies the function of the keyboard keys when the Swimming software is used. The softkeys are the column of six unlabeled keys immediately to the right of the display screen. The function of each key changes depending on the option selected; the screen displays the function currently available directly to the left of each softkey. If no label appears next to a softkey, that key is inactive at the time. To run the Swimming software, press the softkey labeled Swimming after you’ve turned the System 6 on. If you are changing from another sport, press the Misc softkey, then Change Sport, then Swimming. Swimming loads and is ready to operate. The timer turns ON set to Event 1 and Heat 1. If you have selected an “event sequence” the timer will be set for which ever event is #1, if you do not have a defined sequence then the timer will set itself to a 100 event. You may select 3-1 another distance with the events keypad toward the right side of the keyboard and press the distance you wish. In its default setting, each time you press a key the System 6 beeps. If you press a key but do not hear a beep, then either the System 6 did not sense the keystroke or the beep has been turned OFF in SETUPS. Since we are only using 6 of 10 lanes in the pool for this race, press on/off keys for lanes not being used. The active lane indicator disappears in each of the lanes turned off. The display screen is updated to reflect the data entered. Starting The Race The Swimming software is in the reset state (note the RESET in the upper left corner of the timer) and is ready to begin timing a race. The horn sounds, the timer starts simultaneously and the swimmers are in the pool. Do not press the start key on the Swimming keyboard unless the timer did not start. All 6 touchpads are inactive for a user-defined number of seconds after the start, a feature which allows backstroke starts without interfering with race timing. See Chapter 4 for details of using the Setups menu to set this number. As soon as the touchpads are ready to receive a touch, the pad status display indicates armed. The swimmers have made their turn at the far end of the pool and come in to touch at the near end. The swimmer in lane 3 touches first. When the Swimming software receives the touch pulse, it beeps and displays the number of complete lengths completed in that lane, in this case 2. The pad status indicator in lane 3 goes blank for 15 seconds (or for the number of seconds defined in Setups) to indicate the pad split delay time. During this time, the pad will not accept a touch. The System 6 beeps as each swimmer touches a pad. Using The +Touch Key As the operator, you notice that the second swimmer in lane 2 has started, but the Swimming display does not indicate that the first swimmer in that lane touched the pad. Notice that there is no length display in lane 2 as in other lanes. Figure 3-A illustrates this situation as it appears on the display screen. Figure 3-A Lane 2 Pad Touch Missed As sometimes happens, the first swimmer touched the wall beside the pad, which is a legal touch under swimming rules, but the Swimming software cannot register this as a touch. 3-2 To correct the missed pad touch, press the +touch key. The small window shown in Figure 3-B appears on the display screen prompting you to enter the lane number to which the touch should be added. Use the numeric keypad to type 2 and press enter. Figure 3-B Using the +Touch Key The display screen now shows that 2 lengths have been completed in lane 2. The split time will be missing, but hopefully all following split times and finish time will be correct. Notice that it is not possible to finish a race using the +touch key. Races must be finished from the touchpads or backup buttons. There is always a reason for a missed touch. An athlete simply missing the pad is not bad but if you continue to have missed touches on the same lane you will want to determine why. Using Split Arm The next situation that arises involves the second swimmer in lane 1. This swimmer is slow getting out of the pool and steps on the touchpad after its split delay time of 15 seconds is up. The pad is armed at that point and when the swimmer stands on it, a touch pulse is sent to the System 6. The display screen, Figure 3-C, now shows lane 1 having completed 6 lengths and on the finish lap. Figure 3-C Invalid Pad Touch in Lane 1 To correct this situation, you can press S. Arm for lane 1 which will remove the last touch and switch the pad to the ARMED status immediately. Notice that the pad status display in lane 1 has returned to Armed status and the lengths completed is revised to indicate the accurate number, in this case 4. Figure 3-D illustrates the corrected situation. Figure 3-D Lane 1 Reset to 4 Lengths Completed Using Finish Arm All swimmers touch at the end of the third leg of this race and the final leg swimmers are in the pool. The timer warns you, by showing Finish LAP, which lanes are on the last lap of the race. After the split delay each lane will display a flashing Finished Armed. The swimmers turn at the far end of the pool, you notice that lane 5 did not register a pad touch. Its length count shows 4, its pad display is not Finish Armed. Figure 3-E illustrates this situation. 3-3 Figure 3-E Lane 5 Pad Touch Missed To prepare the lane for the upcoming finish touch, press the F. Arm key in lane 5. The length counter now displays 6 and the pad status display indicates that the pad is Finish Armed, as shown in Figure 3F. The final split time is not accurate, but as demonstrated with the pad touch missed earlier in the race, the finish time and place pick will be accurate. Figure 3-F Updated Lane Display Finishing The Race All swimmers touch their pads successfully at the finish. The System 6 beeps as each swimmer finishes and displays the place picks in each lane. As soon as the race is over, press the store/print key. As its name indicates, this key stores the race results in memory. A message appears on the lower part of the display screen (next to the race number) confirming that the results have been stored and printing of results begins immediately. If your printer does not respond within 1 second of pressing the store/print key, make sure it is turned on (in the SETUPS area) and that the printer itself is turned on. Finally, press Reset to prepare for the next race. HINT: hitting the Reset key will do an automatic store/print for you. There is a safety feature that will not allow a store/print or a Reset if the timer thinks that there is still a swimmer that has not finished the race. Shut down procedure When finished using the System 6, be sure to follow this shut down procedure: 1) On the softkey menu, choose Misc 2) Choose Change Sport 3) Confirm that you wish to leave Swimming 4) Choose Shut Down to from the SELECT SPORT MENU 5) After the screen switches to a dark gray background, it is safe to turn off the power to the System 6. 3-4 4 Reference This chapter describes in detail the operation of the System 6 Sports Timer and Swimming software, the function of each key on the Swimming keyboard insert and all softkey functions. This chapter is not meant to be read from beginning to end. It is designed to be used as a reference for specific features and functions of the Swimming software. When used in conjunction with the index at the end of this manual, this chapter provides quick access to specific, detailed information. While it is not necessary to read the entire chapter, quickly skimming the first 14 pages will provide you with a good overview of the operation of the Swimming software, the function of the keyboard and the meaning of various items appearing on the display screen. More information on using the Swimming software appears in Chapter 3 which includes a complete race tutorial. Basic Operation This section describes the basic operation of the System 6 Sports Timer and Swimming software. The different modes of operation and a basic explanation of the behavior of the timing system are included. Start Up/Main Screen Select Sport Menu Summary Upon being turned on the System 6 goes through a bootup process. After this is complete you are presented with a menu of options. The purpose of this menu is to start up a SPORTS PROGRAM, SHUT DOWN the timer, automatically INSTALL new software or firmware and do some DIAGNOSTICS on the timer. If you have encountered any problems during bootup that require YES or NO answers you will need to have a PC style keyboard connected to the timer to continue. If you do not currently have a keyboard connected you will need to turn OFF the timer and connect one to the back panel of the timer in the slot labeled KEYBOARD. After it is connected connect turn the timer back ON and answer Y(es) to the questions it asks. Usually this problem arises because the timer was not SHUT DOWN properly. You can generally avoid this by following the proper SHUT DOWN procedure (described on page 3-4, and in the Shut Down section below). If you continue to have problems in booting up the timer, call Colorado Time Systems' Customer Service Department at 800-2870653 (U.S. and Canada) or 970-667-1000 (international). Running Swimming To run the system as a Swimming Timer, press the Swimming softkey. The Swimming program will load and is then ready to use. Diagnostics Press the Diagnostics softkey to access the Diagnostics screen, where you can test the membrane keyboard keys, as well as peripheral devices (pads and buttons) that are connected to your System 6. Install To install new software or an update from Colorado Time Systems, insert the floppy disk with the update into the floppy disk drive and hit the Install key. The update or new software will load automatically. 4-1 Shut Down To properly turn off the System 6, be sure to return to this menu and press Shut Down. After the screen displays a dark gray background, it is safe to turn off the power to the System 6. More If you have more than one sport in addition to Swimming installed on your System 6, access the additional sports by pressing the More softkey. The other sports that you have will be shown on a second page of the menu. User Interface The System 6 Sports Timer/Swimming software user interface consists of a full-size color Liquid Crystal Display(LCD) and a membrane keyboards with removable insert. Summary Operation The Swimming program uses the LCD screen to communicate a wide range of information to you. The status of the current race is displayed at all times. Other important information displayed includes the running time, the race number, whether the timer has been reset, event and heat numbers, race distance and type, lane status, and softkey functions available. Warning Messages Summary Operation Near Pad/Far Pad Finish Armed Three important warning messages can appear on the display screen, indicating a potential timing problem. This message shows in the lane display whenever the touchpad in that lane is hit. If no one is standing on the touchpad, this may indicate a problem with a touchpad. When this message flashes in the lane display, it indicates that the timer thinks you are on the final lap of the race in that lane. This message continues to flash until a pad touch is received. Going to Internal Battery If the timer looses its external power it will display at the bottom of the screen the message “The System 6 is operating on BATTERY!” Timing Problems If timing problems are encountered during a race, such as touchpad and backup button times that do not compare properly, the screen shows the possibly questionable times in parentheses when you press store/print. Carefully check the result(s) displayed in the indicated lane(s). To use the backup time for a problem lane, press the softkey labeled Use_lnX Backup with "X" replaced by the specific lane number. Press the Edit/DQ softkey to edit the time(s) in question. Refer to the description of the Edit/DQ key later in this chapter for complete instructions. When you are satisfied that the results are accurate, press the OK to Print softkey to store the results and continue the meet. Timing Corrections The Swimming software is designed to correct timing inaccuracies introduced when automatic and manual timing methods are combined. Summary A start is considered manual when a person presses the start button to start the timer. In the case of a manual start, human reaction time is factored in. If an automatic start is used there is no human reaction time to compensate for. A start is considered automatic if the start system sends an electronic pulse to the System 6 at the start of the race. A loudspeaker start system (e.g., a CTS Infinity, ChampStart or SS-2) is an example of an automatic start system. 4-2 Manual finishes are normally corrected by subtracting 0.15 seconds from the recorded time; this may be altered in the Setups menu, Timing subsection. Currently almost all ruling bodies (High School, NCAA, USA Swimming) state that all backup times should be adjusted. This means that you should measure the time difference between the pad and backup in every lane and average that difference to create a single number to adjust any backup times used in that race. This can be a very tedious process so we do it for you. Just make sure that in the Setups menu, Timing subsection, you are set to “Use Automatic Backup Time Adjustment” For a complete discussion of swim timing and the statistical data and methods used to arrive at the standard correction factor, refer to J. Killpatrick, Timing Accuracies for Swimming ( 1975 J. Killpatrick, Minneapolis, MN) and Timing and Judging Accuracies for Swimming ( 1976 J. Killpatrick, Minneapolis, MN). Operation Relay Judging Automatic Relay Judging Refer to Start under Setups in this chapter for complete information on configuring the Swimming software for your start system. Relay judging is a built-in Swimming feature. Relay judging is accomplished by humans pressing a button (“A” button) or by having an automatically Relay Judging Platform (RJP) for each lane. You need to tell the timer which type of relay judging you are using, in the Setups menu, Hardware subsection, select Relay Judging using Platforms/Buttons (near end) If you are using the far end you should also set that. To use Swimming's automatic relay judging feature, you must first install and connect an RJP for each lane. You do this by plugging the RJP into the “A” button of each lane in the deck cable or deck plate. You should then plug your “A” button on top of the RJP connector. Refer to your RJP Installation Guide for complete installation instructions. Refer to Figure 2-G in chapter 2 for a full system diagram. After the relay judging platforms are installed and cabled, take the following steps to configure the timer so that the relay exchange information is printed. 1) Press the Setups softkey. Press the Up or Down softkey until the selected setup is Printer. 2) Press 1 on the numeric keypad to select Store/Print Format. 3) Press the Choices Down softkey until the selected item is Relay Judging Exchanges. Press the Insert softkey to add “Relay Judging Exchanges” to the List of details that will be printed. Repeat the process to select Relay Exchange Summary. 4) Press Quit, and then press the Save Setups softkey to save the new print setup. Press Quit to exit Setups. Refer to the Setups section in this chapter for complete information on Swimming setups. 4-3 Keyboard Summary This section describes the action of the keys on the Swimming keyboard insert. The keys are described in order as they appear from left to right on the keyboard. Refer to the Index at the end of this manual to locate a specific key description quickly. References to keyboard keys appear lower case bold italic type in this manual. Figure 4-A Swimming Keyboard Insert Lane On-Off Function The lane on-off keys are located directly under the lane numbers on the Swimming keyboard. These keys toggle output to the scoreboard and display screen from each lane ON or OFF depending on current status. Operation If lane 10 is currently off, pressing the on-off key for lane 10 will turn the lane on. Data are still collected from a lane when it is turned off, including running time, splits and finish time. The data collected are not sent to the scoreboard unless the lane is turned on. When a lane is turned off, its number and its status are not displayed on the Swimming screen. Finish Arm Press F.Arm to arm the touchpad in the selected lane for a finish touch. Use this key to arm a lane for a finish touch when the swimmer missed a split touch. Function Operation Split Arm Function Operation When you press this key, the Swimming display changes the lane status to waiting for a finish touch. The display also updates the number of lengths to indicate the final lap. If pressed by mistake, you must press the -touch key to return the lane to its prior state or the split arm key in that lane (see below for more information on the split arm keys). This key allows you to rearm a touchpad for a split touch after an invalid touch has occurred. It arms the pad immediately and subtracts 1 from the lengths swum. For example, in a relay race, the relay swimmer stands on the pad before taking his or her mark. The pad registers a touch that is invalid. To rearm the pad for the proper split touch before the swimmer in the pool touches, press S.Arm in the affected lane. 4-4 Start Function This key is used as the backup start in case the primary system fail. Operation Do not press this key before the primary start system has sounded. The start key also allows the timing operator to start swimmers when no other start system is used. Store/Print Stores the results of the race just completed in memory and prints the results. This indicates that the race is over. The reset key will do this function automatically for you. Function At any time prior to printing, any or all lanes can be re-armed. This is very useful if you forget to change the race distance from a 50 to a 200 as a new event begins. The timer would think that the first split was the end of the race and would show a finish. As long as you have not hit store/print the clock is still running and you can merely hit the race distance key 200 and you are back in business. Operation Press this key at the end of each race to tell the Swimming software that the race is completed. The results of the current race are stored in memory and printed according to the print setup. If you press this key before the timer thinks that all lanes have finished it will ignore you, and the Finish Arm indicator will keep flashing in the lane(s) in question. If a swimmer misses the touchpad BUT the backup buttons come in the timer will think that the race is over and we somehow missed the pad hit. In this case it will prompt you about using the backup time for the missed pad at the finish. If there was no swimmer in an unfinished lane, turn that lane off and press store/print. If a timing problem occurs, a window appears on the display screen as indicated on page 4-2 which indicates the problem lane(s). The lane(s) in question have parentheses around the backup time. Press the Use lnX Backup softkey, or press edit/DQ to edit the time in a highlighted lane. Enter the lane number and select the correct time from the softkey, menu or enter a stopwatch time with the numeric keypad. Refer to Setups to select the kinds of timing discrepancies the Swimming software is to check. Next Heat Advances the Heat counter by one (1). Function Operation Next Event Function Operation Press this key and the heat number advances by one (1). Advances Event counter by one (1). When operating the Swimming software with a programmed event sequence, the race description corresponding to the new event number is automatically displayed. It also sets the Heat number to 1. Press this key and the event number displayed on the screen advances by one (1). When using a programmed event sequence, the race distance and type are advanced by 1 and displayed on the screen. If you are not using a programmed event sequence, be sure to set the correct race distance before starting the next race. 4-5 Edit Event/Heat Function Operation Edit/DQ Function Operation This key allows you to edit the currently displayed event and heat numbers. Press this key, type the desired event number with the numeric keypad and press enter. Then type the desired heat number and press enter. Allows you to edit times or disqualify swimmers, or disqualified/requalify swimmers from the most recent race. To edit times, press this key and then press the Edit Time softkey. Type the lane number you want to edit and press enter. Type the correct time and press enter. Press Quit to close the Edit/DQ window. The Swimming software calculates any changes in finish order based on the new time. To disqualify a swimmer from the most recent stored race, press edit/DQ and then press the DQ softkey. Type the lane number to DQ using the numeric keypad and press enter to disqualify the swimmer in that lane. Repeat the procedure to un-DQ a disqualified swimmer. +Touch This key allows you to add a pad touch when the swimmer in a given lane missed a touch. Function Operation Note: -Touch Function Operation To add a pad touch to a selected lane, press this key, type the lane number using the numeric keypad and press enter. The display is immediately updated to indicate the added touch A race cannot be finished from the keyboard. Therefore, this key is invalid on the finish lap. This key allows you to subtract a pad touch from the total in a given lane. Used when an invalid pad touch is recorded. For example, when a swimmer on the pool deck steps on the lip of a touchpad, triggering an invalid touch. To remove a pad touch from a selected lane, press this key, type the lane number using the numeric keypad and press enter. The display screen is immediately updates to reflect the removed touch. HINT: This function can also be done with the Split Arm key for each lane. 4-6 Events Function Operation Reset Function Operation These keys allow you to enter the race distance. Use the numbered keys in this category to set the race distance, either in yards or meters as you have defined in Setups. Press the key corresponding to the distance desired. The race distance displayed changes to match the new distance and the race status display is updated. Press More Events to display more event lengths on the softkey menu then press the softkey next to the desired race distance. Press the Other Events softkey to set a distance other than those specified on the key pad or the softkeys under More Events. You will be asked to type in the distance using the numeric keypad and then press enter. This key clears the Swimming display and prepares it for the start of the next race. It performs a store/print for you if it has not already occurred. The reset key is composed of two keys placed side-by-side. Both keys must be pressed simultaneously to reset the Swimming race display. Pressing these keys indicates that the race is over. The time is cleared for the top of the screen and the timer is ready for the start of the next race. As a safety measure if you press reset during a race you will told that the race is still going on and be asked if you really want to reset the timer. Whenever you press reset, the race is over even if a swimmer has not finished. The race is stored showing results only for the lanes that were finished before reset was pressed. 4-7 Numeric Keypad Function Operation Enter Function Operation C/E Function Operation This key allows you to enter numbers in response to a variety of prompts. The numeric keypad is located on the right of the keyboard insert on the System 6 lower keyboard. There are many instances during the operation of the Swimming software when it is necessary to enter numbers. Whenever a numeric entry is required, use the keypad to make the desired entry. This key enters the numeric or other keyboard entry into the Swimming software. After a keyboard entry, press enter to accept the entry. This key is exactly the same as the enter key on the upper console. This key allows you to clear an existing entry or clear an entry made in error. Press c/e to clear all data from a prompt line on the screen. 4-8 Console Keys The console keys are located to the right of the LCD screen. The unlabeled keys are also referred to as softkeys, and are described in the next subsection. The labeled ones are described below. Enter Function Operation Quit Function Operation Battery Check Function Operation Help Function Operation This key enters a numeric or other keyboard entry into the Swimming software. After typing information on the keyboard or numeric keypad, press enter to accept the data. This key functions exactly the same as the enter key on the numeric keypad. This key allows you to leave a function without saving data entered or to exit the current prompt when enter does not do so. Press this key to exit a prompt after information has been entered. This key also allows you to cancel an operation that requires an entry without changing the current settings. No information is entered if you press quit before pressing enter. This key DOES NOT function at this time, it should displays the estimated operating time of the battery in your System 6 when it is operational. Pressing this this key to DO NOTHING. In the future it will graphically display the expected remaining battery life at present power consumption. A low reading on this gauge indicates that the battery should be charged as soon as feasible, this is done by leaving the System 6 plugged in and turned off. It takes approximately 3 hours to fully charge the lithium ion battery. Your Swimming software includes context-sensitive help information which is available at any time. Press this key to display useful information on the screen. The help text covers the currently active operation. Use help as a reminder for using a Swimming feature, and not as a replacement for this manual. The information available in help is not intended to replace the manual. 4-9 Softkeys Summary This section describes the operation of the Swimming softkeys. The softkeys are the column of six unlabeled keys immediately to the right of the display screen. The function of each key changes depending on the option selected. The screen displays the function currently available directly to the left of each softkey. If no label appears next to the softkey, that key is inactive. In this manual, softkey names appear capitalized and in Bold-Italic type. See Figure 4-B for an example of the main softkey menu. Figure 4-B Main Softkey Menu Operation Each softkey's function is organized in layers or levels. The first level consists of the six softkeys displayed when you first load Swimming software. When you press one of these softkeys, a second level providing more specific choices is displayed. In general, pressing a second level softkey executes an action or prompts you for entry of data. If you press a softkey by mistake, or want to return to race timing mode when done using a softkey, press quit. Pressing quit exits without saving that entry. Print Summary Operation The Print softkey allows you to print additional printouts from the last stored race organized in a variety of ways. Each item is printed in the order in which you press the softkeys. Make sure your printer is on-line and loaded with paper before beginning. Print samples appear later in this chapter. After pressing store/print, press the Print softkey to access the print menus. The softkeys that make up the first print menu are shown in Figure 4-C. You may press any combination of keys available. Printing begins immediately. 4-10 Figure 4-C Print Softkey Menu 1 By Lane Function By Place Function Race Summary Function Prints a copy of race results sorted by lane. Prints a copy of race results sorted by place. Prints a copy of results sorted by both lane and by place. Splits/Summary Function Relay Summary Function More Function Operation Prints the splits (either cumulative, subtracted or both depending on your choices in SETUPS for SPLITS. Prints a summary of the relay exchanges. Toggles between the two Print softkey menus. Press this softkey to display the other Print softkey menu. The second Print softkey menu is shown in Figure 4-D. Figure 4-D Print Softkey Menu 2 4-11 W/Names By Lane Function W/Names By Place Function Sponsor’s Message Function Form Feed Function Operation Display Summary Operation Prints a copy of race results sorted by lane with a line for you to write in the swimmers' names. Prints a copy of race results sorted by place with a line for you to write in the swimmers' names. Prints the Sponsor's Message on the race printout. Refer to Setups for instructions on entering a sponsor's message. Advances the paper to the top of the next page. Provides page breaks between pages of race information. Press this softkey at the point in the print sequence where you want to end a page. Any information printed after a form feed begins at the top of the next page. The Display softkey provides access to features that are displayed on the Swimming display screen. Press this softkey to display race information on-screen including the last split or finish time for each active lane, the place or last length completed, backup times, the backup buttons pressed and early relay exchanges. Figure 4-E Display Softkey Menu Time Of Day Function Operation Display Lanes Function Operation Software Version Function Displays the time, day and date from the System 6's internal clock. Press this softkey to display the time, day and date. Refer to Setups section later in this chapter for instructions on setting the time, day and date. Re-displays current race information on-screen if it had been removed by Time of Day or Software Version . Press this softkey to display current race information on-screen. Displays the software and firmware versions of Swimming 6 that are currently loaded on your System 6. 4-12 Scoreboard Summary Operation Step Data Function Display lanes Function Operation This softkey provides access to special scoreboard control and display features for single and multi-line fixed-digit scoreboards. Press this softkey to display the Scoreboard softkey menu. Sequences again through the results of the last race. This key is active only if you are using a single-line scoreboard. Currently it works only if all lanes are finished and Reset has NOT been pressed. Allows you to display results from two lanes on one scoreboard line. For example, if you have a 12-lane pool, this allows you to display all race results on a 6-line scoreboard. This softkey is visible ONLY when you have selected option 4 in the Scoreboard Setups menu. At the end of the race, your scoreboard automatically displays the results for the first half of the lanes. To display the second half, press the Scoreboard softkey and then the Display 7-12 softkey. To enable this option, you must first set the number of lanes in your pool and the number of lanes used in the Pool Setups menu. Then, in the Scoreboard Setups menu, select option 4 to choose the number of scoreboard lines you are using. See the Setups Softkey Menu section later in this chapter for more details. Clear Lanes Function Operation Scoreboard Blank Clears the place and time area on each lane module. The next start returns the scoreboard to normal display status. Press this softkey to clear the time and place from all active lanes on multi-line scoreboards. The lane number display is not cleared. Pressing Scoreboard On or the next start returns the scoreboard to normal display status. You might do this just before the Championship Final in a large meet for aesthetic appeal. Pressed once, this softkey blanks the scoreboard and displays the time-of-day. Pressed again and this key blanks the entire scoreboard. Function Operation Scoreboard On Function Operation Scoreboard On/Blank Press this softkey to blank the scoreboard and display the time-of-day. Press again for a TOTAL BLANK of all lines of the scoreboard. To make the scoreboard look neat when you are not running a meet you should TOTAL BLANK it before turning off the System 6. This can also be accomplished by turning the power to the scoreboard on for Press the Scoreboard On softkey to return the scoreboard to normal display status. Returns the scoreboard to normal display status. Press this softkey to return the scoreboard to normal display status after pressing the Clear Lanes or Scoreboard Blank softkeys If you have selected option 4 in the Scoreboard Setups menu to use half as many scoreboard lines as you have active pool lanes, the Scoreboard On softkey changes to Scoreboard On/Blank, combining the features of these two softkeys. The second softkey on the Scoreboard softkey 4-13 menu now allows you to display race results for the alternate set of lanes. Allows entry of up to four teams' scores to display point totals on the scoreboard. Team Scores Function Operation Record Time Press the softkey labeled with the appropriate team and enter the current score. Teams available are Home, Guest 1, Guest 2 and Guest 3. You must keep track of team scores manually. Select the team whose score you wish to enter. Type the appropriate score for that team and press enter. Do the same for each team. The team scores are immediately displayed on the scoreboard. Press quit instead of enter only if you do not want to display new team scores. Allows entry of the record time for the current event. Function Figure 4-F Record Time Prompt Operation Setups Summary Setups Softkey Menu Summary Start Function Operation Press this softkey, type in the record time for the current event using the numeric keypad as shown in Figure 4-F, and press enter. The time entered is displayed on the Record Time scoreboard module (0B). Press quit to exit without displaying a new record time. The Setups softkey provides access to features that allow you to customize the Swimming software. With the exception of Time/Date and Event Sequence, setup changes are made permanent only if you press the Save Setups softkey after making changes. Otherwise, setup changes apply to the current session only and are lost when you exit the Swimming program. Notice the race information displayed in condensed form at the bottom of the display screen. Pressing Setups does not interfere with race timing, but as a general rule, setup changes should only be made when the Swimming software is in reset state. Press quit to leave Setups. Three softkeys are active from the main Setups display screen: Up, Down and Save Setups. Press the Up or Down softkey to move the arrow pointer to the desired setup option. If you want setup changes to be permanent, press the Save Setups softkey to save. Use the numeric keypad to select a specific setup option. All normal events (with the exception of the 50 in a long course pool) are even length races. We ask where you will start the race so that the timer can figure out, by counting lengths, where each race will finish. This allows the System 6 to only accept finishes from the correct end. Press 1 to select where to start races with an even number of lengths. Press 2 to select where to start races with an odd number of lengths. In each case, the options are near end or far end, and pressing the number associated with each toggles between the options. 4-14 Finish/Buttons Function This feature allows you to configure finish parameters to match your hardware setup. The Swimming system uses either touchpads or buttons for primary finish. The times produced by touchpad finish are extremely accurate. Alternatively, each lane can have up to three finish buttons. If three buttons are used, the finish time is the median of the three. If two buttons are used, the finish time is the average of the two. Button finish times are less accurate because of human reaction time. Refer to the discussion of Timing Corrections earlier in this chapter for more information on human reaction time. If touchpads are the primary finish system, up to three buttons per lane can be used to provide backup finish times. Operation Option 1 allows you to select the primary finish method for the near end of the pool. Option 2 allows you set the far end. If you have a Pad finish the timer will always look for buttons as a backup, and if you have a Button finish there is no other timer option for backup. These are toggle functions and will switch back and forth between the available choices. Note: Any setup changes you make are stored in permanent memory only if you press the Save Setups softkey. If you do not press Save Setups, setup changes are lost when you turn off your System 6. Hardware Setup Allows you to configure your System 6 internal speaker volume, screen backlight intensity, whether or not to allow Setup information to be downloaded from a PC, and relay judging method and details. Generally, the speaker volume should be set to an audible level. Function It is very important that you set the proper relay judging method. Electrically the buttons and Relay Judging Platform (RJP) are very different. Operation Press 1 to set the System 6 internal speaker volume. In the prompt box, type 0 to turn the speaker off, 1 for low volume, 2 for medium volume or 3 for highest volume and press enter. Press 2 to select the System 6 screen backlight intensity. In the prompt box, type a number between 1 and 9, with 1 being the lowest intensity. Press 3 to enable the Allow Remote Setup option. Pressing 3 toggles the setting between Remote Setup allowed and Remote Setup NOT allowed. When allowed, this option lets you to edit some setup information on a PC using meet management software and then upload that information to your System 6 through com port 1. This is especially useful for setting up event sequences. Options 4 and 5 allow you to select relay judging using either Buttons or Platforms at the near and far ends of the pool. Both options toggle between buttons and platforms; option 4 sets the near end, and option 5 sets the far end. Option 6 allows you to set the relay judging interval during which the System 6 will consider a relay exchange legitimate. This is the window of time between the incoming swimmer’s touch and the next swimmer’s departure. Press 6, press C/E, type the relay judging interval with the numeric keypad, and press enter. Type a leading zero to get a decimal point. A good window is .75 seconds for most meets; you might want to go to 1 second for young swimmers. 4-15 Option 7 allows you to turn on Fae End Splits if you have touch pads at the far end of the pool. Splits Function Operation Timing Controls split printing format. Subtractive splits produce the time it took to swim the last lap only. Cumulative splits print the total running time of the race to that point. Press 1 to print cumulative splits; press 2 to print subtractive splits. You can select both options. These are both toggle buttons. Controls variable timing functions. Function Operation Timing Precision: Press 1 to toggle between 1.0, 0.1, 0.01, and 0.001 second timing precision. The timing precision option selects the number of decimal places to which times are accurate. Almost ALL ruling bodies for Swimming specify .01 as the timing accuracy for electronic timing. Automatic Backup Time Adjustment: When turn ON this will do the calculations, as specified by USA Swimming, the NCAA and the High School Federation, to the backup buttons to produce the official backup time. Press 2 to choose whether or not to use automatic backup time adjustment. Pad Split Delay Time: Options 3 and 4 allow you to set the pad split delay time. Press C/E, use the numeric keypad to type the delay time and press enter. Pad split delay time allows you to set the length of time the touchpads are inoperative after a touch, allowing relay swimmers to get out of the pool without triggering a pad touch. The recommended delay time for both near- and far-end pads is 15 seconds. You might want to increase this for relays in a long course pool. Time Warning Messages: Press 5 to toggle between displaying and not displaying time warning messages. Pad Delay at Start: Press 6 to set pad delay at start, press C/E, type the seconds of delay time, and press enter. The pad delay at start time allows you to set the time all pads are inoperative after the start of a race. This is done so that backstroke swimmers do not trigger their pad at the start of a race. This number also controls how long start reaction time will stay on the scoreboard at the beginning of each race (Start reaction is a feature that requires Relay Judging Platforms). Length Count Display: Press 7 to toggle whether the lengths count up or down on the scoreboard, press 8 to choose the same for the screen. Note: Pool Function Any setup changes you make are stored in permanent memory only if you press the Save Setups softkey. If you do NOT press Save Setups, setup changes are lost when you exit the Swimming program and go to the Change Sport Menu. Controls the setup configuration information for your pool, including the length of the pool, the unit of measurement (yards or meters), the lanes in the pool, the lanes used for this meet, and mapping of those lanes. In most installations, the touchpad/backup button cables are set up with lane 1 closest to the timer. If, however, lane 1 is at the far end of the cable, reverse the lane order with this setup to properly configure the Swimming software. Proper timer configuration requires that you enter the pool length on 4-16 Pool (continued) Operation this setup. For example, a 100 yard race in a 25 yard pool is 4 lengths, or 2 pad touches at the near end. A 100 meter race in a 50 meter pool is 2 lengths, or one touch at the near end to finish. Press 1 to set lane mapping. In the lane mapping submenu, press 1 to use normal lane mapping, 2 to reverse the lane mapping, 3 to shift the lanes up and 4 to shift the lanes down. The display on the right side of the screen shows the way the lanes are numbered for the race compared with the actual physical pool lanes. Press 2, press C/E, type the number of lanes in the pool with the numeric keypad and press enter. Press 3, press C/E, type the number of lanes being used with the numeric keypad and press enter. Press 4, press C/E, type the pool length with the numeric keypad and press enter. Press 5 to toggle between yards and meters. Scoreboard Function Controls the parameters that affect modular fixed digit scoreboards (CTS LED and light-reflective). Option 1 Self Test checks all scoreboard digit segments by running a test pattern on the scoreboard. You can stop the test pattern display by pressing any key (other than #1 END SELF TEST). Option 3 Blank Scoreboard module feature allows you to blank unused scoreboard modules. Option 2 Define Module(s) will allow you to send one module’s data to a different modules. Scoreboard module definition is a complex operation which should not be attempted by an inexperienced operator. Carefully read the Scoreboard section in chapter 2 before attempting to redefine any scoreboard modules. In the Swimming software all scoreboard module logical addresses default to the physical addresses. For example, the physical switch setting for the scoreboard module displaying data for lane 1 is 01, so the logical address is also 01. If you want the lane 1 (01) scoreboard module to display line 10's data set its logical address in this setup to 0A. On the module definition window, as shown in Figure 4-G, the physical addresses appear on the left, the redefined logical addresses on the right. Normally you would display 6 lanes of data on 6 lines of scoreboard. Option 4 allows you to rotate many lanes of data through a limitted number of scoreboard modules. To set this option for fewer modules than you have lanes just hit the #4 on the numeric keypad. Keep hitting the #4 key untill the screen number matches the actual number of scoreboard lines that you have. If you have a 6 lane pool but only 3 lines of scoreboard, you should set this option to “3-Line Scoreboard” . This will cause the board to display data from lanes 1-3 on the board. The timer will then automatically switch the display to lanes 4-6, then back again, this will continue forever. The length of time that the data will be shown will be the number of seconds that you have defined just below in option 6. Options 5, 6 and 7 apply ONLY to single-line scoreboards. Ordinarily, a single-line scoreboard displays the race results by place at the end of the race and then displays the programmed sequence. This feature (5) allows you to set the number of times this information is displayed. (6) 4-17 The sequence time for each item. Select the time in seconds each item in the sequence is displayed. This setup also sets the minimum time that each result is displayed as the swimmers finish. (7) Allows you to create a Sequence list which define exactly which information gets displayed on this module. Option 8 allows you to choose the way race results sent to the scoreboard are sorted, either by lane order or by place order. Option 9 lets you choose whether splits displayed on the scoreboard are cumulative or subtractive. If you choose this option running time will display on the board showing total time, splits will show as subtracted and FINAL TIME will show as the true final time. Operation Press 2 to display or change scoreboard module definitions, press the Up or Down softkey until the arrow points at the desired physical address as shown in Figure 4-G, then press 1 and type the two-digit logical address in the prompt box with the numeric keypad (and with the softkey menu if a letter is required, as in 0A). Press 2 to display module definitions on the scoreboard. Press 2 again to clear definitions on the scoreboard. Figure 4-G Scoreboard Module Definition Window Note: Scoreboard module numbers and sample displays appear in Chapter 2. Press 3 to select Blank Module(s). Press the Up or Down softkey until the arrow points at the desired module and press 1 to blank, as shown in Figure 4-H. Repeat the procedure to un-blank a blanked module. Figure 4-H Blank Scoreboard Module Window Press 4 to display the results from two lanes on one scoreboard line. The number of scoreboard lines available for this option is equal to half the number of active lanes in your pool. Set the number of active lanes in the Pool Setups menu. For example, if you have a 10-lane pool, this option allows you to display all race results on a 5-line scoreboard. At the end of a race, your scoreboard automatically displays the results for lanes 1 through 5. To display lines 6 through 10, press the Scoreboard softkey and then the Display 6-10 softkey. Press 5 to enter the number of times a single-line scoreboard is to step through the results of the last race--type the desired number and press enter. 4-18 Press 6 to display the single-line scoreboard sequence time prompt box. Type the time in seconds that each item is to be displayed on a singleline scoreboard and press enter. Press 7 to define a single-line scoreboard sequence list. Choose the item to be added to the sequence on a single-line scoreboard. Choices are: Record Event/heat Team scores Place pick Place order Team scores for several different team combinations Time of day Press the Choices Up or Choices Down softkeys until the desired item is highlighted and press INSERT to add the selection to the list. Edit the list by pressing the List Up or List Down softkeys and press DELETE to remove a selection from the list. Press quit to exit this window. Press 8 to toggle between lane and place order. Lane order, the typical sequence at U.S. pools, is to display race results on the scoreboard in lane order. That is lane 1 always appears at the top of the scoreboard. Place order, the typical sequence at European pools, is to display race results on the scoreboard in place. That is 1st place appears at the top of the scoreboard. Both Lane and Place order will display the results on the scoreboard as LANE PLACE TIME from left to right across the board. Press 9 to choose whether to display cumulative splits or subtractive splits on the scoreboard. If you choose SUBTRACTED running time will display on the board showing total time, splits will show as subtracted and FINAL TIME will show as the true final time. Note: Printer Function Any setup changes you make are stored in permanent memory only if you press the Save Setups softkey. If you do not press Save Setups, setup changes are lost when you turn off your System 6. This setup allows you to customize the sequence of information printed when you press store/print. One of the items you can print on each page of the race printout is a sponsor's message. Enter your school's name, meet name, team name or a sponsor's advertising message. One line of print is available for your sponsor's message. You can choose to have the Swimming software print race results immediately when you press store/print even if there are timing problems. You can then mark the corrections on the printout or simply print a new set of results. Refer to page 4-2 for more information on timing problems. The Swimming system can use any printer that has a standard parallel interface, can take an ASCII stream of data and print a minimum of 80 characters per line. Hit 7 and select your printer if it is listed (Citizen, HP, IBM, Okidata, Other). If we know your printers codes we will automatically load them. If you select Other then you will want to go to 4-19 option 4 and enter your printers codes (they should be found in your printer documentation). Enter the printer control codes for pica, elite, condensed and 6 or 8 lines per inch vertical spacing as listed in your printer's manual. You can then select the number of characters per inch horizontally (CPI) and lines of type per inch vertically that you want on your race printouts. Pica type prints 10 CPI, elite prints 12 CPI and condensed 16-17 CPI. It is best to use the largest type size possible for the number of lanes in use. For 6-lane pools, select pica type. For 8-lane pools, select elite type and for 10- and 12-lane pools, select condensed type. If your printout is not properly formatted, and type is wrapping from the previous line to the next line, select the next smaller type size. Operation Press 1 to define the print sequence for the store/print key. Highlight the desired print item with the Choices Up and Choices Down softkeys and press INSERT to add that item to the list. Edit the list by pressing the List Up or List Down softkeys and press DELETE to remove a selection from the list. The best way to organize the print format is to end it with a form feed so that after each printout is complete, the paper advances to the top of the next page. Some printers will hold your printout inside until it receives a form feed command or completely finishes a full page of printing. Press quit to leave this screen. Press 2 to view or enter the sponsor's message. To clear the existing message, press c/e. Create the message by highlighting the desired character with the Up, Down or Jump Forward softkey and pressing enter to select it. Press Right to move to the next space to the right. Repeat the process until the message is complete. The Jump Forward softkey jumps down 10 characters to allow you to move more quickly through the list of characters. Use the Left, Right and Delete softkeys to edit the message. Press quit to exit. Pressing 3 toggles between ALWAYS PRINT and DO NOT ALWAYS PRINT on Store/Print Key. ALWAYS PRINT will cause race results to be immediately printed when you press store/print even if there are timing problems. You can, of course, always print another set of results with the print key. Refer to page 4-2 for more information on timing problems. Press 4 to define printer control codes for your printer. Refer to your printer's manual for the specific codes required. To enter printer control codes, have your printer manual open to the page(s) that show the control codes for pica, elite and condensed print modes. Highlight the printer functions you want to define with the Choices Up or Choices Down softkeys. Using the keypad, type the ACSII value and press the INSERT softkey to add that ASCII value to the code string. Build the control list exactly as it is shown in your printer’s manual. Use the Left, Right and Delete softkeys to edit the control code sequence. Press quit when you are done. You do not need to enter any items that you will not be using. If you used a printer with the System 5, the printer control codes will be the same for the System 6. Press 5 to cycle through pica (6 lanes), elite (8 lanes), condensed (16 lanes) or super condensed type size needed on your race printouts. Press 6 to toggle between 6 and 8 lines of type per vertical inch. The 8 lines per inch option is only recommended when using condensed type. 6 lines per inch will give you up to 64 lines of print on a page while 8 lines 4-20 per inch will give you up to 84 lines of print on a page. Sample Printouts These sample printouts show some of the possible print combinations. Figure 4-I Race Results by Lane and Place Figure 4-J Splits Summary Printout Figure 4-K Relay Judging Exchanges Figure 4-L Relay Exchange Summary Figure 4-M Race History 4-21 Event Sequence Function This setup allows you to program a sequence of swimming events for different types of meets. The race gender and distance are attached to the event number so that each time you press next event the race gender, distance and name are updated. After programming, select the desired meet type to sequence events automatically. Select option 1 (None) to enter race distance manually at the start of each event. Options 2-7 already have a pre-programmed event sequence. You can use these sequences as is or reprogram your own sequences for any of these events. Options 8 and 9 are user-defined event sequences which can be programmed from scratch to fit your needs. Figure 4-N Event Sequence Window Operation To program an event sequence, press the number corresponding to the desired meet type, then press 0 to view or edit the selected sequence. The events already defined, if any, are displayed, and you can insert or delete events. You can not edit an event, you must delete and then enter a new one. The Define Event softkey menu, shown in Figure 4-O, allows you to select the event number to insert. Use the Up, Down, Page Up or Page Down keys to move the arrow to the event number you want to program, and press INSERT Event. Figure 4-O Define Event Softkey Menu Type the event distance using the keypad and press enter. Press the appropriate softkeys for Swimmer type (gender), age group, event type (stroke) and bracket (session) to build the race description, as shown in Figures 4-P and 4-Q. Each softkey category contains a menu from which you can select the desired item, as shown in Figure 4-Q. To select an item within a category, press the Up or Down softkeys until the arrow points at the desired item and press enter. (Currently, the elements on these menus cannot be edited, and therefore the Edit and Delete softkeys on these screens are not functional.) 4-22 Figure 4-P Event Type Softkey Menu Figure 4-Q Race Description Window and Softkey Menu When finished entering the race description, press enter to complete the entry. Press the Up or Down softkey to select the next event number to program and repeat the process. To delete an event, position the cursor on the desired line using the Up or Down softkey and press the Delete Event softkey. To insert a new event between events already defined, position the cursor on the event number you want to add and press the Insert Event softkey. All lines below the selected event are pushed down one position. The selected event line is blank and ready to be programmed. When done programming events, press quit. Event Sequence is automatically saved so you do not need to press Save Setups to save the changes just made. To run a meet using a programmed event sequence, press the number corresponding to the desired meet type. To operate the Swimming software without an event sequence, press 1 which selects no event sequence. Time/Date Function Operation The System 6 has an internal clock which it uses to stamp the time and date on races and meets. Check the time and date and set them using this setup as necessary. The time and date are stored in permanent memory as soon as you press enter; it is not necessary to press Save Setups to save a new time and date. This setup also allows you to select the time display format: 12-hour or 24-hour. Press 1 to set the time of day. Type the correct time in the prompt box using the numeric keypad and press enter. Follow the same procedure to set the date. Pressing 3 toggles between 12-hour and 24-hour time display format. 4-23 Stored Data Summary The Stored Data softkey provides access to race data from current and previous meets. Swimming's memory capacity is thousands of splits. When you press store/print after a race, that race is added to the top of the list of races in memory. If the capacity of memory has been reached, the oldest race in memory is automatically deleted to make room for the new race. For the purposes of Stored Data, a “meet” begins when you enter the Swimming Program. If you exit the Swimming Program (Misc then Change Sport) you will end the current meet and will start a new one when you return to the Swimming program. Pressing the Stored Data softkey displays the results of the last race saved. The race distance and stroke, race number, event and heat numbers, race date and time, race print status, lane, place, pad and backup times, calculated backup times, and RJP exchange times (if RJP’s are installed) are displayed on the screen. Softkey options Print Race Function There are three screens of softkeys in the Stored Data menu. On all three screens, Print Race and More remain constant as the bottom two selections. They are described first below, followed by all of the other options. Allows you to print the results of the race currently displayed. This selection always appears as the second to last choice, even when More is pressed to cycle through the options available on the top four softkeys. Operation Press this key to display the Print softkey menu. Press the appropriate softkeys to build a printout format. Printing begins immediately. Refer to the discussion of the Print softkey earlier in this chapter for more detailed instructions. More The additional softkey functions available on this menu appear as the top four choices. Pressing More cycles through all twelve of the choices. The additional softkey functions are explained below. Function Next Race Function Previous Race Function Next Event Displays the results of the next race number in the current meet. When the most recently stored race is displayed, pressing the softkey resets the display to the bottom of the list, displaying the oldest race in the current meet. Displays the results of the previous race number in the current meet. When the oldest race in the meet is displayed, pressing this softkey resets the display to the top of the list, displaying results from the most recently stored race. Displays the results of the next event number in the current meet. Function 4-24 Previous Event Displays the results of the previous event number in the current meet. Function Print Yes/No Function Operation False Start Function Operation Used in conjunction with the Print Meet softkey. Each race in memory is automatically set to print when you press Print Meet, but it is sometimes desirable not to print every race in a meet. For example, if a race was used to test the touchpads and then stored, it should not be printed. To prevent the results of a given race from being printed, display that race on the screen and press the Print Yes/No softkey. This softkey toggles between print status of the displayed race on and off. Allows you to label a race in memory a false start. False start races are not printed on any printout. Display the desired race on the screen and press this softkey to mark it as a false start. This softkey toggles false start on and off. This should ONLY be used on races that were called back because of a FALSE START. Many of ruling bodies for the Sport of Swimming do not charge the swimmer with a FALSE START until the race is over. In this case the race is GOOD and only the individual swimmer should be charged with the FALSE START, not the heat. Edit/DQ Function Operation Allows you to edit the results of the races stored in memory. Display the desired race on the screen and press this softkey to access the editing features. Press the Edit Time softkey and type the lane number you want to edit. Select the correct backup time from the softkey menu or press c/e and type a stopwatch time. The Swimming software calculates any changes in finish order based on the new time. To disqualify a swimmer, display the desired race on the screen and press the Edit/DQ softkey. Press the DQ softkey, type the appropriate lane number and press enter. Repeat the procedure to un-DQ a disqualified swimmer. Scoreboard Post Function Operation Allows you to post the results of the currently selected race. Press this softkey and select the desired options from the softkey menu to post the results of the currently selected race. The softkey allows you to display results by lane or by place and to display two race results on each scoreboard line if this option is enabled in Scoreboard Setups. Next Meet Function Operation Allows you to select the next meet stored in memory. Remember that a “meet” as defined here begins when you enter the Swimming Program and ends when you exit from the Swimming Program back to the Choose Sport Menu. When the most recently stored meet is displayed, pressing this softkey resets the display to the bottom of the list, displaying the oldest race in memory. 4-25 Previous Meet Function Print Meet Function Operation Meet-Mgr Report Function Allows you to select the previous meet in the sequence in memory; remember that a “meet” as defined here begins when you enter the Swimming Program and ends when you exit from the Swimming Program back to the Choose Sport Menu. When the oldest meet in memory is displayed, pressing this softkey resets the display to the top of the list, displaying results from the most recently stored meet. Prints the results of all races in the current meet beginning with the race displayed on the screen to the end of the meet. Races with a print status of no are not printed. A “meet” is defined as beginning when you enter the Swimming Program and ends when you exit from the Swimming Program back to the Choose Sport Menu. To print an entire meet, press the Next Race or Next Event softkey until the first valid race in the meet is displayed on the screen, then press the Print Meet softkey. Pressing this softkey displays the Print softkey menu. All races are printed in the format that you enter from the menu. Press the appropriate softkeys to build a printout format. Printing begins immediately. Refer to the discussion of the Print softkey earlier in this chapter for more detailed instructions. This option currently has no function. 4-26 Misc Pad Power On/Off Function Turns off power to the pads until the next start is received. Operation This feature is used to reduce connector corrosion and extend touch pad life by removing the small amount of voltage from the touch pads. We recommend that you turn the Pad Power OFF during warmups when there are lots of hits on the pads. Power is automatically turned back on whenever the timer starts. Change Sport Returns the System 6 to its main menu, allowing you to change to other sport programs that you have purchased and downloaded. From the main menu, you can also run diagnostics, install new programs or updates, or shut down the system. Function Note: To properly turn off the System 6, be sure to return to the main menu and press Shut Down. After the screen displays a gray background with an x in the center, it is safe to turn off the power to the System 6. If you have more than one sport in addition to Swimming installed on your System 6, access the additional sports by pressing the More softkey. The sports you have loaded will scroll through the top two softkey positions. Please see the description of the main menu on pages 4-1 and 4-2 for more details. Colors Function Operation Allows you to set the colors for your System 6 screen. Press the appropriate softkey to set the background color, softkey color, and warning message color. Pressing Default sets the background and the softkeys to silver, and the warning messages to red. Please note that the text will always be black, so it is wise to choose a somewhat lighter color for the background, softkeys and warning messages. 4-27 4-28 Appendix A Maintenance This appendix contains information to help you identify and quickly correct problems in your Swimming system without calling customer service or returning equipment to the factory unnecessarily. To use this appendix effectively, read the first six pages and perform any routine maintenance as necessary. If a problem persists, identify the system that is not functioning properly, for example start system, finish system, scoreboard, printer, etc. Then refer to the Troubleshooting section, find the problem you are experiencing and perform the suggested remedy and/or refer to the page reference for further instructions. Try the suggested remedies exactly as given, one at a time and in the order listed. Be sure to record the remedies tried and their results for future reference. Customer Service Caution: If the problem you are experiencing is not described in this chapter, or a problem defies solution, please call the Colorado Time Systems’ Customer Service Department toll-free in the US and Canada at (x256) 800-287-0653 or at +1 970 667-1000 from all other countries. The System 6 uses low-current CMOS components which make battery operation possible. Low current CMOS is extremely susceptible to static electricity. Therefore, do not remove the System 6 case. Refer all internal servicing to the factory. Improper servicing could seriously damage all of the sensitive components! Factory Maintenance Return the System 6 to the factory every 5 to 7 years for the following calibration and testing: 1) The accuracy of the timing circuitry can vary with age. The System 6 contains a high-quality crystal oscillator that is guaranteed to be accurate for five years. After five years of service, the oscillator could drift out of tolerance. To ensure accurate race timing, your System 6 should be tested at the factory every five years. 2) The battery mounted on the main circuit board that powers the System 6’s continuous memory has a manufacturer-specified life span of 10 years. To ensure the integrity of stored data, the battery should be replaced every 5 to 7 years. Replacement of this battery must be performed at the factory. 3) The rear-panel connectors need to be inspected for corrosion and damage and replaced if necessary. A-1 Routine Maintenance Connectors Inspect the cable connectors on the System 6 back panel every time you plug the cable harness(es) into the connector(s). Clean as necessary. To clean cable connectors, put two or three drops of alcohol on a cotton swab (this is NOT the standard cotton swab for your ear but a cleaning cotton swab, which you can get at almost any electrical supply store, such as Radio Shack) and insert the swab into the connector. Pull the swab straight out. Move the swab to the next section of the connector and repeat. Do not slide the cotton swab along the inside of the connector. Damage to the contacts could result. Rinse the connectors with a damp cotton swab, and then dry with a dry swab using the same motion. Never use steel wool to clean these connectors! See Figure A-2 Figure A-2 Clean Data Connectors as Shown LCD Window Case Keyboard Inserts Cables Cleaning The LCD window is made of non-glare, scratch resistant plastic. Clean regularly with any good cleaner made for clear plastic and a soft cloth. Do not use any cleaning products that contain ammonia. Do not under any circumstances wipe the LCD window with a dry cloth. The System 6 case is made of high-impact plastic. Use any neutral detergent to clean the case. Do not use alcohol, thinner or other solvents. These products can change the color or otherwise damage the case. The keyboard insert cover and upper overlay should be cleaned with a mild detergent and water solution and wiped dry with a soft cloth as needed. Install the keyboard insert carefully. Guide it into the keyboard pocket, keeping it as straight as possible. Inspect all cable and in-deck connectors for corrosion before use. All connectors must be corrosion-free if your timing system is to operate properly. To clean cable or in-deck connectors you need Lime-A-Way, silicone grease and cotton swabs. Follow the instructions below and refer to Figure A-3 for reference. 1) Pour a few drops of Lime-A-Way into the cable or deck plate jacks and let it sit for several minutes to dissolve corrosion. 2) Insert a cotton swab into the jack and use a plunging motion to clean the jack. If the jack is not free of corrosion, repeat steps 1) and 2) as necessary. A-2 Figure A-3 Clean Cable Connectors as shown 3) Rinse the jack with a damp cloth swab and dry it with a dry swab. 4) Apply a small amount of silicone grease to a clean cotton swab and insert into the jack. Touchpads and Buttons Make sure all connectors fit snugly into the cable harness. Connectors with broken prongs do not fit properly. Refer to Figure 4-A. Check connector prongs for corrosion and clean or replace connectors as necessary. Refer to the Touchpad maintenance section in this chapter for detailed care instructions. Proper appearance of connector prongs Broken connector prongs Flattened connector prongs Figure A-4 Inspect Touchpad and Button Connectors Start Systems Scoreboard Printer Make sure all connectors fit snugly into the cable. Connector prongs that are broken fit loosely. Refer to Figure A-4. Check connector prongs for corrosion and clean or replace connectors as necessary. Refer to your Start System user’s manual for detail on it’s proper maintanance. Inspect the scoreboard data cable connectors for corrosion and broken or frayed wires. Clean or replace as necessary. Consult your scoreboard manual for any maintenance needed. Inspect the printer cable connectors for corrosion and broken or bent pins. Clean or replace as necessary. Consult your printer manual for instructions on caring for your printer. A-3 Troubleshooting Theory Of Operation The Swimming system is made up of three component systems: input, output and the System 6. All three systems must be working properly to make a functioning Swimming system. The input system includes a start system, relay judging, input computer and a finish system. The start system provides input data to the System 6 which tells the Swimming software to begin timing a race. The relay judging input provides relay exchange information. The input computer can be used to download meet management information to the System 6. The finish system (touchpads, backup buttons) provides input data to the System 6 which tells the Swimming software to record a given split or finish time. The System 6 Sports Timer with Swimming software is the heart of the system. It receives and interprets input data and provides output to a variety of output devices. The output system receives interpreted data from the System 6/Swimming software and provides these data in visual format. The basic output system consists of a printer to provide a hard copy of race results and a scoreboard to display the results to spectators. A more advanced output system also includes a computer running Meet Management software and a video output. A-4 Trouble Shooting Chart System 6 Swimming Software Find the problem you are experiencing on the left and follow the remedy instructions and notes to the right. Try the suggested remedies exactly as given, one at a time and in the order listed. Be sure to record the remedies tried and their results for future reference. Problem Remedy No display at all when power is turned on. 1) Check power adapter cable and wall outlet. A Swimming feature does not function as expected. Refer to Chapter 4 for a complete explanation of the feature in question. Swimming race timer does not start. 1) Make sure start system cable is properly and securely attached. Notes If it still seems wrong, call CTS Customer Service. Refer to Chapter 2 or your start system manual for instructions. 2) Clean connectors. Refer to page A-2 3) Check cabling. Refer to pages A-2 - A-3 4) Check start system. Refer to page A-8 or start system manual. Swimming software does not regis- 1) The timer must be ready for a pad Refer to Chapter 4 for complete instructer pad or finish button/backup but- hit. Ensure that the pad armed indi- tions. ton. cator is displayed in the appropriate lane(s). 2) Confirm that lane mapping is set properly for the lane(s). Refer to Chapter 4, Setups Menu, Pool setups 3) Make sure touchpad and button cables are properly and securely connected. Refer to Chapter 2. 4) Clean connectors. Refer to pages A-2 5) Check cabling. Refer to pages A-2 - A-3 6) Check touchpad(s) or button(s). Refer to page A-9 Trouble Shooting Chart Input System Problem This section addresses input system problems only. Try the suggested remedies exactly as given, one at a time and in the order listed. Be sure to record the remedies tried and their results for future reference. Remedy Start system does not start race timer. 1) Make sure start system cable is properly and securely attached. Notes Refer to Chapter 2 or start system manual for instructions. 2) Clean connectors. Refer to pages A-2 3) Check cabling. Refer to pages A-2 - A-3 4) Check start system. Refer to page A-8 or start system manual. Finish system pad or finish 1) Swimming software must be ready Refer to Chapter 4 for a complete button/backup button hits are not regis- for a pad hit. Ensure that the pad arm explanation. tered on the Swimming display screen. indicator is displayed in the appropriate lane(s). Early and late relay departures are not indicated on chatter splits printout. 2) Make sure touchpad and button cables are properly and securely connected. Refer to Chapter 2 for cabling instructions. 3) Clean connectors. Refer to pages A-2 4) Check cabling. Refer to pages A-2 - A-3 5) Check touchpad(s) or button(s). Refer to page A-9 1) Ensure that the RJP interface cable Refer to Chapter 2 or RJP manual for cabling instructions. is connected to the RJP and to the Button A connector on the touchpad cable harness. Button A backup times not indicated on 1) Ensure that backup buttons are con- Refer to Chapter 2 or RJP manual display screen or printed on race print- nected to the combination banana plug for cabling instructions. out. on the cable harness end of the RJP cable. No Relay Judging Exchange or Summary printout. 1) Ensure that the desired printout options are listed in the print format setup. Refer to Chapter 4 under Setups for complete instructions. A-6 Trouble Shooting Chart Output System Problem Printer does not print. Scoreboard not working at all. This section addresses output system problems only. Try the suggested remedies exactly as given, one at a time and in the order listed. Record the remedies tried and their results for future reference. Remedy Notes 1) Make sure printer is set On-Line and is loaded with paper. 2) Make sure cable connections are secure. Refer to Chapter 2. 3) Clean printer cable connectors. Refer to pages A-2 1) Make sure scoreboard has power and is turned on. Refer to scoreboard manual. 2) Make sure scoreboard is not blanked. Refer to the Scoreboard softkey and scoreboard Setups sections in Chapter 4. 3) Make sure scoreboard cable is properly connected. Refer to Chapter 2. 4) Check scoreboard cable connectors for corrosion and clean or replace as necessary. Scoreboard not showing expected results. 1) Make sure scoreboard cable is properly connected. Refer to scoreboard manual. 2) Check scoreboard cable connectors for corrosion and clean or replace as necessary. Event Sequence Download does not work. 3) Ensure that scoreboard DIP switches for each module are set to the proper physical address. Refer to Chapter 2 and/or scoreboard manual for complete instructions. 4) Check logical addresses in the Swimming software. Refer to Setups in Chapter 4 or call Colorado Time Systems’ Customer Service Department. 1) Make sure Allow Remote Setup Refer to page 4-15 in this User Guide. is enabled in Setups | Hardware Setup. 2) Exit Setups--you cannot download an event sequence if Swimming 6 is in Setup mode. 3) Make sure meet management cable is connected to Com Port 1 on your System 6 back panel. Refer to pages 2-4 - 2-6 in this User Guide. 4) Refer to your meet management program manuals. A-7 References Start System Electronic Start Systems An electronic system sounds a start blast for the swimmers over a speaker and starts the Swimming race timer. There are four possible problem areas: 1) The start system does not start the timer. The start blast and the PA both function. This problem is usually the result of a faulty cable connection. Plug a working pushbutton into the touchpad and button A cable harness connector labeled start and press the button. If the Swimming race timer does not start, refer to the Wiring section beginning on page A-10. If the timer does start, check the cable that goes to the start system. The cable plugs should fit tightly into the jacks and should be free of corrosion. Clean or replace as necessary and repeat process. If the cable and plugs are okay, plug the start system cable into the touchpad and button A cable harness and jumper the connector that normally plugs into the start system with a paper clip. If the Swimming race timer starts, the start system is defective and should be returned for service. 2) No start blast but the PA works. This is usually a problem with the microphone. Plug a working pushbutton into the button start jack on the start system and press the button. If the start blast sounds, the microphone is defective and it should be returned for service. If no start blast sounds, the control board inside the start system is defective and it must be returned for service. 3) No start blast or PA but the Swimming race timer starts properly. This is usually a bad speaker or speaker cable harness. Plug the speaker directly into the speaker output to eliminate the cable. If you do not use a speaker cable, use an ohm meter to check the speaker. If it does not register 8 ohms, the speaker is defective. 4) No start blast, PA or start timer. This usually indicates a low battery, blown fuse or a bad control board. the battery can be checked with a volt meter, the fuse can be checked with an ohmmeter. If the battery and fuse are okay, return the start system to the factory for repair. RJP Judging Platforms Your RJP platforms are very durable and are designed to last without requiring routine maintenance. The only maintenance procedure that may be necessary is cleaning the cable connector on each RJP with Lime-A-Way and a cotton swab if corrosion builds up, as described earlier in this appendix. For Troubleshooting information, refer to your RJP Installation and Operation manual, P/N F507. To obtain a replacement manual, call Colorado Time Systems’ Customer Service Department. A-8 Finish System There are two types of finish systems: touchpads and pushbuttons. Both are simply momentary switches. Touchpads are large switches that are mounted on the pool wall while pushbuttons are used by judges standing next to the pool. Both types use a cable to connect to the Swimming race timer. When either a touchpad or pushbutton switch closes, a split or finish time is recorded by the Swimming race timer. If a split or finish time is not recorded, the finish system has failed. There are three potential problems areas in a finish system: the touchpad or button, the in-deck cable or wiring harness, and finally, the System 6 itself. Start by checking the pad or button and then the cable. Check the System 6 as a last resort. Touchpads and Buttons These items can be checked easily with the touchpad button/tester (Model TPM-D) or ohm meter. Follow these steps: 1) Inspect the plugs for damage and corrosion. Clean or replace as necessary. 2) Plug the pad or button into the tester or attach one ohmmeter test lead to each connector pin on the pad or button cable. 3) Without touching the pad, the tester reads 0 to 20 or infinite resistance on an ohmmeter if the pad is good. Defective pads read 40 to 50 or show measurable resistance on an ohmmeter. Touchpads that read between 20 and 40 on the touchpad tester or show measurable resistance on an ohmmeter should not be trusted. We recommend that they be sent in for evaluation and possible replacement. Defective buttons can generally be repaired at the factory. 4) Touch the pad. If the pad is working properly, the tester reads full scale or an ohmmeter reads less than 100 ohms. Be sure the battery in your touchpad or ohmmeter is properly charged. A weak battery yields inaccurate readings. Touchpad Pressure A touchpad is essentially a switch in a waterproof container. To prevent the pad from floating, most of the air is removed at the factory. Three general rules for touchpad inflation apply: 1) Touchpads should not be over inflated because they will float away from the edge of the pool. A punctured touchpad allows air to enter during storage and must be returned to the factory for service. 2) Touchpads should not be under inflated. A properly inflated pad has a slight air bubble inside the pad at the water line. 3) Pad inflation should need to be adjusted only very rarely. A-9 Wiring Systems Cable Harness Colorado Time Systems use two types of wiring systems: cable harness and in-deck wiring. Refer to the appropriate section below for your type of wiring system. The cable harness is simply a multi-conductor cable that runs across the pool deck. The most common problems with cables are corroded connectors. Cleaning solves most problems. Refer to the connector cleaning instructions earlier in this chapter. If suspected cable problems persist after cleaning the connectors, use a voltmeter to test the cable. Plug the suspect cable into the System 6 as described in chapter 2 and turn on your System 6. Insert the voltmeter test leads into each touchpad and button position on the cable, taking care to observe the polarity of each connector. The voltmeter should read 5 volts. Note that if the low pad voltage setup option is selected, the voltmeter will read 3 volts. If all cable connectors are okay, the touchpad or button is defective. Refer to the Finish System section for more information. In-Deck Cables Printers Check an in-deck wiring system using the same procedure as outlined above for cable harnesses. Most in-deck wiring system problems are found at the wall plate connectors. Inspect the connectors and clean or replace as necessary. There are two basic types of printers. One is a DOS type and takes an ASCII stream of data and prints it. The other is a WINDOWS type of printer and needs a program loaded on your computer called a DEVICE DRIVER” in order to print. Many printers can do both. The ones you CANNOT USE are those that have no brains in them and rely on your computer to do all of the formatting for them. Because these printers have no processor in them they tend to be less expensive models. Any printer that says it needs the Windows environment probably will NOT work. Most, but not all, HP printers should work. They will take HP's PCL (Printer Command Language) codes. HP has a low cost Apollo P-2200 injet printer which works great. Most of the DOT MATRIX printers will work, including OKIDATA 320 and Citizen GSX190. These printer will have a print ribbon, like an old type writer, and little pins will poke the ribbon to leave an ink mark on the paper. This printer will be able to run 3 part carbonless paper. A good laser printer is the Brother HL1440. Once you have a printer that will work with the System 6 you will need to load special codes into the timer in order to print non-standard print sizes. Most printers will print 10 characters per inch (10CPI) across the page as default (this is a good size print if you have a 6 lane pool). If you wish to print a smaller size (12CPI) for an 8 lane pool you will need to set the size on the printer or have print codes that the timer can send to the printer requesting the smaller size print. These print codes are loaded in the SETUPS area under PRINTER. A-10 Appendix B Glossary Introduction This Glossary contains definitions of specialized terms used in this instruction manual. Terms are arranged alphabetically. Channel Hardware Keypad Keys Liquid Crystal Display (LCD) The hexadecimal code used in the Swimming software to direct information to a specific scoreboard destination or the hexadecimal code used in the scoreboard which tells a given scoreboard module what information to display. The physical address is determined by the switch settings in each scoreboard line. Often used interchangeably for both logical address and physical address. Channel is a less precise term which must be taken in the context used to determine if it refers to the logical address, physical address, or both. The physical equipment used to process information, as opposed to the software or programs, that perform specific tasks. The System 6 Sports Timer is a hardware device that can run many different software programs. Swimming is a software program. The keys on the membrane keyboard of the System 6. A solid-state, low-current device used for computer displays when space and power consumption are at a premium. In this case, the System 6 Sports Timer display screen. Logical Address The hexadecimal code used in the Swimming software to direct information to a specific scoreboard destination. A logical address can be directed to any physical address except 0F, which is reserved for single-line scoreboards. Meet For Swimming, a “Meet” begins when you enter the Swimming Program on the System 6 Sports Timer, and ends when when you exit from the Swimming Program back to the Choose Sport Menu. Meets are stored in this way in Stored Data. Physical Address The hexadecimal code used in the scoreboard which tells a given scoreboard module what information to display. The physical address is determined by DIP switch settings in each scoreboard line. Prompt Box Appears on the Swimming display screen when the entry of information is required. Race Reset State For the Swimming software, a race begins when a start is received and continues until the next start is received. When store/print or reset is pressed, the race timing is completed, but the race just completed is still considered the current race. Reset state indicates that all swimmers have finished and that the current race is over. When you press reset, the Swimming software remains in reset state until the next start. The Swimming software is in reset start when you first load it. B-1 Scoreboard Module A scoreboard line set up to display specific information with DIP (Dual Inline Pin) switches mounted in the module. This term is often used interchangeably with physical address. Signage The labels placed on the scoreboard that indicate what type of information a given digit or series of digits displays. Softkeys Keys whose function changes with what is displayed on the screen. On the System 6, the six keys located to the right of the screen. Software A computer program designed to perform specific tasks. Swimming is an example of software. Also known as program or software program. Toggle Like a light switch, a software toggle turns a given function on if it is presently off, or off if it is presently on. B-2 Appendix C System 6 Specifications Environmental Temperature: 0°C - 50°C Humidity: 90% (non-condensing) Altitude: 0 to 3000 m Electrical DC Supply: 15 VDC @ 2.4A Battery: Lithium ion, rechargeable Operating Time: 45 - 60 minutes of normal use Input and Output Connections Primary/Backup/Near End / Far End: Input - 5V @3.5mA COM Ports 1 and 2: Input/Output - RS-232, ±12V Judges I/O Port: Input/Output - RS-232, ±12V, 12 VDC @ 0.5A Parallel Printer Port: SCBD Port: Output - RS-232, ±12V External Power: Input - 15 VDC @ 2.4A Installation/Maintenance This product is intended to be used in an indoor or outdoor swimming pool environment. When the timer is operated in the US it must be used in accordance with the National Electric Code. When the timer is operated elsewhere it must be used in accordance with all appropriate national and local electrical codes and regulations for the country of installation. Run the System 6 a safe distance from the pool where it won’t be splashed. The AC power adapter should never be used in a location where it can get wet. The System 6 AC Power adapter must be used with a grounded outlet. This equipment is intended to be connected to a circuit protected by a ground-fault circuit interrupter when used outdoors or near a pool. This product is equipped with a 3-wire grounding-type plug, a plug having a third (grounding) pin. This plug will only fit into a grounding-type power outlet. This is a safety feature. If you are unable to insert the plug into the outlet, contact a qualified electrician to replace your obsolete outlet. Do not defeat the purpose of the grounding-type plug. If the System 6 has been in a cold location, allow it to come to room temperature in a non-humid area to prevent condensation on the unit. Replacing of fuses or similar servicing shall be performed only while the unit is disconnected from the source of supply. Using the System 6 Timer in a manner not specified by Colorado Time Systems may cause the protection provided by the equipment to be impaired. Other than routine cleaning, as described in the System 6 user manual, there are no user serviceable parts on the System 6 Timer. Symbols Direct Current On (Supply) Caution (refer to accompanying documents) Off (Supply) C-1 System 6 Spezifikationen Umgebung Temperatur: 0°C - 50°C Luftfeuchtigkeit: 90% (nicht-kondensierend) Höhe: 0 bis 3000 m Elektrizität DC Verorgung: 15 VDC @ 2.4A Eingänge und Ausgänge Primär/Backup/Wendeseite: Eingang - 5V @3,5mA COM Ausgänge 1 und 2: Eingang und Ausgang - RS-232, ±12V Kampfrichter I/O Ausgäng: Eingang und Ausgang - RS-232, ±12V, 12 VDC @ 0,5A Drucker Ausgang /Computer Ausgang 3: Eingang und Ausgang - 5 VDC Anzeigetafelausgang: Ausgang - RS-232, ±12V Extern: Eingang - 15 VDC @ 2.4A Installation/Wartung Dieses Produkt ist für die Benutzung in Swimming Pools für innen und außen bestimmt. Die Installation des System 5 Zeitmeßgerätes muß nach den landesüblichen Vorschriften erfolgen. Das AC Stromversorgungskabel sollte geschütst und während des Betriebes nicht zugänglich sein. Wenn das System 6 Zeitmeßgerät nicht so installiert wird wie von CTS spezifiziert, kann die Funktion beeinträchtigt werden. Es gibt keine weiteren notwendigen Service-Wartungsarbeiten für den System 6 Timer als die routinemäßigen Reinigungsarbeiten wie es im System 6 Handbuch beschrieben wird. Symbols Gleichspannung Ein (Spannung) Achtung (siehe beiliegende Dokumentation) Aus (Spannung) Doppelt isoliert C-2 Appendix D History of Swim Timing Congratulations on the purchase of your new System 6 Sports Timer! You have chosen the latest sports timer from Colorado Time Systems, the company that pioneered precision and accuracy in swim timing. A legacy of excellence is behind your new timer. In the early 1970s, Colorado Time Systems offered the first practical display timing and scoreboard system to the American marketplace. It featured easy-to-read final time displays plus the first “split time” display available on a swim timer. Our Printing Timer system, which incorporated a built-in paper strip printer, appeared a few years later. The Printing Timer provided an affordable, instantly printed split and final times at the end of each heat. It also included three buttons per lane backup timing with automatic comparison of touchpad and backup times. An optional standby battery system provided protection against loss of data in the event of an electrical power failure. In the early 1980s, Colorado Time Systems introduced the third generation timing system which revolutionized the industry with innovative features -- the Swimming III timing system. New features included race memory to store previous race results, thereby speeding meet operation, a relay judging system and the use of a membrane keyboard with overlays to replace obsolete button keyboards. The Swimming III timer quickly and easily converted to other aquatic sports simply by loading a different program cassette and changing the keyboard overlay. The Swimming III timer earned recognition as the performance standard of the industry from 1981 through 1989. In the late 1980s, Colorado Time Systems introduced the next generation sports timer. The System 4000 included the industry’s first fullsized printer and meet management computer. A full range of sports timing programs were available on programmable cards. Installing a new program became as simple as inserting a new card into the slot on the System 4000 rear panel. The System 4000 set the pace in the sports timing industry in its time. The System 5 Sports Timer continued Colorado Time Systems’ tradition of using advanced technology to provide beneficial new features. A large LCD screen with contrast control enabled the operator to see at a glance the entire race situation, including the status of each lane. The ease of operation built into the System 4000 was further advanced in the System 5. Most keyboard operations required only a single keystroke. The System 5 also incorporated output for meet management software and expanded race memory with enough space to store the entire meet’s results--all important innovations in swim timing. Meet efficiency benefitted since a race could be started as soon as the previous race was completed. All race information could be printed in many different formats at the operator’s convenience with an economical, full sized 81/2 by 11 inch line printer. D-1 The System 5 Sports Timer incorporated a self-diagnostic system to check the timer’s internal circuitry and components. The diagnostics program also ran circuitry checks on the cable harness, touchpads, pushbuttons and scoreboard cable when these items are properly connected. New programs for other sports were provided on diskette and downloaded from a personal computer to the System 5’s internal memory. Once downloaded, the new programs remained in the System 5, ready to be used at a single keystroke. New programs and program updates were easily incorporated using this innovative system. This full range of features built into the System 5 Sports Timer meant that it was the industry leader ever since it came out. With the advent of the System 6, users can take advantage of these existing features and the addition of a larger and full color screen, external mouse and PC keyboard, support for 12-lane pools, additional input and output capabilities, automatic updating of firmware and software, automatic calculation of adjusted backup times (USA Swimming, NCAA and High School rule), enhanced relay judging capabilities, enhanced handling of one line scoreboards, ability of displaying subtracted and running splits similtaniously on LED matrix boards and the possibility of continued software features. D-2 Index B Backup Buttons 2-3, 4-16 Basic Operation 4-1 - 4-3 Modes of Operation 4-1 - 4-3 Relay Judging 4-3 Timing Corrections 4-2 User Interface 4-2 Warning Messages 4-2 Batteries 1-1, A-1 Battery Check Key 4-9 Battery Compartment 1-1, A-1 Blank Scbd 4-13 Button Finish 2-2 - 2-3, 4-15 C C/E (Clear Entry) Key 4-8 Cables Cleaning A-2 Clear Lanes 4-13 Console Keys 4-9 Battery Check 4-9 Enter 4-9 Help 4-9 Quit 4-9 Customer Service 1-2, 4-1, A-1 D Display Softkey 4-12 Display Lanes 4-12 Software Version 4-12 Time of Day 4-12 Downloading Sports Programs 4-1, 4-27 E Edit Event/Heat Key 4-6 Edit/DQ Key 4-6 Enter Key 4-8 Event Sequence 4-1 - 4-4, 4-5, 4-22 - 4-26 Events Keys 4-7 F False Start 4-25 Finish Arm Key 3-3, 4-4 Finish Systems Backup Buttons 2-1, 4-15 Button Finish 2-2 - 2-3, 4-15 Touchpads 2-2, 4-15 H Hardware Setup Diagrams 2-1 - 2-4 Finish Systems 2-2 - 2-4 Start Systems 2-1, 4-15 Help Key 4-9 I I/O Panel 1-1, 2-4 - 2-6 Internal Speaker Volume 4-15 K Keyboard 1-2, 4-4 - 4-8 C/E (Clear/Entry) 4-8 Edit Event/Heat 4-6 Edit/DQ 4-6 Enter 4-8 Events 4-7 Finish Arms 3-3, 4-4 Lane On/Off 4-4 -Touch 4-6 Next Event 4-5 Next Heat 4-5 +Touch 4-6 Reset 4-7 Split Arm 3-3, 4-4 Start 3-2, 4-5 Store/Print 3-4, 4-5 L Lane On/Off Key 4-4 Lane Order 4-18 Lanes in Pool 4-17 LCD Display 1-1, 4-2, A-2, B-1 Length of Pool 4-17 - 4-16 Length Warning 3-4, 4-2 Logical Address 4-17, 4-18, A-7, B-1, B-2 M Meet Management Software 2-6, 4-17, 4-24 -Touch Key 4-6 Misc Softkey 4-24 - 4-27 Pad Power 4-24 Modes of Operation 1-1, 4-2 - 4-3 N Next Event Key 4-5 Next Heat Key 4-5 Numeric Keypad 4-8 C/E (Clear Entry) Key 4-8 Enter Key 4-8 P Pad Warning 4-2 Physical Address 4-17, 4-18, A-7, B-1, B-2 +Touch Key 4-6 Print Softkey 4-10 - 4-12 INDi Print Softkey cont. By Lane 4-11 By Place 4-11 Form Feed 4-12 Race Summary 4-11 Relay Summary 4-11 Splits/Summary 4-11 Sponsor’s Message 4-12 Top of Form 4-12 W/Names by Lane 4-12 W/Names by Place 4-12 Printing Backup Times 4-16 On Store/Print 4-7, 4-19 Sample Printouts 4-21 Setup Options 4-14 - 4-20 Split Times 4-11 Sponsor’s Message 4-12 Stored Data 4-24 - 4-26 Troubleshooting A-10 Type Size 4-19 - 4-20 Q Quit Key 4-9 R Record Time 4-14 Reducing Corrosion A-3 Relay Judging 4-3, 4-15 Sample Printouts 4-21 Remote Setup 4-15 Reset Key 3-2, 4-5 Reset State B-1 S Scbd Blank 4-13 Scbd On 4-13 Scoreboard Configuration Blank Module(s) 4-17 Channel 2-8, C-1 Define Modules 4-17 - 4-18 Logical Address B-1 Module B-2 Multi-Line Scbd 2-7 - 2-9 One-Line Sequence 4-17 - 4-19 Physical Address B-1 Self-Test 4-17 Show Module Definitions 2-8, 4-17 Single-Line Scbd 2-7, 4-17 Single-Line Sequence 4-17 - 4-19 Software Setup 4-14 Scoreboard Module B-2 Scoreboard Softkeys 4-13 - 4-14 Clear Lanes 4-13 Display Alternate Lanes 4-13 Record Time 4-14 Scbd Blank 4-13 Scbd On 4-13 Scoreboard On/Blank 4-13 Step Data 4-13 Team Scores 4-14 Self-Test 4-1 - 4-2 Setup Allow Remote Setup 4-15 Setups Softkey 4-14 - 4-23 Event Sequence 4-22 - 4-23 Finish/Buttons 4-15 Hardware Setup 4-15 Pool 4-16 - 4-17 Printer 4-19 - 4-21 Scoreboard 4-17 - 4-19 Splits 4-16 Start 4-14 Summary 4-14 Time/Date 4-23 Timing 4-16 Softkeys 1-2, 4-10 - 4-27 Display 4-12 Misc 4-27 Print 4-10 - 4-12 Scoreboard 4-13 - 4-14 Setups 4-14 - 4-23 Stored Data 4-24 - 4-26 Split Arm Key 3-3, 4-4 Sponsor’s Message 4-12 Sports Menu 3-1, 4-1 Start Key 3-2, 4-5 Start Systems Hardware Setup 2-1 Software Setup 4-14 Starting Swimming 4-1 Step Data 4-13 Store/Print Key 3-4, 4-5, 4-19 - 4-20 Stored Data Softkey 4-24 Edit/DQ 4-25 False Start 4-25 Meet Mgr Report 4-26 Next Event 4-24 Next Meet 4-25 Next Race 4-24 Previous Event 4-25 Previous Meet 4-26 Previous Race 4-24 Print Meet 4-26 Print Race 4-24 Print Yes/No 4-25 Scoreboard Post 4-25 System Setup Diagram 2-1 - 2-4 Finish Systems 2-2 - 2-3 Start Systems 2-1, 2-4 System Test 2-9 T Team Scores 4-14 Time/Date 4-23 Timing Corrections 4-2 - 4-3 Timing Problems 4-7, 4-16 Timing Problems Screen 4-2 - 4-3 INDii T cont. Touchpad Split Delay 4-16 Touchpads 2-2 U User Interface 4-2 LCD Display 1-1, 4-2, A-2, B-1 W Warning Messages Pad 4-2 INDiii INDiv