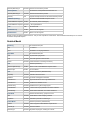
1
1. .bookmarks . . . . . . . . . . . . . . . . . . . . . . . . . . . . . . . . . . . . . . . . . . . . . . . . . . . . . . . . . . . . . . . . . . . . . . . . . . . . . . . . . . . . . . . . . . . . . . . .
2. 1 Introduction . . . . . . . . . . . . . . . . . . . . . . . . . . . . . . . . . . . . . . . . . . . . . . . . . . . . . . . . . . . . . . . . . . . . . . . . . . . . . . . . . . . . . . . . . . . . . . .
2.1 1.1 Document Overview . . . . . . . . . . . . . . . . . . . . . . . . . . . . . . . . . . . . . . . . . . . . . . . . . . . . . . . . . . . . . . . . . . . . . . . . . . . . . . . . . .
2.2 1.2 System Overview . . . . . . . . . . . . . . . . . . . . . . . . . . . . . . . . . . . . . . . . . . . . . . . . . . . . . . . . . . . . . . . . . . . . . . . . . . . . . . . . . . . .
2.3 1.3 Documentation License . . . . . . . . . . . . . . . . . . . . . . . . . . . . . . . . . . . . . . . . . . . . . . . . . . . . . . . . . . . . . . . . . . . . . . . . . . . . . . . .
2.4 1.4 Source License . . . . . . . . . . . . . . . . . . . . . . . . . . . . . . . . . . . . . . . . . . . . . . . . . . . . . . . . . . . . . . . . . . . . . . . . . . . . . . . . . . . . . .
3. 2 Building . . . . . . . . . . . . . . . . . . . . . . . . . . . . . . . . . . . . . . . . . . . . . . . . . . . . . . . . . . . . . . . . . . . . . . . . . . . . . . . . . . . . . . . . . . . . . . . . . .
3.1 2.1 Language . . . . . . . . . . . . . . . . . . . . . . . . . . . . . . . . . . . . . . . . . . . . . . . . . . . . . . . . . . . . . . . . . . . . . . . . . . . . . . . . . . . . . . . . . .
3.2 2.2 Dependencies . . . . . . . . . . . . . . . . . . . . . . . . . . . . . . . . . . . . . . . . . . . . . . . . . . . . . . . . . . . . . . . . . . . . . . . . . . . . . . . . . . . . . . .
3.2.1 1 Java Install . . . . . . . . . . . . . . . . . . . . . . . . . . . . . . . . . . . . . . . . . . . . . . . . . . . . . . . . . . . . . . . . . . . . . . . . . . . . . . . . . . . . . .
3.2.1.1 Manual ImageIO Installation . . . . . . . . . . . . . . . . . . . . . . . . . . . . . . . . . . . . . . . . . . . . . . . . . . . . . . . . . . . . . . . . . . . . .
3.2.1.2 Manual JAI Installation . . . . . . . . . . . . . . . . . . . . . . . . . . . . . . . . . . . . . . . . . . . . . . . . . . . . . . . . . . . . . . . . . . . . . . . . . .
3.2.2 2 Maven Install . . . . . . . . . . . . . . . . . . . . . . . . . . . . . . . . . . . . . . . . . . . . . . . . . . . . . . . . . . . . . . . . . . . . . . . . . . . . . . . . . . . .
3.2.3 3 Subversion Optional Install . . . . . . . . . . . . . . . . . . . . . . . . . . . . . . . . . . . . . . . . . . . . . . . . . . . . . . . . . . . . . . . . . . . . . . . . . .
3.2.3.1 SVN Eclipse . . . . . . . . . . . . . . . . . . . . . . . . . . . . . . . . . . . . . . . . . . . . . . . . . . . . . . . . . . . . . . . . . . . . . . . . . . . . . . . . . .
3.2.3.2 SVN Linux . . . . . . . . . . . . . . . . . . . . . . . . . . . . . . . . . . . . . . . . . . . . . . . . . . . . . . . . . . . . . . . . . . . . . . . . . . . . . . . . . . .
3.2.3.3 SVN Netbeans . . . . . . . . . . . . . . . . . . . . . . . . . . . . . . . . . . . . . . . . . . . . . . . . . . . . . . . . . . . . . . . . . . . . . . . . . . . . . . . .
3.2.3.4 SVN Tortoise . . . . . . . . . . . . . . . . . . . . . . . . . . . . . . . . . . . . . . . . . . . . . . . . . . . . . . . . . . . . . . . . . . . . . . . . . . . . . . . . .
3.2.3.5 SVN Windows . . . . . . . . . . . . . . . . . . . . . . . . . . . . . . . . . . . . . . . . . . . . . . . . . . . . . . . . . . . . . . . . . . . . . . . . . . . . . . . .
3.2.4 4 Oracle Optional Dependency . . . . . . . . . . . . . . . . . . . . . . . . . . . . . . . . . . . . . . . . . . . . . . . . . . . . . . . . . . . . . . . . . . . . . . . .
3.2.5 5 Sphinx . . . . . . . . . . . . . . . . . . . . . . . . . . . . . . . . . . . . . . . . . . . . . . . . . . . . . . . . . . . . . . . . . . . . . . . . . . . . . . . . . . . . . . . . .
3.3 2.3 Source Code . . . . . . . . . . . . . . . . . . . . . . . . . . . . . . . . . . . . . . . . . . . . . . . . . . . . . . . . . . . . . . . . . . . . . . . . . . . . . . . . . . . . . . . .
3.4 2.4 Using Subversion . . . . . . . . . . . . . . . . . . . . . . . . . . . . . . . . . . . . . . . . . . . . . . . . . . . . . . . . . . . . . . . . . . . . . . . . . . . . . . . . . . . .
3.5 2.5 Using Maven . . . . . . . . . . . . . . . . . . . . . . . . . . . . . . . . . . . . . . . . . . . . . . . . . . . . . . . . . . . . . . . . . . . . . . . . . . . . . . . . . . . . . . . .
3.5.1 2.5.1 Build All Modules . . . . . . . . . . . . . . . . . . . . . . . . . . . . . . . . . . . . . . . . . . . . . . . . . . . . . . . . . . . . . . . . . . . . . . . . . . . . . .
3.5.2 2.5.2 Maven Local Settings and Repository . . . . . . . . . . . . . . . . . . . . . . . . . . . . . . . . . . . . . . . . . . . . . . . . . . . . . . . . . . . . . .
3.5.3 2.5.3 Building an individual module . . . . . . . . . . . . . . . . . . . . . . . . . . . . . . . . . . . . . . . . . . . . . . . . . . . . . . . . . . . . . . . . . . . . .
3.5.4 2.5.4 Doing things other than building . . . . . . . . . . . . . . . . . . . . . . . . . . . . . . . . . . . . . . . . . . . . . . . . . . . . . . . . . . . . . . . . . . .
3.5.5 2.5.5 Project Object Model (POM) Files . . . . . . . . . . . . . . . . . . . . . . . . . . . . . . . . . . . . . . . . . . . . . . . . . . . . . . . . . . . . . . . . .
3.5.6 2.5.6 Remote Repository and Files . . . . . . . . . . . . . . . . . . . . . . . . . . . . . . . . . . . . . . . . . . . . . . . . . . . . . . . . . . . . . . . . . . . . .
3.5.7 2.5.7 Testing with Maven . . . . . . . . . . . . . . . . . . . . . . . . . . . . . . . . . . . . . . . . . . . . . . . . . . . . . . . . . . . . . . . . . . . . . . . . . . . .
3.5.8 2.5.8 Maven Eclipse Plugin Goals . . . . . . . . . . . . . . . . . . . . . . . . . . . . . . . . . . . . . . . . . . . . . . . . . . . . . . . . . . . . . . . . . . . . . .
3.5.9 2.5.9 Working with Others . . . . . . . . . . . . . . . . . . . . . . . . . . . . . . . . . . . . . . . . . . . . . . . . . . . . . . . . . . . . . . . . . . . . . . . . . . . .
3.6 2.6 Generating Javadoc . . . . . . . . . . . . . . . . . . . . . . . . . . . . . . . . . . . . . . . . . . . . . . . . . . . . . . . . . . . . . . . . . . . . . . . . . . . . . . . . . .
3.7 2.7 Generating Maven reports . . . . . . . . . . . . . . . . . . . . . . . . . . . . . . . . . . . . . . . . . . . . . . . . . . . . . . . . . . . . . . . . . . . . . . . . . . . . .
4. 3 Communication . . . . . . . . . . . . . . . . . . . . . . . . . . . . . . . . . . . . . . . . . . . . . . . . . . . . . . . . . . . . . . . . . . . . . . . . . . . . . . . . . . . . . . . . . . . .
4.1 3.1 Internet Relay Chat . . . . . . . . . . . . . . . . . . . . . . . . . . . . . . . . . . . . . . . . . . . . . . . . . . . . . . . . . . . . . . . . . . . . . . . . . . . . . . . . . . .
4.2 3.2 Email . . . . . . . . . . . . . . . . . . . . . . . . . . . . . . . . . . . . . . . . . . . . . . . . . . . . . . . . . . . . . . . . . . . . . . . . . . . . . . . . . . . . . . . . . . . . . .
4.3 3.3 Issue Tracker . . . . . . . . . . . . . . . . . . . . . . . . . . . . . . . . . . . . . . . . . . . . . . . . . . . . . . . . . . . . . . . . . . . . . . . . . . . . . . . . . . . . . . .
4.3.1 How to Create a new Issue . . . . . . . . . . . . . . . . . . . . . . . . . . . . . . . . . . . . . . . . . . . . . . . . . . . . . . . . . . . . . . . . . . . . . . . . . . .
4.4 3.4 Websites . . . . . . . . . . . . . . . . . . . . . . . . . . . . . . . . . . . . . . . . . . . . . . . . . . . . . . . . . . . . . . . . . . . . . . . . . . . . . . . . . . . . . . . . . . .
5. 4 Roles and Responsibilities . . . . . . . . . . . . . . . . . . . . . . . . . . . . . . . . . . . . . . . . . . . . . . . . . . . . . . . . . . . . . . . . . . . . . . . . . . . . . . . . . . .
5.1 1 Contributors . . . . . . . . . . . . . . . . . . . . . . . . . . . . . . . . . . . . . . . . . . . . . . . . . . . . . . . . . . . . . . . . . . . . . . . . . . . . . . . . . . . . . . . . . .
5.2 2 Committers . . . . . . . . . . . . . . . . . . . . . . . . . . . . . . . . . . . . . . . . . . . . . . . . . . . . . . . . . . . . . . . . . . . . . . . . . . . . . . . . . . . . . . . . . . .
5.3 3 Module Maintainers . . . . . . . . . . . . . . . . . . . . . . . . . . . . . . . . . . . . . . . . . . . . . . . . . . . . . . . . . . . . . . . . . . . . . . . . . . . . . . . . . . . .
5.4 4 Project Management Committee . . . . . . . . . . . . . . . . . . . . . . . . . . . . . . . . . . . . . . . . . . . . . . . . . . . . . . . . . . . . . . . . . . . . . . . . . .
6. 5 Project Conventions . . . . . . . . . . . . . . . . . . . . . . . . . . . . . . . . . . . . . . . . . . . . . . . . . . . . . . . . . . . . . . . . . . . . . . . . . . . . . . . . . . . . . . . .
6.1 5.1 Coding Guidelines . . . . . . . . . . . . . . . . . . . . . . . . . . . . . . . . . . . . . . . . . . . . . . . . . . . . . . . . . . . . . . . . . . . . . . . . . . . . . . . . . . . .
6.1.1 5.1.1 Coding Conventions . . . . . . . . . . . . . . . . . . . . . . . . . . . . . . . . . . . . . . . . . . . . . . . . . . . . . . . . . . . . . . . . . . . . . . . . . . . .
6.1.2 5.1.2 Do not return null . . . . . . . . . . . . . . . . . . . . . . . . . . . . . . . . . . . . . . . . . . . . . . . . . . . . . . . . . . . . . . . . . . . . . . . . . . . . . .
6.1.3 5.1.3 Logging . . . . . . . . . . . . . . . . . . . . . . . . . . . . . . . . . . . . . . . . . . . . . . . . . . . . . . . . . . . . . . . . . . . . . . . . . . . . . . . . . . . . . .
6.1.4 5.1.4 Exception handling . . . . . . . . . . . . . . . . . . . . . . . . . . . . . . . . . . . . . . . . . . . . . . . . . . . . . . . . . . . . . . . . . . . . . . . . . . . . .
6.1.5 5.1.5 Avoid assumptions . . . . . . . . . . . . . . . . . . . . . . . . . . . . . . . . . . . . . . . . . . . . . . . . . . . . . . . . . . . . . . . . . . . . . . . . . . . . .
6.1.6 5.1.6 Converting URLs to Files . . . . . . . . . . . . . . . . . . . . . . . . . . . . . . . . . . . . . . . . . . . . . . . . . . . . . . . . . . . . . . . . . . . . . . . .
6.1.7 5.1.7 Use of Assertions, IllegalArgumentException and NPE . . . . . . . . . . . . . . . . . . . . . . . . . . . . . . . . . . . . . . . . . . . . . . . . .
6.2 5.2 Naming Conventions . . . . . . . . . . . . . . . . . . . . . . . . . . . . . . . . . . . . . . . . . . . . . . . . . . . . . . . . . . . . . . . . . . . . . . . . . . . . . . . . . .
6.3 5.3 Module Directory Structure . . . . . . . . . . . . . . . . . . . . . . . . . . . . . . . . . . . . . . . . . . . . . . . . . . . . . . . . . . . . . . . . . . . . . . . . . . . . .
6.4 5. 5 Refactoring . . . . . . . . . . . . . . . . . . . . . . . . . . . . . . . . . . . . . . . . . . . . . . . . . . . . . . . . . . . . . . . . . . . . . . . . . . . . . . . . . . . . . . . . .
6.5 5. 6 Code Profiling . . . . . . . . . . . . . . . . . . . . . . . . . . . . . . . . . . . . . . . . . . . . . . . . . . . . . . . . . . . . . . . . . . . . . . . . . . . . . . . . . . . . . . .
6.6 5. 7 Testing . . . . . . . . . . . . . . . . . . . . . . . . . . . . . . . . . . . . . . . . . . . . . . . . . . . . . . . . . . . . . . . . . . . . . . . . . . . . . . . . . . . . . . . . . . . .
6.6.1 Online Test Fixtures . . . . . . . . . . . . . . . . . . . . . . . . . . . . . . . . . . . . . . . . . . . . . . . . . . . . . . . . . . . . . . . . . . . . . . . . . . . . . . . .
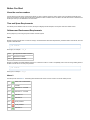
6.7 5. 8 Test Data . . . . . . . . . . . . . . . . . . . . . . . . . . . . . . . . . . . . . . . . . . . . . . . . . . . . . . . . . . . . . . . . . . . . . . . . . . . . . . . . . . . . . . . . . .
6.8 5. 9 Versioning . . . . . . . . . . . . . . . . . . . . . . . . . . . . . . . . . . . . . . . . . . . . . . . . . . . . . . . . . . . . . . . . . . . . . . . . . . . . . . . . . . . . . . . . .
7. 6 Documentation . . . . . . . . . . . . . . . . . . . . . . . . . . . . . . . . . . . . . . . . . . . . . . . . . . . . . . . . . . . . . . . . . . . . . . . . . . . . . . . . . . . . . . . . . . . .
7.1 01 User Guide Welcome . . . . . . . . . . . . . . . . . . . . . . . . . . . . . . . . . . . . . . . . . . . . . . . . . . . . . . . . . . . . . . . . . . . . . . . . . . . . . . . . . .
7.2 02 User Guide . . . . . . . . . . . . . . . . . . . . . . . . . . . . . . . . . . . . . . . . . . . . . . . . . . . . . . . . . . . . . . . . . . . . . . . . . . . . . . . . . . . . . . . . . .
7.3 05 Confluence Tips and Tricks . . . . . . . . . . . . . . . . . . . . . . . . . . . . . . . . . . . . . . . . . . . . . . . . . . . . . . . . . . . . . . . . . . . . . . . . . . . . .
7.4 06 GeoTools 2.0 Documentation . . . . . . . . . . . . . . . . . . . . . . . . . . . . . . . . . . . . . . . . . . . . . . . . . . . . . . . . . . . . . . . . . . . . . . . . . . .
8. 7 Project Procedures . . . . . . . . . . . . . . . . . . . . . . . . . . . . . . . . . . . . . . . . . . . . . . . . . . . . . . . . . . . . . . . . . . . . . . . . . . . . . . . . . . . . . . . . .
8.1 Building the Website . . . . . . . . . . . . . . . . . . . . . . . . . . . . . . . . . . . . . . . . . . . . . . . . . . . . . . . . . . . . . . . . . . . . . . . . . . . . . . . . . . . . .
8.2 Continuous Integration . . . . . . . . . . . . . . . . . . . . . . . . . . . . . . . . . . . . . . . . . . . . . . . . . . . . . . . . . . . . . . . . . . . . . . . . . . . . . . . . . . .
8.3 Creating your own Module . . . . . . . . . . . . . . . . . . . . . . . . . . . . . . . . . . . . . . . . . . . . . . . . . . . . . . . . . . . . . . . . . . . . . . . . . . . . . . . .
8.4 GeoTools change proposal . . . . . . . . . . . . . . . . . . . . . . . . . . . . . . . . . . . . . . . . . . . . . . . . . . . . . . . . . . . . . . . . . . . . . . . . . . . . . . . .
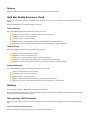
8.5 Gold Star Quality Assurance Check . . . . . . . . . . . . . . . . . . . . . . . . . . . . . . . . . . . . . . . . . . . . . . . . . . . . . . . . . . . . . . . . . . . . . . . . .
8.6 Hacking . . . . . . . . . . . . . . . . . . . . . . . . . . . . . . . . . . . . . . . . . . . . . . . . . . . . . . . . . . . . . . . . . . . . . . . . . . . . . . . . . . . . . . . . . . . . . . .
3
3
3
3
3
3
4
4
5
6
8
10
12
14
15
15
16
16
16
16
17
18
20
23
23
27
28
28
29
31
32
33
34
36
37
38
38
39
39
39
42
43
43
44
45
46
47
47
47
50
52
55
57
60
61
62
63
64
66
67
71
72
73
75
75
76
79
80
80
81
81
84
88
92
92
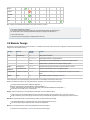
8.7 How to add a 3rd party jar . . . . . . . . . . . . . . . . . . . . . . . . . . . . . . . . . . . . . . . . . . . . . . . . . . . . . . . . . . . . . . . . . . . . . . . . . . . . . . . . .
8.8 How to cut a release . . . . . . . . . . . . . . . . . . . . . . . . . . . . . . . . . . . . . . . . . . . . . . . . . . . . . . . . . . . . . . . . . . . . . . . . . . . . . . . . . . . . .
8.8.1 Announcement . . . . . . . . . . . . . . . . . . . . . . . . . . . . . . . . . . . . . . . . . . . . . . . . . . . . . . . . . . . . . . . . . . . . . . . . . . . . . . . . . . . .
8.9 Making a major API shift . . . . . . . . . . . . . . . . . . . . . . . . . . . . . . . . . . . . . . . . . . . . . . . . . . . . . . . . . . . . . . . . . . . . . . . . . . . . . . . . . .
8.10 Supporting your module . . . . . . . . . . . . . . . . . . . . . . . . . . . . . . . . . . . . . . . . . . . . . . . . . . . . . . . . . . . . . . . . . . . . . . . . . . . . . . . . .
8.11 Working on a stable branch . . . . . . . . . . . . . . . . . . . . . . . . . . . . . . . . . . . . . . . . . . . . . . . . . . . . . . . . . . . . . . . . . . . . . . . . . . . . . .
9. 8 Design and Architecture . . . . . . . . . . . . . . . . . . . . . . . . . . . . . . . . . . . . . . . . . . . . . . . . . . . . . . . . . . . . . . . . . . . . . . . . . . . . . . . . . . . . .
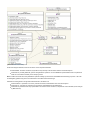
9.1 8.1 Architecture . . . . . . . . . . . . . . . . . . . . . . . . . . . . . . . . . . . . . . . . . . . . . . . . . . . . . . . . . . . . . . . . . . . . . . . . . . . . . . . . . . . . . . . . .
9.1.1 Detailed Model . . . . . . . . . . . . . . . . . . . . . . . . . . . . . . . . . . . . . . . . . . . . . . . . . . . . . . . . . . . . . . . . . . . . . . . . . . . . . . . . . . . .
9.1.2 Plugin Extension Model . . . . . . . . . . . . . . . . . . . . . . . . . . . . . . . . . . . . . . . . . . . . . . . . . . . . . . . . . . . . . . . . . . . . . . . . . . . . . .
9.2 8.2 Modular Design . . . . . . . . . . . . . . . . . . . . . . . . . . . . . . . . . . . . . . . . . . . . . . . . . . . . . . . . . . . . . . . . . . . . . . . . . . . . . . . . . . . . . .
9.2.1 Module Categories . . . . . . . . . . . . . . . . . . . . . . . . . . . . . . . . . . . . . . . . . . . . . . . . . . . . . . . . . . . . . . . . . . . . . . . . . . . . . . . . .
9.3 8.4 Data Access . . . . . . . . . . . . . . . . . . . . . . . . . . . . . . . . . . . . . . . . . . . . . . . . . . . . . . . . . . . . . . . . . . . . . . . . . . . . . . . . . . . . . . . .
9.4 8.5 Patterns . . . . . . . . . . . . . . . . . . . . . . . . . . . . . . . . . . . . . . . . . . . . . . . . . . . . . . . . . . . . . . . . . . . . . . . . . . . . . . . . . . . . . . . . . . . .
9.4.1 Abstract Factory . . . . . . . . . . . . . . . . . . . . . . . . . . . . . . . . . . . . . . . . . . . . . . . . . . . . . . . . . . . . . . . . . . . . . . . . . . . . . . . . . . .
10. 9 Tools . . . . . . . . . . . . . . . . . . . . . . . . . . . . . . . . . . . . . . . . . . . . . . . . . . . . . . . . . . . . . . . . . . . . . . . . . . . . . . . . . . . . . . . . . . . . . . . . . . .
10.1 Eclipse Developers Guide . . . . . . . . . . . . . . . . . . . . . . . . . . . . . . . . . . . . . . . . . . . . . . . . . . . . . . . . . . . . . . . . . . . . . . . . . . . . . . . .
10.1.1 Eclipse FAQ . . . . . . . . . . . . . . . . . . . . . . . . . . . . . . . . . . . . . . . . . . . . . . . . . . . . . . . . . . . . . . . . . . . . . . . . . . . . . . . . . . . . .
10.1.2 Eclipse Setup and Build . . . . . . . . . . . . . . . . . . . . . . . . . . . . . . . . . . . . . . . . . . . . . . . . . . . . . . . . . . . . . . . . . . . . . . . . . . . .
10.2 Eclipse Modeling Framework . . . . . . . . . . . . . . . . . . . . . . . . . . . . . . . . . . . . . . . . . . . . . . . . . . . . . . . . . . . . . . . . . . . . . . . . . . . . .
10.3 IDEA4 . . . . . . . . . . . . . . . . . . . . . . . . . . . . . . . . . . . . . . . . . . . . . . . . . . . . . . . . . . . . . . . . . . . . . . . . . . . . . . . . . . . . . . . . . . . . . . .
10.4 IDEA Project File Generation with Maven . . . . . . . . . . . . . . . . . . . . . . . . . . . . . . . . . . . . . . . . . . . . . . . . . . . . . . . . . . . . . . . . . . . .
10.5 ImageIO . . . . . . . . . . . . . . . . . . . . . . . . . . . . . . . . . . . . . . . . . . . . . . . . . . . . . . . . . . . . . . . . . . . . . . . . . . . . . . . . . . . . . . . . . . . . .
10.6 Java Emitter Templates . . . . . . . . . . . . . . . . . . . . . . . . . . . . . . . . . . . . . . . . . . . . . . . . . . . . . . . . . . . . . . . . . . . . . . . . . . . . . . . . .
10.7 NetBeans developers guide . . . . . . . . . . . . . . . . . . . . . . . . . . . . . . . . . . . . . . . . . . . . . . . . . . . . . . . . . . . . . . . . . . . . . . . . . . . . . .
10.8 Omondo . . . . . . . . . . . . . . . . . . . . . . . . . . . . . . . . . . . . . . . . . . . . . . . . . . . . . . . . . . . . . . . . . . . . . . . . . . . . . . . . . . . . . . . . . . . . .
10.9 YourKit profiler . . . . . . . . . . . . . . . . . . . . . . . . . . . . . . . . . . . . . . . . . . . . . . . . . . . . . . . . . . . . . . . . . . . . . . . . . . . . . . . . . . . . . . . .
11. A Reference . . . . . . . . . . . . . . . . . . . . . . . . . . . . . . . . . . . . . . . . . . . . . . . . . . . . . . . . . . . . . . . . . . . . . . . . . . . . . . . . . . . . . . . . . . . . . . .
11.1 Version . . . . . . . . . . . . . . . . . . . . . . . . . . . . . . . . . . . . . . . . . . . . . . . . . . . . . . . . . . . . . . . . . . . . . . . . . . . . . . . . . . . . . . . . . . . . . .
11.1.1 ArcSDE . . . . . . . . . . . . . . . . . . . . . . . . . . . . . . . . . . . . . . . . . . . . . . . . . . . . . . . . . . . . . . . . . . . . . . . . . . . . . . . . . . . . . . . . .
11.1.2 DB2 . . . . . . . . . . . . . . . . . . . . . . . . . . . . . . . . . . . . . . . . . . . . . . . . . . . . . . . . . . . . . . . . . . . . . . . . . . . . . . . . . . . . . . . . . . . .
11.1.3 JAI . . . . . . . . . . . . . . . . . . . . . . . . . . . . . . . . . . . . . . . . . . . . . . . . . . . . . . . . . . . . . . . . . . . . . . . . . . . . . . . . . . . . . . . . . . . . .
11.1.4 JDK . . . . . . . . . . . . . . . . . . . . . . . . . . . . . . . . . . . . . . . . . . . . . . . . . . . . . . . . . . . . . . . . . . . . . . . . . . . . . . . . . . . . . . . . . . . .
11.1.5 JRE . . . . . . . . . . . . . . . . . . . . . . . . . . . . . . . . . . . . . . . . . . . . . . . . . . . . . . . . . . . . . . . . . . . . . . . . . . . . . . . . . . . . . . . . . . . .
11.1.6 Maven . . . . . . . . . . . . . . . . . . . . . . . . . . . . . . . . . . . . . . . . . . . . . . . . . . . . . . . . . . . . . . . . . . . . . . . . . . . . . . . . . . . . . . . . . .
11.1.7 Oracle . . . . . . . . . . . . . . . . . . . . . . . . . . . . . . . . . . . . . . . . . . . . . . . . . . . . . . . . . . . . . . . . . . . . . . . . . . . . . . . . . . . . . . . . . .
12. Home . . . . . . . . . . . . . . . . . . . . . . . . . . . . . . . . . . . . . . . . . . . . . . . . . . . . . . . . . . . . . . . . . . . . . . . . . . . . . . . . . . . . . . . . . . . . . . . . . . . .
12.1 Navigation . . . . . . . . . . . . . . . . . . . . . . . . . . . . . . . . . . . . . . . . . . . . . . . . . . . . . . . . . . . . . . . . . . . . . . . . . . . . . . . . . . . . . . . . . . . .
95
98
109
110
111
113
115
115
118
119
120
120
121
127
127
128
128
128
129
134
143
143
144
144
144
146
147
147
147
148
148
148
148
148
148
148
148
150
.bookmarks
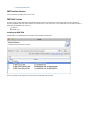
GeoTools Developers Guide Recent bookmarks in null
This page is a container for all the bookmarks in this space. Do not delete or move it or you will lose all your bookmarks.
Bookmarks in GeoTools Developers Guide | Links for GeoTools Developers Guide
The 15 most recent bookmarks in GeoTools Developers Guide
There are no bookmarks to display.
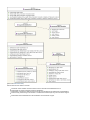
1 Introduction
1.1 Document Overview
1.2 System Overview
1.3 Documentation License
1.4 Source License
1.1 Document Overview
This document provides comprehensive java software development processes tailored for open source projects. It covers processes,
conventions, and recommended tools. The guide aims to help developers quickly get up to speed with best practices. You are not expected to
read this guide cover-to-cover. You probably should be familiar with the contents and reference the appropriate section when you need it.
Documentation aims to be concise with references elsewhere on the web for details like installation instructions.
This guide is written in a modular fashion so that different projects can easily add, delete, or modify sections. It is hoped that this guide will
become the de-facto standard software developers guide for java-based open source projects. For this guide to be useful it needs to be
continually added to and improved as tools are developed, processes improved and projects grow.
Please consider improving or adding a section if you feel it is required. Only free, cross-platform tools are recommended here. Where applicable,
widely-accepted conventions and open standards are used. It has been satisfying to discover the breadth of quality free and open source tools
which support software development. It is hoped that this document will highlight areas where tools can be improved or developed and encourage
developers to focus on these areas. This guide has been used as the basis for Generguide - A Generic Software Developer's Guide.
1.2 System Overview
Geotools is an open source, Java GIS toolkit for developing standards compliant solutions. Its modular architecture allows extra functionality to be
easily incorporated.
Geotools aims to support OpenGIS and other relevant standards as they are developed. GeoTools code is built using the latest Java tools and
environments and will continue to leverage the capabilities of future Java environments and official extensions as and when the technologies are
released and have been through the first maintenance cycle (i.e. version 1.x.1).
It is not the intention of the GeoTools 2 project to develop finished products or applications, but it is the intention to interact and support fully other
initiatives and projects which would like to use the GeoTools 2 toolkit to create such resources.
The GeoTools project is divided into separate modules, each of which implements a specific requirement. Only a subset of these modules is
usually required to build an application based on Geotools2.
1.3 Documentation License
Copyright (c) 2004 Geotools Project Management Committee (PMC). Permission is granted to copy, distribute and/or modify this document under
the terms of the GNU Free Documentation License, Version 1.1 or any later version published by the Free Software Foundation; with the Invariant
Sections being with no Invariant Sections, with the Front-Cover Texts being no Front-Cover Texts, and with the Back-Cover Texts being no
Back-Cover Texts.
1.4 Source License
GeoTools - The Open Source Java GIS Toolkit http://geotools.org
(C) 2004-2008, Open Source Geospatial Foundation (OSGeo)
This library is free software; you can redistribute it and/or modify it under the terms of the GNU Lesser General Public License as published by the
Free Software Foundation; version 2.1 of the License.
This library is distributed in the hope that it will be useful, but WITHOUT ANY WARRANTY; without even the implied warranty of
MERCHANTABILITY or FITNESS FOR A PARTICULAR PURPOSE. See the GNU Lesser General Public License for more details.
2 Building
2.1 Language — Java 1.5 extended with JAI and ImageIO
2.2 Dependencies — download and install
1 Java Install
2 Maven Install
3 Subversion Optional Install
4 Oracle Optional Dependency
5 Sphinx
2.3 Source Code — obtain the geotools source code
2.4 Using Subversion — helpful subversion tips
2.5 Using Maven — an easy-to-use build tool
2.5.1 Build All Modules
2.5.2 Maven Local Settings and Repository
2.5.3 Building an individual module
2.5.4 Doing things other than building
2.5.5 Project Object Model (POM) Files
2.5.6 Remote Repository and Files
2.5.7 Testing with Maven
2.5.8 Maven Eclipse Plugin Goals
2.5.9 Working with Others
2.6 Generating Javadoc
2.7 Generating Maven reports
2.1 Language
GeoTools is written exclusively in the Java Programming Language and is currently targeted at Java 1.5.
Approach
Current Language Policy
IDE Settings
Build / Tested / Supported
Links:
2.2 Dependencies
Approach
JDK 1.6 - while the build process will work; please set code generation to 1.5 levels and avoid the use of new Java 6 methods (as some
platforms such as mac do not have a Java 6 yet)
JDK 1.5 - this is the current target
Geotools versions 2.4.x and below are targeted for Java 1.4.
We make use of Java 1.5 extended with JAI and ImageIO - for more information please see the next section on dependencies.
Current Language Policy
Our policy is waiting for the majority of our users before migrating to a new version of the Java language. In general we are held up by the slow
migration of Java Enterprise Edition environments such as websphere.
IDE Settings
If you are developing on geotools 2.5.x or greater you must change your compile options to:
produce 5.0 compliant code
If you are developing on geotools 2.4.x or earlier you must change your compile options to:
produce 1.4 compliant code and;
to treat assert identifiers as Errors.
If you do not perform this change, the default Eclipse 3.0 and 3.1 M4 installs will trip up over the use of the assert keyword in the GeoTools
codebase.
Eclipse users may obtain more information from the Geotools Eclipse Developers Guide.
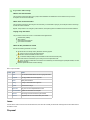
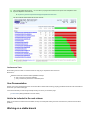
Build / Tested / Supported
GeoTools 2.5.x:
JDK
GeoTools 2.2
Java 6
Source Tested
Java 5
Source Tested
Java 1.4
GeoTools 2.3
GeoTools 2.4
n/a
n/a
n/a
n/a
2.2.3 Archive
Acrhive
Archive
GeoTools 2.5
GeoTools 2.6
Tested
Tested
Supported
Supported
n/a
n/a
GeoTools 2.5 and GeoTools 2.6 are tested on Java 6 but it is not an official target at this time
GeoTools 2.3 and GeoTools 2.4 run on Java 1.4 - you cannot compile the for Java 5 due to Java API changes
GeoTools 2.4 is the last release to work on Java 1.4
GeoTools 2.2 has been updated to Java 5 if you would like to check out the source code yourself
2.2 Dependencies
Before using or developing GeoTools, you should download and install the following:
Just the Version Numbers
ArcSDE
DB2
Instructions:
1 Java Install
2 Maven Install
3 Subversion Optional Install
4 Oracle Optional Dependency
5 Sphinx
You will need both a Java Developers Kit and a Java Runtime Environment! You will also need to extend both of these with Java Advanced
Imaging and Image IO support.
Just the Version Numbers
These dependencies often do not represent the latest available, just the Versions we have tried and tested.
Build
Download
Apache Maven Project
Build Tools
Apache build tool used for geotools
Maven 2.1.0
Java
Download
Required to Compile
Java 2 Software Developers Kit
Java 2 Standard Edition Software Developers Kit
Java(TM) 2 SDK, Standard Edition 1.5.0_12
Java Advanced Imaging API
Java extention for image processing
Java Advanced Imaging API 1.1.3
Java Image I/O
Low-level image access
JAI Image I/O Tools 1.1
Optional
Download
4 Oracle Optional Dependency
Contents
Oracle JDBC Driver
ojdbc14.jar
ArcSDE
ArcSDE classes
Included on CD
DB2
IBM DB2 JDBC Driver
db2jcc.jar
ArcSDE
The ArcSDE support requires you place the ESRI jars into your maven repository, these jars are not available for download - Sorry!
DB2
The DB2 support similarly requires jars be made available.
1 Java Install
As mentioned on the previous page we use a stable version of Java to build the GeoTools library.
Tested Java Versions
Java 2 Standard Edition Software Developers Kit (SDK)
Java 5 Target - be careful with Java 6
Why JAVA_HOME does not work on Windows
Java Extensions
Java Advanced Imaging
For More Information
Java Image IO
Optional: Classpath Install (Emergency Backup Plan)
We have to balance the needs of Java Enterprise Edition developers (who tend to use older versions of Java) against the needs of Java Desktop
developers (who often experiment with the latest and greatest).
Tested Java Versions
Java 6
Not supported for release at this time (but reported to build)
Java 5
GeoTools 2.5 and later
Java 1.4
GeoTools 2.4 and earlier
Java 2 Standard Edition Software Developers Kit (SDK)
1. Download an JDK:
Java(TM) 2 SDK, Standard Edition 1.5.0_12
2. Use the one click installer
When it asks if you want to install a JRE you can say yes
Java 5 Target - be careful with Java 6
The API has changed in a few areas so making use of Java 6 for building is a little risky (you may accidentally use a new method).
GeoTools requires a Java 1.5 SDK for versions 2.5 and above; for older versions of java please use GeoTools 2.4.
Why JAVA_HOME does not work on Windows
How to Build using Java 5 and run using Java 6 on windows
Several projects expect to make use of a JRE 6 runtime environment (simply for the speed benefit). If your computer is set up with both a JDK 1.5
for building GeoTools; and a JDK 6 for your other projects you will need to sort out how to switch between them.
One technique is to set up a batch file similar to the following:
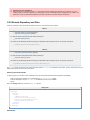
1. Hunt down the cmd.exe ( Start menu > Acessories > Command Prompt) and right click to send it to the desktop
2. Edit the desktop cmd.exe short cut and change the target to:
%SystemRoot%\system32\cmd.exe /k C:\java\java15.bat
3. Create the C:\java\java15.bat file mentioned above
set ANT_HOME=C:\java\apache-ant-1.6.5
set M2_HOME=C:\java\maven-2.0.9
set JAVA_HOME=C:\Program Files\Java\jdk1.5.0_19
set
PATH=%JAVA_HOME%\bin;%SystemRoot%\system32;%SystemRoot%;%SystemRoot%\System32\Wbem;C:\Program
Files\Subversion\bin;%M2_HOME%\bin;%ANT_HOME%\bin
Please note that the construction of the PATH above is very important; JAVA_HOME\bin must appear before SystemRoot\system32 as the
system32 contains a stub java.exe that looks up the correct version of java to run in the registry.
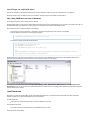
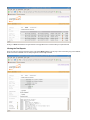
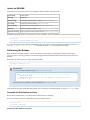
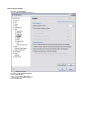
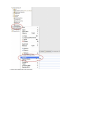
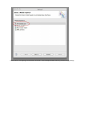
You can see in the above screen snap that the My Computer\HKEY_LOCAL_MACHINE\SOFTWARE\JavaSoft > Java Development Kit >
CurrentVersion is set to 1.6. The 1.6 entry documents the path to the version of java to run. Placing JAVA_HOME on the path before System32
shortcuts this annoying "feature".
Java Extensions
GeoTools is now able to build with just a normal Java Software Developers Kit. You should be aware that several of our raster formats are
capable of making use of native code packaged up as Java extensions.
Java Developers Kit:
Can make use of JAI and ImageIO if they have been installed into your JDK
Java Runtime Environment:
Can make use of JAI and ImageIO if you have installed them into your JRE
These extensions end up adding:
some jars into your lib folder
some dlls into your bin folder
Please follow the installation instructions carefully.
Java Advanced Imaging
Download this Version of JAI
Java Advanced Imaging API 1.1.3
1. Download JAI for your JDK by clicking on the above link
Example: jai-1_1_3-lib-windows-i586-jdk.exe
2. Use the one click installer to install JAI into your JDK
3. Download JAI for your JRE by clicking on the above link
Example: jai-1_1_3-lib-windows-i586-jre.exe
4. Use the one click installer to install JAI into your JRE
If you are working on linux you will of course need to choose the appropriate download.
For More Information
Java Media Home Page: http://java.sun.com/products/java-media/jai/index.jsp
Java Image IO
Download this Version of ImageIO
JAI Image I/O Tools 1.1
1. Download ImageIO for your JDK by clicking on the above link
Example: jai_imageio-1_1-lib-windows-i586-jdk.exe
2. Download ImageIO for your JRE by clicking on the above link
Example: jai_imageio-1_1-lib-windows-i586-jre.exe
If you are working on linux you will of course need to choose the appropriate download.
Optional: Classpath Install (Emergency Backup Plan)
Notes:
This is only needed if the windows one-click installers don't work for you (say for example you are on linux on OS X).
OS X has started including JAI and ImageIO so your luck may vary
The basic idea is to download the zip file and place the jars into your libs folder (for both your JRE and JDK).
For details please visit this page:
Manual JAI Installation
Manual ImageIO Installation
Mac OSX (10.3 Panther)
The Java SDK 1.4.2 comes with the Panther install disks and is hopefully pre-installed with your mac.
Install the Java 3D and Java Advanced Imaging Update from apple to get the JAI extension (and other goodies).
The JAI image_io extension is not yet available for mac. However, you can use the jar from the Linux/windows download to get
pure java functionality. Copy jai_imageio.jar to
/System/Library/Frameworks/JavaVM.framework/Versions/1.4.2/Home/lib/ext. According to
README-jai_imageio.html, the "JPEG and PNG reader-writer plug-ins will not be available" without the native code.
Manual ImageIO Installation
Warning
This is an optional installation step that is only required if:
You are running several JDKs
You are on a Max and the version of JAI/ImageIO included with your operating system is out of date
This should be considered under construction - please revise if needed.
JAI ImageIO Tools
Where to get it
The Java Advanced Imaging I/O Tools most complete download page can be found here.
Use only zip bundles on each platform
I suggest to use the zip version which does NOT automagically install anything on your machine. I can assure that spending 1
hour to understand what you do now will save you and us a lot of time in the future!
What we get
It is worth to point out that JAI ImageIO Tools is a Java library that can use native codec on some platforms by means of the codedcLib library,
namely Windows, Solaris and Linux (yes, there is no native acceleration on Mac at the moment, but it is planned). As a consequence the JAI
ImageIO Tools library is made by a certain number of jar files plus some additional (OPTIONAL) native libs (dlls on Windows and so on Linux); all
the jars files shipped with JAI ImageIO Tools must be installed but one could decide to not install the native libs, being aware that in some cases
performances will degrade.
Native Libraries
If use of native code is disallowed then the JPEG and PNG reader-writer plug-ins and some accelerations used for bilevel TIFF
compression will not be available nor will the native implementation of the JPEG 2000 reader-writer plug-in; the
JavaTMimplementation of the JPEG 2000 plug-in will however be available. The respective plug-ins will detect that native
libraries cannot be used and respond accordingly.
Let's briefly discuss what each single jar or lib will give us.
JAR files
jai_imageio.jar
JAR file containing core JAI Image I/O class files.
required
clibwrapper_jiio.jar
codecLib JNI interfaces.
required
Native Libs
File name
Decription
Platform
libclib_jiio.so
mediaLib JNI shared libraries, C version.
Linux
clib_jiio.dll
codecLib JNI shared libraries.
Windows
clib_jiio_sse2.dll
mediaLib JNI DLL libraries, MMX version.
Windows
mlib_jai_util.dll
A utility to detect whether MMX is available.
Windows
Where to place things
Here we want to briefly discuss where things should be placed in orderfor GeoTools to work smoothly with coverages.
JAR files
The jar files, which I remark again are required, should be placed in the classpath for your application. In my opinion the best place where to put
them is %JAVA_HOME%/jre/lib/ext where JAVA_HOME is the home of your java installation. However you might even want to bundle them in
some other ways directly inside your application. The key thing is that they MUST be in the classpath.
In case you have both JDK and JRE installed I would recommend putting all JAR files from JAI ImageIO Tools inside the /lib/ext
dir of both installations.
This is crucial to have GeoTools maven infrastructure (which relies on JRE) working properly
Native Libs
If you want to leverage on the power of native libraries support the library version that applies to your platform must be reachable throught the
PATH variable on your machine. In my opinion the best place where to put them is in %JAVA_HOME%/bin which usually is in the path on most
systems with Java installed.
Forcing Pure-Java mode
JAI ImageIO Tools can be run without its native codec without loss of functionality. This may be accomplished by setting the JVM switch
com.sun.media.imageio.disableCodecLib to true, which means starting the JVM adding the following parameters:
-Dcom.sun.media.imageio.disableCodecLib=true
Additional Information
Q: What are the binary packages on the download page for (like jai_imageio-1_1-lib-windows-i586-jdk.exe)?
A: Most platform bundles for JAI ImageIO Tools provides prebuilt, all-in-one installation packages. This installation will place the needed files
respectevely in the JRE, JDK and under Program Files/Sun Microsystems/JAI Image IO Tools, but I would not recommend this approach since it
might not fits for you and you cannot control it.
Additional detailed JRE instructions are available from the UDIG project:
Links:
Windows JRE Install
Windows Java Advanced Imaging Install
Windows Image IO Install
SUN Detailed information for installation
Manual JAI Installation
Warning
This is an optional installation step that is only required if:
You are running several JDKs
You are on a Max and the version of JAI/ImageIO included with your operating system is out of date
This should be considered under construction - please revise if needed.
Java Advanced Imaging
Where to get it
The Java Advanced Imaging most complete download page can be found here.
In this small guide I will show how to install JAI using the latest stable discribution (which at moment is 1.1.3).
What we get
It is worth to point out that JAI is a Java library that can use native acceleration through SUN MediaLib on some platforms, namely Windows,
Solaris and Linux (yes, there is no native acceleration on Mac at the moment, but it is planned). As a consequence the JAI library is made by a
certain number of jar files plus some additional (OPTIONAL) native libs (dlls on Windows and so on Linux); all the jars files shipped with JAI must
be installed but one could decide to not install the native libs, being aware that in some cases performances will degrade.
Let's briefly discuss what each single jar or lib will give us.
JAR files
jai_core.jar
JAR file containing core JAI class files.
required
jai_codec.jar
JAR file containing JAI class files for doing I/O on some image formats. It is worth to point out that this
so-called CODECS load and store images in various formats are deprecated in favour of using ImageIO
extensions.
required
mlibwrapper_jai.jar
JNI interfaces for exploiting native mediaLib.
required
Native Libs
File name
Decription
Platform
libmlib_jai.so
mediaLib JNI shared libraries, C version.
Linux
mlib_jai.dll
mediaLib JNI DLL libraries, C version.
Windows
mlib_jai_mmx.dll
mediaLib JNI DLL libraries, MMX version.
Windows
mlib_jai_util.dll
A utility to detect whether MMX is available.
Windows
What to download
If you took a quck look at page you might have noticed that for the various platforms there are various options for installations, the ones we are
interested in are as follows:
file
platform
description
Purpose
Native
Acceleration
jai-1_1_3-lib-*****-jdk.*
ALL
Installation files for the JDK. This files is usually an executable that
install the JAI version it ships in the first installed JDK. It usually
contains both jars and native libraries for the SUN mediaLib image
processing library. This installation should usually allow you to
leverage on the native acceleration.
Required
for
developing
with
GeoTools
Y
jai-1_1_3-lib-*****-jre.*
ALL
Installation files for the JRE. This files is usually an executable that
install the JAI version it ships in the first installed JRE. It usually
contains both jars and native libraries for the SUN mediaLib image
processing library. This installation should usually allow you to
leverage on the native acceleration.
Required
for
developing
with
GeoTools
Y
jai-1_1_3-lib.zip
Cross-Platform
Pure Java Installation Files. This bundle contains a pure-Java
installation of JAI without native libraries support. It is made up only
by JAR files.
Required
for
developing
with
GeoTools
N
jai-1_1_3-lib-platform.*
ALL
Installation files for the JDK. This files is usually an executable that
install the JAI in the local filesystem without any check for the JDK or
the JRE. On Windows for example they should get installed under
C:\Program Files\Sun Microsystems\Java Advanced Imaging 1.1.3.
If you want to leverage on native acceleration I suggest to download both the JDK and JRE executables or the latter executable. If you want just
to try out things and you want to really understand what is going on under the hood of JAI, please, download, the zip bundle.
What to do now
Zip bundle
This zip contains only jar files hence you need to follow instruction here below for placing JAR files.
JDK and JRE executables
In this case you downloaded two executables that should almost automagically install everything at the right place for you. Run them and follow
the instructions (crossing your fingers) this should do it.
If you are trying to install on Linux, you'll first have to copye the .bin files into the JDK directory, and then run them. Due to a Solaris dependency
the packages may fail to install reporting a checksumming failure. This is not the case, it's just that tail stopped supporting an old syntax.
To have the command run anyways, perform a "export _POSIX2_VERSION=199209" before running the binary scripts.
Standalone Executable
Where things are placed
Here we want to briefly discuss where things should be placed in order for GeoTools to work smoothly with coverages.
JAR files
The jar files, which I remark again are required, should be placed in the classpath for your application. In my opinion the best place where to put
them is %JAVA_HOME%/jre/lib/ext where JAVA_HOME is the home of your java installation. However you might even want to bundle them in
some other ways directly inside your application. The key thing is that they MUST be in the classpath.
In case you have both JDK and JRE installed I would recommend putting all JAR files from JAI inside the /lib/ext dir of both
installations.
This is crucial to have GeoTools maven infrastructure (which relies on JRE) working properly
Native Libs
If you want to leverage on the power of native libraries support the library version that applies to your platform must be reachable throught the
PATH variable on your machine. In my opinion the best place where to put them is in %JAVA_HOME%/bin which usually is in the path on most
systems with Java installed.
Getting strange warning about not loading mediaLib
In case you see a warning message like the following when running your application:
Error: Could not load mediaLib accelerator wrapper classes. Continuing in pure Java mode.
Occurs in: com.sun.media.jai.mlib.MediaLibAccessorcom.sun.media.jai.mlib.MediaLibLoadException
This means that you did not install properly the native libraries and then JAI is working in pure JAVA mode.
Forcing Pure-Java mode
JAI can be run without its native acceleration layer without loss of functionality. This may be accomplished by setting the JVM
switch com.sun.media.jai.disableMediaLib to true, which means starting the JVM adding the following parameters:
-Dcom.sun.media.jai.disableMediaLib=true
Additional Information
Q: Why is mlibwrapper_jai.jar fatal?
A: Your one-click JAI installation already copied this jar for you AND signed it. If you use one provided by jai_imageio (that is not signed)
everything will be broken. If this happens to you, uninstall & reinstall jai.
Q: What are the binary packages on the download page for (like jai-1_1_3-lib-windows-i586-jdk.exe )?
A: Most platform bundles for JAI provides prebuilt, all-in-one installation packages. This installation will place the needed files respectevely in the
JRE, JDK and under Program Files/Sun Microsystems/JAI, but I would not recommend this approach since it might not fits for you and you cannot
control it.
Additional detailed JRE instructions are available from the UDIG project:
Links:
Windows JRE Install
Windows Java Advanced Imaging Install
JAI installation guidelines
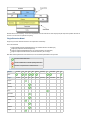
2 Maven Install
We use Maven 2 for our build environment, this page simply set's it up for you. Actual build instructions will happen later.
Download and Install Maven
Did it Work?
Do not use Apt-Get
Reference:
http://maven.apache.org/
http://maven.apache.org/start/install.html
Download and Install Maven
1. Download Maven
2. The last version we tested with was:
Maven 2.1.0
3. Here is what we know; email the list if you try a new configuration
Maven2
Build
Status
2.2.1
2.2.1
GeoTools version(s)
2.6, 2.7
rdebian-1
known problems
2.2.0
untested
2.1.0
2.5, 2.6
2.0.10
2.5, 2.6
2.0.9
2.4
2.0.8
2.4
2.0.7
known problems
2.0.6
known problems
2.0.5
2.3
2.0.5
2.2
1. Unzip the maven download to your computer: C:\java\maven-2.0.9
The use of maven-2.0.9 is now required
If you do not have an unzip program may we recommend: http://www.7-zip.org/
2. You need to have the following environmental variables set for maven to work:
JAVA_HOME
C:\j2sdk1.4.2_07\
Location of your JDK installation
M2_HOME
C:\java\maven-2.0.9
Location of your maven installation
PATH
%JAVA_HOME%\bin;%M2_HOME%\bin
Include java and maven bin directory in your PATH
(You can change all of that with Control Panel > System > Advanced > Environmental Variables)
Did it Work?
Open up a cmd window and type the following:
C:\java>mvn --version
Apache Maven 2.2.1 (r801777; 2009-08-07 05:16:01+1000)
Java version: 1.6.0_17
Java home: /System/Library/Frameworks/JavaVM.framework/Versions/1.6.0/Home
Default locale: en_US, platform encoding: MacRoman
OS name: "mac os x" version: "10.6.3" arch: "x86_64" Family: "mac"
If it spits out the version number mentioned above you are good to go.
Do not use Apt-Get
It is very tempting to use apt-get to install maven, ubuntu users I am looking at you! Please be careful of the maven provided out of the box by
unbuntu:
Apache Maven 2.2.1 (rdebian-1)
It is not actually apache maven as provided by apache; and it has a build failure with:
[INFO] -----------------------------------------------------------------------[INFO] Building Cross-modules javadoc
[INFO]
task-segment: [install]
[INFO] -----------------------------------------------------------------------[INFO] [plugin:descriptor {execution: default-descriptor}]
[WARNING] Using platform encoding (UTF-8 actually) to read mojo metadata, i.e. build is platform
dependent!
[INFO] Applying mojo extractor for language: java
[INFO] Mojo extractor for language: java found 0 mojo descriptors.
[INFO] Applying mojo extractor for language: bsh
[INFO] Mojo extractor for language: bsh found 0 mojo descriptors.
[INFO] -----------------------------------------------------------------------[ERROR] BUILD ERROR
[INFO] -----------------------------------------------------------------------[INFO] Error extracting plugin descriptor: 'No mojo definitions were found for plugin:
org.geotools.maven:javadoc.
3 Subversion Optional Install
Subversion is an advanced version management tool with the same command line syntax as CVS.
SVN offers the geotools project:
the ability to version directories and renames
the change to get off of the SourceForge CVS repository
For More Information
subversion book
Although links to various IDE interfaces will be made available, no GUI will substitute for an understanding of the underlying subversion versioning
model, and how the system is actually doing work.
Subversion Install
Here is the installation instructions for SVN Windows:
Command line access is similar to cvs. Once again, your best reference is the subversion book.
The svn tool can be downloaded from here:
http://subversion.apache.org
http://www.sliksvn.com/en/download (up to date no login required)
The use of the windows shell extension Tortoise (http://tortoisesvn.tigris.org/) is highly recommended in conjunction with the command line. IDE
integration is available for both NetBeans and Eclipse. Make sure that the client supports the installed server (current release of subversion server
is 1.5.6).
Windows Setup (SVN Command Line )
1. Download a win32 installer from here:
http://subversion.tigris.org/servlets/ProjectDocumentList?folderID=91
2. Run the installer you downloaded or unzip the archiv. For latter one please add path to bin folder to %PATH%
3.
3. Copy the config file to where subversion keeps its configuration:
Windows XP: C:\Documents and Settings\ %USERID% \Application Data\Subversion\config
Vista: C:\Users\ %USERID% \App Data\Roaming\Subversion\config
You'll need to have view system folders turned on to see "Application Data" in explorer.
Subversion should have an example config file there already.
4. (Optional) change any of your client settings in the config file
5. (Optional) change your servers file to account for any firewalls
Additional Subversion Clients
Several Subversion Clients are available:
SVN Eclipse
SVN Linux
SVN Netbeans
SVN Tortoise
SVN Windows
The above pages include installation checkout instructions.
Subversion Config
DO THIS BEFORE USING SUBVERSION
Subversion uses a config file for determining default file settings - this includes the End-of-Line style for Java files.
Please use this subversion config file
If you don't do this every java file you edit will appear to be 100% modified.
Windows
Copy the config file to: C:\Documents and Settings\ %USERID% \Application Data\Subversion\config
You will need to have view system folders turned on to see "Application Data" in explorer. You'll also need to create the
subversion folder if missing.
Linux
Copy the config file to: ~/.subversion/config
SVN Eclipse
Eclipse has plug-in support for subversion:
Subclipse: http://subclipse.tigris.org/
Subversive
To do a checkout of the GeoTools project in Eclipse open the SVN Repositories view in and create a new repository. Then use Checkout As ->
Java Project...
For More Information
Subclipse
Eclipse Developers Guide
Subclipse Checkout
SVN Linux
Linux setup for svn command line access:
1. If svn is not already installed, get it here (most distributions already have it installed.)
2. Install/compile the package
3. Copy the config file to:
~/.subversion/config
4. (Optional) change any of your client settings in the config file
SVN Command Line Checkout of Geotools
1. svn co http://svn.geotools.org/geotools/trunk
2. This will create a trunk directory with a gt subdirectory that contains the source code for this project
SVN Netbeans
A netbeans profile is available here.
To ignore the ubiquitous .svn folders:
click the filesystem node
set the "Ignored Files" property to include '.svn'
SVN Tortoise
A windows shell extension is available here and is highly recommended. Works nicely with the GEOTOOLS:svn windows as well.
ToroiseSVN Checkout of Geotools
1. Create a folder for geotools to live in
C:\java\geotools
2. Navigate to the folder, and right-click
3. Select "Checkout ..."
a. URL of Repository: http://svn.geotools.org/geotools/trunk
b. Checkout directory: C:\java\geotools
c. Revision: Head Revision
4. Press OK
SVN Windows
Command line access is similar to cvs. Once again, your best reference is the subversion book.
The svn tool can be downloaded from here:
http://subversion.apache.org
http://www.sliksvn.com/en/download (up to date no login required)
The use of the windows shell extension Tortoise (http://tortoisesvn.tigris.org/) is highly recommended in conjunction with the command line. IDE
integration is available for both NetBeans and Eclipse. Make sure that the client supports the installed server (current release of subversion server
is 1.5.6).
Windows Setup (SVN Command Line )
1. Download a win32 installer from here:
http://subversion.tigris.org/servlets/ProjectDocumentList?folderID=91
2. Run the installer you downloaded or unzip the archiv. For latter one please add path to bin folder to %PATH%
3. Copy the config file to where subversion keeps its configuration:
Windows XP: C:\Documents and Settings\ %USERID% \Application Data\Subversion\config
Vista: C:\Users\ %USERID% \App Data\Roaming\Subversion\config
You'll need to have view system folders turned on to see "Application Data" in explorer.
Subversion should have an example config file there already.
4. (Optional) change any of your client settings in the config file
5. (Optional) change your servers file to account for any firewalls
4 Oracle Optional Dependency
In order to use the Oracle module you need the proprietary JDBC driver from Oracle.
This page provides instructions for the plugins/jdbc/jdbc-oracle plugin. The old unsupported Oracle datastore can be built with
similar instructions, but you'll have to use -Doracle.jdbc in place of -Doracle when creating the Eclipse projects
As of Oracle 10.2 oracle has decided to "seal" its jar files (a security option that can be turned on in the manifest file). This
option limits access to package-protected members to classes defined in the package and in the same JAR file.
This means that the only way to create a connection is via a DataSource (and we are not there yet since we still use JDBC
Drivers).
Please download a driver from the 10.1.x series in order to avoid the above problem.
Download the Driver and place into the Repository
Unlike most external libraries used in GeoTools, we cannot redistribute this jar. However, you can obtain them from the Oracle website, free of
charge, after registering.
Oracle JDBC Driver
Once you download the jar, you should place them in the Oracle Maven repository directory.
mvn install:install-file -Dfile=ojdbc14.jar -DgroupId=com.oracle
-D artifactId=ojdbc14 -Dversion=10.2.0.3.0 -Dpackaging=jar
Switching between Oracle Profiles with oracle.jdbc property
The oracle modules are all set up to work with a pretend "mock" jdbc driver in order to compile. To actually use the real thing you are going to
need to set the oracle.jdbc property.
You will need to do this each time on the command line (as of Maven 2.0.4 there is no way to set a property in your setting.xml file that can be
used to configure other profiles):
Here is an example that builds eclipse .classpath and .project files using the real driver:
mvn eclipse:eclipse -Doracle
If the property is not set the mock jdbc driver will be used.
5 Sphinx
To build the geotools "doc" folder you will need to install the components of the sphinx documentation system.
Windows
Mac
Linux
Links:
http://docs.geoserver.org/latest/en/docguide/install.html
http://stackoverflow.com/questions/1815080/easy-install-pil-fails
Windows
Install Python:
1. Python version 2.7 has been verified to work
http://www.python.org/download/releases/2.7/
2. You will need to add it to your path. it installed into C:Python27 for me:
set 'PYTHON=C:\Python27\'
set 'PATH=%PATH%;%PYTHON%'
3. You will need Setup Tools for Python 2.7
3.
http://pypi.python.org/pypi/setuptools#downloads
4. Install and add Setup Tools to your path:
run 'set SETUPTOOLS=C:\Python27\Scripts'
run 'set PATH=%PATH%;%SETUPTOOLS%'
5. Install Sphinx:
easy-install sphinx==0.6.6
We are using Sphinc 0.6.6 in order to be compatible with rst2pdf
You can optionally install rst2pdf to build pdf documentation:
#. Install Visual Studio 2008 Express Edition. It is a free download on the Microsoft site. You need to be sure to use the 2008 edition so that
easy_install will compile something that can actually be linked to the Python executable.
1. Use easy install
easy_install rst2pdf
2. This depends on the Python Image Library (which it can probably build).
You can download a precompiled Python Image Libary (PIL) from here if you like:
http://effbot.org/downloads/#pil (download the one for python 2.7)
Mac
1. On OSX Use macports to install Python 2.7:
sudo port install python27
sudo port install python_select
sudo python_select python27
2. You can use macports to install Python Image Libraryy:
sudo port install py27-pil
3. You can now use python easy_install to install Sphinx 0.6.6:
sudo easy_install sphinx==0.6.6
4. To build the PDF targets you will also need rst2pdf.
sudo easy_install rst2pdf
If you uses easy_install to grab the python image library it easy to get compile errors.
Linux
The following instructions were written on unbuntu:
#. Install Python 2.7 using apt-get
apt
2.3 Source Code
You can obtain the geotools source code in several ways:
Download Source Code
Subversion Checkout of Source Code
Getting Subversion
How to Checkout
Geotools Repository
Download Source Code
Source code releases are made available on a monthly basis and are available on the downloads page.
http://sourceforge.net/projects/geotools/files
Source code encoding is UTF-8.
Subversion Checkout of Source Code
Geotools makes use of the Subversion revision control system. It is an advanced version management tool with the same command line syntax
as CVS.
You do not need any special permission to have read-only access to the source code. Please just check out the code and have fun.
If you are interested in getting commit permission later you can look into 4 Roles and Responsibilities...
Getting Subversion
Our 3 Subversion Optional Install contains everything you need to know - instructions for setting up svn on Windows and Lunix.
All of these instructs require the use of a specific config file.
DANGER
1. Download this config file:
config
2. Copy it to right location for your platform
Windows XP: C:\Documents and Settings\Pierrick\Application Data\Subversion\config
Windows Vista: C:\Users\Jody\AppData\Roaming\Subversion\config
Linux: ~/.subversion/config
If you do not do this binary and xml files may get messed up (subversion uses this config file to tell when to change linefeeds
between windows and linux)
How to Checkout
Source code checkout instructions:
1. Navigate to where you want the checkout with the command line
C:\java>
2. Checkout geotools using svn (a new directory "trunk" will be created):
C:\java>svn co http://svn.osgeo.org/geotools/trunk trunk
3. This will create a trunk directory that contains the source code for this project
You may also use subversion to checkout a stable version of geotools:
svn co http://svn.osgeo.org/geotools/branches/2.5.x stable
Take the time to read the subversion book before diving into subversion.
Although links to various IDE interfaces will be made available, no GUI will substitute for an understanding of the underlying subversion versioning
model, and how the system is actually doing work.
If you are interested you can also use https:
svn co https://svn.osgeo.org/geotools/trunk
Geotools Repository
The geotools svn repository holds previous versions of geotools:
http://svn.osgeo.org/geotools/trunk - this is what we are currently working on
http://svn.osgeo.org/geotools/tags - contains our official releases
http://svn.osgeo.org/geotools/branches - stable development branches; and wild experiments are located here
Within a checkout we have the following structure:
build - java projects that help with our build process
demo - example code and demos
modules/library - the core library allowing your application to be spatial
modules/extentions - extentions built on top of the library that do useful things
modules/plugins - plugins that work with the core library to support additional formats
modules/unsupported - code that is not ready yet, but you may find interesting
spike - a scratch space for ideas and experiments
2.4 Using Subversion
Subversion Repository
The GeoTools SVN repository can be found here:
http://svn.osgeo.org/geotools/
Since SVN also provides web access, all these addresses can be navigated with a web browser.
Table of contents
Subversion Repository
Table of contents
Repository Layout
Subversion Configuration
Windows
Linux
Handy SVN Commands
Ignoring Files
Ignoring Specific files
Status / Update Differences
Info
Log
Blame
Miscelaneous Notes
meta-data
Repository Layout
The repository follows the standard layout for SVN projects, i.e.
http://svn.osgeo.org/geotools/trunk/ is the main branch of development
http://svn.osgeo.org/geotools/branches/ has the branches
http://svn.osgeo.org/geotools/branches/2.4.x is the 2.4 branch
http://svn.osgeo.org/geotools/tags/ has the versions which have been tagged for release
http://svn.osgeo.org/geotools/tags/2.0.0 was the 2.0.0 release (and possibly minor bug fixes)
Developers typically setup their working directories to follow the SVN layout but do not simply checkout the whole tree since that is huge.
Typically, a developer will create a local 'geotools' directory, move into that directory, and do a checkout of GeoTools trunk by doing
svn co http://svn.osgeo.org/geotools/trunk trunk
thereby ending up with
geotools/
geotools/trunk/
the latter of which has all the files used to build GeoTools. All directories, 'trunk' and below will each have a hidden '.svn' directory which holds the
repository information.
Developers working on branches will create 'geotools', then 'geotools/branches' and change into that directory before checking out the branch of
their interest with a command like
svn co http://svn.osgeo.org/geotools/branches/2.2.x 2.2.x
thereby ending up with
geotools/
geotools/branches/
geotools/branches/2.2.x
with the '.svn' directories only appearing in '2.2.x' and below.
Subversion Configuration
DO THIS BEFORE USING SUBVERSION
Subversion uses a config file for determining default file settings - this includes the End-of-Line style for Java files.
Please use the config file.
If you don't do this every java file you edit will appear to be 100% modified.
Windows
Copy the attached config file file to: C:\Documents and Settings\ %USERID% \Application Data\Subversion\config
You will need to have view system folders turned on to see "Application Data" in explorer. You'll also need to create the
subversion folder if missing.
Linux
Copy the attached config file file to: ~/.subversion/config
The following helpful subversion tips, as so many others, are attributed to IanS and have been stolen from his email.
Handy SVN Commands
Ignoring Files
Subversion uses a config file for your local ignores. It's very handy to set this up.
Here are the vital lines from mine:
[GEOTOOLS:miscellany]
### Set global-ignores to a set of whitespace-delimited globs
### which Subversion will ignore in its 'status' output.
global-ignores = *.so *.o *.lo *.la #*# .*.rej *.rej .*~ *~ .#* .DS_Store
*.class CVS .nbattrs .nbintdb
Ignoring Specific files
You can set the "svn:ignore" property on a directory; listing a specific file to ignore:
svn propset svn:ignore target .
The above line is used to ignore the target directory for the current folder (ie . ); this is used so you don't accidentally commit all the generated
source code and classes.
This makes those status and commit routines so much cleaner. This works on a folder by folder basis - that is, sub folders do not inherit their
parents' props.
You could also ignore several things at once (one per line):
set EDITOR=notepad
svn propedit svn:ignore .
Status / Update Differences
Subversion allows you to work locally (off-line) in some cases. If you make changes, svn status applies to only the local state. svn update will
sync with the repository.
One of my favorite cvs commands was cvs -n -q update -d which says be quiet, make no changes, but tell me what you would do. Use svn
-u status instead.
Another nice feature is that you can revert any local changes offline as well using svn revert. This is especially handy if you are doing lots of
automated changes (like replacing a mucked-up author's name in a project.xml file) and you make a mistake. Instead of a lengthy remote
refresh, "clean" local copies are used.
Info
Tells you about your checkout.
svn info
Invaluable for finding those pesky urls and in terms of branches and tags, tells you where you are.
Log
Tells you info about commits/revisions.
svn log
Blame
My favorite. Annotates a document with who changed what and when.
svn blame Sample.java
Miscelaneous Notes
meta-data
Arbitrary meta-data can be stored w/ folders and files. I'm not sure if there is any potential use within geotools, but this data can be
programmatically obtained and altered from ant scripts.
2.5 Using Maven
Maven is a Java project management and project comprehension tool, or - in other words - yet another build tool. It can use Ant and a number of
other open source utilities and brings them together in an easy-to-use build tool.
2.5.1 Build All Modules
2.5.2 Maven Local Settings and Repository
2.5.3 Building an individual module
2.5.4 Doing things other than building
2.5.5 Project Object Model (POM) Files
2.5.6 Remote Repository and Files
2.5.7 Testing with Maven
2.5.8 Maven Eclipse Plugin Goals
2.5.9 Working with Others
Project Files (ie pom.xml)
The key part of maven is the use of project files, so you will find a pom.xml file in all active modules. The project file tells you the name of the
module, who maintains it, who develops it, what version it has reached and what it depends on.
Note: that as all the modules have some things in common, the module project files actually extend one which can be found in the GeoTools root
directory.
The most important part of the project file is the dependencies section as maven uses this to determine what order to build the modules in and
what support jars to download when needed (if we move over to maven exclusively we will no longer need the extbin folder).
Use of Notepad
The windows implementation of notepad messes up pom.xml byte order - causing trouble for mac developers working on our
project. Please consider using a notepad replacement such as notepad2.
Trouble looks like:
Reason: Parse error
reading POM. Reason: only whitespace content allowed before start tag
and not \ud4 (position: START_DOCUMENT seen \ud4... @1:1)
Related links
GeoTools:Using the SNAPSHOT releases
Maven 2 Wiki
2.5.1 Build All Modules
Several GeoTools modules depend on other GeoTools modules, so the first thing you will want to do is perform a full build so that you have a jar
from each module installed in your local repository.
Building With Maven
Really Building All Modules
Building Offline
Configuring the heap size
Configuring a proxy server
BUILD FAILURE!
Common Build Problems
Failure of Metadata RangeSetTest
Failure of GridCoverageRendererTest
Unable to Delete Directory on Windows
Building With Maven
1. Let's start by going to where you have the source code.
cd C:\java\geotools\trunk
2. And check that we actually have the source code
C:\java\geotools\trunk>dir
Volume in drive C is INTERNAL
Volume Serial Number is 3CA5-71DD
Directory of C:\java\geotools\trunk
26/04/2007
26/04/2007
11/01/2007
01/12/2006
04/11/2006
16/07/2006
07/04/2007
26/04/2007
22/10/2006
26/04/2007
11:12 AM
<DIR>
.
11:12 AM
<DIR>
..
12:25 AM
<DIR>
build
01:27 AM
<DIR>
demo
01:04 PM
<DIR>
doc
07:56 AM
<DIR>
licenses
10:36 AM
<DIR>
modules
11:12 AM
52,450 pom.xml
09:11 AM
3,705 README.txt
10:08 AM
<DIR>
target
2 File(s)
56,155 bytes
8 Dir(s) 15,264,776,192 bytes free
3. Make sure you are connected to the internet
4. Let's try your first build
C:\java\geotools\trunk>mvn install
5. If all is well, Maven should download the required .jar files and build GeoTools modules. At the end of this process it will display a list of
all the modules which were built and installed correctly.
... BUILD SUCCESS
The first build takes a while due to the download time for the .jar files.
Future builds check for the most recent .jar files from the internet. The checking is based of md5 checksums and does not take long.
Really Building All Modules
GeoTools plays host to a number of experiment "unsupported" modules; if you would like to help out on any of these modules (or get a preview of
new features).
mvn install -Dall
The "-Dall" acts as a switch to part engages several profiles; you can also do this by hand with -P
modules that are included -Dall
-Pgdal
include modules that depend on having gdal installed into your JRE
-Ppending
several experimental modules
-Praster
-Pswing
-Pworkflow
process and wps support
Not included with -Dall
-Parchive
modules that no longer work
Building Offline
However when working offline, you can bypass the checking of md5 files and run maven using the following:
C:\java\geotools\trunk>mvn -o install
This will save a bit of time....
Configuring the heap size
The Maven build may requires a fair amount of memory. For example some JUnit tests are known to fail on Maven 2 whith the default heap size.
The maximal heap size need to be increased, and may be configured as below (on Windows command line):
set MAVEN_OPTS=-Xmx384M
Configuring a proxy server
If you are behind a firewall, you will need maven to use a proxy server.
http://maven.apache.org/guides/mini/guide-proxies.html
The above link shows how modify the settings.xml file in your .m2 directory.
BUILD FAILURE!
Or if something went wrong you will get feedback like this:
[INFO] -----------------------------------------------------------------------[ERROR] BUILD FAILURE
[INFO] -----------------------------------------------------------------------[INFO] There are test failures.
[INFO] -----------------------------------------------------------------------[INFO] For more information, run Maven with the -e switch
[INFO] -----------------------------------------------------------------------[INFO] Total time: 7 minutes 56 seconds
[INFO] Finished at: Mon Nov 20 12:15:48 PST 2006
[INFO] Final Memory: 23M/42M
[INFO] ------------------------------------------------------------------------
You need to scan back through the output and find the "<<< FAILURE!"
Running org.geotools.data.mif.MIFDataStoreTest
Tests run: 9, Failures: 1, Errors: 0, Skipped: 0, Time elapsed: 6.703 sec <<< FAILURE!
Common Build Problems
The following common problems occur during a:
mvn -U clean install
Failure of Metadata RangeSetTest
This looks like the following:
[INFO] ---------------------------------------------------------------------------[INFO] Building Metadata
[INFO]
task-segment: [clean, install]
[INFO] ---------------------------------------------------------------------------[INFO] [clean:clean]
...
Running org.geotools.util.RangeSetTest
Tests run: 1, Failures: 0, Errors: 1, Skipped: 0, Time elapsed: 0.031 sec <<< FAILURE!
Navigating into the directory to look at the actual error:
C:\java\geotools\trunk\modules\library\metadata\target\surefire-reports>more *RangeSetTest.txt
------------------------------------------------------------------------------Test set: org.geotools.util.RangeSetTest
------------------------------------------------------------------------------Tests run: 1, Failures: 0, Errors: 1, Skipped: 0, Time elapsed: 0.031 sec <<< FAILURE!
testRangeRemoval(org.geotools.util.RangeSetTest) Time elapsed: 0 sec <<< ERROR!
java.lang.NoClassDefFoundError: javax/media/jai/util/Range
at org.geotools.util.RangeSetTest.testRangeRemoval(RangeSetTest.java:58)
This indicates that Java Advanced Imaging has not been installed into the JRE (please see the dependencies section and try again).
Experimental Option
On GeoTools trunk you can try the following experimental option:
mvn install -Pnojai
This will download and use just the JAI jar files, you wont get native performance - but for a build do you even care?
Failure of GridCoverageRendererTest
This looks like the following:
[INFO] ---------------------------------------------------------------------------[INFO] Building Render
[INFO]
task-segment: [install]
[INFO] ---------------------------------------------------------------------------...
Running org.geotools.renderer.lite.GridCoverageRendererTest
Tests run: 2, Failures: 0, Errors: 2, Skipped: 0, Time elapsed: 0.062 sec <<< FAILURE!
Details:
C:\java\geotools\trunk\modules\library\render\target\surefire-reports>more
*GridCoverageRendererTest.txt
------------------------------------------------------------------------------Test set: org.geotools.renderer.lite.GridCoverageRendererTest
------------------------------------------------------------------------------Tests run: 2, Failures: 0, Errors: 2, Skipped: 0, Time elapsed: 0.062 sec <<< FAILURE!
testPaint(org.geotools.renderer.lite.GridCoverageRendererTest) Time elapsed: 0.047 sec <<< ERROR!
java.lang.NullPointerException
at
org.geotools.renderer.lite.GridCoverageRendererTest.getGC(GridCoverageRendererTest.java:103)
at
org.geotools.renderer.lite.GridCoverageRendererTest.testPaint(GridCoverageRendererTest.java:163)
testReproject(org.geotools.renderer.lite.GridCoverageRendererTest) Time elapsed: 0 sec <<< ERROR!
java.lang.NullPointerException
at
org.geotools.renderer.lite.GridCoverageRendererTest.getGC(GridCoverageRendererTest.java:103)
at
org.geotools.renderer.lite.GridCoverageRendererTest.testReproject(GridCoverageRendererTest.java:199)
This indicates that Image IO support has not been installed into the JRE (please see the dependencies section and try again).
Unable to Delete Directory on Windows
Build systems like maven (that smash files around for a living) are generally incompatible with Microsoft Indexing Service.
From Lim Goh on email:
I would also like to point out for future reference that the Windows
Indexing Service is not 100% compatible with maven, and causes some
maven builds to break. Developers who use Windows 7 64-bit (or
anything close like Vista or 32-bit) may have unsuccessful build due
to "unable to delete directory". If that happens please try to disable
Windows Indexing Service for the entire svn working copy and try
again. Hopefully this will fix the problem.
2.5.2 Maven Local Settings and Repository
On your machine you will find a directory in called 'm2'. This is where maven stores all downloaded jars and installed projects.
Linux: ~/.m2
Windows: C:\Documents and Settings\USER\.m2
settings.xml
You can provide an optional settings.xml file in this directory that is used to describe configuration and resources avaialble on your machine.
Examples of use:
set heap size (so you can have a faster build?)
turn on / off online tests
select testing profiles (so you can test against a local database, or geoserver install)
Example (for using a local shared maven repository):
settings.xml
<settings>
<mirrors>
<mirror>
<id>mirror.repo</id>
<name>mirror of Ibiblio/</name>
<url>file://R:/m2/repository</url>
<mirrorOf>ibiblio</mirrorOf>
</mirror>
</mirrors>
</settings>
Much of the advice on testing will depend on creating one of these files and updating it.
Repository
You should see that any third party jars, such as JTS, will have been installed in this repository. You should also see that all successful module
builds (e.g. main, referencing...) have had their jars installed in a directory called org/geotools.
2.5.3 Building an individual module
Provided you have done at least one complete build you should be able to build individual modules.
1. Change to the modules home directory
cd $GEOTOOLS_HOME/gt/modules/library/main
2. Use maven to compile
mvn compile
It should do a complete build.
3. Use maven to update the registry
mvn install
It should run the test cases and install the jar in the registry for other modules (or applications).
Most Common Problem
If you have not done a full build yet then the build may fail because it can't find the jar for a module it depends on.
An error caused by not having another GT2 module installed can be a little misleading:
Error: unable to download main-2.1.x.jar
This is because Maven:
failed to find main-2.1,x.jar in the local repository where a full build should have put it
tried to download the file from the internet (and failed)
If you see an error like that, either do a full build or change into the module which is missing (main in this case) and type.
maven jar:install
Avoiding Tests
You may also notice that running the tests takes a fair wack of time. While these tests need to be run before you commit for the day, you may
want to forgo the wait while experimenting.
The following will build the tests - but not run them:
mvn -DskipTests install
This is useful for installing the postgis module test jar; which is used by the postgis-version module as a dependency.
The following will not even build the tests:
mvn -Dmaven.test.skip=true install
2.5.4 Doing things other than building
Doing things other than building
The following can be done in any individual module.
Generate a Web Site
Generate a website (full of javadocs and handy coverage test reports):
mvn site:site
The web site is in your target/docs folder.
Genearte Javadoc
Generates the javadoc for the module:
mvn javadoc:javadoc
Look in target for output.
Running Tests
Run the tests (normal):
mvn test
Run the tests (online):
HELP!
Look in target/surefire-reports for output.
2.5.5 Project Object Model (POM) Files
Complete documentation for the project.xml file for maven can be found at the maven site, and in particular in the project descriptor part of the
reference section. So, we only show the things specific to a GeoTools2 module project.xml file here.
Extending a parent module
Maven 1
The <extend> tag allows one project.xml file to inherit items from another. Modules should extend the project.xml within
the top level GeoTools2 directory. Also, the path given to the other project.xml file must begin with ${basedir} in order for
maven to find it.
Example:
<extend>${basedir}/../../project.xml<extend>
Maven 2
The <parent> section allows one pom.xml file to inherit items from another. Modules should extend the pom.xml within the
module, plugin, ext} or {{demo directory they belong to.
<parent>
<groupId>org.geotools</groupId>
<artifactId>gt2-module</artifactId>
<version>2.2-SNAPSHOT</version>
</parent>
Id
Maven 1
The id should reflect the name of the module. However, because the main project.xml defined groupId to be gt2, there is no
need to prepend a GeoTools prefix. Examples are main and referencing.
Maven 2
The id should reflect the name of the module. Because the groupId is defined to be org.geotools (as required by the new
Maven policy) and do not appears in the final JAR filenames, a gt2 prefix shall be prepended. Examples are gt2-main and
gt2-referencing.
Dependency
Dependencies are specified within the project.xml (Maven 1) or pom.xml (Maven 2) file, but care should be taken.
New dependencies, and in particular any dependency on another GeoTools2 module, should use:
groupId
identify the project
artifactId
identify the jar within that project
artifactIds correspond to modules in GeoTools2.
Sample project.xml or pom.xml dependency entry:
Maven 1
<dependency>
<groupId>gt2</groupId>
<artifactId>main</artifactId>
<version>2.2.x</version>
</dependency>
Maven 2
<dependency>
<groupId>org.geotools</groupId>
<artifactId>gt2-main</artifactId>
<version>2.2-SNAPSHOT</version>
</dependency>
Dependencies issue with Maven 1
Dependencies are not transitive in Maven 1. In other words, suppose module B has a dependency on module A. If you are
creating module C, and have a dependency on module B, then you do not automatically have a dependency on module A. If C
depends on A, then you must add the dependency manually. This issue do not exists anymore with Maven 2.
2.5.6 Remote Repository and Files
There are repositories of jars required by GeoTools2 stored online. You can browse them online at:
Maven 1
http://lists.refractions.net/geotools (primary)
http://www.ibiblio.org/geotools (backup)
You may also want to look at/use the main maven repository at:
http://www.ibiblio.org/maven
If a module you are developing needs a third party jar to operate then this is the place to put it. The naming convention is:
groupId/jars/artifactId-version.jar
Maven 2
http://maven.geotools.fr/repository (primary)
You may also want to look at/use the main maven repository at:
http://www.ibiblio.org/maven2
If a module you are developing needs a third party jar to operate then this is the place to put it. The naming convention is:
groupId/artifactId/version/artifactId-version.jar
The groupId usually corresponds to the name of the project and the artifactId corresponds to the jar name. In many cases, there is only one
artifact within a group and so they may be the same.
Reducing internet downloads
To set things up so you can have a team of developers, and not have them all hammer the internet please do the following:
1. Set up a local maven repository on a network share (e.g. R:/m2/repository below)
2. ask the developers to set up a settings.xml file describing this as a mirror of iBliblio
3. Enjoy
Here is the settings.xml file for your teams HOME/.m2/ directory
settings.xml
<settings>
<mirrors>
<mirror>
<id>mirror.repo</id>
<name>mirror of Ibiblio/</name>
<url>file://R:/m2/repository</url>
<mirrorOf>ibiblio</mirrorOf>
</mirror>
</mirrors>
</settings>
Related links
GeoTools:Using the SNAPSHOT releases
Maven 2 Wiki
2.5.7 Testing with Maven
Maven complicates things on the logging front, as it does a lot of redirection.
Maven 2
cd $GEOTOOLS_HOME/gt/modules/library/main
mvn test
By default:
the logs from testing end up in target/test-reports or target/surefire-reports sub-directory of each module
There should be XML and text files for the results of each test
Be sure to check both, as one of the wrinkles of maven makes it so the output isn't always exactly the same.
Logging (Maven 1)
To have maven display the logging as it tests instead of just writing to files, set the maven.junit.usefile property to false.
To set a property, you can either:
pass it in from the command line with the -D flag
maven -D maven.junit.usefile=false
set it in the build.properties file
just add the line: maven.junit.usefile=false
Another helpful testing hint
In order to run only one test (replace with the test case class you want to run):
Maven 2
// send output to file (as is normally done in a build)
maven -Dtest=Rendering2DTest test
If you are having problems with logging output levels be sure to read the logging section.
Setting a proxy server for running tests (Maven 1)
If you are behind a firewall, you should have configured maven to use a proxy server.
In order to run tests which need to connect to the internet, be sure that the proxy address and port are being passed as
command-line arguments to the virtual machine in the following line of the build.properties file:
maven.junit.jvmargs=-Xmx512M -Dhttp.proxyHost=${maven.proxy.host}
-Dhttp.proxyPort=${maven.proxy.port}
Online Testing
Many tests require an online resource to run such as a remote server. These tests are excluded from the default build as often these online
resources are not available and as a result case tests to fail. The naming convention for these tests is to name them as OnlineTest. Examples:
PostgisDataStoreAPIOnlineTest.java
WMS1_0_0_OnlineTest.java
To execute online tests during a build, the online profiles is used:
mvn test -P online
Stress Testing
Stress tests can roughly be defined as tests that dont add much test coverage to a module, and take a extended amount of time to run. These
tests are excluded from the default build as they are time consuming. The naming convention for these tests is to name them as StressTest.
Examples:
GMLParserStressTest.java
WFSIonicStressTest.java
To execute stress tests during a build, the stress profiles is used:
mvn test -P stress
2.5.8 Maven Eclipse Plugin Goals
Maven can be used to work with the Eclipse IDE.
Creating .project and .classpath files
Customizing the Name of the Generated Projects
Working With Many Projects
Creating .project and .classpath files - WITH SOURCE CODE
Cleaning up the .project and .classpath files
Tips and Tricks for working with Eclipse
Creating .project and .classpath files
You can use maven to set up the files needed for eclipse:
C:\java\geotools\trunk\>mvn eclipse:eclipse -DoutputDirectory=bin -Dall
This will produce the following files for each module:
.classpath file
.project file
The way to read the above line is we are using the eclipse plugin, and we are asking it to do the goal eclipse. The other options are to specify a
default output directory (so that eclipse and maven do not both use target/classes and trip on each other). The -Dall switch is used to include the
unsupported modules.
If you like you can just do a simple:
C:\java\geotools\trunk\>mvn eclipse:eclipse
Because maven and eclipse will both use target/classes you will need to perform a clean when switching between maven and eclipse for building.
You can then import all the geotools projects into your Eclipse IDE.
Eclipse Setup and Build
Customizing the Name of the Generated Projects
You can customize the generated project names a little bit (useful you have an existing project like GeoServer with its own "main" project):
mvn eclipse:eclipse -Declipse.projectNameTemplate="[groupId].[artifactId]"
An alternative approach could be:
mvn eclipse:eclipse -Declipse.projectNameTemplate="gt2-trunk-[artifactId]"
For more information see the maven eclipse plugin documentation.
Working With Many Projects
After you have imported the above files you may notice something - there are a lot of projects. You should limit the open projects to those you are
working on.
1. Close all the eclipse projects (just "close" them don't delete them)
2. Then pick the module you're interested in, and open it. It will ask you
if you'd like to open dependent projects, and you should say "yes".
3. Then go to the eclipse package manager "filters" setting (little "v" in
the upper right) and choose to "hide closed projects".
Now you're looking at about 6-8 geotools projects that are easily eclipse buildable (all dependencies on SNAPSHOTS and what-not are
handled by eclipse:eclipse) fairly small and well cross-referenced.
Creating .project and .classpath files - WITH SOURCE CODE
THIS MAY TAKE TWO HOURS
C:\java\geotools\trunk\>mvn eclipse:eclipse -DdownloadSources=true
Source code ... so much fun it is worth the wait. Seriously.
Downloading the source code will make sure eclipse has enough information to show you nice javadocs, when implementing stuff the correct
name for the arguments will be there and so on.
Cleaning up the .project and .classpath files
C:\java\geotools\trunk\>mvn eclipse:clean
The way to read the above line is we are using the eclipse plugin, and we are asking it to do the goal clean.
Tips and Tricks for working with Eclipse
1. The GeoTools codebase uses "UTF-8" - so you will need to tell eclipse about it.
2. GeoTools has defined formatting settings you can import: build/eclipse/formatter.xml
3. GeoTools has defined templates you can import: build/eclipse/codetemplates.xml
2.5.9 Working with Others
Maven is used primarily to allow us to work with other projects with a minimum of fuss and bother.
Dependency Version Changes
Dependency SNAPSHOT Changes
Deploy GeoTools SNAPSHOT
Related:
How to add a 3rd party jar
Dependency Version Changes
When a dependency changes you will need to update the root pom.xml "dependency management section" to reflect the new version number.
You should be able to locate an entry like this and change the version number:
<dependency>
<groupId>net.java.dev.swing-layout</groupId>
<artifactId>swing-layout</artifactId>
<version>1.0.2</version>
</dependency>
Dependency SNAPSHOT Changes
We depend on a "snapshot" of several projects (usually project GeoTools community memebers are involved in like GeoAPI or ImageIO-EXT). In
these cases an email will be sent to the developer list asking people to "update with -U"
To respond to one of these emails include "-u" in your next build.
1. Update
svn up
2. build using the -U option
mvn clean install -U -Dmaven.test.skip=true
The above example skipped the tests (which is common when you are trying for a quick update), please note by definition that "-U" is not
compatible with the "-o" offline mode.
Deploy GeoTools SNAPSHOT
If you are working on GeoServer or uDig or another project that depends on the latest greatest GeoTools release you will need to know how to
deploy a SNAPSHOT (so members of your developer community do not get compile errors).
Usually do this after a commit:
1. Update to make sure you are not missing out on anyones work
svn up
2. Build with tests to make sure your commit is not fatal
mvn clean install
3. Commit - remember to include any Jira numbers in your log message
3.
svn commit -m "Change to fix shapefile charset handling, see GEOT-1437"
4. Ensure your ~/.m2/settings.xml has your webdav credentials (these are the same as your svn access credentials)
<?xml version="1.0" encoding="ISO-8859-1"?>
<settings>
<offline>false</offline> <!-- set to true to build udig offline -->
<servers>
<server>
<id>refractions</id>
<username>NAME</username>
<password>PASSOWRD</password>
</server>
</servers>
</settings>
5. Deploy for members of your community
mvn deploy -Dmaven.test.skip=true
6. Let your community know via email!
2.6 Generating Javadoc
Javadoc can be generated using the standard mvn javadoc:javadoc command. It can be generated for an individual module, by invoking mvn
javadoc:javadoc in this specific module, or for the whole Geotools project, by invoking mvn javadoc:javadoc from the root. The latter is
called aggregated javadoc.
Dependencies in aggregated javadoc
As of October 2006, aggregated javadoc using maven-javadoc-plugin version 2.0 fails to resolve all external dependencies
like JTS or GeoAPI. It may be related to MJAVADOC-66, but the later said that the bug is already fixed. Waiting for the next
maven-javadoc-plugin release in the hope that it will be fixed there.
JAR files for distribution
Use Java 6 for this; because we use some fancy tags (mentioned below) you will need to use Java 6 here
JAR files are created by invoking:
1. mvn javadoc:javadoc
2. mvn javadoc:jar
The javadocs are created in the target directory for each module.
Custom javadoc tags
Geotools code contains a few custom javadoc tags, including:
Tag
Purpose
Example
@source
The file URL, usually provided by SVN itself.
@source $URL$
@tutorial
Link a tutorial page on this server.
Those custom tags are processed by taglets provided in the Geotools maven/javadoc module. Those taglets are automatically used by the
javadoc tools when using the javadoc:javadoc goal.
Modifying the javadoc configuration
The gt/pom.xml file contains the javadoc:javadoc goal configuration. Configuration includes custom taglets, hyperlink to external libraries
like JTS, list of package to exclude, etc. Excluded packages are com.*, org.geotools.maven.* and org.geotools.resources.*.
When Maven fails to generate the javadoc
Javadoc has "warnings" and "errors". Only errors cause the build to stop. Unfortunatly our javadoc in Geotools is not in very good shape, since it
causes a lot of warnings to be generated. It is difficult to spot the little fatal error that caused javadoc to fail in the middle of hundreds of warnings.
Thankfully the following Unix command is very helpful:
mvn javadoc:javadoc | grep "error"
The above gives a much smaller output, typically only about 5 lines. So we can spot immediately the cause of javadoc failure, for example
something like:
modules/library/referencing/src/main/java/org/geotools/referencing/factory/epsg/package.html:
error - Close body tag missing from HTML file
In this particular example, adding the missing </BODY> tag as suggested by the error message fix the javadoc generation. It is that simple.
2.7 Generating Maven reports
Maven reports can be generated by the following command, to be executed from the directory that contains the parent pom.xml file:
mvn site:site
The site are created in target/site directory of every module. An aggregated javadoc is also created in the parent target/site/apidocs
directory.
The site can optionnaly be deployed to the maven.geotools.fr server using the following command:
mvn site:deploy
SCP Upload Errors
If you encounter an error such as:
The authenticity of host 'maven.geotools.fr' can't be established.
RSA key fingerprint is ae:31:42:8a:55:ba:f1:af:51:90:fd:b8:21:cc:17:e9.
or:
Exit code 255 - Permission denied (publickey,keyboard-interactive).
Then you need to install your public key on maven.geotools.fr. You need to generate a public and private key, copy it over
to maven.geotools.fr and append it to ~/.ssh/authorized_keys. I don't know how to generate a key in windows, so the
first part of these commands are only known to work on Linux:
ssh-keygen \-t rsa
scp \~/.ssh/id_rsa.pub [email protected]:/home/geotools/id_rsa.pub
Now log in to the remote server:
ssh [email protected]
Append your key:
cat id_rsa.pub >> \~/.ssh/authorized_keys
Now if you execute mvn site:deploy again, it will hopefully work.
When Maven fails to generate the site
If Maven failed during javadoc generation, see "When Maven fails to generate javadoc" in the 2.6 Generating Javadoc page.
3 Communication
3.1 Internet Relay Chat
3.2 Email
3.3 Issue Tracker
3.4 Websites
3.1 Internet Relay Chat
GeoTools developers use an IRC channel for real time collaboration (for situtations where email is too slow) - this is also a suitable venue for
questions.
Internet Relay Chat
IRC Breakout Meetings
Office Hours
Internet Relay Chat
If you are new to IRC, you will need to find an IRC client. The later versions of Netscape and Mozilla have IRC built in, and you can connect to a
GeoTools meeting simply by using the URL: irc://irc.freenode.net/geotools.
The information you need to configure your IRC client are:
Server - Pick one from Freenode Servers
Channel - #geotools
Port - 6667
Logs from IRC meetings are stored on this wiki:
News
Members of the Project Management Committee who are regular IRC participants should let others know if they are not coming so that the
meeting is not delayed on their behalf.
IRC Breakout Meetings
Occasionally breakout IRC meetings will be announced on the geotools-devel mailing list around specific topics of interest.
Anyone is free to start a meeting; we ask that an email be sent out and a time negotiated on the email list allowing interested parties to attend.
Office Hours
Jody Garnett is maintaining GeoTools office hours as a community experiment/service. This is a time slot where you know a PSC representative
will be available to answer your questions.
Click on the link to see the time in your area:
8pm for Sydney will be morning in Europe
7am for Sydney will be afternoon in North America)
3.2 Email
Much of the development discussion happens on the geotools-devel mailing list. subscribe or view the devel archives.
However, if your query is more general, e.g. you need help with how to use geotools then please use the geotools-gt2-users mailing list.
subscribe or view the users archives.
For a listing of all geotools email lists, please see Mailing Lists.
3.3 Issue Tracker
GeoTools tracks tasks, issues and bugs with its JIRA tracker, generously provided by Atlassian and hosted by CodeHaus. This is where all bugs
should be reported, in addition to requested features and improvements.
For more information:
How to Create a new Issue
Filling out all fields is specially important for bug reports:
including component(s)
affected versions of geotools ( a release or code from SVN? )
A description of what caused the problem (example code that reproduces the problem) along with any stack traces
The Java Version and the type of operating system you are using
You may wish to attach log files, or screen snapshots to the Jira task
Bug Report Tip
If you are reporting failed tests during the maven build, check the test reports in
geotools/geotools-src/<module>/target/test-reports for further details
How to Create a new Issue
GeoTools tracks tasks, issues and bugs with its JIRA tracker, generously provided by Atlassian and hosted by CodeHaus. This is where all bugs
should be reported, in addition to requested features and improvements.
To create an issue:
1. Create a new account
2. Login.
3. Once you are logged in you can create a new issue.
be sure that GeoTools is selected as the project
When logged in there will also be a "Create New Issue" link on the GeoTools JIRA home page.
4. When creating a new issue be sure to fill out all the relevant fields.
Filling out all fields is specially important for bug reports, including components, affected versions, and environment
You may wish to attach log files, or screen snapshots to the Jira task
Besides a description of the problem, some additional information is also useful when reporting bugs.
The version of Geotools2 you are using (a release or code from CVS ?)
A description of what caused the problem (example code that reproduces the problem) along with any stack traces
The Java Version and the type of operating system you are using
Tip: If you are reporting failed tests during the maven build, check the test reports in
geotools/geotools-src/<module>/target/test-reports for further details
What Happens Next?
On creation a notification will automatically be sent to the geotools-devel list. JIRA sends notifications for everything done on the issue, to the
reporter, the assignee, and to anyone who clicks on the link to 'watch' an issue.
This is why you must sign up for an account, so that JIRA can email you when updates are done. Your email will not be used for
anything else. One nice little feature of JIRA is that if you reply to the email sent for notification, including [email protected] as a
recipient, then the reply will show up as a comment on the issue.
What Happens After That?
Or rather will my bug be fixed?
Well for the above bug report David Zwiers (the module maintainer) will get assigned the bug by default, and will probably respond with a nice
email explaining the problem.
Unfortantly Authorization and LockID are different!
The WFS DataStore needs to know the mapping from the Authorization given to the Transaction to the WFS LockID. I know this
does not make a lot of sense, you need to imagine the same Transaction being used to Lock two DataStores - well Two WFS
DataStores if that helps).
I have not thought of an elegent solution to this problem yet - if you have any suggestions let us know. For now please just have
your client code keep the Authorization String used when making the Lock Opperation, rather than the WFS LockID.
I have modified the WFS Data Access tutorial to make this requirement more explicit
David Zwiers
And then the bug will be "Resolved and Closed", and Jira will tell you about that too.
Note the above bug report is entirely fanciful
For New Bugs
However for bug reports: usually the a Developer (or the Module Maintainer) will need to ask you for more information. Until they can reproduce
you issue, or you volunteer to join them on IRC and test while they hack, not much is going to happen.
If you are on some exotic hardware (like oracle) that we do not have public access to you will probably need to arrange to meet on IRC
and test out different solutions with a developer.
For hackers: you can attach a code patch to the Jira task and have the module maintainer include your fix in the next release.
For improvements: you may be asked to attend a IRC chat to thrash out ideas on how best to include you great idea.
For documentation: this is a wiki! Please go ahead and correct any mistakes you find
Why Volunteering to Test Makes a Difference
Remember that even volunteering to test makes a HUGE difference for developers .. it literally cuts down the work by two thirds!
If you are available to test they do not have to spend time trying to reproduce the problem (heck you already have it!); and
If you are available to test they they can focus on the code in front of them, you can verify the fixed worked
Even if you cannot test right away, swapping messages on email, or updating the documentation can make a difference.
3.4 Websites
Public Websites
There are two public urls that map to our wiki:
http://www.geotools.org/ - Our home page (Acts as a copy of our wiki with advertising)
http://geotools.org/ - our developers guide
Why Advertising: It is CodeHaus policy (and fund raising) - and we are guests on their system. By creating our own format we have avoided
adds on our normal wiki views, not sure if we should be doing that - but we are.
We also have several other public pages:
http://xircles.codehaus.org/projects/geotools - Codehaus project page (for project permissions)
http://svn.geotools.org/ - svn source code repository
http://sourceforge.net/projects/geotools/ - Used for project downloads
http://freshmeat.net/projects/geotools/ - Used for project links and downloads
Confluence
Confluence, the wiki software that powers this website (hosted by Codehaus), has been used since March 2004 to allow anyone (developers and
users) to create and update geotools documentation. It is hoped (and appears true) that a collaborative documentation effort will create a
resource for the geotools community that no group of geotools developers could create on their own.
We have three spaces:
GeoTools Space - Home
Users Guide Space - Home
Developers Guide Space - Home
Getting Edit Permission
Because of spammers our procedure to get read/write access to the wiki has gotten a tad annoying. It is documented at the bottom of our home
page:
Home
In brief:
1. Create an account for confluence: http://docs.codehaus.org/signup.action
2. Create an account for codehaus: http://xircles.codehaus.org/signup
3. Go to your personal details page: http://xircles.codehaus.org/my/details
Use the form to fill in your Confluence Username from step one
4. http://xircles.codehaus.org/projects/geotools
5. Go to the GeoTools project page: http://xircles.codehaus.org/projects/geotools
And click on Apply to join as a developer
6. Wait for a GeoTools Project Management Committee Member to grant you permission
Once you have an account, you just need to login and click on the edit button to modify a page.
Wiki Pages
Confluence uses a simple markup language, and a quick reference is given on the right side of pages you are editing. One way to start
contributing to the wiki documentation is to fix mistakes, clarify confusing content or by contributing to the documentation for areas of the
GeoTools code base you are familiar with.
The following are some useful resources for editing the wiki:
6 Documentation - some guidelines for the Geotools wiki.
Confluence Markup - an introduction to the Confluence markup language in The Confluence Manual.
Linking In Confluence
Wiki Comments
The wiki also allows people to leave comments on the pages with feedback and/or ideas for improving the content. This may only be done if you
are logged.
Since it is difficult to carry on a conversation in the comments, it best to only use them to give feedback about the wiki pages: questions about
using the geotools library should be directed to the geotools-gt2-users mailing list.
4 Roles and Responsibilities
1 Contributors
2 Committers
3 Module Maintainers
4 Project Management Committee
1 Contributors
Anyone can contribute to the Geotools project by editing the web site, by writing documentation, by answering questions on the email list, or by
contributing actual code integrated into the project.
Initially, newcomers to the project generally participate in an informal role. These types of contributors have no long term responsibility to the
project.
Easy informal code contributions.
Informal participants can contribute small modifications to the project code by submitting a patch as an attachment to a JIRA task.
The best way to make a code contribution is to develop a formal patch against a checkout of the code from the SVN branch for which the code is
being developed. That is, a contributor uses SVN to obtain the code of the branch, edits the files on that checkout, does a full maven build and
test to make sure the patch compiles cleanly, and then uses the 'svn diff' command to generate a patch against the branch. Next, the contributor
opens a JIRA issue against the subsystem in which the patch was made. The subject of the item should describe the contribution and ideally
mention that a patch is attached.
JIRA will automatically notify the maintainer of the module since that is the best person to do the code review. If no one answers or comments in
the subsequent few days, then the contributor can contact the developers' mailing list to let everyone know about the patch and find someone
else competent to review the code and integrate the contribution into the code base or provide a request for improvements to the patch.
Large contributions
Informal participants can also contribute larger contributions following essentially the same process as that just described for small code
contributions but also including the formal transfer of the copyright over the contribution to the Open Source Geospatial Foundation (OSGeo).
Patches submitted to JIRA for large contributions should include the contributor name in the list of authors of the class documentation for any file
in which the contributor has made significant changes. That is the contributor's name should be added using the @author javadoc tag.
GeoTools Contributor Agreement
Geotools has adopted a formal policy as part of the process of joining the Open Source Geospatial Foundation (OSGeo). All new contributors will
be required to transfer copyright to the foundation.
Contributors wishing to become Committers must print out a copy of the copyright assignment document and either sign it themselves or have
their employer sign the document, depending on the circumstances governing when and where the Contributor develops the code. It is up to the
Contributor to understand the legal status of the code which the Contributor produces. The document should be sent to the address on the first
page of the document. Any questions should be addressed to the developers' mailing list.
Signing a GeoTools Contribution Agreement" is intended to serve several purposes such as shielding the contributor from a direct
legal attack by users of the code, enabling the Foundation to represent the interests of the Geotools project in a legal forum, and
enabling the Geotools project to switch licenses when necessary.
2 Committers
Contributors who give frequent and valuable contributions to a subproject of GeoTools can have their status promoted to that of a formal
"Committer" to GeoTools.
Responsibilities
A Committer has write access to the whole source code repository which entails certain responsibilities.
Committers must coordinate their efforts with the maintainers of any modules they wish to modify or extend, i.e. committers need to ask
permission. Contact details for each module's maintainer can be found in the source code as part of the pom.xml file or in the Module
Matrix. If committers are working in their own module, then they are themselves maintainers of that module and they can do as they wish
in that module only.
Committers are expected to follow GeoTools conventions. They are required to read this developer's guide. Committers are responsible
for any code they submit which means they are required to know and correctly document the origin of any code they submit and required
to ensure they are legally allowed to submit and share that code.
Committers are required to submit clean code. Code formatting should follow the project guidelines.
Committers must not submit data files without prior approval. We want to include only the minimal amount of data necessary, and have
that all contained in the sample-data module. If new data is needed in that module, we can add the data there.
Otherwise, Committers have one primordial responsibility:
Thou shalt not break the build.
This means that all code should be run through a full maven install and test cycle
mvn clean install
prior to commit. Yes, this takes time; yes, it is necessary.
Process
In order for a Contributor to become a Committer, another Committer can nominate that Contributor or the Contributor can ask for Committer
status. Once a Contributor is nominated, all existing committers will vote. If there are at least 3 positive votes and no negative votes, the
Contributor will be considered a Committer and can gain write access to the source code repository.
Welcome letter
This is an example offer letter that should be sent to the volunteer after 3 positive votes have been received:
Dear Contributor,
The GeoTools project would like to offer you commit privileges. If you are interested in having commit privileges, please create an
OSGeo user id on this page http://www.osgeo.org/osgeo_userid/ and pass on your user id to myself or any other member of
GeoTools.
GeoTools is a member of the Open Source Geospatial Foundation, we have attached a copy of the
GeoToolsContributorsAgreement to this email. The attachment contains instructions for use, and the mailing address for the OSGeo
foundation is on the first page.
We all hope that you accept this invitation.
GeoTools Project Management Committee
Attachment:
GeotoolsAssignmentToOSGeo.pdf
Getting write access to the repository
Once we have confirmation that you have sent in the document any GeoTools committer can grant you access to the project:
1. Create an osgeo login id using this page:
http://www.osgeo.org/osgeo_userid/
2. Send an email with your id to the mailing list (or any GeoTools committer you know) and they can add you using the following link:
https://www.osgeo.org/cgi-bin/auth/ldap_group.py?group=geotools
For more information on the OSGeo SVN Repository facilities you can visit http://wiki.osgeo.org/wiki/Subversion
Lapses due to Inactivity
At times, Committers may go inactive for a variety of reasons. A Committer who has been inactive for 12 months or more may lose their status as
a Committer. Getting access back is as simple as re-requesting it on the project's Developer mailing list.
3 Module Maintainers
Module maintainers are the lifeblood of GeoTools. They own a specific module and make the majority of project decisions related to their module.
In GeoTools, module maintainers have the most direct responsibility and say over the code in the project, via their module.
Module Maintainer Responsibilities
Formal "Supported" Modules
Module maintainers have the three most critical responsibilities in GeoTools:
1. Thine module shalt not break the build.
2. You must keep your module up to date
Your source code must meet the developers guide to the letter
Your test code coverage is measured by the build box (you can provide a profile - if normal JUnit tests take too long)
Your module code up should be up to date with other released modules (no deprecations)
3. You must keep your external documentation up to date
The Jira issue tracker should be up to date
Your module's wiki page should be accurate (see Module Matrix for the complete list)
Your module should have a couple of pages of User Guide
If these requirements are not met for a release, or if the module maintainer cannot be found, the module will revert to unsupported status.
Maintainers are removed by their own choice or a 75% majority of the PMC. If a volunteer is found for an abandoned module the PMC will need a
75% majority to appoint them.
Experimental "Unsupported" Modules
We have a "relaxed" set of requirements for "unsupported" modules - providing a great opportunity for experiments and new contributors to get
involved:
1. Thine module shalt not break the build.
2. You must keep your module up to date
Set up a module wiki page (see Module Matrix for the complete list)
Recommended: user documentation will help reduce the amount of email you recieve (see 16 Unsupported for examples)
We have no process for "volunteering" to work on an unsupported module at this time; email the developer list and we will figure it out.
To get started with your own unsupported module please follow:
Creating your own Module
When you are ready to make your module a formal part of the library:
Supporting your module
4 Project Management Committee
Module maintainers who have an interest in the greater direction of the project may have their status promoted to that of a Project Management
Committee Member. This committee is the official managing body of the Project and is responsible for setting overall project direction. The PMC
makes all decisions that cannot be resolved by module maintainers. The PMC strives to make as few technical decisions as possible, preferring to
leave technical decisions to module maintainers and a general consensus process.
The GeoTools Project Management Committee.
The GeoTools PMC is the formal "Project Steering Committee" that reports to the Open Source Geospatial Foundation on behalf of the library.
Current PMC members:
Andrea Aime
Ben Caradoc-Davies
Christian Mueller
Ian Turton
Justin Deoliveira
Jody Garnett (current OSGeo representative)
Michael Bedward
Simone Giannecchini
Our thanks to previous PMC members:
Andrea Aime
Artur Hefczyc
Cameron Shorter
Chris Holmes
David Blasby
Ian Schneider
Martin Desruisseaux
David Zwiers
Richard Gould
Rob Hranac
Rueben Schulz
Responsibilities
PMC members:
It is recommended that PMC members maintain a released module
Alternatives such documentation or user list have worked for previous PMC members such as Rueben Schulz)
Must be willing to do whatever dirty work is necessary to keep the project moving forward.
getting releases out on time (within a week of a request, or according to a schedule)
making a representative available to the OSGeo foundation
Nominations
In order to become a Member, someone on the PMC must nominate the Committer. The individual may then be approved with a 75% majority of
the PMC.
Stepping Down
If you are unable to maintain your responsibilities as a PMC member, please feel free to step down at any time. Thank you so much for your
contributions.
If we cannot find you (especially when voting on proposals) it becomes very difficult to keep the project functioning. After two months time we will
send out a search party and nominate your replacement.
Honoured Founder
We would like to thank the founder of the GeoTools library:
James Macgill
5 Project Conventions
5.1 Coding Guidelines
5.1.1 Coding Conventions
5.1.2 Do not return null
5.1.3 Logging
5.1.4 Exception handling
5.1.5 Avoid assumptions
5.1.6 Converting URLs to Files
5.1.7 Use of Assertions, IllegalArgumentException and NPE
5.2 Naming Conventions
5.3 Module Directory Structure
5. 5 Refactoring
5. 6 Code Profiling
5. 7 Testing — JUnit
Online Test Fixtures
5. 8 Test Data
5. 9 Versioning
5.1 Coding Guidelines
5.1.1 Coding Conventions
5.1.2 Do not return null
5.1.3 Logging
5.1.4 Exception handling
5.1.5 Avoid assumptions
5.1.6 Converting URLs to Files
5.1.7 Use of Assertions, IllegalArgumentException and NPE
5.1.1 Coding Conventions
Coding conventions describe the coding styles developers should use when writing code.
Sun Coding Conventions and a little bit more
But what about the header?
Use of Formatting Tools (read carefully)
Eclipse
NetBeans
For example, whether you use 2, 4, or 8 space indents. Standardizing on a coding style across a project improves legibility of the code, and
automatic code formatters make conforming to these standards easy.
Sun Coding Conventions and a little bit more
We follow:
Sun's coding convention: http://java.sun.com/docs/codeconv/
but allow for 100 characters in width
developers should use spaces for indentations, not tabulations
(because the tab width (4 or 8 spaces) is not the same on all editors)
But what about the header?
The header for all core GeoTools code is:
/*
*
*
*
*
*
*
*
*
*
*
*
*
*
*
*/
GeoTools - The Open Source Java GIS Toolkit
http://geotools.org
(C) 2004-2009, Open Source Geospatial Foundation (OSGeo)
This library is free software; you can redistribute it and/or
modify it under the terms of the GNU Lesser General Public
License as published by the Free Software Foundation;
version 2.1 of the License.
This library is distributed in the hope that it will be useful,
but WITHOUT ANY WARRANTY; without even the implied warranty of
MERCHANTABILITY or FITNESS FOR A PARTICULAR PURPOSE. See the GNU
Lesser General Public License for more details.
The header for all demo code is:
/*
*
*
*
*
*
*
*
*/
GeoTools - The Open Source Java GIS Toolkit
http://geotools.org
(C) 2004-2009, Open Source Geospatial Foundation (OSGeo)
This file is hereby placed into the Public Domain. This means anyone is
free to do whatever they wish with this file. Use it well and enjoy!
Use of Formatting Tools (read carefully)
Get it right the first time - seriously. You cannot expect to go in and reformat your code later in time - because that would make applying fixes
between branches of GeoTools impossible.
So if you are going to take the time to use one of these tools - do so on the first commit. And before every commit. After the code is branched you
are stuck.
If you must
If you must change the formatting in an existing file; please be sure to do so with a distinct commit. Do not combine code
modification (ie a bug fix) with changing the file around to make it look pretty.
You need to do this as a separate commit in order to have any confidence you can apply patches fixes as they are developed
for other branches in the past.
Eclipse
Here are some eclipse settings that you can import when working on geotools work:
http://svn.osgeo.org/geotools/trunk/build/eclipse/codetemplates.xml
http://svn.osgeo.org/geotools/trunk/build/eclipse/formatter.xml
To use:
1. Open up Window > Preferences and navigate to the Java > Code Style > Formatter page
2. Press the import button and select the file from your geotools check out (located in build/eclipse.formatter.xml)
3. Change to the Java > Code Style > Code Templates page
4. Import the template definition from your geotools check out (located in build/eclipse/codetemplates.xml)
These files will have the header already to go for you; the right format options and so on.
NetBeans
NetBeans also has the sun settings built in; please modify these defaults to match our project.
5.1.2 Do not return null
DO NOT RETURN "null"
try {
do_some_stuff();
} catch (Exception e) {
return null;
}
We will be on the lookout for anything like this when performing a code review.
Stop
Stop returning null! It sounds easy - and it is. Use one of the many "NullObjects" available to you as a stand in. You are expecting the person
calling you to do something when you retuned null right? A NullObject is set up to capture exactly what you expect them to do.
Stop eating exceptions!! Exceptions contains valuable informations about what may have gone wrong. Eating all exceptions is especially bad.
Catch only the most specific exceptions you are expecting.
In the bad example above, the exception should at least be logged as below:
Log the exception
try {
do_some_stuff();
}
catch (SomeSpecificException e){
LOG.warning("Could not do some stuff: " + e);
return SOME_EMPTY_OBJECT;
}
An alternative is to invokes some convenience unexpectedException method from the org.geotools.util.Logging class. The examples
below use the latest approach.
How to return a "null" List
try {
return a_set;
}
catch (SomeSpecificException e){
Logging.unexpectedException(LOG, e);
return Collections.EMPTY_LIST;
}
How to return a "null" Expression
try {
return a_expression;
}
catch (SomeSpecificException e){
Logging.unexpectedException(LOG, e);
return Expression.NULL;
}
How to return a "null" Filter (negative)
// Often used if it a programmer error encountering a limitation (say SQL encoding)
try {
return a_filter;
}
catch (SomeSpecificException e){
Logging.unexpectedException(LOG, e);
return Expression.EXCLUDES;
}
How to return a "null" Filter (positive)
// Often used if it is a "data problem", return too much data rather then none
try {
return a_filter;
}
catch (SomeSpecificException e){
Logging.unexpectedException(LOG, e);
return Expression.INCLUDES;
}
If you need additional "NullObjects" email the devel list and we will make them happen. We probably should have a NullDataStore and a
NullFeatureSource for example ... or throw an Exception.
Drop
Drop the pretense that everything is okay, if you are in a situtation where you are returning null chances are there is a real problem around ... so
throw some kind of Exception. This should be used when you have defined your limitations in the javadocs, and the programmer has neglected
to read them.
This may require use of runtime exceptions, or the interface you are implementing may already provide a checked exception for you to throw.
Programming Error
try {
do_some_stuff();
} catch (SomeSpecificException e) {
return (IOException) new IOException("Could not do some stuff (did you read the javadocs?): "
+e).initCause(e);
}
Roll
As a last possible effort; Roll with the flow (but be sure to "log the cause" so client code can notice something is wrong):
Log the Cause
try {
do_some_stuff();
} catch (SomeSpecificException e) {
Logging.unexpectedException(LOG, e);
return null;
}
Be sure to use the warning level (we are still making an assumption) - and client code should know about it). And do not worry about filling up the
test case results with garbage; testing code that expected to produce warnings happens all the time (the test case code can change the logging
level to "Info" and then set it back).
5.1.3 Logging
We use the logging package bundled into J2SE 1.4 and above (java.util.logging). An overview is available on line in the Sun's SDK
documentation. An other valuable source of inspiration is Logging in NetBeans.
GeoTools typically (but not always) uses one logger per package and is named after the package name. Private classes or implementations
sometime use the name of their public counterpart.
Getting a Logger
The Java way to get a logger is to invoke Logger.getLogger(String). However in the GeoTools library, this call shall be replaced by a call to
Logging.setLogger(String) where Logging is a class in the org.geotools.util.logging package. Example:
import org.geotools.util.logging.Logging:
class myClass {
void myMethod() {
Logger logger = Logging.getLogger("org.geotools.mypackage");
logger.config("There is some configuration information.");
}
}
Logger Declaration
The logger may be declared in the class's static fields or returned by a class's static method. This is not mandatory but suggested if it is going to
be used in many places.
import java.util.logging.Logger;
import org.geotools.util.logging.Logging:
public class GMLDataStore {
/** The logger for the GML Data Store */
private static final Logger LOGGER = Logging.getLogger("org.geotools.data.gml.GMLDataStore");
}
Logging Messages
Message can be conveniently logged using one of 7 predefined levels. The levels in descending order are:
Level
Displayed on standard output
Comments
severe
yes by default
highest value
warning
yes by default
non-fatal warning to bring to user attention
info
yes by default
information for end users (not debugging information)
config
no unless configured
configuration information (services available, etc.)
fine
no unless configured
information for developpers (high level)
finer
no unless configured
commonly used when entering, returning, or throwing an exception
finest
no unless configured
most verbose output
A convenience method exists in Logger for each of those levels
LOGGER.info("There is a message of interest for ordinary user");
Logging are not println
Do not use the logging info level as a replacement of System.out.println for displaying debug information to the console.
The info level is for end users. Use the fine, finer or finest levels for debug information, and setup yours
$JAVA_HOME/jre/lib/logging.properties file accordingly (see Logging Configuration below).
Entering/Existing Logger
There is three more convenience methods: entering, exiting and throwing when entering and exiting a method, or when we are about to
terminate a method with an exception.
public Object myMethod(String myArgument) {
LOGGER.entering("MyClass", "MyMethod", myArgument);
// ... do some process here
LOGGER.exiting("MyClass", "MyMethod", myReturnValue);
return myReturnValue;
}
Minimising Logger output
When logging a message, the logger will include many informations like date and time, source class and method name, current thread, etc. In
order to avoid too many informations to be logged, it may be useful to merge consecutive logging into a single log statement. This is especially
appropriate if the many logs are actually different parts of a multi-lines message. Using distinct logger calls can result in an output interleaved with
the logging from an other thread. Merging the logging is not appropriate if the log messages are conceptually unrelated.
// Wasteful use of logging
LOGGER.finer("Value for A is "+A);
LOGGER.finer("Value for B is "+B);
LOGGER.finer("Value for C is "+C);
// Good use of logging
LOGGER.finer("Computed values: A="+A+"; B="+B+"; C="+C);
Selective Logging
If the log message is expensive to construct, then consider enclosing it in a if statement.
if (LOGGER.isLoggable(Level.FINER)) {
LOGGER.finer("Current state = "+someVeryExpensiveMethodCall());
}
Logging Configuration
To change the default logging setting, edit the following file:
$JAVA_HOME/jre/lib/logging.properties
Default Level Configuration
Define the .level property to the minimal level of interest for you:
.level= FINER
Console Level Configuration
Define the java.util.logging.ConsoleHandler.level property to the minimal level you want to see on the console. It may be different
than the level logged to the XML file.
# Limit the message that are printed on the console to FINE and above.
java.util.logging.ConsoleHandler.level = FINE
java.util.logging.ConsoleHandler.formatter = java.util.logging.SimpleFormatter
java.util.logging.ConsoleHandler.encoding = Cp850
Note the encoding property. For Windows user, it should be set to the value displayed by chcp on the command line. Linux and Unix users may
ignore this line since Unix systems do a more intelligent work with page codes.
Module Level Configuration
Finally, a different logging level may be specified for each module.
org.geotools.gml.level = FINE
org.geotools.referencing.level = INFO
Provides fairly detailed logging message from the GML module, but not from the referencing module.
Log4J interoperability
Geotools can produces a console output similar to the Log4J one (single-line instead of multi-line log message) if the following code is invoked
once at application starting time:
Logging.ALL.forceMonolineConsoleOutput();
Alternatively, this formatter can also be configured in the logging.properties without the need for the above-cited method call. See the
MonolineFormatter javadoc for details.
The logging output can also be redirected to the real Log4J framework (or any other framework supported by Apache's Common Logging) if the
following code is invoked once at application starting time:
Logging.ALL.setLoggerFactory("org.geotools.util.logging.Log4JLoggerFactory");
Why not common-logging?
The common-logging API is basically a set of println functions with name (info, trace, debug, etc.). Java logging API provides the same
convenience methods, but is also richer. We use some of its extra capabilities in GeoTools code base:
ResourceBundle support for localization.
Logging of stack traces.
Information on source class and method names.
Information about which thread produced the logging.
Can be used through Java Monitoring and Management system.
Log4J offers similar functionalities with a wider range of handler implementations. On the other hand, Java logging is more closely tied to the
JVM, which avoid some ClassLoader problems that prevent usage of Log4J in some environments.
We are not claiming that Java logging in superior to Log4J, neither we are forcing peoples to use Java logging. We push for usage of Java logging
API, which may very well redirect to Log4J under the hood through java.util.logging.Log4JLoggerFactory implementations.
Commons-logging is widely used in server containers, but other communities like scientists face a different picture. For example the NetCDF
library developped by University Corporation for Atmospheric Research (UCAR) uses SLF4J, yet other logging framework that aims to be a
replacement for commons-logging.
5.1.4 Exception handling
Exception handling in a GIS system is a little different than in other systems because data is usually much more valuable than the software itself.
So:
On one side, the software should try hard to cope with minor problems in the data and do a best effort operation, instead of throwing an
exception right away.
On the other side, best effort handling may hide data problems that the user should be aware of. For some peoples using GIS for
decision purpose, a wrong answer is much worst than no answer at all. Some users will want an exception right away rather than risking
a wrong decision based on uncorrectly processed data.
Striking a balance is not easy, but nevertheless, the following guidelines do apply.
Let the User Recover from Exceptions
If the API allows for exceptions, and the user is supposedly able to recover from them and keep on doing work, do throw the exception.
try {
// some code that may throw an exception
} finally {
// cleanup whatever resource was used and let exceptions go
}
Don't Break the Chain
If a different exception class is needed, either chain the old one or at least log it, but don't let the old exception fade away in thin air;
try {
// some code that may throw an exception
} catch(IllegalAttributeException e) {
throw new DatastoreException("Error occurred while building feature type", e);
} finally {
// cleanup whatever resource was used and let exceptions go
}
An alternative (but the chained exception above is preferred):
try {
// some code that may throw an exception
} catch(IllegalAttributeException e) {
LOGGER.log(Level.FINE, "Attribute building error occurred", e);
throw new DatastoreException("Error occurred while building feature type");
} finally {
// cleanup whatever resource was used and let exceptions go
}
Converting to Runtime Exception (only in no checked exception is appropriate - in such case, consider adding one before to fallback on
RuntimeException):
try {
// some code that may throw an exception
} catch(IllegalAttributeException e) {
throw (RuntimeException) new RuntimeException("Error occurred while building feature type"
).initCause( e);
} finally {
// cleanup whatever resource was used and let exceptions go
}
Provide warning when Making Assumptions
If a legitimate return value can be returned when an exception occurs (bbox computations for example), do return the legitimate value, but log the
exception as a warning (don't let it disappear). Note: for such warning, the unexpectedException convenience method in
org.geotools.util.Logging may be of some help.
try {
// some code that may throw an exception
} catch(DataSourceException e) {
LOGGER.log(Level.WARNING, "Could not determine bounding box - assuming valid CRS area", e);
return null;
} finally {
// cleanup whatever resource was used and let exceptions go
}
Otherwise
Otherwise, if keep on going it's important (for example, during rendering, to avoid blocking because of a handful of bad Feature objects), then
have some way to log the exceptions and report them to the user for later inspection. It is recommanded to process all unexpected exceptions into
a unexpectedException method that users can override, giving a chance for them to stop the process if the error is critical to their application.
/**
* Paint the map.
*/
public void paint() {
Iterator it = featureCollection.iterator();
String fid;
try {
while (it.hasNext()) {
try {
Feature feature = (Feature) it.next();
fid = feature.getId();
// some code that may throw an exception
} catch (IllegalAttributeException e) {
// Feature was invalid - continue to the next one..
unexpectedException("Skipping invliad Feature", e);
} catch (NullPointerException e2) {
unexpectedException("Problem working with Feature", e);
}
}
}
catch (IOException io) {
if (LOGGER.isLoggable(Level.FINER)) {
// example of "guarding" an expensive logging statement
unexpectedException("Feature ("+fid+") failed:"+ io.getMessage(), e);
}
throw (IOException) new IOException("Problem processing "+featureCollection);
}
finally {
featureCollection.close(it);
}
}
/**
* Invoked when an unexpected exception occured. The default implementation
* log the exception at the warning level. Subclasses can override this
* method if they need to handle the exception in an other way (for example
* throwing an other exception, if failure to render a feature is critical).
*/
protected void unexpectedException(String message, Throwable e) {
LOGGER.log(Level.FINE, message, e);
}
So, to sum up, never, ever throw away exceptions, either throw or log them. Failing to do so makes debugging really hard, especially when
all you have is a log file from one of your users!
As for logging, in the case where the exception is not thrown, think hard about the level you'll use to log exceptions, and follow the logging
guidelines to avoid wasting CPU cycles in it. Sometimes it's a nice compromise to just log the exception message at INFO or FINE level, and log
the stack trace at a lower level.
5.1.5 Avoid assumptions
A new code has been added or an existing code has been modified, and everything seems to work fine? Then why some reviewers push for what
seem useless details? Why not just wait to see if somebody complains?
Because approximative code often work only for some specific cases. It is more difficult to figure out six months later what is going wrong, than to
think hard about corners at the time the code is first written. Real examples from geotools code:
Attention to equals and hashCode contract
The org.geotools.geometry.GeneralEnvelope class implements the equals method with a strict comparaison: equals returns true
only if two envelopes are of the same class and have identical coordinates (e.g. e1.x == e2.x). It may sound like a good idea to relax this rule
and compare the coordinates only up to some tolerance error (e.g. abs(e1.x - e2.x) < EPS), since rounding errors in various calculation
algorithms may produce slightly different floating point numbers for conceptually identical envelopes.
Actually, it is not a good idea to define the standard equals(Object) method in this relaxed way. First of all, the EPS tolerance level is arbitrary
and should be provided explicitly by the user. Second and most important, such relaxation violates the equals and hashCode contract in the
Object class. The contract stipulate that if e1.equals(e2) == true, than e1.hashCode() == e2.hashCode(). If the hash code value is
computed from the envelope coordinates, then a relaxed equals implementation will wrongly return true even if the hash codes are actually
different.
The consequence is a GeneralEnvelope that seems to work conveniently, but a java.util.HashMap that work randomly when such
envelopes are used as keys. The user may have the feeling that there is a bug in Sun's implementation of HashMap, while actually it is caused by
oversight in GeneralEnvelope.equals(Object) implementation.
Attention to String used as keys
Strings are sometime used as keys, either in java.util.Map or some kind of named object. They are dangerous when used in more than one
place without the help of compile time constants. Examples:
String Literal's as Keys
map.put("No data", value);
// Will not work because of the upper-case 'D'
value = map.get("No Data");
// Will work only in English or unsupported locales!
value = map.get(Vocabulary.format(VocabularyKeys.NO_DATA));
Consider using a static constants instead:
Static Constants as Keys
private static final String NO_DATA = "No data";
map.put(NO_DATA, value);
value = map.get(NO_DATA);
Please not this static constant can still be used for generating human readable messages; it is simply used as a key to look up the appropriate
translation.
Use AffineTransform mathematic
Incorrect Use of Transform
public void foo(CoordinateReferenceSystem crs, AffineTransform transform) {
boolean isLongitudeFirst = crs.getCoordinateSystem().getAxis(0)
.getDirection().absolute().equals(AxisDirection.EAST);
double scaleX = (isLongitudeFirst) ? transform.getScaleX() : transform.getShearY();
double scaleX = (isLongitudeFirst) ? transform.getScaleY() : transform.getShearX();
}
The above code is wrong for two reasons described below:
Do not make assumption on AffineTransform based on the coordinate reference system
What the isLongitudeFirst line above really try to do is to determine if the affine transform interchanges the x and y axis. But as the name
suggests, isLongitudeFirst just said if the first axis is longitude. It implicitly assumes that the axis are exclusively (longitude, latitude) or (
latitude, longitude), which is a wrong assumption. Oceanographers will want to display (time, latitude) images for example, in which case the
above code will wrongly believes that axis are interchanged.
To be strict, we need at least the sourceCRS and targetCRS in order to determine if some axis were interchanged. In addition, if
isLongitudeFirst is used only for selecting affine transform coefficients, it would be much safer to determine the "axis interchange" state from
the affine transform rather than from the CRS. Keep in mind that this is a user-supplied affine transform and we have no guarantee that the user
built it in the same way that we would. Maybe the user wants an arbitrary rotation? Maybe he uses a ( latitude, depth) coordinate system? So if
you really want to determine if axis were interchanged, consider using something like transform.getShearX() != 0, or yet better
XAffineTransform.getSwapXY(transform) == -1 (a static convenience method that perform more elaborated mathematic than the naive
former test).
Use mathematic invariants when possible (avoid special cases)
In the vast majority of cases, code don't need to determine if axis were interchanged. If a code tries to fetch different affine transform coefficients
according some "axis interchanged" state, chances are that the code is just not using proper affine transform mathematic. Instead of:
Axis Interchange with Modal Code
public void foo(AffineTransform gridToWorld) {
double scaleX = Math.abs(swapXY ? gridToWorld.getShearY() :
gridToWorld.getScaleX());
double scaleX = Math.abs(swapXY ? gridToWorld.getShearX() :
gridToWorld.getScaleY());
double xUpperLeft = (swapXY) ? gridToWorld.getTranslateY() :
gridToWorld.getTranslateX();
double yUpperLeft = (swapXY) ? gridToWorld.getTranslateX() :
gridToWorld.getTranslateY();
}
consider using:
public void foo(AffineTransform gridToWorld) {
AffineTransform worldToGrid = gridToWorld.createInverse();
double scaleX = 1 / XAffineTransform.getScaleX0(worldToGrid);
double scaleX = 1 / XAffineTransform.getScaleY0(worldToGrid);
double xUpperLeft = -worldToGrid.getTranslateX() * scaleX;
double yUpperLeft = -worldToGrid.getTranslateY() * scaleY;
// TODO: in case of flipping, there is a sign issue.
// See XAffineTransform.getFlip(...) javadoc.
}
Note that swapXY vanished completely in the later code, providing that we work on the right affine transform ( worldToGrid rather than
gridToWorld in the above example). The XAffineTransform.getScaleX0 method uses an identity that work for any rotation, not just axis
swapping (which is a 90° rotation + flip) like the former code.
If you are tempted to fetch different coefficients in an affine transform according some conditions, it is worth to take a paper and a pencil, write
down the matrix and see if the equations can be written in some form invariant to rotation, flipping or axis swapping. This is often possible and
leads to more robust and generic code.
It may sound like paranoiac, but it is not. Old Geotools code was assuming (longitude,latitude) axis order in all cases, for example through
unconditional calls to AffineTransform.getScaleX(). It required a great amount of energy from nice volunter in order to handle the (latitude,
longitude) axis order as well. Unfortunatly the initial fix for this axis order issue, based on the " Axis Interchange with Modal Code" approach, has
just pushed the problem a little bit further away. The code will fails for the next great Geotools step: 3D-Coverage. Users will want to see 2D slices
using a wide range axis that are not longitude or latitude. It is better to make the best possible use of affine transform mathematic early than
revisiting again the whole Geotools code base as in the "axis order issue" case.
Prefer MathTransform over GridRange - Envelope pair
In some place of Geotools API, a MathTransform is inferred automatically from a grid range and an envelope. For example the
GeneralGridGeometry class provides the following constructors:
public GeneralGridGeometry(GridRange gridRange, Envelope userRange);
public GeneralGridGeometry(GridRange gridRange, MathTransform gridToCRS, CoordinateReferenceSystem
crs);
While the GridRange - Envelope pair seems easier and more intuitive, it is also ambiguous. There is no way to infer a MathTransform from
this pair without making some assumptions on axis order and axis reversal. For example GeneralGridGeometry assumes that the y axis must
be reversed in order to match the direction used in most screen devices (y values increasing down). Only the constructor with MathTransform
argument is unambiguous.
GridRange - Envelope pairs are provided as a convenience for helping users to get their first math transform right in a majority (but not all)
cases. From that point, Geotools code should perform all their internal work on MathTransform, never on Envelope. Need to expand an
envelope? Compute a scale affine transform and concatenate it with the user math transform. Need to translate, flip or swap axis? Same
approach: express your change as an other transform, then concatenate.
5.1.6 Converting URLs to Files
Converting a File to a URL is difficult across different versions of Java; and across different platforms is tough.
DataUtilities.fileToURL
DataUtilities.urlToFile
Examples
DataUtiltiies provides a couple of methods to centralise the handling of platform eccentricities, and ensure the correct encoding and decoding of
characters such as spaces that are permitted in file paths but not in URLs. Use them wherever possible.
DataUtilities.fileToURL
Here is how to do it for GeoTools:
URL url = DataUtilities.fileToURL(file);
The official Java 6 way to do this is to use:
URL url = file.toURI().toURL(); // can produce problems on Mac OSX
The traditional Java 1.4 way is now deprecated:
URL url = file.toURL(); // will produce invalid URL if spaces are in the path
DataUtilities.urlToFile
When presented with a URL it is hard to know what to do - since we cannot know how a user has constructed the URL. So we have to assume
the worst and try every possible way to untangle
the provided URL.
We have spent a lot of time trying to package up a nice clean way of doing this for our code:
File f = DataUtilities.urlToFile(url);
An early workaround for Java 1.4 code was to use the file authority information (to account for drive letters like "C:" and "D:"). If you find any of
this code please update it to use DataUtilities.urlToFile(url).
File f = url.getAuthority() == null ?
new File( url.getPath() ) :
new File("//" + url.getAuthority() + url.getPath());
Examples
a
b
File
URL
file.txt
file:file.txt
/Users
file:/Users
Win32
URL
C:\
file:///C:/
C:\Users
file:///C:/Users
C:\direct with a space\file.txt
file://C:/directory%20with%20a%20space/file.txt
\\host.org\share\directory\file.txt
file://///host.org/share/directory/file.txt
Unix
URL
/Users/Jody/java
file:///Users/Jody/java/
As you ca see the difference between a and b is very small.
5.1.7 Use of Assertions, IllegalArgumentException and NPE
The Java language has for a couple of years now made an assert keyword available; this keyword can be used to perform debug only checks.
While there are several uses of this facility, a common one is to check method parameters on private (not public) methods. Other uses are
post-conditions and invariants.
Reference: Programming With Assertions
Pre-conditions (like argument checks in private methods) are typically easy targets for assertions. Post-conditions and invariants are sometime
less straighforward but more valuable, since non-trivial conditions have more risks to be broken.
Example 1: After a map projection in the referencing module, an assertion performs the inverse map projection and checks the result
with the original point (post-condition).
Example 2: In DirectPosition.equals(Object) implementations, if the result is true, then the assertion ensures that
hashCode() are identical as required by the Object contract.
Use Assert to check Parameters on Private methods
private double scale( int scaleDenominator ){
assert scaleDenominator > 0;
return 1 / (double) scaleDenominator;
}
You can enable assertions with the following command line parameter:
java -ea MyApp
You can turn only GeoTools assertions with the following command line parameter:
java -ea:org.geotools MyApp
You can disable assertions for a specific package as shown here:
java -ea:org.geotools -da:org.geotools.referencing MyApp
Use IllegalArgumentExceptions to check Parameters on Public Methods
The use of asserts on public methods is strictly discouraged; because the mistake being reported has been made in client code - be honest and
tell them up front with an IllegalArgumentException when they have screwed up.
public double toScale( int scaleDenominator ){
if( scaleDenominator > 0 ){
throw new IllegalArgumentException( "scaleDenominator must be greater than 0");
}
return 1 / (double) scaleDenominator;
}
Use NullPointerException where needed
If possible perform your own null checks; throwing a IllegalArgumentException or NullPointerException with detailed information
about what has gone wrong.
public double toScale( Integer scaleDenominator ){
if( scaleDenominator == null ){
throw new NullPointerException( "scaleDenominator must be provided");
}
if( scaleDenominator > 0 ){
throw new IllegalArgumentException( "scaleDenominator must be greater than 0");
}
return 1 / (double) scaleDenominator;
}
5.2 Naming Conventions
Naming conventions is another one of those things that are fun to learn working with a new codebase.
Naming Files and Directories
Naming Conventions
Tools that can Help
We tend to follow normal Java naming for things; we have had some fun with unicode variable names over the years so please be careful and
think of others.
Naming Files and Directories
Geotools makes use of the following naming conventions.
Artifact
Sample
Convention
Directory
ext/validation
Directory names shall be all lower case with no spaces.
Package
org.geotools.filter
Packages shall be all lower case with no spaces and should be located in org.geotools
package
Interfaces
Query
Geotools interfaces are usually located in the main module. Interfaces should be called
XXX.java
Implementation
PostgisDataStore
Append the name of the interface being implemented
Default
DefaultQuery
Default implementations should be called DefaultXXX.java
Abstract
AbstractDataStore
Abstract implementations should be called AbstractXXX.java
javadoc
doc-files/
Javadoc makes use of doc-files directories in the package heirarchy to allow the inclusion of
rich content in generated api documentation.
junit
test-data/
JUnit test cases make use of test-data directories in the package heirarchy
test
SampleTest
JUnit test, picked up by maven build process
online test
ServerOnlineTest
JUnit test making use of line resource such as a web service
Some versions of windows do not distinguish between upper and lower case, and in unix, writing spaces in filenames is painful.
Notes:
both test-data and doc-files do not follow the package naming convention allowing them to be easily distingished from normal
code
both Test and OnineTest are picked out by the maven build process for special treatment
Naming Conventions
We tend to follow normal java development naming conventions. Classes start with Capital letters and use CamelCase, variable start with a lower
case letter and use camelCase, constants and enumerations are ALL_CAPITALS etc..
Code
Example
Description
interface
Renderer
Use camel case and start with a capital letter
interface
RendererFactory
When defining an interface you often need a factory to handle construction
class
DefaultRenderer
Use cample case and start with a capital letter. Try and end with the interface name
class
RendererImpl
Used to quickly implement an interface when we expect only one implementation
Code
Example
Description
variable
xDelta
Start with lower case using camel case to seperate words
Code
Example
Description
constant
MAX_LIMIT
Use all capitals and an underscore to seperate words. This applies to enumeration constants as well
Tools that can Help
FindBugs
http://findbugs.sourceforge.net/
PMD
http://pmd.sourceforge.net/
Running these static analysis tools on your code will find all sorts of mistakes; in addition to checking that your names follow accepted practice.
5.3 Module Directory Structure
Geotools 2.4 and above complies to the Maven 2 standard layout with an extension regarding module hierarchy. The table below gives a
summary where module is the module name and category is one of library, plugin, extension, demo or unsupported.
Module Structure:
modules/category/module/pom.xml
Provides metadata about the module for maven
modules/category/module/src/site
Files for Maven to automatically generate the site
modules/category/module/src/site/site.xml
Layout file for the site, required to add a menu entry for the review information
modules/category/module/src/site/apt/review.apt
Almost Plain Text file for copyright and licensing info
modules/category/module/src/main/java
Module Java source files
modules/category/module/src/main/resources
Resources to be included in the JAR file
modules/category/module/src/test/java
JUnit tests source files
modules/category/module/src/test/resources
Resources required for tests only
modules/category/module/target
Automatically created for Maven output (details below)
Module Targets:
modules/category/module/target/classes
Generated class files, results of last 'maven compile'
modules/category/module/target/site
Files for the automatic website, from 'maven site:site'
modules/category/module/target/site/apidocs
Generated javadocs, from last 'maven javadoc:javadoc'
modules/category/module/target/surefire-reports
Logs from junit, from last 'maven test'
modules/category/module/target/test-classes
Generated junit classfiles, from last 'maven test'
modules/category/module/target/module-2.4-SNAPSHOT.jar
Generated jar file, from last 'maven install'
Module Categories (From 8 Design and Architecture )
category
directory
example
module
purpose
Core
modules/library/
api
stable geotools interfaces
referencing
default implementations of geoapi interfaces
main
geotools library w/ default implementations, includes non stable interfaces
render
implementation of geotools SLD conformant rendering system
Plugin
modules/plugin/
postgis
modules that dynamically intergrate to the geotools library at runtime
Extention
modules/extension/
validation
extentions and extras built on top of the geotools library
Unsupported
modules/unsupported/
oracle
modules that are not ready yet, or are orphaned and no longer have a contact
person
Demos
demo/
gui
small working examples, usually part of a tutorial
5. 5 Refactoring
Refactoring is the process of restructuring/renaming your code to ensure your design remains clean as your requirements and functionality
change and grow with time.
Refactoring is best explored using the excelent book writen my Martin Fowler.
Subversion Warning
SVN wants to know what you are doing, please use the svn move name1 name2 command
when refactoring to let svn keep track of history information.
This is especially important when using either of the tools at the end of this page - although we can hope that more complete
svn intergration is available for Eclipse shortly.
Changing public API
Before to refactor a method, make sure that it didn't had public access in the previous Geotools release. If not, go with the refactoring. If it was
public, then we need to go through a "deprecate, then remove" cycle. For example consider the following method:
/**
* Do some stuff.
*/
public void foo(double x, double y) {
// Do something
}
Suppose that Geotools 2.3 is already released and we are working on Geotools 2.4. Suppose that we want to add a String argument to the
above method. Do not refactor this method directly like this:
WRONG
/**
* Do some stuff.
*/
public void foo(String title, double x, double y) {
// Do something
}
Instead, duplicate the method for at least one Geotools release:
Better
/**
* Do some stuff.
*
* @deprecated Replaced by {@link #foo(String,double,double)}.
*/
public void foo(double x, double y) {
foo(someDefaultTitle, x, y);
}
/**
* Do some stuff.
*
* @since 2.4
*/
public void foo(String title, double x, double y) {
// Do something
}
Note the @since 2.4 javadoc tag. It is an important hint for both users and the module maintainer, so do not forget it. The deprecated method
can be removed in Geotools 2.5.
Keep methods private
Does it sound like tedious to apply the above procedure everytime we want to refactor a method? Then keep your methods
private!! Hide the internal mechanic as much as possible and declare public only the methods that are really expected to be
used. If you need to share the internal mechanic with other classes that perform a related work, consider the package private
access (chances are that related classes are declared in the same package). Think very hard before to give public access to a
method. In case of doubt, keep it private until we get more experience about that particular method. It is much easier to turn a
private method into a public one later than trying to change an already public method.
Giving public access to a private method
Wanting to turn a private method into a public one? Before to do so, make sure that the method is declared at the right place for public access. In
many cases, private methods are convenience methods performing some work that are only indirectly related to the main purpose of the
enclosing class. For example an Apple class may have a compareOranges private method for whatever internal reason. If you need public
access to this method, replacing the private keyword by public is not enough! Consider moving this method to the Orange class. Keep also
in mind that the method will now be used in a wider context than it originaly did, so check if it made any assumptions that need to be revisited.
Refactoring tools
RefactorIt
To ease refactoring you can use RefactorIt which provides tools to:
research, probe and understand existing source code,
move, organise and transform existing code,
and provide code metrics.
More details can be found from the online help.
RefactorIt is commercial, but provides free licences for Open Source projects like Geotools. See the RefactorIt web pages for details. It can be
plugged into a variety of IDEs, including Netbeans.
Installation in to GEOTOOLS:Netbeans fairly strait forward through Tools -> RefactorIt -> Project Options, although setting up soucepath and
classpath is a difficult if some of the geotools files don't compile. You will need to either remove the offending files, get them to compile or remove
them from RefactorIt's sourcepath.
Eclipse Developers Guide Refactoring
Eclipse has many refactorings available, mostly through context menus.
Netbeans Refactoring
Netbeans has many refactorings available, mostly through context menus.
5. 6 Code Profiling
Code profilers are tools which analyse performance and memory of applications. We have several good free tools that we have used.
HPJMeter
HPJMeter analyzes profiling data from hprof (provided with JDK).
To invoke hprof, run java with the following options:
-Xrunhprof:cpu=samples,thread=n,depth=40,cutoff=0,format=a
At the end of the run you'll find a java.hprof.txt file that can be opened with HPJMeter.
Eclipse Profiler PlugIn
The following eclipse profiler is recomended:
http://eclipsecolorer.sourceforge.net/index_profiler.html
Net Beans and HPJMeter
If you are running from Netbeans:
select:
Tools -> Options -> Debugging and Executing -> Execution Types -> right click -> New -> External Executor
Rename the new executor HProf External Executor (or whatever you like).
Still in the Options dialog box, open
HProf External Executor -> Properties -> External Process
and in arguments add at the beginning:
-Xrunhprof:cpu=samples,thread=n,depth=40,cutoff=0,format=a {assertEnabled}
hprof will be launched every time you select this kind of executor.
Go to:
HProf External Executor -> Expert -> Working Directory
Set a working directory:
Eg /home/<username>/tmp/hprof
Hprof dumps the resulting text file in this directory.
This setting modifies the working directory of the java JVM. Make sure the working directory exists, otherwise the executor won't work.
Close the options dialog and select the file you want to profile
select (right click on file to profile) -> Properties -> Execution -> Executor
Set to the HProf External Profiler.
Run
At the end of the run you'll find a java.hprof.txt file that can be opened with HPJMeter.
5. 7 Testing
As you code, you should write a unit test for each class to test the functionality and robustness of the class. This is made much easier by using
JUnit.
JUnit is very good at:
capturing a Jira bug report in a reproducable manner
allowing you to specify exactly the behaviour your want - before you start coding
unit testing
The general idea:
If you are testing src/org/geotools/module/HelloWorld.java
create a file test/org/geotools/module/HelloWorldTest.java
any public void methods starting with test will be run by JUnit
maven will run all tests for your module using: mvn test
tests can be ignored using you pom.xml file
maven will not "release" your module into the repository while it still fails unit testing
Code Coverage vs Regression Testing
Code Coverage reports are available via:
mvn site
The percentage reported is based on the lines of code your test cases manage to test, please limit this to "real" tests - although
we demand 60% test coverage for supported modules we would much rather this is produced honestly.
Creating boiler plate tests that just call assertEquals against every method, and cutting and pasting the current result is an
example of a regression test. While this will catch changes in our codebase it is not nearly as useful as actually testing for what
you expect.
Use of Maven Test Profiles
pending review
You can also make use of maven profiles to isolate long running tests from the day to day grind of other GeoTools developers.
Install with all normal tests:
mvn install
Install with online tests (will connect to servers around the world):
mvn -P online install
Install with stress tests (long running tests that try to break the code using many threads):
mvn -P stress install
You can combine profiles as needed:
mvn -P online,stress install
To keep build times down (so tests are run at all) we ask you to stay in the following time limits.
20 seconds
for a module
5 seconds
for a plugin
5 seconds
for an ext
Tests on unsupported modules are not subject to a time limit, to run your tests in an unsupported module you will need to make use
of the provided profile:
mvn -P unsupported install
Example TestCase
package org.geotools.module;
import org.geotools.map.BoundingBox;
/**
* Unit test for BoundingBox.
*
* @author Cameron Shorter
*/
public class HelloWorldTest extends TestCase {
/** Test suite for this test case */
private TestSuite suite = null;
/**
* Constructor with test name.
*/
public HelloWorldTest(String testName) {
super(testName);
}
/**
* Main for test runner.
*/
public static void main(String[] args) {
junit.textui.TestRunner.run(suite());
}
/**
* Required suite builder.
* @return A test suite for this unit test.
*/
public static Test suite() {
TestSuite suite = new TestSuite(HelloWorldTest.class);
return suite;
}
/**
* Initialize variables
*/
protected void setUp() {
// initialize variables
}
/** Test normal constuctors. */
public void testHello(){
assertTrue("HelloWorld should return null is true",HelloWorld.isNull());
}
}
Testing with junit is as easy as copying HelloWorldTest.java and adding more tests, and then executing it. If you want more information, look
at the junit documentation or read one of the many junit tutorials.
Online Tests
We make use of a naming convention, ie ensure the name of your TestCase ends in OnlineTest, to indicate the use of external web services and
databases. If a unit test requires a network connection to pass, it is an online test.
These tests will be skipped as part of the normal build process, but will be executed by certain build boxes.
In addition to the naming convention, JUnit 3 online tests should extend the OnlineTestCase class, since it will extract connection parameters
from fixture properties files in the user's ~/.geotools directory with minimal hassle. Test cases extending this class will need to implement the
getFixtureId() method which will return the identifier for a fixture; a fixture id of "postgis.typical" will attempt to read the file
"~/.geotools/postgis/typical.properties".
Fixture property files allow site-specific connection information such as database authentication credentials to be provided outside the public
GeoTools code base. For example, a developer might provide access to a test database in their own PostGIS instance, but not want to share this
online resource with the public. Fixture property files make it easy for other developers to configure online tests to use their own private resources.
JUnit 4 online tests should extend OnlineTestSupport, which provides the same functionality as OnlineTestCase.
The default behaviour of OnlineTestCase is that, if connect() throws an exception, the test suite is disabled, causing each test to pass
without being run. In addition, exceptions thrown by disconnect() are ignored. This behaviour allows tests to be robust against transient
outages of online resources, but also means that local software failures in connect() or disconnect() will be silent. To have exceptions
thrown by connect() and disconnect() cause tests to fail, set skip.on.failure=false in the fixture property file. This restores the
traditional behaviour of unit tests, that is, that exceptions cause unit tests to fail.
Each module should try to provide default fixture files pointing to publicly accessible servers. Users running online tests will copy these defaults
and customize them accordingly. If a fixture file is missing, its tests will not be run; therefore, if one deletes the ~/.geotools/oracle directory, for
example, all oracle online tests will be disabled.
For more details see: Online Test Fixtures, which defines the identity of each fixture and what its expected qualities and contents are.
Example Use
Example use (using PostgisOnlineTestCase):
public abstract class PostgisOnlineTestCase extends OnlineTestCase {
protected DataStore dataStore;
protected abstract String getFixtureId();
protected void connect() throws Exception {
Map params = getParams();
dataStore = new PostgisDataStoreFactory().createDataStore(params);
}
public Map getParams() {
Map params = new HashMap();
params.put(PostgisDataStoreFactory.DBTYPE.key, "postgis");
params.put(PostgisDataStoreFactory.HOST.key, fixture.getProperty("host"));
params.put(PostgisDataStoreFactory.PORT.key, fixture.getProperty("port"));
params.put(PostgisDataStoreFactory.SCHEMA.key, fixture.getProperty("schema"));
params.put(PostgisDataStoreFactory.DATABASE.key, fixture.getProperty("database"));
params.put(PostgisDataStoreFactory.USER.key, fixture.getProperty("user"));
params.put(PostgisDataStoreFactory.PASSWD.key, fixture.getProperty("password"));
if (fixture.containsKey("wkbEnabled")) {
params.put(PostgisDataStoreFactory.WKBENABLED.key, fixture.getProperty("wkbEnabled"));
}
if (fixture.containsKey("looseBbox")) {
params.put(PostgisDataStoreFactory.LOOSEBBOX.key, fixture.getProperty("looseBbox"));
}
return params;
}
protected void disconnect() throws Exception {
dataStore = null;
}
}
Example LocalPostgisOnlineTest
And here is a sample use:
class LocalPostgisOnlineTest extends PostgisOnlineTestCase
protected abstract String getFixtureId(){
return "local";
}
}
{
As a rule of thumb, online tests should not fail if a server is unavailable.
Example Fixture
Example fixture ~/.geotools/postgis/local.properties:
host=localhost
port=15234
schema=bc
user=postgres
passwd=postgres
database=bc
wkbEnabled=true
In windows you cannot create a ".geotools" folder!
1. Open up a CMD window
2. cd to your home directory and use mkdir
C:\Documents and Settings\Fred>mkdir .geotools
3. And set up any fixtures you need:
C:\Documents and Settings\Fred>cd .geotools
C:\Documents and Settings\Fred\.geotools>mkdir postgis
C:\Documents and Settings\Fred\.geotools>cd postgis
C:\Documents and Settings\Fred\.geotools\postgis>notepad typical.properties
# And use the [default fixture files|http:
//svn.geotools.org/geotools/trunk/gt/build/fixtures/] as a guide
Examples:
PostgisOnlineTestCase - Abstract Testcase class which connects to a specified database and creates a datastore
PostgisPermissionOnlineTest - Simple online test which makes use of PostgisOnlineTestCase
Online Test Fixtures
Any junit test in geotools which makes use of remote resources should provide the connection settings in a fixture file. If a user ...
When placed in the users home directory, ~/.geotools/fixtures/..., the user will be able to redirect the
Fixture Definitions
epsg
Used for modules with the naming epsg-*.
epsg/oracle.properties
postgis
postgis/demobc.properties
default fixture
nogeos.properties
restricted.properties
typical.properties
5. 8 Test Data
If your tests require test data, there are a couple of things to keep in mind.
test-data folder
TestData Utility Class
Sharing test files accross many modules
test-data filename:
Temporary filename:
test-data folder
There are two guidelines for handling of data required for testing:
Java: test data (xml files, png files, whatever) should be stored in a test-data directory next to your test case (the use of test-data
makes it obvious that the directory is not a package, similar to the use of doc-files for javadoc).
Maven: The maven build system recommends that all test resources be placed into src/test/resources.
Combining these two guidelines we end up with the following:
src/main/java/org/geotools/example/Fred (the class under test)
src/test/java/org/geotools/example/FredTest
src/test/resources/org/geotools/example/test-data/fred.xml
TestData Utility Class
The TestData class provides several convience methods to aid in this process.
import junit.framework.TestCase;
import org.geotools.resources.TestData;
// ... snip other imports ...
public class MyTest extends TestCase {
public void testImage() throws IOException {
InputStream in = TestData.openStream( this, "my_data.properties" );
Properties properties = new Properties( in );
in.close();
assertTrue( properties.contains("something") );
}
}
Specifically:
file( this, "filename" ): File
url( this, "filename" ): URL
openStream( this, "filename" ): InputStream
openReader( this, "filename" ): BufferedReader
openChannel( this, "filename" ): ReadableByteChannel
temp( this, "filename" ): File (uses default suffix of ".tmp")
You can also use the the standard java construct for temporary files:
File victim = File.createTempFile( "graph", "tmp" );
victim.deleteOnExit();
The main extra that TestData.temp( this, "filename" ) offers is a predicatable location for your temp file, rather than the System
specific location. It also make a harder attempt to delete the file on program termination.
Note: temporary files are kind of magic and have a random number inserted between the prefix and suffix (in order to keep them unique).
Open streams must be closed
When using any openFoo method, don't forget to close the resource after usage! Do not rely on object finalization for that.
Temporary files are not deleted on program termination if some streams to that files still open.
Sharing test files accross many modules
Some test files are used by many modules. A typical example is the statepop shape file. Shared files must be in the test-data directory of the
sample-data module. They can been read as in the following example:
import junit.framework.TestCase;
import org.geotools.TestData;
// ... snip other imports ...
public class MyTest extends TestCase {
public void testShapefile() throws IOException {
ReadableByteChannel channel = TestData.openChannel("shapes/statepop.shp");
ShapefileReader
reader = new ShapefileReader(channel, new Lock());
// ... Peforms tests here ...
channel.close();
}
}
Note the differences compared to the first example above in this page:
Import the TestData class from org.geotools rather than org.geotools.resources. This is needed in order to get access to the
org/geotools/test-data directory provided in the sample-data module.
Invoke TestData.openFoo(filename) method without this argument value. This is because we want TestData to searchs
resources into the shared org/geotools/test-data directory instead of some other test-data owned by the module performing
the tests.
Because the statepop.shp files is bundled into the sample-data JAR file, it is available as an URL only. Consequently, some
operations usually available for files (like random access) may not be available for shared resources.
But I need a Filename
Even if the code you are testing wants a filename you can still use the above contructs. The call to TestData.copy(this,
...) copies the named file from the shared resources to the caller test-data directory, which enable access as a file.
test-data filename:
TestData.copy( this, "my.shp" );
File file = TestData.file( this, "my.shp" );
System.out.println( file.getAbsolutePath() );
// Something like: C:\....\test-data\my.shp"
Temporary filename:
File temp = TestData.temp( this, "my.shp" );
System.out.println( temp.getAbsolutePath() );
// Something like: C:\....\test-data\my12345.shp"
5. 9 Versioning
Module Version Numbers
Each GeoTools2 module contains it's own version number. Version numbers are based on 3 digits:
<major>.<minor>.<patch>
Major (first digit), is incremented to indicate that a module has lost full compatibility to earlier versions. So you can safely upgrade to later
versions of a module so long as the major version has not changed.
Minor (second digit) is incremented whenever new features are added.
Modules are forward compatible across minor versions, but usually not backward compatible.
Patch (last digit) is for bug fixes. It is used to indicate fixes in bugs only. No new features were made and full compatibility is preserved.
In practice...
The above is theory. In practice, we released some patch versions that contained new features. We also released minor
versions that were not forward compatible with older releases (usually through the removal of deprecated methods). This policy
on numbering may be revisited later in order to better match the current practice.
Version Number and Maven
Maven is intimently aware of version numbers (in fact they have been seeing each other for some time).
Maven tracks the following information:
gt/pom.xml - id is used to name the project (gt2eclipse will use this)
gt/pom.xml - groupId is used to name the maven repository folder
module/*/pom.xml - name is used for the display name (website and output)
module/*/pom.xml - id is used to generate the name of the jar (and track dependency)
module/*/pom.xml - groupId is used to name the target maven repository folder
dependency)
The module version number is set in the <version> element in
<module>/pom.xml
. Maven uses this value during the build process to figure out what to call generated jars.
root
trunk
maven
name
Geotools 2
id
gt2
groupId
gt2
target repository folder
currentVersion
2.4-SNAPSHOT
default version number
module/main
trunk
maven
name
Main module
website & output display name
id
main
used to name the repository jar
groupId
gt2
target repository folder
currentVersion
2.4-SNAPSHOT
used to name the repository jar
Tagging Releases
The release process has changed a bit since moving to subversion for details please see How to cut a release.
@since javadoc tag
Every public and protected class, interface, method or field should have a @since javadoc tag. If the Geotools 2.2 release is under development,
then every new API should be identified with a @since 2.2 tag. For the end user, it means that:
All classes and methods with a @since 2.0 or @since 2.1 javadoc tag are safe. Because they were there is previous releases, they
will not change except for bug fixes (a few of them may be deprecated however).
Any classes and methods with a @since 2.2 javadoc tag may be modified, moved or deleted without warning until the 2.2 final release.
6 Documentation
The chapter covers some writing guidelines for GeoTools documentation, along with some tips and tricks for working with Confluence.
01 User Guide Welcome
02 User Guide
05 Confluence Tips and Tricks
06 GeoTools 2.0 Documentation
You may wish to review 3.4 Websites which covers how to get edit access for the wiki.
01 User Guide Welcome
The Welcome section of the Users Guide is devoted to introduction material and tutorials.
Since there is no module maintainer for overview and background knowledge of this nature we need to be very careful that it is always up to date.
All example code used in the wiki must be present in the demo folder.
By making use of the demo folder we will ensure that the code:
Compiles and Functions
Is kept up todate as API changes occur
It is the responsibility of those making an API change to update the demo code, and associated wiki pages. Please be kind and include a link to
the wiki page in your demo code javadocs.
Welcome
00 Source License
01 Documentation License
02 Meet the GeoTools Library
03 First Project
04 How to Read a Shapefile
06 CSV2SHP Lab
07 PostGIS Lab
08 ImageLab
09 ShapeLab
10 Communication and Support
FOSS4G 2006 Presentation
How to Create Something
How to Find a Factory
Use of Standards
Welcome to Eclipse Developers
Welcome to JUMP Developers
Welcome to NetBeans developers
Welcome to uDig Developers
What API Should I Use
Writing Guidelines
When writing for the welcome section please consider the target audience as experienced in Java, but not experienced with spatial constructs and
ideas. We must focus on results, not correctness.
Here are some examples:
Introduce the concept of a Feature, but not Java Generics
Show first, explain after - given your target audience showing them the source code first will put them at ease. That way when you are
talking about what a Feature means afterwords they will know to pay attention (it is after all a real concept that they must deal with in the
form of a Java interface).
Leave the specifications out of it as much as possible. You can link to the specifications as "related information", and talk about ideas
such as ISO Geometry - but do not drive people crazy. They are here to get a job done - it is your job to understand the specification so
they do not have to.
You can create a "Welcome for..." page if you have a different target audience in mind.
Use of Demo
For any code examples used in your article please
02 User Guide
Guidelines for writing in the GeoTools User Guide
Welcome
Welcome Writing Guidelines
Reference Material
General Approach
Documenting a Module
Code Examples
Documenting Plug-ins for a Module
Extensions
Unsupported
Advanced
Guides
Depreacted
GeoTools User Guide Contents:
01 Welcome
02 GeoAPI
03 JTS Topology Suite
04 API
05 Util
06 Metadata
07 Referencing
08 Grid Coverage
09 Main
10 Data
11 JDBC
12 Render
13 XML
14 CQL
15 Extensions
16 Unsupported
17 Advanced
18 Guides
19 Depreacted
Welcome
The Welcome section of the Users Guide is devoted to introduction material and tutorials.
Since there is no module maintainer for overview and background knowledge of this nature we need to be very careful that it is always up to date.
All example code used in the wiki must be present in the demo folder.
By making use of the demo folder we will ensure that the code:
Compiles and Functions
Is kept up todate as API changes occur
It is the responsibility of those making an API change to update the demo code, and associated wiki pages. Please be kind and include a link to
the wiki page in your demo code javadocs.
Welcome Contents:
00 Source License
01 Documentation License
02 Meet the GeoTools Library
03 First Project
04 How to Read a Shapefile
06 CSV2SHP Lab
07 PostGIS Lab
08 ImageLab
09 ShapeLab
10 Communication and Support
FOSS4G 2006 Presentation
How to Create Something
How to Find a Factory
Use of Standards
Welcome to Eclipse Developers
Welcome to JUMP Developers
Welcome to NetBeans developers
Welcome to uDig Developers
What API Should I Use
Welcome Writing Guidelines
When writing for the welcome section please consider the target audience as experienced in Java, but not experienced with spatial constructs and
ideas. We must focus on results, not correctness.
Here are some examples:
Introduce the concept of a Feature, but not Java Generics
Show first, explain after - given your target audience showing them the source code first will put them at ease. That way when you are
talking about what a Feature means afterwords they will know to pay attention (it is after all a real concept that they must deal with in the
form of a Java interface).
Leave the specifications out of it as much as possible. You can link to the specifications as "related information", and talk about ideas
such as ISO Geometry - but do not drive people crazy. They are here to get a job done - it is your job to understand the specification so
they do not have to.
You can create a "Welcome for..." page if you have a different target audience in mind.
Reference Material
The bulk of our user guide is devoted to reference material, on a module by module basis. Please keep in mind that this is reference material
focused on results - ie code examples to accomplish a specific purpose. We do not need a bunch of design documentation here, show us what
your code can do.
You may want to briefly introduce any new concepts specific to your module, but please leave the definitions of what things are to the javadocs.
As an example:
When documenting Main you can mention what a Feature is used for - since DefaultFeature is the first implementation a user will have
used.
When documenting WFS you can mention what a Web Feature Server is - since that is the new concept for your plugin, but please don't
define what a Feature again.
Focus on useful results and examples, leave the background information to the specifications and welcome section
Do not:
You do not need to go all out and define the interfaces - we have javadocs for that.
General Approach
The GeoTools user guide is set up as a one two punch:
One: The Javadocs define the Concepts (users can see what a class is when they look at a tooltip in their IDE)
Two: The Reference Material here provides example code
The expected Use of this material is (honestly):
1. User finds the wiki page using google
2. They cut and paste the source code into their program
(They may curse a bit as they hunt down dependencies but that is not your fault)
3. Their IDE can show them the Javadocs for any classes (incase they wonder what something is).
With this in mind our goal is to provide code examples showing how to perform common tasks.
Documenting a Module
Each page of documentation is prefixed with a number; in order to ensure order when exporting the user guide. If possible try and use a {toc}
(table of contents) tag near the top to allow users to quickly navigate down the page.
A FeatureCollection is used to represent a set of Features (often returned as the result of a query):
{toc}
Related:
* [02 FeatureSource]
h1. Creating a FeatureCollection
h2. Using FeatureSource.getFeatures()
h2. Using FeatureCollections.newInstance()
h1. Using a FeatureCollection
h2. FeatureVisitor
h2. Iterator
h2. Feature Iterator
It looks like using a number to prefix the page name may not be strictly required anymore (since a new update to Confluence lets us set page
order)
Code Examples
Please isolate complete working examples as a demo module. For most quick examples taking content from your tests cases will be just fine.
Please remember to mention the wiki page in your javadocs, so we can keep the two in sync.
If you are really lazy you can provide link to your test case in from the wiki - so users can check that the example code is still valid themselves.
Documenting Plug-ins for a Module
Each module that allows plug-ins should have the plug-ins listed as child pages; there is no need to "prefix" these pages with a number as
Alphabetical order will be fine (every plugin is considered equal).
Extensions
The extensions are functionality that are built "on top" of the core library; we have a child page for each extensions.
Extensions Contents:
Brewer
Graphs
MapPane
Validation
WMS
Unsupported
Unsupported modules (that bother to have any documentation at all) are listed here - one child page for each unsupported module. This is mostly
used as a staging area when an unsupported module is getting ready and meeting its documentation requirements.
Unsupported Contents:
Swing
EPSG Oracle Plugin
JTS Wrapper Plugin
Process Plugin
WPS Plugin
Catalog
Geometry Plugin
App-Schema
Oracle Plugin
Vector grids
Advanced
Advanced Materials cover "Intergration" of GeoTools with facilities provided by an existing application.
Easy: Logging (teaching GeoTools how to make use of an application's existing logging facilities)
Medium: Making use of a Java EE application server that shares JDBC Connection Pools between running applications
Hard: An organizations that has a single EPSG database for a workgroup (and have registered this database as a JNDI service).
All of these issues boil down to careful application of:
Factories (how you can teach uDig new tricks)
Hints (generally used to inject your own Factory into GeoTools)
Advanced Contents:
01 Sample Data
02 Integration Basics
05 How to write a Plugin - from Interface to Factory
15 Commons Pool
Guides
Advanced Guides on specific topics; the target audience is now a fellow GeoTools developer who wishes to implement a new plugin.
Guides Contents:
DataStore Developers Guide
Feature Model Guide
Generating Image Pyramid Guide
JDBCDataStore Developers Guide
Referencing Developers Guide
XML Developers Guide
Depreacted
A collection of old reference material that is now outdated; copy old code examples here as API is updated.
05 Confluence Tips and Tricks
Page Hierarchies
Related wiki pages can be grouped into hierarchies. For example, all tutorials are children of the Tutorials page. You can set a page's 'parent
page' property to make it a child of the parent. Using a hierarchical organization makes the hundreds of wiki pages easier to navigate in the
directory view of the wiki.
Hierarchies also allows wiki macros to be used to create table of contents of the child pages (as done for the FAQ and Reference pages). The
table of contents is organized alphabetically. If you need the pages to be ordered, prepend numbers to them. The following macro creates a table
of content of all the child pages:
{children:all=true|excerpt=true}
The above macro also includes page excerpts in the table of contents. An excerpt can be created with the following wiki tag:
{excerpt}an excerpt{excerpt}
Use of pages and Links
Link early link often, and the pages will come.
Feel free to link to pages that don't exist yet, or to reference terms a reader may not know. Undefined pages act as reminders to write new
content, and can be found from the Reports on the Space Summary page.
Linking to References
Since all references are on their own page, they can just be linked like any other page. For example:
The design of the [GEOTDOC:GCE] was influenced by the [GEOTDOC:Web Map Server] specification.
Including page content in other pages
Sometimes you will want to include information in one page in many different pages. You can use the following tag to accomplish this:
{include:quicklinks}
Special Characters
Unfortunately the Confluence wiki software does not like page names with '?' characters. Also, pages with '-' characters in their names do not link
correctly on the http://geotools.codehaus.org/ view of the wiki.
Use of Attachments
The confluence system allows the use of images:
1. Upload the picture as an attachment
2. Refer to it: !my-image.png
Use of Export
Export to PDF and html work. The series of check boxes used to specify each page is a bit clunky but life will go on.
We will probably make use of export to html (and provide a custom style sheet) when exporting the developers guide for release.
A few glitches remain:
Comments are always exported
Exporting to PDF can take a long time
06 GeoTools 2.0 Documentation
The following pages were used to collection information for the GeoTools 2.0 release - information is being migrated to the user guide as needed.
Tutorials - Use for lessons and discussions, with sample code, about the geotools codebase. Such tutorials can be printed out and
referenced as the library is learned. UML diagrams are also common here.
Snippets - A place for small pieces of sample code that do not have to be full worked examples. Some Snippets may latter be further
developed into tutorials.
Articles Non-coding documents (miscellaneous).
FAQ - Answers to questions that new users and developers may have.
RnD - Proposed new features for the geotools library.
Home - (aka Developers Guide) A place for project procedures and standards.
Reference - A list of abbreviations and acronyms. New references are added as children pages to the reference pages. If you want to go
the extra mile you can provide an information hierarchy for things like OGC Specifications, GIS Terms, Definitions and so on.
7 Project Procedures
Building the Website
Continuous Integration
Creating your own Module
GeoTools change proposal
Gold Star Quality Assurance Check
Hacking
How to add a 3rd party jar
How to cut a release
Making a major API shift
Supporting your module
Working on a stable branch
Building the Website
This page describes how the geotools.org and docs.geotools.org sites are built and how to modify and maintain them.
Server Setup
The sites are generously hosted by osgeo and live on the server projects.osgeo.osuosl.org.
All the site files are located at /osgeo/geotools/htdocs. This directory contains two main sub directories:
web - Root of the main geotools.org site
docs - Root of docs.geotools.org site
Under the docs folder are two folders:
stable - Root of docs for current stable branch
latest - Root of docs for trunk
Under each of the stable|latest folders are the folder:
userguide - Root of user guide for that branch
javadocs - Root of the javadocs for that branch
The apache configuration files are located in the /etc/apache2/sites-available directory.
The script /home/geotools/update_site.sh is used to update the published site once doc artifacts are uploaded to the server. See below
section.
Server Access
The site is built and owned by a user named "geotools". In order to login to the server as the geotools user you must obtain the appropriate
private key. Contact the PSC to obtain the private key and copy it into your .ssh directory.
Once the private key has been obtained one can log into the server with the following command:
ssh -i ~/.ssh/id_rsa_geotools [email protected]
Site and Doc Generation
The site and docs are generated by the two hudson jobs:
http://hudson.opengeo.org/hudson/view/geotools/job/geotools-2.6.x-docs
http://hudson.opengeo.org/hudson/view/geotools/job/geotools-trunk-docs
Upon successful builds the docs and sites are uploaded directly to the server. Once uploaded the update_site.sh is used to unpack the
artifacts into the web root and publish the site.
Continuous Integration
The geotools continuous integration build is managed by Apache Continuum. The build monitors the subversion repsository and triggers a build
every time a commit occurs.
Debugging the Build
Manually Triggering a Build
Build Failures
In the event of a build failure, continuum will email the developers list with the details of the build that failed
To: [email protected]
Subject: continuum BUILD FAILURE: Geotools
Online report : http://geo.openplans.org/continuum/servlet/continuum/target/ProjectBuild.vm/view/ProjectBuild/id/1/buildId/113
Build statistics:
State: Failed
Previous State: Failed
Started at: Tue, 16 Jan 2007 12:00:48 -0500
Finished at: Tue, 16 Jan 2007 12:01:49 -0500
Total time: 1m 0s
Build Trigger: Schedule
Exit code: 1
Building machine hostname: geo
Operating system : Linux(unknown)
Java version : 1.4.2_12(Sun Microsystems Inc.)
Changes
aaime Fix for geot-1121
/geotools/trunk/gt/modules/library/main/src/main/java/org/geotools/filter/FunctionFinder.java
...
In the body of the email you will find the changelog and entire build log.
Fixing the Build
In the event where you have caused a build failure, you should fix it
. This can be done by simply comitting the fix. Continnuum with catch the
commit and trigger another build. Or if you are impatient you can manually trigger a build.
Debugging the Build
Often things will work fine in your local environment, but fail on the build server. You can use the continuum web interface to help diagnose the
problem. From http://geo.openplans.org:9090/continuum/servlet/continuum/target/View.vm/fid/maven2Project/id/1 you can view information abou
the geotools build.
Viewing the Build Log
At the top of the main geotools information page is a link labelled Builds. From this page all the information from recent builds is available.
Clicking on a Result link located on the right hand side of the page allows one to view the build log for a particular build.
Viewing the Test Reports
At the top of the main geotools information page is a link labelled Working Copy. From this page a view of the working copy of the codebase
stored on the server is available. One can freely navigate it to view test logs as needed.
Manually Triggering a Build
A build can be manually trigger from the Info page by pressing the Build Now button.
Creating your own Module
So you want to do something wild, exciting, and cough dangerous? Chances are people have encouraged you in your GeoTools endeavour (we
all love volunteers!). The following document outlines some guidelines to help make all of our lives easier (including yours).
Give warning - Get Permission
Step One: Email the List
Step Two: Set up a Wiki page
Step Three: Ask via Email
Step Four: Read the Developers Guide
Step Five: Create a little slice of SVN
Create a skeleton
Edit the base files
pom.xml
src/site/apt/review.apt
Edit some code
Ask for forgiveness
Commit to svn
But what about ... Questions
Step Six: Include Yourself in the Build
Edit the pom.xml
Try a build
Commit
Step Seven: Bon Voyage
Pearls of wisdom
Do not break the Build
Communicate early and often
Re-write your code
Unit tests are your friends
The first section deals with communication and the rest show where new code can be incorporated into GeoTools.
Give warning - Get Permission
Lets follow a couple of steps - just to start out with. The goal here is to let everyone know what is happening, and see if other are willing/able to
help.
Step One: Email the List
Someone on the list may already have plans, or they might help, they may even do step number two for you...
To: [email protected]
CC: [email protected]
Subject: Proposed Fish module
Hi Jody, I noticed that the geotools library lacks support for the small fish POJO objects you keep mentioning in your examples.
I would like to add this feature, by making use of Hibernate DataStore with a H2 backend. It will serve as an example use for new
users and will be funny.
Sincerely,
ARandomDeveloper
Most likely Jody will respond with the request that you make a Wiki page, (Jody is good that way).
Step Two: Set up a Wiki page
We use the wiki for collaboration, and sometimes even documentation. Make sure you have access to the wiki (if you have not already), and set
up a page describing your idea.
1. Login to Confluence
2. Navigate to the RnD page
3. Select "Add Content" > and then "Add Page"
You can add as much, or as little, details as you require to communicate. Feel free to attach any design documents you have to the page,
introduce yourself and so on. It is always good to highlight any deadlines you have associated with the work.
Step Three: Ask via Email
We are not too formal, we just want to keep the lines of communication open.
To: [email protected]
CC: [email protected]
Subject: SVN Access request for Fish module
Well as requested I have read the developers guide (some of it looks out of date?),
and created a wiki page for my proposed module:
http://docs.codehaus.org/display/GEOTOOLS/Fish
I think all I need is svn access and I can get going.
Sincerely,
ARandomDeveloper
Even if if you do already have svn access is nice to email and let people review that wiki page. You never know, people may offer to help
Hopefully the email discussion will settle down, (perhaps with skill testing question about the developers guide), leaving you armed with an svn
password.
Step Four: Read the Developers Guide
This gives you something to do while waiting for feedback or authorization from a GeoTools PMC member, and makes you up to speed with the
conventions you need to know to effectively work with others.
Step Five: Create a little slice of SVN
The modules/unsupported/ directory is there to welcome your experimental work; that is what the directory is for - a little RnD.
Create a skeleton
The first step is to create a skeleton module for you work. The easiest way to do this is to copy, within svn, an existing module and alter that.
svn copy
Choose a module that is close to what you want, copy it to capture the 5.3 Module Directory Structure, and gut the
src/main/java, src/test/java and pom.xml files. Make sure to not copy the hidden .svn directories.
We have an "example" module all ready for you to copy:
svn cp http://svn.geotools.org/geotools/trunk/gt/modules/unsupported/example
http://svn.geotools.org/geotools/trunk/gt/modules/unsupported/fish
That should give you a working skeleton for your work.
Edit the base files
All modules have a standard set of files, which are detailed in the Module Directory page. We need to edit these to match the new module's name
and purpose.
pom.xml
We start by getting the pom.xml configured since maven will need that to work against the module. The following will start you out:
1. Change all occurances of the word example to the name of your module:
<groupId>org.geotools</groupId>
<artifactId>example</artifactId>
<packaging>jar</packaging>
<name>Example</name>
<description>
Supply a quick description here.
</description>
2. Supply information about yourself:
<developer>
<id>YOURID</id>
<name>YOUR NAME</name>
<email>[email protected]</email>
<organization>University, Organization or Company</organization>
<organizationUrl>http://organization.url</organizationUrl>
<timezone>YOUR_OFFSET_IN_HOURS</timezone>
<roles>
<role>Java Developer</role>
</roles>
</developer>
Note: YOURID should be your SVN login name.
src/site/apt/review.apt
This file describes the origin of the contents of your module and needs to be used to track any issues of copyright and licensing related to the
module. We need to know about any code which was not written directly by those with svn access. For example, if the module depends on an
external library, we need to know how it is that we are able to re-distribute that library under the LGPL. All modules should have such a file so, if
you started by copying a module such as the example module, you should have an example of the file, the contents which are required and the
formatting needed for those files.
Edit some code
Finally, your time to shine. Add your code to the src/main/java/ and src/test/java/ directories. If you need to add resources, these can
live in the src/main/resources/ and src/test/resources/ directories.
Ask for forgiveness
Before committing your new module, you should make everyone aware you are about to do so by sending another email to let everyone know you
are getting under way. Sometimes what you are asking so so strange that nobody will reply, and as a guideline I wait about three days before
going ahead.
Do send a final email out to the list and maybe ask the exhaulted leader to speak up.
TO: [email protected]
CC: [email protected]
CC: [email protected]
Subject: Starting work on Fish
Hi Developers and/or PMC,
The PMC is really busy, or exhausted from that last geotools breakout IRC has not gotten back to me.
I have started the "unsupported/fish" module where I will prototype a hibernate datastore fish example. When complete I would
like to get feedback from the list, it may be a candidate for inclusion in demo.
Thanks,
ARandomDeveloper
Commit to svn
Once you have a working base, commit to the shared svn and we are off and running...
But what about ... Questions
The Developers Guide should cover, or provide links to, information on:
1. updating your pom.xml
2. creating a test profile
3. using svn ignore on your "target" directory
and should answer most of the questions a new developer might have---its what we use to answer our own questions.
Beyond that, there are the mailing lists for users and for developers.
Step Six: Include Yourself in the Build
Once your module is stable and you are keeping it compiling as you work, you can include it in the shared build. This means everyone will have to
compile your module whenever they compile the rest of GeoTools.
When you first do this commit, you should take special care. Ideally you will work with someone else who can confirm that the build works with
their setup and you would try a test compile with a blank maven repository to ensure that others can access all the dependencies on which your
module depends.
Edit the pom.xml
1. Navigate to the unsupported/pom.xml file and update the list:
<modules>
<module>jpox</module>
...
<module>fish</module>
</modules>
Try a build
First you should make sure that your module can build as part of the entire GeoTools build using maven clean install.
Then you should try again, this time with a blank maven repository. First, backup or remove the maven repository which, by default, is hidden your
home directory as ~/.m2/repository/. Then, run a full build once again using maven clean install. This build will need an internet
connection and will take a while to download all the dependencies from the various servers. The build may even fail due to network issues; you
may need to re-run the command, perhaps a few hours later, to work around temporary network or mirror issues.
Ideally, you would then ask someone else, hopefully using a platform with a different architecture, to add the module to their build. If they succeed
we can be fairly sure the module will build for everyone.
Commit
Then you can commit your one line change. Welcome to the build!
Try to do this on a day when you will be around for the next few hours and available to deal with any problems which might arise. Your commit will
probably trigger the automatic build systems to run a build. If they fail, they will send messages out to the developer's mailing list and to the IRC
channel. If you can resolve the issues right away, you can avoid being kicked out of the build by someone else whose build suddenly starts failing
when compiling or testing your module.
Step Seven: Bon Voyage
We all hope your work is a success and will eventually migrate from the land of radical development into the core GeoTools library. When you feel
ready, you may decide to declare your module formally "supported" , at which point it could be moved into the modules/plugin/ or
modules/extension/ directories. Eventually, the work could even become part of the core library.
Pearls of wisdom
Before we leave you here are some pearls of wisdom for you on your road to success:
Do not break the Build
We do have this nice rule about breaking the build: don't. Make sure you run a full maven install and test cycle before you commit: do a mvn
clean install without using either the -DskipTests or the -Dmaven.test.skip=true flag. Yes, it takes longer; yes, it will save you some
day.
Communicate early and often
Try and send email to the developers list about your progress. Once a week during active development is cool, or drop by the weekly IRC
meeting. Ask for help, offer advice---it will all help you benefit from the expertise of others.
Re-write your code
Code only becomes polished and elegant when you have reworked it. You will improve as a coder as you work so re-writing old code will help you
catch things the old-you used to write (yuck!) and replace them with things the new-you writes (aaaah).
Unit tests are your friends
Developing a well structured test suite is almost as valuable as developing a good set of code. A well structured test suite can help you develop
high quality, robust, correct code.
GeoTools change proposal
This procedure is used to propose a change to the GeoTools API. By necessity all API changes must be applied to trunk (although RnD
experiments may of been carried out in a branch or unsupported module prior to being proposed).
So you want to make a Change
When to use this Procedure
This procedure is used at the start of your project; before deadlines are established to ensure that the work you need to
accomplish can be done and delivered.
When not to use this Procedure
This procedure is focused on API changes to the core library, for work limited to a plugin you should just be able to sort things
out with the module maintainer.
Repeat - this procedure is for changes to public interfaces, for simple bug fixes and mistakes chat the the module maintainer.
Playing nicely with others
This procedure is used to let us work in a controlled and managed fashion:
preserve library stability
allow evolution
forbid controversial changes
up to date documentation
When will this procedure be revised
We have the following measures of success:
We want trunk to be directly used by GeoServer and uDig projects
If this no longer occurs we will revisit this policy
We want the user documentation to reflect trunk
If a release is delayed waiting for documentation we will need to revisit this policy
Client code will have a full release cycle to change over from deprecated code
This is not always possible when the interface is not defined by the GeoTools project (examples GeoAPI, JTS and
Commons anything)
Release update instructions should be exacting
Here is a quick checklist:
Check
Task
Notes
Issue
The Jira issue will be used to record on going discussion
Proposal
This page reflects the current proposal
Email
Seek public feedback
Voting
Change is discussed and/or approved
Update
Introduce API change
Deprecate
Any prior art can be deprecated at this time
Documentation
Update documentation and examples
Release
API change must be included in a point release
Remove
Deprecated API can be removed after point release
Issue
You will need to create a new Jira issue to track discussion; this issue will eventually be marked as closed against a formal release and be
accessible to users.
Proposal
The proposal page is used to track the current state of the proposal; it will be modified as discussions and compromises are reached.
1.
2.
3.
4.
Open up Proposals
Select Add Content and then Add Page
Click on Select a page template and select Proposal
Press Next>> and fill in the blanks
The resulting document is yours to play with - here is what you get out of the box:
Motivation: Quick description of what is needed
Contact: Use your [~confluence_profile] or email address
Tracker: Link to your Jira Issue
Tagline: Have some fun
Description: Contains as much background material as you need to convey the problem; and towards the end of the process enough
design material to describe the solution
Status: Initially "under under construction", eventually we will move on to "approved" and "completed in GeoTools 2.5.0". There is also a
quick task list to mark where you are stuck.
Resources: List of child pages and attachments; often used for diagrams and documents
Tasks: a rough outline of the plan, we are looking to make sure that volunteer time exists to solve the problem (rather then just started).
Remember half a solution just looks like another problem.
API Changes: simple BEFORE and AFTER, this will be used in the update instructions associated with each release
Documentation Changes: Identify the developer and user documentation that needs to be modified as part of this proposal
The amount of detail you need depends on what you are up to:
change effecting multiple modules is significant and will need most of the above
change localized in the public API of a single module may be able to get by with only API changes and documentation
updates
Email
Once you have the proposal page in place, and the Jira issue ready to capture discussion it is time to send an email.
From: [email protected]
To: [email protected]
Subject: FunctionImpl Library separation
Justin found a short coming in our implementation of Functions; right
now we are focused on Implementation to the point we forgot to capture
the "idea" of a function.
Significantly if we do not have an implementation for a particular
function we cannot even represent that Expression in GeoTools.
This will require the introduction of a new API; and thus I am following
the GeoTools change proposal process and emailing the list.
Here are the links:
- http://jira.codehaus.org/browse/GEOT-1083
- http://docs.codehaus.org/display/GEOTOOLS/FunctionImpl Library separation
This change requires the introduction of *new* API (namely Library), and
will require the deprecation of our existing FunctionFactory extension
mechanism (as it is flawed). We can however "run with both" (i.e. duplicate,
deprecate, replace).
Cheers,
Jody Garnett
Voting
PMC members do vote on the change proposal, with the following votes:
+1
For
+0
Mildly for, but mostly indifferent
-0
Mildly against, but mostly indifferent
-1
Against
Required to have an alternate suggestion
To avoid stagnation by lack of interest/time from community members the following assurances are provided:
svn access for changes is granted within 3 days from the proposal
proposal is accepted 'automatically' within 15 days (unless objections are raised)
Since I am sure your change is interesting enough here is what you need to proceed:
A successful proposal with no negative -1 votes
You can consider the the alternatives provided with the -1 votes and revise your proposal
It is also strongly recommended that you have:
Approval from the module maintainer for the API you are changing, if they have a grand vision it is good to go along with it
A lack of panic from effected module maintainers
Update
You will need to update GeoTools to make the new API available, creating new classes adding new methods as needed.
interface Library {
FilterCapabilities getFilterCapabilities();
Object evaluate( String name, List params );
}
Please understand that adding methods to an interface is not always an option (since client code will be forced to update right away). You can
create an additional interface with the required methods (and give users one release cycle to implement this additional API).
Deprecate
The next step is to deprecate the API being replaced (in the case of new API this step can be skipped).
/** @deprecated Please use Library as a replacement */
interface FunctionFactory {
..
}
You (of course) must provide a replacement for deprecated API, it could be as simple as a workaround provided as part of the documentation.
Documentation
You will need to update all test cases and demo code to use the new API; since our test cases are often used by those learning the library this is
especially important (also leaving deprecated code in the test cases simply assures us of a broken build one release cycle later when the plug is
pulled).
The User Guide, and User Manual are often the target of documentation updates. The developers guide tries to stick to library architecture and
only needs updating if you are changing the scope and/or focus of one of the core modules.
Release
The next step is to make the changed API available in at least a milestone release. It is good to ensure that an API change is in releasable state
(this may pick up PMD failures or QA coverage needs that were missed earlier).
Remove
After the API change is included in a point release the deprecated code can be removed from trunk.
Gold Star Quality Assurance Check
The GeoTools Module Matrix makes use of a gold star system, just like in school. 3 stars or more is great, an X is used to indicate non working
modules.
This test is something quick, accessable and visisble to end users.
Testing a Module
Here is how a library (aka part of the geotools library API) may earn a star:
Passes IP check documented in review.txt file, basically has correct headers
Releasable - has no non blocking bugs in jira
Quality Assurance - Test Case coverage
Stability - based on reviewed GeoAPI interfaces or latest ISO/OGC spec (example referencing)
Supported - user docs, module maintainer watches user list, answers email etc.. (example referencing)
Testing a Plugin
Here is how a plugin (aka hooks into the geotools library) may earn a star:
Passes IP check, basically has correct headers
Releasable - has no non blocking bugs in jira
Used in anger - Used by GeoServer or uDig on large real world datasets
Optimized - has been tuned to meet hard performance requirements (example shapefile)
Supported - user docs, module maintainer watches user list, answers email etc.. (example referencing)
Testing an Extension
Here is how a extension (aka build on top of the geotools library) may earn a star:
Passes IP check, basically has correct headers
Releasable - has no non blocking bugs in jira
Quality Assurance - Test Case coverage
Stability - based onreviewed GeoAPI interfaces, or at least a ISO/OGC specification
Supported - user docs, module maintainer watches user list, answers email etc.. (example graph)
Hacking
So you want to fix something, or gasp improve, a part of the GeoTools library?
Chances are people have encouraged you in your geotools endevour (we all love volunteers!). The following document outlines some guidelines
to help make all of our lives easier (including yours).
Give warning - Get Permission
Lets follow a couple of steps - just to start out with. The goal here is to let everyone know what is happening, and see if other are willing/able to
help.
Step One: Talk to the module maintainer
They may already have plans, and they might help, they may do step number two for you...
To: [email protected]
CC: [email protected]
Subject: Proposed change to Postgis DataStore
Hi chris I noticed that the postgis datastore lacks a small pengin support from GO-1.
I would like to add this feature, by making use of new new SVG SLD icons support
storing the symbol used for pengins in the Postgis metadata table information.
The Go-1 spec contains the icon definition. Adding this metadata entry will allow LiteRenderer
(and thus GeoServer) to know the default icon assocaited with the table without additional client
intervention.
Sinceryly,
ARandomDeveloper
Most likely chris will respond with the request that you make a Jira task (Chris is good that way).
Step Two: Set up a Jira task
Jira tracks features as well as bugs. Create a Jira account (if you have not already), and set up a Jira task
for your proposed work.
Step Three: Email the list and explain what you want to do.
We are not too formal, we just want to keep the lines of communication open.
To: [email protected]
CC: [email protected]
Subject: Adding Pengin support to Postgis DataStore
I noticed that the postgis datastore lacks a small pengin support from GO-1.
I have created a Jira task: JIRA-234 and would like to begin work.
I will be making use of new new SVG SLD icons support
storing the symbol used for pengins in the Postgis metadata table information.
The Go-1 spec contains the icon definition. Adding this metadata entry will allow LiteRenderer
(and thus GeoServer) to know the default icon assocaited with the table without additional client
intervention.
This change should be transparent to existing code.
Sinceryly,
ARandomDeveloper
Even if if you are the module maintainer it is nice to email and give people a couple days notice, or ask for a vote if your changes will break other
peoples code.
You never know, people may offer to help
Step Four: Ask for forgiveness
Sometimes what you are asking so so strange that nobody will reply (or vote), and as a guidline I wait about three days before going ahead.
Do send a final email out to the list and maybe ask the exhaulted leader to speak for the module maintainer that did not reply to you?
It is also recomended that you strike up an ext/module and write some code for people to look at: chances are they did not understand you.
TO: [email protected]
CC: [email protected]
CC: [email protected]
Subject: Starting work on Postgis DataStore Pengin support
Hi James / Chris,
Chris is really busy, or lost in south america and has been unable to get back to me. The email list has not responded to JIRA-234
either. Apparently everyone is really busy.
I have started "ext/postgis-pengin" where I will prototype pengin support for postgis. When complete I would like to get feedback
from the list, or your approval before merging these changes into plugin/postgis.
Thanks,
ARandomDeveloper
Step 0: Don't break the Build
And remember don't break the build.
We do have this nice rule about breaking the build (don't). This means that if you are hacking core interfaces you will be running all over the
place cleaning up modules.
One very good reason to talk to the list first is to give other module maintainers a chance to get out of the way, or offer to help you clean up the
mess.
Get Going
Depending on what feedback you got you are in one of the following positions:
1. Exile to a Branch
2. Working on Trunk
Exile to a Branch
This is what all those branches in the svn repository are about - and they are not fun
Many great geotools capabilities started out life in a
branch: from the datastore api, through to grid coverage exchange and feature id mapping.
When asked to work on a branch please don't feel neglected. You are working on important aspects of the geotools library. Infact your work is so
important that it would impact current development. By having your own branch you are free to work on any module and do great things.
With Great Powers comes great responsibilities
You are responsible for:
merging your work back onto trunk
releasing a new GeoTools point release
If your branch lasts more then a couple of weeks this is going to represent a lot of work - please be warned and try to work
within the plugin system if at all possible.
svn branching
The svn book is a great resource here, you have read it haven't you?
Of course you have - so this will only serve as reminder for you:
svn cp http://svn.geotools.org/geotools/trunk http://svn.geotools/org/geotools/branches/wild_exp
Here is a good tip though - write down the revision number - there will be a test after class
Of course when you eventually merge your work back onto trunk you will need to go through that get permission cycle again - hopefully you can
scare up a few volunteers (at least for testing).
svn merging
Guess what it is after class you need that revision number.
Subversion merging is a strange beast - you are basically going to gather all the changes to your source tree from that version
number to now as one big happy diff.
And then apply that diff to trunk.
svn merge -r REVISION:HEAD http://svn.geotools/org/geotools/branches/wild_exp .
Or if you are more brave (or trusting):
svn merge http://svn.geotools/org/geotools/branches/wild_exp
http://svn.geotools/org/geotools/trunk .
Where . is your working copy.
In practice, we have often found that using svn copy for indivdual files that are entriely new, and use svn merge on the other files
one at a time works the best.
Go Ahead - working on trunk
This is actually the worst outcome - why?
Because you have landed on a critical path. That don't break the build guideline will really start to kick in.
This means that you really have to run maven (from scratch), and pass all tests, before you even think about committing.
You will also need to send out those permission emails all the time as you run over module after module with changes.
Working on an unsupported/ module or in a branch is way more fun.
However don't lose hope - others have braved this process - infact some of our GeoAPI updates have happened in just this fashion.
And on the bright side you will get lots of feedback when you break things.
How to add a 3rd party jar
This short document answers the question "So, how do I let everyone have a copy of a jar that my code depends on?".
Before You Start
This page does not apply to GeoAPI jars
Recommended reading
It really is not available - now what?
Deploying to Open Source Geospatial Foundation Maven 2 Repository
Deploying to OpenGeo Maven 2 Repository
Uploading to Ibiblio
Examples
Example JTS 1.12
See also:
http://maven.apache.org/guides/mini/guide-3rd-party-jars-remote.html
Before You Start
Please check the jar you are looking for may already be in a repository out there on the big bad internet:
1. Visit: http://mvnrepository.com/ and search
Example: swing layout
2. If you get a hit:
Confirm it is the jar you want:
Example: swing-layout
Navigate to the correct version and cut and paste the dependency into your pom.xml:
<dependency>
<groupId>net.java.dev.swing-layout</groupId>
<artifactId>swing-layout</artifactId>
<version>1.0.2</version>
</dependency>
3. You can also try the following site: http://maven.ozacc.com/
This page does not apply to GeoAPI jars
GeoAPI is a Maven 2 project and should be deployed using the mvn deploy command. See How to deploy a GeoAPI release to a Maven 2
repository in GeoAPI's wiki instead.
Recommended reading
If you are not familiar with the way to declare a dependency in a Maven pom.xml file, see "How do I use external dependencies?" in the Maven
Getting started guide. More information can also be found in the Guide to deploying 3rd party JARs to remote repository in Maven documentation.
Our build process does not include jar files inside the subversion repository, instead Maven downloads jar files it needs from remote repositories
(web sites). The location of these web sites is specified in the parent pom.xml file, which is inherited by all modules. There are mainly three sites
available:
http://www.ibiblio.org/maven2/
general utility open source projects, especially apache related
http://lists.refractions.net/m2/
jars specific to us, e.g. JTS
http://maven.geotools.fr/repository/
a mirror of above?
http://www.ibiblio.org/geotools/
doesn't seem to be maintained anymore
Take a look at these sites and some of the "mystery" out of how Maven works. You may notice that the directory structure matches the
dependency entries that you see in the pom.xml files. If the dependency entry has a groupId tag then this will be the name of the folder, if it just
has an id tag then this will be used for the name of the folder and the jar within it.
It is always worth taking a look at these sites (particularly the maven one) just to check that a version of the jar you want to use
is not already available.
It really is not available - now what?
Assuming the jar you want is not already hosted on one of these sites you need to upload it and add a dependency entry to your pom.xml file.
Upload with Maven (not by copy-and-paste)
Uploading a jar file is not enough. A clean repository also needs the associated jar.md5, jar.sha1, pom, pom.md5,
pom.sha1 files to be uploaded, and needs the various maven-metadata.xml files to be updated (as well as their associated
md5 and sha1 files). This is very tedious, so don't do that by hand! Maven 2 will do this automatically for you.
Deploying to Open Source Geospatial Foundation Maven 2 Repository
This is the GeoTools repository used for stable releases; as such it is the best place to host extra 3rd party dependencies. You can use your
OSGeo ID login credentials when deploying; provided you are a signed up contributor to the GeoTools project.
http://download.osgeo.org/webdav/geotools/
Create or update your ~/.m2/settings.xml file as below (~ is your home directory):
<?xml version="1.0" encoding="ISO-8859-1"?>
<settings>
<servers>
<server>
<id>osgeo</id>
<username>your osgeo id</username>
<password>your osgeo password</password>
</server>
</servers>
</settings>
Now you can deploy your jar:
mvn deploy:deploy-file -DgroupId=<group-id>
\
-DartifactId=<artifact-id>
\
-Dversion=<version>
\
-Dfile=<path-to-file>
\
-Dpackaging=jar
\
-DrepositoryId=osgeo
\
-Durl=dav:http://download.osgeo.org/webdav/geotools/
Or if you have a pom file:
mvn deploy:deploy-file -DpomFile=<path-to-pom>
\
-Dfile=<path-to-file>
\
-DrepositoryId=osgeo
\
-Durl=dav:http://download.osgeo.org/webdav/geotools/
Elements in bracket (<foo>) need to be replaced by their actual values.
Deploying to OpenGeo Maven 2 Repository
This is the repository used for SNAPSHOT releases; you can ask on the email list for access - although this really is more the target for a "mvn
deploy" then something to upload to by hand.
http://repo.opengeo.org
Uploading to Ibiblio
You can also upload your new jar to ibiblio - in case lists.refractions.net is hacked again.
Unfortunately only a limited number of GeoTools developers have ibiblio access so unless you are one of the lucky few you will have to ask
someone else to do that part for you. To do this create a JIRA task requesting that your jar be uploaded (
http://jira.codehaus.org/secure/CreateIssue!default.jspa).
In this task request include the following information:
Location where the jar can be obtained from
A version number for the jar (this should match what you specify in the pom.xml)
The license under which the jar can be re-distributed
Examples
Example JTS 1.12
1. Change into one of the geotools directories (the geotools pom.xml has all the repository definitions)
1.
C:\> cd java\geotools\trunk
2. Here is an example of how to deploy the JTS binary jar:
C:\java\geotools\trunk>mvn deploy:deploy-file -DgroupId=com.vividsolutions -DartifactId=jts -Dversion=1.12
-Dfile=C:\java\jts\lib\jts-1.12.jar -Dpackaging=jar -DrepositoryId=osgeo -Durl=dav:
http://download.osgeo.org/webdav/geotools/
3. And the source code (you will need to zip this up first since JTS does not provide a source download):
C:\java\geotools\trunk>mvn deploy:deploy-file -DgroupId=com.vividsolutions -DartifactId=jts -Dversion=1.12
-Dfile=C:\java\jts\jts-1.12-src.zip -Dpackaging=java-source -DrepositoryId=osgeo -Durl=dav:
http://download.osgeo.org/webdav/geotools/ -DgeneratePom=false
How to cut a release
These instructions explain how to create a Geotools release.
The instructions are meant for those making a formal milestone, a release candidate, a final release, or a point release of the Geotools project
itself. However, the instructions can also be used by any project or anyone that needs to make their own release, for example to use a new
release with http://geoserver.org/ or http://udig.refractions.net/.
Before You Start
Know the version numbers
Time and Space Requirements
Software and Environment Requirements
Permissions
Sanity Check
Email the List
Sanity Check of Codebase
Test extensively the code base
Preparing the Release
Create the branch (if needed) and the tag
Change version number
Get those SNAPSHOT dependencies out of our build
Build and Test Extensively
Update the README
Performing the Release
Assemble the Distribution Archives
Clean Up the Bin Archive
Assemble the Javadocs
Generate Sphinx Documentation
Test the src release
Release to Public
Export out the User Guide from the wiki
Update JIRA and create a changelog
Upload Distribution to SourceForge
Update the Downloads Page
Tell the World
Do not use the Maven "release" plugin
The instructions in this page invoke "svn copy", "mvn install" and "mvn deploy" manually. Those operations were
supposed to be done automatically by "mvn release", but the later appears to be a difficult experience. It is time consuming
(in case of failure, every new attempt implies a new checkout from svn), clobbers every pom.xml files by stripping comments
and enumerating all possible versions of each maven plug-in (a lot), advances version number in a way that is not what we
would like, make it difficult to use a javadoc tool more recent than javac, etc.
Invoking "svn copy", "mvn install" and "mvn deploy" explicitly is both faster and safer than "mvn release", since it
allows human checks before to continue to the next step and avoid to redo some successful steps after a problem occured and
has been fixed.
Before You Start
Know the version numbers
You will need to know the version number of the release you wish to make as well as the version number of the next release that will be made.
The former is needed to correctly name the files being released; the latter is needed to add a new task in the JIRA issue tracker so all tasks which
are still open move up to be addressed in the next version.
Time and Space Requirements
The release process will take a few hours of time, will require a Gigabyte of free diskspace, and requires continuous network access.
Software and Environment Requirements
Check quickly that you are using the java and maven versions required:
Java
Geotools currently uses the JDK 1.5 version of Java(tm). The build will also need all the dependencies, presented earlier in this manual, which are
required to build Geotools.
java -version
Should give, for example: 1.5.0_11
Java 6
Not supported for release at this time
Java 5
GeoTools 2.5 and later
Java 1.4
GeoTools 2.4 and earlier
Geotools 2.4 releases and earlier must be made with a 1.4 JDK and not with a 1.5 JDK in compatibility mode. There are enough subtle glitches in
the latter case that we run into many user problems.
java -version
should give, for example: 1.4.2_13
Maven 2
The build process uses Maven 2 - the following table indicates what version of maven is safe to use for the release process.
2.2.1
builds; have not tried release
2.2.0
untested
2.0.10
GeoTools 2.5 - 2.6 series
2.1.0
GeoTools 2.5 - 2.6 series
2.0.9
GeoTOols 2.4
2.0.8
GeoTools 2.4
2.0.7
known problems
2.0.6
known problems
2.0.5
GeoTools 2.3
2.0.5
GeoTools 2.2
Latest tested release:
Maven 2.1.0
To check:
mvn --version
should give, for example: 2.0.10
Be sure to provide enough memory to Maven, if not already done:
linux:
export MAVEN_OPTS=-Xmx512M
win32:
set MAVEN_OPTS=-Xmx1024m
Permissions
You will need access to several accounts and to the machines at refractions to properly create and announce the release.
Subversion Access
http://svn.osgeo.org/geotools/
Contact PMC member on geotools-devel
http://svn.refractions.net/geotools
Contact [[email protected]]
/
You will need a Subversion account in order to properly create a release. Your account name/password is used to create tags and so on.
WebDav Access
http://downloads.osgeo.org/geotools
Contact PMC member on geotools-devel
http://lists.refractions.net/m2
Contact [[email protected]]
The jars get uploaded to the maven repository during the deploy phase. Those jars will then be pulled in by those running maven.
The account name and password for lists.refractions.net are stored in the settings.xml file (located in your user folder
~/.m2/settings.xml). The file can remain indefinately and,if it is still in the same place, the file will be used during a future release.
<settings>
<servers>
<server>
<id>refractions</id>
<username>username</username>
<password>...</password>
</server>
<server>
<id>osgeo</id>
<username>username</username>
<password>...</password>
</server>
<server>
<id>opengeo</id>
<username>username</username>
<password>...</password>
</server>
</servers>
</settings>
Administration rights on the GeoTools sourceforge site.
This will be required to upload the finished files and to create the download page for the release.
First make sure you have a sourceforge account. You can create an account if you need to. Then you need to join the geotools project and ask
one of the other administrators to give you administration rights on the project.
Adminstration rights to Geotools Confluence, JIRA and codehaus xircles.
The JIRA authority is required to create a new release number for the future, to bump all unfinished tasks to that future release, and thereby to
collect a list of changes in the current release.
The Confluence edit permission is required to make a release page.
The codehaus xircles login is now required for the previous two. See the bottom of the Geotools home page for instructions on how to obtain
these permissions.
Sanity Check
Email the List
Email the geotools-devel list that a release is underway.
Sanity Check of Codebase
The code tree used for the build should be up to date and clean of any local modifications. This can be done by doing an update and making sure
there are no significant local changes. First, change the default directory according the release to be performed:
GeoTools 2.6.x
http://svn.osgeo
GeoTools 2.5.x
http://svn.osgeo.org/geotools/branches/2.5.x
.
/geotools/trunk |
GeoTools 2.5.x
http://svn.osgeo.org/geotools/branches/2.5.x
GeoTools 2.2.x
http://svn.osgeo.org/geotools/branches/2.2.x
The default directory should contains the main pom.xml file. Then update the local repository and note the revision number returned by svn
update (you will need it later).
C:\java\geotools> cd 2.5.x
C:\java\geotools\2.5.x> svn up
We can then check the svn status which should immediately return with a blank line.
C:\java\geotools\2.5.x>svn status
If there are local modifications or files that svn does not track, you may get something resembling the following:
$ svn status
?
modules/plugin/arcsde/.classpath
?
modules/plugin/arcsde/.project
?
modules/plugin/arcsde/.settings
These modifications should not hurt, but you may want to wipe them out for safety. If there is pending modifications in files tracked by svn, you
should commit them (after making sure that they do not break the build) before to continue. Take note again of the new revision number given by
svn.
Test extensively the code base
This is to make sure there are no previously built classes still hanging around.
mvn clean
This is the build that will stress the library as much as possible to see if we can break things. The interactive.tests profile will open and
close a series of windows as part of its work.
mvn -Pextensive.tests,interactive.tests install
Check your network settings
If you're connected to the internet through DHCP and the DHCP server is providing your hostname, ensure your hostname
matches the one in /etc/hostname and you have an entry in for it in /etc/hosts, or the coverage module tests will fail.
If there is any build or test failure, report the errors on the geotools developers mailing list (attach the appropriate file from the
target/surefire-reports directory to the email) and wait until those errors are fixed. Then perform a new svn update, note the revision
number and try again the above-cited mvn install command.
Preparing the Release
The release preparation will create a tag, change the version numbers, build the library and perform the full testing of the library to set everything
up for release.
Create the branch (if needed) and the tag
The tag name must be the same than the Geotools version to be released. The following instructions assume that we are releasing Geotools
2.4-M0. For other releases, update the version number accordingly.
You will need the revision number from latest svn update. The following examples use revision number 24652, but this number needs to be
replaced by the one provided by svn. We use the revision number in order to create a branch or a tag from the revision tested above. If some
changes were commited after the latest successful mvn install, they will not be part of this release.
Perform only one of the following "svn copy" commands:
Releasing a milestone
Creates the tag directly from the trunk:
svn copy http://svn.osgeo.org/geotools/trunk
http://svn.osgeo.org/geotools/tags/2.6-M2
-m "Created 2.6-M2 tag from revision 33797." -r 33797
The reason we are using -r 33797 is so we don't get tripped up by anyone who committed while between when we tested trunk and now.
Releasing first release candidate
First creates the branch, then the tag:
svn copy http://svn.osgeo.org/geotools/trunk
http://svn.osgeo.org/geotools/branches/2.6.x
-m "Created 2.6.x branch from revision 34232." -r 34232
svn copy http://svn.osgeo.org/geotools/branches/2.6.x
http://svn.osgeo.org/geotools/tags/2.6-RC0
-m "Created 2.6-RC0 tag."
Releasing final release or additional release candidate
Creates the tag from the branch:
svn copy http://svn.osgeo.org/geotools/branches/2.6.x
http://svn.osgeo.org/geotools/tags/2.6.1
-m "Created 2.6.1 release" -r 37232
Verify that the tag has been correctly created by visiting the http://svn.geotools.org/tags/ web page.
Change version number
After creation, please checkout the new tag:
cd ../tags
svn checkout http://svn.geotools.org/tags/2.5-M2/
cd 2.4-M0
You could also just "switch" your existing directory to the new tag:
svn switch http://svn.geotools/org/tags/2.5-M2
From this point, all remaining operations in this page should be performed from this tag directory (unless you're releasing from a stable
branch). You should not need to change directory anymore (except for zipping javadoc). The next step is to replace every occurences of
2.6-SNAPSHOT by 2.6.0 in all pom.xml files.
An ant file can be found in build/rename.xml to update the pom.xml files and the GeoTools.java file to the new version number.
1. Type the following from the command line.
C:\java\geotools\2.6-M2>copy build\rename.xml .
2. Edit the rename.xml file - changing 2.6-SNAPSHOT and 2.6.0 version numbers to match the release you are making.
3. Run the file
C:\java\geotools\2.6-M2>ant -f rename.xml
4. Check that the version numbers were updated as expected:
4.
svn status
svn diff
Do not commit yet. We will commit only after a successful build from the tag directory.
Fixing number change error
If the numbers are not changed like expected (for example because of a mistake while using sed), revert the changes:
svn revert . --recursive
Then run again sed or ant, and check with svn diff.
If you're releasing from a stable branch, the branch version numbers must be updated as well. If, for example, the branch version number was
2.4.1-SNAPSHOT, you'll have to alter all pom file to state 2.4.2-SNAPSHOT instead. So:
1.
2.
3.
4.
5.
enter the branch checkout directory;
rename;
check the rename was done properly;
commit;
go back to the tag checkout;
Get those SNAPSHOT dependencies out of our build
At the current time their is one usual suspect - geoapi. Ask them to deploy something (example 2.1-M4) ... and then update as follows:
BEFORE (under root pom.xml dependency management tag):
<dependency>
<groupId>org.opengis</groupId>
<artifactId>geoapi-nogenerics</artifactId>
<version>2.1-SNAPSHOT</version>
</dependency>
AFTER
<dependency>
<groupId>org.opengis</groupId>
<artifactId>geoapi-nogenerics</artifactId>
<version>2.1-M4</version>
</dependency>
Build and Test Extensively
We already tested the library before to create the tag, so testing again here is more a safety measure; it should give the same result. Note that
there is no need to invoke "mvn clean" since we are building from a fresh checkout.
mvn -Pextensive.tests,interactive.tests install
In case of build failure, report to the Geotools developers mailing list as we did for the build on trunk. If the build is successful, commit the pending
version number changes. We commit only now because the tests after the version number change may reveal some bad configurations in
pom.xml files, which should be fixed before the commit.
svn status
svn commit -m "Changed version number from 2.4-SNAPHOT to 2.4-M0."
Update the README
The skeleton README contains tags which must be updated to reflect the release. These tags include:
@VERSION@
geotools version
@DATE@
release date
@REQUIRED@
list of required modules (all those located in modules/library)
@PLUGIN@
list of plugins (all those located in modules/plugin)
@EXTENSION@
list of extensions (all those located in modules/extension)
@DEMO@
list of demos (all those located in demo)
@UNSUPPORTED@
list of unsupported modules (all those located modules/unsupported)
Substitute the appropriate values for in the file and then commit it. Remember, you are committing to the tag and not the development branch.
svn status
svn commit -m "Updated README for 2.4-M0."
Hint: a quick way to get the list of modules for the README under a Unix system is to enter the directory that contains them and use find .
-maxdepth 1 -type d | sed 's|./||g' | sort (remember to remove ".", ".svn" and "target" from the output).
Performing the Release
Deploy the jar files to the Maven repository. You can verify during the process if the files are uploaded as expected by watching the
http://lists.refractions.net/m2/org/geotools/gt2-metadata/ web page (the Geotools metadata module should be among the first ones to be
uploaded).
Please deploy the release to maven; including unsupported modules:
mvn deploy -DskipTests -Dall
Not Authorized
If you run into problems deploying the jars to lists.refractions.net:
[INFO] -----------------------------------------------------------------------[ERROR] BUILD ERROR
WARNING: No credentials available for the 'GEOTOOLS' authentication realm at
lists.refractions.net
Ensure that you have provided the correct credentials in your settings.xml file.
If this step fails for some other reason after getting started, it may be caused by some network problem. Try running "mvn deploy" again.
Assemble the Distribution Archives
Now we need to create the binary, source and javadoc archives that users can download.
Since we do not want to include the unsupported jars produced by -Dall we need to:
mvn clean -Dall
mvn install -DskipTests
Assemble the Bin and Source Archives
We use the maven 2 assembly plug-in to do this for us.
mvn -DskipTests assembly:assembly
If you look in target/ directory, you will see source and binary zip files.
Clean Up the Bin Archive
Remove unnecessary jars from the bin archive. This includes velocity and junit jars, as well as any jdbc driver stubs.
cd target
unzip geotools-2.7-M1-bin.zip
cd geotools-2.7-M1
rm junit*.jar
rm *dummy-*
cd ..
rm geotools-2.7-M1-bin.zip
zip -r geotools-2.7-M1-bin.zip geotools-2.7-M1
rm -rf geotools-2.7-M1
Assemble the Javadocs
This will use the standard Maven javadoc plugin to create the javadocs. The javadoc build uses Java 5 constructs, thus it is recommanded to build
it with a more recent JDK than 1.4. The build creates a slew of warnings (13000+) and errors (100) and may exits with an error code.
Nonetheless, the build produces the document tree. If you experience building problems, check out the GeoTools javadoc page too.
cd modules
mvn javadoc:aggregate
Bundle the files by hand:
cd target/site/
zip -9 -r ../../../target/geotools-2.7-M1-doc.zip apidocs/
cd ../../..
Note: The javadoc plugin usage and configuration is explained in more details there.
Generate Sphinx Documentation
cd docs
mvn install
cd target/user
zip -9 -r ../../../target/geotools-2.6.5-welcome.zip html/
Test the src release
1. Unzip the gt2-yourreleaseversion-src.zip archive to a clean directory.
2. Move or rename your <usrhome>/.m2/repository directory.
3. Run maven from the root of the directory you unzipped to - mvn install
We do this in case a required module was accidentaly excluded from the list of modules to be included in the release. You would see no error
during the release process but the generated src archive would be un-buildable.
Release to Public
Export out the User Guide from the wiki
1.
1.
2.
3.
4.
5.
6.
Login to confluence and visit the user guide: http://docs.codehaus.org/display/GEOTDOC/Home
go to the Browse Space > Advanced
Choose Export Space
Select HTML and don't include the comments
It will take a few momemnts for the zip file to be ready
Rename this zip to gt-2.5.0-guide.zip for later upload
Update JIRA and create a changelog
Any unresolved issues that did not make the release version need to be bumped back to the next release. Fortunately, JIRA allows you to do this
en masse:
create the next 2.4.n+1 release
release 2.4.n
it will ask you where you want to move unresolved issues
select 2.4.n+1
This will update the changelog file to show what has been fixed since the last release. For example, see:
change log
Upload Distribution to SourceForge
SourceForge now allows various methods for uploading files:
web form
WebDav
sftp
rsynch + ssh
Details on how to use them can be found in the Release files for download wiki page, beware that the first two, thought easier, are recommended
for uploads of less than 20MB.
Command-line client on Linux using sftp
sftp [email protected]
cd /home/frs/project/g/ge/geotools
cd "GeoTools 2.6 Releases"
cd 2.6.1
put geotools*.zip
As the last sanity check email the geotools2 list and ask people to try it out.
Update the Downloads Page
1. Navigate to the Downloads Page; and choose the download page for the version you are releasing
2. Press Add Child Page
3. Enter in the title of the release (it is important to use '.' and '-' correctly for the sorting order)
2.3-M1 - for a milestone release - adding a planned feature from a RnD branch
2.3-RC3 - for a release candidate - feature complete, waiting on bug fixes, documentation, QA checks
2.2.0 - for a major release - a formal release we API commited to supporting (supporting stable GeoServer or uDig)
2.2.1 - for a patch release - remember that support, this is an example of a bug fix patch going out
4. Press the 'select a template page' link and choose Geotools Release from the list
5. Press next to view the generated page
6. You will need to correct the following information:
Update the date (between the excerpt macros).
Update the Source forge links above to reflect the release by following this link
Update the Release Notes by choosing the the correct version from this link.
Fill in a blurb about the release
List any completed proposals or interesting new features provided by the release
Tell the World
After the list has had a chance to try things out - Make an Announcement
[email protected]
1.
2.
3.
4.
Post a message to the geotools-devel list.
To: [email protected]
Subject: Released
Text:
..Announcement..
http://geotools.org/
1. Add a news article: using Add News
2. News Title: " released"
3. Content: allows wiki links (example)
..Announcement..
[email protected]
Let the user list know:
1. To: [email protected]
2. Subject: Released
3. Text:
..Announcement..
Open Source Geospatial Foundation
Directions:
Only to be used for "significant" releases (Major release only, not for milestone or point releases)
https://www.osgeo.org/content/news/submit_news.html
1.
2.
3.
4.
Post a message to the osgeo news email list (you are subscribed cause you are a nice caring PMC, right?).
To: [email protected]
Subject: Released
Text:
..Announcement..
Tell More of the World!
Well that was not very much of the world was it? Lets do freshmeat, sf.net, geotools.org and freegis.
Do it in the Morning
Please don't announce releases on a Friday or weekend. And try to make it in the mornings as well. If it's late then just finish it
up the next day. This will ensure that a lot more people will see the announcements.
http://freshmeat.net/projects/geotools/
1.
2.
3.
4.
Add release: http://freshmeat.net/projects/geotools/
Branch: "" (or GT2 for 2.0.x)
Version: Version (example 2.1.M1)
Changes: (Example)
(see screen snapshot).
You can also update the screen snapshot to reflect a current geotools application; GeoServer and UDIG have been highlighted in
the past. If you are making the release to support a project this is your big chance!
http://sourceforge.net/
1. Add a news article: http://sourceforge.net/news/submit.php?group_id=4091
2. Subject: (Make sure it is of the form " released")
3. Details: allows http links (example)
..Announcement..
The format of the subject is important it gets the message included on the http://sourceforge.net/ Home Page. This is a one shot
deal, if you go back and fix any mistakes it is kicked off the Home Page.
http://freegis.org/
1.
2.
3.
4.
Email Jan-Oliver Wagner
To: [email protected]
Subject: Geotools update for FreeGIS site
Text:
..Announcement..
http://java.net/
1.
2.
3.
4.
5.
6.
Submit a news article
Use form at: http://today.java.net/cs/user/create/n
Source: geotools.org
URL: http://geotools.org/
Link to article: http://geotools.org/News
Note Membership required
http://slashgisrs.org/
1.
2.
3.
4.
Submit a news article
Use form at: http://slashgisrs.org/submit.pl (gotta login!)
Use your profile page (example: http://docs.codehaus.org/display/~jive) for Home page
Section: Technology Topic: Open Source Community
..Announcement..
Warning: You may wish to change to HTML Formatted, and insert a few links in!
Announcement
The GeoTools 2.6.4 release is now available for download:
geotools-2.6.4-bin.zip
geotools-2.6.4-project.zip
geotools-2.6.4-doc.zip
geotools-2.6.4-welcome.zip
geotools-2.6.4-guide.zip
Release Notes
This is a bug fix release made in conjunction with uDig 1.2-RC3.
This release adds support for Oracle Georaster access as the result of a productive collaboration between Christian and Baskar. It
is great to see developers from different organisations combine forces.
There are many small but interesting improvements in the release notes. I am exited by the new interpolate functions which will be
very useful when styling maps, generated SLD files no longer write out "default" values which will make for a more readable result.
This release also features more documentation then normal; we have exported out the 2.6.4 documentation from our website and
the users guide. It is nice to have archives of this material that match a specific release.
For more information please review the Release Notes:
Release Notes
For more information on GeoTools and the 2.6 series:
http://geotools.org
http://docs.codehaus.org/display/GEOTOOLS/2.6.x
http://docs.codehaus.org/display/GEOTOOLS/Upgrade+to+2.6
Enjoy,
The GeoTools Community
Making a major API shift
A "proposal procedure" has been adopted by the GeoTools project. This page needs to be updated as part of the following proposal.
Change handling and stability keeping procedures
It has now been accepted and placed into the developers guide:
GeoTools change proposal
Can we remove this page?
From time to time in the life of the GeoTools project is becomes nessasary to perform a 'major API shift'. The biggest so far was the
move to a new coordiate reference api when we decided to adopt the one from the GeoAPI project and we have at least one major
one planned in the future - the big geometry shift.
A few things went wrong during the last shift so this section aims to set out a 'plan' that we can follow for future changes.
Draft Plan
1. Add the new API into the codebase
2. Mark the old API with @deprecated
(deprecated tag provides explicit instructions on how to change to the new API)
3. Wait for one dot release (see GEOTOOLS:Versioning)
(This means code that was deprecated in 2.0.0 cannot be removed until 2.1.0)
4. Warn the Module Maintainers
Set BLOCKING Jira tasks assigned to them as required
5. Wait at least one point release
6. Advertize on the email lists and wiki to let people know what the specific changes will be and possible
problems. Wait at least 1 week for feedback.
7. Tag SVN before the API switch
8. Perform the API switch
a. Move deprecated classes in module/main over to module/legacy
b. Move any broken code from module/main into module/migrate
c. Let plugin/module and ext/module maintainers depend on module/legacy but ...
9. Legacy will not be included in the stable release, any modules that depend on it will be left out. (Client
code has already been warned due to dependency in the previous dot release).
Supporting your module
The GeoTools library plays host to several "unsupported" components, here is the process for formally including your work in the as a core part of
the GeoTools library.
Why Support your Module
You do get a couple of benefits from having a supported module:
your work is bundled up as part of the GeoTools release process
You can have a couple of seconds JUnit test time to verify your module works
You can create Online-Tests for cruise control to run
Check
Step
Notes
Visibility
Communicate module status to users
Intellectual Property Check
Build user trust, OSGeo policy
Follow the Developers Guide
Project policies
User Documentation
Ensure work is accessible to users
Ask
Ask to be included in the next release
Picking up a Module
If you are interested in picking up an unsupported module (perhaps it was abandoned?) have a look into the section on 3
Module Maintainers - the GeoTools can set you up as Module Maintainer if you interested.
Visibility / Module Status
The GeoTools Module Matrix defines a couple quick QA tests allowing you to rate your module according to the number of gold stars it has
earned.
1. The first step is to rate your module:
Gold Star Quality Assurance Check
2. The second step is to ensure you meet the standard set for the release:
GeoTools 2.3 - just rate your module
GeoTools 2.4 - three stars are required to be included
GeoTools 2.5 - four stars are required
3. Create a Module Matrix page:
show project status
list jira issues (from as many projects as possible)
The goal here is to make your module status visible to end users.
Intellectual Property Check
Your module must have a file presenting the providence review of the contents of your module including the copyright and licenses which apply to
your module. This file must describe any contents which do not follow the copyright and license of the project as a whole. Deviations which
require later fixes should have a link to a JIRA task explaining the issue and describing the plan to resolve the issue or remove the offending
resource.
The file must be named and located as 'src/site/apt/review.apt'. The file must be in the "Almost Plain Text" format and should follow the
standard layout of the file in the unsupported/example module.
The goal here is to show that each and every file has been looked at, by hand, and any issues of copyright or licensing have been addressed.
Fixing some of these issues in the past has required "stubbing" some of the jar dependencies with dummy code of the same signature from a third
party JAR which we cannot distribute.
Follow the Developers Guide
The developers guide lists a number of coding conventions:
5.1 Coding Guidelines
5.2 Naming Conventions
5.3 Module Directory Structure
5. 5 Refactoring
5. 6 Code Profiling
5. 7 Testing — JUnit
5. 8 Test Data
5. 9 Versioning
Test Coverage and Maven Profiles
The one most likely to cause grief is the JUnit testing requirement, please be aware that the tests may be performed by cruise control (especially
if they are on-line tests requiring the use of web services).
Initially the GeoTools library aimed for 60% test coverage, for now we will stick with:
GeoTools 2.3
Correct use of Online-Test
GeoTools 2.4
Test Coverage measured and published to Module Matrix page
Coverage of 30% measured by a cruise control profile (you can supply a test fixture so the nightly builds can run against your
database)
Making use of a Conformance test if available
For help setting up your test fixture and maven profile for the nightly build box please contact the geotools-devel list.
Test coverage measured with clover ... run mvn site for your plugin and look at the clover report. As an example the clover
report for shapefile is mentioned here:
http://maven.geotools.fr/reports/modules/plugin/shapefile/clover/index.html
The report indicates that shapefile has 58% test coverage:
Conformance Tests
We are looking into the creation of conformance tests to verify plug-in completeness and correctness.
GeoTools 2.4:
DataStore conformance based on MemoryDataStore example
Verify concurrency and event notification
Verify constant time performance of metadata queries
User Documentation
Currently have a very simple requirement for user documentation. Please make something (anything!) available in GeoTools User Guide wiki and
link to it from your module matrix page.
It is recommended that you make a single example showing how to use your module or plugin.
02 User Guide (Writing Guidelines for the User Guide)
Ask to be included in the next release
Finally you can ask to be included in the next release, show up at a weekly IRC meeting or send an email to the list. (chances are there will be
questions)
Working on a stable branch
Working on a stable branch like 2.0.x or 2.1.x is a bit different working on trunk. For one we are not adding new features, and we need to back out
changes that fail.
The following changes are cool for a stable branch:
applying a fix
creating a new plugin
What is not cool is changing any API. You can create a new plug-in as they are optional, and the functionality is available through the core library
- requiring no API change in client code.
If you find this all a bit hard to take here is an Stable Branch Example.
Applying a Fix to the Stable Branch
Do you hava Jira issue? Chances are any change worth doing on the branch has a jira issue
1. Update
Mark down the resulting revision as BEFORE
2. Do the full maven cycle of maven build, maven createRelease
3. Commit your change (you probably had to ask the module maintainer first as per GEOTOOLS:Hacking)
Mark down the revision AFTER (your commit told you this)
Remember: Mark the issue as CLOSED in Jira and be sure to include:
Resolved in 2.1.RC1 (you can be more specific)
BEFORE: 13926
AFTER: 13927
This will help when applying your change to trunk....
Applying your Change to trunk
It is nice to do this after every fix, or you may want to save up a couple.
Please try to apply your fixes to trunk before the next trunk Milestone release (we like to release the best code we can - and that includes your
fixes).
1. Grabs the url: like http://svn.geotools.org/geotools/branches/2.1.x and revision numbers
2. From your trunk check out apply the patch
svn merge -r 13926:13927 http://svn.geotools.org/geotools/branches/2.1.x
3. Do the complete maven cycle of: clean, build, createRelease
4. If the change works all is well commit
svn commit -m "Applied fix for GEOT-538 from 2.1.x"
5. If not back out the change ... and open a jira bug on the matter.
svn revert -r .
Applying a fix from trunk
To merge in a change you will need:
url: url where the fix is located (although knowing that it is in plugins/wms will help)
before: revision when the fix was started
after: revision when the fix was complete
1. Grabs the url: like http://svn.geotools.org/geotools/trunk/gt/plugins/wms
2. From your 2.1.x checkout:
svn merge -r 13926:13927 http://svn.geotools.org/geotools/trunk/gt/plugins/wms
3. Do the complete maven cycle of: clean, build, createRelease
4.
4. If the change works all is well commit
svn commit -m "Applied fix for GEOT-538 from trunk"
5. If not back out the change ... and (re)open a Jira bug about it.
svn revert -r .
Remember: pleas update any Jira bug to indicate that the issue is fixed on 2.1.x as well.
Backing out a Change
If you find out later that a change is bad sometime after your commit, all is not lost:
svn merge -r 13927:13926 http://svn.geotools.org/geotools/trunk
svn commit -m "Reopened GEOT-538 Javadoc @url was broken"
Remember to (re)open any associated Jira issue.
8 Design and Architecture
Geotools has several strong Architecture and Design elements. This section explores several of them in detail:
8.1 Architecture
8.2 Modular Design
8.4 Data Access
8.5 Patterns
8.1 Architecture
There are two system architecture patterns in use:
layers for data abstraction
plugins for extendability
Xavier has asked for an overview of the geotools models, a break down into layers.
This is a little bit hard, the architecture inside the main module is aranged into layers. The other modules hook into this architecture
via a plugin mechanism.
To make matters a bit more exciting the data abstractions are defined by the OGC, and as often as possible we make use of GeoAPI in order to
co-operate with other toolkits.
Geotools Main Layer Model
We literally mean module/main as compiled into gt2-main.jar.
Geotools does not do everything – to form the complete data stack we make use of other GIS projects (like JTS) where possible. We want to
succeed – we don't want to implement everything.
Plugin Extension Model
Plugins only ever offer extensions based on the "implements" relationship.
How to use this table:
plugin/shapefile implements DataStoreFactory (an interface defined in the data layer)
plugin/epsg implements CRSAuthorityFactory
plugin/wfs implements DataStoreFactory (an interface defined in the data layer)
plugin/wfs implements XMLSchema (an interface defined by the xml layer)
Note: Main offers implements its own extentions, this is how default implementations are provided.
extends indicated data model
uses an out dated API, so needs updating before use
extends in a experimental or untested manner
Module
renderer
style
grid
data
filter
feature
geometry
crs
parameter
units
xml
renderer
style
grid
data
filter
feature
geometry
CRS
parameter
units
xml
main
Plugin
arcgrid
arcsde
directory
epsg
geomedia
geometryless
geotiff
gml
gtopo30
image
mapinfo
shapefile
wms
wfs
Note: If plugins have dependencies between each other it is always "requires".
Q: So nobody implements geometry?
A: Correct we use the JTS Topology Suite (JTS) to capture Simple Feature for SQL Geometry
A2: GeoAPI has a set of Geometry Interfaces that we plan to migrate to for Geotools 2.2
Q: And what about units?
A: We use the javax units package, an implemention of ISO units.
Layered Data Abstraction Model
From Highest to Lowest (Detailed Model...)
Rendering
No formal extention point
Map
no comment
Layer
visualization of a single georeference
Style Model
No formal extention point
Style
Geotools
Captures SLD styling model
Rule
Geotools
Rule limits application based on Filter
Stylizer
Geotools
actual information for rendering a Geometry
Extentions provided by ...
Grid
GridCoverageExchange
GeoAPI
Based on new CoordinateReferenceSystem model
GridCoverage
GeoAPI
An actual Raster
Extentions provided by DataStoreFactory
Data
Repository
Geotools
Collection of known services
DataStore
Geotools
A provider of Geographic information
FeatureSource
Geotools
High-level data access for a single GeoResource
FeatureSource
Geotools
GeoResource read/write access
FeatureLocking
Geotools
GeoResource long term locking support
FeatureReader
Geotools
Low-level read only representation of stream of features
FeatureWriting
Geotools
stream based modification, and creation of features
Extented via FilterFactory, geoapi has one too
Filter Model
Filter
Geotools
Yes/No based on filter accepting a Feature
Expression
Geotools
Evaluation syntax built on FeatureType
Extentions provided by FeatureFactory
Feature Model
Feature
Geotools
Feature supportes nested attributes & xpath access
FeatureType
Geotools
Schema for feature
AttributeType
Geotools
Represent simple types, nested types or POJO
GeometryAttributeType
Geotools
Schema info for Geometry w/ CRS
No extentions, model split between Geotools & JTS
Geometry Model
GeometryAttributeType
Geotools
Schema info for Geometry w/ CRS
Geometry
JTS
Implements Simple Feature For SQL based Geometry classes
ISO based CoordinateReferenceSystem model
CRS Model (Pending)
CoordinateReferenceSystem
GeoAPI
ISO interfaces (shared with Degree)
CoordinateReferenceSystem
Geotools
.. with implementations
Units
JSR?
ISO based units
ParameterGroup
GeoAPI
Based on an ISO origional
ParameterValue
GeoAPI
Based on an ISO origional
GeoAPI is working on additional shared interfaces - many of which duplicate the classes above. See the GEOTOOLS:Roadmap for our schedule
of evaulation and possible adoption.
Detailed Model
Rendering
No formal extention point
Map
no comment
Layer
visualization of a single georeference
Style Model
No formal extention point
Style
Geotools
Captures SLD styling model
Rule
Geotools
Rule limits application based on Filter
Stylizer
Geotools
actual information for rendering a Geometry
Extentions provided by ...
Grid
GridCoverageExchange
GeoAPI
Based on new CoordinateReferenceSystem model
GridCoverage
GeoAPI
An actual Raster
Extentions provided by DataStoreFactory
Data
Repository
Geotools
Collection of known services
DataStore
Geotools
A provider of Geographic information
FeatureSource
Geotools
High-level data access for a single GeoResource
FeatureSource
Geotools
GeoResource read/write access
FeatureLocking
Geotools
GeoResource long term locking support
FeatureReader
Geotools
Low-level read only representation of stream of features
FeatureWriting
Geotools
stream based modification, and creation of features
Extented via FilterFactory, geoapi has one too
Filter Model
Filter
Geotools
Yes/No based on filter accepting a Feature
Expression
Geotools
Evaluation syntax built on FeatureType
Extentions provided by FeatureFactory
Feature Model
Feature
Geotools
Feature supportes nested attributes & xpath access
FeatureType
Geotools
Schema for feature
AttributeType
Geotools
Represent simple types, nested types or POJO
GeometryAttributeType
Geotools
Schema info for Geometry w/ CRS
No extentions, model split between Geotools & JTS
Geometry Model
GeometryAttributeType
Geotools
Schema info for Geometry w/ CRS
Geometry
JTS
Implements Simple Feature For SQL based Geometry classes
ISO based CoordinateReferenceSystem model
CRS Model (Pending)
CoordinateReferenceSystem
GeoAPI
ISO interfaces (shared with Degree)
CoordinateReferenceSystem
Geotools
.. with implementations
Units
JSR?
ISO based units
ParameterGroup
GeoAPI
Based on an ISO origional
ParameterValue
GeoAPI
Based on an ISO origional
GeoAPI is working on additional shared interfaces - many of which duplicate the classes above. See the GEOTOOLS:Roadmap for our schedule
of evaulation and possible adoption.
Plugin Extension Model
Plugins only ever offer extensions based on the "implements" relationship.
How to use this table:
plugin/shapefile implements DataStoreFactory (an interface defined in the data layer)
plugin/epsg implements CRSAuthorityFactory
plugin/wfs implements DataStoreFactory (an interface defined in the data layer)
plugin/wfs implements XMLSchema (an interface defined by the xml layer)
Note: Main offers implements its own extentions, this is how default implementations are provided.
extends indicated data model
uses an out dated API, so needs updating before use
extends in a experimental or untested manner
Module
renderer
style
grid
data
filter
feature
geometry
crs
parameter
units
xml
renderer
style
grid
data
filter
feature
geometry
CRS
parameter
units
xml
main
Plugin
arcgrid
arcsde
directory
epsg
geomedia
geometryless
geotiff
gml
gtopo30
image
mapinfo
shapefile
wms
wfs
Note: If plugins have dependencies between each other it is always "requires".
Q: So nobody implements geometry?
A: Correct we use the JTS Topology Suite (JTS) to capture Simple Feature for SQL Geometry
A2: GeoAPI has a set of Geometry Interfaces that we plan to migrate to for Geotools 2.2
Q: And what about units?
A: We use the javax units package, an implemention of ISO units.
8.2 Modular Design
Geotools as a whole is defined as a series of modules, or reuseable components. These modules do not opperate in isolation but fall into distinct
categories (as was mentioned earlier).
category
directory
example
module
purpose
Core
modules/library/
api
stable geotools interfaces
referencing
default implementations of geoapi interfaces
main
geotools library w/ default implementations, includes non stable interfaces
render
implementation of geotools SLD conformant rendering system
Plugin
modules/plugin/
postgis
modules that dynamically intergrate to the geotools library at runtime
Extention
modules/extension/
validation
extentions and extras built on top of the geotools library
Unsupported
modules/unsupported/
oracle
modules that are not ready yet, or are orphaned and no longer have a contact
person
Demos
demo/
gui
small working examples, usually part of a tutorial
These categories cover several interesting points; and show how the modules may be used in client code.
Core: the module/main makes up the core geotools library, this library is the required baseline containing:
Geotools Interfaces (like Feature, DataStore, MapLayer,...)
Default implementations (like DefaultFeature, MemoryDataStore, ...)
"Helper" classes designed to aid Client code, and plugin writers (like AbstractDataStore, DataUtilites, ...)
At this time core is made up only of module/main.
Plugins: these modules plugin (or aid and abet) the functionality of the core Geotools library
plugin modules contain a META-INF/services entry describing what the plugin does (plugins can do more then one thing)
plugin modules may require other plugins inorder to function, as example the plugin/wms requires plugin/epsg inorder to function
Extentions: these modules build on top of Geotools providing new and interesting functionality.
ext modules do not plugin to Geotools (they don't contain a META-INF/services entry)
ext modules build ontop of Geotools just like a regular client application
Demos: for completeness Demos contain sample applications that can actually run.
most demos are accompied by a Tutorial, and make great code examples
Module Categories
category
directory
example
module
purpose
Core
modules/library/
api
stable geotools interfaces
referencing
default implementations of geoapi interfaces
main
geotools library w/ default implementations, includes non stable interfaces
render
implementation of geotools SLD conformant rendering system
Plugin
modules/plugin/
postgis
modules that dynamically intergrate to the geotools library at runtime
Extention
modules/extension/
validation
extentions and extras built on top of the geotools library
Unsupported
modules/unsupported/
oracle
modules that are not ready yet, or are orphaned and no longer have a contact
person
Demos
demo/
gui
small working examples, usually part of a tutorial
8.4 Data Access
Here are some stats before you get going:
four: number of classes representing a set of Features
one: class to control workflow
four: number of classes listing feature collections
zero: number of datastores that support metadata at this time
sixteen: number plugins connecting geotools to the world
three: number of classes needed to implement a new datastore
thirty: times, speed improvement of previous implementation
five: number of times locking API has changed
Data Discovery and Catalog
We have defined a Catalog API based on the Catalog version 1.0 document. This API consists of the following interfaces:
interface Catalog {
void add( CatalogEntry );
void iterator();
QueryResult query( QueryDefinition query );
void remove( CatalogEntry );
}
interface CatalogEntry {
String getDataName();
Map(<String>,<Metadata>) metadata();
Object getResource();
}
MetadataEntity is a placeholder for Metadata Information.
DataStore Read
DataStore is the Geotools API for data source access. It is used to access both file and Service information. Wide ranges of data sources are
supported from simple Shapefile access through to Database and Web Feature Services.
DataStore operates on an OGC Feature Model notable in its use of XPATH queries to access nested attribute type information. Creation of
everything from FeatureTypes to Filter Expression is controlled by the use of Factories.
(picture from Data access basic)
As the above diagram illustrates, there are two APIs for access to spatial information:
FeatureReader: an iterator of Features (sequential access), basically an iterator that is allowed to throw IOExceptions
FeatureSource: provides getBounds, getCount and getFeatures operations. For most DataStore implementations these are optimized to
make use of the native functionality of the underlying service.
Note: In addition to the API above many DataStores implement Catalog to provide access to Metadata based FeatureType queries. In this case
the CatalogEntry.getResource() returns the FeatureSource associated with the FeatureType.
FeatureSource is very similar to the geotools FeatureCollection, the difference is:
FeatureCollection - represents an in memory collection of features, FeatureIterator does not throw Exceptions
FeatureSource - represents an external source of Features, FeatureReader throws IOExceptions
FeatureSource provides the read-only representation of an external source of Features, complete with event notification (events changes
by BBox and FID).
public interface FeatureSource<T extends FeatureType, F extends Feature> {
Name getName()
Envelope getBounds()
Envelope getBounds(Query query)
int getCount(Query query)
DataAccess<T, F> getDataStore()
FeatureCollection<T, F> getFeatures()
FeatureCollection<T, F> getFeatures(Filter filter)
FeatureCollection<T, F> getFeatures(Query query)
T getSchema()
void addFeatureListener(FeatureListener listener)
void removeFeatureListener(FeatureListener listener)
}
DataStore Write
DataStore offers a comprehensive writing API with support for Transactions and optimized updates.
(picture from Data access basic)
This time there are four classes to consider:
Transaction: offers workflow control and rollback. Can be used with several DataStores at once.
FeatureWriter: an iterator of Features supporting modification.
FeatureStore: provides add, update and remove as high level requests that are optimized for most DataStores.
FeatureLocking: offers locking for the duration of a Transaction and WFS Style Long Term Transaction support.
FeatureStore extends FeaturesSource with modification and "Transaction" support
interface FeatureStore<T extends FeatureType, F extends Feature> extends FeatureSource<T, F> {
Set addFeatures(FeatureCollection<T, F> reader)
void modifyFeatures(AttributeType[] type, Object[] value, Filter filter)
void modifyFeatures(AttributeType type, Object value, Filter filter)
void removeFeatures(Filter filter)
void setFeatures(FeatureReader<T, F> reader)
Transaction getTransaction()
void setTransaction(Transaction transaction)
}
Transaction works as a cross cutting control mechanism for client code. A single Transaction can be used to commit/rollback multiple
FeatureStores in one go. This is impemented by allowing implementotrs to externalize there State information as a Momento under
Transaction control. A jdbc implementation can have Transaction remember the "current" database connection, a Shapefile could have
the Transaction remember a Map of differences, or the name of a temporary file.
see Transaction
FeatureLocking extends FeatureStore with locking support. Uses WFS style long term locking support. Locks that last as long as the
current transaction are also supported. To opperate on a locked feature the current Transaction must be supplied with an AuthorizationID.
public interface FeatureLocking<T extends FeatureType, F extends Feature> extends
FeatureStore<T, F> {
int lockFeatures()
int lockFeatures(Filter filter)
int lockFeatures(Query query)
void setFeatureLock(FeatureLock lock)
void unLockFeatures()
void unLockFeatures(Filter filter)
void unLockFeatures(Query query)
}
Unfortantly UnLocking must occur at the level of a Catalog that "knows" all the FeatureSources invloved in the opperation.
DataStore Creation
As promised, even DataStore creation is controlled by use of a Factory.
interface DataAccessFactory extends Factory {
boolean canProcess(java.util.Map<String, Serializable> params);
DataAccess<? extends FeatureType, ? extends Feature> createDataStore(Map<String, Serializable>
params);
DataStore createNewDataStore( Map params );
String getDescription();
Param[] getParametersInfo();
ParameterGroupDescriptor getParameterGroup();
}
interface DataStoreFactorySpi extends DataAccessFactory{
DataStore createDataStore( Map params );
}
DataAccessFactory provides access to both (complex) Feature and SimpleFeature capable content providers. DataStore specializes in
serving SimpleFeature.
The map used to create a DataStore is described by:
A legacy getParametersInfo() method
ParameterValueGroup adapted for general use by GeoAPI
There are several difficulties with this approach:
A Map is not optimal ? for drag and drop support we would like to use a File or URL directly
The ParameterValueGroup is difficult to understand
ISO 19119 is designed to describe Services
The plug-in system FactorySPI is used to ?discover? the appropriate DataStoreFactory based on a Map of parameters. In practice many
DataStoreFactory implementations require a ?magic? key be entered in Map to support this functionality.
It is likely that DataStore will be simplified over the coming weeks to take these factors into consideration.
Repository
Offers cross DataStore operations, and FeatureSource access by namespace URI and type name irrespective of DataStore.
interface Repository {
Map getDataStores();
SortedMap getFeatureSources();
Set getPrefixes();
boolean lockExists(String lockID);
boolean lockRefresh(String lockID, Transaction transaction)
boolean lockRelease(String lockID, Transaction transaction)
FeatureSource source(URI namespace, String typeName)
}
It is an interesting consequence of Locks being held across DataStores that a central Repository is required to unlock them safely.
Grid Coverage Exchange
Grid Coverage Exchange provides access to Grid Coverage information. This has been assembled as part of the uDig project, and has been
donated to the GeoAPI project.
interface GridCoverageExchange {
void dispose();
Format[] getFormats()
GridCoverageReader getReader(Object source)
GridCoverageWriter getWriter(Object destination, Format format)
}
interface Format {
String getDescription()
String getDocURL()
String getName()
ParameterValueGroup getReadParameters()
String getVendor()
String getVersion()
ParameterValueGroup getWriteParameters()
}
interface GridCoverageReader {
String getCurrentSubname()
Format getFormat()
GridCoverage read(GeneralParameterValue[] parameters)
}
interface GridCoverageWriter {
Object getDestination()
Format getFormat()
void write(GridCoverage coverage, GeneralParameterValue[] parameters)
}
The one difficulty with the above API is that one gets no indication what the source parameter is when acquiring a GridCoverageReader. Once
again Catalog has stepped in to the rescue. Many GCE implementations are using the Catalog API to provide client code with an avenue to
discover a source parameter (based on a remote Web Map Server, or a local file system).
The complete API also provides facilities for GridCoverageReader and GridCoverageWriter to be used with streamed content. This has been
omitted for brevity.
The Future
Now for where we want to go - David Zwiers is starting the process of simplifing this API - here is what I remember:
Simplify Creation
Make the provider of FeatureSource GeoAPI Catalog based
Provided a simplified starting point for File based FeatureSource implementors
Better GridCoverage intergration with Catalog
Intergrate the idea of FeatureResults and FeatureReader
Consider adding support for Random Access, or Spatial Index based queries
Consider making FID creation stratagy objects (from JDBC DataStore) part of the public API
David Zwiers is thinking about these ideas now, I am going to be away on Holiday for most of November (so the above list should not be
considered complete or a promise).
Compare and Contrast
Degree also has a DataStore API (I think each DataStore represents a FeatureSource in our model), the code is based on hibernate and is quite
cool (comments based on http://deegree.sourceforge.net/deegree2/index.html).
interface DataStore extends Handler {
void describeFeatureType(DescribeFeatureType request)
void getFeature(GetFeature request)
void getFeatureWithLock(WFSGetFeatureWithLockRequest request)
boolean isKnownFeatureType(String featureType)
void lockFeature(LockFeature request)
void registerFeatureType(String featureType)
void removeFeatureType(String featureType)
void transaction(Transaction request)
}
ESRI has a ContentProvider class that works in this same domain.
8.5 Patterns
Patterns are used through out the geotools codebase .. here are some you will run into (often):
Abstract Factory
Abstract Factory
Summary based from the GOF book, pattern language based on Fowler.
Name
Abstract Factory (aka Kit)
Intent/Sketch
"Provide an interface for creating familieis of related or dependent objects without specifing their concreate classes" - GOF
interface FooFactory {
Foo createFoo( Object params ... );
}
class DefaultFactory implements FooFactory {
public Foo createFoo( Object params ){
return new DefaultFoo( params );
}
}
How it Works
FooFactory defers creation of product objects to DefaultFactory.
When to Use It
When you are working with interfaces, and want to define constructors
When you want to allow client code the freedom to varry implementation
Further Reading
Portland Pattern Repository:AbstractFactoryPattern and
FeatureTypeFactory & DefaultFeatureTypeFactory
Examples
FactoryFinder (explained by 05 How to write a Plugin - from Interface to Factory)
PluggableFactory
9 Tools
This page provides reference information on the tools used by the geotools community. If you like working with an IDE this is the page for you.
Tools Reference:
Eclipse Developers Guide
Eclipse Modeling Framework
IDEA4
IDEA Project File Generation with Maven
ImageIO
Java Emitter Templates
NetBeans developers guide
Omondo
YourKit profiler
Eclipse Developers Guide
The use of Eclipse with the Geotools code base is popular, and we are doing our best to support it. Indeed you will have found several mention of
Eclipse plugIns durin the course of the main Developers Guide.
Reference Information
All eclipse pages:
Page: Eclipse Setup and Build
Page: Eclipse FAQ
Page: 2.5.8 Maven Eclipse Plugin Goals
Eclipse FAQ
Eclipse Setup and Build
Interesting Plugins
Subclispe - the origional
Subversive - new new kid on the block (faster?)
http://www.eclipsezone.com/articles/pmd/ (for commiters)
http://jalopy.sourceforge.net/ (for commiters)
For all those hard core Eclipse users, this document does not get you out of reading the main Developers Guide, or even using Maven (gotta
populate a M2_REPO somehow).
For More Information
http://maven.apache.org/plugins/maven-eclipse-plugin/overview.html
A quickstart was provided by Luigi: Eclipse GeoTools Quickstart
Eclipse FAQ
Q: Why do I have to use Maven?
A:
It is a tool that allows us open source developers to work together with out buiilding a lot of infrastructure. As an example of this Maven downloads
142 jars (at last count) into a repository on your machine.
Maven allows you the developer to work on several of these projects at once, your "local" project will publish a jar into the repository on your
machine (where maven can pick it up).
Q: How do I set up M2_REPO?
A:
M2_REPO is a "Classpath Variable" expected by the .classpath file so that Eclipse can know where the the Maven Repository is on you machine.
M2_REPO is set using Eclipse References:
1. Locate the 'Classpath Variables' under Java-->Build Path
2. Hit the "New" button and type M2_REPO
3. Use the folder button and select your maven repository (if you are a windows user this is located under your user name in "C:\Documents
and Settings\USER\.m2\repository")
Q: It won't compile (part 0) - Out of Memory
A:
Yes there is a lot of code
On windows change the shortcut you used to start eclipse to:
C:\java\eclipse\eclipse.exe -vm %JAVA_HOME%\bin\javaw -vmargs -Xmx512m
You will find everything much faster - 768m is also good choice
Q: It won't compile (part 1)
A:
You can set up Eclipse to handle asserts using Preferences:
1.
2.
3.
4.
Locate the page Java-->Compiler
Go to the "Compliance and Classfiles" page
Set the "Compiler compliance level" to 5.0
Ensure the "Use default compliance settings" checkbox is checked
Q: It won't compile (part 2)
A:
Make sure you have installed JAI and possibly image_io extensions.
Q: It won't compile (part 3)
A:
Java 6 has changed a few interfaces (like DataSource) to require more methods:
1. Locate the page Java-->Installed JREs
2. Choose a JRE5 from the list (or use add to locate a JRE5 on disk)
3. Rebuild
Q: Where is my module
A:
If your module failed the "maven build" process it the script will not pick it up. Please try and fix the maven build problem first. The -all option asks
the script to pick up everything (but you need maven to populate that repository for you)
Eclipse Setup and Build
Before you start
1. Open a shell and do a full "mvn install" if you haven't done so before
2. Then do a "mvn eclipse:eclipse" to generate all the .classpath and .project files
you need to do this full build first (so the .m2/repository directory has all the jars downloaded from the internet)
For More Information
2.5.8 Maven Eclipse Plugin Goals
Setting Eclipse Preferences
1. Open up the Eclipse preferences window (Menu item Window>Preferences)
M2_REPO Classpath Variable
1.
2.
3.
4.
Navigate to Java>Build Path>Classpath Variable
Press New.. button
In Name field enter M2_REPO
In Path field enter the path to your .m2/repository_ directory
Example: "C:\Documents and Settings\Jody\.m2\repository"
5. Press Apply button
Do not do a rebuild
Java 5 Compiler Settings
1. Navigate to Java>Compiler
2. Change Compiler Compliance Level to 5.0
Rebuild if prompted
3. Navigate to Java>Compiler>Building
4. Expand Output folder
5. Add to the end Filtered Resources: ,.svn
(This will make your builds a lot faster)
6. Press the OK button
Importing the Source Code
1. Press File>Import Menu item
2. In new dialog Select Existing Projects into Workspace
3. Press Next
4. In Select root directory field enter where your code is:
example: C:\java\geotools\trunk
5. Press Finish button.
You may want to use working groups to organize all these projects - there are so many!
Eclipse Modeling Framework
A number of GeoTools modules use the Eclipse Modeling Framework (EMF) at the core. The "ogc" set of modules use EMF as the object model
which mirrors the xml schema model they were developed in.
Module
Supported OGC Specifications
net.opengis.ows
OWS 1.0, 1.1
net.opengis.wcs
WCS 1.0, 1.1
net.opengis.wfs
WFS 1.1
net.opengis.wfsv
WFSV 1.?
net.opengis.wps
WPS 1.0
This document describes how to install the EMF tools and use them for model development:
EMF Runtime Version
EMF SDK Version
Installing the EMF SDK
Working with EMF Models
Instrumenting an EMF Model
Reloading an EMF Genmodel
Regenerating Model Code
EMF Runtime Version
Currently GeoTools uses EMF version 2.2 at run time.
EMF SDK Version
In order to modify and regenerate EMF models the EMF SDK is required for your Eclipse environment. EMF versions are good at retaining
backward compatibility with older versions therefore it is possible to use a newer version than 2.2 for the EMF SDK. The last verified versions of
Eclipse and the EMF SDK known to work are:
Eclipse 3.5.1
EMF SDK 2.5.0
Installing the EMF SDK
The EMF SDK can be installed directly from Eclipse using the Software Update facility:
Also if a new model is to be created from an xml schema the XSD SDK is also necessary:
Working with EMF Models
The initial result of generating an EMF model from an XML schema is often undesirable. EMF will create its own objects for every entity in the
schema. However it is often the case that pre-existing object models exist that are favorable. For example consider filters in WFS. GeoTools
contains its own object model for filters. Therefore it is desirable to have the WFS EMF model use those objects rather than its own
representation. Another example is envelopes. Any generated model that contains the notion of an envelope or bounding box should use the JTS
envelope class or one of its equivalents.
In order to achieve these sorts of customizations the generated EMF needs to be changed after the fact. Making such changes is referred to as
"instrumenting" the model.
Instrumenting an EMF Model
Most of the time instrumenting an emf model follows the following workflow:
1. The required changes are made to an interface
2. The EMF "genmodel" is reloaded
3. The EMF model is regenerated
Changing EMF Model Interfaces
EMF Interfaces use "annotated java" to describe model components. These annotations can be modified to control how EMF generates
implementation classes. To clarify the following are examples of the typical sorts of customizations.
Changing a Property Type
This case involves changing the type of a particular property of an emf object. As an example consider query from the WFS schema. A query
contains a filter property. The original EMF interface generated straight from the schema looks something like the following:
* @see net.opengis.wfs.WfsPackage#getQueryType_Filter()
* @model dataType="org.eclipse.emf.ecore.xml.type.AnySimpleType"
*
extendedMetaData="kind='element' name='Filter' namespace='http://www.opengis.net/ogc'"
* @generated
*/
FilterType getFilter();
The QueryType interface has been generated with a filter property that is of type org.opengis.wfs.FilterType. However we want it to be
of type org.geotools.filter.Filter. To fix this the following is required:
1. Remove all the attributes of the @model annotation
2. Remove the @generated annotation
The @model annotation is what tells EMF that a property of an interface should be "modeled", ie: An implementation should be generated for it.
Step above 1 essentially erases all of EMF's assumptions about the property. And because we want to override its type we don't want it to make
any assumptions. Some of the attributes could probably be preserved but in general they are unnecessary.
The @generated annotation above is how EMF marks code that it has generated. If EMF sees this annotation it thinks that it is free to overwrite
the entity, be it a method, class, variable, etc... For this reason it is crucial that whenever an instrumentation occurs that this tag be removed to
prevent EMF from wiping out our change.
So the above property becomes:
* @see net.opengis.wfs.WfsPackage#getQueryType_Filter()
* @model
*/
org.opengis.filter.Filter getFilter();
One thing that has not been consider is the setter that was generated:
* @param value the new value of the '<em>Filter</em>' attribute.
* @see #getFilter()
* @generated
*/
void setFilter(FilterType value);
The setter can remain untouched. The reason being that because we already instrumented the getter for the filter property, EMF will overwrite the
setter to match it when the model code is regenerated. However note that if the @generated annotation was removed from the getter this would
not occur because on regeneration of the model code EMF would not overwrite the setter.
Adding a Property
Another common case is adding a new property to an object. This can be desired in cases where it is desired to model beyond what is modeled in
the core specification as xml schema. A common case of this is in GeoServer where request objects support the idea of "format options".
Consider a GetFeature request from WFS. EMF creates an interface named GetFeatureType to model this:
public interface GetFeatureType extends EObject {
...
}
Adding a new property simply involves adding a getter for it:
public interface GetFeatureType extends EObject {
...
/**
* @model
*/
Map getFormatOptions();
}
The @model annotation is necessary in order to have EMF consider it as part of the model and generate the code for it.
Changing the Type of a Collection
This is similar to first example but instead the property is multi valued. As an example consider an Insert operation from WFS. By default EMF
generates an interface named InsertElementType which contains a "features" property:
* @model unique="false" dataType="org.eclipse.emf.ecore.xml.type.AnySimpleType" required="true"
*
extendedMetaData="kind='element' name='_Feature' namespace='http://www.opengis.net/gml'"
* @generated
*/
EList getFeature();
In this case it is desirable for the list to contain geotools Feature instances, org.opengis.feature.Feature. Changing the type of a collection
involves using the type attribute of the @model annotations. This involves:
1. Removing existing attributes from the @model annotation and adding the type attribute
2. Removing the @generated annotation
The above then becomes:
* @model type="org.opengis.feature.Feature"
*/
EList getFeature();
Reloading an EMF Genmodel
Every EMF model contains a .genmodel file which contains all the information about the model. The original version of this file contains
information generated directly from an xml schema.
Whenever an EMF model is instrumented the .genmodel must be reloaded. When a model is reloaded it takes into account all the changes
made by instrumenting the interfaces. This is important so that the next time model code is generated from the .genmodel it contains the desired
changes.
If a .genmodel is not reloaded before the model code is regenerated it will overwrite all the changes made during the instrumentation step.
A .genmodel is located under the root of the project. To reload it from Eclipse:
1. Right-click on the .genmodel in the package explorer and select "Reload..."
2. Select "Annotated Java" and click "Next"
3. Select which "ecore package" to reload and click "Finish". In this example the EMF model only contains a single package
Upon success the .genmodel will not be in sync with the Java interfaces of the model. However the implementation code has not yet been
generated.
Regenerating Model Code
The final step of the instrumentation process is to generate the implementation code. To generate the implementation code from Eclipse:
1. Open the .genmodel file in the Eclipse editor:
2. Right-click on the root element and select "Generate Model Code"
The above will generate all the implementation code from the model interfaces. This is however a bit overkill. Since more often than not only a
single interface was changed. It is possible to regenerate only the single class by navigating to the interface in the model editor:
IDEA4
Intellij IDEA4
in geotools.zip you find geotools.ipr, an IDEA 4.0 project file that is able to build geotools. Tested with B4 sources.
Just extract the zipfile on your toplevel geotools folder. There are .iml files for each subproject.
One special thing about the project files: JTS is included as a module, not library. You can easily achieve this if you
just extract the JTS sources into geotools-src/jts
For your convenience, the jts dir is also attached in jts.zip.
Alternatively you could remove the dependency to JTS everywhere and add it as a library.
There is a build.xml for ant 1.6 that builds geotools (was generated by IDEA4.5)
Links:
http://www.jetbrains.com/idea
IDEA Project File Generation with Maven
How to set up Intellij IDEA for GeoTools development.
Recent IDEA versions (6.0)
For a recent IDEA version, you can use the maven idea plugin to generate a IDEA project file for GeoTools.
Note that you don't actually need to download the maven idea plugin, maven will do that automatically for you.
Simply move to the root directory of your GeoTools checkout, and type:
mvn idea:idea -DjdkName=1.4
The last argument specifies the JDK configured in IDEA to be used in the created project. You can use another value than "1.4" for it, or you can
leave the argument out, simply using:
mvn idea:idea
In this case you may have to specify the JDK for the project before you can use it.
IDEA 4.0
For IDEA version 4, see IDEA4.
ImageIO
JAI Image I/O Tools 1.1
Java Emitter Templates
Java Emitter Templates (JET) is a an Eclipse Modeling Framework (EMF) component used to maintain the GeoTools xmlcodegen Maven plugin.
JET is a tool for generating source code using a JSP-like syntax. See:
A Jet Tutorial
To modify xmlcodegen:
1. Ensure that JET is installed in Eclipse, either by installing it (or EMF) manually, or by using the Eclipse JEE bundle (which contains EMF
and thus JET).
2. Run mvn eclipse:eclipse as usual to create Eclipse .project file for xmlcodegen. Note that every time you run mvn
eclipse:eclipse you will need to reset the JET configuration for the project.
3. Use "New > Other > Java Emitter Templates > Convert Projects to JET Projects" and convert xmlcodegen to a JET project.
4. Change the project "Properties > JET" Settings to reflect the xmlcodegen directory layout:
Template Containers: src/main/template (note: no s!)
Source Container: src/main/java
Now JET is run automatically to update the generated source files whenever template files such as schemas.javajet are modified.
xmlcodegen can now be built with Maven as usual.
NetBeans developers guide
NetBeans is a free java IDE which also provides a framework for adding extra functionality. GeoTools2 is developed using the same modular
structure as Netbeans and we plan to integrate GeoTools into Netbeans. Sun have repackaged Netbeans and called it Sun ONE Studio
(previously Forte for J).
These instructions refer to recent versions of Netbeans. If you are using an older version consider upgrading because the new versions offer
better support for Maven and Subversion, both valuable for GeoTools programming, as well as many general improvements and bug fixes.
Installing NetBeans 6.x and Maven 2.x
Installing Netbeans requires the JRE 5 (at least) to be on your system. Download Netbeans from http://www.netbeans.org. The installation
process is simple and should be self-explanatory.
If you have just installed NetBeans 6 the first thing to do is to add the MevenIDE plugin which gives Netbeans the ability to natively open Maven
projects and create new Maven projects as well as other useful bits such as local and remote repository browsing. Installing the plugin is easy.
Launch Netbeans, select the Tools menu and then the Plugin item (at the bottom of the menu). This will display the Plugins dialog. Select the
Available Plugins tab and you will see Maven listed as one of the Java category plugins. Click the checkbox for Maven and the Install button at the
bottom of the dialog. You will be prompted to confirm a licence agreement after which the Maven plugin will be installed.
The Maven plugin includes an embedded version of maven itself so there is no need to install maven separately on your system unless you want
to be able to use it from the command line or work with a version different to that included in the Maven plugin. If you do maven separately
installed you can choose to use it, rather than the plugin's version, for all projects or for selected projects. To use maven for all projects open the
Options dialog by selecting the Preferences item from the Netbeans menu. In the dialog select the Miscellaneous icon at the top, and then the
Maven 2 tab below that. Here you can specify the path to your external maven executable and choose to use it for all projects. This is also where
you can specify the path to your local maven repository (the directory structure where maven will install copies of all jars and other files required
for building projects etc). If you leave the path blank in the Options dialog, a default path will be used (e.g. on unix systems this is
~/.m2/repository).
You don't have to install a Subversion plugin manually, it comes as part of the Netbeans base IDE.
Specifying and monitoring memory usage
If you get out of memory errors or Netbeans is sluggish, you can explicitly set the maximum heap size available to it in the file etc/netbeans.conf.
For example, here we are requesting a maximum heap size of 640Mb:
netbeans_default_options="-J-client -J-Xss2m -J-Xms32m -J-Xmx640m -J-XX:PermSize=32m
-J-XX:MaxPermSize=200m -J-Xverify:none"
Within the IDE you can display current and peak memory usage in a toolbar widget. Select View menu -> Toolbars menu -> Memory.
Installing a working copy of the GeoTools source
You can checkout the code from the GeoTools subversion repository from within Netbeans.
In the Checkout dialog enter the URL for the GeoTools repository as shown below. If you have commit access to the repository, you can also
choose to enter your user name and password at this stage and have Netbeans cache them. Then click the Next button...
On the next dialog page you specify the repository path containing the files that you want to check out and the local path for you working copy.
The checkout will commence once you click the Finish button. You can follow its progress in the Netbeans Output window.
todo: Michael to finish this page
Related
http://wiki.netbeans.org/MavenBestPractices
Omondo
Omondo is an Eclipse Developers Guide plug-in used to generate diagrams for tutorials.
In the past the tool poseidon
has been used for this purpose. You will still see the occasional *.zargo file in the codebase.
Both programs feature strong java reverse engineering. We have often taken the approach of coding up java interfaces to generate diagrams
during design (rather than fiddle with a drawing program).
If you are making a picture for a tutorial you are to be commended, we really don't care what applicaiton you use. Please save the picture into the
wiki, or into a doc-files directory for use with javadoc.
If you would like to save a UML diagram file into the code base please use one of thesee two programs. The less we need to document the better.
The fact that both of these programs are cross platform, causes us to use them over tools like Viso.
YourKit profiler
YourKit is a CPU and memory profiler for Java applications.
Can be run stand alone or integrated with various IDEs.
For a full list of features, please refer the YourKit pages
License management
YourKit is a commercial product, which provides open source project
committers with free licenses.
Geotools PMC has been granted 10 licenses, each one can be used by at most
one developer in a given period of time.
Andrea Aime is managing the licenses now, so if you feel like using
YourKit for profiling the gt2 source code base please:
check that at least one license it available or
ask someone to step down and give the license to you
ask Andrea Aime about the license file
update this page to allow us to track the licenses used.
License list
license 1: Andrea Aime
license 2: Simone Giannecchini
license 3: Justin Deoliveira
license 4: Gabriel Roldan
license 5: free
license 6: free
license 7: free
license 8: Jody Garnett
license 9: Christophe Rousson
license 10: Daniele Romagnoli
A Reference
Version
This is your guide out of "version hell", this list represents links to the latest version of any software used in the geotools developers guide.
ArcSDE
DB2
JAI
JDK
JRE
Maven
Oracle
Each one of these pages is defined as a:
Link to the file download directly, or at least the download page
ArcSDE
Included on CD
DB2
db2jcc.jar
JAI
Java Advanced Imaging API 1.1.3
JDK
Java(TM) 2 SDK, Standard Edition 1.5.0_12
JRE
Java(TM) 2 Runtime Environment, Standard Edition 1.5.0_12
Maven
Maven 2.1.0
Oracle
ojdbc14.jar
Home
This guide is intended for programmers wishing to improve the Geotools library itself. The User guide is intended for programmers wishing to use
Geotools as a code library.
Table of Contents
.bookmarks
1 Introduction
1.1 Document Overview
1.2 System Overview
1.3 Documentation License
1.4 Source License
2 Building
2.1 Language — Java 1.5 extended with JAI and ImageIO
2.2 Dependencies — download and install
1 Java Install
2 Maven Install
3 Subversion Optional Install
4 Oracle Optional Dependency
5 Sphinx
2.3 Source Code — obtain the geotools source code
2.4 Using Subversion — helpful subversion tips
2.5 Using Maven — an easy-to-use build tool
2.5.1 Build All Modules
2.5.2 Maven Local Settings and Repository
2.5.3 Building an individual module
2.5.4 Doing things other than building
2.5.5 Project Object Model (POM) Files
2.5.6 Remote Repository and Files
2.5.7 Testing with Maven
2.5.8 Maven Eclipse Plugin Goals
2.5.9 Working with Others
2.6 Generating Javadoc
2.7 Generating Maven reports
3 Communication
3.1 Internet Relay Chat
3.2 Email
3.3 Issue Tracker
How to Create a new Issue
3.4 Websites
4 Roles and Responsibilities
1 Contributors
2 Committers
3 Module Maintainers
4 Project Management Committee
5 Project Conventions
5.1 Coding Guidelines
5.1.1 Coding Conventions
5.1.2 Do not return null
5.1.3 Logging
5.1.4 Exception handling
5.1.5 Avoid assumptions
5.1.6 Converting URLs to Files
5.1.7 Use of Assertions, IllegalArgumentException and NPE
5.2 Naming Conventions
5.3 Module Directory Structure
5. 5 Refactoring
5. 6 Code Profiling
5. 7 Testing — JUnit
Online Test Fixtures
5. 8 Test Data
5. 9 Versioning
6 Documentation
01 User Guide Welcome
02 User Guide
05 Confluence Tips and Tricks
06 GeoTools 2.0 Documentation
7 Project Procedures
Building the Website
Continuous Integration
Creating your own Module
GeoTools change proposal
Gold Star Quality Assurance Check
Hacking
How to add a 3rd party jar
How to cut a release
Announcement
Making a major API shift
Supporting your module
Working on a stable branch
8 Design and Architecture
8.1 Architecture
Detailed Model
Plugin Extension Model
8.2 Modular Design
Module Categories
8.4 Data Access
8.5 Patterns
Abstract Factory
9 Tools
Eclipse Developers Guide
Eclipse FAQ
Eclipse Setup and Build
Eclipse Modeling Framework
IDEA4
IDEA Project File Generation with Maven
ImageIO
Java Emitter Templates
NetBeans developers guide
Omondo
YourKit profiler
A Reference
Version
ArcSDE
DB2
JAI
JDK
JRE
Maven
Oracle
Editors' Corner
Known Documentation Issues
Docs: 6 issues
Writing Guidelines:
Use parent/child relationships for table of contents
Use a number to start your page name for order
Provide definitions as child pages of Glosary
InkScape for digrams (attach svg and png to page)
Target audience are geotools committers
Notes:
Navigation
(Child pages Home)
Focus
Below are the 3 labels used in GeoTools Developers Guide listed alphabetically. Click on a label to see its associated content.
A-Z
eclipse, osgeo, pending
Navigation
Home
GeoTools
UserGuide
DeveloperGuide
.bookmarks
1 Introduction
2 Building
3 Communication
4 Roles and Responsibilities
5 Project Conventions
6 Documentation
7 Project Procedures
8 Design and Architecture
9 Tools
A Reference
Home
Edit Instructions