1
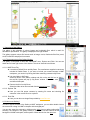
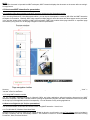
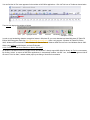
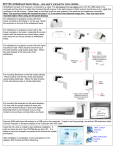
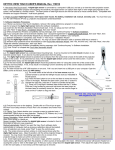
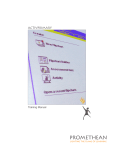
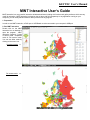
KEYTEC User's Manual Revision 110723 MINT Interactive User’s Guide MINT Interactive is a very powerful interactive whiteboard software including rich functions and gallery software, which are very useful for education. MINT Interactive is placed on the top layer with full transparency to any application running on your computer, you can easily add annotation or draw pictures over any program. 1. Preparation In order to use MINT Interactive, a DUO pen or ACEeBoard must be connected to your computer's USB port. 2. Run MINT Interactive Double click on the MINT Interactive icon on desktop to open the program. MINT Interactive supports 2 types of screen mode - Scrapbook mode & Full screen mode. You can use either mode by clicking on the menu icon. Scrapbook mode >> Full screen mode >> MINT Interactive supports 2 types of tool bar - Floating and Bar type. Each type is mutually exchangeable by clicking menu icon on toolbar and it can be moved by dragging with a DUO or ACEeBoard pen. 3. Toolbar Functions Description. Toggle between Mint Interactive mode and Window mode. Pencil, highlighter, brush. Erasers. Color, size, shapes/lines/diagrams. Text input, edit. Screen capture, recording. Previous page, next page. Insert new page, delete selected page. Redo, undo. Shift window, tool & utility. Shift & zoom, setup options. 4. Using Scrapbook It is sometimes very useful to work in scrapbook mode, especially working on multi pages or with gallery. 4.1 Viewing Multi pages Whenever you add new pages, MINT Interactive caches those pages in memory for later use. You can see all cached pages in Scrapbook mode and recall or delete selected page by clicking it directly. Also you can easily copy, paste, delete or move specific page by using menu commands located at upper-left side in the preview window. You can open preview window any time by clicking on the slightly ejected bar located at the left side of window during full screen mode. 4.2 Overview of the Gallery. The gallery is the collection of various images and multimedia files, which is useful for education or presentation. The gallery is displayed in the right window. The gallery supports various file formats such as image, movie, flash and office files (excel, word, PowerPoint and pdf) as its contents. 4.2.1 The tree structure of the Gallery Window. The gallery is composed of three tabs called MINT room, Explorer and Flickr. You can see these tabs on lower right corner of the window. The role of each tab is as follows: 4.2.1.1. MINT Room Tab It consists of Default Room and My Room. The manufacturer supplied contents are included in Default Room. If you want to include your owned contents in MINT workspace, you can do it by linking the folder containing contents to My Room. Link user folder to My Room: Select My Room in the Gallery window and click on the add link icon on the tool bar. System will pop up “My Room” window. Enter folder name and define folder path. Remove the link from My Room: Select the folder to be removed and click the remove link icon. 4.2.1.2. Explorer Tab. Here you can find proper contents by entering file name and checking file extension in the combo box to be explored. 4.2.1.3. Flickr Tab. Here you can also use image files provided by www.flickr.com. 4.2.2 How to use Gallery? In order to export contents in the Gallery to MINT workspace, you can either double click on the content file or drag it to MINT workspace with the digital pen. You can also export the contents by clicking on the insert icon on gallery toolbar after selecting the contents in the gallery window. If you want to use the contents as the background of MINT workspace, select specific content and click on the open icon. NOTE: When office document is imported into MINT workspace, MINT interactive displays the document on the screen after converting it to image format. 4.3 How to use MINT Interactive for presentation. 4.3.1 Importing Office documentations into MINT Interactive workspace using Scrapbook function If you are using Windows XP, Vista Home basic edition, you can import documentation created by MS office into MINT Interactive workspace for annotation. Basically, MINT Note supports multiple pages for office document and those pages can be previewed in the preview window after importing to MINT Note workspace. MINT Note enables direct page selection or sequential page movement by using arrow icon on the page navigation toolbar for presentation. However, if you are using Vista Home Premium edition or above, you can use Ink tool on MS office menu bar by clicking “view” -> “Ink start” menu for annotation. 4.3.2 Using MINT Interactive toolbar. You can use MINT Interactive directly for Microsoft Office and other applications without importing documents into MINT Interactive scrapbook. Start MINT Interactive before opening the application program, then MINT Interactive toolbar will be placed on the top layer of the applications with full transparency. You can annotate on any running applications. 4.4 How to use Digital Ink (Ink Tool) for presentation? You can also annotate on MS office documents without using MINT Interactive. Here is how: 4.4.1 For Window-XP, Windows Vista Home Basic. Windows XP and VISTA Home Basic do not support Digital Ink directly, you will need to use Ink Tool software which is included in the MINT installation CD and automatically installed. This software is useful for annotation on MS Office documents including PowerPoint, Word, Excel and Outlook. You can find the Ink Tool menu appeared in the toolbar on MS Office applications. Click Ink Tool icon on Toolbar as shown below. Then Ink tool displays the toolbar as follows clear pen highlighter eraser color thickness handwriting language insert and object or cancel In order to use handwriting character recognition feature in Windows XP, you must download and install Windows XP Tablet PC Edition 2005 Recognizer Pack from http://download.microsoft.com. Note: It only support - Windows XP Tablet PC Edition 2005, Windows XP Professional Edition, Windows XP Service Pack 2, Windows 2000 Service Pack 4 and Windows Server 2003. When using Ink Tool on MS Outlook, set it at HTLM mode. 4.4.2 For Window Vista Home Premium or above / Windows7 As Window Vista Home Premium or higher version and Windows 7 directly support MS digital ink library, Ink Tool is not necessary. By clicking “review” on menus of MS Office applications, it automatically enables “Ink start” icon, located at the right-end side of the menu. Click “Ink Start”, another toolbar pops up consisting of functions for annotation.