1
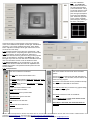
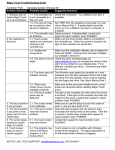
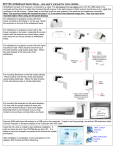
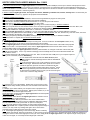
KEYTEC VIEW TOUCH USER'S MANUAL Rev. 110812
1. How does View Touch work? A digital light sensor is connected to a computer’s USB port, and set up to view the entire projection screen.
After running a calibration program and adjusting the sensitivity, the digital sensor can capture laser light or other bright light projected on the
screen, and translate to a mouse function. The laser pointer or other light source can then be used as a mouse control device. Compatible with
Windows and support Windows 7 multi-touch gestures,
2. What's included? Digital light sensor, mini tripod, laser mouse, AA battery, installation CD, manual, warranty card. You must have your
own PC with Windows XP and up, projector and projection screen/board/wall.
3. Software Installation Procedures:
3.1. If there is a previous View Touch installation, remove it first using add/remove program in control panel.
3.2. Do not plug in the digital light sensor before the software installation.
3.3. Insert CD, the Windows Installation Wizard should start. If not, run setup.exe from CD Rom.
3.4. Click “Next” in View Touch – Installation Wizard, then click “Install”.
3.5. When prompted by Windows compatibility warning message, click “Continue Anyway” in Software Installation.
3.6. If your computer does not have DirectX installed, click “I accept the agreement” in Installing Microsoft DirectX, then click “Next”, then
“Finish”. This step will be automatically skipped if you already have DirectX installed in your computer.
3.7. Software installation is completed, click “Finish” in “View Touch – Installation Wizard”.
3.8. Plug the digital light sensor into a USB port. You may use active USB extension cable or powered USB hub to extend it.
3.9. Windows may update the driver automatically or start Found New Hardware Wizard, click “Yes, this time only”, then click “Next”, then click
“Install the software automatically”, then click “Next”.
3.10. When prompted by Windows compatibility warning message, click “Continue Anyway” in Software Installation.
3.11. Click “Finish” to complete the Found New Hardware Wizard.
4. Hardware Installation Procedures:
4.1. The digital light sensor has a standard tripod mounting hole. It can be mounted on the mini tripod included, or any
standard camera tripod. It can also be mounted upside down from the ceiling.
4.2. The digital light sensor should be positioned at a distance from the screen that is twice of the width of the projected
image on the screen. If it is positioned too close, then the digital light sensor cannot cover the entire screen. It can be
positioned farther away, but the resolution will become lower.
4.3. For the best results, the digital light sensor should be positioned within 15° along the center line of the screen (both
vertically and horizontally). If not, it may result in increasingly uneven sensitivity due to the uneven distances between the
sensor and the screen.
4.4. The laser mouse has a RF USB receiver on one end. Pull it out and insert into a USB port on your computer. Open the
battery cover at the back, insert one AAA battery.
4.5. The mode switch at the left side of the laser mouse must be
pushed forward to activate the left/right mouse clicks as indicated in
the left picture.
4.6. Press the laser button to turn on the red laser to move the mouse
cursor to the target. Release the laser button, press the 2nd button to
activate the right click, press the 3rd button to activate the left click.
4.7. There is a D-ring kept in between laser button and the 2nd button.
Push the D-ring forward to press and hold down the laser button so
the laser beam is constantly turned on, then you can use the finger to
press on the 3rd button to drag and draw.
4.8. Find the two icons on the desktop. Double click on VTouch icon to open
the View Touch Setup window (VTouch Pen is for annotation and Power Point
control).
4.9. Display Type: Select whether your computer screen is projected onto a
screen/wall - specify front or rear projection. Display (LCD, Plasma, etc.) is not
recommended unless the laser light can be seen.
Sensor Orientation: Select whether the digital light sensor is mounted Upside
down (from ceiling) or Upside up.
Sensor Location: Select whether the digital light sensor is located in front of
the screen or behind it (rear projection).
Startup Automatically: Select if you want the View Touch software starts
automatically on computer start-up (previous calibration data will be loaded).
Once all selections are made, press “Start” to open the control panel.
4.10. The center picture-in-picture window in control panel shows what the
digital light sensor sees. Adjust its position until the entire projected image is
covered. You may check it by emitting laser light to the 4 corners of the
projected image to make sure all the corners are covered.
4.11. Avoid bright spots appearing on the screen image, whether caused by
nearby lamps, light fixtures, light from the projector, or other sources of strong light in the room. Otherwise the sensor will become ‘fixated’ on it,
causing the cursor to ‘stick’ to the bright spot. To free your cursor, simply block the digital light sensor. Then adjust the angle of the projector,
or dim the room lights, or move lamps until the bright spot is removed.
4.12. Click “Calibration”
button. The digital light
sensor takes a screen shot
of a grid image and place it
in the center window. Using
your mouse, place the cursor
at the center of each cross
point of the grid (9 total) then
click to place the calibration
point. Start at the upper-left
corner, continue clockwise
around the figure, finishing in
the center of the pattern.
Check the accuracy by pointing laser to the screen and see if
mouse cursor matches to the position of laser light. Recalibrate if
necessary. If you need to reposition the sensor, press “Reset”
button. Adjust the sensitivity scale at right until the laser mouse
can move the cursor freely.
4.13. Click the top button on the left to set “speed levels” – fast,
smooth, super smooth – responding to the speed of mouse clicks.
4.14. Click “Options” to open the selections: Although it is
defaulted at “Normal” which is good when using on rear projection
screen in close distance. Otherwise, click “Move only”, so the
laser light only moves the cursor and does not activate the mouse
click. Use the buttons on laser mouse to activate the clicks.
4.15. Multi-touch option: If you use Windows 7, you can click
“Enable Multi” button to enable the multi touch capabilities with
multiple laser pointers. The speed level will drop when the multi
touch is enabled.
4.15. View Touch Pen:
This menu contains the tool buttons:
The Pen button shows the annotation menu
The Mouse button extends to Right click, Move only, Lift off
and Normal modes (see 4.14)
The Speed button extends to Fast, Smooth, and Super
Smooth (see 4.13)
Power Point Control Buttons include:
Home returns to the first slide
This menu contains the View Touch Pen’s annotation
options:
Click on the Pen to extend color and width selections for
pen and highlighter. You can draw, mark, and write on the
screen over any program.
Click Save to save the entire screen (annotations and all)
as a snap shot in either BMP or JPG format.
Use Undo and Redo like you would in any graphic editing
or word processing program.
Left point arrow goes to previous slide
Click Trash to clear the screen of annotations.
Right point arrow goes to next slide
End advances to the last slide
End PPT will exit the slide show.
Click the Return Arrow to return to the mouse control
menu shown in the left column.
Note: When in Pen mode, the mouse functions are
disabled.
Close View Touch Pen
KEYTEC, INC. 520 Shepherd Drive, Garland, Texas 75042 USA Tel: 972-272-7555 or 800-624-4289 Fax: 972-272-7501 Hours: 8:30AM – 5:00PM CST Mon – Fri
Homepage: www.magictouch.com View Touch page: http://www.magictouch.com/ViewTouch.html
Email: for information: [email protected] for sales inquiry: [email protected] for tech support: [email protected].