1
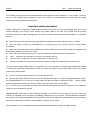
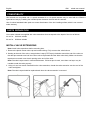
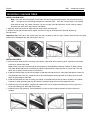
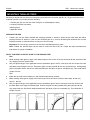
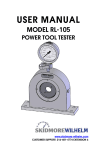
CARBONBIKEKITS WHEELS USER MANUAL English CBK wheel user manual This manual contains important information about the safe operation and maintenance of your wheels. To ensure that your CBK wheels perform properly, we urge you to follow our recommendations to help make your riding experience more enjoyable and trouble-free. Important safety information Riding a bike with an improperly installed wheel can allow the wheel to move or disengage from the bicycle, causing damage to the bicycle, and/or serious injury and/or death to the rider. Your wheels must be properly mounted to the bicycle frame. Misalignment can result in problems with shifting and bike handling. It is essential that you: Ensure that your axle, dropouts, and quick release mechanisms are clean and free of dirt or debris. Ask your dealer to help you understand how to properly secure your wheels using the quick release mechanism. Apply the correct techniques when installing your wheels. Make sure four or more threads are engaged in the quick release adjusting nut when it is closed. Never ride your bicycle unless you are sure your wheels are installed properly, and are secure. CBK wheels are not intended to be used on any tandem bicycle. Do not exceed 125 psi (8.6 Bar) when inflating tires on clincher rims. Do not exceed the tire manufacturer’s maximum pressure rating when inflating tires on tubular rims. You must use the proper brake pads for your specific rims. Use of improper or contaminated brake pads will lead to excessively high braking temperatures which can cause premature rim wear and/or failure which can lead to serious injury and/or death. Do not use ceramic specific pads on non-ceramic coated rims. Use only the pads included with your wheels or CBK approved pads. For a list of CBK approved pads, refer to www.carbonbikekits.com. Do not use any other pads. Non-approved pads, including non-CBK carbon specific pads, may generate heat that can lead to rim failure causing serious injury and/or death. Do not re-use any brake pads on carbon rims that have been previously used on aluminum rims as abrasive material may be embeded in the pad. Aluminum rims: Check the rim wear indicator(s) located on each side of the rim before every ride. If any wear indicator is completely worn or missing, immediately discontinue use of the wheel. The wear indicator represents the minimum rim thickness allowable for safe operation of the wheel. Riding the wheel with less than the minimum allowable rim thickness can lead to structural failure of the rim and/or wheel. Do not attempt to use any tubeless products (excluding tubular tires) with clincher or tubular wheels. English CBK wheel user manual COMPATIBILITY CBK wheels are compatible with 11 speed cassettes.A9 or 10 speed cassette may be used with the SRAM 11 speed driver body by installing the included spacer between the hub and the cassette. Use of colored standard brake pads can cause discoloraton of the rim's braking surface,which is not covered under warranty PARTS REPARATION Your carbon wheels are supplied with valve extensions that correspond to the depth of the rim as follows: 44 mm for 38/44mm wheels 50 mm for 50/60mm wheels INSTALL VALVE EXTENSIONS Note: Install valve extensions before mounting tires. 1. Remove the plastic Presta valve cap and metal lockring. Fully unscrew the valve locknut. 2. Starting at the end of the valve, wrap plumber’s tape (PTFE tape) clockwise around the end of the valve so that the tape extends over both the narrow valve cap threads and the wider valve body. Make sure that the tape does not stretch over the air opening at the end of the valve. Note: Plumber’s tape comes in several thicknesses. If thinner tape is used, more than one layer may be needed to seal the valve properly. 3. Using a 3 mm hex wrench inserted into the valve extension, thread the valve extension onto the end of the valve and tighten. Note: Plumber’s tape should be replaced each time the valve extension is removed. English CBK wheel user manual MOUNTING CLINCHER TIRES INSTALLING RIM TAPE Note: You must use a thin plastic or thin fabric rim strip for proper performance. We recommend using CBK rim tape as it is specifically designed to work with CBK rims. Do not use Velox? or a similarly thick cloth rim strip. For carbon clinchers, 18 mm rim tape. Rim tape less than 18 mm used on carbon clinchers can shift, which may lead to tube failure. 1. Align the valve hole in the rim strip with the valve hole in the wheel rim. 2. Stretch the rim strip around the rim. Make sure the rim strip is centered on the tire bed all the way around the rim. Important: Make sure all of the spoke holes are fully covered by the rim strip. Double check that the rim strip valve hole is still aligned with the valve hole in the rim. INSTALLING TIRES 3. Mount one tire bead onto the rim using your hands. If tire bead will not seat by hand, carefully use a plastic tire lever to seat the tire bead. Note: Check your tires for directional arrows printed on the sidewalls to indicate rotation of wheel. Not all tires have directional arrows. Install the tire with the manufacturer’s logo near the rim valve hole. This will allow you to quickly find the cause of a puncture. 4. Inflate the tube enough to just hold its shape. Install the tube valve into rim valve hole and align the valve so it is perpendicular to the rim. Install the rest of the tube between the tire and the rim making sure the tube does not get twisted or bunched. 5. Install second bead onto the rim using your hands. If tire bead will not seat by hand, carefully use a plastic tire lever to finish mounting the tire. Be careful to avoid pinching the inner tube against the rim. 6. Inflate the tire to low pressure. Inspect both sides of the rim for proper tire seating and for any sign of the inner tube sticking out. Re-install if necessary. 7. Inflate the tire to full pressure. There should be no hops or side-to-side movement in the tire when it is rotating. English CBK wheel user manual MOUNTING TUBULAR TIRES Mounting a tubular tire to a wheel involves gluing a tubular tire to a tubular specific rim. To glue a tubular tire to a tubular specific rim you will need the following: 1.Tubular glue (Do not use 3M? Fast Tack glue. It will damage the tires.) 2. Isopropyl alcohol or acetone 3.Nitrile gloves 4 Applicator brush PREPARE THE RIM 1. Carbon rims can be safely cleaned with isopropyl alcohol or acetone. Clean the tire seat area with either isopropyl alcohol or acetone. If the rim has old dried glue on it, remove all dried glue andclean the rim with isopropyl alcohol or acetone before moving on to the next step. Important: Do not use any solvent on the rim that could damage epoxy resin. Note: Tubular tire specific tape may be used to mount the tire to the rim. Follow the tape manufacturer’s instructions for proper installation. APPLY THE FIRST LAYER OF GLUE TO THE RIM AND TIRE Rim 2. While wearing nitrile gloves, apply a thin bead of glue to the center of the tire seat area all the wayaround the rim, skipping over the spoke holes. 3. Use your gloved finger or an applicator brush to spread the glue in a thin, even layer from the center of the tire seat area to each edge of the rim. Ensure the glue is evenly spread all the way around the rim. Avoid getting glue in the spoke holes. Set the rim aside and allow the first layer of glue to completely dry. This could take a couple of hours. Tire 4. Inflate the tire until it turns inside out, with the base tape facing outward. 5. While wearing nitrile gloves, apply a thin bead of glue onto the center of the tire base tape, all the way around 6. the tire. Use your gloved finger or an applicator brush to spread the glue in a thin even layer from the center of the tire base tape to the edge of the base tape. Ensure the glue is evenly spread along the base tape all the way around the tire. Set the tire aside and allow the first layer of glue to completely dry. This could take a couple of hours. English CBK wheel user manual APPLY A SECOND LAYER OF GLUE TO THE RIM AND TIRE 7. Apply a second, thin,even layer of glue to both the rim and tire, using the same method described above,Set each rim and tire aside separately and allow the second layer of glue to dry until it is slightly tacky.This may take several hours APPLY THE FINAL LAYER OF GLUE TO THE RIM AND TIRE 8. Apply a final,thin even layer of glue to both the rim and tire again using the same method described above.Allow the glue to dry on both the rim and tire or about 15 minutes. MOUNT THE TIRE ON THE RIM Important:Do not use any tools to mount tubular tires onto carbon rims as this may damage the rims. 9. Roll the valve stem portion of the tire inward and insert the valve stem into the rim valve hole. 10. Press the tire firmly onto the rim at the valve stem area before you stretch and roll the rest of the tire over the rim. As you continue to roll the tire onto the rim,be sure to maintain firm pressure on the sections of tire already mounted. CENTER THE TIRE ON THE RIM 11. After the tire is mounted on the rim, check that the tire is centered on the rim: an equal amount of base tape should be visible along both sides of the rim. 12. Inflate the tire to 50 psi(3.4bar)then spin the wheel by band, As the wheel is spinning ensure that the tire tread does not appear to move back and forth, This movement is an indication that the tire os off-center.If the tire is off-center.deflate the tire and push or twist it into place where necessary. 13. Re-inflate the tire and check that it is centered on the rim, Repeat this process until the tire is Centered on the rim when inflated. 14. Once the tire is centered,inflate the tire to its maximum rated are pressure(not to exceed 135psi /8.6bar)and let the wheel sit overnight to allow the glue to bond the tire to the rim. CLEANUP AND MAINTENANCE 15. Carefully remove any excess glue on the rim sidewall with isopropyl alcohol or acetone,Keep the solvent away from the tire/rim glue bond, Before each ride,check the tire to rim glue bond and the tire pressure.Remove and re-glue the tire as needed or at least once a season English CBK wheel user manual WHEEL INSTALLATION ASSEMBLING AND INSTALLING THE QUICK RELEASE 1. Unthread the adjusting nut from the end of the quick release skewer and remove the tension spring closest to the adjusting nut. 2. Slide the quick release skewer shaft through the hub axle from the non-drive side. Re-install the tension spring with the narrow end toward the hub axle and thread the adjusting nut a few turns onto the skewer. Front Wheel 3. Check that the quick release skewer lever is in the open position. Check that the brake quick release mechanism is open. 4. Install the front wheel between the dropouts with the quick release lever positioned on the non-drive side of the bike. Check that the wheel axle is fully seated in the fork dropouts and clear of any safety tabs. Note: If your front tire has directional arrows, take note of the direction of rotation and install so that the quick release lever is on the non-drive side of the bicycle, and the tire rotates in the proper direction. 5. Close the quick release half way, with the quick release lever parallel to the hub axle. 6. Tighten the quick release adjusting nut so that it contacts the dropout. When closing the lever, tension should be felt when the quick release lever is in the horizontal position (90 degrees to the fork), but you should still be able to reach the fully closed position (90 degrees to the hub axle). The quick release lever should leave a clear impression on your hand. If the quick release lever does not leave a clear imprint on your hand, tension is insufficient. To increase tension, open the quick release lever and tighten the quick release adjusting nut in small increments until proper tension is achieved. When closed, the quick release lever should be positioned just behind the non-drive side fork leg. Reposition the lever as necessary to achieve this orientation. English CBK wheel user manual Rear Wheel 7. Check that the quick release skewer lever is in the open position. Check that the brake quick release mechanism is open. 8. Shift the derailleur and chain to the highest (smallest) gear. 9. Pull back and down on the rear derailleur to open chain and install the cassette between upper and lower sections of chain so that the chain wraps around the smallest cog. 10. Check that the wheel axle is fully seated in the fork dropouts. 11. Close the quick release half way, with the quick release lever parallel to the hub axle. 12. Tighten the quick release adjusting nut so that it contacts the dropout. When closing the lever, tension should be felt when the quick release lever is in the horizontal position (parallel to the ground), but you should still be able to reach the fully closed position (90 degrees to the hub axle). The quick release lever should leave a clear impression on your hand. If the quick release lever does not leave a clear imprint on your hand, tension is insufficient. To increase tension, open the quick release lever and tighten the quick release adjusting nut in small increments until proper tension is achieved. When closed, the quick release lever should be positioned between the seat stay and chain stay. Reposition the lever as necessary to achieve this orientation. FINAL INSPECTION 13. Close the front brake quick-release mechanism. View front wheel centering in fork. The wheel should be centered between fork blades. If the wheel is not centered between the fork blades, open the quick release, make sure the wheel axle is fully seated in the fork dropouts, and close the quick release (see step 6). Inspect brake pad alignment and centering by closing and opening pads with brake lever. If brake pads are not centered to the wheel, see your brake manufacturer’s instructions. If wheel fails to adequately center in the fork, you should consult your CBK dealer or professional bicycle mechanic. 14. Close the rear brake quick-release mechanism. View centering of the wheel between chain stays and seat stays. If the wheel is not centered between the chain stays and/or seat stays, open the quick release, make sure the wheel axle is fully seated in the dropouts, and close the quick release (see step 12). If brake pads are not adequately centered to the wheel, see your brake manufacturer’s instructions. If further attempts to align the wheel fail to adequately center it in the frame, you should consult your SRAM dealer or professional bicycle mechanic. CARE AND CLEANING Use soap and water to clean your rims. When using solvent to remove glue from tubular rims, avoid getting solvent onto the decals as this may cause damage to them. English CBK wheel user manual WARRANTY EXTENT OF LIMITED WARRANTY CBK warrants its wheels to be free from defects in materials or workmanship for a period of 1 years after original purchase. This warranty only applies to the original owner and is not transferable. Claims under this warranty must be made through the retailer where the bicycle or the CBK component was purchased. Original proof of purchase is required. LOCAL LAW This warranty statement gives the customer specific legal rights.The customer may also have other rights which vary from state to state (USA), from province to province (Canada), and from country to country elsewhere in the world. To the extent that this warranty statement is inconsistent with the local law, this warranty shall be deemed modified to be consistent with such law, under such local law, certain disclaimers and limitations of this warranty statement may apply to the customer. For example, some states in the United States of America, as well as some governments outside of the United States (including provinces in Canada) may: A. Preclude the disclaimers and limitations of this warranty statement from limiting the statutory rights of the consumer (e.g. United Kingdom). B. Otherwise restrict the ability of a manufacturer to enforce such disclaimers or limitations. LIMITATIONS of LIABILITY To the extent allowed by local law, statement, in no event shall CBK except for the obligations specifically set forth in this warranty or its third party supplies be liable for direct, indirect, special, incidental, or consequential damages. LIMITATIONS of WARRANTY This warranty does not apply to products that have been incorrectly installed and/or adjusted according to the respective CBK technical installation manual. The CBK installation manuals can be found online at carbonbikekits.com. This warranty does not apply to damage to the product caused by a crash,impact, abuse of the product,non-compliance with manufacturers specifications of usage or any other circumstances in which the product has been subjected to forces or loads beyond its design. This warranty does not apply when the product has been modified. This warranty does not apply when the serial number or production code has been deliberately altered, defaced or removed. This warranty does not apply to normal wear and tear. Wear and tear parts are subject to damage as a result of normal use, failure to service according to CBK recommendations and/or riding or installation in conditions or applications other than recommended. This warranty shall not cover damages caused by the use of parts of different manufacturers. This warranty shall not cover damages caused by the use of parts that are not compatible, suitable and/or authorised by CBK for use with CBK components. This warranty shall not cover damages resulting from commercial (rental) use.