1
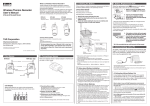
Operating-Instructions
Spare parts list
UNIVERSAL
48/5 S
04/2005
Narrow Stitching Head
hohner Maschinenbau GmbH
Gänsäcker 19, 78532 Tuttlingen, Telephone 07462 / 9468-0, Fax 07462 / 9468-20
hohner Maschinenbau GmbH - 48/5 S
hohner Maschinenbau GmbH - 48/5 S
Contents
Chapter
I.
1.
2.
3a
3b
4.
4.1
4.2
5.
6.
7.
8.
9.
10.
11.
12.
13.
14.
15.
16.
17.
18.
II.
III.
Page:
General and Services ..................................................................................................4
Safety notices ..............................................................................................................4
Technical data .............................................................................................................5
Foundation plan of the stitching head UNIVERSAL 48/5 s...........................................7
Foundation plan of the stitching head and clincher box mounting ................................8
Accessories .................................................................................................................9
Equipment: ..................................................................................................................9
Tools:...........................................................................................................................9
Lube specification ......................................................................................................10
Installation and adjustment of the Universal 48/5 s ....................................................11
Fine adjustment of the clincher box ...........................................................................13
Inserting the wire .......................................................................................................14
Straightening of the wire ............................................................................................15
Basic setting of wire length ........................................................................................16
Setting of leg length...................................................................................................17
Alignment of former ...................................................................................................19
Alignment of bender...................................................................................................20
Exchange of knives....................................................................................................21
Exchange of bender...................................................................................................22
Exchange of driver.....................................................................................................23
Exchange of clincher .................................................................................................24
Fitting the holding down device..................................................................................25
Conversion of the universal 48/5 s from standard-stitching to loop-stitching ..............28
Troubleshooting .........................................................................................................30
hohner Maschinenbau GmbH - 48/5 S
I.
General and Services
1.
Safety notices
ATTENTION
1.
Before the operation of the stitching head or before working with the machine, do not
forget to read carefully the hohner-instructions for use and observe all warning on the
machine. The non-observance of this prescription may lead to severe injuries.
2.
Do not operate the machine before all safety devices, lock and other security fixtures
function or are set up.
3.
Before working, cut off the current supply and set safety switch (main switch) to 0.
4.
Your right to claim under guarantee can only be followed if the label with the serial
number is stuck on the body of the head.
The user is responsible for the safe function of the machine at any time as well as for
the observance of all prescriptions of these instructions for use by the operating
person. For all questions regarding the safe operation of this machine, please, contact
your senior officer or hohner sales representative or directly to:
hohner Maschinenbau GmbH
Street:
Gänsäcker 19
Town:
D-78532 Tuttlingen
Telephone:
07462 / 94 68 - 0
Fax:
07462 / 94 68 - 20
Email:
[email protected]
Internet:
www.hohnerstiching.com
Spare Parts / Customer Service
Fax:
07462 / 9468-20
- modifications reserved -
hohner Maschinenbau GmbH - 48/5 S
-4-
I.
General and Services
2.
Technical data
Crown width:
Max. stitching thickness clenched:
Round stitching wire:
or alternatively:
No. 26 - 30
0,50 - 0,35 mm ∅
0.020 - 0.014 in. ∅
Distance index for standard stitching (in mm):
hohner Maschinenbau GmbH - 48/5 S
No. 24 - 28
0,60 - 0,40 mm ∅
0.024 - 0.016 in. ∅
-5-
Standard loop stitching
Sizes of the staple
Max. stitching thickness:
Round stitching wire:
No.. 24 - 26
0,60 - 0,50 mm ∅
0.024 - 0.020 in. ∅
Distance index for loop stitching (in mm):
net weight:
approx. 2,7 kg / 5.9 lbs
IMPORTANT
Please only use name brand steel, in normal or extra high tension steel versions,
depending on usage. By heavy scuffing of wire, scuff resistibility causes wire guides to
clog.
hohner Maschinenbau GmbH - 48/5 S
-6-
I.
General and Services
3a
Foundation plan of the stitching head UNIVERSAL 48/5 s
hohner Maschinenbau GmbH - 48/5 S
-7-
I.
General and Services
3b
Foundation plan of the stitching head and clincher box mounting
hohner Maschinenbau GmbH - 48/5 S
-8-
I.
General and Services
4.
Accessories
Every new UNIVERSAL 48/5 S is supplied with:
4.1 Equipment:
Art.-No.
1 wire bow cpl.
Art.-No.
1 clincher box cpl. (with clincher and
clincher pusher)
4.2 Tools:
Art.-No. 46 00 006
1 hexagon socket screw key no. 2
Art.-No. 46 00 007
1 hexagon socket screw key no. 2,5
Art.-No. 46 00 033
1 hexagon key with T-handle no. 4 x 150
Art.-No. 94 61 230
1 adjusting handle
hohner Maschinenbau GmbH - 48/5 S
-9-
I.
General and Services
5.
Lube specification
Apply a first-rate oil only, never a viscous mineral
oil, spray lubricants.
We recommend
Sliding oil with viscosity grade 65-70 (ISO-viscosity
grade according to DIN 51 519).
Oiling: how often?
In case of need (approx. every 16 working hours).
From time to time slightly oil the felt discs on the
wire bow. Please observe all these regulations
carefully to guarantee a faultless operation.
Former for loop stitching
hohner Maschinenbau GmbH - 48/5 S
- 10 -
I.
General and Services
6.
Installation and adjustment of the Universal 48/5 s
Insert mounting block 1 into stitching head receiver 2 laterally. Insert stitching head
over the protruding journal of the mounting block 1 , taking caution that the carrier
nose 3 in the main drive bar 4 is properly seated. Tighten the hexagon socket head
cap screw 5 with the delivered hexagon key no. 4 54 . By loosing both hexagon
socket set screws 6 the stitching head can be adjusted to the clincher box.
hohner Maschinenbau GmbH - 48/5 S
- 11 -
IMPORTANT!
The middle of driver 8 and clincher box 9 have
to coincide absolutely. Depending on the type of
machine, an adjustment may be necessary. By
removing the hexagon socket set screws 10 or
11 , the stitching head can be aligned with the
clincher box 9. First loosen both hexagon socket
set screws 12
and retighten them after
adjustment.
hohner Maschinenbau GmbH - 48/5 S
- 12 -
I.
General and Services
7.
Fine adjustment of the clincher box
Loosen clamping nuts 13 . Adjust the clincher box 9 by moving it laterally until it is
centered with the stitching head. The middle of the former 14 must be exactly in
alignment with the middle of the clincher box 9 . It is helpful to use a straight flat
material i.e. a ruler. The flat material 53 is put against the right side of the stitching
head. Then move the clincher box 9 to the right side against the flat material 53
until it stops. Tighten the clamping nuts 13 again.
hohner Maschinenbau GmbH - 48/5 S
- 13 -
I.
General and Services
8.
Inserting the wire
Turn off the wire transport (turn the three square handle 15 to
the right). Push the stitching wire 30 from the topside through
eyelets 16 between both felt discs 18 into the wire returnstop 17 , through the upper wire tube, between both
transporting wheels 20 , so that some stitching wire is inserted
the center wire tube 21 .
Turn on the transport (turn the three-square handle 15 to the
left). Now, the stitching wire can be transported to the knives
with the delivered adjusting handle 28
(rotate clockwise
adjusting handle 28 ).
To take back the wire in case of change-over wire type or
stitching head disassembly, push down the adjusting washer
19 in that way the wire return-stop 17 is not pressed.
hohner Maschinenbau GmbH - 48/5 S
- 14 -
I.
General and Services
9.
Straightening of the wire
The wire must be straight for stitching. If the wire is not straight or if any difficulties
appear, try to change the course of the wire by slightly turning the wire straightener 22
by using a screw driver.
If this is unsuccessful the former 14 must be removed. Pivot the leaf spring 23
sideways and remove the former 14 . Now put the adjusting handle 28 on the
adjusting nut 24 turn to the right and you will see whether the stitching wire 30 is
transported bent or straight. If the wire is not exactly horizontal it must be corrected by
the wire straightener 22 until getting a straight wire. Put in again the former 14 and
turn back the leaf spring 23 .
hohner Maschinenbau GmbH - 48/5 S
- 15 -
I.
General and Services
10. Basic setting of wire length
The adjustment is necessary only once, and that is when the stitching head is installed
and compression is set. A slight correction is only necessary if you change the
stitching wire thickness.
Standard stitching
The required length of wire for 2-page
stitching is approx. 26 mm. Set the
stitching aggregate for 2-page stitching.
Turn knurled nut 25 until the upper
edge of the tooth rack 26 indicates
„N“. * After wards fine adjustment.
Standard loop-stitching
The required length of wire for 2-page
stitching is approx. 32 mm. Set the
stitching aggregate for 2-page stitching.
Turn knurled nut 25 until the upper
edge of the tooth rack 26 indicates „L“
* After-wards fine adjustment.
* Fine Adjustment
knurled nut 25 turned to the right
= longer wire
knurled nut 25 turned to the left
= shorter wire
hohner Maschinenbau GmbH - 48/5 S
- 16 -
I.
General and Services
11. Setting of leg length
The thickness of the folder or pad determines the required length of the stitching wire
for a complete staple, but first the stitching aggregate must be adjusted to the required
stitching thickness (see corresponding machine operating instructions). Turn off the
wire transport with the three-square handle 15 . Put the delivered adjusting handle 28
on the stand-up bolt 55 . Adjust the needed stitching thickness from the marking
stitch on the cutting pusher 42 to the scale 29. Turn on the wire transport.
hohner Maschinenbau GmbH - 48/5 S
- 17 -
hohner Maschinenbau GmbH - 48/5 S
- 18 -
I.
General and Services
12. Alignment of former
The stitching will be correctly only when the former 14 swings in so far that the
stitching wire 30 comes exactly under the middle of the groove of the bender 31. This
can be controlled exactly by laying a mirror 32 on the clincher box 9 , by that means
the position of the former respecting the wire can be seen cleary. A correction
eventually necessary can be obtained by the hexagon socket set screw 33.
Important!
After adjustment tighten hexagon nut 34 again carefully.
hohner Maschinenbau GmbH - 48/5 S
- 19 -
I.
General and Services
13. Alignment of bender
To maintain a proper function, the stitching head
must be adjusted to the stroke of your stitching
aggregate which is roughly done at our factory. A
correction is only necessary, if the latch 35 in the
bender 31 does not come out laterally approx. 2,5
mm when the stitching head is at its highest
position. If an adjustment is necessary, place the
stitching aggregate to the lowest position and
remove the former 14. Loosen hexagon socket set
screw 36 and unscrew hexagon socket set screw
37
about 1-2 turns. After adjustment tighten
hexagon socket set screw 36 again. Now switch on
the stitching aggregate and examine if the latch
comes out enough. Repeat this procedure until the
function is correct.
hohner Maschinenbau GmbH - 48/5 S
- 20 -
I.
General and Services
14. Exchange of knives
The quality of the stitching mainly depends on the condition of the knives. The knives
can be used several times by turning them some degrees.
a)
exchange of flat knife 41
Loosen hexagon socket set screw 56 . Remove stand-up bolt 55 and take out the
cutting block 39 . Loosen the slotted countersunk head cap screw 40 at the flat knife
41 and exchange the flat knife. Assemble in reversed order.
b)
exchange of round knife 44
Loosen hexagon socket set screw 56 . Remove stand-up bolt 55 and take out the
cutting block 39 . Carefully remove the cutting pusher 42 (the installed compression
spring is under pressure). Loosen hexagon socket head cap screw 43 and squeeze
out the round knife 44 from the left. Exchange round knife. Assemble in reversed
order. When assembling the new round knife you must pay attention that the round
knife projects so far that an absolute cutting effect with the counter cutting edge
results. For the best results push in the round knife and adjust it at the flat knife
pressed down. Tighten the hexagon socket head cap screw 43 again. Make sure that
the stand-up bolt 55 is tightened so strongly that the cutting block 39 can only be
slightly adjusted when using the adjusting handle 28.
hohner Maschinenbau GmbH - 48/5 S
- 21 -
I.
General and Services
15. Exchange of bender
Pivot the leaf spring 23 sideways and remove the former 14 . Remove hexagon
socket head cap screw 45 and the corresponding carrier 46 . Pull out the bender 31
downwards. Assemble in reversed order. When inserting the bender 31 into the
stitching head, the latch must be pressed a bit into the bender (see chapter 12, pos.
35).
hohner Maschinenbau GmbH - 48/5 S
- 22 -
I.
General and Services
16. Exchange of driver
Pivot the leaf spring 23 sideways and remove the former 14 . Turn out both
threaded bolts 47 in the driver 8 and pull out the driver downwards. Assemble in
reversed order. If the lower edge of the driver is worn out, the driver can be turned
round and used again.
hohner Maschinenbau GmbH - 48/5 S
- 23 -
I.
General and Services
17. Exchange of clincher
Draw out clincher pusher 48 downwards. Turn clinchers 49 in the clincher box 9
upwards and extract them out of the locking bolt 50 . Push in new clinchers into the
locking bolt 50 , turn them around to the middle of the clincher box. Insert the clincher
pusher 48 again.
hohner Maschinenbau GmbH - 48/5 S
- 24 -
I.
General and Services
18. Fitting the holding down device
correct
incorrect
hohner Maschinenbau GmbH - 48/5 S
incorrect
- 25 -
Spine centering parts
The spine centering parts are only for saddle stitching. They help to precisely position
the stitch 1 in the center of the sheet fold 2 (see page 22).
Fitting the holding down device
- Attach tension spring 3 to the two spring bolts 4 .
- Mount distance plate 5 on stitching head.
- Place complete rod assembly 6 with the guide plate 7 on the distance plate and fix
to the housing with the help of the two countersunk screws 8 .
- Ensure that the rod assembly runs smoothly.
Fitting the slide
- Insert slotted screw 10 laterally into the clinching box mounting.
- Fix slide 9 with slot on slotted screw and tighten lightly using the locking nut 11.
- Push the complete slide 9 against the clinching box.
- Align the V-block of the slide to the center of the clinching box with the help of the M5
setscrew 12 .
- Set the height of the V-block to approx. 0,5 mm above the clinching box.
- Tighten the locking nut 11 .
Setting the holding down device
The centering V-block 17 on the lower part of the rod linkage should lie approx.
3-5 mm beneath the edge of the bender. This can be adjusted by moving the plate 15
in the slot.
- Install stitching head in the stitching unit. You must ensure that the locating key 13
of the plate is positioned on the lifting bar and is not, as is the case with the stitching
head locating key, inserted into the locating groove.
- Loosen the 2 countersunk screws 14 .
- Drive rod linkage into plate 15 until the lower part of the rod linkage is positioned
approx. 3-5 mm beneath the edge of the bender.
- Tighten the 2 countersunk screws 14 .
The centring V-block
adjusting screw 16 .
17
can be moved backwards or forwards by turning the
- Move centring V-block 17 far enough backwards or forwards so that it is precisely
aligned with the V-block of the slide 9 .
hohner Maschinenbau GmbH - 48/5 S
- 26 -
Standard stitching
with centering device
Standard loop stitching
with centering device
hohner Maschinenbau GmbH - 48/5 S
- 27 -
II.
Conversion of the universal 48/5 s from standard-stitching to loop-stitching
For standard loop stitching a change part set
Art.-No. 05 48 051 consisting of the following parts is needed:
Art.-No. 38 63 418 L
leaf spring, short
Art.-No. 99 61 355 L
bender, complete
Art.-No. 99 63 410 L
former, complete
(see page 26)
Pivot the leaf spring 23 sideways and remove the former 14 Remove hexagon
socket head cap screw 45 and the corresponding carrier 46 . Pull out the bender
31 downwards. Now install the bender 31 for standard loop-stitching and make sure
that the latch (see chapter 12, position 35) is pressed a bit into the bender. Install
carrier 46 and tighten hexagon socket head cap screw 45 again. Install former 14
and put the leaf spring, short 23X on the leaf spring 23 with the prevailing torque,
type hexagon nut 57 pivot back leaf spring 23.
hohner Maschinenbau GmbH - 48/5 S
- 28 -
hohner Maschinenbau GmbH - 48/5 S
- 29 -
III.
Troubleshooting
Here are some examples of faults with specifications of the possible causes. There are
often different reasons which have to be investigated step by step. Do not apply all
suggestions simultaneously but one after the other making tests in between. Worn out
parts should be exchanged.
Staple back arched:
- wire weak or soft
- wire not straightened:
see chapter 9
- knives worn out:
see chapter 14
- pressure of the shoe tongue weak or blocked: remove blocking
wire pieces or replace compression spring in the shoe tongue
- wire groove in the driver is dirty, worn out or broken out:
remove driver,
see chapter 16
clean wire groove resp. exchange driver
Staple back does not lay tight:
- pressure of the stitching too weak: adjust stitching aggregate to
stitching thickness
Staple legs are not bent enough:
- pressure of the stitching too weak: adjust stitching aggregate to
stitching thickness
- clincher do not go upwards enough: adjust pression for the clincher
lifting at the stitching aggregate
- timing from clincher actuation to lifting actuation not correct:
stitching aggregate must be adjusted again at the manufacturer
Staple back does not lay tight, is saddle shaped:
- pressure of the stitching too weak: adjust stitching aggregate to
stitching thickness
- wire weak or soft
- pressure of the shoe tongue too weak or blocked: remove blocking
wire pieces or replace compression spring in the shoe tongue
Staple legs rammed and are not correctly bent:
- wire weak or soft
- wire not straightened:
- clincher box must be aligned:
- staple legs not equal length:
- overall wire length too short:
- knives worn out:
see chapter 9
see chapter 7
see chapter 11
see chapter 10
see chapter 14
Wire does not pierce through and builds sling:
- wire weak or soft
- groove in the bender is clogged by wire pieces
- knives worn out:
see chapter 14
- wire groove in the driver its dirty, worn out or broken out:
remove driver,
see chapter 16
clean wire groove resp. exchange driver
- shoe tongue spring too weak: remove blocking wire pieces
or replace compression spring in the shoe tongue
- clincher box not aligned properly:
see chapter 7
hohner Maschinenbau GmbH - 48/5 S
- 30 -
Staples legs break off:
- latch not adjusted:
see chapter 13
- wire its brittle: use other wire quality
- former is blocked by wire pieces: remove wire pieces,
eventually remove former
- tension spring or gripper in former defective
- hook spring in bender defective
- wire sizes does not coincide with the wire bender parts
(bender and driver)
- adjust the former to the groove of the bender
Bulge at one staple edge:
- wire weak or soft
- driver is broken out:
- knives worn out:
see chapter 16
see chapter 14
Staple legs run together or apart:
- wire not straightened:
- knives worn out:
see chapter 9
see chapter 14
One leg is formed wrong:
- wire not straightened:
- clincher box must be aligned:
see chapter 9
see chapter 7
One or both legs are formed diagonally:
- wire weak or soft
- wire not straightened:
see chapter 9
- knives worn out:
see chapter 14
- clinchers broken out:
see chapter 17
- adjustment of the cutting box receiver to the stit.head rec., s.ch. 3b
Staple legs are formed diagonally to the same side:
- wire not straightened:
see chapter 8
- adjustment of the cutting box receiver to the stit.head rec., s.ch. 3b
Slightly formed wire pieces trop out:
- wire not straightened:
see chapter 9
- adjust bender:
see chapter 13
- hook spring in the bender is defective or bender worn out
Snarled wire between transport wheels and wire tube:
- wire not straightened:
see chapter 9
- cutting pusher is jamming: round knife is
pressed against flat knife,
see chapter 14b
cutting rocker is blocked, compression spring in the cutting block is
defective
- lower wire tube misplaced or wrongly adjusted:
move slightly upwards or downwards
- former wrongly adjusted:
see chapter 12
Troubleshooting - loop stitching:
Most faults and specifications of the eventual reasons are indicated
in the section before.
Only straight wire pieces appear:
- adjust the short leaf spring for the former on the cover: s.chapter II
- wire not straightened:
see chapter 9
- former wrongly adjusted:
see chapter 12
hohner Maschinenbau GmbH - 48/5 S
- 31 -