Transcript
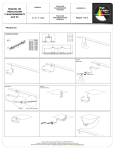
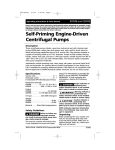
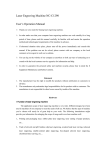
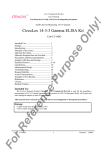
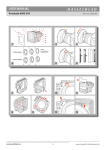
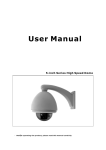
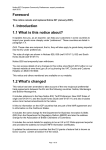
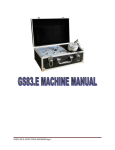
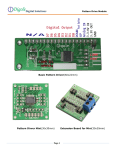
4. Safety Instruction:
6. The wave pump can only work with the original wave pump driver box.
7. Maximum operating temperature of aquarium waster: +40degree
Celsius
8. Please read the manual before use. Keep it in a safe place for future
reference.
Xwave Pump 6800 Manual
10
1. Contents of package:
8
7
6
9
13 12
5
3
4
2
15
Part NO.
1
2
3
4
5
6
7
8
Part Name
wave pump
rotatable link head
lock nut
Part NO.
9
10
11
12
13
14
15
16
rotatable shelf
conector panel
connector bend
lengthing connector
slide block
16
Part Name
grip holder
lock screw
screw
screw
lengthing connector
cupule
fix board for cupule
wave pump driver
2. Disposal:
(In accordance with RL2002/96/EG)
The product must not be added to normal household waste. It must be disposed of properly.
3. General Feature:
Xwave Wave Maker Series is designed to create the most natural simulation of the ocean waves in
your tank. It can simulate the pulsing wave and turbulence current, which occur in the natural
environment.
Wave pump is operated by means of a 120V/AC (US Model) 230V/AC (EU Model) to 12VDC wave
pump driver box. It creates a high flow volume at moderate speeds. By the Xwave Multicontrol System,
the speed can be continuously controlled to execute the preset prorgam (For details of the Xwave
multicontrol system, please refer to the corresponding operating manual). It also can be used with Xwave
Rotary Machine to make the current upgraded from 1 dimension to 2 dimension level (For details of the
Xwave Rotary Machine, please refer to the corresponding operating manual).
2
3
9
4
10
7
6
4
6. Attaching the wave pump to horizontal aquarium pane:
1. The package contains several components of the product. Please
3
2
assemble step by step according to the figure right .
1
2. Use the plastic screw (11)(12) to fix the position and place the
suction cup on the back of the pump.
3. Mount the whole set of Xwave to the horizontal aquarium pane by the
plastic screw (10)
7. Attaching the wave pump by the cupule holder:
1. The package contains several components of the product.
Please assemble step by step according to the figure right.
2. Place the cupule on the back of the pump.
3. Mount the whole set of Xwave to plain surface of aquarium
by the cupule holder.
8
1
11
13 12
14
1
5 10
7
11
5. Attaching the wave pump to vertical aquarium pane:
1. The package contains several components of the product. Please
assemble step by step according to the figure right .
2. se the plastic screw (11) to fix the position and place the suction cup
on the back of the pump.
3. ount the whole set of Xwave to the vertical aquarium pane by the
plastic screw (10)
9
11
4
3
5
15
14
2
1
8. Beginning operation for wave Pump:
1. Please assemble the pump plug into the corresponding sockets
of the dirver box.
2. Submerge the wave pump in the water. To prevent the air being drawn
in, keep the closed zone upwards.
3. Set the 6-position slide switch to the 0ff position. Then connect the
wave driver to the power supply.
4. By sliding the switch, the speed and the performance of the wave
pump can be adjusted to among 50, 60, 70, 80, and 100 percent to your
desired output.
5. The wave pump may have running noises at the beginning, After
one week running-in period, the noise will simply become softer.
6. For details of the connection Xwave multicontrol system, please
refer to the corresponding operating manual.
wave pump driver
4. Safety Instruction:
1. The main voltage must be corresponding to the operating voltage of the Xwave indicated.
2. The wave pump driver box must be placed at a dry and ventilated position which is free from water
splashing.
3. Do not operate pump without water.
4. Disconnect all the electric units when you are working with the aquarium.
5. Never remove the plugs of the wave pump from the wave pump driver box as long as it is
connected with electricity.
1
Wave pump
WAVE ADJUST
OFF 1 2 3 4 5
Wave pump
ST
E ADJU
3
2
WAV
OFF 1
5
2
9. Blocking:
When the pump is blocked for 3 seconds, an alarm in the wave driver box is
activated, at the same time the wave pump is switched off. After removal of the blockage,
the pump will start again automatically.
10. Automatic rinsing process:
In order to clean the water inlet suction housing, set the pump to 100 percent output,
and uses your hand to close up the water outlet for 10 seconds. Then all dirt and scum
trapped by the suction housing would be removed by the turbulences produced.
We suggest to this process, however, cannot substitute the disassembling and
cleaning of the pump.
11. Guarantee:
One year guarantee is provided for the wave pump after the date of purchase
covering all material and workmanship defects. (Method: Defective units should be
returned well-packed, together with the sales slip, to the retailer or the manufacturer.
Unpaid consignments will not be accepted and will be returned to the sender immediately.)
Exclusion from guarantee
The guarantee does not cover any damage caused by incorrect handling and any
technical modification made by the user.
Sand and lime deposits may increase the wear of the bearings considerably and can
lead it to exclusion from guarantee (see cleaning the pump)
Xwave Pump 6800
User Manual
12. Troubleshooting:
Before requesting service, check the following chart
Condition
Speculation
Counter-measures
The pump does not work
1. Blockage in the pump
1. Disassembel andclean the
pump
1. Some particles indide the
motor.
2. The baring worn affer
an edtensive usage.
1. Disasseble and clean the
pump.
The noise from the pump
The pump furs
The pump stops, and the
driver box alarms.
1. Overdose of lime
additives, e.g. Cause lime
deposites on the bearing
parts.
The drive unit is jammed due
to wear, lime, small fish or
snail.
2. Replace the propeller
1. Reduce the lime additive
or submerge the pump in
a 10L(2.6gal.) bucket, half
full with wather and 20mL
of vinegar essence. Allow
the pumpto run for one to
two rs. Avoid splashes!
Subsequently, thoroughly
rines by tap water.
Remove the blockage
Clean the pump and replace
the drive unit, if necessary.
The pump will start operating
again automatically.
V9/2007
3