1
LEGAL NOTICES:
BEFORE USING THIS PRODUCT YOU MUST ACCEPT THE TERMS OF THE LICENSE
AGREEMENT. READ THE LICENSE AGREEMENT. IF IT IS MISSING, CONTACT
LUMAGEN, INC. TO OBTAIN A COPY. IF YOU DO NOT AGREE TO BE BOUND THE
TERMS OF THE LICENSE AGREEMENT, RETURN THE PRODUCT TO THE POINT OF SALE
IMMEDIATELY. BY DISASSEMBLING OR USING THE PRODUCT, YOU ACCEPT ALL
TERMS OF THE LICENSE AGREEMENT.
TO THE EXTENT NOT PROHIBITED BY LAW, IN NO EVENT SHALL LUMAGEN, ITS
SUPPLIERS, OR ITS DEALERS, BE HELD LIABLE FOR INJURY TO PERSONS OR
PROPERTY, ANY LOST REVENUE, LOST PROFIT, SPECIAL, INCIDENTAL, INDIRECT,
CONSEQUENCIAL, OR PUNITIVE DAMAGES, IMPAIRMENT OF OR DAMAGE TO OTHER
GOODS, HOWEVER CAUSED REGARDLESS OF THE THEORY OF LIABILITY, RESULTING
FROM THE USE OF, OR INABILITY TO USE, THIS PRODUCT, EVEN IF LUMAGEN, ITS
SUPPLIERS, OR ITS DEALERS, HAS BEEN ADVISED OF THE POSSIBILITY OF SUCH
DAMAGE.
LUMAGEN SHALL NOT BE LIABLE FOR OMISSIONS OR ERRORS IN ITS
DOCUMENTATION OR SOFTWARE. LUMAGEN RESERVES THE RIGHT TO MAKE
CHANGES TO ITS PRODUCTS AND DOCUMENTATION WITHOUT NOTICE.
Unless you are experienced in the installation and set-up of high-performance video
electronics , we suggest you hire a professional home -theater specialist to do installation and
configuration of this product. We recommend that you choose a professional who has been
certified by the Imaging Science Foundation™ (ISF).
This equipment has been tested and found to comply with the limits for a class B digital device,
pursuant to Part 15 of the FCC rules, Canadian ICES-003, and CISPR 22. These limits are
designed to provide reasonable protection against harmful interference in a residential
installation. This equipment generates, uses, and can radiate radio frequency energy and, if not
installed and used in accordance with the instructions, may cause harmful interference to radio
communications. However, there is no guarantee that interference will not occur in a particular
installation. If this equipment does cause harmful interference to radio or television reception,
which can be determined by turning the equipment off and on, the user is encouraged to try to
correct the interference by one or more of the following measures:
Reorient or relocate the receiving antenna.
Increase the separation between the equipment and receiver.
Connect the equipment into an outlet on a circuit different from that which the receiver is
connected.
- Consult the dealer or an experienced radio/TV technician for help.
Unauthorized modifications to this equipment may void Lumagen’s limited warranty and the
user’s authority to operate this equipment.
Lumagen is a registered trademark of Lumagen Inc. VisionDVI, VisionHDP, VisionHDQ, and other
Lumagen product names, are trademarks of Lumagen, Inc. Other trademarks are the property of
their respective owners.
WARNINGS:
•
Do not defeat the safety features of the power supply or power cord, such as,
but not limited to, removing the ground pin connection.
•
Do not open, insert objects into, or spill liquid into, this equipment.
•
Do not block the cooling vents.
•
Do not program an output resolution that exceeds the maximum specified
refresh rate of the attached television, or projector.
•
Improperly set gray-bar intensity may accelerate screen burn- in. Consult a
home -theater specialist for help setting gray-bar intensity.
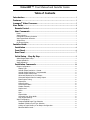
VisionHDP™ User Manual and Installer Guide
Table of Contents
Introduction ................................................................................................................... 1
Features........................................................................................................................... 1
Lumagen® Video Processor ...................................................................................... 2
User Guide....................................................................................................................... 4
Remote Control......................................................................................................... 4
User Commands........................................................................................................ 5
Power......................................................................................................................................................................5
Input Selection ....................................................................................................................................................5
Configuration Memory Selection....................................................................................................................5
Input Aspect Ratio Selection...........................................................................................................................5
Image Zoom .........................................................................................................................................................5
On Screen Display ..............................................................................................................................................5
Installer Guide............................................................................................................... 6
Installation ................................................................................................................. 6
Front Panel.................................................................................................................. 6
Rear Panel................................................................................................................... 7
Initial Setup − Step By Step................................................................................. 9
Initial Output/Input Setup: ..............................................................................................................................9
Output Calibration: ...........................................................................................................................................11
Input Calibration: ..............................................................................................................................................12
Installation Commands........................................................................................ 14
Output Configuration.......................................................................................................................................14
Display Type.................................................................................................................................................. 14
Vertical Output Resolution - Presets ..................................................................................................... 15
Vertical Output Resolution - Programmable....................................................................................... 15
Vertical Output Refresh Rate ................................................................................................................... 15
Horizontal Resolution for DVI Output................................................................................................... 15
Horizontal Refresh Rate for Analog Output........................................................................................ 15
Exact Output Timing .................................................................................................................................. 16
Output Size.................................................................................................................................................... 16
Output Position ............................................................................................................................................ 16
Screen Aspect Ratio.................................................................................................................................... 16
Graybar Intensity......................................................................................................................................... 16
Output Level.................................................................................................................................................. 17
Shrink .............................................................................................................................................................. 17
Sync ................................................................................................................................................................. 17
Output Mode ................................................................................................................................................. 17
Horizontal Sync Pulse Width.................................................................................................................... 18
Copy Output Settings ................................................................................................................................. 18
Input Configuration..........................................................................................................................................18
Component/RGB Input Type Selection ................................................................................................ 18
Standard Definition Input Type Selection ........................................................................................... 19
Linking an Input Memory to an Output Configuration ................................................................... 19
Black and White Levels.............................................................................................................................. 19
VisionHDP™ User Manual and Installer Guide
Color and Hue............................................................................................................................................... 19
Chroma-Upsample-Error Correction...................................................................................................... 20
Color-Temperature and Gamma Calibration ...................................................................................... 20
Input Sizing ................................................................................................................................................... 20
Mask................................................................................................................................................................. 20
Non-linear Stretch....................................................................................................................................... 20
Pass-Through mode ................................................................................................................................... 21
Y/C Delay....................................................................................................................................................... 22
Sharpness....................................................................................................................................................... 22
Input Level..................................................................................................................................................... 22
Input Name ................................................................................................................................................... 22
Select Deinterlacing Mode ........................................................................................................................ 22
Flip Input Field ............................................................................................................................................. 23
Genlock ........................................................................................................................................................... 23
DVI input HDCP Capability Setting ........................................................................................................ 23
DVI input EDID Display Information..................................................................................................... 23
DVI input Hotplug Mode ........................................................................................................................... 24
Serial-Digital-Interface Video Input ...................................................................................................... 24
Copy Input Settings.................................................................................................................................... 24
Miscellaneous Commands ..............................................................................................................................25
Calibrate Component/RGB inputs (5 and 6) ...................................................................................... 25
On-Screen-Display Enable ........................................................................................................................ 25
Initial Power State ....................................................................................................................................... 25
Power-On On-Screen Message ............................................................................................................... 25
Power-On and Power-Off RS232 Output Message .......................................................................... 25
Lock the Configuration .............................................................................................................................. 26
Test Patterns................................................................................................................................................. 26
Menu Timeout .............................................................................................................................................. 26
Front Panel LED Function......................................................................................................................... 26
Zoom Step ..................................................................................................................................................... 26
Sidebar Pan ................................................................................................................................................... 26
Other Commands ........................................................................................................................................ 27
Saving the Configuration................................................................................................................................27
Save ................................................................................................................................................................. 27
Save Undo...................................................................................................................................................... 27
Revert To Factory Settings....................................................................................................................... 27
Restore Configuration Saved during calibration ............................................................................... 27
Revert To Defaults For Current Output Resolution.......................................................................... 27
Serial RS232 Command Interface.................................................................... 28
Menu tree..................................................................................................................... 30
For Optimal Picture Quality ...................................................................................... 32
Selecting the Output Resolution ...................................................................... 33
Multiple Output Mode........................................................................................... 34
Troubleshooting...................................................................................................... 35
Updating Software..................................................................................................... 36
Specifications............................................................................................................... 37
VisionHDP™ User Manual and Installer Guide
Introduction
Thank you for purchasing a Lumagen Video Processor. It has been designed to offer great video
processing quality, while providing the best available value.
The two main sections of this manual are the User Guide and the Installer Guide. As their names
imply, the User Guide provides instructions on day-to-day usage, and the Installer Guide provides
initial setup information. It is important to read and understand this manual, and the display’s
specifications, before setting up the video processor. Also, check the www.lumagen.com website
for possible updates to the manual or software.
To simplify references to video projectors, direct-view televisions and rear-projection televisions,
they are all referred to as a “display” in this manual.
Features
A Lumagen Video Processor provides a cornerstone for the ultimate home theater experience. It
is designed to adapt to your home theater needs, rather than having the designed-in limitations
commonly found in today’s video processors. Some notable features are listed below.
•
•
•
•
•
•
•
•
•
•
•
•
•
•
•
•
•
•
•
•
•
•
•
•
•
Eight standard inputs (2 composite, 2 SVideo, 2 SD/HD component/RGB, 2 DVI-D)
Two optional SDI inputs
All video processing features are supported for HDCP encrypted DVI-D inputs.
All video processing features are supported for HD analog YPB PR and RGB inputs.
Component/RGB analog and DVI-D input accept 720p and 1080i sources
Transcoding is supported for both digital and analog SD and HD inputs.
Per-pixel motion-adaptive video deinterlacing for SD and HD source sources
3:2, 3:3 and 2:2 film pull-down frame-reconstruction for SD sources
3:2, 3:3 and 2:2 film pull-down frame-reconstruction for HD sources (VisionHDP only)
Four independent configuration memories for each input
Black-level, contrast, calibration per memory
Color, red-color-offset, green-color-offset calibration per memory
Hue, red-Hue-offset, green-Hue-offset calibration per memory
Y/C delay calibration with independent CB and CR delay
Detail enhancing scaler
Output resolution from 480p to 1080p (VisionHDP) or to 768p (VisionDVI), plus 1080i
Output width programmable in pixel increments
Programmable output color format (SD and HD component, plus RGB)
Programmable vertical refresh rate
Programmable screen aspect ratio
DVI-I output with HDCP encryption support
Optional BNC analog output (replaces DVI-A connection)
Backlit infrared remote control with on-screen menu system
RS232 serial interface for control and software-updates
Silent operation (no fan)
© 2004-2007 Lumagen®, Inc.
1
Rev 1.14
VisionHDP™ User Manual and Installer Guide
Lumagen® Video Processor
The primary function of the VisionHDP, and VisionDVI, is to act as a video switch, process the
selected video source, and output in the appropriate format and resolution. Standard definition
(SD), enhanced-definition (ED), or high-definition (HD) video inputs are supported, in addition to
a number of PC formats. Video inputs are converted to progressive video (if needed) and are
then scaled the video output resolution.
Interlaced video has been in use for more than 50 years and is still the most common video
format. It displays half of the lines of picture information each sixtieth (or fiftieth) of a second.
Each half of the image is called a field and displays either all the even lines, or all the odd lines.
So, an entire image, called a frame, takes a thirtieth (or twenty-fifth) of a second to display on
the screen. An “i” suffix on the resolution specification is used to indicate interlaced formats.
In contrast, progressive video presents each frame as a whole. A “p” suffix on the resolution
specification is used to indicate progressive formats. Converting interlaced video to progressive
video is referred to as “deinterlacing.”
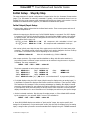
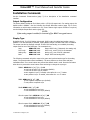
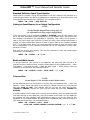
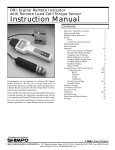
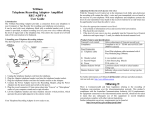
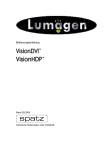
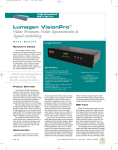
The Lumagen video processor is comprised of four major functional sections:
• Input selection, conversion to digital (if needed), and video decoding
• Deinterlacing
• Filtering and scaling
• Conversion to analog video, or output as digital DVI-D video.
These functional blocks are shown below.
DVI-D 1
DVI-D 2
YPB PR /RGB 3
Deinterlace
Input
Selection
Filtering
and Scaling
YPB PR /RGB 4
Composite 5
Composite 6
A-to-D
and
SVideo 7
SVideo 8
TV
Decoder
DVI-D
with
HDCP
DVI-D
Digital-toAnalog
Conversion
RGB/
YPB PR
(option) SDI 9
(option) SDI 0
VisionHDP Functional Block Diagram
© 2004-2007 Lumagen®, Inc.
2
Rev 1.14
VisionHDP™ User Manual and Installer Guide
Composite and SVideo inputs automatically select between NTSC, PAL and SECAM formats. The
component, RGB and DVI-D inputs accept SD, ED and HD video at either 50 or 59.94 Hertz.
HDCP encryption is supported for the DVI-D inputs. If the signal is encrypted, the DVI-D inputs
are decrypted, processed, scaled and then re-encrypted for output as DVI-D. This is not just a
“pass-through” function.
NOTE:
HDCP encrypted DVI-D sources must be re-encrypted for output.
The analog output is disabled in this case. The display
must be HDCP capable to show these encrypted sources.
If the video input is interlaced, it is first deinterlaced into a progressive format. Proprietary
scaling algorithms are used to scale the resulting progressive video to the optimal size for the
display. The Lumagen video processor scaling is programmable in scanline increments. For
analog outputs, the video is over-sampled to provide the best possible image quality. For DVI-D
outputs the resolution is programmable in both scanline increments vertically, and pixel
increments horizontally.
As part of the scaling process, digital filtering is used to enhance the image detail. This
enhancement allows standard definition inputs, such as DVDs, to appear to be much higher
resolution. This is especially good for DVDs when they are viewed on the large screen sizes
common in home theaters.
When the digital processing is completed; the video is converted to analog using digital-to-analog
converters (DACs), or is output as DVI-D (digital) video.
To accommodate the various video displays, the output type is programmable. It can be set to
analog YPR PB , RGBHV, RGBS or RGsB; with programmable sync type and polarities. YPR PB can be
selected with either the SD or HD color formats. DVI-D video can use either the “PC” range (full
range black to white), or “video range” (reduced range black to white to allow for blacker-thanblack and whiter-than-white levels).
An infrared remote control is provided. Alternately, the serial RS232 port can be used for control,
or for software updates. Critical display setup parameters have direct commands. Other functions
use an on-screen menu.
Every input has four independent configuration memories, to allow options such as day and night
specific modes for both NTSC and PAL sources. In addition, the HD capable inputs have four
input resolution based sub-memories. These allow independent calibration and setup for 480i/p
or 576i/p sources, 720p sources, 1080i sources, plus an additional sub-memory for another
resolution. This feature is very useful for satellite receivers and other source devices, such as DVHS HD video recorders, that can output the native resolution of the source material. In this
“hybrid mode,” SD sources are output as either 480i/576i or 480p/576p, 720p source material is
output as 720p, and 1080i material is output as 1080i. Each of these source formats can be
independently calibrated for each of the four input memories.
© 2004-2007 Lumagen®, Inc.
3
Rev 1.14
VisionHDP™ User Manual and Installer Guide
User Guide
This section describes the user interface for everyday functions. For initial setup information see
the Installer Guide section (page 6).
User commands can be entered with the supplied infrared remote control, or using the RS232
serial control port. Contact the installer for information on user commands if the RS232 serial
port is used.
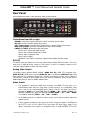
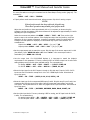
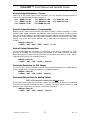
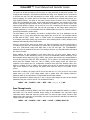
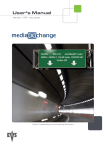
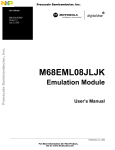
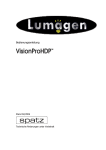
Remote Control
The infrared remote control is shown below.
Power
and
Standby
Input Aspect
Ratio Selection
Input Aspect
Ratio Selection
Step
Input Aspect
Ratio Selection
Step
Command completion
and OSD
Image
Zoom
Exit/Cancel
Activate Menu
Numeric Entry
and
Input Selection
Configuration
Input Selection
© 2004-2007 Lumagen®, Inc.
4
Rev 1.14
VisionHDP™ User Manual and Installer Guide
User Commands
Power
Turn power on by pressing ON. Place the VisionHDQ in standby-mode by pressing STBY.
Input Selection
The ten inputs are numbered 0 to 9. To select an input, press the button (0 to 9).
NOTE:
To select an input, the menu must not be active.
Configuration Memory Selection
Each input has four configuration memories. These are referred to as memory “A,” “B,” “C,” and
“D.” To select memory “A”, press MEMA . To select memory “B”, press MEMB. To select memory
“C”, press MENU then MEMA . To select memory D, press MENU then MEMB. Note, RS232
codes are provided to directly access MEMA , MEMB, MEMC and MEMD.
When NTSC/PAL auto-selection is enabled (i.e. output mode set to AUTOIND), MEMA and
MEMC are linked and used for NTSC and PAL, respectively. In this mode, if MEMA or MEMC is
active, an NTSC source automatically selects MEMA and a PAL source automatically selects
MEMC. MEMB and MEMD are also linked, with MEMB used for NTSC and MEMD for PAL.
Each configuration memory is independent of all others. To allow these memories to be used for
mode selection (e.g. day/night), the type remains unchanged when a new input is selected. (e.g.
if input 2 memory B is active pressing 3 selects input 3 memory B).
Input Aspect Ratio Selection
The four source aspect ratios are: 4:3, letterbox, 16:9, and 1.85. They can be selected by
pressing the 4:3, LBOX, 16:9, or 1.85 buttons, respectively. Use 4:3 for standard full-screen
material. Use LBOX for “letterbox” material, such as analog-television movies shown with black
bars above and below the image. For material labeled as “Enhanced for 16:9 televisions”
selecting 16:9 is generally best. However, 1.85 can be used for sources “Enhanced for 16:9
televisions” that have a 1.85 aspect ratio stretched vertically to 16:9.
The 4:3 input aspect ratio mode can also be programmed as a “non-linear stretch” mode so 4:3
sources fill a 16:9 screen. See the Nonlinear Stretch section (page 20) for details.
NOTE:
Make sure the “television aspect ratio” setting is 16:9 in the setup menu of all
source devices that support this feature (e.g. DVD players), even if your display is
not 16:9.
Image Zoom
After the input aspect ratio has been selected, the image can be zoomed in to better fit the
screen. The zoom function uses the ‡ and ˆ arrow buttons. When the menu is off, the ‡ arrow
button zooms in and the ˆ arrow button zooms out.
On Screen Display
Pressing OK successively, when the menu is off, displays input and output status.
© 2004-2007 Lumagen®, Inc.
5
Rev 1.14
VisionHDP™ User Manual and Installer Guide
Installer Guide
Installation
Unpack the shipping container. Save the container and packing materials incase they are needed
later. Place the VisionHDP Video Processor on a component shelf and connect as described in the
Rear Panel section. The cooling vents must be clear of obstructions to provide for convection
cooling.
Install two AAA batteries in the remote control.
The following items should be included:
VisionHDP Video Processor
Infrared remote control
External power supply
User manual
License agreement
Warranty card
RS232 null-modem cable for updating the VisionHDQ
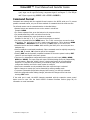
Front Panel
NOTE:
The front panel LED does NOT stay on by default. To change the LED
function to stay illuminated to indicate “power-on,” see the “Front Panel
LED Function” section (page 26).
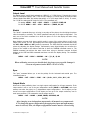
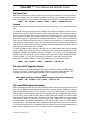
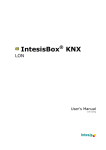
The front panel has a Light-Emitting-Diode (LED) indicator light, which can show command
activity (default), or be used as a “power-on” light (user selectable). When the LED is set to
“activity” it illuminates for a short time after commands are received. When the LED is set to
“power” it stays illuminated as long as the unit is on, turning off briefly when a command is
received.
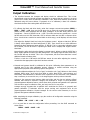
The front panel of the VisionHDP is shown below. The front panel of the VisionDVI is the same,
except for the product name.
IR remote sensor
Activity or Power-on light
© 2004-2007 Lumagen®, Inc.
6
Rev 1.14
VisionHDP™ User Manual and Installer Guide
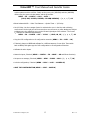
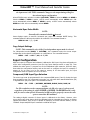
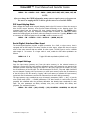
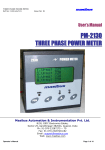
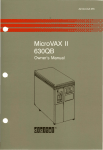
Rear Panel
All connections are made on the rear panel, which is shown below.
Lumagen, Incorporated
www.lumagen.com
Manufactured in U.S.A.
GREEN
User must read and accept
license agreement before
using this product.
No user serviceable parts
inside. Refer servicing to
factory authorized agent.
RED
BLUE
HCSYNC
VSYNC
(Optional)
INPUT 9
(Optional)
INPUT 0
SDI
SDI
INPUT 4
Y
PB
PR
PB
PR
INPUT 6
INPUT 8
VIDEO
SVIDEO
VIDEO
SVIDEO
INPUT 5
INPUT 7
NOTE: If BNC analog output option installed, do not use DVI analog output.
5 VDC
RS-232
DVI
DVI
DVI
POWER
CONTROL
OUTPUT
INPUT 1
INPUT 2
Y
INPUT 3
This device complies with part 15 of the FCC Rules, Canadian ICES-003, and CISPR 22. Operation is subject to the following two conditions: (1) This device
may not cause harmful interference, and (2) this device must accept any interference received, including interference that may cause undesired operation.
Connections from left to right
•
•
•
•
•
POWER: Connect the supplied external 5 Volt DC, at 5 amp, power supply.
RS-232: Used for software updates and control.
DVI- I Video output: Provides either digital (DVI-D) or analog (DVI-A) video output.
BNC analog output (optional): Replaces DVI-A output when installed.
INPUT 0 to INPUT 9: Standard input connections.
Input 1 and 2: DVI-D with HDCP support
Input 3 and 4: SD/HD Component, or RGB
Input 5 and 6: Composite video
Input 7 and 8: SVideo
SDI INPUT 9 and INPUT 0 (optional): Optional Serial-Digital-Interface inputs.
RS-232
The RS232 serial port allows the use of an external home theater RS232 controller. This is the
same as a PC DB9 serial port, except no “flow-control” is used. For updates, connect to a PC
using the supplied DB9-F to DB9-F null-modem cable.
Analog Video Output
The analog output supports RGBHV (default, MENU 012 OK), RGBS (TTL composite sync,
MENU 013 OK), RGsB (sync-on-green, MENU 014 OK), or component (MENU 011 OK), using
BNC connectors. For component output the Y channel is connected to green, the PR channel to
red and the PB channel to blue. Digital output uses a DVI-D connection, which can also drive a
HDMI display using a “DVI-D to HDMI” adaptor cable.
Video Inputs
•
It is possible to connect two RGsB (sync-on-green), two RGBS (TTL level sync), or a
single RGBcvS (video level sync using input 3) video source(s), or a combination, using
one or both of the component/RGB inputs (inputs 3 and 4). For RGsB, the input is
specified as RGsB in the input TYPE menu as (MENU → IN → TYPE → RGsB). The
separate composite sync types are specified as RGBS (MENU → IN → TYPE → RGBS)
or for RGBcvS as SCART (MENU → IN → TYPE → SCART).
•
For all RGB formats, the Y channel is used as Green, the PB channel as Blue and the PR
channel as Red.
•
For the separate composite sync types, one of the composite inputs is redefined as
the S (TTL level), or cvS (video level), sync input. For these types, input 3 uses
input 5, and input 4 uses input 6, as composite sync. A single RGBHV (TTL level
© 2004-2007 Lumagen®, Inc.
7
Rev 1.14
VisionHDP™ User Manual and Installer Guide
sync) input can be specified using component input 4 and inputs 5, 6 for HSync
and VSync respectively (MENU→IN→TYPE→RGBHV).
Command Format
Commands are selected with the supplied infrared remote or the RS232 serial port. To prevent
possible command conflict, only one of these methods of command should be used at a time.
The infrared remote control command notation is described below:
• Remote buttons are named as shown on the remote in a bold font.
Example: MENU.
• For comma separated lists, press the buttons in the sequence shown.
• For parenthesized lists, select one button from the list.
• For square-bracketed lists, press the buttons as needed.
Example: For the list […, †, ‡ , ˆ ], press the arrow keys as needed.
• For menu commands press the MENU button. The ‡ and ˆ arrow keys are used to select
the function. The † arrow key (or OK) is used to enter sub-menus. This is shown as: MENU
→ MenuItem → MenuItem. The … arrow key (or EXIT) steps up one menu level.
• Numerical entries are listed as value. While entering the value, the … arrow key acts as a
backspace key.
• Some commands are activated immediately. Other commands must be explicitly accepted by
pressing OK. If needed, OK is listed as part of the command.
• Pressing EXIT cancels a partially completed command. If the menu system is active, EXIT
returns to one level higher in the menu system.
• There are four independent configuration memory types for each input (MEMA , MEMB,
MEMC and MEMD). The input setup and output resolution/timing can be set independently
for each memory. Note that, initially, there is a single output mode for all configuration
memories. To program an input memory, first select the input, then select the desired
configuration memory and use the menu system to configure.
• Some menu commands are only available when their respective input is selected.
• Before changes are saved, they can be discarded by entering standby mode.
• To prevent unintended configuration changes, before saving, use the lock command.
• Save the configuration after making changes, otherwise the changes will be lost when
entering STBY mode.
If the serial port is used, the ASCII character associated with the respective remote control
button must be sent. See the Serial RS2323 Command Interface section (page 28) for
information on serial commands.
© 2004-2007 Lumagen®, Inc.
8
Rev 1.14
VisionHDP™ User Manual and Installer Guide
Initial Setup − Step By Step
The setup sequence for typical configurations is shown below. See the Command Format section
(page 7) for information on entering commands. Typically, not all commands shown here are
needed. Only the most common setup commands and options are shown in this section. See the
Installation Commands section (page 14) for additional commands and options.
Initial Output/Input Setup:
• Connect video cables as described in the Rear Panel section. Then connect power and turn all
required components on.
• Select the output type: Skip this step if a DVI-D/HDMI display is connected. If a DVI-D display
is connected, DVI-D will be selected by default, otherwise analog RGBHV output is the default.
For analog output, the mode can be changed as shown below. For more info see the Output
Configuration Section (page 14).
HD YPR PB tri-level:
SD YPR PB bi-level:
MENU 0 1 1 OK
MENU 0 1 5 OK
HD component with embedded tri-level sync
SD component with embedded bi-level sync
• Set vertical refresh rate: Skip this step if the output rate is to be 59.94 (U.S.A and some other
countries). The default vertical refresh rate is 59.94, but it can be changed to be from 23.98 up
to 120 Hertz. The maximum rate varies depending on the resolution.
MENU 0 4 value OK
Value is in hundredths (e.g. 59.94 is 5 9 9 4)
• Set output resolution: The output resolution defaults to 480p, with 480 active scanlines in
progressive format. A different output resolution can be selected using the menu or by direct
command. The menu command is:
MENU → OUT → RES → VRES → value OK
The direct commands to select output resolution are:
480p: MENU 0 2 1
540p: MENU 0 2 2
600p:
MENU 0 2 3
720p: MENU 0 2 4
768p: MENU 0 2 5
840p:
MENU 0 2 6
1080p: MENU 0 2 7
1080i: MENU 0 2 8
Other: MENU 0 3 value [ˆ ,‡ ] OK, where ˆ is interlaced and ‡ is progressive (default).
• For digital displays using the DVI-D input (skip this step for displays using an analog input), it
is important to operate the display at their native resolution to achieve a “pixel-perfect” image.
This maximizes the Lumagen’s video processing advantages by disabling the display’s internal
processing. Some displays do not support their native resolution as an input, or do not operate
in “pixel-perfect” mode even when they are driven at their native resolution. Consult with the
display’s manufacturer for more information on if the display can achieve a pixel-perfect image.
• Set the horizontal resolution. Skip this step for analog output, or if the default HRES selected
by the Lumagen for user selected VRES is correct. The command is:
MENU → OUT → RES → HRES → value OK
• Some DVI-D/HDMI displays can achieve a “pixel-perfect” image, but require specific pixel
timings for all parameters, not just active pixel counts (skip this step for displays using an analog
input). Lumagen video processors can accommodate these displays using the TIMING command.
© 2004-2007 Lumagen®, Inc.
9
Rev 1.14
VisionHDP™ User Manual and Installer Guide
For more information on using this command see the Exact Output Timing section (page 16). The
command is:
MENU → OUT → RES → TIMIING
• If pixel perfect mode cannot be achieved, adjust overscan. Skip this for analog outputs.
NOTE:
If pixel-perfect mode has been achieved, skip this step,
since these operations may disable pixel-perfect mode.
Adjust size and position to have approximately 0% to 1% overscan, as shown using the
Lumagen overscan test pattern. Note that overscan will be adjusted to approximately 2% while
adjusting the input configuration.
Select the overscan test pattern with MENU → MISC → TPAT → OK. Then use the right
arrow to step to the overscan pattern. If the display has output size and position, use them.
Otherwise use the Lumagen commands. Lumagen’s commands cannot be entered while the
Lumagen overscan pattern is displayed, so this method may require some iteration. The
commands are:
Output size: MENU → OUT → RES → SIZE → […,†,ˆ ,‡ ] OK
Output position: MENU → OUT → RES → POS → […,†,ˆ ,‡ ] OK
• Set the output aspect ratio to match the screen. Skip this step if the screen aspect ratio is 16:9
(the default). Press “MENU 0 6 value OK” where “value” is the screen aspect ratio in
hundredths (4:3 is MENU 0 6 1 3 3 OK)
• Set the output level. For DVI-D/HDMI displays it is important to match the display’s
requirement for this parameter. If unsure, selecting DVI-D as VIDEO output level is safer. Most
analog displays work well with either pedestal setting. The commands are:
For analog: MENU → OUT → LEVL → PDSTL → (0 IRE, 7.5 IRE) OK
For DVI-D: MENU → OUT → LEVL → DVILVL → (VIDEO, PC) OK
• Select the input type for the DVI-I inputs 1 through 4. Skip this step if input is DVI-D. DVI-D
inputs can also be selected to accept the 4:4:4 or 4:2:2 HDMI input format. Select desired
input, then press
MENU → IN → TYPE → (DVI- D, 4:4:4, 4:2:2, DVI-A), OK
• Select the input type for the component/RGB inputs 5 and 6. Skip this step if input 5 and 6 are
component and use the correct color-space. Note SD component inputs always use the SD
color space. The SD/HD selection for YPbPr only applies to HD input resolutions. Select desired
input, then press
MENU → IN → TYPE → (SDYPBPR, HDYPBPR, RGBS, RGsB, SCART), OK
• Set the video input levels. If unsure, selecting 0 IRE for analog, and PC input levels for DVI-D,
is safer. The commands are:
For analog inputs: MENU → IN → CONFIG → ADJ → LEVL → (0 IRE, 7.5 IRE) OK
For DVI-D inputs: MENU → IN → CONFIG → ADJ → LEVL → (VIDEO, PC) OK
© 2004-2007 Lumagen®, Inc.
10
Rev 1.14
VisionHDP™ User Manual and Installer Guide
Output Calibration:
• The interface between the Lumagen and display should be calibrated first. This is best
accomplished using the internal Lumagen test patterns to assure that any variance in a source
(either size or levels) does not affect the calibration. Later, differences between inputs can be
calibrated using the source devices. If grayscale is to be calibrated, a base line calibration
should also be done after setting black and white levels.
• To calibrate the black and white levels, select the Lumagen contrast test pattern (MENU →
MISC → TPAT → OK), then use the left-arrow key to select the contrast test pattern. This
pattern has two white rectangles and two black rectangles. In the dark areas, there are two
vertical bars – One at 4 IRE and one at –4 IRE. The white area has two vertical bars – one at
96 IRE and one at 104 IRE. Note that 0 IRE is reference black and 100 IRE is reference white.
Since –4 and 104 are outside the nominal black to white range, not all displays will show these
levels.
First adjust the display’s black level using the brightness control. Adjust so that the 4 IRE bar
is barely visible against the black background (0 IRE). There should be no visible difference
between the black background areas and the –4 IRE bar. This is a secondary indication verses
the 4 IRE bar, but can be useful in optimizing the black level in displays that support blackerthan-black.
Next adjust the white level using the display’s contrast control. Adjust so that the 96 IRE bar is
barely visible against the white (100 IRE) background. If a display supports whiter-than-white,
the 104 IRE bar may be visible. This is not a requirement, but does show that there is some
additional headroom above white.
If either or both the 4 IRE and/or 96 IRE bars cannot be seen after adjusting the controls,
recheck that the appropriate output level has been selected.
• Grayscale and gamma should be calibrated at this point. Calibrating these parameters is an
essential part of the video calibration process. However, a trained technician using the
appropriate equipment must calibrate grayscale and gamma.
Grayscale calibration adjusts the “color of gray” so that the color “gray” adheres to the industry
standard D6500 point, at all levels from black to white. Most HDTVs, and projectors, are
intentionally miss-calibrated to maximize their brightness for the showroom. This calibration
step is necessary to correct this error, so the image appears as the producers intended.
Gamma is the response curve between black and white and also has an industry defined
standard that should be followed. Lumagen has developed a unique 11-point parametric
grayscale/gamma calibration feature, which allows both grayscale and gamma to be optimized
over the entire range from black to white, and not just at one or two points.
Lumagen strongly suggests that a qualified video technician be hired to do grayscale and
gamma calibration. A technician with the proper training and equipment must do the
grayscale/gamma calibration. Contact Lumagen for the service codes necessary to use the
grayscale and gamma calibration features.
• After completing the output calibration, copy the results to all configuration memories using the
following command:
MENU → IN → COPY → ALL → OK
• It is a good idea to save the configuration before proceeding. Use the SAVE command as
shown below:
MENU → SAVE → SAVE → OK
© 2004-2007 Lumagen®, Inc.
11
Rev 1.14
VisionHDP™ User Manual and Installer Guide
Input Calibration:
• Each input source should be calibrated, starting with the DVD. The Lumagen provides four
independent input configuration memories for each input. So, calibration for each input is
independent of the other inputs and multiple independent calibrations can be done for each
input. One use for the multiple calibrations for each input is to calibrate MEMA for day and
MEMB for night viewing. Typically the DVD input is calibrated first, using a DVD calibration disc.
Then the results of the DVD calibration are copied to all input memories as a reference starting
point for the other sources.
• Play a DVD calibration disc and select it as the input source. AVIA ® test patterns are referenced
here, but Digital Video Essentials® is also excellent.
• Select Lumagen input aspect ratio as 16:9 for a 16:9 screen, or 4:3 for a 4:3 screen. This is
necessary to properly set the overscan.
• Select Advanced AVIA → Video Test Patterns → Special Tests → Overscan.
• Adjust the input size and position. This selects which pixels are captured. The corner being
adjusted is moved toward the center to make it easy to calibrate. If the corner being adjusted
cannot be seen on-screen, go back to the Initial Output/Input Setup section and correct the
output size, then come back to this step. Adjust the top-left corner of the image first. Then
adjust the bottom-right corner.
Input top-left: MENU→ IN→ CONFIG→ ADJ→ SIZE→ TOPL→ […,†,ˆ ,‡ ] OK
Input bottom-right: MENU→ IN→ CONFIG→ ADJ → SIZE→ BTMR →[…,†,ˆ ,‡ ] OK
• Select Advanced AVIA → Video Test Patterns → Gray Scale & Levels → Black and White Levels
→ Needle Pulses.
• Set the black level. Follow AVIA instructions for setting the black level. Since the Lumagen-todisplay levels were set above in the Output Calibration section, the Lumagen internal Black
level control should be used. It is recommended that the black frame with two moving bars (2
and 4 IRE) be used for setting black level. The reason is that the black level varies with the
average intensity on the screen for a lot of displays and the black level is most critical in dark
scenes. The command is:
MENU → IN → CONFIG → COLR → BLCK → [‡ ,ˆ ] OK
• Set the white level. Follow AVIA instructions for setting the white level (often called contrast).
Since the Lumagen-to-display levels were set above in the Output Calibration section, the
Lumagen internal Contrast control should be used. The command is:
MENU → IN → CONFIG → COLR → CONT → [‡ ,ˆ ] OK
• Select Advanced AVIA → Video Test Patterns → Color → Standard Colorbars.
• Set Color and Hue and then the Color and Hue offsets for red and green. Set the display’s
Color and Hue to default before performing this calibration step. Follow instructions on the
AVIA disc for the color bar images. First set Color and Hue using the AVIA blue colorbar pattern
and the blue filter. Next set the red color (COLRED) and Hue (HUERED) offsets using the red
© 2004-2007 Lumagen®, Inc.
12
Rev 1.14
VisionHDP™ User Manual and Installer Guide
colorbar pattern and the red filter. Finally set the green color (COLGRN) and Hue (HUEGRN)
offsets using the green colorbar pattern and the green filter.
MENU → IN → CONFIG → COLR → COLR →
(COLR, HUE, COLRED, HUERED, COLGRN, HUEGRN) → […, †, ˆ , ‡ ] OK
• Select Advanced AVIA → Video Test Patterns → Special Tests → Y/C-Delay.
• Set Y/C Delay. Use the Lumagen Control to minimize the error in the blue and red timing
verses Luma. On the right part of the screen there are red bars on a yellow background. Adjust
to balance any color transition errors on the left and right edges of the red bars. The CB and
CR channels are calibrated independently.
MENU → IN → CONFIG → ADJ → YC- DLY → (CBCR, CB, CR) → […, †, ˆ , ‡ ] OK
• Copy the DVD configuration to all configuration memories (MENU → IN → COPY → OK).
• If desired, change to MEMB and calibrate for a different amount of room light. Then switch
back to MEMA, and again copy the DVD configuration to all configuration memories.
• Calibrate the other inputs.
• Name the inputs, if desired (MENU → CONFIG → IN → NAME → OK and follow directions).
• Set power-on message, if desired (MENU → MISC → POWR → MSG → […, †, ˆ , ‡ ] OK)
• Lock the configuration, if desired (MENU → MISC → LOCK → LOCKED OK)
• SAVE THE CONFIGURATION (MENU → SAVE → SAVE OK)
© 2004-2007 Lumagen®, Inc.
13
Rev 1.14
VisionHDP™ User Manual and Installer Guide
Installation Commands
See the Command Format section (page 7) for a description of the installation command
interface.
Output Configuration
The factory-default is 480p at 59.94 Hertz, with a 1.78 (16:9) aspect ratio. For analog output, the
default mode is RGBH-V-. See the Selecting the Output Resolution section (page 33) for more
information on which output resolution to use. If more than a single output resolution is required,
see the Multiple Output Mode section (page 34).
NOTE:
If the analog output is enabled, it is turned off for HDCP encrypted sources.
Display Type
By default (Auto), if a DVI-D display is detected, DVI-D output is enabled and analog output is
disabled. If no DVI-D display is detected, analog RGBHV output is enabled and DVI-D is disabled.
The output can also be manually selected. If both DVI-D and analog are enabled, the analog
output must be one of the RGB types. The commands are:
Auto:
DVI-D only:
Analog only:
Both:
MENU
MENU
MENU
MENU
0
0
0
0
9
9
9
9
3
3
3
3
2
2
2
2
1
2
3
4
Output DVI-D only, if detected, else analog only
DVI-D only, even if DVI-D is not detected
Analog only, even if DVI-D is detected
Output DVI-D and analog RGB
The following commands select the output color-space and synchronization type for the analog
output. The selection takes effect immediately. The arrow buttons are then active and have
immediate effect. If no arrow buttons are pressed the default mode is used. Press the OK button
when done to prevent the arrow buttons from continuing to change the sync type.
RGBHV: MENU 0 1 2 [ˆ ,‡ ] […, †] OK
ˆ sets both H and V sync as negative (default)
‡ sets both H and V sync as positive.
… sets negative H sync. If needed, select after the ˆ or ‡ button.
† sets positive H sync. If needed, select after the ˆ or ‡ button.
RGBS: MENU 0 1 3 [ˆ ,‡ ] OK
ˆ sets negative composite sync (default)
‡ sets positive composite sync
RGsB: MENU 0 1 4 [ˆ ,‡ ] OK
ˆ sets embedded bi-level sync
‡ sets embedded tri-level sync (default)
HD color-space YPR PB : MENU 0 1 1 [ˆ ,‡ ] OK
ˆ sets embedded bi-level sync
‡ sets embedded tri-level sync (default)
SD color-space YPR PB : MENU 0 1 5 [ˆ ,‡ ] OK
ˆ sets embedded bi-level sync (default)
‡ sets embedded tri-level sync
© 2004-2007 Lumagen®, Inc.
14
Rev 1.14
VisionHDP™ User Manual and Installer Guide
Vertical Output Resolution - Presets
Select one of the preset output vertical resolutions. The only interlaced format supported is
1080i. The command format for each resolution is:
480p: MENU 0 2 1 OK
720p: MENU 0 2 4 OK
1080p: MENU 0 2 7 OK
540p: MENU 0 2 2 OK
768p: MENU 0 2 5 OK
1080i: MENU 0 2 8 OK
600p: MENU 0 2 3 OK
840p: MENU 0 2 6 OK
Vertical Output Resolution - Programmable
Manually set the output vertical resolution from 480p to 1080p, in scanline increments. To select
between 1080i, 1080p, 1080p24sF and 1080p24; enter a vertical resolution of 1080 lines and
then use the arrow buttons to selected the correct format. 1080p output also allows the choice
between two modes. MODEA follows the SMPTE standard. MODE B is required for some 1080p
devices, such as the JVC® HD2K® projector. Out of range values are ignored. The command
format is:
MENU 0 3 value OK
or MENU → OUT → RES → VRES → value, [ˆ,‡] OK
Vertical Output Refresh Rate
Set the vertical refresh rate. The range is 23.98 (DVI-D), to 120 Hertz in hundredths (e.g. 75.00
is entered as 7 5 0 0). The maximum refresh rate depends on the output resolution. For DVI-D
Segmented-Frame (sF) output format, select 1080 lines and then select 24sF (or 25 sF). Out-ofrange values are ignored. The command format is:
MENU 0 4 value OK
or MENU → OUT → RES → VRATE → value OK
Horizontal Resolution for DVI Output
For DVI-D output, use this command to set the active horizontal resolution if the HRES selected
by the Lumagen does not match the display. The command format is:
MENU 0 7 value OK
or MENU → OUT → RES → HRES → value OK
Horizontal Refresh Rate for Analog Output
NOTE: Generally this command should not be used.
Set the analog output horizontal refresh rate in Hertz. The vertical total scanline count is adjusted
to achieve the specified horizontal frequency, if possible. The active vertical resolution is not
changed. Out-of-range values are ignored. The command format is:
MENU 0 5 value OK
or MENU → OUT → RES → HRATE → value OK
© 2004-2007 Lumagen®, Inc.
15
Rev 1.14
VisionHDP™ User Manual and Installer Guide
Exact Output Timing
The Timing command sets output timing in pixel increments. This command can be selected
using the menu or with a direct command. The menu command screen is:
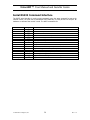
MENU → OUT → RES → TIMING
To directly select press: MENU 0 9 4 3. An example screen for 480p is shown below:
0
1
2
3
VTOT
VRES
VSYN
VFRN
8
VRATE
525
480
5
5
4
5
6
7
59.94
HTOT
HRES
HSYN
HFRN
858
720
54
15
9 EXECUTE
To program the pixel timing, first enter the single-digit (0-8) for a parameter to change. This will
bring up a sub-menu where the desired value can be entered. Select the value and press OK.
Continue setting all parameters that need to be changed. The changes do not take effect until
option 9 (EXECUTE) is selected. This updates the hardware timing, and gives the user 15
seconds to accept the changes. If the accept-screen times out, or if the user presses EXIT while
it is active, the output timing reverts to the old timing and the Timing command screen is once
again displayed without the changes.
The parameters entered are for vertical (V) or horizontal (H), for the total pixel count (TOT), the
active pixel count (RES), the sync-pulse duration (SYN), or the front porch (FRN). Note the frontporch is the time after active video and before the sync pulse. The back-porch timing is
automatically calculated. The vertical rate (VRATE) can also be set.
Output Size
Change scale of the image with respect to the active output. The command format is:
MENU → OUT → RES → SIZE → […, †, ˆ , ‡ ] OK
or MENU 0 9 4 1 […, †, ˆ , ‡ ] OK
Output Position
Position the image with respect to the active output. The command format is:
MENU → OUT → RES → POS → […, †, ˆ , ‡ ] OK
or MENU 0 9 4 2 […, †, ˆ , ‡ ] OK
Screen Aspect Ratio
Select the screen aspect ratio. The screen aspect ratio range is 1.33 (4:3) to 2.35 and is entered
in units of hundredths (e.g. 16:9 is entered as 1 7 8). The command format is:
MENU 0 6 value OK
or MENU → OUT → ASPECT → value OK
Graybar Intensity
NOTE:
Consult a home theater specialist for assistance setting the graybar intensity.
Some degree of burn-in will occur on any susceptible display, but this command can help
minimize it by allowing the intensity of graybars to be adjusted. The command format is:
MENU → OUT → GBAR → SIDE → [ˆ , ‡ ] OK
© 2004-2007 Lumagen®, Inc.
16
Rev 1.14
VisionHDP™ User Manual and Installer Guide
Output Level
For analog output, specify black pedestal as 0 IRE (PC) or 7.5 IRE (Video). Typically this is set to
0 IRE for fixed-pixel displays, and 7.5 IRE for CRT displays. For DVI-D output, set levels as video
(allows blacker-than-black and whiter-than-white) or PC (full-range black to white). If unsure,
use 7.5 IRE for analog and PC levels for DVI-D. The commands are:
For analog: MENU → OUT → LEVL → PDSTL → (0 IRE, 7.5 IRE) OK
For DVI-D: MENU → OUT → LEVL → DVILVL → (VIDEO, PC) OK
Shrink
The "shrink" command allows you to bring in any edge of the picture, thus shrinking the picture
either horizontally or vertically. The "shrink" parameters are part of an output configuration. The
main use of the shrink command is to shrink the picture to fit in the display and when using
masking systems.
Many displays overscan their picture which results in some of the picture being cut off at the
edges of the screen. For CRT type displays and some digital displays this can be corrected using
the OUT→ RES→SIZE and POS (position) commands. The SIZE and POS commands shrink the
picture by adjusting the display timings. Unfortunately many digital displays do not allow the
picture to be resized in this manner and that is where the SHRINK command comes in. The
SHRINK command can achieve the same result when trying to eliminate overscan in digital
displays as the SIZE and POS commands and does not alter the display timing. The command
format is:
MENU → OUT → MISC → SHRINK → OK→ (T, L, B , R) OK
NOTE:
When calibrating overscan you should check the picture overscan with Lumagen’s
overscan test pattern (under MISC->TPAT->PATS).
Sync
The “sync” command allows you to set the polarity for the horizontal and vertical sync. The
command format is:
MENU → OUT → MISC → SYNC → OK→ (H+V+, H+V-, H-V+, H-V-) OK
Output Mode
When set to factory-defaults, there is a single output configuration for all input memories. If the
output mode is set to one of the two independent modes (INDEP or AUTOIND) each input
memory can select the eight (0 to 7) independent output configurations. For SD inputs you can
choose one output configuration. For HD inputs you can up to four output resolutions, one for
each input resolution. The command to set the output mode is:
MENU → OUT → MODE → (SAME, INDEP, AUTOIND) OK
NOTE:
After changing to an independent output mode, all memories use output mode
0. To change an output configuration, the appropriate input and input memory
must be selected, Then, the output configuration number must be selected using
© 2004-2007 Lumagen®, Inc.
17
Rev 1.14
VisionHDP™ User Manual and Installer Guide
the input menu’s OUTSEL command. Changes to the output timing will affect
the selected output configuration.
When NTSC/PAL auto-selection is enabled (AUTOIND), MEMA is linked to MEMC and MEMB is
linked to MEMD. If MEMA is active, a NTSC source automatically selects MEMA and a PAL
source automatically selects MEMC. If MEMB is active, a NTSC source automatically selects
MEMB and a PAL source automatically selects MEMD.
Horizontal Sync Pulse Width
NOTE:
Generally this command should not be used.
Some displays require a narrower horizontal sync pulse than standard SMPTE timing. This
command allows the HSync pulse width to be controlled. The command format is:
MENU 0 9 4 0 → […, †] OK
Copy Output Settings
NOTE: This command is only visible if an independent output mode is selected.
For independent modes (INDEP, or AUTOIND), this command copies the current output
configuration to the selected configuration or configurations. The command format is:
MENU → OUT → COPY→ (ALL, 0 – 7) OK
Input Configuration
After the output is configured and calibrated, calibrate the DVD input. Copy that configuration to
all the other configuration memories (see the Copy Input Settings section on page 24). Then
calibrate the other inputs. To program one of the independent input memories, select the input,
then select the configuration memory and use the menu to configure the input. For example; if
memory A for an input is to be the same as memory B for that same input, the input
configuration must be copied from one to the other.
Component/RGB Input Type Selection
The source type must be programmed for the component/RGB inputs (3 and 4). Select the input
then program its type. For component input mode, you can select either standard-definition (SD)
or high-definition (HD) color-space. The command format is:
MENU → IN → TYPE → (SDYPBPR, HDYPBPR, RGBHV, RGBS, RGsB) OK
NOTE:
For SD resolutions on the component inputs; the SD color space is always used,
regardless of the setting for either SDYPBPR or HDYPBPR. The HDYPBPR mode is only
used for sources that upscale SD material to HD but fail to properly convert the color
space to match the HD standard.
The analog-to-digital converter for these inputs is calibrate d at the factory. However, since
source levels vary, these inputs should be calibrated with the intended source device to achieve
optimal performance. If the source is capable of displaying a 100 IRE Window Pattern, use the
“Calibrate Component/RGB Input” command to calibrate the input.
© 2004-2007 Lumagen®, Inc.
18
Rev 1.14
VisionHDP™ User Manual and Installer Guide
Standard Definition Input Type Selection
Inputs 8 and 9 are SVideo, but can be programmed to use the Y-channel of the connector as a
composite input. Input 0 can also be programmed as a composite input. In this case cvS6 is used
as a composite input (the SDI input is disabled). The command format is:
MENU → IN → TYPE → (VID, SVID) OK
Linking an Input Memory to an Output Configuration
NOTE:
See the Multiple Output Mode section (page 34)
for information on using output configurations.
If the output mode is set to independent (INDEP or AUTOIND), each SD input memory uses
one of the eight independent output configurations. For HD capable inputs, each memory has
four resolution “sub-memories” (PC, 480i/480p (or 576i/576p), 720p, 1080i). The PC memory is
used for any other single input resolution For these HD inputs, when Multiple-Output-Mode is
enabled, the output-configuration numbers for each of these is listed as four numbers separated
by a “/” in the order shown above. The output-configuration number for each sub-memory must
be set independently, but all submemory selections can be set independent of which input
submemory is active.
First select the desired input memory. Then use this command to select the desired output
configuration. The command is:
MENU → IN → OUTSEL → (0 – 7) OK
Black and White Levels
To set the black-level (also referred to as brightness) and white-level (also referred to as
contrast) using the Lumagen controls, select the needle pattern in AVIA (Advanced AVIA → Video
Test Patterns → Gray Scale & Levels → Black and White Levels → Needle Pulses). Follow the
instructions on the AVIA disk. The command format is:
MENU → IN → CONFIG → COLR → (BLCK, CONT) → [‡ ,ˆ ] OK
Color and Hue
NOTE:
Set the display’s Color and Hue to their default values.
Use the Advanced AVIA color test pattern to set Color and Hue (Advanced AVIA → Video Test
Patterns → Color). Follow instructions on the AVIA disc. Calibrate using the blue color bars and
blue filter (COLR and HUE). Then calibrate using the red color bar image and red filter
(COLRED for HUERED), and then the green color bar image and green filter (COLGRN and
HUEGRN).
If an RGB (analog or DVI) output mode is used to drive the display, and if the display uses RGB
color-space through its entire data path, enter the Lumagen service mode. This will disable the
two primaries not being adjusted, which eliminates the need to use the color filters for this
adjustment. If it is uncertain whether the display has an all RGB data path, leave the Lumagen in
user-mode and use the filters. The command format is:
MENU → IN → CONFIG → COLR → COLR →
(COLR, HUE, COLRED, HUERED, COLGRN, HUEGRN) → […, †, ˆ , ‡ ] OK
© 2004-2007 Lumagen®, Inc.
19
Rev 1.14
VisionHDP™ User Manual and Installer Guide
Chroma-Upsample-Error Correction
Some digital video sources, such as some DVD players, have an error in design that affects the
Chroma video quality. The CUE filter can be enabled to mitigate this error. For high quality
sources that do not have the CUE artifact, disabling the CUE filter may increase Chroma
resolution. The CUE filter is on by default. The command format is:
MENU → IN → CONFIG → COLR → CUE → (ON, OFF) OK
Color-Temperature and Gamma Calibration
Lumagen video processors can correct the color-of-gray (also called grayscale, color-temperature
or white-balance) and gamma using the internal 2, 5, or 11 point parametric grayscale calibration
function. This adjustment requires the appropriate test equipment and training, so has been put
in the service menu. Contact Lumagen for details.
Input Sizing
Input sizing can be used to compensate for active image size differences in the source. Note; the
input size command does not affect the output size or position. Rather, it affects which input
pixels are captured for processing.
Use the TOPL command to select the top left most active input pixel. Use the BTMR command
to select the bottom right most active pixel. For these commands, the active corner is temporarily
moved toward the center of the screen. Select the scanline using the ‡ and ˆ arrows, and the
pixel using the … and † arrows. The command format is:
MENU → IN → CONFIG → ADJ → SIZE → (TOPL, BTMR) → […, †, ˆ , ‡ ] OK
Mask
The mask command allows you to cover up the sides of the video source. It is different then
cropping in that the video is not stretched to fill the screen. It can be useful for pass-through
modes where you do not wish the video processor to scale the picture but there is some video
noise on side(s) of the picture you wish to cover up. Another situation may be that you wish to
cover up the letterbox gray from a DVD player with black instead.
When you select the command you must first select which mask # you wish to use. There are 15
available. They can be shared among different input memories. The number of times each mask
has been used is displayed as “# USES”. This allows you to decide to use an unused mask or
share a previously set up mask. After selecting the MASK # you then can adjust how much the
mask covers of the 4 sides of the input. Use the left/right arrows to select the edge you're
adjusting and the up/down arrows to adjust the amount of masking. The last step is to alter the
gray level for the 4 sides. Note that the gray level for masks is overridden if aspect bars are
present by the gray level setting of the aspect bar (aspect bar colors can be adjusted under OUT>MISC->GBAR). Also, if aspect bars are requested (via differing input and output aspects) the
masking is added to the aspect bar width. The command format is:
MENU → IN → CONFIG → ADJ → SIZE→ MASK→ (OFF, 0 … 15) OK
Non-linear Stretch
Non-linear-stretch (NLS) is used to horizontally stretch a 4:3 aspect ratio source to fit a display
that has a wider aspect, such as 16:9. The image is stretched by a constant amount in the center
and by an increasing amount approaching the left and right edges. This eliminates the black
sidebars normally seen when viewing 4:3 material on a 16:9 display.
© 2004-2007 Lumagen®, Inc.
20
Rev 1.14
VisionHDP™ User Manual and Installer Guide
The goal is to stretch the image to fill the screen in a way that looks as natural as possible. The
Lumagen NLS command is very flexible and allows the image to be adjusted to user preferences
to achieve this goal. The NLS adjustments are center width, center stretch, top cropping and
bottom cropping. The center section of the image is stretched by a constant amount from 0 to
24% (CENTER STR%). The width of the center section can be set from 15% to 75% (CENTER
SIZ%). By programming the center section width and stretch amount, the amount of non-linear
stretch in the left and right sections can be optimized. In addition, the top (CROP TOP%) and
bottom (CROP BTM%) cropping can be set from 0 to 12%. Increasing the amount of cropping
reduces the amount of stretch near the left and right edges of the image. When setting the
cropping parameters, it is recommended that the satellite/cable box menu be checked to assure
that critical parameters remain visible.
The NLS feature is off by default, and must be enabled before any of its parameters can be
changed. Also, it is only active when the input aspect ratio is set to 4:3. The command reports
the NLS status as "OFF," "NLS1", "NLS2" or "USER" mode. It is recommended that NLS2 be used
as a starting point before setting user preferences. After selecting NLS2 or NLS1, changes to any
parameter automatically selects USER mode.
Some 4:3 sources fill the entire source image (e.g. DVD 16:9 movies), but other sources place a
4:3 image in the center of a 16:9 image (e.g. HDTV with up-scaled SD source). This latter case is
seen as a “pillar-boxed” image with black bars on the left and right. The “PILLARBOXED”
parameter must be enabled for this case. The Lumagen will then crop the pillbox bars and stretch
the active 4:3 image.
When enabled, the NLS command is only active when the 4:3 input source aspect ratio is
selected. Since it is often desirable to view a 4:3 source as transmitted, without stretching it; the
NLS command allows either the 1.85 (or LBOX), input aspect ratio button to be reprogrammed to
turn off NLS (using the “NLS OFF BTN” parameter). This is global to all configuration memories
which have NLS enabled. Note, the 1.85 (or LBOX), source aspect button still selects the
respective input aspect ratio for configuration memories that have NLS disabled. When this
feature is enabled, a 1.85 (or LBOX), source aspect ratio can still be selected using the left and
right arrows buttons to step through the aspect ratios while the menu is not visible on the
screen.
When NLS is enabled, the image will fill the screen with the 4:3 (1.33) source for any output
aspect ratio up to 1.85. If the output aspect ratio is greater than 1.85, software limits the
maximum width to the equivalent of 1.78 and adds left and right sidebars.
Select the parameter to adjust using the ‡ and ˆ arrows, and change the value of the selected
parameter using the … and † arrows. The command format is:
MENU → IN → CONFIG → ADJ → SIZE → NLS → […, †, ˆ , ‡ ] OK
Pass-Through mode
The source image is scaled by default, even if the input and output resolution match (i.e. 1080i in
and 1080i out). The SCALE command allows scaling to be disabled if the input and output
resolutions match. Note that since the general case is to have a single output resolution that
matches the native resolution of the display, any source input resolution that does not match the
output resolution is still scaled.
MENU → IN → CONFIG → ADJ → SIZE → SCALE → (NORM, PASS) OK
© 2004-2007 Lumagen®, Inc.
21
Rev 1.14
VisionHDP™ User Manual and Installer Guide
Y/C Delay
Adjust the horizontal Chroma timing in relation to Luma. It is suggested that you use the Y/Cdelay calibration image from the Special Tests section of Advanced AVIA, to calibrate the Y/Cdelay. The CB and CR channels are adjusted separately.
MENU → IN → CONFIG → ADJ → YC- DLY → […, †, ˆ , ‡ ] OK
Sharpness
This command is used to adjust the sharpness for all inputs It is generally best to leave this at
the factory default setting. The command format is:
MENU → IN → CONFIG → ADJ → SHARP → […, †] OK
Input Level
This command specifies if an analog input has a black pedestal, and if DVI inputs use video levels
or PC levels. I you are unsure, it is better to leave these at 0 IRE for analog, or PC level for DVID. The analog command format is:
MENU → IN → CONFIG → ADJ → LEVL → (7.5 IRE, 0 IRE) OK
The DVI input command format is:
MENU → IN → CONFIG → ADJ → LEVL → (VIDEO, PC) OK
Input Name
Each input configuration memory can be named. Follow the on-screen directions. The … and †
arrows select which input to change and then which character to change. The ‡ and ˆ arrows
change the selected character. The command format is:
MENU → IN → CONFIG → NAME
Select Deinterlacing Mode
The default deinterlacing mode, for both SD and HD material, is to automatically detect film or
video source material and deinterlace accordingly. Since this can never be a perfect detection,
the Lumagen processor allows the user to force deinterlacing to assume the source material is
video. For SD material the choices are AUTO1, AUTO2, Video and FILM. For HD the choices are
AUTO1, AUTO2, VIDPP and VIDNC. The AUTO2 mode is similar to AUTO1 but will more quickly
switch to video mode and can be better suited if the source tends to have more video material
than film.
The HD VIDPP mode uses a “per-pixel” motion adaptive deinterlacing algorithm (as used for SD
deinterlacing), and the VIDNC uses a scaling deinterlacing method. While the VIDPP mode
generally provides the best image, the Lumagen will not comb in VIDNC mode, and so VIDNC is
sometimes preferable.
The deinterlacing mode command format for SD inputs is:
MENU→ IN→ CONFIG→ CNTRL→ DEINT→ MODE→(AUTO1,AUTO2,VIDEO,FILM) OK
For HD inputs, the mode for SD and HD sources are selected independently. The SD portion is
the same as for SD only inputs. The HD selection command is:
MENU→ IN→ CONFIG→ CNTRL→ DEINT→ MODE→ (AUTO1,AUTO2,VIDPP,VIDNC) OK
© 2004-2007 Lumagen®, Inc.
22
Rev 1.14
VisionHDP™ User Manual and Installer Guide
Flip Input Field
Some source devices do not follow conventions for the order of video fields. This can be seen as
excessive combing in the video. While it’s generally not required, this command allows the input
fields to be swapped so that the images can be properly deinterlaced. The command format is:
MENU → IN → CONFIG → CNTRL → DEINT → FIELD → (NORM, FLIP) OK
Genlock
Genlock is the ability to exactly lock the output rate to the input rate, or to a multiple of the input
rate.
For a typical system with an NTSC source (nominally 59.94 Hz) and outputting a 59.94 Hz rate to
the display, the clocks of the NTSC source and the Lumagen will never match exactly. Because of
this very slight mismatch, there will be a dropped (or doubled) frame once every few minutes.
When genlock is enabled, the Lumagen output clock is varied slightly to keep its output rate
locked to the input rate. This avoids any dropped/doubled frames. This may not be observable by
most users, but genlock corrects this issue for users who are sensitive to it. Another benefit of
using genlock is that it slightly reduces the video delay (aka lip-sync delay) going through the
video processor. It also makes the delay constant through the Lumagen. When genlock is off, the
delay varies over time by about one field time.
To check the genlock status, press the OK button on the remote several times until the genlock
status is visible. This must be done when no onscreen menu is present. Possible states are OFF,
DISABLED, LOCKING and LOCKED. Genlock is disabled if the output is not an appropriate
multiple of the input. For NTSC, genlock is able to lock output rates of 24sF (actually 23.976Hz),
47.95Hz, 59.94Hz, or 71.93 Hz. For PAL sources, 50 Hz and 75 Hz outputs can achieve lock.
Genlock can be enabled/disabled on a per-input memory basis. The command format is:
MENU → IN → CONFIG → CNTRL → GENLOCK → (YES, NO) OK
DVI input HDCP Capability Setting
Some DVI sources limit functionality when driving HDCP capable devices by disabling analog
outputs on the source, even though the analog outputs do not require HDCP capability. This
command can disable reporting HDCP capability for the current DVI input memory.
NOTE:
When HDCP capability is disabled, HDCP encrypted sources are not displayed.
MENU → IN → CONFIG → DVI → HDCP → (YES, NO) OK
DVI input EDID Display Information
EDID is information that can be read over DVI/HDMI cables to influence how source devices send
video over the HDMI/DVI cable and this can then result in a better picture. Enabling this feature
does not guarantee the source will use the EDID. There are 5 basic settings for the Lumagen
EDID interface. The OFF setting means the source plugged into the Lumagen DVI input will see
no info when it tries to read the EDID. With the PASS setting the Lumagen will read the EDID
from the display and pass that back to the source. The DFLT setting enables some basic display
modes such as 480p, 720 and 1080i. The DFLT+EXT mode enables all of the display modes
currently available and disables advertising the 422 and 444 YCbCr mode. The USER setting
allows the user to individually select which capabilities will be advertised to the connected source.
You can scroll through the list of capabilities with the up/down arrows and toggle advertising the
feature with the left/right arrows. Press "ok" when done. The command format is:
© 2004-2007 Lumagen®, Inc.
23
Rev 1.14
VisionHDP™ User Manual and Installer Guide
MENU→ IN→ CONFIG→ DVI→ EDID→ (USER, DFLT+EXT, DFLT, PASS, OFF) OK
NOTE:
After you change the EDID information, many sources require you to cycle power on
the source or unplug the DVI cable to get the source to re-read the EDID.
DVI input Hotplug Mode
Each Lumagen DVI input sends a signal (Hotplug) back to the DVI source to inform the source to
drive its DVI output. However, some sources behave differently to the Hotplug signal. This
command selects how the Lumagen DVI input Hotplug signal functions. The NORM option
asserts Hotplug only when the respective Lumagen input is selected. The ON option always
asserts the Hotplug signal, at all times, while the Lumagen is turned on. Typically, NORM is used
to connect to an HDCP encrypted source and ON is used to connect to a PC.
MENU → IN → CONFIG → DVI → HOTPLG → (NORM, ON) OK
Serial-Digital-Interface Video Input
The Serial-Digital-Interface provides a digital connection for a DVD, or other source, that is
equipped with an SDI output. The setup is similar to other inputs, except SDI does not require
some of the setup controls that are needed for other inputs. The SDI input is set for a default
cable length of ≤10 meters. If a longer cable is used, enable the SDI cable equalization as
follows:
MENU 0 9 7 4
Toggle SDI cable equalization (default is off)
Copy Input Settings
Copy the input setup (contrast, etc.) from the active memory, to the selected memory or
memories. Copying the first input memory calibrated to other input memories can speed up the
calibration process. Note that copying a SD input to a HD input, copies the SD memory to (only)
the SD submemory of the HD input. The HD submemories for the PC, 720p and 1080i resolutions
are not changed. Copying a HD input memory to a SD input memory copies the SD submemory
of the HD input to the SD memory. Copying a HD input memory to another HD input memory
copies both the SD submemory and the HD submemory to the other HD input memory.
The input memory copy command can copy all memory parameters (COPY -> ALL), or just the
color (COLR) menu (COPY -> COLOR) parameters. This later function is useful when color and
grayscale are calibrated after the geometry calibration has already been completed for each
input. The color parameters are black, contrast, color, Hue, color offsets, Hue offsets, and
grayscale. The command format is:
MENU→ IN→ COPY→ (ALL, COLOR)→ (ALL, ALLMEMA – ALLMEMD, 1A – 0D) OK
© 2004-2007 Lumagen®, Inc.
24
Rev 1.14
VisionHDP™ User Manual and Installer Guide
Miscellaneous Commands
Calibrate Component/RGB inputs (5 and 6)
Input 5 and 6 use a high-quality fixed-gain analog-to-digital converter. Because of this, variations
between different sources should be taken into account. This command can calibrate the analogto-digital converter for component/RGB inputs and compensate for differences in source levels.
Select the input (5 or 6) to be calibrated and the input type. Display a 100-IRE “Window” test
pattern and enter the command. The command format is:
MENU 0 9 6 6
Calibrate active input using a 100-IRE Window Pattern.
On-Screen-Display Enable
Enable or disable On-Screen-Display (OSD) activation after user commands. If enabled, the OSD
shows the selected input, input aspect ratio, and zoom. The command format is:
MENU → MISC → OSD → (OFF, ON) OK
Initial Power State
When power is first connected, the unit can be set to turn on (ON), or it can be set to start in
standby mode (STBY). The command format is:
MENU → MISC → POWR → AUTO → (ON, STBY) OK
Power-On On-Screen Message
Change power-on message. The … and † arrows select which character to change. The ‡ and ˆ
arrows change the selected character. The command format is:
MENU → MISC → POWR → MSG → […, †, ˆ , ‡ ] OK
Power-On and Power-Off RS232 Output Message
Change the power-on, or power-off, message to transmit on the RS232 serial port. Each message
can be up to 40 ASCII characters long. When either the power-on or power-off serial output
message is enabled, the default RS232 command echo is disabled.
The message being edited can be cleared by pressing the 5 button. The last character that is to
be sent is highlighted by a small up-arrow below the character, and its position, from 0 to 39, is
displayed on the screen. Press the 7 button to move the last-character “mark.” For normal text,
the ASCII character is display. The “@” symbol is displayed as a solid box. Other values are
displayed as a pattern, so the hex value for that character must be used to identify which
character is to be transmitted.
In addition the BAUD rate (BAUD), byte-parity (PAR) and character spacing (GAP) can be
selected. The BAUD rate is entered in bits/second (e.g. 9600). Parity can be set to no-parity,
even-parity or odd-parity. The character spacing gap can be set to 0 or 450 mS.
The … and † arrows select which character to change. The ‡ and ˆ arrows change the selected
character. By default no message is sent. The command format is:
MENU→ MISC→ POWR→ RS232→ (PWRON, PWROFF) → […, †, ˆ , ‡ , 5, 7] OK
© 2004-2007 Lumagen®, Inc.
25
Rev 1.14
VisionHDP™ User Manual and Installer Guide
Lock the Configuration
The configuration can be locked to prevent unintended changes. When locked, the input
selection functions normally, but setup parameters are fixed. The command format is:
MENU → MISC → LOCK → (UNLOCKED, LOCKED) OK
The following command can be used to unlock the configuration memories if the on-screen menu
cannot be displayed. The command is:
MENU 0 9 1 5
Same as MENU → MISC → LOCK → UNLOCKED OK
Test Patterns
Warning:
Test patterns can cause screen burn-in if left on-screen for more then a few seconds.
Activate test pattern. The … and † arrows select the test pattern. The intensity is adjusted from
10 to 100 IRE, in 10 IRE steps, using the ‡ and ˆ arrows. The command format is:
MENU → MISC → TPAT → OK […, †, ˆ , ‡ ]
Menu Timeout
The MENU timeout can be changed. The command is:
MENU 0 9 0 5
Toggle menu timeout. Short (default) or long
Front Panel LED Function
The front panel LED is illuminated for a short time after a command and then turned off. This
behavior can be changed so the LED light stays on while the unit is on. The command is:
MENU 0 9 2 5
Toggle LED as "activity" (default) or "power."
Zoom Step
A smaller zoom step of about 5% can be selected instead of the normal step of about 15%. The
command is:
MENU 0 9 2 3
Toggle zoom-step between default and 5%.
Sidebar Pan
To help reduce screen burn-in with 4:3 sources on widescreen displays, the output can be slowly
moved left and right a fractional pixel step every few minutes. The command is:
MENU 0 9 8 7
© 2004-2007 Lumagen®, Inc.
Toggle Sidebar-pan for anti-burn. Default = off.
26
Rev 1.14
VisionHDP™ User Manual and Installer Guide
Other Commands
Freeze frame
S/W Rev
Video/Film flag
Input Reselect
TV Black
TV Contrast
TV MV Black
TV MV Contrast
In 3,4 sync level
MENU
MENU
MENU
MENU
MENU
MENU
MENU
MENU
MENU
0
0
0
0
0
0
0
0
0
9
9
9
9
9
9
9
9
9
0
0
1
1
3
3
3
3
4
0
3
8
9
6
7
8
9
4
Freeze picture (RS232 code = ‘z’). Any button exits
Display software revision, save-count and serial-number
Display input type on screen as video (V) or film (F)
Ignore reselection of same input
TV decoder black
TV decoder contrast
TV decoder Macrovision black offset
TV decoder Macrovision contrast offset
Adjust sync-sense level for input 5 or 6
Saving the Configuration
Save
NOTE:
If a save command is not executed, any changes will be lost when the
unit is put into standby power mode, or if power is interrupted.
Permanently save the current configuration. Note that, once saved, the configuration is retained
even if the unit is disconnected from power. Configuration from previous save is retained to allow
one-level of save-undo. The command format is:
MENU → SAVE → SAVE OK OK
Save Undo
Revert to the configuration over-written by the last save. Repeating the save undo command
toggles between the last two saved configurations. The command format is:
MENU → SAVE → UNDO OK OK
Revert To Factory Settings
Set all parameters to factory defaults. A SAVE is required to make permanent. The command is:
MENU 0 9 9 9
Same as MENU → SAVE→ FCTRY OK
Restore Configuration Saved during calibration
During calibration, the video technician can save the resulting Lumagen configuration to a special
hidden configuration memory. This command restores that configuration in the event that the
user inadvertently changes the configuration. A SAVE is required to make the restore
permanent. The command format is:
MENU → SAVE→ RESTORE OK
Revert To Defaults For Current Output Resolution
Sets output parameters to defaults for the current output resolution. A SAVE is required to make
permanent. The command is:
MENU 0 9 9 8
© 2004-2007 Lumagen®, Inc.
Same as MENU → SAVE→ FCTRY OK
27
Rev 1.14
VisionHDP™ User Manual and Installer Guide
Serial RS232 Command Interface
The RS232 serial interface is used to enter commands using the same command format as the
infrared remote. The serial rate is 9600 BAUD with 8 data bits, no parity bit and one stop bit. No
hardware or software flow-control is used. The ASCII commands are:
ASCII
%
$
M
X
!
i
P
k
<enter>
<
>
v
^
0 -9
n
[
Remote
ON
STBY
MENU
EXIT
CLR
INPUT
PREV
OK
…
†
ˆ
‡
0- 9
4:3
4:3NZ
© 2004-2007 Lumagen®, Inc.
Function
Power on
Power to standby
Activate menu
Exit. Often acts as a cancel key
Force menu off (e.g. can use to assure menu is off for input selection)
Choose input (i.e. i2 <enter> for input 2)
Display previous input
Accept command
Accept command (uses the PC “ENTER” keycode)
Left arrow (“less-than” key on keyboard)
Right arrow (“greater-than” key on keyboard)
Down arrow (lower-case v, as in “vote”)
Up arrow (shift 6 key on keyboard)
Enter a digit 0 through 9
Input is 4:3 format. Use previous zoom setting
Input is 4:3 format. No zoom
28
Rev 1.14
VisionHDP™ User Manual and Installer Guide
l
]
w
*
j
/
W
a
b
c
d
g
s
z
Y
R
S
T
A
B
C
D
E
F
G
I
V
~
H
=
LBOX
LBOXNZ
16:9
16:9NZ
1.85
1.85NZ
2.35
MEMA
MEMB
MENC
MEND
FREEZE
YPRPB
RGBHV
RGBS
RGsB
480P
540P
600P
720P
768P
840P
1080P
1080I
VRES
VRATE
HRATE
ASPECT
tXMM
ZT1xxxx
ZC
ZY0M
ZY1MMM
ZY1MMMNNN
OOOPPP
© 2004-2007 Lumagen®, Inc.
Input is 4:3 letter-box format (lower-case L). Use previous zoom setting
Input is 4:3 letter-box format (lower-case L) . No zoom
“Enhanced for 16:9 televisions” format. Use previous zoom setting
“Enhanced for 16:9 televisions” format. No zoom
Input is 1.85 format. Use previous zoom setting
Input is 1.85 format. No zoom
Input is 2.35 format. Use previous zoom setting
Select M EMA
Select MEMB
Select MEMC
Select MEMD
Onscreen messages on
Onscreen messages off
Freeze-frame. Any other character resumes
Output type is HD color-space YPRPB (component)
Output type is RGBHV. <enter> completes command
Output type is RGBS. <enter> completes command
Output type is RGsB. <enter> completes command
Select Vertical Resolution = 480p
Select Vertical Resolution = 540p
Select Vertical Resolution = 600p
Select Vertical Resolution = 720p
Select Vertical Resolution = 768p
Select Vertical Resolution = 840p
Select Vertical Resolution = 1080p
Select Vertical Resolution = 1080I
Set Vertical Resolution (e.g. V960 <enter>, for 960p)
Set Vertical rate (e.g. ~5994 <enter>, for 59.94 Hz)
Set Horizontal Rate (e.g. H45000 <enter> for 45KHz)
Set Output aspect ratio (e.g. =178 <enter> for 16:9 displays)
Test Pattern command: X is a letter ‘a’-‘p’ corresponding to the 16
available patterns. MM is the ire level divided by 10, so 0-10. Sending
‘X’ will exit the pattern display.
Print a message on the screen for 5 seconds. The command always
begins with the characters "ZT", followed by a single digit which sets
the duration of the message. '0' for 2 seconds, '1' for 5 seconds, '2' for 10
seconds and so on, with '9' leaving the message onscreen until a "ZC" is
sent or a Lumagen remote control command clears the message. The
message string “xxxx” which follows the duration digit can be up to 30
characters in length. The '@' character font is replaced with a solid block
for use as a volume bar. Legal characters must be in the range of ' ' thru
'z' (which is 0x20 - 0x7a in hex). Anything outside that range such as
carriage return or even the '{' can be used to terminate the message
command.
Clear any onscreen messages .
Set zoom factor to M. Where M can be 0-2, or 0-7 if zoom is set for 5%
steps.
Set output aspect ratio to MMM. Where valid range is 110-250 which
corresponds to 1.10 to 2.50.
Set output shrink parameters. Where MMM=top, NNN=left,
OOO=bottom, PPP=right edge. Range is 0-255 for each.
29
Rev 1.14
VisionHDP™ User Manual and Installer Guide
Menu tree
NOTE: When selecting among several opt ions for a control, the active selection is highlighted in red.
Press Menu
IN →
TYPE →
DVI -D
4:4:4
4:2:2
DVI -A
SDYPBPR
HDYPBPR
RGBS
RGsB
SDI
OUTSEL
CONFIG →
COLR →
BLCK
CONT
COLR →
COLR
HUE
COLRED
HUERED
COLGRN
HUEGRN
CUE
CTMP
ADJ →
SIZE →
TOPL
BTMR
NLS
SCALE
MASK
YC-DLY
SHARP
LEV EL
NAME
CNTRL →
DEINT →
MODE
FIELD
GENLOCK
DVI →
HDCP
EDID
HOTPLG
COPY →
ALL
COLOR
© 2004-2007 Lumagen®, Inc.
Input type selection as appropriate for current input
Digital-Video-Interface (HDMI compatible)
Digital-Video-Interface (HDMI 4:4:4 compatible)
Digital-Video-Interface (HDMI 4:2:2 compatible)
Digital-Video-Interface (HDMI compatible)
Component using the SDTV color-space
Component using the HDTV color-space
RGB with separate composite sync
RGB with composite sync on green
Serial Digital Interface
If output in INDEP mode, select one of 8 output configurations
Use display black for selected input
Use display contrast for selected input
Color saturation (Use “blue” color bar pattern)
Hue (Use “blue” color bar pattern)
Red Color saturation offset (Use “red” color bar pattern)
Red Color Hue offset (Use “red” color bar pattern)
Green Color saturation offset (Use “green” color bar pattern)
Green Hue offset (Use “green” color bar pattern)
Chroma-Upsample-Error mitigation filter
Grayscale and gamma calibration (Service mode only)
Position top-left of input
Scale to position bottom-right corner of input
Select 4:3 input as normal or Non-Linear-Stretch
Disable scaling if input resolution matches out resolution
Adjustable Mask to cover the four sides of the video.
Y/C delay independently for CB and CR
Select image sharpness. Not available for most VisionDVI inputs
DVI-D levels or Analog black-pedestal (PC or Video)
Name input memory by following on-screen instructions
Deinterlacing control
Select deinterlacing mode
Flip input fields (i.e. swap odd and even fields)
Select genlock mode
For DVI inputs, select modes
Select if DVI input reports HDCP capability
Select EDID as Lumagen default, monitor values, or off
Select if “hotplug” remains asserted when input not selected
Copy current input memory to selected input memories
Copy the current input memory’s color parameters (only)
30
Rev 1.14
VisionHDP™ User Manual and Installer Guide
OUT →
RES →
VRES
VRATE
HRATE
HRES
TIMING
SIZE
POS
ASPCT
MISC →
GBAR →
SIDE
LBOX
LEVL →
PDSTL
DVILVL
SHRINK
SYNC →
DVI
MODE →
SAME
INDEP
AUTOIND
COPY
MISC →
LCD →
BKLGHT
CNTRST
OSD
LOCK
POWR →
AUTO
MSG
RS232 →
PWRON
PWROFF
BAUD
PAR
GAP
Vertical active resolution
Vertical refresh rate
For analog output only: Horizontal rate (normally not used)
For digital output only: Horizontal active resolution
Set output timing parameters in pixel increments
Set output size
Output position
Output aspect ratio (1.33 to 2.35 in hundredths)
Side gray-bar intensity (0 to 49 ire)
Top/bottom letter-box-bar intensity (Service mode only)
Analog output black pedestal (0 IRE or 7.5 IRE)
DVI-D output level (VIDEO or PC)
Shrink any edge of the picture to fit in mask
Select DVI output sync polarity (use direct command for analog out)
Single (default) or multiple-output-timing mode
Single output configuration. All memories share output timing, etc.
Eight independent output configurations.
Automatically select output configuration for NTSC or PAL input.
Copy current output configuration to selected output configuration(s)
Visible for VisionHDQ only
LCD backlight enable
LCD contrast
Toggle OSD-enable. Shows status when input selected if enabled
Lock or unlock the configuration
Unit can go to either “ON” or “STBY” when power is applied
Change power-on on-screen message by following instructions
Transmit message out RS232 serial port on power on or off
Power-on RS232 serial output message
Power-off RS232 serial output message
Power on/off message BAUD rate
Power on/off message parity
Power on/off message character spacing
TPAT →
PATS
WARMUP
SAVE →
SAVE
UNDO
RESTORE
FCTRY
© 2004-2007 Lumagen®, Inc.
Test and warm-up patterns
Test patterns
Warm-up patterns
Note: Unsaved changes can be discarded by going to STBY
Save current configuration to flash ROM.
Toggle between current saved and previous saved configurations
Restore from calibrator’s hidden configuration
Reset to factory defaults
31
Rev 1.14
VisionHDP™ User Manual and Installer Guide
For Optimal Picture Quality
• Proper calibration is as important for attaining the best picture as deinterlacing and scaling. If
you don’t have one, purchase a DVD setup disc, such as AVIA ® or Digital Video Essentials® and
watch the training lessons provided. Then follow the calibration instructions on the disc and in
this manual.
• Using high-quality cables is a very important part of video quality.
• Use a power conditioner for the video source, video processor and the display. Power line noise
is at least as important an issue for video as it is for audio.
• Use the DVI-D output if supported by the display. For analog displays, RGBHV is preferable to
component.
• For display of PC generated data, such as spreadsheets, the PC resolution should be set to
match the native resolution of the display and the Lumagen should be in “pass-through” mode
(MENU → IN → CONFIG → ADJ → SCALE → [ˆ , ‡ ] OK).
• Avoid running video signals through the video switch inside receivers, as these tend to degrade
video quality. Also, the Lumagen provides independent configuration memories for each input.
Using the Lumagen to switch the video allows these configuration memories to be
automatically selected for each source.
• Component inputs on some displays do not work with standard width HSync pulses. When
using component video to drive the display, if there is a “green cast”, the likely cause is the
circuitry inside the display. Making the HSync pulse narrower with the Lumagen HSync Width
command (MENU 0 9 4 0) may eliminate this problem.
• A system’s “ground loop noise” can cause visible horizontal banding, or other problems. Since
the Lumagen case “floats” with reference to ground, it may need to be grounded to the video
source or display. Use approximately 18-guage wire to connect the case of the Lumagen to a
chassis ground on the video source or display. Eliminating the ground connection on the
Lumagen wall plug can also resolve the issue, but check local electrical codes before trying
this.
• For standard definition programming using cable/satellite set top boxes, it is best to have the
set top box output standard definition interlaced video (480i or 576i). This allows the Lumagen
to deinterlace and scale the video rather than the set top box. If this is not supported, use
480p output for standard definition programming. When the set top box outputs standard
definition material as 1080i or 720p, the Lumagen can do much less to improve the quality of
the image.
• Each input has four configuration memories. These are memory A (MEMA ), memory B
(MEMB), Memory C (MEMC), memory D (MEMD). These memories can be used to have four
independent configurations, such as for day (bright room) and night (dark room). In this
example, the black level would be set higher for viewing in a bright room than for viewing in a
darkened room. To use MEMA and MEMB for day/night, first setup MEMA normally, SAVE the
settings. Then use the input copy command to copy the setup to MEMB. Then adjust MEMB as
desired for a different black level setting.
© 2004-2007 Lumagen®, Inc.
32
Rev 1.14
VisionHDP™ User Manual and Installer Guide
Selecting the Output Resolution
The Society for Motion Picture and Television Engineers (SMPTE) standards for 480p, 720p, 1080i
and 1080p are used as reference points for output timing. Other resolutions and vertical-refreshrates are derived from these standards.
It is important that the optimal output resolution is selected on the Lumagen. For a DVI-D output
which is connected to a plasma, DLP, or LCD display, the output resolution should be the native
resolution of the display. To find the native resolution of the display, check the user manual
provided with the display. Use the instructions in the Installation Commands section of this
manual to select the appropriate resolution.
For CRT projectors, and other analog interface displays, the best choice of output resolution is
more involved. The best choice depends on tube size, focus, phosphor spot size, and videobandwidth. For CRT projectors, some suggested starting points, based on tube size, are 720p for
7 inch, 840p for 8 inch, and 960p for 9 inch. Use the instructions in the Installation Commands
section of this manual to select the appropriate resolution.
High-definition, direct-view and rear-projection televisions typically support 480p and 1080i.
Some also support 540p or 720p. If 720p is supported, it is the recommended resolution,
because 1080i suffers from display interlace-artifacts that reduce the perceived vertical resolution
to roughly the same as 720p. Since the output is over-sampled horizontally, 720p provides nearly
equivalent perceived vertical and horizontal resolution as 1080i, and it eliminates interlaceddisplay artifacts.
A vertical-refresh-rate of 59.94 Hertz works well for NTSC and PAL M material. For PAL (except
PAL M) and SECAM, 50 Hertz generally provides the best picture. Note that the selected rate
must be supported by the display at the selected vertical resolution.
NOTE:
The maximum resolution depends on the vertical rate, the output aspect
ratio, and on whether the output size is reduced from factory defaults.
The software attempts to prevent illegal combinations of resolution, vertical rate and aspect ratio,
but given that there are millions of combinations, not all cases could be checked.
© 2004-2007 Lumagen®, Inc.
33
Rev 1.14
VisionHDP™ User Manual and Installer Guide
Multiple Output Mode
The default configuration uses a single output mode for all inputs and input memories. This
works well for fixed pixel displays. However, for CRT projectors, and some fixed pixel projector
configurations, such as when a movable Anamorphic-lens is used, having more than one output
mode may be desirable. For example, in this case, 16:9 source material is viewed with a different
output aspect ratio than 2.35:1 material.
After the first output configuration is programmed, and saved, select multiple output mode
(MENU → OUT → MODE → INDEP OK). This enables eight output configurations.
NOTE:
When multiple-output-mode is enabled, all input memories, including the HD
input “per-resolution” sub-memories, are set to output configuration 0. So, at
that point, changes to the output setup still affect all the input memories.
Select a new Output Configuration Number before making changes if they
are not supposed to affect all memories.
To create a new output configuration, select an input and input memory to be changed. Then
select a different output configuration number (e.g. MENU → IN → OUTSEL → 1 OK). For SD
inputs, there is a single output configuration selection. However, for HD capable inputs, each
memory has four resolution “sub-memories” (PC, 480i/480p/576i/576p, 720p, 1080i). The PC
memory is used for any single input resolution other than those listed above. For these HD
inputs, when Multiple-Output-Mode is enabled, the output-configuration numbers for each of
these is listed as four numbers separated by a “/” in the order shown above. The outputconfiguration selection can be made for all four submemories independent of input resolution.
NOTE:
Each HD input submemory must be configured independently
while the respective input resolution is active.
As an example consider a system with two sources, a DVD player and a set top box. It is desired
that the output resolution be 960p when the DVD is the source, 960p output when the source is
the satellite receiver and it is receiving SD material (480i, 480p, 576i or 576p), and 1080p when
the satellite receiver is receiving 720p or 1080i material. This can be achieved as follows (this
example assumes that the Lumagen is at factory default state and that the set top box is set to
output at the source’s native resolution – i.e. 480i or 480p for SD source, 720p for 720p source
and 1080i for 1080i source). Do the following steps:
1.
2.
3.
4.
5.
6.
7.
Select 960p output resolution and configure.
Select multiple-output mode
View a 720p or 1080i set top box source channel
Change the 720p submemory output configuration to 1 (see page 19)
Change the 1080i submemory output configuration to 1 (see page 19)
With a 720p or 1080i source from the satellite, select 1080p output and configure
Save the configuration
After this, when the DVD player is selected the output will be 960p. When the satellite is selected
and it is outputting 480i, 480p, 576i or 576p the output will be 960p. When the satellite is
selected and it is outputting 720p or 1080i the output will be 1080p.
© 2004-2007 Lumagen®, Inc.
34
Rev 1.14
VisionHDP™ User Manual and Installer Guide
Troubleshooting
Following are some common problems, along with suggestions to help resolve them. Also, check
the www.lumagen.com website for updated troubleshooting information.
No picture is visible:
•
Are all components properly connected to power, outlets switched on and all
components powered on?
•
Are all of the video cables connected to the correct inputs and outputs?
•
Is the menu visible when the MENU button is pressed? If it is, the problem is
with the inputs. If it is not, the problem is with the output connections or
settings.
•
Does the display support the programmed vertical and horizontal timings?
•
Is the correct output type (DVI-D or analog) selected?
•
Is the correct color-space (RGB or YPB PR ) selected?
•
For analog output, is the correct synchronization type and polarity selected?
•
For analog output, if used, are the separate horizontal and vertical sync signals
misconnected? For VGA breakout cables, the signal order at the BNC connectors
is generally red, green, blue, horizontal-sync and vertical-sync, but this may vary.
•
Is the source HDCP encrypted? Then the display must have HDCP capability.
•
If these steps fail to resolve the problem, contact your home theater specialist
for assistance.
A PC will not drive the DVI input of the Lumagen video processor:
•
The correct Lumagen DVI input must be selected while booting the PC for the PC
to be able to read the EDID data from the Lumagen video processor.
Objects appear to be too tall or too wide:
•
Make sure the video output aspect ratio is programmed correctly.
•
Make sure the correct input aspect ratio is selected.
•
Make sure input size is adjusted correctly.
•
Make sure the “television aspect ratio” setting is 16:9 in the setup menu of all
source devices that support this feature (DVD players, satellite receivers, etc.).
NOTE:
Choose 16:9 in the setup menu of the source
even if the display is not 16:9.
Colors appe ar incorrect:
•
Is the correct output color space (RGB, SD YPB PR , HD YPB PR ) selected?
•
If input 5 or 6, and color have a slight color “cast”: Has the input been calibrated
using the “Calibrate Component/RGB Input” command?
© 2004-2007 Lumagen®, Inc.
35
Rev 1.14
VisionHDP™ User Manual and Installer Guide
Updating Software
Lumagen video processor software can be upgraded by downloading update software from the
Lumagen website. To upgrade the software:
1. Download the update from http://www.lumagen.com/update_hdp.htm
2. Connect the Lumagen to the PC using the supplied “DB9F to DB9F null-modem
cable.”
3. Turn the Lumagen on.
4. Wait for at least 30 seconds after power on.
5. Double-click on the update program, select the appropriate serial port (default is
COM1), select the desired BAUD rate (default is 28.8K), and then click the START
button to begin the update. Desktop PCs generally work well with an update
BAUD rate of 57.6K BAUD, but a slower rate may be necessary.
6. When complete, the update program will generally shut the Lumagen processor
off. If the Lumagen processor remains on for several minutes after the download
has completed, remove and then reconnect power.
On rare occasions, such as a power interruption during update, the update may fail in a way that
prevents the Lumagen from functioning normally. For this case, there is a special recovery mode.
The Lumagen has a small boot program that runs when power is first connected. Since this “boot
kernel” is never updated, it remains intact even if an update fails after the system flash memory
is erased. To recover from a failed update:
1. Download the update from http://www.lumagen.com/update_hdp.htm
2. Disconnect power from the Lumagen.
3. Connect the Lumagen to the PC using the supplied “DB9F to DB9F null-modem
cable.”
4. Double-click on the update program, select the appropriate serial port, and select
the desired update BAUD rate, but do not click START.
5. Connect power to the Lumagen.
6. Within 10 seconds of connecting power to the Lumagen, click START in the
update program. Then quickly respond to its request for product type by clicking
the appropriate product name and selecting the OK button.
7. When complete, the update program will generally shut the Lumagen processor
off. If the Lumagen processor remains on for several minutes after the download
has completed, remove and then reconnect power.
If you experience difficulty, email [email protected] for assistance.
© 2004-2007 Lumagen®, Inc.
36
Rev 1.14
VisionHDP™ User Manual and Installer Guide
Specifications
Inputs
•
•
•
•
•
Eight standard inputs: Two composite, two SVideo, two SD/HD component/RGB and two
DVI-D/HDCP inputs.
Two optional SDI inputs.
Composite, SVideo and component inputs support NTSC (M, Japan, 4.43), PAL (B, D, G,
H, I, M, N, Nc) and SECAM (B, D, G, K, K1, L).
Component input color-space can be selected as SDTV or HDTV.
Absolute maximum rating is ±2 volts, referenced to case ground, for analog video inputs.
Processing
•
•
•
•
•
•
•
Per-pixel motion adaptive deinterlacing and inverse-telecine for SD and HD sources.
Proprietary scaling algorithms provide detail-enhancement.
Adjustments for sizing, black-level, contrast, color, Hue, color/Hue offset, and Y/C delay.
11-point parametric grayscale and gamma calibration.
Source aspect ratio selection of 4:3, 4:3 nonlinear-stretch, letterbox, 16:9 and 1.85.
Supports two zoom steps for each source aspect ratio.
Four independent configuration memories per input.
Output
•
•
•
•
•
•
•
•
•
•
DVI-D/HDCP and analog output resolution from 480p to 1080p (VisionHDP), or to 800p
(VisionDVI), at up to 60 Hertz.
The analog output supports RGB and YPR PB . Both formats support bilevel and trilevel
sync. RGB also supports discrete horizontal and vertical, or discrete composite, sync with
programmable polarities.
YPR PB output color-space can be selected as SDTV or HDTV.
For red, green, blue and Luma, the nominal output is 1.0 volts peak-to-peak with
embedded sync, and 0.7 volts otherwise. For PR and PB , the peak-to-peak is 0.7 volts,
including sync. Output levels are specified driving an external 75-ohm load.
Discrete sync outputs drive TTL levels into an external 75 ohm load.
Eight independent output configuration memories are supported.
Resolution is programmable from 480p to 1080p in scanline increments, plus 1080i.
Vertical refresh rate is programmable from 48 to 120 Hertz in steps of 0.01 Hertz. This
varies with resolution.
Output aspect ratio is programmable from 1.33 to 2.35 in steps of 0.01.
Output size and position are programmable in pixel increments .
Miscellaneous
•
•
•
•
•
•
Menu based setup.
Infrared remote or RS232 serial control interface.
Dimensions: 12” (W) by 5” (D) by 3.5” (H).
Power consumption: 25 watts nominal.
The power supply input rating is from 100 to 240 volts at 47 to 63 Hertz.
Silent operation (no fan).
© 2004-2007 Lumagen®, Inc.
37
Rev 1.14