1
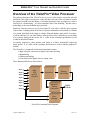
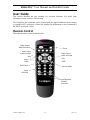
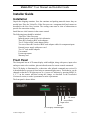
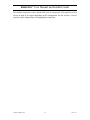
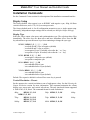
Vision Pro
Video Processor
User Ma nual
and Installer Guide
LEGAL NOTICES:
BEFORE USING THIS PRODUCT YOU MUST ACCEPT THE TERMS OF THE
LICENSE AGREEMENT. READ THE LICENSE AGREEMENT. IF IT IS MISSING,
CONTACT LUMAGEN, INC. TO OBTAIN A COPY. IF YOU DO NOT AGREE TO BE
BOUND THE TERMS OF THE LICENSE AGREEMENT, RETURN THE PRODUCT TO
THE POINT OF SALE IMMEDIATELY. BY DISASSEMBLING OR USING THE
PRODUCT, YOU ACCEPT ALL TERMS OF THE LICENSE AGREEMENT.
TO THE EXTENT NOT PROHIBITED BY LAW, IN NO EVENT SHALL LUMAGEN,
ITS SUPPLIERS, OR ITS DEALERS, BE HELD LIABLE FOR INJURY TO PERSONS
OR PROPERTY, ANY LOST REVENUE, LOST PROFIT, SPECIAL, INCIDENTAL,
INDIRECT, CONSEQUENCIAL, OR PUNITIVE DAMAGES, IMPAIRMENT OF OR
DAMAGE TO OTHER GOODS, HOWEVER CAUSED REGARDLESS OF THE
THEORY OF LIABILITY, RESULTING FROM THE USE OF, OR INABILITY TO USE,
THIS PRODUCT, EVEN IF LUMAGEN, ITS SUPPLIERS, OR ITS DEALERS, HAS
BEEN ADVISED OF THE POSSIBILITY OF SUCH DAMAGE.
LUMAGEN SHALL NOT BE LIABLE FOR OMISSIONS OR ERRORS IN ITS
DOCUMENTATION OR SOFTWARE. LUMAGEN RESERVES THE RIGHT TO MAKE
CHANGES TO ITS PRODUCTS AND DOCUMENTATION WITHOUT NOTICE.
Unless you are experienced in the installation and set-up of high-performance video
electronics, we suggest you hire a professional home-theater specialist to do installation and
configuration of this product. We recommend that you choose a professional who has been
certified by the Imaging Science Foundation™ (ISF).
This equipment has been tested and found to comply with the limits for a class B digital device, pursuant to
Part 15 of the FCC rules, Canadian ICES-003, and CISPR 22. These limits are designed to provide
reasonable protection against harmful interference in a residential installation. This equipment generates,
uses, and can radiate radio frequency energy and, if not installed and used in accordance with the
instructions, may cause harmful interference to radio communications. However, there is no guarantee that
interference will not occur in a particular installation. If this equipment does cause harmful interference to
radio or television reception, which can be determined by turning the equipment off and on, the user is
encouraged to try to correct the interference by one or more of the following measures:
- Reorient or relocate the receiving antenna.
- Increase the separation between the equipment and receiver.
- Connect the equipment into an outlet on a circuit different from that which the receiver is connected.
- Consult the dealer or an experienced radio/TV technician for help.
Unauthorized modifications to this equipment may void Lumagen’s limited warranty and the user’s
authority to operate this equipment.
Lumagen and VisionPro are trademarks of Lumagen, Inc. Other trademarks are the property of their
respective owners.
WARNINGS:
Do not defeat the safety features of the power supply or power cord, such as, but not limited
to, removing the ground pin connection.
Do not open, insert objects into, or spill liquid into, this equipment.
Do not block the cooling vents.
Do not program an output resolution that exceeds the maximum specified refresh rate of
the attached television, or projector.
Improperly set gray-bar intensity may accelerate screen burn-in. Consult a home-theater
specialist for help setting gray-bar intensity.
Vision Pro™ User Manual and Installer Guide
Table of Contents
Introduction ................................................................................................................... 1
Features ......................................................................................................................... 1
Overview of the VisionPro™ Video Processor ............................................................... 2
User Guide ..................................................................................................................... 4
Remote Control ......................................................................................................... 4
User Commands ........................................................................................................ 5
Power ...................................................................................................................... 5
Input Selection ........................................................................................................ 5
Configuration Memory Selection............................................................................. 5
Input Aspect Ratio Selection ................................................................................... 5
Image Zoom............................................................................................................ 5
On Screen Display................................................................................................... 5
Installer Guide ............................................................................................................... 6
Installation................................................................................................................. 6
Front Panel ................................................................................................................ 6
Rear Panel ................................................................................................................. 7
Rack Mounting.......................................................................................................... 9
Basic Setup − Step By Step...................................................................................... 10
Hints For Optimal Picture Quality......................................................................... 13
Command Format ................................................................................................... 14
Installation Commands ........................................................................................... 15
Display Setup ........................................................................................................ 15
Input Configuration ............................................................................................... 18
Miscellaneous Commands ..................................................................................... 20
Saving the Configuration....................................................................................... 23
Serial Interface ........................................................................................................ 24
Selecting the Output Resolution ............................................................................. 25
Troubleshooting ...................................................................................................... 26
Specifications ............................................................................................................... 27
Vision Pro™ User Manual and Installer Guide
Introduction
Thank you for purchasing the Lumagen VisionPro™ Video Processor. It has been
designed to offer great video processing quality, while providing the best available value.
We hope you find that the VisionPro Video Processor exceeds your expectations.
The two main sections of this manual are the User Guide and the Installer Guide. As
their names imply, the User Guide provides instructions on day-to-day usage, and the
Installer Guide provides initial setup information.
To simplify references to video projectors, direct-view televisions and rear-projection
televisions, they are all referred to as a “display” in this manual.
It is important to read and understand this manual, and the display’s specifications, before
programming the VisionPro Video Processor. Also, check the www.lumagen.com
website for possible updates.
Features
The Lumagen VisionPro™ Video Processor provides a cornerstone for the ultimate
home theater experience. It is designed to adapt to your home theater needs, rather than
having the designed-in limitations commonly found in today’s video processors.
Some notable features are listed below.
• Eight programmable inputs
• All inputs can be programmed as composite or SVideo. Four inputs can also be
programmed as component. Two inputs can also be programmed as pass-through
• Studio quality TV decoder with 10-bit A/D converters
• Adaptive comb-filter reduces cross-luma and cross-chroma artifacts
• 3:2 and 2:2 film pull-down frame-reconstruction
• Per-pixel motion-adaptive video deinterlacing
• Black-level, contrast, color, hue and Y/C delay calibration
• Two independent input/output configuration memories for each input
• Automatic selection of configuration memory based on input type.
• Detail enhancing scaler
• Programmable output resolution from 480p to 1080p, in scanline increments, plus
1080i
• Programmable output color format and synchronization type
• Programmable vertical refresh rate
• Programmable screen aspect ratio
• Over-sampled 10-bit digital-to-analog converters for the video output
• Pass-through sync-polarity processing for displays that require a specific sync polarity
• High-quality video input adaptor cables are provided
• Back-light infrared remote control with on-screen menu system
• RS232 serial interface
• Silent operation (no fan)
© 2003 Lumagen, Inc.
1
Rev 1.13
Vision Pro™ User Manual and Installer Guide
Overview of the VisionPro™ Video Processor
The primary functions of the VisionPro are to act as a video switch, convert the selected
interlaced video input to progressive video and then scale the video resolution to match
the optimal resolution for the display. Converting interlaced video to progressive video is
referred to as “deinterlacing.” It is also sometimes called “line-doubling,” but this term is
misleading, so the term deinterlacing is preferred.
Interlaced video has been in use for more than 50 years and is still the most common
video format. It displays half of the lines of picture information each sixtieth (or fiftieth)
of a second. Each half of the image is called a field and displays either all the even lines,
or all the odd lines. So, an entire image, called a frame, takes a thirtieth (or twenty-fifth)
of a second to display on the screen. An “i” suffix on the resolution specification is used
to indicate interlaced formats.
In contrast, progressive video presents each frame as a whole, dramatically improving
image quality. A “p” suffix on the resolution specification is used to indicate progressive
formats.
The VisionPro is comprised of four major functional sections:
• Input selection, conversion to digital, and video decoding
• Deinterlacing
• Filtering and scaling
• Conversion of the digital video to analog video
These functional blocks are shown below.
Input 1
Input 2
Input 3
Input 4
Input
A/D
and TV
Decoder
Deinterlace
Filtering
and Scaling
Input 5
Input 6
Digital-toAnalog
Conversion
Input 7
Input 8
RGB/
YPRPB
Passthrough
VisionPro Functional Block Diagram
© 2003 Lumagen, Inc.
2
Rev 1.13
Vision Pro™ User Manual and Installer Guide
Composite and SVideo inputs automatically select between NTSC, PAL and SECAM
formats. Component inputs accept standard-definition interlaced video. The selected
input is first sent to the TV decoder, which digitizes the video using a 10-bit analog-todigital (A/D) converter. The digitized data is then decoded into standard digital video.
The digital video is then deinterlaced into a progressive format. To accomplish this, four
input fields are used to determine the contents of each frame. For progressive sources, the
original frames are reassembled using 3:2, or 2:2, pull-down reconstruction. For video
sources, interlaced-video artifacts are detected on a per-pixel basis. Using the result of
this detection, the source pixels are combined into the best possible progressive image.
Proprietary scaling algorithms are used to scale the resulting progressive video to the
optimal size for the display. Unlike many video processors, which are limited to a few, or
even a single output resolution, the VisionPro is programmable from 480 to 1080 active
scanlines, in scanline increments. Output video is over-sampled to provide the best
possible image quality. Video oversampling provides the same benefit that audio
oversampling does for music CDs. That is, it produces the most-accurate reproduction of
the video signal possible.
As part of the scaling process, digital filtering is used to enhance the image detail. This
enhancement allows standard definition inputs, such as DVDs, to appear to be much
higher resolution, even when viewed on the large screen sizes common in home theaters.
Image enhancement combined with oversampling allows elements of the image to be
sharper and more precisely placed within the image. This leads to a more threedimensional look. In fact, a good way to judge the quality of any video processor and
display combination is to evaluate how “three-dimensional” the images appear for a
given video source. This is because edge enhancement makes the image appear to be
more focused, and improved edge placement gives better “depth cues” to the viewer.
When the digital processing is completed, video is once again converted to analog using
three over-sampled 10-bit digital-to-analog converters (DACs).
To accommodate the various video formats, the output type is programmable. It can be
set to YPRPB, RGBHV, RGBS or RGsB, with programmable sync type and polarities.
For the pass-through input, video is buffered using high-bandwidth video amplifiers. If
discrete sync inputs are used, they can optionally be converted to the same polarity as the
internally generated video sync outputs. This simplifies interconnection with displays that
require a specific sync polarity.
Control can be through an infrared remote control, or the serial RS232 port. Critical
display setup parameters have direct commands. Other functions use an on-screen menu.
The composite, SVideo and component inputs each have two independent configuration
memories, to allow options such as day/night specific modes.
© 2003 Lumagen, Inc.
3
Rev 1.13
Vision Pro™ User Manual and Installer Guide
User Guide
This section describes the user interface for everyday functions. For initial setup
information see the Installer Guide section.
The VisionPro user commands can be selected with the supplied infrared remote control,
or with the RS232 serial port. Contact the installer for information on user commands if
the RS232 serial port is used.
Remote Control
The infrared remote control is shown below.
Input Aspect
Ratio Selection
Power
Input Aspect
Ratio Selection
Step
Input Aspect
Ratio Selection
Step
Image
Zoom
OSD
Exit/Cancel
Activate Menu
Input
Selection
Configuration
Memory
Selection
© 2003 Lumagen, Inc.
4
Rev 1.13
Vision Pro™ User Manual and Installer Guide
User Commands
Power
Turn power on by pressing ON. Place the unit in standby-mode by pressing STBY.
Input Selection
The eight inputs are numbered from 1 to 8. To select an input, press the respective input
button (1 to 8).
Configuration Memory Selection
There are two configuration memories for each input, except pass-through. These are
referred to as type “A,” and type “B,” and are selected by pressing MEMA, and MEMB,
respectively. Each configuration memory is independent of all others. To allow these two
types to be used for mode selection (e.g. day/night), the type remains unchanged when a
new input is selected. (e.g. if input 2 type B is active pressing 3 selects input 3 type B).
Check with the installer to determine when to use each type.
Input Aspect Ratio Selection
There are four source aspect ratios: 4:3, letter-box, 16:9, and 1.85. They can be selected
by pressing the 4:3, LBOX, 16:9, or 1.85 buttons, respectively. The and arrow keys
can also be used to step through all four aspect ratios. Use 4:3 for standard full-screen
material. Use LBOX for “letterbox” material, such as analog-television movies shown
with black bars above and below the image. For material labeled as “Enhanced for 16:9
televisions” using 16:9 is generally best.
Some “Enhanced for 16:9 televisions” material is originally 1.85 aspect ratio stretched
vertically to 16:9. This material can be shown at the correct aspect ratio by selecting the
1.85 source aspect ratio.
Note:
Make sure the “television aspect ratio” setting is 16:9 in the setup menu of all source
devices that support this feature (e.g. DVD players), even if the screen is not 16:9.
Image Zoom
After the input aspect ratio has been selected, the image can be zoomed in to better fit the
screen. The zoom function uses the and arrow keys. Each arrow key zooms the
image in approximately 15%, up to 33% total. The arrow key reverses these steps.
On Screen Display
Pressing OK activates the On-Screen-Display (OSD), when the menu is inactive. The
OSD shows the active input, memory, input aspect ratio, and zoom. Pressing OK again
shows additional status information.
© 2003 Lumagen, Inc.
5
Rev 1.13
Vision Pro™ User Manual and Installer Guide
Installer Guide
Installation
Unpack the shipping container. Save the container and packing materials incase they are
needed later. Place the VisionPro Video Processor on a component shelf and connect as
described in the Rear Panel section. The cooling vents must be clear of obstructions to
provide for convection cooling.
Install the two AAA batteries in the remote control.
The following items should be included:
VisionPro Video Processor
Infrared remote control with 4 AAA batteries
Three RCA-female to BNC-male adaptors
Two S-Video to BNC-male adaptor cables
Two sets of three RCA-male to BNC-male adaptor cables for component inputs
External power supply with power cord
Two 19” rack mount adaptors
User manual
License agreement
Warranty card
Front Panel
The front panel has an LCD status display with backlight, along with power, input select
and aspect ratio select switches, plus an infrared sensor for remote control commands.
The LCD display is illuminated for a short time after infrared commands are received. It
is then darkened to prevent it from being an unwanted light-source. This behavior can be
changed so that the LCD light stays on as a “power-on” indicator by pressing MENU, 0,
9, 2, 5 on the remote and then saving the change, as described in the Installation
Commands section, to make it permanent to make it permanent.
The front panel is shown below.
VisionPro
Video Processor
POWER
INPUT
ASPECT
IR sensor
Aspect Ratio
Input select
Power
LCD display with backlight
© 2003 Lumagen, Inc.
6
Rev 1.13
Vision Pro™ User Manual and Installer Guide
Rear Panel
INPUT 2
Y
INPUT 4
C
Y
INPUT 8
INPUT 6
C
Y
C/ P R
PB
G/ Y
R/ C/ P R
B/ P B
OUTPUT SYNC
HSYNC
VSYNC
HSYNC
VSYNC
AUX
This device complies with part 15 of the FCC
Rules. Operation is subject to the following two
conditions: (1) This device may not cause harmful
interference, and (2) this device must accept any
interference received, including interference that
may cause undesired operation.
RS-232 CONTROL
POWER
Y
C
INPUT 1
Y
C
INPUT 3
Y
C/ P R
PB
G/ Y
INPUT 5
R/ C/ P R
B/ P B
HSYNC
VSYNC
G/ Y
INPUT 7
R/ PR
OUTPUT VIDEO
5V DC
10 W
B/ P B
No user serviceable parts
inside. Refer servicing to
factory authorized agent.
All connections are made on the rear panel, which is shown below.
The connections are:
• RS-232 CONTROL: If used, connect to an external RS232 control device.
• INPUT 1 to INPUT 8: Connect inputs as described below.
• OUTPUT VIDEO and OUTPUT SYNC: Connect to the display as described below.
• AUX: Auxiliary control (power-on output, or power-on input).
• POWER: Connect to external 5 volt DC power supply.
The RS232 serial port allows commands and status to be communicated with an external
device. This connector is the same as a PC DB9 serial port, except it does not use flowcontrol signals. If connecting to a PC, use a female-to-female DB9 null-modem cable.
All video connections use female BNC jacks for the best mechanical and electrical
connection. Because of this, conversion adaptors, or cables, are required for many source
components. Three RCA-female to BNC-male adaptors, two SVideo to BNC-male cables
and two sets of three RCA-male to BNC-male cables are provided. These are used for
composite, SVideo and component sources, respectively. The three RCA-female to BNCmale adaptors can also be used for another component input, if no composite inputs are
used. Additional cables may be purchased at the www.lumagen.com website. Note that
the type of each input must be programmed as described in the Input Type section.
The connections for each input depend on the source type. Connect composite video
sources to the Y input. Connect SVideo Luma (Y) and Chroma (C) channels to the Y (or
G/Y) and C (or C/PR or R/C/PR) inputs, respectively. Connect component Luma (Y),
chroma-red (PR) and chroma-blue (PB) channels to the Y (or G/Y), C/PR (or R/C/PR) and
PB (or B/PB) inputs, respectively.
Pass-through inputs, and the video output, support RGB and component video formats.
The pass-through input format must be compatible with the display input.
The appropriate cabling for the pass-through input, and video output, will vary depending
on the home theater configuration. If the pass-through source, or display, uses a VGA
connector, use a VGA to BNC “breakout” cable. If they use BNC connectors, use 75ohm video cables that have 75-ohm BNC-male connectors at both ends.
© 2003 Lumagen, Inc.
7
Rev 1.13
Vision Pro™ User Manual and Installer Guide
The auxiliary connector is also a female BNC jack. It always uses TTL signal levels, but
can be an input or an output depending on the configuration. See the Auxiliary Control
section for more information on configuring this connection.
© 2003 Lumagen, Inc.
8
Rev 1.13
Vision Pro™ User Manual and Installer Guide
Rack Mounting
For installation in a 19” rack, remove the two case screws on the left and right sides of
the unit. Place a rack-mount adaptor on each side and loosely replace screws through the
rack-mount adaptors and case cover. Align the rack-mount adaptor front tabs so that their
front edge is flush with the backside of the front panel and so they are vertically aligned
with the front panel. Retighten the screws.
It is suggested that a 1U space be left above and below the VisionPro for better cooling.
© 2003 Lumagen, Inc.
9
Rev 1.13
Vision Pro™ User Manual and Installer Guide
Basic Setup − Step By Step
The remote control setup sequence for common configurations is described below. For
additional information, see the Installation Commands section.
• Connect video cables and power. Turn all required components on.
• Set the output type. Use RGBHV (default) if display has an RGBHV input. Examples:
YPRPB trilevel:
MENU 1 1 OK
Component with embedded trilevel sync
YPRPB bilevel:
MENU 1 1
OK Component with embedded bilevel sync
RGB H−V−:
MENU 1 2 OK
RGB with discrete H− and V− sync (default)
RGB S−:
MENU 1 3 OK
RGB with discrete composite− sync
(default)
RGsB:
MENU 1 4
OK RGB with embedded bilevel sync
• Set the output resolution. For a fixed pixel device use the maximum resolution it
accepts, not its native resolution. This will improve the picture unless there is a major
design flaw in the fixed pixel display. The commands are as follows:
480p: MENU 2 1
540p: MENU 2 2
600p: MENU 2 3
720p: MENU 2 4
768p: MENU 2 5
840p: MENU 2 6
1080p: MENU 2 7
1080i: MENU 2 8
Other: MENU 3 value OK, where value is the resolution (e.g. 9, 0, 0)
• Set the vertical refresh rate (default = 59.94 Hz). For NTSC, use the default. For PAL,
using 50.00 Hz is optimal, but higher rates can be used to reduce flicker. Press
“MENU 4 value OK ” where “value ” is the vertical refresh rate in hundredths. For
example a vertical refresh rate of 59.94 is entered as MENU 4 5 9 9 4 OK.
• Set the output aspect ratio. Press “MENU 6 value OK ” where “value ” is the desired
screen aspect ratio in hundredths (16:9 is MENU 6 1 7 8, 4:3 is MENU 6 1 3 3)
• For MENU commands press the MENU button, use arrow keys to highlight the next
item in the list and press the OK button. An “→”denotes levels in the menu hierarchy.
• Set input types (Select input then MENU → IN → TYPE → (VID, SVID, YPRPB, PASS),
OK)
• Play a DVD calibration disc and select it as the input source. Typically either AVIA™
or Digital Video Essentials™ calibration DVDs are used.
• Display one of the test images with “overscan” markers. On AVIA one such test pattern
is the 200 TVL chart in the Advanced AVIA section. Select the appropriate input
aspect ratio so the test pattern is full-screen (e.g. 16:9 for a 16:9 screen aspect ratio).
• Adjust output size and position to minimize the amount of overscan. In other words, try
to get the entire active image on-screen. If the display has output size and position, use
it rather than the Lumagen controls. Otherwise use the following Lumagen commands:
For sizing: MENU → OUT → RES → SIZE → [ , , , ], OK
For positioning: MENU → OUT → RES → POS → [ , , , ], OK
© 2003 Lumagen, Inc.
10
Rev 1.13
Vision Pro™ User Manual and Installer Guide
• Adjust the input size and position using the Lumagen controls. When the Lumagen
input size controls are selected, the corner of the image being adjusted is moved toward
the center of the screen to simplify accurate calibration. First adjust the top-left of the
image so that all active pixels are on-screen. Then adjust the bottom-right.
For top-left: MENU → IN → ADJ → SIZE → TOPL → [ , , , ], OK
For bottom-right: MENU → IN → ADJ → SIZE → BTMR → [ , , , ], OK
• Recheck the output size and position and readjust as necessary.
• Set the output black pedestal. This specifies if output blank and black are the same (0
IRE), or if blank is a lower level than black (7.5 IRE). Typically this should be set to 0
IRE for fixed-pixel displays, and 7.5 IRE for CRT based displays. The command is:
For 0 IRE: MENU → OUT → LEVL → PDSTL → 0 IRE, OK
For 7.5 IRE: MENU → OUT → LEVL → PDSTL → 7.5 IRE, OK
• Set the input black pedestal. This specifies if input blank and black are the same (0
IRE), or if black is a higher level than blank (7.5 IRE). Typically this should be set to 0
IRE for component inputs, and to 7.5 IRE for composite and SVideo, but this is not
always the case. If uncertain, 0 IRE is the safest selection. The command is:
For 0 IRE: MENU → IN → ADJ → PDSTL → 0 IRE, OK
For 7.5 IRE: MENU → IN → ADJ → PDSTL → 7.5 IRE, OK
• Set the black level. Use the AVIA “PLUGE” which has vertical bars moving left and
right for 2 and 4 IRE (black is 0 IRE) and at 96 and 98 IRE (white is 100 IRE). For
calibrating black, look at the 2 and 4 IRE bars and adjust so the 4 IRE bar is visible and
the 2 IRE bar is barely visible. Note for many displays the black level will not be
constant between dark and light scenes, so some compromise may be needed. If the
display has a black level control (also called “brightness”), use it for the DVD input,
then use the Lumagen controls for differences in other inputs. The command is:
MENU → IN → COLR → BLCK → [ , ], OK
• Set the white level. Use the AVIA PLUGE pattern. For calibrating white, look at the 96
and 98 IRE bars and adjust so the 96 IRE bar is visible and the 98 IRE bar is barely
visible against white. If the display has a contrast level control, use it for the DVD
input, then use the Lumagen controls for differences in other inputs. The command is:
MENU → IN → COLR → CONT → [ , ], OK
• Set Color and Hue using the Lumagen controls. Use the Advanced AVIA color test
pattern. Follow instructions on the AVIA disc for using the blue filter and the color bars
for use with the blue filter.
For color: MENU → IN → COLR → COLR → [ , , , ], OK
For bottom-right: MENU → IN → COLR → HUE → [ , , , ], OK
• Set Y/C Delay (formerly called CPHASE). One pattern to use is the Y/C-Delay pattern
in the Special Test section of Advanced AVIA. On the right half of the image there are
red and yellow vertical bars. Adjust the yellow-red transitions to minimize any black.
MENU → IN → ADJ → YC-DLY → [ , ], OK
• The grayscale “color-of-gray” should be calibrated by a video technician. Have them
contact Lumagen for the service codes to access the five-point color of gray calibration.
© 2003 Lumagen, Inc.
11
Rev 1.13
Vision Pro™ User Manual and Installer Guide
• Copy the DVD configuration to all configuration memories (MENU → IN → COPY →
OK).
• Calibrate other inputs, if desired.
• Name the inputs, if desired (MENU → IN → NAME → OK and follow directions).
• Set power-on message, if desired (MENU → MISC → POWR → MSG → [ , , , ], OK)
• Lock the configuration, if desired (MENU → MISC → LOCK → LOCKED, OK)
• Save the configuration (MENU → SAVE → SAVE, OK)
© 2003 Lumagen, Inc.
12
Rev 1.13
Vision Pro™ User Manual and Installer Guide
Hints For Optimal Picture Quality
• Proper calibration, along with the use of high-quality cables, is as important for
attaining the best picture as are deinterlacing and scaling. If you don’t have one,
purchase a DVD setup disc, such as AVIA™, or Digital Video Essentials™ and watch
the training lessons provided.
• If possible, use a power conditioner for the video source, video processor and the
display. Power line noise is at least as important an issue for video as it is for audio.
• For fixed-pixel devices, use RGBHV from the Lumagen to drive BNC inputs, when
available, to minimize noise. For RGB, “Luma noise” is distributed across the red,
green and blue channels but for component, Luma noise is all on the Y (Luma) channel.
So, RGB sources can show lower noise levels since the weighting of the three channels
for “Luma” as perceived by the viewer tends to filter out some of the Luma noise.
• Contrary to popular opinion, most fixed-pixel displays look best running their input at a
resolution higher than their native resolution, such as 1024p, and in some cases 1080i,
for a 720p or 768p display. This is because the process of “down-sampling” the higher
resolution to the display’s native resolution can filter out some of the noise and provide
more detail. Note: Rules for display of Video are completely different than for the
display of PC data. For display of PC generated data, such as spreadsheets, the PC
resolution should be set to match the native resolution of the display.
• Avoid running video signals through the video switch inside receivers, as these tend to
degrade video quality. The rule of thumb for a video switch is to have 10 times the
bandwidth of the video being switched. This equates to 70 MHz for SDTV and 300
MHz for HDTV switching.
• Component inputs on some RPTVs and projectors do not work with standard width
HSync pulses. When using component video to drive the display, if there is a “green
cast” the likely cause is a design problem in the circuitry inside the display. Changing
to bilevel sync, and/or making the HSync pulse narrower with the Lumagen HSync
Width command (MENU 0 9 4 0) can help eliminate this problem.
• A system’s “ground loop noise” can cause problems. This shows as a screen-width
horizontal-band of intensity variation. Since the Lumagen case “floats” it may need to
be grounded to the video source and/or display.
• Component DVD sources provide the best standard-definition picture quality, but
SVideo sources are often a bigger challenge and therefore can show more improvement
using Lumagen. Since many satellite receivers, and other video sources, only have
composite and SVideo outputs, this improved SVideo performance is important for
many installations.
• Memory A (MEMA) and memory B (MEMB) can be used to have two independent
configurations, such as for day (bright room) and night (dark room). One difference for
this example is that the black level will be set higher for daylight viewing than for
viewing in a darkened room. To program MEMB to be different, first setup MEMA
normally, use the input copy command to copy to MEMB, than adjust MEMB as
desired. Remember to save changes.
© 2003 Lumagen, Inc.
13
Rev 1.13
Vision Pro™ User Manual and Installer Guide
Command Format
VisionPro commands are selected with the supplied infrared remote, or the RS232 serial
port. To prevent possible command conflict, only one of these inputs should be used at a
time.
The infrared remote control command notation is described below:
• Remote buttons are named as shown on the remote in a bold font.
Example: MENU.
• For comma separated lists, press the buttons in the sequence shown.
Example: For the list RGBHV, OK, press RGBHV then OK.
• For parenthesized lists, select one button from the list.
• For square-bracketed lists, press as needed.
Example: For the list [ , , , ], press the arrow keys as needed.
• For menu commands press the MENU button. The , and arrow keys are used to
select the function. The arrow key is used to enter sub-menus. This is shown as:
MENU → MenuItem → MenuItem.
• Numerical entries are listed as value. While entering the value, the arrow key acts as
a backspace key.
• Some commands are activated immediately. Other commands must be explicitly
accepted by pressing OK. If needed, OK is listed as part of the command.
• Pressing EXIT cancels a partially completed command. If the menu system is active,
EXIT returns to one level higher in the menu system.
• There are two independent configuration memory types for each input (MEMA, and
MEMB). The input setup and output resolution/timing can be set independently for
each memory. Note that, initially, there is a single output mode for all configuration
memories. To program an input memory, first select the input, then press the
appropriate configuration memory button, and use the menu system to configure.
• Some menu commands are only available when their respective input is selected.
Example: Calibration commands, such as contrast, are not available when the passthrough input is selected.
• Before changes are saved, they can be discarded by entering standby mode.
• Save the configuration after making changes, or they will be lost when entering STBY
mode.
• To prevent unintended configuration modifications, after saving, use the lock
command.
If the serial port is used, the ASCII character associated with the respective remote
control button must be sent. See the Serial Interface section for information on serial
commands.
© 2003 Lumagen, Inc.
14
Rev 1.13
Vision Pro™ User Manual and Installer Guide
Installation Commands
See the Command Format section for a description of the installation command interface.
Display Setup
The factory-default video output is set to RGBHV with negative sync, 480p, 60-Hertz
vertical-refresh-rate, and a 1.78 (16:9) screen aspect-ratio.
The factory-default mode is for all configuration memories to use a single output setup.
Alternately, independent output settings can be selected (see Multiple Output Settings).
Display Type
Select the video output color-space and synchronization type. The selection takes effect
immediately. The arrow keys are then active and have immediate effect. Press the OK
key when done to prevent the arrow keys from continuing to change the sync type.
RGBHV: MENU, 1, 2, [ , ], [ , ], OK
sets both H and V sync as negative (default)
sets both H and V sync as positive.
sets negative H sync. If needed, select after the or key.
sets positive H sync. If needed, select after the or key.
RGBS: MENU, 1, 3, [ , ], OK
sets negative composite sync (default)
sets positive composite sync
RGsB: MENU, 1, 4, [ , ], OK
sets embedded bilevel sync
sets embedded trilevel sync (default)
YPRPB: MENU, 1, 1, [ , ], OK
sets embedded bilevel sync
sets embedded trilevel sync (default)
Default: The respective default is selected if no arrow key is pressed.
Vertical Resolution - Presets
Set the output active vertical resolution to one of eight preset values. See the Selecting the
Output Resolution section for more information. This command maintains the current
display type, aspect ratio, and vertical refresh rate. The only interlaced format supported
is 1080i at 60, or 50, Hertz. The command format for each resolution is:
MENU, 2, 1, OK
MENU, 2, 3, OK
720p:
MENU, 2, 4, OK
MENU, 2, 6, OK
1080p:
MENU, 2, 7, OK
480p:
© 2003 Lumagen, Inc.
540p: MENU, 2, 2, OK
600p:
768p: MENU, 2, 5, OK
840p:
1080i: MENU, 2, 8, OK
15
Rev 1.13
Vision Pro™ User Manual and Installer Guide
Vertical Resolution - Programmable
This command allows the output active vertical resolution to be set from 480p to 1080p,
in scanline increments. See the Selecting the Output Resolution section for more
information. This command maintains the current display type, aspect ratio, and vertical
refresh rate. Out of range values are ignored. The command format is:
MENU, 3, value, OK
or
MENU → OUT → RES → VRES → value, OK
Vertical Refresh Rate
Set the output vertical refresh rate in the range of 48, to 75, Hertz (entered in hundredths
as 4, 8, 0, 0 to 7, 5, 0, 0). See the Selecting the Output Resolution section for more
information. This command maintains the current display type, aspect ratio and vertical
active resolution. The display must support the vertical resolution and vertical rate
specified. Out-of-range values are ignored. The command format is:
MENU, 4, value, OK
or
MENU → OUT → RES → VRATE → value, OK
Horizontal Refresh Rate
Note:
Do not use this command unless the display requires a rate different than
the interpolated rate and the correct horizontal refresh rate is known.
Set the horizontal refresh rate in Hertz. The vertical total scanline count is adjusted to
achieve the specified horizontal frequency, if possible. The active vertical resolution is
not changed. Out-of-range values are ignored. The command format is:
MENU, 5, value, OK
or
MENU → OUT → RES → HRATE → value, OK
Horizontal Sync Pulse Width
Some displays require a narrower horizontal sync pulse than standard SMPTE timing.
This command allows the HSync pulse width to be controlled. The command format is:
MENU, 0, 9, 4, 0 → [ , ], OK
Output Size
Note:
Generally, this command should not be used. Instead use the display’s size controls.
Change the percentage of the scanlines that contain active video, and the percentage of
each scanline that contains active video. Only the active times are changed. The vertical
total-scanline-count and horizontal total-pixel-count are not changed. An example use for
this command is to match fixed display timing requirements. This command can also be
used to match the pass-through input timing.
© 2003 Lumagen, Inc.
16
Rev 1.13
Vision Pro™ User Manual and Installer Guide
The command format is:
MENU → OUT → RES → SIZE → [ , , , ], OK
Output Position
Note:
Generally, this command should not be used. Instead use the display’s position controls.
Reposition the active display. An example use for this command is to match fixed display
timing requirements. This command can also be used to match the pass-through input
timing.
The command format is:
MENU → OUT → RES → POS → [ , , , ], OK
Aspect Ratio.
Select the screen aspect ratio. The screen aspect ratio range is 1.33 (4:3) to 2.35 and is
entered in units of hundredths (e.g. 2.35 is entered as 2, 3, 5). See the Selecting the
Output Resolution section for more information.
The command format is:
MENU, 6, value, OK
or
MENU → OUT → ASPECT → value, OK
Graybar Intensity
Note:
Consult a home theater specialist for assistance setting the graybar intensity.
Some displays have significant burn-in issues (e.g. CRT and Plasma), while others do not
(e.g. DLP). Some degree of burn-in will occur on any susceptible display, but this
command can help minimize it by allowing the intensity of graybars to be adjusted.
The command format is:
MENU → OUT → GBAR → SIDE → [ , ], OK
Output Black Pedestal
This command specifies if there is an output black pedestal. The default is 0 IRE, but
some projectors require the 7.5 IRE setting. The command format is:
MENU → OUT → LEVL → PDSTL → (7.5 IRE, 0 IRE), OK
Output Mode
When set to factory-defaults, changes to the output settings affect all configuration
memories. It is possible to have independent output settings for each configuration
memory by setting the output to independent mode (INDEP).
Some source devices can dynamically switch their output type between NSTC, PAL and
SECAM. To allow precise calibration for these formats, two additional output modes
(AUTOA/B and AUTOINDEP) are provided, and are similar to the SAME and INDEP modes,
© 2003 Lumagen, Inc.
17
Rev 1.13
Vision Pro™ User Manual and Installer Guide
respectively. For these modes, MEMA is automatically selected for 59.94 Hertz sources
and MEMB is selected for 50 Hertz sources. In both AUTOA/B and AUTOINDEP modes
MEMA and MEMB output modes are independent, and must be independently
configured. The command format is:
MENU → OUT → MODE → (SAME, INDEP, AUTOA/B, AUTOINDEP), OK
Copy Output Settings
If the output is set to independent mode (INDEP or AUTOINDEP), this command copies the
output setup (resolution, etc.) from the active memory, to the selected memory, or
memories. This allows the display setup to be quickly copied for use with other
configuration memories. The command format is:
MENU → OUT → COPY→ (ALL, ALLMEMA, ALLMEMB, 1A–3A, 1B–3B), OK
Input Configuration
NOTE: Remember to save after completing configuration.
Each input must have its source type programmed (unless the factory default is correct).
Each input should be calibrated. Calibrate the DVD input first, using a DVD calibration
disc. Then, copy this configuration to all the other configuration memories, using the
input copy command (see the Copy Input Settings section for more information). The
other inputs can then be calibrated.
Configuration Memories
The setup for each input configuration memory is independent. For example, if memory
type A for an input is meant to be the same as memory type B for that same input, the
input configuration must be copied from one to the other.
To program an input memory, first select the input, then press the appropriate
configuration memory button. Then use the menu system to configure.
Input Type
The source type must be set properly for each input. To program the input type, select an
input, then program its type. Note that all inputs support composite (VID) and SVideo
(SVID), four inputs (4 to 8) support component (YPRPB) and two inputs (7 and 8) support
pass-through (PASS). Factory defaults set inputs 1 to 4 as SVideo, inputs 5 and 6 as
component, and inputs 7 and 8 as pass-through.
The command format is:
MENU → IN → TYPE → (VID, SVID, YPRPB, PASS), OK
© 2003 Lumagen, Inc.
18
Rev 1.13
Vision Pro™ User Manual and Installer Guide
Color and Intensity
Note:
For the first input calibrated, when possible, use the display’s black-level and contrast
adjustments. Then use these controls to correct for differences between inputs. Some
iteration between the display’s controls and these controls may be necessary.
Set the black-level, contrast, color or hue. The command format is:
MENU → IN → COLR → (BLCK, CONT, COLR, HUE) → [ , ], OK
Input Sizing
Input sizing can be used to compensate for differences in active input size. The size
command does not affect the video output size or position. Rather, it affects the size and
position of the input image within the previously defined video output.
Use the size TOPL command to select the first active pixel. This moves the input image,
removing any portion of the input that is moved beyond the top-left corner of the output.
Use the size BTMR command to select the last active pixel. This scales the input, and has
the effect of moving the bottom-right corner of the input. Portions of the image that are
moved beyond the bottom-right corner of the output are removed. For the size TOPL and
BTMR commands, the appropriate image corner is moved toward the center of the screen,
to allow the size to be set accurately.
The size SIZE and POS (position) commands can be used in conjunction with, or in place
of, the size TOPL and BTMR commands. The size SIZE command scales both horizontally
and vertically. The size POS command moves the input image like size TOPL. However,
the image is shown in its normal position, without repositioning it toward the center as
with the size TOPL command.
Select the scanline using the and
arrows. The command format is:
arrows, and the scanline pixel using the
and
MENU → IN → ADJ → SIZE → (TOPL, BTMR, SIZE, POS) → [ , , , ], OK
Y/C Delay (Formerly called CPHASE)
Adjust the horizontal Chroma timing in relation to Luma. It is suggested that the Y/Cdelay calibration image on the Video Essentials™ disk (title 17, chapter 24), or the AVIA
Y/C-delay test image in the Special Tests section of Advanced AVIA, be used to
calibrate the Chroma phase.
MENU → IN → ADJ → YC-DLY → [ , ], OK
Sharpness
This command is used to adjust the sharpness of the input image. It is almost always best
to leave this at the factory default setting, especially for SVideo and component inputs.
The command format is:
MENU → IN → ADJ → SHARP → [ , ], OK
© 2003 Lumagen, Inc.
19
Rev 1.13
Vision Pro™ User Manual and Installer Guide
Input Black Pedestal
Note:
For best video quality, the Input Black Pedestal must be set correctly. For Composite and
SVideo sources, 7.5 IRE is generally correct. Many component sources use 0 IRE. Check
the manual of the source device to be sure which setting is correct. If unsure, use 0 IRE.
This command specifies if there is an input black pedestal. The command format is:
MENU → IN → ADJ → PDSTL → (7.5 IRE, 0 IRE), OK
Input Black Enhance
This command expands the lowest 2% of the input range (0 to 2 IRE) slightly. This can
help to make black backgrounds appear darker verses the 4 IRE level used in some
PLUGE patterns. The command format is:
MENU → IN → ADJ → ENHNCE → (BLACK, OFF), OK
Pass-through Sync Processing
Select the pass-through sync processing mode. If processing is enabled, pass-through
sync signal polarity is processed to match internally generated sync levels. In this case,
the pass-through sync type must match the internally generated sync type. If pass-through
sync buffering is selected, the sync signals are simply buffered.
MENU → IN → ADJ → SYNC → (PROCESS, BUFFER), OK
Input Name
Each input configuration memory can be named. Follow the on-screen directions. The
and arrows select which input to change and then which character to change. The
and arrows change the selected character. The command format is:
MENU → IN → NAME
Copy Input Settings
Copy the input setup (contrast, etc.) from the active memory, to the selected memory, or
memories. Since the parameters for the first input calibrated will likely be closer to
optimal than the factory defaults, this command can speed up the calibration process.
The command format is:
MENU → IN → COPY → (ALL, ALLMEMA, ALLMEMB, 1A–8A, 1B–8B), OK
Miscellaneous Commands
On-Screen-Display Enable
Enable or disable On-Screen-Display (OSD) activation after user commands. If enabled,
the OSD shows the selected input, input aspect ratio, and zoom.
MENU → MISC → OSD → (OFF, ON), OK
© 2003 Lumagen, Inc.
20
Rev 1.13
Vision Pro™ User Manual and Installer Guide
Lock the Configuration
The configuration can be locked to prevent unintended changes. When locked, the input
selection keys function normally, but setup parameters are fixed. The command format is:
MENU → MISC → LOCK → (UNLOCKED, LOCKED), OK
The following command can unlock the configuration memories without being able to
see the screen.
MENU 0 9 1 5
Same as MENU → MISC → LOCK → UNLOCKED, OK
Initial Power State
When power is first connected to the unit, it can be set to turn on (ON), or it can start in
standby mode (STBY). Note, ON and STBY commands are not affected. The command
format is:
MENU → MISC → POWR → AUTO → (ON, STBY), OK
Power-On Message
A user generated text message can be displayed when power is applied, or the ON key is
pressed. The and arrows select which character to change. The and arrows change
the selected character. The command format is:
MENU → MISC → POWR → MSG → [ , , , ], OK
Test Patterns
Warning:
Test patterns can cause screen burn-in. Do not leave
test patterns displayed for more than a few seconds.
There are several test patterns available. The and arrows select the test pattern. The
intensity can be adjusted from 10 to 100 IRE, in 10 IRE steps, using the and arrows.
The command format is:
MENU → MISC → TPAT → OK, [ , , , ]
Genlock
Genlock puts the input and output frames in “lock-step.” When enabled, genlock makes
sure all input frames arrive at the output a fixed time later. In other words, no frames are
dropped and none are repeated. Very few people can notice any difference whether
Genlock is enabled or disabled (default). Note: Not all displays are capable of
synchronizing to the slightly different timing Genlock produces. If the image is not
stable, or not visible, disable Genlock. To enable Genlock:
MENU 0 9 8 1
Toggle genlock. Default = off. (can be saved)
To check the status of Genlock:
MENU 0 9 8 2
Genlock status (off, locked, unlocked)
© 2003 Lumagen, Inc.
21
Rev 1.13
Vision Pro™ User Manual and Installer Guide
Menu Timeout
The time the MENU is displayed after the last action can be changes from normal to long
with the following command:
MENU 0 9 0 5
Toggle menu timeout. Short (default) or long. (can
be saved)
Power Indication
By default the front panel LCD light is illuminated for a short time after a command. This
behavior can be changed so that the LCD light is on while the unit is on. The command
is:
MENU 0 9 2 5
Toggle light as "activity" (default) or "power."
Zoom Step
A smaller zoom step of about 5% can be selected instead of the normal step of about
15%. The command format is:
MENU 0 9 2 3
Toggle zoom-step between default and 5%.
Sidebar Pan
To help prevent screen burnin with 4:3 sources on widescreen displays, the output can be
slowly moved left and right a fractional pixel step every few minutes. While not easily
visible to the viewer, this will help minimize the visibility of screen burn-in. The
command is:
MENU 0 9 8 7
Toggle Sidebar-pan for antiburn. Default = off.
Auxiliary Control
The auxiliary control connector can be used to turn the VisionPro on (PWRON) when the
input is asserted to a TTL high level, or it can be asserted as an output to turn an external
device on (SWTCHOUT) when the VisionPro power is on. The AUX connector always uses
TTL signal levels. The command format is:
MENU → MISC → POWR → AUX → (OFF, PWRON, SWTCHOUT), OK
© 2003 Lumagen, Inc.
22
Rev 1.13
Vision Pro™ User Manual and Installer Guide
Saving the Configuration
Note:
Power must be maintained during save and undo commands. If power is interrupted, the
command may fail to complete. If this occurs, the unit will revert to factory defaults.
Save
Note:
If a save command is not executed, any changes will be lost when the
unit is put into standby power mode, or if power is interrupted.
Permanently save the current configuration. Note that, once saved, the configuration is
retained even if the unit is disconnected from power. The command format is:
MENU → SAVE → SAVE, OK, OK
Implicit: Configuration from previous save is retained to allow one-level of save-undo.
Save Undo
Revert to the configuration over-written by the last save. Repeating the save undo
command toggles between the last two saved configurations.
Hint:
To discard unsaved changes, temporarily enter standby mode.
The command format is:
MENU → SAVE → UNDO, OK, OK
Revert To Factory Settings
Sets all parameters to factory defaults, but does not save them into nonvolatile memory.
MENU, 0, 9, 9, 9
or
MENU → SAVE→ FCTRY, OK
It is possible to reset only the current output resolution to default settings, while leaving
input setting unchanged. The command is:
MENU 0 9 9 8
resolution
© 2003 Lumagen, Inc.
Reset current output (only) to defaults for current
23
Rev 1.13
Vision Pro™ User Manual and Installer Guide
Serial Interface
The RS232 serial interface can be used to enter commands using the same command
format as the infrared remote. The serial rate is 9600 BAUD with 8 data bits, no parity bit
and one stop bit. No hardware or software flow-control is used. The following table
defines the ASCII characters used along with their functions. Each ASCII character is
entered without pre-amble or post-amble. Note, all commands except “power on” are
ignored in standby mode.
ASCII
%
$
M
X
<enter>
<
>
v
^
0-9
n
l
w
j
a
b
z
Y
R
S
T
A
B
C
D
E
F
G
I
V
~
H
=
Remote Function
ON
Power on
STBY Power to standby
MENU Activate menu
EXIT
Exit. Often acts as a cancel key
OK
Accept command (uses the PC “ENTER” keycode)
Left arrow (“less-than” key on keyboard)
Right arrow (“greater-than” key on keyboard)
Down arrow (lower-case v, as in “vote”)
Up arrow (shift 6 key on keyboard)
Enter a digit 0 through 9
0-9
4:3
Input is 4:3 format
LBOX Input is 4:3 letter-box format (lower-case l, as in “letter”)
16:9
Input is “Enhanced for 16:9 televisions” format
1.85
Input is 1.85 format (lower-case j, as in “jump”)
MEMA Select MEMA
MEMB Select MEMB
Freeze-frame. Any other key resumes
Output type is YPRPB (component)
Output type is RGBHV. <enter> completes command
Output type is RGBS. <enter> completes command
Output type is RGsB. <enter> completes command
Select Vertical Resolution = 480p
Select Vertical Resolution = 540p
Select Vertical Resolution = 600p
Select Vertical Resolution = 720p
Select Vertical Resolution = 768p
Select Vertical Resolution = 840p
Select Vertical Resolution = 1080p
Select Vertical Resolution = 1080I
Set Vertical Resolution (e.g. V960 <enter>, for 960p)
Set Vertical rate (e.g. ~5994 <enter>, for 59.94 Hz)
Set Horizontal Rate (e.g. H45000 <enter> for 45KHz)
Set Output aspect ratio (e.g. =178 <enter> for 16:9 displays)
© 2003 Lumagen, Inc.
24
Rev 1.13
Vision Pro™ User Manual and Installer Guide
Selecting the Output Resolution
The Society for Motion Picture and Television Engineers (SMPTE) standards for 480p,
720p, 1080i and 1080p are used as reference points for output timing. Other resolutions
and vertical-refresh-rates are derived from these standards.
It is important that the optimal output resolution is selected. For fixed-pixel devices, such
as DLPs, and LCDs, the output resolution should be set to the native vertical resolution.
For CRT projectors, the best choice is more involved, since it depends on tube size,
focus, phosphor spot size, and video-bandwidth. Some suggested starting points, based
on tube size, are 720p for 7 inch, 840p for 8 inch, and 960p for 9 inch. Consult a hometheater specialist for help selecting the optimal resolution.
High-definition direct-view and rear-projection televisions typically support 480p and
1080i. Some also support 540p or 720p. If 720p is supported, it is the recommended
resolution, because 1080i suffers from display interlace-artifacts that reduce the
perceived vertical resolution to roughly the same as 720p provides. Since the output is
over-sampled horizontally, 720p provides nearly equivalent perceived vertical and
horizontal resolution as 1080i, and it eliminates interlaced-display artifacts. If 720p is not
available, 1080i is most likely best for these displays since, even though it has interlaceartifacts, it eliminates the visible line structure often apparent at 480p and 540p.
A vertical-refresh-rate of 59.94-Hertz works well for NTSC, and PAL M, material. For
PAL (except PAL M) and SECAM, 50-Hertz may provide the best picture. Note that the
selected rate must be supported by the display at the selected vertical resolution.
Note:
The maximum resolution depends on the vertical rate and on the output aspect ratio.
For an output aspect ratio of 1.33, the maximum resolution is 1080p at all vertical rates.
At a 1.78 output aspect ratio, the maximum resolution is 1080p at 60 Hertz, 900p at 72
Hertz, and 840p at 75 Hertz. For an output aspect ratio of 2.35, the maximum resolution
is 768p at 60 Hertz, 640p at 72 Hertz, and 600p at 75 Hertz. The software attempts to
prevent illegal combinations of resolution, vertical rate and aspect ratio, but given that
there are millions of combinations, not all cases could be checked. If noise is observed on
the screen, reduce the resolution, aspect ratio, or vertical rate.
The minimum output resolution is 480p. For NTSC, and PAL M, this is also the
minimum suggested resolution for output aspect ratios of ≥1.78. For other formats the
minimum suggested resolution is 576p for output aspect ratios of ≥1.78. For output
aspect ratios of less than 1.78, the suggested minimum output resolution as the aspect
ratio approaches 1.33 is proportionally increased to 640p for NTSC, and PAL M, and
768p for other formats. Lower resolutions work with these smaller aspect ratios, but
material that is “enhanced for 16:9 televisions” will be set to the minimum scale factor of
1.0 and cropped to fit the screen. Note, for these calculations, 1080i is the same as 540p.
© 2003 Lumagen, Inc.
25
Rev 1.13
Vision Pro™ User Manual and Installer Guide
Troubleshooting
Following are some common problems, along with suggestions to help resolve them.
Also, check the www.lumagen.com website for updated troubleshooting information.
No picture is visible:
Are all components properly connected to power and power outlets switched on?
Are all components powered on?
Are all of the video cables connected to their respective inputs and outputs?
Is the menu visible when the MENU button is pressed? If it is, the problem is with
the inputs. If it is not, the problem is with the output connections or settings.
Does the display support the programmed vertical and horizontal timings?
Is the correct output color space (RGB or YPBPR) selected?
Is the correct synchronization type and polarity selected?
If used, are the separate horizontal and vertical sync signals misconnected? For
VGA breakout cables, the signal order at the BNC connectors is generally red,
green, blue, horizontal-sync and vertical-sync, but this may vary.
If there is still no picture, press MENU, 0, 9, 9, 9 on the remote to reset
parameters to factory defaults. Then connect an analog VGA computer monitor to
the video output. After the monitor warms up, press the MENU button on the
remote control. The on-screen menu should be visible. Select each input in turn to
make sure they are working properly. If the inputs work properly, the problem is
with the display, display cabling, or output setup.
If these steps fail to resolve the problem, contact a home theater specialist for
additional assistance.
Objects appear to be too tall or too wide:
Make sure the video output aspect ratio is programmed correctly.
Make sure the correct input aspect ratio is selected.
Make sure input size is adjusted correctly.
Make sure the “television aspect ratio” setting is 16:9 in the setup menu of all
source devices that support this feature (DVD players, satellite receivers, etc.),
even if the screen is not 16:9.
Colors are way strange:
Is the correct output color space (RGB or YPBPR) selected?
© 2003 Lumagen, Inc.
26
Rev 1.13
Vision Pro™ User Manual and Installer Guide
Specifications
Inputs
Eight programmable inputs. All inputs can be composite or SVideo. Inputs 4 to 8 can also
be selected as component. Inputs 7 and 8 can also be selected as pass-through.
Composite and SVideo inputs support NTSC (M, Japan, 4.43), PAL (B, D, G, H, I, M, N,
Nc) and SECAM (B, D, G, K, K1, L).
Component inputs accept interlaced SDTV YPRPB video.
The TV decoder analog-to-digital conversion uses 10-bit oversampling A/D’s.
Three, or four, line adaptive comb-filters for Luma and Chroma reduce cross-luma and
cross-chroma artifacts.
The pass-through inputs are actively buffered, have a nominal bandwidth of 300 MHz
and a ±1.1 volt nominal input/output range.
All video inputs use BNC female jacks and are terminated into 75 ohms.
Absolute maximum rating is ±2 volts for video inputs. For other inputs it is +3.3, –0
volts, except for the RS232 port which is ±12 volts.
Processing
Per-pixel motion adaptive deinterlacing with 3:2 and 2:2 pulldown frame reconstruction.
Proprietary scaling algorithms provide detail-enhancement.
Adjustments for sizing, black-level, contrast, color, hue, and Y/C delay.
Source aspect ratio selection of 4:3, letterbox and 16:9 are supported.
Supports two zoom steps for each source aspect ratio.
There are two independent configuration memories per input.
Output
The output supports both RGB and YPRPB, using female BNC jacks.
Both formats support bilevel and trilevel sync. RGB also supports discrete horizontal and
vertical, or discrete composite, sync with programmable polarities.
YPRPB output uses the HDTV color-space.
For red, green, blue and Luma, the nominal output is 1.0 volts peak-to-peak with
embedded sync, and 0.7 volts otherwise. For PR and PB, the peak-to-peak is 0.7 volts,
including sync. Output levels are specified driving an external 75-ohm load.
Discrete sync outputs drive TTL levels into an external 75 ohm load.
Two independent output configuration memories per input.
Resolution is programmable from 480p to 1080p in scanline increments, plus 1080i.
Vertical refresh rate is programmable from 48, to 75, Hertz in steps of 0.01 Hertz.
Output aspect ratio is programmable from 1.33 to 2.35 in steps of 0.01.
Output size and position are programmable in pixel increments.
Miscellaneous
Menu based setup.
Infrared remote, or RS232 serial control interface.
Dimensions: 17” (W) by 10” (D) by 3.5” (H).
Power consumption: 10 watts nominal. Standby mode: 2 watts.
The power supply input rating is from 100 to 240 volts at 47 to 63 Hertz.
Silent operation (no fan).
© 2003 Lumagen, Inc.
27
Rev 1.13