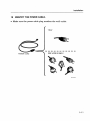
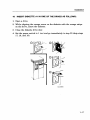
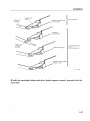
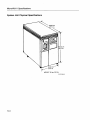
1
AZ-GLCAA-MN
:IHC_ _K)C:JUoexx XX:::::::·:·
MC_RC;~~(xXXX:::::::·:::·
AZ-GLCAA-MN
~f\A - T rJ
AA -Fti
/
~
· ... :. :.:.:.:. ::::::::::.: :::.: :.:.:.: :.:':.:':.:':.:':.:':.:::.:::::::.:::::::::::::::::::e:::e:::e:::
· ... :.:. :.:.:.::::::::::.: :: :.: :.:.:.: :.:':.:':.:':.:':.:':.:::.:::::::.:::::::::::::::::::e:::.::;.:::
· ... :.:.:.:.:.:: :: :: ::::.: :::.: :.:.:.: :.:.:.:.:.:.:.:.:.:.:.:::.:::::::.:::::::::::::::::::.:::.:::.:::
.......... .
......... .
xx:::::::.:
.......... .
~~y • • • • • • • • • •
~
xx:::::::.:
~~y • • • • • • • • • •
~~
~~y • • • • • • • • • •
~
~
xx:::::::.:
MicroVAX II
630Q8
Owner's Manual
Prepared by Corporate User Publications
of Digital Equipment Corporation
First Printing, October
Second Printing, December
Updated, May
Updated, July
1985
1985
1986
1986
The information in this document is subject to change without notice and
should not be construed as a commitment by Digital Equipment Corporation.
Digital Equipment Corporation assumes no responsibility for any errors that
may appear in this document.
The software described in this document is furnished under a license and may
only be used or copied in accordance with the terms of such license.
No responsibility is assumed for the use or reliability of software on
equipment that is not supplied by DIGITAL or its affiliated companies.
© Digital Equipment Corporation 1985, 1986.
All Rights Reserved.
Printed in U.S.A.
A postage-paid READER'S COMMENTS form is included on the last page of
this document. Your comments will assist us in preparing future
documentation.
The following are trademarks of Digital Equipment Corporation:
COMPACTape
DECmate
DECsystem-l0
DECSYSTEM-20
DECUS
DECwriter
DIBOL
FALCON
LSI-II
~D~DDmDTM
MASSBUS
MicroPower/Pascal
MicroVAX
MicroVMS
MicroPDP-ll
PDP
P/OX
Q-BUS
Professional
Rainbow
RSTS
RSX
ULTRIX-32m
UNIBUS
VAX
VAXELN
VMS
VT
Work Processor
Notice
This equipment generates, uses and may emit radio frequency energy. The
equipment has been tested and found to comply with the limits for a Class A
computing device pursuant to Subpart J of Part 15 of FCC Rules, which are
designed to provide reasonable protection against such radio frequency
interference when operated in a commercial environment. Operation of this
equipment in a residential area may cause interference, in which case the
user, at his or her own expense, may be required to take measures to correct
the interference.
iii
Contents
Introduction ................................................... vii
Installation
PROCEDURE ................................... 1-2
TESTING ...................................... 1-14
Testing with RX50 Diskettes .................... 1-15
Testing with the TK50 Tape Drive ................ 1-18
INSTALLING OPERATING.SYSTEM SOFTWARE .... 1-43
Operation
CONTROL PANEL ................................ 2-2
TURNING THE SYSTEM ON ....................... 2-5
Initial Control Panel and Console Terminal Switch
Settings ....................................... 2-5
TURNING THE SYSTEM OFF ...................... 2-8
MAKING BACKUP COPIES ........................ 2-8
RD52 OR RD53 FIXED-DISK DRIVE ................ 2-9
RX50 DISKETTE DRIVE ......................... 2-10
RX50 Diskettes .................................. 2-11
Diskette Handling and Storage Guidelines ......... 2-13
Write-Protecting a Diskette ...................... 2-14
Inserting a Diskette ........................... 2-15
TK50 TAPE DRIVE .............................. 2-16
Design of the Drive ............................ 2-17
Labeling a Tape Cartridge ....................... 2-18
Write-Protecting a Tape Cartridge ................ 2-19
Tape Cartridge Handling and Storage Guidelines .... 2-20
Inserting a Tape Cartridge ...................... 2-21
Removing a Tape Cartridge ...................... 2-23
Summary of TK50 Controls and Indicator Lights .... 2-23
v
Contents
Troubleshooting
POWER-ON MESSAGES ........................... 3-2
CORRECTIVE ACTIONS .......................... 3-4
THE MICROVAX MAINTENANCE SYSTEM ......... 3-11
Main Menu ................................... 3-13
Main Menu Options ............................ 3-14
Upgrade ...................................................... 4-1
Appendix A
Related Documentation ............................ A-I
Appendix B
MicroVAX II Specifications
PREPARING FOR YOUR MICROVAX II SYSTEM ..... B-1
Electrical Requirements ......................... B-4
Environmental Requirements .................... B-5
Acoustic Noise Emission ........................ B-6
System Unit Physical Specifications ............... B-7
RX50 DUAL-DISKETTE DRIVE .................... B-8
TK50 MAGNETIC TAPE .......................... B-9
RD52 FIXED WINCHESTER DISK DRIVE .......... B-I0
RD53 FIXED WINCHESTER DISK DRIVE .......... B-ll
Appendix C
MicroVAX II Options
TERMINAL AND PRINTER OPTIONS .............. C-l
MEMORY OPTIONS .............................. C-2
COMMUNICATION OPTIONS ..................... C-3
Glossary
vi
Introduction
This manual describes how to install and operate the MicroVAX II system
and what to do if you have a problem with the system. Coverage is provided for the 630QB (BA123-A) version. DIGITAL recommends that you
carefully read the Installation and Operation sections of this manual before
you attempt to install and operate the MicroVAX II system.
This manual is for a Micro VAX II system user; little or no previous computer experience is assumed. To help nontechnical users, a glossary
explains common computer terms.
Detailed technical information is available in the MicroVAX II 630QB
Technical Manual and in other related documents. Related documents and
their order numbers are listed in Appendix A.
vii
Installation
1
Before installing your system, make sure the site conforms to the environmental and safety requirements summarized in Appendix B in this manual.
If you prefer not to install the system yourself, DIGITAL provides an installation service.
To install the system, perform the following steps in order. If you have
trouble, refer to the Troubleshooting section that begins on page 3-1.
1-1
Installation
PROCEDURE
1 UNPACK THE MICROVAX II SYSTEM.
If any item is missing or damaged:
• Contact your sales representative or store .
• Contact your delivery agent.
1-2
Installation
o
GRANT CONTINUITY MODULE
TERMINAL CABLE
LABEL SHEET
POWER CABLE
SYSTEM UNIT
MLO·578·85
1-3
Installation
2
PUT THE SYSTEM UNIT WHERE IT WILL BE USED.
• Allow space around the unit for air circulation and servicing.
• Keep food and liquid away from unit.
• Place the unit away from heaters, photocopiers, and direct sunlight.
• Minimize static by placing the unit away from busy office corridors.
• Keep the area free from dust and other abrasive materials.
• Install your system in an operating environment that meets the requirements listed in Appendix B.
AIR FLOW
1-4
MLO-579-85
Installation
3
LABEL THE CONTROL PANEL AND DISKETTE DRIVE UNITS.
• Select labels for your language.
• If your unit contains diskette drives, label them 1 and 2.
• Make sure that all buttons on the control panel are set to the out position.
f~'
IR.QPOODOOO
~DDDDOO
WRITEPROTECT
READY
MLO-580-85
1-5
Installation
4
UNPACK THE INSTALLATION AND USER GUIDES FOR THE FIRST
TERMINAL TO BE CONNECTED TO YOUR SYSTEM.
• This will be the console terminal.
MLO-581-85
5
USE THE INSTALLATION GUIDE TO UNPACK AND INSTALL THE
CONSOLE TERMINAL.
MLO-582-85
1-6
Installation
6
OPEN THE REAR DOOR OF YOUR UNIT.
• The door is 'held in place by a pop fastener.
MLO-583-85
1-7
Installation
7 SET THE CONTROLS ON THE CPU PANEL ON THE REAR OF THE
UNIT TO THE POSITIONS LISTED BELOW.
• Set the Halt Enable/Disable switch to the disable (down) position.
• Rotate the Mode switch to the middle (language inquiry) position.
• Rotate the Baud control knob for the console terminal to 4800.
HALT
ENABLE/DISABLE -+---++(DOWN POSITION)
MODE
---+----;....~
BAUD ---+-----+--
MLO·584-85
1-8
Installation
8
CONNECT THE CONSOLE TERMINAL CABLE TO THE CONSOLE
TERMINAL AND THE UNIT AS SHOWN.
LA120
(REAR VIEW)
r:l a
[g]
~:~I:S:
0>
VT240
(REAR VIEW)
VT220
&lrb
l________ ,~-- ____________ ___ ~-- ____ ___ ...;
I
~D
u==~
"""'g-'~~~
~:~~ (j)1IIII:iiiiiiiiIIIi"'T
-'3600
19200
38400
MlO-190-85
1-9
Installation
9 INSTALL AND CONNECT ANY ADDITIONAL DEVICES.
• Additional devices may include terminals, printers, modems, and external
storage devices. The devices may be connected in any order.
• Refer to the installation guide included with each device.
• Thread all the cables through the cable guide.
ADDITIONAL
DEVICES
CABLE GUIDE
MLO-585-85
1-10
Installation
10 IDENTIFY THE POWER CABLE.
• Make sure the power cable plug matches the wall outlet.
115 V
POWER CORD
220 V/230 V /240 V
MLO-192-85
1-11
Installation
11
CHECK THE VOLTAGE SWITCH SETTING. PEEL BACK THE LABEL
COVERING THE SWITCH TO SEE THE VOLTAGE SETTING. IF
NECESSARY, CHANGE THE SWITCH SETTING TO MATCH THE
VOLTAGE SOURCE YOU ARE USING.
CAUTION
An incorrect voltage switch setting will damage your system.
READ AND
REMOVE
CAUTIO.\'
LABEL
115V
IN NORTH AMERICA THE
SWITCH IS SET TO 115V
@
220V /230V /240V
IN OTHER COUNTRI ES THE
SWITCH IS SET TO 230V.
I F NOT SLI DE SWITCH TO
230V.
II
=
~g
=
iJ
MLO·193·85
1-12
Installation
12
SET THE POWER SWITCH ON THE FRONT OF THE UNIT TO 0 (OFF).
MLO-586-85
1-13
Installation
13
PLUG IN THE POWER CABLE.
• Do not close the rear door at this time .
• Now you are ready to test your system (see the next page).
MLO-195-85
1-14
Installation
TESTING
Testing your system consists of turning the system on, selecting a language, and executing MicroVAX Maintenance System software.
14 TURN ON YOUR CONSOLE TERMINAL.
MLO-587-85
• If you received RX50 diskettes with this manual, proceed with step 15.
• If you received a TK50 tape cartridge with this manual, go to step 17 (skip
steps 15 and'16).
1-15
Installation
Testing with RX50 Diskettes
15
FIND THE DISKETTES LABELED MVII DIAG. CUST. RX50 IN THE
DISKETTE HOLDER AT THE FRONT OF THIS MANUAL.
• The diskettes are numbered sequentially to show the order of their use.
DISKETTE _ _•
COVER
WRITE PROTECT
NOTCH
DISKETTE
SURFACE
DO NOT
TOUCH
ORANGE ~-,•..,.
ARROW
PROTECTIVE
ENVELOPE
MLO-588-85
1-16
Installation
16 INSERT DISKETTE #1 IN ONE OF THE DRIVES AS FOLLOWS:
1. Open a drive.
2. While aligning the orange arrow on the diskette with the orange stripe
on the drive, insert the diskette.
3. Close the diskette drive door.
4. Set the power switch to 1 (on) and go immediately to step 20 (skip steps
17, 18, and 19).
ML0-589-85
1-17
Installation
Testing with the TK50 Tape Drive
17
FIND THE TAPE CARTRIDGE LABELED MVII DIAG. CUST. TK50 IN THE
CARTRIDGE HOLDER AT THE FRONT OF THIS MANUAL.
This cartridge contains maintenance system software used to test your
MicroVAX. Before you insert the cartridge into the drive, you should do three
things.
1. M,ake sure the cartridge is write-protected.
2. Check the position of the tape leader inside the cartridge.
3. Check the position of the tape leader inside the drive.
Setting the Write-Protect Switch
You make sure the cartridge is write-protected by checking the position of the
write-protect switch, located next to the label. An orange rectangle is visible
when the switch is in the write-protected position. If you do not see an orange
rectangle, slide the write-protect switch towards the label as shown in the
following figure.
WRITE-PROTECT
SWITCH
(PUSH LEFT)
1-18
MLO-275-86
Installation
Checking the Cartridge Leader
When you insert the cartridge into the drive, a tape leader on the take-up
reel couples with a leader in the cartridge, much as you thread a needle. The
arrow-shaped leader in the drive goes through the eye on the cartridge leader.
On rare occasions, shipping or rough handling may jar either leader out of
position. This can damage your tape drive, as explained more fully in the
Operation chapter. To prevent such damage, we suggest you check both
leaders before inserting the cartridge.
To check the cartridge leader, open the door in the back of the cartridge. With
your thumb, lift the door lock (as shown below) and press on the hinge. The
door swings open.
DOOR LOCK
(RE LEASE BY LI FTING
DOOR LOCK WITH THUMB)
MLO-276-86
The tape leader should appear exactly as shown with most of the leader eye
visible. If no leader is visible or if the leader extends out more than shown,
DO NOT LOAD THE CARTRIDGE INTO YOUR TAPE DRIVE. DO NOT
TRY TO ADJUST THE LEADER. Contact your service representative for
another diagnostic cartridge. If the leader appears normal, close the door and
proceed.
1-19
Installation
Checking the Drive Leader
To check the leader in the drive, look inside the drive (you may need to use a
light). You should look for two things.
1. The pointed end of the leader should be clearly visible and straight (not
bent up or down).
2. The leader should be hooked onto the bucking link, as shown below.
BUCKLING
LINK
TAKE-UP
LEADER
--~[Q]
CARTRIDGE INSERT/RELEASE
HANDLE DOWN
MLO-277-86
If the leader is unhooked or if you cannot clearly see the pointed end, DO
NOT INSERT THE CARTRIDGE INTO THE DRIVE. DO NOT ATTEMPT
TO FIX THE LEADER. Contact your service representative.
1-20
Installation
PROPER LOCATION
OF LEADER
}
ACCEPT AB LE
LEADER
UNHOOKED
UNACCEPTAB LE
CALL
FIELD SERVICE
LEADER DISPLACED
ABOVE LINK
M LO·278·86
If both the cartridge leader and drive leader appear normal, proceed with the
next step_
1-21
Installation
18
PUSH THE FIXED DISK 0 READY BUTTON ON THE CONTROL PANEL
TO THE IN POSITION.
This places the fixed (nonremovable) disk off line and causes your system to
look for data on the tape cartridge.
OPTIONAL
FIXED DISKS
READY BUTION
--t-t--- (FIXED DISK 0)
ML0279-86
19
INSERT THE TAPE CARTRIDGE INTO THE TAPE DRIVE AS FOLLOWS:
1. Set the system power switch to 1 (on).
2. After the green light comes on, pull the cartridge release handle up.
CAUTION
Never move the cartridge release handle unless the red light is off
and the green light is on. Never move the cartridge release handle
while a light is flashing.
3. With the arrow on the tape cartridge facing up, insert the tape cartridge
into the tape drive.
1-21.1
Installation
POWER
SWITCH
GREEN
LIGHT IS LIT
CARTRIDGE
RELEASE HANDLE
MLO-280-86
4. Push the cartridge release handle down.
5. Push the red LoadlUnload button to the in (load) position. The red light
comes on immediately. In a few moments, the green light also comes on,
indicating the tape is ready to use.
CAUTION
Never put any object other than a TK50 tape cartridge into the tape
drive. Handling the mechanisms inside the tape drive may damage
the drive.
®
LOAD/UNLOAD
BUTTON
RED LIGHT
IS LIT
MLO-281-86
1-21.2
Installation
20
A FEW MOMENTS AFTER SETTING THE POWER SWITCH TO 1 (ON),
YOU SHOULD SEE THE LANGUAGE SELECTION MENU ON THE
CONSOLE TERMINAL.
Select the language you wish to use by pressing the corresponding number
key and then pressing the RETURN key on the console terminal keyboard.
KAG30-A.Vl.2
1) Dar,
s t,
2) Deutsch
3) English
LI)Espanol
5) Frany<lIS
G) It~llano
7) Nederlands
8) Nor s t;
9) Portugues
10) SUOll11
11) Suenst;a
(1 .. 11):
MLO-593·85
1-22
Installation
• Some console terminals, such as the VT100 and LA100, do not provide
the international language capability. If you use one of these console
terminals, the language selection menu does not appear. All messages
are in English .
• If your console terminal provides international language capability, and
you do not see this display, go to the Troubleshooting section of this
manual.
1-23
Installation
A few moments after selecting the language, you should see this power-on
display on the console terminal.
PerforfTling norfTlal s)'stefTl tests.
7 •• G •• 5 •• Lj •• 3 ••
Tests COfT1Pleted.
Loading S'lsterTl softlAlare.
2 •• 1 •• 0 ••
MLO-594-85
• The terminal slowly displays the numbers 7 through 3 indicating completion of steps in the power-on test.
• The last part of the display contains the numbers 2 through 0 indicating
that the system is loading Micro VAX Maintenance System software.
1-24
Installation
NOTE
If you see the message, ?54 RETRY on your console terminal,
and you are testing with diskettes, make sure you completed
steps 15 and 16. If you are testing with a tape cartridge, make
sure you completed steps 17, 18, and 19. Restart the system by
pressing the Restart/Run button. If the message appears again,
refer to the Troubleshooting section of this manual.
1-25
Installation
Then you should see the introductory display of the MicroVAX Maintenance System.
MicroVAX Maintenance System - Release 1.12
COUFIDElITIAL DIAGnOSTIC SOFT'fARE
PROPERTY OF
DIGITAL EQUIPMEllT CORPORA TIOll
Use Authorized Only Pursuant to a Valid Right-to-Use License
Copyright (c) 1986
Digital Equipment Corporation
The current date and time is: 14-AUG-1986 08 39·37 00
Press the RETURU key to continue
or enter new date and time, then press the RETURII key.
[DD-MMM- YYYY HH: MN]
>
MlO·289A-86
• If you are testing with a tape cartridge, approximately 4 minutes
elapse before this display appears.
1-26
Installation
21
PUSH THE READY BUTTONS ON THE CONTROL PANEL TO THE
OUT POSITION .
• This places the fixed disks back on line.
22
MAKE SURE THE CURRENT DATE AND TIME IN THE
INTRODUCTORY DISPLAY ARE ACCURATE. IF THE CURRENT DATE
AND TIME ARE ACCURATE, PRESS THE RETURN KEY TO
CONTINUE.
• If the current date and time are inaccurate, type the correct date and
time following the format shown. An example is: 07-DEC-1985 13:30.
Press the RETURN key to continue.
1-27
Installation
23
YOU SHOULD IMMEDIATELY SEE THE TEST PREPARATION
DISPLAY.
The system is preparing' for testing'.
This may taKe selJeral minutes.
Please . . Iait •••
MLO-597-85
• If you are testing with a diskette, proceed with step 24 .
• If you are testing with a tape cartridge, go to step 26 (skip steps 24 and
25).
1-28
Installation
24
A FEW MOMENTS LATER YOU SHOULD SEE THE DISKETTE
REMOVAL DISPLAY.
Please reMove the disKette,
Insert the next disKette in the sallIe dri'!e
and press the RETURN Key,
If YOU can not insert the next disKette
type 1 and press the RETURN keY,
t
MLO·598·85
• Remove diskette # 1 .
• Insert diskette #2 in the same drive. Press the RETURN key to
continue.
1-29
Installation
25
EACH TIME THE DISKETTE REMOVAL DISPLAY REAPPEARS,
REMOVE THE USED DISKETTE AND INSERT THE NEXT DISKETTE IN
THE SAME DRIVE. PRESS THE RETURN KEY TO CONTINUE.
NOTE
If your MicroVAX II does not request all the diskettes that came
with it, your system configuration does not need the additional
diskettes for testing.
1-30
Installation
26
YOU SHOULD SEE THE READY FOR TESTING DISPLAY ON YOUR
CONSOLE TERMINAL. PRESS THE RETURN KEY TO CONTINUE.
The sYstem is ready for testing
Press the RETURN key to continue.
>
MlO-599-85
1-31
Installation
A few moments later you should see the Maintenance System MAIN
MENU display,
MAIN
MENU
1 - Test the sYstem
2 - Display SYstem Confi9'llration and Devices
3 - Display the Utilities Menu
a-
Display the Service Menu
5 - Exit Microl)ax Maintenance SYstem
Type the number; then press the RETURN KeY,
MLO-600-85
1-32
Installation
27
BEFORE TESTING YOUR SYSTEM, SAVE THE LANGUAGE YOU
SELECTED IN STEP 20.
• Rotate the Mode switch to the upper right
(~)
position .
• Close the rear door.
MODE
",ung ~~~
1200
<DDT
2400
4800
9600
19200
38400
MLO-205-85
1-33
Installation
28
SELECT THE SYSTEM TEST BY TYPING 1 AND THEN PRESSING THE
RETURN KEY.
• A few moments later, you should see this SYSTEM TEST display.
SYSTEM TEST
This is a test of the Microl.IAX COltlPuter and its del.Jices.
No additional preparation for this testing is re9uire.J;
the MicroVAX is ready to be tested.
Testing occurs in two parts: the functional tests 9uicKly
test each device se9uentially; the exerciser test (lasting
about 1I minutes) tests how the del!ices ",lorK together.
To halt the test at any time and return to the Main Menu,
type 'C by holding down the CTRL Key and pressing the C Key.
Press the RETURN key to begin testing,
or type 0 and press the RETURN Key to return to the previous menu.
>
MLO-601-85
1-34
Installation
29
PRESS THE RETURN KEY TO BEGIN TESTING.
• You should see the first part of the BEGIN DEVICE TESTS display
shown below.
• A number of device passed messages should be displayed on the console
terminal to inform you of the progress of the system tests.
BEG I N DEV I CE TESTS
This is a test of all sYstem devices identified by the
diagnostic. If any of your system de.!ices are not
listed below. consult your troubleshooting documentation
for the action to taKe.
Device
Result
CPUA •••••••••••••••••• pass ed
MEMA •••••••••••••••••• passed
RQDXA ••••••••••••••••• passed
MLO-602-85
If any of your system devices are not listed in the messages, refer to the
diagnostics chapter of the Micro VAX II 630QB Technical Manual or call
your service representative.
1-35
Installation
After about 4 minutes, the following message should appear on your console
terminal.
SYSTEM TEST PASSED
All devices passed fO.lnctional tests and the SYsteM passed
the exe rc i se r test.
At this point YOU May exit froM the Maintenance SYsteM
or perforM More specialized testing; If YOU would liKe
additional inforMation, conso.tIt the Maintenance Section
of your SYsteM Technical Manual.
Press the RETURN Key to return to the pre'lious Menu.
>
MLO·603·85
You have successfully installed and tested your MicroVAX II system.
NOTE
If you see any error messages, refer to the diagnostics chapter of
the MicroVAX /I 630QB Technical Manual or call your service
representative.
1-36
Installation
30
RETURN TO THE MAIN MENU BY PRESSING THE RETURN KEY.
• The MAIN MENU will be displayed,
MAIN
MENU
1 - Test the sl'stem
2 - Display
Syster~
Confi9'lIration and Devices
3 - Display the Utilities Menu
a-
Displal' the Ser<.Jice Menu
5 - Exit Microl,/ax Maintenance 51'stem
Type the number; then press the RETURN KeY,
MLO-600-85
1-37
Installation
31
EXIT THE MICROVAX MAINTENANCE SYSTEM BY TYPING 5 AND
PRESSING THE RETURN KEY.
• The following message should be displayed on the console terminal.
Exiting MicroVAX Maintenance SYsteM.
Exit cOMPlete. You May now load your SYsteM software.
MLO-604-85
1-38
Installation
32
IF YOU ARE TESTING WITH A DISKETTE, REMOVE THE DISKETTE
AND RETURN IT TO ITS HOLDER. GO TO STEP 33.
IF YOU ARE TESTING WITH A TAPE, REWIND AND UNLOAD THE
TAPE BEFORE YOU REMOVE THE TAPE CARTRIDGE FROM THE
TAPE DRIVE. USE THE FOLLOWING PROCEDURE.
1. Press the Load/Unload button to the out (unload) position to signal the
drive to rewind and unload the tape. The red and green lights flash as
the tape is being rewound.
2. When the red light goes off and the green light goes on, lift the cartridge
release handle up and remove the tape cartridge.
3. Return the cartridge to its holder.
CAUTION
Always remove the tape cartridge from the tape drive when the
cartridge is not in use or before you turn off the system. Failure
to remove the tape cartridge may result in damage to the
cartridge.
NOTE
For a more detailed discussion of the TK50 tape drive controls
and procedures, refer to the Operation section in this manual.
1-39
Installation
INSTALLING OPERATING SYSTEM SOFTWARE
33
THE MICROVAX II IS NOW READY FOR YOU TO INSTALL
OPERATING SYSTEM SOFTWARE. FOLLOW THE SOFTWARE
INSTALLATION INSTRUCTIONS PROVIDED WITH YOUR SOFTWARE.
• Read the Operation section of this manual to become familiar with
MicroVAX II controls and indicators that may be used during software
installation.
MLO-595-85
1-40
Operation
2
This section describes:
• The control panel controls and indicators
• How to turn on the system
• How to turn off the system
• The use of RD52 or RD53 fixed disks, RX50 diskettes, and TK50 tapes.
2-1
Operation
CONTROL PANEL
The control panel contains a 110 (on/oro switch, several system buttons, and
several indicator lights (LEDs), which are described in Table 2-1.
Additional controls and indicators are located on the CPU distribution
panel on the rear of the unit. Those controls and indicators are not used for
normal system operation. They are described in the MicroVAX 11 630QB
Technical Manual.
rTTl101'_-t------.-
[bgdJ
POWER 1/0
(ON/OFF)
- - - t 1 - - - - - L OPTIONAL
FIXED DISKS
-4-1+------t1- WRITE - PROTECT
(FIXED DISK 0)
READY
(FIXED DISK 0)
MLO-605-85
2-2
Operation
Table 2-1: Controls and Indicators
Control
Position
Function
110
(On/Off)
1
Turns the system on
o
Turns the system off
Out (not lit)
Normal position for software operation
In (glows red)
Stops normal software operation and puts
the CPU in the console mode (see the
MicroVAX II 630QB Technical Manual).
Halt*
Restart
Restarts the system as when turning on the
power 110 switch. Work in progress is lost.
Fixed
Disk:**
Write
Protect
*
**
Out (not lit)
Normal position for software operation.
System software is free to read or write information on the fixed disk if the Ready
button is also in the out position.
In
(glows orange)
Prevents system software from writing on
the fixed disk. You can write-protect the
disk so that information is not erased accidentally if a wrong diagnostic program is
chosen.
When the Halt Enable/Disable switch on the rear of the unit is in the down
(normal) position, the Halt button has no effect on system operation.
The system contains one or more fixed disks, each with its own controls.
(Continued on next page.)
2-3
Operation
Table 2-1: Controls and Indicators (Cont.)
Control
Position
Function
Ready
Out
(glows green)
Normal position for software operation.
System software is free to read information
on the fixed disk. If the Write-Protect button is in the out position, system software
can also write on the fixed disk.
In (not lit)
Tutns off the fixed disk
Indicator
Function
Run
Glows green when the CPU is operating
DC OK
Glows green when the power supply is generating the correct voltages
2-4
Operation
TURNING THE SYSTEM ON
The following procedure assumes a system has been installed as described
in the Installation section of this manual, and system software has been
installed. If system software has not been installed, install the software as
directed in the manual supplied with the software before using the
procedure.
Initial Control Panel and Console Terminal Switch Settings
• Turn on the console terminal.
• Set all buttons on the front control panel to the out position.
• Set the power 1/0 (on/off) switch to the 1 (on) position.
When you turn the power on, the control panel indicators should appear as
listed in Table 2-2.
2-5
Operation
Table 2-2: Normal Power-On Indications
Control!
Indicator
Normal Indication
1/0
1 (on)
Run
Glows green
DC OK
Glows green
Fixed Disk:
Ready
Glows green within 30 seconds
Tape Drive:
Load/Unload
Glows red for 2 seconds and then goes out
Green Light
Lights when red light goes out
If you do not observe the indications listed above, refer to the Troubleshooting section in this manual.
In addition to these indications, the console terminal should display the
messages shown on the next page.
2-6
Operation
Performing normal SystefTl tests.
7 •• 6 •• 5 •• 4 •• 3 ••
Tests completed.
Loading S}'stelrl soft.lare.
2 •• 1 •• <) ••
MLO-606-85
The console terminal should slowly display the numbers 7 through 3 indicating completion of steps in the power-on system tests. The Micro VAX II
performs power-on system tests each time you turn the system on.
The last part of the power-on display shows the numbers 2 through 0 to
indicate that the system is loading the system software. The first display
for the system software appears on the console terminal after a few
seconds. That display is described in the manual supplied with the system
software.
If you do not see this sequence of events, refer to the Troubleshooting section in this manual.
You are now ready to use the system. Refer to the system software manual
for further instructions on using the system.
2-7
Operation
TURNING THE SYSTEM OFF
• Follow the system shut-down procedure described in your system software
manual. That procedure will insure an orderly system shut-down that
will prevent accidental loss of data.
• Turn the system off by setting the power 1/0 switch to the 0 (off) position.
MAKING BACKUP COPIES
A backup copy is a copy of files stored on the fixed disk, diskette, or tape.
You should make backup copies of files to insure against accidental loss of
information. As a general rule:
• Make backup copies on diskettes or magnetic tape.
• Make a daily backup copy of all information you create or change that
day.
• Make a weekly backup copy of all information stored on your fixed disk.
• Store all backup copies in a safe place.
Make backup copies of files you use with the system software as directed in
the manual supplied with the system software.
2-8
Operation
RD52 OR RD53 FIXED-DISK DRIVE
The RD52 and/or RD53 fixed-disk drives are located inside the cabinet.
Information is stored on fixed (nonremovable) disks.
The RD52 fixed disk stores up to 31M bytes of data. The RD53 fixed disk
stores up to 71M bytes of data.
The first fixed disk is referred to as drive
o.
2-9
Operation
RX50 DISKETTE DRIVE
The RX50 dual disk drive holds two 5.25-inch diskettes. Each diskette
stores 400 kilobytes (400K bytes) of information, which is roughly 150 typewritten pages.
An indicator light on each drive lights when the drive is in use.
DRIVE LIGHT 2
MLO-607-85
2-10
Operation
RX50 Diskettes
• Information is stored magnetically.
• Information is stored on only one side of an RX50 diskette.
• Information stored previously can be erased and new information stored
in its place.
The diskette rotates inside its cover. The diskette is cleaned continuously
by the soft fabric lining of the cover.
CAUTION
Use only formatted RX50 diskettes, available from DIGITAL or its
licensed distributors.
2-11
Operation
DISKETTE _ _~
COVER
WRITE PROTECT
NOTCH
DISKETTE
SURFACE
DO NOT
TOUCH
PROTECTIVE
ENVELOPE
2-12
Operation
Diskette Handling and Storage Guidelines
• Do not touch the exposed surfaces of the diskette.
• Always return a diskette to its protective envelope to keep out dust and
dirt.
• Do not bend or fold a diskette.
• Always store diskettes vertically and loosely to prevent the covers from
becoming warped.
• Write on the diskette label before applying it to the diskette. Writing on
the diskette might damage the diskette.
• Keep diskettes away from direct sunlight, heaters, and other sources of
heat.
• Keep diskettes away from magnets and equipment that generate magnetic fields, such as motors, transformers, and terminals.
• Always close the drive door when using a diskette. The drive does not
work with the door open.
• Do not open the drive doors when the drive indicator lights are on. Information could be lost.
• Make and keep backup copies of all working diskettes. Refer to your
system software manual for instructions.
2-13
Operation
Write-Protecting a Diskette
To prevent the system from accidentally adding, changing, or deleting information on a diskette, cover the write-protect notch with one of the selfadhesive foil tabs supplied with your diskettes. This is known as writeprotecting the diskette. You can later add or change information on the
diskette by removing the write-protect tab. The tab is illustrated below.
WRITEPROTECT
TAB
MLO-609-85
2-14
Operation
Inserting a Diskette
1. Open the diskette door by pressing on its outer edge.
2. Align the orange arrow on the diskette with the orange stripe on the
drive and insert the diskette.
3. After inserting the diskette, press the drive door to close it.
MLO-610-85
2-15
Operation
TK50 TAPE DRIVE
The TK50 tape drive (referred to as drive 1) holds one removable TK50
magnetic tape cartridge. You can use a cartridge as both an input and output
device. As an input device, you use it to load software or data onto your
system. As an output device, you use it to make copies (or backups) of
software or data, or as a journaling device to record input to the system. Each
tape cartridge holds 94.5 megabytes (94.5M bytes) of information, more than
100 times the capacity of a diskette.
The tape drive has two primary controls: the cartridge release handle and the
LoadIU nload button. You use the cartridge release handle to insert/remove
cartridges and lock them into position. You use the LoadIU nload button to
control winding/rewinding of the tape.
The drive also has two indicator lights that let you know the status of the
drive. A red light is part of the LoadlUnload button. A green light is at the
opposite end of the drive. See the figure below for the location of the TK50
tape drive in your system. The controls and lights are labeled.
CARTRIDGE
RELEASE
~H--HANDLE
LOAD/UNLOAD
BUTTON - RED LIGHT
GREEN LIGHT
MLO-282-86
To operate the drive properly, you must carefully monitor the status lights.
The instructions for inserting/removing cartridges later in this section tell
you exactly what should happen at each step. A table at the end of the section
summarizes light and control combinations.
2-16
Operation
Design of the Drive
The TK50 drive operates much like a reel-to-reel tape deck. Inside the drive
is a take-up reel with a leader attached. Inside the cartridge is a single reel
containing the magnetic tape. When you insert the cartridge and press the
Load button, two things occur: the leader in the drive automatically couples
with the leader in the cartridge, and the tape winds onto the take-up reel.
The coupling and winding process is called loading. When the automatic
loading process completes, the cartridge is ready to use.
Once the cartridge is loaded, you cannot remove it without rewinding and
uncoupling the leaders, a process called unloading. Even if you have not used
the tape, you must unload it before you can remove the cartridge. When you
press the LoadlUnload button, the tape rewinds into the cartridge and the
leaders uncouple.
The two tape leaders are coupled much like you thread a needle. The leader
in the cartridge has a large eye with a notch. The leader in the drive is
arrow-shaped. See the figure below.
CARTRIDGE
LEADER
EYE
ARROW
SHAPED
TIP
RETAINING
NOTCH
RELATIVE
MOTION
TAPE
DRIVE
LEADER
MLO-283-86
The process proceeds in two steps:
1. When you insert a cartridge, the leader in the drive first threads through
the eye of the cartridge leader.
2. When you press the LoadlUnload button, the take-up reel begins to move,
and the drive leader catches in the notch and pulls the tape onto the takeup reel.
2-17
Operation
Because the position of each leader is critical to successful coupling, you
should make sure they are properly positioned.
Although rare, rough handling during shipment can dislodge the cartridge
leader. We therefore advise you to check the leader whenever you use a new
cartridge. The Installation chapter tells you how to do this. An improperly
positioned cartridge leader can damage your drive by displacing the leader on
the take-up reel. If you always check new cartridges, you can prevent
problems with the drive. Also if you drop a cartridge, check the leader before
using it again.
You should check the leader in the drive in the following situations: when you
first install your system (as described in the Installation chapter), if your
system has been moved, or if you are having load/unload problems.
Labeling a Tape Cartridge
Always label your cartridge. For your convenience a slot for the label is
provided on the front of the cartridge. This label is visible when the tape is in
the drive. Labels or markings on any other part of the cartridge can interfere
with proper operation of the drive.
• Write the desired identification on the label.
• Insert the label in the slot on the front of the cartridge.
• Do not apply stick-on labels to the top, bottom, or sides of the cartridge.
• Do not write on the tape cartridge with a pen or pencil.
LABEL
2-18
Operation
Write-Protecting a Tape Cartridge
Write-protecting a tape cartridge prevents accidental erasure of information
stored on the tape. You set the write-protect status with a two-position switch
on the cartridge. Your system can read information on the tape regardless of
the position of the write-protect switch. However, it cannot write data to the
tape when the write-protect switch is set to the write-protected position.
Whenever you use a cartridge to install software onto your system, make
sure the write-protect switch on the front of the cartridge is in the writeprotected position. The switch has two icons indicating the write-protect
status as shown in the figure below. An orange rectangle is also visible when
the switch is in the write-protected position. If you do not see an orange
rectangle, slide the switch towards the label slot.
,
WRITE~
PROTECTED ~
NOT WRITEPROTECTED
M LO·28586
NOTE
Early versions of the cartridges do not have the orange rectangle.
Use the icons as guides.
When you use a cartridge to make a backup copy, to write out data, or to
function as a journaling device, make sure the write-protect switch is set to
enable writing to the tape. To enable writing, slide the switch away from the
label slot until it locks into place.
2-19
Operation
Generally, you set the write-protect switch before you insert the cartridge
into the drive. You can change the write-protection status of the tape while it
is in the drive, but the TK50 may not recognize it immediately, depending on
what activity is occurring. To guarantee that it recognizes the change in
status, do the following:
1. Unload the tape by pushing the LoadIU nload button. Both the red and
green lights flash while the tape is rewinding. The red light comes on
steady as the tape unloads into the cartridge. When completely unloaded,
the red light goes off and the green light comes on.
2. Move the write-protect switch to the desired position.
3. Push the LoadIU nload button to reload the tape. The red light comes
on while loading. When the green light also comes on, the tape is ready
to use.
The drive now recognizes the new write-protect status.
Tape Cartridge Handling and Storage Guidelines
• Do not touch the exposed surface of the tape.
• Do not drop the tape cartridge. The impact from a fall can damage the tape
cartridge.
• Allow any new tapes to stabilize at room temperature for 24 hours before
using them.
• Write on the identification label before putting the label on the tape
cartridge. Place the label only in the label slot on the front of the tape
cartridge.
• Store tape cartridges in a dust-free environment.
• Keep tape cartridges away from direct sunlight, heaters, and other sources
of heat. Store tape cartridges in an even temperature between 50 and 104
degrees F (10 to 40 degrees C). Store tape cartridges where the relative
humidity is between 20 and 80 percent.
• Keep tape cartridges away from magnets and equipment that generate
magnetic fields, such as motors, transformers, and terminals.
• Keep tapes away from x-ray equipment.
2-20
Operation
Inserting a Tape Cartridge
Make sure the system power 1/0 switch is set to 1 (on) and the LoadlUnload
button is out.
The LoadlUnload button glows red for approximately 4 seconds during the
tape drive power-on self test.
The red light goes off and the green light comes on, indicating that it is safe
to move the cartridge release handle.
1. Pull the cartridge release handle up.
2. With the arrow on the cartridge facing up and pointing toward the drive,
insert the cartridge into the TK50 drive.
The red light comes on.
The green light goes off.
GREEN
LIGHT IS LIT
CARTRIDGE
RELEASE HANDLE
MLO-286-86
3. Push the release handle down.
The red light goes off.
The green light comes on.
4. Push the LoadIU nload button to the in (load) position.
The red light comes on.
The green light goes off.
2-21
Operation
RED LIGHT
IS LIT
M LO-287-86
5. The tape loads in 10-15 seconds. During loading the two leaders couple
and the tape winds onto the take-up reel inside the tape drive.
The red light remains on.
When the green light also comes on, the tape is ready to use. Refer to your
system software manual for further instructions on how to use the tape,
for example how to perform backup.
NOTE
If a cartridge is new, the system performs a calibration sequence
that takes approximately 40 seconds. The green light flashes
rapidly and irregularly during calibration.
CAUTION
Never move the cartridge release handle unless the red indicator
light is off and the green indicator light is on-. Never move the
cartridge release handle while either indicator light is flashing.
If the red light flashes rapidly at any time, press the Load/Unload
button four times. If the problem persists, do not attempt to use the
tape drive or to remove the tape cartridge. Call your nearest service
representative.
2-22
Operation
Removing a Tape Cartridge
You must unload a tape (includes rewinding and uncoupling) before you can
remove the cartridge from the tape drive. Use the following procedure.
1. Press the LoadfUnload button to the out (unload) position.
The red and green lights flash slowly, but not in unison, as the tape
rewinds to the beginning of the tape. This may take up to 90 seconds.
The red light remains on and the green light goes off, as the tape unloads
into the cartridge.
When the tape is completely unloaded, the red light goes off and the green
light comes on.
2. Pull the cartridge release handle up.
NOTE
Rewinding a tape can also be done under software control. Refer to
your software manual for information.
3. Remove the tape cartridge and store it in a safe place.
4. Push the cartridge release handle down.
The green light remains on showing that there is power to the drive and
that you can safely move the cartridge release handle.
CAUTION
Always remove the tape cartridge from the tape drive when the
cartridge is not in use or before you turn off the system. Failure to
remove the cartridge may result in damage to the tape cartridge.
Summary of TK50 Controls and Indicator Lights
Table 2-3 summarizes the operation of the TK50 tape drive controls and
indicator lights.
2-23
Operation
Table 2-3: TK50 Tape Drive Controls and Indicator Lights
Control
Position
Load/
Unload
button
In
Function
Loads the tape (10-15 seconds).
If a tape is already in place when the power is
turned on, rewinding and loading can take up
to 2 minutes.
Out
Rewinds and unloads the tape.
Up
Lets you insert or remove a tape after rewind
and unload operations are completed.
Down
Locks tape in operating position.
Green
Light
Red
Light
Condition
Off
Off
No power to the tape drive.
On
Off
Safe to move cartridge release handle. Power
is present.
Off
On
Do not move the cartridge release handle. One
of the following is in effect:
- Power-on self test is occurring.
- Cartridge is inserted but handle is still up.
- Tape is loading or unloading.
- Tape is stopped.
On
On
Tape loaded successfully.
Flashing
On
Tape is in motion (except rewind). Read/write
commands are being processed. Irregular fast
flashing means tape calibration is occurring. *
Flashing
Flashing
Tape is rewinding.
Off
Flashing
There is a fault. Press rapidly and release the
LoadIU nload button four times. If the problem
persists, do not attempt to use the tape drive
or to remove the tape cartridge. Call your
service representative.
Cartridge
release
handle
*
If a tape is new, the system performs a calibration sequence that takes
approximately two minutes.
2-24
Troubleshooting
3
Troubleshooting is the process of isolating and repairing minor problems.
This section describes three levels of troubleshooting:
• Power-on messages - A list of indications that appear when the system
is turned on and what they mean.
• Corrective actions - A simple checklist of potential problems and what
to do.
• The MicroVAX Maintenance System - The maintenance tests available
and when to use them.
3-1
Troubleshooting
POWER-ON MESSAGES
During the power-on sequence, the MicroVAX II executes built-in diagnostic
and start-up routines that can give you useful maintenance information.
Monitoring the power-on display can warn you of possible problems. The
information is displayed in the form of single letters, and numbers on the
console terminal and on the LED display located on the CPU panel on the
rear of the unit. Normally, the display will progress from F to 0, as listed in
Table 3-1.
If the display stops in the range of F to 3, there may be a hardware error in
the system. Refer to the Micro VAX II630QB Technical Manual.
If the display stops on 2, check the "system does not start from ... " problem
indications listed in the Corrective Actions section of this chapter first. If the
actions listed there do not solve the problem, refer to the Micro VAX II 630QB
Technical Manual.
If the display stops on 1, the most likely problem is that the start-up device
does not contain startable system software. Complete the system software
installation as directed in the manual supplied with your system software.
3-2
Troubleshooting
Table 3-1: ROM Start-Up/Diagnostic Test Output Codes
Display Description
F
E
D
C
B
A
9
8
7
6
5
4
3
2
1
o
Waiting for DCOK assertion
Waiting for POK assertion
Running checksum test on ROM
Searching for RAM memory required to run ROM programs
Reading IPCR register (accesses Q22-Bus)
Testing QxSS video console display (if present)
Identifying console terminal
Language inquiry or CPU halted
Running data tests on RAM memory
Running address tests on RAM memory
Running tests that use Q22-Bus map to access RAM memory
Running CPU instruction and register tests
Running interrupt tests
Searching for a start-up device
Loading secondary start
Testing completed
3-3
Troubleshooting
CORRECTIVE ACTIONS
The corrective actions listed in this section are for minor problems that you
can easily identify and correct. For example, an improper switch position can
cause problems.
The types of problems you may encounter are grouped into three sections.
• Power-on problems - Table 3-2 lists problems that typically occur during
power-on. These problems can occur whether or not you have already
installed system software.
• Software installation problems - Table 3-3 lists problems that can occur
during installation of diagnostic or system software.
• General problems - Table 3-4 lists problems that can occur at any time.
Corrective actions listed here assume a fairly simple cause. If these actions
do not solve your problem, run the MicroVAX Diagnostics, described in the
next section.
CIRCUIT
BREAKER
MLO-288-86
3-4
Trou bleshooti ng
Table 3-2: Power-On Problems
Problem
Possible Cause
Corrective Action
No response when the
power switch is turned
on (switch is not lit).
System is not plugged
in.
Set the power switch to
O. Plug in the system.
Set the power switch
to 1.
No power at the wall
outlet.
Use a different wall
outlet.
System circuit breaker
is in the out position.
Set the power switch
to O. Reset the circuit
breaker by pushing it
in. The circuit breaker
is shown on the
previous page. Set the
power switch to 1. If the
circuit breaker is in the
out position again, refer
the problem to service
personnel.
Power cable is
incorrectly installed.
Set the power switch to
O. Check that the cable
is fully seated in the
socket in the rear of the
system. Set the power
switch to 1.
(Continued on next page)
3-5
Troubleshooting
Table 3-2: Power-On Problems (Cont.)
Problem
Possible Cause
Corrective Action
Power is on (1/0 switch
is lit), but there is no
display on the console
terminal.
Console terminal is off.
Turn the terminal on.
Console terminal is offline.
Put the terminal
on-line. Refer to the
manual that came with
the terminal.
Console terminal cable
is not installed
correctly.
Make sure that the
cable is installed
properly at both ends.
Terminal module is
defective.
Run system diagnostics
to check status of
terminal module.
Baud rate setting of
the system and the
terminal do not match.
Make sure the baud
rate settings are the
same. Refer to the
Installation chapter
of this book.
Mode switch on the
CPU panel is set to T.
Refer to step 7 and step
27 in the Installation
chapter for the correct
switch setting.
Halt enable/disable
switch is set to the
enable positon.
The system is in console
mode. To exit console
mode, set the halt
enable/disable switch
to the disable (down)
position and then
restart the system.
Power is on (1/0 switch
is lit), but there is no
display on the console
terminal
Instead of
automatically
starting, system
power-on results
in > > > being
displayed on the
console terminal.
(Continued on next page)
3-6
Troubleshooting ,
Table 3-2: Power-On Problems (Cont.)
Problem
Possible Cause
Corrective Action
System does not start
from the fixed-disk
drive.
The fixed -disk is offline, because the Ready
button is in (not lit).
Press and release the
Ready button to put the
fixed disk on-line. The
Ready button should
glow green.
Table 3-3: Software Installation Problems
Problem
Possible Cause
Corrective Action
The message "?54
RETRY" appears on
the console terminal
twice.
No startable (bootable)
media was found.
Install software from
your diskette or tape
cartridge. If the
message reappears two
or more times, refer to
the Micro VAX II630QB
Technical Manual.
System does not start
from the diskette drive.
(The wrong software
appears on the console
terminal.)
No diskette in diskette
drive.
Insert a diskette
containing startable
system software in the
diskette drive.
Diskette drive door is
not closed.
Close the diskette drive
door.
Diskette is in the drive
upside down.
Check that the orange
stripe on the diskette
matches the stripe on
the drive.
Diskette is not
startable (does not
contain a bootstrap
program).
Use a diskette
containing a bootstrap
program to start system
software.
Diskette is worn or
damaged.
Try another diskette.
(Continued on next page)
3-7
Troubleshooting
Table 3-3: Software Installation Problems (Cont.)
Problem
Possible Cause
Corrective Action
System does not start
from the TK50 tape
drive. (The wrong
software appears on
the console terminal.)
No tape cartridge in
the tape drive.
Insert a cartridge
containing startable
system, software into
the tape drive.
Fixed disk drive is online (Ready button is
lit). Your system starts
from the fixed disk, if
it is on-line.
Push the Ready button
to place the fixed disk
off-line.
Tape is not startable
(does not contain a
bootstrap program).
Use a tape containing
a bootstrap program to
start system software.
Tape is worn or
damaged.
Try another tape
cartridge.
Table 3-4: General Problems
Problem
possible Cause
Corrective Action
System halts
unexpectedly during
normal operation.
< BREAK> key on the
Set halt enable/disable
switch on the back of
the system to disable
(down) position to
prevent recurrences.
Press Restart button
to restart the system.
console terminal was
pressed inadvertently.
Halt button was
pressed inadvertently.
Set halt enable/disable
switch on the back of
the system to disable
(down) position to
prevent recurrences.
Press Restart button to
restart the system.
(Continued on next page)
3-8
Troubleshooting
Table 3-4: General Problems (Cont.)
Possible Cause
Corrective Action
Fixed-disk read error
message is displayed.
Disk is off-line because
Ready button is in (not
lit).
Press and release
Ready button (glows
green) to put the disk
on-line.
Fixed-disk write error
message is displayed.
Disk is off-line because
Ready button is in (not
lit).
Press and release the
Ready button (glows
green) to put fixed-disk
on-line.
Disk is write-protected
(Write-Protect button
glows orange).
Press and release
Write-Protect button
(not lit).
No diskette in the
diskette drive.
Insert a diskette in the
drive.
Diskette drive door is
not closed.
Close the diskette drive
door.
Diskette is in the drive
upside down.
Check that the orange
stripe on the diskette
matches the stripe on
the drive.
Diskette is not
formatted.
Use a preformatted
RX50 diskette.
Diskette is worn or
damaged.
Try another diskette.
No diskette in the
diskette drive.
Insert a diskette in the
drive.
Diskette drive door is
not closed.
Close the diskette drive
door.
Diskette is in the drive
upside down.
Check that the orange
stripe on the diskette
Problem
Fixed-Disk Problems
Diskette Drive Problems
Diskette read error
message is displayed.
Diskette write error
message is displayed.
(Continued on next page)
3-9
Troubleshooting
Table 3-4: General Problems (Cont.)
Problem
Possible Cause
Corrective Action
matches the stripe on
the drive.
Diskette is not
formatted.
Use a preformatted
RX50 diskette.
Diskette is worn or
damaged.
Try another diskette.
Diskette is writeprotected.
Remove the writeprotect tab.
TK50 red light flashes
rapidly, but there are
no unusual sounds.
A problem in the tape
drive.
Press the LoadIU nload
button four times. If the
problem persists, do not
attempt to use the tape
drive or to remove the
tape cartridge if loaded.
Call your service
representative.
Red light flashes
rapidly and you hear a
whirring sound.
Leaders did not couple
properly.
Power down
immediately and
call your service
representative. Do not
attempt to remove the
cartridge.
Cartridge release
handle does not move.
Power-on test is still in
process.
If you are trying to
Tape Drive Problems
insert a cartridge, wait
for the red light to
go out and the green
light to come on. Then
try again. If you are
trying to remove a
cartridge, try loading
and unloading the
cartridge again. Move
(Continued on next pa~e)
3-10
Troubleshooting
Table 3-4: General Problems (Cont.)
Problem
Possible Cause
Corrective Action
the cartridge release
handle only after the
red light goes off and
the green light goes on.
If the problem persists,
call your service
representative.
Cartridge release
handle does not lock.
Cartridge is not
inserted properly.
Reinsert the tape
cartridge. If the
problem persists, call
your service
representative.
Cartridge does not
unload.
LoadIU nload button is
in the load (in) position.
Make sure the Load!
Unload button is in the
unload (out) position.
Wait for the red light to
go out and the green
light to come on before
trying to remove the
cartridge.
TK50 passes power-on
test but does not work.
The controller may be
bad, or the connection
between the drive and
the controller may be
loose.
Consult the MicroVAX
II630QB Technical
Manual for instructions
on how to read LEDs
during power-on. The
LEDs will help you
diagnose the problem.
THE MICROVAX MAINTENANCE SYSTEM
The maintenance system software provides user tests that are designed
to isolate and identify faults in the system. You can run the system test
in response to an error message or to test your system periodically. These
tests can detect more serious problems than those listed in the Corrective
Actions tables. Such problems as defective drives, defective controllers, bad
connections between drives and controllers, and power supply problems are
identified by the system test.
3-11
Troubleshooting
Before calling a service representative to report a problem, run the system
test and record the results.
The maintenance system software is stored on RX50 diskettes or on a
TK50 magnetic tape cartridge. You run the maintenance system programs
using the console terminal for command inputs and system displays. The
Installation chapter describes the system test. To run the test after your
system software has been loaded, you must do the following:
1. Check that halts are enabled. The switch on the rear of the system should
be set to the up position (dot inside the circle).
2. Press the <BREAK> key on the console terminal or the Halt button on
the control panel. This puts your system into console command mode. You
should see the > > > prompt.
3. If you are testing with a tape cartridge, press the Ready button on the
control panel to the in position. This puts the fixed disk off-line so that
your system will load the diagnostic software from the tape drive. This
step is, not necessary if you are testing with diskettes.
4. Insert the medium containing the diagnostic software into the appropriate
drive. If you are testing with a cartridge, use the cartridge labeled MVII
Diag. Cust. TK50. Be sure to press the LoadlUnload button. If you are
testing with diskettes, start with the diskette labeled MVII Diag. Cust.
RX501.
5. Press the Restart button on the control panel to the in position. This
restarts your system from the medium containing the diagnostic software.
After you see the introductory display of the MicroVAX Maintenance System,
run the diagnostic tests as described in the Installation chapter beginning
with step 21.
More serious problems require the use of the maintenance procedures
described in the Micro VAX II 630QB Technical Manual. Those procedures
should only be performed by qualified service personnel.
3-12
Troubleshooti ng
Main Menu
The main menu lists three customer options available to all users who run
the maintenance system and two service options available only to those users
who have purchased a MicroVAX Maintenance Kit. You can obtain the main
menu display as directed in the Installation chapter of this manual, steps 14
through 26.
rum fltElIU
1 - Test the system
2 - Display System Configuration and Devices
3 - Display the Utilities fltenu
4 - Display the Service fltenu
5 - Exit NicroVax Naintenance System
Type the number; then press the
RETURI~
key
>
MLO-289-86
3-13
Troubleshooting
Main Menu Options
You can:
1. Run a test of all devices supplied by DIGITAL in the system. You can run
these tests as described in the Installation chapter, of this manual, steps 14
through 30.
2. Display a list of all devices supplied by DIGITAL in the MicroVAX II
system. A sample display is shown below.
3. Display a menu of the MicroVAX Maintenance System utility programs.
This option is reserved for future use by DIGITAL.
4. Display the diagnostics menu if you have purchased the MicroVAX
maintenance kit. The diagnostics option is for qualified service personnel
only (see the Micro VAX II630QB Technical Manual).
5. Exit the MicroVAX Maintenance System.
SYSTEM CONFIGURATION ArID DEVICES
SYSTEM CONFIGURA TI ON
CPUA
MicroVAX CPU
KA630-AA 1MB, FPU MC=OO HW=OO
MEMA .. MicroVAX memory system
5 megabytes. 10240 Pages
KA360 ... CPU module, 1MB on-board memory
MS630-BB
Quad height memory module, 4MB
RQDX2A ... MSCP Winchester/diskette controller.
Revisions =10 and 6
RD53 ... Nonremovable
RX50 ... Removable
*RX50 ... Drive is offline
DEQNAA ... Ethernet controller.
AA-OO-03-01-2E-3F
DZQ11A ... Asynchronous line controller.
Press the RETURN key to return to the Previous menu. >
MLO-290-86
3-14
Upgrade
4
As you upgrade your system, insert your documentation here for future
reference.
4-1
Appendix A
Related Documentation
Document
Order Number
MicroVAX II 630QB Technical Manual
MicroVAX II Upgrade Installation Guide
MicroVAX System Maintenance Guide
630QB System Illustrated Parts Breakdown
630QB Field Maintenance Print Set
MicroVAX 630 CPU Module User's Guide
ZA-GLBAA-MN
EK-630QA-IN
AZ-GM3AA-MN
EK-UVAX2-IP
MP-02071-01
EK-KA630-UG
Microcomputer Handbook Series:
VAX Architecture Handbook
VAX Software Handbook
Microcomputer Interfaces Handbook
Microcomputers and Memories Handbook
EB-19580-20
EB-21812-20
EB-20175-20
EB-18451-20
Software Documentation:
MicroVMS User's Manual V4.0
ULTRIX-32m Installation Guide
VAXELN User's Guide
AA-Z209B-TE
AA-CN29A-TE
AA-EU38A-TE
These documents can be ordered by writing to:
Digital Equipment Corporation
Accessories and Supplies Group
P.O. Box CS2008
Nashua, NH 03061
Attention:
Documentation Products
A-l
Appendix B
MicroVAX II Specifications
PREPARING FOR YOUR MICROVAX II SYSTEM
The versatile configuration of MicroVAX II systems allows for multiple terminals that can be installed on more than one floor of a building or in more
than one building. DIGITAL Field Service personnel are available to help
you plan your installation. Your sales representative can provide more
information.
MLO-220-85
B-1
MicroVAX II Specifications
To get the best possible performance from your system, you must provide
the operating environment listed in this appendix.
Use one 15 amp dedicated circuit for the MicroVAX system unit. Use
another 15 amp dedicated circuit for the console terminal and additional
devices.
NOTE
Your terminal and printer might be different from those shown.
POWER CABLE
DATA
CABLE
DO NOT SHARE
THESE LINES
WITH OTHER
ELECTRICAL
EQUIPMENT
SYSTEM UNIT
MLO-618-85
B-2
MicroVAX II Specifications
Electrical Requirements
These requirements depend on the line voltage setting that you select.
Input
Specifications
Line voltage
Voltage tolerance
Power source phasing
Frequency
Line frequency tolerance
Running current (typical)
Running current (maximum)
Power consumption (maximum)
(switchable for input voltage)
120 Vac
88-128 V
Single
60 Hz
47-63 Hz
8.8 A
12.0 A
690W
220 Vac
176-256 V
Single
50 Hz
47-63 Hz
4.4 A
6.0 A
690 W
B-3
MicroVAX II Specifications
Environmental Requirements
Operating
Nonoperating
Maximum altitude
2.4 km
8000 ft
4.9 km
16000 ft
Temperature range*
10-40°C
50-104 of
-40 to 66°C
-40 to 151°F
Temperature change
rate
Relative humidity
11°C/hour
20 of/hour
20% to 80%
10% to 95%
* Reduce the maximum temperature specification by
1.8 °C for each 1000 m (1°F for
each 1000 ft) increase in altitude.
NOTE
Your service contract may require specific limits for temperature
and humidity.
B-4
MicroVAX II Specifications
Acoustic Noise Emission
Operating Mode
LNPE*
LPAt
Disk operating
6.0 bels
45 dB
Disk idle
5.9 bels
44 dB
* LNPE
Noise power emission level measured in bels (1 bel = 10 dB).
t LPA
Sound pressure level measured in dB at the front bystander position:
1.0 m from the front edge of the unit and 1.5 m above the floor.
NOTE
Acoustic noise information is for 50 and 60 Hz.
8-5
MicroVAX II Specifications
System Unit Physical Specifications
62.23 em
(24.5 in)
~. 33.02em ~
r---~
(13.0 in)
WEIGHT 59 kg (130 Ib)
MLO-619-85
B-6
MicroVAX II Specifications
RX50 DUAL-DISKETTE DRIVE
Functional Specifications:
Diskettes per RX50 drive - 2. Number of recording surfaces per diskette1.
Storage capacity:
Per diskette (80 tracks)
Per track (10 sectors)
Per sector (1 logical block)
409,600 bytes
5120 bytes
512 bytes
Performance:
A verage seek time
Average rotational latency
Average access time
Transfer rate
164 msec
100 msec
264 msec
12.8K bytes/sec*
Physical Specifications:
Height
Width
Depth
Weight
8.25 cm (3.25 in)
14.6 cm (5.75 in)
21.6 cm (8.50 in)
2.8 kg (4.18 lb)
* When operating with RQDX2 controller
8-7
MicroVAX II Specifications
TK50 MAGNETIC TAPE
Functional Specifications:
Recording media
Tape dimensions
Mode of operation
Read/Write method
Recording density
Number of tracks
Magnetic tape
0.5 in wide
600 ft long
Streaming
Serpentine
6667 bits/in
22
Storage capacity:
Unformatted
Formatted
131.0M bytes
94.5M bytes
Performance:
Tape start time
Tape speed
Streaming data rate
Access time (from insertion of new
tape)
300 msec maximum
75 in/sec
500K bits/sec
1 min minimum
35 min maximum
Physical Specifications:
Height
Width
Depth
Weight
8-8
8.25 cm (3.25 in)
14.60 cm (5.75 in)
21.44 cm (8.44 in)
2.27 kg (5 lb)
MicroVAX II Specifications
RD52 FIXED WINCHESTER DISK DRIVE
Storage Capacity:
Total capacity
User capacity
User capacity (blocks)
33,554,432 bytes*
30,965,760 bytes*
60,480 blocks*
Performance:
Average seek time
Average rotational latency
Average access time
Transfer rate
49.00 msec
8.33 msec
57.33 msec
184.32K bytes/sec*
Physical Specifications:
Height
Width
Depth
Weight
8.25 cm (3.25 in)
14.6 cm (5.75 in)
20.32 cm (8.00 in)
3.18 kg (7 lb)
* When operating with RQDX2 controller
8-9
MicroVAX II Specifications
RD53 FIXED WINCHESTER DISK DRIVE
Storage capacity:
Total capacity
V ser capacity
V ser capacity (blocks)
71,303,168 bytes*
70,987,776 bytes*
138,648 blocks*
Performance:
Average seek time
Average rotational latency
Average access time
Transfer rate
30.00 msec
8.33 msec
38.33 msec
184.32K bytes/sec*
Physical Specifications:
Height
Width
Depth
Weight
* When operating with RQDX2 controller
8-10
8.25 cm (3.25 in)
14.60 cm (5.75 in)
20.32 cm (8.00 in)
3.18 kg (7 lb)
MicroVAX II Specifications
RD54 Fixed Winchester Disk Drive
Storage Capacity
Total capacity
User capacity
User capacity (blocks)
191,394,000 bytes
159,334,000 bytes
311,200 blocks
Performance
Average seek time
Average rotational latency
Average access time
Transfer rate
30.00 msee
8.33 msec
38.33 msec
552.96K bytes/sec
Physical Specifications
Height
Width
Depth
Weight
8.25 em (3.38 in)
14.60 cm (5.75 in)
20.32 cm (8.20 in)
2.8 kg (6.3 lb)
8-11
Appendix C
MicroVAX II Options
Additional hardware options are available for your MicroVAX II system.
Some of these options are customer-installable; others require a trained
specialist.
For more information on options refer to Chapters 3 and 4 of the MicroVAX
II630QB Technical Manual.
TERMINAL AND PRINTER OPTIONS
You can use any DIGITAL video or hard-copy terminal and any LA series
printer with Micro VAX II systems. The MicroVAX II system supports terminals and printers that meet EIA standard RS--232C.
The number of terminals or printers that can be connected to your system
depends on the model you have.
Some systems are equipped with communication options that allow connection of additional terminals and/or printers. Refer to the MicroVAX II
630QB Technical Manual for details.
C-l
MicroVAX II Options
MEMORY OPTIONS
The MicroVAX II system can have up to two MS630 memory modules. Three
variations are available.
Module Number
Capacity
MS630-AA
MS630-BA
MS630-BB
MS630-CA
1M byte
2M bytes
4M bytes
(8M bytes)
NOTE
On systems with 16 MB of memory, it may take up to three minutes
to perform the self-tests when you turn on the system.
MICROVMS PROBLEMS WITH 8 MB MEMORY BOARDS
Every time you turn on your MicroVAX II, it first runs self-tests on the
hardware, then tries to load system software from a fixed disk. If you have
Version 4.4 (or earlier) of MicroVMS installed on your system, Micro VMS
reports some misleading error messages when one or two of the MS630-CA
(8 MB) memory options are installed. These problems will be solved in a
future release of MicroVMS and do not affect how you use your system.
The error messages are described in the following sections.
Faulty SYSGEN parameter
When you boot a MicroVAX II system containing 16 MB of memory, you may
receive the following error message:
%SYSBOOT-W-WS, default and quota raised to PHD+MINWSCNT
This message indicates that the PQL_DWSDEFAULT SYSGEN parameter
is too low. You can ignore this message, as it does not affect the performance
of your system.
Bootstrap Program Reports Faulty Memory Pages
When you boot MicroVMS on a MicroVAX II system, the primary bootstrap
program checks all memory in the system. As part of that checking procedure, it reports bad pages of memory. In VMS, a page is an area of 512
contiguous bytes, the size of a block of data read into memory from mass
storage.
C-2
MicroVAX " Options
If you issue a SROW MEMORY command on a system having more than
13MB of memory, VMS reports one bad page of memory. On systems having
more than 16 MB of memory, VMS reports two bad pages of memory.
The report of bad pages is misleading. The pages of memory are not
bad, but "in use" to support the video function. You can safely ignore the
error message.
COMMUNICATION OPTIONS
The primary communication options available for MicroVAX II systems are
as follows.
Model
Maximum
Speed
Transmission
Mode
Lines
DMA
DEQNA
10M bits/sec
Ethernet
1
DRV11
DZQ11
38,400 bits/sec
9,600 bits/sec
Asynchronous
Asynchronous
8
4
Yes
(block mode)
Yes
No
This is only a partial list of options that are available for MicroVAX II
systems. For a complete and up-to-date list, contact your DIGITAL sales
representative.
C-3
Glossary
Application program
A program that meets specific user needs, such as a program that
monitors a manufacturing process.
Backplane
The connector block that all the Micro VAX II printed-circuit boards plug
into.
A printed-circuit board containing the bus.
Back up
The process of making copies of the data stored in your disk drive(s) so
that you can recover that data after an accidental loss. You make copies
on RX50 diskettes or TK50 magnetic tape and then store them in a safe
place.
Backup copy
A copy of data on your fixed disk that is stored on RX50 diskettes or
TK50 magnetic tape.
Baud rate
The speed at which signals are transmitted serially along a communication line. One baud equals one bit per second.
Glossary-l
Glossary
Binary
A number system that uses only two digits: 0 and 1. These digits are
usually represented in the circuitry by two voltage levels. All programs
are executed in binary form.
Bit
A binary digit, the smallest unit of information in a binary system of
notation, designated as a 0 or a 1.
Boot
To use a bootstrap program.
Bootable medium
A fixed disk, diskette, or magnetic tape containing software (such as an
operating system) that the bootstrap program can load into the system
memory.
Bootstrap
A program that you start when you turn the MicroVAX II on. The bootstrap loads software contained on the fixed disk, diskette, or magnetic
tape into memory. The MicroVAX II then stops executing the bootstrap
and starts executing the software in memory. The software usually loads
an operating system or other software into memory, so that the
MicroVAX II can start processing.
Bug
An error in the design or implementation of hardware or software system
components.
Bus
A printed-circuit board that is part of the backplane. The bus permits
communication among the other printed-circuit boards.
Byte
A group of eight binary digits (bits). A byte is one-half the size of a
MicroVAX II word and one-quarter of the size of a MicroVAX II longword.
Glossary-2
Glossary
Central processing unit
The part of a computer system that. controls the interpretation and execution of instructions. In the Micro VAX II system all CPU functions are on
one chip.
Command
An order given by a user to a computer, often through a terminal
keyboard.
Communication line
A cable along which electrical signals are transmitted. Devices or
MicroVAX II systems connected by communication lines can share information and resources.
Computer system
A combination of computer hardware, software, and external devices that
performs specific operations or tasks.
Console terminal
The terminal that you use when installing software and running diagnostic programs.
Controller
A Micro VAX II component, usually a printed-circuit board, that regulates
the operation of one or more peripheral devices. Controllers are often
called interface units.
Control panel
The area on the front of the system cabinet that contains control switches
and indicator lights.
CPU
Abbreviation for central processing unit.
Data
A representation of facts, concepts or instructions, suitable for communication, interpretation or processing by humans or by machines.
Glossary-3
Glossary
Data transmission
The movement of data, in the form of electrical signals, along a communication line.
Debug
To detect, locate, and correct errors (bugs) in system hardware or
software.
Device
The general name for any entity connected to the MicroVAX II that is
capable of receiving, storing, or transmitting data. (See Input device,
Output device, Input/Output device, and Controller.)
Device name
The name by which a device or controller is identified within a
Micro VAX II system. You use the device name to refer to that device
when communicating with the system.
Diagnostic program
A program that detects and identifies abnormal MicroVAX II hardware
operation. The Micro VAX Maintenance System software contains several
diagnostic programs.
Disk
A flat circular plate with a coating on which data is stored magnetically
in concentric circles (tracks). MicroVAX II disks include the RD52 or
RD53 fixed disk and the RX50 diskette.
Disk drive
A device that contains a fixed disk or one or more diskettes. The drive
contains mechanical components that spin the disk or diskettes, and move
the read/write heads that read and store information on the surface of the
disk or diskettes.
Diskette
A flexible magnetic disk used to store information.
Diskette drive
The device that holds one or more RX50 diskettes. (See Disk drive.)
Glossary-4
Glossary
EIA
Electronic Industries Association.
Error message
A message displayed by the MicroVAX II to indicate that it has detected
an error or malfunction.
File
A collection of related information treated by the computer as a single
item.
Formatted data
Data laid out in a particular pattern to conform to a predetermined structure. The structure is dictated by the system software.
Hard-copy terminal
A terminal that displays information on paper, rather than on a screen.
(Compare with video terminal.)
Hardware
The physical components - mechanical and electrical - that make up a
computer system. (Compare with Software.)
Head
The part of a fixed-disk drive, diskette drive, or tape drive that reads,
records, and erases data. Also called a read/write head.
Input device
A piece of equipment used to transfer data into the computer. A keyboard is an input device.
Input/Output (I/O) device
A piece of equipment that accepts data for transmission to and from a
computer. A terminal is an input/output device.
Interactive
A method of communicating with a computer system. You type a command at the keyboard, the system executes the command, and then
responds with a message or prompt for another command.
Glossary-5
Glossary
Interface
A device or piece of software that lets different components of a computer
communicate with one another.
I/O
Abbreviation for input/output.
K
When referring to the storage capacity of a computer, the symbol that
means a binary thousand or 2 to the 10th power (1024 in decimal
notation.)
K byte
Abbreviation for kilobyte.
Kilobyte
1024 bytes.
LED
Abbreviation for light emitting diode. LEDs are used as indicator lights
on the control panel. A segmented LED display on the CPU distribution
panel on the rear of the MicroVAX II cabinet displays the characters 0-9
and A-F during the power-on sequence to indicate CPU status and normal/abnormal MicroVAX II operation.
Load
To move software, usually from a peripheral device into memory.
To place a disk in a disk drive, or tape in a tape drive.
Longword
A group of 32 bits, equal to two words or four bytes.
M
When referring to the storage capacity of a computer, the symbol that
means a binary million or 2 to the 100th power (1,048,576 in decimal
notation).
Glossary-6
Glossary
Magnetic tape
A long strip of plastic coated with magnetic oxide, used for storing data.
The tape used in a TK50 magnetic tape cartridge. Often called magtape.
M byte
Abbreviation for megabyte.
Megabyte
1,048,576 bytes.
Memory
The area where a computer finds the instructions and data it will process.
Menu
A displayed list of options. The list usually contains commands you can
enter.
Off-line
Pertaining to equipment, devices, and events that are not under direct
control of the computer system.
On-line
Pertaining to equipment, devices, and events that are in direct communication with the computer system.
Operating system
A collection of programs that controls the overall operation of a computer
system and performs such tasks as:
Assigning places in memory to programs and data
Processing requests, scheduling jobs
Controlling the operation of input and output devices
Output device
A device by means of which data can be extracted from a computer system. For example, a printer.
Glossary-7
Glossary
Peripheral device
Any device distinct from the central processing unit that provides it with
additional memory storage or communication capability. Examples are
disk and diskette drives, video terminals, and printers.
Power-on sequence
A series of ordered events that occurs when you supply power to a system
by turning it on.
Printer
A peripheral device that provides paper copies of information stored in a
computer.
Program
The complete sequence of instructions necessary for a computer to perform a task. (See Software.)
Prompt
A character or words that a computer displays to indicate it is waiting for
you to type a command.
Read-only memory
A memory that does not allow modification of its contents. A computer
can use data in a read-only memory but cannot change it.
Reboot
To restart a computer system. Pressing the Restart button on the control
panel reboots the Micro VAX II system.
Record
A set of related data that a program can treat as a unit. A file consists
of a number of records.
ROM
Abbreviation for read-only memory.
Glossary-8
Glossary
Run
A single continuous execution of a program.
To execute a program.
Software
Programs executed by a computer system to perform chosen or required
functions. (Compare with hardware.)
Software package
A set of related programs that performs a specific task.
Storage medium
Any device capable of recording and releasing information; for example, a
diskette.
Store
To enter data into a storage device, such as a disk, or into memory.
System
A combination of computer hardware and software and external devices
that performs specific processing operations.
System management
Tasks performed by the operating system to control the overall operation
of the computer system.
Terminal
An input/output device used for communication between the user of a
computer system and the system itself. Terminals are divided into two
basic categories: video and hard-copy.
Video terminal
A terminal that displays information on the screen of a cathode ray tube
(CRT). (Compare with hard-copy terminal.)
Word
A word is 16 bits (2 bytes) long.
Glossary-9
Glossary
Write-protect
To protect a disk, diskette, or other storage medium against the addition,
revision, or deletion of information.
Write-protect notch
A small notch in the side of an RX50 diskette. You can cover the notch
with an adhesive-backed tab to write-protect the diskette.
Glossary-l0
'HOW TO ORDER
ADDITIONAL DOCUMENTATION
From
Call
Write
Chicago
312-640-5612
Digital Equipment Corporation
Accessories & Supplies Center
1050 East Remington Road
Schaumburg, IL 60195
8:15 AM to 5:00 PM CT
San Francisco
408-734-4915
8:15AM t05:00PM PT
Alaska, Hawaii
603-884-6660
8:30 A M to 6:00 PM ET
Digital Equipment Corporation
Accessories & Supplies Center
632 Caribbean Drive
Sunnyvale, CA 94086
or 408-734-4915
8:15 AM to 5:00 PM PT
New Hampshire
603-884-6660
8:30 AM to 6:00 PM ET
Rest of U.S.A.,
Puerto Rico*
1-800-258-1710
8:30 AM to 6:00 PM ET
Digital Equipment Corporation
Accessories & Supplies Center
P.O. Box CS2008
Nashua, NH 03061
'Prepaid orders from Puerto Rico must be placed with the local DIGITAL subsidiary (call 809-754-7575)
Canada
British Columbia
1-800-267-6146
8:00 AM. to 5:00 PM ET
Ottawa-Hull
613-234-7726
8:00 AM to 5:00 PM ET
Elsewhere
Digital Equipment of Canada Ltd
940 Belfast Road
Ottawa, Ontario K1G 4C2
Attn: A&SG Business Manager
112-800-267-6146
8:00 AM. to 5:00 PM ET
Digital Equipment Corporation
A&SG Business Manager*
Elsewhere
'CIO
DIGITAL's local subsidiary or approved distributor
MicroVax II 630QB
Owner's Manual
AA-FM8AA-TN
READER'S COMMENTS
NOTE: This form is for document comments only. DIGITAL will use comments submitted on this form at the company's discretion. If you
require a written reply and are eligible to receive one under Software
Performance Report (SPR) service, submit your comments on an SPR
form.
Did you find this manual understandable, usable, and well organized? Please
make suggestions for improvement.
Did you find errors in this manual? If so, specify the error and the page
number.
Please indicate the type of user/reader that you most nearly represent.
_
_
_
_
_
_
Assembly language programmer
Higher-level language programmer
Occasional programmer (experienced)
User with little programming experience
Student programmer
Other (please specify)
Nanle ______________ Date _ _ _ _ _ _ _ _ _ _ _ __
Organization
Telephone _ _ _ _ _ _ _ _ _ __
Street ________________________________________________
City ________________ State _ _ Zip Code _ _ _ _ __
or Country
Do Not Tear - Fold Here and Tape
III
NO POSTAGE
NECESSARY
IF MAILED
IN THE
UNITED STATES
BUSINESS REPLY MAIL
FIRST CLASS PERMIT NO.33 MAYNARD MASS.
POSTAGE WILL BE PAID BY ADDRESSEE
DIGITAL EQUIPMENT CORPORATION
CORPORATE USER PUBLICATIONS
ML05-5/E45
146 MAIN STREET
MAYNARD, MA 01754-2571
Do Not Tear -
Fold Here
-
-
-
-
-
-
-
-
-
-
-
-
-
-
-
-
-
-
-
-
-
UPDATE NOTICE 1
MicroVAX II 630Q8
Owner's Manual
AZ-FNBAA-MN
May 1986
NEW INFORMATION
This update contains additions to the Micro VAX II 630QB Owner's Manual,
AZ-GLCAA-MN.
To order additional copies of this document, contact the Software Distribution Center,
Digital Equipment Corporation, Westminster, Massachusetts 01473
To order additional documents from outside DIGITAL, refer to the instructions at the back
of this document.
INSTRUCTIONS
The enclosed pages are replacements for or additions to current pages of the
Micro VAX II 630QB Owner's Manual.
Keep this notice in your manual to maintain an up-to-date record of changes.
© Digital Equipment Corporation 1986.
All Rights Reserved:
Printed in U.S.A.
Old page
New page
Title/Copyright
Title/Copyright
iiilblank
v/vi
viilblank
1-17 thru 1-20
1-21/1-21.1
1-21.2/1-22
1-25/1-26
2-15/2-16
2-17 thru 2-24
3-1 thru 3-14
Reader's CommentslMailer
iii/iv
vlblank
1-17 thru 1-20
1-2111-22
1-25/1-26
2-15/2-16
2-17 thru 2-26
3-1 thru 3-14
Reader's CommentslMailer
UPDATE NOTICE 2
MicroVAX II 630QB
Owner's Manual
AA-FM8AA-TN
July 1986
NEW INFORMATION
This update contains additions to the Micro VAX II 630QB Owner's Manual,
(AZ-GLCAA-MN).
To order additional copies of this document, contact the Software Distribution Center,
Digital Equipment Corporation, Westminster, Massachusetts 01473
To order additional documents from outside DIGITAL, refer to the instructions at the back
of this document.
INSTRUCTIONS
The enclosed pages are replacements for or additions to current pages of the
Micro VAX II 630QB Owner's Manual.
Keep this notice in your manual to maintain an up-to-date record of changes.
© Digital Equipment Corporation 1986.
All Rights Reserved
Printed in U.S.A.
Old page
New page
Ti tle/Copyright
Title/Copyright
B-11
C-1 thru C-3
Reader's CommentslMailer
C-l/C-2
Reader's CommentslMailer
2