1
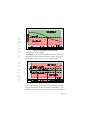
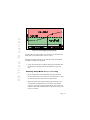
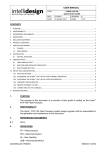
948 Lenape Drive Town Center, New Britain, PA 18901
email: [email protected]
www.jlcinstrumentation.com & www.jlcinternational.com
user manual
JLC International
Phone: 215-340-2650
Fax: 215-340-3670
Non-invasive Ultrasonic Flow Monitor
KATflow 10
M-10-0000-E
K A T f l o w 10 s e r i e s
First Edition - Version 1.0
June 1998
Copyright
Copyright © Katronic Technologies Ltd. 1998
All rights reserved.
No part of t his publication may be reproduced, transmitted, transcribed, stored in a
retrieval system, or translated into any language in any form without the written
permission of Katronic Technologies Ltd.
Warranty and Liability
Katronic Technologies Ltd. guarantee for a period of 12 months from the date of delivery
that it will either exchange or repair any part of this product returned t o Katronic
Technologies Ltd. if it is found to be defective in material or workmanship, subject to the
defect not being due to fair wear and tear, misuse, modification or alteration, accident,
misapplication or negligence.
Disclaimer
Katronic Technologies Ltd. neither gives nor implies any process guarantee for the
KATflow 10 or other products, and shall have no liability in respect of any loss, injury or
damage whatsoever arising out of the application or use of any product or circuit
described herein.
Every effort has been made to ensure accuracy of this documentation, but Katronic
Technologies Ltd. cannot be held liable for any errors.
Technical Enquiries
Please contact Katronic Technologies Ltd. for technical support:
Katronic Technologies Ltd.
23 Cross Street
Leamington Spa
Warwickshire
CV32 4PX
United Kingdom
Tel. 01926 882954 (International +44 1926 882954)
Fax 01926 338649 (International +44 1926 338649)
Web Site: http://www.pipemedia.net/katronic
e-mail: [email protected]
Returns Addre ss
In the unlikely event of product failure there are no user serviceable parts. Please send any
returns to the above address.
Page 2
K A T f l o w 10 s e r i e s
Contents
Introduction....................................................
4
Principle of Operation....................................
5
Applications.............................................…...
6
Installation.................................................….
8
Set up Procedure (KATflow 10-01 only) .....
12
Alarm Modes.................................
12
Entering the Setup Mode..............
14
Selecting the Alarm Mode............
15
Setting the Alarm Set Point..........
15
Alarm Conditions.......……………..
16
Current Output...............................
16
Voltage Output...............................
17
Diagnostics....................................
17
Operation at Elevated Temperatures..........….
18
Cable Specification......................................…
19
EMC Declaration........................................….
20
Troubleshooting..........................................….
21
Technical Specification...............................….
22
Page 3
K A T f l o w 10 s e r i e s
Introduction
The KATflow 10 series is a range of non-invasive flow monitors
and switches designed for use on most industrial liquid flow
applications. The latest, proven ultrasonic techniques are
employed to provide repeatable and reliable switching points.
The KATflow 10 series can be installed and set up in minutes
without disturbing the process it is monitoring.
The microprocessor control allows the set up procedure to be
completed in a few seconds as well as providing fault diagnosis
and alarm indication.
There are two models in the range, the KATflow 10-01 is the
standard version for use in non-hazardous industrial
applications and the KATflow 10-02 is a hazardous area version
(EEx m) for use in Zone 1 & Zone 2 hazardous areas.
The KATflow 10-01 provides a 4 to 20 mA output, a 0 to 10 V
analogue voltage output and a programmable volt free relay
contact as standard.
The KATflow 10-02 provides a 0 to 10 V analogue voltage
output as standard.
Note:
The KATflow 10-01 must be powered by a fused power supply,
the recommended dc fuse rating is 250 mA.
The KATflow 10-02 must be powered by a fused power supply,
the recommended dc fuse rating is also 250 mA. In addition the
dc fuse must have a rated breaking capacity of 4000 A.
Page 4
K A T f l o w 10 s e r i e s
Principle of Operation
The KATflow 10 series uses a proven ultrasonic technique. An
ultrasonic signal is transmitted into the fluid and is reflected
back off any solid particles or air bubbles in the fluid. If the particles are moving the signal will be reflected back at a slightly different frequency than the transmitted signal. The difference in
the frequencies between the received and transmitted signals, or
frequency shift, relates directly to the speed that the solid particles are travelling at in the pipe. The KATflow 10 series converts
this frequency shift into an analogue voltage which is proportional to the flow rate. This analogue voltage is then scaled to 0
to 10 V and buffered to provide the analogue output voltage.
KATflow 10-01 only - The 4 to 20 mA output is scaled directly
from the analogue voltage output (4 mA = 50 mV & 20 mA = 10
V). The relay switching point is determined from the analogue
voltage signal.
Page 5
K A T f l o w 10 s e r i e s
Applications
For the best results the KATflow 10 series can be applied
where:
•
there is a full pipe flow.
•
the pipe material is steel, iron, plastic or glass but not concrete, rubber or flexible plastic pipes.
•
the pipe diameter is greater than 40 mm, and less than 400
mm.
•
the pipe wall thickness is less than 10 mm.
•
the flow velocity is between 0.3 m/s and 3.5 m/s. See the table opposite for minimum and maximum flow rates.
•
the ambient temperature is between -40 oC and +85 oC.
•
if the intended application is in a designated hazardous area
(zone 1 or 2) then the KATflow 10-02 must be used.
•
The solids concentration in the fluid is greater than 100 parts
per million. (e.g. not pure or distilled water). The solids particles must be greater than 100 µm in diameter.
Page 6
Page 7
Pipe ID
inches
1.6
2
3
4
6
8
10
12
16
Pipe ID
mm
40
50
75
100
150
200
250
300
400
26000
14750
10250
6600
3700
1650
920
410
170
76
53
33.5
19
8.4
4.75
2.1
1600
880
620
400
220
100
56
25
Table 1. Minimum and Maximum Flow Rates
2850
1275
880
560
315
140
79
35
750
335
233
147
84
37
21
9.2
7050
3870
2730
1760
970
440
250
110
Min. Flow Max. Flow Min Flow Max. Flow Min. Flow Max. Flow
ltr/min
ltr/min
m 3/hr
m 3/hr
Imp. Gall/ Imp. Gall/
min
min
22.5
265
1.35
16
5.9
70
K A T f l o w 10 s e r i e s
K A T f l o w 10 s e r i e s
Installation
•
Before installation ensure that the application and intended mounting position are compatible with the requirements in the previous section and that the power
supply is capable of supplying the rated voltage and
current (22 to 36 V dc @ 150 mA) and is fused correctly (250 mA).
•
NB: The KATflow 10-02 power supply must have a dc
fuse with a rated breaking capacity of 4000 A.
•
The unit should be installed on a straight section of
pipe at least 4 pipe diameters from any restrictions to
flow or sources of fluid turbulence, e.g. pumps etc.
•
The point at which the sensor attaches should be
cleaned down to bare metal / plastic etc.
•
On horizontal pipes it is preferable to mount the sensor
between the 1 o’clock and the 5 o’clock position on
the pipe to ensure that the ultrasound is easily transmitted into the fluid and not into an air pocket (top of
pipe) or through a layer of sediment (bottom of pipe),
see figure 1.
Figure 1. Correct Positioning on horizontal pipes
Page 8
K A T f l o w 10 s e r i e s
Figure 2. Correct alignment on pipe
•
The sensor is strapped to the pipe using suitable metal
banding (11 mm wide maximum). Prior to mounting the
sensor on the pipe ensure that the length of banding
will go around the pipe and then thread one end
through the slot in the base of the sensor.
•
Before clamping the sensor, smear some silicon grease
(Dow Corning DC4 or similar) along the bottom of the
sensor, where it touches the pipe. This is to provide a
good acoustic path for the ultrasonic signal between
the sensor and the pipe.
•
Thread one end of the banding through the grub screw
attachment and fit the grub screw. Tighten the banding
as tight as possible whilst checking that the sensor is
aligned along the pipe axis, see figure 2.
•
Note: Do not install a KATflow 10 within 3 m of another KATflow 10 on the same section of pipe.
•
KATflow 10-01 only - Undo the four captive screws
and remove the sensor lid.
•
KATflow 10-01 only - Feed a multi-core cable, (see caPage 9
K A T f l o w 10 s e r i e s
Figure 3. Cable End Preparation
ble specification page 19) with the end already prepared, see figure 3, through the cable gland and wire
the sensor as shown in figure 4.
•
KATflow 10-01 only – Tighten the cable gland.
Figure 4. KATflow 10-01 wiring details
Before applying power to the sensor check that the power supply is
rated at 22 to 36 V dc, 150 mA and is suitably fused (dc side) with a
250 mA fuse. In addition, on KATflow 10-02 applications, the dc
fuse must have a rated breaking capacity of 4000 A.
Page 10
K A T f l o w 10 s e r i e s
Note: The KATflow 10-02 is fitted with an integral cable, it is
not possible to remove the lid. The sensor should be connected
as shown in figure 5
Figure 5. KATflow 10-02 wiring details
Apply power to the sensor.
•
KATflow 10-01 only - both LED’s should be illuminated for 30 secs. (Do not attempt to program the unit
during this ”warm up” period - wait until one or both
LED’s go out).
•
KATflow 10-01 only - after the initial start up, pressing the red push button briefly (< 1 sec) will flash the
green LED and confirm that the unit is operational.
Page 11
K A T f l o w 10 s e r i e s
Set up Procedure (KATflow 10-01 only)
Note: There is no set up procedure for the KATflow 10-02 .
Once the unit is wired up and the power applied, the analogue
voltage output provides a signal that is proportional to the flow
rate in the pipe.
The following section describes how the KATflow 10-01 is set
up.
It assumes the installation is complete as described in the previous section.
All the set up functions are performed using the red push button and the two LED’s (one green, one red).
The set up consists of learning and storing the normal flow
characteristics, selecting the Alarm Mode and setting the Alarm
Set Point. The Alarm Modes are described opposite, the Alarm
Set Point is set as a percentage of the normal flow reading.
Even if you do not intend to use the relay output you still need
to complete the set up procedure as several internal settings
need to be configured at this stage.
Alarm Modes (KATflow 10-01 only)
There are 3 Alarm Modes that can be set: alarm low, out of
bounds alarm and alarm high.
Alarm Low - in this mode the KATflow 10-01 will go into alarm
when the flow rate falls below the alarm set point, see figure 6, e.
g. to detect pump dry running.
Out of Bounds Alarm - in this mode the KATflow 10-01 will go
into alarm when the flow rate falls outside an upper and lower
alarm set point, see figure 7, e.g. to detect when a flow rate goes
Page 12
K A T f l o w 10 s e r i e s
Figure 6 - Alarm Low operating mode
outside the normal flow range.
Alarm High - in this mode the KATflow 10-01 will go into alarm
when the flow rate rises above the alarm set point, see figure 8.
For example to detect when a flow exceeds a safe limit.
Figure 7 - Out of bounds alarm mode
Once the KATflow 10-01 has been installed on the pipe and all
the necessary electrical connections made, (“Installation”, page
8) the unit has been powered up and the “warm up” period has
Page 13
K A T f l o w 10 s e r i e s
Figure 8 - Alarm High operating mode
finished, the set up procedure can commence, if the lid has not
been removed you will need to remove it now.
Before proceeding with the set up, decide which Alarm Mode
and Alarm Set-Point are required.
•
Set up the normal flow condition in the pipe and allow time
for the flow to stabilise before starting the set-up procedure.
Entering Setup Mode (KATflow 10-01 only)
•
Press and hold the red push-button, the green LED will
flash. The KATflow 10-01 will now record and store a value
for normal flow, this value will be scaled to 100%.
•
When the green LED stops flashing (approximately 3 seconds) and stays illuminated you can release the button.
You are now ready to set the Alarm Mode. The sensor will
remain in this mode until the button is pressed (or time out
after 10 seconds).
Page 14
Selecting the Alarm Mode (KATflow 10-01 only)
K A T f l o w 10 s e r i e s
•
Select 1 of the 3 Alarm Modes (see previous pages for an
explanation) by pressing the button 1, 2 or 3 times. Each
button press will cause the green LED to extinguish for 0.5
seconds as confirmation.
⇒ Alarm Low Mode is entered by pressing the set-up button once.
⇒ Out of Bounds Alarm Mode is entered by pressing the
set-up button twice.
⇒ Alarm High Mode is entered by pressing the set-up
button three times.
•
Once the required mode has been entered the red LED will
flash for a couple of seconds, then the green LED will flash
1, 2 or 3 times to confirm which alarm mode has been set.
Wait until both LED’s are extinguished before setting the
Alarm Set Point.
Setting the Alarm Set Point (KATflow 10-01 only)
•
The Alarm Set Point is set by pressing the button once for
10%, twice for 20%, three times for 30% etc. up to a maximum of 10 times for 100%. The green LED will flash each
time you press it as confirmation.
⇒ Example - a 30% alarm set point is selected.
In alarm low mode a 30% set point will trigger an alarm if
the flow goes below 70% of normal flow.
In out of bounds alarm mode a 30% set point will trigger an
alarm if the flow exceeds 130% of normal flow or falls below
Page 15
70% of normal flow.
K A T f l o w 10 s e r i e s
In alarm high mode a 30% set point will trigger an alarm if the
flow exceeds 130% of normal flow.
•
If the requested Alarm Set Point cannot be set it will default
to the closest possible. At some low flow rates the resolution
of the flow measurement is insufficient to allow reliable
switching if a 10% or 20% Alarm Set Point is requested, the
Alarm Set point will then default to 30%.
•
After the last button press wait 3 seconds until the green LED
flashes once for each 10% of the Alarm Set Point that has
been set. The calculated switching alarm set point will now be
stored in the sensor memory.
•
The red LED will now flash once. Set up is now complete.
•
If at any point a mistake is made you can re-enter the set up
mode by pressing and holding the push button until the
green LED stops flashing.
Alarm Conditions (KATflow 10-01 only)
When the Alarm Set Point is crossed the sensor will:
⇒ flash the green LED
⇒ de-energise the SPCO relay (the relay is energised
during normal operation).
Current Output (KATflow 10-01 only)
•
The range of output current is 4 mA to 20 mA.
4 mA corresponds to a zero flow condition and 20 mA = ap-
Page 16
prox. 3.5 m/s flow velocity
Voltage Output
K A T f l o w 10 s e r i e s
•
The range of output voltage is 50 mV to 10 V.
The scaling of the voltage output is fixed, 50 mV corresponds
to a zero flow condition and 10 V = approx. 3.5 m/s flow velocity
Diagnostics (KATflow 10-01 only)
There are several fault conditions that the sensor can detect
such as insufficient particles in the fluid (e.g. pure water), loss
of coupling between the pipe and the sensor or transducer
failure. In any one of these fault conditions KATflow 10-01
will:
⇒ de-energise the relay.
⇒ clamp the voltage output to approx. 50 mV - 100 mV.
⇒ illuminate the red LED.
In the event of a power failure or circuit failure the sensor outputs will all failsafe i.e.
⇒ the voltage output will drop to 0 V, at all other times
the output will have a small offset of approx. 50 mV.
⇒ the current output will drop to 0 mA.
⇒ the relay contacts will de-energise.
⇒ the LED’s will not be illuminated
Page 17
If the KATflow 10 series is to be operated in ambient temperatures in excess of 55 0C, the maximum allowable power supply
voltage will need to be de-rated according to the graph below.
KATflow 10 MAXIMUM INPUT VOLTAGE
DE-RATING GRAPH
Supply Voltage
K A T f l o w 10 s e r i e s
Operation at Elevated Temperatures
40
30
20
10
0
-40
-20
0
20
40
60
80
Temperature in C
Figure 9. Supply Voltage / Ambient Temperature de-rating
graph
Page 18
K A T f l o w 10 s e r i e s
Cable Specification
The cable used should be a shielded multi-core with 4 to 9 cores
(dependent upon the outputs used). The scre en must be solidly
connected to the housing using the “top hat” in the cable gland as
shown in figure 2.
KATflow 10 series requires minimum power supply parameters of
18 V dc @ 150 mA at the sensor. In order to determine a suitable
cable specification you need to calculate the voltage drop along
the cable and subtract that from the power supply output voltage
such that:
Vsensor = VPSU - Vdrop = > 18 V
Vdrop = Cable resistance (ohm / metre) x Cable length (metres) x 0.15.
The cable gland fitted will accept cables with an outside diameter
of between 6.88 mm and 8.8 mm.
Suitable cable conductor sizes are:
4 core - 16/0.2 mm conductors
6 core - 16/0.2 mm conductors
8 core - 16/0.2 mm or 7/0.2 mm conductors
12 core - 7/0.2 mm conductors
A cable gland to suit larger cables is available upon request.
Page 19
EMC Declaration
K A T f l o w 10 s e r i e s
The product described in this manual has been tested and complies
with the following European standards:
EN50081-1 : 1992 Generic Emission Standard - Residential, Commercial
and Light Industry
EN50082-2 : 1995 Generic Immunity Standard - Industrial Environment.
Note: The product is susceptible to fields greater than 4 V/m at
kHz and in the band 1.48 to 1.52 MHz.
750
A full declaration of conformity is available upon request.
This declaration assumes that the product has been installed correctly as described in this manual.
Page 20
Troubleshooting
K A T f l o w 10 s e r i e s
Symptom
The red LED is illuminated
after the setup procedure has
completed.
Remedy
⇒
⇒
There is no change in the
KATflow 10 output for a
given change in flow
⇒
⇒
The LED's are not illuminated
⇒
⇒
The alarm set point cannot
be set to a 10% or 20%
band / level at certain flow
rates
⇒
The output does not reach
10 V or 20 mA even at
maximum flow.
⇒
The mA output is less than
4 mA
⇒
The KATflow 10 cannot detect a flow, check that
there is flow in the pipe and that the flow is within
the rated flow rates as defined i n Table 1, page 7.
Check that the KATflow 10 is correctly aligned on
the pipe and the banding is as tight as possible.
Check that the application criteria fits with the
“Application” section in this booklet. If the application involves very pure or distilled water where the
solids concentration is less than 100 parts per mi llion (100 µm diameter minimum) then there may not
be enough particles in the flow.
Check that the sensor is firmly clamped to t he pipe, a
suitable acoustic couplant (i.e. silicon grease) has
been used and that the setup procedure has been
Press the red button, the green LED should illuminate.
Check that the sensor is wired correctly and the
At some low flow rates the KATflow 10 will not set
10% or 20% alarm set points as the signal resolution
would be too small. In these cases it will default to a
30% setting.
The outputs are scaled for a flow rate range of 0.3 to
3.6 m/s, the application flow rate range may not be
the same.
Check that the power supply is within the range 22
to 36 V dc and is capable of supplying at least 150
mA.
Page 21
Technical Specification: KATflow 10
Outputs
KATflow 10-01
1 volt free contact, programmable 1A at 30V dc SPCO
4-20 mA auto scaled
0-10 V dc analogue
KATflow 10-02
0-10 V dc analogue
Power Requirements
22-36 V dc, 120 mA typically
Operating Temperatures
-40 0C to +85 0C
Ingress Protection Rating
IP67 (equivalent to NEMA 6)
Velocity Range
0.3 m/s to 3.5 m/s
Size/Weight
Size: 118 mm L x 70 mm H x 65 mm W
Weight: 1.5 kg
Pipe Diameter
40 mm min. diameter up to 400 mm max.
Pipe Wall Thickness
up to 10 mm
Hazardous Area Approvals
EEx m II T6 ( T amb –20 0C to + 80 0C, KATflow 10-02 only)
Repeatability / Accuracy
±7.5% of reading, application dependent
Housing Material
Type 316 stainless steel investment casting
CE / EMC Approval
Complies with BS EN 50081-1:1992 for emissions
BS EN 50082-2:1995 for immunity
Bump, Shock & Vibration
Contact Details:
Katronic Technologies Ltd.
23 Cross Street
Leamington Spa
CV32 4PX
United Kingdom
Tel:
01926 882954 (International +44 1926
882954)
Fax:
01926 338649 (International +44 1926