1
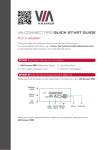
STEP 3: Connect the Unit
• Connect keyboard and mouse
• Connect your main display
• Connect a Local Area Network (LAN) cable for connection to your network
or use a router for connection to Wi-Fi
• Connect the power supply
• Turn on the device
STEP 4: Configure VIA Connect PRO
Open the VIA Connect PRO menu and click on Features, then on Settings.
Enter password: supass.
The Settings Menu tabs are:
• LAN Settings – Configure your network parameters and apply settings
• Room Name/Code – Manage room code and name preferences
• System Controls – Manage your display and audio settings
• Wallpaper – Insert a custom wallpaper image
• Authentication – Activate presentation mode and define moderator/participant
settings
After settings are defined, click on the reboot button to apply all settings.
For more details, read the Settings section in the user manual.