1
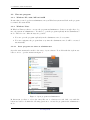
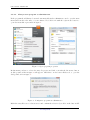
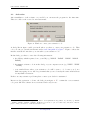
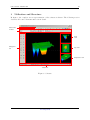
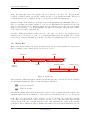
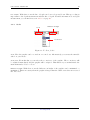
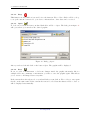
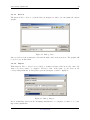
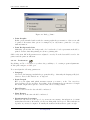
FS Future Serie
®
Visualizer 3D
Software
User’s manual
User’s manual: Visualizer 3D
2
Any information contained in these operating instructions may be changed without prior notice.
OKM does not make any warranty for this document. This also applies without limitation to implied assurances
of merchantability and fitness for a specific purpose. OKM does not assume any responsability for errors in this
manual or for any incidental or consequential damage or loss associated with the delivery, exploitation or usage
of this material.
This documentation is available as presented“ and without any kind of warranty. In no circumstances OKM
”
takes responsibility for lost profits, usage or data losts, interruption of business activities or all kind of other
indirectly damages, which developed because of errors in this documentation.
This instruction manual and all other stored media, which are delivered with this package should only be used for
this product. Program copies are allowed only for security- and savety purposes. The resale of these programs,
in original or changed form, is absolutely forbitten.
This manual may not be copied, duplicated or translated into another language, neither in part nor completely,
over the copyright matters without the prior written consent of OKM.
Copyright ©2002 – 2007 OKM Ortungstechnik GmbH. All rights reserved.
OKM Ortungstechnik GmbH
www.okm-gmbh.de
Table of Contents
3
Table of Contents
1 Licence Agreement and Limited Warranty
5
2 Installation, Start and Activation
2.1 Installation . . . . . . . . . . . . . . . . .
2.2 Execute program . . . . . . . . . . . . . .
2.2.1 Windows XP, 2000, ME and 98SE
2.2.2 Windows Vista . . . . . . . . . . .
2.3 Activation . . . . . . . . . . . . . . . . . .
.
.
.
.
.
.
.
.
.
.
.
.
.
.
.
.
.
.
.
.
.
.
.
.
.
.
.
.
.
.
.
.
.
.
.
.
.
.
.
.
.
.
.
.
.
.
.
.
.
.
.
.
.
.
.
.
.
.
.
.
.
.
.
.
.
.
.
.
.
.
.
.
.
.
.
.
.
.
.
.
.
.
.
.
.
.
.
.
.
.
.
.
.
.
.
.
.
.
.
.
.
.
.
.
.
.
.
.
.
.
6
6
7
7
7
10
3 Utilisation and Structure
3.1 Navigation Bar . . . . . . .
3.2 Status Bar . . . . . . . . . .
3.3 Toolbars . . . . . . . . . . .
3.3.1 Standard . . . . . .
3.3.2 Graphics . . . . . .
3.3.3 View . . . . . . . . .
3.3.4 Depth measurement
3.3.5 Scale . . . . . . . . .
3.4 Main Menu . . . . . . . . .
3.4.1 File . . . . . . . . .
3.4.2 Graphics . . . . . .
3.4.3 View . . . . . . . . .
3.4.4 Extras . . . . . . . .
3.4.5 Help . . . . . . . . .
3.5 Key Functions . . . . . . .
.
.
.
.
.
.
.
.
.
.
.
.
.
.
.
.
.
.
.
.
.
.
.
.
.
.
.
.
.
.
.
.
.
.
.
.
.
.
.
.
.
.
.
.
.
.
.
.
.
.
.
.
.
.
.
.
.
.
.
.
.
.
.
.
.
.
.
.
.
.
.
.
.
.
.
.
.
.
.
.
.
.
.
.
.
.
.
.
.
.
.
.
.
.
.
.
.
.
.
.
.
.
.
.
.
.
.
.
.
.
.
.
.
.
.
.
.
.
.
.
.
.
.
.
.
.
.
.
.
.
.
.
.
.
.
.
.
.
.
.
.
.
.
.
.
.
.
.
.
.
.
.
.
.
.
.
.
.
.
.
.
.
.
.
.
.
.
.
.
.
.
.
.
.
.
.
.
.
.
.
.
.
.
.
.
.
.
.
.
.
.
.
.
.
.
.
.
.
.
.
.
.
.
.
.
.
.
.
.
.
.
.
.
.
.
.
.
.
.
.
.
.
.
.
.
.
.
.
.
.
.
.
.
.
.
.
.
.
.
.
.
.
.
.
.
.
.
.
.
.
.
.
.
.
.
.
.
.
.
.
.
.
.
.
.
.
.
.
.
.
.
.
.
.
.
.
.
.
.
.
.
.
.
.
.
.
.
.
.
.
.
.
.
.
.
.
.
.
.
.
.
.
.
.
.
.
.
.
.
.
.
.
.
.
.
.
.
.
.
.
.
.
.
.
.
.
.
.
.
.
12
13
14
15
15
16
16
17
18
19
19
25
28
29
29
31
4 Analysis and Evaluation of Measurements
4.1 Ground Scan . . . . . . . . . . . . . . . . . .
4.1.1 Metal or Mineralization . . . . . . . .
4.1.2 Signal Correction . . . . . . . . . . . .
4.1.3 Interpolation . . . . . . . . . . . . . .
4.1.4 Color Filter . . . . . . . . . . . . . . .
4.1.5 Determination of Position and Depth .
4.2 Discrimination . . . . . . . . . . . . . . . . .
4.3 Live-Scan . . . . . . . . . . . . . . . . . . . .
4.3.1 Horizontal Live-Scan . . . . . . . . . .
4.3.2 Vertical Live-Scan . . . . . . . . . . .
.
.
.
.
.
.
.
.
.
.
.
.
.
.
.
.
.
.
.
.
.
.
.
.
.
.
.
.
.
.
.
.
.
.
.
.
.
.
.
.
.
.
.
.
.
.
.
.
.
.
.
.
.
.
.
.
.
.
.
.
.
.
.
.
.
.
.
.
.
.
.
.
.
.
.
.
.
.
.
.
.
.
.
.
.
.
.
.
.
.
.
.
.
.
.
.
.
.
.
.
.
.
.
.
.
.
.
.
.
.
.
.
.
.
.
.
.
.
.
.
.
.
.
.
.
.
.
.
.
.
.
.
.
.
.
.
.
.
.
.
.
.
.
.
.
.
.
.
.
.
.
.
.
.
.
.
.
.
.
.
.
.
.
.
.
.
.
.
.
.
.
.
.
.
.
.
.
.
.
.
.
.
.
.
.
.
.
.
.
.
.
.
.
.
.
.
.
.
.
.
32
32
33
34
36
37
39
42
44
44
45
.
.
.
.
.
.
.
.
.
.
.
.
.
.
.
.
.
.
.
.
.
.
.
.
.
.
.
.
.
.
.
.
.
.
.
.
.
.
.
.
.
.
.
.
.
.
.
.
.
.
.
.
.
.
.
.
.
.
.
.
.
.
.
.
.
.
.
.
.
.
.
.
.
.
.
.
.
.
.
.
.
.
.
.
.
.
.
.
.
.
.
.
.
.
.
.
.
.
.
.
.
.
.
.
.
.
.
.
.
.
.
.
.
.
.
.
.
.
.
.
5 Internet Update
46
OKM Ortungstechnik GmbH
www.okm-gmbh.de
User’s manual: Visualizer 3D
4
List of Figures
1
2
3
4
5
6
7
8
9
10
11
12
13
14
15
16
17
18
19
20
21
22
23
24
25
26
27
28
29
30
31
32
33
34
35
36
37
38
39
Open program as administrator . . . . . . . . . . . . .
Open program properties . . . . . . . . . . . . . . . .
Configurate program as administrator . . . . . . . . .
Window to enter your activation code . . . . . . . . .
Internet activation form to obtain the activation code
Software . . . . . . . . . . . . . . . . . . . . . . . . . .
Operating Elements of the Navigation Bar . . . . . . .
Status bar . . . . . . . . . . . . . . . . . . . . . . . . .
Toolbar Standard“ . . . . . . . . . . . . . . . . . . .
”
Toolbar Graphics“ . . . . . . . . . . . . . . . . . . . .
”
Toolbar View“ . . . . . . . . . . . . . . . . . . . . . .
”
Toolbar Depth measurement“ . . . . . . . . . . . . .
”
Toolbar Scale“ . . . . . . . . . . . . . . . . . . . . . .
”
Dialog New“ . . . . . . . . . . . . . . . . . . . . . . .
”
Dialog Open“ . . . . . . . . . . . . . . . . . . . . . .
”
Dialog Save“ . . . . . . . . . . . . . . . . . . . . . . .
”
Dialog Import“ . . . . . . . . . . . . . . . . . . . . .
”
Dialog Print“ . . . . . . . . . . . . . . . . . . . . . .
”
Dialog Preferences“ . . . . . . . . . . . . . . . . . . .
”
Dialog Interpolation“ . . . . . . . . . . . . . . . . . .
”
Dialog Signal Correction“ . . . . . . . . . . . . . . . .
”
Dialog Characteristics“ . . . . . . . . . . . . . . . . .
”
Comparison of object and mineral . . . . . . . . . . .
Graphic before signal correction . . . . . . . . . . . . .
Graphic after signal correction . . . . . . . . . . . . .
Graphic before and after interpolation . . . . . . . . .
Usage of the color filter by moving the color levels . .
Usage of the color filter by moving the color levels . .
Operating Elements of the Graphic Control . . . . . .
Determining the position of objects . . . . . . . . . . .
Depth measurement with line of depth . . . . . . . . .
Depth measurement with crosshairs . . . . . . . . . .
Curve Shape of Iron . . . . . . . . . . . . . . . . . . .
Curve Shape of Precious Metals . . . . . . . . . . . . .
Curve Shape of Cavities . . . . . . . . . . . . . . . . .
Horizontal Live-Scan . . . . . . . . . . . . . . . . . . .
Vertical Live-Scan . . . . . . . . . . . . . . . . . . . .
Start Internet Update . . . . . . . . . . . . . . . . . .
Update Files . . . . . . . . . . . . . . . . . . . . . . .
.
.
.
.
.
.
.
.
.
.
.
.
.
.
.
.
.
.
.
.
.
.
.
.
.
.
.
.
.
.
.
.
.
.
.
.
.
.
.
.
.
.
.
.
.
.
.
.
.
.
.
.
.
.
.
.
.
.
.
.
.
.
.
.
.
.
.
.
.
.
.
.
.
.
.
.
.
.
.
.
.
.
.
.
.
.
.
.
.
.
.
.
.
.
.
.
.
.
.
.
.
.
.
.
.
.
.
.
.
.
.
.
.
.
.
.
.
.
.
.
.
.
.
.
.
.
.
.
.
.
.
.
.
.
.
.
.
.
.
.
.
.
.
.
.
.
.
.
.
.
.
.
.
.
.
.
.
.
.
.
.
.
.
.
.
.
.
.
.
.
.
.
.
.
.
.
.
.
.
.
.
.
.
.
.
.
.
.
.
.
.
.
.
.
.
.
.
.
.
.
.
.
.
.
.
.
.
.
.
.
.
.
.
.
.
.
.
.
.
.
.
.
.
.
.
.
.
.
.
.
.
.
.
.
.
.
.
.
.
.
.
.
.
.
.
.
.
.
.
.
.
.
.
.
.
.
.
.
.
.
.
.
.
.
.
.
.
.
.
.
.
.
.
.
.
.
.
.
.
.
.
.
.
.
.
.
.
.
.
.
.
.
.
.
.
.
.
.
.
.
.
.
.
.
.
.
.
.
.
.
.
.
.
.
.
.
.
.
.
.
.
.
.
.
.
.
.
.
.
.
.
.
.
.
.
.
.
.
.
.
.
.
.
.
.
.
.
.
.
.
.
.
.
.
.
.
.
.
.
.
.
.
.
.
.
.
.
.
.
.
.
.
.
.
.
.
.
.
.
.
.
.
.
.
.
.
.
.
.
.
.
.
.
.
.
.
.
.
.
.
.
.
.
.
.
.
.
.
.
.
.
.
.
.
.
.
.
.
.
.
.
.
.
.
.
.
.
.
.
.
.
.
.
.
.
.
.
.
.
.
.
.
.
.
.
.
.
.
.
.
.
.
.
.
.
.
.
.
.
.
.
.
.
.
.
.
.
.
.
.
.
.
.
.
.
.
.
.
.
.
.
.
.
.
.
.
.
.
.
.
.
.
.
.
.
.
.
.
.
.
.
.
.
.
.
.
.
.
.
.
.
.
.
.
.
.
.
.
.
.
.
.
.
.
.
.
.
.
.
.
.
.
.
.
.
.
.
.
.
.
.
.
.
.
.
.
.
.
.
.
.
.
.
.
.
.
.
.
.
.
.
.
.
.
.
.
.
.
.
.
.
.
.
.
.
.
.
.
.
.
.
.
.
.
.
7
8
8
10
11
12
13
14
15
16
17
17
18
19
21
22
22
24
25
26
26
27
33
34
35
36
37
37
38
39
40
41
42
42
43
44
45
46
46
Key Functions . . . . . . . . . . . . . . . . . . . . . . . . . . . . . . . . . . . . .
Key Functions of the Color Filter . . . . . . . . . . . . . . . . . . . . . . . . . . .
31
38
List of Tables
1
2
OKM Ortungstechnik GmbH
www.okm-gmbh.de
1
1
Licence Agreement and Limited Warranty
5
Licence Agreement and Limited Warranty
Read carefully all terms of this agreement before using the software program of the Future Series. By using the software you give your accordance to the conditions of this Licence agreement.
This software as well as the attendant user manual are protected by copyright. All rights
reserved. Illegal copies of the software program or the appendant manual are explicit forbidden.
You can be made responsable for any copyright violation which has been caused or motivated
by you.
Concerning the terms mentioned above you need to register your software before utilisation.
You will get a special security code to unlock your software. The program can only be used
with your proper personal unlock code on your computer. There are only 4 free registrations
possible. Every further registration package is at the owner‘s expenses. Further information
about the installation and registration of your software you can find in section 2 on page 6.
Your registration code is only valid for your computer or computer terminal. If you want to use
the program on another PC you need a new security code. These program codes you cannot
modify, process or change by yourself in any way.
Without any written permission of OKM all hiring, leasing or loaning of the software or giving
access to third parties is prohibited.
OKM Ortungstechnik GmbH
www.okm-gmbh.de
User’s manual: Visualizer 3D
2
6
Installation, Start and Activation
By using the software you give your accordance to the terms of this contract and the conditions
of this agreement. Read again carefully all terms before starting to use the software.
The utilisation of this program requires an activation. Therefore you will get a personal
activation code. This code can only be used in one operating system. Every installation in a
new operating system requires a different activation code. This code is fee required beginning
from the fifth activation. The first 4 activations are included in the purchase price.
The following description of the installation and activation requires that the user have access
to internet and own a proper email address. If these conditions are not given, please contact
your dealer to obtain your activation code.
This section describes how to install and activate the software. After installation is finished
you have to obtain a personal activation code which has to be entered in the program to start
working with the software.
2.1
Installation
To install the software on your PC please go the following instructions:
1. Insert the CD into your CD–ROM drive of your computer. The CD will start by itself. If
not, please go on to step 2 otherwise to step 3.
2. (a) Double click on Desktop and then click twice on your CD–ROM drive. Now you
see the contents of the CD. Start the file start.exe or autorun.exe with a double
click.
or
(b) Click on Start → Run... and insert d:\start.exe or d:\autorun.exe whereby d:
notes your CD–ROM drive. Confirm your input with a click on OK.
3. Select Install 3d software in the installation dialog to start the installation.
4. Follow the instructions on the screen to finish the installation!
OKM Ortungstechnik GmbH
www.okm-gmbh.de
2
Installation, Start and Activation
2.2
7
Execute program
2.2.1
Windows XP, 2000, ME and 98SE
Be sure that you are logged in as administrator in your Windows system and click on the program
icon inside the start menu!
2.2.2
Windows Vista
In Windows Vista you have to execute the program as administrator. It is not enough only to log
in to the system as administrator. You have to open the program explicitly in the administrator
mode. Therefore two different ways are possible:
• You can open the program explicitely in the adminstrator mode every time.
• You can configurate the program that every time the adminstrator mode will be executed
automatically.
2.2.2.1
Start program one time as administrator
Open the start menu and search for the entry of your software. Now click with the right mouse
button on it to open the menu from figure 1.
Figure 1: Open program as administrator
In this menu you have to select the entry Execute as administrator and click on it with the
left mouse button. Confirm the following questions to execute the program in the adminstrator
mode.
OKM Ortungstechnik GmbH
www.okm-gmbh.de
User’s manual: Visualizer 3D
2.2.2.2
8
Always start program as administrator
If the program should always be started automatically in the administrator mode open the start
menu and search for the entry of your software. Now click on it with the right mouse button to
open the menu like represented in figure 2.
Figure 2: Open program properties
In this menu you have to select the entry Properties and click on it with the left mouse button.
A dialog window like in figure 2 will appear. Click there on the button Enhanced, to open the
dialog window from figure 3.
Figure 3: Configurate program as administrator
Mark the entry Execute as administrator and confirm the selection by a click on the button OK.
OKM Ortungstechnik GmbH
www.okm-gmbh.de
2
Installation, Start and Activation
9
Confirm the following questions to execute the program in the administrator mode.
OKM Ortungstechnik GmbH
www.okm-gmbh.de
User’s manual: Visualizer 3D
2.3
10
Activation
After installation of the software on your PC you can start the program for the first time.
Therefore click on the created icon in start menu.
Figure 4: Window to enter your activation code
A dialog like in figure 4 will open itself, where you have to enter your activation code. This
code you can get yourself via internet under www.okm-gmbh.de/register1 . Figure 5 shows the
internet activation form where you can ask for your activation code.
In this dialog you have to enter the following information:
a the CD-key which is printed onto your CD (e.g. X0X0X – X0X0X – X0X0X – X0X0X –
X0X0X)
b the numeric software code from the dialog on your computer screen (e.g. XXXX – XXXX
– XXXX)
c your email address, where your activation code will be sent to. So be sure you do not
make any typing errors. Also keep in mind that you need exactly the same email address
for any further activation.
If there are any activation problems please contact your dealer for assistance!
Insert now the activation code into the dialog from figure 4. To confirm the correct numeric
code press OK. The software is now activated and ready for use.
1
You can only use the online registration, if there is an alphanumeric key printed on your CD (e.g. X0X0X
– X0X0X – X0X0X – X0X0X – X0X0X ). If this is not your case or you do not have any connection to internet
please contact your dealer to obtain the activation code!
OKM Ortungstechnik GmbH
www.okm-gmbh.de
2
Installation, Start and Activation
11
Figure 5: Internet activation form to obtain the activation code
OKM Ortungstechnik GmbH
www.okm-gmbh.de
User’s manual: Visualizer 3D
3
12
Utilisation and Structure
In figure 6 the complete screen representation of the software is shown. The following section
describes all control elements and icons in detail.
Main menu
Toolbar
Side
view
Navigation
bar
Top view
Perspective view
Status bar
Figure 6: Software
OKM Ortungstechnik GmbH
www.okm-gmbh.de
3
Utilisation and Structure
3.1
13
Navigation Bar
In the Navigation Bar you can find different functions, to change the representation (position,
rotation, size) of the graphic.
Rotation
Shift
Line of depth
Zoom
Difference in height
Color filter
Figure 7: Operating Elements of the Navigation Bar
Rotation:
These functions are used to rotate the graphic around the x-, y- or z-axis, to view the
graphic from all sides. Through clicking on these functions several times you can rotate the
graphic in the position you like. Another possibility to turn the graphic is to keep pressed the
left mouse button and to move the mouse. The speed of this movement can be adjusted in File
7→ Configuration inside the main menu.
Shift:
With these functions the graphic can be moved to the left, right, up or down. This is
necessary if certain parts of the represented image are not visible. Another possibility is to
keep pressed the right mouse button and to move the mouse. The speed of this movement can
be adjusted in File 7→ Configuration inside the main menu.
Line of depth:
With this function the line of depth in the graphic can be moved up or down. This
option is necessary to determine the exact depth of located objects. Further information about
depth measurement of objects you can find in section 4.1.5.2 on page 40.
OKM Ortungstechnik GmbH
www.okm-gmbh.de
User’s manual: Visualizer 3D
14
Zoom:
By using this button the graphic can be zoomed in or zoomed out. If your mouse
possesses a turnable wheel you can also change the size of your graphic therewith. The speed
of this movement can be adjusted in File 7→ Configuration inside the main menu.
Difference in height:
If the difference in height between the maximum and minimum value is too
large you can make the graphic suitable to your screen. This function is useful in case the side
view of your graphic is not completely visible in your computer screen. In case your graphic
includes black patches“ you should minimize the difference in height. Then all value outside
”
of the visible area will be indicated also.
Color Filter:
With these functions either the red or the blue color level of the graphical representation can be moved up or down. So potential structures inside the graphic can be made
better visible. Detailed information about the color filter you can find in section 4.1.4 on page 37.
3.2
Status Bar
In the Status bar information about the program and about the current graphic are represented
like for example position and depth about detected objects.
Depth
Search line
Impulse
State of
connection
Information field
Rotation axes
Figure 8: Status bar
State of connection: This field indicates if there is currently an active connection between computer
and measuring instrument. There are the following possibilities:
= Connection inactive
= Connection active
Search line and Impulse: These fields indicates the position of the crosshairs inside the graphic. Detailed information about determination of the position you can find in section 4.1.5.1 on page 39.
Depth:
Here you can read the depth of buried objects. To measure the depth the crosshairs
or the line of depth should be placed directly over the object. The first value indicates the
current depth of the line of depth and the second value indicates the depth of the measure
point where the crosshairs are placed. Further information about depth measurement you can
OKM Ortungstechnik GmbH
www.okm-gmbh.de
3
Utilisation and Structure
15
find in section 4.1.5.2 on page 40.
Information field:
This field indicates the function of the icon over which you move the arrow of
your mouse.
Rotation axes:
3.3
Here you can select around which axes the graphic should be rotated.
Toolbars
The toolbarsToolbar are a fast way to use the functions from the main menu. The small icons
you can find also in the main menu next to the corresponding entry.
The following sections gives only a brief explanation about these functions. A detailed description you can find in section 3.4 on page 19.
3.3.1
Standard
New
Save
Open
Print
Characteristics Help
Figure 9: Toolbar Standard“
”
New:
Click here to scan a new area and to transfer data to your PC. Before you start the
measurement you have to configure the data transmission. This function you can find inside
the main menu under File 7→ New .
Open:
Load a stored scan file from your hard disk to review or analyse again. A dialog will open
itself where you can select the file. This function you can find inside the main menu under File
7→ Open.
Save:
If you recorded a measurement or did some changes inside the graphic afterwards, like for
example add some comments or information, you have to save the graphic again. This function
you can find inside the main menu under File 7→ Save.
Characteristics:
Click on this icon to enter detailed information about your measurement
to remind later. Thereto belong for example length and width of your measured area and
type of soil. This function you can find inside the main menu under Graphics 7→ Characteristics.
Print:
If you want to print out the currently represented graphic click on this icon. This function
you can find inside the main menu under File 7→ Print.
OKM Ortungstechnik GmbH
www.okm-gmbh.de
User’s manual: Visualizer 3D
Help:
16
This function is not yet implemented.
3.3.2
Graphics
Restore to Signal
Original Correction
Interpolation
Wireframe
Resolution
Figure 10: Toolbar Graphics“
”
Restore to Original:
With this icon you can cancel all changes which were made on the graphic.
The graphic will be represented like a new opened file. This function you can find in the main
menu under Graphics 7→ Restore to Original .
Interpolation:
This function is used to do a mathematical computation of the graphic. New
measured points between the measured lines and impulses will be calculated. This function you
can find inside the main menu under Graphics 7→ Interpolation. Additional information about
Interpolation you can find in section 4.1.3 on page 36.
Signal Correction:
By using this function created error signals (e.g. caused by radio transmission)
inside the graphic can be rectified. This function you can find inside the main menu under
Graphics 7→ Signal Correction. Detailed information about Signal Correction you can find in
section 4.1.2 on page 34.
Resolution:
With this icon the resolution of the graphic can be rarefied. Thereby new measure
points are calculated mathematically. This function you can find inside the main menu under
View 7→ Resolution.
Wireframe:
The graphic will be represented in a wireframe, whereby all measure points and
measured lines becomes visible. This function you can find inside the main menu under View
7→ Wireframe.
3.3.3
View
Undo all changes: Undo all changes of the graphic regarding rotation, moving and zoom of the
graphic. This function you can find inside the main menu under View 7→ Undo all changes.
Perspective View:
By using this function the graphic can be rotated into perspective view. This
function you can find inside the main menu under View 7→ Perspective View .
OKM Ortungstechnik GmbH
www.okm-gmbh.de
3
Utilisation and Structure
17
Undo all Side View
changes
Show/Hide
color value
PerspectiveTop View
View
Figure 11: Toolbar View“
”
Side View:
The graphic will be represented in the side view. This function you can find inside
the main menu under View 7→ Side View .
Top View:
This icon shows the graphic from above. This function you can find inside the main
menu under View 7→ Top View .
Show/Hide color value: These icons can be used to show or hide certain color values. When
the button is pressed the corresponding color will be represented. This function is useful for
example if an object is located inside a large cavity. From the side view the object will not
be visible because the measured values are hidden from the cavity. In this case you can eliminate the blue color values to do a depth measurement (with line of depth) of the metallic object.
3.3.4
Depth measurement
Line of depth
Selection
type of soil
Figure 12: Toolbar Depth measurement“
”
Selection type of soil:
Here you can select the type of soil according to your measured area. The
better the selected type of soil is adjusted to your measured area, the exacter will be the
determination of depth. The type of soil you can select also in the menu option Graphics 7→
Characteristics. The type of soil which you enter there will be stored with your graphic.
OKM Ortungstechnik GmbH
www.okm-gmbh.de
User’s manual: Visualizer 3D
18
Line of depth:
With these icons the line of depth can be moved up and down. This proceeding is
important for the depth measurement with the line of depth. Detailed information about depth
measurement you can find in section 4.1.5.2 on page 40.
3.3.5
Scale
Zoom
Difference in height
Zoom factor
Figure 13: Toolbar Scale“
”
Zoom:
Here the graphic can be zoomed in or zoomed out. Alternatively you can use the turnable
wheel on your mouse.
Zoom factor:
From this list you can select the zoom factor of the graphic. The zoom factor will
be adjusted immediately and the graphic will be adapted. This function you can find inside the
main menu under View 7→ Zoom.
Difference in height:
With these icons the difference in height of the graphic can be minimized or
maximized. This is necessary when the graphic is larger than the visible area when it is rotated
into side view.
OKM Ortungstechnik GmbH
www.okm-gmbh.de
3
Utilisation and Structure
3.4
19
Main Menu
Through the main menu you can access to all possible functions, which are put on disposal from
the software program. In the following sections all options are explained in detail.
3.4.1
File
In the following subsections all functions of the menu option File are described in detail.
3.4.1.1
New
If you are working with eXp 3000, eXp 5000 or Localizer 3000 this function is not needed.
Instead of this you have to use function File 7→ Import.
Click on File 7→ New if you want to transfer data from a device to your PC. A window like in
figure 14 will open where some parameters has to be adjusted.
Figure 14: Dialog New“
”
• Measure, Equipment
Select here the device from where you want to transfer the measurement.
• Com Port
Select here the corresponding Com Port to which your cable or USB dongle2 is connected.
2
Read in your device manual how to find out the corresponding Com Port when using a USB dongle.
OKM Ortungstechnik GmbH
www.okm-gmbh.de
User’s manual: Visualizer 3D
20
• Transfer Method
Here you can enter the method of data transfer. The following possibilities are on disposal:
– Wireless Connection: Enter this type of data transmission if you are working with a
data receiver and antenna.
– Cable Connection: You have to select this type of data transmission when your devices
is connected directly to the computer with a serial data cable.
– Bluetooth: Choose this method of data transmission when you are working with a
Bluetooth USB dongle.
• Work Mode
Enter in this section which working method you want to use to record or transfer data.
Beware that this working mode should correspond with the selected operating mode of
your device and that not all devices proceed all of these working modes.
– Ground Scan: This function is standard function for every measuring instrument.
It calculates a three dimensional image of the measured data. Detailed information
about the analysis you can find in section 4.1 on page 32.
– Discrimination: This function is available for all devices with Super Sensor. Detailed
information about this function you can find in section 4.2 on page 42.
– Live-Scan (Horizontal Probe): The measured data of a horizontal live probe are
represented on the screen. Additional information about this operating mode you
can find in section 4.3.1 on page 44.
– Live-Scan (Vertical Probe): The measured data of a vertical live probe are represented
on the screen. Additional information about this operating mode you can find in
section 4.3.2 on page 45.
• Pulse
Here you have to enter the number of impulses per search line. Beware that this number
has to be exactly the same like the one selected on the measuring instrument. If for
example you used 20 impulses for the measurement with your device you have to enter
here also 20 impulses. If you are working with Cavefinder B you have to enter always 4.
• Function
There are two different possibilities to process the measured results:
– Zig-Zag (↑↓↑): This scanning method is used with GEMS, Cavefinder B, Grailfinder,
Rover C, Rover C II, Rover Deluxe, Walkabout and Walkabout Deluxe. Additionally
there is the possibility to use this manner also for Future 2005 and Future I-160.
– Parallel (↑↑↑): This scanning method is used with GEMS, Future 2005 and Future
I-160. Additionally there is the possibility to use this manner also for Grailfinder,
Rover C, Rover C II, Rover Deluxe, Walkabout and Walkabout Deluxe, but only in
the manual mode.
After you entered all details about data transmission you can click on the button OK. The
software is now ready to receive data from the measuring instrument.
OKM Ortungstechnik GmbH
www.okm-gmbh.de
3
Utilisation and Structure
3.4.1.2
21
Stop
This function is only visible if you used before the function File 7→ New . Click on File 7→ Stop,
to stop the current connection to your device. Afterwards no other data can be received.
3.4.1.3
Open
To load a stored scan file from your hard disk click on File 7→ Open. The dialog from figure 15
will open, where you can select the desired graphic.
Figure 15: Dialog Open“
”
After you selected the file click on the button Open. The graphic will be displayed.
3.4.1.4
Save
If you recorded a measurement or did some changes inside the graphic afterwards, like for
example add some comments or information, you have to save the graphic again. This allows
you to revert to all changed data every time.
If the current file is already stored on your hard disk you can click on File 7→ Save to save again
the file on the same name. If the current file is new recorded data the function File 7→ Save as
will be displayed automatically.
OKM Ortungstechnik GmbH
www.okm-gmbh.de
User’s manual: Visualizer 3D
3.4.1.5
22
Save as
The function File 7→ Save as opens the dialog from figure 16, where you can rename the current
graphic.
Figure 16: Dialog Save“
”
After you selected the destination folder and file name click on the item Save. The graphic will
be stored on your hard disk.
3.4.1.6
Import
With function File 7→ Import it is possible to transfer measured data from eXp 3000, eXp
5000 or Localizer 3000 to a computer. Therefore click on the name of your device in the
corresponding submenu. A dialog like represented in figure 17 will be displayed.
Figure 17: Dialog Import“
”
Before transfering data from the measuring instrument to a computer you have to do some
important adjustments.
OKM Ortungstechnik GmbH
www.okm-gmbh.de
3
Utilisation and Structure
23
• Measure, Equipment
In this field the exact serial number of your device has to be entered. Only if this number
correspond with the serial number of your device a data transmission is possible.
• Destination Folder
Enter here the folder where the transferred data should be filed. If you click on the small
item on the right side of the input field, a list will open, where you can select an already
existing folder on your hard disk.
• Use USB Connection
Do only mark this entry when your measuring instrument has a USB Connection. If your
device has a serial connection this field should not be marked, also if you connect it with
an adapter cable to your USB connection of your computer.
• Com Port
This entry is only necessary for measuring instruments with serial Com Port. Select here
the Com Port to which you connected the serial data cable.
Click on the button OK when you adjusted all parameters correctly. Now all data will be
transferred from the device to your computer. Afterwards you have to use option File 7→ Open
to open the transferred files.
3.4.1.7
Export as BMP
Click on File 7→ Export as BMP to save the image of the measured data as graphic file
(Bitmap). A dialog will open, where you can enter a file name selected by yourself. After click
it last some seconds until the window will open, because the graphic has to be prepared for
export. During this proceeding an indication like Graphic will be exported: 23% is visible in
the Information field of the Status bar.
After the image has been stored you can use it like a usual picture in different documents, emails
or image processing applications.
3.4.1.8
Print
If you want to print out the graphic click on File 7→ Print. The dialog from figure 18 will
open. After click it last some seconds until the window will open, because the graphic has to
be prepared. During this proceeding an indication like Preparing to Print: 38% is visible in
the Information field of the Status bar.
In the dialog you can adjust the following parameters:
• Printer
Here you can select the printer from where you want to print out the graphic. Additional
options you can get by clicking the button Preferences.
• Print Cover Page
Mark this entry if you want to print a cover page with notes. The indications which you
made in Graphics 7→ Characteristics will also be printed.
OKM Ortungstechnik GmbH
www.okm-gmbh.de
User’s manual: Visualizer 3D
24
Figure 18: Dialog Print“
”
• Print Graphic
If this option is marked with a tick, the current graphical representation of the screen will
be printed. Deactivate this option for example if you only want to print the cover page
with information.
• Print Background Color
Mark this option if also the background color besides the colored representation should be
printed. Beware that this printing needs more printing ink.
Click on the item OK if all parameters are adjusted correctly. Now the data will be send to the
printer and the printout will start.
3.4.1.9
Preferences
By clicking on File 7→ Preferences you have the possibility to do certain program adjustments.
A dialog like in figure 19 will open.
You can adjust the following parameters:
• Language
Select here the language in which the program should go. Currently the languages English,
German, French and Turkish are on disposal.
• Input Length
Here you can adjust with which measures system you want to work. You can select
between Meter, Inches and Feet. Depending on the adjustment the specification of length
like width, length and depth are converted into the according format.
• Date Format
Here you select how the date should be indicated.
• Time Format
Select here how the time should be indicated.
• Transformation Parameter
Enter here the factors of the speed of your mouse movements. An indication of 2,0000
means that a Rotation, Movement or Scale is working with double speed. These indications
depends on your used computer. Normally the standard indications are quite enough.
OKM Ortungstechnik GmbH
www.okm-gmbh.de
3
Utilisation and Structure
25
Figure 19: Dialog Preferences“
”
• Filter Parameter
The filter parameter influence the fineness of the Color Filter, which you can change with
the buttons in the navigation bar.
3.4.1.10
Exit
Click on File 7→ Exit to close the program. If the graphic is not yet saved or has been changed
during this time the program will ask you if the data should be saved before exit the software
program.
3.4.2
Graphics
The following section describes all functions of the menu Graphics in detail.
3.4.2.1
Restore to Original
With function Graphics 7→ Restore to Original you can cancel all changes which were made on
the graphic, like for example Signal Correction or Interpolation.
3.4.2.2
Interpolation
Click on Graphics 7→ Interpolation, to do a mathematical computation of the graphic. A dialog
like represented in figure 20 will open.
Before the interpolation will be done you have to adjust how often the interpolation should be
used for the current graphic. Therefore place the regulator on the desired position and click on
the icon OK.
Detailed information about Interpolation you can find in section 4.1.3 on page 36.
OKM Ortungstechnik GmbH
www.okm-gmbh.de
User’s manual: Visualizer 3D
26
Figure 20: Dialog Interpolation“
”
3.4.2.3
Signal Correction
The function under Graphics 7→ Signal Correction allows to eliminate all error signals which
can be caused by data transmission via radio. After click on this function a dialog like in figure
21 appears on your screen.
Figure 21: Dialog Signal Correction“
”
You can select between two different types of signal correction:
• Correct the Value under the Cross Hairs only
If this option is marked only the value under the cross hairs will be corrected. So you can
avoid the unmeant correction of other values.
• Correct all Values (Automatic Mode)
In this mode all measured values in the graphic will be checked and if necessary corrected.
The modification of the measured values results from the following parameters:
- Average Surface Deviation Value
The measured value will only be corrected if its deviation to all other measured values
inside the graphic is higher than the selected parameter value (standard value = 7).
- Average Sub-Surface Deviation Value
The measured value will only be corrected if the deviation to all adjoining values is higher
than the selected parameter value (standard value = 4).
OKM Ortungstechnik GmbH
www.okm-gmbh.de
3
Utilisation and Structure
27
Detailed information about Signal Correction you can find in section 4.1.2 on page 34.
3.4.2.4
Characteristics
Click on Graphics 7→ Characteristics to enter detailed information about your measurement
project. A dialog like in figure 22 will open.
Figure 22: Dialog Characteristics“
”
Essential information are not only length and width of your measured field but also the type of
soil of the area where you did the measurement. Only with these values you can determine the
correct position and depth of objects.
• Model
Enter here for example the name of your project or the place of your measurement.
• Remarks
In this field you can enter additional information like the distance between impulses, width
of measured lines, walking direction and others.
• Field Length
Enter here the length of your measured area, also the length of your search line. The
indication correspond to the selected linear measure (meter, inches or feet).
• Field Width
Enter here the width of your measured area. The indication correspond to the selected
linear measure (meter, inches or feet).
• Soil Type
Select here the most corresponding type of soil of the area on which you did your measurement.
OKM Ortungstechnik GmbH
www.okm-gmbh.de
User’s manual: Visualizer 3D
28
Click on the icon OK to take over the selected values and adapt the graphic. To save these data
permanent you have to use option File 7→ Save or File 7→ Save as.
3.4.3
View
In the following subsections the functions of the menu View are explained in detail.
3.4.3.1
Undo
The function View 7→ Undo cancel all rotations, movements or enlargements of the graphic.
3.4.3.2
Perspective
Click on View 7→ Perspective to see the current graphic in perspective view. Alternatively you
can double click on the graphic preview Perspective.
3.4.3.3
Side View
With a click on function View 7→ Side View the current graphic will be moved in side view. You
can also click twice on the graphic preview Side View. In this view you can measure with the line
of depth how depth objects are buried in the ground.
3.4.3.4
Top View
If you click on function View 7→ Top View you can see the current graphic from above (bird‘s
eye view). Alternatively you can click twice on the graphic preview Top View. In this view you
can measure not only the position but also the depth of specific points.
3.4.3.5
Cross Hairs
Click on View 7→ Cross Hairs to fade in or out the white cross hairs, which are used to determine
the position and depth.
3.4.3.6
Wireframe
Click on View 7→ Wireframe to see the current graphic in a wireframe representation. Often
small hidden details can become visible. Another click on this function shows the graphic again
in the normal representation.
3.4.3.7
Quality
By clicking on View 7→ Quality you can select how many additional mathematical caculated
points you want to add to the graphic. You can select between Level 1 (Fast), Level 2, Level 3,
Level 4 and Level 5 (Slow).
The more points will be calculated the more computing capacity is needed. Your computer
needs more time for the representation of the graphic. Change your graphic into wireframe
representation to see and analyse exactly the effects.
OKM Ortungstechnik GmbH
www.okm-gmbh.de
3
Utilisation and Structure
3.4.3.8
29
Zoom
If you click on function View 7→ Zoom you can select between the zoom factors 50%, 80%,
100%, 150%, 200%, 400%, 800% and 1000%. Click on any of these factors to see the graphic
immediately in the corresponding zoomed level. Another possibility to scale is to use the turning
wheel of your mouse.
3.4.4
Extras
In the following subsections the function of the menu Extras are explained in detail.
3.4.4.1
Split Screen
With function Extras 7→ Split Screen you can fade in or out the three different graphical previews
Side View , Top View and Perspective. If these views are visible the function in the main menu
is marked with a small tick.
3.4.4.2
Navigation Rulers
With function Extras 7→ Navigation Rulers you can fade in or out the navigation bar on the
left side of your screen. If the navigation bar is visible the function in the main menu is marked
with a small tick.
3.4.4.3
Fullscreen
When you click on function Extras 7→ Fullscreen you see only the graphic on your complete screen
and if visible the three graphic previews. This mode is most suitable for the measurement with
Live-Scan, which is possible with Future 2005 and Future I-160.
3.4.5
Help
In the following subsections the functions of the menu Help are explained in detail.
3.4.5.1
Index
This function is not yet implemented.
3.4.5.2
Homepage
With a click on Help 7→ Homepage you will get on the homepage of the manufacturer, where you
can inform yourself about new products or offers. An active connection to internet is required.
3.4.5.3
Internet Update
To use function Help 7→ Internet Update an active connection to internet is required. When
you click on this function the application will be closed and the program WebUpdate starts.
Now you can download current updates from the internet.
Detailed information you can find in section 5 on page 46.
OKM Ortungstechnik GmbH
www.okm-gmbh.de
User’s manual: Visualizer 3D
3.4.5.4
30
Information
Under Help 7→ Information a dialog opens where you ca find detailed information about your
program version.
OKM Ortungstechnik GmbH
www.okm-gmbh.de
3
Utilisation and Structure
3.5
31
Key Functions
Most of the program functions can be activated by a simple keypress. In table 1 all available
key combinations are shown.
Key
Function
F2
Show/Hide cross hairs
F3
Switch between full screen mode and wireframe
F5
Move blue color level down
F6
Move blue color level up
F7
Move red color level down
F8
Move red color level up
F9
Show characteristics of the project
F10
Open dialog preferences
F11
Fade in and fade out full screen mode
Page ↓
move line of depth down
Page ↑
move line of depth up
1
Graphic in resolution 1 (less CPU-intensive)
2
Graphic in resolution 2
3
Grafik in resolution 3
4
Grafik in resolution 4
5
Grafik in resolution 5 (more CPU-intensive)
Strg + P
Print graphic
Strg + I
Use interpolation
Strg + C
Use signal correction
Strg + R
Undo all changes
Strg + M
Fade in and fade out graphic preview Side view, Top view and Perspective view
Strg + F1
Perspective view
Strg + F2
Side view
Strg + F3
Top view
←, ↑, →, ↓
Move cross hairs
Table 1: Key Functions
OKM Ortungstechnik GmbH
www.okm-gmbh.de
User’s manual: Visualizer 3D
4
32
Analysis and Evaluation of Measurements
Before measurement you have to know what kind of objects or cavities you are looking for and
if the area you choose is suitable for this. Measurement without a plan will not give you the
results you would like. For this reason please consider the following indications:
• What are you looking for (graves, tunnels, buried objects, . . . )? This question has its
effects on your concrete manner to measure an area. If you are looking for big objects you
can enlarge your distance between the measure points (impulses), for small objects use
small distances.
• Inform yourself about the area you select for measurement. Is it usefull to search at this
place? Are there historical indications, which confirm your speculations? What type of
soil is on this area? Are there good conditions? Is a correct data recording possible?
• Your first measurement in a unknown area has to be large enough to get representative
values (e.g. 20 impulses, 20 search lines).
• What is the form of the object you search? If you are looking for an angular metal box,
the identified object in your graphic should have a form according to this.
• To get exact values concerning the depth measurement, the object has to be in the centre
of the graphic, which means it has to be framed by normal reference values (normal
ground). If the object is on the side of the graphic and not totally visible a correct depth
measurement is not possible.
• There should not be more than one object in a graphic. This will influence the exactness
of depth measurement.
• You should do at least two control scans to get sure about your results. So you also can
recognize and isolate mineralized ground.
4.1
Ground Scan
With operating mode Ground Scan all recorded measured values are represented in a three
dimensional graphic on the screen. All high-grade positive signals (e.g. metals) are shown in
red color and all low-order negative values (e.g. cavities) are represented in blue color. The
markedness of the red- and blue coloring depends among other things of the following factors:
• Type of soil (e.g. loam, sand, stone, . . . )
• Contamination through other metallic objects
In the following subsections it is explained in which way the graphical representations can be
edited and analysed.
OKM Ortungstechnik GmbH
www.okm-gmbh.de
4
Analysis and Evaluation of Measurements
4.1.1
33
Metal or Mineralization
On the beginning it is not always easy to find out the difference between metallic objects and
mineralizations. Generally metals are represented in red color, but mineralized depositis in the
ground can also include red color signals.
Here some important notes how to distinguish a real object from a mineralization:
• Form
If the object represented in your graphic has a special form (e.g. rectangle, circle, . . . ),
you can conclude of a possible real found.
• Color
If there are many yellow and orange color values around the object, it will be probably a
mineralisation.
• Depth
With a small depth of about 0,10m or 0,40m there is a high possibility that there is only
a mineralisation of the ground.
• Color Filter
If position and form of the object are changing with the use of the color filter it is probably
a mineralisation.
• Control Scan
If position, depth and form of the object stay nearly the same, also in further control scans
you can conclude of a real object. Also if some graphics look similiar you always have to
compare all indications.
Figure 23 shows a real object (left side) and a mineralized accumulation (right).
Figure 23: Comparison of object and mineral
OKM Ortungstechnik GmbH
www.okm-gmbh.de
User’s manual: Visualizer 3D
4.1.2
34
Signal Correction
During the measurement there are different influences from the environment which can affect
the graphical representation in a negative way. Especially other radio signals can impact
negatively the measured values. This function is used to eliminate error signals from the
graphical representation3 .
A click on Graphics 7→ Signal Correction shows the dialog Signal Correction“ from figure 21
”
on page 26. There are two options possible:
• Correct the value under the cross hairs only
Manual mode, where only the marked value will be adapted.
• Correct all values (Automatic Mode)
Automatic mode, where all measured values will be adapted.
To use option Signal Correction the follwoing parameters has to be adjusted:
• Average Surface Deviation Value
Here you assign how large the deviation of certain values to the average values of the
complete measured field can be. The value Zero means no deviation.
• Average Sub-Surface Deviation Value
This value indicates how large the deviation of every measured point to the adjoining
values can be. A value of Zero means no deviation.
The smaller the values of the parameters are, the more modulations will be made.
Figure 24: Graphic before signal correction
Figure 24 shows a graphic including two error signals. The side view shows clearly a high
pointed deviation down. Often the complete graphic will be coloured in red if error signals are
3
You should only use this function when you are using an older model with 433MHz-radio transmission, that
is without bluetooth or direct cable connection.
OKM Ortungstechnik GmbH
www.okm-gmbh.de
4
Analysis and Evaluation of Measurements
35
included. The error signals itself will be represented as large spikes in blue colour.
Figure 25: Graphic after signal correction
Figure 25 shows the same graphic like in figure 24, but after using the option Signal Correction.
Now two blue parts become visible which were not visible before. They represent two places
with excavations. Before the Signal Correction there was no indication visible.
OKM Ortungstechnik GmbH
www.okm-gmbh.de
User’s manual: Visualizer 3D
4.1.3
36
Interpolation
With option interpolation you can improve the representation of your graphic. Also by using
this option certain irregularities in the measurement will be eliminated. So it is possible to
check possible objects regarding mineralization.
A click on Graphics 7→ Interpolation opens the dialog Interpolation“ from figure 20 on page
”
26. To begin place the regulator on number 1 and confirm your selection with a click on OK.
Figure 26 shows on the left side the graphic before interpolation and on the right side the same
graphic after interpolation. You should repeat this procedure about 3 or 4 times. Alternatively
you can also adjust an interpolation value of 3 to do the interpolation only one time.
Figure 26: Graphic before and after interpolation
With the interpolation value you can adjust how often the interpolation procedure should be
realized. So it is the same result when you do 3 times a interpolation with value 1 or just one
interpolation with value 3.
The interpolation is also very suitable to distinguish real objects from mineralizations. When
there is a real metallic object inside the graphic it will also be visible after using interpolation
several times and it will keep the same position, size and form. If already after one interpolation
the signal disappears or split in more parts or change its position radical, than it is probably a
mineralization of the ground.
If you repeat the interpolation process too often, also real objects will disappear from the graphic.
OKM Ortungstechnik GmbH
www.okm-gmbh.de
4
Analysis and Evaluation of Measurements
4.1.4
37
Color Filter
The representation of the graphic can be variated by moving the blue and red color level.
Therfore you can use either the buttons of the Color Filter from the Navigation Bar or the keys F5,
F6, F7 and F8 of your computer keyboard. Figure 27 shows the original graphic (left side) and
the changed graphic after moving the red color level.
Figure 27: Usage of the color filter by moving the color levels
In figure 28 you can see two examples how the original graphic from figure 27 can be changed.
On the left side the graphic after moving the blue color level is represented and on the right
side the image after moving both color levels.
Figure 28: Usage of the color filter by moving the color levels
Normally the adjusted position of the color levels is selected optimal and do not has to be
changed manually. But it can be useful to verify the graphic regarding to mineralization in the
OKM Ortungstechnik GmbH
www.okm-gmbh.de
User’s manual: Visualizer 3D
38
ground. If the detected signal is changing strongly after only little moving of the color level,
than the signal represents probably a mineral.
Move red color
level down
Move red color
level up
Move blue color
level down
Move blue color
level up
Figure 29: Operating Elements of the Graphic Control
In tabel 2 you can find again the key functions of the Color Filter, like already mentioned in
tabel 1 on page 31.
Key
Function
F5
Move blue color level down (reduce blue color values)
F6
Move blue color level up (amplify blue color values)
F7
Move red color level down (amplify red color values)
F8
Move red color level up (reduce red color values)
Table 2: Key Functions of the Color Filter
OKM Ortungstechnik GmbH
www.okm-gmbh.de
4
Analysis and Evaluation of Measurements
4.1.5
39
Determination of Position and Depth
Only if you are sure to have found a real object you can begin to determine its position and
depth. The next section explains how to proceed.
4.1.5.1
Determining the position
To locate the exact position of an object you have to enter the field length and width at first.
Therefore click in the main menu on the entry Graphics 7→ Characteristics. A dialog window
will open which is represented on page 27 in figure 22. Enter here the corresponding values.
Place now the crosshairs with the arrow keys (←, →, ↑ and ↓) directly over the object, like
shown in figure 30.
Figure 30: Determining the position of objects
Now you can read the relative distance between the object to your starting position in the
arrays Search line and Impulse of the Status bar.
The represented position applies always to the measure point directly under the crosshairs, like
represented in figure 30. You can move the crosshairs over any desired measure point inside
your field with the arrow keys (cursor keys). During the representation of the the graphic with
wireframe, which can be activated with View 7→ Wireframe, you can recognize easily every
single measure point. This is visible in figure 30 on the right side.
If for example the indication shows Search line: 3m and Impulse: 5m, this means that you have
to walk 3m to the left and 5m forward beginning from your starting point to stay directly over
the object.
Now you may see that it is important to remember the exact location of your starting point.
Note this information always in the information dialog which you can open anytime by pressing
the key F9. Additionally it is adviced to place a little marking on the ground where your starting
point is situated.
OKM Ortungstechnik GmbH
www.okm-gmbh.de
User’s manual: Visualizer 3D
4.1.5.2
40
Determining the depth
For the depth measurement a single object should be included inside the graphic. Also the
object should be placed in the centre of the graphic if possible, it should be surrounded by
normal reference values. Therewith optimal conditions for the precise determination of depth
are given.
To determine the depth differences are quite possible. The deeper the object is located in the
ground the higher can be the variance from the real depth. Normally depth differences of about
0,50m are possible. If there is a strong mineralization of the ground higher differences can arise.
Before determining the depth you have to enter the type of soil which was present in your
measured area. Therefore select in the toolbar Depth measurement the corresonding type of soil
from the list.
To determine finally the depth of objects there are two possibilities:
• Depth measurement with line of depth
• Depth measurement with crosshairs
Both possibilities are described in detail in the following subsections.
Depth measurement with line of depth
At first rotate the graphic into side view, like represented in figure 31. Alternative you can click
twice on the side view window on the right side of your screen.
Figure 31: Depth measurement with line of depth
With the keys Page ↑ and Page ↓ of your computer keyboard you can move the line of depth to
the ending point of your object. Now you can read the depth in segment Depth in the Status bar.
Beware that two values are represented. You have to consider the first value. The second value
is used for determination of depth with crosshairs.
OKM Ortungstechnik GmbH
www.okm-gmbh.de
4
Analysis and Evaluation of Measurements
41
Determination of depth with crosshairs
Rotate the graphic into top view, like shown in figure 32. Alternative you can also click twice
on the view from above window on the right side of the screen.
Figure 32: Depth measurement with crosshairs
With the arrow keys of your computer keyboard you can move the crosshairs directly over the
measure point whose depth you want to determine. Now you can read the depth in segment
Depth in the Status bar. Beware that there are two values represented. You have to consider only
the second value. The first value indicates the determination of depth with the line of depth.
OKM Ortungstechnik GmbH
www.okm-gmbh.de
User’s manual: Visualizer 3D
4.2
42
Discrimination
The operating mode Discrimination can only be realized with the Super Sensor. With this
specialized probe it is possible to discriminate between ferrous and non-ferrous metals.
The recorded measured data is represented in curves. From these curves you can conclude to
characteristics about possible objects. Generally there are three important forms representing
non-ferrous metals, ferrous metals and cavities.
Figure 33: Curve Shape of Iron
In figure 33 it is represented, which curve shape results from ferrous metals. Typically is the
high deflection to the top followed by the same deflection down.
Figure 34: Curve Shape of Precious Metals
Figure 34 shows which principle curve shape is represented when passing over a precious metal.
Typically is the small additional deflection with the difference that there is no deflection down.
OKM Ortungstechnik GmbH
www.okm-gmbh.de
4
Analysis and Evaluation of Measurements
43
Figure 35: Curve Shape of Cavities
In figure 35 you can see the principle curve shape when passing over a cavity. Typically is the
high deflection down. But there is no equivalent deflection in the opposite direction.
OKM Ortungstechnik GmbH
www.okm-gmbh.de
User’s manual: Visualizer 3D
4.3
44
Live-Scan
The operating mode Live-Scan is only possible with the devices Future 2005 and Future I-160.
The measured data are recorded continiously and send directly to the software. This way you
will get a flowing“ image, which represents the current situation under the connected probe.
”
4.3.1
Horizontal Live-Scan
After connecting the horizontal antenna connect the device to your computer. Therefore select
Live-Scan (Horizontal Probe) in the dialog from figure 14 on page 19. With impulses you
select the amount of measurement series represented at the same time (recommended value =
10). The higher the value of the selected impulses the slower the image is flowing over the screen.
The latest measured data is always represented on the top of the screen. As soon as new
data is present all values which were recorded before move down. In figure 36 the graphical
representation is shown.
Figure 36: Horizontal Live-Scan
The measured values of the Live-Scan cannot be stored. You should decide during the measurement if there is an interesting discovery or not. In principle there are the same guidelines
like in operating mode Ground Scan. Red color values represents metals and blue color values
indicates cavities.
OKM Ortungstechnik GmbH
www.okm-gmbh.de
4
Analysis and Evaluation of Measurements
4.3.2
45
Vertical Live-Scan
Connect the vertical antenna and connect your device to the computer. Therefore select
Live-Scan (Vertical Probe) in the dialog from figure 14 on page 19. With impulses you
select the amount of measurement series represented at the same time (recommended value =
10). The higher the value of the selected impulses the slower the image is flowing over the screen.
The latest measured data is always represented on the left side of the screen. As soon as
new data is present all values which were recorded before move to the right. In figure 37 the
graphical representation is shown.
Figure 37: Vertical Live-Scan
The vertical live scan shows a cross section through the measured soil. The representation of
depth is limited on 3 meters from the top until the bottom of the graphic.
The measured values of the Live-Scan cannot be stored. You should decide during the
measurement if there is an interesting discovery or not. Light green color values indicates
possible metal objects and dark grey color represents cavities.
OKM Ortungstechnik GmbH
www.okm-gmbh.de
User’s manual: Visualizer 3D
5
46
Internet Update
From time to time certain program functions will be improved or new functions will be added.
With the Internet Update you have the possibility to update your software. Therefore click on
Help 7→ Internet Update. Your software program will now be closed and the dialog from figure
38 appears on your screen.
Figure 38: Start Internet Update
Be sure that you are connected to the internet and click on the function Start. Now the system
will check if an updated version of your software program is available. If so than all necessary
data will be downloaded and installed, like represented in figure 39.
Figure 39: Update Files
When the installation process is finished please click on the function Finish, which restart your
updated software program.
OKM Ortungstechnik GmbH
www.okm-gmbh.de
Index
Activation, 6
Activation Code, 6, 10
antenna, 20
Save, 15, 21, 28
Save as, 21, 22, 28
Stop, 21
Future 2005, 20, 29
Future I-160, 20, 29
Bluetooth, 20
Cavefinder B, 20
Characteristics, 15
Color Filter, 14, 25, 37, 38
Key Functions, 38
Com Port, 23
control scan, 32
crosshairs, 14, 39, 41
GEMS, 20
Grailfinder, 20
graphic preview
perspective, 28, 29
side view, 28, 29
top view, 28, 29
Graphics
Characteristics, 15, 17, 23, 27, 39
Interpolation, 16, 25, 36
Restore to Original, 16, 25
Signal Correction, 16, 26, 34
Ground Scan, 20, 32
data cable, 20
data receiver, 20
data transmission, 23, 26
Date Format, 24
depth, 13, 14, 28
Depth measurement, 40
Crosshairs, 40
Line of depth, 40
depth measurement, 13, 18, 32
line of depth, 17, 18
Destination Folder, 23
determination of depth, 40
Difference in height, 14, 18
Discrimination, 20
Help, 16
Homepage, 29
Information, 30
Internet Update, 29, 46
Horizontal Probe, 20
Impulse, 14, 32, 39
Information field, 15
Input Length, 24
Installation, 6
installation, 5
Internet Update, 46
Interpolation, 16, 25, 36
error signal, 16, 26, 34, 35
eXp 3000, 22
eXp 5000, 22
Extras
Fullscreen, 29
Navigation Rulers, 29
Split Screen, 29
Language, 24
English, 24
French, 24
German, 24
Turkish, 24
Licence agreement, 5
Line of depth, 13, 14, 18, 28, 31, 40
Live-Scan, 20
Localizer 3000, 22
File
Configuration, 13, 14
Exit, 25
Export as BMP, 23
Import, 19, 22
New, 15, 19, 21
Open, 15, 21, 23
Preferences, 24
Print, 15, 23
mineralization, 32, 36, 37, 40
Movement, 24
47
User’s manual: Visualizer 3D
Navigation Bar, 13, 37
New, 15
Open, 15
Perspective, 28
Perspective View, 16
position, 14, 28
Print, 15
radio signals, 34
registration, 5
Resolution, 16
Restore to Original, 16
Rotation, 13, 24
Rotation axes, 15
Rover C, 20
Rover C II, 20
Rover Deluxe, 20
Save, 15
Scale, 24
Search line, 14, 39
Security Code, 5
Selection type of soil, 17
serial Com Port, 23
serial number, 23
Shift, 13
Show/Hide color value, 17
Side View, 17, 28
Signal Correction, 16, 27, 34, 35
Starting point, 39
State of connection, 14
Status bar, 39
Depth, 14, 40, 41
Impulse, 14, 39
Information field, 15, 23
Rotation axes, 15
Search line, 14, 39
State of connection, 14
Super Sensor, 20
48
Unlock Code, 5
USB Connection, 23
USB dongle, 20
Use USB Connection, 23
Vertical Probe, 20
View
Cross Hairs, 28
Perspective, 28
Perspective View, 16
Quality, 28
Resolution, 16
Side View, 17, 28, 40
Top View, 17, 28, 41
Undo, 28
Undo all changes, 16
Wireframe, 16, 28, 39
Zoom, 18, 29
Walkabout, 20
Walkabout Deluxe, 20
Wireframe, 16
Zoom, 14, 18
Zoom factor, 18
Time Format, 24
Toolbar, 15
Depth measurement, 40
Top View, 17, 28
Transformation Parameter, 24
Undo all changes, 16
OKM Ortungstechnik GmbH
www.okm-gmbh.de