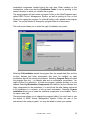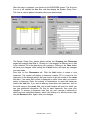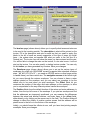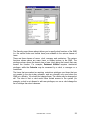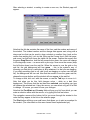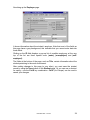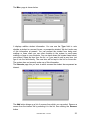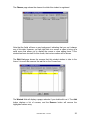
1
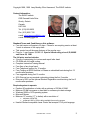
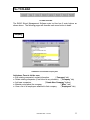
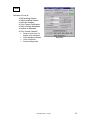
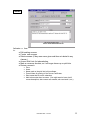
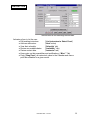
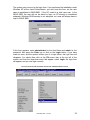
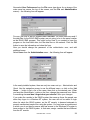
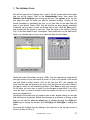
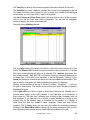
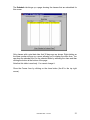
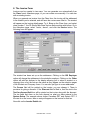
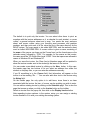
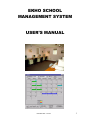
EKHO SCHOOL
MANAGEMENT SYSTEM
USER’S MANUAL
EKHOSMS.DOC 12/21/99
1
Copyright 1998, 1999 Larry Bradley, Elton Hammond, The EKHO Institute.
Contact Information:
The EKHO Institute
6302 Emerald Links Drive
Greely, Ontario
Canada
K4P 1M4
Tel. (613) 822-6935
Fax. (613) 822-7132
e-mail: [email protected]
e-mail: [email protected]
Larry Bradley
Elton Hammond
Standard Terms and Conditions on this software:
♦ Free trial version will expire in 60 days. Phone for non-expiring version at least
1 week in advance of the expiry date.
♦ Trial version has all the same features of the regular copy.
♦ Price for 1 user licence: $4,000 US. Special introductory price of $2,000US
until June 30, 1999.
The full price version includes:
♦ 2 hours of customising for invoices and report letter head
♦ CD-ROM with full install routine.
♦ Complete Instruction/Training Manual.
♦ Free fixes of any bugs found.
♦ Free Telephone support for 12 months.
♦ Free Training at EKHO facilities in Ottawa on scheduled basis during first 12
months after purchase.
♦ Free upgrades during first 12 months.
♦ 20% Discount on any required customising during the first 3 months.
♦ Discount of 50% on the optional Student Registration module during the first 3
months after purchase.
Required system to operate:
♦ Pentium 90 workstation or better with a minimum of 32 Mb of RAM.
♦ Minimum 20 Mb free space on hard disk for software plus data storage.
♦ Windows 95/98 or NT4 operating system.
♦ Microsoft Mouse
♦ Minimum 15” monitor (17” is better) with a resolution of
•
•
minimum 1024x768,
preferred 1280 x 1024 to allow multiple forms on the screen
♦ Hewlett Packard compatible Laser Printer that accepts PCL5 print language.
EKHOSMS.DOC 12/21/99
2
TABLE OF CONTENTS
TABLE OF CONTENTS
3
OVERVIEW OF THE SOFTWARE
5
HISTORY OF THE SOFTWARE
6
GLOSSARY OF TERMS
7
1.
7
PRE-REQUISITES FOR LEARNING THIS SOFTWARE
INTERACTING WITH THE SOFTWARE
8
1.
2.
3.
8
8
8
BUTTONS ON THE TOOL BAR
“ADMINISTRATION” PULL DOWN MENU
“FILE” PULL DOWN MENU
FEATURES OF THE SCHOOL MANAGEMENT SYSTEM
10
THE TOOLBAR
11
INSTALLATION INSTRUCTIONS
18
A TOUR OF THE SYSTEM
26
1.
2.
3.
4.
5.
6.
7.
8.
9.
10.
11.
27
28
32
37
38
40
43
49
52
53
55
THE HOLIDAYS FORM
THE COURSE FORM
THE STUDENT FORM
THE COMPANY FORM
THE INSTRUCTOR FORM
THE CLASS FORM
THE CALENDAR FORM
THE INVOICE FORM
THE REPORTS FORM
PRINTING LABELS
OTHER FEATURES
TUTORIALS
56
EKHOSMS.DOC 12/21/99
3
1.
2.
3.
4.
5.
6.
7.
8.
ADDING A NEW STUDENT.
ADDING A NEW CLASS.
RE-SCHEDULING A CLASS
DELETING A CLASS
ADDING A NEW COMPANY.
ADDING A NEW STUDENT TO A CLASS.
MOVING A STUDENT TO A NEW CLASS
INVOICING
56
56
57
57
57
57
57
58
QUICK REFERENCE
59
SAMPLE REPORTS
61
1.
2.
3.
4.
5.
6.
7.
62
63
64
65
66
67
68
CALENDAR REPORT FOR A STUDENT
CALENDAR REPORT FOR A CLASSROOM
CALENDAR REPORT FOR THE SCHOOL
CALENDAR REPORT FOR AN INSTRUCTOR
CLASS ATTENDANCE LIST
INVOICE FORM
STUDENT NAME TAGS FOR CLASSROOM DISPLAY.
EKHOSMS.DOC 12/21/99
4
OVERVIEW OF THE SOFTWARE
This software is intended for use by small private or public training schools with up
several classrooms that need to be managed efficiently. It is based on a data
base system called Microsoft Visual FoxPro 5.0 and soon will be migrated to
FoxPro 6.0. It will operate on Windows 95/98 or Windows NT4 systems, either
stand-alone or networked. There is no limit to the number of students or
companies that can be stored in the database. It allows for very quick scheduling
of new classes, even while a client is on the phone asking for a group booking in
your available time slots.
This software currently manages:
♦ Class scheduling on available dates.
♦ Reservation of seats for a company when they don’t yet know the
names of those who will be attending.
♦ Classroom scheduling.
♦ Instructor scheduling, non-availability, and conflict management.
♦ Student scheduling and tracking.
♦ Wait List Management/Notification to students for telemarketing.
♦ Invoicing to students, companies or third parties.
♦ Mailing/Fax lists for specific interests.
♦ Holiday scheduling for the school.
♦ Preparation/Printout of all student mailouts when they register:
•
•
•
•
•
•
Invoice for the course booked by the student.
Calendar for the course(s) the student has just booked.
Map to your school.
Course Outline for the course just booked.
Envelope to mail the whole package.
Welcome Sheet .
♦ Printing of envelopes for students and companies.
♦ Backup of data files.
Future versions of the EKHO training school software may add:
•
•
•
•
•
•
Student photos with each student record.
Career tracking.
Output to a web site schedule.
Enhancements to the contact management aspect (Wait List).
Further refinements to the user interface IF requested/desired/suggested.
Other popular requests by the users who purchase this software from EKHO.
EKHOSMS.DOC 12/21/99
5
HISTORY OF THE SOFTWARE
This software was originally developed about eight years ago for use at The
EKHO Institute (An Autodesk Premier Training Centre with two computer
classrooms for AutoCAD and 3D Studio training) under an early version of FoxPro
running on DOS. The many features were refined and added as we gained
practical experience with the software and our training school’s needs. It was
decided one-year ago to re-write the software’s features using the latest Visual
FoxPro 5 capabilities. It has always been developed with the idea of making it
useful to other private training schools besides EKHO. The result has been a
labour of love by the chief programmer, Mr. Larry Bradley and it’s main
user/guinea pig, Elton Hammond, owner of EKHO. Endless hours have been put
into it at both ends to refine the interface, the features and keep it easy to use.
The result is a program that we now consider a delight to use in our every day
training school needs and something we will sell to other schools with pride. The
software has been refined to make the administration tasks of managing a training
school as efficient and quick as possible. We welcome the input of future users to
make it an even better program for managing training schools.
Some of our goals as we developed and will continue to develop will be:
♦ Easy to use. We don’t want to use the manual now, do we?
♦ Simplicity so that this manual is hardly needed after the first day.
♦ Time saving features that reduce administrative tasks and errors.
•
•
•
•
•
•
•
•
The invoicing module fills in the basics with one or two clicks.
Printing of standard mailout materials for students registered for a class
(calendar, course description, map to your site, welcome letter)
Calendars for Students, Instructors, Classrooms and School.
Self-Registration module (optional) to allow students to check/add their
data. This ensures correct spelling on course certificates.
Printing of student certificates.
Conflict checking to prevent double booking of instructors.
Can’t double book a classroom or a session.
Student “Name Tags” for displaying in classroom beside stations to aid
instructor in remembering student names and backgrounds.
EKHOSMS.DOC 12/21/99
6
GLOSSARY OF TERMS
The following terms are explained as to how we use them in this manual.
♦ DRAG AND DROP
•
Selecting an item (text) with the cursor, pressing and holding down the left
mouse button while dragging to a new location and releasing the left mouse
button.
♦ SELECT
♦ PICK
•
Picking with the left mouse button.
•
Selecting an item with the left mouse button.
•
Pressing down the right mouse button usually activates a context sensitive
menu providing only relevant choices for the item at hand.
♦ RIGHT CLICK
♦ FORM
•
A window that shows data in a particular format and allowing interaction by
the user.
♦ DIALOGUE BOX
•
A window that comes out and asks the user for a response.
1. PRE-REQUISITES for Learning this Software
The pre-requisites for a user to learn this software and understand this manual
are as follows:
•
•
•
Good understanding of basic Windows 95/NT4 functions.
Good understanding of administering a Private Training School.
Basic understanding of databases is helpful.
EKHOSMS.DOC 12/21/99
7
INTERACTING WITH THE SOFTWARE
There are three primary areas for the user to interact with the software:
1. Buttons on the Tool Bar
These activate the most popular forms. Once opened, you will make simple
selections with buttons, edit boxes, pick lists and right click menus in the views to
carry out tasks in managing your school.
♦ Company
To add/edit/delete employers.
♦ Class
To add/edit/delete classes.
♦ Course
To add/edit/delete courses.
♦ Instructor
To add/edit/delete instructors.
♦ Calendar
To view/print schedules & much more.
♦ Student
To add/edit/delete students.
♦ Invoice
To create/edit/print invoices.
♦ Reports
To print reports
2. “Administration” Pull Down Menu
Accesses 10 forms - the ones on the Tool Bar plus:
♦ Update Student
To update student data from
optional registration module.
♦ Clean Up Invoices
To flush out old invoices.
♦ Maintain List of Holidays
To edit the list of school holidays.
3. “File” Pull Down Menu
“Print Student Labels” item will allow you to generate mailing labels for students:
♦ for students who have taken specified courses
♦ for students who are interested in specified courses
“Print Reports” item will allow you to access 5 basic Reports:
♦ Generate a Winfax report
Used to transmit group faxes
with Winfax Pro.
♦ Instructor List with Classes
To summarise an instructor’s classes.
♦ Invoice Report for a Month
Show what has been invoiced.
♦ Non-Invoiced AttendeesShow what is not yet invoiced.
♦ Waiting List
Use this list for telemarketing.
EKHOSMS.DOC 12/21/99
8
The EKHO School Management System Screen
EKHOSMS.DOC 12/21/99
9
FEATURES OF THE SCHOOL MANAGEMENT SYSTEM
The main features of this system include:
♦ A monthly Calendar as the main form for
accessing most activities and printing of:
•
•
•
•
Instructor’s individual class schedules.
School schedule.
Individual Classroom schedules.
Student’s Personalised schedule.
♦ Extensive use of:
•
•
“drag and drop”
“right click” menus for exceptional
convenience.
♦ Checks for instructor conflicts so you don’t
book an instructor twice for the same time
period.
♦ Allows use of four types of training sessions:
• Morning
• Afternoon
• All-day
•
The Calendar Form is Easy!
Evening.
♦ Instructors can block out non-available dates.
♦ Allows for custom setting of school holidays.
♦ “Wait List” and “Interest List” allows for telephone, fax or postal
marketing and tracking of students who want a particular course on a
particular date.
♦ Invoicing module allows quick and easy invoicing to:
• Employer
• Student
• A 3rd Party
♦ Printing of Course Certificates.
♦ Separate Registration software module allows students to check and
correct errors in their names or record. School administrators then
transfer this data back into the main student data base if warranted.
♦ Report writing for:
•
•
•
•
•
Generating a Winfax report.
Instructor List with Classes.
Invoice Report for a Month.
Non-Invoiced Attendees.
Waiting List.
EKHOSMS.DOC 12/21/99
10
The TOOLBAR
The MAIN TOOLBAR
The EKHO School Management Software main tool bar has 8 main buttons as
shown above. The following pages will describe each menu button in detail.
Company
COMPANY Form edits/adds Company data
Activates a Form to let the user:
♦ Edit existing companies’ contact information.
(“Company” tab)
♦ Delete existing companies (if not linked to any students). (“Company” tab)
♦ Add new companies.
(“Create New Company” button)
♦ Maintain notes about the company.
(“Misc.” tab)
♦ View a list of all employees attached to that company.
(“Employees” tab)
EKHOSMS.DOC 12/21/99
11
Class
Activates a Form to:
♦ Edit existing classes.
♦ Delete existing classes.
♦ Add new classes.
♦ Print Course Certificates.
♦ Add or Delete Attendees.
♦ Invoice an Attendee
♦ Print 4 small “reports”:
•
•
•
•
Student “name tags” for
display in the classroom.
Class Attendance Sheets.
Class Certificates
Student Address lists.
EKHOSMS.DOC 12/21/99
Class Form
12
Course
Course Form edits/adds Courses
Activates a form
to:
♦ Edit existing courses.
♦ Create new courses.
♦ Delete courses (if they were never given and thus not related to any
classes.)
♦ Access Wait Lists for telemarketing.
♦ Mark a course as obsolete, so it no longer shows up on pick lists.
♦ Revise a course’s:
•
•
•
•
•
•
Price.
Hours.
Name used on the pick lists in this software.
Formal Name for printing of the Course Certificates.
Short name that fits on the calendars.
Add/ revise notes about a course. (You might want to have a brief
course description, date course was created, who can teach it, etc.)
EKHOSMS.DOC 12/21/99
13
INSTRUCTOR
Instructor form lets user add/change Instructor Data.
Activates a form to let the user:
♦ Edit existing instructors.
(“List Instructors to Select From”)
♦ Add new instructors.
(“New” button)
♦ View their schedule.
(“Schedule” tab)
♦ Revise non-available dates.
(“Availability” tab)
♦ Revise contact data.
(“Instructor” tab)
♦ Keep notes on their specialities and qualifications. (“Misc”. Tab)
♦ Drag (“Drag Zone”) an instructor’s name to the Calendar and view or
print their schedule for a given month.
EKHOSMS.DOC 12/21/99
14
Calendar
The Calendar form is the
main working form.
Activates a very powerful and convenient form to see the schedule on a selective
monthly basis for each:
♦ Classroom (Pick in top left corner of the Calendar Form)
♦ Student. (Drag and Drop from Student Form)
♦ Instructor. (Drag and Drop from Instructor Form)
The calendar form also allows the user to:
♦ Print calendars for:
•
•
•
•
Classroom
Student
Instructor
All Classrooms.
•
•
•
•
•
•
Course number
Course name (default)
Instructor
Cost
Total number of hours
Number of students enrolled
♦ View Class Information on the calendar by (selected in bottom right)
Right click on the mouse (while resting the cursor over a chosen class) to do
several common tasks:
♦ Re-Schedule the class.
♦ Display class information.
♦ Display attendees.
♦ Delete class sessions.
♦ Print a calendar for the class.
♦ Print an attendance sheet for the class
♦ Edit the class.
♦ Edit the course.
EKHOSMS.DOC 12/21/99
15
Student
Student form edits Student data
Activates a form to let the user:
♦ View the list of students sorted by:
• Name (default)
• Date the entry was last changed
• Date the entry was created (use to see last few people entered if you forgot a
name).
♦
♦
♦
♦
♦
♦
♦
Edit a student’s personal and at-work information.
Add new students.
View the classes that a student has taken.
(“Classes” tab)
Add a student to a “Wait List”.
(“Wait List” tab)
Keep notes about discussions, exam marks, preferences. (“Misc.” Tab)
Keep a list of courses in which a student is interested. (“Interests” tab)
View data about the company for whom they work.
(“Employer” tab)
EKHOSMS.DOC 12/21/99
16
INVOICE
Invoice Form to create or edit invoices.
Activates a form to let the user:
♦ Edit existing invoices.
♦ Create a New Invoice. (Alternative
preferred method: Use “Class” View,
“Attendees” tab)
♦ Print the following to mail out for a new
registrant:
•
•
•
•
•
•
Invoice.
Envelope.
Calendar (personalised).
Course Outline (coursename.PRN)
Welcome Sheet (WELCOME.PRN)
Map to the school. (MAP.PRN1)
Check List of items to Print for
Mailing
1
Print your map to a file called MAP.PRN and save in the system’s DATA subdirectory.
EKHOSMS.DOC 12/21/99
17
INSTALLATION INSTRUCTIONS
♦ Read this instruction manual from cover to cover so you know what to expect.
♦ You must be logged on as an administrator or equivalent in order to install the
software.
♦ Insert the CD into CD-ROM drive.
♦ Select SETUP or SETUP.EXE in the root of this drive by accessing through
Explorer or the “Run” command on the Start button on the Windows TaskBar.
♦ Follow the on-screen instructions as directed.
♦ Start the EKHO SMS system.
♦ Fill in the Setup System form
♦ Login to the system with a User Name of administrator.
♦ Set up the User Preferences
♦ Add additional users to the system.
The setup program will present you with a series of screens. Use the Back and
Next buttons to move amongst them. After an introductory screen, you will be
presented with a License Agreement, then a ReadMe Screen. Then you will be
presented with the following screen:
The Destination Folder is where you want to install the software – the directory
EKHOSMS on the current drive is the default. You may change this, and if you are
installing it on a network, you will need to select a network drive. The directory
you specify (e.g. EKHOSMS) will be created if it does not already exist, as well
as two subdirectories EKHOSMS\DATA and EKHOSMS\TESTDATA.
Note that if you are installing on a network server, the users of the system must
have full access to the EKHOSMS directory and its subdirectories. If you install
the software on a network, each workstation that will use it must have the
EKHOSMS.DOC 12/21/99
18
workstation components installed during the next step. When installing on the
workstations, make sure that the Destination Folder is set up pointing to the
network directory in which you installed the program.
The setup program will also create a program folder on the Start/Programs menu
called EKHO School Management System, as well as placing an Icon on the
Desktop for running the program. An Uninstall facility is also placed in the program
folder. You will be allowed to change the program folder in a later screen.
The next screen allows you to select the type of installation you prefer.
Selecting Full Installation installs the program files, the sample data files, and the
run-time libraries and other components that must be installed on each
workstation that will be running the software. Selecting Program Only will install
the program files only – no sample data and no workstation components. You
might use this if you wanted to re-install the program, perhaps because of a new
release. Selecting Workstation Components will install the run-time libraries and
other components on the workstation. You would use this after having performed
a full installation to a network, to set up each workstation. Selecting Custom
Installation allows you to select the individual components to be installed. This is
for expert users only.
The next screen allows you to change the program folder if you don’t want to use
the default of EKHO School Management System. Follow the rest of the
instructions in the setup program. You may be asked to restart your system.
EKHOSMS.DOC 12/21/99
19
After the setup is complete, you should run the EKHOSMS system. The first time
it is run, it will initialize the data files, and then display the System Setup Form.
This form is used to gather information about your environment.
The System Setup Form (shown above) shows the Company and Classroom
pages with sample data filled in. Clicking on a tab displays a different set of data
to be collected. Fill in the data about your company. Clicking on the Save button
will save your changes, while clicking the Cancel button will erase any changes
you have made.
Now click on the Classrooms tab. Click the Add button to create a new
classroom. The system will display a classroom number. Fill in a name for the
classroom (in the example above, we have chosen to put the number in the name
field also) - the name field is what is displayed on other forms when you need to
select a classroom. Enter the number of workstations or seats the classroom
holds in the size field. If you wish to add any notes about the classroom, click on
the word memo in the notes field, and a small window will open into which you
can type additional information. Do this for each classroom, then save your
changes. To remove a classroom (note that you can’t remove a classroom in
which you have scheduled classes), select it by clicking on it with the mouse, then
click the Remove button. Again, save your changes.
EKHOSMS.DOC 12/21/99
20
The Invoices page (shown above) allows you to specify what taxes and rates are
to be used in the invoicing module. The description is what will be printed on the
invoice. Fill in the description and rate for each tax that you need to apply (the
labels to the left of each are merely suggestive of the type of taxes you might
have – the system does not assume that what you enter in the first line is a
Federal tax). The invoice form will show the taxes you have entered and the rate.
You will be able to change the rates on the invoice; if a tax rate is zero, it will not
print on the invoice. You can also specify a starting invoice number. You can only
do this before you have generated any invoices. Save your changes.
The Envelopes page (shown above) allows you to set up the various types of
envelopes you might use. EKHOSMS currently supports three standard envelope
sizes - #9, #10 & C4 (9”x12” – you need an HP5000 series or other larger printer
to handle these), and one custom size. The navigation arrows at the bottom right
let you move through the various envelopes. You can choose to have a return
address printed on the envelope, and you can select one envelope to be the
default size to be used when you print envelopes. The Offset fields let you
customize the position of the return and main address on the envelope, to allow
you to compensate for the way different printers handle the envelopes.
The Position fields show the default location of the return and main addresses, in
inches, from the top left corner of the envelope. If you print an envelope and find
that the addresses are improperly positioned, you can measure the differences
between the actual and desired locations, and enter these in the offset fields,
either directly or by clicking on the arrows next to the field. The Position fields will
change to reflect the offsets. A positive number means that the address will be
printed more to the left or to the bottom of the envelope.
Initially, you should leave the offsets at zero, until you have tried printing sample
envelopes. Save your changes.
EKHOSMS.DOC 12/21/99
21
The Security page (shown above) allows you to specify what functions of the SMS
(i.e. the various menu and toolbar items) are available to the various classes of
users.
There are three classes of users: clerk, manager and maintainer. The various
functions shown above are menu items or toolbar buttons in the SMS. The
privilege column shows the lowest class of user (clerk being the lowest) that may
access the function. For example, Database Utilities requires maintainer
privileges, while the Calendar may be accessed by a clerk, a manager or a
maintainer.
The items that are marked as requiring maintainer privileges are those that are
not needed in the day-to-day operation, and are normally only used when the
SMS is in difficulty. You should not change these. The others may be changed at
will. The idea is that a clerk would have limited access to the system (for
example, a clerk is not allowed to edit user privileges, nor can a clerk change the
list of holidays the school observes.
EKHOSMS.DOC 12/21/99
22
The system may now put up the login form. If you performed the installation under
Windows NT as the userid Administrator, you won’t see this form, as this user
name is predefined in EKHOSMS. If the NT userid is a valid user nam in the
EKHO SMS, the user will not be asked to login, as NT security is considered
adequate. Windows 95/98 security is not adequate, so a user will always have to
login to EKHO SMS.
If this form appears, enter administrator for the User Name and admin for the
password, then press the Enter key or click on the Login button. If you have
made an error, and the system informs you of a login failure, the login form will
disappear. You should then click on the File menu item at the top left of the
screen, and from the drop-down menu that appear, select Login; the login form
will appear, and you can login correctly.
The main menu bar and the toolbar, with the File and Administration menus.
EKHOSMS.DOC 12/21/99
23
Now select User Preferences from the File menu (see above for an image of the
main menu bar across the top of the screen, and the File and Administration
menus) – the following form will appear:
For now, just click in the box marked Use Test Data. The other fields are used if
the data files for the EKHO SMS system are not going to be in the same location
as the EKHO SMS program. This might be the case if you wanted to have the
program on the local hard drive, but the data files on the network. Click the OK
button to save the information and close the form.
Now you should change the password of the administrator user, and add
additional users.
Select Users from the Administration menu – the following form will appear:
In the newly-installed system, there are only two users set up – Administrator and
Guest. Use the navigation arrows to see the different users, or click on the List
Users … button to get a list of the users, then click on the desired user. When
you have the Administrator ‘s data on the form, change the password from Admin
to something else and don’t forget what you selected. Save your changes.
If you make the userids in the EKHO system the same as those the people use
when they logon to a Windows NT system, the user will not be asked to login
when he starts the EKHO system, as the NT security is deemed adequate to
prevent unauthorized people from using the system. You may have an environment
in which you do not want a person who has access to the Windows NT system to
have access to the EKHO system. In that case, assign userids that are different
from the NT userids.
EKHOSMS.DOC 12/21/99
24
Click on the New button to add a new user. You will be presented with a blank
form. Fill in a name and password, and click on the arrow at the right of the
Privilege field to select the type of user you wish to create. A clerk has access to
those parts of the system needed for day-to-day operation; most of your users in
an organization that has several staff working with the system will be clerks. A
manager has more privileges, such as the ability to add and modify users, but
cannot perform some system maintenance. A maintainer has complete access to
all parts of the system; you should not normally run the system as a maintainer.
Repeat this for all the people who will be using the system. Then click the close
box in the top right corner of the form to close the form.
For more information on the privilege levels, see the reference manual.
You have now set up the basic system, and are ready to try it out. Login as one
of the newly-created users (select Login from the File menu). You will now be
accessing the test data, a set of sample data provided for you to experiment with
and get familiar with the system. When you are ready to use the system with your
own data, select User Preferences from the File menu, and click on the Use
Test Data box to turn it off. Close this form, and you will now be accessing the
production data files, which, of course, are empty at this point.
EKHOSMS.DOC 12/21/99
25
A TOUR OF THE SYSTEM
For the following tour, you should follow along with the EKHO SMS running, using
the test data supplied. The tour will take you through the various forms and
activities of the SMS. Features of the user interface will be explored.
Get the system running by selecting the EKHO SMS system from the Start
taskbar. You may get asked to login. If so, login as the administrator user name
(the password is admin unless you changed it after installation, as instructed).
When it has started, you will have a screen with a menu across the top and just
below that, the taskbar. The main menu and taskbar are shown below, along with
the File and Administration menus.
Toolbar
File Menu
Administration Menu
Select User Preferences from the File menu, then click on the Use Test Data
check box so that the system is accessing the data we have supplied. Remember
to uncheck this when you want to start working with your own data.
The toolbar is a quick way to access the most commonly used items on the
Administration menu. The Edit menu, which is shown disabled, is used to cut and
paste text on forms. The Window menu is used to select among forms on the
screen if some are hidden behind others – you can have several forms on the
screen at once. The Navigation menu provides a method of moving through the
records displayed on a form, although each form will have a set of navigation
buttons on it for this purpose.
EKHOSMS.DOC 12/21/99
26
1. The Holidays Form
We will first explore the Holidays form, used to tell the system about those days
that you will be closed. Click on the Administration menu, then select the
Maintain List of Holidays item to bring up the form. The spinner at the top lets
you select the year for which you want to schedule holidays. Clicking on the
arrows increases or decreases the year, or you can click on the date field and
enter a year directly. Select 1998. You will see that we have already scheduled
Christmas, but you want to close on Boxing Day as well. Click the New button,
and another line will appear on the form. Type the name of the holiday (“Boxing
Day”) in the field where it says “Description”, then double-click on the date field to
bring up a calendar that you can use to select the date for the holiday.
Select the month (December) and year (1998) from the calendar by using the left
and right arrows to move one month at a time, or click on the arrows on the month
and year fields to select directly. Click on the day (the 28th); the calendar will
close, and the date will appear on the form. Note that you can only select dates in
the year for which you are scheduling holidays. Click Save to save your changes.
On all forms, you must save in order for your changes to take effect. If you try to
close the form, or move to another record, the system will ask you if you want to
save your changes first.
Anywhere in the system that you need to enter a date, double-clicking on the date
field will bring up a calendar. Rather than bringing up a calendar to change a date
field, you can use the plus and minus keys to change the days, the PgUp and
PgDn keys to change the months, and Ctrl-PgUp and Ctrl-PgDn to change the
years.
Now close the Holidays form by clicking on the close box in the top right corner of
the form (it has an “X” in it).
EKHOSMS.DOC 12/21/99
27
2. The Course Form
Now that we have noted when you are not working, let’s set up some things for
you to do when you are. Click on the Course button on the toolbar to bring up the
course form.
The title bar of the form shows the name of the form, a number showing which
copy of the form this is (you can have several course forms open at once), and
the name of the course. Below that is the course number, the date this record
was last changed, and a green box labelled “Drag Zone”. Several forms have this.
It is used when you want to “drag and drop” information from one form to another.
For example, you can drop a course onto the calendar form, and the calendar will
then show only the classes scheduled for that course. We will explore drag and
drop later.
There are three names shown for the course. When you create a new course and
fill in the Name field, the other two name fields will be filled in with the same value.
The Name field is the name that you will use when selecting this course in other
forms; it can be an abbreviated name. The Formal Name field is used on
certificates and other places where the full name should be used. The Calendar
Name will be used on the calendar form and printout. Since there is limited space,
a shorter name is necessary. The size of the field on the form is about right. If the
name you enter fits in the box, it should fit the calendar. Check it by examining the
calendar form and a printout of the calendar, and adjust if necessary.
The Hours field must be filled in. It is the number of hours that this course
requires. The system assumes that a full day is 7.5 hours, and that morning,
afternoon, or evening sessions are 3.75 hours (a half-day), thus the amount you
enter should be a multiple of half or full days. The calendar uses this information to
tell you if you have scheduled enough sessions for a class.
EKHOSMS.DOC 12/21/99
28
The Cost field is used by the invoicing module to provide a default for the cost.
The obsolete box, when checked, prevents this course from appearing in the list
of courses that other forms display for you to select from. Rather than deleting a
course when you no longer offer it, mark it as obsolete.
The List Courses to Select From button will drop down a list of all the courses;
click on the one you want and it will be displayed. You can use the navigation
arrows to display the other courses as well.
Now click on the Waiting List tab.
This is a grid showing the people who want to take the course some time in the
future. The Wanted field is when the person wants to take the course. It is a date
field, thus double-clicking will bring up a calendar. The session field shows the
time of day wanted – day, AM, PM, or Evening. Clicking in this field displays a list
to chose from. If the time is not important, it can be left blank. Clicking on the
notes field brings up a window into which you can type additional information. This
can be used to note when you have contacted the person, for example.
Clicking on the headers at the top of the grid (“student”, “Employer”, …) will sort
the grid on that column. The header of the column upon which the grid is sorted is
highlighted in green.
If you right-click on a field in a grid, a small menu may pop up, allowing you to
perform some action on the field selected. If you right-click on an employer, a
menu pops up (“Edit this Item”) allowing you to bring up the Company form for
that employer. If you right click on a student, a menu allows you to bring up the
student form for the student, print an envelope for the person, or to display a
small form that has the student’s name, employer, home and work phone
numbers. This is handy when you are using the waitlist for marketing purposes.
Clicking on the Show More Info box brings up this same information form, but the
form will stay up and change as you select different students in the grid.
EKHOSMS.DOC 12/21/99
29
The Print Envelopes button brings up a small form that allows you to print
envelopes for everyone on the waitlist. Selecting Print an Envelope from the
right-click menu brings up the same form, but will only print one envelope.
This form allows you to select an envelope size (the default is the one you set up
in the System Setup form during installation). You can chose to have your return
address printed or not. Checking the Select a Printer box will cause a Windows
printer selection dialog box to appear before printing occurs. This allows you to
select a different printer for envelopes. Click on the Print button to print the
envelope(s).
Note that you may have to use the System Setup form to fine-tune the positioning
of the addresses on the envelopes.
You can remove people from the wait list by selecting the person in the list (click
on the name, or use the arrow keys on the keyboard), then clicking on the
Remove button. You will always be asked to confirm delete operations – just in
case.
EKHOSMS.DOC 12/21/99
30
The Schedule tab brings up a page showing the classes that are scheduled for
this course.
Only classes with a start date later that 30 days ago are shown. Right-clicking on
the class number will pop up a menu allowing you to display the class form. You
can show the calendar form for the selected class by selecting the class and then
clicking the button at the bottom of the page.
Note that this table is read-only. You cannot change it.
Close the Course form by clicking on the close button (the X in the top right
corner).
EKHOSMS.DOC 12/21/99
31
3. The Student Form
Click on the Student button on the toolbar (or select Student from the
Administration menu) to get the student form.
The first page is used to select a student to process. There is a list of students
from which you can select by clicking in the list, then using the slider bar at the
right, or the arrow keys to move to the desired student. Then double-click with the
mouse or click on the Display Student button. Or you can click in the box just
below the list, and start typing the surname of the student. As you type, the
system will fill in the first name on the list that matches the letters you have typed,
and the list will highlight the name in yellow. When you have typed enough to
select the desired student, press the Enter key, or click on the Display Student
button. If you need to type more than just the surname (the Smiths come to
mind!), follow the surname with a comma, then start typing the first name (don’t
type a space after the comma).
The list’s default order is alphabetic by surname and first name. By clicking on one
of the buttons on the List Ordering box, you can have the list ordered by the date
that the records were changed (it lists the newest date first). This is useful if you
want to see what has been changed recently. You can see the list displayed in the
order in which the students were entered, the most recent first. This is useful to
get access to new students.
To create a new student, click the Create New Student button. You will be asked
if you have checked to make sure the person has not already been entered. You
should first check the name in the list – you don’t want to have duplicate entries.
EKHOSMS.DOC 12/21/99
32
After selecting a student, or asking to create a new one, the Student page will
appear.
Note that the title bar contains the name of the form, and the number and name of
the student. The student number and the change date appear next, along with a
drag zone box that can be used to drop a student on another form (such as the
course form waiting list). Let’s try this. Bring up the Course form’s Wait List page,
and move it so that both forms are visible on the screen. Position the mouse over
the green Drag Zone box, hold the left mouse button down; the cursor will change
to the drag-drop cursor – an arrow with a plus sign. Now move the mouse (keep
the left button down) over the wait list. When the mouse is over the grid on the
wait list, the grid background will turn green - this is the system’s way of
informing you that this is a valid place to drop whatever it is that you are dragging.
If you drag something that is not valid (such as dragging a course over the wait
list), the background will turn red. Now that the mouse is over the green wait list,
release the mouse button, and the student will now appear in the wait list.
To change a field, click on it with the mouse, or use the Tab keys to move to it.
Note that when you do this, field changes colour – white on a dark blue
background. This shows that the text has been selected, and anything you type
will replace the selected text. Using the mouse, you can select only part of a field
to change. Of course, you need to save your changes.
Note that the Prov/State and Country fields will pop up a list from which you can
make a selection either with the mouse, or by typing the first few letters.
The navigation arrows at the bottom left let you move through the student in the
order that they appear in the list on the selection page.
The Print button will bring up a small menu that allows you to print an envelope for
the student. (The other items on this menu haven’t been implemented yet).
EKHOSMS.DOC 12/21/99
33
Now bring up the Employer page.
It shows information about the student’s employer. Note that most of the fields on
this page have a grey background; this indicates that you cannot enter data into
these fields.
Clicking on the ID field displays a pop-up list of possible employers; at the very
top of the list are three special ones: (none), (unemployed) and (selfemployed).
The fields at the bottom of the page, such as Title, contain information about the
student pertaining to the work environment.
After making changes to this page (or any other), you must save the student
record by using the Save button on the Student page. Or you can use a shortcut
for saving – use the Ctrl-S key combination. Ctrl-E (for Escape) can be used to
cancel your changes
EKHOSMS.DOC 12/21/99
34
The Misc. page is shown below.
It displays addition student information. You can use the Type field to note
whether a student is a current, former, or prospective student. We don’t make use
of this information at present. You can prevent the student from being sent
mailings or faxes when you use other modules in the system to send mass
mailings or faxes to your students. You can track where the student heard about
your school. Select an item from the list, or if you want to add a new item, just
type it into the field directly. The new item will be kept in the list for future use.
The system does not currently make use of this information.
The Interests page lets you note in which courses the student has expressed an
interest.
The Add button brings up a list of courses from which you can select. Remove a
course from the interest list by selecting it in the list, then clicking the Remove
button.
EKHOSMS.DOC 12/21/99
35
The Classes page shows the classes for which this student is registered.
Note that the fields all have a grey background, indicating that you can’t change
any of this data. However, you can right-click on a course or class to bring up a
small menu that allows you to display the course or class editing forms. If the
student has been invoiced for this course, the invoice number will be shown.
The Wait List page shows the courses that this student wishes to take in the
future. It is much the same as the wait list on the Course form.
The Wanted field will display a popup calendar if you double-click on it. The Add
button displays a list of courses, and the Remove button will remove the
highlighted course entry.
EKHOSMS.DOC 12/21/99
36
4. The Company Form
This form is very similar to the Student form we just explored. The Selection
page, above, works the same way.
The Company page has both a Name and an ID field; when you create a new
company, the ID field will be filled in automatically with the contents of the Name
field. The ID field is used in other forms (such as the Student form’s Employer
page) to select a company. The Name field should be the formal name of the
company. The ID field could be an abbreviation, or used to distinguish several
divisions or departments of a large company, to make is easy for you to find in a
popup list.
The Misc page has additional details. The Employees page displays a list of the
students that are employed by this company. You can’t change anything on this
page, but right-clicking on the name of a student allows you to bring up the
student editing form for that student.
EKHOSMS.DOC 12/21/99
37
5. The Instructor Form
This form is used to maintain the list of instructors at your school. You can use the
navigation buttons to move through the instructors, or you can click on the List
Instructors to Select From button for a popup list.
The Misc page lets you record information regarding courses the instructor could
teach, plus a general notes field.
The Schedule page shows the class the instructor is (or has been) scheduled to
teach.
Right-clicking on the Class or Course fields allows you to bring up the Class or
Course forms. The schedule only show recent and future classes; clicking on the
Show All Classes button will show all the past classes for this instructor as well.
EKHOSMS.DOC 12/21/99
38
The Availability page show the dates that the instructor has booked off.
The Date field will pop up a calendar upon double-clicking. You can select a
session (Day, AM, …) for which the instructor is unavailable. Currently the system
does not use it. It uses the date only, to block off the day on the calendar. A
future release will use the session information, as well as allowing a more flexible
method of specifying the time off, such as a range of dates, or “Every Monday”.
The Add button adds an item to the list, with today’s date. Edit the date as
necessary. The Remove button will remove the highlighted date.
EKHOSMS.DOC 12/21/99
39
6. The Class Form
The Selection Criteria page lets you select classes to display in different ways. If
you enter a class number, that class will be displayed. If the class number is left
as zero, then you can select classes based upon the course they are for, or the
starting date (or both). The course popup will give you a list of courses and the
date popup will give you a calendar. The Show Obsolete Classes & Courses
check box allows you to see all courses and classes, or it will filter out those that
are obsolete. If a course is obsolete, all the classes for that course are also
obsolete. Turning this off makes the list of classes you are working with smaller,
as you are now looking at only those classes that are current.
The Clear button will clear out all the criteria so you can start again. If you leave
the fields all empty, all classes will be available for editing. When you have
entered your criteria, click the Select button to go to page 2, the Data Entry page.
The New Class button will bring up a blank Data Entry page.
At the top of the Data Entry page you are shown the number of classes that met
the selection criteria. The List Classes to Select From button or the navigation
buttons can be used to move through the records that were selected.
The Course field will pop up a list of courses for the class; the Instructor popup
will give a list of instructors to choose to teach the class. The Hours Required
field will be filled in from the information in the course table when you create a
new class; you can change it if you wish. The fields with a grey background
cannot be changed. Hours Scheduled and Current Size are updated as class
sessions are scheduled on the calendar and students are registered.
The Maximum Size field will be set by the calendar when you schedule sessions
for a new class, based on the classroom you schedule. It is taken from the value
EKHOSMS.DOC 12/21/99
40
you specified in the System Setup form’s Classroom page. You can change it if
you wish, although the system will warn you if you try to make it greater than the
classroom is set up to hold. The system will not let you register more students
than the value in this field.
The New button will let you create a new class. You need to fill in the course,
instructor, and hours required, then save the information. At this time the system
will bring up the calendar so that you may schedule class sessions. We won’t
explore this at present, not until after we have explored the calendar in detail.
The Class Notes page allows you to record additional information about this
class.
The Attendees page is where you register students for the class.
The Add button will pop up a student selection form, just like that on the Selection
page of the Student form. You can select from the list, or start typing the name
into the box below the list.
The Reserve button will pop up a company selection form, just like that on the
Selection page of the Company form. This allows you to reserve places in a class
for a company, when the company does not yet know who will be attending. The
attendees list shows this by putting the word ‘for’ before the company name, and
using blue text for name.
The Remove button will remove the student whose entry is highlighted on the grid.
The Invoice field shows the number of the invoice upon which this student was
billed. This is useful for tracking who has and has not been invoiced. The Del field
will have Yes in it if an invoice has been generated, but later deleted while
cleaning up old invoices. This allows you to clean up invoices, but not lose track of
who has been billed.
EKHOSMS.DOC 12/21/99
41
Right-clicking on the Student field pops up a menu of things that you can do with
this student.
You can print a student form, which is a form with information about the student
that can be placed at his workstation so that the instructor and other students can
know who he is. You can also bring up the Student form for this student, or
remove him from the list of attendees for the class.
Selecting the Invoice … item will bring up the Invoice form. If the student has
been invoiced already, the existing invoice will be displayed. Otherwise a new
invoice will be created for the student. We’ll discuss invoicing later.
We have the ability to print a certificate for students. Currently, we only are set up
to print certificates for AutoDesk courses on pre-printed forms. In a future release
we plan to provide a more general facility for printing certificates.
The Print button brings up a small menu.
The first item prints a student form for the highlighted student, as described
above. The Class Attendance form is a printed form that the instructor can use to
keep an attendance record for the class. The Class List for Students is just a
name and address list of all the students that you can give to each student, in
case they wish to contact on another.
The Invoice button brings up the Invoice form for the highlighted student, just as
described above in the right-click menu.
EKHOSMS.DOC 12/21/99
42
7. The Calendar Form
The calendar is the heart of the School Management System. You will find that
you start up the calendar as soon as you run the program. Most other activities
can be started from the calendar.
Across the top of the calendar are controls for selecting the month and classroom
that the calendar will display. The two arrows move forward or backward one
month at a time. There is a popup for selecting a month and a spinner for the
year. There is a popup for selecting the classroom.
The date displayed in each box on the calendar can be highlighted in a different
colour, as shown in the Date Legend box. For example, the 25th is shown in red in
the sample above, as it is a holiday. The current date, the 16th, is shown in yellow.
A date highlighted in light blue means that there is a date conflict for an instructor.
This can occur if you change the instructor for an already-scheduled class, and the
new instructor is already busy on some or all of the days. The Class for will warn
you of this, but will let you continue. The calendar highlights these dates as a
reminder. Later we’ll see how you can find out what the conflicts actually are.
Each class is shown in a different colour. For example, on the calendar above
“ACAD 14 Lvl 1” is shown in red.
EKHOSMS.DOC 12/21/99
43
EKHO SMS supports four different time periods for class scheduling: all day,
morning, afternoon, and evening. The position of a class session in a date box on
the calendar indicates what time period it used. A morning session is at the top,
an afternoon session just below that, and an evening session at the bottom. An allday session will be positioned halfway below where a morning session would be.
It would overlap the bottom of a morning session and the top of an afternoon
session if all three were scheduled at once (which is impossible in the same
classroom). For example, in the calendar above on the 14th, we see “ACAD 14 Lvl
2” in the AM, “ACAD 14 Lvl 1” in the PM, and “R13-R14 Upgrade” in the evening.
(By the way, these names come from the Calendar Name field on the Course
form – you may have to play with abbreviations to make them fit). On the 15th, you
can see that “ACAD 14 Lvl 2” is an all-day session (compare it with the day
before). Although the spatial aspect of this may seem confusing, you will quickly
get used to it.
The default contents for a session box (that’s what we call the coloured boxes) is
the course name. You can select different things to display by selecting from the
Session Display popup in the bottom right corner of the calendar. You can
display the class number, the instructor (useful for detecting those conflicts we
talked about earlier), the cost, the hours scheduled, and the number of attendees.
The Number display is very useful, as it displays the time period as well as the
class number. Try it! You may find number more suitable for your everyday use.
The box at the bottom to the right of the Session Display lets you select whether
the calendar should show busy sessions (those with a class assigned), free
sessions (those without a class assigned), or both. Try selecting Show Free and
observe the screen. It will now show the time slots, or sessions, available for
scheduling classes. This is the view of the calendar that the class scheduling
facility uses. Note the word “Free” in each session, as well as the colour code to
show the time period (there is a legend for the colour code near the bottom right
of the calendar in this view. Also note that if there is a class in the all-day time
slot, the AM and PM slots do not show as free. Show All is shows all of the
sessions.
Clicking on a session in the calendar pops up a small form showing the details of
the class. You can have several of these on the screen at once if you wish.
Right-clicking on class session pops up a menu of things that you can do for that
class.
The first one is for rescheduling classes; we’ll explore that in a minute. Display
Class Info brings up the same form as clicking on the class does. Display
EKHOSMS.DOC 12/21/99
44
Attendees pops up a form showing the students registered for this class. Print
Calendar for this Class allows you to print a calendar just for this class. We’ll
look at printing in a minute. Print Attendance Sheet … prints the same
attendance sheet as we saw in the Class form. Edit Class and Edit Course bring
up the respective forms for editing.
The Print button brings up a form that lets you specify what sort of calendar you
want printed.
You may select a Standard calendar – a full calendar for the month, or one for
each of the other items shown. When you select one of the others, the
appropriate popup box will be enabled so that you can select the student, or
class, or whatever. If you select a class, there may be several pages printed if the
class extends over more than one month (class 6, for 3D Studio Max, extends into
January). If you print a calendar from the right-click menu for a class, you will get
this same form, but the with the Class option selected, and the class number filled
in.
EKHOSMS.DOC 12/21/99
45
Now let’s look into scheduling classes. Right-click on one of the “ACAD Lvl 1”
sessions, and select Reschedule… from the popup menu.
The title bar shows that we are scheduling class number 2, with Elton Hammond
as the instructor. The calendar now shows the free sessions, as well as the
sessions for the class being scheduled (“ACAD 14 Lvl 1”). The box labelled
Scheduling also has the class being scheduled in it. You can change the display
to the class number from the name if you wish – it may make it easier to see what
is going on, as the number display shows the time period as well as the classroom
number. The number of hours that the class requires, and the number of hours
that are scheduled are shown; the latter will be updated as you add or remove
sessions.
To move sessions, we use “drag and drop”. You place the mouse over the
session you want to move and hold the left mouse key down. Drag the cursor
(which now has a small box attached to the bottom) over the free slot. Notice that
the cursor shows the time period of the slot (Day, AM, etc) when it is over a free
slot so you can be sure that you are dropping it in the right place. Try it. Drag the
session from the 16th to the free “day” slot on the 11th. But while dragging, move
the mouse over some of the other spots on the screen to see what happens. The
cursor will turn into a “Don’t” symbol, and in some places the background will turn
EKHOSMS.DOC 12/21/99
46
red if a drop isn’t permitted. Now move over the free slot on the 11th and release
the mouse button. Now the class appears on the 11th, and the slot on the 16th is
now free.
To add a session, drag the class from the Scheduling box near the bottom right
corner of the form. Note that in this case, the cursor has a plus sign with it,
indicating that you are adding a session. Drop it on the free “day” slot on the 17th,
and note that the class now appears there, and the Hours Scheduled field has
increased to 45 from 37.5 as you added a 7.5 hour all-day session.
You can also add sessions by holding down the Ctrl key while dragging and
dropping. You can add several sessions this way; hold the Ctrl key down, then
drag a session and drop it on a slot, then drag that one to the next free slot.
If you only want to schedule in a particular time slot (e.g. Day), you can have the
calendar only show the free slots for that period by clicking on the appropriate
period in the legend box at the bottom right of the calendar. Clicking on the period
again will display all the free slots.
You can add sessions to another month by selecting that month. Click the rightarrow at the top right to move the calendar to January 1999. Note that the 4th, 5th
and 6th dates are shown in red, as holidays. These are days that the class
instructor, Elton Hammond, has booked off (remember when we worked on the
Instructor form?), and you can’t schedule a class on one of those days. Now drag
the class from the Scheduling box to a free slot.
You can add a class to another classroom as well, if necessary. Just select
another classroom, the drag the class from the Scheduling box to a free slot. Try
it.
To delete a session, right-click on the session and select Delete Session from
the popup menu. You can delete all the sessions for the month by selecting
Delete All Session … from the menu.
Click on the Show All option. Notice how the busy and the free slots are shown.
The class being scheduled is always shown with a white background to distinguish
it from the others.
Click on the Save button to save your changes, or on the Cancel button to erase
any changes you have made. The display will return to the showing of busy
sessions for the current classroom. When you save, the system will warn you if
you have not scheduled enough (or have scheduled too many) hours. If you have
deleted all the sessions for the class, it will inform you of this as well.
If you have the Class form for this class open while you are scheduling, it will
change to reflect the new schedule. The start and finish dates, and the number of
hours scheduled will be updated automatically.
Remember how in the discussion of the Class form we mentioned that when you
created a new class and saved it, the calendar would appear? It will appear in
reschedule mode, with the new class number in the Scheduling box. Select the
proper month, year, and classroom. Then drag and drop from the Scheduling box
to add sessions. When you save, the Class form will be updated with the
classroom, start and finish dates, and hours scheduled. Simple!
EKHOSMS.DOC 12/21/99
47
As well as the normal calendar, which shows all classes for the month, it is
possible to display specialised calendars. This is where that little green Drag
Zone box that you saw on the various other forms can be used. If you drag from
the Drag Zone of the Instructor form to the calendar and drop there (the calendar
will turn green to show that it is legal to drop an instructor), you will get a calendar
that show those classes that the instructor is teaching. If you drop a student, or a
course, you will get the appropriate calendar. To return to a normal calendar, click
on the Calendar Type box and select Normal.
The calendar is the focal point of the EKHO system; play around with it until you
are comfortable.
EKHOSMS.DOC 12/21/99
48
8. The Invoice Form
Invoices can be created in two ways. You can generate one automatically from
the Class form’s Attendees page, or you can create one manually. You can also
edit an existing invoice.
When you generate an invoice from the Class form, the invoice will be addressed
to the student you’ve selected, and will have the course name filled in. The student
will appear on the invoice details page. Try it. Bring up the Class form, and select
class number 7, the 3D Studio Max class that we were working with before. Go to
the Attendees page, select “Leduc, James”, and click the Invoice button. The
following form will appear:
The student has been set up as the addressee. Clicking on the Bill Employer
option will change the addressee to the student’s employer. Clicking on the Other
option will add two buttons to the display allowing you to select a student or a
company from a list; the lists are the same as they appear on the selection pages
of the Student and Company forms. You can also just type in a new addressee.
The Course field will be printed on the invoice; you can change it. There is
provision for giving a discount. If the Discount field is filled in, then the text in the
Text for discount field box will be printed on the invoice along with the discount.
The tax fields that show on the form depend on what you have entered in the
System Setup. The example above shows Canadian GST and Ontario PST. If
the rate for a tax is zero, then no entry will appear on the invoice for that tax.
Now click on the Invoice Details tab.
EKHOSMS.DOC 12/21/99
49
The student has been automatically added to the invoice details, along with the
default course cost. Many times you will be billing an employer for several
students who are taking the same class. You can add additional students from the
class to the invoice by clicking on the Add Student button. This will pop up a list
of those students who are registered for this class that have not yet been
invoiced. Selecting one will add that student to the invoice, with the cost as filled in
on the Header page. You can change the cost if you wish.
The Add Item button will add a blank line to the details; you can fill this in with
anything else that you might wish to bill for, such as manuals.
Note the columns headed GST and Ontari. These are used to specify what taxes
are applicable to each item. There will be one column for each tax shown on the
invoice header page. Double-clicking on the box will turn the check mark on and
off. The text in these headings are taken from the Invoices page of the Setup
form.
When you print an invoice in the trial system, you will get an invoice form set up
for The EKHO Institute. When you purchase a system from EKHO, we will
customize the invoice for you at no extra charge, using your graphic logo if you
have one, and any other pre-printed information you wish.
At the same time as you are printing the invoice, the system will let you print
additional material to send out to the student.
Now go back to the Invoice Header page, and click the Print button. A small form
will appear, allowing you to chose what you wish to print.
EKHOSMS.DOC 12/21/99
50
The default is to print only the invoice. You can select other items to print: an
envelope with the invoice addressee on it, a calendar for each student, a course
outline, a general welcome sheet and a map. You create the map, welcome
sheet, and course outline using your favourite word processor and graphics
package, and then print each to a file; store the file in the same directory as the
EKHO system. The map needs to be called MAP.PRN, and the welcome sheet
must be called WELCOME.PRN. A course outline is given a name consisting of
the name of the course, as shown on the Course form (not the formal name or the
calendar name), followed by “.PRN”. For example, for the course on this invoice,
the name would be “3D Studio Max Level 2.PRN”. Note that spaces are allowed in
names in Windows 95 and Windows NT.
When you save the invoice, the Class form’s Attendees page will be updated to
show the invoice number next to the student(s) that were on the invoice.
You can create a new blank invoice by clicking on the New button. In this case,
the header page has two buttons to let you select an address from either the
student or company lists, or you can enter an addressee manually.
If you fill something in to the Course field, that information will appear on the
invoice in a line reading “Re: …” You can also add other text to the invoice using
the Notes field.
On the Details page, the only option is to add items, since there is no class
associated with the invoice. An item, of course, can be anything you wish to enter.
You can edit an existing invoice by clicking on the Selection page. This is also the
page that comes up when you click on the Invoice button on the toolbar.
Select an invoice from the popup list, then click on the Display Invoice button.
Note regarding invoice numbers: in the system setup, you can assign a starting
invoice number to fit in with your existing accounting system.
EKHOSMS.DOC 12/21/99
51
9. The Reports Form
Click on the Reports button on the toolbar to bring up the following form:
This form gives you a list of reports that you can print, or preview on the screen,
or have printed to a file. “Generate a WINFAX table” does not actually print
anything; it generates a list of all students in a form suitable for use by WINFAX
Pro, a fax program. It can be used to send out mass FAXes to your students.
More reports will be added to the system as our customers request them. These
are the ones that we have found useful in the years we have been running the
system. We had others, such as complete student lists, but with 3000 names on
our list, that’s not too useful.
EKHOSMS.DOC 12/21/99
52
10.
Printing Labels
Selecting the Print Student Labels item from the File menu brings up the
following form:
This is used to print mailing labels. We support the four sizes of label sheets
shown; these are the most popular sizes from the Avery catalogue. The list shows
the number of labels across and down, and the size of each label. Use 1.5” high
labels if you can, as they have more room for the address.
You can print labels for students who have taken specified courses in the past.
This would be useful, for example, to market an Advanced course to those who
have taken the Basic course. You can also print labels for students who have
expressed an interest in specified courses (via the Interest or Wait List pages of
the Student form). Clicking on either brings up the following form for you to select
the courses:
EKHOSMS.DOC 12/21/99
53
The “mover” form allows you to select courses from the left window and move
them to the right window. The courses in the right window are those that will be
used for the mailing. You can move courses between the two windows by
selecting with the mouse and clicking the Add or Remove buttons, or by doubleclicking. You can add or remove all the courses at once. You can drag and drop
courses from one window to the other. You can select several courses at once by
holding down the Ctrl or Shift keys when you click with the mouse. Play with the
mover to get the feel of it. Click OK when you have made your selections.
Click the Generate Labels button to print the labels. If you are printing labels for
students who have taken certain courses you are asked to enter a date (it is a
calendar popup) before which the students must have taken the course. This
allows you to avoid sending mailings to very recent students.
EKHOSMS.DOC 12/21/99
54
11.
Other Features
The File menu provides access to several other features:
♦ Print Setup. This brings up a dialog box to allow you to select the printer to be
used for subsequent printing operations
♦ Print Reports. This is the same as the Reports button on the toolbar
♦ Database Utilities. This brings up a form to perform system maintenance
activities on the data files. The data files can have their structures updated if
this is required by a new release of the software. Their indexes can be rebuilt,
and the files can be packed to remove deleted records. There is also a file
repair utility that can recover files that have been damaged when a workstation
or server crashes. These utilities are normally only used upon advice from
EKHO Tech Support.
♦ System Setup. This brings up the setup form that was discussed in the
section on installation
♦ User Preferences. This allows the user to select between production and test
data.
♦ Activate. This provides the ability to enter an EKHO-supplied key to activate
optional features of the software.
♦ Backup Data. This will back up the data files to a user-selected directory in a
compressed (‘zip’) format. Each backup file name contains the date and time
of the backup, making it possible to keep a set of backups (one each day, for
example).
♦ Login. This brings up the login form so that a different User Name (normally
with different privileges) may be used. All other forms are first closed.
♦ Special. This will run an EKHO-supplied program to perform maintenance
activities on the system. It should only be used upon instruction from EKHO
Tech Support.
♦ Error Log. This will bring up a form that displays the contents of the error log.
If the system encounters problems, it will normally display a dialog box telling
the user of the error, and giving him a choice of things to do – normally, the
user would chose the option to quit the existing form. The system also logs
details of the error. EKHO Tech Support may request you to bring up the error
log form and read off some of the information. It provides the ability to E-mail
the log file to EKHO Tech Support. Note that for this feature to work, your EMail program must support the Microsoft MAPI interface, and be set up as the
default MAPI mail client. We have successfully used Eudora Pro (Version 3 or
later), Microsoft Outlook and Outlook Express, and Microsoft Exchange as
MAPI mail clients with this system.
♦ Exit. Terminates the operation of the EKHO SMS.
This is the end of the tour of the EKHO School Management System. In order to
use your own data, Select User Preferences from the File menu, and uncheck
the Use Test Data box. Exit from the system by selecting Exit from the File
menu, or by clicking on the Close box in the top right corner of the screen.
EKHOSMS.DOC 12/21/99
55
EKHOSMS.DOC 12/21/99
56
TUTORIALS
We will show you how to do the following every day tasks in this section of the
manual:
♦
♦
♦
♦
♦
♦
♦
♦
Adding a new student.
Adding a new class.
Re-scheduling a class.
Deleting a class.
Adding a new company.
Adding a new student to a class.
Moving a student to a new class.
Invoicing;
• One student per invoice
• More than one student on an invoice.
• Printing the Invoice
1. Adding a new student.
♦ Select the “STUDENT” button on the toolbar to activate the Student form.
♦ Type the last name,first name of the student you are planning to enter first,
to check if they are already in the database. Put no spaces between the first
and last name, just the comma.
♦ If you do not find them, pick on the “New Student” button to create a new
record.
♦ Fill in as much data as possible under the “Student” tab.
♦ Select the “Employer” tab to select an employer. If this is a new employer,
see the section on adding a new company.
♦ Select the “Misc.” tab to:
•
•
•
•
Pick the type of student
Where they heard about you.
Whether they don’t want faxes or mailings.
Keep dated notes about the conversation and information received.
♦ Select the “Interests” tab to specify what courses they are interested in.
♦ Select the “Wait List” tab to choose courses they want to be notified of at
some future date.
♦ Select the “Student” tab to “Save” the data and complete the entry.
♦ Select the X in the top right corner of the form if you no longer need the
Student form for further editing or input.
2. Adding a new class.
♦ Select the “Class” button on the main toolbar. The Class form should now
open.
♦ Select the “New Class” button in the Class form.
EKHOSMS.DOC 12/21/99
57
♦ Enter the relevant data, then select Save. The calendar will then be displayed,
(or activated if it is already on the screen) in rescheduling mode.
♦ Drag the new class from the calendar’s drag area (lower right corner) to the
chosen calendar dates.
♦ Select “Save” in the lower left corner of the calendar on completion.
♦ Return to the “Class” form and select “Save” again.
♦ Close the “Class” form by picking the X in the top right corner.
3. Re-scheduling a class
♦ Place your mouse pointer on the class you wish to schedule on the Calendar.
Right click to activate the context sensitive menu.
♦ Select “Reschedule Class Session” from the small pop up menu.
♦ This will activate the editing mode of the calendar, allowing ou to drag and drop
any session or sessions to any Free date.
♦ If you want to move a session(s) to a new month you will need to use the White
drag zone at the bottom right corner of the View where it says “Scheduling”.
Dragging with your mouse from this zone will allow you to drop it on any of the
“Free” slots in a new month.
4. Deleting a class
Two possible methods allow the user to delete a Class if it is not going ahead and
has no students registered in it:
♦ Use the “Calendar”
• Right click on the class (session) you want to delete
• Select the “Reschedule Class Session” option
• Right click on top of the class again and select either “Delete this Session”
or “Delete for this month”.
♦ Use the “Class” form
•
•
Find the Class number in the drop down pick list and pick it.
Select the “Delete” button at the bottom of the View.
5. Adding a new company.
♦ Select the “Company” button on the main toolbar. The Company View should
now open.
♦ First, confirm that the company name is not already entered.
♦ Select the “Create New Company” button in the Company View.
♦ Enter the relevant data.
♦ Press “Save” upon completion.
6. Adding a new student to a class.
♦ Select the “Student” button on the main toolbar. The Student View should
now open.
♦ First, confirm that the person’s name is not already entered.
♦ Select the “Create New Student” button in the Student View.
♦ Enter the relevant data.
♦ Press “Save” upon completion.
EKHOSMS.DOC 12/21/99
58
7. Moving a student to a new class
♦ Open the “Class” form by selecting the correct class on the “Calendar” form,
right clicking and picking “Edit Class”. This opens the correct Class view.
♦ Select the “Attendees” tab in the Class form.
♦ Select the student to be moved and select “Remove” at the bottom of the
“Class” form window. Confirm your decision when prompted.
♦ Open the class to which you wish to move the student.
♦ Select the “Attendees” tab on this class form and “Add” the student here.
♦ Picking on the Invoice box will drop down a list of previous invoices that may
have been sent to this student. If the correct one for this course appears,
select it, edit if necessary and print again if necessary.
♦ Select the “Save” button on the “Data Entry” tab.
8. Invoicing
♦ One Student per invoice.
•
•
•
•
•
•
•
•
•
Select the “Class” button on the main tool bar to select a class to invoice.
Choose the “Attendees” tab to see a list of the people not yet invoiced.
Choose someone on the list by left clicking with the mouse while the pointer rests
on the chosen name.
Choose “Invoice” on the bottom of the View.
Choose whether to bill the employer, student or other.
Edit discount condition if required. (e.g. “if paid before course start date”)
Add a general note (“Comment to go on invoice”) if a special arrangement was
made regarding payment, attendance, etc.
Select “Save” once you have completed all appropriate editing.
Select “Print” to print out an invoice. (Twice if you want 2 copies)
♦ More than one student per invoice.
•
•
•
•
•
Same instructions as above but also:
Select the “Invoice Details” tab.
Select the “Add Student” button to add another student from this class onto this
same invoice. (If the other student that you want to invoice is in a different class,
you will have to do a separate invoice)
Select “Save” once you have completed all appropriate editing.
Select “Print” to print out an invoice. (Twice if you want 2 copies)
EKHOSMS.DOC 12/21/99
59
QUICK REFERENCE
The following quick reference chart lists common tasks and where you can access
them.
Task #
Task Description
Where to Access
Telemarketing
“Course” button, “Wait List” tab or
Marketing
“File” menu, “Print Reports”
Faxing with WinFAX Pro
“File” menu, “Print Reports”
Mailing campaign
“File” menu, “Print Reports”
Monitoring
advertising
Classes
success
of “Student” button, “Misc.” tab to
choose “Where did he hear about
us?”
Select this button first è=è=è
“Class” button on Toolbar
Adding a class
“New” Button, “Data Entry” tab
Deleting a class
“Delete” Button, “Data Entry” tab
Re-scheduling a class
“Calendar” button – right click on
the class, Choose “Reschedule ..”
Changing Instructor for a class
Printing
Sheet
a
Printing
certificates
Courses
Invoicing
Class
“Data Entry” tab, “Instructor” edit
box.
Attendance “Print” button, “Attendees” tab or
student
Right Click on the Class in Calendar
course “Print” button, “Attendees” tab
Select this button è=è=è
“Course” button
Creating new
Editing Existing
“NEW” button, “Class Information”
tab
“Class Information” tab
Select this button è=è=è
“Invoice” button or
Creating, Editing, Printing
“Class Attendees” tab in Class
View.
“Invoice” button or
“Class” View, “Attendees” tab
EKHOSMS.DOC 12/21/99
60
Reports
Printing student “name tags”
Company
Student
Printing Invoiced list
Printing Not Invoiced List
Class View – Attendees tab – Print
button (or right click on student)
File menu, Print Reports
File menu, Print Reports
Select this button first è=è=è
“Company” button on Toolbar
Adding a company
“New” Button, “Company” tab
Deleting a company
“Delete” Button, “Company” tab
Editing a company
“Company”
finished.
Select this button first è=è=è
“Student” button on Toolbar
Adding a student
“New” Button, “Student” tab
Deleting a student
“Delete” Button, “Student” tab
Editing a student
“Student” tab, “Save” when
finished.
“Wait List” tab, “Add” button,
“Save” when finished.
Wait Listing a student
tab,
“Save”
when
Classroom “name tags” for each “Class” button, “Attendees” tab,
student.
Right click on selected student.
Invoicing a student
“Class” button, “Attendees” tab,
Pick student, “Invoice” button.
EKHOSMS.DOC 12/21/99
61
SAMPLE REPORTS
The following section contains some typical forms that we use daily at The EKHO
Institute. They are all produced with this software. Customers who purchase this
software from us will receive 2 hours of free time from us to incorporate your own
letterhead in place of ours. Once you have ordered the software, just e-mail us
your letterhead in any of the following formats:
♦ any standard raster image format (.JPG, .BMP,.TIF,.TGA, etc.).
♦ Microsoft Word 95 or later.
♦ AutoCAD 12 .DWG or later.
♦ AutoCAD 12 .DXF or later.
♦ Corel Draw 3 or later.
♦ WordPerfect 5 or later.
♦ Excel 5 or later.
♦ .WMF
EKHOSMS.DOC 12/21/99
62
1. Calendar Report for a Student
EKHOSMS.DOC 12/21/99
63
2. Calendar Report for a Classroom
EKHOSMS.DOC 12/21/99
64
3. Calendar Report for the School
EKHOSMS.DOC 12/21/99
65
4. Calendar Report for an Instructor
EKHOSMS.DOC 12/21/99
66
5. Class Attendance List
EKHOSMS.DOC 12/21/99
67
6. Invoice Form
EKHOSMS.DOC 12/21/99
68
7. Student Name Tags for Classroom display.
EKHOSMS.DOC 12/21/99
69