1
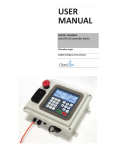
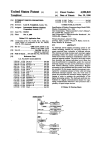
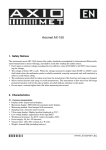
USER
MANUAL
MODEL NUMBER:
IVX-LITE Controller Series
Inventory Logix
English (Original Instructions)
USER MANUAL: IVX-LITE Inventory Logix
READ ALL INSTRUCTIONS BEFORE OPERATING EQUIPMENT
Table of Contents
Installation Instructions.............................................................................4
Control Box..................................................................................................... 4
Setup Instructions.....................................................................................5
Admin Settings............................................................................................... 5
User Settings................................................................................................... 6
Sensors............................................................................................................ 7
Unit Info/Config.............................................................................................. 10
Time Set/Config.............................................................................................. 11
USB Options................................................................................................... 13
Network Setup................................................................................................ 14
Reporting......................................................................................................... 17
Troubleshooting........................................................................................19
Admin Screen Errors....................................................................................... 19
Exploded Views/BOMs..............................................................................20
Model IVX-LITE | Exploded View: 115VAC ................................................ 20
Model IVX-LITE | BOM: 115VAC ............................................................... 21
Model IVX-LITE | Exploded View: 12VDC ................................................. 22
Model IVX-LITE | BOM: 12VDC ................................................................ 23
USER MANUAL (MODEL: IVX-LITE) Page 2 of 23
6/10/2015
USER MANUAL: IVX-LITE Inventory Logix
READ ALL INSTRUCTIONS BEFORE OPERATING EQUIPMENT
WARNING
Avoid Personal Injury
1. Avoid contact of cleaning agent with skin and
eyes. If contact occurs, see MSDS sheet for
further first aid measures.
2. Follow safety instructions of chemical
manufacturer (MSDS).
3. Always follow plant and OSHA guidelines
about the use of hygiene equipment.
Specifications
Width..............11.5”
Depth..............5”
Height.............9.5”
Electrical Connection Requirements
115 Volts AC
Single Phase
60 Hz
2 Amps
24 VDC - Control Voltage (Unit has internal power supply)
4. Disconnect power before servicing unit.
USER MANUAL (MODEL: IVX-LITE) Page 3 of 23
6/10/2015
USER MANUAL: IVX-LITE Inventory Logix
READ ALL INSTRUCTIONS BEFORE OPERATING EQUIPMENT
Installation Instructions
Control Box
Aspects to consider when deciding on placement:
• Distance to electrical connection.
• Distance to Ethernet or WiFi connections
(depending on model).
• Room for entering and exiting.
• Emergency exit paths.
Attach the included mounting feet to the control box with
a phillips screwdriver. Securely mount control box to wall,
then plug into 115 volt wall outlet.
If the unit was purchased with an Ethernet connection,
plug it into the plant network. (See page 16 to setup the
unit on an Ethernet network).
Power
Fuse
USB Connection
CAN Line
USER MANUAL (MODEL: IVX-LITE) Page 4 of 23
6/10/2015
USER MANUAL: IVX-LITE Inventory Logix
READ ALL INSTRUCTIONS BEFORE OPERATING EQUIPMENT
Setup Instructions
Admin Settings
To edit settings on the IVX-LITE, log into the Admin screen
by pressing the “Admin” button and typing in the 4-digit
administrator passcode. The default Admin user will be
setup with the code “1234.” This code can be changed
under the “Users” section. (See Page 6).
Admin Login
Enter Passcode:
XXXX
The Admin screen will automatically return to the home
screen after 1 minute of inactivity for security purposes.
To edit a setting select its option from this menu:
• Users: Create and edit users.
• Sensors: Edit sensors, set calibration points, set
alarms, and check the status of the sensor.
• Unit Info/Config: Edit the unit name, language,
units of measurement, and view the unit’s serial
number and build date.
• Time Set/Config: Set the date, time, and time
zone on the unit.
• USB Options: Safely remove USB, update firmware, and import/export configuration files to a
USB flash drive.
• Network Setup: Setup the unit on a WiFi or
Ethernet network so it can send out Inventory
Reports via email.
• Reporting: View the reporting status, and change
the timing and recipients of the Inventory Reports.
IVX-LITE Admin Menu
1-Users
2-Sensors
3-Unit Info/Config
IVX-LITE Admin Menu
4-Time Set/Config
5-USB Options
6-Network Setup
IVX-LITE Admin Menu
5-USB Options
6-Network Setup
7-Reporting
NOTE: If at any point you need to go back, press ESC
USER MANUAL (MODEL: IVX-LITE) Page 5 of 23
6/10/2015
USER MANUAL: IVX-LITE Inventory Logix
READ ALL INSTRUCTIONS BEFORE OPERATING EQUIPMENT
User Settings
To create new, and edit existing users, log into the Admin
screen by pressing the “Admin” button and typing in the
4-digit administrator passcode.
Edit Users
00- Add New User
01- Administrator
Press “1” or use the navigational keys to select the
“Users” option and press ENTER.
This will bring up a list of users currently setup on the
unit. Use the navigational keys to scroll through the list.
To edit current users, use the navigational keys to select
them from the list, then press ENTER.
Editing User #02
Name: Plant User
Password: 0000
To create a new user, select “Add New User” and press
ENTER.
Using the keypad, type in the user’s name and their
4-digit passcode they will use to login.
Once finished, press ESC to go to the confirmation page.
From here, press ENTER to save the user, or ESC to
ignore.
NOTE: A 4-digit code can only be assigned to one user.
Users cannot share codes. If the code being assigned to
the user is “0000” or a code that is already assigned to
another user, the screen will say “Supplied Password is
Invalid. Please Correct and Try Again.”
The new user will now appear in the list of users.
USER MANUAL (MODEL: IVX-LITE) Page 6 of 23
Editing User #02
(SAVE Entry)
ENTER to save
ESC to ignore
Edit Users
00- Add New User
01- Administrator
02- Plant User
6/10/2015
USER MANUAL: IVX-LITE Inventory Logix
READ ALL INSTRUCTIONS BEFORE OPERATING EQUIPMENT
Sensors
To edit Sensors, log into the Admin screen by pressing
the “Admin” button and typing in the 4-digit administrator passcode.
Select Sensor
100-Chemical 1
200-Chemical 2
Press “2” or use the navigational keys to select
“Sensors” and press ENTER.
To edit a sensor, use the navigational keys to select it and
press ENTER.
Use the keypad and navigational keys to edit the sensor
name, ID, and enter the size container it is in.
To set the calibration points select “Set Cal Point #1”,
and press ENTER.
Edit Sensor
#100
Name: Chemical 1
ExtID:
Size: 0000080 GAL
NOTE: Calibrations should be done prior to initial use.
Use the keypad to enter in the number of liters currently
in the container.
When finished press ESC. You will be prompted to a confirmation screen, press ENTER.
Set Cal Point #1
Set Cal Point #2
Alarm Setup
Sensor Status
Repeat the same steps for setting calibration point 2.
Set Cal Point #1
Sensor Status
000303 Liters
USER MANUAL (MODEL: IVX-LITE) Page 7 of 23
6/10/2015
USER MANUAL: IVX-LITE Inventory Logix
READ ALL INSTRUCTIONS BEFORE OPERATING EQUIPMENT
Sensors (Continued)
When setting the calibrations be sure to use two different levels for calibration point 1 and calibration point 2. For
example, an 80% full container for calibration point 1 and a 20% full container for calibration point 2 would be ideal.
While, a 50% full container for both calibration points would be unreliable. See the diagram below.
Calibration Point #1
Calibration Point #2
Calibration Point #1
Calibration Point #2
Alarms
This unit also has alarm features. The alarms can be set
to send email alerts based on your volume specifications.
For example, if you typically order more chemical when
your drum has about 5 liters left, you can program 5
liters as a “Low set”. Then the unit will send you an alarm
through your email when your drum has reached this
level.
Another example, for the “High Set” you may want to
set the volume level the drum is supposed to be filled
to. This will send you an email alarm when the drum
reaches this level. Thus, you could ensure your chemical
shipment arrived without making a trip to the chemical
room.
The “Alarm Setup” option allows you to:
• Set high and low points where you would like the
sensor to alarm you
• How often you want the alarm repeated
• Set the delay in response to volume changes
USER MANUAL (MODEL: IVX-LITE) Page 8 of 23
Set Cal Point #1
Set Cal Point #2
Alarm Setup
Sensor Status
High Set 400
L
Low Set
10
L
Repeat Rate
1 hr
Hysteresis
2.0%
6/10/2015
USER MANUAL: IVX-LITE Inventory Logix
READ ALL INSTRUCTIONS BEFORE OPERATING EQUIPMENT
Sensors (Continued)
The high and low points (in liters) can be entered using
the keypad.
Next you will see “Repeat Rate”. This is a time setting
for how often you want the email alarm to be repeated
while the volume remains at the high or low set point.
Alarm Settings
High Set 400
L
Low Set
10
L
Repeat Rate
1 hr
To change “Repeat Rate” press → or ←.
Hysteresis is the setting for the delay. This allows you
to set a delay in response to volume changes. The unit
will only send the alarm if the volume has reached the
high or low set point, the specified delay time has been
reached, and the volume still remains at the set point or
more extreme.
To change “Hysteresis” press → or ←.
Once finished, press ESC to return to the “Edit Sensor”
menu. Any changes will be automatically saved.
To view the status of the sensor select “Sensor Status”
and press ENTER.
The sensor status displays:
High Set 400
L
Low Set
10
L
Repeat Rate
1 hr
Hysteresis
2.0%
Set Cal Point #1
Set Cal Point #2
Alarm Setup
Sensor Status
• The sensor number
• A live reading from the sensor
• The two set calibration points
Press ESC to return to the “Sensor” menu.
Press ESC again to return to the “Admin” menu.
USER MANUAL (MODEL: IVX-LITE) Page 9 of 23
Live
Cal1
Cal2
0.0L
0L
0L
#100
17080uA
4000uA
4000uA
6/10/2015
USER MANUAL: IVX-LITE Inventory Logix
READ ALL INSTRUCTIONS BEFORE OPERATING EQUIPMENT
Unit Info/Config
To edit Unit Config Settings, log into the Admin screen
by pressing the “Admin” button and typing in the 4-digit
administrator passcode.
Press “3” or use the navigational keys to select
“Unit Info/Config” and press ENTER.
Unit Config/Info
Unit Name: Test Unit
Event Logging: Yes
RFID enabled: Yes
From here the unit’s basic config settings can be
changed. To change an option, use the navigational keys
to select it, then press ENTER, → or ← to switch settings.
To enter or change a units name, press → and begin
entering the name.
Press ENTER, → or ← over the “Event Logging” option to
switch between “Yes” and “No”.
Advance rate:
10s
Units:
Metric
Language:
English
Version #:
009
NOTE: To assign cards to users, “RFID” must be enabled.
Press ENTER, → or ← over the “RFID enabled” option to
switch between “Yes” and “No”.
NOTE: “Advance rate” not utilized with this version.
Press ENTER, → or ← over the “Units” option to switch
between Imperial and Metric units of measurement.
Language:
Version #:
Serial #:
Built on:
English
009
000001
6/10/15
Press ENTER, → or ← over the “Language” option to
switch between English and Spanish text.
The “Version #” shows what software version this unit
currently has, and the bottom of the page shows when
this unit was built.
USER MANUAL (MODEL: IVX-LITE) Page 10 of 23
Once finished, press ESC to return to the main Admin
menu. Any changes will be automatically saved.
6/10/2015
USER MANUAL: IVX-LITE Inventory Logix
READ ALL INSTRUCTIONS BEFORE OPERATING EQUIPMENT
Time Set/Config
To change the date or time on the unit, log into the
Admin screen by pressing the “Admin” button and typing
in the 4-digit administrator passcode.
Press “4” or use the navigational keys to select “Time
Set/Config” and press ENTER. The “Time Config Menu”
with three options will appear.
Press ENTER over the “Status” option to view:
• Date
• Time
• Whether or not daylight savings time is enabled
• Time zone
• If time synced is on or off
Time Config Menu
Status
Time Zone Setup
Manual Time Set
06/10/15 03:00:20PM
DST: Enabled
TZ: -5
Actual: -5
Time Synced:
YES
Press ESC when you are done viewing.
Press ENTER over the “Time Zone Setup” option to make
changes to:
• Time zone
• Enable daylight savings time
• Set the start and stop month, day, and hour for
daylight savings time
To change any of these options use the navigational keys
to select it, then press → or ← to increase, decrease, or
switch the option.
Once finished, press ESC to return to the “Time Set/Config” menu. Any changes will be automatically saved.
USER MANUAL (MODEL: IVX-LITE) Page 11 of 23
Time Zone Config
Zone Offset:
-5
DST Enabled:
YES
DST Start Month:
3
DST
DST
DST
DST
Start Day:
Start Hour:
Stop Month:
Stop Day:
8
2
11
1
6/10/2015
USER MANUAL: IVX-LITE Inventory Logix
READ ALL INSTRUCTIONS BEFORE OPERATING EQUIPMENT
Time Set/Config (Continued)
To change the date and time select the “Manual Time
Set” option.
Use the navigational keys and the keypad to input the
correct values for the date and time. To change from
AM to PM scoll untill the AM on the screen appears as
“>AM<” press ENTER to switch to PM. Use the same
method to switch from PM to AM.
Once finished, press ESC to return to the main Admin
menu. Any changes will be automatically saved.
USER MANUAL (MODEL: IVX-LITE) Page 12 of 23
Time Config Menu
Status
Time Zone Setup
Manual Time Set
Date
M:06 D:10 Y:2015
Time
H:03 M:00
PM
6/10/2015
USER MANUAL: IVX-LITE Inventory Logix
READ ALL INSTRUCTIONS BEFORE OPERATING EQUIPMENT
USB Options
To access USB Options on the unit, log into the
Admin screen by pressing the “Admin” button and typing
in the 4-digit administrator passcode.
Press “5” or use the navigational keys to select
“USB Options” and press ENTER.
Press ENTER over any of the following options to select
it.
• Remove USB disk
• Update Firmware
• Export Config
• Import Config
USB Options
1-Remove USB disk
2-Update Firmware
3-Export Config
USB Options
2-Update Firmware
3-Export Config
4-Import Config
The IVX-LITE unit will come with a small USB flash drive
already plugged into the USB port on the bottom for
your convenience, although any standard USB flash drive
can also be used.
Once any export process is complete, the unit will
display “Export Complete,” and whatever was exported
to the flash drive will appear when it is plugged into a
computer.
USER MANUAL (MODEL: IVX-LITE) Page 13 of 23
6/10/2015
USER MANUAL: IVX-LITE Inventory Logix
READ ALL INSTRUCTIONS BEFORE OPERATING EQUIPMENT
Network Setup
To edit Network settings on the unit, log into the Admin
screen by pressing the “Admin” button and typing in the
4-digit administrator passcode.
Press “6” or use the navigational keys to select
“Network Setup” and press ENTER.
From here the unit’s network settings can be changed.
To change an option, use the navigational keys to select
it, then press ENTER to switch settings.
Press ENTER → or ← over the “Type” option to specify if
the unit will connect to the network via WiFi, Ethernet,
or not at all.
Network Setup
Type:
WiFi
Address:
DHCP
WiFi Config
Network Setup
WiFi Config
TCP/IP Config
Connection Status
Press ENTER → or ← over the “Address” option to
specify a DHCP address, or a manual IP address.
Setup on a WiFi Network w/ DHCP
Set the “Type” to “WiFi” and set the address to “DHCP.”
Press ENTER over the “WiFi Config” option to setup the
unit on the wireless network. From here, use the keypad to type in the SSID (name of the network).
Press → or ← over the “Security type” to select between WEP, WPA, WPA2 or no encryption options.
Press ↓ to scroll down, then use the keypad to type in
the password to the wireless network.
USER MANUAL (MODEL: IVX-LITE) Page 14 of 23
WiFi Config
SSID
(demo network)
Security Type:
WPA2
WiFi Config
Security Type: WPA2
Security Key
(demo password)
6/10/2015
USER MANUAL: IVX-LITE Inventory Logix
READ ALL INSTRUCTIONS BEFORE OPERATING EQUIPMENT
Setup on a WiFi Network w/ DHCP (Continued)
Once finished, press ESC to return to the Network Setup
menu. Press ESC again and the unit will say “Initializing”
and will return to the main menu. Any changes will be
automatically saved.
Status:
Connected
IP: 192.168.002.057
SUB: 255.255.255.000
GW: 192.168.002.001
To see if the unit is connected to the network, log back
into the Network setup page and press ENTER over
“Connection Status.”
The unit will either say “Connected,” “Pending,” or
“Disconnected.”
Setup on a WiFi Network w/ Manual IP Info
Status:
Pending
IP: 255.255.255.255
SUB: 255.255.255.255
GW: 255.255.255.255
Set the “Type” to “WiFi” and set the address to
“Manual.”
Press ENTER over the “TCP/IP” option to manually setup
the unit on the WiFi Network.
Use the keypad to type in the IP address, the Subnet, the
Gateway, and the DNS.
Once finished, press ESC to return to the Network Setup
menu. Press ESC again and the unit will say “Initializing”
and will return to the main menu. Any changes will be
automatically saved.
To see if the unit is connected to the network, log back
into the Network setup page and press ENTER over
“Connection Status.”
Network Setup
Type:
WiFi
Address:
Manual
WiFi Config
TCP/IP Config
IP: 000.000.000.000
SUB: 000.000.000.000
GW: 000.000.000.000
The unit will either say “Connected,” “Pending,” or
“Disconnected.”
USER MANUAL (MODEL: IVX-LITE) Page 15 of 23
6/10/2015
USER MANUAL: IVX-LITE Inventory Logix
READ ALL INSTRUCTIONS BEFORE OPERATING EQUIPMENT
Setup on an Ethernet Network w/ DHCP
Make sure the unit is plugged into the Ethernet network.
Set the “Type” to “Ethernet” and set the address to
“DHCP.”
Once finished, press ESC to return to the Network Setup
menu. Press ESC again and the unit will say “Initializing”
and will return to the main menu. Any changes will be
automatically saved.
To see if the unit is connected to the network, log back
into the Network setup page and press ENTER over
“Connection Status.”
The unit will either say “Connected,” “Pending,” or
“Disconnected.”
Network Setup
Type:
Ethernet
Address: DHCP
WiFi Config
Status:
Connected
IP: 192.168.002.057
SUB: 255.255.255.000
GW: 192.168.002.001
Setup on an Ethernet Network w/ Manual IP Info
Set the “Type” to “Ethernet” and set the address to
“Manual.”
Press ENTER over the “TCP/IP” option to manually setup
the unit on the Ethernet Network.
Use the keypad to type in the IP address, the Subnet, the
Gateway, and the DNS.
Once finished, press ESC to return to the Network Setup
menu. Press ESC again and the unit will say “Initializing”
and will return to the main menu. Any changes will be
automatically saved.
To see if the unit is connected to the network, log back
into the Network setup page and press ENTER over
“Connection Status.”
The unit will either say “Connected,” “Pending,” or
“Disconnected.”
USER MANUAL (MODEL: IVX-LITE) Page 16 of 23
Network Setup
Type:
Ethernet
Address: Manual
WiFi Config
TCP/IP Config
IP: 000.000.000.000
SUB: 000.000.000.000
GW: 000.000.000.000
6/10/2015
USER MANUAL: IVX-LITE Inventory Logix
READ ALL INSTRUCTIONS BEFORE OPERATING EQUIPMENT
Reporting
To edit Reporting settings on the unit, log into the
Admin screen by pressing the “Admin” button and typing
in the 4-digit administrator passcode.
Press “7” or use the navigational keys to select
“Reporting” and press ENTER. From here the reporting config, status, and addresses can be changed and a
report can be sent on demand.
Press ENTER over “Reporting Config” to set:
• Rate in which samples are taken
• Rate in which reports are sent
• Web reporting on or off
Press ESC to return to the Reporting menu when finished. Any changes made will be saved automatically.
Press ENTER over “Reporting Status” to see when the
next Inventory Report will be emailed, when the last
Inventory Report was emailed, and whether the unit is
connected to the plant network or not.
Press ENTER over “Report Addresses” to enter up to
three different email addresses that the Inventory
Reports will be emailed to. Use the keypad to type in
the addresses.
Once finished, press ESC. Any changes will be
automatically saved.
USER MANUAL (MODEL: IVX-LITE) Page 17 of 23
Reporting Config
Reporting Status
Report Addresses
Report Now
Reporting Config
Sample Rate
5 m
Report Rate
1 hr
Web Reporting
No
Reporting Status
Next: 06/11 12:00PM
Last: 06/10 12:00PM
Net:Yes Pts:
5
Report Addresses
[email protected]
[email protected]
[email protected]
6/10/2015
USER MANUAL: IVX-LITE Inventory Logix
READ ALL INSTRUCTIONS BEFORE OPERATING EQUIPMENT
Reporting (Continued)
To manually force an email report to be sent, go to the
Reporting Menu and press ↓ to scroll down until
“Report Now” appears.
Press ENTER over “Report Now” to send an email report
to all of the email addresses setup in
“Report Addresses.”
Reporting Config
Reporting Status
Report Addresses
Report Now
Processing Report
If the unit is connected to the internet, it will send a
report containing the latest dispense logs (since the
last email report) in a .csv file, and the raw data of the
dispense logs in a .json file.
The report will include the date and time of the report,
as well as the serial number of the unit that it was sent
from. If the report is not received, check the spam filter
on your email provider as well as the internet connecton
of the IVX-LITE.
Report Complete!
USER MANUAL (MODEL: IVX-LITE) Page 18 of 23
6/10/2015
USER MANUAL: IVX-LITE Inventory Logix
READ ALL INSTRUCTIONS BEFORE OPERATING EQUIPMENT
Troubleshooting: Admin Screen Errors
Message
Cause
Export Failed
Export Failed!
A USB flash drive is not plugged into the
USB port on the bottom of the unit.
Solution
Plug a USB flash drive into the unit so
that it can export logs.
Message
Export Empty
Cause
No new dispense logs have been created
since the last time logs were exported.
Solution
Once new dispenses have been run, the
unit will be able to successfully export
“New Dispenses.”
Message
Reporting Disabled
Cause
A manual report was attempted, but the
interval in “Report Timing” is set to “00.”
Solution
Log into the Admin screen, then under
“Reporting” select “Report Timing” and
set the interval to something higher
than “00.” (See Page 22).
Message
Nothing to Report
Cause
A manual report was attempted, but
there have not been any new dispenses
since the last report.
Solution
Once new dispenses have been run, the
unit will be able to successfully report.
USER MANUAL (MODEL: IVX-LITE) Page 19 of 23
Export Empty!
Reporting Disabled
Nothing to Report!
6/10/2015
USER MANUAL: IVX-LITE Inventory Logix
READ ALL INSTRUCTIONS BEFORE OPERATING EQUIPMENT
Exploded Views/BOMs
Model IVX-LITE | Exploded View
115VAC
USER MANUAL (MODEL: IVX-LITE) Page 20 of 23
6/10/2015
USER MANUAL: IVX-LITE Inventory Logix
READ ALL INSTRUCTIONS BEFORE OPERATING EQUIPMENT
Model IVX-LITE | BOM
115VAC
USER MANUAL (MODEL: IVX-LITE) Page 21 of 23
6/10/2015
USER MANUAL: IVX-LITE Inventory Logix
READ ALL INSTRUCTIONS BEFORE OPERATING EQUIPMENT
Exploded Views/BOMs
Model IVX-LITE | Exploded View
12VDC
USER MANUAL (MODEL: IVX-LITE) Page 22 of 23
6/10/2015
USER MANUAL: IVX-LITE Inventory Logix
READ ALL INSTRUCTIONS BEFORE OPERATING EQUIPMENT
Model IVX-LITE | BOM
12VDC
USER MANUAL (MODEL: IVX-LITE) Page 23 of 23
6/10/2015