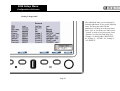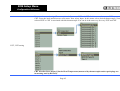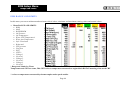
1
© Copyright 2008-2010
TL elektronic
All Rights Reserved
Except as expressly provided below, no part of this manual may be downloaded, transmitted, copied, reproduced, disseminated or stored
in any storage medium, for any purpose without the express prior written consent of the TL elektronic company. Address your questions about
the technical information to TL elektronic. Other information about sale, distribution should be directed to our exclusive distributors
(see World Distributor list on our website).
Producer’s address:
TL elektronic Inc.
Airport, Building 125,
503 41 Hradec Kralove, Czech Republic
Fax: +420 49 548 23 94 E-mail: [email protected]
Web Site Address: www.tl-elektronic.com
Please, send your e-mail address to [email protected] to receive the latest information about software upgrade.
Send your ideas to [email protected]
We will evaluate your suggestion and provide an update.
Windows is registered trademark of Microsoft Corporation.
All trademarks and registered trademarks are acknowledged.
SchecK® is registered trademark of TL elektronic.
iFamily® is registered trademark of TL elektronic.
sModern® is registered trademark of TL elektronic.
All information in this User’s manual is subject to change without prior notice.
Page 1
Introduction
Table of Contents
Table of Contents
TABLE OF CONTENTS..................................................................................................................................................................................................... 2
RECORD OF REVISION ................................................................................................................................................................................................... 4
EFIS SETUP MENU ............................................................................................................................................................................................................ 6
EFIS UNITS.......................................................................................................................................................................................................................... 8
EFIS CONFIGURATION & SENSORS.......................................................................................................................................................................... 10
EFIS RANGE AND LIMITS ............................................................................................................................................................................................ 10
EFIS OTHER SETTINGS & CALIBRATION............................................................................................................................................................... 14
Aircraft identification .................................................................................................................................................................................................14
Time ............................................................................................................................................................................................................................15
Date .............................................................................................................................................................................................................................15
Pitch Setting................................................................................................................................................................................................................16
Backlight Control........................................................................................................................................................................................................16
AUX INPUT/OUTPUT ..............................................................................................................................................................................................17
Main Switch Control...................................................................................................................................................................................................17
EFIS EXTERNAL DEVICES ........................................................................................................................................................................................... 18
GPS .............................................................................................................................................................................................................................19
SL30 nav com .............................................................................................................................................................................................................19
Remote compass .........................................................................................................................................................................................................20
CO Guardian ...............................................................................................................................................................................................................21
EFIS DATA SHARING ..................................................................................................................................................................................................... 22
LANGUAGE....................................................................................................................................................................................................................... 23
Page 2
Introduction
Table of Contents
DEMO MODE .................................................................................................................................................................................................................... 23
AUTOPILOT (OPTIONAL FUNCTION)....................................................................................................................................................................... 25
Servo Setup .................................................................................................................................................................................................................27
Servo Deflection Calibration ......................................................................................................................................................................................28
External Button ...........................................................................................................................................................................................................29
Roll Axis Setup...........................................................................................................................................................................................................31
Pitch Axis Setup..........................................................................................................................................................................................................33
Enter Activation/Enter Reactivation ...........................................................................................................................................................................35
EMS SETUP MENU .......................................................................................................................................................................................................... 36
EMS UNITS ........................................................................................................................................................................................................................ 37
EMS CONFIGURATION & SENSORS.......................................................................................................................................................................... 39
EMS RANGE AND LIMITS............................................................................................................................................................................................. 46
Available Limits Configuration Table.....................................................................................................................................................................47
EMS OTHER SETTING & CALIBRATION ................................................................................................................................................................. 52
Aircraft identification .................................................................................................................................................................................................52
Time ............................................................................................................................................................................................................................52
Date .............................................................................................................................................................................................................................52
Backlight Control........................................................................................................................................................................................................52
AUX INPUT/OUTPUT ..............................................................................................................................................................................................52
Fuel flow .....................................................................................................................................................................................................................53
Fuel pressure – set zero...............................................................................................................................................................................................54
Water CHT Temperature Label..............................................................................................................................................................................59
Main Switch Control...................................................................................................................................................................................................59
EMS EXTERNAL DEVICES ........................................................................................................................................................................................... 60
CO Guardian ...............................................................................................................................................................................................................60
EMS DATA SHARING ..................................................................................................................................................................................................... 61
Page 3
Introduction
Record of Revision
RECORD OF REVISION
Revision
Revision Date
Description
ECO#
A
1.10.2008
Initial version
0001
B
2.2.2009
Language correction
Jezek
C
14.7.2009
New function added
Jezek
D
1.10.2009
New function added
Jezek
E
5.12.2010
New functions added
Hovorka
Page 4
Insertion date
By
Jezek
Introduction
Warnings, Cautions & Notes
V
WARNING:
If setup or calibration data is inadvertently or improperly changed, there could be inaccurate readings that may lead to
improper operation of the aircraft or engine. This could result in engine damage and/or an emergency situation.
L
CAUTION:
Use the INTEGRA at your own risk. To reduce the risk of unsafe operation, carefully review and understand all aspects of
this Configuration Manual and the Flight Manual Supplement, and thoroughly practice basic operation prior to actual use.
When in actual use, carefully compare indications from the INTEGRA to all available navigation sources, including the
information from other NAVAIDS, visual sightings, charts, etc. For safety, always resolve any discrepancies before
continuing navigation.
NOTE:
It is the pilot’s responsibility for initial missed approach guidance in accordance with published procedure. The unit may
not provide correct guidance until established on a defined leg.
NOTE:
GPS level of service annunciations are not applicable to the external CDI (or HSI) when VLOC is active.
TL elektronic is fully committed to your satisfaction as a customer. If you have any questions regarding the INTEGRA, please contact our
customer service department.
Page 5
EFIS Setup Menu
Introduction
EFIS Setup Menu
Page 6
EFIS Setup Menu
Introduction
NOTE:
This manual assumes that you have read User Manual and you’ve mastered operation of the Integra.
In this menu you can set up many parameters mainly for flight settings.
Access to this menu:
Press right knob, select Enter Setup in menu. When prompt “Are you sure you want to enter to setup” appears, press “Yes”. There in Setup mode
switch screen to EFIS. Press right knob again, you should see Menu EFIS Setup now.
•
Menu EFIS Setup
• Units
• Configuration & Sensors
• Range and Limits
• Other Settings & Calibration
• External Devices
• EFIS Data Sharing
• Autopilot Setup
• Language
• Demo Mode
• Exit Menu
Page 7
EFIS Setup Menu
Units
EFIS UNITS
You can choose between metric and imperial units or you can define your own unit settings.
• Menu UNITS
• Metric
• Imperial (UK)
• Imperial (US)
• Custom
Metric
Imperial (UK)
Imperial (US)
Custom
•
INTEGRA display units in metric system
INTEGRA display units in metric and imperial system
INTEGRA display units in imperial system
you can choose individual units for each measure
km/h
kts
kts
m
ft
ft
mBar
mBar
inHg
Menu Custom
• Airspeed
• Altitude
• Baro pressure
• Distance
• VSI
You can choose between metric and imperial units or you can define your own unit settings.
You can try changing some units. Take note EFIS screen is changed by how you modified values to metric or imperial.
Page 8
km
nm
nm
m/s
ft/min
ft/min
EFIS Setup Menu
Units
Available units for measured quantities
Quantities
Selectable units
Digital speed indicator
km/h
kts
mph
Airspeed strip
km/h
kts
mph
Baro pressure
inHg
mBar
Altitude strip
feet
metre
Digital altitude indicator
feet
metre
Vertical speed indicator
ft/min
kts
Page 9
m/s
EFIS Setup Menu
C&S and R& L
EFIS Configuration & Sensors
This menu contains settings for sensors of temperature.
• Menu Configuration & Sensors
• IAT
• OAT
• AUXT
IAT
OAT
AUXT
Internal Air Temperature
Outside Air Temperature
Auxiliary Temperature
After you choose option for setting(IAT, OAT or AUXT) from the menu, you’ll get list of available sensors. You can assign one of them to
selected temperature or disable displaying of selected temperature by option Not Connected.
EFIS RANGE and LIMITS
In this menu you can set airspeed values
• Menu Range and Limits
• Airspeed
• Vne – never exceed
• Vno – maximum structural cruising
• Vfe – maximum flap extended
• Vs – stall speed
• Vso – minimum flight speed in landing configuration
NOTE:
The limits of one each Vne, Vno, Vfe,Vs or Vso can´t overlap each other. If you try decrease for example Vne and it is
impossible so you need to decrease Vno at first and than you can set Vne to lower value.
Page 10
EFIS Setup Menu
Range and Limits
Vne
Vno
Never exceed speed.
Change the underlined by rotating the right Knob.
After you get required number, just press the knob and the
underscore skips on to the next number. Press “Set” to enter the
value. Press “Cancel” to skip previous menu.
Maximum structural cruising speed or maximum speed for
normal operations.
Change the underlined by rotating the right Knob.
After you get required number, just press the knob and the
Cancel
Position
underscore skips on to the
next number.SetPress “Set”
to enter the
value. Press “Cancel” to skip previous menu.
Page 11
Cancel
Set
Position
Cancel
Set
Position
EFIS Setup Menu
Range and Limits
Vfe
Vs
Maximum flaps extended speed.
Change the underlined by rotating the right Knob.
After you get required number, just press the knob and the
underscore skips on to the next number. Press “Set” to enter the
value. Press “Cancel” to skip previous menu.
Stall speed or minimum steady flight speed in which the aircraft is
still controllable.
Change the underlined by rotating the right Knob.
After you get required number, just press the knob and the
underscore skips on to the next number. Press “Set” to enter the
value. Press “Cancel” to skip previous menu.
Page 12
Cancel
Cancel
Set
Set
Position
Position
Cancel
Set
Position
EFIS Setup Menu
Range and Limits
Vso
Minimum flight speed in landing configuration.
Change the underlined by rotating the right Knob.
After you get required number, just press the knob and the
underscore skips on to the next number. Press “Set” to enter the
value. Press “Cancel” to skip previous menu.
Page 13
Cancel
Set
Position
EFIS Setup Menu
Other Settings & Calibration
EFIS OTHER SETTINGS & CALIBRATION
This menu allows you to modify settings and calibrations
•
Menu OTHER SETTINGS & CALIBRATION
• Aircraft Identification
• Time
• Date
• Pitch Setting
• Backlight control
• AUX Input/Output
• Main Switch Control
Aircraft identification
The Aircraft ID Box has Letters A-Z, numbers 09 blanks and - symbol. The ID can also be
shortened to fewer than 8 digits.
The underlined letter you can change just rotate
with the right knob. If you get required letter, just
press the knob and the underscore will skip on to
the next letter. Then press “Set” to enter the new
value. Press “Cancel” to skip previous menu.
Page 14
Cancel
Set
Position
EFIS Setup Menu
Other Settings & Calibration
You can set the time. The underlined numbers
you can change just rotate with the right knob. If
you get required time, just press the knob and the
underscore will skip on to the next number. Then
press “Set” to enter the new value. Press
“Cancel” to skip previous menu.
Time
Date
NOTE:
Cancel
Set
Position
Cancel
Set
Position
It is necessary to set UTC (Zulu time) on the INTEGRA Clock.
You can set the date. The underlined numbers
you can change just rotate with the right knob. If
you get required time, just press the knob and the
underscore will skip on to the next number. Then
press “Set” to enter the date. Please insert date in
the form of DD/MM/YY or day/month/year.
Press “Cancel” to skip previous menu.
Page 15
EFIS Setup Menu
Other Settings & Calibration
Pitch Setting
V
WARNING:
Backlight Control
•
If the INTEGRA is not mounted at a right angle in relation to the pitch of the aircraft this function can be
used to compensate for this variation.
If you are unfamiliar with pitch calibration please obtain qualified assistance. An incorrect calibration of horizon may
result in death or serious injury.
This menu has 2 submenus – Dimmer Source Control and Button Color
•
Dimmer Source Control
•
•
•
Manual
External
• Max 5V
• Max 12V
• Max 24V
Auto
Button Color
•
•
•
You can set brightness manually
You can set external dimmer
You can set brightness automatically
Page 16
Green
Red
Orange
You can set green backlighting
You can set red backlighting
You can set orange backlighting
EFIS Setup Menu
Other Settings & Calibration
AUX INPUT/OUTPUT
This menu contains other external inputs and outputs.
In every menu you can choose if you want to NOT CONNECT or YES – HI or YES – LO.
CNPY
Canopy status (open/close)
Gear UP
Undercarriage is retracted
Gear DOWN
Undercarriage is extended
Main Switch Control
•
Menu Main Switch Control
• Not Connected
• Connected
If you have Integra connected via external main switch, set in this menu “CONNECTED”. So you can
power on or power off integra via main switch. If you have Integra connected directly to battery power,
choose “NOT CONNECTED” in this menu.
Page 17
EFIS Setup Menu
External Devices
EFIS EXTERNAL DEVICES
You can add any external device, such as GPS, SL30 nav com, Remote Compass and CO Guardian.
•
Menu EXTERNAL DEVICES
• GPS
• SL30 nav com
• Remote compass
• CO Guardian
External devices
GPS: Port: COM1; Baud rate: 19200; Protocol: NMEA
SL30: Port: COM2
Remote compass: Connected
CO Guardian:
Not connected
Page 18
EFIS Setup Menu
GPS & SL30 nav com
GPS
•
In this menu you can set access point, baud rate and protocol. First you can choose between COM1 or COM2.
Now you can set baud rate from 4800 to 115200. And now you can choose protocol between NMEA and
ARNAV.
Menu GPS
• Not connected
• Com 1
• Com 2
• Baud: 115200
• Baud: 57600
• Baud: 38400
• Baud: 19200
• Baud: 9600
• Baud: 4800
• Protocol: NMEA
• Protocol: ARNAV
NOTE: If you select baud rate, which is not supported by your GPS receiver, baud rate 4800 will be automatically set.
SL30 nav com
•
The SL30 is a VHF Navigation/Communications Transceiver. You can connect SL30 with INTEGRA via
COM1 or COM2.
Menu SL30 nav com
• Not connected
• Com 1
• Com 2
Page 19
EFIS Setup Menu
Remote Compass
Remote compass
•
Menu Remote compass
• Not connected
• Connected
• Settings
• Declination
• Inclination
• Total Mag. Field
• Build In
• Calibration
TL elektronic Remote Compass is exclusive source of magnetic heading information for the Integra. The
connection to Integra is via CAN BUS.
If Remote Compass is not connected you will not have Heading data.
If Remote Compass is “connected” on Integra, but Remote Compass is missing or there is a problem with
communication, heading data display ERROR.
If Remote Compass is connected properly you will have correct Heading data.
Menu Settings
To calibrate your Remote Compass, you must input your location’s current magnetic inclination angle and intensity. Before doing this, you must
obtain these two values for the geographic location where you will be performing the calibration. Note that this procedure only needs to be done
once, prior to magnetic calibration. Moving the aircraft to another location does not require repeating this procedure.
Obtaining Magnetic Inclination and Intensity
1. TL elektronic recommends The National Geophysical Data Centre (NGDC) of the National Oceanic & Atmospheric Administration
2.
3.
4.
5.
website at http://www.ngdc.noaa.gov/geomagmodels/IGRFWMM.jsp to obtain inclination and intensity.
Select your country and your city.
Click on “Compute Magnetic Field Values” button at the bottom of the page to obtain values needed for the EFIS INTEGRA.
Set up in Integra “DECLINATION”, INCLINATION” and “TOTAL FIELD” in agreement with this website.
Set up in Integra position of Remote Compass (“Build In”) according to its placing in the aircraft.
Page 20
EFIS Setup Menu
Remote Compass & CO Guardian
L
CAUTION: Is requiring setting magnetic inclination angle and intensity
Menu Calibration
In this menu you can calibrate your Remote Compass.
Orient your plane in a known direction, preferably on a compass rose at the airport. Turn aircraft to the north direction. Stabilize the aircraft at
horizontal position and keep the aircraft in this position during all calibration. Press OK. Integra start with calibration.
Turn aircraft in agreement with instruction on Integra. You will turn aircraft to the west, south and east.
After calibration will be displayed information about status of calibration.
There can be some mistake during calibration. Integra show you error message with error description.
CO Guardian
•
Menu CO Guardian
• Not connected
• Com 1
• Com 2
You can connect and disconnect the external CO Guardian device on port COM 1or COM 2.
CO guardian monitors the quantity of CO2 in the cockpit. If the quantity of CO2 exceeds the safety limit the
INTEGRA will show you an alert message.
Page 21
EFIS Setup Menu
EFIS Data Sharing
EFIS Data Sharing
If you have multiple TL elektronic products in your aircraft, they can be networked together via the TL
elektronic iFamily® CanBUS. Units networked via iFamily® have the ability to share information with each
other. Any product's data can then be viewed on any other screen in the iFamily® network. For example, an
EFIS has the ability to display engine monitor information if it is connected to an EMS TL-6724.
The iFamily® systems allows you to connect autopilot servos and remote compass.
NOTE: See Integra iFamily® Connection part and Explanation of Possible Connections in User Manual for more information and
explanation.
•
Menu EFIS Data Sharing
• Off
• Low Priority
• High Priority
Off
The Integra doesn’t send EFIS data to bus. The Integra is not source of EFIS data for other Integra units connected to bus. The Integra only
receives EFIS data from bus.
Low Priority
The Integra is set as data source with low priority for EFIS data shared by bus.
High Priority
The Integra is set as data source with high priority for EFIS data shared by bus.
Page 22
EFIS Setup Menu
Language and Demo Mode
Language
You can switch between languages; the Integra will display button labels, menus, prompts etc. in selected language. Options are: English, Czech,
German, French, Russian.
Demo Mode
NOTE: Run of Demo Mode during flight is strictly prohibited because the Integra isn’t displaying actual flight parameters, but
values from internal memory loop.
This option provides opportunity for trying out features of other versions of the Integra(TL-6524 EFIS, TL-6724 EMS, TL-6824 Remote
Display). Of course the opportunity for trying out features of other versions is also available in Integra Demo PC application, which you could
obtain from TL-elektronic web site.
After you’ll start-up Demo Mode by selecting Demo On, the Integra will be reading input data of sensors from loop in internal memory. After
time of loop is up, loop will be automatically start-up again.
•
Menu Demo Mode
• Demo ON
• Demo OFF
• Integra Type
• Reset Time
• Save Setting
Demo ON / Demo OFF
These two options switch between on-state and off-state of Demo Mode.
Integra Type
In this submenu you can choose simulated Integra unit of specific version. Options are EMS(refers to TL-6724), EFIS(refers to TL-6524),
EFIS + EMS(refers to TL-6624) and Remote Display(refers to TL-6824).
Page 23
EFIS Setup Menu
Demo Mode
NOTE: To exit the Remote Display Demo Mode, you’ll have to press right knob and then immediately left knob. This is only way,
because Menu Enter Setup isn’t available for TL-6824 Remote Display.
Reset Time
This submenu serves for setting reset time of loop. Range is from 30 seconds to 10 minutes.
Save Setting
If you select Save Setting, complete settings of the Integra will be saved. That includes the settings in standard screens (e.g. set of Towing Menu,
Highway, Baro Pressure, Nav Source) and in Setup Mode (sensors setting, units etc.).
After count down of Reset Time reaches zero, all settings (that you’ve made after the Save Setting option selection) will be lost. In other words,
settings will revert to state in moment, that you’ve select Save Setting option.
NOTE: Running of Demo Mode is indicated by changing of color of the Integra buttons(sequence red-orange-green) and red displayed
message Demo Mode.
Page 24
Autopilot Section
Introduction
AUTOPILOT (OPTIONAL FUNCTION)
Page 25
Autopilot Section
Introduction
The Integra Autopilot (referenced below as the AP) offers roll(aileron), pitch(elevator) and yaw(rudder) axis control. The number of axes, which
can be controlled by AP, is depending on your purchased Activation Key; as well as variety of navigation abilities of AP. See Price list for
available AP Activation keys and their features.
Available features of the Integra Autopilot includes: control of the aircraft axes with the aid of Altitude and Heading Bug or dynamic control
supported by VOR or GPS, comfortable Autopilot setting via your chosen external button, settings of Autopilot servos including sensitivity
setting, slip setting, adjustment of monitored limits as maximum bank angle, turn rate control, maximum climb/descent speed etc.
Access to Autopilot Setup:
Select option Autopilot Setup in Menu EFIS Setup.
•
Menu Autopilot Setup
• Servo Setup
• Servo Deflection Calibration
• External Button
• Roll Axis Setup
• Pitch Axis Setup
• Enter Activation / Enter Reactivation
On following pages you’ll find description of each option(listed above) of menu Autopilot Setup.
Page 26
Autopilot Section
Servo Setup
Servo Setup
This submenu provides options for determining connected servos by user and its automatic detection.
•
Menu Servo Setup
• Servo Roll
o Installed-YES
o Installed-NO
o Slip
• Servo Pitch
o Installed-YES
o Installed-NO
o Slip
• Servo Yaw
o Installed-YES
o Installed-NO
o Slip
• Servo Detection
Servo Roll / Servo Pitch / Servo Yaw
You can see above that adjustable options for all servos are same. Therefore these options are collectively described below and apply to all
servos.
Installed-YES / Installed-NO
You can choose just one of these options: Installed-YES or Installed-NO. That determines, whether the appropriate servo is installed or not.
Page 27
Autopilot Section
Servo Setup
Slip
Option Slip provides adjusting of servo slipping. That means that you can set amount of transmitted torque via magnetic clutch before slipping. If
you set higher number, more torque could be transmitted and you will have to exert much more force in case of manual adjustment when the AP
is active. There is no drag, which could be exerted by turned off AP on yoke and rudder pedals. Range of maximum transmitted torque is from 0
to 100% with 5% step.
Servo Detection
You will have to execute this procedure because it’s necessary to assign servos to appropriate controlled axes. Follow the instructions which will
appear on screen.
Servo Deflection Calibration
This submenu serves for calibration of deflections of servos and their subsequent test.
•
Menu Servo Deflection Calibration
• Deflection Calibration
• Deflection Test
Deflection Calibration
This procedure identifies range of motion of each servo and it should be executed before servo Deflection Test. Just follow the instructions on the
screen for successful completion of calibration.
Deflection Test
By using this option you can test servos assignment to controlled axes and verify correctness of direction of movement for flight control
surfaces.
Select Deflection Test option and avoid touch the yoke during the test. Follow the instructions on the screen.
Page 28
Autopilot Section
External Button
External Button
This option enables extension of the ways for activation and deactivation of the AP. Moreover it simplifies the setting of Altitude bug and
Heading bug and makes setting of bugs more comfortable. Of course, external button with appropriate and handy position is needed.
Recommended place for external button is on yoke (control column) or on central panel.
•
Menu External Button
• Autopilot Activation-Deact. Only
• Autopilot Activation-Prev. Act. & Deact.
• Autopilot Activation-Stab. Act. & Deact.
• Hold On Function-Enable
• Hold On Function-Disable
Page 29
Autopilot Section
External Button
option of Menu
External Button
Hold On Function
Enable
Deact.
Only is set
Prev.Act.
& Deact
is set
Stab.Act
& Deact.
is set
Hold On Function
Disable
Deact.
Only is set
Prev.Act.
& Deact
is set
Stab.Act
& Deact.
is set
action of the button
(note: Before any deactivation[temporary or permanent] of the AP performed by the external button, the AP
has to be activated by the AP buttons on the Integra at first.)
press
holding down
(press and immediate release)
The AP is deactivated. Activation of the AP must
be performed by the AP buttons on the Integra.
The AP is activated with the last configuration.
Next pressing will deactivate the AP.
The AP is temporarily deactivated. After release of the button,
the AP will follow the last configuration.
The AP is temporarily deactivated. After release of the button,
the AP will follow the last configuration.
The AP is activated and the AP will hold current
altitude and heading.
The AP is temporarily deactivated. After release of the button,
the AP will hold current altitude and heading.
The AP is deactivated. Activation of the AP must
be performed by the Integra buttons.
The AP is activated with the last configuration.
Next pressing will deactivate the AP.
no reaction
The AP is activated and the AP will hold current
altitude and heading.
Page 30
no reaction
no reaction
Autopilot Section
Roll Axis Setup
Roll Axis Setup
This submenu provides settings of the AP performance during a roll of the aircraft.
• Menu Roll Axis Setup
• Control Sensitivity
• Mode-Turn Rate
• Mode-Bank Angle
• Max. Bank Angle
• Turn Rate Target
Control Sensitivity
This parameter specifies how fast the AP reacts to deviations between target heading and actual heading. If the parameter is adjusted too high, the
aircraft will be itchy. Fast, hardline adjustments of heading will appear. If the parameter is adjusted too low, the aircraft will leisurely responds to
heading deviations. Range of values of the parameter is from 1 to 24. Value 1 refers to low sensitivity, value 24 refers to high sensitivity. Default
value is 10.
Page 31
Autopilot Section
Roll Axis Setup
Mode-Turn Rate/Mode-Bank Angle
These options are entitled here together because they are two options of one switch (metaphorically told). That means that you can choose ModeTurn Rate or Mode-Bank Angle.
Mode-Turn Rate
If you select this mode, the AP will control the aircraft according to parameter Turn Rate Target (described below) and Max. Bank
Angle(described below).
Mode-Bank Angle
If you select this mode, the AP will control the aircraft according to parameter Max. Bank Angle.
Max. Bank Angle
The parameter determines maximum bank angle of the aircraft during AP’s controlled turns. Range of adjustable values of the parameter is from
5 to 45 degrees. Default value is 15 degrees and it is adjustable in 1 degree increments.
Turn Rate Target
The parameter determines average target turn rate of the aircraft. Turn Rate target is specified in angular degrees per second. That means, for
example when Turn Rate Target is 1 degree per sec., then aircraft’s turn of 90 degrees will be performed in 90 seconds. Remember that
adjustable value of the parameter is only average value, which could be exceed due flight dynamics and the time for turn initialization. Range of
adjustable values is from 0.5 degree to 3 degrees per sec. Default value is 1.5 degree per sec. and it is adjustable in 0.1 degree per sec.
increments.
Page 32
Autopilot Section
Pitch Axis Setup
Pitch Axis Setup
This submenu provides settings of the AP performance during controlled change of altitude.
•
Menu Pitch Axis Setup
• Control Sensitivity
• Mode-Vertical Speed
• Mode-Longitudinal Angle
• Max. Longitudinal Angle
• Max. Climb Speed
• Max. Descent Speed
• Min. Air Speed
• Max. Air Speed
Control Sensitivity
This parameter specifies how fast the AP reacts to deviations between target altitude and actual altitude. If the parameter is adjusted too high, the
aircraft will be itchy. Fast, hardline adjustments of altitude will appear. If the parameter is adjusted too low, the aircraft will leisurely responds to
altitude deviations. Range of values of the parameter is from 1 to 24. Value 1 refers to low sensitivity, value 24 refers to high sensitivity. Default
value is 10.Mode-Vertical Speed/Mode-Longitudinal Angle
These options are entitled here together because they are two options of one switch (metaphorically told). That means that you can choose ModeVertical Speed or Mode-Longitudinal Angle.
Mode-Vertical Speed
If you select this mode, the AP will control the aircraft according to parameters Max. Climb Speed and Max. Descent Speed(both described
below).
Page 33
Autopilot Section
Pitch Axis Setup
Mode-Longitudinal Angle
If you select this mode, the AP will control the aircraft according to parameter Max. Longitudinal Angle(described below).
Max. Longitudinal Angle
The parameter determines angle between longitudinal axis of the aircraft in horizontal flight and longitudinal axis of the aircraft when the AP
pitches the aircraft up or down during controlled altitude change. If Mode-Longitudinal Angle is set, parameter Max. Longitudinal Angle is
activated.
Max. Climb Speed/Max. Descent Speed
If Mode-Vertical Speed is selected, Max. Climb Speed and Max. Descent Speed will be used for reduction of Vertical Speed during climb or
descent of the aircraft.
Min. Air Speed
Min. Air Speed is minimum airspeed at which you can activated the AP.
If actual airspeed is lower than set Min. Air Speed , the AP will pitch the aircraft down to increase actual airspeed.
If aircraft’s altitude is lower than altitude determined by Altitude Bug or Navigation source(VOR or GPS) and the AP can’t pitch the aircraft up
without dropping below Min. Air. Speed , the Integra will display message “ADD POWER”.
The Min. Air Speed must be set to (at least) 30% above Vs. This is default setting of Min. Air Speed value.
Max. Air Speed
Max. Air Speed is maximum airspeed at which you can activated the AP.
If actual airspeed is higher than set Max. Air Speed , the AP will pitch the aircraft up to decrease actual airspeed.
If aircraft’s altitude is higher than altitude determined by Altitude Bug or Navigation source(VOR or GPS) and the AP can’t pitch the aircraft
down without Max. Air. Speed get exceed , the Integra will display message “REDUCE POWER”.
The Max. Air Speed must be set to (at most) 95% of Vne. This is default setting of Max. Air Speed value.
Page 34
Autopilot Section
Pitch Axis Setup & Enter (Re)Activation
V
WARNING:
Default values of Min. Air Speed and Max. Air Speed are set according to Vs (Stall Speed) and Vne (never exceed speed)
values which are set in menu EFIS Range and Limits (see on page 10). Proper readjustment from default values of
Min. Air Speed and Max. Air Speed isn’t watched by the Integra. So, make sure that you know, what you are
doing.
Enter Activation/Enter Reactivation
The last option in menu Autopilot Setup is Enter Activation or Enter Reactivation. Enter Activation is displayed, when Activation Key hasn’t
been entered. In that case the Autopilot function isn’t enable. When you’ve already entered Activation Key, option Enter Reactivation is
displayed. If you want to upgrade your Activation Key (e.g. Premium Activation Key to Gold Activation Key), just select Enter Reactivation and
enter your new Activation Key.
Page 35
EMS Setup Menu
Introduction
EMS Setup Menu
Page 36
EMS Setup Menu
Units
Access to this menu:
Press right knob, select Enter Setup in menu. When prompt “Are you sure you want to enter to setup” appears, press “Yes”. There in Setup mode
switch screen to EMS. You should see Menu EMS Setup.
In this menu you can set up many parameters mainly for engine and sensor settings.
• Menu EMS Setup
• Units
• Configuration & Sensors
• Range and Limits
• Other Setting & Calibration
• External Devices
• EMS Data Sharing
• Autopilot Setup
• Language
• Demo Mode
• Exit Menu
EMS UNITS
You can choose between metric and imperial units or you can define your own unit settings.
• Menu UNITS
• Metric
• Imperial (UK)
• Imperial (US)
• Custom
Metric – INTEGRA display units in metric system – (Bar, °C, Pa, litre)
Imperial (US) – INTEGRA display units in metric and imperial system (Bar, °C, Pa, gallons)
Imperial (UK) – INTEGRA display units in imperial system (inHg, F, psi, gallons)
Custom – you can choose individual units for each measure.
Page 37
EMS Setup Menu
Units
•
Menu Custom
• MAN pressure
• Temperature
• Pressure
• Quantity
Available units for measured quantities
Quantities
Selectable Units
Indicator press of oil
bar
Indicator oil temperature
Celsius
Internal air temperature
Celsius
Outsider air temperature
Celsius
Temperature of cylinders
Celsius
Information about fuel, fuel pressure
bar
kg/cm2
Consumption fuel flow and fuel quantity
Litre
Manifold air pressure
mBar
torr
.
Page 38
psi
Fahrenheit
Fahrenheit
Fahrenheit
Fahrenheit
psi
GAL
inHg
EMS Setup Menu
Configuration & Sensors
EMS CONFIGURATION & SENSORS
In this menu you can properly set all connected sensors.
•
Menu CONFIGURATIONS & SENSORS
• RPM
• MAP
• Rotor RPM
• Oil pressure
• Oil Temperature
• Water CHT Temperature
• Water Aux Temperature
• Left / Total Tank
• Right Tank
• Fuel Pressure
• Fuel Flow
• EGT, CHT number
• EGT, CHT setting
• IAT
• OAT
• Voltage
• Current
Page 39
EMS Setup Menu
Configuration & Sensors
In every menu you can choose if you want to CONNECT or NOT CONNECT a sensor and in some menus you will have a list of sensors in
which to choose the appropriate sensor.
RPM
This sensor monitors RPM
MAP
This sensor monitors manifold pressure
Rotor RPM
This sensor monitors Rotor RPM
Oil Pressure
This sensor monitors oil pressure
Oil Temperature
This sensor monitors oil temperature
Water CHT Temperature
Water Aux Temperature
This sensor monitors CHT Temperature(in meaning used by
ROTAX, technically the sensor is placed on engine block). To
enable displaying of this info, see section Other Setting &
Calibration-Water CHT Temperature Label.
This sensor monitors water temperature. To enable displaying of
this info, see section Other Setting & Calibration-Water CHT
Temperature Label.
Left / Total tank
This sensor monitors fuel level in left tank
Right tank
This sensor monitors fuel level in right tank
L
You can disconnect this tank, so the left tank
will be the only one and the main tank.
CAUTION:
After left or right tank is chosen a warning message is displayed: “After change sensor you have to recalibrate fuel tank, do
you want to continue?” and two labels are displayed “YES or NO”. If you press YES, a list will be shown with possible sensors choices.
Page 40
EMS Setup Menu
Configuration & Sensors
Fuel Pressure
This sensor monitors fuel pressure
Fuel flow
This sensor monitors Fuel Flow
EGT, CHT Number
You can set the Cylinder Number to 2, 4 or
6.
IAT
This sensor monitors internal air
temperature
OAT
This sensor monitors outside air
temperature
Page 41
EMS Setup Menu
Configuration & Sensors
•
Voltage
You can choose where (battery,
pump, avionics etc.) you want
gauge voltage monitoring.
Menu for Voltage is the same
as for Current.
•
Current
You can choose where (battery,
pump, avionics etc.) you want
gauge current monitoring.
Menu for Current is the same as
for Voltage.
Page 42
Menu Voltage
•
Voltage1 – Yes
•
Voltage1 – No
•
Voltage1 – Label
•
Voltage2 – Yes
•
Voltage2 – No
•
Voltage2 – Label
•
Voltage3 – Yes
•
Voltage3 – No
•
Voltage3 – Label
Menu Current
•
Current1 – Yes
•
Current1 – No
•
Current1 – Label
•
Current2 – Yes
•
Current2 – No
•
Current2 – Label
•
Current3 – Yes
•
Current3 – No
•
Current3 – Label
VoltageX –Yes
-Select when Voltage(1,2
or 3) is used
VoltageX –No
-Select when Voltage(1,2
or 3) is not used
VoltageX –Yes
-Select when you want to
set label of Voltage(1,2 or
3). See next page for
description.
CurrentX –Yes
-Select when Current(1,2
or 3) is used
CurrentX –No
-Select when Current(1,2
or 3) is not used
CurrentX –Yes
-Select when you want to
set label of Current(1,2 or
3). See page 44 for
description.
EMS Setup Menu
Configuration & Sensors
Setting Voltage label
The underlined letter you can change by
rotating right knob. If you get the required
letter, just press the knob and the
underscore will skip on to the next letter.
Press “Set” to accept the new label. Press
“Cancel” to skip to previous menu. Press
“Default” to reset to default label. For
Voltage 1 is default label “BATTERY”,
for Voltage 2 – “PUMP”, for Voltage 3 –
“AVIONICS”.
Page 43
EMS Setup Menu
Configuration & Sensors
Setting Current label
The underlined letter you can change by
rotating right knob. If you get the required
letter, just press the knob and the
underscore will skip on to the next letter.
Press “Set” to accept the new label. Press
“Cancel” to skip to previous menu. Press
“Default” to reset to default label. For
Current 1 is default label “BATTERY”,
for Current 2 – “PUMP”, for Current 3 –
“AVIONICS”.
Page 44
EMS Setup Menu
Configuration & Sensors
You can choose and assign Thermocouple and Sensors to EGT and CHT. In this menu choose one EGT or one of
CHT. Press the knob and discovers next menu. Now select Input. In this menu select desired thermocouple. Now
selected EGT or CHT is associated with this thermocouple. You can do it the same way for every EGT and CHT.
EGT, CHT setting
CHT described here means Cylinder Head Temperature(measured by thermocouples under spark plugs not
in meaning used by ROTAX).
Page 45
EMS Setup Menu
Range and Limits
EMS RANGE AND LIMITS
In this menu you can set minimum and maximum critical values, minimum and maximum warning values and normal values.
•
Menu RANGE AND LIMITS
• RPM
• MAP
• ROTOR RPM
• Oil Pressure
• Oil Temperature
• Water CHT Temperature*
• Water Aux Temperature
• Left / Total tank
• Right tank
• Fuel pressure
• Fuel flow
• EGT
• CHT**
• Voltage 1
• Current 1
• Voltage 2
• Current 2
• Voltage 3
• Current 3
* Range and Limits for Water
Temperature and CHT are same, This CHT refers to temperature measured on engine block-ROTAX meaning of the word CHT
**refers to temperatures measured by thermocouples under spark candles
Page 46
EMS Setup Menu
Range and Limits
NOTE:
The limits of one each values can´t overlap each other. If you try decrease for example ALARM and it is impossible so
you need to decrease WARN at first and than you can set ALARM to lower value.
Available Limits Configuration Table
You can set
Indicator
Range
RPM
X
MAP
X
Rotor RPM
X
Oil Pressure
Min. Alarm
Min. Warn
Norm
Warn
Alarm
X
X
X
X
X
X
X
X
X
X
X
X
X
X
Oil Temperature
X
X
X
X
X
X
Water CHT Temperature
X
X
X
X
Water Aux Temperature
X
X
X
X
Left tank / Total Tank
X
Page 47
X
EMS Setup Menu
Range and Limits
Available Limits Configuration Table
You can set
Indicator
Range
Min. Alarm
Right tank
X
X
Fuel pressure
X
X
Fuel flow
X
EGT
X
X
X
CHT
X
X
X
Voltage 1
X
X
X
X
X
Current 1
X
X
X
X
X
Voltage 2
X
X
X
X
X
Current 2
X
X
X
X
X
Voltage 3
X
X
X
X
X
Current 3
X
X
X
X
X
Page 48
Min. Warn
X
Norm
Warn
Alarm
X
X
X
EMS Setup Menu
Range and Limits
Example of differences between set values.
Default values are defined
RANGE
MIN ALARM
MIN WARN
NORM
WARN
ALARM
3000
-
-
500
2700
2800
New values are defined:
RANGE
MIN ALARM
MIN WARN
NORM
WARN
ALARM
5000
-
-
1000
3000
4000
Page 49
EMS Setup Menu
Range and Limits
Indicator
Function
Recommendation
Warning Oil Pressure
Warning Limit. Useful as a reminder to reduce RPM when
warming a cold engine, especially in winter conditions, to avoid
excessive oil pressure.
As recommended by engine
manufacturer
Alarm Minimum Oil Pressure
Minimum Oil Pressure – This Warns of loss of oil pressure. This
is serious. Consider you situation carefully. This may lead to
complete engine seizure or it may only be instrument or sensor
failure. It requires immediate action but not over-reaction.
As recommended by engine
manufacturer
Oil Temperature Warning
Yellow indicator
As recommended by engine
manufacturer
Maximum Oil Temp.
Consider setting this limit lower than the maximum to get early
warning of abnormal oil temp.
As recommended by engine
manufacturer
Normal Oil Temperature
Intended for troubleshooting. Can also indicate reminder that the
engine is not warm enough.
Set according to engine
manufacturer’s recommendation
or set based on experience
RPM Alarm Max
Red Line -Warns when the engine has reached maximum RPM
Set according to engine
manufacturer’s recommendation.
RPM Warning
Yellow Indicator
Set Based on experience
RPM Normal
Green indicator
Set according to engine
manufacturer’s recommendation.
Page 50
EMS Setup Menu
Range and Limits
Fuel Right and Left Tank Alarm
Minimum Fuel Quantity
Set for at least enough useable
fuel to provide for 30-60 minutes
of flight at cruise power.
Fuel Right and Left Tank range
Indicates each tanks capacity
Setting Fuel Tank Range requires
Fuel Tank Calibration
Fuel Flow
Generates a warning when the fuel flow (rate of fuel burn)
exceeds this limit. Useful for detecting badly leaking fuel lines,
loose connections to fuel injectors, etc. Very useful safety feature
for all engines, but especially fuel injected engines. Be sure to use
it!
Account for max fuel flow rate at
full takeoff set max 10%-20%
above max rate
EGT Warning
Maximum Exhaust Gas Temp. – Not all engines have published
limits, nor do all engines require a maximum EGT limit.
Set limit according to engine
manufacturer recommendation,
or based on experience.
CHT Warning
Warning Cylinder Head Temperature. Often engines will
normally operate significantly lower than the engine
manufacturer’s limit.
Set according to engine
manufacturer’s recommendation
CHT Alarm
Consider setting this limit lower than the maximum to get early
warning of abnormal CHTs
Set according to engine
manufacturer’s recommendation
Page 51
EMS Setup Menu
Other Setting & Calibration
EMS OTHER SETTING & CALIBRATION
•
Menu OTHER SETTING & CALIBRATION
• Aircraft Identification
• Time
• Date
• Backlight Control
• AUX Input/Output
• Fuel Flow
• Fuel Press – set zero pressure
• Fuel Calibration
• Set Unexhaustible Fuel
• RPM Setting
• Rotor RPM Setting
• Engine Time Threshold
• Water CHT Temperature Label
• Main Switch Control
Aircraft identification
Time
Date
Backlight Control
AUX INPUT/OUTPUT
It is the same as in EFIS.
It is the same as in EFIS.
It is the same as in EFIS.
It is the same as in EFIS.
It is the same as in EFIS.
Page 52
EMS Setup Menu
Fuel Flow
Fuel flow
•
Menu Fuel flow
• K-Factor
• Time of Average Flow
You can set K-factor and Time of aver flow.
K-factor
You can manually adjust the K-Factor. The K-Factor is a measurement of the pulses
per gallon that the flow transducer outputs. Due to variations in the installation of the
flow transducer, it may be necessary to adjust the K-Factor for the first few flights in
order to get an accurate fuel remaining, fuel used and flow reading. The K-Factor
should be changed only when the fuel tanks
have been filled accurately on level ground.
After a few adjustments of the K-Factor, the
fuel remaining and the fuel used as calculated
by the INTEGRA should be within a few
Set
Position
gallons (or less) of actual and should not need
further adjustment. Use the following fields,
as necessary, to correct the K-Factor.
The underlined numbers you can change by
rotating the right knob. If you get the required
number, just press the knob and the
underscore will skip on to the next number.
Press “Set” to enter the new value. Press
“Cancel” to skip previous menu.
(Shown value – Real value) x Last K-FACTOR
K-FACTOR = Last K-FACTOR +
Page 53
Real value
EMS Setup Menu
Fuel Pressure
Time of Average Flow
You can set time duration for how long
you want average flow of fuel. After this
time the INTEGRA will show you
average fuel flow.
The numbers of seconds you can change
just rotate with the right knob. If you get
required number, just press “Set”. Press
“Cancel” to skip previous menu.
NOTE: Maximum displaying time which you can set is 10 seconds.
Fuel pressure – set zero
This is function for correction of variance between
pressure sensors.
Page 54
Set
Position
EMS Setup Menu
Fuel Calibration
Fuel calibration
•
Because the shape of the tank can be asymmetric
therefore petrol in fuel tanks may not be level. You
can set up to 15 steps of fuel calibration.
Menu Fuel calibration
• Left tank
• Right tank
(Right tank is enable)
Or
First you choose left or right tank for calibration
and press the knob. Now is displayed label and you
can choose number of steps merely rotate the knob.
When you have set number of steps, press “OK”.
You can cancel this operation if you press the
“Cancel” button.
OK
• Total tank
(Right tank is disable)
NOTE: You can set count of calibration steps in range from 3 to 15.
NOTE:
If you want to change the capacity of the tank:
Enter to Setup – Range and Limits – Left / Total Tank and set the RANGE.
If you press “OK” button the next label with “Start calibration”
is displayed. Be sure before starting the calibration that your fuel
tank is full.
Page 55
Cancel
Edit value
EMS Setup Menu
Set Unexhaustible Fuel
L CAUTION:
The INTEGRA must be calibrated to the aircraft fuel system and the INTEGRA’s accuracy must be verified before flying
the aircraft. The accuracy and proper operation of each function displayed on the INTEGRA should be verified before the
aircraft is released for flight.
Set unexhaustible fuel
•
Menu Set Unexhaustible Fuel
• Left tank
• Right tank
(Right tank is enable)
Or
Your fuel tank may contain fuel that cannot be
consumed. In this step you may set the quantity of
this fuel.
In first step you choose left or right tank. Now the
underlined number you can change just rotate with
the right knob. If you get the required number, just
press the knob and the underscore will skip on to
the next number. Press “Set” to enter the new value.
Repeat the same procedure for the second tank.
• Total tank
(Right tank is disable)
Page 56
Cancel
Set
Position
EMS Setup Menu
RPM Setting
RPM setting
•
Menu RPM setting
• Pulses Per Rev
• Reduction ratio
NOTE:
You can set number of pulses per rev and you can set
reduction ratio.
In both cases the underlined number you can change by
rotating the right knob. If you get the required number,
just press the knob and the underscore will skip on to
the next number. Press “Set” to enter the new value.
Press “Cancel” to skip previous menu.
If you are unable to install a sensor directly on your engine and the
location of your sensor is affected by a reduction ratio. It is then
necessary to enter the correct reduction ratio. If this function is not
used then preset reduction ratio to 1.00.
Page 57
Cancel
Set
Position
Cancel
Set
Position
EMS Setup Menu
Rotor RPM & Engine Time Threshold
Rotor RPM settingYou can set number of pulses.
The underlined number you can change by rotating
the right knob. If you get the required number, just
• Menu Rotor RPM setting
press the knob and the underscore will skip on to the
• Pulses Per Rev
next number. Press “Set” to enter the new value.
Press “Cancel” to skip previous menu.
Engine time Threshold
The underlined number you can change by rotating the
right knob. If you get the required number, just press
the knob and the underscore will skip on to the next
number. Press “Set” to enter the new value. Press
“Cancel” to skip previous menu.
Page 58
Cancel
Set
Position
Cancel
Set
Position
EMS Setup Menu
Water Temp and Main Switch
Water CHT Temperature Label
You can choose whether you want to display WATER TEMPERATURE and/or Cylinder Head Temperature (ROTAX meaning of the
word) .
•
Menu Water CHT Temperature Label
• WATER
• CHT
OR
AND
Water Temperature and CHT depiction as it is
displayed on EMS screen when Towing Menu is OFF
Water Temperature and CHT depiction as it is
displayed on EMS screen when Towing Menu is
ON
The CHT described here represents value measured on engine block with resistance sensor. That’s the meaning of CHT used by
ROTAX. Don’t confuse this CHT with CHT measured by thermocouples under spark plug.
Main Switch Control
It is the same as in EFIS
Page 59
EMS Setup Menu
External Devices
EMS EXTERNAL DEVICES
External devices are devices which you can connect on port COM1 or COM2.
•
Menu EXTERNAL DEVICES
• CO Guardian
CO Guardian
You can connect and disconnect the external CO Guardian device on port COM 1or COM 2.
CO guardian monitors the quantity of CO in the cockpit. If quantity of CO exceeds the preset safe limit the
INTEGRA will show you an alert message.
Page 60
EMS Setup Menu
EMS Data Sharing
EMS Data Sharing
If you have multiple TL elektronic products in your aircraft, they can be networked together via the TL elektronic iFamily® CanBUS. Units
networked via iFamily® have the ability to share information with each other. Any product's data can then be viewed on any other screen in the
iFamily® network. For example, an EFIS has the ability to display engine monitor information if it is connected to an EMS TL-6724.
The iFamily® systems allows you to connect autopilot servos and remote compass.
•
NOTE: See Integra iFamily® Connection part and Explanation of Possible Connections in User Manual for more information.
Menu EMS Data Sharing
• Off
• Low Priority
• High Priority
Off
The Integra doesn’t send EMS data to bus. The Integra is not source of EMS data for other Integra units connected to bus. The Integra only
receives EMS data from bus.
Low Priority
The Integra is set as data source with low priority for EMS data shared by bus.
High Priority
The Integra is set as data source with high priority for EMS data shared by bus.
Autopilot Setup
See separated Autopilot Section on page 25.
Page 61
Notes
Page 62
Notes
Page 63
Notes
Page 64
TLD-6624X-DS-001_RevE