1
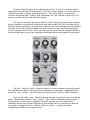
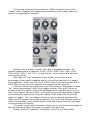
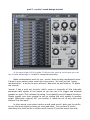
sound design tutorial
for de la mancha's erratic²
First things first: erratic² is a drum sampler instrument plug-in in VST format
with randomization powers. Unlike the first version of erratic there is no step
sequencer. There are 15 drum pads each of which can load up to 6 layers of
samples. It has the ability to randomize velocity, pan position, hit probability and
"repeat" on a per-pad basis as well as velocity modulation for pitch, volume
envelope, lowpass filter cutoff, lowpass envelope, swing, chance-of-repeat and
repeat feedback.
If it is not obvious what you can do with these powers that is what this
tutorial is for. To get you up and running building your own randomizationenabled drum kit presets as quickly as possible. This is not intended to be a user
manual, has not been vetted by the author of the plug-in (my evil ally de la
Mancha) and any errors are the responsibility of myself only. I'll try to do away
with technical jargon for this tutorial and write it down to the level of a beginner
whenever possible.
part 1 - erratic² quick start guide
Let's start with something simple. On the upper right of the GUI (graphical
user interface, pronounced "gooey" unfortunately, means the image of the plugin) is the "gain" control slider.
This controls the overall volume output of the plug-in, whereas each drum
pad has it's own individual volume control. This way you can compensate for
having loud of soft samples in the drum kit you're creating. For instance when I
made the "runa 3am fried kit" the samples I was using for kick drums were much
softer than the other samples, so I just turned all the other ones down and
cranked the "gain" control.
Here's a pair of very important controls that seem innocuous at first on the
middle of the top of the GUI:
Because erratic² loads your samples into your computer's RAM sometimes it
needs to be flushed out to hear the samples you just loaded. If you're hearing the
previously loaded samples instead of the ones you've added, simply hit the
"reload" button. Whether this is necessary depends on what host software you're
using.
The "all" button is very important. Each drum pad strip of controls has a
mute and a solo button. If you solo a drum pad to, for instance, hear it while
you're editing it's controls you'll need to hit "all" to hear all the drum pads again.
If you seem to mysteriously hear only one drum layer, just hit that "all" button.
To the left of those controls are these buttons:
If your PC is bogging down from too many processes running at once and
having huge samples loaded, try using these to tone it down. erratic² can load
stereo .wav files and plays stereo files by default. If you hit the "mono" button,
which turns it blue, then the files play in mono thus halving the power needed to
play them. The "quality" drop-down box can also help free up computer power,
though I use it aesthetically - the lower you set the quality, the more the drums
sound bitcrushed. This setting does appear to get saved in a preset so you can
use it as an extra special effect.
OK, let's load some samples already. Every drum pad has this strip of
controls:
The number on the left is the number of the drum pad. There are 15 pads.
Each pad can load 6 layers. We'll get to that shortly. When you click on the
number it allows you to edit the all those controls on the right side of the GUI for
that pad. That's really important. If you start twiddling the knobs on the right
make sure you've got the drum pad number selected that you intend to edit.
The next control is labeled "midi" and denotes what midi note will trigger
this particular drum pad. It can be dragged up and down like a slider. If you don't
know what midi note number is represented by a particular key just hit the key
you want to assign this drum pad to and conveniently it'll show up in the lower left
of the GUI:
Next comes the "layer selection" buttons. They are labeled 1 through 6.
When selected the button turns blue. The appropriate layer must be selected for
you to load the sample you want in that layer. I'll return to that in a second. But
make sure to have the right layer selected when you go to load a sample. Luckily
the name of the sample loaded appears to the right of these controls in a blue
font when you select a layer. If there's no word, there's no sample in that slot.
Underneath the "layer selection" buttons are three labeled "vel", "cyc" and
"rnd" which stand for velocity, cycle and random, respectively. When the
"velocity" button is highlighted hitting a drum pad will play the sample loaded into
the layers in order of how hard you're hitting the key or drum pad (or sequencer
or whatever) from left to right. That is 6 represents hardest hit, 1 represents
lowest velocity. So load your samples into the layers with that in mind. These
layers will come into play once again utilizing some cool tricks with the velocity
and randomization effects.
The "cyc" or cycle, when selected, causes the samples loaded into the
active layers to play in order, cycling around in a, well, circle. This can be used for
cool effects such as using non-percussive sounds, making sure all the sounds get
played regardless of the velocity they're played at. Also, uneven numbers of
samples make for a nice contrary rhythmic effect. You could for instance use 6
small variations on a percussion sample and play them in "cyc" mode and it'd
introduce a natural sounding variation to your player.
The "rnd" or random mode is much the same, except it plays the number of
selected layers at random, in no particular order. Also very good for natural
variation, or for strange chaotic effects. Depends on what you've got loaded in
there.
To the right of the layer selection buttons is a box labeled "layers" with a
number beneath it. The number can be dragged up and down like a slider. It
represents the number of layers that the drum pad will play, counting from the
lowest: e.g. if "3" layers are selected, then the samples in layer slots 1, 2 and 3
will play and the rest will remain silent. If you load a bunch of samples into each
layer and forget to drag the "layers" control number upwards the pad will just
keep playing the first sample loaded only.
Next is the "load" control. Click this to load the sample you'd like in the
selected layer. It opens a window that lets you navigate around in Window's
browser to find the samples you want to load. Very important: the presets
remember where you loaded the samples from, so if you move the samples later
or change the folder's name the plug-in won't know about it! Thus it's a good idea
to copy whatever sample folder you're going to use into the VST folder where
you've put erratic² so they'll always be where you expect them. erratic² does not
have the ability to audition samples from this browser! You've got to listen to
them some other way or do like I do, load some samples in, select cycle mode,
and hit the trigger arrow to hear what you've got.
Just below the "load" control are two buttons labeled "n" and "r" which stand
for "normalized" and "reverse." The reverse button, when toggled, makes all the
samples play in reverse. A good control to latch to a hardware midi button when
playing live. The normalization control normalizes all the samples in that drum
pad strip. Basically that means that they get turned up to their highest peak's
maximum volume without clipping. In velocity mode erratic² applies a volume
attenuation to the layers such that 1 is quietest and 6 is loudest so turning off the
normalization could "make them quieter still" so says the user manual.
The rightmost controls on each drum strip are the name of the loaded
sample for the selected layer and a little readout that tells you how long the
loaded sample is. This is useful for when you edit the volume envelope and
lowpass filter envelope controls.
Beneath the sample name is a little arrow facing rightward. This is the
"trigger" for the drum strip. This plays at maximum velocity, so it'll play whatever
sample layer is the highest currently selected in velocity mode, so if you've got
"4" selected on the "layers" control, you're going to hear the sample loaded in
layer 4 when you hit the trigger. To audition the samples I have loaded I turn on
the "cyc" mode temporarily to make sure I'm hearing all the samples to make sure
I've got them in the right order.
Next on the drum pad are the last four controls. "Cut" and "by" are "choke
groups" which in sampler parlance means that if you select one drum pad to "cut"
group a (there's 4 groups possible, a, b, c & d, which you can select by dragging
up and down on the dash to the right of the "cut" or "by" label) and another layer
to be cut "by" a then every time the first drum pad plays it'll "choke" the second
layer, causing it to fall silent. This is typically done to make a closed hi-hat
sample choke an open hi-hat sample. I say typically because you can use this
functionality for all sorts of interesting effects, especially when you've loaded a
bunch of long samples instead of short drum hits.
Finally on the far right of the drum pad are the "s" and "r" controls which
represent solo and mute, respectively. The solo button makes it so that only the
soloed drum pad is heard, muting all others. The mute button, conversely,
silences the drum pad. Simple. But remember the "all" button at the top, hit it
when you want to hear the entire kit again.
Oh, yeah, now we're getting to the fun stuff. Every time you select a drum
pad it changes the available controls on the right side of the GUI to allow you to
edit the extra controls for just that pad. Before you start changing all your edited
controls look to the left and make sure you've got the right drum pad selected.
It's the number that's lit up. Plus, you can see the name of the sample loaded in
the selected layer so you can navigate the large amount of samples more easily.
Top left: "velocity" knob. Velocity does not mean volume in the midi world,
but how hard the key is being struck or whatever's analogous. Underneath the
knob is a "rnd" control. You can make the velocity per hit up to 100% random!
Next to the right: pan. Controls where the sound comes from in the stereo
field. Underneath another "rnd" control. I don't quite understand how erratic²
knows when a new layer is triggered, but this control not only determines
randomly where the sound originates in the stereo field, but changes it when a
new layer is triggered if the "repeat" effect is active... makes for some
wonderfully chaotic bouncing around!
Far right, top row: a "pitch" so you can tune your samples. Applies to all the
layers in that drum pad, mind you. Then a "vel" control beneath that. When
toggled you can slide the percentage control up or down into negative detuning
and the sample gets tuned from where you're set the big knob plus or minus
whatever degree of velocity modulation you've selected. At -33% velocity
selected, the harder you hit the drum the more it gets detuned. When you take
into consideration the velocity of "repeated" notes (more on this later) this can
introduce a really wicked pitch modulation effect.
I'll skip the filter and envelopes section for a bit then come back to them.
Next row down: the "swing" control knob. This controls the degree of
syncopation or how "randomly late" a drum will be triggered when a drum pad is
hit (or a note plays from a DAW's piano roll or whatever) as well as in the
"repeated" re-triggers of the samples.
To the right of that: the "hit probability" knob. When toggled this
determines what percentage of the time the sample will actually play when it's
midi note is triggered. Why is this cool? Well, you can just throw any old midi
loop at erratic² and then allow these hit probability percentages do the dirty work
of random drum playing. You can make a really dense midi score and just use
small percentages to determine whether the pads are played, thus making a quite
natural sounding drum playing style! Hard to explain in words, I'm sure dlM or I
will provide examples at some point. For instance see dlM's "two snares dif prob"
preset. The idea being that you can just toss a bunch of notes at the 2 snares and
a more natural and unpredictable series of snare playing comes out magically.
Lastly in this row of controls is the volume knob. This controls the volume
for the selected drum pad and all the samples in it's layers. Use the "gain" control
at the top to control the plug-in's overall volume level.
The last row of controls are my favorite. When the button next to the
"repeat" label is toggled the samples repeat, somewhat like a delay effect but
actually re-triggering the samples.
Beneath that is another "repeat" label with a draggable window. The
possible repeat delays in beats are 1/16th, 1/12th, 1/8th, 1/6th, 1/4th, 1/3rd,
1/2nd, 2/3rd, 3/4th, 1, 4/3, 3/2, 2, 3, and 4 beats. I love it when devs add such
nice rhythm choices.
Next down is a "vel" parameter which allows you to select at what
percentage of the original triggered velocity of the drum pad that the "repeats"
are triggered at. Thus if the "vel" is set to 65% and you hit the drum pad with a
100% velocity note, then the "repeats" are triggered at 65% velocity.
And this is where can make some really crazy effects. Remember all those
"vel" control percentages? Well, if you trigger a pad at 100% with 6 layers of
samples loads the sample in slot 6 will be triggered first, followed by the one in
layer 4 on a repeat velocity of 65%... and if you've got other parameters toggled
to be affected by velocity then they will change to this lower velocity level on
repeat re-trigger! This is in addition to the fact that as velocity devolves then
lower layers of samples will be being triggered. This is the true ultimate power of
erratic² and monkey clown horrible karate round and yummy like cute small baby
chick would beat the donkey.
The "prob" control, when activated, allows you to control what percentage of
the time the repeat effect occurs and re-triggers the drum pad.
Finally comes the "feedback" knob which, much like in a delay effect,
determines how many times the sample is re-triggered at the previously selected
rate (in the second "repeat" control)
Ok, back to the second row of controls in this section.
These controls are a bit complex and are better dealt with now that you
know about the repeat effect. The "vol env" is the volume envelope. You can
click on the graph picture to change what shape of envelope you're using. Scroll
up and you'll see I've changed the envelopes for this picture.
Each envelope window has two little white boxes. The top on can be
dragged up and down. This controls the maximum value at which the envelope is
triggered, whether it be volume level or lowpass filter cutoff frequency.
The other little white box can be dragged left to right. This controls how
long the envelope is in milliseconds, as you can see in the white text readout
above the envelope image.
Each of these controls can be toggled on and off with the little circular
selector to the upper right of the main control.
Both envelops also have a "vel" control with a little circular selector to
toggle it on and off. This makes it so the midi note velocity which triggers your
drum pad also modulates the length of the envelope. Harder hits translate to
longer envelops. Higher percentages mean that the velocity has more sway over
the length of the envelope. Remember that when "repeating" the change in
velocity also affects these parameters!
The "LP cutoff" knob controls the lowpass filter of erratic². The inner blue
circle around the knob shows at what frequency (in megahertz) the filter cuts off,
and since I forgot to mention this but it applies to all such displays the outer gray
circle represents the actually active level of the control once the modulation
(random or velocity) is taken into account.
part 2 - erratic² sound design tutorial
In the second part of this guide I'll discuss the various techniques you can
use to take advantage of erratic²'s unique functionality.
Make randomization work for you. erratic² does not play randomized notes.
It doesn't even output notes unless you input some. Yet even just the "swing
randomization" is worth the price of entry! Bear with me and read on. To quote
the manual:
"erratic 2 has a midi out function, which means it transmits all the internally
processed midi signals to the output so you can use it to trigger and external
sampler or synth. This includes the swing, hit probability and hit repeat functions.
Please consult your host manual to set up routing the midi signals to another
plugin. Whichever external VST you control, it needs be set to only take midi
channel 1 as the input."
In other words, even when used as a midi send erratic² gives you the ability
to vary the drum-playing's swing on a per-pad basis. You can send it a beat
(obviously this must be set to receive midi channel 1) and the output the midi,
with hit probability and swing randomized, to whatever channel other than 1.
Then just set whatever other plug-in you intend to play to receive that midi
channel and you've just introduced a powerful humanizing effect to your played
rhythm.
The possibilities are much greater when you consider internally-loaded
samples. Let's look at the list of randomizable parameters:
• velocity layers' randomized play selection
• hit probability
• swing
• hit repeat probability, with adjustable delay time, repeat velocity and
velocity sensitive feedback
• velocity randomization
• pan randomization
Now utilizing the power of these effects will take some forethought. This is
one of the reasons I always say to compose away from the box! When you're
staring at the screen you get caught up in the technicalities of that moment and
forget to take a step back and think through how to use your tools to best achieve
the music in your imagination. This is especially true when you're creating your
drum kits and selecting samples (and remember, you can't quickly audition
samples in erratic² so it's best to make your kits not when you're actually scoring
music but during some other spare time you have).
It's easy to imagine how "swing" and "velocity" randomization is instantly
add a human feel to your drum parts. "Pan" randomization is great for making
sounds fly around but not a particularly realistic effect for use with a traditional
trap kit.
"Velocity layer" randomization, however, can work wonders with intelligent
selection of samples. erratic² automatically creates changes in volume
appropriately according to the velocity of a struck note even when the layers are
set to be played on "rnd" or "cyc" (round-robin fashion) so using the random layer
selection effect with subtly different samples of the same drum hit is another way
to add "humanization" to drums. But take this concept further, using a snare as
an example. Since you have 6 layer slots to fill you could load one really good
ringy thwack of a snare hit, another that's got some struck rim, a lighter hit
toward the edge of the snare, one with a nice little drag, and a quick roll. This
wouldn't make much sense in cascading order when set to "vel" or "cyc" but
would instantly enliven a drum part when set to "rnd" layer selection!
Of course being a great love of strange sounds I've included presets that
use this effect in a more strange way. I loaded pads with layers of somewhat
similar odd sound effects and set all sorts of parameters to random and velocity
sensitive so that odd and unpredictable noises come flying out. I'll get into that
more later, but "rnd" layer selection can be used for that, too.
What requires the most forethought is probably the "hit probability" ability.
As this is a negative probability, in other words it takes away notes, it's not like
you might expect where erratic² would output random drum hits. One kit I made,
"probly illusive" was made with the idea that you could send it a bunch of notes
and it'd "thin out" what would otherwise be overwhelming chaos. Good for a
sequencer, bad for playing on a keyboard. This effect is best used by sending it
midi rhythms from your DAW in order to add humanization and works well in
conjunction with the "repeat" effect: in combination you can make the hit
probability leave space for the possibility of repeats which then combine in to an
unpredictable but organic whole.
Because of the complexity of possible interactions amongst the effects now
I'll get into the velocity-sensitive ones before continuing:
•
•
•
•
velocity sensitive pitch
velocity sensitive volume decay envelope with adjustable contours
low pass filter with velocity sensitive cut-off
velocity sensitive cut-off decay envelope with adjustable contours
Addressing velocity sensitive pitch is easy. When used sparingly it can
mimic the natural variations in pitch that would occur in even percussion
instruments, adding yet another naturalistic detail to your drum track. When
cranked up, especially when using very short or very long samples, it creates a
wonderful FSU effect, many examples of which are in my presets.
With sharp, staccato samples and the repeat effect wild pitch variations
sound great and enliven your track. It does not work well with, say, a reverbedout snare hit. With a weird, non-percussive sound effect it also sounds wonderful
especially in conjunction with more dissimilar samples loaded into the velocity
layers when the repeat and pitch effects are set to be velocity-sensitive.
I discussed the volume and filter envelopes briefly earlier but here I'll add
that in addition to their traditional use in samples in attenuting long-playing
samples (which, if carefully tweaked, can make cymbal sounds decay quite
naturally according to how hard they're struck) that these envelopes work on
"repeated" drum hits, so if you're got the "repeat" effect turned on and the
"feedback" set high but with velocity sensitivity a low-velocity hit will repeat less
and be "filtered out" quickly whereas a longer feedback of repeated retriggers will
play longer and be more subtly attenuated by the filter. These effects can, of
course, be used to simply trim down a long sample to just the attack portion that
you like which I've done many times on kicks in my presets.
I've included an example mp3, "erratic² 3am fried kit sound design
example" for download from my website that demonstrates some of the more outthere conjunction of using randomization, velocity modulation, repeat effect, pan,
filter and pitch control. I simply played each pad, one at a time, from my
keyboard for a while at different velocities and let erratic² work it's magic.