1
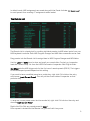
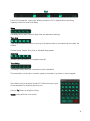
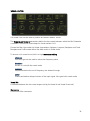
Looperator User Manual 1 Table of Content About Getting Started Reference Guide The Header Clock Source Tempo Control Preset Browser Undo/Redo Init Global Random About Screen The Effect Sequencer Input Slicer Looper Envelope FX1 FX2 Filter The User Effects LOOPER ENVELOPE FILTER FX1 + FX2 The Footer MIX Master Mix Bypass General Looperator Settings Scales 2 Host Integration Cubase Ableton Live ProTools Studio One Sonar Logic FL Studio MIDI remote Installation WINDOWS 32bit WINDOWS 64bit OS X Uninstalling Authorization License Contact 3 About Looperator is the ultimate slicing and processing plugin for all styles of electronic music. The quick & intuitive interface makes designing subtle groove enhancements to spectacular rhythmic pyrotechnics easy and fun. Build a 16-step looping effects sequence, with discrete per-step settings for each of Looperator’s stunning effects modules, then bring everything to life using the comprehensive modulation system on a per-step basis. Rearrange your groove! Chop the input signal into 16 slices and freely assign them to each sequence step on the Slice track, then rhythmically stutter selected steps on the Loop track. Flexible filters. Looperator’s Filter provides per-step frequency shaping of the left and right channels independently. Multi-effects galore. Two User FX modules each deliver dynamic effects sequencing via a rich and varied line-up of high-quality processors. User steps. Each sequencer track offers 20 ready-made step options. Much of the time, you won’t need to go any further than that, but when you do, the four User-defined steps also available to each track give you full and precise control of five processor parameters per effect. Motion and modulation. Every User step configuration features five adjustable parameters, each automated using a simple knob, a Randomizer, an Envelope Follower or one of 20 preset parameter modulation curves with adjustable start and end points. When it comes to animating your Looperator effects sequences, the possibilities are literally endless! Fast, focused workflow. Like all Sugar Bytes software, Looperator has been developed with operational fluidity at the top of the agenda. Looperator’s snappy workflow keeps up with even the fastest-moving producer. There’s more… The feature list just keeps on giving! Seven per-module and global Mix blending modes; intelligent randomization options throughout; super-smooth step transitions; deep MIDI integration and control; limitless undo/redo; standalone functionality and more. It all comes together to make Looperator nothing less than a state-of-the-art loop design powerhouse that no electronic musician should be without. 4 Getting Started Set up an audio input Looperator is an effect plugin, so it will need some audio source to work with. Audio Player. In stand-alone, this is a handy way to load and loop any audio into Looperator’s input. Access via: Menu Bar/Window/Audio Player. Host Integration: Set up Looperator as an effect in your DAW. There are two Clock Source options: In Host mode, Looperator always runs in sync with the host clock. If the Clock Source is set to the PLAY Button, Looperator will run when triggered via MIDI note input or automation. Audio Player. Options for looping and tempo detection. See Host Integration for detailed instructions. Check out the factory presets Looperator comes with over 300 presets made by the Sugar Bytes crew and our friends. The middle of the Header houses the Preset Browser. Click the name of the current preset to open the preset library dialogue. Step through the factory presets via the < > buttons. You can pick any of the included factory presets from the preset library dialogue. The left column contains the categories/folders. Preset Browser 5 Have a look at some vital controls When designing Looperator, our focus was always on the user’s creative flow. The abundance of intelligent and customizable random buttons all over Looperator is one aspect of this. Undo/Redo, Initialize & Random Buttons Undo/Redo. Undo and Redo recent actions with the curved arrows. Init. You can initialize the entire sequencer (Init All) or each of the six effect tracks individually. Global Random. Six different modes (dice sides 1-6). Smart: Creates a balanced effect sequence. Space: Creates Reverb & Delay effects only. Single: Limits each track to a single effect setting. Randolf: Fills the sequencer with random effect steps with each cycle. Tieland: Creates random effects tied across multiple steps. Track Random: Uses the settings established with the Track Random controls. Monophonic Mode: Each vertical column can only contain one active step. Track Settings. Each of Looperator’s effect tracks has its own customizable random function and an individual dry/wet control. The behavior of each track random can be adapted in the Track Random Settings. The available random options are different for each track! Here are the options for the Filter track as an example: Select 100. Assigns the same filter curve to every sequencer step. Select 50. Assigns the same filter curve to randomly selected steps. Talk. Assigns only random vowel filter curve types with Tie steps in between. Lowpass. Every step is assigned a random low-pass filter curve. Highpass. Every step is assigned a random high-pass filter curve. Motion. A random number of steps are each assigned a randomly selected filter curve, with Tie steps in between. Smart. Randomly assigns a balanced array of filter curves. Track Menus & Settings Chaos. Assigns a random filter curve to each and every step. Have a look at Track Random for more details. 6 Ready-made effects All of Looperator’s effect lanes offer ready-made effect options to quickly populate the sequencer. Again, the options differ for each lane. In FX1 & FX2, there are different effect categories. In the Slicer track, you can choose any of the sixteen slices, in all other tracks, you can pick any of the four User-designed effects. Tie. Extends an effect's duration across multiple contiguous steps. Random. Sets a step to play a randomly chosen effect with each cycle of the sequencer. The behavior of this random function can be adapted in the Step Random Settings. Delete. Blanks the current step. User Effects In addition to the ready-made effects, you can create up to four user configurations in each effect track. Hit the button to call up the User Settings page. The basic handling of the editor is same for all tracks: Switch between the four tabs to access User effects U1-U4. Right beside you have copy, paste, init and random functions. All user effects have five parameter sections. There are four basic modulation sources: 1. 2. 3. 4. Motions Parameter (linear) Envelope Follower Random See User Effects for more details. BACK TO TABLE OF CONTENT 7 Reference Guide The Header Clock Source The sequencer has two clock modes. It can run in sync with your DAW (HOST), or be started manually via the PLAY button. This button can also be triggered by MIDI or automation. Tempo Control Sets the step resolution to 1/2, 1/4 or 1/8. This makes the duration of one step a half note, a quarter note or an eighth note. Preset Browser The middle of the Header houses the Preset Browser. Click the name of the current preset to open the preset library dialogue and step through the factory presets via the < > buttons. You can pick any of the included factory presets from the preset library dialogue . The left column contains the categories/folders. Click the “Disk” button to save your own presets in the “User” folder. The factory presets are stored in /USER/Documents/Looperator/Presets. 8 In default mode, MIDI assignments are saved along with the Preset. Activate “CC Recall Lock” to avoid presets from recalling CC assignments when loaded. The Remote List The Remote List is a handy tool for recalling individual presets via MIDI notes inputs from your MIDI keyboard/controller. Both MIDI Program Changes and MIDI Note commands can be used. Drag presets into the Remote List to assign them to MIDI Program Changes and MIDI Notes. Use the Load and Save icons to store and recall your remote lists. On start-up, Looperator loads the 'Default.smbp' list from the USER/Documents/Looperator/Midi PrgList folder. Key Offset sets the MIDI trigger note for the first row of remote presets (PRG 0). The triggers for the subsequent presets depend on this setting. If you want to have a modified preset on a certain key, right-click/Ctrl+click on the entry and choose 'Insert Current Preset'. This will put the current state of Looperator on that particular key. To drag the current preset folder into the remote list, right-click/Ctrl+click on the entry and choose 'Insert Current Folder'. Right-click/Ctrl+Click any remote preset to clear it. Once a preset is locked into the Remote List, you can’t edit it any more. 9 Undo/Redo Undo and Redo recent actions with the curved arrows. Init You can initialize the entire sequencer (Init All) or each of the six effect tracks individually. Global Random In the upper right-hand corner is a dice button and a drop-down menu. Click the dice to randomize the sequencer steps. Six randomize modes are available via the drop-down menu: Smart: Creates a balanced effect sequence. Space: Creates Reverb & Delay effects only. Single: Limits each track to a single effect setting. Randolf: Fills the sequencer with random effect steps with each cycle. Tieland: Creates random effects tied across multiple steps. Track Random: Uses the settings established with the Track Random controls. Monophonic Mode: Each vertical column can only contain one active step. With the Global Random dialogue open, you can trigger the currently selected random mode by clicking it. You can randomize individual sequencer tracks in the track settings. The Track Random settings give you extensive control of the random functions. Look here. 10 About Screen Clicking the Looperator logo opens the About Screen: Your Serial Number is shown in the right, along with its validation status. If you entered an incorrect serial number it will be marked as invalid here. The serial number is needed for downloading updates and additional content. Click NEED HELP for quick access to this Manual. Click the Sugar Bytes Logo to open the Sugar Bytes Website. BACK TO TABLE OF CONTENT 11 The Effect Sequencer Looperator’s central section contains six sequencer lanes, each offering a choice of 20 readymade effects. You can create up to four User effect configurations for each sequencer track. Each track includes a Randomizer. This can be tweaked in the Track Random settings. Adjust the Dry/Wet mix of each track via the icon on the far right. Effect Routing Change the effects routing by clicking a track’s name – FX 1, say – and dragging it vertically to another position in the signal chain. Mouse Handling PC Click any step in the sequencer to add an effect from the pop-up. Right-click a step to delete it. Right-click and drag to delete multiple steps. Drag from an active step to copy it horizontally. Shift+click to create Tie steps. Cmd/Ctrl + left click a step, click and drag vertically, or use your mouse's scroll wheel to step/scroll through the effect configurations. Click and hold 1-4 and left mouse to create User 1-4 steps. 12 Mac Click any step in the sequencer to add an effect from the pop-up. Ctrl+click a step to delete it. Ctrl+click and drag to delete multiple steps. Drag from an active step to copy it horizontally. Shift+click to create Tie steps. Cmd+click a step, click and drag vertically, or use your mouse's scroll wheel to step/scroll through the effect configurations. Click and hold 1-4 and left mouse to create User 1-4 steps. Input The top-most lane of the Effect Sequencer visualizes the audio input into Looperator. The input is recorded in real time and automatically sliced into 16 steps. Use the Slicer to rearrange these slices. Slicer Assign audio slices to steps by clicking their assigned numbers in the Slicer pop-up menu, or set a step to play a randomly chosen slice with each cycle of the sequencer by clicking the dice icon. Delete steps with the cross button. Attention! Looperator cannot see into the future, so if you select a slice to be triggered before its audio signal is recorded, the result will be silence. An exclamation mark next to the slice number on the step alerts you to this. 13 Looper The Looper algorithm repeats the audio signal in a variety of ways. Two parameters define each of the ready-made Looper effects: the duration of the loop and the direction in which it plays back. A right-pointing triangle indicates forward playback; a leftpointing triangle indicates reverse playback. Note that you can create up to four user defined steps for each sequencer track. Set a step to play a randomly chosen Looper effect with each cycle of the sequencer by assigning the dice icon to it. Use the Tie Button to extend an effect's duration across multiple contiguous steps. Delete a step with the cross button. Here all different loop styles are explained: Repeat after 1/2 Repeat after 1/3 Repeat after 2/3 Repeat after 1/4 Repeat after 3/4 Repeat after 1/3 + repeat after 2/3 Repeat after 1/4 + repeat after 2/4 Repeat after 2/4 + repeat after 3/4 Repeat after 1/4 + repeat after 3/4 Repeat after 1/4 + play in reverse after 1/2 4 repeats 6 repeats 8 repeats 12 repeats 16 repeats Play backwards after 1/2 Play backwards after 1/4 + repeat all after 1/2 Play backwards after 2/3 Play backwards after 3/4 Play backwards after 1/3 + forwards after 2/3 14 Envelope The Envelope track is used to shape the volume of the sound. Select a random volume curve with every cycle of the sequencer using the dice icon in the Envelope pop-up menu. Click the Tie Button to change the duration of the volume modulation curves by creating Tie steps. Delete a step with the cross button. The following Envelope types are available: Linear Attack Linear Release Linear Attack Release Linear Release Attack Linear Release Attack Release Sloped Attack Fast Sloped Release Fast Sloped Attack Slow Sloped Release Slow Sloped Release Attack Release Sloped Release Attack Sloped Attack Release Sloped Release Attack Slow Sloped Attack Release Slow Sloped Wobble Silence Hard On Off Hard Off On Hard On Off On Linear Release Release 15 FX1 The first of Looperator's two multi-effects processors, FX1’s default effects are Delay, Tapestop, Distortion and Tonal Delay. Delay Five delay setups with different delay time and panorama settings. Tape stop Tape Stop simulates the effect of turning off a tape recorder or turntable with its output still audible. Choose Linear, Sloped, Slow, Fast or Ultrafast stop speeds. Distortion Choose from five flavours of roughness and dirt. Tonal Delay This delay's delay times are converted to pitch modulation. The modulation can be set to constant, upward, downward, up/down or down stepped. Set a step to play a randomly chosen FX1 effect with each cycle of the sequencer by selecting the dice icon. Use the Tie Button to lengthen a Step. Delete a step with the cross button. 16 FX2 FX2's factory effects are Reverb, Vinyl, Stretch and Phaser. Reverb Give your sounds a sense of position and space. Vinyl Authentically emulates the sound of scratching a vinyl record. Stretch With that effect time and pitch are treated independently. Select either Timefreeze, Half Speed, Pitched Up Stretch, Pitched Down Stretch, or Pitchshift Low (-2 octaves). Phaser Adds some ’70s swirl and otherworldly vibes with this warm, wide phaser. A selection of five phasing styles is on offer: Up, Down, Electric, Wobble and Wobble2. 17 Filter The Filter sequencer features low-pass and high-pass filters for classic sweeps, as well as our acclaimed vowel filter. The various modulation curves enable quick and easy selection of a range of distinctive filter sweeps and movements. Low-Pass/High-Pass Filter The top lane contains five low-pass filter curves, while the bottom lane hosts their five highpass counterparts. Vowel Filter Sugar Bytes’ famous Vowel Mode delivers a powerful 'talkbox' sound, making the output signal sound like it's being spoken. Alongside the vowels – A-E-I-O-U – we've also included five transitions: AI, AIAI, AIAIAI, OI and IA. BACK TO TABLE OF CONTENT 18 The User Effects In addition to the ready-made effects, you can create up to four user configurations in each effect track. Hit the button to call up the User Settings page. The basic handling of this editor is the same for all tracks: Switch between the four tabs to access User effects U1-U4. Copy/paste settings between User effects, and initialize or randomize the settings using the Copy, Paste, Reset and dice buttons. All User effects have five parameters, the fifth of which is always Mix. Clipboard You can transfer settings from one User effect to another. Reset Initialize the settings of the active User effect. Copy/Paste Hit the Copy button, switch to another User effect and Paste the settings into it. Using Copy/Paste, you can easily create variations on existing material. Random Press this button to randomize all parameters of the active effect. 19 Parameter Section Here’s where things get interesting: each User effect can be modulated via the parameter settings. There are four basic modulation sources: 5. 6. 7. 8. Motions Parameter (linear) Envelope Follower Random 1. Motion: Choose from 20 preset modulation curves and define their start and end values. Linear Sloped Sloped Inverse 2 Steps 3 Steps 4 Steps Sine Parabol Sine*2 Sine*4 2 Steps Short Attack Tie Value Triangular Slope Peak Saw Up*2 Stepped Triplet Triangular + Saw Up Parabol 1.5 Parabol*2 Set the start and end (or intensity) settings of the curve using the sliders on each side to customize the modulation of the target parameter. 20 2. Parameter: Static manual control of the parameter value. 3. Envelope Follower: Modulate the active effect with the amplitude envelope of Looperator's audio input. Base value Use the knob in the top-left corner to set the base value of the parameter being modulated. This will be the starting point of modulation. Direction Specifies the direction of the modulation (positive or negative). Attack Establishes the speed with which the envelope follower responds to the signal. Release Adjusts the the envelope follower release time. 4. Random Mode: The parameter value will be randomized. Min and Max control Defines the range of the randomizer. Rnd Defines the numbers of random values generated per step. 21 Step/Glide Switch the transition from one random value to the next between instantly jumping and smoothly gliding. Mix The Mix control set the blend ratio of dry and processed signal. At the bottom of the Mix section, the Mix Mode menu establishes the mixing mode of the Mix control. The mixing modes affect the prominence of the effect signal in the mix. Linear With the Mix control at the center position, the mix comprises 50% dry and 50% processed signal. Equal The crossfade is shaped according to the “Equal Power Law”, which leads to some signal attenuation at 50/50 mix. Dry + Wet The wet signal is added to the dry signal. Wet Only Only the effect signal is audible and the Mix parameter becomes a volume control. Wet Pan Only the effect signal is audible and the Mix parameter becomes a pan control. Dry + Wet Pan The wet signal is mixed with the dry signal and the Mix parameter becomes a pan control for it. DELAY and REVERB use a slightly different mixing system. Wet Mixing is linear: 50% dry and 50% processed signal in the center position. Wet (100%) Panned The dry and wet signals are equally audible, and the Mix parameter becomes a pan controller for the effect signal. 22 Wet (75%) Panned The dry signal is mixed in at 100% and the wet signal is reduced to 75%. The Mix parameter becomes a pan controller for the wet signal. Wet (50%) Panned The dry signal is mixed in at 100% and the wet signal is reduced to 50%. The Mix parameter becomes a pan controller for the wet signal. Wet (25%) Panned The dry signal is mixed in at 100% and the wet signal is reduced to 25%. The Mix parameter becomes a pan controller for the wet signal. Dry + Feed The Mix Parameter controls the level of the dry signal and the input feed into the effect. This is especially useful for extracting pure reverb/delay tails. For example, by choosing a modulation shape that starts at a high value and drops to zero, the signal is fed into the reverb such that when the Mix parameter reaches zero, the dry signal disappears, leaving just the tail of the reverb or delay audible. BACK TO TABLE OF CONTENT 23 LOOPER A looper effect that repeats the incoming audio material at a user-defined rate. Repeats Sets the number of repetitions per step and features the following options: Sync Relative All repeats will be played per step regardless of Tie steps. Sync Absolute The number of repeats is fitted to the total length of the loop including Tie steps. Free Freely specify any number of repeats, including non-integers – 2.5 repeats, for example. Pan Determines how the repeats will jump around the stereo panorama. Pitch Sets the pitch of the repeated signal and features the following options: Free Fine tune the pitch from -24 to +24 semitones. Tone Adjusts the pitch in semitone steps from -24 to +24. Amp Determines the output volume of the Looper and features the following options for altering the feel of the repeats: Off Every repeat is played. 24 2nd Every other repeat is dropped (not played). 3rd Off Every 3th repetition is left out. (On , On, On, Off) 3rd On Every third repeat is dropped. (Source , On, On, Off) Rhythm 1 The length of the repeats is varied to create a rhythmic feel rather than evenly spaced repetition. Shuffle The length of the repeats is varied to create a shuffle feel. Swing Soft The length of the repeats is varied to create a soft swing feel. Swing Hard The length of the repeats is varied to create a hard swing feel. BACK TO TABLE OF CONTENT 25 ENVELOPE The Envelope track manipulates the amplitude/volume of the sound. Volume Attenuate or boost the Amplitude of the audio signal (up to 200% /+ 6 dB). Pan Determines the position of the signal in the stereo field. Crush Adds quantization noise by reducing the bit depth. Depending on the amount of reduction applied, this will imbue the sound with a warm, digital or metallic character. There are four options: Normal Reduces the bit depth to generate classic bitcrushed sound. High Reduces the signal non-linearly, resulting in loud sounds being bitcrushed more than quiet ones. Low Works the other way around, so that quiet sounds are bitcrushed more than loud ones. Clip Boosts the signal so that it clips. Samplerate Applies digital distortion by reducing the internal sample rate. There are three Options: Normal Creates classic sample rate reduction all the way to total sonic decimation. 26 Dynamic Reduces the sample rate dynamically according to the amplitude of the incoming signal. The louder the signal, the more sample rate reduction is applied. Absurd While the sample rate is reduced the signal will be modulated creating harsh overtones. BACK TO TABLE OF CONTENT 27 FILTER Looperator's Filter module houses an excellent stereo filter with 12 filter types, and a powerful vowel filter. FILTER A stereo filter that enables independent control of cutoff frequency and resonance. The Link option under the Cutoff Right parameter synchronizes the Left and Right channels. Cutoff adjusts the filter cutoff frequency, and Resonance sets the feedback level of the filter circuit. Turning the Resonance control fully left produces a very smooth, non-resonant sound. Raising the Resonance exaggerates the frequencies immediately surrounding the cutoff point, making it more pronounced, until, ultimately, the filter self-resonates. Cutoff Left Set both channels to any of the following filter types in the Cutoff Left submenu: Highpass Frequencies above the cutoff are allowed through, while frequencies below it are attenuated. This filter can be used to reduce low frequency noise. Bandpass Allows frequencies within the cutoff range through, and rejects (attenuates) frequencies outside that range. Lowpass Frequencies below the cutoff are allowed through. Comb Creates and adds a delayed version of the input signal. 28 12dB LP Low-pass filter with 12dB/octave slope. 12 dB HP High-pass filter with 12dB/octave slope. 12 dB BR Band-reject filter with 12dB/octave slope. 12 dB BP Band-pass filter with 12dB/octave slope. 24dB LP Low-pass filter with 24dB/octave slope. 24 dB HP High-pass filter with 24dB/octave slope. 24 dB BR Band-reject filter with 24dB/octave slope. 24 dB BP Band-pass filter with 24dB/octave slope. Reso Left Determines the filter resonance/sharpness of the left filter. Cutoff Right Controls the cutoff frequency of the right filter. Link Syncs the Cutoff Right parameter to the Cutoff Left parameter. Unlink Allows independent adjustment of the two Cutoff parameters. Reso Right Determines the filter resonance/sharpness of the right filter. 29 VOWEL FILTER The Vowel Filter can be used to produce an intense 'talkbox' sound. The Vowel A and Vowel B parameters define the two vowels between which the Mix Parameter crossfades. Choose one vowel shape for A and another for B. Choose the filter type under the Vowel A parameter: Highpass, Lowpass, Bandpass and Comb. Bandpass and Comb modes deliver the best results in vowel mode. To ensure a rich vowel sound, dial in a high resonance setting. Highpass This filter type can be used to reduce low frequency noise. Bandpass Perfect for use with the vowel mode. Lowpass Frequencies below the cutoff frequency are allowed through. Comb Creates and adds a delayed version of the input signal. Also great with vowel mode. Vowel Mix Crossfades between the two vowel shapes (set by the Vowel A and Vowel B controls). Resonance Controls the filter resonance. 30 FX1 + FX2 Although their ready-made effects differ, the FX1 and FX2 modules are identical in their User effect options. DELAY REVERB Distortion GRAIN TONALIZER PHASER VINYL CHAOSSYNTH REVERB2 RINGMODULATOR 31 DELAY Delay L/Delay R Set independent delay times for the left and right channels. The synced delay time/note values available are: 1/1, 1/2, 1/4, 1/8, 1/16, 1/32 and 1/64. Sync The delay time is relative to the host tempo (bpm). Sync TP The delay time is relative to the host tempo and triplet and dotted values are available via the DelayL/DelayR controls. Free The delay time is unsynced and set in milliseconds. Feedback Determines the decay of the delayed signal. Pitch Applies pitch modulation to the delayed signal. The Pitch control submenu also gives access to a range of filters: LP, LP Q, Comb, Comb Q, HP, HP Q, +LP , +LP Q , +Comb , +Comb Q, +HP, +HP Q, -LP, -LP Q, -Comb, -Comb Q, -HP, -HP Q ‘Q’ filters have a high resonance setting. ‘+’ filters include upward cutoff modulation from 0% to 100%. ‘-‘ filters include downward cutoff modulation from 100% to 0%. The rest of the filters (no +/- or Q) have no cutoff modulation or pitch functionality. LP Low-pass: passes frequencies below the cutoff frequency. 32 Comb Generates and adds a delayed version of the input signal. HP High-pass: passes frequencies above the cutoff frequency. This filter type can be used to reduce low frequency noise. BACK TO TABLE OF CONTENT 33 REVERB Size Size of the main reverberation 'room'. Reverb Time Sets the decay time of the reverb signal. Reflectivity Determines the reflectivity of the room walls. Cutoff Sets the filter cutoff frequency. The following filter types are available: HP High-pass: passes frequencies above the cutoff frequency. Can be used to reduce low frequency noise. BP Band-pass: attenuates low and high frequencies, and passes those around the cutoff frequency. LP Low-pass: passes frequencies below the cutoff frequency. Comb Generates and adds a delayed version of the input signal. ‘+’ indicates a high resonance filter. 34 DISTORTION Drive Sets the overdrive intensity – distortion occurs at higher settings. You can also toggle between Mono and Stereo modes in the submenu. The Low, Mid and High parameters define the frequency bands to be distorted. You can choose one of three limiter modes in the Low parameter submenu. BACK TO TABLE OF CONTENT 35 GRAIN A Grain effect giving control over grain size, timing and pitch. Amount Sets the tempo adjustment in relation to the incoming audio signal. Grainsize Determines the grain length in milliseconds. To avoid gaps in the audio signal, the Grainsize value should be higher than the Distance value. There are also five grain crossfading modes, each defining a particular transformation window. Distance Determines the distance between the grains. The Distance parameter has several options for controlling the play direction of the grains: Forward, Backward and Ping Pong. Pitch Determines the pitch of the grains. If no timestretching is active and the pitch is shifted upwards a minimal delay is mixed into the audio signal which may not be audible. BACK TO TABLE OF CONTENT 36 TONALIZER The Tonalizer is a special delay that uses short delay times and high feedback to create tuned delay tails. Note Left/Note Right Sets the pitch of the left and right channels. The Note Left submenu enables you to choose between various tonal intervals, from semitones to octaves: Chromatic, Whole, 3rd, 4th, 5th, 7th, Octave, Major, Harmonic Minor, Melodic Minor, Major Pentatonic, Minor Pentatonic, Blues, General Bebop, Neapolitan Major, Neapolitan Minor, Spanish 8 tone, JazzMinor, Japanese, Balinese, Arabian, Hindu, Gypsy, Jewish Click here for a detailed explanation of the scales available. The Note Right submenu lets you synchronize the left and right channels via the Link to Left option. Feedback Widens and intensifies the tonal effect. In Normal mode, the Feedback parameter returns the signal back to the Tonalizer input, exaggerating the effect. The Feedback parameter's Inverse option inverts the phase of the feedback. Filter Emphasizes or suppresses frequencies in the processed signal. The following filter types can be applied within the Tonalizer effect: 37 HP, BP, LP, Comb, HP+, BP+, LP+, Comb+, HP++, BP++, LP++ , Comb++ HP High-pass: passes frequencies above the cutoff frequency. Can be used to reduce low frequency noise. BP Band-pass: attenuates low and high frequencies, and passes those around the cutoff frequency. LP Low-pass: passes frequencies below the cutoff frequency. Comb Generates and adds a delayed version of the input signal. ‘+’ indicates a high resonance filter. BACK TO TABLE OF CONTENT 38 PHASER Phase Depending on the value of the Depth parameter, this control sets the phase (Phase Direct) or the speed of the phase LFO. Set the number of phaser stages running in series, from 3 to 8, in the Phase submenu. Feedback Controls the intensity and width of the phasing effect. Choose Normal or Invert from the submenu to set positive or negative feedback . In Normal mode the Feedback parameter returns the signal back to the Phaser input to enhance the effect. The Inverse option inverts the phase of the feedback. Depth Controls the intensity of the Phaser effect. Phase Direct The phase control directly sets the phase. Phase LFO Sync The phase is modulated by an LFO, the rate of which is synced to the host tempo. 1/1, 1/2P, 1/1T, 1/2, 1/4P, 1/2T, 1/4, 1/8P, 1/4T, 1/8, 1/16P, etc. Phase LFO Free The LFO runs unsynced to the host tempo. Width Shifts the phases of the left and right channels, creating stereo movement BACK TO TABLE OF CONTENT 39 VINYL The stereo Vinyl Effect emulates the stopping and scratching of a vinyl record. Attention! As we’re dealing with real-time audio and, sadly, can't see into the future, it’s not possible to speed up the signal. Speed Left/Speed Left Set the playspeed of the left and right channels. The submenu modes establish the parameter range. Stop Play 0% to 100% speed. Stop Playx2 0% to 200% speed. Reverse Play -100% to 100% speed. Reverse Playx2 -100% to 200% speed. Lfo Amount Applies an LFO to the playspeed. Lfo Speed Controls the speed of the LFO. BACK TO TABLE OF CONTENT 40 CHAOSSYNTH Root Note Specifies the note on which the scale is based. The submenu offers several play modes: Off The default mode, under which only a single voice is played. Unison Soft/Middle/Hard Multiple voices are played with a frequency offset (Soft, Middle or Hard). Cluster Voices at ascending pitches are played together. Chord 1-6 A variety of chord modes differing in the number of voices played and their spread. Note Offset Modifies the pitch of the synth relative to the selected scale and root note. Scales: Chromatic, Whole, 3rd, 4th, 5th, 7th, Octave, Major, Harmonic Minor, Melodic Minor, Major Pentatonic, Minor Pentatonic, Blues, General Bebop, Neapolitan Major, Neapolitan Minor, Spanish 8 tone, JazzMinor, Japanese, Balinese, Arabian, Hindu, Gypsy, Jewish Click here for a detailed explanation of all available scales. Modulation Controls the speed of the synth's in-built modulation LFO . The submenu offers a range of modulation modes: FM1 Frequency modulation at low depth. FM2 Frequency modulation at medium depth. 41 FM3 Frequency modulation at high depth. AM Amplitude modulation of the synth. Ring Mod Uses the incoming audio signal as a modulation source. Pulse Width Adjusts the pulse width of the oscillator. There are four base oscillator waveforms: Sawtooth, Triangle, Square and Sine. BACK TO TABLE OF CONTENT 42 REVERB2 Size Sets the reverb 'room' size. Damp Dampens the reverb reflections. Width Creates a broader stereo image by slightly offsetting the left and right signals. Filter A classic high-pass filter for reducing rumble at high reverb sizes. BACK TO TABLE OF CONTENT 43 RINGMODULATOR Drive Overdrive intensity; distortion occurs at higher settings. Ring Amount Sets the modulation intensity. Off No effect on the stereo image. Lo Width Adds a little stereo width. Mid Width Adds stereo width. Hi Width Adds a lot of stereo width. Ring Freq Adjusts the central ring modulation frequency. Sine, Triangular and Parabolic wave shapes are selected in the submenu. LFO Speed Set the LFO shape and speed, or turn the LFO off. BACK TO TABLE OF CONTENT 44 The Footer MIX Set the Dry/Wet Level, blending the incoming signal with Looperator's output. Master Mix The Master Mix menu offers seven blending modes that determine how the Mix control blends the incoming dry signal with the Looperator output signal: Linear A linear mix – the center position provides 50% dry and 50% processed signal. Equal The crossfade is shaped according to the “Equal Power Law”, which leads to some signal attenuation at 50/50 mix. Wet The dry signal is mixed with the wet signal, and the Mix parameter becomes a volume control for the wet signal. Dry The dry signal is mixed with the effect signal, and the Mix parameter becomes a volume control for the dry signal. Wet (Only) Only the effect signal is audible and the Mix parameter becomes a volume control. Wet Pan Only the effect signal is audible and the Mix parameter becomes a pan control. Wet Pan2 The dry signal is mixed with the wet signal and the Mix parameter becomes a pan control. Bypass Deactivates Looperator’s output. This setting is saved with presets. General Looperator Settings Click the Settings Icon to open the General and Track Random Settings. BACK TO TABLE OF CONTENT 45 General Settings CC Recall Lock MIDI Learn settings won't change when loading presets. MIDI PRG ignores Tempo Incoming MIDI Program Changes won't change the tempo. MIDI PRG ignores Mix Setting Incoming MIDI Program Changes won't change Mix settings. Solo Mode when User Edit When editing a User effect, only the current step will be heard constantly. Force Clock Retrigger (Manual Clock Mode) When Looperator is triggered by MIDI, this setting forces the clock to restart when each new note arrives, even if a previous note is still being held. Lock Matrix Popup Position Activate this setting and the pop-up will open in a fixed position in the Looperator GUI. BACK TO TABLE OF CONTENT 46 Track Random Settings Select specific random modes for track random function and random steps. Track Random Every sequencer lane has its own random button, and each track has its own set of random modes. Slice Select 100 Assigns the same slice number to every sequencer step. Select 50 Assigns the same slice number to randomly selected steps. Smart An algorithm assigns balanced slice numbers to randomly selected steps. Offbeat Offbeat slices only. Toggle Fills the sequencer track with alternating slices. Looping Select 100 Assigns the same loop style to every sequencer step.. Select 50 Assigns the same loop style to randomly selected steps. 47 Straight Every step is assigned a random loop style – User-defined steps aren't used. On/Off Every other step is assigned a random loop style. Reverse Fills the whole sequencer track with only backward loop styles. Smart Assigns a balanced selection of random loop styles. Tied User Assigns random User-defined steps (U1-U4) with Tie steps in between. Envelope Select 100 Assigns the same envelope curve to every sequencer step. Select 50 Assigns the same envelope curve to randomly selected steps. Decay Assigns a random decay envelope curve to every step. Attack Assigns a random attack envelope curve to every step. Chaos Assigns random envelop curves to randomly selected steps. Only User Fills the whole sequencer lane with randomly selected User steps (U1-U4). Filter Select 100 Assigns the same filter curve to every sequencer step. Select 50 Assigns the same filter curve to randomly selected steps. Talk Assigns only random vowel filter curve types with Tie steps in between. Lowpass Every step is assigned a random low-pass filter curve. Highpass Every step is assigned a random high-pass filter curve. 48 Motion A random number of steps are each assigned a randomly selected filter curve, with Tie steps in between. Smart Randomly assigns a balanced array of filter curves. Chaos Assigns a random filter curve to each and every step. FX1 & FX2 Select 100 Assigns the same effect to every sequencer step. Select 50 Assigns the same effect to randomly selected steps. Motion A random number of steps are each assigned a randomly selected effect, with Tie steps in between. Smart Randomly assigns a balanced array of effects. Tied User Assigns random User-defined steps (U1-U4) with Tie steps in between. Chaos Assigns a random effect to each and every step. Step Random Define how the random steps should behave here. Slice Any Slice selection is totally random. Smart Uses only steps that are already recorded. Looping Any Loop style selection is totally random. 49 Any (No User) Selects from all loop styles except User-defined (U1-U4). User Only Only selects User (U1-U4) loop styles. Smart Uses only loop motions that doesn't affect rhythmic perception. Envelope Any Envelope curve type selection is totally random. Any (No User) Selects from all envelope curve types except User-defined (U1-U4). User Only Only selects User (U1-U4) envelope curves. Attack Selects only attack envelope curve types. Decay Selects only decay envelope curve types. Motion Selects only steps with movement. Filter Any Filter type selection is totally random. Any (No User) Selects from all filter types except User-defined (U1-U4). User Only Selects only User (U1-U4) filter types. Talk Selects only vowel filter types. Lowpass Selects only low-pass filter curve types. Highpass Selects only high-pass filter curve types. Motion Selects only steps with movement – not A I O U E, for example. 50 FX1 & FX2 Any Effect selection is totally random. Any (No User) Selects from all effects except User-defined (U1-U4). User Only Selects only User (U1-U4) effects. Motion Selects only steps with movement – not distortions, for example. BACK TO TABLE OF CONTENT 51 Scales All Scales with C as rootnote: Chromatic: C C# D D# E F F# G G# A A# B Whole: C D E F# G# A# 3rd: C D# F# A 4th: C E G# 5th: C F A# D# G# 7th: C G D A E B F# C# G# Octave: C G# E Major: CDEFGAB Harmonic Minor: C D D# F G G# B Melodic Minor: C D D# F G A B Major Pentatonic: CDEGA Minor Pentatonic: C D# F G A# Blues: C D# F F# G A# General Bebop: C D E F G G# A B Neapolitan Major: C C# D# F G A B Neapolitan Minor: C C# D# F G G# B Spanish 8 Tone: C C# D# E F F# G# A# Jazz Minor: C D D# F G A B Japanese: C C# F G G# Balinese: C C# D# G G# Arabian: C D E F F# G# A# Hindu: C D E F G G# A# Gypsy: C C# E F G A A# Jewish: C C# E F G G# A# 52 Host Integration The Clock Source determines how the Looperator engine is started and stopped. HOST: Looperator always runs in sync with the host clock. If the Clock Source is set to the PLAY Button, Looperator will run when triggered via MIDI note input or automation. Cubase In the Cubase plugin manager, perform a full rescan. Ensure that the Looperator.dll file is in Cubase's assigned VST Plugins folder. In Windows, be sure to install the correct version (32- or 64-bit). You can check if Cubase is running in 64bit or 32bit when you open the taskmanager while Cubase is running. Load Looperator as an insert effect on an Audio or Instrument track. Create a MIDI track and assign Looperator as its target. Trigger Looperator with your MIDI controller and record knob movements on the MIDI track. 53 Ableton Live We highly recommended that you only use the VST version of Looperator in Live. The installer will ask you to locate the VST plugins folder. Make sure you choose the VST Plugins used by Live. When installation is complete, check that the Looperator.dll file is in that folder. In Windows, be sure to install the correct version (32- or 64-bit). You can check if Live is running in 64bit or 32bit when you open the taskmanager while Live is running. I In Live, plugins sometimes get marked as unloadable and aren't rescanned automatically. If this happens, force a rescan by unchecking and checking the 'Use custom VST Folder' checkbox in Preferences/File Folder/Plug-In Sources. Set up an audio track and insert Looperator as effect. Send MIDI to it from a MIDI track. Select the Audio track with Looperator inserted into it in the MIDI track's MIDI TO menu. You can now play Looperator live by triggering it from the MIDI track. 54 ProTools When installing Looperator, select the RTAS or AAX plug-in format. (AAX is supported by Pro Tools 10.3.5 and higher.) Use Looperator as an insert effect. To control it via MIDI, create a MIDI track and select Looperator as Output in the I/O Menu of the Mixer. Studio One Go to the Studio One menu and choose Options. Click Locations, then VST Plug-Ins. Click the Add button and select your VST Plugins folder. Press OK then close and reopen Studio One. If you don’t see the plugin, go back into the settings screen of Studio One and click the Reset Blacklist button, then close and open Studio One again. Pick Looperator up from the Effects list. Create an instrument track and choose Looperator as its MIDI Out target. 55 Sonar Ensure that Looperator is installed in the VST Plugins folder used by Sonar, and that you've installed the correct version (32- or 64-bit). Configure Looperator as a 'soft synth' or tempo-based effect, depending on how you want to use it. To trigger Looperator via MIDI, first insert it as an effect, then open the plugin settings. Then, configure it as 'synth'. If you just want Looperator run in sync with Sonar, choose 'tempo-based effect' Plug it out. Plug it in an FX slot again but from the synthmenu 56 Then you will have a MIDI track assigned to it and from now on you can route a MIDI track to Looperator so that Looperator can receive MIDI from this track. Activate Looperator's Play button to trigger the sequencer with MIDI notes. Logic Use Looperator as a MIDI Controlled FX. Load it on an Instrument Track and choose it from the MIDI Controlled FX list in the Plugins menu. Then, in the Sidechain menu in the upper right corner, select the Audio track or Bus that you want to process with Looperator. 57 In Logic's mixer, turn down the level of the audio track that you selected in the Looperator Sidechain menu. FL Studio Load Looperator in the mixer section of your audio track – here, it's insert1. To control Looperator via MIDI, set up a MIDI out channel. Go to Channels>Add one>More... Double-click MIDI Out to setup a MIDI out channel. 58 Be sure to set the correct input and output ports in the Looperator MIDI section. BACK TO TABLE OF CONTENT 59 MIDI remote Certain Looperator parameters can be controlled via host automation and MIDI controllers. Right-click/Ctrl+click a control to bring up the MIDI Learn option. BACK TO TABLE OF CONTENT 60 Installation Download (requires login) the latest version here. The standalone version and manual will be installed to Windows: C:\Program Files\Sugar Bytes\Looperator OS X: /Application/Sugar Bytes/Looperator Presets will be installed into Documents\Sugar Bytes\Looperator Do not move the Looperator presets after installation! WINDOWS 32bit Default installation paths: VST C:\Program Files\Steinberg\Vstplugins RTAS C:\Program Files \Common Files\Digidesign\DAE\Plug-Ins AAX C:\Program Files \Common Files\Avid\Audio\Plug-Ins WINDOWS 64bit Note that all 64-bit plugins are in in C:\Program Files and your 32-bit plugins are located in C:\Program Files (x86). Make sure you have installed the correct version (32- or 64-bit). You can check if your DAW is running in 64-bit or 32-bit mode by opening the Task Manager while it's running. Default installation paths for the 32-bit version: VST C:\Program Files (x86)\Steinberg\Vstplugins RTAS C:\Program Files (x86)\Common Files\Digidesign\DAE\Plug-Ins AAX C:\Program Files (x86)\Common Files\Avid\Audio\Plug-Ins Default installation paths for the 64-bit version: VST C:\Program Files\Common Files\Steinberg\VST2 AAX C:\Program Files\Common Files\Avid\Audio\Plug-Ins BACK TO TABLE OF CONTENT 61 OS X The Audio Units, VST, AAX and RTAS plugins will be automatically installed into the correct folders. Our plugins are Universal Binaries that are both 32-bit and 64-bit compatible. Depending on your host, the right one will be loaded and used. AAX is supported by Pro Tools 10.3.5 and higher (and not selected by default in the installer). Default installation paths: VST /Library/Audio/Plug-Ins/VST/ AU /Library/Audio/Plug-Ins/Components/ RTAS Macintosh HD/Library/Application Support/Digidesign/Plug-Ins AAX Macintosh HD/Library/Application Support/Avid/Audio/Plug-Ins Uninstalling To uninstall Looperator: Windows: Uninstall Looperator under Control Panel>Add/Remove Software. OS X: Delete all the following files and folders. /Applications/Sugar Bytes/Looperator /Library/Audio/Plug-Ins/VST/Looperator.vst /Library/Audio/Plug-Ins/Components/Looperator.component /Library/Application Support/Digidesign/Plug-Ins/Looperator.dpm /Library/Application Support/Avid/Audio/Plug-Ins/Looperator.aaxplugin ~/Documents/Sugar Bytes/Looperator ~/Library/Preferences/com.sugar-bytes.Looperator.plist '~' means: /Users/YOURLOGINNAME (your home folder) (Please note that in OSX 10.7 and later, the user Library folder is hidden. To open it, select the "Go To Folder" from the Finder's Go menu and enter '~/Library'.) Authorization The serial number is requested during installation. If the serial number is missing or incorrect, the product will not produce any sound. To remedy this, open the About page and enter the correct serial number or just reinstall the product. BACK TO TABLE OF CONTENT 62 License The Looperator License covers both the OS X and Windows versions and can be used on two computers. For use on more than two computers, you must buy an additional license. You may resell the software three months or more after purchase. Contact Sugar Bytes GmbH | Made of Passion Greifswalder Str. 29 | 10405 Berlin, Germany Tel.+493060920395 [email protected] www.sugar-bytes.com BACK TO TABLE OF CONTENT 63