1
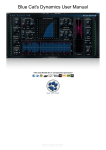
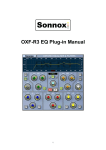
B U I LT F O R P O W E R C O R E
ASSIMILATOR
ENGLISH
USER MANUAL
ASSIMILATOR
/ 99
INTRODUCTION
Did you ever ask yourself “Why doesn’t my mix sound like THAT?” If you have asked
yourself this question, then ASSIMILATOR is your Plug-In. With ASSIMILATOR, you
can learn the frequency curve of your favorite mix or solo instrument track and apply
that frequency curve to your mix or track; sort of like an “automatic equalizer”.
Simply put, ASSIMILATOR is an equalization tool that delivers excellent results while
removing the tedious work from equalizing and fine tuning your mix. What’s more,
ASSIMILATOR is a phase linear equalization tool, freeing you from needless worries
about artifacts related to phase distortion. Without such phase interference, you get
the most transparent and musical processing possible. Best of all, ASSIMILATOR is a
Plug-In that demonstrates the most significant benefit of the POWERCORE platform:
Extreme processing, without bogging your host CPU down.
Enjoy!
The TC WORKS Team
ATTENTION!
THIS IS A POWERCORE PLUG-IN AND REQUIRES POWERCORE TO BE INSTALLED
IN THE COMPUTER! THIS PLUG-IN WILL NOT RUN WITHOUT POWERCORE.
ATTENTION!
ENGLISH
ASSIMILATOR is a Hybrid POWERCORE and Native Plug-In. To maximize the
performance of this Plug-In while maintaining the best sound quality, the limiter will
run ”Native” on your host CPU. This will not place a heavy load on your host CPU
and will reduce ASSIMILATOR’s DSP use for non-critical tasks such as gain staging.
is a TC Group company.
©
BY
TC WORKS SOFT & HARDWARE GMBH 2002. ALL PRODUCT AND COMPANY NAMES ARE TRADEMARKS OF
ALL SPECIFICATIONS SUBJECT TO CHANGE WITHOUT NOTICE. ALL RIGHTS RESERVED.
THEIR RESPECTIVE OWNERS .
GETTING STARTED
SYSTEM REQUIREMENTS
Windows
•
•
•
•
•
•
POWERCORE running system 1.6.5 or later
Windows 98SE, ME, 2000 or XP
PIII 500 or faster
128 MB RAM
VST compatible host application
System must meet requirements of the host application
Mac OS
POWERCORE running system 1.6.5 or later
Mac OS 9.04 or higher (including Mac OS X)
G3/300 or faster
128 MB RAM
VST or MAS compatible host application
System must meet requirements of the host application
ENGLISH
•
•
•
•
•
•
ASSIMILATOR
/1
ASSIMILATOR BASICS
The ASSIMILATOR is an extremely powerful equalization tool for POWERCORE and
it is unlike anything else. The idea is simple: you “learn” the frequency curve of one
piece of audio and apply it to another audio file. It is best to think of it in terms of
sampling:
• You “sample” the frequency curve of the audio that you want your audio to sound
like. (Learn the “reference” audio.)
• You “sample” the frequency curve of the audio that you want to process.
(Learn the “target” audio.)
• You “apply” the “reference” curve to the “target” curve to meet your needs.
Simple, isn’t it? The ASSIMILATOR compares the frequency curves of the two audio
sources and interpolates between the two to generate the ideal EQ curve for the target
audio.
ASSIMILATOR APPLICATIONS
The ASSIMILATOR is perfectly suited for:
ENGLISH
• Matching a live mix to a studio mix (…or vice versa.)
• Matching tracks on an album to “even out” the overall EQ across the entire
project.
• Applying the frequency curve of your favorite song to your song.
• Applying the frequency curve of your favorite track to your track, i.e. vocals, a
snare, etc.
• Matching the sound of multiple environments and morphing between them, as an
audio post effect for film or video.
2
/ ASSIMILATOR
GLOSSARY OF TERMS
The “analysis curve” is based on a frequency analysis – or spectral
snap-shot – of any audio source, such as a complete mix or an
individual audio track. The “analysis curve” can be stored for later
use.
Assimilation:
The process of making the overall spectral information – or
equalization – of one piece of audio similar to another.
EQ Curve:
The “EQ curve” is the calculated equalization applied to the target
curve. The EQ curve is an interpolation between the reference
analysis curve and the target analysis curve.
Learn:
The “Learn” function is how you can sample (or grab) the spectral
curve of any audio file or source.
Reference:
This is the desired analysis curve or the audio you want to sound
like.
Target:
This analysis curve is based on your audio; or, the audio you want to
process with the “reference” analysis curve.
ENGLISH
Analysis Curve:
ASSIMILATOR
/3
WHY LEARN TWO CURVES?
Learning just one curve would be insufficient for proper assimilation. Consider the
concept as a whole: how else does the ASSIMILATOR Plug-In know how to make your
“target” sound like the “reference”? Here are two examples that show the value of
learning two curves.
ONE CURVE IS INSUFFICIENT FOR PROPER ASSIMILATION
1. “Learn” the analysis curve of the audio that you want your audio to sound like
(“reference”).
2. “Apply” the analysis curve to the “target” audio.
What are the results? In this example, there is the risk that the results will not meet
your expectations. Consider what happens when we process our target audio using the
method from the example above. If the “reference curve” has a level of +12dB at 100
Hz and then you apply that to your target, which already has +6 db at 100 Hz, then
the total boost at 100 Hz would be +18dB. The conclusion is that if we apply the
reference curve to the target without also learning the target, then there will be a 6dB
difference at 100 Hz and the two pieces of audio will not share a common frequency
response!
PROPER ASSIMILATION REQUIRES TWO CURVES
With the additional step of learning the analysis curve of your “target” audio, or the
audio you want to process with the “reference” analysis curve, then there is the ability
to do a highly accurate comparison between the two curves and interpolate an ideal EQ
curve.
Let’s expand on our previous example adding only one step to correctly use the
ASSIMILATOR.
ENGLISH
1. “Learn” the analysis curve of the audio that you want your audio to sound like
(“reference”).
2. “Learn” the analysis curve of the audio that you want to process (“target”).
3. “Apply” the interpolated “EQ curve” to the “target” audio.
4
Now what are the results? Quite good! If we process our “target” audio from the
example above, we have an interpolation process that compares the two curves prior
to processing. If the reference curve has a level of +12 dB at 100 Hz, and then you
apply that to your target, which already has +6db at 100 Hz, then the total boost
would be +6dB at 100 Hz. 6dB is the difference between the two curves, so the sum
will result in something extremely different – and much more useful – than in the first
example.
/ ASSIMILATOR
PRESET MANAGEMENT
Unlike other Plug-Ins, ASSIMILATOR has two types of presets.
CURVE
After you have learned the audio spectrum of one piece of audio, you can save it
as an analysis curve. Once the analysis curve is saved, it can be loaded as either a
“reference” or “target” curve from one of the File menus.
PRESET
The preset is the global setting of the entire Plug-In. Saving a preset will store the
reference and target curves for both the A and B views of the Plug-In, as well as any
settings made in the Morph view. This global type preset is similar to those handled by
your host application, the difference is that using ASSIMILATORs preset manager will
ensure that you can share your presets with other users, regardless of host application
or platform.
ASSIMILATOR’s comprehensive file based preset architecture makes archiving presets
and curves a breeze. This allows you to organize your presets the way you find most
comfortable for your workflow, and to exchange presets and curves with other users, no
matter what platform or application they are using.
Presets are saved as discrete files on your hard drive. Once a preset is saved into the
default location, it will automatically appear in the “File” menu every time you use the
Plug-In. The files can then be arranged in subfolders, which will also be recognized by
the Plug-In.
FILE
Pressing the “File” button will open the File menu. The following options are available
from the File menu.
LOAD PRESET / CURVE
By selecting “Load”, you can navigate to any folder on the system, including any
“Shared” folder. By default, these will be loaded from the default location for
ASSIMILATOR presets.
Only presets located in the default file location will appear in ASSIMILATOR’s pop-up
preset menu.
ENGLISH
SAVE PRESET / CURVE
By selecting “Save”, you can save your preset to any folder on the system, including
any shared folder. By default, presets will be saved to the default location for
ASSIMILATOR presets.
ASSIMILATOR
/5
ASSIMILATOR can arrange presets and
analysis curves into different subfolders. These
subfolders are sorted into basic music genres
and applications such as Classical, Jazz,
Psychedelic Pop etc.
You can delete, rearrange or create your own
folders to accommodate your needs. You could,
for example, create preset folders for projects,
customers or by genre.
ENGLISH
This figure demonstrates various analysis curves that can be used either as reference
or target curves.
6
/ ASSIMILATOR
DEFAULT PRESET LOCATIONS:
The following locations will describe where you can find your ASSIMILATOR analysis
curves and presets, which are stored in different folders.
Mac OS Classic: Files are stored in the System folder.
System Folder: Application Support: TCWorks: ASSIMILATOR: Presets
System Folder: Application Support: TCWorks: ASSIMILATOR: Curves
Mac OS X: Files are stored in your user folder.
Users: Your Name: Library: Application Support: TCWorks: ASSIMILATOR: Presets
Users: Your Name: Library: Application Support: TCWorks: ASSIMILATOR: Curves
Windows: Files are stored on the Windows OS hard drive.
System Hard Drive:\Program Files\TCWorks\System\Application Support\ASSIMILATOR\
Presets
System Hard Drive:\Program Files\TCWorks\System\Application Support\ASSIMILATOR\
Curves
• To delete a file, simply move it to the “Trash” or “Recycle bin”.
• To create a new subfolder that appears in the Plug-In menu, simply create a new
folder in the Plug-In folder that resides in the PRESETS folder of the
ASSIMILATOR default preset location.
ACCESS PRIVILEGES IN Mac OS X
If you want to share your files with another user, it is advised that you copy your
presets to the “Shared” folder before the other user logs in.
If you save files into the System folder, make sure that you have the appropriate
Administrator rights.
ENGLISH
Preset subfolders will not appear in the File menu unless there is at least one file in
that subfolder.
ASSIMILATOR
/7
OVERVIEW
3
1
7
ENGLISH
8
8
1.
2.
3.
4.
5.
6.
7.
8.
9.
10.
Analysis Display
Preset Handling
Input Gain and Meter
Low Frequency Resolution Size
Output Gain and Meter
Limiter Enable and Limiter Activity Indicator
Reference Analysis Curve Section
Target Analysis Curve Section
Apply EQ Curve Fader
Level Calibration Fader
/ ASSIMILATOR
2
6
5
9
10
ENGLISH
4
ASSIMILATOR
/9
ANALYSIS DISPLAY
On the A and B views, the display shows the frequency of the reference analysis curve,
target analysis curve and the interpolated EQ curve. The Analysis display will appear
differently when the Morph view is active. For details, refer to the Morph section at the
end of the manual.
Blue
Indicates the reference analysis curve
Green
Indicates the target analysis curve
Black
Indicates the real time Analysis of the signal after processing.
Red
Indicates the amount of the EQ curve that is applied to the target. At zero,
when there is no application of the EQ curve to the target, the red application
curve will be flat.
DISPLAY OPTIONS
By selecting the Display Options, you can enable and disable any of the curves from
being visible in the display. Disabling a curve from the display will NOT deactivate the
curve. Only the metering will be hidden.
INPUT GAIN AND METER
The Input gain fader and meter manage the input signal to the ASSIMILATOR.
The clip indicators at the top of the meters should never be active. Remember:
POWERCORE is a fixed processing system and it is not possible to drive the signal
above 0dB without distorting the signal. If the clip indicators are active, reduce the
Input gain fader until no clips are indicated on the input clip LEDs.
LOW FREQUENCY RESOLUTION
The Resolution Sizes of the FFT:
ENGLISH
Low
Med
High
10
2048 Points
4096 Points
8192 Points
By default, the Resolution of ASSIMILATOR’s FFT is “Med”. In most cases, this is all
that is needed for processing. The “High” resolution is recommended for situations
where you must ensure accurate analysis of the bass frequencies, especially in a full
mix. The “Low” setting is only advised for use with an individual track, rather than a
full mix. As an example, the “Low” setting is sufficient for matching vocals from one
recording session to another.
OUTPUT GAIN AND METER
This is a standard gain fader and meter – measured in dB – that indicates the output
gain stage of the Plug-In. The clip indicators at the top of the meters should never
be active. Remember: POWERCORE is a fixed processing system and serious clipping
/ ASSIMILATOR
can occur if the output signal is above 0dB. If the clip indicators are active, reduce
the Output gain fader setting or adjust the Gain Calibration (described later in this
manual) until no clips are indicated on the Output clip LEDs.
APPLY
This fader will apply the reference analysis curve – indicated by the blue curve – to the
target audio. When Apply is set to 0%, the “apply curve” – indicated by the red curve
– will be flat. As the Apply fader is increased, the red curve will change to indicate
the EQ interpolated between the target and reference curves. At 100%, there will be a
100% interpolation of the EQ.
CALIBRATION
The calibration tool allows you to adjust the gain of the applied EQ curve so that you
can evenly match levels with and without processing. With this function, you can
bypass the Plug-In and compare the signal at exactly the same levels, allowing you to
best monitor the equalization.
LIMITER ENABLE AND ACTIVITY INDICATOR
The Limiter will ensure that the output of the Plug-In never exceeds 0dB.
When the Limiter is engaged, it will have an orange color.
When the Limiter flashes Red, this indicates that the Limiter is active.
REFERENCE CURVE
As described in the “ASSIMILATOR BASICS” Section of this manual, the “reference
curve” is the desired curve, or the audio you want to sound like. The “reference” could
be another track, another recording session, or even a song from a CD that you would
like your audio to sound like.
LEARN
The “Learn” function is how you can sample (or grab) the spectral curve of
any audio file or source. Simply engage the “Learn” button and begin playback. When
you are finished – for example, when the song has completed playback – disengage the
“Learn” button and the curve will become active.
The “File” Dialog is where you can save or load your curves. For details about
managing analysis curve files, please refer to the “PRESET MANAGEMENT” section of
this manual.
ASSIMILATOR
ENGLISH
FILE
/ 11
DRAW
It may be desirable to edit the reference curve with one of the draw tools.
PENCIL TOOL
ASSIMILATOR’s “Pencil Tool” allows you to draw a reference curve on the
display. Say, for example, you wish to use a reference curve that has a very good
bass spectrum, but when you apply the reference curve to your target, the high
frequencies are not boosted enough. If this is the case, you can keep the bass
frequencies in tact and draw a boost in the high frequencies with the Pencil.
MAGNET TOOL
ASSIMILATOR’s “Magnet Tool” allows you to snap a reference curve to a target
curve on the display. Say, for example, you wish to use a reference curve that
has a very good bass spectrum, but you love the high frequency content of your
target. Simply use the “Magnet Tool” to snap the reference curve to your target
curve in the area where you do not want processing applied.
RANGE TOOL
ASSIMILATOR’s “Range Tool” allows you to group a range of points on the
spectrum and move them up or down in unison. Say, for example, you like the
bass frequencies of your reference curve, but you find that when you apply the
EQ curve to your target, there is just a little too much boost in the bass. Simply
use the “Range Tool” to group the bass frequencies and gently pull them down
with your mouse until they sound correct.
TARGET CURVE
As described in the “ASSIMILATOR BASICS” section of this manual, the “target
curve” is the frequency spectrum of your audio or the audio you want to process to
make it sound like the “reference”. The “target” could be an audio track, a mix from
another recording session or even another take recorded earlier that does meet your
expectations.
LEARN
ENGLISH
The “Learn” function is how you can sample (or grab) the spectral curve of
any audio file or source. Simply engage the “Learn” button and begin playback. When
you are finished – for example, when the song has completed playback – disengage
the “Learn” button and the curve will become active.
12
FILE
The “File” Dialog is where you can save or load your curves. For details about
managing curve files, please refer to the “PRESET MANAGEMENT” section of this
manual.
/ ASSIMILATOR
ASSIMILATOR VIEWS
ASSIMILATOR has three views that each have a range of functions.
• The “A” and “B” views allow you to have two complete reference and target settings.
• Morph allows you to Morph between the A and B View settings.
A and B Views
ASSIMILATOR’s “A” and “B” views have an identical user interface, but allow you
to have two complete sets of reference and target curves. These views can be used
to do quick A to B comparisons of different settings. The “A” and “B” views become
interesting with the addition of the “Morph” view.
ASSIMILATOR’s “Morph” function provides unprecedented power. The Morph slider
can be used to transition the processing from A to B or B to A, depending on which
direction you move the fader. This could be used to morph from one equalization curve
in the intro and verse to a completely different equalization curve for the chorus. The
morph function could also be used in film and television post where you smoothly
transform the EQ curve of one environment to another in order to match sound to
picture.
ASSIMILATOR
ENGLISH
MORPH
/ 13
ANALYSIS DISPLAY
On the Morph view, the display will show the frequency analysis of the A analysis
curve, the B analysis curve, and the morphed EQ curve.
The yellow curve indicates the EQ curve view A.
The red curve indicates the morph curve. At zero, the morph curve is set to the
settings from the A view. As you move right with the Morph fader, the applied EQ
curves will morph to the settings from view B.
The purple curve indicates the EQ curve from view B.
The black curve indicates the real time analysis of the signal after processing.
Display Options
By selecting the Display Options, you can enable and disable any of the curves from
being visible in the display. Disabling a curve from the display will NOT deactivate the
curve. Only the metering will be hidden.
Morph Slider
This slider will morph between the settings made in the A and B views of the Plug-In.
For this to be effective, you must “learn” reference and target curves for both the A
and B views.
When the Morph slider is set to A, only the settings in the A section are applied to
the audio, and the red “apply curve” will be identical to yellow A curve.
When the Morph slider is set to B, only the settings in the B section are applied to
the audio, and the red “apply curve” will be identical to purple B curve.
ENGLISH
Curve Calibration
14
These calibration tools allow you to adjust the gain of the curves from the A and
B views. This allows you to adjust the curves so that morphing is possible without
changing the output level. This way, you can be certain that the level is the same
between the A and B curves when morphing is applied.
/ ASSIMILATOR
TUTORIALS
INSTRUMENT MATCHING
In the first example, let’s review how ASSIMILATOR is used as an insert effect for
matching instrument tracks in a multi-track application. Our goal is to create an
acoustic guitar sound that sounds identical to your favorite guitar track. The two guitar
tracks are somewhat similar, i.e. your guitar track – the target – and your ideal guitar
sound – the reference – are both 6 string nylon guitars.
1. Insert ASSIMILATOR into the channel processing your 6 string nylon guitar track.
2. From the Target section of the interface, select “Learn” and begin playback.
3. When the audio track has completed playback, press “Learn” again to disengage
the Learn function.
4. Now, we will be loading one of the default presets that will be used to equalize your
track. From the “File” menu in the Reference section, load the preset curve
“6 String Nylon”.
5. Begin playback of your track and – from the user interface – begin moving the
“Apply” fader to the right until the equalization of the guitar track sounds right.
MASTERING
In this example, let’s review how this Plug-In is used in a mastering application such
as Spark or WaveLab. Our goal is to create a mix that sounds like another mix that was
professionally mastered. The two songs use similar arrangements, i.e. they have more
or less the same type of tracks with a similar overall spectral balance. In this example,
we will use Spark LE as our editor.
1. Grab the audio from the track on the CD that you would like to use as the
reference, or “Master”, audio track. Load this audio into your Spark LE or whatever
audio editor you typically use for mastering and sample editing.
2. From the Reference section, select “Learn” and begin playback.
3. When the CD track has completed playback, press “Learn” again to disengage the
Learn function.
4. Now, we will be using your track. Make sure it is loaded into the file view or audio
pool of mastering editor.
5. Select “Learn” from the Target section to learn the analysis curve for your mix.
6. Begin playback of your track. When your song has finished playing through, press
“Learn” again to disengage the Learn function.
ASSIMILATOR
ENGLISH
If you want to recall this analysis curve at a later time, save the analysis curve
from the File menu of the Reference section.
/ 15
7. Save your analysis curve as “My Song” or whatsoever from the File menu of the
Target section.
8. Now, in the Reference section you have the analysis curve of the “professionally”
mastered song, and the Target section has the analysis curve of your track.
9. Begin playback of your track, and begin moving the “Apply” fader to the right
until the overall equalization sounds good to you.
10. Once you have found an apply setting that you like, you can “bounce” your new
mix to disk as a new audio file.
11. If you want to edit the overall EQ curve, this can be done in the reference curve
using one of the draw tools. Editing the reference curve will adjust the EQ
curve that is applied to the target audio.
MORPHING
You are mastering a rock tune. You want the intro and the verse to have a Lo-Fi
sound – as though it is coming from an AM Radio – but you want the bridge to
transform into a High-Fidelity sound as it approaches the chorus. By the time you
reach the chorus, you want the song to have completely High Fidelity equalization.
With ASSIMILATOR, this is easy to accomplish.
1. Make sure that the “A” view is visible.
2. “Learn” a Low Fidelity audio mix in the Reference section or use one of the
included “Lo-Fi” presets.
3. When the Low Fidelity song has completed playback, press “Learn” again to
disengage the Learn function.
If you want to recall this analysis curve at a later time, save the analysis curve
as “Lo Fi” or whatsoever from the File menu of the Reference section.
4. “Learn” the analysis curve for your mix in the Target section.
5. When your song has completed playback, press “Learn” again to disengage the
Learn function.
6. Save your analysis curve as “My Hit Song” or whatsoever from the File menu of
the Target section.
ENGLISH
7. Now that you have the “Lo Fi” as your reference and your mix as the target, switch
to the “B” view by selecting the “B” View tab.
16
8. In the Reference section of the “B” View, “Learn” a High Fidelity track you would
like your chorus section to sound like.
9. From the File menu in the Target section, load the analysis curve “My Hit Song”.
10. Once you have a complete range of settings in both the “A” and “B” views, switch
to the Morph view by selecting the “Morph” view tab.
/ ASSIMILATOR
11. Set the fader to the far left or to 0% Morphing.
12. Play back the song using an application that can automate Plug-In parameters.
13. During the intro and the verse, leave the Morph fader at 0% to hear the Low
Fidelity portion of your audio.
ENGLISH
14. As the bridge begins playback, start moving the Morph fader from 0% reaching
100% when the chorus of your song begins.
ASSIMILATOR
/ 17
CONTACT DETAILS
If you would like to get in touch with us please e-mail to: [email protected], contact our
local distribution partner or write to:
TC WORKS Soft-& Hardware GmbH
Customer Support
Flughafenstrasse 52B
22335 Hamburg
Germany
www.tcworks.de
e-mail: [email protected]
USA:
TC Electronic Inc.
TC Works Customer Support
742-A Hampshire Rd.
Westlake Village, CA 91361
www.tcworks.de
e-mail: [email protected]
TECHNICAL SUPPORT
ENGLISH
Details on how to obtain technical support can be found in the included Customer
Support Document. For immediate answers on many support questions, visit the
TC SUPPORT INTERACTIVE pages on www.tcworks.de
18
/ ASSIMILATOR