1
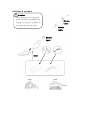
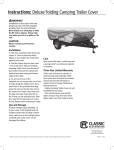
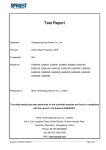
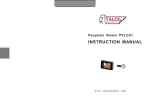
Eco 2 IN 1 STEAM MASTER
User’s Manual
Thank you for purchasing our product, please read this manual carefully before using
this unit. Then, you can use it correctly
Please keep this manual for future reference.
Safety Instructions
Warning: Danger of scalding
●
●
●
The steam cleaner must not be directed onto equipment containing electrical
components, such as inside the oven.
The steam cleaner must be unplugged after use and before the maintenance of
the unit.
If the power cord is damaged, it must be replaced by the manufacturer, its
service agent, or a qualified person in order to avoid hazards.
Warning
●
●
●
●
●
Do not repair or change anything yourself in order to avoid fire and other
accidents.
Do not let children touch this product to avoid shock, scalding and other
accidents.
Do not direct the nozzle towards any person or animal. This will cause serious
scalding.
Do not submerge this unit in water or pour water onto it. This will cause it to
short circuit, or lead to an electric shock or fire.
Do not operate this unit, its cord, or its plug with wet hands as it could lead to an
electric shock.
Attention
●
●
●
●
●
●
Fill the water tank with clean water only. Do not add any other kind of liquid.
Do not pull the power cord forcibly. Hold the plug only and then gently pull it
out of the socket.
If the connection is too loose, stop using this product.
Pull out the plug when the machine is not in use. Otherwise, shock, electric
leakage or fire may arise due to bad insulation.
Do not use it without water in the tank.
Turn off the power when assembling or disassembling the accessories.
Do not use this unit in the following conditions
● The product or any part of the product is damaged.
● The power cord or the socket is damaged.
● There is leakage of steam or water.
In these instances, please shut off the power and pull the power cord out and contact a
mechanic.
Description of all parts
20
4
3
5
6
7
16
19
17
1
14
2
11
13
10
8
9
18
21
15
12
1. Main body
2. Square floor attachment
3. Water tank knob
4. Power indicator light
5. Steam control knob
6. Power switch
7. Handle
8. Non-woven cloth
9. Microfibre cloth
10. Clothes brush
11. Scraper
12. Lemon acid
13. Round nylon brush
14. Round wire brush
15. Brush for floor attachment
16. Angled nozzle
17. Clothes plate
18. Cleaning stick
19. Measuring cup
20. Power cord
21. Wheel attachment
Guideline of Assembly
Attention
Please shut power off and unplug
power cord before assembling and
changing accessories. Assemble all
parts after the unit cools down.
Revolve
tightly
Revolve
tightly
Revolve
tightly
Insert
push
push
Put in
Operating instructions for each of the attachments:
● A. Square Floor Attachment
This is the main attachment for using the unit as a steam mop. As shown on the
previous page, install the handle to the end of the main body and align both arrows.
Then, attach the square floor attachment at the base of the main body. This is securely
attached once the button clicks into place. To remove it, simply press in this button and
pull out the attachment.
The following parts are for use with the Square Floor Attachment:
●
Non-Woven Cloth
The non-woven cloth is for use on carpets. You can hold this in place by lifting the
green clips on the edge of the attachment and placing the cloth under these clips.
Note: This cloth is hand washable only.
•
Microfibre Cloth
The microfibre cloth can be used on hard floors. This cloth has an elasticized edge so it
fits securely on the square floor attachment. Once these clips are released, they will
hold the cloth in place. Note: This cloth is machine washable.
•
Wheel Attachment
After installing the non-woven cloth, install the wheel attachment on to the front edge
of the square attachment so that the mop can glide on carpets easily.
●
Brush for Square Floor Attachment
The bush can be used to get into narrow areas such as stairs and in corners.
The non-woven cloth or microfibre cloth cannot be installed together with the brush on
the base of the square floor attachment.
====================================================
● B. Angled Nozzle
Pic1
Pic2
The angled nozzle (see Pic1) and round brushes (see Pic2)
are for use when the unit is used as a handheld steamer. For
this, you just need the main body.
To use, simply attach the angled nozzle to the main body and then attach either the
round nylon or the wire brushes (see Pic3) onto the end. The angled nozzle is great for
use around window frames, door frames, toilet rims and other spots that cannot be
reached easily.
Pic3
z
Wire Brush is for coarse or metal surfaces such as
brick floor, car wheel, metal door, metal frame, etc.
z
Nylon Brush is for smooth hard surfaces such as
toilet, sink, kitchen counter etc.
The two brushes can also effectively clean the grease on pans, stoves and ovens in the
kitchen. They can be used with soap or detergent to clean very dirty areas.
====================================================
● C. Square attachment
The square attachment (see Pic4) is installed onto the main body by aligning
the ridge in the attachment with the slot on the end of the main body and
pushing it into place.( see Pic5. Pic6. Pic7)
You can also attach the handles onto the main body to allow you to reach higher or
deeper places.
Pic5
Pic6
Pic7
This attachment is for use with the following parts:
● Clothes Brush
The clothes brush (see Pic8) can be used to steam clothes, upholstery, sofa, etc.
To attach to the square attachment:
With the square attachment facing downwards and the bristles of the clothes
brush facing upwards, slot the top of the clothes brush attachment into the
Pic8
ridges at the end of the square attachment. Then, press down on the tab so the bottom
part clicks into place. (see Pic9. Pic10.Pic11)
● Scraper
Pic9
Pic10
Pic11
● Scraper
The scraper (see Pic12) can be used to clean smooth surfaces such as glass,
mirror, marble, etc.
To attach to the square attachment:
Pic12
Pic4
With the square attachment facing downwards and the blade from the scraper facing
upwards, slot the top of the scraper attachment into the ridges at the end of the square
attachment. Then, press down on the tab so the bottom part clicks into place. (see Pic13.
Pic14.Pic15)
Pic13
Pic14
Pic15
Operating instructions
To add water to the unit:
Unscrew the tank knob and use the measuring cup to
add clean water to the tank (see Pic16). Please ensure
that the tank is refilled when there is little water
remaining so that the steam function is not affected. Do
not add any detergent or aroma oil in order to avoid
Pic16
blocking the steam nozzle.
Attention: You can push the cleaning stick (part 15) through the nozzle hole to clean
the unit.
Once the unit has been assembled as either the steam mop or handheld unit, plug the
power cord into the socket and press the power switch on. The power indicator will then
light up. After 30 seconds of pre-heating, steam will start to emit from the unit and the
product is ready to operate.
You can adjust the steam level according to different requirements:
1) Low and medium
Ideal for cleaning carpets and rugs. (short pile)
For best result, use the non-woven cloth.
2) High
Ideal for cleaning all hard floors such as tiles, linoleum, marble.
For best results, use the microfibre cloth.
3) Hot Spray
Ideal for cleaning bathrooms, kitchen worktops, ovens. (window sills, car wheels,
patios etc.)
For best result, use this setting for the handheld unit.
Attention
z The floor will be quite wet after use as the steam turns into water.
z Do not spray steam directly onto glass and other fragile surfaces
when these surfaces are cold. Use the low steam level from a
distance first to let the surface preheat. Otherwise, it may damage
the surface due to the rapid temperature increase.
Care and Storage
1) Before cleaning this unit or changing accessories, press the power switch off and
unplug the power cord.
2) Drain the remaining water in the tank and clean it after every use. (Please wash the
tank before draining the remaining water so that furring and other dirt in the tank
can be cleaned.)
3) If there is much furring and other dirt in the tank, add lemon acid into the main body
(the water tank) when there is still water in the tank. And then just use the machine
as usual. The water with lemon acid will clean the inner wall. The lemon acid is
used up in one serving. Please buy lemon acid for future cleaning.
4) Please use detergent to clean the accessories (nozzle, round brush, etc.) when they
are dirty. Then, wash them with clean water and dry them in air to avoid
deformation.
5) Please store it in a cool and dry place when not in use. Do not leave it exposed to
sunlight or rain.
6) Do not use detergent such as benzene or thinners to clean it.
Specification
Voltage…………………………………………………………...230V/50HZ
Output Power…………………………………………………….1300W
Steam Capacity…………………………………………………...MIN 28mL/minMAX
45mL/min
Water Tank Capacity………………………………………………450mL
Continual Use Time …………………………………………………..8 ±3 mins.~16±4mins.