1
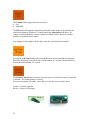
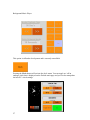
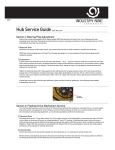
Professional Jukebox Software
Exclusively distributed by
Contents
Security devices
The “Load” program
Music encryption
Splash screen
Main screen
Button Mode
Selecting a track
Selecting a track (cont)
Decrypting a track
Finding a track
Finding a track (cont)
The search keyboard
Accessing administration
Administration
Program update
Music update
User interface
ProJuke controller comms
Video Options
Secondary Screen
Music management
Music management (cont)
Password manipulation
Clearing the playlist
On screen volume control
On screen pause / resume
Coin-op or Freeplay
ProJuke Desktop
Audio output options
Displaying advertising
ProJuke license control
Background music player
Clock
Coin setup
Removing tracks & entry’s
Disclaimer
2
Page 3
Page 4
Page 5
Page 6
Page 7
Page 8
Page 9
Page 10
Page 11
Page 12
Page 13
Page 14
Page 15
Page 16
Page 16
Page 17
Page 17
Page 18
Page 19
Page 20
Page 20
Page 21
Page 21
Page 22
Page 23
Page 24
Page 24
Page 25
Page 26
Page 26
Page 26
Page 27
Page 27
Page 28
Page 29
Page 30
ProJuke is an encrypted media playing platform designed for Jukebox operators.
It employs encryption algorithms that enable it to encode / decode media files.
There are two basic types of security devices are available for use with ProJuke,
1. Rockey
2. ProJuke Controllers
ProJuke requires that either of these two devices be fitted to allow the software to become
fully functional, if no device is present, ProJuke will default to “Demonstration Mode”.
The Rockey is a USB device that requires no external drivers to be loaded. It operates as
a Key to enable ProJuke to operate.
The ProJuke Controllers are available in various configurations and unless you purchase
a pre-configured computer, you will need to install the driver pack. There are currently 2
versions of the controllers available with Ver 5.08 due later in 2012
•
•
•
Ver 5.07 Basic
Ver 5.07 Extended
Ver 5.08
The “Ver 5.07 Basic” level controller operates in the same way as a Rockey, that is, it
only functions as a key to allow ProJuke to be enabled
The “5.07 Extended & 5.08 Controllers” incorporate an operator interface for Coin / Note
validator inputs, Function / Control buttons, Audio / Video switching etc.
For further information on the specifications of the Controllers, please visit the ProJuke
website www.ProJuke.com and download the manuals.
Rockey
ProJuke Controller V5.07
The security device should be inserted prior to switching the host PC on. Failure to do so
may result in ProJuke switching to “Demonstration Mode” due to hardware detection and
failure to load device drivers in adequate time.
3
Starting ProJuke
After the Host PC has started, Windows should be directed to start the Load program as
shown in the diagram below.
The Load program resides in the “Jukesoft” folder of your “D:\” drive
The Load program has several built-in features, which will prepare ProJuke for proper
operation, these include
•
•
•
•
•
Delayed Starting to allow some older PC’s to finish loading Device Drivers
Detection of the ProJuke Security device (Rockey or Control board)
Automatic detection & setup of communication parameters (where required)
Determination of whether the correct security device is fitted (Controllers only)
Indication of the controller board’s unique identification
The Load program will write critical settings to ProJuke, the start ProJuke and then exit.
4
ProJuke will make an enquiry with the Rockey / ProJuke controller and determine if the
internal media encryption switch has been set.
If the switch has been set then ProJuke will continue to load, Should the switch not be set
then ProJuke will close and the encryption Manager program will start. Your media will
be uniquely encrypted to the Rockey or ProJuke controller’s internal code.
Once the encryption Manager has completed, it will set the encryption switch and reload
ProJuke.
DO NOT SWAP YOUR SECURITY DEVICES between machines as ProJuke will not
be able to decode the music, further to this, if a security device with the encryption switch
that is not set is presented, you could Double Encrypt and irreversibly corrupt your
music.
The diagram below shows the encryption Manager screen.
All unencrypted music must be located in the “Music” folder of the “D:\” drive.
5
Once the encryption has been successfully completed, encryption Manager will close
and ProJuke will restart.
ProJuke always starts with a splash screen. This screen is displayed while operational
parameters are retrieved and will only last a few seconds.
Product parameters are displayed upon retrieval
The Splash screen shows the ProJuke Build number of the software. Check for updates of
your software by downloading the latest copy from www.ProJuke.com
The Build number is the ProJuke version. Build 1110 A = 2011 (Oct)10 Revision A
6
Once the splash screen has completed loading settings & variables, the main ProJuke
screen will load. Below is a typical example of a main screen in coin operation mode.
The screen is divided into 4 main areas.
•
•
•
•
Video / Adds Display window
Message pane, showing Price Per Play in coin mode or Coming tracks in freeplay
Selection Categories, These can be toggled on/off through the Administration menu
Task Bar, shows optional settings. (volume control, expanded categories, credits &
clear playlist)
Some options are available dependant on what mode the software is operating in.
(freeplay / coin mode)
7
ProJuke can operate via touchscreen and/or button operation.
If operating in “Button” mode, 6 navigation switches will be required for basic operation.
•
•
•
•
•
•
Page Back
Back
Select
Cancel
Forward
Page Forward
The above picture shows the 6 button controls connected to an older style encoder board
8
Pressing the FWD button, you will see the graphic will move down slightly to indicate
which genre is selected.
Once a category is chosen, press the select button to enter the category.
9
The Selection screen will now open. There are 15 songs per screen that are available.
You can use the Page Fwd / Page Back buttons to navigate page by page and/or the
Fwd / Back buttons to navigate 1 item at a time.
When the page first opens the Select button can be used to enable the search utility, but
more on that later in the manual.
If you press the Fwd button the graphic will again move indicating your selection.
Once you navigate to your desired selection, press the Select button and a confirmation
message will appear in the task bar. (Should you be in “Coin” mode and you have
insufficient credit, a message indicating your dilemma will appear prompting you to
insert more coins.)
Pressing Select again will commit your song to the playlist.
10
Once a track is selected, it will be decoded. This process takes place immediately if there
is no track currently playing. The process can take a few seconds depending on whether
the track is Video or Audio. The host computers processor speed, available ram and hard
disk drive access rate also play a role in time taken to decode the track.
If a track is currently playing, then the next track will be decoded whilst the first is
playing. When decoding takes place, a message is placed in the task bar advising the user.
When the track retrieval message appears in the taskbar, The only user inputs that
ProJuke will acknowledge are;
•
•
11
Volume Adjustment
Coin Inputs
Alternatively, selecting a track can be achieved using the Search utility, as previously
mentioned. When navigating to a selection page by buttons, upon the page first opening,
the Select button may be used to access the Search feature.
For operators using touchscreens, these buttons will be yellow.
Pressing the Fwd or Back buttons at this point will disable the search feature in button
mode and enable the user interface to be operated for track selections. At this point the
task bar will change the colours of the task bar menu items.
12
Selecting Search will change the taskbar options to search by “Artist” or “Song”
Pressing either the green “Select” button or the red “Cancel” button at this point will
open the Search utility.
For operators using touchscreens, these buttons will be yellow.
13
The Search screen will now open.
Pressing on the Fwd or Back buttons at this point will advance you through the keyboard.
The button will appear to depress and the button text will change to green to indicate your
position.
Type your Artist / Song name in part or full and navigate to the search button.
The Search utility will close and the resulting matches (provided you have the
appropriate tracks) will be displayed in a selection screen for you to choose the track.
14
The administration area of ProJuke is accessible by any of the following 3 methods
however in all cases ProJuke must be running and on the Main screen.
•
•
•
Pressing the yellow button twice on the ProJuke controller board
Entering the access code by touchscreen using hidden buttons
Plugging in a keyboard and pressing the “/” key twice
Default pass code = 3280
15
The administration screen consists of a series of switches that are used to manipulate and
customise your jukebox. As the program evolves, options may be added/removed from
the interface.
The following pages describe the functionality of the administration switches.
The Program Update button, this is used to update the main ProJuke program from
media inserted in the “E:\” drive of your computer
16
The Music Update button launches the Update program. As updates are received from
Visual Sounds, Place them in your “E:\” drive and press this button. Providing there are
matching licenses on the update disk, the music will be copied and encoded. If the license
does not match a message will appear, informing you of your dilemma.
Should you not be able to update your music, contact Visual Sounds for further
assistance.
The Interface switch is the user interface. There are 2 choices and pressing the button
will toggle between them. “Interface button” & “Interface touch”
This is where you set the interface for button mode or touchscreen mode.
If you are using a touchscreen, you will need to have previously loaded your touchscreen
drivers, calibrated and setup your touchscreen.
Refer to the installation manual for your touchscreen for further information on this
process.
17
The Comm button is used exclusively for communicating with the ProJuke controllers.
The newer version of the load program automatically sets the correct value however older
versions of the load program do not. (Check the website for updates.)
Pressing this button will change the communication port that ProJuke is using to
communicate with the controller.
The green LED lamp on the controller will be lit when communications are established.
This button is unavailable if the “License” button is set as “Rockey”
18
Pressing the Video Options button will open a small options page where the following
features are available.
•
•
Fullscreen Video
Video Options
Fullscreen Video will allow the film clip of your music video to be displayed on the main
Jukebox screen. This option is useful for party hire operators using Karaoke where they
have no secondary screen to display the lyrics.
Fullscreen video will engage after a short delay has elapsed from the main ProJuke screen
being shown.
The Video switch array allows the operator to manipulate when video clips will be
shown. The green indicator shows the current setting.
Video Always Off
Video Always On
Video Off – BGM
No Video
Video always shown (if media is a music video clip)
Video shown with the exception of background music in play
After making any alterations, press the “Save” button
19
The Screen 2 button is used for setting the output resolution that ProJuke sends to a
secondary monitor. There are 2 settings available,
• 1024 x 768
used for plasma / LCD TV’s using the VGA connector
• 800 x 600
used for standard TV’s using a composite video input
To make use of this feature your host PC needs to have a suitable dual head enabled,
video card fitted. Please refer to your computer manual or supplier for further information
on the fitting, supply & setup of the video card.
Pressing the Manage Music button will open the following options page
20
•
•
•
•
•
•
•
•
Delete Queued Songs
Increase Hits Detention
Deletes all songs from the playlist
Increases the number of days that New releases are held in
the “NEW RELEASES” category.
Decrease Hits Detention Decreases the number of days that New releases are held in
the “NEW RELEASES” category.
Standard Categories
Toggles between Standard and Expanded. Use this feature
if you wish to add further music categories to your system.
Remove Music
Loads the Music Delete program (more details on pg. 29)
Queue Limit
Sets a limit to the amount to the amount of songs that can
be added to the playlist
Songs Sorted by Song
Toggles between Artist & Song. This sorts the category
databases by song or by artist. This will occur only when
the next music update is performed on the system.
Category Switches
Each switch toggles the connected category On / Off
The Change Password button will open a decimal keyboard where you can change the
password used to access the “Administration” menu. It is highly recommended that you
change this password if you are using a touchscreen to prevent unauthorised access to
the administration area.
The default password is 3280
21
The Playlist Clear button is active only when the system is in freeplay mode. It toggles
between Enabled / Disabled and places an icon on the bottom right hand corner of the
main ProJuke page which allows users to clear the playlist. This is useful where someone
selects a range of songs to be played at an event which maybe inappropriate for the event.
It does not cancel the song in play.
The clear playlist icon can be accessed by pressing the “Cancel” button or by touching
the icon if using a touchscreen. A confirmation message will appear in the taskbar on the
main screen before the playlist is cleared.
Taskbar showing the confirm message to clear the playlist.
22
The Screen Vol. button toggles the on-screen volume control off and on. Pressing on the
Volume icon in the lower Left corner of the ProJuke main screen will open the volume
adjustment page.
If the screen vol. button is set to disabled the icon does not appear on the main page.
23
The Screen Pause button attaches to the bottom of the on-screen volume control a set of
buttons that allow the user to pause / resume play.
This feature is ideal for functions where speeches are to be made.
The Freeplay button toggles ProJuke between freeplay and Coin operation modes.
24
Pressing the ProJuke Desktop button will open a small options page where the
following features are available.
•
•
•
Colour customisation of the Song & Artist text in selection screens
Changes to the font size in the selection screens. (green indicator marks selection)
Background image selection
There are 21 different backgrounds that you can choose from.
25
The Volume button toggles between two modes.
• Full
• Adjustable
The Full mode will output the maximum permissible audio output (as governed by the
sound card settings in Windows ™ control panel) and Adjustable mode allows for
volume control manipulation via the touchscreen volume control, ProJuke controller
interface or optional remote control.
Any changes to this settings will take place once the system has been restarted.
Pressing the Add Time button will increment the value of time that adds are displayed.
Each time the button is pressed the time will increment by 5 seconds. Maximum time is
60 seconds and minimum is 5 seconds.
The License Control button is used to select the type of security device that is connected
to ProJuke. The default setting is “Rockey”
For correct operation of ProJuke, ensure this is set for the correct security device.
Control = ProJuke controller
Rockey = Rockey USB dongle
26
Background Music Player
This option is still under development and is currently unavailable
Pressing the Clock button will activate the clock menu. You can toggle on / off an
analogue clock that is displayed on the ProJuke main page and you can also manipulate
the host PC’s clock settings
27
ProJuke caters for both coin operation and freeplay systems
When coins are inserted, their value is accumulated into a non-resettable counter which
totalities the monetary return in Dollar values.
For convenience, site operators have a second counter they can use for monthly collection
audits etc. This is reset to 0 by pressing Reset Counter Two button
The Coin Setup button opens a monetary adjustment screen where site operators can
fine-tune the price / play and pricing messages.
28
Deleting a track from your system is possible using the Delete program. Access to this
program is gained via pressing the Manage Music button in the administration menu
then pressing the Remove Music button. (see page 15 for details on accessing the
administration menu)
Press on the button Searching for Artist button to toggle between searching for an
Artist or Song
Type the desired information in the data window and press Search
The results will be displayed in the top message display and you can use the arrow keys
to navigate to the desired track that you wish to remove.
There are 2 options available for removing music, Delete Listing Only which removes
the entry from the ProJuke system database & Delete Listing & Media which removes
the track entirely from the system including the entry in the ProJuke system database.
Pressing the Exit button will return you to the ProJuke main program.
29
LIMIT OF LIABILITY / DISCLAIMER OF WARRANTY:
The following is without prejudice to any rights you may have at law, which cannot be
legally excluded or restricted.
You have relied upon your own skill and judgement in the installation of the ProJuke
software package. It is your responsibility that you have complied with all relevant laws
regarding the safe, proper and legal installation of this product.
While the manufacturer, publisher and author have used their best efforts in preparing
this manual, they make no representations or warranties with respect to the accuracy or
completeness of the contents of this manual and specifically disclaim any implied
warranties of merchantability or fitness for a particular purpose.
No Warranty may be created or extended by sales representatives or written sales
materials. The written advice contained herein may not be suitable for your situation.
You should consult with a professional where appropriate.
Neither the publisher, manufacturer nor author shall be liable for any loss of profit or any
other commercial damages, including but not limited to special, incidental, consequential,
or other damages.
30