1
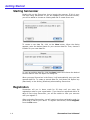
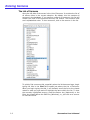
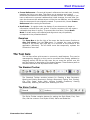
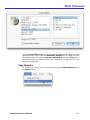
Sermonizer
User’s Manual
©2003
DataDomain™
1009 Elgin Avenue
Forest Park, Illinois 60130
www.datadomainsoftware.com
Permission is granted to print copies of this manual for personal use.
It may not be sold under any circumstances except by DataDomain™.
Table of Contents
Chapter 1 - Getting Started................................................................................ 1-1
Introduction................................................................................................1-1
About this Manual........................................................................................1-1
Installation................................................................................................. 1-3
Starting Sermonizer.....................................................................................1-4
Registration................................................................................................ 1-4
Getting Help............................................................................................... 1-5
Chapter 2 - Entering Sermons.............................................................................2-1
Overview....................................................................................................2-1
The List of Sermons.......................................................................... .2-2
Working with Sermons................................................................................ .2-3
Entering Information About a Sermon...................................................2-5
Entering the Text of a Sermon
Chapter 3 - Using the Word Processor................................................................ 3-1
Layout of Word Processor Area...................................................................... 3-2
The Menu Bar.................................................................................. 3-2
The Tool Bars...................................................................................3-8
The Ruler........................................................................................ 3-9
Preferences................................................................................................ 3-9
Using Dynamic References.......................................................................... 3-10
Data Fields.....................................................................................3-11
Date and Time................................................................................3-14
Page Numbers................................................................................3-14
Showing References or Values.......................................................... 3-15
Freezing References........................................................................ 3-16
Computing References.....................................................................3-17
Pictures.................................................................................................... 3-17
Chapter 4 - Finding Sermons.............................................................................. 4-1
Overview....................................................................................................4-1
Quick Find................................................................................................. .4-1
Advanced Searches......................................................................................4-1
Chapter 5 - Choice Lists......................................................................................5-1
Overview....................................................................................................5-1
Modifying a Choice List....................................................................... 5-1
Getting Started
Chapter 1 - Getting Started
Introduction
Sermonizer is any easy-to-use yet powerful tool for filing and categorizing
sermons, speeches or other writings. It combines a full-featured word
processor with a powerful database that allows you to keep all of your
sermons in one place and instantly find any sermon based on the text, title,
series, scripture reference, topics, or date and locations preached. You can
also easily save and open documents outside of Sermonizer in Text,
Microsoft Word, RTF, and HTML formats.
Minimum System Requirements
Macintosh
• System 9.2 or later; or, OS 10.2 or later
• 20 MB available RAM
• 100 MB available disk space
Windows
• Windows 98 or later
• 20 MB available RAM
• 100 MB available disk space
About this Manual
If you are viewing this manual through a web browser, text colored blue
and underlined are hyperlinks. Click these links to take you directly to the
section in the manual that discusses the topic in detail. The screen shots are
from the Macintosh version so, if you are using Windows, the screens will
look a little different. The differences are very minor and affect only the look
of menus, buttons and hierarchical lists since Sermonizer automatically
adapts itself to the look of the platform you are working on. As an example,
here is the way the Activities screen looks on Windows 2000 and on
Macintosh OS X:
Sermonizer User’s Manual
1-1
Getting Started
Windows 2000
1-2
Sermonizer User’s Manual
Getting Started
Macintosh OS X
Installation
Windows
Double click the Sermonizer_Install.iss installer program and follow the onscreen instructions. By default, the installation directory will be c:\program
files\Sermonizer\.
Macintosh
Sermonizer comes as a Stuffit archive (if you don’t already have it, you can
get it for free at http://www.aladdinsys.com). Double-click the archive to
expand it. Then, just drag the Sermonizer folder into your Applications
folder.
Sermonizer User’s Manual
1-3
Getting Started
Starting Sermonizer
Double click on the Sermonizer icon to launch the program. If this is your
first time using Sermonizer or you are updating from a previous version,
you will be asked to choose an existing data file or create a new one.
To create a new data file, click on the New button. When the dialog
appears, enter the desired name for your sermon data file. Then, choose a
location for your new data file.
To open an existing data file, click the Open button and choose the desired
sermon data file from the Open File dialog box.
When you open Sermonizer in the future, it will automatically open your last
opened data file. To create a second data file, hold down the Option key
(Macintosh) or the Alt key (Windows) when starting Sermonizer.
Registration
Sermonizer will run in demo mode for 30 days until you enter the
registration code for your organization. If you have not registered within 30
days of first trying Sermonizer, you will be unable to view your sermons
until you register it.
After purchasing Sermonizer, you will receive a unique registration code by
email that is tied to your name. To register Sermonizer, choose Register
from the File menu.
1-4
Sermonizer User’s Manual
Getting Started
Enter your name exactly the same as when you purchased Sermonizer.
Open your registration email, select the entire registration key (including
the BEGIN and END portions) and select Copy from your email program’s
Edit menu. Switch to Sermonizer and Paste the registration key from
Sermonizer’s Edit menu. Click the Register button to complete the
registration.
If your registration is not accepted, verify the spelling, including
capitalization, of your organization’s name. It must match the spelling that
you gave when you purchased Sermonizer. (It will also be contained in your
registration email)
Getting Help
You can access this user manual from within Sermonizer from the Help
menu or by pressing the Help key. When you access Help, the manual is
displayed in your default web browser.
Free technical support is available by email at:
[email protected]
In addition, answers to frequently asked questions (FAQ’s) can be found on
DataDomain’s web site at:
www.datadomainsoftware.com
Sermonizer User’s Manual
1-5
Getting Started
1-6
Sermonizer User’s Manual
Entering Sermons
Chapter 1 - Entering Sermons
Overview
Sermonizer uses a unified screen that allows you to easily scroll through
your sermon titles and view the sermons themselves by clicking on a title.
The entry portion of the screen has two tabs, Info and Sermon Text. The
Info tab is where you enter information about the sermon (Title, Series,
Scripture Reference, Dates and Locations, and Topics); the Sermon Tab is
where you enter the text of the sermon itself.
Sermonizer User’s Manual
2-1
Entering Sermons
The List of Sermons
Along the left side of the screen is the List of Sermons. It contains the list of
all sermon titles in the current selection. By default, this list contains all
sermons in the database. If you perform a search for sermons, this list will
contain the titles of the sermons found by the search. The sermons titles
are in alphabetical order. To view a sermon, click on the sermon in the list.
To quickly find a sermon title, especially when the list becomes large, begin
typing the title in the Find field located just above the List of Sermons.
When you begin typing the title, it will instantly scroll the list to the closest
match to what you type and will highlight the name within the list. To view
the currently highlighted sermon, press the Return key (Macintosh) or the
Enter key located above the Shift key (Windows); or, just click on a sermon
to view the record.
2-2
Sermonizer User’s Manual
Entering Sermons
Working with Sermons
To enter a new sermon, click the New button at the bottom of the screen.
You can then fill in the information about the sermon on the Info tab and
enter the sermon text on the Sermon Text tab. To save the sermon, click
the Save button. To throw our your changes and revert to the last saved
version, click the Revert button. To delete a sermon, click the Delete
button.
Entering Information about a Sermon
To enter information about a sermon, go to the desired sermon by clicking
on it in the List of Sermons or create a new sermon by clicking on the New
button. On the Info tab are the following fields:
• Title - The title of the sermon (up to 80 characters). Each sermon must
have a unique title.
• Series - If the sermon is part of a series, enter the name of the series here.
The series field has a choice list associated with it. As you start typing the
series, Sermonizer will look in the choice list for a match and fill in the rest
of the series name as you type. You can view and modify the choice list by
clicking on the blue arrow button to the right of the field or by typing the
down arrow key while the cursor is in the field. For more information
about using choice lists, see Chapter 5.
• Scripture - Type in the complete scripture reference(s) in standard
notation. You can add several references and can use ranges. If you enter a
range, you can still search for the sermon based on verses within the range.
You can use the full names of books of the Bible or standard abbreviations.
For example,
Eph 2:8,9; John 3:16; Rom 3:28; 6:23
Sermonizer will validate the scripture references when you save the
sermon. Do not use periods for abbreviations. The reference must validate
before you can save the sermon.
• Dates and Locations - You can enter the dates and locations where the
sermon was preached by clicking on the
button next to the list of dates
and locations. You can enter as many dates and locations as desired. The
following window will appear:
Sermonizer User’s Manual
2-3
Entering Sermons
Enter the date and location where the sermon was preached. Dates entered
with a 2-digit year will be in the 21st century. For other centuries, enter all
four digits of the year, e.g., 1993.
The location has a choice list associated with it. As you start typing the
location, Sermonizer will look in the choice list for a match and fill in the
rest of the series name as you type. You can view and modify the choice list
by clicking on the blue arrow button to the right of the field or by typing the
down arrow key while the cursor is in the field. For more information
about using choice lists, see Chapter 5.
• Topics - You can associate any number of topics with a sermon. To add
topics, click the
button next to the topic area. This will display the
choice list of topics. Drag all of the desired topics from the list into the
Topics area on the sermon window. You can set up the topics choice list
hierarchically so that you can easily organize them. For more information
about using choice lists, see Chapter 5.
2-4
Sermonizer User’s Manual
Entering Sermons
Entering the Text of a Sermon
To enter the sermon text, click on the Sermon Text tab. This tab contains
the integrated word processor where you can add the full text of the sermon
complete with paragraph formatting, fonts, styles, headers and footers. You
can also embed dynamic links to the sermon information you entered on the
Info tab. You can create a template that contains your preferred fonts,
styles, formatting, etc. The template will be used by default when you
create new sermons. You can resize the window and shrink the width of the
List of Sermons by dragging the divider to see more of your text. To print
your sermon, choose Print from the word processor’s File menu. For more
information about how to use the word processor, see Chapter 3.
Sermonizer User’s Manual
2-5
Entering Sermons
2-6
Sermonizer User’s Manual
Word Processor
Chapter 3 - Using the Word Processor
Layout of Word Processor Area
The word processor is embedded in various windows, e.g., Contacts, Notes
and Activity Meetings. It has its own menu bar and tool bars separate from
the main menu bar at the top of the screen.
Menu bar
Sermonizer User’s Manual
Rulers
Text Area
Tool bars
3-1
Word Processor
The Menu Bar
File
• New - Displays a new empty document in the text area.
• Open - Presents the standard Open file dialog box that lets you open a
document saved on disk.
• Save - Saves the sermon. This is the same as clicking the Save button at the
bottom of the window.
• Save as - Displays the standard Save file dialog box for saving a document to
a disk.
• Save as Template Saves the current document as a template. All
formatting and any text in the document are saved. The template is
automatically used for new sermons.
• Preferences - Displays the Document Preferences dialog: This dialog box lets
you to set document preferences, such as ruler units, header and footer
options, binding options, widow and orphan control and the selection of the
spell checker. For more information on how to use this dialog, refer to
“Preferences”.
• Page Setup - Displays the Page Setup dialog of the current printer.
• Print Preview - Displays the print preview window: The Print Preview window
displays the pages of the document as it will be printed. It also allows you to
start or cancel the printing.
• Print - Displays the Print dialog box for the current printer.
• Go to Full Window - This command zooms the window to the screen size (Mac
OS) or to the size of the window of the application (Windows).
Edit
• Undo Action - Reverses the last action taken by the user. If the last action
cannot be undone, the command menu is dimmed and its title becomes
Cannot Undo Action.
• Redo Action - Repeats the last action canceled by the user. If the last action
cannot be repeated, the menu command is dimmed and its title becomes
Cannot Redo Action.
• Cut - Deletes the current selection and places it in the clipboard.
• Copy - Copies the current selection and places it in the clipboard.
• Paste - Inserts a copy of the contents of the clipboard at the location of the
insertion point, or replaces a selection with the contents of the clipboard if
anything is selected. Note If the contents of the clipboard is an image, 4D
3-2
Sermonizer User’s Manual
Word Processor
displays the Paste Picture... dialog box. This dialog box allows you to set where
the picture will be pasted (floating or within the text, for example). For more
information, refer to “Pictures” on Page”.
• Delete - Deletes the current selection.
• Select all - Selects all the elements present in the area being edited
(characters, tables and pictures). Note If Page View mode is selected, and the
cursor is located in either the header or footer area, only the contents of that
area will be selected.
• Find - Displays the Find dialog box: The Find dialog box is used to define
character, style, border or format searches.
• Find Next - Triggers a search based on the last character or format search you
performed.
• Replace - Displays the Replace dialog box: This dialog box allows you to define
searches in the same way the Find dialog box does. It also allows you to define
a character string that will replace that string you searched for. Replacements
are not limited to characters and can be extended to character, paragraph,
border and style formats.
• Replace Next - Triggers a search based on the last character or format search
you performed, followed by a replacement identical to the last replacement
executed.
• Change case - Displays a submenu that allows you to modify the character
case of the current selection.
lower case converts the selected text to lower case.
UPPER CASE converts the selected text to upper case.
Title Case converts the first letter of each word in the selection to
upper case.
tOGGLE CASE converts all upper case letters in the selection to
lower case and vice-versa.
• Show selection - Scrolls the document in order to display either the insertion
point or the current selection. If either is already displayed, this command has
no effect.
• Goto Page - Displays the Goto Page dialog box. Once you have entered a page
number, clicking OK displays the corresponding page.
View
• Normal - Displays the document as an uninterrupted series of paragraphs
without columns, headers or footers. When this mode is selected, a check mark
is displayed next to the Normal menu command. Selecting this option
unchecks the Page menu command.
Sermonizer User’s Manual
3-3
Word Processor
• Page - Displays the document as a succession of separate pages, and displays
text columns. When this mode is selected, a check mark is displayed next to
the Page menu command. Selecting this option unchecks the Normal menu
command.
• Toolbars - Displays a submenu: In this submenu, toolbars whose name is
preceded by a check mark are displayed. Selecting the name of a toolbar, when
there is a check mark next to it, hides the corresponding toolbar. Selecting the
name of a toolbar, when there is no check mark next to it, displays the
corresponding toolbar.
• Rulers - Selecting the Rulers menu command can either hide or display the
rulers. When rulers are displayed, a check mark is displayed next to the Rulers
menu command. Note When the Page mode is selected, both horizontal and
vertical rulers are displayed. When the Normal mode is selected, only the
horizontal ruler is displayed. The Rulers menu command only affects the rulers
that are displayed by the current view mode.
• Header - When in Page mode, selecting the Header menu command displays
the document’s header area. The header area is displayed in a separate area
located at the top of the current page. When the Normal mode is selected this
command is disabled since that mode cannot display the header area.
• Footer - When in Page mode, selecting the Footer menu command displays
the document’s footer area. The footer area is displayed in a separate area
located at the bottom of the current page. When the Normal mode is selected
this command is disabled since that mode cannot display the Footer area.
• References - Displays the values of the references. When a check mark
appears before the References menu command, references are displayed,
otherwise the computed values of references are displayed. Note For more
information about references, refer to “Using Dynamic References”.
• Pictures - When a check mark is displayed next to the Pictures menu
command, 4D Write displays the pictures in your document. When no check
mark is displayed next to the Pictures menu command, frames are displayed
instead of pictures. This make the display faster. Note This menu command
also affect the printing and displaying of pictures. For more information, refer to
“Pictures”.
• Invisible Characters - Toggles the display of invisible characters, e.g.,
carriage returns and spaces.
• Margins - This menu command is only accessible when Page mode is selected.
When Page mode is selected, selecting the Margins menu command displays
or hides the margins of the document. When margins are displayed, a check
mark is displayed next to the Margins menu command.
• Horizontal Scrollbars - Displays or hides the horizontal scrollbar. When the
horizontal scrollbar is displayed, a check mark is displayed next to the
Horizontal Scrollbars menu command.
3-4
Sermonizer User’s Manual
Word Processor
• Vertical Scrollbars - Displays or hide the vertical scrollbar. When the vertical
scrollbar is displayed, a check mark is displayed next to the Vertical
Scrollbars menu command.
• Menu Bar - Displays or hides the menu bar. When the menu bar is displayed, a
check mark is displayed next to the Menu Bar menu command. When the
menu bar is hidden, you can display it again by pressing the following
combinations of keys: Ctrl+Shift+M (Windows) and Command+Shift+M
(Mac OS).
• Status Bar - Displays or hide the horizontal scrollbar. When the horizontal
scrollbar is displayed, a check mark is displayed next to the Status Bar menu
command.
Insert
• Date and Time - Displays the Insert Date dialog box. This dialog box lets you
select the current date, the current time or both as well as their display
formats.
• Page Number - Displays the Insert Page Number dialog box that inserts the
page number or the number of pages at the location of the insertion point.
• Special Character - Displays the Select Special Character dialog box. This
dialog box allows you to pick a specific character by viewing it beforehand.
• Soft Hyphen - Inserts a soft hyphen at the cursor location. A soft hyphen
specifies where a word should be broken if it is at the end of a line.
• Non Breaking Space - Inserts a non breaking space at the insertion point. A
non breaking space act like a regular letter, i.e., it will not be broken on if it is
at the end of a line.
• Column Break - Inserts a column break at the insertion point.
• Page Break - Inserts a page break at the insertion point.
• HTML Expression - Displays the HTML Expression dialog box: This dialog box
allows you to insert all types of HTML expressions (URLs, style tags, photos,
etc.) where the cursor is located. An HTML expression is an instruction for a
web browser that will be rendered if you save your document in HTML format
and view it in a browser.
• Hyperlink - Displays a dialog box that allows you to insert various types of
hypertext links into your sermon. An HTML hyperlink is a reference to a web
page. An Open Document hyperlink opens another word processor document on
disk. The exact path name to the document must be specified. Hyperlinks of
type, Execute 4D method, are not currently supported by Sermonizer.
• 4D Expression - Displays the Insert 4D Expression dialog box that allows you
to select a field from your data or to define a 4D expression. For more
information, see “Using Dynamic References”.
Sermonizer User’s Manual
3-5
Word Processor
Style
The Style menu allows you to set the character style (bold, italic,
superscript, etc.) of the selected text. Or, if no text is selected, the
character style will apply to the characters that you type after it.
Colors
The Colors menu allows you to apply colors to Characters, Character
backgrounds, the Stroke of the Strikethrough effect, the Line that
underlines a piece of text, the Shadow for the Shadowed effect, Paragraph
backgrounds, and Text borders.
Paragraph
The Paragraph menu allows you to define the alignment and line spacing
of the selected paragraphs. You can also copy these settings (Copy Ruler)
from one paragraph and paste them (Paste Ruler) into another paragraph.
Format
The Format menu displays dialogs for controlling all of the formatting of
Characters, Paragraphs, Tabs, Borders, Style Sheets and Columns.
Tools
• Table Wizard - Displays a dialog for setting up tables. Tables are simply
formatted paragraphs, but using the Table Wizard makes setting them up quick
and easy. The Table Wizard consists of three tabs:
Template - this tab is where you set up the overall format of the table:
number of columns and rows, and text formatting.
Columns - this tab allows you to set up alignment and spacing of
columns. You can also automatically fill in fixed values and information
from your data.
Rows - this tab allows you to set up formatting and borders for the rows
of your table. You can also automatically fill in fixed values.
• Spelling - Invokes the spell checker. Sermonizer comes with a demo version of
the GetItRightFor4D spell checker. You can purchase a license for it from the
Automated Solutions Group web site at http://www.asgsoft.com. The word
processor will also work with standard CSAPI spell checkers.
• Language - This should be the same language as set up in the spell checker.
• Document Information - Displays a dialog where you can enter special
information about the document: Title, Subject, Author, Composer and Notes.
• Document Statistics - Displays a dialog that summarizes your document,
e.g., word count, paragraph count, etc.
• Compute References Now - Recalculates all dynamic references to their
current values.
3-6
Sermonizer User’s Manual
Word Processor
• Freeze References - Converts all dynamic references into static text, thereby
breaking the link to your data. This allows you to preserve your letter’s
reference information to the values they currently contain. For example, if you
have a reference to a person’s address and it later changes, the next time you
open the document the address shown will be the new address, not the address
when the document it was originally created. To prevent this, choose Freeze
References before saving the document.
• Draft Mode - In regular mode, the display of your document is based on
information retrieved from your printer. In some computers, this will cause a
noticeable slow down in typing. To prevent this slow down, choose Draft
Mode. In draft mode, some spacing and alignment may not perfectly
correspond to the printed document.
Zoom box
The Zoom Box at the far right of the menu bar has the same function as
Goto Full Menu from the File menu. It expands the word processor
window to the screen size (Mac OS) or to the size of the window of the
application (Windows). The 4D Write menu bar temporarily replaces the
Sermonizer menu bar.
The Tool bars
The tool bars allow quick access to commonly used features. They can be
rearranged by dragging or they can be converted into floating palettes by
dragging entirely off the tool bar area. As you move the pointer over the
tool bar buttons, a description of the button appears. These buttons perform
the same actions as the equivalent menu items.
The Standard Toolbar
The Standard Toolbar contains buttons for Creating a New Document,
Opening an Existing Document, Saving a Document, Finding Text, Printing,
Cut, Copy, Paste, Undo, Redo, Viewing Invisible Characters, Viewing
References, Inserting the Date, and Inserting the Time.
The Styles Toolbar
The Styles Toolbar contains buttons for setting the Style Sheet, Font, Font
Size, and the common Font Styles of Bold, Italics and Underline.
Sermonizer User’s Manual
3-7
Word Processor
The Borders Toolbar
The Borders Toolbar contains buttons for adding paragraph borders.
The Format Toolbar
The Format Toolbar contains buttons for setting the paragraph alignment
and line spacing.
The Ruler
The Ruler is where you set the margins and tab stops.
Left margin marker
Tab selector
First line indent marker
Right margin marker
Tab stop
Preferences
General document preferences are set by choosing Preferences from the
word processor’s File menu. The Preferences dialog has two tabs:
• Document
Unit - Sets the unit of measure for the ruler: inches or centimeters.
Headers and Footers
headers and footers you
rest of the document. If
you can create headers
pages.
- If you check Different on First Page, the
create on the first page will not carry over to the
you check Different on Left and Right Pages,
and footers that are different for odd and even
First Page - You can select whether the first page of your document will be
a left page or a right page.
First Page Number - The page number that will be used for the first page
of the document.
3-8
Sermonizer User’s Manual
Word Processor
Binding - Binding margins are extra space to allow for binding your
document into a book. If you select Opposite Pages, left pages will have
the binding margin on the right and right pages will have the binding margin
on the left.
Default Tab Spacing - This value is applied to paragraphs where tab
markers have not been set.
Widow and Orphan Control - This prevents the first line of a paragraph
from being left at the bottom of a page and the last line of a paragraph from
being left at the top of a page.
Using Dynamic References
Dynamic References are references to information that can change. These
can be Date, Time, Page numbers, or data fields from Sermonizer.
Data Fields
A Data Field is a piece of information from your data. Some examples are,
Salutation, address and birthday. To enter a reference to a data field, select
4D Expression from the Insert menu:
Sermonizer User’s Manual
3-9
Word Processor
The Insert 4D Expression dialog shows a list of data fields that you can
choose from, organized according to the underlying table where the
information is stored. When you select a field, you can also apply
formatting, e.g., for dates.
Date and Time
To insert the date and/or time into your document, select Date and Time
from the Insert menu:
3-10
Sermonizer User’s Manual
Word Processor
From the Insert Date dialog, you can select the date and/or the time in the
desired format. If you check the Automatic Update box, the date and time
will update when you choose Compute References from the Tools menu
or the next time you open the document. Otherwise, the date and time are
inserted as static text.
Page Numbers
To insert page numbers into your document, select Page Numbers from
the Insert menu:
Sermonizer User’s Manual
3-11
Word Processor
From the Insert Page Number dialog, you can insert the current page
number or the total number of pages in your document as well as choose
the format of the page numbers.
Showing References or Values
You can toggle between the display of References or the underlying Values
by choosing References from the View menu:
3-12
Sermonizer User’s Manual
Word Processor
When the check mark appears next to References, the references are
displayed, e.g., <<[Sermon]Title>>. When there is no check mark, the
underlying values are displayed. So, for Salutation, you would see the
person’s actual salutation.
Freezing References
Freezing References removes the dynamic link to the underlying data and
converts the references into static text that you can edit. To freeze all
references in a document, choose Freeze Document from the Tools
menu:
To freeze only certain references, first select the text the contains the
references that you want to freeze. The Freeze Document menu item
becomes Freeze Selection:
Sermonizer User’s Manual
3-13
Word Processor
Computing References
To recompute the references so that the current underlying values are
shown, choose Compute References Now from the Tools menu:
Pictures
To insert a picture, copy it into the clipboard from any application and paste
them into your document using the standard Copy and Paste commands in
the Edit menu. Pictures of type PICT, Bitmap (BMP), and EMF (Windows
only) are supported.
When you paste a picture from the clipboard, you have the choice of placing
it within the flow of text or in the page itself. Upon pasting, the following
dialog appears:
3-14
Sermonizer User’s Manual
Word Processor
• Paste Picture in Text Flow -Places the picture within the flow of text.
• Past Picture in Page - Places the picture directly on the page, outside of
the text flow.
• In Current Page - The picture only appears in the page where the
cursor is at the time of pasting.
• In All Pages - The picture will show on all pages.
• In Right Pages - The picture will show only on right pages. This
requires the “Opposite Pages” option to be set in Preferences (see
Preferences earlier in this chapter).
• In Left Pages - The picture will show only on left pages. This
requires the “Opposite Pages” option to be set in Preferences (see
Preferences earlier in this chapter).
• Not in First Page - The picture will not show on the first page. This
requires the “Different on first page” option to be set in Preferences
(see Preferences earlier in this chapter).
• Behind Text - The picture will be place behind the text.
After the a picture is pasted into the page, you can drag it to a different
location and change it size by dragging the control handles. You can also
Sermonizer User’s Manual
3-15
Word Processor
alter it’s properties at any time by double-clicking it. A dialog appears that
allows you to change it’s size and position, as well as alter the properties
that were chosen when the picture was first pasted.
3-16
Sermonizer User’s Manual
Finding Sermons
Chapter 4 - Finding Sermons
Overview
Once you have entered sermons, you can find specific ones based on any
combination of any of the information about the sermons or any of the text
of the sermons. For example, you can easily find all sermons that contain
the name “Moses” and reference the book of Matthew.
Quick Find
You can quickly find sermons based on any single piece of information using
the Quick Find feature. To perform a Quick Find, click the
button at
the bottom of the window or choose Search from the Selection menu. The
Quick Find window appears:
Choose the type of information to search for from the pop-up menu and
enter the value to search for in the text box. Click the Find button to
perform the search. The List of Sermons will now contain all Sermons that
match your criteria.
Advanced Searches
You find sermons based upon combinations of criteria using the Advanced
Search window. To perform an advanced search, first click on the
button at the bottom of the window or choose Search from the Selection
menu to bring up the Quick Find window. Then, click the Advanced button
on the Quick Find window to display the Advanced Search window:
Sermonizer User’s Manual
4-1
Finding Sermons
In the Advanced Search window, you can enter in multiple criteria at once.
For example, you can enter a scripture reference and a topic and find all
sermons that contain both the reference and the topic.
• Sermon Text - Type in a word or phrase to look for in the text of your
sermons.
• Reference pop-up - This pop-up menu allows you to search on scripture
references. If you choose Any reference, Sermonizer will look for sermons
that match any of the scripture references that you enter into the text box.
If you choose All references, Sermonizer will look for sermons that
match all of the references you enter into the text box (sermons that match
only some or part of the references will not be found). References are
entered using standard notation; and you can enter ranges.
• Date pop-up - This pop-up menu allows you to find sermons based on the
dates they were preached. Date is will match the date you enter; Date is
after will find sermons preached after the date you enter; Date is before
will find sermons preached before the date you enter.
• Location - Search on the Location where the sermon was preached.
• Series - Search on the Series that the sermon is a part of.
• Title - Search on the title of the sermon. You can search on partial words
and phrases anywhere within the title.
4-2
Sermonizer User’s Manual
Finding Sermons
• Topic pop-up - This pop-up menu allows you to search on topics. If you
choose Any topic, Sermonizer will look for sermons that include any of the
topics you choose. If you choose All topics, Sermonizer will look for
sermons that include all of the topics you choose (sermons that include only
some of the topics will not be found). To add topics to search on, click the
button and drag the desired topics into the Topic area on the search
window.
• Find Any Criteria button - Click this button to find sermons that match
any of the criteria you have entered. For example, if you entered
Text: “Moses”
Any Reference: “Matthew 3:5-10”
Sermonizer will find all sermons that have the word “Moses” in the text OR
reference any verse in the range “Matthew 3:5-10”.
• Find All Criteria button - Click this button to find sermons that match all
of the criteria you have entered. For example, if you entered
Text: “Moses”
Any Reference: “Matthew 3:5-10”
Sermonizer will find all sermons that have the word “Moses” in the text AND
reference any verse in the range “Matthew 3:5-10”.
Sermonizer User’s Manual
4-3
Finding Sermons
4-4
Sermonizer User’s Manual
Choice Lists
Chapter 5 - Choice Lists
Overview
The Location, Series and Topics fields use choice lists. Choice Lists help
prevent entry errors and speed up data entry by forcing you to choose
values from a list that you define. To enter a value in one of these fields,
simply begin typing a few letters of the desired value. As you begin to type,
the field will automatically fill in the rest of the value. You may also go
directly into the choice list to select the value from the list itself. If the
cursor is in the field, you may press the down arrow key (on the keyboard)
to get the choice list. Or, press and hold the triangle button (next to the
field) to open the list. If you attempt to tab out of a field without your entry
matching a value from the choice list, Sermonizer will automatically display
the choice list for you. You can then choose the desired value or add a new
one to the list.
Modifying a Choice List
When making modifications, it is important to note that those changes will
be reflected in all records that already use values in the list. For example, if
you change the Topic “Christmas” to “Easter”, all sermons that previously
had the topic “Christmas” will now have the topic “Easter”. So be careful not
to change the meaning of an item in a choice list. A change that does not
change the meaning is OK.
To the right of the choice list is a column of buttons. These allow you to
make modifications to the list.
Sermonizer User’s Manual
5-1
Choice Lists
• Edit - edits the name of an item in the list.
• Add - adds a new item to the bottom of the list.
• Insert item - inserts a new item above the selected item.
• Add Sub-Item - creates an item at a lower hierarchical level than the
selected item.
• Delete item - deletes the selected item. You cannot delete an item that
is in use.
• Sort - sorts the list alphabetically.
• Cancel - leaves the screen and will cancel any changes you may have
made.
• Select - inserts the item into the field you were editing and closes the
choice list window (Location and Series fields).
• Done - closes the choice list window (Topics - topics are added to
sermons by dragging from the choice list to the Topic area on the
sermon.
For example, to add an item to a choice list, click the Add button. Type in
the name of the item and press OK. The new item will appear at the
bottom of your list. You can press the Sort button to move it within the list
alphabetically.
5-2
Sermonizer User’s Manual