1
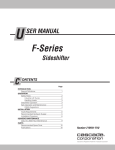
U
SER MANUAL
Order Picker
CAUTION: This is a precise weighing
system, treat with care. Environment
and application will affect the system and
its components. Conditions with mud,
grime, water, corrosive chemicals and
abrasive substances can damage or effect
performance of the iForks.
Manual Number 6182775
Cascade is a Registered Trademark of Cascade Corporation
C
ONTENTS
OVERVIEW
WARNINGS & SAFETY MEASURES
INSTALLATION
USING DISPLAY
Functions
Other Features
Display Messages
USING iFORKS
Prior To Weighing
Handling Loads
To Weigh A Load (Normal Weighing Mode)
Obtaining Net/Tare/Gross Weight
Adding and Totaling A Group of Load Weights
Sampling Weight
Sampling Quantity
AUTO SHUT-OFF
DISPLAY OPTIONS
User Settings
PRINTER EQUIPPED
Print Weight
Print Total Weight
Change Time & Date Printout
PERIODIC MAINTENANCE
i
Page
1
2
3
6
6
7
8
9
9
9
10
11
14
16
17
18
19
19
21
21
21
22
23
6182775
O
VERVIEW
This manual describes the installation and use of the Order Picker iForks. Read this manual thoroughly prior to installation
and operation. Be sure to know and understand all installation processes, operating procedures and safety operations.
Perform installation and operation in the order shown in this manual.
This manual should be kept in a safe and dry place. In case of damage or loss, request a new copy of the manual from
Cascade. Manuals are available at www.cascorp.com under the support tab, "Technical Support Manual" link.
NOTE: For troubleshooting, refer to iForks Service Manual.
Read through
this manual
Review parts
Install Order Picker
iForks system to an
operator compartment.
FK0189.eps
Use system
6182775
Perform Periodic
Maintenance
1
W
ARNINGS & SAFETY MEASURES
When using iForks, carefully read the instructions and
guidelines contained in this manual. Follow the steps
shown to install the iForks system onto the truck. If any of
the instructions are not clear, please contact Cascade.
No riders
IMPORTANT: Field alterations may impair performance
or capability and could result in loss of warranty. Consult
Cascade for any required modifications.
No standing under load
CAUTION: Do not use iForks
display in a moist environment for
an extensive period.
WARNING: Cascade
is not responsible for
any physical harm
done to the operator
due to the presence
of the display in the
truck cabin.
No Stand Zone
WARNING: Do not operate iForks unless
you are a trained and authorized lift truck
driver.
IMPORTANT: Cascade is not responsible for errors that
occur due to incorrect weighing or inaccurate scales. It is
the responsibility of the purchaser to train their employees
and to properly maintain iForks.
No Pressure
Wash/Steam
IMPORTANT: All safety regulations that apply to the truck
remain valid and unchanged. Always follow the operating,
maintenance and repair instructions for the truck.
CAUTION: High humidity and liquid applications will
damage iForks. Conditions with mud, grime, water,
corrosive chemicals and abrasive substances can
damage or effect performance of the iForks. Verify
iForks are pretreated with a coating to help prevent rust
and corrosion.
CAUTION: Environment and application can affect the
iForks and how the system weighs. Verify that iForks
suit proper conditions.
2
Optimal Temperature Range:
15° F (10° C) minimum
105°F (40° C) maximum
6182775
I
NSTALLATION
CAUTION: Install an electrostatic discharge strap to the truck chassis to
prevent electrostatic discharge damage to the Order Picker iForks system.
1
Locate and mount bracket and
junction box underneath the
operator compartment.
NOTE: The junction box and bracket should be
close enough to the iForks so that each sensor
connector can reach the junction box and each
sensor receptacle.
Junction Box
2
Bracket
Operator
Compartment
Install iForks underneath the front
operator compartment.
AInstall user-supplied pin into the horizontal holes
located on the block on the fork.
BSecure the pin for each fork.
If required, secure
the back of the fork at the vertical hole.
User-Supplied Pin
Fork
User-Supplied Pin
6182775
3
I
3
NSTALLATION
Locate and mount the display
Find a suitable location for readout and easy
access to display.
Cabin Roof
OR
Side Rail
OR
Dashboard
Display
FK0038.eps
4
Install display bracket and support,
if required
AInstall bracket to display.
BInstall bracket/display to the support.
B
A
FK0039.eps
S5
S13
4
6182775
I
5
NSTALLATION
Connect cables
AConnect the sensor connectors to each sensor
receptacle.
BConnect cable end from the display to the junction box.
CConnect the RS232 cable to a laptop, handheld device
or separate inventory control system.
DCut the provided fuse wire.
E Connect the fuse inline with the positive wire (red - US,
brown - EU) to the display cable.
F Connect the display negative wire (black - US,
blue - EU) to the negative battery terminal.
GConnect the detached end of the fuse to a switched
positive power source.
D
Cut fuse
A
Sensor
Receptacle
Sensor
Connector
FK0197.eps
Sensor
Connectors
A
To Fork 1
A
To Fork 2
C
To RS232
Connection
B
Red (US)
Brown (EU)
Black (US)
Blue (EU)
E
Fuse, 3.15A, Cascade
Part No. 6167147
G
Switched
F
Truck
Fuse Block
Truck
Battery
Ground
6182775
5
U
SING DISPLAY
Functions
Left of Display
When
appears:
The weighing system
(including load) is stable
The weight shown is
within the zero range
The display is showing
the net weight
When
appears, the
weight shown is negative
Middle of Display
When
Right of Display
appears:
Weight shown is in .44 lb (.2 kg) steps; only for
weight that ranges 0-441 lb (0-200 kg).
When the following
appears:
Weight shown is in 1.1 lb (.5 kg) steps; only for
weight that ranges 441-1102 lb (200-500 kg).
Weight shown is in 2.2 lb (1 kg) steps; only for
weight that ranges 1102-4850 lb (500-2200 kg).
Fork 1 relay setpoint 1 is activated.
Fork 2 relay setpoint 2 is activated.
Weight shown is
in kilograms
Weight shown is
in pounds
Quantity displayed
is the number of
items on the scale
NOTE: Smaller loads are weighed with higher accuracy.
Example: If an original load with e2 range selected is
removed, and a smaller load qualified for e1 range, the
e2 range will remain selected until the forks are zeroed.
FK0207.eps
Display
Button
Button
Names
"Zero"
6
Short Button Press
Zero Setting - Manually
zeros the display.
"Tare"
Automatic Tare - Allows the
tare weights to be reset to
zero automatically. Added
and subtracted weights
can be determined.
"Total"
3 Second Button Press
Code Entry - A 5-digit
code useful for a weighing
system connected to
peripheral equipment for
later processing.
Entry Mode
Enter
(accept
value)
Manual Tare - An entered
tare weight at any moment.
Decrease
the value
of the digit
flashing
Add To Total – Weighed load is
added to total weight. If printer
is installed, a printout is made.
Check subtotal and print
total.
Increase
the value
of the digit
flashing
"Sampling"
Sampling item weight(s) Determine an unknown item
weight by sampling a set
quantity of the same kind of
items. Standard sampling
amount is 10 items.
Sampling Determine a quantity of the
same items sampled with
an known item weight.
Shift to the
next digit
on the left
"On/Off"
On - Turn the display on.
OR
Toggle Units - Change the
units on the display between
kg and lb.
Off - Turn the display off.
Clear entry
6182775
U
SING DISPLAY
Other Features
Display Menus
The following menu options are available:
Weigh Mode
Options:
Manual zero
Net/Tare/Gross (Auto/Manual Tare)
Add and total a group of load weights
Sampling weight
On/off (or Toggle units)
User Settings ◆
Auto shut-off time
Light intensity
Deactivate/Activate Com Port 1
Deactivate/Activate Com Port 2
Alibi Memory
FK0041.eps
◆ Refer to "Display Options – User
Settings" Section, page 19.
Toggle Units (lb and kg)
To view a displayed value in another unit format (kg or lb) perform the following:
2
1000
The toggled value
will appear for
five seconds.
3
2205
1
6182775
Hold for three seconds.
The original
unit format will
resume.
FK0042.eps
7
U
SING DISPLAY
Display Messages
FK0085.eps
Error Messages
8
Display
Shows:
Meaning:
To Exit Error Mode:
Err01
Load cell signal is unstable.
Automatic
Err02
iForks are overloaded.
Automatic after removing weight
Err03
Gross weight is negative. This action is not allowed.
Automatic
Err04
Out of zero range.
Press any button
Err05
Sampling accuracy too low.
Press any button
Err06
Input signal too high.
Automatic after correcting input
Err08
Calibration out of range (negative).
Automatic
Err09
Calibration out of range (signal too low).
Automatic
Err10
Calibration count 2nd (3rd) point is lower than count 1st (2nd)
point.
Automatic
Err14
Calibration setpoint value 2 < setpoint value 1. This is not allowed. Automatic
Err98
Entered weight used for weight calibration must be higher than
previous entered weight.
Automatic
Err99
Button pressed or another action is performed while toggling
between units format (lb or kg).
Wait for display to return to original unit
format (lb or kg).
ErrF1
Problem with iFork 1 (no communication).
Restart display. Restart iForks & display.
ErrF2
Problem with iFork 2 (no communication).
Restart display. Restart iForks & display.
-----
Load cell signal negative.
Lift up the forks from the ground
ErrCS
Problem with correction sensor
Contact the Cascade Service department
6182775
U
SING iFORKS
Prior To Weighing
Verify the display shows
zero. If necessary, press the
Zero button.
Verify iForks are free of
obstacles prior to zeroing
Optimal Temperature Range:
15° F (10° C) minimum
105° F (40° C) maximum
FK0208.eps
Handling Loads
Center load on forks and
pallet, load must be flat
FK0209.eps
FK0210.eps
6182775
FK0211.eps
9
U
SING iFORKS
To Weigh A Load (Normal Weighing Mode)
IMPORTANT:
• At initial daily start up, allow 3-5 minutes for iForks
system to warm up before weighing loads.
• The system will not weigh correctly if front face or
bottom of iForks touches the load or pallet.
2
• Unstable weight readings indicate debris (ie. wood
chips) between fork and fork shoe.
• When weighing liquids, more time is needed for display
to show a steady weight.
1 On the display, press the "On/Off" button.
seconds.
Wait five
2 Display will zero.
If necessary, zero manually by
pressing the "Zero" button.
1
If required, press
the "Zero" button
to manually zero
the display.
3
3 Position the load on the iForks and raise the iForks.
Load
FK0212.eps
4 The display will show the weight of the load.
If needed,
the display may need more time to show a steady
weight. Before next weighing, verify that the display is
zeroed.
10
4
6182775
U
SING iFORKS
Obtaining Net/Tare/Gross Weight
A
C
B
FK0049.eps
Net (A) + Tare (B) = Gross (C)
Net – The weight of the load being weighed.
Tare – The weight of an unladen load that is not included (pallet, bin, etc).
Gross – The combined weight of the load and unladen load.
Obtain Net Weight Using Automatic Tare
To weigh a load (Net weight) but disregard part of the load
(Tare weight) with an unknown weight (example: pallet),
perform the following procedure:
NOTE: The display must be in normal weighing mode prior
to performing the following procedure.
1 If required, zero the display.
2 Position a pallet or bin (Tare weight) on forks and raise
forks. The weight of the pallet or bin will show on the
display.
2
FK0213.eps
2
3
3 Press the "Tare" button.
4 The display will be set to zero and the Net arrow will
appear. The arrow indicates only Net weight values will
show on the display.
NET Arrow
Procedure continued on next page
6182775
4
11
U
SING iFORKS
Obtaining Net/Tare/Gross Weight (Continued)
Obtain Net Weight Using Automatic Tare (Continued)
5 Add a load to weigh onto the iForks.
Load
5
FK0214.eps
6 The display will show the Net weight (only the load's
weight).
6
View Gross weight (Tare weight + Net weight):
Press the "Tare" button to view the Gross weight.
Gross Weight
Example: Pallet weight + Load weight
FK0217.eps
Net Arrow will
disappear
12
"Tare" button
6182775
U
SING iFORKS
Obtaining Net/Tare/Gross Weight (Continued)
Obtain Net Weight Using Manual Tare
To weigh a load but disregard part of the load with a known
weight (example: pallet):
NOTE: The display must be in basic weighing mode prior to
performing the following procedure.
Load –
Net
Weight
1 Position a pallet or bin (Tare weight) and load (Net
weight) on the iForks and raise the iForks.
1
Pallet –
Tare
Weight
FK0235.eps
2 The Gross weight will show on the display.
3 Press and hold the "Tare" button for three seconds.
3
2
4 Enter the known Tare weight value of the pallet or bin.
Use the Entry Mode Guide (below) as an aide to enter
the value.
Entry Mode Guide
Use the following buttons to enter the
value. The current digit to change will
flash.
Current digit to
change will flash
A
OR
Decrease
the value
B
B
C
A
Increase
the value
C
Shift to the next
digit on the left
Accept the value
FK0219.eps
5 The display will show the Net weight and the Net arrow
will appear. The arrow indicates only Net values will
show.
Net Arrow
will appear
5
Net Weight
• If the load is removed from the pallet (or bin), the
display will show zero.
• If the pallet (or bin) and load are removed, a negative
weight (Tare weight) will show.
NOTE: Pressing the "Tare" button will show the Gross
weight.
FK0231.eps
6182775
13
U
SING iFORKS
Adding And Totaling A Group Of Load Weights
1 If required, position a pallet or bin on forks.
(and pallet or bin).
Raise iForks
3
Load
2 Zero the display.
1
3 Add a load to weigh to the iForks.
FK0236.eps
4 Press the "Total" button.
This will begin an adding
sequence of the group to be weighed.
4,7
5 The display will show "Added" and return to normal
weighing mode.
5,8
6 Add the next load to the pallet with previous load(s).
Load
6
Additional
Load(s)
7 Press the "Total" button to add the weighed load to the
total.
NOTE: If a printer is installed, the Gross, Net and Tare
weights will be printed.
8 The display will show "Added" and return to weighing
mode.
9 Repeat Steps 6-8 until all loads to be weighed are on
the pallet and added to the total.
FK0237.eps
NOTE: At any time during weighing and adding, the
subtotal can be viewed by pressing and holding the
"Tare" button for three seconds. The counter (number
of loads weighed) and subtotal will flash for three
seconds.
Procedure continued on next page
14
6182775
U
SING iFORKS
Adding And Totaling A Group Of Load Weights (Continued)
10
When all loads are weighed, remove the loads from
the iForks and pallet or bin.
11
Press and hold the "Tare" button for three seconds to
view the total weight.
11
12
The counter (number of loads weighed)
and total weight will flash for three
seconds.
12
Counter
13
Total
While the display screen flashes, the
following can be performed:
• Press the "Total" button to print the
total and reset the total weight to zero
and the counter to zero.
• Press the "On/Off" button to reset the
total weight to zero and the counter
to zero.
NOTE: If no button is pressed while the
display screen flashes, the total weight
and counter value stays in the display's
memory. The system will return to
normal weighing mode.
6182775
13
Total Button
On/Off Button
FK0222.eps
15
U
SING iFORKS
Sampling Weight
Perform the following procedure to determine an unknown item weight by sampling the weight of the number of the same
kind of items. The number of items placed on the iForks determines the accuracy of the sampling. The greater the weight
difference, the greater accuracy. The standard sampling amount is 10 items (95 items maximum). A display equipped
with a printer is recommended for this section.
NOTE: The total weight of items must be greater than 22 lb (10 kg).
1 Position a pallet or bin on forks.
(or bin).
Raise iForks and pallet
1
2 If required, zero the display.
FK0238.eps
3
4
3 Press "Sampling" button on the display.
4 The display will show "Add 10" and "pcs".
5 Choose a quantity of items to weigh.
"Add 10" is the
standard. To change the number to another quantity,
use the "Tare" (up) and "Total" (down) buttons to scroll
through the list. The following quantity options are
available: 10, 20, 50, 95, 1, 2, and 5.
6 Add the number of items, based on the quantity entered
into the display, onto the pallet (or into the bin).
5
6
7 Press and hold the "Zero" button for two seconds.
NOTE: If the error message "Err05" appears, the total
sampling weight is too low. Press any key to return
normal weighing mode. Remove the items being
weighed. Repeat Steps 3-7. Adjust the quantity in Step
4 to a higher quantity.
8 Sampling is complete.
The display will show the total
number (quantity) of pieces on the forks. Press the "On/
Off" button return to normal weighing mode.
NOTE: If a printer is installed, item weight (print label:
"PcWt") sampled and quantity (print label: "Qty") will be
printed. Refer to "Printer Equipped" section, page 23.
16
FK0239.eps
7
6182775
U
SING iFORKS
Sampling Quantity
Perform the following procedure to determine the quantity of the same items in a sampling using a known weight of one
item. The items are placed on the iForks and weighed prior to entering the known weight.
1 Position a pallet or bin on iForks.
(or bin).
Raise fork and pallet
3
2 If required, zero the display.
3 Place the items onto the pallet (or into the bin).
1
FK0240.eps
4
4 After the weight shows on the display, press and hold
"Sampling" button for three seconds.
5
5 A previous item weight will show on the display.
Press
the "Zero" button to accept the value or change the
value using the Entry Mode Guide (below) as an aide to
enter the weight value.
Entry Mode Guide
Use the following buttons to enter the
value. The current digit to change will
flash.
Current digit to
change will flash
A
OR
Decrease
the value
B
B
C
A
Increase
the value
C
Shift to the next
digit on the left
Accept the value
FK0219.eps
6182775
17
U
SING iFORKS
Sampling Quantity (Continued)
6 Press and hold the "Zero" button for two seconds.
6
7 The display will show the quantity of items currently
7
being weighed. Press the "On/Off" button to return to
normal weighing mode.
NOTE: If a printer is installed, item weight (print label:
"PcWt") sampled and quantity (print label: "Qty") will be
printed. Refer to "Printer Equipped" section, page 23.
FK0229.eps
A
UTO SHUT-OFF
After 2 minutes of no action:
1 On the display, a countdown screen shows.
Press
any button to cancel auto shut-off and return to normal
weighing mode.
2 After 20 seconds of no further action, "- - off" will appear
on the screen. The display will turn off.
1
2
3 After 2 hours of no weighing, the iForks will turn off.
NOTE: To turn on, refer to "To Weigh A Load" section,
page 10.
FK0232.eps
18
6182775
D
ISPLAY OPTIONS
User Settings
Enter User Setting Menu
User Settings Menu
Option Name
4
Continue to
selected
submenu
(go to next
page)
FK0223.eps
1
To enter user settings, hold
the "Total" button for ten
seconds.
NOTE: Multiple screens will
flash while button is held.
2
Choose a user setting menu
option by scrolling through the list.
Options available are as follows:
"A_off "– Auto Shut-Off Time (Display)
"Light" – Light Intensity
"Conn1" – Deactivate/Activate Com
Port 1 (Bluetooth board) 1
"Conn2" – Deactivate/Activate Com
Port 2 (Printer board)
3
Press the "Zero" button to
confirm the selected user
setting menu option and
enter the menu option's
submenu.
1NOTE: Communication Port 1
can not be deactivated.
Exit User Settings
To Save and Exit:
To Exit without Saving:
1
1
Press "On/
Off" button
Press and
hold the "Zero"
button for three
seconds
2
2
The display will
return to normal
weighing mode
A screen
will show as
changes are
saved.
3
The display will
return to normal
weighing mode
FK0224.eps
6182775
19
D
ISPLAY OPTIONS
User Settings (Continued)
Change Submenu Settings
NOTE: To access User Setting Submenus, refer to the
previous page, "Enter User Settings Menu" to select the
appropriate submenu.
Auto Shut-Off Menu (Display)
NOTE: Auto shut-off is set to zero only when
the display is hardwired to the truck power.
1
Change time and
accept the value
by pressing the
"Zero" button.
Selected digit
(minutes) flashes
2
FK0075.eps
As performed on the previous
section, the "Zero" button is
pressed to enter the submenu.
Backlight Intensity Menu
Accept
Value
Move left to
next digit
Decrease
digit value
1
Increase
digit value
Scroll through the list of intensity
options and accept the value by
pressing the "Zero" button.
2
FK0076.eps
As performed on the previous
section, the "Zero" button is
pressed to enter the submenu.
Com Port 2 Menu (Printer Board)
Accept
Value
Move down
through list
Move up
through list
1
Scroll through the list of options
and accept the value by pressing
the "Zero" button.
FK0078.eps
20
When value
is accepted,
the display will
return to the
User Settings
Menu (previous
page)
Intensity options (percentage):
0 (Backlight Off), 25, 50 ,75, 100
2
As performed on the previous
section, the "Zero" button is
pressed to enter the submenu.
When value
is accepted,
the display will
return to the
User Settings
Menu (previous
page)
Accept
Value
Move down
through list
Move up
through list
Options:
C20ff – De-activate Com Port 2
C2_on – Activate Com Port 2
When value
is accepted,
the display will
return to the
User Settings
Menu (previous
page)
6182775
P
RINTER EQUIPPED
Print Weight
1 If required, zero the display.
Load
2 Position load on iForks and raise iForks.
2
3 Weigh the load.
FK0241.eps
B/G
T
N
4 Press the "Total" button to print.
5 Printer will print out load weight.
NOTE: This will add the weight to the
total weight.
250.0 lb.
25.0 lb.
275.0 lb.
Nr.1
10/15/0917:45
4
5
Print Total Weight
1 Press and hold the "Total" button for three seconds.
2 Press the "Tare" button to print.
IMPORTANT: The load must be removed from the
iForks before pressing the "Tare" button.
3 Printer will print out the total load weight.
Tot. B/G2000.0 lb.
Tot. T
50.0 lb.
Tot. N 1950.0 lb.
Tot. Nr.5
10/15/0917:55
FK0082.eps
6182775
1
2
3
21
P
RINTER EQUIPPED
Change Time & Date Printout
NOTE: For Steps 2-6, refer to the Entry Mode Guide
(below) to change the time and date values.
2
1
Press and hold the
"Sampling" button for 8
seconds
3
Enter the hour
Enter the minute
Entry Mode Guide
C
4
B
A
Enter the day
Use the following buttons to change the
value. The current digit to change will
flash.
A
OR
Decrease
the value
5
Increase
the value
C
B
Shift to the next
digit on the left
Accept the value
6
FK0083.eps
7
22
Enter the month
Enter the year
The display will return to normal weighing mode.
NOTE: If a printer is installed, the date and time will
print with weight information.
6182775
P
ERIODIC MAINTENANCE
IMPORTANT: Only trained and authorized personnel are
allowed to service iForks Other maintenance procedures
are the sole responsibility of the purchaser.
IMPORTANT: To prevent weighing inaccuracies, the end
user is responsible to check accuracy on a regular basis
at intervals that best fit their application and requirements.
Development of a periodic schedule will prevent faulty
readings. Cascade recommends a minimum interval of
every 12 months or 2000 hours, whichever comes first.
Daily Inspection
Check the following items below each day:
• Inspect the bottom of the forks for debris that might be
wedged between the fork and the fork shoe. Remove
any debris found.
• Inspect fork pin connections.
100-Hour
Every time the lift truck is serviced or every 100 hours
of truck operation, whichever comes first, complete the
following maintenance procedures:
• Check for debris between fork and fork shoe (ie. wood
chips).
• Inspect the bottom of the forks for debris that might be
wedged between the fork and the fork shoe. Remove
any debris found.
• Check for pinched wires.
• Tighten fork shoe capscrews after initial 100 hours of
service. Tighten to a torque of 80 ft.-lbs. (108 Nm).
As necessary, replace the cover spool, fork shoe
capscrews and nuts.
Cleaning iForks
As required, use a mild cleanser and wipe down
the forks with a towel. Rinse the fork with a
non-pressurized stream of water.
CAUTION: Do not rinse display.
6182775
23
Do you have questions you need
answered right now? Call your nearest Cascade Service Department.
Visit us online at www.cascorp.com
AMERICAS
Cascade Corporation
U.S. Headquarters
2201 NE 201st
Fairview, OR 97024-9718
Tel: 800-CASCADE (227-2233)
Fax: 888-329-8207
Cascade do Brasil
Praça Salvador Rosa,
131/141-Jordanópolis,
São Bernardo do Campo - SP
CEP 09891-430
Tel: 55-13-2105-8800
Fax: 55-13-2105-8899
Cascade Canada Inc.
5570 Timberlea Blvd.
Mississauga, Ontario
Canada L4W-4M6
Tel: 905-629-7777
Fax: 905-629-7785
EUROPE-AFRICA
Cascade Italia S.R.L.
European Headquarters
Via Dell’Artigianato 1
37030 Vago di Lavagno (VR)
Italy
Tel: 39-045-8989111
Fax: 39-045-8989160
Cascade (Africa) Pty. Ltd.
PO Box 625, Isando 1600
60A Steel Road
Sparton, Kempton Park
South Africa
Tel: 27-11-975-9240
Fax: 27-11-394-1147
ASIA-PACIFIC
Cascade Japan Ltd.
2-23, 2-Chome,
Kukuchi Nishimachi
Amagasaki, Hyogo
Japan, 661-0978
Tel: 81-6-6420-9771
Fax: 81-6-6420-9777
Cascade Korea
121B 9L Namdong Ind.
Complex, 691-8 Gojan-Dong
Namdong-Ku
Inchon, Korea
Tel: +82-32-821-2051
Fax: +82-32-821-2055
Cascade-Xiamen
No. 668 Yangguang Rd.
Xinyang Industrial Zone
Haicang, Xiamen City
Fujian Province
P.R. China 361026
Tel: 86-592-651-2500
Fax: 86-592-651-2571
Cascade Australia Pty. Ltd.
1445 Ipswich Road
Rocklea, QLD 4107
Australia
Tel: 1-800-227-223
Fax: +61 7 3373-7333
Cascade New Zealand
15 Ra Ora Drive
East Tamaki, Auckland
New Zealand
Tel: +64-9-273-9136
Fax: +64-9-273-9137
Sunstream Industries
Pte. Ltd.
18 Tuas South Street 5
Singapore 637796
Tel: +65-6795-7555
Fax: +65-6863-1368
© Cascade Corporation 2014
09-2014
Cascade India Material
Handling Private Limited
No 34, Global Trade Centre
1/1 Rambaugh Colony
Lal Bahadur Shastri Road,
Navi Peth, Pune 411 030
(Maharashtra) India
Phone: +91 020 2432 5490
Fax: +91 020 2433 0881
Part Number 6182775