1
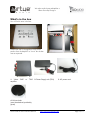
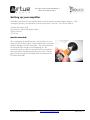
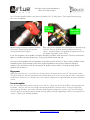
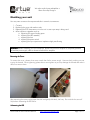
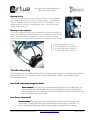
Owners Manual
Document Revision 2.1
Reference grade integrated two-channel amplifier
Powered by Tripath™ technology
Purchased from Dealer:
Serial Number:
Purchase Date:
Invoice Number:
Virtue ONE & TWO Owner’s Manual
http://www.virtueaudio.com
Page 1 of 11
We make audio lovers audiophiles.TM
Better Sound by Design.TM
Welcome
We started Virtue in 2005 with the dream of bringing the sensory experience of the high-end audio to the
masses. Welcome to our family! If you’re already an audiophile, you know already that this amplifier is one
of the best sounding, highest value audio products ever made. If you simply like listening to good music, we
hope to help you appreciate of accurate sound reproduction and museum-caliber build quality. When you
do, you’ll be an audiophile.
Virtue is a principle-driven company. Here are some of the rules we live by:
Life is too short for bad audio. Make audio lovers audiophiles.
If it’s not overbuilt, it can be made better. Overbuild.
Provide a transporting sensory experience through sight, touch, and sound.
Make a product too attractive to be hidden in a cabinet.
Build it no bigger than it needs to be, but no smaller.
Make sure that ten is “loud enough” but go all the way to eleven regardless.
Establish Virtue as the highest value brand in the industry.
Provide a completely satisfying buying experience.
Live up to the Virtue name in every product and every way, every day.
We hope that you get a lifetime of enjoyment from your Virtue amplifier. Let this guide show you
how. We’ll cover:
What’s in the box
Setting up your amplifier
Deployment options
Trouble-shooting
Specifications
Warranty
Trademarks
If you are have any questions whatsoever about the amplifier, please submit feedback on our
website. Go to http://www.virtueaudio.com , click on “Us
Us”
Product Question”
Us and then specify “Product
Question or
“Product
Product Issue”
Issue in the message form.
Virtue ONE & TWO Owner’s Manual
http://www.virtueaudio.com
Page 2 of 11
We make audio lovers audiophiles.TM
Better Sound by Design.TM
What’s in the box
You will find 4 items in the box.
Please note that we changed the name of the
product from “audiophile” to “virtue” but the box
was not reprinted.
1. Virtue
amplifier
ONE
or
TWO 2. Power Supply unit (PSU)
3. AC power cord
4. Volume knob
(must be attached, preferably
glued)
Virtue ONE & TWO Owner’s Manual
http://www.virtueaudio.com
Page 3 of 11
We make audio lovers audiophiles.TM
Better Sound by Design.TM
Setting up your amplifier
We bubble wrap several of the amplifier parts to protect them during long-distance shipping. After
unwrapping the parts, you should be up and running within 5 minutes. You will then need to:
1) Attach the volume knob
2) Connect the signal and speaker cables
3) Plug in power
4) Turn on!
Attach the volume knob
After unwrapping the amplifier and the volume knob, you must
attach the volume knob, which is shipped separately to minimize
possible damage to the POT/attenuator. The volume knob will
not always be tight enough to avoid dropping off. We
recommend putting a drop of super-glue into the inner plastic
bushing and then immediately pressing on the knob. The flat
part on the bushing should correspond with the flat part of the
POT/attenuator shaft.
Virtue ONE & TWO Owner’s Manual
http://www.virtueaudio.com
Page 4 of 11
We make audio lovers audiophiles.TM
Better Sound by Design.TM
Plug in audio inputs and outputs
The following diagram shows how the unit is configured for stereo (2 channel) play.
For use as a monomono-block amplifier,
amplifier simply
use one channel of the amplifier (left or
right). The unit will automatically dedicate
all available current to the channel you
choose: left, right or both (if both channels
are attached). That’s it.
Note:
Note it is possible that the black RCA input
(left) will be on top. This will have no affect
on sound.
Connect your audio source to the L/R RCA input connectors. Your CD/DVD player, DAC, MP3 player, tuner,
TV audio, preamp, and other inputs can be connected here. The unit supports high level inputs such as MP3
players on maximum volume.
WARNING
WARNING: If you are using a subwoofer, please use the line-level subwoofer output. Do NOT connect
the highhigh-level speaker outputs to your subsub-woofer highhigh-level inputs and use the subwoofer amp to crossover the high and low frequencies. With Tripath™ amps such as this one, there is a decent chance that
your subwoofer amplifier will bridge the amp’s speaker outputs, blowing up your Virtue amp. If you want
to prevent low frequencies from reaching your main speakers, follow the instructions below about changing
the main input capacitors.
Virtue ONE & TWO Owner’s Manual
http://www.virtueaudio.com
Page 5 of 11
We make audio lovers audiophiles.TM
Better Sound by Design.TM
You will attach speaker cables to the glorious Propeller Post™ binding posts. They support banana plugs,
bare wire, and spades.
Banana plugs are simply inserted in the back
of the plug. Banana plugs are the most
convenient attachment option.
Bare wire can be wrapped around the post or inserted through
the hole. Be sure the brass bushing is above the hole as
shown. Spades and bare wire provide the opportunity for an
all-copper signal path (on the TWO).
If you are using bare wire or spades, twist down the posts to make a solid connection. Check the connections
again in a week to see they remain snug. If snug, they should remain that way.
You may connect speakers with an impedance of anywhere from 2 ohms to 16 ohms, without problem. Lower
impedances may cause the amp to shut down; higher impedances may not have optimum frequency
response. But you'll be fine with the vast majority of speakers on the market. Running the amp without
speakers will not harm it.
Plug in power
Making sure that the unit is turned off, you will then plug in the power brick to your AC mains power socket.
The power bricks we ship are regulated so they already have much of the circuitry that you find in many power
conditioners. However, you may still want to use a power conditioner to supply smoother and more consistent
current.
Turn on the amplifier
amplifier
You can now depress the power switch to turn on the unit. When you do, the blue LED on the front panel will
illuminate. Also, you will notice a red light momentarily behind the volume control. Seeing this light flash
during startup, shutdown, and under very heavy loads (signaling clipping) is normal. If you see the red light
come on often or consistently during normal listening, please consider upgrading the PSU or turning down the
volume. Clipping can damage speakers.
Virtue ONE & TWO Owner’s Manual
http://www.virtueaudio.com
Page 6 of 11
We make audio lovers audiophiles.TM
Better Sound by Design.TM
Modding your unit
You may want to remove the wrap-around skin in several circumstances:
1.
2.
3.
4.
Curiosity.
Replacing the cover with another color.
Bypassing the POT/attenuator to turn the unit in case a pre-amp is being used.
Minor repairs or upgrades such as:
a. tightening the output binding posts
b. replacing the LED assembly
c. replacing the fuse
d. replacing the power switch
e. replacing the input capacitor to implement high-pass filtering
WARNING:
WARNING Before modding your Virtue amplifier, please insure that the amplifier is completely powered
off and the power supply cable is disconnected from the amplifier.
Removing the Cover
To remove the cover, choose a hex-screw wrench that fits the screws snugly. Unscrew slowly, making sure not
to strip the threads. When tightening, please do not over-tighten as you may damage the threads and make it
difficult to remove them.
After removing the screws, spring open the shell and gently slide back, half way. Do not slide the cover off
fully before unfastening the LED tether.
Unfastening the LED
Virtue ONE & TWO Owner’s Manual
http://www.virtueaudio.com
Page 7 of 11
We make audio lovers audiophiles.TM
Better Sound by Design.TM
On the front side of the unit, you will find the LED tether. Using your fingers or a needle-nose pliers, pull it
up from the board.
Turn the unit into a power amplifier
If you are using a pre-amplifier, there is no need to use the internal attenuator (POT) on the Virtue amp.
Customers have found that by taking the POT out of the circuit, sound quality improves. This job requires
moving the POT bypass jumpers.
The volume control bypass jumpers are located on the
end of the circuit board behind the POT. On most
models of the virtue amp the jumpers will be
underneath the board. A small needle nose plier will
make the job easy. Simply move the jumpers to the
position shown in the photo above.* If yo have not yet
glued the volume knob in place, the job can be made
easier by removing the 8mm nut, pulling the POT back
and moving the jumpers. Then reinstall the pot.
*We recommend trying the volume in full open position
with your preamp first, to be certain this works well with
your system.
Virtue ONE & TWO Owner’s Manual
http://www.virtueaudio.com
Page 8 of 11
We make audio lovers audiophiles.TM
Better Sound by Design.TM
Replacing the fuse
The fuse is located on the main circuit board. Please use 3A for standard
power supplies and 7A for the 130W (or higher) supply. It is possible that
when you upgrade the PSU on the amp, the fuse will simply blow. This is a
standard part you can find in most hardware stores. If you have trouble
finding the part, email us.
Replacing the input capacitors
If you wish to replace the input caps with smaller values (see table below) to
remove some bass from satellite speakers, you can solder new capacitors in
place. Simply desolder the existing Virtue Caps or Auricaps and install
smaller values. We recommend high quality film capacitors such as Auricap
or other.
For 80Hz high pass use 0.1uf
For 100Hz high pass use 0.082uf
For 120Hz high pass use 0.068uf
For 160Hz high pass use 0.05uf
Troubleshooting
Virtue amplifiers are triple checked and burned in for 24-hours before shipment to customers and are built to
provide a lifetime of use. Here are the most common problems that customers have experienced and
recommended solutions.
Issue: Sound is only coming through one channel
Recommendation: The green ring on the subwoofer output jack is a quite dark green, so it
may be mistaken for a black signal input jack. Please check to see that both the left and
right (red/black) RCA input cables are connected to the RCA input jacks (red and black) and
not the subwoofer output jack (green).
Issue: The unit will
will not turn off
Recommendation: The push-button on/off switch has been known to stick, internally, from
time-to-time. Typically, the switch can be unstuck by physically pumping it on and off. To
do this, please detach the power cable and then vigorously press the switch on and off,
Virtue ONE & TWO Owner’s Manual
http://www.virtueaudio.com
Page 9 of 11
We make audio lovers audiophiles.TM
Better Sound by Design.TM
between 10 and 20 times. If the switch remains non-functional, please contact us about
replacing the switch.
Issue: FM reception is weaker when the radio is beside the amplifier
Recommendation: Please try moving the unit at least 24 inches away from FM receiver in
order to reduce interference.
Issue: The left and right RCA jacks are reversed
Recommendation: Due to a silkscreen printing error, input RCA jacks are not labeled “Left”
and “Right” as they are with the output speaker posts. You should find in all cases that the
black input jack corresponds to the “Right” channel and the red input jack corresponds to
the “Left” input source channel. Phase is correct on the amplifier.
Issue: The Virtue label
label fell off
Recommendation: Due to some very cold weather this
winter in both shipping and storage, your “VIRTUE” label
on the front of the amp may have come unglued. A drop
of Super Glue will fix it back in place.
Issue: The red light behind the
the volume knob is flashing often
Recommendation: Seeing this light during play indicates clipping, a condition when the
peaks of the signal are clipped off. This is the power limit of the amp. If you find your unit
clipping often, please consider upgrading the power supply or turning down the volume.
Both the ONE and TWO amplifiers will play more than 90wpc cleanly at 30v with sufficient
current. The unit will drive loads as low as 2 ohms and with speakers as insensitive as
83db, we have many satisfied customers.
Issue: My propeller posts have broken free from the chasis
Recommendation: It is possible to over-tighten the posts, thereby breaking allowing them to
freely rotate. If this occurs, please open up the enclosure and tighten down the posts from
the inside. Also, add some super-glue or Lok-Tite™ to reduce the chance of untwisting.
Virtue ONE & TWO Owner’s Manual
http://www.virtueaudio.com
Page 10 of 11
We make audio lovers audiophiles.TM
Better Sound by Design.TM
Specifications
Maximum DC voltage
Efficiency
Input Impedance
(default: POT enabled)
Input Impedance
(POT bypassing)
Minimum speaker impedance
Maximum speaker impedance
Total Harmonic Distortion (THD) @ 87wpc
Recommended maximum usable power source @
30v
30v
~85%
18K ohm
15K ohm
2 ohms
20 ohms
<0.1%
200w (both channels)
Warranty
Virtue Audio products are guaranteed to be free of defects for 2 years from the time of purchase. If you
experience what you consider a defect, please visit the “Contact Us” section of the Virtue Audio website and
submit a message with the type “Product Issue”. We reply to requests within 24-48 hours. If you did not
purchase the product from Virtue Audio directly, you may also contact the seller who may be able to help you
faster and easier.
We keep a stock of replacement parts such as blue LEDs, power switches, and volume POTs. In some
situations, it may be faster and easier for you the customer to perform the repair than to send your unit back
to the dealer or Virtue in the USA. We will discuss opportunities for self-service on a case-by-case basis.
Copyrights
Virtue Audio® as well as WIHIFI™, Better Sound by Design™, Built for You™, EcoAudio™, We make audio
lovers audiophiles™, Sensation Amplifier™, Virtue Amplifier™ are protected trade-marks of Virtue, LLC. If you
suspect that another company is infringing on our trademark rights, we would be most appreciative of your
contacting us at [email protected].
[email protected]
Virtue ONE & TWO Owner’s Manual
http://www.virtueaudio.com
Page 11 of 11


![[ENG] – User Manual – Hammer 2](http://vs1.manualzilla.com/store/data/005660577_1-e32ef60d54b8720b57dfb511ee785652-150x150.png)