1
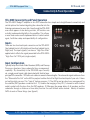
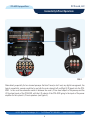
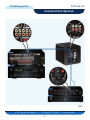
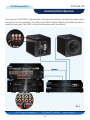
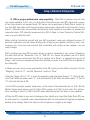
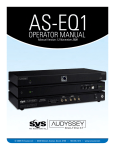
SV Sound, LLC
STA-400D Equipped Subs
Manual Version 1.4 June 2011
© 2011 Specialty Technologies, LLC
•
Call SVSound™ 877.626.5623
•
www.svsound.com
SV Sound, LLC
STA-400D Equipped Subs
Table of Contents
Safety Instructions 3
Welcome 5
About Your SVS Subwoofer6
Connectivity & Panel Operations 7
Setup, Calibration & Integration 13
Terms & Conditions 18
© 2011 Specialty Technologies, LLC
•
Call SVSound™ 877.626.5623
2
•
www.svsound.com
SV Sound, LLC
STA-400D Equipped Subs
Important Safety Instructions
1. Read these instructions.
2. Keep these instructions.
3. Heed all warnings.
4. Follow all instructions.
5. Do not use this apparatus near water.
6. Clean only with dry cloth.
7. Do not block any ventilation openings. Install in accordance with the manufacturer’s instructions.
8. Do not install near any heat sources such as radiators, heat registers, stoves, or other apparatus
(including amplifiers) that produce heat.
9. Do not defeat the safety purpose of any polarized or grounding-type plug. A polarized plug has two
blades with one wider than the other. A grounding type plug has two prongs and a third grounding
point. The wide blade or the third prong are provided for your safety. If the provided plug does not fit
into your outlet, consult an electrician for replacement of the obsolete outlet.
10. Protect the power cord from being walked on or pinched particularly at plugs, convenience receptacles,
and the point where they exit from the apparatus.
11. Only use attachments/accessories specified by the manufacturer.
12. Use only with the cart, stand, tripod, bracket, or table specified by the manufacturer, or sold with the
apparatus. When a cart is used, use caution when moving the cart/apparatus combination to avoid
injury from tip-over.
FIG. 1
© 2011 Specialty Technologies, LLC
•
Call SVSound™ 877.626.5623
3
•
www.svsound.com
SV Sound, LLC
STA-400D Equipped Subs
Important Safety Instructions
13. Unplug this apparatus during lightning storms or when unused for long periods of time.
14. Refer all servicing to qualified service personnel. Servicing is required when the apparatus has been
damaged in any way, such as power-supply cord or plug is damaged, liquid has been spilled or objects
have fallen into the apparatus, the apparatus has been exposed to rain or moisture, does not operate
normally, or has been dropped.
15. WARNING: To reduce the risk of fire or electric shock, this apparatus should not be exposed to rain or
moisture and objects filled with liquids, such as vases, should not be placed on this apparatus.
16. To completely disconnect this equipment from the mains, disconnect the power supply cord plug from
the receptacle.
17. The mains plug of the power supply cord shall remain readily operable.
FIG. 2
© 2011 Specialty Technologies, LLC
•
Call SVSound™ 877.626.5623
4
•
www.svsound.com
SV Sound, LLC
STA-400D Equipped Subs
WELCOME
At SVS, you can actually hear the tireless research and design efforts built into our subwoofers and speakers. Years are spent developing any SVS product. These days our teams work typically span from our Ohio
headquarters to all corners of the USA and of course with the finest component suppliers in Asia and Europe
as well. Nearly nothing in our speakers is an “off the shelf” part. We spend more and tend to overbuild our
stuff, because that’s how our customers like it.
SVS is committed to making better sound systems with elegant looks, robust construction, world-class technology and materials. We believe you deserve nothing less. This manual and the printed Quick Start sheet
will help integrate your speakers and subwoofer quickly and with professional results. Armed with only a few
basic tools, such a sound pressure level (SPL) meter, and the test tones built in to most audio/video receivers
(AVR), you will achieve smooth, detailed and powerful reproduction of all your favorite music and movie audio.
Expect to hear things you never heard before… and expect not to hear some of the artifacts you might have
accepted in the past from inferior brands.
Have a question about your surround sound system? For more information about SVS products check
out our US website, or speak with the exclusive dealer for your region. Regardless, contact us via phone or
email should you have questions about our products. SVS was founded by audio enthusiasts — our dedication to customer service is the only thing rivaling the products we create.
:
The SVS Team, Ohio, USA
June 2011
www.svsound.com
© 2011 Specialty Technologies, LLC
•
Call SVSound™ 877.626.5623
5
•
www.svsound.com
SV Sound, LLC
STA-400D Equipped Subs
About your SVS Subwoofer
There maybe be other subwoofers that look like them, but virtually none work like them. SVS
subwoofers are decidedly different in how they are designed, produced, sold, and the exceptionally high quality components we use. You could have spent much more on other brands and still not come close to the performance
our products provide. What makes a subwoofer an SVS?
Quality components, sane prices. You might be surprised at how inexpensive the components in
some not-so-inexpensive subwoofers are. At SVS, performance is king... not cutting a few dollars from our cost
to build. We range the world with our engineers and use the best stuff and best suppliers in the business.
Innovative designs, rich materials. We test all our materials, and features in the real world, and
build stuff our own in-house enthusiasts would buy with our own hard-earned money! “Over-built” SVS cabinet
construction ensures rigid cores for decades of solid performance. All our subwoofers offer computer controlled
panel cutting, steel fasteners, recessed components, custom parts made just for us at every turn. Tap the side
of your sub, look at the solid construction, or remove your powder-coated grill. You’ll know what we mean.
Sealed, or vented; down-firing or front-firing cabinets. An SVS tradition. Offering a variety of form
factors which provide exceptional performance yet also a compact foot print which complements your room style.
Features and controls. Variable phase, defeat-able crossovers, even power saving auto-on mode. Flex-
:
ible hookup options mean your SVS subwoofer can adapt to your space. Spend time exploring this guide and
contact your dealer if you require assistance on any feature.
World class driver power. SVS woofers have arguably been the industry’s best for a decade. Now our
advanced amplifiers raise the bar to new levels with digital signal processing (DSP) tuned pre-amps. With all new
power stages, more sophisticated protection our subs achieve exceptional depth, tremendous power and flat,
natural sound that defies price points or sometimes even words. To hear everything your favorite movies and music have to offer you need the most refined power available. SVS Sledge™ DSP amps push our exclusive woofers
like nothing else can.
© 2011 Specialty Technologies, LLC
•
Call SVSound™ 877.626.5623
6
•
www.svsound.com
SV Sound, LLC
STA-400D Equipped Subs
Connectivity & Panel Operations
STA-400D Connectivity and Panel Operation
The STA-400D Sledge™ amplifier in this SVS subwoofer has simple and straightforward connectivity and
control options that make integrating the subwoofer into the
listening environment an easy task. Even though the STA-400D
uses what appears to be analog controls, all functions are
actually implemented digitally in the amplifier. This allows
a more linear and accurate implementation of controls which
again, facilitates setup and repeatability of configuration.
Inputs
There are two low level input connectors on the STA-400D:
One labeled Line In Left (white) and the other labeled Line In
Right (red). The input signal(s) can have a “High Pass Filter”
applied which affects the signal presented to the STA-400D’s
“High Pass Out” RCA jack (single output).
Input Configuration
Typically today most Audio Video Receivers (AVRs) and Pre-amp
Processors (pre/pros) have subwoofer/bass management
capability. So, connectivity to the STA-400D amp is usually
FIG. 3
via a single coaxial signal cable terminated with familiar large
pin-type RCA connectors. SVS sells such cables in several common lengths. The subwoofer signal cable runs from
the “Subwoofer Pre-Out” on the AVR or pre/pro to either the Left or Right low level input of your sub. It does
not matter which you use. This “typical” hookup assumes: 1.) The AVR or pre/pro does bass management for
the satellite (SAT) speakers connected to it. 2.) Handles the merging of any LFE (.1 channel in multi-channel
audio) content with the bass from the SAT speakers. 3.) Manages the proper delay of all speakers and the
subwoofer through a distance or time delay function for each utilized audio channel. Nearly all modern
AVR’s do each of these things. (see figure 4)
© 2011 Specialty Technologies, LLC
•
Call SVSound™ 877.626.5623
7
•
www.svsound.com
SV Sound, LLC
STA-400D Equipped Subs
Connectivity & Panel Operations
FIG. 4
Alternatively, especially for two-channel preamps that don’t have (or don’t use) any digital management, the
typical connectivity scenario would be to use both the main channel Left and Right (L/R) inputs into the STA400D. In this case the subwoofer would sit between the main L/R low level outputs of the preamp and the
L/R low level inputs of the STA-400D, with the L/R outputs of the STA-400D going to the inputs of the power
amplifier for the system’s L/R main speakers. (see figure 5)
© 2011 Specialty Technologies, LLC
•
Call SVSound™ 877.626.5623
8
•
www.svsound.com
SV Sound, LLC
STA-400D Equipped Subs
Connectivity & Panel Operations
FIG. 5
© 2011 Specialty Technologies, LLC
•
Call SVSound™ 877.626.5623
9
•
www.svsound.com
SV Sound, LLC
STA-400D Equipped Subs
Connectivity & Panel Operations
If you have one of SVS’s AS-EQ1 high-resolution, multi-subwoofer Equalizers, see Figure 6 for proper connectivity with one or more subwoofers. Also refer to your AS-EQ1 Operator Manual for detailed information on
connectivity and setup of the AS-EQ1 into your listening environment. (see figure 6)
FIG. 6
© 2011 Specialty Technologies, LLC
•
Call SVSound™ 877.626.5623
10
•
www.svsound.com
SV Sound, LLC
STA-400D Equipped Subs
Connectivity & Panel Operations
Outputs
There are two sets of output connectors on the STA-400D. One set (labeled Line Out) is unfiltered and carries
the same signal as found on the input connectors. The set labeled High Pass Out has a high pass filter applied
which has a corner frequency of 80Hz and a slope of -12 dB per octave.
The output connectors are typically used to either daisy-chain additional subwoofers with a single, unfiltered
output, or as the input to a power amplifier for the Left and Right main channels with no filtering or the 80Hz
High Pass applied depending on which set of connectors are used.
Limiter LED
The limiter LED illuminates when the amplifier is being over driven, protecting the driver and amplifier from
potential damage. This LED may flicker during exceptionally loud passages which should cause no concern.
If the LED is lit continuously, you should lower the input signal, the amplifier gain, or a combination of both to
ensure you are receiving full dynamic range of the amplifier.
Power Mode Switch
The Power Mode switch allows the STA-400D to either stay on all the time (On), or go into standby (Auto) if no
signal is being received. When in standby mode and a signal is detected on one of the inputs, the STA-400D
will turn on and begin playing the material.
Power LED
The power LED will be green when the subwoofer is on and ready to receive (or is receiving) an audio signal.
When the Power Mode switch is On, the LED will constantly be green. When the Power Mode switch is on
Auto, the LED will be off when the amplifier is in standby, and green when receiving signal.
Phase
The Phase control allows you to adjust the timing of sound coming from your subwoofer. Normally this control
should be set to 0, but if you have multiple subwoofers in different parts of your listening environment, this
control can be use to ensure the sound from both arrives at a listening position at the same time. Alternatively
this control can be used to better blend the subwoofer with the front main channels if necessary.
Low Pass Control
The Low Pass control adjusts the STA-400D’s internal low pass filter. Effectively this controls the low frequencies
the subwoofer will play. Setting this control will allow frequencies below the control setting to be output from the
subwoofer and those above it will be rolled off at -12 dB per octave. Full clockwise rotation disables the LPF.
© 2011 Specialty Technologies, LLC
•
Call SVSound™ 877.626.5623
11
•
www.svsound.com
SV Sound, LLC
STA-400D Equipped Subs
Connectivity & Panel Operations
Gain Control
The Gain control effectively adjusts the output level (volume) of the subwoofer. The higher the gain control is
set (towards MAX) the louder the subwoofer will play. Please be aware that high Gain settings may cause the
STA-400D’s Limiter to engage during loud passages. See the discussion regarding the Limiter LED above for
more information.
Main Power Switch
Use this switch to apply power to the STA-400D amplifier.
Power Cord
Plug the power cord into a wall outlet. It is not recommended that the subwoofer be plugged into a convenience outlet on the back of a AVR or pre/pro as they are not rated for the level of power required Do not use
extension cords to lengthen the cord.
Note the power receptacle also contains the main fuse for the amplifier.
© 2011 Specialty Technologies, LLC
•
Call SVSound™ 877.626.5623
12
•
www.svsound.com
SV Sound, LLC
STA-400D Equipped Subs
Setup, Calibration & Integration
Before using your new subwoofer, it is important to get it set up and integrated into the rest of your audio or
home theater system to ensure optimum results. Failure to properly set up and calibrate your new subwoofer
may result in too much, too little, or boomy bass, none of which provides the best overall listening experience.
There are multiple ways to set up and calibrate your subwoofer depending upon what type of equipment you
have and how many subwoofers you will be using. Each common scenario will be covered below, however if
you have questions about your specific situation that are not covered here, contact SVS Technical Support at
[email protected].
Unpacking and Subwoofer Location
If you have not already done so, take a few minutes to carefully unpack your new subwoofer. Try to avoid damaging
the shipping materials and keep the box and internal cushioning for a short time just in case you need to return the
sub for any reason.
There continues to be much discussion about subwoofer placement. If you have done your research and determined
the best place for your sub(s) in your room, that’s great. If not, we recommend starting in a corner, especially in large
rooms, leaving about five to six inches in back for cable hookups and to access controls.
Corners provide the most reinforcement for both sub level and extension and in most rooms provide good response
in most listening positions. However all the things that make a corner good can also work against you in some
cases, causing locations in the room where bass may sound overly loud compared to other locations or inversely,
bass may be lacking the punch you expect. If you find there is too much bass at certain frequencies or bass response
is uneven in the room, experiment with different placement options around the room. There is surprisingly little difference between the front and the back of a room when the subwoofer is properly calibrated so feel free to try any
location that is convenient or meets aesthetic criteria for placement in the room.
Power and Signal Connection
Before making any power or signal connections, make sure all equipment in the chain is turned off. Plug the
subwoofer into a power outlet that is capable of a peak draw of 600 watts. Using convenience outlets located
on some AVR receivers or pre/pros is NOT recommended for your subwoofer as these outlets are not meant
for high current devices.
For a discussion of the audio connections available on your subwoofer, see the section earlier in the manual
entitled “STA-400D Connectivity and Panel Operation”.
© 2011 Specialty Technologies, LLC
•
Call SVSound™ 877.626.5623
13
•
www.svsound.com
SV Sound, LLC
STA-400D Equipped Subs
Setup, Calibration & Integration
From an audio signal connection perspective, there are two primary ways you can connect the subwoofer based upon the capabilities of the AVR, pre/pro, or preamp you are using in your
listening environment:
1) Bass Management and time alignment performed in the AVR or pre/pro. In this
configuration it is assumed that the subwoofer will be passed a signal intended strictly for the
subwoofer – in other words it has no additional higher-frequency information that needs to be accounted for.
Normally, you would use a single coaxial RCA cable from your AVR or pre/pro’s “Sub Pre Out” connector and attach it to either the Left or Right Low Level Line In connector on the STA-400D amplifier. Turn the Low Pass control fully clockwise to disable the STA-400D’s internal low pass filter. If
you have multiple subwoofers you can split the signal at the AVR or pre/pro using a “Y” adapter,
or you can daisy-chain an additional subwoofer through the Low Level Line Out connector on the
STA-400D amplifier.
2) Bass Management performed in subwoofer. In this configuration, it is assumed
that due to the lack of bass management in a preamp (typical for 2 channel analog systems) bass
management will be handled using the features of the STA-400D amplifier.
If you are using one subwoofer for the bass of both left and Right Channels, connect the Left and
Right preamp Outputs for these channels to the corresponding Line In connections of the STA400D. Normally the High Pass Outputs of the STA-400D will be connected to the Inputs of the
power amplifier for the main Left and Right speakers.
Using the High Pass Outputs will send all frequencies above 80Hz with a -12 dB per octave slope
to the power amplifier for your speakers. The Low Pass filter control on the STA-400D should be
adjusted to provide the best integration of your speakers with the subwoofer. If you are using two
subwoofers (one for each channel), connect as above using one sub for the Left channel and one
sub for the right channel.
© 2011 Specialty Technologies, LLC
•
Call SVSound™ 877.626.5623
14
•
www.svsound.com
SV Sound, LLC
STA-400D Equipped Subs
Setup, Calibration & Integration
Calibrating the Subwoofer
In order to get the best experience from your new SVS subwoofer, it is important to calibrate it with
the rest of your speakers. To do this correctly you either need an AVR or pre/pro with “Auto Setup”
capability, or you will need a Sound Pressure Level (SPL) Meter (preferably with Analog display) like
those sold by Radio Shack as well as a source of test tones. It is highly unlikely the subwoofer level
can be set correctly using hearing alone due to the difference in hearing capability of individuals,
as well as the decreased level of hearing sensitivity in the lower frequencies. Therefore it is highly
discouraged to use your ears as a substitute for the SPL meter.
If you have two or more subwoofers in your system, it is important that they be level matched (set
at the same level relative to one another) before starting the calibration process. If the subs are not
level matched, there is a risk of unbalanced bass and potential subwoofer localization in your listening environment. This level matching process is best performed using a SPL meter as discussed
above.
1) AVR or pre/pro with auto setup capability. Many AVRs and pre/pros newer than 2004
to 2005 have some form of auto setup capability that does a good job of setting channel levels and
speaker distances, making calibrating your subwoofer very easy. Review the documentation that came
with your AVR or pre/pro on how to run the auto setup feature. Connect your subwoofer and set the
Gain control between 10:00 and 11:00 o’clock and run the auto setup routine.
At the completion of running the auto setup routine, there are two things you should check in your AVR
or pre/pro’s Manual Speaker Setup menu to make sure your subwoofer has been integrated properly:
a) Check to see your speakers are all set to small with a suggested crossover of no lower than 80 Hz.
If already small and the crossover is higher than 80 Hz the setting should be left as is.
b) Check to make sure your subwoofer trim value does not exceed the positive or negative limits of trim
(typically +12 dB to -12 dB but may be different based upon your equipment). A value at the negative
limit (example, -12 dB) indicates the Volume on the subwoofer was set too high. Lower the Gain on the
subwoofer and re-run the auto setup routine. If the subwoofer trim is at the positive limit, raise the
Gain on the subwoofer and re-run the auto setup routine.
© 2011 Specialty Technologies, LLC
•
Call SVSound™ 877.626.5623
15
•
www.svsound.com
SV Sound, LLC
STA-400D Equipped Subs
Setup, Calibration & Integration
2) AVR or pre/pro without auto setup capability. Older AVRs or pre/pros may not have
auto setup capability. In this case, you will need a Sound Pressure Level (SPL) meter and a source
of test tones used to set speaker levels. SPL meters can be purchased at Radio Shack, usually for
less than $50. Even older multi-channel receivers and pre/pros have built-in test tones but if yours
doesn’t, calibration disks are available that have the tones needed to accurately set speaker and
subwoofer levels. SVS typically recommends the AVIA II Guide to Home Theater by Ovation Software as a good calibration disk.
Before starting, familiarize yourself with your AVR or pre/pro’s setup and configuration menu. Of
particular importance are the menus dealing with setting up your speakers (distance, level, size,
crossover, etc.). Once you have read and feel comfortable with setting up your speakers, you are
ready to begin.
Start by making sure your AVR or pre/pro knows you have a subwoofer in your system. Sometimes
the menu item will be “Subwoofer = Yes, or “SUB ON”, etc. Ensure all speakers are set to Small
and have crossovers set no lower than 80 Hz (a speaker set to Small – as opposed to Large or Full
Range – will cause bass frequencies below the selected crossover to be routed from the speaker to
the subwoofer).
a) Make sure you have a known good battery in the SPL meter (use the Battery Function). Set the
“Weighing” switch to “C”, and the “Response” switch to “Slow”.
b) Set the “Range” dial to “70” to start. Consequently, when the meter displays “0”, that will indicate 70 dB. When the meter reads “5”, that will indicate 75 dB. When the meter reads “-3” (left of
“0”), that will indicate 67 dB.
c) In the AVR or pre/pro speaker setup menu, set the value of the subwoofer trim to -3 db. Set the
Master Volume (main volume control) of the AVR or pre/pro to 0.0 dB. In most units, this will produce a reading of close to 75 dB on the SPL meter when playing the test tones on your speakers.
d) Place the SPL meter in your main listening position, ideally on a tripod (the Radio Shack SPL meter will mount to a standard camera tripod adapter) with the unit pointed straight up (microphone
pointed at the ceiling). Adjust the tripod so the microphone is roughly at ear height.
© 2011 Specialty Technologies, LLC
•
Call SVSound™ 877.626.5623
16
•
www.svsound.com
SV Sound, LLC
STA-400D Equipped Subs
Setup, Calibration & Integration
e) Using the Manual Speaker Setup menu of your receiver or pre/pro, play the speaker level matching test tone and adjust each speaker to read 75 dB (“5” on the meter with the range switch set to
70) using the speaker trim controls found in the menu for each channel. When playing the test tone
for the subwoofer, use the Gain control on the STA-400D to raise or lower the level of the subwoofer
to read 75 dB leaving the subwoofer trim control in the AVR or pre/pro set to -3 dB. (Note the meter
may fluctuate by several dB when measuring the subwoofer. This is normal and what you are seeing
are room modes in play. Use the average of the swings to determine the volume of the subwoofer.)
If you have two subwoofers, you should split the difference between the two when making level
adjustments. For example, if you need to lower the combined level of the two subs by 4 dB, lower
each sub by 2 dB.
f) From this point forward to add to or decrease the level of your subwoofer(s), use the subwoofer
trim in your receiver. In some cases the level of your subwoofer trim may exceed +/- 5 dB after
tweaking your sub level to taste. If this occurs, use your SPL meter and a combination of the subwoofer trim in your AVR or pre/pro and the Gain control on the STA-400D to get the subwoofer trim
back to -3 dB while reading your desired subwoofer level.
© 2011 Specialty Technologies, LLC
•
Call SVSound™ 877.626.5623
17
•
www.svsound.com
SV Sound, LLC
STA-400D Equipped Subs
Terms & Conditions
Terms and Conditions: Details are available on request, please contact your Dealer for more. Note that these
terms and conditions do not affect your statutory rights.
Shipping: When you receive your new subwoofer, please check to ensure there is no damage. If after unpacking
you discover any damage that may have been caused by transportation on your product, we request you contact
SVS or if outside the USA your Dealer immediately and if possible, provide a photo of damage in question to them
to ensure the fastest possible correction to the situation.
Warranty: The product has a 3 year warranty against defects in materials and workmanship. Upon return, the
products will be repaired, and redelivered. Naturally, this warranty does not cover any product subjected to
misuse or accidental damage.
The bottom line: We’re proud of our products and want you to be as happy owning one, as we are selling one (or
more) to you. E-mail your Dealer if you have any warranty question or contact SVS directly if in North America.
SV Sound, LLC
6420 Belmont Avenue, Girard, Ohio 44420
Fax: 703-997-2603
Phone: 877-626-5623
Email: [email protected]
Technical Support: [email protected]
© 2011 Specialty Technologies, LLC
•
Call SVSound™ 877.626.5623
18
•
www.svsound.com