1
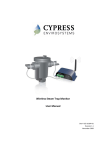
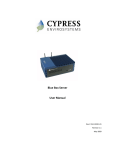
Wireless Freezer Manual
Installation Guide
Doc # 152-11103-01
Revision DRAFT
May 2009
Copyrights
Copyright 2008 by Cypress Envirosystems. All rights reserved.
The information in this document is subject to change without notice. While reasonable precautions have been
taken, Cypress Envirosystems assumes no responsibility for any errors that may appear in this document. No part
of this document may be copied or reproduced in any form or by any means without the prior written consent of
Cypress Envirosystems.
Disclaimer
CYPRESS ENVIROSYSTEMS MAKES NO WARRANTY OF ANY KIND, EXPRESS OR IMPLIED, WITH REGARD TO THIS
MATERIAL, INCLUDING, BUT NOT LIMITED TO, THE IMPLIED WARRANTIES OF MERCHANTABILITY AND FITNESS FOR
A PARTICULAR PURPOSE. Cypress Envirosystems reserves the right to make changes without further notice to the
materials described herein. Cypress Envirosystems does not assume any liability arising out of the application or
use of any product or information described herein. Cypress Envirosystems does not authorize its products for use
in mission or safety critical systems or where a malfunction or failure may reasonably be expected to result in
significant injury to the user. The inclusion of Cypress Envirosystems’ product in mission or safety critical system
applications implies that the manufacturer assumes all risk of such use and in doing so indemnifies Cypress
Envirosystems against all charges. In no event is Cypress Envirosystems liable to anyone for any indirect, special or
consequential damages.
Table of Contents
1.0
2.0
3.0
4.0
5.0
6.0
7.0
8.0
9.0
10.0
11.0
12.0
Introduction ........................................................................................................................ 4
Safety Precautions .............................................................................................................. 5
Components........................................................................................................................ 5
Tools Required .................................................................................................................... 5
Workflow ............................................................................................................................ 6
Installation .......................................................................................................................... 7
6.1
Access the Freezer .................................................................................................. 7
6.2
Locate the WFM...................................................................................................... 7
6.3
Connect the Sensors ............................................................................................... 7
6.4
Mount and Connect the Antenna........................................................................... 7
6.5
Connect the Terminal Strips ................................................................................... 8
6.6
Configure the WFM Channel Set ............................................................................ 8
6.7
Configure the WFM on the BBS .............................................................................. 9
6.8
Perform Functional Test ....................................................................................... 14
6.9
Restore the As-Found Condition of the Freezer ................................................... 15
Battery Life........................................................................................................................ 15
Troubleshooting................................................................................................................ 15
Technical Specifications .................................................................................................... 15
Product Disposal ............................................................................................................... 16
Support ............................................................................................................................. 16
Warranty Information....................................................................................................... 16
DRAFT
1.0 Introduction
Thank you for purchasing this Wireless Freezer Monitor, WFM. Please read this guide thoroughly before
installing the WFM.
The Cypress Envirosystems Wireless Freezer Monitor, WFM, is designed to monitor the operating
condition of a freezer. This is achieved by monitoring compressor amperage, chamber temperature, and
door switch status of a freezer and transmitting the data to a PC, or data acquisition system. The WFM
can be either AC or DC powered. Installation is designed to be minimally invasive.
The following diagram describes the various components of the WFM.
B
C
D
G
A
F
E
WFM Front Panel
Gnd
Aux In
Gnd
Aux In
Batt Out
Batt Out
Current 2 (High Stage)
Opt2
Batt In
Current 1 (Low Stage)
Opt1
Batt In
Shield
Shield
Door Switch -
Door Switch +
Ch2+
Ch2-
Shield
Thermocouple Ch1-
Shield
Thermocouple +
Sensor input terminal strip
External power terminal strip
LED Indicators
5V-48V barrel jack input, 5.0mm x 2.1mm
Function Button
Radio 1 antenna connector
Programming/Expansion port
Ch1+
A.
B.
C.
D.
E.
F.
G.
WFM Back Panel
Sensor Input and External Power Terminal Strip Details
Cypress Envirosystems
Doc # 152-11103-01 Rev DRAFT
WFM User Manual
Page 4
DRAFT
2.0 Safety Precautions
•
•
•
Do not immerse the WFM in water.
Always wear personal protective equipment appropriate to the system the WFM is being installed on.
Do not try to repair the WFM yourself as it contains no user-serviceable parts. Contact a qualified
service technician for repairs. See Section 11.0, Support, for details.
3.0 Components
The WFM comes with the following components:
WFM
Antenna, with cable
Power cord (optional)
Thermocouple
External power
connector
Sensor input connector
Clamp-on ammeter
Crimp connector
4.0 Tools Required
•
•
•
•
Screwdriver (to access the mechanical space of the freezer)
3/32” Flat-head Screwdriver
Cable Ties
Compression Pliers for #24 to #28 wire splices
Cypress Envirosystems
Doc # 152-11103-01 Rev DRAFT
WFM User Manual
Page 5
DRAFT
5.0 Workflow
Access the mechanical space of the
freezer.
Identify the WFM location in the
mechanical space of the freezer.
Connect the sensors.
Mount and connect the antenna.
Ensure that the input and external
terminal power strips are connected to
the base unit of the WFM.
Configure the WFM channel set and ID,
using the HHC.
Configure the WFM on the BBS.
Perform a functional test.
Restore the freezer to the initial asfound condition.
Cypress Envirosystems
Doc # 152-11103-01 Rev DRAFT
WFM User Manual
Page 6
DRAFT
6.0 Installation
6.1
Access the Freezer
In order to monitor the freezer, sensors must be installed on various components within the freezer. This
requires that the installer locate the compressor motors and existing door switch for the freezer.
Access the freezer by removing the panels on the back and side of the freezer, exposing the mechanical
space. For some models, the mechanical space is on top of the freezer.
6.2
Locate the WFM
Find a secure location for the WFM in the mechanical space of the freezer. This will ensure that the WFM
is out of the way of everyday users. When finding a location for the WFM, make sure that the sensors can
still be connected to the WFM.
6.3
Connect the Sensors
6.3.1
Compressor Ammeters
For safety reasons, the freezer should be unplugged prior to making any connections to the freezer.
1. Locate the compressors in the mechanical space of the freezers.
2. Identify which compressor is the high stage and low stage. Most times the compressors are marked
with an “H” or “L” identifier. If the compressors are not marked, connect the ammeters and identify
the correct compressor during the functional test. Typically, the low stage compressor starts first.
3. Identify the power legs of each compressor. Connect the ammeter to the negative side of the power
legs.
4. The high stage compressor ammeter positive wire (white) connects to OPT2, the negative wire (black)
connects to ground on the WFM terminal strip.
5. The low stage compressor ammeter positive wire (white) connects to OPT1, the negative wire (black)
connects to ground on the WFM terminal strip.
6.3.2
Thermocouple
1.
2.
3.
6.3.3
Determine the path to route the thermocouple into the freezer chamber. Use cable fasteners to
secure the thermocouple, as required.
Route the closed end of the thermocouple into the freezer chamber.
Connect the two-wire end of the thermocouple to the WFM. The yellow wire connects to CH1+ on
the WFM terminal strip. The red wire connects to CH1- on the WFM terminal strip.
Door Switch
For safety reasons, the freezer should be unplugged prior to making any connections to the freezer.
1. Determine if the freezer has a door alarm. If so, the door switch alarm can be connected.
2. Locate the freezer door switch contact wires. If the freezer has two doors, determine which door the
owner wants to alarm.
3. Use the crimp connector and compression tool to connect the door switch contact wires. The higher
potential of the two door contact wires should be connected to Ch2+ on the WFM terminal strip.
6.4
Mount and Connect the Antenna
1.
2.
3.
The external antenna is magnetic. The best location for the antenna is the upper back corner of the
freezer. Find a path from the antenna location to the WFM.
Route the extension wire and connect it to the WFM.
Connect the antenna.
Cypress Envirosystems
Doc # 152-11103-01 Rev DRAFT
WFM User Manual
Page 7
DRAFT
6.5
Connect the Terminal Strips
Plug in the two terminal strips. If the WFM is battery operated, ensure that the batteries are installed. If
the WFM is AC powered, route the power cord to a power outlet.
6.6
6.6.1
Configure the WFM Channel Set
Connect the WFM to the HH Device
1. Turn on the WFM by connecting the power terminal strip. If the WFM is AC powered, make sure the
unit is plugged in.
2. Transition the WFM into Configuration Mode: Hold the Function button for approximately 6 seconds.
The green light, yellow light, and red light will turn on in series, then flash rapidly. Release the
function button and the green light will blink continuously.
3. Remove the HH Device from its Docking Station
4. Power on the HH. Press and hold the [Enter/On] key for one second. When the Green LED flashes,
release the [Enter/On] key.
5. Launch the HH application: Select the Windows Start Icon on the top left of the Touch Screen
,
Select the HH Control application from the Start Menu
.
, press the Find Button
. Wait for the HH to search
6. Bind to WFM: Select the Name ID Tab
for all WFMs in the vicinity that are in Configuration mode.
7. The HH will list all WFMs and their Device ID it finds. Select the WFM you want to configure based on
the Device ID
.
8. Assign a Device Name (if not already assigned) by tapping on the name twice until it is in text entry
mode
. Enter a name and press Bind
. The Bnd column should
convert to “Y” from “N”
.
6.6.2
Configure WTR using the HH
The following parameters must be setup using the HH to configure a WFM.
WFM Parameter
Node ID
RF Frequency A
RF Frequency B
Sample Rate
Channel 1 Setup
Channel 2 Setup
Channel 3 Setup
Channel 4 Setup
Parameter in HH
Node ID
RF Frequency A
RF Frequency B
Sample Rate (sec)
Radius 1
Radius 2
Radius 3
Radius 4
Function
The Node ID of the WFM
Wireless communication Frequency A of the WFM
Wireless communication Frequency B of the WFM
Update rate of the WFM while in Normal Mode (seconds)
Channel configuration – See channel setup
Channel configuration – See channel setup
Channel configuration – See channel setup
Channel configuration – See channel setup
Notice the WFM parameter name is not used in the HH parameters list. Channel 1-4 setup will be done
under Radius 1-4. All other fields should be 0. The table above shows the mapping between the two.
Cypress Envirosystems
Doc # 152-11103-01 Rev DRAFT
WFM User Manual
Page 8
DRAFT
The following table lists the channel setup values.
Channel
Setup
Type
0
2
3
4
5
6
7
8
9
10
11
Channel is off – not used
Normal voltage/current sensing (which one depends on
hardware)
Thermistor (not used for WFM)
Sample RS232 LR300's ch1 (not used for WFM)
Sample RS232 LR300's ch2 (not used for WFM)
Sample RS232 LR300's ch3 (not used for WFM)
Sample RS232 LR300's ch4 (not used for WFM)
Sample RS485 LR300's ch1 (not used for WFM)
Sample RS485 LR300's ch2 (not used for WFM)
Sample RS485 LR300's ch3 (not used for WFM)
Sample RS485 LR300's ch4 (not used for WFM)
Thermocouple
12
Switch
1
o
o
o
o
6.7
Channel 1 – Thermocouple ONLY. Value = 11
Channel 2 – Switch ONLY. Value = 12
Channel 3 – Voltage ONLY. Value = 1
Channel 4 – Voltage ONLY. Value = 1
Configure the WFM on the BBS
Navigate to the Node Config page and enter the Device ID of the node you wish to add. The node ID for
each channel will increment as follows. The example assumes that the WFM Device ID is 150.
Device ID
150
150
150
150
Cypress Envirosystems
Doc # 152-11103-01 Rev DRAFT
Node ID
150
151
152
153
Channel Description
Low-side compressor current sensor
High-side compressor current sensor
Internal freezer temperature sensor
Freezer door sensor
WFM User Manual
Page 9
DRAFT
Enter the Device ID of the WTR and click Add.
Node ID 150: Configure the low side current sensor. Enter the sensor units [A] for amps. Select the sensor
input type. For the current sensors, this will be [OPT 1-2]. Enter the sensor responsivity. This number is
typically found in the datasheet; for the clamp on current sensors, it is 0-5V for an input of 0-20A.
Cypress Envirosystems
Doc # 152-11103-01 Rev DRAFT
WFM User Manual
Page 10
DRAFT
Node ID 151: Configure the high side current sensor. Enter the sensor units [A] for amps. Select the
sensor input type. For the current sensors, this will be [OPT 1-2]. Enter the sensor responsivity. This
number is typically found in the datasheet; for the clamp on current sensors, it is 0-5V for an input of 020A.
Cypress Envirosystems
Doc # 152-11103-01 Rev DRAFT
WFM User Manual
Page 11
DRAFT
Node ID 152: Configure the freezer thermocouple temp sensor. Enter the sensor units [C] for Celsius.
Select the sensor input type. For the thermocouple, this will be [Thermocouple Type-K]. The sensor
responsivity field is not needed for this sensor.
Cypress Envirosystems
Doc # 152-11103-01 Rev DRAFT
WFM User Manual
Page 12
DRAFT
Node ID 153: Configure the freezer door sensor. Select binary for unit type. In the pulldown box, select
open/closed as the binary states. The other information on the page has no effect on the binary sensor.
Cypress Envirosystems
Doc # 152-11103-01 Rev DRAFT
WFM User Manual
Page 13
DRAFT
Thermocouple Temperature Calibration: If the displayed temperature differs from the desired
temperature, a correction can be made by selecting One Point Calibration and entering the value desired.
The Value Measured and Cold Junction temperatures are populated with the latest readings.
6.8
Perform Functional Test
With the WFM configured and recording, test the inputs to the freezer.
6.8.1
Door Switch
•
•
•
•
6.8.2
Thermocouple
•
•
•
•
6.8.3
Open the freezer door to trigger the door switch.
Press the function button on the WFM to collect a reading.
Confirm that the door status is correct; ensure that the door is open when the switch says open. If
the switch is backwards, return to the Node Config page and change the Open/Close or Close/Open
binary option.
Repeat the test to confirm proper operation of the door switch.
Check the temperature reading, and confirm it is consistent with the freezer temperature.
Place your fingers over the thermocouple to change the temperature.
Press the function button on the WFM to collect a reading.
Confirm that the temperature reading changed.
Current Sensors
•
Check the current readings.
Cypress Envirosystems
Doc # 152-11103-01 Rev DRAFT
WFM User Manual
Page 14
DRAFT
•
•
6.9
Allow the freezer to cycle. This may take some time (1/2 hour). If the freezer does not cycle in a
reasonable period of time, open the freezer door to create a temperature change in the chamber.
As the freezer cycles, verify that the low stage compressor turns on first, then the high stage
compressor.
Restore the As-Found Condition of the Freezer
Once the WFM functionality has been verified, close any open freezer panels and put the freezer back in
place.
7.0 Battery Life
If you are using a battery powered WFM, the battery status of the WFM can be monitored through the
web console. Battery change-out must be performed by a qualified service technician. See Section 10.0,
Support, for details.
The battery life of the WFM is dependent on the sampling frequency. Typical ranges are listed below.
Sampling Frequency
1 sample per 1 minute
1 sample per 15 minutes
1 sample per hour
1 sample per day
Estimated Battery Life
1.5+ years
2.5+ years
3+ years
3+ years
8.0 Troubleshooting
9.0 Technical Specifications
Analog Data Inputs:
Number of Inputs:
Data Capture Rate:
Thermocouple:
Current Sensor:
Wireless Frequency:
Wireless Range:
Wireless Protocol:
Approvals:
Power Supply:
Battery Life:
Humidity:
Operating Temperature:
Storage Temperature:
Enclosure:
Cypress Envirosystems
Doc # 152-11103-01 Rev DRAFT
User-configurable: Typically internal temperature, door switch, high side
compressor current, low side compressor current
Up to four inputs per WFM
User-configurable
Type K, -328°F to 482°F (-200°C to 250°C)
Standard: Split core, 0-20A DC. Other current sensors available upon
request.
2.4GHz Direct Sequence Spread Spectrum, 100mW peak output
Up to 1600 ft (488 m), high interference immunity, extendable with
repeaters
Cypress Semiconductor's highly optimized industrial DSSS radio and
protocol. Integrates robust security, antenna and frequency diversity,
optional encryption and minimal interference with existing wireless systems
(for additional details, please see FAQ at www.cypressenvirosystems.com)
FCC Class B compliant, RoHS, ETSI compliant
Standard 110-240VAC or battery powered
>3 years (approximate)
10-99%RH, non-condensing
-4°F to 158°F (-20°C to 70°C)
-40°F to 185°F (-40°C to 85°C)
Rugged extruded aluminum industrial chassis (optional NEMA4/IP66
enclosure)
WFM User Manual
Page 15
DRAFT
Dimensions:
Weight:
5.7” x 2.2” x 1.6” (145mm x 57mm x 42mm)
0.51 lbs (230g)
10.0 Product Disposal
The WFM is recycled by Cypress Envirosystems. Contact a service technician or Cypress Envirosystems
headquarters to recycle the WFM. See Section 10.0, Support, for details.
11.0 Support
For additional support, including configuration, maintenance, and troubleshooting, please contact us.
Cypress Envirosystems
198 Champion Court
San Jose, CA 95134
+1 888 987 3210
Email: [email protected]
12.0 Warranty Information
Every product comes with a full one-year parts and labor warranty. Cypress Envirosystems monitoring of
battery status, product status, and potential communications packets are included during this period, so
that proactive service can be provided to our customers.
Cypress Envirosystems
Doc # 152-11103-01 Rev DRAFT
WFM User Manual
Page 16