1
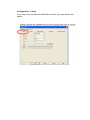
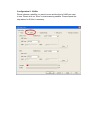
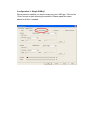
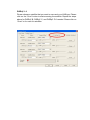
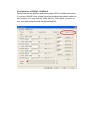
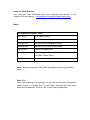
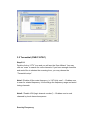
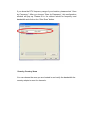
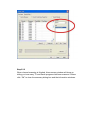
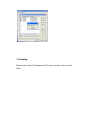
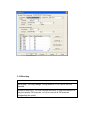
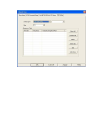
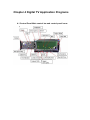
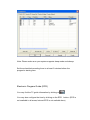
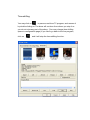
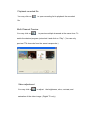
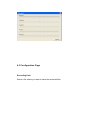
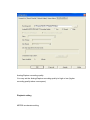
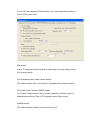
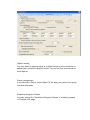
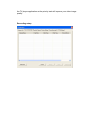
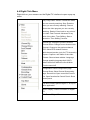
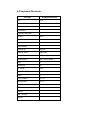
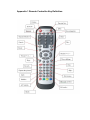
Digital TV
User’s Manual V3.X
Chapter 1 Digital TV Product Introduction
Introduction
Digital TV series allow you to watch digital TV & listen to Radio programs
via PCI or USB interface devices. With Digital TV products, users are able
to watch, record, and play back high quality digital TV programs on PC.
Please read the instructions carefully before you begin the installation.
Features
Ì
Ì
Ì
Ì
Ì
Ì
Ì
Ì
Ì
Ì
Ì
Ì
Ì
Ì
Digital TV and Radio Program Receiving
Support Common Interface (For CI Model)
NTSC / PAL / SECAM Analog TV (For Hybrid Device)
Analog AV Capture Function (For Hybrid Device)
FM Radio (For FM Device)
HDTV Support (Up to 1080i)
Support VGA DxVA Acceleration
4:3 / 16:9 / Full Screen Display
OSD Mode Channel Information Display
Video Adjustment
PIP / POP Dual Screen Display (For Multi Tuner Device)
Multi Language Audio Support
AC-3 Audio SPDIF Output Option
Favorite List
Ì
Ì
Ì
Ì
Ì
Ì
Ì
Ì
Ì
Ì
Ì
Ì
Ì
Local Channel Number (LCN) (For Terrestrial and Cable Device)
Classified Channel Management
Unicode Channel Name Support
Real Time Recording and Scheduling Recording (MPEG II)
Recording One Channel When Watching Another Channel (For Multi
Tuner Device)
Image Mode Recording File Management
Wake Up the System for Recording from S1 / S3 Mode
Time-Shifting
Electronic Program Guide (EPG) with Daylight Saving Time Support
Teletext
Teletext / DVB Subtitling
Single / Multi Still Frame Picture Capture (BMP)
Multi Free Channel Preview
Ì
Ì
Ì
Parental Control Password (PCP)
Easy / Advance Mode Channel Scan Setting
Channels Scan by Country / Frequency Range / Auto (For Terrestrial
Device)
Ì
Ì
Ì
Ì
Ì
Transponder / Satellite Auto Scan (For Satellite Device)
Antenna Utility
Signal Strength / Quantity Indicator
Off-Center Frequency Scan (For Terrestrial Device)
64 Bit OS Support
Ì
Ì
DiSEqC 1.2 / USALS Approved (For Satellite Device)
IR Remote Controller Support
Ì
Ì
Ì
MPEG-II / H.264 Software Decoding
User Friendly Interface
Software Upgradeable
(Note: Some features are only provided by content provider, be sure to
check if your content provider supports them or not.)
Chapter 2 Installation
Step 1: Activate Digital TV CD-ROM
After installing the DTV hardware device, insert the Digital TV driver CD
into your CD-ROM drive, and click on “Install Software and Driver”.
Step 2: Installation
Define the destination for the installation of DTV driver. Upon
the completion of the driver installation you will see the
icon appearing on your desktop
Chapter 3 Channel Scanning
You have to scan the channels before you watch TV programs. Please
click on the scanning icon to find channel information as below:
DVB-S
When there is only one LNB on your Satellite Dish, please connect
Satellite signal to SAT input1; and Select Device#1 or #2’s signal source
as the LNB-in#1. However, you can also watch the second Satellite
channel from the same transponder as the first Satellite Channel.
When there are two LNB ports on your Satellite Dish, please connect the
first LNB signal to SAT input1, and the second SAT LNB signal to SAT
input2; Set Device#1’s signal source as the LNB-in#1, Device#2’s signal
source as the LNB-in#2
DVB-T/Analog
When you have both DVB-T and Analog signals in one cable, please
connect this cable directly into the T/A input#1.
If you have one DVB-T cable, and one Analog cable, please connect the
DVB-T cable to T/A input#1, and the Analog cable to T/A input#2.
However, in this case, you can enjoy two DVB-T channels at same time,
but not two Analog channels in the same time.
3.1 Satellite
Step 3.1.1
Double click on DTV icon, you will see the Scanning Wizard on the screen.
If you only have one LNB port and without the DiSEqC/USALS, please
click on “scan” to find channels; if you have other equipments, please click
on ”Advanced setup”. For “Easy Setup” please choose the preffered
satellite as the target and click on the “Scan” button. You may go to
http://www.satcodx.com/eng/ for more information.
“Advanced Setup” (satellite setup)
In “Satellite Setup” page, there are five options to help you set up your
satellite: a. None b. 22 KHz, c. Simple DiSEqC, d. DiSEqC 1.0, and e.
DiSEqC 1.2/USALS. Please choose accordingly.
Note 1: Remember to click the “Apply” button every time after you change
the satellite setting.
Note2: There are three types of LBN and you must choose your LNB
type in any situations. Below are the three types of LBN:
a. Normal b. Universal c. Custom.
If you choose “Custom”, you will need to fill in the parameters for LNB 1
and LNB 2.
\
Configuration 1: None
If you only have one dish and LNB without motor, you may choose this
option.
Configuration 2: 22 KHz
Please choose a satellite you want to scan and the kind of LNB you want
to use. Please click on “Scan” to start scanning satellite. Please repeat the
step above for 0 KHz if necessary.
Configuration 3: Simple DiSEqC
Please select a satellite you want to scan and your LNB type. Click on the
“Scan” button to start scanning the satellite. Please repeat the steps
above for 0 KHz if needed.
DiSEqC 1.0
Please choose a satellite that you want to scan and your LNB type. Please
click on the “Scan” button to start scanning the satellite. Repeat the steps
above for DiSEqC B, DiSEqC C, and DiSEqC D if needed. Please click on
“Scan” to for scan for satellites.
Configuration 4: DiSEqC 1.2/USALS
Please choose the satellites and select power "ON" for LNB power option.
If you have USALS motor, please input the longitude and latitude values of
your location. You may use the “Drive East” or “Drive West” functions to
turn your dish facing towards the desired satellite.
Notes for USALS motor:
You could get more information about the longitude and latitude of your
location from this website – http://www.bcca.org/misc/qiblih/latlong.html
Motor:
The Functions of Motor Table
Drive East
Turn motor to east
Drive West
Turn motor to west
Set East limit
Set the limit for East angle turning
Set West limit
Set the limit for West angle turning
Cancel limit
Cancel the default limit
Go to Sat.
Start turning motor to the satellite you have selected
(for USALS Motor Only)
Go to Zero
Return motor to original (zero) point
Note: Please set up Sat2, Sat3, Sat4, and Sat5 by repeating the above
steps.
Step 3.1.2
When the scanning is completed, you will see the summary window as
shown below. It contains the TV and Radio channels that had been
scanned and detected. Click on “OK” to finish this configuration.
3.2 Terrestrial (DVB-T/ATSC)
Step3.2.1
Double click on “DTV” icon and you will see the Scan Wizard. You may
click on “scan” to search for more channels. If you have enough channels
and would like to shorten the scanning time, you may choose the
“Terrestrial setup”.
Note1:“Enable off-the-main-frequency (+/-167 kHz) scan”— Enables user
to scan for related frequency. It will enlarge the frequency range and avoid
losing channels.
Note2: “Enable LCN (logic channel number)”— Enables user to rank
channels by local channel sequence.
Scan by Frequency
If you know the DTV frequency range of your location, please select “Scan
by Frequency”. After you choose “Scan by Frequency”, this configuration
window will pop up. Please fill in the correct values for frequency and
bandwidth and click on the “Start Scan” button.
.Scan by Country /Area
You can choose the area you are located in and verify the bandwidth the
country adopts to scan for channels.
Step3.2.2
When channel scanning is finished, this summary window will show up
telling you how many TV and Radio programs had been scanned. Please
click “OK” to close the summary dialog box and the information windows.
3.3 Cable
Double click on “Digital TV” icon and you will see the “Scanning Wizard”.
You can choose between “Scan by Area” and “Scan by Frequency”.
Step3.3.1 Scan by Country/Area Channel List
Please select the country and the area for channel scanning. There are six
different symbol rates, please choose your symbol rate or fill in the
number of the symbol rate (we suggest you to select all). After you have
finished all settings please click on "Start Scan".
Scan by Frequency
Click on “Scan by Frequency” and you will see this configuration setting
page. Please fill in all information for channel scanning. After you finish
filling the information, click on "Start Scan".
Step3.3.2
You can see the summary massage window when the scanning is
completed. Please click on "OK" to close the ‘Channel Scan”
configuration.
3.4 Analog
Please select Area/TV standard and TV input, and then click on “Auto
Scan”.
3.5 FM setting
Tuning step: You may change Tuning scale to 0.1 or 0.05 to find FM
channels
Reception sensitivity: You may change sensitivity to High and Medium to
find good quality FM channels, or Low to receive all FM channels
disregarding the quality.
Chapter 4 Digital TV Application Programs
4.1 Control Panel Main control bar and control panel icons:
4.2 Functions
Picture in Picture (PIP)/ Picture Out of Picture (POP) switch
If you have multi Digital TV products for your PC you can watch multiple
TV channels at the same time.
You can select channels in the “Channel list” to pick channels that are
available to you.
You can watch and switch two channels at same time using the” POP
(Picture Out of Picture) and PIP (Picture In Picture) functions.
PS: All software functions only work on Primary screen If you want to
switch screen, please click the “Video Windows Switch”
PS: User can either have one channel recording or one channel
Time-Shifting at the same time.
Video Recording
You can record video by clicking on
You may also choose between Once/Daily/Weekly for pre-schedule
recording under Record Mode. Specify the date when pre-scheduling
weekly recording.
Wake up recording
Enter the record information in “Recording Setup” under the
“RecordSchedule” page, and set your PC to sleep mode by pressing the
button (“
hibernate”). By doing so the system will wake up 5 minutes
before your schedule time.
Note: Please make sure your system supports sleep mode and always
Set the scheduled recording timer to at least 5 minutes before the
program’s starting time.
Electronic Program Guide (EPG)
You may find the TV guide information by clicking on
You may also configure the time by clicking on the EPG button. (EPG is
not available in all areas; Internet EPG is not available here)
Multi-Language
Please click on
channels)
to change language. (SAP in not able in all
For Teletext You may click on
to look for Teletext information.
Note: Teletext does not support the UK DVB-T standard.
Time-shifting
You may click on
to pause a real-time TV program, and resume it
by double-clicking on The show will continue from where you stop it so
you do not miss any part of the show.. (You may change time shifting
space in configuration page).If you like to go back to the live program,
click on
and it will stop the time-shifting function.
Playback recorded file
You may click on
to open recording list to playback the recorded
file.
Multi-Channel Preview
You may click on
to preview multiple channels at the same time. To
watch the desired program just select it and click on “Play”. (You can only
preview FTA channels from the same transponder.)
Video adjustment
You may click on
to adjust
the brightness, color, contrast, and
saturation of the video image. (Digital TV only)
4.3 Configuration Page
Recording Path
Select a file where you want to save the recorded files.
Analog/Capture recording quality
You may set the Analog/Capture recording quality to high or low (higher
recording quality takes more space)
Playback setting
MPEG2 accelerator setting
If your VGA card supports DxVA function, you may enable this function to
reduce CPU’s work load.
VBI setting
If your TV program has pixel mixing in video edge, you may simply remove
it by cutting it away.
Force decoding noisy video frames setting
This feature allows user to force play TV programs with a bad reception
AC3 Audio Pass-Through (SPDIF output)
If you have a Dolby sound card, you may enable this function to get 5.1
channel sound effects. (Not all TV programs carry Dolby sound)
Subtitle setting
This feature allows subtitles to be turned on or off.
OSD
Enables “Auto play on star up” and the OSD will appear on screen when
you start the player.
Auto play setting
Allows to play TV programs directly after launching the software
Mute setting
You may mute the show when software is in minimized mode
Aspect ratio setting/ Full screen setting
You may set TV programs to display in different aspect ratios
Stop playback while signal quality is low
You may stop playing TV program when signal strength is below a specific
degree System setting
Capture setting
You may select to capture signal or multiple frames in native resolution or
aspect ration (small size picture) format. You can set time and interval for
multi-capture.
Power management
If you select the “Reject” mode, Digital TV will stop your system from going
into hibernate mode.
Predefined Program Classes
You may change the “Predefined Program Classes” to classify programs
in “Program List” page.
Remote Controller LCN channel selection support
You may set remote controller to “Logic Channel Number” mode
(Recommend for users in UK and France) or “Normal” mode
(Recommend for users in other areas).
Remote Controller channel switch waiting delay 2 seconds
Channel changes 2 seconds after you press down on the button.
Start in full screen mode
You may select to start program as “full screen” mode or “normal size”
mode
Time-Shifting buffer size
You may set the Time-Shifting feature to maximum; longer the time you
set, bigger the disk space is required.
Parental control password
You may set password to specific channels to avoid children from viewing
the adult programs. Password will be required when anyone attempts to
view the encrypted channels.
Control panel setting
You may configure the size of the screen to ” Windows mode” or “Full
screen mode”
TV Application Priority
You may configure theTV playing software as the priority program to your
PC. Other applications often take up a lot system resource, and playing
video on PC generally requires most of the system’s resource. By setting
the TV player application as the priority task will improve your video image
quality.
Recording setup
4.4 Right Click Menu
Right-click on your mouse over the Digital TV interface to open a pop-up
menu:
Play: Plays video. Pause: Freezes the video
you are currently watching. Stop: Ends the
video you are currently watching. Record:
Stores the video program you are currently
watching. Rewind: Goes back to any point of
the video. Fast Forward: Advances to any
point of the video. Time Shifting: Start or
pause the “Time Shifting” function
Channel Up: Change to previous channel
Channel Down: Change to next channel Last
Channel: Change to the previous channel
EPG: Show EPG window Preview:
Multi-channel preview (only for FTA channels)
Capture: Capture a still frame of the video
Teletext: Show teletext window. Language:
Change speaking language Apid (SAP):
Switch audio from different sources Mute:
Turn the sound off
Configuration: Show configuration page
Channel Scan: Show Channel Scan setting
page. Record List: Open record list Favorite
List: Open favorites list Control Panel: Show
control panel
Top Most: Always places Digital TV on top of
other application
About: Display version information of Digital
TV.
Exit: Turn off Digital TV.
4.5 Keyboard Shortcuts
Function
Keyboard Shortcut
Play
Enter
Stop
End
Pause
Space bar
Full Screen
Z
Properties windows
O
Record
Home
Stop Record
End
Program list
L
Time Shifting
T
Channel up
Page up
Channel down
Page down
Volume up
Shift + Arrow up
Volume down
Shift + Arrow down
Help
F1
Key cancel
Esc
Key enter
Enter
Digital TV Exit
X
Mute
M
Right Speaker
Ctrl + R
Left Speaker
Ctrl + L
Favorites List
V
EPG
E
Preview
K
Fast Forward
F
Rewind
R
Appendix 1 Remote Controller Key Definition
Appendix 2 Trouble Shooting
General
1. Windows cannot recognize card correctly (for example:
mistaken the DVB-T for a DVB-S):
You may switch to a different PCI slot and try again. Please make sure
that your PCI slot and the PCI card’s pin area are clean
2. Error message "Setting error! Fail to play the program!" or "Fail
to play your program" shows up:
Please check the driver of VGA card and sound card
Please make sure the hardware and software settings are correct, and try
scanning again
Please install Microsoft DirectX9.0c and Media Player 9.0 or higher
version
Poor signal quality could result in insufficient data rate and, sometimes,
wrong data for the Digital TV..
If it is a pay-TV channel and you are not authorized to watch make sure to
use the latest version of Digital TV software for decoder. Register
C:\Program Files\PC-TV\Common\Bin\claud.ax and CLVSD-dtv.ax again
with regsvr32.exe in C:\Windows\System32.
3. Screen blacked out when playing, or playback freezes on first
picture.
Find and install the latest VGA driver and DirectX 9.0c, and check if other
DTV players are installed, e.g. ProgDVB. If yes, remove them and
uninstall all the filter drivers.
4. What format of video does Digital TV record as? Why do I
have problem with converting/burning this file?
MPEG2. However, since some broadcasters have problems at Kpbs rate
in their TS (which is over DVD format limit), you will need to use MPEG
editing software to adjust the Kpbs rate.
5. Error message “Hardware setting error”
Please reinstall the driver.
6. Video can be played but Audio failed.
Please check the sound card or the volume setting.
7. Can I view and record different channels at the same time?
Yes, but the channels must be from the same transponder.
8. Why my EPG, Teletext and Subtitle cannot be shown?
In some areas, the broadcasters do not provide the services above.
Please contact you broadcaster for more information.
9. Cannot find driver for R/C receiver.
Please re-plug the receiver or change to a different USB port. You do not
need to install additional drivers because it will install the built-in HID
driver in your OS.
10. Remote control does not work
Check whether there are batteries inside. Then, check remote receiver:
The red light on receiver will remain ON while it is getting signal from the
remote control. Also, your remote control must point at the receiver when
in use.
11. How do I use Product with MCE 2005?
Please use BDA driver to run MCE2005.
12. Why can not I watch two different channels for my
3070/6090/6050?
You may have wrong input setting for your configuration, please go to
chapter 3 to check.
Satellite
1. Why can not I lock any channels when auto-scanning?
Please click on "Apply" button after you change any settings in "Dish
Setup", and then scan satellite or transponders.
Check whether the dish aims at the right satellite.
Check the cable connection between Digital TV device and the dish.
Please note that the cable should be connected to "LNB In"
F-connector of the card.
Set LNB power on to supply power to LNB. Note that most LNB need
power supply from tuner.
Check whether the voltage for LNB is correct. (18V-21V for Horizontal or
11V-14V for Vertical)
Check the settings of satellite; for example, LNB frequency is for C band
or Ku band.
Check the switch settings in "LNB - Switch" setting in "Configuration".
Please re-insert the Digital TV device to another PCI slot or USB port.
2. When the dialog "Unlock!" pops up, you can…
check the setting of polarization (H or V);
check the cable connection between Digital TV device and the dish.
Please note that the cable should be connected to "LNB In" F-connector of
the card.
3."22 KHz error" and "LNB Power Open Error"
Make sure that your Digital TV Sat/Sat-CI Card Driver was installed. (From
device manager)
Please note that any other TV tuner card equipped with Conexant BT878
can not be installed in the PC at the same time. Please remove other TV
tuner card and its driver.
Re-insert the Digital TV Sat/Sat-CI Card to another PCI slot. The previous
PCI slot might be damaged.
Clean up the golden finger of the Digital TV Sat/Sat-CI Card by pencil
eraser.
4. Why cannot I receive 18V program?
The LNB is 13V vertical LNB. IRD only receives 13V Program, Digital TV
only receive 18V Program. LNB is biased 2 cm. Please adjust the LNB or
contact the dish installer for service.
Terrestrial
Why cannot I lock any channels when auto-scanning?
Check whether the antenna connects to the device correctly. Check
whether the signal in your area is strong enough.
ATSC
Where can I get Air Digital TV Channel information?
http://www.checkhd.com/