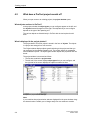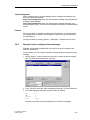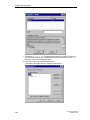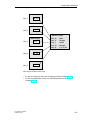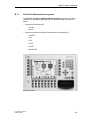
1
Contents Preface Introduction SIMATIC HMI ProTool Configuring Text-based Systems Installing and configuring ProTool Creating projects Configuration techniques User’s Manual Testing projects Documenting and managing projects System limits SIMATIC HMI documentation Abbreviations Glossary, Index 6AV6594-1AA05-2AB0 Release 12/99 1 2 3 4 5 6 7 A B C Trademarks The registered trademarks of Siemens AG are listed in the Preface. Some of the other designations used in these documents are also registered trademarks; the owner’s rights may be violated if they are used be third parties for their own purposes. Copyright © Siemens AG 1999. All Rights Reserved. Liability Disclaimer Distribution or duplication of this document, commercial exploitation or communication of its content is prohibited unless expressly authorised. Violation of these conditions shall render the perpetrator liable for compensation. All rights reserved in particular with respect to the issue of patents or registration of trademarks. The content of the printed document has been checked for consistency with the hardware and software described. The possibility of inaccuracies can nevertheless not be entirely eradicated as a result of which no guarantee of absolute accuracy is offered. The information in this document is regularly checked and any alterations found to be necessary included in the subsequent revisions. All suggestions for improvements gratefully received. Siemens AG Automatisierungs- und Antriebstechnik Bedien- u. Beobachtungssysteme Postfach 4848, D-90327 Nuremberg Siemens Aktiengesellschaft Copyright © Siemens AG 1999 Subject to alteration on the basis of technical modifications or advances. Order No. 6AV6594-1AA05-2AB0 Contents 1 2 3 4 Preface ........................................................................................................ 1-1 1.1 1.1.1 1.1.2 Guide to the Manual....................................................................... History ...................................................................................... Notation .................................................................................... 1-2 1-3 1-4 1.2 Other Sources of Assistance .......................................................... 1-5 Introduction ................................................................................................ 2-1 2.1 What is ProTool?............................................................................ 2-2 2.2 What is supplied with ProTool ........................................................ 2-4 2.3 Getting started: configuring text-based displays ............................. 2-6 Installing and configuring ProTool............................................................ 3-1 3.1 Installing ProTool............................................................................ 3-2 3.2 3.2.1 3.2.2 Configuring ProTool ....................................................................... Configuring with ProTool integrated in STEP 7 .......................... Example of an instance DB ....................................................... 3-5 3-5 3-7 Creating projects ........................................................................................ 4-1 4.1 Fundamental considerations when creating a project ..................... 4-2 4.2 What does a ProTool project consist of? ........................................ 4-4 4.3 Steps to be taken when creating a project ...................................... 4-5 4.4 Example: How to create an OP5 project......................................... 4-6 4.5 Setting up area pointers ................................................................. 4-7 4.6 Selecting a PLC driver ................................................................... 4-9 4.7 Which projects can you convert? ................................................... 4-10 4.8 Copying objects: Between projects and within a project .................. 4-11 4.9 4.9.1 4.9.2 Undoing and redoing actions.......................................................... Undoing the last action.............................................................. Redoing the last action.............................................................. 4-13 4-14 4-14 4.10 4.10.1 Retrieving project information ........................................................ What is displayed in the "Cross-Reference" window? ................ 4-16 4-16 ProTool User’s Guide Release 12/99 i Contents 4.10.2 5 ii What can you view under "Project Information"?....................... 4-17 Configuration techniques .......................................................................... 5-1 5.1 What are screens?......................................................................... 5-2 5.2 5.2.1 5.2.2 Configuring display elements ......................................................... What is static text?.................................................................... What are output fields? ............................................................. 5-5 5-5 5-6 5.3 5.3.1 5.3.2 5.3.3 Configuring controls ....................................................................... What are input fields? ............................................................... What are combined input/output fields? .................................... What are function keys?............................................................ 5-7 5-7 5-8 5-8 5.4 5.4.1 5.4.2 5.4.3 5.4.4 5-10 5-10 5-11 5-13 5.4.5 5.4.6 5.4.7 Using tags...................................................................................... What are tags?.......................................................................... Properties of tags...................................................................... Example: Scaling tags............................................................... Example: How to set the acquisition cycle and the standard clock pulse ................................................................................ What is a tag list? ..................................................................... What is address multiplexing?................................................... Example: How to configure a multiplex tag................................ 5.5 5.5.1 Creating headers and footers ......................................................... Creating headers and footers .................................................... 5-19 5-19 5.6 5.6.1 Creating text or graphic lists........................................................... What are text or graphic lists?................................................... 5-20 5-20 5.7 5.7.1 Configuring a scheduler ................................................................. What is a scheduler?................................................................. 5-21 5-21 5.8 5.8.1 5.8.2 5.8.3 5.8.4 5.8.5 5.8.6 5.8.7 5.8.8 5.8.9 5.8.10 5.8.11 5.8.12 5.8.13 5.8.14 5.8.15 Configuring messages.................................................................... Reporting operating and process states..................................... What goes into a message? ...................................................... What parameters do you set for messages?.............................. Acknowledging messages ......................................................... What settings are there for message classes?........................... Example: How to configure alarm messages............................. What are system messages? .................................................... Example of displaying system messages .................................. How to log messages on the printer?......................................... Configuring printers for the operating unit.................................. Displaying messages on the operating unit................................ What is in the message buffer?................................................. What communication areas are required for messages? ........... Optional communication areas for messages ............................ How are messages initiated?..................................................... 5-23 5-23 5-24 5-25 5-26 5-26 5-27 5-28 5-29 5-30 5-31 5-31 5-32 5-34 5-34 5-35 5.9 5.9.1 Using functions .............................................................................. What functions are used for ...................................................... 5-37 5-37 5-14 5-15 5-16 5-17 ProTool User’s Guide Release 12/99 Contents 5.9.2 5.9.3 5.9.4 5.9.5 5.9.6 5.9.7 6 7 Events for triggering functions................................................... Function parameters ................................................................. Combining multiple functions .................................................... Function screens....................................................................... Peculiarities with conversion functions ...................................... Example: changing the operating mode .................................... 5-38 5-39 5-42 5-43 5-43 5-44 5.10 5.10.1 5.10.2 5.10.3 5.10.4 5.10.5 Creating recipes............................................................................. What is a recipe? ...................................................................... Configuring recipes ................................................................... Transferring data records .......................................................... Example: How to create a recipe............................................... Example: How to transfer data records...................................... 5-48 5-48 5-52 5-54 5-55 5-59 5.11 5.11.1 5.11.2 5.11.3 5.11.4 5.11.5 Operator guidance ......................................................................... Providing Help text.................................................................... What are dynamic attributes?.................................................... Evaluating key operation........................................................... Driving light-emitting diodes...................................................... Assigning operator authorization ............................................... 5-62 5-62 5-62 5-63 5-63 5-64 5.12 5.12.1 5.12.2 5.12.3 5.12.4 5.12.5 5.12.6 5.12.7 Configuration in foreign languages................................................. System requirements for foreign languages .............................. User interface language and project languages ......................... Configurable languages ............................................................ Language dependent keyboard assignment............................... Reference text .......................................................................... Steps to creating a multilingual project ...................................... Cyrillic characters...................................................................... 5-66 5-66 5-66 5-68 5-68 5-69 5-70 5-71 Testing projects .......................................................................................... 6-1 6.1 Testing projects .............................................................................. 6-2 6.2 Downloading the executable project file ......................................... 6-3 6.3 Peculiarities of MPI transfers ......................................................... 6-4 6.4 Status/Force Tag ............................................................................ 6-5 Documenting and managing projects ....................................................... 7-1 7.1 7.1.1 7.1.2 7.1.3 Documenting projects .................................................................... Printing project data .................................................................. Example: creating a customized report ..................................... Constraints with printing ............................................................ 7-2 7-2 7-3 7-6 7.2 7.2.1 7.2.2 Managing projects.......................................................................... Project management with integrated operation.......................... Managing projects in stand-alone operation............................... 7-7 7-7 7-7 ProTool User’s Guide Release 12/99 iii Contents A B C iv System limits .............................................................................................. A-1 A.1 OP7 and OP17 system limits ......................................................... A-2 SIMATIC HMI documentation ..................................................................... B-1 B.1 B.1.1 B.1.2 B.1.3 Documentation for ProTool............................................................. ProTool for Windows-based systems......................................... ProTool for graphical displays.................................................... ProTool for text-based displays ................................................. B-2 B-3 B-4 B-5 B.2 Overview of the SIMATIC HMI documentation ............................... B-6 Abbreviations.............................................................................................. C-1 Glossary ...................................................................................................... D-1 Index............................................................................................................ I-1 ProTool User’s Guide Release 12/99 Preface 1 Overview This chapter explains how the manual is organized and where to find what information. Trademarks The following names are registered trademarks of Siemens AG: • SIMATIC • SIMATIC HMI • HMI • ProTool/Pro • ProTool • ProTool/Lite • ProAgent • SIMATIC Multi Panel • MP270 • SIMATIC Multifunctional Platform ProTool User’s Guide Release 12/99 1-1 Preface 1.1 Guide to the Manual Contents This manual provides all the information you require to • install and configure ProTool/Lite • configure your operating unit to suit your installation • upload the executable project file to the system and test it • manage your project What you should already know about This manual assumes that you already have general experience of working with Windows® applications. The information given in this manual is therefore limited to a description of the functions and routines provided by ProTool/Lite and which are not involved in the standard operation of the operating system. This manual also assumes that you have a basic familiarity with the configuration of your PLC, e.g. SIMATIC S5 or SIMATIC S7. Where to find what The chapters of this manual are arranged by topic as follows: • The Introduction explains the advantages of the ProTool/Lite configuration software and demonstrates how easy it is to create an executable project file for your operating unit using ProTool/Lite. • The chapter Installing and configuring ProTool explains the requirements your system must satisfy, how to integrate ProTool/Lite in STEP 7 and how to install ProTool/Lite on your configuration computer. • The chapter Creating projects shows you the basic considerations that are worth making before creating a project and what a project consists of. It also explains for what tasks you set up which data areas on the PLC and must specify in ProTool/Lite as area pointers. • The chapter Configuration techniques shows you how to configure operating and display elements, how to implement a user prompt system on your operating unit and report process statuses. • The chapter Testing projects explains how to check the results of your work. It shows how to compile your project into an executable project file and upload it to the system. 1-2 ProTool User’s Guide Release 12/99 Preface • The chapter Documenting and managing projects introduces the Project Manager. It shows you how to print out project data and how to use the functions Backup and Restore to backup and restore your project data. • Finally, the Appendix provides details of the system limitations and an overview of the SIMATIC HMI documentation. Other sources of information 1.1.1 • You will find more examples and guidance together with reference material, for example, on functions and PLC drivers in online Help. • For device-specific information, please refer to your equipment manual. • Detailed information about the ProTool/Pro RT visualization software is given in the ProTool/Pro Runtime User’s Guide. • The fundamentals of communication between the operating unit and the PLC are described in the Communication for Windows-based Systems User’s Guide. • The ProTool/Pro ReadMe contains important notes on installation and configuration; this also applies to ProTool/Pro RT ReadMe with regard to the runtime system. History This manual describes the configuration of text-based displays with ProTool. The various issues of the user’s guide correspond to the following versions of ProTool: Issue 06/95 Valid for ProTool/Lite versions up to and including version 1.01. Issue 01/96 Extended functions and editorial revisions of the manual. Valid for ProTool/Lite version 2.0 or higher. Issue 09/96 Inclusion of OP7 and OP17. Valid for ProTool/Lite version 2.5 or higher. Issue 04/97 Extended functions and editorial revisions of the manual. Valid for ProTool/Lite version 3.0 or higher. Issue 07/98 Upgrades and inclusion of C7-633 and C7-634. Software runs under Windows® 95 and WindowsNT ® 4.0 or higher. Valid for ProTool/Lite version 5.0 or higher. Issue 12/99 Software runs under Windows® 95/98, Windows® 2000 and WindowsNT® 4.0 or higher. Valid for ProTool/Pro CS 5.2 or higher ProTool User’s Guide Release 12/99 1-3 Preface 1.1.2 Notation There are a number of character formats used in this manual to assist reader orientation. 1-4 Output Words printed in Courier typeface represent input and output data as it appears on the screen of the operating unit. F1 The names of keys are printed in bold type. File → Edit Menu items are printed in italics. Succeeding levels are separated by arrows. The complete sequence of menu items leading to the final menu item required is always shown. Messages dialog box The names of dialog boxes, tabs and buttons are printed in italics. ProTool User’s Guide Release 12/99 Preface 1.2 Other Sources of Assistance SIMATIC Customer Support Hotline Available worldwide around the clock: Nuremberg Johnson City Singapore SIMATIC Basic Hotline Nuremberg Johnson City Singapore SIMATIC BASIC Hotline SIMATIC BASIC Hotline SIMATIC BASIC Hotline Local time: Mon - Fri 7:00 to 17:00 Local time: Mon - Fri 8:00 to 19:00 Local time: Mon - Fri 8:30 to 17:30 Tel.: +49 (911) 895-7000 Tel.: +1 423 461-2522 Tel.: +65 740-7000 Fax: +49 (911) 895-7002 Fax: +1 423 461-2231 Fax: +65 740-7001 E-mail: simatic.support@ nbgm.siemens.de E-mail: simatic.hotline@ sea.siemens.com E-mail: simatic.hotline@ sae.siemens.com SIMATIC Premium Hotline (chargeable, available only with SIMATIC Card) Times: Mon - Fri 0:00 to 24:00 Tel.: +49 (911) 895-7777 Fax: +49 (911) 895-7001 ProTool User’s Guide Release 12/99 1-5 Preface SIMATIC Customer Support Online Services SIMATIC Customer Support Online Services offer extensive additional information about SIMATIC products as follows. • Up-to-date general information is available − on the Internet at http://www.ad.siemens.de/simatic − by fax polling on 08765–93 02 77 95 00 • Up-to-date product information and downloads for practical use can be obtained from − the Internet at http://www.ad.siemens.de/support/html-00/ − the bulletin board system (BBS) in Nuremberg (SIMATIC Customer Support Mailbox) on +49 (911) 895–7100. To call the mailbox, you should use a modem with a transmission rate of up to V.34 (28.8 kbd) using the following settings: 8, N, 1, ANSI, or you can connect via ISDN (x.75, 64 kbit). 1-6 ProTool User’s Guide Release 12/99 Introduction ProTool User’s Guide Release 12/99 2 2-1 Introduction 2.1 What is ProTool? Configuring text-based displays ProTool/Lite is an innovative configuration software package for the text-based displays of the SIMATIC HMI device family. You use the same configuration software to configure all the devices in the family. Regardless of the device for which you are creating your project, ProTool always presents you with the same, familiar user interface. Example of the structure: ProTool/Lite PC PLC OP17 F1 F2 F3 F4 F5 F6 F7 K1 K2 K3 K4 K5 K6 K7 F8 K8 K9 K10 K11 K12 K13 K14 K15 K16 Example: a PC for configuration and an OP17 as the operating unit: ProTool is easy to use ProTool is a Windows application for Windows® 95, Windows ® 98 and Windows® NT. The fully graphical user interface allows you to create object-oriented projects easily by mouse click. No special programming knowledge is required. ProTool is versatile The editors provided in ProTool can be called simultaneously. You can also open different projects, even those of different devices, simultaneously and transfer data via the clipboard from one project to another. 2-2 ProTool User’s Guide Release 12/99 Introduction ProTool can also be integrated in the SIMATIC STEP 7 configuration software. Thus allowing you to select STEP 7 symbols and data blocks as tags in ProTool. This not only saves you time and money but also eliminates the possibility of errors made when entering the same data several times. You will find more information on configuring ProTool with SIMATIC STEP 7 at Configuring with ProTool integrated in STEP 7 (Chapter 3.2.1). Offline configuration With ProTool you create and edit your projects offline. The device need not yet be available at this time. The configuration computer displays the configured process data as it will subsequently be displayed on the device. On completion of configuration you can download the executable project file from the configuration computer to the device. ProTool User’s Guide Release 12/99 2-3 Introduction 2.2 What is supplied with ProTool PLC drivers ProTool is shipped as standard with drivers for the following PLCs: • Siemens PLCs − SIMATIC S5 − SIMATIC S7 − SIMATIC 500/505 • PLCs of other manufacturers − Allen Bradley DF1 − Allen-Bradley DH485 − GE Fanuc − MITSUBISHI FX − Modicon Modbus − OMRON (Link/Multilink) − Telemecanique TSX Adjust − Telemecanique Uni-Telway • FREE SERIAL Sample projects ProTool is shipped with ready-made sample projects for different PLCs. The examples are located in the ProTool directory under ..\SAMPLES. The directory also contains the associated PLC programs. The sample project and PLC program are matched to each other. Standard projects and standard screens Standard projects are supplied for almost every configurable operating unit. Functions that are widely used are already configured in the standard projects. Standard projects contain device-specific standard screens. These provide all the functions you need for the basic operation of your operating unit. If you select the Use Standard Project check box in the project assistant when you start ProTool, ProTool automatically integrates in your new project the standard project associated with your operating unit and the set PLC. 2-4 ProTool User’s Guide Release 12/99 Introduction Utilities There are a number of utilities and other useful files in the ProTool directory under ..\UTILITY. Utilities to be found there include the Backup/Restore utility ProSave for OP7, OP17 and TD17. ProTool User’s Guide Release 12/99 2-5 Introduction 2.3 Getting started: configuring text-based displays If you are not all that familiar with the ProTool visualization software, we would recommend you read this brief introduction and get started with ProTool/Pro with the help of the example. The printed version is enclosed with this manual. Requirements for working with the brief introduction To do the exercises for ProTool in this brief introduction, you require • a PC as a configuration computer • the SIMATIC ProTool/Lite 5.2 software package ProTool/Lite includes the ProTool/Lite configuration software and ProTool/Pro RT runtime software. • an operating unit - for example, OP17. Other documents on ProTool/Lite You will find the electronic manuals on the installation CD under: Docs\..\UsersManual_Text.pdf You can find all the information contained in this manual in ProTool’s online Help. 2-6 ProTool User’s Guide Release 12/99 Installing and configuring ProTool 3 Overview In this chapter you will learn • the requirements the configuration computer must meet and • how to install ProTool. ProTool User’s Guide Release 12/99 3-1 Installing and configuring ProTool 3.1 Installing ProTool System requirements The following table shows the recommended system requirements for running the ProTool configuration software. Configuration Recommendation CPU Pentium 133 MHz Main memory 64 MB Free hard disk space 150 MB for ProTool 5 MB for each additional language Drive CD-ROM Operating system Microsoft Windows 95 with Service Pack 1 (Build 950a) Microsoft Windows 95 OSR 2 (Build 950b) Microsoft Windows 98 Microsoft Windows NT 4.0 with Service Pack 3 Microsoft Windows 2000 Remark Service Pack 1 must not be installed on a Windows 95 OSR 2 (Build 950b) or higher. Integration in STEP 7 If you have STEP 7 programming software as of V4 on your computer, you can also install ProTool integrated in STEP 7. This has the following advantages: 3-2 • You manage ProTool projects using SIMATIC Manager (i.e. the same management tool that you use for your STEP 7 projects). • You can select STEP 7 symbols and data blocks from the S7 symbol table as tags. The data type and address are entered automatically. • ProTool lists all the PLCs in your STEP 7 project and, once a PLC has been selected, determines the associated address parameters. • In STEP 7 you can configure ALARM_S messages and output them to the operating unit. ProTool User’s Guide Release 12/99 Installing and configuring ProTool Selecting languages The installation program prompts you for the options and languages to be installed. If you wish to install several languages simultaneously, select the User defined option when you are installing. You can then change the ProTool language later without having to reinstall ProTool by opening Start Menu→ Simatic → ProTool CS → ProTool Setup. During installation you specify the language that you want to be active after installation. Installing ProTool from a CD-ROM To install ProTool, proceed as follows: 1. Insert the installation CD in the CD-ROM drive. If the autorun function for your CD-ROM drive is activated, the browser starts automatically when you insert the CD. Alternatively, select the CD-ROM drive in Explorer, and double-click install.exe to start the installation program. 2. Select the installation language you want at Language. 3. Select Installation and install ProTool/Pro CS first, followed by ProTool/Pro RT. When installing, follow the instructions on the screen. Note: Make sure when you are installing ProTool/Pro RT that you do not use blanks in the path name if you choose to install ProTool/Pro RT under a different path name from the one proposed. 4. If you have STEP 7 programming software as of V4 on your computer, you can also install ProTool integrated in STEP 7. ProTool checks in Setup whether STEP 7 is installed on your system. If STEP 7 is has been installed, you can choose whether ProTool should be installed in Integrated or Stand-alone mode. 5. Install the license when prompted to do so. If you do not have a license when you are installing ProTool/Pro Runtime, you can install it later. The procedure for this is described in commissioning instructions, software protection. 6. Reboot your PC so that all registrations can be performed. Installing ProTool from a hard disk In order to install ProTool from the hard disk, you first have to copy al the folders and all their subfolders, including all their files in the main folder, from the CD to the hard disk: ProTool User’s Guide Release 12/99 3-3 Installing and configuring ProTool Uninstalling ProTool On the Windows start menu at Settings → Control Panel → Software, choose ProTool and installed options from the and click Add/Remove. Starting ProTool After ProTool has been installed, you will find a folder on the Start menu called Simatic, in which the following symbols are available: ProTool Lite CS V5.20 ProTool Help ProTool Lite CS ProTool ReadMe ProTool Setup 3-4 ProTool User’s Guide Release 12/99 Installing and configuring ProTool 3.2 Configuring ProTool 3.2.1 Configuring with ProTool integrated in STEP 7 Requirements If the PLC you are using is a SIMATIC S7 and you have installed STEP 7 configuration software on your system, you can integrate ProTool in STEP 7. Advantages of STEP 7 integration As you are using the same database as STEP 7, you have the following advantages: • You assign your symbolic name once only and can then use it everywhere. Note If you use an instance DB in the STEP 7 program, the corresponding instance FB must also be defined in the symbol table in STEP 7. If this is not the case, this DB is not offered for selection in ProTool. • When you configure variables and area pointers, you access the STEP 7 symbol table. Changes to the symbol table in STEP 7 are updated in ProTool (refer to the figure at Properties of tags (Chapter 5.4.2)). • When the project is compiled, the data is synchronized. • In STEP 7 you can configure ALARM_S messages and output them to the operating unit. • The communication parameters of the PLC are transferred directly to your project. ProTool User’s Guide Release 12/99 3-5 Installing and configuring ProTool Example Driver Parameters dialog box for integrating STEP 7 Integrating ProTool projects Projects created in ProTool on a stand-alone basis cannot be called directly using SIMATIC Manager. To include projects like this in a STEP 7 project, they have to be integrated. To do this, choose the File → Integrate menu command in ProTool. In the STEP 7 configuration, give the ProTool project a different name to the original project. Note Conversely, projects created with ProTool on an integrated basis must on no account be edited with ProTool on a stand-alone basis. If they were, the connection to the STEP 7 symbol table would be lost. Starting ProTool Start ProTool directly under Windows. Choose File → New. This opens a dialog box in which you select a STEP 7 project and create a ProTool project in it. You then select the operating unit. 3-6 ProTool User’s Guide Release 12/99 Installing and configuring ProTool Example of the New dialog box for integrating STEP 7 3.2.2 Example of an instance DB In order to be able to access an instance DB in the symbol table of STEP 7 in ProTool, the associated FB must be defined. This is illustrated by the following example: ProTool User’s Guide Release 12/99 3-7 Creating projects 4 Overview In this chapter you are given an overview • of the project structure and • the procedure for creating a project. ProTool User’s Guide Release 12/99 4-1 Creating projects 4.1 Fundamental considerations when creating a project Objective To operate and monitor a machine or process. To do this, you map the machine or process on the operating unit as accurately as is necessary. System configuration Communication takes place between the operating unit and the machine or process by means of tags via the PLC. The value of a tag is written to a memory area (address) on the PLC, from where it is read by the operating unit. The following diagram provides an overview of the fundamental structure: Operating unit Printer Communication by means of tags PLC Machine, process A typical structure Before you begin If you are creating a project for the first time, note the following recommendations: • Use the standard screens from the standard projects. When creating a new project, you can select a standard project for your system (operating unit and PLC) from the project assistant. • 4-2 Under ...\ProTool\Samples you will also find the sample project "Quickmix", which is implemented for various operating units and PLCs. ProTool User’s Guide Release 12/99 Creating projects • Consider also whether you can use parts of existing projects. Message texts or graphics, for example, are suitable for this. • In the case of operating units from a single device family, it is also possible to copy entire project sections via the clipboard. Note The prerequisite for successful copying between projects is that the system limits of the operating unit for which you want to use the copied sections must not be exceeded. ProTool User’s Guide Release 12/99 4-3 Creating projects 4.2 What does a ProTool project consist of? When you open a new or an existing project, the project window opens. What objects are there in ProTool? In the project window, the object types you can configure appear on the left, and the objects themselves appear on the right. The objects that you can configure depend on the type of the operating unit. The various objects are linked directly in ProTool with the tool required to edit them. What is displayed in the project window? The project data of a ProTool project is stored in the form of objects. The objects in a project are arranged in a tree structure. The Project window displays object types that belong to the project and that you can configure for the selected operating unit. The project window is comparable with Windows® Explorer. The object types contain objects with properties that can be set. The project window is structured as follows: • The title bar contains the project name. • The left half of the screen displays object types that you can configure, and the right half of the screen displays the objects contained in them. Example of a project window with tags Note If you maximize the project window, tabs are displayed for the open windows along the bottom border to enable you to change easily from one window to another. 4-4 ProTool User’s Guide Release 12/99 Creating projects 4.3 Steps to be taken when creating a project To create a project, proceed as follows: 1. Create a new project (File → New or File → Open) Choose File → New to create a new project. The project assistant guides you through a number of selection dialogs. 2. Select a PLC Select a driver for your PLC. Only those drivers with which the operating unit can be run are displayed. 3. Use a standard project Select a standard project in order to use it as a basis. 4. The project assistant allows you to enter information on the project in the summary. If you click the Create button, the project window opens. 5. Define communication areas (System → Area Pointers). To enable the operating unit and PLC to communicate with each other, you have to define communication areas (Setting up area pointers (Chapter 4.5)) that are to be used by them both. 6. Create a project This is the most involved part of the work. You can approach it in one of two ways: Either you create all the individual parts first and then link them to form a meaningful structure (the bottom → up approach), or you begin by designing a structure and then fill it with the individual elements (the top → down approach). To do this, you basically have to perform the following steps: − Create the user interface with display and controls. − Configure tags in order to enable data interchange with the PLC. − Configure messages in order to obtain information on the state of the machine or process. − Split the display on the operating unit (not on devices with a text-based display). In addition, you can configure additional objects, such as recipes, depending on the operating unit. ProTool User’s Guide Release 12/99 4-5 Creating projects 4.4 Example: How to create an OP5 project To create a project for an OP5 and the SIMATIC S7-300/400 PLC, proceed as follows: 1. Choose File → New or click . 2. In the Select Device dialog box under Text-based Operator Panels, select an OP5. Click the Continue button. 3. In the Select PLC dialog box, enter the name of the PLC. From the list below this, select the driver you want to use for communication between the operating unit and the PLC. 4. Click the Parameters button to set the driver parameters Click the Continue button. Note: You can also set the driver parameters at a later date. 5. In the Standard projects dialog box, select Use standard project. This puts you on the standard project. 6. Choose the System → Area Pointers menu command to configure the Event Messages communication area. Select this under Type and then click the Add button. 7. Enter the following values in the Event Messages dialog box: DB: 70, Length: 4. Confirm by clicking OK. You can then configure 64 event messages. Note: This data block must also be available in your PLC program. 8. Choose System → Screen/Keys to divide up the OP display. 9. Select Window/Window for Alarm/Event Mess. so that event messages and alarm messages can be displayed simultaneously in screens. 10. Select the message area via Active and, holding down the mouse button, position it in the screen layout. This completes the subdivision of the OP display. 11. Proceed to configure the event messages. If you enter more than 64 messages, only messages 0000 to 0063 can be output on the operating unit. 12. Save your project with File → Save. 4-6 ProTool User’s Guide Release 12/99 Creating projects 4.5 Setting up area pointers What are area pointers for? A defined address area on the PLC for data interchange with the operating unit is addressed by means of an area pointer. Choose System → Area Pointers to set up area pointers. What area pointers are available? The number of area pointers available varies depending on the selected operating unit. For information on how large the area pointers should be when you create them, and the structure they have to have, refer to the Communication User’s Manual. The overview below lists the various area pointers and what they are used for. The order in which they are listed corresponds to that in ProTool. Area pointer Explanation Interface area The interface area is the interface between the PLC program and the operating unit. It contains data and pointers to areas required for data interchange between the PLC and the operating unit. User version The user version identifies the version of the project. A version check is performed on the PLC by means of this area pointer. Screen number The operating unit stores information on the current screen in this data area. You can evaluate this information in the PLC program in order to call another screen, for example. Data mailbox The data mailbox is a data area on the PLC. It is used as intermediate storage to download data records from the operating unit to the PLC. The data mailbox contains only the values of the tag. The addresses are not transferred. Event messages You can configure an event message for each bit in this data area. The bits are assigned to the message numbers in ascending order. As soon as the PLC sets a bit in this data area, the operating unit recognizes that the assigned event message has "arrived". Conversely, the operating unit interprets the message as "gone" after the bit is reset in the PLC. ProTool User’s Guide Release 12/99 4-7 Creating projects Area pointer Explanation Alarm messages You can configure an alarm message for each bit in this data area. The bits are assigned to the message numbers in ascending order. As soon as the PLC sets a bit in this data area, the operating unit recognizes that the assigned alarm message has "arrived". Conversely, the operating unit interprets the message as "gone" after the bit is reset in the PLC. PLC acknowledgement The PLC uses this area to indicate to the operating unit which alarm messages have been acknowledged by the PLC. OP acknowledgement The operating unit uses this area pointer to indicate to the PLC which alarm messages have been acknowledged on the operating unit. System keyboard The operating unit transfers keystrokes of the system keys via this data area. You can evaluate this information in the PLC program in order to indicate incorrect operation by means of a message, for example. Function keyboard The operating unit transfers keystrokes of the function keys via this data area. You can evaluate this information in the PLC program in order to indicate incorrect operation by means of a message, for example. LED assignment The PLC can use this area pointer to drive the lightemitting diodes on the function keys of the operating unit. Recipe number The recipe number mailbox is a data area in the SIMATIC S5. It is required for the transfer of data records between the operating unit and the PLC. The recipe number mailbox contains the recipe number and the number of the data record to be transferred. Recipe mailbox The recipe mailbox is a data area in the SIMATIC S5. It is used as intermediate storage to download data records from the operating unit to the PLC. Not only the values of tags but also their addresses are transferred to the recipe mailbox. Successive recipe mailbox The successive recipe mailbox is a data area on the SIMATIC S5 for transferring data records. You only need to create it when the recipe mailbox cannot accommodate the largest data record to occur. Note There are no area pointers for the SIMATIC S7-NC. 4-8 ProTool User’s Guide Release 12/99 Creating projects 4.6 Selecting a PLC driver Select the PLC driver with the project assistant in the Select PLC dialog box. You can also define or later edit the parameters there if you select PLC Properties in the project window. Available PLC drivers You can select the following drivers for devices with a text-based display: • SIMATIC S5 - AS511 • SIMATIC S5 - FAP • SIMATIC S5 - L2-DP • SIMATIC S7-300/400 • SIMATIC S7-200 • SIMATIC S7-NC • SIMATIC 500/505 • Allen-Bradley DF1 • Allen-Bradley DH485 • FREE SERIAL • GE Fanuc • MITSUBISHI FX • Modicon Modbus • OMRON Hostlink/Multilink • Telemecanique Repercussions for tags The address depends on the PLC you are using. The way in which the address of a tag with a PLC connection is displayed depends on the PLC selected. Select the available data types and data formats in the Tag dialog box under Type or Format. ProTool User’s Guide Release 12/99 4-9 Creating projects 4.7 Which projects can you convert? You can convert a ProTool project that you created for an OPx5 operator panel into a project for an OPx7. You can convert the following projects: Source: 4-10 Destination: OP5 → OP7 OP15C → OP17 ProTool User’s Guide Release 12/99 Creating projects 4.8 Copying objects: Between projects and within a project Principle You can cut or copy selected parts of your project and paste them via the clipboard. For example you can copy text and fields from the alarm message editor to the event message editor, or graphic elements from one screen to another. The prerequisite for successful copying between projects is that the system limits of the destination project must not be exceeded. Preparations for new projects Before starting to copy objects from an existing project, you should without fail carry out the following global settings in the new project. This will ensure that no loss of data occurs during copying due to different settings. • Under the heading System → Screen / Keys make the subdivision of the screen display the same as in the source project. • Make the name and driver of the PLC the same as in the source project. Procedures There are two ways of pasting objects from the clipboard to the destination project: • Menu command Edit → Paste The object is pasted from the clipboard to the destination project. If there is already an object of the same name in the destination project, the object is pasted under a new name. • Menu command Edit → Paste Special Only objects that are different are pasted. If there is already an identical object of the same name in the destination project, this is used. If there is an object that has the same name but is not identical, the object from the clipboard is pasted under a new name. You can utilize this copying variant to make the destination project the same as the source project, for instance. Note In the case of both Paste and Paste Special, ProTool always checks the underlying objects (such as the limit value tags of a tag which has been copied) to ensure that existing objects are reusable. If there is already an object of the same name in the destination project, the object to be pasted will be renamed if necessary. It is given the next available name in the destination project. ProTool User’s Guide Release 12/99 4-11 Creating projects Example: Tag VAR_4 will be renamed VAR_11 if tags VAR_1 through VAR_10 already exist in the destination project. What is copied? You can copy the following via the clipboard: • All objects listed in the project window, such as screens, text or graphic lists, tags etc. • Objects from screens (trends, fields, graphics etc.) in the screen editor. • Messages and objects from messages (message text, fields, info text etc.) in the message editor. An object is copied complete with its attributes and all cross-referenced objects. Special situations encountered during copying are reported in the system message window under Clipboard. This gives you information about any objects that have not been copied or renamed, for example. Special situation with screens If the object to be copied refers to a screen that does not exist in the destination project, the underlying screen is not copied; instead a blank screen is created as a dummy if the destination project does not contain a screen that can be reused. This ensures that you will not copy the complete source project by mistake along with the start screen. Afterward, when you paste the screen via the clipboard, the dummy screen in the destination project will be automatically replaced by the proper screen. What is not copied? These objects are not copied: 4-12 • Objects that are unknown in the destination project (such as functions or command buttons when copying from TP27 to OP27) • Area pointers • Global function key assignments • Character sets • In the case of multilingual projects, only the languages available in the destination project are copied. No new languages will be created. ProTool User’s Guide Release 12/99 Creating projects 4.9 Undoing and redoing actions Purpose During configuration, it may become necessary to cancel actions which have been performed, or to reconstruct actions which have been discarded. The two commands Undo and Redo in the Edit menu are used for this purpose. • Cancel (Undo) The Undo command (key combination Ctrl-Z) cancels the last action performed. If you keep selecting the command, you can cancel up to 30 successive modifications. • Restore (Redo) The Redo command (key combination Ctrl-Y) revokes the last action canceled thus restoring the status before the last Undo command was executed. Principle Each active editor (project window, screen editor, drivers for WS) has its own undo history. Thus, for example, if three screens are opened at the same time, three separate Undo Histories will be created. When a screen is closed, the actions listed in the accompanying History are deleted. When the project is saved, all the Undo Histories for the current project are deleted. The last recorded action is displayed in abbreviated form in the menu. The Tooltips contain more detailed texts for the Undo and Redo buttons and for the status bar. Example: • • Menu Undo: Redo: VAR_5 edited PIC_2 edited Tooltip/Status bar Undo: Redo: property edited of tag VAR_5 contents edited of screen PIC_2 Ctrl-Z Ctrl-Y Until the accompanying Undo History is deleted, deleted objects will continue to be listed in the cross-reference (Chapter 4.10.1) as used objects. The status of these objects is given in brackets after each object, e. g. PIC_5 (deleted). General Information The commands Undo and Redo only work with actions taken since the last time the project was saved. If, for example, you move a screen object and then save your project, you cannot later cancel this action. ProTool User’s Guide Release 12/99 4-13 Creating projects These are some of the rules that apply to Undo/Redo: • Settings in dialog boxes (properties of a field) can only be canceled in their entirety. It is not possible to open the dialog box and discard individual entries. • With multilevel dialog boxes, only changes to the primary object are recorded. Modifications to underlying objects, or creations or deletions cannot be reversed. Example (project window): Editing tags → Editing limit tags. Only the tag changes can be reversed here. • 4.9.1 Undo/Redo is ProTool-specific. With a project integrated in STEP 7, the Undo buffer cannot be accessed by a higher-level Step 7 Undo Manager. Undoing the last action To undo your last action in ProTool, choose one of the three following options: • Choose the Edit → Undo menu command. The last action that can be undone (canceled) is shown in abbreviated form after the menu command. A longer description is given in the status bar. • Click the Undo button in the toolbar. This opens a Tooltip which shows you the last action that can be undone (canceled). You are given the same information in the status bar. • Press the CTRL and Z keys simultaneously. In contrast to the first two options, you are not given any feedback about which action has been canceled. If you keep executing the Undo command, you can successively cancel all the recorded modifications. 4.9.2 Redoing the last action To redo your last canceled action in ProTool, choose one of the three following options: 4-14 • Choose the Edit → Redo menu command The last canceled action is shown in abbreviated form after the menu command. A longer description is given in the status bar. • Click the Redo button in the toolbar. This opens a Tooltip which shows you the last canceled action. You are given the same information in the status bar. ProTool User’s Guide Release 12/99 Creating projects • Press the CTRL and Y keys simultaneously. In contrast to the first two options, you are not given any feedback about which action has been restored. If you keep executing the Redo command, you can successively restore all the recorded cancellations. ProTool User’s Guide Release 12/99 4-15 Creating projects 4.10 Retrieving project information The following tools are available to you for displaying or storing information on a project. 4.10.1 • Cross-references • Project information What is displayed in the "Cross-Reference" window? Usage When you have to add to or modify a project and need to check where and how a particular object is used in your project, you open the Cross-Reference window. You select an object in this window, and all the references to this object in the project are then displayed to you. Example from a project You open the Cross-Reference window by choosing the View → Cross-Reference menu command. The active object is displayed with a red border around it. 4-16 ProTool User’s Guide Release 12/99 Creating projects The selected object is at the uppermost level, and all the objects in which the selected object is used appear under it. The cross-reference list also contains object in the current undo history(Undo actions (Chapter 4.9)). The status of these objects is shown in brackets behind the object concerned - for example, PIC_5 (deleted). Tip You can use the Cross-Reference window efficiently for troubleshooting. 4.10.2 What can you view under "Project Information"? To obtain information about a project when projects change or are adapted, open the Project Information dialog box. To do so, choose File → Project Information from the menu. The Project Information dialog box displays general project data and the memory required by the project. Project information is spread according to subjects over three tab controls: • General • Description • Statistics General The General tab control shows information on the device type, project name, path name of the stored project file and creator of the project. You fill in the Creator field and all the other fields are updated automatically by ProTool upon saving the project. Description The Description tab control contains an input field for the project description. Here you can enter any information you like that are important for your project. Statistics The Statistics tab control shows when the project was created, modified, generated and downloaded, the ProTool version last used to edit the project and the memory required by the project after it has been downloaded to the flash memory on the operating unit. The memory requirement is determined and displayed following the first download operation. Exception: with text-based displays OP3, OP5 and OP15A/C, the memory requirement is determined and displayed following initial compilation. ProTool User’s Guide Release 12/99 4-17 Creating projects 4-18 ProTool User’s Guide Release 12/99 Configuration techniques 5 Overview In this chapter you will learn how to • create screens • configure controls and display elements • use tags • configure messages After that we will show you, for example, how you • Using functions • create recipes • assign operator authorization • create multi-lingual projects ProTool User’s Guide Release 12/99 5-1 Configuration techniques 5.1 What are screens? Example Screens are an image of the process. You can display processes on screens and specify process values. The figure below shows an illustrated example of a mixing unit for producing different juices. Ingredients are filled into a mixer from different tanks and then mixed. The liquid levels in the tanks and in the mixer and also the actual speed of the mixer are displayed. You can specify the required speed of the mixer in an input field. Configured screen for a mixing unit Components of a screen You can configure several screen entries for a screen. A screen entry has display size. You can see the entry numbers on the left border of the screen editor. The maximum number of screen entries for a screen depends on which device you are using. A screen can consist of static and dynamic components. Static components are text, whereas dynamic components are fields which are linked to the PLC and display values from the PLC memory. Dynamic components are also inputs made by the operator on the operating unit and written to the PLC memory. The link to the PLC is established by means of tags (refer to Using tags (Chapter 5.4.1)). Depending on the operating unit you are using, fields can be used for input, output and combined input/output. 5-2 ProTool User’s Guide Release 12/99 Configuration techniques Screen editor Screens are created with a separate editor in ProTool. The operating unit is displayed when you call the screen editor. Open the screen editor by: • double-clicking on Screens in the left half of the project window to create a new screen • double-clicking in the right half of the project window on an existing configured screen to open the screen for editing. Screens are stored under a symbolic name. You enter a name by choosing Edit → Properties from the menu. This name has to be specified when you edit, reference or delete the screen. In addition, screens are numbered automatically. Start screen Declare one screen in every project as a start screen. The start screen is the screen that is displayed after the operating unit has started up. To identify a screen as the start screen, select the screen and assign it as the start screen by choosing Edit → Properties from the menu. On the General tab, select the Start Screen check box. Soft keys Soft keys are function keys configured for specific screens (refer to What are function keys? (Chapter 5.3.3)). When you configure a soft key, you assign functions to it. You can point out the task of a soft key with a piece of explanatory text. You can use soft keys to open another screen, turn a motor on and off or display the message buffer, for example. Selecting screens Every configured screen has to be integrated into the control process so that it can be opened at runtime on the operating unit. You can select a screen in either one of two ways: • Select Screen function You an assign this function to an input field, a function key or a button, for example. You specify the name of the screen as the parameter. This means that a screen can be displayed by means of an input field or a function key. With input fields and soft keys, the function can be used only locally on that screen. Should you wish the function to be available on every screen, you have to configure the function on a global function key on the operating unit (refer to What are function keys? (Chapter 5.3.3)). ProTool User’s Guide Release 12/99 5-3 Configuration techniques • 5-4 Select Screen Directory Include the screen in the screen directory. To do so, choose Edit → Properties and click the Screen to Directory check box on the General tab. Enter text specifically for that screen on the Title tab for display in the directory. This means that you can select the screen on the operating unit by means of the Screens → Edit standard screen. ProTool User’s Guide Release 12/99 Configuration techniques 5.2 Configuring display elements Purpose You use display elements to monitor the machine or the system on the operating unit. You can display current information, such as actual values from the PLC, process and operating modes and malfunctions, on the operating unit as a numerical value or in plain language. Overview There are essentially two types of display element available for the different tasks: • Static display elements A static display element is text (What is static text? (Chapter 5.2.1)) which is not linked to the PLC. Static display elements do not react to user inputs and cannot be modified at runtime on the operating unit. Use static display elements, for example, for explanations of controls and dynamic display elements. • Dynamic display elements Dynamic display elements are output fields (What are output fields? (Chapter 5.2.2)) that are connected to the PLC by means of tags. They visualize current values from the PLC in alphanumeric form. Output fields can change their display spontaneously at runtime on the operating unit without the operator intervening. Use output fields for all tasks associated with monitoring the process, a machine or the system. Detailed descriptions of the different steps to configuration will be found in the ProTool online Help. 5.2.1 What is static text? Static text is text that is not linked to the PLC. It cannot be modified at runtime on the operating unit. Use static text, for example, to label controls and output fields. The relative importance of different text strings on a screen can be illustrated by means of different character formats - for example, by means of flashing or uppercase text. You can configure static text separately for any language available on the operating unit. You enter text strings directly into the screen editor. ProTool User’s Guide Release 12/99 5-5 Configuration techniques 5.2.2 What are output fields? Purpose Output fields display current values from the PLC on the operating unit. The values may be output optionally in numerical, alphanumeric or symbolic form. Configure output fields by selecting the symbol illustrated or by choosing Insert → Input/Output Field from the menu. Numerical and alphanumeric output Output fields for numerical or alphanumeric values show the value as a number or as text. A numerical value, for example, is the number 80 as the actual value of a temperature. An alphanumeric value, for example, is the text string Valve_12. Symbolic output Output fields for symbolic values do not display the true value but a text string from a text list. For example, you can store the two states of a valve in a text list. When the valve is open, the output field then points, for example, to the text string OPEN. By using output fields for symbolic values, you eliminate misinterpretations on the part of the operator to a large extent, since a symbolic value often presents a state more lucidly than an abstract numerical value, for instance. 5-6 ProTool User’s Guide Release 12/99 Configuration techniques 5.3 Configuring controls Purpose You use controls on the operating unit to intervene directly in the process. They are used, for example, to specify setpoints, trigger functions, open screens (What are screens? (Chapter 5.1)) and acknowledge messages. You can assign a password level to controls in order to prevent manipulation by unauthorized persons. Overview The following controls are available in ProTool for the different tasks: • Input fields (What are input fields? (Chapter 5.3.1)) • Input/output fields (What are combined input/output fields? (Chapter 5.3.2)) • Function keys (What are function keys? (Chapter 5.3.3)) Detailed descriptions of the different steps to configuration will be found in the ProTool online Help. 5.3.1 What are input fields? Purpose In input fields you enter values on the operating unit that are transferred to the PLC. The values may be input optionally in numerical, alphanumeric or symbolic form. If you define limit values for the input field tag, you can reject inputs on the operating unit that are outside the specified range of values. You can prevent manipulation by unauthorized persons by assigning a password level. Create input fields by selecting the symbol illustrated or by choosing Insert → Input/Output Field from the menu. ProTool User’s Guide Release 12/99 5-7 Configuration techniques Numerical and alphanumeric input In input fields for numerical and alphanumeric values you enter the value one character at a time on the operating unit. A numerical value, for example, is the number 80 as the setpoint for a temperature. An alphanumeric value, for example, is the text string Valve_12. Symbolic input In input fields for symbolic values you do not enter the value one character at a time but select this value on the operating unit from a text list. During configuration you assign symbolic text on the text list to every value of a tag. In this way, for example, you can turn a motor on and off by means of the two entries ON and OFF. By using input fields for symbolic values, you prevent misinterpretations to a large extent, since the operating unit accepts only the configured values on the text list. 5.3.2 What are combined input/output fields? Combined input/output fields display current values from the PLC on the operating unit. You can also enter values that are transferred to the PLC at the same time. The values may be input and output optionally in numerical, alphanumeric or symbolic form. During input, the value you want to be output is not updated on the operating unit. You can prevent manipulation by unauthorized persons by assigning a password level. If you define limit values for the input/output field tag, you can reject inputs on the operating unit that are outside the specified range of values. Create combined input/output fields by selecting the symbol illustrated or by choosing Insert → Input/Output Field from the menu. 5.3.3 What are function keys? A function key is a key on the operating unit for configuring a function assignment. You can assign one or more functions to any function key in ProTool. The functions are triggered as soon as the key is pressed. The function key assignment may be locally or globally significant. You can assign a password level to function keys in order to prevent manipulation by unauthorized persons. 5-8 ProTool User’s Guide Release 12/99 Configuration techniques Global assignment Globally assigned function keys always trigger the same function, irrespective of the current control situation. You can use them, for example, to open a screen, display the current alarm message or print the contents of a screen. By using globally assigned function keys, you cut your configuration effort considerably since you do not have to assign individual functions to global keys on every screen. Assign function keys globally by choosing System → Screen/Keys from the menu. To do this, click in the Screen/Keys dialog box on one of the keys K1 through KX or F1 through FX. You can specify the functions you have assigned to specific keys on the operating unit by means of labeling strips (not OP3). Local assignment Locally assigned function keys trigger different actions on the operating unit depending on the situation. A function key whose assignment may vary from screen to screen is referred to as a soft key. Assign soft keys locally in the screen editor. To do so, click in the screen on one of the keys F1 through FX, which are arranged directly around the operating unit screen. You can also assign soft keys globally. A global assignment is active on all screens to which you do not assign a screen-specific function. Use globally assigned soft keys, for example, to change from any screen to the same system screen. Note Do not assign functions that have to be permanently available on the operating unit to soft keys. ProTool User’s Guide Release 12/99 5-9 Configuration techniques 5.4 Using tags Overview Since tags are the most important means of communication between the operating unit and the PLC and for exchanging data, a detailed explanation is presented here of what tags are and what types of tag are used in ProTool. 5.4.1 What are tags? Definition A tag has a symbolic name and a defined data type. The value of the tag changes while the PLC program is being executed. Tags with a PLC link are referred to as global tags. Tags without a PLC link are known as local tags. • Global tags A tag with a PLC link occupies a defined memory address on the PLC, to which read and write access is possible from both the operating unit and the PLC. • Local tags Local tags are not connected to the PLC. They are available only on the operating unit. You create local tags, for example, so that the operator can enter limit values on the operating unit. Tag types ProTool recognizes the following tag types (but these are not available on every PLC): 5-10 Data Type Bit System Range of Values BYTE (OP7/17 only) 8 bit 0 through 255 INT 16 bit - 32768 through 32767 UINT 16 bit 0 through 65535 LONG 32 bit - 2147483648 through 2147483647 ULONG 32 bit 0 through 4294967295 FLOAT 32 bit Upper limit value: ± 3.402823 e+38 Lower limit value: ± 1.175495 e-38 DOUBLE (OP7/17 only) 64 bit Approx. 12 valid digits ProTool User’s Guide Release 12/99 Configuration techniques 5.4.2 Data Type Bit System Range of Values BOOL – true (1), false (0) STRING – 1 to 128 bytes Array tags This tag type combines a random number of tags of the same type to form a total, which can be handled as a whole. Properties of tags To define a tag, set the properties of the tag. The following figure shows an example of the Tag dialog box for the SIMATIC S7. Tag Dialog Box for the SIMATIC S7 ProTool User’s Guide Release 12/99 5-11 Configuration techniques Tag definition (Section A) The available data types or data formats and the number of decimal places depend on which PLC you selected. Refer to ProTool online Help for details. Updating tags The acquisition cycle determines the time interval in which the value of a tag is updated on the operating unit. System default setting: 1 s The acquisition cycle is a multiple of the standard clock pulse, which you configure for every PLC in the PLC dialog box. You globally modify the acquisition cycles for all the tags of a project by setting the standard clock pulse. Array tags An array tag represents a number of tags of the same type with consecutive memory addresses. If you wish to define an array tag, enter the number of elements in the array in the Tag dialog box at Number Elements. The system default setting is 1, in other words, the tag is not defined as an array. The maximum number of elements in an array is 255. Tip You can use array tags for recipes, for instance. Address (Section B) The address determines the memory location of a global tag on the PLC. The address therefore depends on the PLC you are using. The display of the address depends on the PLC you selected. This section of the Tag dialog box adjusts dynamically to the programmable address areas. ProTool integrated in STEP 7 (Section C) If you have installed ProTool in STEP 7 on an integrated basis, you can access the STEP 7 symbol table directly in the Tag dialog box. For performance reasons, ProTool does not automatically update the STEP 7 symbol table after every change. In order to make the latest changes to the STEP 7 symbol table available in ProTool, update the display of the symbol table in the Tag dialog box by clicking Update. See the example in online Help with regard to the definition of an entity DB in the symbol table. 5-12 ProTool User’s Guide Release 12/99 Configuration techniques Setting a start value You can set a start value for the tag at Options. When the project is downloaded, the tag is assigned the start value. The start value is displayed only on the operating unit and is not stored on the PLC. Example: If tags are used for scaling trends and bar graphs, the initial value may be the start value of the scaling. Remark This is not useful for tags of the type STRING. Setting limit values An upper and a lower limit value can be configured at Limit values for tags. If the tag value is outside the defined range, in other words, it is higher or lower than the limit value concerned - this has the following effect on the input fields, for example. If the operator enters a value outside the configured limit values, the input is rejected. Configuring tags with functions You can assign functions to tags in input/output fields - for example, the Select Screen function. The screen is selected as soon as the value of the tag changes. Note A function which you have configured for an internal tag (without PLC connection) whose value is modified by another function is not executed. 5.4.3 Example: Scaling tags The scaling of tags is configured as a function relating to a tag. The following functions are available for this: • Scaling Linear 1 and Scaling Linear 2 • Scaling Square 1 and Scaling Square 2. If you configure no scaling, the tag value on the PLC corresponds to the tag value on the operating unit. ProTool User’s Guide Release 12/99 5-13 Configuration techniques Linear scaling Scaling can be configured for any tag in the form y = a*x + b. • X = displayed value/input value The Y value read from the PLC undergoes linear scaling before being displayed on the operating unit as the X value. Inputs X on the operating unit undergo scaling before being written to the PLC as the Y value. • X = displayed value/input value The Y value read from the PLC undergoes linear scaling before being displayed on the operating unit as the Y value. Inputs Y on the operating unit undergo scaling before being written to the PLC as the X value. Example You have configured 3 as the value of a6 as the value of b. The value 21 is transferred from the PLC. It is inserted in the conversion formula, thus: 21 = 3 * X 6. This produces a value of 5 for X. That value is displayed on the operating unit. Square scaling Scaling can be configured for any tag in the form: y = a * x^2 + b * x + c. • X = displayed value/input value The Y value read from the PLC undergoes square scaling before being displayed on the operating unit as the X value. Inputs X on the operating unit undergo scaling before being written to the PLC as the Y value. • Y = displayed value/input value The X value read from the PLC undergoes square scaling before being displayed on the operating unit as the Y value. Inputs Y on the operating unit undergo scaling before being written to the PLC as the X value. Example You have configured a value of 2 for a, and a value of 3 for b and 6 for c. A value of 71 is transferred from the PLC. It is inserted in the conversion formula, thus: 71 = 2 * X^2 + 3 * X + 6. This produces a value of 5 for X. That value is displayed on the operating unit. 5.4.4 Example: How to set the acquisition cycle and the standard clock pulse System default setting: standard clock pulse 200 ms, acquisition cycle 1 s. Set the standard clock pulse in the PLC dialog box. If you increase the standard clock pulse to 600 ms, the acquisition cycle for all tags is increased to 3 s. 5-14 ProTool User’s Guide Release 12/99 Configuration techniques Tip In order not to overload communication between the PLC and the operating unit, the times you set for the standard clock pulse should not be too short. This would mean that other processes, such as the updating of trends or the execution of PLC jobs, would take considerably longer. 5.4.5 What is a tag list? Purpose With each input field, you generally set in advance which tag is assigned to the input field. With a tag list, this assignment is not static for the OP7 and OP17 devices, but can be influenced by the operator. You can choose from as many as eight tags, which supply the input field with data at runtime. Principle The figure shows the principle of a tag list. When you configure the input field, in addition to tag VAR_1 of the input field, also define an alternative tag, VAR_2 . The alternative tag is an array tag. Use the configured value for the height of the input field to set how many tags you want to assign to the input field. At runtime, the value (6) entered in the input field will determine the index in the alternative tag and supply the input field with the value saved under the associated address in the PLC. Alternative tag (VAR_2) Input field 6 VAR_1 Value 1 Value 2 Value 3 Value 4 Value 5 Value 6 Value 7 Value 8 ... ... ... ... Height of the field ... Tag list (principle) ProTool User’s Guide Release 12/99 5-15 Configuration techniques 5.4.6 What is address multiplexing? Definition With address multiplexing, the address parameters of a tag are modified as a function of the value of the multiplex tag. Purpose of address multiplexing With address multiplexing, you can address a number of memory addresses in the address area of the PLC (S7-CPU) with a single tag. You can read or write to the addresses without having to define a tag for every single address, that is, it is a very efficient method of processing data. Principle of address multiplexing The following figure illustrates the principle of address multiplexing with tags: Multiplex tag Tag Value 1 Byte 1 Value 2 Byte 2 Value 3 Byte 3 Value n Byte n Address multiplexing with tags Configuring a multiplex tag You define the multiplex tag by pressing on the corresponding button next to the address in the Tag dialog box. Pay attention to the following when configuring multiplex tags: • 5-16 The multiplex tag must not be multiplexed. ProTool User’s Guide Release 12/99 Configuration techniques • The type of multiplex tag must match the type of address parameter which the multiplex tag is defining. The following figure shows the result of the address multiplexing for tags: Address multiplexing with tags Note If one of the multiplex tags is modified during operation, the multiplexed tag is not modified until the next recording cycle. If you want immediate updating, configure the Update Screen function for every multiplex tag. 5.4.7 Example: How to configure a multiplex tag To multiplex an address, create the following tag, for example: 1. Select Paste → Object to configure a new tag. 2. In the Tag dialog box, enter Var_1 as the name for the new tag. 3. On the Address tab, select INT under Type and enter the address as : DB 50 DBB 0 Click this button to open the Address Multiplexing dialog box. 4. 5. Activate address multiplexing. 6. Enter Multiplex_1 as the name of the new multiplex tag. Click this button to define the multiplex tag. 7. 8. On the Address tab, select BYTE under Type and enter the address: FW 20 The multiplex tag may assume values between 0 and 255, in other words you can reference 256 different addresses with the tag Var_1. Note: If you want to make use of this maximum range of values, DB 50 in the STEP 7 program has to be created with at least 128 data words. 9. Apply the settings by clicking OK. ProTool User’s Guide Release 12/99 5-17 Configuration techniques The name of the multiplex tag is displayed as the address of the tag Var_1: DB 50 DBB [MULTIPLEX_1] Variable_1 DB DBB 50 [mux] Byte 0 Byte 1 Byte 2 Multiplex_1 MW 20 Byte n Example: configuring a multiplex tag 5-18 ProTool User’s Guide Release 12/99 Configuration techniques 5.5 Creating headers and footers 5.5.1 Creating headers and footers Note Headers/footers can only be configured for the OP5, OP7, OP15 and OP17 and the corresponding complete units. What objects can you use in headers and footers? You can configure static text and output fields in headers and footers. Two lines of 80 characters are available in all instances. At Usage, you can choose between Date, time and Page number. This also sets the Display and the Field length. For what uses can you configure headers and footers? You can set headers and footers for the following printouts from the operating unit. Message Report Messages for which you have configured Print are output to the printer. EM Chronological The contents of the event buffer are printed in chronological order of the messages. EM Together The contents of the event buffer are printed in message number order. AM Chronological The contents of the alarm buffer are printed in chronological order of the messages. AM Together The contents of the alarm buffer are printed in message number order. Overflow When the buffer overflows, the messages are output to the printer. Print Screen A screen that you have selected is printed. Print Recipe The recipe specified in the function parameter of the function Print All Data Records is printed out complete with all its data records. ProTool User’s Guide Release 12/99 5-19 Configuration techniques 5.6 Creating text or graphic lists 5.6.1 What are text or graphic lists? Purpose Text is often more meaningful than an abstract value. For example, the pieces of text full and empty present the state of a tank more lucidly than the corresponding numerical values. Which is why ProTool gives you the opportunity to configure text or graphic lists. These text lists are lists in which you assign a text element from the list to each tag value. Usage With text or graphic lists, you can display texts in output fields and select texts for input in input fields. To a large extent, this eliminates misinterpretations in the display and operator errors during input. A text or graphic list assigns a text to every value of a tag. At runtime, the tag value determines which text is selected from the list and displayed, for example, in an input/output field on the operating unit. To create a new text or graphic list, double-click Text or graphic lists in the project window. 5-20 ProTool User’s Guide Release 12/99 Configuration techniques 5.7 Configuring a scheduler 5.7.1 What is a scheduler? Constraint Note Schedulers are available only for the OP15 and OP17 operating units. Tasks of a scheduler A scheduler defines a regularly recurring time at which a particular function is to be executed. The following types of scheduled times are available: • hourly • daily • weekly • annually Scheduler dialog box ProTool User’s Guide Release 12/99 5-21 Configuration techniques The following table shows which time entries you can specify for which scheduler types: Scheduler type Required time entries hourly Minute daily Hour, minute weekly Day of the week, hour, minute annualy Month, day, hour, minute Functions linked to a scheduler If you subsequently want to change or deactivate the scheduled time on the operating unit, you can insert it in a screen entry. At a scheduled time, the associated scheduler bit is set on the PLC (in the interface area) and the configured function executed. For example, you can configure print functions for a scheduler: • Events - Print Buffer • Alarms - Print Buffer • Print Screen • Print Data Record Scheduler without functions It is not essential to configure a function. If no function is configured, the scheduler bit is set when the scheduler is executed, but of course no function is executed. 5-22 ProTool User’s Guide Release 12/99 Configuration techniques 5.8 Configuring messages Overview To display process and operating states or to acquire and log process data on the operating unit that you obtain on the process from the PLC, configure messages. Messages are initiated by the PLC and can be displayed on the operating unit. 5.8.1 Reporting operating and process states What do you use to display operating and process states? There are the following message types in ProTool: • Event messages display routine operating and process states and processes. • Alarm messages display critical or hazardous operating and process states and require operating personnel to react by issuing an acknowledgement. • System messages display states and faults of the operating unit, the PLC or the communications between them. They are issued by the operating unit or by the PLC. • System messages on the S7-NC and S7-FM (OP7 and OP17 only) display states and errors of the PLC or during communication. For what purpose do you use messages? The messaging system is responsible for the following tasks: • Reporting events or states that can occur on the system or in the process: − A state is reported immediately following its occurrence. − The messages are presented to the operator as a function of their significance (priority). • Support in eliminating the cause of error conditions: − Messages provide in-depth information on the causes of errors (diagnostics). − The process can be influenced as a result of the message. • Printout: the message events are output to a printer. ProTool User’s Guide Release 12/99 5-23 Configuration techniques 5.8.2 What goes into a message? A message consists of: • a message number • message text • a message tag • help text The following messages are displayed on the operating unit but cannot be edited in ProTool: • The message number cannot be modified in system messages, standard S7 diagnostic results (S7 system messages) and NC alarms. (only with OP7 and OP17). • Message numbers of user defined S7 diagnostic results can be freely defined in STEP 7 within certain limits. • The message number is assigned to Alarm_S messages in STEP 7. Message number The message number is used to reference a message. In ProTool, you have a free choice of message number (within the range 0 to 2000) and message text. Message text Message text contains the description of a message. The length of the message text depends on the operating unit. The number of characters per line is marked by this character at the top border of the window during configuration. By choosing Edit → Style from the menu, you can select from the following styles for the message text, depending on the operating unit: flashing, underscore, italic, and capitals (text-based displays only). Tip You can also configure operator instructions as a message. Message tags A message can contain output fields with tags. They are also referred to as message tags. By choosing Edit → Style from the menu, you can select from the following styles for output fields, depending on the operating unit: flashing, underscore, italic. Insert an output field by selecting the symbol illustrated. Note The values of message tags are updated in the message buffer when messages are active or are cleared, but not when messages are acknowledged. 5-24 ProTool User’s Guide Release 12/99 Configuration techniques Help text Help text containing further details on a message can be configured for every message. Help text is displayed for the operator in a separate window on the operating unit by pressing the HELP key. Enter Help text by selecting the symbol illustrated or by using the menu command View → Help text. 5.8.3 What parameters do you set for messages? You can configure the following parameters for messages: • priority • acknowledgement group • print Priority High-priority messages are displayed before low-priority messages on the operating unit. The lowest priority is 1. • If several messages having the same priority are waiting to be displayed, the most recent (last) is displayed. • If several unacknowledged alarm messages having the same priority are waiting to be displayed, you can choose whether the most recent (last ) or the oldest (first) should be displayed. Configure the priority in the Attributes dialog box for every single message. Set the sort criterion by choosing System → Messages → Settings from the menu. Acknowledgement group Alarm messages can be assigned to acknowledgement groups. Configure the assignment to an acknowledgement group for every single message. If you acknowledge an alarm message in one acknowledgement group, all the alarm messages in that group are acknowledged simultaneously (group acknowledgement). ProTool User’s Guide Release 12/99 5-25 Configuration techniques Print If you select Print, the message event (active, cleared, acknowledged) is logged automatically on the printer if you selected, at System → Messages → Settings, Print on Message Event. Configure printing in the Attributes dialog box for every single message. 5.8.4 Acknowledging messages Principle An alarm message can be acknowledged either by the operator on the operating unit or by the PLC program. By acknowledging an alarm message, you confirm that you have taken notice of it. Assigning acknowledgement groups You can assign several alarm messages to a single acknowledgement group when you configure alarm messages. This means that when the first alarm message is acknowledged – for example, the cause of the malfunction- all the other alarm messages in the same acknowledgement group (consequential malfunctions) are acknowledged together. A blank field in the message editor Attributes window is equivalent to entering 0. The value 0 results in individual acknowledgement, i.e. when an alarm message is acknowledged, only that alarm message is acknowledged. If you acknowledge an alarm message in one acknowledgement group, all the alarm messages in that group are acknowledged simultaneously (group acknowledgement). You can allocate the messages to one of 4 acknowledgement groups. 5.8.5 What settings are there for message classes? You can configure the following parameters for message classes: 5-26 • acknowledgement • printout ProTool User’s Guide Release 12/99 Configuration techniques Acknowledgement Alarm messages have to be acknowledged. Alarm messages are displayed until they have been acknowledged. Single acknowledgement: when you acknowledge a message only that particular message is acknowledged. Group acknowledgement: when you acknowledge a message belonging to an acknowledgement group, all the queued messages of this group are acknowledged as well. Printout Printing is enabled or disabled by selecting the Print attribute, or is enabled when the message buffer overflows. The messages are printed on a printer attached to the operating unit. Configure Printout by choosing System → Messages → Settings from the menu. 5.8.6 Example: How to configure alarm messages Example: set the alarm message area and configure an alarm message with a SIMATIC 300/400 PLC In this example, you will configure the alarm message area first and then an alarm message. 1. Choose System → Area Pointers from the menu to create the alarm message area. The Area Pointers dialog box is opened. 2. In the Type field, select the Alarm messages area pointer. Click the Add button. 3. The Alarm Messages dialog box is opened. Enter at Address: DB: DW: Length: PLC: 10 2 2 PLC_1 You have just created an alarm message area for 32 alarm messages. ProTool User’s Guide Release 12/99 5-27 Configuration techniques 4. Confirm all settings by clicking OK. Exit from the Area Pointers dialog box likewise by clicking OK. 5. Double-click the Alarm Messages window to open it. Position the cursor at message No. 2. 6. Enter the following message: Motor temperature too high 7. Perform the following settings in the Attributes window: Priority: Acknowledgement: Print: 1 1 ã The figure shows the configured alarm message: 5.8.7 What are system messages? System messages are always implemented on the operating unit and cannot be configured in ProTool. They are displayed in a process window. What is reported? A system message consists of a message number and message text. The message text may contain internal system tags that provide further details on the cause of an error message. System messages provide information on operating unit operating states. The wealth of possible system messages ranges from notes to serious errors. Note You will find a list of system messages of the operating units, their causes and, if possible, remedial action in an appendix to the Communication User’s Guide. 5-28 ProTool User’s Guide Release 12/99 Configuration techniques Displaying system messages Under System → Messages → System Messages, set the length of time the system messages are to be displayed on the operating unit. Note The 0 setting means the display is static. The process window is not closed until you press ESC. On operating units OP7 and OP17 (and accordingly C7-633 and C7-634) you can also activate display of the following system messages (example): • SIMATIC S7 (Minimal): The message numbers of the S7 system messages (time stamped) are output. You can refer to the cause of the error in your S7 manual by means of the number. • SIMATIC S7 (Standard): In addition to minimal display, the message text of the S7 system message is output and you can display it using the arrow keys. • SIMATIC S7-FM: The message text of FM system messages is output. • SIMATIC S7-NC: The message text of NC system messages is output. Remark The ..\PROTOOL\SYSMSG folder contains system messages for the S7-NC and the S7-FM in several languages. 5.8.8 Example of displaying system messages You will find examples of system messages and how they are displayed on the operating unit in the following: SIMATIC OP The system messages of the operating unit are output. 316 Invalid Password Level Some system messages expect confirmation or a decision by the operator for example: 557 Save data record? 0 Yes / 1 No You decide on how you want to proceed by entering 0 (Yes) or 1 (No). ProTool User’s Guide Release 12/99 5-29 Configuration techniques SIMATIC S7 (Minimal) The message numbers of the S7 system messages are output. You can refer to the cause of the error in your S7 manual by means of the number. MESSAGE S4303 07.03.98 15:16:34 SIMATIC S7 (Standard) In addition to the minimal display, the message text of the S7 system message is output. For this, select the corresponding message with the help of the arrow key. MESSAGE S4303 07.03.98 15:16:34 If you press the RIGHT arrow key: PLC_1: STOP by operating Stop switch SIMATIC S7-FM The message text of FM system messages is output. SIMATIC S7-NC The message text of NC system messages is output. 5.8.9 How to log messages on the printer? Enabling and disabling message logging To output messages to the printer, open the Attributes - Message dialog box by choosing menu item View → Message Attributes and select Print. The messages are logged when their status changes (active, cleared, acknowledged). By choosing System → Messages → Settings from the menu, you can select the following settings for message logging: • Message event Message logging is activated for all message events. • Buffer overflow When the specified remaining buffer capacity is reached, all messages are printed out irrespective of whether printing is enabled or not. The message buffer is then deleted. • Off Message logging is disabled. You use the Message Log ON/OFF function to enable and disable automatic printing of messages (refer to Functions). 5-30 ProTool User’s Guide Release 12/99 Configuration techniques 5.8.10 Configuring printers for the operating unit Attach a printer to your operating unit for the printout of process states or process data reports. For this you can configure one or more printers. • In ProTool, some printers in the list box have already been defined. Parameters have already been assigned to these printers. • You can add more new printers to the list box in ProTool. You have to enter the specific control characters contained in the printer manuals concerned for these printers. Perform the settings for the printers and the interface parameters by choosing System → Printer from the menu. Tip Use the Z_PRINTER standard screen belonging to the standard configuration. 5.8.11 Displaying messages on the operating unit Messages are displayed in special output windows. You can still operate the operating unit when messages are queued and displayed. Set the display of messages on the operating unit by choosing System → Messages → Settings from the menu. Select Separate or Together: • Together The display on the operating unit is split. Event messages are displayed in one half and alarm messages in the other. If no event messages or alarm messages are queued, the corresponding section remains empty. • Separate Event messages and alarm messages are displayed separately from each other on the operating unit. They are displayed according to priority: − unacknowledged alarm messages − event messages − acknowledged alarm messages − standby message If, for example, at least one unacknowledged message is pending, no event messages are displayed. ProTool User’s Guide Release 12/99 5-31 Configuration techniques Sort criterion for alarm messages If several unacknowledged alarm messages of the same priority are queued, select the sort criterion by choosing System → Messages → Settings from the menu: First The first (oldest) alarm message is displayed first. Last The last (most recent) alarm message is displayed first. If you configure the function Select Function Screen and screen name with the value AM First/Last as a parameter, you can change the sort sequence in the operating unit too. Tip This function has already been implemented on the System Settings standard screen. Standby message The standby message is a special event message. The standby message is event message number 0. It is displayed if no other message is pending on the operating unit. Note The standby message can have only message text and output fields containing the date and time. 5.8.12 What is in the message buffer? Definition A message buffer is a memory area with battery backup in the operating unit RAM in which message events are stored in chronological order. It takes the form of a FIFO buffer with a specified size and does not have to be explicitly configured. The message buffer can store 256 alarm message events as well as 256 event message events. Data storage in message buffer Every message event is stored with the following information: 5-32 • message number • event identification (A for Arrived, D for Departed, K for AcKnowledged) ProTool User’s Guide Release 12/99 Configuration techniques • time stamp consisting of date and time • acknowledgement group QGR (with alarm messages only) • message text • value of the message tag at the time of arrival or departure Example Below is an example of output from the message buffer to the printer: 0010 D 11:58:08 27/03/98 QGR02 Boiler pressure too high: 7.9 bar 0029 K 11:40:47 27/03/98 Oil supply shut off QGR00 0029 AK 11:38:09 27/03/98 Oil supply shut off. QGR00 0010 K 11:35:18 27/03/98 QGR02 Boiler pressure too high: #### bar 0010 AK 11:34:26 27/03/98 QGR02 Boiler pressure too high: 12.7 bar If a message contains process values, then those values that were available when the message event arrived or departed are stored in the message buffer. In the case of the Acknowledged message status, the operating unit does not acquire any current process values. Note The last four characters cannot be displayed on the operating unit on the first line of the message buffer on account of the message number being displayed. If a message tag has been configured at this point, it is not displayed. Behavior on overflow Under System → Messages → Settings you can select whether an overflow warning is to be output when the specified remaining buffer capacity is reached. Before the messages are deleted, they are output to the printer. This applies to all messages even if they are not marked with the attribute Print. Using a standard screen The following functions have already been implemented on the standard screen known as Event Messages (Z_MESS_EVENT): ProTool User’s Guide Release 12/99 5-33 Configuration techniques • Display event message buffer • Print event buffer • Delete event buffer • Output Overflow Warning • Display number of event messages The following functions have already been implemented on the standard screen known as Alarm Messages (Z_MESS_ALARM): 5.8.13 • Display alarm message buffer • Print Alarms Buffer • Delete alarm buffer • Output Overflow Warning • Show number of alarm messages What communication areas are required for messages? For communication between the operating unit and the PLC functions properly, choose System → Area Pointers from the menu and establish in your project an assignment to the following communication areas: event messages and/or alarm messages These areas are imperative if you have configured event messages and alarm messages. They must be chosen at least large enough for a bit to be available for every configured message. If the communication area is not made large enough, a warning will be issued during compilation of the project. If you wish, you can create the following communication areas: 5.8.14 • PLC acknowledgement • OP acknowledgement Optional communication areas for messages If you want the acknowledgement to come from the PLC, you have to create the following acknowledgement areas by choosing System → Area Pointers from the system. • 5-34 PLC Acknowledgement ProTool User’s Guide Release 12/99 Configuration techniques The acknowledgement bit is set by the PLC program and thus causes acknowledgement of the corresponding alarm message to be displayed on the operating unit. The PLC Acknowledgement acknowledgement area − has to be contiguous with the associated alarm message area − has to have the same acquisition cycle as the alarm messages area − can have the same length as the associated alarm area at most. • OP Acknowledgement The operator acknowledges an alarm message on the operating unit and thus sets the acknowledgement bit of this alarm message on the PLC. When he does so, the entire acknowledgement area is transferred to the PLC. The OP Acknowledgement acknowledgement area may have the same length as the associated alarm message area at most. 5.8.15 How are messages initiated? Message procedure: The message procedure identified the transfer path of messages and thus also the parameters of the messages. The message procedure in ProTool is the message bit procedure. With this message procedure, the operating unit detects the arrival, departure or acknowledgement of a message by setting a bit in the address area, the bit being assigned by choosing System → Area Pointers from the menu to the event/alarm message area. ALARM_S reference A message is event-driven and is issued when a bit is set in the PLC. The setting, resetting and acknowledging of the bit is known as a message event. Active (K) The message bit has been set and the message is waiting to be displayed. Cleared (G) The message bit has been reset because the cause that gave rise to the message no longer exists. Acknowledge (Q) With alarm messages only: The operator (or the PLC) acknowledges the message to confirm the noting of the message. The message events have been acquired by the operating unit and time stamped. The operating unit automatically enters all the message events in the message buffer. In this way the message events can be viewed at a later time again. ProTool User’s Guide Release 12/99 5-35 Configuration techniques Communication areas for messages The display of messages on the operating unit is initiated by the PLC by a bit being set on it in a defined communication area. You can see which communication areas for messages have to be created on the PLC in the following figure: Operating unit Display 000x message PLC Adress area Event message area Alarm message area Message buffer Printer Displaying messages 5-36 ProTool User’s Guide Release 12/99 Configuration techniques 5.9 Using functions Overview Functions are a central element of configuration with ProTool. This section explains what functions are and how to use them in practice. 5.9.1 What functions are used for Basic principle In ProTool, you can link events (e. g. "Key pressed") with predefined functions. If the event occurs during operation, the function executes a specific action on the operating unit or the PLC. For example, the "Select Screen" function on the operating unit opens a particular configuration screen. Event Press key Function: Select Screen A B Action: Screen is switched Triggering a function Areas of application In general, you can use functions to: • Set up the configuration process-specifically (e.g. to switch from one screen to another) ProTool User’s Guide Release 12/99 5-37 Configuration techniques • Control the process (e.g. to set a bit in order to switch on a motor with it) • Use features of the operating unit (e.g. to display or print out the message buffer) • Perform system settings online on the operating unit (for example, change modes) In most cases, you can configure the behavior of the functions precisely by means of parameters. If you want to trigger several actions, you can also combine different functions. Configuration You configure functions on the Functions tab in the properties dialog box of the relevant object. For some operating units you can also define global entry points by choosing the System → Functions menu command. 5.9.2 Events for triggering functions Necessity The execution of a function is always linked to a specific event. The function is only triggered when this event occurs. The events that can be linked to a function depend on the type of the function. Many functions are only effective with certain specific events. Examples Examples of events that can trigger functions are the events "press key" and "release key". In the case of the former, the function is executed the moment a particular function key is pressed; in the latter case, it is executed the moment the function key is released again. Object-linked functions Functions and events are generally linked to a specific object. For example, a function linked to the event "press key" is to be triggered when a specific key is pressed, not just any key. The following objects can be linked to functions, for example: 5-38 ProTool User’s Guide Release 12/99 Configuration techniques • Function keys, soft keys and buttons • Screen objects • Screens • Tags Depending on the operating unit, it may not be possible to configure functions for all these objects. Tip Functions with tags are triggered only if the Read Options Continuously tab is selected or the tag is displayed on the screen. Global functions You can also link some functions to global, object-independent events. These can be triggered in cases such as the following: • when a tag is initialized or upon system startup • when a value is entered • when a screen shot is printed (Print Screen) • when the message buffer overflows or is deleted • when a data record of a recipe is read or written Depending on the operating unit, it may not be possible to configure all events. You will find a detailed description of all the permissible events in the ProTool online Help under the topic Configurable events. 5.9.3 Function parameters Necessity Many functions can only execute one particular action. For example, the Events - Delete Buffer function empties the buffer for event messages. ProTool User’s Guide Release 12/99 5-39 Configuration techniques Function predefined action Function without input parameters However, many functions can also work in various ways. Input parameters Imagine that you want to open another screen using a key on the operating unit. To do this, you configure the Select Screen function. However, your project will generally have several screens. Which of these screens should ProTool open? You therefore have to give the function more information. This is done using parameters. For the Select Screen function, you specify as a parameter the name of the screen to be opened, for example. Another example is the Language function. In this case, the parameter you specify is the language to be set. Input parameters Function Action depending on input parameter Function with input parameters Some functions require a single parameter; others require several. Output parameters Some functions write the result of their execution (i.e. the current status) to a tag. You can then further evaluate the value of this tag, for example in order to display a setting-dependent text on the operating unit. An example is the Mode function. You specify a code for the operating mode as the input parameter, and the function supplies the same code in a tag as the output value. The value of the tag lets you display the current operating mode by means of a text list, for example. Note Output parameters cannot be configured for all operating units. 5-40 ProTool User’s Guide Release 12/99 Configuration techniques Input parameters Function Action depending on Input parameter Output parameter Evaluation (optional) Function with input and output parameters Special case: program-controlled behavior In the case described above, the behavior of the functions does not change during runtime. However, in the case of some operating units and some functions, you can also pass the value of a tag as an input parameter. The behavior of the function can thus be controlled by the program. General principle The following figure illustrates the principle of how a function works: Tag Function Tag Constant How a function works An input parameter is specified for the function. This can be either constant or read from a tag. The tag may be local or it may have a connection to the PLC. If there is a connection to the PLC, the value is set by the process. The result of the function is written to a tag, which itself can either be local or have a connection to the PLC. ProTool User’s Guide Release 12/99 5-41 Configuration techniques 5.9.4 Combining multiple functions Multiple functions with one object You can also assign an event several functions. The functions are then initiated one after the other. You set the order in which this occurs in the Functions dialog box during configuration. You can change the order of the functions by using the Up and Down buttons. Multiple functions with one object Note On the OP3, OP5 and OP15 operating units you can only configure a single function for each object. Sequence The list of functions is processed from the top down. Note If an error occurs during the processing of a function list (e.g. a limit value is exceeded), processing is aborted. The subsequent functions in the list are not executed in this case. 5-42 ProTool User’s Guide Release 12/99 Configuration techniques 5.9.5 Function screens Select Function Screen function The Select Function Screen function accesses internal screens. These screens are stored in the firmware of the operating units and cannot be changed in the configuration. When a function screen is called, a screen is displayed in which the operator can then execute the function. The function screens are integrated in the configuration by means of the Select Function Screen function. Some functions can be called both directly by means of a function (individual function) and by means of a function screen. Other functions are available only via function screens or only as individual functions. In the case of an individual function, you specify a parameter. The function is then executed directly with the set parameter. In function screens, the operator can select a parameter and then execute the function. If a function exists in the configuration as both an individual function and a function screen, the current status of the function is displayed when the function screen is called. All the existing function screens are used with the supplied standard screens. Example A soft key is assigned the function Alarms - Display First/Last and the parameter Last. If you press the key on the operating unit, the setting Last is accepted. Another soft key is assigned the function Function Screen and the parameter Alarms - Display First/Last. If you press this key on the operating unit, the function screen for setting the alarm message display is called. It indicates the current status: Message Display: Last You can use the cursor keys on the operating unit to select a different setting and then press the ENTER key to accept it. 5.9.6 Peculiarities with conversion functions Problems When conversion functions are applied to tags that use the same tag as a parameter, incorrect calculations can result. ProTool User’s Guide Release 12/99 5-43 Configuration techniques Example You have configured a screen with two tags, x and y: tag x for an input/output, tag y for an output. Both are PLC tags. Tag x has been assigned the Convert Value function as follows: y=10*x. The function is to be executed when a value is entered. Process Let’s assume that x currently has a value of 1 on the PLC and the operating unit. If a value of 2 is entered on the operating unit for x, an incorrect value of 10 appears for y. The reason for this is as follows: The function is executed when a value is entered. However, the new value x is not yet on the PLC. The function thus takes the old value for x from the PLC. Consequently, the result is incorrect. Action In order to get around this problem, set Value Output as the condition of execution. The function is thus not triggered until the value changes on the PLC. Note The usage of this function with OP7/17 and the connection to a SIMATIC S5 can lead to rounding errors, as with OP7/17, internal calculations are made with Double values, which are then redisplayed as integer tags (refer to Tags). 5.9.7 Example: changing the operating mode The following example using the Mode function illustrates How to configure functions with a parameter. Objective You want to set the Online and Offline operating modes by means of two function keys. 5-44 ProTool User’s Guide Release 12/99 Configuration techniques Procedure: 1. Create and open the screen in which the switchover and display take place. 2. Click the function key that you want to use to switch on the Online operating mode. The Function Key dialog box appears. 3. Select the Functions tab. 4. Select the Display Selectable Functions check box. The Select Function window appears. 5. Select the Mode function under the Switch function group. 6. Click the Add button. The Parameters dialog box appears. ProTool User’s Guide Release 12/99 5-45 Configuration techniques 7. Select the Operating Mode parameter from the list, and enter the value 0 in the input field under the list. This parameter controls the behavior of the Mode function, so the mode changes to online. 8. Click OK to close the Parameters dialog box. The function then appears in the Selected Functions list. 5-46 ProTool User’s Guide Release 12/99 Configuration techniques 9. Click OK to close the Function Key dialog box. The configuration of the function for switching on the Online operating mode is thus complete. 10. Repeat steps 2 to 9 for the second function key. In step 7, however, you use the parameter 1 this time. At runtime, the operator can use both the configured function keys to set the operating mode. ProTool User’s Guide Release 12/99 5-47 Configuration techniques 5.10 Creating recipes Overview In this chapter you will learn 5.10.1 • what recipes and data records are • how to configure recipes • how to transfer data records between the operating unit and the PLC. What is a recipe? Requirements In order to be able to configure recipes, you require one of the following operating units: • OP5, OP15 • OP7, OP17 • C7-623, C7-624 • C7-633, C7-634 Purpose The purpose of recipes is to transfer a group of related data to the PLC together and synchronously. Recipe and data record The terms recipe and data record are defined below using the example of a filling station for a fruit juice system: 5-48 ProTool User’s Guide Release 12/99 Configuration techniques Fruit juice system Grapefruit Lemon Nectar Juice Drink Orange Apple Recipe and data record in a filing cabinet analogy • Recipe Recipes correspond to the drawers of the filing cabinet shown (for example Orange or Lemon). The reference value fields (tags) that belong to the recipe are defined in the recipe. You use the recipe to define the data structure in your ProTool project. You cannot change this structure subsequently on the operating unit. You can configure up to 99 recipes in ProTool. • Data record Data records correspond to the filing cards in the drawers of the cabinet (Drink, Juice and Nectar). A data record contains the values for a recipe. You create, delete and modify data records on the operating unit. You can configure up to 99 data records for a recipe. Example of a recipe The filling station above is used to produce orange drink, orange juice and orange nectar. The mixing proportions for each of these are different. The ingredients are always the same. Let us assume that a recipe called Mixture is created, containing the following data structure: ProTool User’s Guide Release 12/99 5-49 Configuration techniques Tag Designation Var_23 Name Var_11 l orange Var_7 l water Var_19 kg sugar Var_21 g flavor The tag designations Name, l orange, g flavor etc., are known as entry names. The entry names are displayed as well on the operating unit. Tag Var_11, for example, can thus be identifed as the tag designating the mixture component orange. The data records contain the values for the different drink types. The data records could be as follows, for example: Orange drink Orange juice Orange nectar Name Drink Name Juice Name Nectar l orange 90 l orange 95 l orange 70 l water 10 l water 5 l water 30 kg sugar 1,5 kg sugar 0,5 kg sugar 1,5 g flavor 200 g flavor 100 g flavor 400 Same tags in screens and the recipe For each ingredient (orange, water, etc.) there is a separate screen in the above example, containing a supply tank, valves, an overview of the quantities used and other information. The screens contain input fields that allow you to set the various supply quantities for the mixer. You can thus enter the mixing proportions screen by screen. The mixer is then started. This process is repeated for each drink type. If the tags of the input fields are formed into a recipe, you can store finished mixtures for the different drink types by creating data records on the operating unit. The figure below shows how to use the same tags in screens and in the recipe. To produce a specific drink type, the corresponding data record is transferred to the PLC. All tags are thus assigned the required values at the same time. 5-50 ProTool User’s Guide Release 12/99 Configuration techniques Mixer Scr_1 Var_23 Orange supply Scr_2 Var_11 "Mixture" recipe Water supply Scr_3 Var_7 Var_23 Var_11 Var_7 Var_19 Var_21 name l orange l water kg sugar g aroma Sugar supply Scr_4 Var_19 Aroma supply Scr_5 Var_21 Same tags in screens and the recipe • For how to configure a recipe, see Configuring recipes (Chapter 5.10.2). • For how to transfer data records, see Transferring data records (Chapter 5.10.3). ProTool User’s Guide Release 12/99 5-51 Configuration techniques 5.10.2 Configuring recipes Identifying a recipe on the operating unit You create a recipe in your project with a symbolic name. This name is only relevant on the configuration computer, not on the operating unit. The recipe is identified on the operating unit by means of the recipe number and recipe heading set in the project. You create the recipe heading in the recipe editor by choosing Edit → Properties. In addition, ProTool automatically assigns a number to the recipe. You can also change this number by choosing Edit → Properties. Both the recipe number and recipe heading are visible on the operating unit and enable you to select the recipe from the recipe directory. Identifying a data record You create a data record on the operating unit with a symbolic name. This name is only relevant on the operating unit. In addition, the operating unit automatically assigns a number to the data record. When a data record is transferred to the PLC, only the recipe number and data record number are transferred with the data, not the symbolic names. Since the data record’s number is its unique identification attribute, you can create several data records with the same name but not with the same data record number. The operating unit writes the data and number of the data record and of the associated recipe to specified locations on the PLC: SIMATIC S5 Numbers: Recipe number mailbox Data: Recipe mailbox, possibly successive recipe mailbox SIMATIC S7 Numbers: Data mailbox Data: To the addresses directly You will find more information on the recipe number mailbox, recipe mailbox, successive recipe mailbox and data mailbox in the Communication User’s Manual. 5-52 ProTool User’s Guide Release 12/99 Configuration techniques Tags in recipes Tags that you use in recipes must have an address on the PLC. Only these tags will be transferred to the PLC when a data record is transferred. Tags without an address are not transferred. There is no point using the tag types Timer and Counter in recipes. Note Functions you have assigned to recipe tags are not executed in recipes. Standard screen for recipes The standard screen Z_RECORD is available so that you can create, edit, delete and transfer data records on the operating unit. This screen is already integrated in the standard project and can be displayed on the operating unit by means of a function key. Recipe entries Recipes consist of individual entries. Each entry consists of a maximum of one input field and an optional text. You can configure direct or symbolic entries for the input field. By way of example, the figure below shows the Mixture recipe with its entries. In contrast to screens, the operating unit can display several entries for recipes at the same time. The table shows how many lines and characters per line are available with the different operating units. ProTool User’s Guide Release 12/99 5-53 Configuration techniques Operating unit Lines Characters per line OP5 2 17 OP7 2 17 OP15A 1 36 OP15C 2 17 / 36 OP17 2 17 / 36 C7-623 2 17 C7-624 2 17 C7-633 2 17 C7-634 2 17 / 36 Recipe entries: number of available lines and characters per line Note When you download a new project to the operating unit, the configuration memory is deleted, and with it all the data records created there. 5.10.3 Transferring data records How to create data records and transfer them to the PLC is described in detail in the manual of your operating unit. Transferring data records when working on the operating unit (standard case) The transfer of data records from the operating unit to the PLC and vice versa is the standard case. The special cases are described in the Communication User’s Manual. We recommend that you only transfer data records by using the operating unit. To do this, use the standard screen Z_RECORD. • Creating data records Data records can only be created on the operating unit and saved in the flash memory there. The operating unit automatically creates a data record with the number 1 for each recipe. All the values of the data record are preset with 0. Copy this data record and save it by a different name in order to create other data records. 5-54 ProTool User’s Guide Release 12/99 Configuration techniques • Synchronization during transfer An essential feature of recipes is that the data is transferred with synchronization and uncontrolled overwriting of the data is thus prevented. In order to ensure coordinated operation when data records are transferred, bits are set in the control and acknowledgment area of the interface area. The interface area for the SIMATIC PLCs is described in the Communication User’s Manual. You will find information for non-SIMATIC PLCs in the ProTool online help system. • Functions ProTool offers functions for: − Transferring data records from the PLC to the operating unit − Transferring data from the operating unit to the PLC Assign a function like this to a function key. The parameters of the function contain the recipe name and the data record number. • Transfer screen A transfer screen is available on the operating unit for transferring data records. This allows you to transfer data records in the following directions: − From the operating unit to the PLC − From the PLC to the operating unit − From the operating unit to the operating unit (which corresponds to copying a data record) Transferring data records by means of a PLC program You can transfer data records from the PLC to the operating unit and vice versa by means of PLC jobs 69 and 70. However, the PLC job only writes to the tags or reads from them. The data record cannot be saved in the flash memory or read from the flash memory directly using a PLC job. You have to use the operating unit for this. 5.10.4 Example: How to create a recipe Task In this example you create a recipe for the mixing station of a fruit juice system. Different fruit juices are to be mixed using the same system. The ingredients are the same; only the mixing proportions are different. You begin by creating a recipe called Mixture and then a data record with the name Juice. This data record contains the mixing proportions for orange juice. ProTool User’s Guide Release 12/99 5-55 Configuration techniques The example How to transfer data records shows you how to transfer the data record to the PLC afterwards. The task involves the following steps: • Creating a recipe • Transferring a project file to the operating unit • Creating a data record on the operating unit Example system You are going to create the example recipe for an OP7 linked to the SIMATIC S5 PLC via AS511. The PLC is the AG115U with the CPU 944. Preparatory settings: 1. Open the standard project OP07_S5_S7.pdb. Save the project with a new name (for example, QUICKMIX.PDB) by choosing File → Save As. 2. In the project window, select PLCs and double-click the entry in the right column. 3. Select the SIMATIC S5-AS511 driver under Driver in the PLC dialog box. 4. To set the CPU type, click the Parameters button. Select the S5 115U CPU944 CPU type. Close all the dialog boxes. Creating a recipe: 1. Double-click Recipes in the project window. This opens the editor for recipes. Create the recipe shown. 5-56 ProTool User’s Guide Release 12/99 Configuration techniques Proceed as follows: 2. Enter the text Name and insert an input field for the data record name after it. In the Input/Output Field dialog box, select Text and create the following text or graphic list: 0 1 2 Drink Nectar Juice 3. Configure the new tag Var_23 of type KF for the input field. Set an address for the tag on the PLC (for example DB 12, DW 0). Do not change the PLC that is set. You can thus also use the tag in screens or messages. 4. Create four more tags - Var_11, Var_7, Var_19 and Var_21 - for the mixture ingredients orange (in liters), water (in liters), sugar (in kilograms) and flavor (in grams). These tags are also of the type KF. Specify DB 12 for the address as well. Configure 1 decimal place for tag Var_19 (sugar). Additional settings: In the following steps you specify the name of the recipe and set up the recipe number mailbox and the recipe mailbox. 5. Choose the Edit → Properties menu command, and, on the General tab, change the name of the recipe to Mixture. 6. Enter Mixture for the recipe on the Heading tab as well. The heading entered here allows you to identify the recipe during runtime on the operating unit. 7. Close the dialog box. 8. Choose System → Area Pointers to set the interface area. Click the Add button, and set the address: Area: DB.DW DB: 51 Length: 185 Set up the recipe number data area: Area: DB.DW DB: 13 DW: 0 Set up the recipe mailbox data area: Area: DB.DW DB: 14 DW: 0 Length: 29 Create the corresponding data areas on your PLC as well. ProTool User’s Guide Release 12/99 5-57 Configuration techniques Transferring a project file to the operating unit: 1. Choose File → Save to save your project. 2. Connect the OP7 to the configuration computer using the connecting cable. 3. Choose File → Compile to compile an executable project file. 4. Set the OP7 to download mode. 5. Download the compiled file to the OP7 by choosing File → Download. 6. After the transfer, the OP7 is on the message level and displays the system message S5 unavailable. 7. Connect the OP7 to the PLC. The system message disappears. Creating a data record on the operating unit: 1. On the OP7, change to the standard screen for data record editing by choosing Data Records → Edit. Select the Mixture recipe from the recipe directory. 2. Press the ENTER key. The following appears on the display: 01 Data Record Press the ENTER key again. The following appears: 01 Name Drink The cursor is on 01. 3. Press the cursor key. The cursor jumps to Drink. Press the SHIFT key. The and cursors allow you to scroll through the symbolic names. Scroll through until Juice. Then press ENTER to save the first recipe entry. 4. Press ENTER to jump to other recipe entries. Then enter the following mixture values for the ingredients orange, water, sugar and flavor: 02 03 04 05 Orange 95 Water 5 Sugar 0.5 Flavor 100 Press ENTER to save your entries in each case. 5. Once you have entered all the recipe entries, save the data record. To do this, press the ESC key twice. The following query appears: No. 1 Name: Data recordd Save Data Record? Y The cursor is on 1. Since you have just edited the first data record, do not change anything here. Press the cursor key. The cursor jumps to Data Record. 5-58 ProTool User’s Guide Release 12/99 Configuration techniques 6. Define a name for the data record. To do this, overwrite the name Data Record with DE01. Delete the rest of the letters by pressing the key combination SHIFT + DEL. Press ENTER to save your entry. 7. Press the cursor key. The cursor jumps to the Yes field. Press the ENTER key again. The following message appears: No. 1 Name: DE01 Overwrite? Y Press ENTER to confirm. Data record 1 is saved. The following message appears: No. 1 Name: DE01 Data record saved Press the ESC key. The OP7 displays the data record number with the new name: 01 5.10.5 DE01 Example: How to transfer data records Task You want to transfer a data record from the OP7 to a SIMATIC S5. The PLC is the AG115U with the CPU 944. The example How to create a recipe shows how to configure the associated recipe and create data records on the operating unit. Preparations on the PLC Before you can transfer a data record from the operating unit to the PLC, you must create the following data blocks on the PLC: • DB 12 for the tags in the recipe • DB 13 for the recipe number ProTool User’s Guide Release 12/99 5-59 Configuration techniques • DB 14 for the recipe mailbox • DB 51 for the interface area The following two function blocks are also required: • FB 51 FB 51 controls communication between the operating unit and the PLC. • FB 42 The synchronization between the operating unit and PLC takes place in data word 64 of the interface area. FB 42 carries out this synchronization and then distributes the data to the addresses. The organization blocks OB1, OB20, OB21 and OB22 are thus structured as follows: • OB 1 :L KY 51,0 :SPA FB 51 :T MW 100 :L KY 51,0 :SPA FB 42 :BE • OB 20/21/22 :L KF +1 :A DB 51 :T DW 64 :BE Transferring a data record You then transfer data record 1 of the "Mixture" recipe from the OP7 to the PLC. 1. Connect the OP7 to the PLC. 2. Change to the transfer screen on the OP7 by choosing Data Records → Transfer. The recipe 01 Mixture is displayed. 3. Press the ENTER key. The following display appears: Source: 00 Dest.: 00 PLC: 00 / 00 Accept OP: 1 The cursor is on the Source field. 4. Enter the value 01 for Source, because the first data record is to be transferred. Press the ENTER key to accept the entry. 5-60 ProTool User’s Guide Release 12/99 Configuration techniques 5. Press the cursor key twice. This takes you to the Accept field. You skip the Destination field, because the value 00 indicates the desired transfer direction OP → PLC. 6. Press the ENTER key to transfer the data record to the PLC. The following display appears: Source: 01 Dest.: 00 PLC: 01 / 01 Accept OP: 1 7. Result: Function block FB 42 distributes the values to the specified addresses. ProTool User’s Guide Release 12/99 5-61 Configuration techniques 5.11 Operator guidance Purpose In addition to the option of customizing the user interface of your operating unit to make it easier for you to use, ProTool features other options for supporting and prompting you on your operating unit as a function of the situation. This means you can implement mechanisms and decision-making aids that can prevent possible incorrect operations on the operating unit. Overview ProTool makes the following methods available for the implementation of operator prompting: 5.11.1 • Providing Help text (Chapter 5.11.1) • Applying dynamic attributes (What are dynamic attributes? (Chapter 5.11.2)) • Evaluating key operation (Chapter 5.11.3) • Driving light-emitting diodes (Chapter 5.11.4) Providing Help text Help text provides additional information and operator instructions on screens, input and output fields and messages to the operator at runtime. For example, Help text may be in the form of the permissible range of values for an input field or the cause and elimination of a malfunction in the case of an alarm message. Configure information for objects on the Help Text tab. Configured Help text is displayed in the language set on the operating unit by pressing the Help key. 5.11.2 What are dynamic attributes? Purpose To draw the operator's attention on the operating unit to specific situations – for example, specified limit values have been reached or exceeded – you can configure the dynamic attribute Flashing for output fields. This enables you activate or deactivate the flashing attribute for the displayed text according to the value of a tag. 5-62 ProTool User’s Guide Release 12/99 Configuration techniques Index tag You can either link the dynamic attribute directly to the tag of an output field or you can define a separate index tag for it. You can influence several output fields simultaneously with a separate index tag. 5.11.3 Evaluating key operation Purpose Key operations on the operating unit can be downloaded to and evaluated on the PLC. This means, for example, that you can issue a message that will draw the operator’s attention to the incorrect operation of a key. Requirements For the PLC to be able to evaluate whether and, possibly, which key has been operated on the operating unit, you have to create specific data areas on the PLC and specify them in your project at System → Area Pointers. These are the two data areas System keyboard assignment and Function keyboard assignment, depending on which keys you wish to evaluate. You set the assignment of the function keys to the bits in the function keyboard assignment when you configure the function keys. You will find a description of the keyboard assignments for the different operating units in the Communication Manual. 5.11.4 Driving light-emitting diodes Purpose The light-emitting diodes (LEDs) on the function keys of the operator panel can be driven on the PLC. By means of a light-emitting or flashing LED, you can indicate to the operator that, for example, the operating panel is expecting a certain function key to be operated. ProTool User’s Guide Release 12/99 5-63 Configuration techniques Requirements For the PLC to be able to drive the LEDs, you have to create the LED assignment data area on the PLC and in your project by choosing System → Area Pointers from the menu. Set the assignment of the individual LEDs to the bits in the LED assignment when you configure the function keys. You will find a description of the LED assignment and the LED functions for the different operating units in the Communication Manual. 5.11.5 Assigning operator authorization Purpose ProTool allows you to use a password to prevent controls such as input fields and function keys from being used by those unauthorized to do so. This means that when you are creating your project you can restrict the use of functions that relate to security to specific people or groups of operators. Important parameters and settings can thus only be changed by authorized personnel. The access protection that you configure allows you to guard against incorrect usage and increase the security of the system or machine. Password hierarchy During the configuration phase you can assign operator authorization to specific groups. At runtime, individuals can be allocated to one of these groups, as appropriate, and they thus automatically receive the access rights of that group. ProTool provides hierarchically organized password levels from level 0 to 9. If a user is assigned password level 4, for example, this user is authorized to execute the functions of password levels 0 to 4. 5-64 • Password level 0 Password level 0 is the default in ProTool. Use this lowest level in the hierarchy for functions that have little or no effect on the operational sequence. These are generally functions that do not required any input, such as the display of messages. You do not have to enter a password on the operating unit in order to execute functions with password level 0. • Password levels 1 to 8 Assign functions to password levels 1 to 8 according to their importance. Before you execute these functions, the operating unit prompts you to enter a password. ProTool User’s Guide Release 12/99 Configuration techniques • Password level 9 The authorization to execute functions at password level 9 is granted only to the System Administrator or service engineer. This provides access to all the functions of the operating unit, including password administration. You define the password of the System Administrator by choosing System → Settings. The default setting is 100. You can change this setting on the operating unit at runtime. You can find more information on password administration in the equipment manual for your operating unit. Logging into and out of the operating unit • When you call a password-protected operation, the operating unit automatically prompts you to enter an appropriate password. In order to eliminate the possibility of those without authorization gaining access, a password level greater than 0 should not remain active on the operating unit for any length of time. • If you do not do anything on the operating unit for a configured period of time (logout time), the operating unit automatically resets the current password level to 0. You set the logout time by choosing System → Settings. The system preset is 5 minutes. Note To log into the operating unit, use the Z_PASSWORD standard screen in your project. Setting the password level on the operating unit The following PLC jobs are available for setting a defined password level on the operating unit: • PLC job 23 allows you to set any password level on the operating unit from the PLC, for example in order to allow a defined user group to use the operating unit. • PLC job 24 allows you to reset the password level to 0 from the PLC. You will find a list of all the possible PLC jobs with job numbers and parameters in the ProTool online help system. ProTool User’s Guide Release 12/99 5-65 Configuration techniques 5.12 Configuration in foreign languages Overview This chapter shows you what you need to know in order to create a project with a user interface in a foreign language. You can create a monolingual or a multilingual project. In a multilingual project you can decide: 5.12.1 • whether to make several languages available on an OP and provide the user with a key for switching between them • whether to download only one language to a specific OP System requirements for foreign languages With the exception of Russian, you can configure all foreign languages without having to make changes to your Windows system configuration. To be able to configure in Russian (OP7, OP15C, OP17 only), you have to enable Russian language support under Windows 95 (Control Panel → Software → Windows Setup → Language Support → Details). This is not necessary in Windows NT. Alternatively, of course, you can also install a Russian version of Windows. Not all the characters of the ANSI character set can be displayed on the screen, depending on the panel. You will find a table showing the characters for specific devices in ProTool’s online Help under the topic "Character Maps". 5.12.2 User interface language and project languages Basically, a distinction has to be made between two different display levels: • ProTool’s user interface language. This is the language in which text is displayed on menus and dialog boxes in ProTool. The user interface language is selected in ProTool’s Setup. • The project language for the operating units. This is the language in which configured text appears on the operating unit. The configuration can be created in all of the languages available on the configuration computer under Windows. 5-66 ProTool User’s Guide Release 12/99 Configuration techniques The following objects contain language dependent text: − event messages − alarm messages − screens − recipes − text lists − help texts The two language levels are completely independent of each other. For example, you can create French projects with an English ProTool, or English projects with a French ProTool. User interface language - up to 3 project languages Editing language Language levels in ProTool Up to three project languages per operating unit You can store text for any project in as many project languages as you like. You can even download up to three of these project languages simultaneously to an operating unit. The operator can switch from one language to another. To do this, you configure the function Language. Editing language The project language in which you edit text at any given time on the configuration computer is the editing language. The toolbar and the status bar show the current editing language setting. ProTool User’s Guide Release 12/99 5-67 Configuration techniques Reference language One of the project languages can be used as the reference language. You can create all the different pieces of text in the reference language first and then use it as a basis for translations into other languages. 5.12.3 Configurable languages You can configure text-based operating units in the following languages: • German • English • French • Italian • Spanish In addition, you can use Russian for panels OP7, OP15C, OP17 and TD17. Tip If you make do without language dependent special characters, you can of course enter text in a different language too. For example, you could select "English" as the language in ProTool, but enter text in Flemish. However, all system messages will continue to appear in English, since they cannot be edited in ProTool. 5.12.4 Language dependent keyboard assignment Language dependence The characters on a PC keyboard are language dependent. For example, no German or French special characters are available on an English keyboard. Further, the letters are arranged somewhat differently. As soon as you change the editing language in ProTool, it modifies the assignment of your keyboard to the layout of the foreign language concerned. Auxiliary window with keyboard layout In order to facilitate the assignment of the characters printed on your keyboard and those actually entered, ProTool displays a window containing the new key layout on the screen. You can then see where differing keys are located and can enter them directly. Alternatively, you can directly click the different letters and special characters on the screen with the mouse. 5-68 ProTool User’s Guide Release 12/99 Configuration techniques Example of language dependent keyboard with French as the editing language The language dependent keyboard is hidden automatically as soon as you change the editing language back to the current Windows language. You can also activate and deactivate display of the language dependent keyboard by choosing View → Keyboard. 5.12.5 Reference text When you create a project for several languages, you normally configure all the pieces of text in your native tongue first. If you then change the editing language to enter text in a foreign language, all the text fields appear blank again. ProTool features a user-friendly reference text function so that you have a basis for your translations. In dialog boxes, you can view the original text in the reference language by clicking a special button. You can display an additional window with reference text in the screen editors by means of the toolbar or by choosing View → Reference Text. Reference text In the editor you can translate the pieces of text displayed in the window reference text without having to change from one language to another to do so. ProTool User’s Guide Release 12/99 5-69 Configuration techniques 5.12.6 Steps to creating a multilingual project Scenarios The basic approach is identical no matter whether: • you configure in a different language from that installed in ProTool. (Example: you have ProTool in German and would like to create a French project.) • you want to sell a project to several countries, in the language of the countries concerned. (Example: you are sending a machine to Germany, England and France. You want all pieces of text to be displayed on the operating unit in the language of the countries concerned.) • you supply a project to a multilingual country. (Example: you are selling a machine to Switzerland. You want the operator to be able to choose between German, French and Italian on the operating unit.) In any case, you should always attempt to create and test the project in one language first. This language then acts as your reference language for the translations. Steps Configuring in foreign languages consists of the following specific work steps: 1. Comply with the requisite system requirements. 2. Define the languages you want to configure (choose System → Language Assignment from the menu). 3. Select a language as the first editing language (choose Edit → Languages from the menu). Create and test the complete project in this language first before proceeding to translate all the pieces of text later together. 4. Setting up the character set (menu item System → Fonts) 5. Configure a language change (only when you want to offer several languages simultaneously on one operating unit). 6. Translate the pieces of text. To translate them, change the editing language (choose Edit → Languages). Select the language in which you created the project as the reference language (likewise choose Edit → Languages from the menu). 7. Select the languages to be downloaded to a specific operating unit (choose System → Language Assignment from the menu). You can select a single language but, alternatively, you can select up to three languages simultaneously. 5-70 ProTool User’s Guide Release 12/99 Configuration techniques 8. Compiling the project. 9. Download the project to the operating unit. Detailed descriptions of the different steps will be found in ProTool online Help. Note Avoid moving fields in event messages and alarm messages when you modify a configuration that has been created in several languages. Since there is no permanent assignment between the field and its position within the text, you should move the pieces of text – if necessary – instead of the fields. 5.12.7 Cyrillic characters If you have selected Russian by choosing Edit → Languages from the menu, you can enter both Cyrillic and Latin characters on the keyboard: • All lowercase letters produce Cyrillic characters. • All uppercase letters produce Latin characters. • Digits and punctuation continue to be available. You will find a table with a precise assignment of Latin and Cyrillic characters under the keyword Character maps in the ProTool Online Help. ProTool User’s Guide Release 12/99 5-71 Configuration techniques 5-72 ProTool User’s Guide Release 12/99 Testing projects 6 Overview In this chapter you will learn how to • create an executable project file • perform download settings • download the executable project file to the operating unit, and • test the project. ProTool User’s Guide Release 12/99 6-1 Testing projects 6.1 Testing projects Once you have completed your entire project or self-contained parts within it, the test phase comes. The following steps must be taken: 1. Compile the project - in other words, create a file from the project that can be run on the operating unit. 2. Download the project - in other words, transfer the project to the operating unit. You have to carry out some settings for this. 3. You test the project; If you find any errors, correct them and begin again with step 1. Note If the PLC you are using is a SIMATIC S5 or S7, configure Status/Force in order to test certain tags in the PLC program, for example. 6-2 ProTool User’s Guide Release 12/99 Testing projects 6.2 Downloading the executable project file Basic procedure To download the project file, you have to do the following: 1. Set the transfer mode. 2. Select an interface on the configuration computer. 3. Select a storage medium on the operating unit. 4. Download the project file. Note for text-based displays When a new project file is downloaded to the operating unit, the memory is deleted, and with it all the data records on the operating unit. Peculiarities These deviations from the basic procedure are only to be carried out the first time: • Transfer mode: The first download is always a serial transfer. • Firmware: Before a compiled project file can be downloaded to the operating unit for the first time, the firmware of the operating unit is downloaded automatically. A corresponding status message is issued. Download not possible If no connection to the operating unit can be established, a status message to this effect is output. Check the physical connection between the operating unit and the configuration computer. Note The project file must not be transferred directly from the configuration computer to the module, but must first be loaded into the flash memory on the operating unit, since the memory organization of the two storage media differs. If the project file were to be downloaded directly to the module and then loaded into the flash memory on an operating unit, error states can result. In the DRAM the data are lost when the operating unit is switched off. ProTool User’s Guide Release 12/99 6-3 Testing projects 6.3 Peculiarities of MPI transfers Requirements • MPI download is possible with the following operating units: all graphics displays and OP3, C7-633, C7-634, C7-623, C7-624. • An MPI module is required on the configuration computer. • The configuration computer and operating unit are connected physically to the MPI network. • An MPI network can only be set up with a SIMATIC S7 PLC. Setting the MPI address on the operating unit If you have downloaded the compiled project file for the first time, and serially at that, the operating unit has the configured MPI address. To carry out an MPI transfer, the standard screen System Settings must be configured in the project and the MPI transfer operating mode must be selected. Multiple operating units in the MPI configuration If you want to integrate multiple operating units in the MPI configuration, you can only do it successively. 1. Connect the first operating unit physically. 2. Change to serial transfer mode, and download first the firmware and then the compiled project file. 3. Then connect the next operating unit physically, and so on. Reason If you were to connect several operating units physically and then download the project, this would lead to an address conflict. All the operating units would have the same default MPI address, namely 1– which is not permissible in the MPI configuration. 6-4 ProTool User’s Guide Release 12/99 Testing projects 6.4 Status/Force Tag Purpose At runtime you can have direct access to the connected PLC (SIMATIC S5 and SIMATIC S7) from the operating unit to read and write values. This means you can monitor and change the PLC operands easily on the operating unit without having to connect a programming device or PC to the PLC as well. This is very advantageous particularly during the testing and commissioning phase of your project. Requirements: In order to be able to access values on the PLC directly at runtime, the following requirements must be met: • The connected PLC must be a SIMATIC S5 or SIMATIC S7 • You must have integrated the two standard screens Status Tag and/or Force Tag in your project. Standard screens The programming device function STATUS VAR is called in the standard screen Status Tag. This allows you to monitor PLC operands on the operating unit. Write access is not possible in this screen. The programming device function FORCE VAR is called in the standard screen Force Tag. This allows you to monitor and change PLC operands on the operating unit. You will find detailed descriptions about working with the two standard screens in the equipment manual for your operating unit. ProTool User’s Guide Release 12/99 6-5 Testing projects 6-6 ProTool User’s Guide Release 12/99 Documenting and managing projects 7 Overview This chapter details the multiplicity of functions offered by ProTool for printing out, documenting and managing and archiving your project data. ProTool User’s Guide Release 12/99 7-1 Documenting and managing projects 7.1 Documenting projects 7.1.1 Printing project data Print function ProTool provides a comprehensive printout function that can be accessed via menu item File → Print. It provides detailed lists for documenting all projectrelevant data such as screens, messages, tags, symbol tables, etc. for ProTool/Lite In this way it provides the facility for documenting your complete project. An up-todate printout can also be very helpful while you are configuring. Tip When configuring, as an alternative to the printout function, there is also the convenient cross-reference function offered by ProTool (see Retrieving project information (Chapter 4.10)). Chapter ProTool subdivides printouts into chapters arranged by subject according to object types. For example, one chapter contains all the definitions on the subject of screens, another contains a list of all the tags and yet another a list of all the defined text or graphic lists. You can print several chapters at once or just print single chapters. 7-2 ProTool User’s Guide Release 12/99 Documenting and managing projects Reports ProTool offers you the facility of customizing printouts to suit your individual requirements. • You can limit a printout to single chapters or single pages. • You can set the order in which the chapters appear. • You can decide which data you want to output within a chapter. • You can set margins, define your own headers and footers and embed your own graphic in the cover. These definitions are stored in a report. Frequently required reports have been defined in ProTool in advance. But you can also create your own reports, as you wish. All reports are common to all projects. Every time you want to print, you choose the report with which you would like your output to conform. 7.1.2 Example: creating a customized report Objective You wish to print all the data in your project. Unlike the default setting, you do not want the ProTool graphic but your company logo, which you have already used in your project under the name of LOGO, to be printed on the cover. You want to leave a margin for handwritten comments on the right side of the printout. Perform the following steps: 1. Open the project from which you wish to print data. 2. Choose File → Print from the menu. 3. In the Print dialog box at Reports, choose the Complete report. You will now see the individual chapters on the Contents list in the order in which they will later be output. ProTool User’s Guide Release 12/99 7-3 Documenting and managing projects 4. Click the Preview button. The print preview shows you how your printout will look later. You want to replace the graphic on the first page (cover) with your company logo. You want the right border to be much wider. 7-4 ProTool User’s Guide Release 12/99 Documenting and managing projects 5. Exit from the preview by clicking the Print button. 6. To perform the changes you require, click the Reports button. The Reports dialog box is opened. 7. To modify the margin, click the Page button. 8. Enter the value you require for the right border at Right - for example, 3 for 3 cm. If you like, you can specify a piece of text here for the headers and footers at the same time. ProTool User’s Guide Release 12/99 7-5 Documenting and managing projects 9. Confirm your input by clicking OK. You a re now back in the Reports dialog box. 10. To modify the definition for the cover, select the entry Cover on the Contents list and click the Parameters button. 11. In the Cover dialog box, select the graphic called LOGO with your company logo at Graphic. 12. Click OK twice until you are back in the Print dialog box. You have now modified the definitions for the report called Complete. The changes will be available in future when you print other projects. 13. Finally, click the OK button to activate the printing process. 7.1.3 Constraints with printing Printer drivers Note the following constraints with certain printer drivers: • It may not be possible to print the configuration with CANON drivers. Printing will be discontinued in this case. • With the Apple laser printer, the first line is not printed. This problem does not occur with drivers for the HP LaserJet III, PostScript or PostScript printers. ASCII character set With some printers, it is not enough simply to set the ASCII character set in the configuration. Make sure the ASCII character set is set on the printer too. 7-6 ProTool User’s Guide Release 12/99 Documenting and managing projects 7.2 Managing projects 7.2.1 Project management with integrated operation If you integrated ProTool into STEP 7 when you installed it, use "SIMATIC Manager" to manage your projects. You can then copy, move, back up and restore your projects in the same way as you have been used to from STEP 7. For further information refer to the documentation on SIMATIC Manager. Note ProTool’s Project Manager is not available to you in the event of integrated operation. ProTool data can no longer be viewed independently in this event, since the data is always linked to a STEP 7 project. It therefore has to be managed and backed up using this application. 7.2.2 Managing projects in stand-alone operation Project Manager If you installed ProTool as a stand-alone version – in other words, if you are not operating it under STEP 7 – there is a user-friendly Project Manager incorporated into ProTool in place of the SIMATIC Manager. You can use it to manage your projects in a user-friendly way. Usage With Project Manager, it is simple for you to: • back up projects, even on more than one floppy disk • restore projects that you have backed up • open projects • delete projects Call You start Project Manager by choosing File→ Project Manager from the menu. When you call Project Manager for the first time, the Find dialog box is displayed initially. Here you choose the drives and directories which have to be searched for ProTool files. Only those projects that are located within these directories are displayed by Project Manager. ProTool User’s Guide Release 12/99 7-7 Documenting and managing projects Find dialog box After you have selected the appropriate directories, or when you call Project Manager later again, the Project Manager window proper appears. 7-8 ProTool User’s Guide Release 12/99 Documenting and managing projects Display Project Manager In the left segment of the Project Manager you will see a hierarchical structure of all the projects located in the directories in which Project Manager searched. Here you can select a project in order to open it, delete it or back it up. In the center segment of the window you will find detailed information on the project highlighted on the list. With the help of the buttons in the right segment, you can add directories to the list of directories in which you want Project Manager to search (Find button), you can search the directories again (Update button) and you can have the list searched in accordance with different project data, such as project name, device type, creation date, etc. (Sort button). ProTool User’s Guide Release 12/99 7-9 Documenting and managing projects 7-10 ProTool User’s Guide Release 12/99 System limits A Overview In this chapter you are given a brief overview of the system limits of the OP7 and OP17 operating units. ProTool User’s Guide Release 12/99 A-1 System limits A.1 OP7 and OP17 system limits The following list of system limits helps you estimate whether your project is still within the system limits of the operating unit. A-2 • Depending on the configuration size, up to 300 word tags can be configured for each screen. • 4 KB is reserved for tag lists. If this system limit is exceeded, a restart may be triggered when the screen is selected. ProTool User’s Guide Release 12/99 SIMATIC HMI documentation B Overview The SIMATIC HMI documentation is made up of a combination of manuals, instructions and online Help in keeping with the range of target groups. This chapter provides a broad outline. ProTool User’s Guide Release 12/99 B-1 SIMATIC HMI documentation B.1 Documentation for ProTool The SIMATIC HMI device family is a complete family of text displays, operator panels, touch panels and Windows-based systems for efficient machine operation and monitoring. The performance and convenience of the devices are finely tuned to suit the individual demands made of them. SIMATIC HMI operating units The great advantage is that you configure all the devices with the same configuration software. B-2 • ProTool for Windows-based systems (Chapter B.1.1) • ProTool for graphics displays (Chapter B.1.2) • ProTool for text-based displays (Chapter B.1.3) ProTool User’s Guide Release 12/99 SIMATIC HMI documentation B.1.1 ProTool for Windows-based systems The ProTool - Configuring Windows-Based Systems manual tells you how to configure the following flat panel displays, PC-based operating units and touch panels: • Systems with Windows® CE − TP170A − MP270 • Systems with Windows® 95/98, Windows® 2000 or Windows® NT: − OP37/Pro − FI25 − FI45 − PC670 − PC670T − Standard PC Example: OP37/Pro ProTool User’s Guide Release 12/99 B-3 SIMATIC HMI documentation B.1.2 ProTool for graphical displays The ProTool - Configuring Graphics Displays manual tells you how to configure the following graphics-based operating units and touch panels: • Operator panel − OP25 − OP27 − OP35 − OP37 • Touch panels − TP27 − TP37 • C7 devices − C7-626 (OP25 with integrated S7 CPU) Example: TP37 B-4 ProTool User’s Guide Release 12/99 SIMATIC HMI documentation B.1.3 ProTool for text-based displays The ProTool - Configuring Text-Based Displays manual tells you how to configure the following line-based operating units: • Operator panel − OP3 − OP5 − OP7 − OP15A − OP15C − OP17 • Text displays − TD17 • C7 devices − C7-621 (OP3 with integrated S7 CPU) − C7-623 (OP5 with integrated S7 CPU) − C7-624 (OP15 with integrated S7 CPU) − C7-633 (OP7 with integrated S7 CPU) − C7-634 (OP17 with integrated S7 CPU) Example: OP7 ProTool User’s Guide Release 12/99 B-5 SIMATIC HMI documentation B.2 Overview of the SIMATIC HMI documentation This manual is part of the SIMATIC HMI documentation. The table below shows where to find what information. Documentation Target Group Content Getting Started New users This document leads you step by step through the process of configuring Brief instructions • a screen using various objects, • a change of screen, • and a message This document is available for ProTool Configuring Windowsbased systems User’s Guide Programmers • Text-based displays: OP3, OP5, OP7, OP15, OP17 • Graphics displays: OP25, OP27, OP35, OP37, TP27, TP37 • Windows-based systems: for example: TP170A, MP270, OP37/Pro, FI25, FI45 Provides information about working with the ProTool/Pro configuration software. It contains • information about installation, • basic principles of configuring, • detailed description of configurable objects and functions. This document applies to Windows-based systems. B-6 ProTool User’s Guide Release 12/99 SIMATIC HMI documentation ProTool Configuring Graphics Displays Programmers User’s Guide Provides information about working with the ProTool configuration software. It contains • information about installation, • basic principles of configuring, • detailed description of configurable objects and functions. This document applies to graphicsbased display units. ProTool Configuring Text Displays Programmers User’s Guide Provides information about working with the ProTool/Lite configuration software. It contains • information about installation, • basic principles of configuring, • detailed description of configurable objects and functions. This document applies to textbased display units. ProTool Programmers Online Help ProTool/Pro Runtime User’s Guide ProTool User’s Guide Release 12/99 Commissioning technicians, users Provides information on the configuration computer during a ProTool session. The online Help contains • context-sensitive Help • detailed instructions and examples • detailed information • all the information contained in the User’s Guide Describes how to install the ProTool/Pro RT visualization software and commissioning and operation of the software on Windows-based systems. B-7 SIMATIC HMI documentation Software Security Commissioning instructions Example application Commissioning technicians, users The ProTool/Pro Runtime visualization software is protected against unauthorized use. These instructions contain information about installing, repairing and uninstalling user authorization. New users ProTool is supplied with a number of specimen configurations together with the corresponding PLC programs. This document describes how to Commissioning instructions TP170A equipment manual MP270 Equipment Manual Commissioning technicians, users load the examples onto the operating unit and the PLC, • operate the examples and • extend the PLC connection for the purposes of our application. Describes the hardware and general operation of the units. It contains • instructions for installation and commissioning, • a description of the units, • OP27/OP37 Equipment Manual instructions for connecting PLC, printer and configuration computer, • OP25/OP35/OP45 Equipment Manual descriptions of the various operating modes, • instructions on operation, • descriptions of the standard screens supplied and their usage, • instructions on fitting options, • instructions on servicing and fitting replacement parts. OP37/Pro Equipment Manual TP27/TP37 Equipment Manual OP7/OP17 Equipment Manual OP5/OP15 Equipment Manual TD17 Equipment Manual OP3 equipment manual B-8 • Commissioning technicians, users, programmers Describes the hardware of the OP3, its general operation and how to connect it to the SIMATIC S7. ProTool User’s Guide Release 12/99 SIMATIC HMI documentation Communication Programmers User’s Guide Provides information about connecting text-based and graphic display units to the following PLCs: • SIMATIC S5, • SIMATIC S7, • SIMATIC 500/505, • Drivers for Other PLCs This document describes Communication for Windows-based Systems User’s Guide Programmers • the configuration and parameters required for connecting the units to the PLC and the network, • the user data areas used for exchanging data between the operating unit and the PLC. Provides information about connecting Windows-based systems to the following PLCs: • SIMATIC S5, • SIMATIC S7, • SIMATIC WinAC, • SIMATIC 505, • OPC, • Allen-Bradley, • Mitsubishi, • Telemecanique. This document describes ProTool User’s Guide Release 12/99 • the configuration and parameters required for connecting the units to the PLC and the network, • the user data areas used for exchanging data between the operating unit and the PLC. B-9 SIMATIC HMI documentation Other PLCs Programmers Online Help Provides information about connecting operating units to PLCs such as • Allen-Bradley, • GE Fanuc • Mitsubishi, • Modicon, • Omron, • Telemecanique. The relevant online Help is installed at the same time as the drivers are installed. ProAgent for OP Programmers User’s Guide ProAgent/Pro User’s Guide B-10 Programmers Provides the following information about the ProAgent options package for OPs (process diagnostics for OPs and TPs): • configuring installation-specific process diagnosis, • locating process faults, identifying the causes of and eliminating faults, • adapting the ready-made diagnosis screens supplied to suit your own requirements. Provides the following information about the ProAgent /Pro options package for (process diagnostics for Windows systems): • configuring installation-specific process diagnosis, • locating process faults, identifying the causes of and eliminating faults, • adapting the ready-made diagnosis screens supplied to suit your own requirements. ProTool User’s Guide Release 12/99 Abbreviations C Overview The meanings of the abbreviations used in this documentation are as follows: ANSI American National Standards Institute ASCII American Standard Code for Information Interchange CPU Central Processing Unit FM Function module HMI Human Machine Interface LED Light-emitting diode MPI Multipoint Interface (SIMATIC S7) OLE Object Linking and Embedding OP Operator panel PC Personal Computer PLC Programmable logic controller PPI Point to Point Interface (SIMATIC S7) PU Programming unit RAM Random access memory: memory with random access (working memory) TD Text-based display ProTool User’s Guide Release 12/99 C-1 Abbreviations C-2 ProTool User’s Guide Release 12/99 Glossary A Acknowledge By acknowledging an alarm message, you confirm that you have taken notice of it. Thereafter the message is no longer displayed on the operating unit. You can acknowledge alarm messages on the operating unit or you can have then acknowledged by the PLC. If you assign alarm messages to acknowledgement groups, you can acknowledge several messages simultaneously. Acknowledgement groups You can assign several alarm messages to an acknowledgement group when you are configuring. When the first message is acknowledged, all the other messages in the same acknowledgement group are acknowledged simultaneously. This means, for example, that you can acknowledge alarm messages referring to the cause of a malfunction and to all consequential malfunctions together (group acknowledgement). Acquisition cycle The acquisition cycle determines the time interval in which the value of a tag is updated by the PLC. With a zero acquisition time, the tag is updated only when screens, messages and recipes containing that tag are displayed on the operating unit. The acquisition cycle is a multiple of the standard clock pulse. Address multiplexing With address multiplexing, the address parameters of a tag are modified as a function of the value of a multiplex tag. In this way you can address a number of memory locations in the address area of the PLC (S7 CPU) with a single tag without having to define a tag for each address. Alarm message Alarm messages provide information on the operating unit on malfunctions of the machine or system connected to the PLC. Message text may include current samples. Since alarm messages display extraordinary operating states, they have to be acknowledged. ProTool User’s Guide Release 12/99 D-1 Glossary Alarm messages (area pointer) You can configure an alarm message for each bit in this data area. The bits are assigned to message numbers in ascending order. As soon as the PLC sets a bit in this data area, the operating unit recognizes the assigned alarm message as having "arrived“. Conversely, the message is interpreted by the operating unit as having "departed" when the bit is reset on the PLC. Area pointers An area pointer is a memory area defined by the user on the PLC. The area is used for exchanging data between the PLC and the operating unit. Synonym: user data area B Backup You use the "Backup" function to archive projects created on your operating unit. Archived data can be read back in by means of the "Restore" function. Baud rate The baud rate is a criterion for the speed with which data are transferred. The baud rate is specified in bits per second. C Clipboard The Clipboard is a memory area on the configuration computer and is accessed by ProTool when you cut, copy and paste objects. Compile Compile means you create an executable file from your project. You can download the file to the operating unit. During the compilation process, a consistency check is performed on the project. Coordination This data area can be used by the PLC to query the status of the operating unit, for example • D-2 Startup of the operating unit ProTool User’s Guide Release 12/99 Glossary • Current operating mode • Ready for communication CPU CPU is the abbreviation for central processing unit. Cross-reference Cross-references provide information on which objects refer to each other in the project. If, for example, you wish to delete a variable, you will learn via the crossreference the points at which the variable is used in your project. D Data mailbox The data mailbox is a data area on the PLC. It is used as intermediate storage to transfer data records from the operating unit to the PLC. The data mailbox contains only the values of the tag. The addresses are not downloaded. Data record A data record is a recipe to which data have been assigned. A recipe may consist of several data records. When a data record is downloaded, all the assigned data are passed to the PLC together in a synchronized manner. Date/time (area pointer) The operating unit writes the data and time to this data area by means of a PLC job. These data can be evaluated by the PLC program. Download You use the "Download" function to transfer an executable project file to the operating unit. Before you can do so, connect the operating unit to the configuration computer by means of a standard cable. Duration of display The duration of display determines whether and how long a system message is displayed on the operating unit. Dynamic attributes Dynamic attributes enable and disable flashing in an output field as a function of the state of a bit of an index tag. ProTool User’s Guide Release 12/99 D-3 Glossary E Editing language The editing language is the language in which you create text for your project. Event message Event messages provide information on the operating unit on operating states of the machine or system connected to the PLC. Message text may include current samples. Event messages (area pointer) You can configure an event message for each bit in this data area. The bits are assigned to message numbers in ascending order. As soon as the PLC sets a bit in this data area, the operating unit recognizes the assigned event message as having "arrived“. Conversely, the message is interpreted by the operating unit as having "departed" when the bit is reset on the PLC. Event Functions are triggered upon the occurrence of defined events - for example, upon pressing or releasing a key. Events can be configured as a function of an object. Export You can export configured messages and screens as a text file to translate them into a different language with an external editor, for example. Using the ProTool's import function, you can reimport the text file into your project. F Flash memory A flash memory is a programmable memory that can be erased and then rewritten. Footer A footer is the bottom line of a page in a printed report. It appears on every page of the report and contains freely configurable information such as the project name, number of pages, date and time, for example. Function key A function key is a key on the operating unit for configuring a function assignment. D-4 ProTool User’s Guide Release 12/99 Glossary A function key with a global function assignment always triggers the same function irrespective of the screen that is currently open. A function key with a local function assignment (soft key) can trigger a different function on every screen. Function keyboard (area pointer) The operating unit transfers function key operations via this data area. You can evaluate this information in the PLC program in order to draw attention to an incorrect operation by means of a message, for example. G Global function Global functions are not assigned to any particular objects but are linked to specific events. If, for example, you configure the Set Bit function as a global function with the condition Enter Value, a bit is set every time a value is entered. Irrespective of the field selected. Global tag Global tags (process variables) establish the connection to the PLC. You have a set address on the PLC. The operating unit reads and writes to and from that address. Group acknowledgement You can assign any alarm message to an acknowledgement group when you are configuring. When the alarm message is acknowledged, all the other messages in the same acknowledgement group are acknowledged simultaneously too. H Header A header is the top line of any printed report. It appears on every page of the report and contains freely configurable information such as the project name, number of pages, date and time, for example. Help text Refer to Help text. ProTool User’s Guide Release 12/99 D-5 Glossary I Import You reimport text files back into your project that you exported with ProTool’s export function in order, for example to translate then into another language with an external editor. Input field An input field is where you enter values on the operating unit that are transferred to the PLC. Interface area The interface area is the interface between PLC program and operating unit. It contains data and pointers to areas required for exchanging data between the PLC and the operating unit. J Job mailbox The PLC uses this data area to pass PLC jobs to the operating unit to initiate specific functions for example, display a screen. L LED assignment This area pointer can be used by the PLC to drive the light-emitting diodes on the function keys of the operating unit. Limit value You can set for tags an upper and a lower limit value that is determined by a constant or by a tag. When the specified limit value has been exceeded, you can reject all invalid input in an input field on the operating unit, for example. Local tag Local tags are not connected to the PLC. They are available only on the operating unit. D-6 ProTool User’s Guide Release 12/99 Glossary Log off time With the configurable logoff time you set the time after which the password level is reset to zero if the operating unit is not operated within that time. M Message arrival The arrival of a message denotes the time at which the message is initiated by the PLC or operating unit. Message buffer A message buffer is a memory area on the operating unit in which message events are stored in chronological order when they arrive. Event messages and alarm messages are stored in separate message buffers. Message departure The departure of a message indicates the time at which a message is withdrawn by the PLC. Message event Message events are the: • Message arrival • Acknowledgement of a message • Message departure Message events are stored in chronological order in the message archive on the operating unit. Message logging With message logging, messages are output to the printer in addition to being displayed on the operating unit. Multiplex tag A multiplex tag is a tag that is selected at runtime as a function of the value of an index tag. ProTool User’s Guide Release 12/99 D-7 Glossary O Object type The object type specifies whether values or symbols can be entered in or output to an object on the operating unit. Object An object is an integral part of a screen or a message. Depending on the object type, objects are used to display or enter text and values on the operating unit. OP Acknowledgement This area pointer is used by the operating unit to inform the PLC which alarm messages have been acknowledged on the operating unit. Operator panel An operator panel (OP) is a configurable operating unit for operating and monitoring machines and systems. Output field An output field displays current values from the PLC on the operating unit. Overflow warning The overflow warning is a message that is output to the operating unit as soon as the configured size of the remaining buffer is reached or exceeded. P Password level You can specifically restrict the privileges of operating the operating unit to certain users or groups of users. To do this, you assign hierarchically ascending password levels to individual functions, function keys and input fields. The password level is linked to the password. It entitles you execute functions at that or a lower password level on the operating unit. Password A password is a string of characters that you have to enter on the operating unit before you are able to execute a protected function. A defined password level is assigned to every password. D-8 ProTool User’s Guide Release 12/99 Glossary PLC Acknowledgement This area pointer is used by the PLC to inform the operating unit which alarm messages have been acknowledged by the PLC. PLC job You can trigger functions on the operating unit by means of PLC jobs by the PLC program - for example, Display Screen. PLC PLC is the abbreviation for programmable logic control. Print Screen Print Screen prints a copy of the contents of the operating unit screen. Open windows are not printed. R Recipe mailbox The recipe mailbox is a data area on the SIMATIC S5. It is used as intermediate storage to transfer data records from the operating unit to the PLC. Not only the values of tags but also their addresses are transferred to the recipe mailbox. Recipe number (area pointer) The recipe number mailbox is a data area on the SIMATIC S5. It is required for transferring data records between the operating unit and the PLC. The recipe number mailbox contains the recipe number and the number of the data record that has to be transferred. Recipe A recipe is a compilation of tags to form a fixed data structure. The configured data structure can be assigned data on the operating unit and is the referred to as a data record. The use of recipes ensures that when a data record is downloaded, all the data assigned to it are passed together in a synchronized manner to the PLC. Reference language With multi-lingual projects, the reference language (reference text) serves as a basis for translations into other languages. ProTool User’s Guide Release 12/99 D-9 Glossary Reference text With multi-lingual projects, the reference text serves as a basis for translations into other languages. Reference texts cannot be edited. Remaining buffer The remaining buffer is the configurable size of the message buffer at which an overflow warning is issued when it is exceeded. Restore With the "Restore“ function you read data back in which you had previously archived using the "Backup“ function. S Screen number (area pointer) In this data area the operating unit stores information on the current screen. You can evaluate this information in the PLC program to call another screen, for example. Screen A screen is a group of logically related process data that can be displayed collectively on the operating unit and modified individually. Screens consist of individual screen entries. A screen entry has display size. It can consist of static text as well as input and output fields. Soft key A soft key is a function key with a locally assigned function on the operating unit. Depending on the current screen, a soft key can trigger different functions. Standard clock pulse The standard clock pulse of the operating unit is the basic factor for the update rate, which you can set by means of the acquisition cycle of the tag. You globally modify the acquisition cycle for all the tags of a project by modifying the standard clock pulse. Standard screens Standard screens contain preconfigured functions which you require for basic operation of your operating unit. D-10 ProTool User’s Guide Release 12/99 Glossary standby message The standby message is the event message numbered 0. It is displayed on the operating unit when no event message is waiting. No bit is assigned to the standby message in the user data area for event messages. Start value The initial value is the value with which a tag preset following downloading of a new project or following deletion of the buffer. You can configure the start value. Successive recipe mailbox The successive recipe mailbox is a data area on the SIMATIC S5 for transferring data records. You have to create it only when the recipe mailbox cannot accommodate the largest data record to occur. Supervisor The supervisor is the user who is entitled to execute functions at the highest password level. He therefore has access to all the functions of the operating unit. System keyboard (area pointer) The operating unit transfers system key operations via this data area. You can evaluate this information in the PLC program in order to draw attention to an incorrect operation by means of a message, for example. System keys are all operating unit keys that cannot be configured as function keys. A detailed description of the system keys you can evaluate on the different operating units is provided in the Communication User’s Guide. System The system is the hardware platform for the executable project file. It includes the • programmable logic control • operating unit • printer T Tag A tag is a defined memory address to and from which values are written and read, respectively. This can be done by the PLC or by means of the operating unit. A distinction is made between global tags (process tags) and local tags, depending on whether a tag is linked to the PLC or not. ProTool User’s Guide Release 12/99 D-11 Glossary Text list A text list assigns text to every value of a tag. This means, for example, that you can display the assigned text on the operating unit in an output field instead of a value. Text or graphic list Refer to Text list. U Update time The update time is the sum of the polling time, download time and processing time. User data area A user data area is a memory area defined by the user on the PLC. It is used to exchange data between the PLC and the operating unit. Synonym: area pointer User version The user version identifies the version of a project. A version check is performed on the PLC by means of this area pointer. D-12 ProTool User’s Guide Release 12/99 Index A Abbreviations C-1 Access protection configuration overview 5-64 Acknowledge messages 5-26 Acknowledgment 5-26 Acquisition cycle 5-14 Action canceling 4-13 Address multiplexing 5-16 Alarm message area configuration 5-27 Alternative tag 5-15 ANSI C-1 Area pointers 5-34 ASCII C-1 C Canceling 4-13; 4-14 Chapter Summary 1-2 Clipboard 4-11 copy 4-11 Combined input/output field Overview 5-8 Combining multiple functions 5-42 Communication areas for messages 5-34 optional 5-34 Complete devices B-2 Configuration software 2-2 Configuring color change overview 5-62 Configuring controls 5-7 Configuring display elements 5-5 Configuring user prompts 5-62 ProTool User’s Guide Release 12/99 Conventions typefaces 1-4 Converting a project 4-10 Copy 4-11 CPU C-1 Creating a project 4-5 Creating headers and footers 5-19 Cross-reference (overview) 4-16 Cyrillic characters 5-71 D Data record create 5-54 definition 5-48 identifying 5-52 transfer (example) 5-59 transferring 5-54 Delivery package of ProTool 2-4 Device type 4-17 Direct transfer data records 5-54 Discarding 4-14 Display actual values 5-6 Display actual values 5-6 Displaying messages on the operating unit 5-31 Documentation B-6 Download 6-4 MPI 6-4 Downloading the project file 6-3 Drive LED overview 5-63 Driving light-emitting diodes I-1 Index overview 5-63 Driving the LED overview 5-63 Dynamic attributes overview 5-62 Dynamizing attributes overview 5-62 G E H EM C-1 Enter alphanumeric values 5-7; 5-8 Enter numerical values 5-7; 5-8 Enter setpoints 5-7; 5-8 Enter symbolical values 5-7; 5-8 Enter values 5-7; 5-8 Entries recipe 5-52 Evaluate key operation (overview) 5-63 Evaluating key operation overview 5-63 Events for triggering functions 5-38 Example changing the operating mode 5-44 creating a customized printout 7-3 Help information 5-24 HMI C-1 HMI Documentation B-6 Hotline 1-5 Getting Started 2-6 Global function key 5-8 Graphic lists 5-20 Graphics displays B-2 Guide to the Manual 1-2 I Indirect transfer data records 5-54 Information on project 4-17 Input field Overview 5-7; 5-8 Input/output field Overview 5-8 Installing ProTool 3-2 Instance DB 3-5 Instance DB (ProTool integrated) 3-7 F Fields 5-2 Fixed window 5-2 Flashing fields (overview) 5-62 LED (Overview) 5-63 FM C-1 Force Tag 6-5 Foreign languages system requirements 5-66 Function key 5-8 evaluating key operation (overview) 563 Function parameters 5-39 I-2 K Keyboard assignment language-dependency 5-68 L Language-dependency keyboard assignment 5-68 Languages configurable 5-68 creating a multilingual project 5-70 ProTool User’s Guide Release 12/99 Index LED C-1 Limitations 7-6 Local function key 5-8 Logging messages 5-30 Logging off from the operating unit overview 5-64 Logout 5-64 Operator Panel B-2 Other Sources of Assistance 1-5 Output alphanumeric values 5-6 Output field overview 5-6 Output numerical values 5-6 Output values 5-6 M P Managing projects in stand-alone operation 7-7 Memory requirement 4-17 Message acknowledgement 5-26 Message buffer 5-32 Message display on the operating unit 5-31 Message number 5-24 Message text 5-24 Messages alarm message area configuration 5-27 communication areas 5-34 overflow 5-23 properties 5-25 structure 5-24 MPI C-1 MPI download 6-4 Multiplex tag 5-17 Password hierarchy 5-64 Password level 5-64 PC C-1 Peculiarities with conversion functions 543 PLC 4-9; C-1 driver selection 4-9 PPI C-1 Printer configuration 5-31 Printing 7-6 example 7-3 project data 7-2 Printing messages 5-25; 5-26 Priority of messages 5-25 Process state reporting 5-23 Project 4-5; 4-6; 4-10; 6-2 converting 4-10 creating OP5 (example) 4-6 creation 4-5 fundamentals of creating 4-2 test 6-2 Project Information 4-17 Project information (overview) 4-16 Project management with integrated operation 7-7 ProTool delivery package 2-4 device family B-2 overview 2-2 ProTool device overview B-2 ProTool for graphical displays B-4 ProTool for text-based displays B-5 ProTool for Windows-based systems B-3 ProTool integrated in STEP 7 3-5 N Notation 1-4 O Object types in the project window 4-4 Objects in the project window 4-4 OLE C-1 OP C-1 Operation state reporting 5-23 Operator authorization assignment overview 5-64 ProTool User’s Guide Release 12/99 I-3 Index ProTool version 4-17 ProTool/Lite 2-2 Provide information text overview 5-62 Providing Help text overview 5-62 PU C-1 R RAM C-1 Recipe configuring 5-52 configuring (example) 5-55 data record 5-48 entries 5-52 example 5-48 identifying 5-52 overview 5-48 standard screens 5-52 tags 5-52 Redo 4-13; 4-14 Reference text 5-69 Restoring 4-13; 4-14 Revoking 4-14 Russian Cyrillic characters 5-71 Russian projects system requirements 5-66 S Scheduler 5-21 Screen editor 5-2 Screens components of a screen 5-2 example 5-2 overview 5-2 select screen 5-2 Security through password protection 5-64 Selecting function screens 5-43 Setting up area pointers 4-7 Settings for message classes 5-26 I-4 SIMATIC HMI device family B-2 SIMATIC HMI Documentation B-6 SM C-1 Soft key 5-8 Standard clock pulse 5-14 Standard screens recipe 5-52 Start screen 5-2 Static text overview 5-5 Status Tag 6-5 Style 5-24 Superuser 5-64 Support 1-5 Symbol table updating 3-5 Symbol table (ProTool integrated) 3-7 System key evaluating key operation (overview) 563 System limits A-2 System messages 5-28 System messages (example) 5-29 System requirements for foreign languages 5-66 T Tag Status/Force 6-5 Tag list 5-15 Tags 5-10; 5-11; 5-13 definition 5-10 limit values 5-11 properties 5-11 recipe 5-52 scaling 5-13 start value 5-11 TD C-1 Text static 5-5 Text displays B-2 Text lists 5-20 Text or graphic lists 5-20 ProTool User’s Guide Release 12/99 Index Text-based displays B-2 Touch Panel B-2 Transfer data records (example) 5-59 Transferring data records 5-54 Transferring the project file 6-3 V Version 4-17 W What functions are used for 5-37 Windows-based systems B-2 U Undo 4-13; 4-14 undo buffer 4-16 User prompting 5-62 ProTool User’s Guide Release 12/99 I-5 Index I-6 ProTool User’s Guide Release 12/99