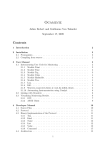
1
MXM-6410/APC-6410 Linux User’s Manual v1.2 Computer on Module COM Ports Two USB Hosts LCD Ethernet SD MXM-6410 Ubuntu Linux 9.04 (Jaunty Jackalope) User’s Manual v1.2 1 MXM-6410/APC-6410 Linux User’s Manual v1.2 Table of Contents CHAPTER 1 MXM-6410/APC-6410 UBUNTU LINUX (JAUNTY JACKALOPE) FEATURES .. 5 1.1 BOARD SUPPORT PACKAGE (BSP) .................................................................................................. 5 1.2 DRIVERS ......................................................................................................................................... 5 1.3 DEFAULT SOFTWARE PACKAGES ..................................................................................................... 7 1.4 SPECIAL FEATURES ....................................................................................................................... 21 CHAPTER 2 SYSTEM INFORMATION .......................................................................................... 23 2.1 STARTING EVKM-MXM-6410..................................................................................................... 23 2.2 JUMPER SETTING .......................................................................................................................... 24 2.3 CONNECTORS ................................................................................................................................ 29 CHAPTER 3 USING UBUNTU JAUNTY JACKALOPE ................................................................ 33 3.1 BOOTING ...................................................................................................................................... 33 3.2 DEFAULT ROOT PASS AND USER ..................................................................................................... 35 3.2.1 Create a User ....................................................................................................................... 35 3.2.2 Set User Password ............................................................................................................... 36 3.2.3 Delete a User ....................................................................................................................... 37 3.3 NETWORK SETTINGS ..................................................................................................................... 37 3.3.1 Configure Network Configuration at Boot or Network Restart............................................ 38 3.4 MANUALLY ADD REPOSITORIES..................................................................................................... 41 3.5 INSTALL SOFTWARE PACKAGES..................................................................................................... 42 3.5.1 List of installed software packages ...................................................................................... 42 3.5.2 Description of installed software packages.......................................................................... 42 3.5.3 List of available software packages ..................................................................................... 42 3.5.4 Searching a software package: apt-cache search ................................................................ 43 3.5.5 Properties and information of a software: apt-cache show ................................................. 44 3.5.6 Installing a software: apt-get install .................................................................................... 45 3.5.7 Removing a software: apt-get remove .................................................................................. 45 3.5.8 Updating the software list: apt-get update ........................................................................... 45 3.5.9 Upgrading the software: apt-get upgrade ............................................................................ 45 3.5.10 Smart software update: apt-get dist-upgrade ..................................................................... 46 3.6 FTP CLIENT .................................................................................................................................. 47 3.7 FTP SERVER ................................................................................................................................. 48 3.8 TELNET/SSH SERVER ................................................................................................................... 49 3.9 VNC SERVER ................................................................................................................................ 51 3.10 GDM .......................................................................................................................................... 54 3.11 LXDE ......................................................................................................................................... 54 2 MXM-6410/APC-6410 Linux User’s Manual v1.2 3.12 CALIBRATION AND TOUCH SCREEN ............................................................................................. 56 3.12.1 Install the Calibration Program ......................................................................................... 56 3.12.2 Calibration Program .......................................................................................................... 56 3.13 KIOSK MODE .............................................................................................................................. 57 3.13.1 Boot Ubuntu 9.04 into text mode instead of graphic mode ................................................ 57 3.13.2 GDM Auto Login ................................................................................................................ 58 3.13.3 Auto Start a Program under LXDE .................................................................................... 58 3.14 NAND ROOT FILE SYSTEM ........................................................................................................ 59 3.14.1 linuxrc ................................................................................................................................ 59 3.14.2 As a rescue file system ........................................................................................................ 60 3.14.3 As a small root file system .................................................................................................. 62 3.15 CROSS TOOLCHAIN ..................................................................................................................... 62 3.15.1 Installing Toolchain ........................................................................................................... 63 CHAPTER 4 USE MXM-6410/APC-6410 HARDWARE MFC MULTIMEDIA FUNCTION ..... 65 4.1. MPEG4 DECODER FOR MPLAYER AT DEVICE .............................................................................. 65 4.1.1. Mplayer running on top of GDM and LXDE ...................................................................... 65 4.1.2. Mplayer Running on top of frambuffer directly................................................................... 67 4.2. MFC DEVICE DRIVER’S API........................................................................................................ 67 4.2.1. CreateFile ........................................................................................................................... 69 4.2.2. DeviceIoControl .................................................................................................................. 70 4.2.3. CloseHandle........................................................................................................................ 71 4.2.4. Control Codes for DeviceIoControl() ................................................................................. 72 4.2.5. Data Structure for Passing the IOCTL Arguments .............................................................. 75 APPENDIX I MXM-6410/APC-6410 FIRMWARE UPDATE ......................................................... 78 A.1. FIRMWARE ARCHITECTURE ......................................................................................................... 78 A.2. UPDATE FIRMWARE FROM UBOOT............................................................................................... 79 A.2.1. Windows Environment ........................................................................................................ 79 A.2.1.1. Setup TFTP Server ........................................................................................................... 79 A.2.1.2. Transfer and Write Image by TFTP and “nand write” Command................................... 80 A.2.2 Linux Environment............................................................................................................... 82 A.2.2.1. Minicom ........................................................................................................................... 82 A.2.2.2. TFTP server ..................................................................................................................... 89 A.2.2.3. Setting up an IP address .................................................................................................. 92 A.2.2.4. Transfer and Write Image by TFTP and “nand write” Command................................... 94 3 MXM-6410/APC-6410 Linux User’s Manual v1.2 MXM-6410/APC-6410 Ubuntu Linux (Jaunty Jackalope) Features This Chapter gives an introduction to the Ubuntu Linux 9.04 features of MXM-6410 and APC-6410. Section include: 4 Board Support Package (BSP) Drivers Services MXM-6410/APC-6410 Linux User’s Manual v1.2 Chapter 1 MXM-6410/APC-6410 Ubuntu Linux (Jaunty Jackalope) Features Ubuntu 9.04 (as known as Jaunty Jackalope) is official released on April 23rd of 2009. And Embedian is one of the first few companies to support Ubuntu 9.04 for ARM11 processors. This Chapter gives an overall picture in regarding to the Ubuntu Linux 9.04 features that Embedian provided with for the MXM-6410 computer on module and APC-6410 single board computer. 1.1 Board Support Package (BSP) The Embedian Board Support Package for Ubuntu Linux 9.04 is one of the most advanced BSPs available on the market. Beside the standard Ubuntu Linux functionality, it also includes a large number of additional drivers as well as optimized versions of standard drivers. The Embedian Linux kernel is provided with a source code and binary format. This allows customers to customize the external device drivers themselves. With Ubuntu support, this relieves the application-developer from the burden of creating and building the own images. Instead the necessary adaptations can be done by using apt-get the software packages from the official Ubuntu 9.04 repository to the on-board root file system. The BSP is available at Embedian FTP site at ftp://ftp.embedian.com/pub/MXM-6410/Linux/. Customers who follow the built instruction in the BSP folder will enable you to build exactly the same Linux kernel zImage as Embedian provides by default. 1.2 Drivers The following drivers are integrated in the standard image that comes pre-installed with each MXM-6410 module or APC-6410 board. 5 MXM-6410/APC-6410 Linux User’s Manual v1.2 Table 1.1 Drivers Table 1.1 Drivers Driver 6 Description COM1 Support RXD/TXD/CTS/RTS COM2 Support RXD/TXD COM3 Support RXD/TXD COM4 External UART that supports the full RS232 specification with all 9 signals. COM5 External UART that supports the full RS232 specification with all 9 signals. Ethernet 10/100Mbit driver for Davicom DM9000B USB Host 4 Ports supporting mass storage devices (USB-stick, hard disc, CD-ROM…) and other devices as keyboard, mouse, USB hub… USB OTG Client, TBS Audio 16Bit stereo output (up to 48kHz), mic input, line-In supports ALSA standards Touch Screen All 4-wire resistive screens supported Display All types of displays supported. Use fbset utility to configure different resolutions and panels. SD/SDHC Memory cards, Wireless LAN, Bluetooth, GSM, GPS … CF Memory cards, Wireless LAN, modem, Bluetooth, serial card, GPS, GSM, … GPIO 12 Configurable GPIO with Sample codes. Flash File System Ext3 is default supported 2D Engine CPU 2D acceleration h/w supported 3D Engine Support CPU 3D h/w acceleration. Support OpenGLES 1.1/2.0. TV-Out TV output driver for NTSC/PAL format is supported Camera Camera drivers for various camera modules MFC Engine Support h/w H.263, H.264, VC1 SPI High speed SPI supported RTC Real time clock driver MXM-6410/APC-6410 Linux User’s Manual v1.2 1.3 Default Software Packages Users can use dpkg-query -W to visualize the list of installed packages or dpkg –l to obtain the description of the set of installed packages. User can add their application oriented packages from the Ubuntu repository by using apt-get install <Package Name> as well. Table 1.2 Default Software Packages Package Name 7 Version acct 6.4~pre1-6ubuntu1 acl 2.2.47-2 adduser 3.110ubuntu5 alsa-base 1.0.18.dfsg-1ubuntu8 alsa-utils 1.0.18-1ubuntu11 apt 0.7.20.2ubuntu6 apt-utils 0.7.20.2ubuntu6 aptitude 0.4.11.11-1ubuntu1 arj 3.10.22-6 aspell 0.60.6-1 aspell-en 6.0-0-5.1 autoconf 2.63-2ubuntu1 base-files 5ubuntu4 base-passwd 3.5.21 bash 3.2-5ubuntu1 binutils 2.19.1-0ubuntu3 bsdmainutils 6.1.10ubuntu3 bsdutils 1:2.14.2-1ubuntu4 busybox-initramfs 1:1.10.2-2ubuntu7 bzip2 1.0.5-1ubuntu1 ca-certificates 20080809 conkeror 0.9~git080629-2 console-setup 1.28ubuntu8 console-terminus 4.26-2.1 consolekit 0.3.0-2ubuntu3 coreutils 6.10-6ubuntu1 cpio 2.9-15ubuntu1 cpp 4:4.3.3-1ubuntu1 cpp-4.3 4.3.3-5ubuntu4 MXM-6410/APC-6410 Linux User’s Manual v1.2 8 dash 0.5.4-12ubuntu2 dbus 1.2.12-0ubuntu2 dbus-x11 1.2.12-0ubuntu2 debconf-i18n 1.5.26ubuntu3 debianutils 2.30ubuntu3 debootstrap 1.0.12 defoma 0.11.10-0.2ubuntu1 desktop-file-utils 0.15-1ubuntu7 dhcp3-client 3.1.1-5ubuntu8 dhcp3-common 3.1.1-5ubuntu8 diff 2.8.1-12ubuntu1 dmsetup 2:1.02.27-4ubuntu5 docbook 4.5-4 docbook-dsssl 1.79-6 docbook-xml 4.5-6 docbook-xsl 1.73.2.dfsg.1-5 dpatch 2.0.30 dpkg 1.14.24ubuntu1 dpkg-dev 1.14.24ubuntu1 e2fslibs 1.41.4-1ubuntu1 e2fsprogs 1.41.4-1ubuntu1 eject 2.1.5+deb1+cvs20081104-5 esound-clients 0.2.40-0ubuntu3 esound-common 0.2.40-0ubuntu3 fakeroot 1.12.1ubuntu1 file 4.26-2ubuntu3 findutils 4.4.0-2ubuntu3 firefox 3.0.8+nobinonly-0ubuntu3 firefox-3.0 3.0.8+nobinonly-0ubuntu3 firefox-3.0-branding 3.0.8+nobinonly-0ubuntu3 fontconfig 2.6.0-1ubuntu12 fontconfig-config 2.6.0-1ubuntu12 gamin 0.1.9-2ubuntu4 gconf2 2.26.0-0ubuntu1 gconf2-common 2.26.0-0ubuntu1 language-pack-zh-base 1:9.04+20090413 laptop-detect 0.13.7ubuntu1 MXM-6410/APC-6410 Linux User’s Manual v1.2 9 leafpad 0.8.13-1 less 418-1 lftp 3.7.8-1 libaa1 1.4p5-37build1 libacl1 2.2.47-2 libart 2.0 libasound2 1.0.18-1ubuntu9 libaspell15 0.60.6-1 libatk1.0-0 1.26.0 libatk1.0-data 1.26.0 libatm1 2.4.1-17.2 libattr1 1:2.4.43-1 libaudio2 1.9.1-5 libaudiofile0 0.2.6-7ubuntu1 libbeecrypt6 4.1.2-7 libblkid1 1.41.4-1ubuntu1 libbluetooth3 4.32-0ubuntu4 libbrlapi0.5 4.0~svn4301-0ubuntu4 libbz2 1.0 1.0.5 libc6 2.9-4ubuntu6 libc6-vfp 2.9 libcaca0 0.99.beta16-1 libcairo2 1.8.6 1ubuntu2 libcanberra0 0.11-1ubuntu5 libcap2 2.11-2 libcdparanoia0 3.10.2+debian -5 libck- connector0 0.3.0 libclass accessor libcomerr2 1.41.4-1ubuntu1 libcroco3 0.6.1-2 libcups2 1.3.9-17ubuntu1 libcurl3 7.18.2-8ubuntu4 libcurl3- gnutls 7.18.2 libcwidget3 0.5.12-4ubuntu1 libdatrie0 0.1.3-2 libdb4.6 4.6.21-12 libdb4.7 4.7.25-6ubuntu1 MXM-6410/APC-6410 Linux User’s Manual v1.2 10 libdbus-1-3 1.2.12-0ubuntu2 libdbus-glib-1-2 0.80-3 libdevmapper1.02.1 2:1.02.27-4ubuntu5 libdirectfb-1.0-0 11.0.1-11ubuntu1 libdmx1 1:1.0.2-3 libdrm2 2.4.5-0ubuntu4 libdv4 1.0.0-1ubuntu2 libedit2 2.11~20080614-1ubuntu1 libenchant1c2a 1.4.2-3.3ubuntu1 libept0 0.5.26build1 libesd-alsa0 0.2.40-0ubuntu3 libexpat1 2.0.1-4 libfontconfig1 2.6.0-1ubuntu12 libfontenc1 1:1.0.4-3 libfreetype6 2.3.9-4build1 libfribidi0 0.10.9-1 libfs6 2:1.0.1-1 libgail-common 2.16.1-0ubuntu2 libgail18 2.16.1-0ubuntu2 libgamin0 0.1.9-2ubuntu4 libgcc1 1:4.3.3-5ubuntu4 libgconf2-4 2.26.0-0ubuntu1 libgcr0 2.26.1-0ubuntu1 libgcrypt11 1.4.1-2ubuntu1 libgdbm3 1.8.3-4 libgif4 4.1.6-6 libgksu2-0 2.0.9-1ubuntu3 libgl1-mesa-dri 7.4-0ubuntu3 libgl1-mesa-glx 7.4-0ubuntu3 libglade2-0 1:2.6.4-1 libglib2.0-0 2.20.1-0ubuntu2 libglib2.0-data 2.20.1-0ubuntu2 libgmp3c2 2:4.2.4+dfsg-2ubuntu1 libgnome-keyring0 2.26.1-0ubuntu1 libgnomecanvas2-0 2.26.0-0ubuntu1 libgnomecanvas2-common 2.26.0-0ubuntu1 libgnutls26 2.4.2-6 MXM-6410/APC-6410 Linux User’s Manual v1.2 11 libgomp1 4.3.3-5ubuntu4 libgp11-0 2.26.1-0ubuntu1 libgpg-error0 1.4-2ubuntu7 libgpm2 1.20.4-3.1ubuntu1 libgsf-1-114 1.14.11-2ubuntu1 libgsf-1-common 1.14.11-2ubuntu1 libgtk2.0-0 2.16.1-0ubuntu2 libgtk2.0-bin 2.16.1-0ubuntu2 libgtk2.0-common 2.16.1-0ubuntu2 libgtop2-7 2.26.0-0ubuntu2 libgtop2-common 2.26.0-0ubuntu2 libhal-storage1 0.5.12~rc1+git20090403-0ubuntu1 libhal1 0.5.12~rc1+git20090403-0ubuntu1 libhunspell-1.2-0 1.2.6-1ubuntu2 libice6 2:1.0.4-1 libicu38 3.8.1-3ubuntu1 libidl0 0.8.13-0.1 libidn11 1.10-3 libio-string-perl 1.08-2 libjasper1 1.900.1-5.1 libjpeg-progs 6b-14 libjpeg62 6b-14 libkadm55 1.6.dfsg.4~beta1-5ubuntu2 libkeyutils1 1.2-9 libklibc 1.5.14-1~exp1ubuntu2 libkrb53 1.6.dfsg.4~beta1-5ubuntu2 liblcms1 1.18.dfsg-0ubuntu1 libldap-2.4-2 2.4.15-1ubuntu3 liblircclient0 0.8.4a-0ubuntu5 liblocale-gettext-perl 1.05-4build1 liblockfile1 1.08-3 libltdl7 2.2.6a-1ubuntu1 libmagic1 4.26-2ubuntu3 libmng1 1.0.9-1 libmpfr1ldbl 2.4.0-1ubuntu3 libmysqlclient15off 5.1.30really5.0.75-0ubuntu10 libncurses5 5.7+20090207-1ubuntu1 MXM-6410/APC-6410 Linux User’s Manual v1.2 12 libncursesw5 5.7+20090207-1ubuntu1 libneon27 0.28.2-6.1 libnewt0.52 0.52.2-11.3ubuntu3 libnotify1 0.4.5-0ubuntu1 libnspr4-0d 4.7.3-0ubuntu2 libnss3-1d 3.12.2~rc1-0ubuntu2 libobparser21 3.4.7.2-3 libobrender21 3.4.7.2-3 libogg0 1.1.3-4build1 liborbit2 1:2.14.17-0.1 libpam-ck-connector 0.3.0-2ubuntu3 libpam-gnome-keyring 2.26.1-0ubuntu1 libpam-modules 1.0.1-9ubuntu1 libpam-runtime 1.0.1-9ubuntu1 libpam0g 1.0.1-9ubuntu1 libpango1.0-0 1.24.1-0ubuntu1 libpango1.0-common 1.24.1-0ubuntu1 libpaper1 1.1.23+nmu1 libparse-debianchangelog-pe rl 1.1.1-2ubuntu1 libpcap0.8 1.0.0-1 libpci3 1:3.0.0-4ubuntu8 libpciaccess0 0.10.5-1 libpcre3 7.8-2ubuntu1 libpcrecpp0 7.8-2ubuntu1 libpixman-1-0 0.13.2-1 libpng12-0 1.2.27-2ubuntu2 libpolkit-dbus2 0.9-2ubuntu1 libpolkit-grant2 0.9-2ubuntu1 libpolkit2 0.9-2ubuntu1 libpopt0 1.14-4 libproxy0 0.2.3-0ubuntu5 libpulse0 1:0.9.14-0ubuntu20 libpython2.6 2.6.2-0ubuntu1 libqt4-dbus 4.5.0-0ubuntu4 libqt4-designer 4.5.0-0ubuntu4 libqt4-network 4.5.0-0ubuntu4 MXM-6410/APC-6410 Linux User’s Manual v1.2 13 libqt4-qt3support 4.5.0-0ubuntu4 libqt4-script 4.5.0-0ubuntu4 libqt4-sql 4.5.0-0ubuntu4 libqt4-xml 4.5.0-0ubuntu4 libqtcore4 4.5.0-0ubuntu4 libqtgui4 4.5.0-0ubuntu4 librarian0 0.8.1-1ubuntu2 libreadline5 5.2-4 librpm4.4 4.4.2.3-2ubuntu1 librsvg2-2 2.26.0-0ubuntu1 librsvg2-common 2.26.0-0ubuntu1 libsasl2-2 2.1.22.dfsg1-23ubuntu3 libsasl2-modules 2.1.22.dfsg1-23ubuntu3 libsdl1.2debian-alsa 1.2.13-4ubuntu3 libselinux1 2.0.65-5build1 libsepol1 2.0.30-2ubuntu1 libsexy2 0.1.11-2 libsigc++-2.0-0c2a 2.0.18-2 libslang2 2.1.3-3ubuntu3 libsm6 2:1.1.0-1 libsmbclient 2:3.3.2-1ubuntu3 libsoup2.4-1 2.26.0-0ubuntu2 libsp1c2 1.3.4-1.2.1-47build1 libspeex1 1.2~rc1-1 libsqlite3-0 3.6.10-1 libss2 1.41.4-1ubuntu1 libssl0.9.8 0.9.8g-15ubuntu3 libstartup-notification0 0.9-1 libstdc++6 4.3.3-5ubuntu4 libsysfs2 2.1.0-5 libtalloc1 1.2.0~git20080616-1 libtasn1-3 1.5-1 libtdb1 1.1.3~git20081222-2build1 libtext-charwidth-perl 0.04-5build1 libtext-iconv-perl 1.7-1build1 libtext-wrapi18n-perl 0.06-6 libthai-data 0.1.9-4 MXM-6410/APC-6410 Linux User’s Manual v1.2 14 libthai0 0.1.9-4 libtheora0 1.0-2 libtiff4 3.8.2-11 libtimedate-perl 1.1600-9 libts-0.0-0 1.0-4ubuntu2 libts-bin 1.0-4ubuntu2 libunique-1.0-0 1.0.8-0ubuntu1 libusb-0.1-4 2:0.1.12-13 libuuid1 1.41.4-1ubuntu1 libvdemgmt0 2.2.2-3ubuntu1 libvdeplug2 2.2.2-3ubuntu1 libvolume-id1 141-1 libvorbis0a 1.2.0.dfsg-3.1 libvorbisfile3 1.2.0.dfsg-3.1 libvte-common 1:0.20.0-0ubuntu2 libvte9 1:0.20.0-0ubuntu2 libwbclient0 2:3.3.2-1ubuntu3 libwebkit-1.0-1 1.0.1-4 libwnck-common 2.26.0-0ubuntu1 libwnck22 2.26.0-0ubuntu1 libwrap0 7.6.q-16 libx11-6 2:1.1.99.2-1ubuntu2 libx11-data 2:1.1.99.2-1ubuntu2 libxapian15 1.0.7-4 libxau6 1:1.0.4-1 libxaw7 2:1.0.5-1 libxcb-render-util0 0.2.1+git1-1 libxcb-render0 1.1.93-0ubuntu3 libxcb1 1.1.93-0ubuntu3 libxcomposite1 1:0.4.0-3 libxcursor1 1:1.1.9-1 libxdamage1 1:1.1.1-4 libxdmcp6 1:1.0.2-3 libxext6 2:1.0.99.1-0ubuntu3 libxfixes3 1:4.0.3-2 libxfont1 1:1.3.3-1ubuntu1 libxft2 2.1.13-3ubuntu1 MXM-6410/APC-6410 Linux User’s Manual v1.2 15 libxi6 2:1.2.0-1ubuntu1 libxinerama1 2:1.0.3-2 libxkbfile1 1:1.0.5-1ubuntu2 libxml2 2.6.32.dfsg-5ubuntu4 libxmu6 2:1.0.4-1 libxmuu1 2:1.0.4-1 libxpm4 1:3.5.7-1 libxrandr2 2:1.3.0-1build1 libxrender1 1:0.9.4-2 libxres1 2:1.0.3-1 libxslt1.1 1.1.24-2ubuntu2 libxt6 1:1.0.5-3ubuntu1 libxtrap6 2:1.0.0-5build1 libxtst6 2:1.0.3-1ubuntu2 libxv1 2:1.0.4-1 libxxf86dga1 2:1.0.2-1 libxxf86misc1 1:1.0.1-3 libxxf86vm1 1:1.0.2-1 linux-sound-base 1.0.18.dfsg-1ubuntu8 locales 2.9+cvs20090214-7 lockfile-progs 0.1.11ubuntu2 login 1:4.1.1-6ubuntu6 lsb-base 3.2-20ubuntu4 lsb-release 3.2-20ubuntu4 lsof 4.78.dfsg.1-4 lxappearance 0.2-1 lxde 0.3.2.1+svn20080509-5 lxde-common 0.3.2.1+svn20080509-5 lxde-core 0.3.2.1+svn20080509-5 lxde-settings-daemon 0.3.2.1+svn20080509-5 lxpanel 0.3.8.1-2 lxrandr 0.1+svn20080716-3 lxsession-lite 0.3.6-2 lxterminal 0.1.3-2 lzma 4.43-14ubuntu1 makedev 2.3.1-88 man-db 2.5.5-1build1 MXM-6410/APC-6410 Linux User’s Manual v1.2 16 mawk 1.3.3-13ubuntu1 midori 0.1.2-1ubuntu1 mime-support 3.44-1 miscfiles 1.4.2.dfsg.1-9 mktemp 1.5-9 module-init-tools 3.7~pre9-2 mount 2.14.2-1ubuntu4 mysql-common 5.1.30really5.0.75-0ubuntu10 ncurses-base 5.7+20090207-1ubuntu1 ncurses-bin 5.7+20090207-1ubuntu1 net-tools 1.60-21ubuntu1 netbase 4.34ubuntu2 netcat 1.10-38 netcat-traditional 1.10-38 notification-daemon 0.4.0-0ubuntu3 ntpdate 1:4.2.4p4+dfsg-7ubuntu5 obconf 2.0.3-3build1 openbox 3.4.7.2-3 openbox-themes 1.0.2 openssh-client 1:5.1p1-5ubuntu1 openssh-server 1:5.1p1-5ubuntu1 openssl 0.9.8g-15ubuntu3 p7zip-full 4.58~dfsg.1-1 passwd 1:4.1.1-6ubuntu6 pciutils 1:3.0.0-4ubuntu8 pcmanfm 0.5-3 perl 5.10.0-19ubuntu1 perl-base 5.10.0-19ubuntu1 perl-modules 5.10.0-19ubuntu1 pm-utils 1.2.2.4-0ubuntu4 policykit 0.9-2ubuntu1 powermgmt-base 1.30+nmu1 procps 1:3.2.7-11ubuntu2 psmisc 22.6-1 python 2.6.2-0ubuntu1 python-central 0.6.11ubuntu7 python-docutils 0.5-2ubuntu1 MXM-6410/APC-6410 Linux User’s Manual v1.2 17 python-minimal 2.6.2-0ubuntu1 python-support 0.8.7ubuntu4 python2.5 2.5.4-1ubuntu4 python2.5-minimal 2.5.4-1ubuntu4 python2.6 2.6.2-0ubuntu1 python2.6-dbg 2.6.2-0ubuntu1 python2.6-minimal 2.6.2-0ubuntu1 qemu 0.10.0-1ubuntu1 qt4-qtconfig 4.5.0-0ubuntu4 quilt 0.46-6 radeontool 1.5+git76606164-0ubuntu2 rarian-compat 0.8.1-1ubuntu2 readline-common 5.2-4 rpm 4.4.2.3-2ubuntu1 sed 4.1.5-8 sgml-base 1.26 sgml-data 2.0.3 shared-mime-info 0.60-1 smartdimmer 0.8b4-1ubuntu2 startup-tasks 0.3.9-8 strace 4.5.17+cvs080723-2ubuntu1 sudo 1.6.9p17-1ubuntu3 sysklogd 1.5-5ubuntu3 system-services 0.3.9-8 sysv-rc 2.86.ds1-61ubuntu11 sysvinit-utils 2.86.ds1-61ubuntu11 tar 1.20-1 tasksel 2.73ubuntu18 tasksel-data 2.73ubuntu18 tcl8.4 8.4.19-2 tcpd 7.6.q-16 tcpdump 3.9.8-4ubuntu2 tightvncserver 1.3.9-4 ttf-dejavu 2.28-1 ttf-dejavu-core 2.28-1 ttf-dejavu-extra 2.28-1 tzdata 2009f-0ubuntu1 MXM-6410/APC-6410 Linux User’s Manual v1.2 18 ubuntu-gdm-themes 0.32 ubuntu-keyring 2008.03.04 ubuntu-minimal 1.140 ucf 3.0014 udev 141-1 unzip 5.52-12ubuntu1 upstart 0.3.9-8 upstart-compat-sysv 0.3.9-8 upstart-logd 0.3.9-8 usbutils 0.73-8ubuntu3 util-linux 2.14.2-1ubuntu4 vde2 2.2.2-3ubuntu1 vim 2:7.2.079-1ubuntu5 vim-common 2:7.2.079-1ubuntu5 vim-runtime 2:7.2.079-1ubuntu5 vim-tiny 2:7.2.079-1ubuntu5 wget 1.11.4-2ubuntu1 whiptail 0.52.2-11.3ubuntu3 x-ttcidfont-conf 32 x11-apps 7.3+4 x11-common 1:7.4~5ubuntu18 x11-session-utils 7.3+1 x11-utils 7.4+1build1 x11-xfs-utils 7.4+1build1 x11-xkb-utils 7.4+1ubuntu2 x11-xserver-utils 7.4+1 xarchiver 0.5.2+dfsg-1 xauth 1:1.0.3-2 xbase-clients 1:7.4~5ubuntu18 xdg-utils 1.0.2-6.1 xfonts-base 1:1.0.0-5 xfonts-encodings 1:1.0.2-3 xfonts-intl-chinese 1.2.1-6ubuntu3 xfonts-intl-chinese-big 1.2.1-6ubuntu3 xfonts-utils 1:7.4+1ubuntu1 xinit 1.0.9-2 xkb-data 1.5-2ubuntu11 MXM-6410/APC-6410 Linux User’s Manual v1.2 xml-core 0.12 xscreensaver 5.07-0ubuntu3 xscreensaver-data 5.07-0ubuntu3 xserver-common 2:1.6.0-0ubuntu14 xserver-xorg 1:7.4~5ubuntu18 xserver-xorg-core 2:1.6.0-0ubuntu14 xserver-xorg-input-all 1:7.4~5ubuntu18 xserver-xorg-input-evdev 1:2.1.1-1ubuntu4 xserver-xorg-input-kbd 1:1.3.1-2ubuntu1 xserver-xorg-input-mouse 1:1.4.0-1 xserver-xorg-input-synaptics 0.99.3-2ubuntu4 xserver-xorg-input-wacom 1:0.8.2.2-0ubuntu2 xserver-xorg-video-all 1:7.4~5ubuntu18 xserver-xorg-video-apm 1:1.2.1-1 xserver-xorg-video-ark 1:0.7.1-1 xserver-xorg-video-ati 1:6.12.1-0ubuntu2 xserver-xorg-video-chips 1:1.2.1-1 xserver-xorg-video-cirrus 1:1.2.1-3 xserver-xorg-video-fbdev 1:0.4.0-3 xserver-xorg-video-i128 1:1.3.1-2ubuntu1 xserver-xorg-video-i740 1:1.2.0-2 xserver-xorg-video-mach64 6.8.0-3 xserver-xorg-video-mga 1:1.4.9.dfsg-3 xserver-xorg-video-neomagic 1:1.2.2-1 xserver-xorg-video-nv 1:2.1.12-1ubuntu5 xserver-xorg-video-r128 6.8.0+git20090201.08d56c88-1 xserver-xorg-video-radeon 1:6.12.1-0ubuntu2 xserver-xorg-video-rendition 1:4.2.0.dfsg.1-2ubuntu1 xserver-xorg-video-s3 1:0.6.1-1 xserver-xorg-video-s3virge 1:1.10.2-1 xserver-xorg-video-savage 1:2.2.1-4ubuntu2 xserver-xorg-video-siliconmot 1:1.7.0-1 ion 19 xserver-xorg-video-sis 1:0.10.1-1 xserver-xorg-video-sisusb 1:0.9.0-4 xserver-xorg-video-tdfx 1:1.4.0-2 xserver-xorg-video-trident 1:1.3.0-1ubuntu1 MXM-6410/APC-6410 Linux User’s Manual v1.2 20 xserver-xorg-video-tseng 1:1.2.0-1ubuntu1 xserver-xorg-video-v4l 1:0.2.0-1ubuntu5 xserver-xorg-video-vesa 1:2.0.0-1ubuntu6 xserver-xorg-video-voodoo 1:1.2.0-1ubuntu1 xulrunner-1.9 1.9.0.8+nobinonly-0ubuntu2 xulrunner-1.9.1 1.9.1~b4~hg20090330r24021+nobinonly-0ub untu1 zenity 2.26.0-0ubuntu2 zip 2.32-1 zlib1g 1:1.2.3.3.dfsg-12ubuntu2 MXM-6410/APC-6410 Linux User’s Manual v1.2 1.4 Special Features In addition to the standard Ubuntu Linux functionality, Embedian has extended the operating system by following features: Table 1.3 Special Features Table 1.3 Special Features Special Features Description Direct SD Boot Boot Directly from SD card. It is very useful for maintenance purposes. LCD Customizer Set all types of LCD resolution parameters by using fbset utility. 21 NAND Flash Writer To recover the firmware in NAND flash from NOR flash or SD card by jumper setting. MPlayer Integrate the MFC drivers into Mplayer Calibration Program Calibration program for touch application. MXM-6410/APC-6410 Linux User’s Manual v1.2 System Information This Chapter gives an introduction of system information to let users quickly pick up how to setting up the system. Section include: 22 System Setup Jumper Setting Firmware architecture in NAND flash MXM-6410/APC-6410 Linux User’s Manual v1.2 Chapter 2 System Information This Chapter gives an introduction of hardware information so that users can quickly set up the system. 2.1 Starting EVKM-MXM-6410 Before starting, please check the jumper to make sure that the jumper configuration is matching your demand. Figure 2.1 shows the steps. Figure 2.1 Starting EVKM-MXM-6410 1. Press the MXM-6410 module and screw it tightly. 2. Connect the console port (UART0, CN20 on figure 2.3) to the console cable, then to a null modem cable and then connect to your PC. Open 3. 4. 5. 6. up the DNW 0.6c (Click “Connect” at “Serial Port” tab) or Hyper Terminal and set the baud rate to 115200, 8N1, no hardware flow control. Connect the backlight invert board power to CN9. Connect the LCD FPC Cable (Top Contact) or LVDS cable. Connect the power cable to power board. Boot the device and you should be able to see the Ubuntu gdm login prompt on the LCD screen. The default user is ubuntu and password is 23 MXM-6410/APC-6410 Linux User’s Manual v1.2 mxm6410. (If login from the console, the root pass is also mxm6410.) 2.2 Jumper Setting This section gives details of the hardware features of the EVKM-MXM-6410. These include a description of the switches, jumper settings, connectors and connector pin outs. Jumpers The EVKM-MXM-6410 SBC has a number of jumpers that allow you to configure your system to suit your application. All use 2mm shorting blocks (shunts) to select settings. Turn off power of the EVKM-MXM-6410 before changing the position of a shunt. 24 MXM-6410/APC-6410 Linux User’s Manual v1.2 Jumper Location Figure 2.2 Jumper Location 25 MXM-6410/APC-6410 Linux User’s Manual v1.2 List of Jumpers The table below lists the function of various jumpers. Table 2.1 Jumpers Table 2.1 Jumpers Label Function JP1 NOR boot or NAND boot Setting and LCD Scan Direction Setting JP2 LCD Power Setting (3.3V or 5V for both TTL and LVDS) JP3 RS232/422/485 Setting S1 Reset Button Jumper Settings The following tables describe how the jumper shunts to various configurations. JP1: Location on Board, D1 Table 2.2 NOR Boot or NAND Boot and LCD Scan Direction Setting (JP1) Table 2.2 NOR Boot or NAND Boot and LCD Scan Direction Setting Setting Function N.C.(Default) NAND Boot JP1 (1-2) NOR Boot JP1 (3-4) Pull-High of CN14 Pin 30 JP1 (5-6) Pull-High of CN14 Pin 31 JP2: Location on Board, C1 Table 2.3 LCD VCC Power Setting for CN14 and CN15 (JP2) (from CPU LVDS and TTL) Table 2.3 26 LCD VCC Power Setting for CN14 (JP2) (from CPU LVDS and TTL) Setting Function JP2(1-2)(Default) 3.3V JP2(3-4) 5V MXM-6410/APC-6410 Linux User’s Manual v1.2 JP3: Location on Board, B6 Table 2.4 RS232/422/485 Mode Setting Table 2.4 RS232/422/485 Setting Setting Function JP3(1-2)(Default) RS232 JP3(3-4) RS422/RS485 half duplex JP3(5-6) RS422/RS485 full duplex Note: If JP3 jumper set to be RS232, the RS232 connector will be CN20 (UART1) header. If JP3 jumper set to be RS422 and RS485, the connector will be CN22 header. User can only choose one (RS232 or RS422 or RS485) at the same time. S1: Location on Board, D6 Table 2.5 Reset Button Table 2.5 Reset Button Setting Function Press Button and Reset CPU and IO Release Immediately Setting Jumpers You configure your board to match the needs of your application by setting jumpers. A jumper is the simplest kind of electric switch. It consists of two metal pins and a small metal clip (often protected by a plastic cover) that slides over the pins to connect them. To "close" a jumper you connect the pins with the clip. To "open" a jumper you remove the clip. Sometimes a jumper will have three pins, labeled 1, 2 and 3. In this case you would connect either pins 1 and 2 or 2 and 3. 27 MXM-6410/APC-6410 Linux User’s Manual v1.2 The jumper settings are schematically depicted in this manual as follows. A pair of needle-nose pliers may be helpful when working with jumpers. If you have any doubts about the best hardware configuration for your application, contact your local distributor or sales representative before you make any change. Generally, you simply need a standard cable to make most connections. 28 MXM-6410/APC-6410 Linux User’s Manual v1.2 2.3 Connectors Onboard connectors link the EVKM-MXM-6410 to external devices such as LCD panel, a keyboard, an audio headset or SD/SDIO and to external communication such as 802.11, USB or Ethernet link. The table below lists the function of each of the board’s connectors. Connector Location Figure 2.3 Connector Location 29 MXM-6410/APC-6410 Linux User’s Manual v1.2 List of Connectors Table 2.6 List of Connectors Table 2.6 Connector Label Function CN5 JTAG CN6 CF Type I/II Connector CN7 SATA Connector CN8 Power Connector CN9 LCD Backlight Inverter Connector CN10 RTC Battery Connector CN11 Audio (Microphone in, Headphone out, Line in) Connector CN12 Buzzer CN13 S-Video and CVBS Video Connector CN14 TTL Level LCD FPC Connector CN15 LVDS LCD Connector CN16 VGA DSub-15 Connector CN17 Ethernet RJ45 and Double USB Host Type A Connector CN18 Double USB Host Header CN19 USB OTG Type B Connector CN20 UART 0 and UART 1 Header CN21 UART 2 and UART 3 Header CN22 SPI and RS422/485 Header CN23 UART 4 and UART 5 Header CN24 SD/SDHC Connector CN25 GPIO Header CN26 4-Wire Touch Panel Connector CN27 CAN Bus Connector For more details, users can refer to the hardware manual.. 30 MXM-6410/APC-6410 Linux User’s Manual v1.2 Using Ubuntu Jaunty Jackalope This Chapter details how to use the Ubuntu Linux of MXM-6410 computer on module or APC-6410 single board computer. Section include: 31 Booting Default root pass and user Network Setting Manually add repositories Install Software Packages FTP Client FTP Server Telnet/SSH Server VNC server MXM-6410/APC-6410 Linux User’s Manual v1.2 32 GDM LXDE Calibration and Touch Screen Kiosk Mode NAND Root File System Cross Toolchain MXM-6410/APC-6410 Linux User’s Manual v1.2 Chapter 3 Using Ubuntu Jaunty Jackalope This chapter gives an introduction in regarding to use the Ubuntu Linux 9.04 Jaunty Jackalope system on MXM-6410 computer on module or APC-6410 single board computers. This guide is mainly focus on the topic related to Embedian’s products. This guide is not an official Ubuntu documentation. But still, a good reference for those people who are interested in Ubuntu 9.04. 3.1 Booting When power on, the uboot will initialize the low-level hardware and bring the Linux kernel to DDR RAM. After that, the Linux kernel will take over the system. The linuxrc is a program that is started in the start-up stage of the kernel prior to the actual boot process. This allows you to boot a small modularized kernel and to load the few drivers that are really needed as modules. linuxrc assists in loading relevant drivers manually. The use of linuxrc provides with the choices to boot into a small root file system in NAND or the Ubuntu 9.04 system in SD card. (The default is set to boot into SD card with Ubuntu 9.04.) The NAND file system is in ext3 format and can be served as a disk-based rescue system or for some simpler applications that don’t need a SD card at all. For more details in regarding to NAND file system, users can refer to section 3.14. If you have LCD attached, users should be able to see the following gdm login screen showing on your LCD. 33 MXM-6410/APC-6410 Linux User’s Manual v1.2 34 MXM-6410/APC-6410 Linux User’s Manual v1.2 3.2 Default root pass and user The default root password is mxm6410 and default user is ubuntu and the ubuntu user default password is also mxm6410. 3.2.1 Create a User To add a user, you can use useradd command. 35 MXM-6410/APC-6410 Linux User’s Manual v1.2 3.2.2 Set User Password After create a user, you can use passwd command to set the password. Example: Below is an example to create a user john with home directory and set his password. 36 MXM-6410/APC-6410 Linux User’s Manual v1.2 3.2.3 Delete a User To delete a user, you can use userdel command. Example: Below is an example to delete a user john with removal of home directory and mail spool. 3.3 Network Settings The default IP is set static and network configuration is as follows. IP address 192.168.1.121 netmask 255.255.255.0 gateway 192.168.1.254 37 MXM-6410/APC-6410 Linux User’s Manual v1.2 Users can use ifconfig to change the IP address at runtime. Example: Below is an example to change the IP address to 192.168.1.122 and netmask to 255.255.255.0 at runtime. 3.3.1 Configure Network Configuration at Boot or Network Restart The ifconfig command only changes the network setting at runtime. After reboot or network restart, the network configuration will be restored to default values. To determine the network configuration at boot or network 38 MXM-6410/APC-6410 Linux User’s Manual v1.2 restart, users need to modify the /etc/network/interfaces file. 3.3.1.1 Static IP To configure the device networking configuration as static IP, user need to modify the /etc/network/interfaces file first. Modify the network configurations After modified this file, you can reboot the device or just use the /etc/init.d/networking restart command to restart the networking configuration. 3.3.1.2 DHCP To configure the device networking configuration as DHCP, user need to modify the /etc/network/interfaces as follows. After modified this file, you can reboot the device or just use the /etc/init.d/networking restart command to restart the networking configuration. 39 MXM-6410/APC-6410 Linux User’s Manual v1.2 You can see the device IP has been assigned as 192.168.1.44 after network restart. Note: At development stage, users might take the MXM-6410 module off from the carrier board and replace by the other new module. If that is the case, Ubuntu will find out the MAC address has been changed and will view the original eth0 network device as eth1. The network configuration settings mentioned above will not take effect. If users want to change the network configuration setting under this situation, you need to modify the /etc/udev/rules.d/70-persistent-net.rules file first time when you replace the CPU module. And delete the following lines. After next reboot or network restart, Ubuntu will generate the new settings to this file to fix the network device interface. 40 MXM-6410/APC-6410 Linux User’s Manual v1.2 3.4 Manually add repositories Do this at your own risk. Modify the default Ubuntu sources.list only if you understand what you're doing. Mixing repositories can break your system. For more information see the Ubuntu Command-line Repository guide. Create a backup of your current list of sources. Note: 1. sudo - runs the command with root privileges. cp = copy. -p = prompt to overwrite if a file already exists. 2. Edit the list of sources: The default repositories are: 3. To use your local mirror you can add "xx." before archive.ubuntu.com, where xx = your country code. Example: deb http://gb.archive.ubuntu.com/ubuntu jaunty main restricted universe multiverse indicates a repository for Great Britain (gb). 4. Refresh the packages list from the new repositories: 41 MXM-6410/APC-6410 Linux User’s Manual v1.2 3.5 Install Software Packages 3.5.1 List of installed software packages To visualize the list of installed packages, we use the following command To visualize an installed package whose name is vim for example, we use the previous command and a redirection (or pipeline) to the grep command. Practically, we have: 3.5.2 Description of installed software packages The description of the set of installed packages is obtained via the command 3.5.3 List of available software packages The list of available packages is obtained as follows: We clearly see that the list is not in alphabetical order. To resolve this issue, we redirect and sort the output: 42 MXM-6410/APC-6410 Linux User’s Manual v1.2 3.5.4 Searching a software package: apt-cache search To search a software package, we proceed as follows: This command displays software packages containing the expression wget. 43 MXM-6410/APC-6410 Linux User’s Manual v1.2 3.5.5 Properties and information of a software: apt-cache show To display information related to a package, for instance the gwget package, we proceed as follows: Note that the exact name of the package should be entered! For example, does not yield any result since flash is not he name of a package. 44 MXM-6410/APC-6410 Linux User’s Manual v1.2 3.5.6 Installing a software: apt-get install Assume we want to install firefox. We type: 3.5.7 Removing a software: apt-get remove To uninstall a package, we can proceed in two ways. Either 1) we uninstall only the software or 2) the software and its configuration files. In the first case, assuming we want to uninstall the mplayer software, we type: In the second case, if we want to uninstall both ‘mplayer’ and its configuration files, we type: 3.5.8 Updating the software list: apt-get update Updating a list of software is not the same as updating the software per se. Only the list is actually updated: 3.5.9 Upgrading the software: apt-get upgrade The upgrade command installs the most recent versions of all packages on the system. To simulate an update installation, i.e. to see which software will be updated, we type: 45 MXM-6410/APC-6410 Linux User’s Manual v1.2 3.5.10 Smart software update: apt-get dist-upgrade The dist-upgrade command has the same effect as the ’upgrade’ except that a smart management is used in changes of dependencies in new versions: conflict resolution and discarding less important packages for more important ones, for example. 46 MXM-6410/APC-6410 Linux User’s Manual v1.2 3.6 FTP Client The lftp is default included in the root file system. You might use apt-get install to use a dedicated ftp client. To use the ltfp FTP client, assuming the remote host IP address is 59.124.115.43 and the user is eric, You can use put <filename> to put transmit a file from local device to remote server and get <filename> to get a file from remote server to local device, and use bye to exit the lftp command mode. You can also use wget command to get the file from webserver. 47 MXM-6410/APC-6410 Linux User’s Manual v1.2 3.7 FTP Server The ftp server is not included in the root file system by default. However, it is very easy to have one. In this section, we would like to take the vsftpd server as an example. First, we need to apt-get install the vsftpd packages. You can use netstat commad to check if the vsftpd has been successfully installed. If you saw the ftp has been LISTEN, then means the vsftpd is running. The default vsftpd is configured only allow the anonymous user to ftp in without password. We now need to configure the /etc/vsftpd.conf file. Below are the common settings for vsftpd. For advanced settings, users can read the remarks from the same file. anonymous_enable=NO (YES means allow the anonymous user to login to ftp. NO means not allow anonymous user to login to ftp) chroot_local_user=YES (Uncomment this to restrict local users to their home directories and cannot change directory to other system directory.) local_umask=022 (Uncomment this will make the privilege of the upload file to 755; If comment out this line, the default privilege of upload file is 700.) local_enable=Yes (Uncomment this to allow local users to log in.) write_enable=YES (Uncomment this to enable any form of FTP write command.) After made the changes, we need to restart the vsftpd server by 48 MXM-6410/APC-6410 Linux User’s Manual v1.2 And now you can use the common FTP client software like Filezilla to FTP files into the user home directory. 3.8 Telnet/SSH Server The telnet and ssh server are default included in the root file system. You can telnet or ssh to the device from a remote telnet/ssh client such as putty. 49 MXM-6410/APC-6410 Linux User’s Manual v1.2 Click Open to login and you will see the following screen. 50 MXM-6410/APC-6410 Linux User’s Manual v1.2 3.9 VNC Server The VNC server allows users to see the desktop of a MXM-6410 based remote device and control it with your local mouse and keyboard and without attaching an LCD to the device, just like you would do it sitting in the front of that MXM-6410 based device. First of all you need to install the tightVNC server first. Now you can start vncserver to have a new display (called :1) It will create .vnc directory under /root. It also will ask you a password (insert it twice) and for the viewing password answer NO. Now it’s time to stop it for few more configurations. and move to the configuration files 51 MXM-6410/APC-6410 Linux User’s Manual v1.2 commenting out everything and insert the following two lines: openbox & lxsession And now you can start vncserver again. At the Windows XP client side, you can download the free VNC viewer from http://www.tightvnc.com/download.php Open up the vncviewer program Click “Connect” and it will pop out a password authentication window. Enter the password. 52 MXM-6410/APC-6410 Linux User’s Manual v1.2 Click “OK” and you will the device desktop on the remote client side. To kill the VNC service, 53 MXM-6410/APC-6410 Linux User’s Manual v1.2 3.10 GDM Embedian MXM-6410 uses GDM Gnome Display Manager) as the graphical login program. GDM is the GNOME Display Manager, a graphical login program that uses XWindow. GDM provides the equivalent of a "login:" prompt for X displays- it pops up a login window and starts an X session. It provides all the functionality of xdm, including XDMCP support for managing remote displays. To stop the gdm service, you can use the command /etc/init.d/gdm stop You can use gdm to load different desktop environments and Window Mangers. Because of the memory limitation, the default is using the LXDE system. If users would like to consider GNOME, the 256MB DDR RAM is the minimum requirement. 3.11 LXDE Because of the memory limitation, Embedian chooses LXDE as default desktop environment. After login into the GDM display manager, the GDM will launch LXDE directly by default. LXDE, Lightweight X11 Desktop Environment, is a desktop environment which is lightweight and fast. It is designed to be user friendly and slim, and keep the resource usage low. LXDE uses less RAM and less CPU while being a feature rich operating system. Because of the low usage of resources it also saves energy. We don't tightly integrate every component of LXDE. Instead, we try to make all components independent, so each of them can be used independently with few dependencies. More about LXDE on the lxde.org website, theLXDE blogs, and in the LXDE forum. LXDE Components PCManFM, is a fast and lightweight file manager with features like Drag & Drop support, tabbed browsing (Similiar to Firefox), Built-in file searching utility, fast load of large directories, File association support (Default application), Thumbnail for image files, Bookmarks support, 54 MXM-6410/APC-6410 Linux User’s Manual v1.2 correct handling of non-UTF-8 encoded filenames and more. LXLauncher, easy-mode application launcher LXPanel, desktop panel, the panel can generate menu for installed applications automatically from *.desktop files. It can be configured from GUI preference dialog, and there is no need to edit config files. The component provides a "Run" dialog with autocompletion. LXSession, session manager, The LXSession manager is used to automatically start a set of applications and set up a working desktop environment. Moreover, the session manager is able to remember the applications in use when a user logs out and to restart them the next time the user logs in. LXSession Edit, window manager used in LXDE can be changed, ability to turn on disabled applications LXAppearance, theme switcher. You can change the theme, icons, and fonts used by applications easily. Leafpad, text editor Xarchiver, archiving GPicView, image viewer, GPicView features lightening fast startup and intuitive interface. LXTerminal, terminal emulator LXTask, task manager / system monitor LXNM, lightweight network connection helper daemon for LXDE supporting wireless connections (Linux-only) Openbox, window manager and obconf LXRandr, screen manager, manages screen resolution and external monitors LXShortCut, an easy way to edit application shortcuts LXMusic, minimalist xmms2-based music player LXDE Common, the default settings configuration file for integrating the different components of LXDE. LXDE Common manages the system behavior and functions to integrate icons and artwork. GtkNetCat, Graphic User Interface for netcat. Netcat provides system functions as a computer networking utility for reading from and writing to network connections on either TCP or UDP. Embedian Add-on Components 55 MXM-6410/APC-6410 Linux User’s Manual v1.2 GMplayer, is the GUI of Mplayer. It is integrated by Embedian to support the hardware MFC from CPU. Details can be found at section 4.1. Calibrate TouchScreen, is a tool to calibrate the touch screen. 3.12 Calibration and Touch Screen Some applications use touch panel as input device. If that is the case, users need to install the calibration program that Embedian provided first. 3.12.1 Install the Calibration Program lftp the tarball (ts_upgrade.tar.gz) that Embedian provided with to the device /tmp directory and extract it. Execute the ./install.sh command. The calibration program installation is done now. Reboot and you will be asked to calibrate the device first now. 3.12.2 Calibration Program The device will only ask you calibrate at first boot. After the first calibration, the calibration value will be stored. And the next boot will check if this value existing or not. If yes, the device will just use this value. To re-calibrate the device, user can either use the following command 56 MXM-6410/APC-6410 Linux User’s Manual v1.2 # ts_calibrate Or pending at the touch screen for a while when booting. 3.13 Kiosk Mode 3.13.1 Boot Ubuntu 9.04 into text mode instead of graphic mode Some users’ applications are relatively simple and they develop their GUIs directly on top of frame buffer (/dev/fb0). They don’t even need X11 running on the device. Or some server applications don’t need to have a graphic interface at all. To boot into text mode or to disable a service (such as GDM) from being started in a given runlevel (e.g., 2 which is Ubuntu’s default runlevel) is like so: After reboot, you will see the text mode booting into the LCD screen. You can reverse this file back to boot into graphic mode again. If you would like launch the, for example, mplayer application under the text mode, you can And you can write a simple script to let this program to startup automatically at boot. If you would like to stop the X11 and X application at runtime, you can To make your services startup at boot, Ubuntu Linux use update-rc.d command to install and remove System-V style init script links. Let us take the mysql service for example. Turn on or start service called mysql on boot Remove service called mysql on boot: 57 MXM-6410/APC-6410 Linux User’s Manual v1.2 OR Replace mysql name with actual service name. Note: It is not recommended to boot into text mode by using update-rc.d remove and update-rc.d defaults. “update-rc.d foo defaults” will not put “foo” back into its previous start-up slot, but puts it at S20 by braindead “default”. It’s the oldest surviving bug in UNIX history. For gdm this can cause real grief because it puts it before processes that should have completed start-up before gdm goes about its merry ways. 3.13.2 GDM Auto Login To allow Ubuntu GDM Auto Login, you need edit gdm.conf and add the user you want to auto login. Let’s assume the user that you would like to auto login is ubuntu. At line 48, 49 Reboot the device will automatically login into the lxde desktop. 3.13.3 Auto Start a Program under LXDE To auto start a program under LXDE, users can edit /etc/xdg/lxsession/LXDE/autostart file and add the program that you would like to auto start at the end of this file. Let’s take the firefox program for example. 58 MXM-6410/APC-6410 Linux User’s Manual v1.2 After reboot, you will see the Firefox program auto start at the top of the panel. Note: If users don’t even need LXDE to auto start the program, you will need to modify the /etc/alternatives/x-session-manager to auto start the program and comment out the LXDE auto start script. 3.14 NAND Root File System The linuxrc file in the NAND flash determines where the root file system should boot into. This section mainly introduces the NAND file system. 3.14.1 linuxrc The linuxrc is a program that is started in the start-up stage of the kernel prior to the actual boot process. This allows you to boot a small modularized kernel and to load the few drivers that are really needed as modules. linuxrc assists in loading relevant drivers manually. The use of linuxrc provides with the choices to boot into a small root file system in NAND or the Ubuntu 9.04 system in SD card. (If no press anything, the default is set to boot into SD card.) The linuxrc file is located in the NAND flash. User can edit it if they purely want to use NAND flash as their main root file system. There are two ways to access linuxrc. First, if user boot into SD Ubuntu file systems, the NAND flash will be mounted automatically. And user can just access the file that is located at /nand directory. 59 MXM-6410/APC-6410 Linux User’s Manual v1.2 Second, users can boot in NAND flash first by pressing 2) NAND during the booting process. (The root pass is apc7110 by default.) The linuxrc file is located at / directory. The NAND file system is also an EXT3 file system. Users can edit the file just you do in any Linux PC. 3.14.2 As a rescue file system The NAND file system can play a role of rescue file system, especially when the main Ubuntu file system is corrupted or cannot boot into for some reason. Here we would like to give you a guide to restore the SD Ubuntu file system from NAND file system. 1. Boot into NAND flash first by pressing 2) NAND during booting process and login as root privilege. (The root pass is apc7110 by default.) 2. Prepare for a at least 1GB SD/SDHC card. The SDHC card will have better read/write performance, but usually the SDHC card is at least 4GB. 3. The NAND file system will mount partition 1 of SD card by default (The device descriptor of SD device is /dev/mmc0, and the partition 1 of SD card is /dev/mmc1). Here would like to format the partition 1 of SD card as EXT3 first. 60 MXM-6410/APC-6410 Linux User’s Manual v1.2 4. Mount the partition 1 of the SD card as /mnt 5. Changing directory to /mnt 6. Ftp the rootfs tarball into this directory. Let’s assume that the root file system is located at 192.168.1.10 ftp server. 7. Extract this tarball (You might need to set the system time by date command first.) 8. remove the tarball 9. cd ../ 61 MXM-6410/APC-6410 Linux User’s Manual v1.2 10. umount /mnt 11. Reboot You will see the gdm login screen appear on the LCD screen. 3.14.3 As a small root file system At development stage, it is recommended that user develop their program under SD Ubuntu root file system. Users can apt-get install gcc and use gcc to do natively make first. After development work done, you can copy the new binary files to NAND flash and do the test again. And then modify the linuxrc to boot into NAND flash only. The other alternative is to use the cross compiler to develop your application at PC. After you done the development, you can ftp the program into the NAND flash and make a test. You can also do this way when developing your program at SD Ubuntu file system. 3.15 Cross Toolchain For kernel compile, since it doesn't rely on any libraries and is totally independent, we do suggest use this cross-compile tool that could save lots of time, and no problem at all for applications. For applications, we do suggest you switch to native compile mode since the host pc which used to make the s/w doesn't know the s/w environment of target platform. User can get the gcc 4.2 at device from Ubuntu repository by # apt-get install gcc IF YOU ARE USING UBUNTU ROOTFS, WE STRONGLY SUGGEST USE NATIVE COMPILE MODE, at least, at the final stage of test. The crosss toolchain version that we are using is 4.2.2 with EABI supported. 62 MXM-6410/APC-6410 Linux User’s Manual v1.2 The file name is cross-4.2.2-eabi.tar.bz2 that can be downloaded from Embedian FTP site. 3.15.1 Installing Toolchain Building the tool chain is not a trivial exercise and for most common situations pre-built tool chains already exists. Unless you need to build your own, or you want to do it anyway to gain a deeper understanding, then simply installing and using a suitable ready-made tool chain is strongly recommended. Please follow the commands below and install the toolchain in the directory mentioned below: # mkdir –p /usr/local/arm # tar jxvf cross-4.2.2.-eabi.tar.bz2 The above command will generate the 4.2.2-eabi folder under the same directory as you made the commands. Move this folder to /usr/local/arm directory. # mv 4.2.2-eabi /usr/local/arm/ # export PATH=$PATH:/usr/local/arm/4.2.2-eabi/bin As of now, you have installed the cross toolchain into your Linux PC. At your application that you would like to cross complied, you need to modify the Makefile and point the CROSS_COMPILE to CROSS_COMPILE = /usr/local/arm/4.2.2-eabi/bin/arm-linux- 63 MXM-6410/APC-6410 Linux User’s Manual v1.2 Use MXM-6410/APC-6410 Hardware MFC Multimedia Function This Chapter gives how to use the hardware MFC multimedia function. Section include: 64 MPEG4 Decoder for Mplayer at Device MFC Device Driver’s API MXM-6410/APC-6410 Linux User’s Manual v1.2 Chapter 4 Use MXM-6410/APC-6410 Hardware MFC Multimedia Function This Chapter gives topics related to hardware MFC multimedia function in MXM-6410/APC-6410. 4.1. MPEG4 Decoder for Mplayer at Device Embedian integrates the CPU MFC hardware codec into Mplayer and natively supports MPEG4 DivX DX50 and MPEG4 Xvid standard. Any video files that generated by a software encoder that supports these standards can be decoded by the hardware decoder supported Mplayer. 4.1.1. Mplayer running on top of GDM and LXDE At “Start” “Audio & Video”, Click “Mplayer” 65 MXM-6410/APC-6410 Linux User’s Manual v1.2 Add the file to the play list, Click the triangle sign on panel to play the video. 66 MXM-6410/APC-6410 Linux User’s Manual v1.2 4.1.2. Mplayer Running on top of frambuffer directly The previous example of Mplayer is running on top of X. Mplayer can also be played directly on top of frame buffer. If that is the case, Note: -quite parameter is highly recommended. -fs means full screen -vo to fbdev means to show video on top of frame buffer directly. -Section 3.13.1 also has an example to demonstrate howto. 4.2. MFC Device Driver’s API API Functions Description CreateFile Create the MXM-6410 MFC instance. DeviceIoControl IOCTL_MFC_MPEG4_DEC_INIT IOCTL_MFC_MPEG4_ENC_INIT IOCTL_MFC_MPEG4_DEC_EXE IOCTL_MFC_MPEG4_ENC_EXE IOCTL_MFC_H264_DEC_INIT IOCTL_MFC_H264_ENC_INIT IOCTL_MFC_H264_DEC_EXE IOCTL_MFC_H264_ENC_EXE IOCTL_MFC_H263_DEC_INIT IOCTL_MFC_H263_ENC_INIT IOCTL_MFC_H263_DEC_EXE IOCTL_MFC_H263_ENC_EXE IOCTL_MFC_VC1_DEC_INIT IOCTL_MFC_VC1_DEC_EXE IOCTL_MFC_GET_LINE_BUF_ADDR IOCTL_MFC_GET_RING_BUF_ADDR IOCTL_MFC_GET_FRAM_BUF_ADDR CloseHandle 67 Close the 6410 MFC instance. MXM-6410/APC-6410 Linux User’s Manual v1.2 68 MXM-6410/APC-6410 Linux User’s Manual v1.2 4.2.1. CreateFile CreateFile Syntax HANDLE WINAPI CreateFile( LPCTSTR lpFileName, DWORD dwDesiredAccess, DWORD dwShareMode, LPSECURITY_ATTRIBUTES lpSecurityAttributes, DWORD dwCreationDisposition, DWORD dwFlagsAndAttributes, HANDLE hTemplateFile ); Description This function creates the 6410 MFC instance. Several MFC instance can be made simultaneously. This means that CreateFile function can be called several times in a process (task). 69 Parameters lpFileName [IN] : MFC’s device driver name. (L”MFC1:”) dwDesiredAccess [IN] : GENERIC_READ|GENERIC_WRITE dwShareMode [IN] : 0 lpSecurityAttributes [IN] : NULL dwCreationDisposition [IN] : OPEN_EXISTING dwFlagsAndAttributes [IN] : FILE_ATTRIBUTE_NORMAL hTeplateFile [IN] : NULL Returns HANDLE of the MFC instance. If it fails, it returns INVALID_HANDLE_VALUE. MXM-6410/APC-6410 Linux User’s Manual v1.2 4.2.2. DeviceIoControl DeviceIoControl 70 Syntax BOOL WINAPI DeviceIoControl( HANDLE hDevice, DWORD dwIoControlCode, LPVOID lpInBuffer, DWORD nInBufferSize, LPVOID lpOutBuffer, DWORD nOutBufferSize, LPDWORD lpBytesReturned, LPOVERLAPPED lpOverlapped ); Description Most of functions are developed in ioctl. This system call has many functions which is separated by dwIoControlCode Parameters hDevice [IN] : HANDLE returned by CreateFile() function dwIoControlCode [IN] : The control code for the operation. Detailed information will explain below. lpInBuffer [IN] : Structure of the MFC argument nInBufferSize [IN] : Size of MFC argument structure lpOutBuffer [OUT] : NULL nOutBufferSize [OUT] : 0 lpBytesReturned [OUT] : NULL lpOverlapped [IN] : NULL Returns If the operation completes successfully, the return value is nonzero. If the operation fails or is pending, the return value is zero. MXM-6410/APC-6410 Linux User’s Manual v1.2 4.2.3. CloseHandle CloseHandle 71 Syntax BOOL WINAPI CloseHandle( HANDLE hDevice ); Description Closes an open MFC's handle. Parameters [IN] hDevice - HANDLE returned by CreateFile() function Returns If the function succeeds, the return value is nonzero. If the function fails, the return value is zero MXM-6410/APC-6410 Linux User’s Manual v1.2 4.2.4. Control Codes for DeviceIoControl() IOCTL_MFC_MPEG4_DEC_INIT IOCTL_MFC_H263_DEC_INIT IOCTL_MFC_H264_DEC_INIT IOCTL_MFC_VC1_DEC_INIT Syntax BOOL WINAPI DeviceIoControl( HANDLE hDevice, DWORD dwIoControlCode, LPVOID lpInBuffer, DWORD nInBufferSize, LPVOID lpOutBuffer, DWORD nOutBufferSize, LPDWORD lpBytesReturned, LPOVERLAPPED lpOverlapped ); Description It initializes the MFC’s instance with the configure stream. Parameters hDevice [IN] : HANDLE returned by CreateFile() function dwIoControlCode [IN] : IOCTL_MFC_MPEG4_DEC_INIT, IOCTL_MFC_H263_DEC_INIT, IOCTL_MFC_H264_DEC_INIT, IOCTL_MFC_VC1_DEC_INIT lpInBuffer [IN] : Pointer to MFC_DEC_INIT_ARG structure. nInBufferSize [IN] : sizeof(MFC_DEC_INIT_ARG) lpOutBuffer [OUT] : NULL nOutBufferSize [OUT] : 0 lpBytesReturned [OUT] : NULL lpOverlapped [IN] : NULL Returns If the operation completes successfully, the return value is nonzero. If the operation fails or is pending, the return value is zero. 72 MXM-6410/APC-6410 Linux User’s Manual v1.2 IOCTL_MFC_MPEG4_DEC_EXE IOCTL_MFC_H263_DEC_EXE IOCTL_MFC_H264_DEC_EXE IOCTL_MFC_VC1_DEC_EXE Syntax BOOL WINAPI DeviceIoControl( HANDLE hDevice, DWORD dwIoControlCode, LPVOID lpInBuffer, DWORD nInBufferSize, LPVOID lpOutBuffer, DWORD nOutBufferSize, LPDWORD lpBytesReturned, LPOVERLAPPED lpOverlapped ); Description It decodes the stream in the LINE_BUF or RING_BUF. Parameters hDevice [IN] : HANDLE returned by CreateFile() function dwIoControlCode [IN] : IOCTL_MFC_MPEG4_DEC_EXE, IOCTL_MFC_H263_DEC_EXE, IOCTL_MFC_H264_DEC_EXE, IOCTL_MFC_VC1_DEC_EXE lpInBuffer [IN] : Pointer to MFC_DEC_EXE_ARG structure. nInBufferSize [IN] : sizeof(MFC_DEC_EXE_ARG) lpOutBuffer [OUT] : NULL nOutBufferSize [OUT] : 0 lpBytesReturned [OUT] : NULL lpOverlapped [IN] : NULL Returns If the operation completes successfully, the return value is nonzero. If the operation fails or is pending, the return value is zero. 73 MXM-6410/APC-6410 Linux User’s Manual v1.2 IOCTL_MFC_GET_LINE_BUF_ADDR IOCTL_MFC_GET_RING_BUF_ADDR IOCTL_MFC_GET_FRAM_BUF_ADDR Syntax BOOL WINAPI DeviceIoControl( HANDLE hDevice, DWORD dwIoControlCode, LPVOID lpInBuffer, DWORD nInBufferSize, LPVOID lpOutBuffer, DWORD nOutBufferSize, LPDWORD lpBytesReturned, LPOVERLAPPED lpOverlapped ); Description It obtains the address of the LINE_BUF, RING_BUF or FRAM_BUF. Parameters hDevice [IN] : HANDLE returned by CreateFile() function dwIoControlCode [IN] : IOCTL_MFC_GET_LINE_BUF_ADDR, IOCTL_MFC_GET_RING_BUF_ADDR, IOCTL_MFC_GET_FRAM_BUF_ADDR lpInBuffer [IN] : Pointer to MFC_GET_BUF_ADDR_ARG structure. nInBufferSize [IN] : sizeof(MFC_GET_BUF_ADDR_ARG) lpOutBuffer [OUT] : NULL nOutBufferSize [OUT] : 0 lpBytesReturned [OUT] : NULL lpOverlapped [IN] : NULL Returns If the operation completes successfully, the return value is nonzero. If the operation fails or is pending, the return value is zero. 74 MXM-6410/APC-6410 Linux User’s Manual v1.2 4.2.5. Data Structure for Passing the IOCTL Arguments 4.2.5.1. MFC_ENC_INIT_ARG MFC_ENC_INIT_ARG int ret_code [OUT] Return code int in_width [IN] width of YUV420 frame to be encoded int in_height [IN] height of YUV420 frame to be encoded int in_bitrate [IN] Encoding parameter: Bitrate (kbps) int in_gopNum [IN] Encoding parameter: GOP Number (interval of I-frame) int in_frameRateRes [IN] Encoding parameter: Frame rate (Res) int in_frameRateDiv [IN] Encoding parameter: Frame rate (Divider) 4.2.5.2. MFC_ENC_EXE_ARG MFC_ENC_EXE_ARG int ret_code [OUT] Return code int out_encoded_size [OUT] Length of Encoded video stream 4.2.5.3. MFC_DEC_INIT_ARG MFC_DEC_INIT_ARG int ret_code [OUT] Return code int in_strmSize [IN] Size of video stream filled in STRM_BUF int out_width [OUT] width of YUV420 frame int out_height [OUT] height of YUV420 frame 4.2.5.4. MFC_DEC_EXE_ARG MFC_DEC_EXE_ARG 75 int ret_code [OUT] Return code int in_strmSize [IN] Size of video stream filled in STRM_BUF MXM-6410/APC-6410 Linux User’s Manual v1.2 4.2.5.5. MFC_GET_BUF_ADDR_ARG MFC_DEC_INIT_ARG 76 int ret_code [OUT] Return code int in_usr_data [IN] User data for translating Kernel-mode address to Usermode address int out_buf_addr [OUT] Buffer address int out_buf_size [OUT] Size of buffer address MXM-6410/APC-6410 Linux User’s Manual v1.2 MXM-6410/APC-6410 Firmware Update This Chapter details how to update firmware in NAND flash. Section include: 77 Firmware Architecture Update Firmware from Uboot MXM-6410/APC-6410 Linux User’s Manual v1.2 Appendix I MXM-6410/APC-6410 Firmware Update This Chapter details firmware upgrade for MXM-6410/APC-6410. The firmware in NAND flash includes uboot, kernel zImage and nandfs image. A.1. Firmware Architecture Figure A.1 shows the firmware architecture of Linux in NAND. Figure A.1 Firmware Architecture of Linux n NAND The u-boot starts from NAND address 0x0. The Linux kernel zImage starts from NAND address 0x40000. The NAND filesystem is a small file system for rescue purposed and load the minimum set drivers and starts from the NAND address 0x200000. Users need a SD card or hard drive with root file system installed to boot up the complete Ubuntu 9.04 system. The will be described at Backup and Restore Root File Systems document. Users can update the firmware under u-boot. The Embedian factory default is fimware pre-installed. Unless necessary, Embedian doesn't recommend you 78 MXM-6410/APC-6410 Linux User’s Manual v1.2 update firmware (especially uboot) since the system might not boot anymore if you did wrong operation. (If you develop your own u-boot and kernel, you will need to do that.) Following tells howto update firmware from uboot command prompt.. A.2. Update Firmware from Uboot You could use u-boot tftp command to download u-boot, Linux kernel and NAND root file system. Below we will tell you how to do this under Windows and Linux PC environment. First, you need to set up a tftp server. A.2.1. Windows Environment First, open up "DNW" program or Windows Hyperterminal and set up the serial port (115200, 8N1). A.2.1.1. Setup TFTP Server Users need to install tftp server on Windows. You can download the freeware and install to your Windows PC in the tftpboot directory. Copy the uboot.bin, zImage and nand.img into this directory. Close your anti-virus software like PC-cillin. (Or close port 69) You can set and add the environment parameter of device using "setenv", "saveenv" command as below. # setenv ipaddr XXX.XXX.XXX.XXX # setenv serverip XXX.XXX.XXX.XXX # saveenv Following figure shows the example for setting up the parameters. EXAMPLE: Ipaddr 192.168.1.2 Serverip 192.168.1.121 Note: 79 MXM-6410/APC-6410 Linux User’s Manual v1.2 Make sure that the ipaddr for MXM-6410/APC-6410 and serverip for Windows PC are in the same network domain. After setting up the IP address and wire everything right, you could start the tftp download. A.2.1.2. Transfer and Write Image by TFTP and “nand write” Command After setting up the tftp server and IP address of devices, users can start transfer and write images using u-boot tftp and nand write command. It is necessary to download to DRAM first before writing to NAND. The following command shows how to transfer u-boot.bin images to DRAM. # tftp 0x 50000000 u-boot.bin Temporary address is base address of DRAM, i.e. 0x50000000. Write the u-boot.bin image to the NAND by using following nand write command. You need to erase first. # nand erase 0x0 0x40000 # nand write 0x50000000 0x0 0x40000 Temporary address is base address of DRAM, i.e. 0x50000000. Start NAND address is 0x0. Image size of bootloader will be below 0x40000 (HEX). Note: Uboot contains specific hardware information and is well configured by Embedian.. It is usually no need to modify. Unless necessary or you are an experienced engineer, it is not recommended to update uboot. Wrong operation will cause the system not booting anymore. Next example shows how to transfer and write Linux kernel. The file name is "zImage". Again, we tftp zImage to DRAM first by the following command. # tftp 50000000 zImage Temporary address is base address of DRAM, i.e. 0x50000000. Write the zImage image to the NAND by using nand write command. The same, you will need to erase first. 80 # nand erase 0x40000 0x1c0000 # nand write 0x50000000 0x40000 0x1c0000 MXM-6410/APC-6410 Linux User’s Manual v1.2 Temporary address is base address of DRAM, i.e. 0x50000000. Start NAND address is 0x40000. Image size of zImage will be below 0x1c0000 (HEX). After writing u-boot and kernel images to NAND flash, the last step is to write NAND root file system nand6410.img image. Repeat the same steps, first, we tftp the nand.img image to DRAM. # tftp 50000000 nand6410.img Temporary address is base address of DRAM, i.e. 0x50000000. Write the nand6410.img image to the NAND by using following nand write command. You still need to erase first. # nand erase 0x200000 0x7e00000 # nand write 0x50000000 0x200000 0x7e00000 Temporary address is base address of DRAM, i.e. 0x50000000. Start NAND address is 0x200000 (40000+1c0000). Image size of NANDFS will be below 0x7e00000 (HEX). Note: The mobile DDR size is 128MB only. If your NANDFS size is big (like Embedian default nand6410.img), you need to use split command in Linux to split the NANDFS into two smaller files, or the uboot will be overwritten in DDR because the execution point of uboot is somewhere in DDR. 81 MXM-6410/APC-6410 Linux User’s Manual v1.2 After done, reset MXM-6410/APC-6410 and the firmware will be updated. A.2.2 Linux Environment In this section, we will detail how to transfer and write firmware under Linux PC. First, we need to set up minicom so that we could see the message from the console. A.2.2.1. Minicom Before transferring images using tftp, you should know how to use Minicom so that you could see the messages from console. In this section will explain how to setup Minicom. Desktop Linux has Minicom program for serial communication. It is used for command prompt of u-boot.bin or shell prompt of embedded Linux. Set up the values before using Minicom program. To execute minicom on setting mode: [root@localhost root] # minicom -s Figure A.2 Minicom Setup 82 MXM-6410/APC-6410 Linux User’s Manual v1.2 Please select ‘Serial port setup’ Push ‘A’ key for setting ‘Serial Device’, then write serial port which is connected to MXM-6410/APC-6410. (If you are using COM1, write /dev/ttyS0, if COM2, write /dev/ttyS1.) Figure A.3 Serial Port Setup I 83 MXM-6410/APC-6410 Linux User’s Manual v1.2 Push ‘E’ key for setting up ‘Bps/Par/Bits’. Push ‘I’ to set up ‘bps’ to 115200, Push ‘V’ to set up ‘Data bits’ to 8, Push ‘W’ to set up ‘Stop bits’ to ‘1’, and ‘V’ to set up ‘parity’ to ‘NONE’. Figure A.4 Serial Port Setup II 84 MXM-6410/APC-6410 Linux User’s Manual v1.2 Push ‘F’ key for setting up ‘Hardware Flow Control’ to ‘NO’. Push ‘G’ key for setting up ‘Software Flow Control’ to ‘NO’. The default value is ‘NO’. Figure A.5 Hardware/Software Flow Control Setup 85 MXM-6410/APC-6410 Linux User’s Manual v1.2 Once setting is over, please press ‘Enter’ key. And select ‘Save setup as dfl’ item, then press ‘Enter’ for saving the values. Figure A.6 Saving Minicom Setup 86 MXM-6410/APC-6410 Linux User’s Manual v1.2 Push ‘Exit’ key, to exit from the setting mode. Currently, the set points are stored to the file ‘/etc/minirc.dfl’. Figure A.7 Exiting Minicom Setup 87 MXM-6410/APC-6410 Linux User’s Manual v1.2 To quit from Minicom, please press ‘Ctrl + A’ and then ‘Z’, at last push ‘Q’ key. Then Selecting ‘Yes’, Minicom is quitted. Figure A.8 Resetting from Minicom 88 MXM-6410/APC-6410 Linux User’s Manual v1.2 A.2.2.2. TFTP server To use tftp server program you have to setup your computer by executing the following command. [root@localhost root]# setup You can see the “Text Mode Setup Utility” as shown below. Figure A.9 Text Mode Setup Utilities Please select “System services”. As shown below. 89 MXM-6410/APC-6410 Linux User’s Manual v1.2 Figure A.10 System Service List Please select “tftp” service as shown in above figure and finally click on “ok”. Finally “quit” setup utility and execute the following command. [root@localhost root]# xinetd -restart Now you can download compiled images to the MXM-6410/APC-6410 by using tftp. Before downloading the images, connect host PC and MXM-6410/APC-6410 by Ethernet cable. (If you direct link PC and device, please use Ethernet cross cable.) To download binary image files to MXM-6410/APC-6410, run tftp server service on your computer and put images in /tftpboot directory. Copy u-boot, kernel zImage and nand.img image to /tftpboot directory. In Linux PC, type [root@localhost]# cp uboot.bin /tftpboot/ 90 MXM-6410/APC-6410 Linux User’s Manual v1.2 [root@localhost]# cp zImage /tftpboot/ And [root@localhost]# cp nand6410.img /tftpboot/ 91 MXM-6410/APC-6410 Linux User’s Manual v1.2 A.2.2.3. Setting up an IP address Setting up an IP address helps in downloading the compiled images to MXM-6410/APC-6410. Connect host PC and MXM-6410/APC-6410 by Ethernet cable. A.2.2.3.1. Setting IP address for host PC On Your Linux Host PC, run the terminal and execute following commands to set up and IP address. [root@localhost tftpboot]# ifconfig eth0 down [root@localhost tftpboot]# ifconfig eth0 192.168.1.10 netmask 255.255.255.0 up [root@localhost tftpboot]# ifconfig Figure A.11 Setting IP address for host PC 92 MXM-6410/APC-6410 Linux User’s Manual v1.2 A.2.2.3.2. Setting IP address for MXM-6410/APC-6410 Run the Minicom first in your host PC and MXM-6410/APC-6410. Please press any key to enter uboot command prompt. Execute the command “printenv”. You can set and add the environment power on parameter of MXM-6410/APC-6410 using “setenv”, “saveenv” command as below. # setenv ipaddr XXX.XXX.XXX.XXX # setenv serverip XXX.XXX.XXX.XXX # saveenv Following shows the example for setting up the parameters. EXAMPLE: ipaddr 192.168.1.121 serverip 192.168.1.2 Note: Make sure that the ipaddr is for MXM-6410/APC-6410 and serverip is for Linux PC are in the same network domain. After you configure the network for Host PC and MXM-6410/APC-6410, the LED of the Ethernet jack will be on. It shows that the network connection has been successfully done. 93 MXM-6410/APC-6410 Linux User’s Manual v1.2 A.2.2.4. Transfer and Write Image by TFTP and “nand write” Command After setting up the tftp server and IP address of devices, users can start transfer and write images using u-boot tftp and nand write command. It is necessary to download to DRAM first before writing to NAND. The following command shows how to transfer u-boot.bin images to DRAM. # tftp 0x 50000000 u-boot.bin Temporary address is base address of DRAM, i.e. 0x50000000. Write the u-boot.bin image to the NAND by using following nand write command. You need to erase first. # nand erase 0x0 0x40000 # nand write 0x50000000 0x0 0x40000 Temporary address is base address of DRAM, i.e. 0x50000000. Start NAND address is 0x0. Image size of bootloader will be below 0x40000 (HEX). Note: Uboot contains specific hardware information and is well configured by Embedian.. It is usually no need to modify. Unless necessary or you are an experienced engineer, it is not recommended to update uboot. Wrong operation will cause the system not booting anymore. Next example shows how to transfer and write Linux kernel. The file name is "zImage". Again, we tftp zImage to DRAM first by the following command. # tftp 50000000 zImage Temporary address is base address of DRAM, i.e. 0x50000000. Write the zImage image to the NAND by using nand write command. The same, you will need to erase first. # nand erase 0x40000 0x1c0000 # nand write 0x50000000 0x40000 0x1c0000 Temporary address is base address of DRAM, i.e. 0x50000000. Start NAND address is 0x40000. Image size of zImage will be below 0x1c0000 (HEX). 94 MXM-6410/APC-6410 Linux User’s Manual v1.2 After writing u-boot and kernel images to NAND flash, the last step is to write NAND root file system nand6410.img image. Repeat the same steps, first, we tftp the nand.img image to DRAM. # tftp 50000000 nand6410.img Temporary address is base address of DRAM, i.e. 0x50000000. Write the nand6410.img image to the NAND by using following nand write command. You still need to erase first. # nand erase 0x200000 0x7e00000 # nand write 0x50000000 0x200000 0x7e00000 Temporary address is base address of DRAM, i.e. 0x50000000. Start NAND address is 0x200000 (40000+1c0000). Image size of NANDFS will be below 0x7e00000 (HEX). Note: The mobile DDR size is 128MB only. If your NANDFS size is big (like Embedian default nand6410.img), you need to use split command in Linux to split the NANDFS into two smaller files, or the uboot will be overwritten in DDR because the execution point of uboot is somewhere in DDR. 95