1
User Manual - NF1002 - NF1004 - NF2000 - 090040787
3. LEVEL 2 MENU
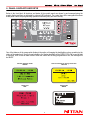
To access LEVEL 2 menu, insert the key supplied with the panel into the plastic lock on the front of the fire panel housing then turn it
and set it to LEVEL 2 position.
Display backlight will turn white and LEVEL 2 menu will be displayed as per following image.
Use ,, ENTER and ESC keys to browse Level 2 Menu.
Level 2 menu starting display:
= ENTER
Menu title
= UP
Submenu title
selected
= DOWN
= ESC
3.1 Disablings
This menu displays lists of zones, devices, and modules that can be disabled, their current status and items
already disabled.
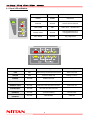
The display below is typical of this menu.
When on the right of an item the "x" symbol appears, it indicates that one (or more) of such item(s) is disabled
(see Output Modules in the example.)
For more details on the item(s) disabled, please enter the relevant submenu using the arrows and ENTER key.
Disablings
ZONE
One (or more) output
module(s) is disabled
Device
Output Modules
X
Sounders.
Panel Outputs
Disablements - ZONE
Go to LEVEL 2 MENU > DISABLEMENTS > ZONE
- A list of zones will display (zones displayed depends on panel model and setup)
- Use (UP) and (DOWN) keys to select the zone(s) to disable.
- To disable the zone selected press ENTER (an ’X’ will appear on the right).
- To re-enable the zone, press ENTER again (the ’X’ on the right will disappear).
- To go back to LEVEL 2 MENU, press ESC twice.
NOTE: when all the addressed devices connected to the same zone are disabled, such ZONE will appear as disabled in the menu above
("x" symbol on the right.) When such zone is re-enabled, all the addressed devices connected to such zone will be re-enabled.
7