1
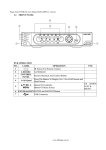
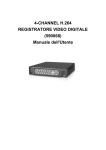
2.2 BACK PANEL
NO.
LABEL
OPERATION
USB Mouse Connector (Only by supplied mouse).
1
2
VIDEO INPUT
Video input with BNC connector.
3
MONITOR OUT
Video output with BNC connector.
4
AUDIO OUT/ IN
Audio output/ input.
5
7
ETHERNET
RS-485/ ALARM/
RELAY
VGA D-SUB OUT
RJ-45 connector for network.
4 pin connector for external control unit, 5 pin connector for
Alarm input and 3 pin connector for relay
Connect to CRT or LCD monitor.
8
POWER
Power switcher: DC 12V 5A / 50-60 Hz input.
6
NOTE: Please plug in the supplied mouse to DVR mouse connector before turn on the
DVR. DO NOT REMOVE and PLUG IN the supplied mouse while DVR is
operating.
2.3 ADVANCED AUTO SWITCH, ZOOM, PTZ, COPY KEY CONTROL & USB
INFORMATION
” keys in the front
AUTO SWITCH : In the split screen mode, use the “QUAD+
panel to enable auto switch function. Moreover, press “
” key
again to disable it.
ZOOM :In the full screen mode, user can use compound key “ ENTER/ COPY ” on the
front panel to perform ZOOM function. Press ▲▼◄►, located on the front
panel, to move the zoom window.
PTZ : When camera supported PTZ function, user can use “
” button on the front
panel to perform PTZ function. Press ▲▼◄► to select and change setup value.
COPY : Within the playback mode, press “ ENTER/ COPY ” button to start backup
record and press “ ENTER/ COPY ” again to end backup. The user can see the
backup image approx. 3 ~5 sec.
9