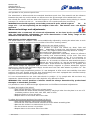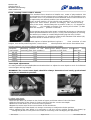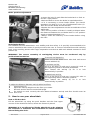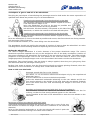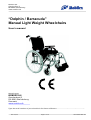
1
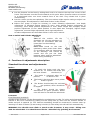
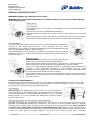
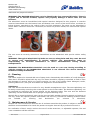
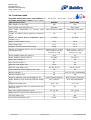
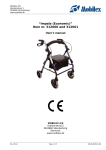
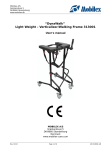
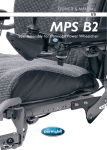
Mobilex A/S
Grønlandsvej 5
DK-8660 Skanderborg
www.mobilex.dk
“Dolphin / Barracuda”
Manual Light Weight Wheelchairs
User's manual
Manufacturer:
MOBILEX A/S
Grønlandsvej 5
DK-8660 Skanderborg
Denmark
www.mobilex.dk
Type the serial number of your wheelchair for future refference: ….......................................................
Rev. 01/13
Page 1 of 19
UM-271840-851-GB
Mobilex A/S
Grønlandsvej 5
DK-8660 Skanderborg
www.mobilex.dk
1. General information
Dear customer,
This user manual contains a description of the medical device and important guidances to ensure a
correct and safe usage of the product. It is important prior to use to read this manual carefully. It is
especially important to read the safety requirements and follow these.
We continuously develop our products and we reserve the right without further notice to change the
specifications and functions of products described in below user's manual.
Observe below symbols attached to each chapter's name. They will help you to define which parts of
this user's manual are dedicated to you.
Pre-sale information: dealers, therapists, physicians.
Service information: technicians, dealers, therapists, services
End user information: users, attendants, therapists
Intended use of the device
The Dolphin/Barracuda manual light weight wheelchair is medical device indicated for use by those
persons with limited motion abilities who are unable to stand, walk and/or seat independently. It
dedicated for transportation and moving of such people in seating position. Users can move with the
wheelchair independently or with a help of attendant, The chair can be used indoor and as well
outdoor on different surfaces (asphalt, concrete, stone, gravel) in good weather conditions. Any
other use is prohibited.
The wheelchair has passed all necessary tests and it is in conformity with following European
Standards: PN-EN 12182:2005; PN-EN 12183:2010; PN-ISO 7176-1,3,5,7,8,15,19; PN-EN 1021-1:2007
It also fulfils all CE requirements imposed by the EEC 93/42 Medical Devices Directive. Upon a correct
usage of the wheelchair we foresee its failure-free work for years.
The sound recording of this user's manual for blind and short sighted persons is available at
manufacturer's office.
In case questions please take contact to your dealer or directly to Mobilex A/S.
Mobilex A/S
Grønlandsvej 5
DK-8660 Skanderborg
Denmark
Phone:
Telefax:
E-Mail:
+45 87 93 22 20
+45 87 93 17 77
[email protected]
2. Safety warnings & requirements
Make sure that this user manual is read by all persons using the device.
Manufacturer doesn’t take any responsibility for damages and/or injuries, caused by the fact
that the user manual has not been followed.
Use the product only in flawless condition.
If defects or errors are detected you must immediately contact the dealer.
Follow the instructions and warnings on all product labels.
Use the product only for the described purpose intended by manufacturer.
Avoid making constructive changes on the device, unless you have the manufacturer’s written
acceptance for such modifications.
The device must only be used on a stable surfaces.
All wheels should be in contact with the floor at ALL TIMES during use. This will ensure the
device is properly balanced and should avoid incidents.
The device must not be loaded with more than 120 kg.
Rev. 01/13
Page 2 of 19
UM-271840-851-GB
Mobilex A/S
Grønlandsvej 5
DK-8660 Skanderborg
www.mobilex.dk
Avoid burnings during usage of the chair in the direct sunlight. Different elements of the
product might become hot.
It is not recommended to use the wheelchair on sand, in mud or in extreme weather
conditions.
The attendant of a wheelchair user should be fully healthy and capable person.
Do not remove by your self any parts or accessories of the wheelchair. It may influence
product's stability and rigidity.
Do not place device near to the sources of heat or fire (fireplaces, ovens, heaters, stoves). It is
not recommended to smoke cigarettes when seated on the device. The wheelchair is not fire
resistant.
Follow below warnings for safe usage of the device:
The BARRACUDA wheelchair is not designed as a seating option for a user in moving vehicles. It is
forbidden to SIT on the BARRACUDA wheelchair in moving vehicles. The BARRACUDA wheelchair
should be safely stowed and secured for the time of it’s transportation. The user should be safely
transferred and seated in safe seating system of the vehicle. There is a great risk of serious incident,
injuries and property damage if above rules are not followed.
The DOLPHIN wheelchair is allowed to be used as a vehicle seating option in moving vehicles (like f.e.
buses, trains, metro etc.) when properly and securely immobilized. For detailed information please
refer to the chapter “Transport recommendations” (page 13).
The design of the wheelchair because of it’s functions include many
moving elements, slots, holes and gaps between device’s parts. There is a
risk of body part trapping during folding, unfolding and adjusting different
elements of the wheelchair. It specially concerns fingers or hands. It is also
possible to have a finger cut by moving parts of the
device. Always be
careful when you adjust or set up a chair to not get your body parts
squeezed and injured.
3. Product Description
The “Dolphin/Barracuda” wheelchair comes with all the typical features like: parking brakes,
detachable footrests, elevable armrests etc. . The device is made from powder coated aluminium
tubing, it is warm to the touch and corrosion resistant. No tools are required for standard assembly.
Wheelchair provides:
A comfortable transportation and storage thanks to it's light aluminium, cross frame structure and
wheels with a quick-release axle, easiness of manoeuvring, easy transfer to - and out of the
wheelchair, the durability and the solidity of the structure. It also offers multiple adjustments. Some
are available as standard feature and some are options.
Devices are supplied in cartons, detached in to few elements for easier transportation:
The standard contents are:
1 Main cross frame with upholstery, armrests & front castors;
2 height adjustable push handles for assistant;
2 detachable footrests with footplates;
2 detachable main 24“ pneumatic wheels with pushrims
2 quick release axles for main wheels
Product label
This is a sample of the product label only (not
original)
The product label is located in the bottom of the
frame
Rev. 01/13
Page 3 of 19
UM-271840-851-GB
Mobilex A/S
Grønlandsvej 5
DK-8660 Skanderborg
www.mobilex.dk
Standard
elements:
1. Push handle –height-adjustable, enabling the
attendant to manoeuvre the wheelchair.
2. Backrest – made of smooth incombustible material,
enabling also easy upholstery cleaning. On
Barracuda itis angle adjustable to 3 different
positions.
3. Armrest – adjustable in height and elevable. It is
used as a comfortable support of forearms. It also
facilitates getting in and out of the wheelchair.
4. Main wheel – Majority of the user's weight rests on
these 24 inches pneumatic wheels. Wheels can be
easily take off, which facilitates the transportation of
the wheelchair.
5. Push rim – Thanks to push rims fastened to main
wheels self propelled drive of the wheelchair is
possible.
WARNING! Do not put fingers between the
wheel and the handrim. It threatens the injury
of the palm.
6. Front wheel – 8 inches turning wheels are installed on rotating forks, which makes
manoeuvring of the wheelchair possible.
7. Cross –thanks to it the wheelchair can be easily folded for transportation and storage.
8. Footplate – User’s feet rest on it. It is possible to lift up the footrest, which can ease getting in
and out of the wheelchair.
9. Footrest – with fixed angle in standard equipment and elevable footrests as option (standard
on Barracuda). The removable footrest is a safe and comfortable support for legs. The footrest
is adjustable in length.
10.Seat – Made in similar way to the backrest.
11.Brake – Pushing of brake lever towards front causes it's activation and protects the
wheelchair against unwanted movement or rolling down the slope.
12. Seat cushion (not shown) – adjustable (by cutting) in depth.
WARNING! Always activate both brakes, if you do not ride the wheelchair.
Options and accessories
Depending on version and order specification, the chair may be equipped in multiple optional
equipment: elevable footrests (standard on Barrcuda), reclining back (only on Barracuda), antitipping supports, headrest, table, spoke protectors etc.
Assembly description
With looking on the picture above the device should be assembled in quite instinctive way. But we
recommend wheelchair to be assembled and set up by professionals before it is delivered to end
user. We recommend to follow below steps:
In first place take all chair’s elements out of the box and check with the list from above if
nothing is missing. If you’d discover at that stage that some part is missing or damaged, do
not continue assembly process. Contact your supplier of the product right away.
Put the push handles in the tube endings on the backrest of the chair. Use attached fixing
knobs or levers to tie push handles in position.
Insert quick release axles in to the holes at the middle of main wheels. To be able to do that
you must press the button at the end of each axle. When axles are inserted the button
should be located on the same side of the wheel as handrim.
Attach wheels to the main frame by pressing the buttons on quick release axles and inserting
the axles in to wheel bushings. Then release the button. The quick release will lock in place
automatically. Try to pull the wheel out of it's socket to check if it is correctly attached. To
detach the main wheels proceed the same way by pressing the button in the middle of the
wheel and pull the wheel out of it's place.
Rev. 01/13
Page 4 of 19
UM-271840-851-GB
Mobilex A/S
Grønlandsvej 5
DK-8660 Skanderborg
www.mobilex.dk
Put the footrests on the frme by sliding their ends in to holes at the top front corners of the
frame. The footrests must be faced outwards at this point. When footrests ends are inserted
in to dedicated holes, turn them towards front of the chair. They should lock in place
automatically.
Put the cushion on the seat upholstery. The new cushion might require cutting to adjust it to
the seat depth. This adjustment is described further in this manual.
Before first usage it might be necesary to make following adjustments: seat depth
adjustment (if standard setting doesn't fit user), main wheels position adjustment (if
necessary), front wheel position adjustment (if main wheel height was changed), break
position adjustment (if rear wheel position or seat depth was changed), legrest length
adjustment, armrest height adjustment, back angle adjustment.
All above adjustments are described further in this user's manual.
How to unfold and fold the wheelchair
To fold:
Take of the cushion. Lift the
footplates up. Lift the upholstery of
the seat (in accordance with the
instructions on the drawing).
To unfold:
Place both hands on the seat
upholstery tubes press them down
(in accordance with the instructions
on the drawing). One should be
careful and not put the hand
between tubes and the wheelchair
frame during unfolding it.
4. Functions & adjustments description
Standard functions and adjustments:
Brakes
To apply the brake push the lever
forward (1). To release the brake pull
the lever toward
the wheel (2).
The brake is activated when set to
position,
as drawn in red.
The brake is inactive when set to psition
as
drawn in green.
The brakes should always be activated
(in
red position) when wheelchair
is stopped
The brakes should be always
deactivated (in green position) before
user will start to ride with the wheelchair.
Footrests
Fixed Footrests (standard)
Standard rigid footrests can be disassembled or pushed away on side. To incline and disassemble the
footrest it has to be unlocked by pulling out the safety-lock (1) then turn the footrest outside or
inside and pull it upwards (2). The footrest assembling should be conducted in reverse order by
inserting it in base of frame (3) and turning it inside (4). The safety-lock will self lock automatically.
WARNING! You should never climb or stand on the footrests, it may cause falling over
with the wheelchair. You should never lift the wheelchair by grabbing the footrests.
Rev. 01/13
Page 5 of 19
UM-271840-851-GB
Mobilex A/S
Grønlandsvej 5
DK-8660 Skanderborg
www.mobilex.dk
Rigid Footrests
Elevable footrests
Footrests are height adjustable. To adjust their length one should release lock lever (5), choose the
height of the footrest and lock the lever. During using the wheelchair outdoor, the footrests must be
placed on height of minimum 4-5cm from the floor.
Elevable footrests (as standard only on Barracuda)
They offer wider range of adjustments of which the most important is ability to choose footrest angle.
Attaching and disassembling of elevable footrests works the same way as on standard ones.
Assembly and disassembly of elevable footrests is the same as on standard ones.
To adjust the legrest angle: press and hold button (1) with your finger, adjust the legrest angle by
moving it up or down (2) with your other hand, release button (1) to lock legrest in desired position.
To adjust calfrest height: release the lock lever (3) and move calfrest up or down to desired position.
Relock the lever (3) to secure the calfrest in desired position.
To adjust the foot plate height: release the lock lever (4) and move footplate up or down to desired
position. Relock the lever (4) to secure the footplate in desired position.
To fold the calfplate away: press the silver button (5) located behind the calfrest, Fold the calfrest to
the back, To open the calfplate back simply push it forward until the “click” sound is heard.
Armrests
The armrests are height-adjustable. To change the
position
one should press the button (1), choose the
height of the
armrest (2) and then tight the screw.
Rev. 01/13
Page 6 of 19
UM-271840-851-GB
Mobilex A/S
Grønlandsvej 5
DK-8660 Skanderborg
www.mobilex.dk
The armrests can be also inclined upwards, which ease getting
in and out of the chair (Fig.4). To unblock the safety-lock (1) one
should press the lever (2) placed on the side of the armrest and
then lift the side panel up (3).
After lowering the armrest and placing it on the guide bar,
the
safety-lock (1) self locks automatically.
How to lift the wheelchair up
Pelvis stabilization
Adjust the position of overlapping part of
fabric (1) for optimal stabilization of the
pelvis. Then secure the overlap in place with
velcro straps located under it.
Backrest with angle adjustement (only on Barracuda)
To adjust the backrest angle
Press and hold the red button (1)
Use the second hand to adjust the backrest to desired angle (2)
Release button (1) to secure backrest in desired position
Repeat above steps on the other side of the backrest
WARNING! Always ensure that the angle of both back tubes is adjusted
to the same positions.
24” pneumatic rear wheels
The wheels on “Dolphin” chair can additionally be easily removed
and fitted in by pressing the quick-release button placed in the
centre of the wheel (1).
24” pneumatic tires are standard on the device. It is recommended
to use wheelchair with above size and type of
wheels, but it is
Rev. 01/13
Page 7 of 19
UM-271840-851-GB
Mobilex A/S
Grønlandsvej 5
DK-8660 Skanderborg
www.mobilex.dk
also possible to use puncture proof tires.
The wheelchair is delivered with the standard aluminium push rims. The material and the distance
between the push rim and the wheel can influence on the grip strength of the wheelchair’s user.
One should be careful and not allow the fingers to get between spokes during driving in narrow
passages. To avoid such risk it is recommended to use a spoke protection (accessory).
WARNING!One should regularly control the pressure in tyres, which ought to
be
in
range of 2 – 2,2 bar depending on the weight of the user. The heavier user – the higher
pressure.
Advanced settings and adjustments
WARNING! We recommend all advanced adjustments to be done by the qualified staff
only. An inappropriate adjustment can cause deterioration of the safety usage of the
wheelchair and decrease its durability.
Main wheels position adjustment
The wheel balance on “Dolphin” chair can be additionally adjusted by moving the wheel axle. In such
case it is necessary to readjust also the position of the front, rotating castors.
To adjust the rear wheel position:
It is possible to adjust rear wheels up, down, forth and
back
depending on wheel size and personal preferences
of a user. The height of wheel assembly allows to modify
the height of the wheelchair’s seat.
The horizontal adjustment (front/back) allows to influence
the stability and maneuverability of the chair. The most
common and neutral position is “B”. If it is necessary to
increase the maneuverability the wheel can be moved to
position “A”. It is easier to maneuver with wheelchair that’s
wheels are set to position ”A”, but the rearwards stability is
much lower. If the wheels are adjusted to “A” position, the
chair should always be equipped with activated anti-tip supports to protect wheelchair against
tipping over. Persons with amputated leg(s) should never use chair with wheels in position “A”. The
risk of tipping over is too high.
For users after leg(s) amputation position “C” was designed. It offer much more stability that other
positions, but even though users like that should always use chair equipped with activated anti-tip
supports to protect wheelchair against tipping over.
It is not recommended to use chair with wheels in position “C” by people who did not have any
amputation. Maneuvering with such chair might be very difficult for them.
WARNING! The correct position of wheels should be always determined by professional
therapist or wheelchair provider.
It is possible to reach 5 different height adjustments and 3 different horizontal adjustments
To adjust the height of the wheel:
• Take off the wheel by using quick release button.
• Disassemble the black wheel assembly plate by untying 4 bolts. Set the plate in to one of 5
available positions (holes 1&2, 2&3, 3&4, 4&5 or 5&6)
• Retie the bolts to secure the plate.
• Repeat above on the other side of the chair.
To adjust the horizontal position of the wheel (A, B or C)
• Take off the wheel by using quick release button.
• Unscrew the silver wheel socket mounted on black wheel assembly plate
• Relocate the socket in to desired hole (A, B or C)
• Tie the socket to secure it in position.
• Repeat above on the other side of the chair.
Rev. 01/13
Page 8 of 19
UM-271840-851-GB
Mobilex A/S
Grønlandsvej 5
DK-8660 Skanderborg
www.mobilex.dk
Front, rotating castors with 8” wheels
The standard front wheels are 200x50 mm, made of polyurethane. We
recommend to stick to above type of wheels, but it is also possible to use
pneumatic tires. It is possible to mount different sizes of front wheels if it
is required by rear wheels position (see sheet below).
If the vertical position of rear wheels was modified it is necessary to
adjust the front castors position accordingly. The vertical turning
axle of the castor should always be in position of 90 (+/- 2°) degrees to
the floor.
It is possible to adjust it by turning the acentric (1) bolt
until the required
position is reached.
If the setting range has to be larger it might be necessary to change the
wheel position between holes (A, B, C, D) by unscrewing bolt (2) moving
the wheel up or down to needed height and tying the bolt (2) back.
In some situations it is needed to replace the standard front wheel (8”)
with the wheel of another size (6” or 7”).
The sheet below presents possible options of wheel positions. It gives a
clear overview of seat
heights, rear wheel positioning holes, correct front
wheel position and correct front wheel size
Correct positions and sizesof wheels depending on required seat height.
Required
Mounting position of rear wheel Front wheel position (hole Correct
front
Seat Height
assembly plate (hole numbers)
symbol on front fork)
wheel size
45 cm
1+2
B
6”
46.3cm
2+3
B
7”
47.7cm
3+4
C
7”
50cm
4+5
C
8”
51.3cm
5+6
D
8”
Seat depth adjustement
It is also possible on the Dolphin/Barracuda wheelchair to adjust the seat depth to set it for individual
users heights and leg lengths.
WARNING! The correct seat depth should be always determined and set by professional
therapist or wheelchair provider.
To adjust seat depth:
• Unscrew the bolts (1) located on the inside of upper and lower tubes of the side frame.
• Slide the front part of the frame (2) forth or back to find the correct seat depth.
• Redo and tie the bolts (1) to secure the frame position.
• Repeat the same steps on the second side of the wheelchair.
• After readjusting the seat depth it is always necessary to readjust the brake position.
• After adjusting the seat depth it is necessary to set the correct cushion length (not shown) by
cutting the portion of rear part of the foam (if necessary) and overlapping the upholstery.
Rev. 01/13
Page 9 of 19
UM-271840-851-GB
Mobilex A/S
Grønlandsvej 5
DK-8660 Skanderborg
www.mobilex.dk
Brake position adjustment
• Loosen the bolt (1) and slide the brake back or forth to
find the right position
• Retie the bolt to secure the brake in required position
• If it is necessary to move brake further you should
reposition the bolt (1) in to one of adjustment holes (2).
Then fine set the brake and tie the bolt.
• Repeat the same adjustments on the second brake of the
wheelchair.
• The correct position of brake is usually achieved when
the distance between tire and brake block in “off” position
equals to approximately0,5 cm.
• Always check the efficiency of the brakes before using
the chair.
Anti-tipping device
This element increase wheelchair's rear stability and thus safety. It is specially recommended to be
used on whelchairs with center of gravity moved to the rear. It concerns all wheelchars with reclining
back, chairs used by persons after leg(s) amputation and devices with main wheels mounted in front
position (A).
WARNING! The correct assembly of anti-tipping device must be conducted only by
proffessional technician.
To mount anti-tip device:
insert it in to the lower frame tube hole and secure
it’s end with bolt (1)
To activate anti-tip:
pull it to the back (2) and turn it around it’s axle so
the supporting wheel is directed downwards.
Then release the anti-tip (3) for it to lock
automatically in position.
To deactivate anti-tip:
pull it to the back (2) and turn it around it’s axle so
the supporting wheel is directed upwards.
Then release the antitip (3) for it to lock
automatically in position.
To adjust the distance between anti-tip wheel and floor:
Unscrew bolt (4)
adjust the anti-tip height over the floor up or down
Put back and tie the bolt on desired height
For anti-tip to work correctly the safe distance between anti-tip and floor should never be
more than 4 cm.
5.
How to use your wheelchair
How to lift the chair
Lift the wheelchair up using the push handles and the front upper
corners of the wheelchair frame, where the footrest is placed.
WARNING! It is not allowed to lift the wheelchair up by gripping
the footrests or armrests! We recommend to detach footrests
before lifting the chair.
Rev. 01/13
Page 10 of 19
UM-271840-851-GB
Mobilex A/S
Grønlandsvej 5
DK-8660 Skanderborg
www.mobilex.dk
Techniques to get on and off of the wheelchair
Teaching the techniques of transferring the passenger must be hold under the exact supervision of
qualified staff. Below we present only our recommendations.
Transferring the passenger from the wheelchair to the bed
The passenger should face the bed without regard on the fact
if the other person helps or not.
Drive the wheelchair as close to the bed as possible and
ensure, that front wheels are facing towards.
Pull the brake, lift the armrests / side panels on his side of the
wheelchair, on which the transfer to the bed will take place.
Transferring the passenger from the bed to the wheelchair
The passenger should face the bed without regard on the fact
if the other person helps or not.
Drive the wheelchair as close to the bed as possible and ensure, that front wheels are facing towards
Pull the brake, lift the footrests.
Do not climb the footrests, it can cause falling over the wheelchair.
The attendants should use mainly the strength of muscles of legs to draw the wheelchair on stairs
avoiding the excessive bending down and impairing the muscles of backs.
Riding the wheelchair
The correct weight distribution is a basic element of the proper wheelchair usage. The correct
wheelchair operation depends not only on the weight but also on the body constitution, position of
the person seating on the wheelchair and location of the rear wheels of the chair. The larger weight
proportion of the passenger rests on the rear wheels of the chair the easier to drive it. The larger
weight proportion of the passenger rests on the front wheels the harder to drive the wheelchair.
Attendants: They should ensure, that the brake is always applied, when they are going away from
the wheelchair with the passenger seating on it.
Parking: One ought to ensure, that the front turning wheels are always pointing forwards, when the
wheelchair is not in movement, to enlarge their contact with the base.
How to ride over the kerb?
Passenger turned with face to the obstacle
(We advise, to use the below mentioned technique only by the experienced
wheelchair users.)
Drive the wheelchair as close to the kerb as possible
Incline the wheelchair backwards balancing on the rear wheels and lift the
front turning wheels to the height of the kerb. Push the rear wheels forwards
and in the same time lean over transferring the weight to the front of the
wheelchair.
Attendant and passenger turned with their faces to the obstacle
The attendant inclines the wheelchair backwards with use of the bar for
inclining, so that the front turning wheels appear on the side-walk.
Use the handles at the back of the wheelchair to enter the rear wheels on the
side-walk.
Passenger turned to the obstacle with their backs
(The below mentioned technique will give the results only in case of the very
low obstacle and when the height of the footrests is sufficient to not make the
obstacle.)
Drive to the obstacle backwards so as the rear wheels will touch it push the
rear wheels backwards leaning in the same time forwards.
Rev. 01/13
Page 11 of 19
UM-271840-851-GB
Mobilex A/S
Grønlandsvej 5
DK-8660 Skanderborg
www.mobilex.dk
Attendant and passenger turned to the obstacle with their backs
Drive to the obstacle backwards so as the rear wheels will touch it
incline the wheelchair backwards with use of the bar for inclining to come the
front turning wheels off the base
pull the wheelchair on the side-walk with use of the handles, then turn it
forwards ensuring, that the front wheels overcame the obstacle
How to ride down the kerb?
Passenger turned ahead to the obstacle’s edge
(We advise, to use the below mentioned technique only by the experienced
wheelchair users.)
Drive the wheelchair as close as possible to the kerb being the edge of the sidewalk.
Balance the wheelchair on the rear wheels allowing the front turning wheels to
come off the base as much as it is necessary.
Drive out of the side-walk very slowly and carefully lowering the front turning
wheels on the base.
Attendant and passenger turned ahead to the obstacle’s edge
Incline the wheelchair backwards with use of the incline bar allowing the front
turning wheels to come off the base as much as it is necessary.
Drive the wheelchair slowly out of the side-walk and carefully lower the front
turning wheels on the base.
Passenger turned to the obstacle’s edge with back
(We do not recommend to use this technique for driving out of the side-walk
higher then 10cm.)
Drive the wheelchair as close as possible to the edge of the side-walk.
Drive out of the side-walk very slowly leaning in the same time forwards.
WARNING! This operation can be dangerous, it can cause the
wheelchair to tip over.
Attendant and passenger turned to the obstacle’s edge with back
Drive the wheelchair backwards as close as possible to the edge of the sidewalk.
Drive out of the side-walk very slowly and pull the wheelchair on the rear
wheels until the front turning wheels go out of the side-walk and lower them on
the base.
Overcoming slopes
Please follow below instructions during overcoming the slopes:
Avoid the direction changes during riding on the slope.
Try to ride along the straight line on the slope. Do not turn sideways.
If necessary do not hesitate to ask for help to avoid an unnecessary risk.
When riding up the slope lean forwards to transfer the centre of gravity to the
front and to make the wheelchair more stable.
When riding down the slope lean backwards to transfer the centre of gravity to
the back and to make the wheelchair more stable
Control the speed by using the rear wheels' hand-rims and not by applying the
brakes.
Rev. 01/13
Page 12 of 19
UM-271840-851-GB
Mobilex A/S
Grønlandsvej 5
DK-8660 Skanderborg
www.mobilex.dk
Climbing up and down the stairs
WARNING! Always ask other persons for help.
WARNING! Do not ride the wheelchair on escalators either on your own nor with the help
of the other person
Up the stairs:
One attendant:
Push the wheelchair to the stairs close enough to touch the first step with the
rear wheels.
Use the bar to incline the wheelchair backwards.
Pull the wheelchair slowly up the stairs, step by step, balancing on the rear
wheels.
After overcoming the last step pull the wheelchair until the front turning.
wheels will be situated entirely on the storey and lower them on the base.
Two attendants:
If there are two attendants, the second one can help pulling the wheelchair by
carrying it with motionless footrests. If the footrests are not fitted.
motionlessly, they ought to be disassembled and the second attendant should
carry the wheelchair holding it with the frame.
The attendants should use mainly the strength of muscles of legs to draw the
wheelchair on stairs avoiding the excessive bending down and impairing the
muscles of backs.
Down the stairs:
Push the wheelchair to the stairs’ edge as close as possible.
Use the bar to incline the wheelchair backwards.
Pull the wheelchair slowly down the stairs, step by step, on the rear wheels.
After overcoming the last step lower the wheelchair on the all wheels.
If there are two attendants, the second one can help pulling the wheelchair by
carrying it with motionless footrests. If the footrests are not fitted
motionlessly, they ought to be disassembled and the second attendant should
carry the wheelchair holding it with the frame.
The attendants should use mainly the strength of muscles of legs to draw the
wheelchair on stairs avoiding the excessive bending down and impairing the
muscles of backs.
Transport recommendations
The wheelchair is quite easy to transport. It can be folded and disassembled to reduce it's size and
weight of single parts. It is possible to detach rear wheels, footrests and fold the chair's cross frame
very easily, in the way that was described previously
Car transport
Fold and place the wheelchair in the car trunk. If, for some reason, it
is not possible, put the folded wheelchair between the front and the
rear seats inside the car ensuring that the wheelchair is in a sure and
stable position. If it is not possible the wheelchair should be fasten
with the safety belt.
Using the wheelchair as a “car seat” in moving vehicles
DOLPHIN wheelchair has successfully passed the crash tests and it conforms to ISO 7276-19:2007
standard. The DOLPHIN wheelchair is allowed to be used as a vehicle seating option in moving
vehicles (like f.e. buses, trains, metro etc.) when properly & securely immobilized. It can be used as
a vehicle seat when fitted in the face forward direction only. Both the user and the device
must be correctly immobilized in accordance with relevant European Standards when the wheelchair
is used as a seat option in moving vehicles. The function can safely be used only in specially
Rev. 01/13
Page 13 of 19
UM-271840-851-GB
Mobilex A/S
Grønlandsvej 5
DK-8660 Skanderborg
www.mobilex.dk
dedicated and prepared vehicles.
WARNING! The DOLPHIN wheelchair can’t be fitted in the face rearward direction. There is
a great risk of serious incident, injuries and property damage if above rules are not
followed.
The wheelchair must be immobilized with special restrains designed for this purpose. 4 restrains
must be intertwined over the bottom front and bottom rear corners of the main frame, as shown on
below pictures, attached to the vehicle’s floor and fully tightened. The spots on the wheelchair’s
frame where restrains should be conducted (as shown on picture below) are marked with special
labels.
The user must be securely seated and immobilized on the wheelchair with special vehicle safety
belts.
WARNING: The typical wheelchair hip belts are not car safety belts and they can’t be used
as secure user immobilization in moving vehicles. The manufacturer takes no
responsibility for incorrect wheelchair's or user's immobilization during vehicle
transportation.
WARNING! The BARRACUDA wheelchair can't be used as a car seat. During travelling in
vehicles seating on the BARRACUDA wheelchair is not allowed. The device should be
folded and safely immobilized.
6. Cleaning
Frame
The frame ought to be cleaned with use of damp cloth, alternatively with addition of a soft detergent.
After that it should be wiped with dry rag. The frame should be regularly controlled, to find on time
the damages of varnish, which my cause corrosion. In case of any visible frame damages (cracks,
painting defects etc.) ask your local dealer for diagnostics and maintenance.
Upholstery
The seat and the backrest are made of a very durable strengthened nylon. The seat upholstery can
be easily removed by removing the screws placed on the frame tubes. The backrest upholstery can
be removed by removing the screws placed on the backrest tubes. The seat and the backrest
upholstery can be washed with use of sponge and gentle washing soap.
Normal dirt on metal and plastic parts can be removed with standard cleaning agents and sponge or
soft rag. Check the specific product information and use only commercial cleaning products which
are
suitable
for
cleaning
and
disinfection
(no
solvents
or
abrasives).
7.
Maintenance & Service
Despite the solid construction and the use of resistant materials the product is subject to wear. It is
therefore recommended to let check the product at regular intervals by a professional service.
For realization of basic service actions the set of socket wrenches, or adjustable spanner, flat and
cross screwdriver will be sufficient.
Rev. 01/13
Page 14 of 19
UM-271840-851-GB
Mobilex A/S
Grønlandsvej 5
DK-8660 Skanderborg
www.mobilex.dk
Parts, which should be regularly inspected:
Part name
Control type
Control frequency
Tires
Tire pressure (2,0-2,2 bar), condition of tread and tires. One At least once a week
should take care, to keep the pressure in both tires on the
same level. Harder tires provide better manoeuvrability of
the wheelchair and easiness of driving, but they reduce the
comfort on bumpy surface.
Spokes
Loose spokes can cause deformation of the rear wheels. If the problem occurs
Contact your dealer or local bicycle service to manage the
problem of loose spokes.
Wheel axles
Remove the hair or accumulated dirt
Push Rims
Excessively scratched push rims ought to be exchanged If necessary
because they can wound the user’s hands during riding the
wheelchair
Brakes
The braking force depends on the tyre pressure. The Control the correctness
efficiency of brake operation can be also affected with dirt of brake operation at
accumulated on tyres. Keep the brakes clean wiping them least once a week
with a damp cloth to remove dirt, and also lubricating the
funnel of screws, on which the brake levers turn.
Frame
Keep the wheelchair clean for better comfort of the user.
At least once a month,
depending on usage
conditions
Turning
wheels
The area between the fork and the front wheel should be
kept clean, because of dirt accumulating there, which can
cause faster wear of turning wheel bearings. To do so, one
should disassemble the front wheel by unscrewing it from
the fork, remove all dirt, and then preserve the metal
elements of the wheel (i.e. technical grease).
The maintenance ought
to be made once a
month or more often
depending on usual
surface
type
&
conditions
Detachable
elements
Check condition of detachable elements of the wheelchair, if In case of intensive
screws are loosen they should be tighten.
exploitation
of
the
wheelchair
the
inspection should be
carry
out
once
a
month.
If necessary
Quick-release One should clean and then lubricate lightly the quick- Lubricating should be
axles of the release axles of the rear wheels. The slots where the quick- carried out periodically.
rear wheels
release axles inserted ought to be cleaned up from all dirt
with dry cloth. The wheel should be laid on the base, resting
on the push rim (never opposite way, because the quickrelease axle can catch dirt from surface, which can cause
it's seizing in the main axle socket. In case of solid particles
occurring on the surface of the quick-release axle, usage of
such axle is not allowed.
Most common problems and solutions
If you notice any irregularities in the wheelchair working you cannot use it. You should contact the
local point of sale or service department of the wheelchair supplier. The manufacturer does not
guarantee correctness of the wheelchair operation, if the parts applied in it are not original.
Symptoms
The
wheelchair
seems to tilt on one
side
Rev. 01/13
Possible cause
What to do?
One of the rear tyres might be
Inflate tires (2,0-2,2 bar).
inflated more then the other
Check position & fastening of the front
one.
turning wheels
Page 15 of 19
UM-271840-851-GB
Mobilex A/S
Grønlandsvej 5
DK-8660 Skanderborg
www.mobilex.dk
The angles of 2 front castors
Check displacement of the wheelchair
are not adjusted to the same mass
position.
The wheelchair
hard to push
is
Low air pressure in tires.
Inflate tires(2,0-2,2 bar).
Wrong angle of front wheels
Check position fastening of the front
vertical axles.
turning wheels.
Front wheels axles are dirty.
Remove dirt or entangled hair from the
Too large load applied on the front turning wheels axles.
front turning wheels.
Move the centre of gravity.
The wheelchair
hard to turn
is
Low air pressure in tires.
The front wheels horizontal
axles are tied to strong
Front wheels axles are dirty.
Inflate tires (2,0-2,2 bar).
Check front wheel axles and loosen
them if necessary.
Remove dirt or entangled hair from the
front turning wheels
Brakes
are
not
working correctly
Low air pressure in tires.
The position of brakes
adjusted incorrectly.
Inflate tires (2,0-2,2 bar).
Adjust the distance between the brake
and tires.
It is hard to fold and
unfold
the
wheelchair
The upholstery fitted to tight.
The frame cross hinge is dirty.
Loosen screws which hold upholstery
and retie them.
Clean up and lubricate the cross hinge.
The wheelchair
not stable
Low air pressure in tires.
The elements of wheelchair
aren't rigid and tight.
The wheelchair is incorrectly
fitted for the user.
Inflate tires (2,0-2,2 bar).
Ensure, that all screws and nuts are
tightened.
Ensure, the wheelchair is properly
adapted for the user. If needed, redjust
elements of wheelchair.
Possible puncture of tube & tire
Tire and tube are worn down.
Contact your nearest wheelchair dealer
or bicycle service to repair or replace
broken tubes and tires
Flat tires
is
is
Defects, which detection lies in the user’s duty:
– Bearing slackness in the front and rear wheels, and also in the front forks;
– The tension degree of spokes and alignment of the rear wheels;
– Defects and the wear status of the tires;
– Defects of the turning wheels;
– Mechanical defects and the wear status of the upholstery;
– Defects of brakes;
– Defects of the cross mechanism;
– Defects of the footrests & armrests;
– Defects of the push handles;
– Defects of the quick-release axles of the rear wheels;
– Defects of the anti-tipping protectors;
List of elements provided for an independent easy service
additional safety belt, armrests, footrests, turning wheels, the seat and backrest upholstery, rear
wheels, brakes, push handles, quick-release axles of the rear wheels, anti-tipping protections.
Parts, which can be easily disassembled and sent to a producer's service
Footrests, turning wheels, seat and backrest upholstery, rear wheels, brakes, armrests, rubber pads
of push handles, quick-release axles of the rear wheels, anti-tipping protectors, headrest.
Service actions executed by the authorized producer's service
WARNING! attempt of an independent repair of following elements can cause the loss
the guarantee
Rev. 01/13
Page 16 of 19
of
UM-271840-851-GB
Mobilex A/S
Grønlandsvej 5
DK-8660 Skanderborg
www.mobilex.dk
Exchange of bearings of the front and rear wheels, exchange and repair of parts of the cross
mechanism, repair of component parts of main frame.
Authorized services
For authorized repair you should contact the dealer, where product was purchased or directly
manufacturer.
The procedure of sending the wheelchair or its parts to the service
To accomplish the repair of the wheelchair one should contact directly the producer’s service or the
local seller. The wheelchair or its parts ought to be sent in a package protecting against incidental
transportation damages. The best solution is to keep the original packaging. The dispatch ought to
be organized through the transporting company indicated by the manufacturer.
Storage
Store device in dry place, where temperature is not freezing. The chair can be folded to reduce space
needed for storage. You can also detach some elements to save even more room. Freezing
temperatures or humidity may cause damages on tires, fabric, axles, bearings and other elements of
the product. To protect tires against deformation during long period of storage you can place wood
bricks or other supports under the frame. It is also recommended to cover chair from dust and dirt.
List of basic spare parts
24” main wheels, push rims, bearings of main and turning wheels, rubber pads of push handles,
brakes: left and right, pads of armrests, footrests and footplates, structure of armrests, structure of
footrests, seat and backrest upholstery, quick-release axles of the rear wheels, anti-tipping
protectors, headrests, cushions
Disposal & recycling of the product
The product can not be disposed with household waste but must be brought to the local recycling
centre.
8. Guarantee terms
Guarantee information
The manufacturer covers the product with 24 months guarantee from the purchase date.
During that period all material or parts defects, caused by manufacturing faults or usage of
improper materials will be repaired or replaced free of charge.
Damages of tires, upholstery and spokes caused by wear in time of exploitation are not
covered by the guarantee. The other parts of the wheelchair, which undergo the normal wear
during the exploitation are not covered by the guarantee either.
All mechanical defects and damages caused by improper use ore usage not intended by
manufacturer are not covered by the guarantee.
Not authorized changes and modifications of the wheelchair will cause the loss of the
guarantee.
If any defects or damages occur, one should immediately inform the supplier about that fact.
Range of responsibility
The guarantee does not cover transport cost.
The guarantee does not cover injury or other damages eventually related to a malfunction of
this product.
The guarantee does not cover the loss, which rise in consequence of impossibility of using of
the product, when faults are being removed.
The manufacturer does not bear the responsibility for damages caused as the result of an
inappropriate or incorrect understanding of this user's manual.
Wheelchair modifications & additionally installed elements
This definition refers to any wheelchair, which was modified and which differs from details given in
this manual or if additional elements, not supplied by the manufacturer, are fixed on the product. If
the device was modified in above way by the user without manufacturer's written authorization, it is
no more compliant with the CE essential requirements and it is not covered by the guarantee.
If you have any questions or doubts in the matter of modifications, please contact the Manufacturer
Rev. 01/13
Page 17 of 19
UM-271840-851-GB
Mobilex A/S
Grønlandsvej 5
DK-8660 Skanderborg
www.mobilex.dk
before you will take any action.
9. Declaration of Conformity (CE declaration)
The company Mobilex A/S, Grønlandsvej ,58660 Skanderborg, Denmark declares that the medical
devices:
“Dolphin / Barracuda” Manual Light Weight Wheelchairs
are designed and produced in accordance with the technical documentation which fully conforms to
the following essential requirements:
EU Council Directive 93/42/EEC for medical equipment
Annex I of the June 14, 1993
During design, testing and production procedures following harmonized standards were used:
EN 12182; PN-EN 12183; PN-ISO 7176-1,3,5,7,8,15,19; PN-EN 1021-1
Lars Nygaard
Managing Director
Mobilex A/S
Skanderborg, the 2011-09-06
Rev. 01/13
................................................
signature
Page 18 of 19
UM-271840-851-GB
Mobilex A/S
Grønlandsvej 5
DK-8660 Skanderborg
www.mobilex.dk
10. Technical data
Available wheelchair sizes (seat widths): 14” - 36 cm; 16” - 40 cm; 18” - 45 cm; 20” - 50 cm
Available wheelchair colours: Silver metallic
Specification Chart
Dolphin
Barracuda
Max weight of a user (kg)
150
120
104-110
99,5-105,5
Total width (depending on chosen) seat
width (cm)
54,6; 58,6; 63,6; 68,6
54,6; 58,6; 63,6; 68,6
Length of folded device (without footrests)
(cm)
76
76
Height of folded device (adjustable push
handles) (cm)
97-106
97-106
Width of folded device (cm)
30,5
30,5
Total weight (kg)
17,7
23,1
Weight of the heaviest element (kg)
11kg
14,2
Legrests (fixed)- 2x1 kg
Rear wheels- 2x2 kg
Cushion- 0,7 kg
Legrests (elev.)- 2x2,1 kg
Rear wheels- 2x2 kg
Cushion- 0,7 kg
15,5
15
9,5-16,5
10,0-17,0
Side static stability (°)
16
16
Seat surface angle (°)
8,7
8,7
Effective seat depth (cm)
50,5
51
Effective seat width (cm)
36, 40, 45, 50
36, 40, 45, 50
Seat height from front edge to floor (cm)
56
56
Backrest angle (°)
12
12,5; 25; 35,5 (adjustable)
Backrest height (cm)
38
38
35-51 (fixed footrests)
36,5-52 (elev. footrests)
107,5 (fixed)
87,5-182 (adjustable)
17,5 – 26
17,5 – 26
26
26
24 x 1 3/8
24 x 1 3/8
5
5
75
69
20x5
20x5
Total length with footrests (cm)
Weight of elements which can be detached
for transport (kg)
Static stability down the slope (°)
Static stability up the slope (°)
Distance between seat and footplate (cm)
Angle between seat and legs (legrest angle)
(°)
Height of armrest (cm)
Distance between front of armrest and the
backrest (cm)
Rear main wheels diameter (inch.)
Displacement of horizontal wheel axles (cm)
Turning radius (cm)
Front wheels diameter (cm)
Rev. 01/13
Page 19 of 19
UM-271840-851-GB