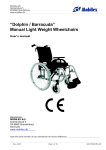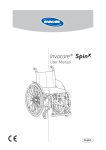
1
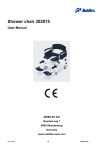
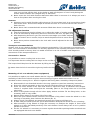
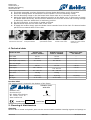
Mobilex A/S Grønlandsvej 5 DK-8660 Skanderborg www.mobilex.dk “Kakadu” Shower Chair with tilt item nr. 302024, 302025 User's manual With manual for optional 24“ wheels MOBILEX A/S Grønlandsvej 5 DK-8660 Skanderborg Denmark www.mobilex.dk Rev. 11.15 Side 1 af 7 UM-302024-25-GB Mobilex A/S Grønlandsvej 5 DK-8660 Skanderborg www.mobilex.dk 1. General information Dear customer, This user manual contains a description of the medical device and important guidances to ensure a correct and safe usage of the product. It is important prior to use to read this manual carefully. It is especially important to read the safety requirements and follow these. We continuously develop our products and we reserve the right without further notice to change the specifications and functions of products. Intended use of the device The Mobilex Product is a medical device which is intended to be used only as seating support by individuals who require such help during bathing, showering and defecating. It is also a transport option intended to move patients from and to bathrooms/toilets. The device serves a fundamental human needs and life of both - physically challenged user and the assistant - can be much easier. The device should only be used as indoor only. It can maximally be loaded with 130 kg. Any other use is prohibited By questions please take contact to your dealer or directly to Mobilex A/S. Mobilex A/S Grønlandsvej 5 DK-8660 Skanderborg Denmark Phone: +45 87 93 22 20 Fax: +45 87 93 17 77 E-Mail: [email protected] 2. Safety requirements ● ● ● ● ● ● ● ● ● ● ● ● Make sure that this user manual is read by all persons using the device. Manufacturer doesn’t take any responsibility for damages and/or injuries, caused by the fact that the user manual has not been followed. Only use the product in flawless condition. If defects or errors are detected you must immediately contact the dealer. Follow the information on the product label. Only use the product for the described purpose. Avoid making constructive changes on the device, unless you have the manufacturer’s written acceptance for such modifications. During different adjustments which are possible on the device the user must take care not to squeeze the fingers or other body parts between two moving elements of the device The device must only be used on a stable surface. All wheels MUST be in contact with the floor at ALL TIMES during use. This will ensure the device is properly balanced and should avoid accidents. When using the device in a stationary position, the brakes MUST be locked. The device must not be loaded with more than 130 kg. The device is dedicated to be used indoor & on flat surfaces only. WARNING! Because of the seat tilting function the device has a specially designed front frame. Do NOT lean forward too far and do not sit on the edge of the seat pad with your feet placed on the footrests. By moving the centre of gravity too much to the front with all your weight located on the chair’s front frame, you may cause the device to tip over to the front. It may result in property damage or injury. If you want to lean forward to reach some objects, or if you want to move your body to the seat’s front edge because of a transfer, ALWAYS put your feet on the floor first, so that a part of your body weight is taken away from the device. The brakes must always be engaged in such a situation Rev. 11.15 Side 2 af 7 UM-302024-25-GB Mobilex A/S Grønlandsvej 5 DK-8660 Skanderborg www.mobilex.dk 3. Description Product description The “Kakadu” comes with all the standard features of the regular shower chair: excrement's bucket, parking brakes, detachable footrests, elevable armrests etc. It is designed for individuals who require seating support when bathing or showering. Made from powder coated steel tubing it is warm to the touch and corrosion resistant. No tools are required for assembly. Product is equipped with headrest tilt function that allows to adjust the seat angle. This function can be very helpful during washing of some patients. Devices are supplied in cartons, detached in to few elements for easier transportation: The contents are: 1 Main Frame with seat 1 detachable Back Frame with armrests 1 detachable Headrest 2 detachable Footrests 4 detachable Wheel assemblies consisting of wheel, brake and vertical assembly tube. 4 bolts and 4 nuts for wheel assembly 1 defecation bucket 1 PU cover for seat’s middle hole 1 User manual Headrest with height and depth adjustment bolts Seat tilt adjustment levers Soft PU back Elevable armrest Back frame’s assembly/disassembly tightening bolt Swing away, detachable legrest and it’s locking mechanism Soft PU seat with detachable middle part for defecation Legrest’s length adjustment bolt Detachable excrement bucket Elevable Footplate Wheel with pedal brake Assembly description With looking on the picture above the device should be assembled in quite instinctive way. We recommend you to follow below steps: Start control ● In the first place take all chair’s elements out of the box and check with the list from above if nothing is missing. If you’d discover at that stage that some part is missing or damaged, do not continue assembly process. Contact your supplier of the product right away. Main frame ● Put the main frame upside down on the floor. You’ll see four holes at the ends of vertical Rev. 11.15 Side 3 af 7 UM-302024-25-GB Mobilex A/S Grønlandsvej 5 DK-8660 Skanderborg www.mobilex.dk frame tubes. Wheels ● Insert wheel's assembly tube in to each frame bottom ending. ● There are 2 holes (A & B) drilled in both: chair's frame and in each wheel's assembly tube (as shown on the picture) . ● Adjust the wheel's vertical tube to the position, where one of its holes would match one of the holes on the frame. Thanks to this solution it is possible to set the seat height of the chair to 3 different heights (in 2,5 cm steps). ● When required position is reached insert the fixing bolt through all the holes and tie it with the nut from the opposite side of the tube. Always adjust all 4 wheels to the same height. ● Check if all wheels are locked correctly by pulling them upwards. They should not be able to slide out or shake. Brakes ● Now turn the main frame around in to it’s correct position so it would stand on wheels. ● Before further assembly lock all wheel brakes, in order for the device not to move. ● To engage the brakes step down with your toes on the pedals attached to the rear part of each wheel until they are locked. To disengage the brakes pull up the pedals with your toes until they will unlock. - Never leave chair without breaks engaged when there is someone sitting in it! - Always engage brakes by entering or leaving the chair! - You should always engage the breaks when you don’t plan to move the chair! Backrest ● Now slide back frame tubes’ endings in to two assembly holes located in the rear, top part of main frame. ● Tighten the bolts on both sides of the frame, so the back is stable and rigid. Headrest ● Put headrest’s vertical bar in to the clamp located at the top middle of the back. ● Tighten the bolt located at the clamp when headrest is adjusted to required height, so the vertical bar won’t move up or down. Toilet bucket ● Put the lid on the bucket (pic. 1) ● Slide it in to the rails located under the seat. You should do it from the back towards the front of the chair (Pic. 2) ● When bucket is in the place cover the seat’s middle hole with the PU cover (Pic. 3) Pic. 1 Pic. 2 Pic. 3 Footrests ● Now you can attach the footrests. ● Put the footrest’s top end in to the hole located at the top, front end of the main frame. The footrest should be directed outwards at that point. ● Now turn the footrest in until it will lock in its front position. ● Repeat the same procedure for second footrest. ● To unlock and detach the footrest press the locking lever, turn the footrest outwards and then pull it up, of the chair. Above function together with elevable footplates helps to transfer the Rev. 11.15 Side 4 af 7 UM-302024-25-GB Mobilex A/S Grønlandsvej 5 DK-8660 Skanderborg www.mobilex.dk ● user in to and out off the chair. It also helps to wash all the parts of user’s body during the shower when footrests are swinged away or detached. Never move the chair with footrests detached when there is someone in it. Always put user’s feet on foot plates when moving the chair Armrest ● Armrests can be easily lifted by pulling them up. To move them back in to low position simply push them down. This function helps to transfer the user in to and out off the chair and to wash the user. ● Never leave chair unattended with armrests lifted when there is someone in it. Tilt adjustment function ● Seat tilt adjustment function allows you to adjust the angle of seating position -5 to +25°. ● It can be activated by depressing the levers located in the rear, top part of the back. ● After depressing the levers you can move the seat angle up or down. Adjusting of seating angle increases user’s comfort, helps to wash the patient and to move user in or out of the chair. ● Never leave patient unattended in the chair with seat tilt adjusted to the max front or rear tilt position. Transport recommendations Shower chair is not a device designed for frequent transportation. If it is necessary to transport the chair, we recommend to disassemble it in the way opposite to the assembly description from above. Chair should packed in the way that it is stable and there is no risk of sudden and dangerous movements of the transported device. Accessories - Extras It is possible to mount a safety belt on the chair. It is important that the safety belt has loops at the end like the mobilex belt item no. 233012 The loops should be placed at the backrest by lifting the backrest like at Pic. 6 Be aware that the belt is turned the right way before the backrest is put back into position like in Pic. 7 Mounting of 24" rear wheels (extra equipment) Pic. 6: Open backrest Pic. 7: Belt mounted It is possible to replace rear small wheels with 24” big rear wheels with push-rims for self propelling. Assembly of this kind of wheels requires also mounting of typical wheelchair brakes. It is all included in the accessory kit no. 302023. together with fixing bolts, assembly clamps and plates ● ● ● ● ● ● ● ● ● ● Disassemble 2 rear Standard wheels in the way opposite to previous assembly instructions. Fit the 24“ wheels assembly to the rear vertical side-frame tube (as shown on picture 8). There are holes drilled in the tube that allow to adjust the chair to different seat heights. Choose 2 required holes and adjust the assembly plate so it's fixing holes are in line with tube holes. Insert 2 fixing bolts through all the holes. Apply washer and Nut. Tie the fixing bolts, so the assembly plate is very stable. Repeat above steps for the other side of the chair Press the quick release button located in the middle of big wheel. Insert the wheel in to the housing on assembly plate. Release the button (Pic. 9) Always check if the wheels are attached correctly by trying to pull them out. To take away the wheel press the quick release button and pull the wheel out of it's housing. After assembly of big wheels it might be necessary to readjust the height of front small wheels as it was described previously. The main bottom frame always has to be in position parallel to the floor. For the 24” wheels it is necessary to mount regular wheelchairs parking brakes as wheels are not equipped with their own brakes. Rev. 11.15 Side 5 af 7 UM-302024-25-GB Mobilex A/S Grønlandsvej 5 DK-8660 Skanderborg www.mobilex.dk ● ● ● ● ● ● ● The brake assembly consists of Mounting Clamp, Brake Mechanism and 2 fixing bolts. Insert the Sliding Profile of the Brake in to the smaller cut out of Mounting clamp. Put the Mounting clamp on the horizontal side frame tube as it is shown on picture 11. Move the sliding profile to find the optimum position of the brake, so it is quite easy to apply the brake when necessary, but the friction between tire and the friction rod is strong enough to efficiently hold the wheelchair in stationary position. Tie the fixing bolts, so the brake is stable and fixed. Repeat those steps for the other side of the chair. To apply the brakes simply push the Brake Lever towards front of the chair. To release brakes pull the lever towards back of the chair. Pic. 8: Wheel assembly mounted on the frame Pic. 9: The 24" wheel with quickrelease Pic. 10: Coping for quickrelease bottom Pic. 11: Mounting of brakes to the frame. Pic. 12: Check that the brakes is in firm contact with the tyre. 4. Technical data Kakadu Tilt Item nr. 302024 Kakadu Tilt large Item nr. 302025 Differences with 24" wheels Seat width 45 cm 50 cm --- Seat depth 43 cm 43 cm --- 54 - 59 cm 54 - 59 cm --- --- --- --- Total width 56 cm 61 cm + 8 cm Total depth 110 - 120 cm 110-120 cm + 5 cm 97 - 141 cm 97 - 141 cm --- 130 Kg 130 Kg --- 15,60 kg 15,70 kg + 2,90 kg -5° to +25° -5° to +25° --- Technical data Seat height (adjustable) Pass over height Total height (adjustable) Max. load Weight Tilt angle Product label The product label is located in the bottom of the frame Shower chair with tilt MOBILEX A/S Grønlandsvej 5 DK - 8660 Skanderborg Tel: +45 87 93 22 20 www.mobilex.dk Produced Max. 130 kg Serial no. Sample of the product label only(not original) 5. Cleaning & Maintenance Cleaning Normal dirt on metal and plastic parts can be removed with standard cleaning agents and sponge or Rev. 11.15 Side 6 af 7 UM-302024-25-GB Mobilex A/S Grønlandsvej 5 DK-8660 Skanderborg www.mobilex.dk soft rag. Check the specific product information and use only commercial cleaning products which are suitable for cleaning and disinfection (do not use alcohol-containing products and no solvents or abrasives). Maintenance The device basically doesn't need maintenance. Despite the solid construction and the use of resistant materials the product is subject to wear. It is therefore recommended to let check the product at regular intervals by a professional service. Varning! When using the chair in very calcareous water calcium binding might accour at wheel bearings and other movable parts. Under such circumstances it can be necessary to use lime solution and afterwards to use lubrication Warning! When using the chair in chlorinated surroundings an extra strong corrosion will accour and garantie will no longer be effective. 6. Most common problems and solutions Symptoms Possible cause What to do? The chair is not stable and the can't The wheels' assemblies are reach horizontal position adjusted to different heights Adjust all wheels to the same height The tilt function isn't working Contact service centre Possible fault of the adjusting mechanism The wheels do not turn smooth and The space between wheels and easily forks is filled up with dirt. Clean the space between wheels and forks of all unintended objects and elements. 7. Disposal of the product The product cannot be disposed of with household waste but must be brought to the local recycling centre. 8. Guarantee terms Mobilex A/S offers 2 years of guarantee by errors in production. The guarantee is not valid by notintended use of the product. Parts subject to normal wear are not covered by the guarantee, unless wear is caused by a manufacturing fault. In the event of damage, please notify your dealer. The guarantee does not cover transport cost. The guarantee does not cover injury or other damages eventually related to a malfunction of this product. 9. Declaration of Conformity (CE) The company Mobilex A/S, Grønlandsvej 5, 8660 Skanderborg, Denmark declares that the product “Kakadu” Shower Chair with tilt - 302024, 302025 is designed in accordance with the technical documentation and made of which conforms to the following basic requirements: EU Council Directive 93/42/EEC for medical equipment Annex I of the June 14, 1993 Lars Nygaard Managing Director Mobilex A/S Skanderborg, the 2015-11-03 ................................................ signature Rev. 11.15 Side 7 af 7 UM-302024-25-GB


![Deep Time User Manual ver.1.3 [ENG]](http://vs1.manualzilla.com/store/data/005775250_1-8eb61345983a4e3ef84e4b82ef32f1cf-150x150.png)