1
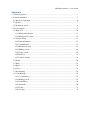
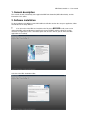
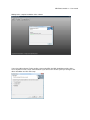
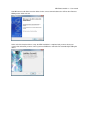
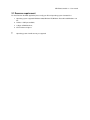
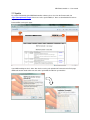
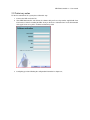
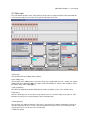
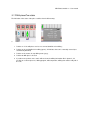
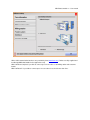
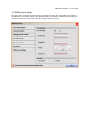
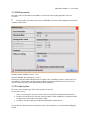
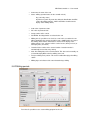
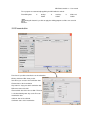
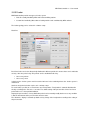
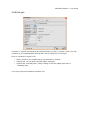
Milk Point Controller 7 – User manual
MILK POINT CONTROLLER
User Manual
SW Ver.
Manual Ver.
Description
Checked
7.0
1.01
GP
6.15
1.01
Detailed all menus and functions of the MPC
GP
6.14
1.00
First edition
MA
Milk Point Controller 7 – User manual
Sommario
1. General description ..................................................................................................................... 3
2. Software installation.................................................................................................................... 3
2.1 Resource requirement ............................................................................................................ 6
2.2 Update................................................................................................................................... 7
2.2 Preliminary action ................................................................................................................. 8
3. View description ......................................................................................................................... 9
3.1 Main view ........................................................................................................................... 10
3.1.1 Milk board indication ................................................................................................... 11
3.1.2 Milk place/Cow status .................................................................................................. 12
3.2 Software Setup .................................................................................................................... 13
3.2.1 Farm information .......................................................................................................... 13
3.2.2 Communication ............................................................................................................ 13
3.2.3 Milk parlour setup ........................................................................................................ 15
3.2.4 Milking session............................................................................................................. 16
3.2.5 Feeder system ............................................................................................................... 16
3.2.6 Database ....................................................................................................................... 18
3.2.7 Software settings .......................................................................................................... 19
3.3 Feeder ................................................................................................................................. 20
3.4 Wash ................................................................................................................................... 21
3.5 Report ................................................................................................................................. 22
3.6 Curves ................................................................................................................................. 23
3.7 Board Setting ...................................................................................................................... 24
3.8 Cows Manager .................................................................................................................... 25
3.8.1 Cow parameters ............................................................................................................ 27
3.8.2 Milking periods ............................................................................................................ 28
3.8.3 Insemination ................................................................................................................. 29
3.8.4 Treatments .................................................................................................................... 30
3.8.5 Feeder........................................................................................................................... 31
3.8.6 Sort gate ....................................................................................................................... 32
Milk Point Controller 7 – User manual
1. General description
This manual describe functionality of the application Milk Point Controller (MPC abbreviation), and the
information for his utilize.
2. Software installation
For the installation of the MPC insert the MPC CD in the CD drive and run the setup.exe application, follow
the indication of the Setup Wizard.
!
If an old version of the MPC was instolled on the PC please BEFORE install a new version
uninstall old MPC and from Windows Control Panel remove all IXXAT software; reboot PC and run
VCIclean.exe application (select scan&delete option and select the drive of your PC where the MPC
application was installed).
Selection of the MPC installation folder:
Milk Point Controller 7 – User manual
Waiting for the complete installation of the software.
If you using a Wasserbauer Feeder machine connected to MPC. the MPC installation provides all the
necessary drivers for the correct communication. If you don’t use this feeder system you can bypass this
drivers installation and click “Exit setup”.
Milk Point Controller 7 – User manual
Now MPC must install all the Ixxat Can drivers for the correct communication to the G-ID or other Panazoo
Milking station. Click next and
At the end of the Ixxat Can drivers setup, the MPC installation is completed and you must reboot your
system. After reboot PC you must connect your Ixxat USB device and let the PC automatically installing the
device.
Milk Point Controller 7 – User manual
2.1 Resource requirement
For install and run the MPC application please verify your PC and operating system charatteristics:
1. Operating system supported: Windows 2000, Windows XP, Windows Vista 32bit and Windows 7 32
bit;
2. Number 1 USB port available;
3. 2 Gbyte of RAM minimun;
4. CPU Pentium or highest.
!
Operating system of 64 bit are not yet supported
Milk Point Controller 7 – User manual
2.2 Update
For a better functionality of the MilkPointController software, please check on the Panazoo web site
(http://www.panazoo.it\mpc) if there are service pack available, if there are download the file and run
on your PC.
Panazoo MPC service pack page:
If your MPC working version is “older” then the last service pack uploaded in Panazoo Service Pack page,
download it and the install. Click next and service pack will be installed on your machine.
Milk Point Controller 7 – User manual
2.3 Preliminary action
For the first activation of the system please follow this step:
1. Connect the USB card to the PC;
2. Start “MilkPointController” and activate the software with your license key number supplied with Ixxat
Can Interface. At the first loading the MPC show you the license activation form. Insert all information
and copy the license key in the “Software activation key” field.
3. Configuring your farm following the configuration information in chapter 3.2;
Milk Point Controller 7 – User manual
3. View description
In this section are described all window of the application and the action that user can performe.
Milk Point Controller 7 – User manual
3.1 Main view
The main window show the status of the parlour, in the top there is a rappresentation of the parlour with the
exact number of milk place, the status of the gate and the status of the cow.
A
E
H
I
C
B
D
G
F
L
M
A (Event list):
A log of all the MPC and milking station activities.
B (On milking now):
A list of all the cow in “Milking status” in the farm. Every cow is detailed with “Post Nr.”, “CowId” and realtime
milking production. With button “ ” it’s possible to switch visualization to “Chart”. In this modality is show a
bar chart of every cow in milking status.
C (Day production)
The total of the daily milk production divided by the number of milking sessions set in software setup.
D (Dry cows)
A list of of all the dry cows. A cow can be in dry status because of a “manual setting” in dry status in “Cow
Manager” form or because are past 220 days after insemination date.
E (Heat detection)
A list of all the cows with heat detection. Heat status is detected by the software monitoring the average of
the milk production in the last 5 sessions. If the production in the current session is less then 30% of the
average of the last 5 sessions this cow is in heat status.
F (Aktiv cow alarms)
Milk Point Controller 7 – User manual
Work in progress…
G (Wash)
Information about wash session; last wash session date, time, maximum water temperature, minimum water
temperature and length of the wash session. Wash data are constantly saved in database and are
summarized in table “Wash data” that is linked in main menu.
H (menu)
Main menu button (explained in chapter 3.1.3)
I: gate switch connection info.
For example in a “Double Line” parlour are 2 gate switch: one for the left side and one for the right side. MPC
during your loading detects the presence of these switch connected to the Antenna board or G-ID board.
L: Other MPC info.
Current session: the number of the current milking session (1 or 2 or 3, depending on your
configuration farm setup)
Farm typology: the farm type setting in software setup (double line, single line, swing over etc).
Minutes to new session: from every last “STOP” milking message received by a global-id (or other
milking station Panazoo) the software start a “minutes counter”. If no other “START” milking
message is received from the PC in 2 hours, the MPC automatically switch to the next milking
session. If the previous session was just the last session, the MPC lock any other “START” milking
message.
M: farm information detail:
Farm name and farm address
3.1.1 Milk board indication
The milk board could be show in two different way:
1. Position 19: If the milk place is in line and work on:
2. Position 20: If the milk plase is out of line or there is problem on the CAN connection:
Milk Point Controller 7 – User manual
3.1.2 Milk place/Cow status
The indication of the status of the place could be show in different way:
a.
b.
1. Position 17: If the milk place are free or a cow not identified are in milking ;
2. Position 18: A cow indetified is in milking (green); “M” indicates that cow is “manually” entered (not
automatically identified)
3. Position 19: A cow was in stop milking status (grey);
4. Position 20: Milk place is in wash.
5. If put the mouse pointer over a cow in milk are show the milking information like in picture b, it is
possible to see alarm presence, milking program, milk temperature, milking time and the milk yeld of
the cow;
Milk Point Controller 7 – User manual
3.2 Software Setup
The Software setup menù permit to customize the MPC for the parlour, before to start to work the user must
configure the application.
Attention at the first run of the MPC application some warning messages are showed, are not important, they
are showed because the system was not configured.
!
!
Now are describe all the step needed to follow before start with the milk activities.
This information are important for specialized person that install the Panazoo milking system.
3.2.1 Farm information
This form need to insert the information of the owner of the parlour.
3.2.2 Communication
This form need to select the type of communication board are connected to the PC and if the identification
system is with walk true gate or with one antenna for milking place (available for the goat system).
Milk Point Controller 7 – User manual
All the CAN communication interfaces are provided by Ixxat (www.ixxat.com) . Drivers are fully supplied and
installed by MilkPointController in the application setup.
With UsbToCan Compact it’s possible to connect up to 32 can nodes so 30 milking station and 2 antenna
boards.
With UsbToCan II it’s possible to connect up to 127 can nodes for each of the two “Can Line”.
Milk Point Controller 7 – User manual
3.2.3 Milk parlour setup
This form need to set the type of parlour present, the number to insert in the cow standing is the number of
the milking place and not the number of the milking board (this two number are different only for swing over
systems); from here it is also possible select the sort gate system is presence.
Milk Point Controller 7 – User manual
3.2.4 Milking session
This form need to set the number of the milking session for the farm and the typical time of the star
sessiones.
!
The Syncronize push button must be pressed AFTER the first reboot of the application and after the
activation code insertion.
Quantity: number of milking sessions, 2 or 3.
Sessions timetable: time period of the sessions.
End session wait: when all the milking station are in IDLE status (no milking) a minutes counter start. If no
other milking is registred in the minutes setting, the MPC automatically switch to the next session. If the
current session is the last no other milking will be stored in database.
3.2.5 Feeder system
This form need to setup the type of the feeder system if it is present.
It is possible to select:
1. None, if no feed system are present or there is the Feed in parlour (with Global ID Feed device);
2. The Basic Feed if thera are in the farm some feed station, for this modality it is possible the interval
for dispence the feed the time for start the feeding.
3. Custom for custom feeding system implemented with Wasserbauer device;
It is possible also activate for the feed in parlour systems the auto dispence syncronized with milking gate
closing.
Milk Point Controller 7 – User manual
Milk Point Controller 7 – User manual
3.2.6 Database
This form need to select the file of the database of the milking data, if it is the first activation set the file
Program>MilkPointController_V6>MilkDB.mdb that is the default.
!
The other control needed for managing the database, but attention that old data could be lost, so
utilize only if you know wath to do.
!
It’s recommended to create “periodically” backup of the working database in order to keep “light” the
database for the storing of the milking.
When you create a backup of the database it’s recommended to “Clear” the milking (button Milking deleting)
In the current database, so you can restart with a clean milking database that maintaining all the stored
cows.
Milk Point Controller 7 – User manual
3.2.7 Software settings
This form need to check directly if any update are available, for set the language and the measure unit that
Language
Select an available language for the MPC. If MPC is not available for your language or if you want to apply
some modifies to your language, click the button “
can modify or create a new MPC language.
”. This will run a tool “Language Editor” from which you
Engineering units
Setting of the measurements units used in the software and in the reports.
Webcam configuration
If you want to use a webcam to monitoring farm status, after you have installed all the necessary drivers to
the correct working of the webcam, select it for using in the MPC. After a reboot of the software you can
enabling the visualization of the webcam from the main menu (button “Webcam”).
Shift system
It is possible also set the webcam presence, and enabling the Shift functionality.
! PAY ATTENTION !
This setting MUST BE THE SAME OF THE MILKING BOARD.
Milk Point Controller 7 – User manual
3.3 Feeder
This function show all feed dispensed divided for cow, in the bottom it is possible select one cow or all cow.
Milk Point Controller 7 – User manual
3.4 Wash
This function permit to show and save the data in the selected period range.
Chart
Milk Point Controller 7 – User manual
3.5 Report
This function permit to elaborate, produce, print and export the report of the production, there are some
filters to select.
Description of the available reports.
Milk Production by CowId: a report that summarizes all the “milkings” of the cows selected in the CowId
listbox in the selected date range. Result table shows result sorted by CowId -> Date -> Time.
Milk Point Controller 7 – User manual
3.6 Curves
This function permit to show the curves of production, temperature, ISC and milking time for the last 31 days
of activity.
With “Y axis min” and “Y axis max” controls it’s possible to set the Y axis range values for the visualization.
Autoscale button automatically set this values.
Milk Point Controller 7 – User manual
3.7 Board Setting
This funtion is accessible from the menù and with double click on the milkING boards simbols, with this panel
is possible to modify some parameters of the milking boards from the remote station.
Clicking this button you save the parameter on the board node (milking station)
selected
Clicking this button it’s possible to save the parameter to “all” the milking stations
connected to the CAN network
Milk Point Controller 7 – User manual
3.8 Cows Manager
In cow manager you can handle all your animals database. Add, modify, remove cows, add inseminations,
treatments feeder data etc.
Double-click on a cow in the list for modify the configuration of a cow.
In the top of the window there is a “search bar” from which is possible to search a specific animal in the
database. The search can be by “CowId” or by “IdTag”.
In the left fo the window there is a “summary cow info” from which it’s possible to view the “Total lactation
period” (total milking amount in the current lactation), “Milk temp.average”, “Milking length average” and
“Milking flow” calculated by “TotalMilk / MilkingLength”.
In the bottom left there is an indication of the total cows stored in the MPC database.
In the bottom right there there are buttons functions:
Multiple cows configuration saving
Milk Point Controller 7 – User manual
Pressing this button MPC shows a window like this:
Here it’s possible to set some configuration
automatically to “all” the cows stored in the
database.
This “common” configuration are: Set0, ISC and
Feeder (only for swing over parlour)
Milk Point Controller 7 – User manual
Pressing this button a window let you choose to print one of this report:
•
“Print single cow list” print a PDF
report of the single cow selected
in cow list. This report contain all
the settings and information about
the selected cow.
•
“Print complete cow list” print a
PDF report containing the list of
all the cows stored in database
•
“Confirmed inseminations” print a PDF containing a list of the confirmed cows
insemination.
•
“Not confirmed inseminations” print a PDF containing a list of the NOT confirmed
cows inseminations.
•
“Dry cows” print a PDF containing a list of the actually dry cows.
3.8.1 Cow parameters
Clicking this button you can add a cow in the database with the user interface.
For each cow in database it’s possible to set custom milking parameters, cow data info,
feeder and many other parameters. Field with symbol “*” are obligatory for the correct storing
of the cow.
•
CowId: automatically calculated by adding “1” to the last cowid detected in
database. Otherwise you can always change this.
•
Birth date: the birth date of the cow
Milk Point Controller 7 – User manual
•
Cow name: the name of the cow
•
Status: milking (standard status for the cow with no lock)
dry (cow in dry status)
dry with lock (cow in dry status but during the identification the MPC
send to the milking station a “LOCK” that will be visualized on the
display of the milking station)
•
Set0: value of parameter Set0
•
ISC: value of parameter ISC
•
Group: number of the cow lot
•
ISO IDTAG: the idtag number associated to the cow
•
Milking lock: it’s possible to set a lock for a cow. In this case when the cow
will be identified by the antenna, the MPC send a “COW LOCK” message to
the milking station and this information is showed on the display of the
milking station. If you “activate” lock this can be forever (“always in lock”) or
with expiry date (“lock until”)
•
Lactation Nr: the number of the current lactation. Lactation number is
automatically increased at every calving.
•
Start: first milking date of the current lactation. This date can be manually set
or automatically by MPC at the first milking of the cow.
•
Feed per milking: feed “portion”. This feed is handled directly by the milking
station.
•
Milking days: an indicator of the current lactation days milking
3.8.2 Milking periods
From here it’s possible to set 3 custom milking program for the cow.
Milk Point Controller 7 – User manual
The 3 program are automatically applied by the MPC with this method:
First milking date
90 days
PGM1
120 days
PGM2
till the end
PGM3
Clicking this button it’s possible to apply the milking program to all the cows stored in
database.
3.8.3 Insemination
From here it’s possible to handle the cow inseminations.
Clicking “Add new” MPC show you this
form where you can store the insemination data.
Execute: date of the insemination
Days after ins.: days past after insemination date
Bull name: name of the bull
Forecast birth: date of the forecast birth. This date
Is calculated adding “280” days to the “Execute”
Insemination date.
Calf born: date of the calf birth.
Confirmed: status of the insemination
Milk Point Controller 7 – User manual
3.8.4 Treatments
From here it’s possible to handle the treatments of the cow.
Date: date of the treatment
Treatment: description of the treatment
Veterinary name: the name of the veteri_
nary
Notes: notes to included to the treatment
(optional)
Milk Point Controller 7 – User manual
3.8.5 Feeder
MilkPointController provides two types of feeder system:
•
Basic line: totally handled by MPC and Panazoo milking stations.
•
Custom line: handled by Wasserbauer feeding machine and coordinated by MPC software.
The feeder typology can be selected in “software setup”.
Basic line
Basic line feeder consist of 4 aliment daily distributed in different periods; this means that a cow is enabled to
eat only 1 time in a period a day. This periods can be subdivided in this way:
•
Once every 5 hours
•
Once every 1 hour
In both case the “feeder system” work for a total of 20 hours. In the remaining 4 hours the “feeder system” is
switched off.
Start hour and period selection can be set in “software setup”.
For each food it’s possible to set “Food name” and “Food portion”. Food portion is automatic distributed in
the day according to the “Percent %” set value. The default setting of the percent value is 25% for 5 hours
period and 5% for 1 hour period distribution.
Anyway the percent values of every distribution period can be manually modify but the necessary condition
is that the total amount of the percent values must be 100%.
The “Grammes” display is automatic updated at every change of the food portion according to the setting of
the percent value.
Milk Point Controller 7 – User manual
3.8.6 Sort gate
Sort gate it’s a “physical” gate installed in the farm from which it’s possible to “separate” specific cows. This
separation can be “enabled/disabled” in this tab that is the last setting of the cow manager.
There are 3 methods to separate a cow.
•
•
•
Always separated – the cow will be always separated with no conditions.
Separate until – the cow will be separated until the setting date.
Separate after conductivity alarm – during a milking session if the milking station detect a
“conductivity alarm”
A cow can be separated in 2 different destination “box”.
Milk Point Controller 7 – User manual
Warranties
Panazoo Italia S.r.l. will replace at no charge for 1 year period from the date of
purchase, any part which results defective in terms of material or workmanship,
after checking the part on our premises in Binasco (MI) – Italy the buyer will bear
all transport costs for shipping the detective materials for substitution within the
terms of this warranty.
The removal of the identification label on the electronic card will invalidate the
warranty conditions.
PANAzoo Italia SrL
Via N.copernico 2/4
20082 Binasco (Mi)
Tel.+39-02-9054833
Fax.+39-02-90091860
e-mail :[email protected]
web:www.panazoo.it
Innovation in Milking system